Biggu
-
Posts
1,762 -
Joined
-
Last visited
Content Type
Profiles
Forums
Events
Gallery
Everything posted by Biggu
-

Mid 60s Peterbilt Unilite COE
Biggu replied to RoninUtah's topic in WIP: Model Trucks: Big Rigs and Heavy Equipment
Ron, and you said I was ‘over estimating your abilities’ HAH !!! NOT… this is going to be better to watch than I first thought. I am really looking forward to the next up date. A VERY interesting build to say the least. As far as the Cummins is concerned, doesn’t the AMT Autocar come with a 230 or 250 non turbo engine? I think the manifolds are a little different on the non turbo version …. I think ….. I might have some pics in my fav file . Jeff -
What did you see on the road today?
Biggu replied to Harry P.'s topic in General Automotive Talk (Trucks and Cars)
A real “dog” ?????I get it , it’s supposed to be a hot-“dog” ???? -
1/32 Freightliner cabover
Biggu replied to Rockford's topic in WIP: Model Trucks: Big Rigs and Heavy Equipment
I love the graveyard videos too. They are really cool and show the trucks as they really were. I watch a lot of these ( probably too many lol) -
Tigercat 880E longer 1/48 scale
Biggu replied to François's topic in WIP: Model Trucks: Big Rigs and Heavy Equipment
That is fantastic !!!! -
Beautiful job Tom… painted just like the box art of the original issue back in the day. Great choice. And I narrowed the deck on my kit as well and that 1/4 inch makes all the difference and changes the over all look to much more realistic. Very nice job and your efforts were well worth it. The truck is really well done. I LOVE the hash marks on the rear plate. Perfect job. Jeff
-
Mid 60s Peterbilt Unilite COE
Biggu replied to RoninUtah's topic in WIP: Model Trucks: Big Rigs and Heavy Equipment
Very cool ….. you guys are so generous. What a nice gesture, Jurgen. That’s what makes this place and hobby so much fun. Jeff -
Mid 60s Peterbilt Unilite COE
Biggu replied to RoninUtah's topic in WIP: Model Trucks: Big Rigs and Heavy Equipment
I agree with the Alpine Green and the color choices are great…. I’m still waffling on that. Another sleepless night I guess??? -
Mid 60s Peterbilt Unilite COE
Biggu replied to RoninUtah's topic in WIP: Model Trucks: Big Rigs and Heavy Equipment
I did think 5 hole but one never knows ,…… the 5 hole Alcoas are really cool old school rims. But I think your call is very period correct and will look excellent. The engine paint sounds interesting… and accurate. What about white? Was that a consideration? Just curious. What color are you thinking for the frame? A lot to consider with these builds. And that is where I am at…. Way too much to figure out ….. is that why I lay awake all night???????? -
Mid 60s Peterbilt Unilite COE
Biggu replied to RoninUtah's topic in WIP: Model Trucks: Big Rigs and Heavy Equipment
Ron. What power are you thinking? Sticking with the kit 318? Or maybe a Cummins? And I really like your idea of the 6 hole Budds are a great departure from the 10 hole ones and even different from my two hole set up on the Hayes. Are you doing a 6 hole on the steering axle as well? This is gonna be a great build. Jeff -
Mid 60s Peterbilt Unilite COE
Biggu replied to RoninUtah's topic in WIP: Model Trucks: Big Rigs and Heavy Equipment
Ok , I’m in the front row for this one. May have to toss mine in the garbage as this one will make mine look like a 4 year old built it. I am REALLY gonna have to up my game now …..I am going to watch this very closely and learn all I can. And I’m sure I can snag a few better ideas. An idea for the double flat bed pups…. And if room is at a premium, why not do a piggy back set up? The lead hooked to the tractor and the pup tied down on the lead as if heading out for a load. Used to see that configuration all the time. Just a random thought IF you wanted to do trailers and not a set up seen on this forum very often. I’m hoping for LOTS of updates for ideas. Thanks for sharing this build Ron. Jeff -
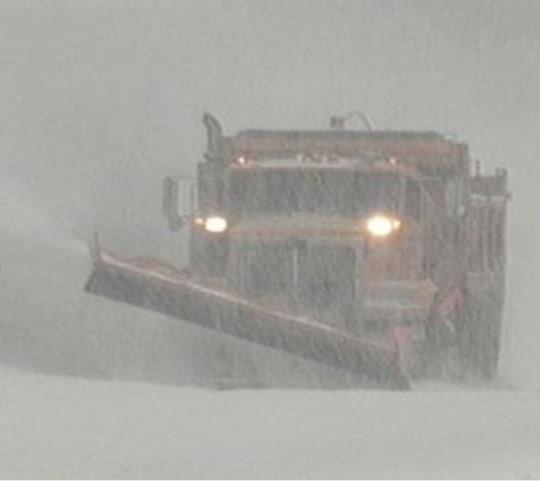
Western Star 4900 FA plow truck
Biggu replied to BK9300's topic in WIP: Model Trucks: Big Rigs and Heavy Equipment
Yeah , that silly ‘rule’ came out a couple years ago. I always thought flashing lights back there was good enough to give a warning but I guess not. Personally I find those light boards WAY too bright and are a hindrance when driving behind these trucks. Even at a distance they are very bright and when flashing in wet conditions in the dark they are really a test to follow . Seems like, some common sense when driving is not a requirement any more. Back in the day our sander lights were an old school 1157 bulb ! Jeff -
1/32 Ford LTL9000
Biggu replied to Rockford's topic in WIP: Model Trucks: Big Rigs and Heavy Equipment
I recall when these first came out , Ford was justifiably proud of the design, that was a huge departure from the previous design. At the time it was ‘cutting edge’ , and when you sat in the driver’s seat you say much higher and that huge windshield gave fantastic visibility. And actually for a large truck it turned in tight places very well. They were strong trucks and built well , at least in my experience with them. The CL units had the same exact cab as the L units, just a different hood assembly. And yes, Steve that one on the brochure is really sweet, a local fellow had two painted just like that as gravel trucks and I drove it on more than one occasion, they were really sharp in real life and I would love to build one like that as well. Sorry for the deviation ….. I get a bit carried away. I love what you are doing with this build. You are opening my eyes to a completely new scale of trucks. Your scratch skills are really good and well thought out … I am watching with great interest. Jeff -
Pete 352 day cab
Biggu replied to Jürgen M.'s topic in WIP: Model Trucks: Big Rigs and Heavy Equipment
I have to totally agree with Gary. Just looking at it, if one didn’t know ALL that went into this build would just say “ oh cool, opening doors, nice build “ …….. BUT when we look deep into this, there is a ton of work into it. Design, printing, and assembly of the WHOLE thing. The design and manufacture of the parts with a complete engine, opening doors and tilting cab. A lot of technicality went into this build. Thats pretty cool and JM , you are light years ahead of me with this build, and your computer and design skills. It looks good, even if it is a learning curve and somewhat experimental . The end result is one you should be proud of. -
Western Star 4900 FA plow truck
Biggu replied to BK9300's topic in WIP: Model Trucks: Big Rigs and Heavy Equipment
Ken , from the shop was over for dinner tonight. I was showing him the latest posts……. He just shakes his head at the accurate details. Even down to the blue ‘Arctic ‘ wire ……. He commented on the muck stick holder , said it was exactly like they used to make. He said Highways have told them to stop making them like that as if one was climbing out of the box and hooked yourself , the results could be really bad. I guess they now use a hook. Interesting information. Your holder is what I know well. He commented on your level of detail. He said, no doubt about it, this is absolutely museum quality. He said the wing parts and operation is spot on!! -
1/32 Ford LTL9000
Biggu replied to Rockford's topic in WIP: Model Trucks: Big Rigs and Heavy Equipment
These were GREAT trucks and fun to drive. Lots of room in the cab, GREAT visibility and super work horses. I loved driving these trucks. Tens of thousands of miles in these. Wish they still made them. Watching this build Steve. …… Jeff -
The Same but “ a little “ Different
Biggu replied to Biggu's topic in WIP: Model Trucks: Big Rigs and Heavy Equipment
Battery box. Good stuff but also a good thing I have seen one or two over the years. A number of bends with no reference pics
-
Western Star 4900 FA plow truck
Biggu replied to BK9300's topic in WIP: Model Trucks: Big Rigs and Heavy Equipment
Deleted -
The Same but “ a little “ Different
Biggu replied to Biggu's topic in WIP: Model Trucks: Big Rigs and Heavy Equipment
Excellent! I hope you do a head liner. I will be watching your build to see how it comes together. Glad to be of a little bit of service. I will look into that refill. I bought these off Amazon after mediocre success with Molitow. These seem to work ok , I’ happy with them
-
Roanoke Railhouse Beer GMC General
Biggu replied to Gary Chastain's topic in WIP: Model Trucks: Big Rigs and Heavy Equipment
The height looks perfect as does the length. Do I see the beginnings of a power tailgate? That will tuck up real nice. Beautiful van box and I agree with Brian the wood floor will be sweet Jeff -
Western Star 4900 FA plow truck
Biggu replied to BK9300's topic in WIP: Model Trucks: Big Rigs and Heavy Equipment
"Therapy" Lord knows we probably all need a little of that -
The Same but “ a little “ Different
Biggu replied to Biggu's topic in WIP: Model Trucks: Big Rigs and Heavy Equipment
Jurgen, take all the information you can, this forum is a melting pot for ideas for sure.... and if you try it and it works, be sure to let us know.... information and communication is gold .... -
The Same but “ a little “ Different
Biggu replied to Biggu's topic in WIP: Model Trucks: Big Rigs and Heavy Equipment
I used a square of . 020 sheet styrene and took one of those cheap shop cloths, and watered down white glue, and soaked the paper towel, and layed it on the sheet to really dry, did a light trim and Bazinga ! I think a shot of paint that will be the interior color will give the illusion of a headliner, not hugely visible, but when I look inside it may appear a little more finished..... I used the Molitow pen on some builds, but the refill bottle sounds possible too.... when you air brushed it... thinned or straight out of the bottle....? -
Western Star 4900 FA plow truck
Biggu replied to BK9300's topic in WIP: Model Trucks: Big Rigs and Heavy Equipment
I have been trying to convince him, .................... maybe we should all take up a 'petition' ..... so at the very least this magnificent build gets into a magazine........ if Brian won't we will.... nanananana -
The Same but “ a little “ Different
Biggu replied to Biggu's topic in WIP: Model Trucks: Big Rigs and Heavy Equipment
Thanks, Brian... still a ways to go though, but you are absolutely correct, amazing what a little patience and accuracy can produce ! LOL Sorry for the crummy pics, its my phone.... -
The Same but “ a little “ Different
Biggu replied to Biggu's topic in WIP: Model Trucks: Big Rigs and Heavy Equipment
Thanks Gary, that's really great info.... I haven't had great luck with cans, and like I mentioned to Jurgen, maybe it was my operating skills or lack there of....