e30lover
-
Posts
367 -
Joined
-
Last visited
Content Type
Profiles
Forums
Events
Gallery
Everything posted by e30lover
-
Lovely build! Tan interior really suits the paint color too.
-
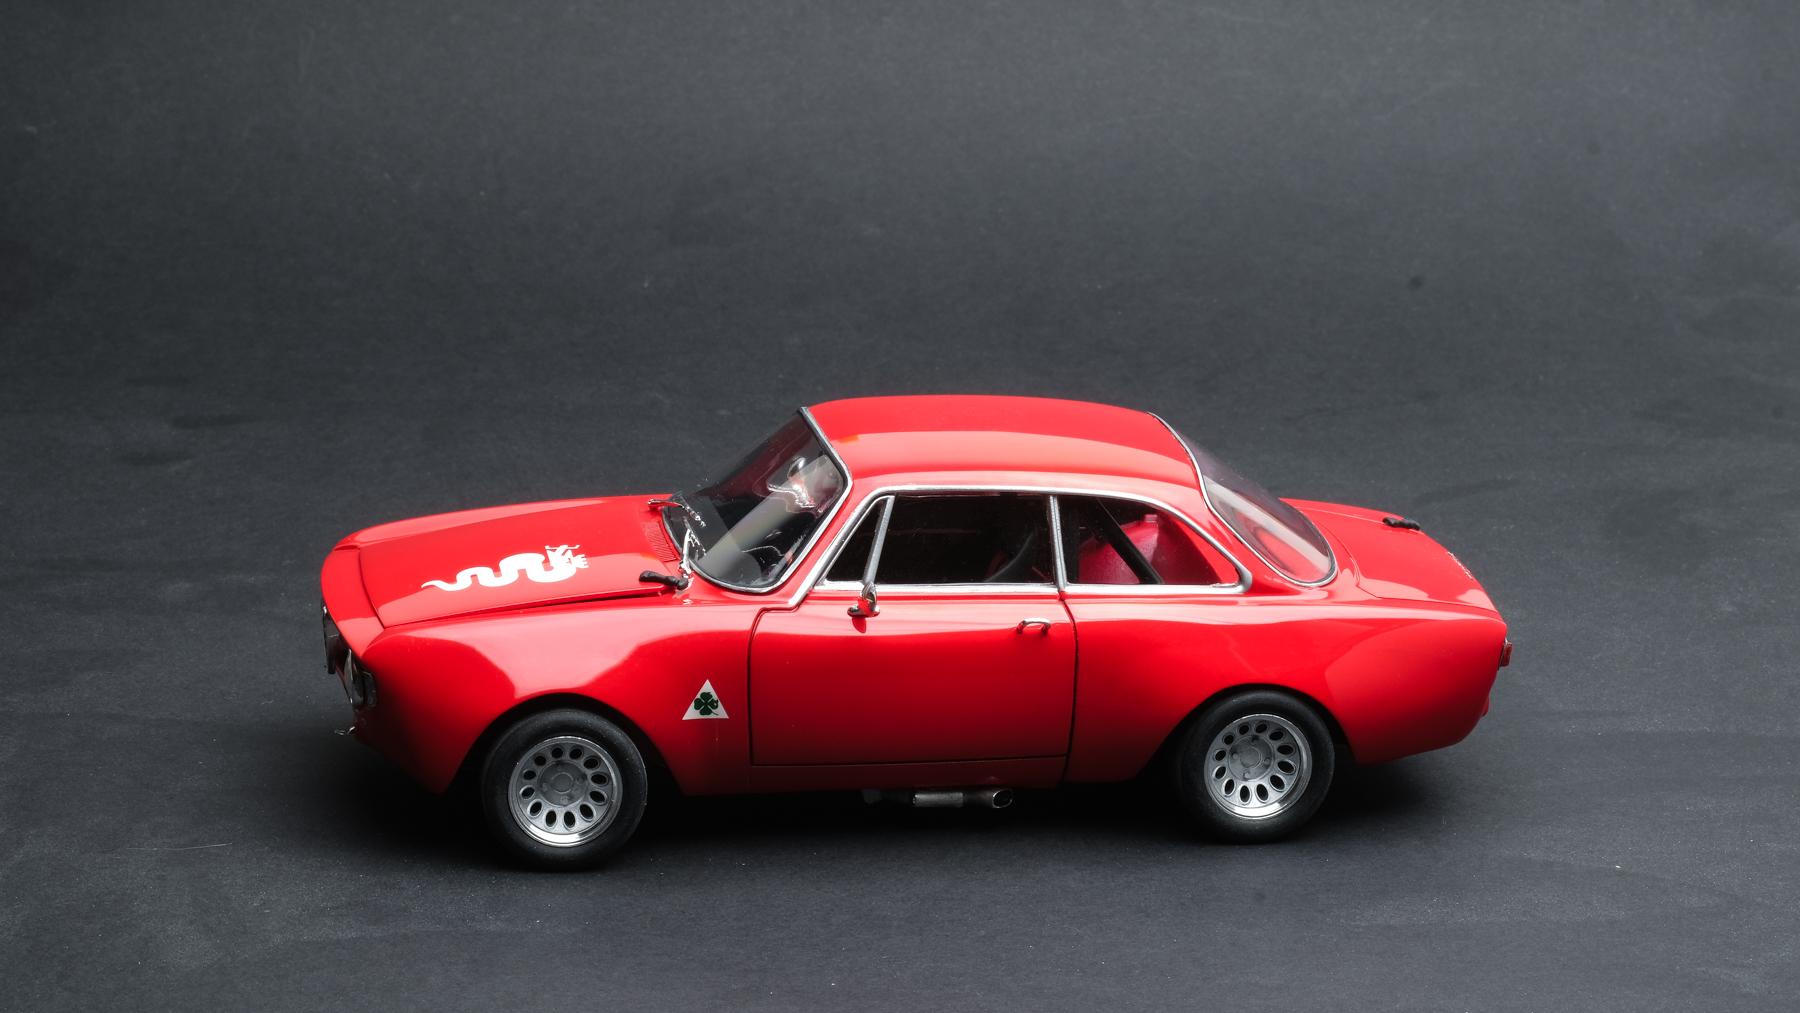
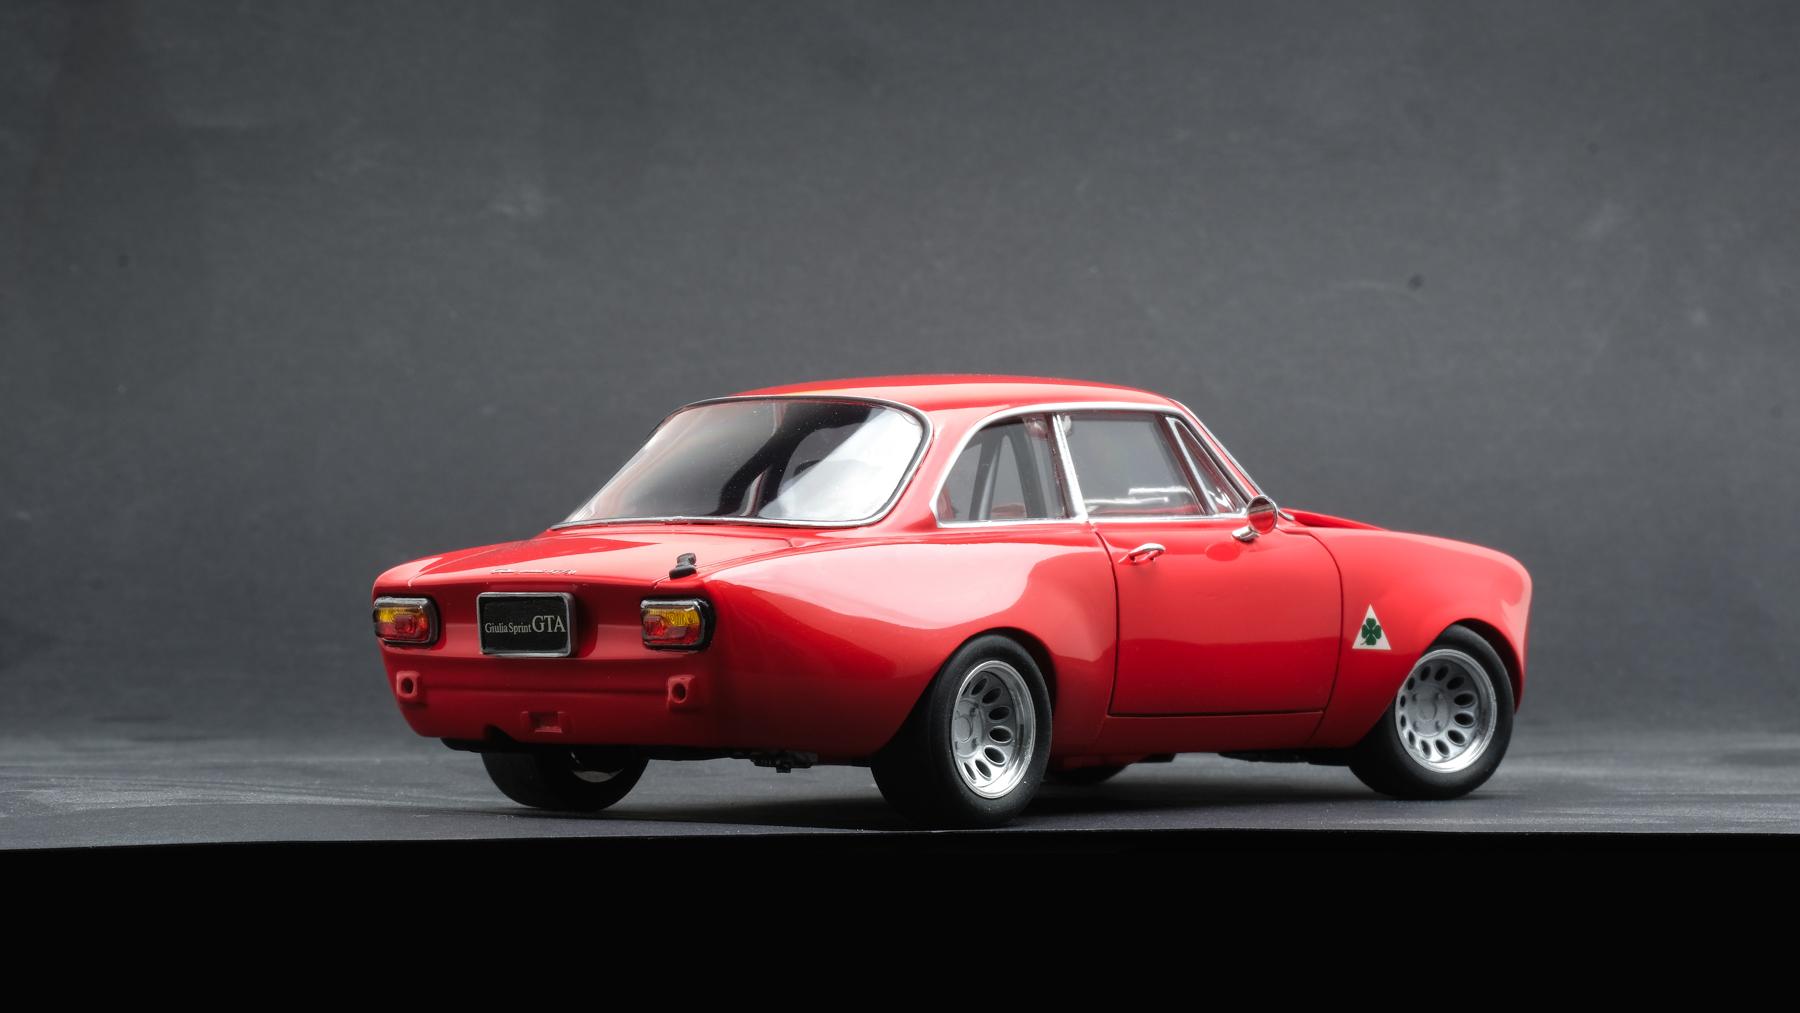
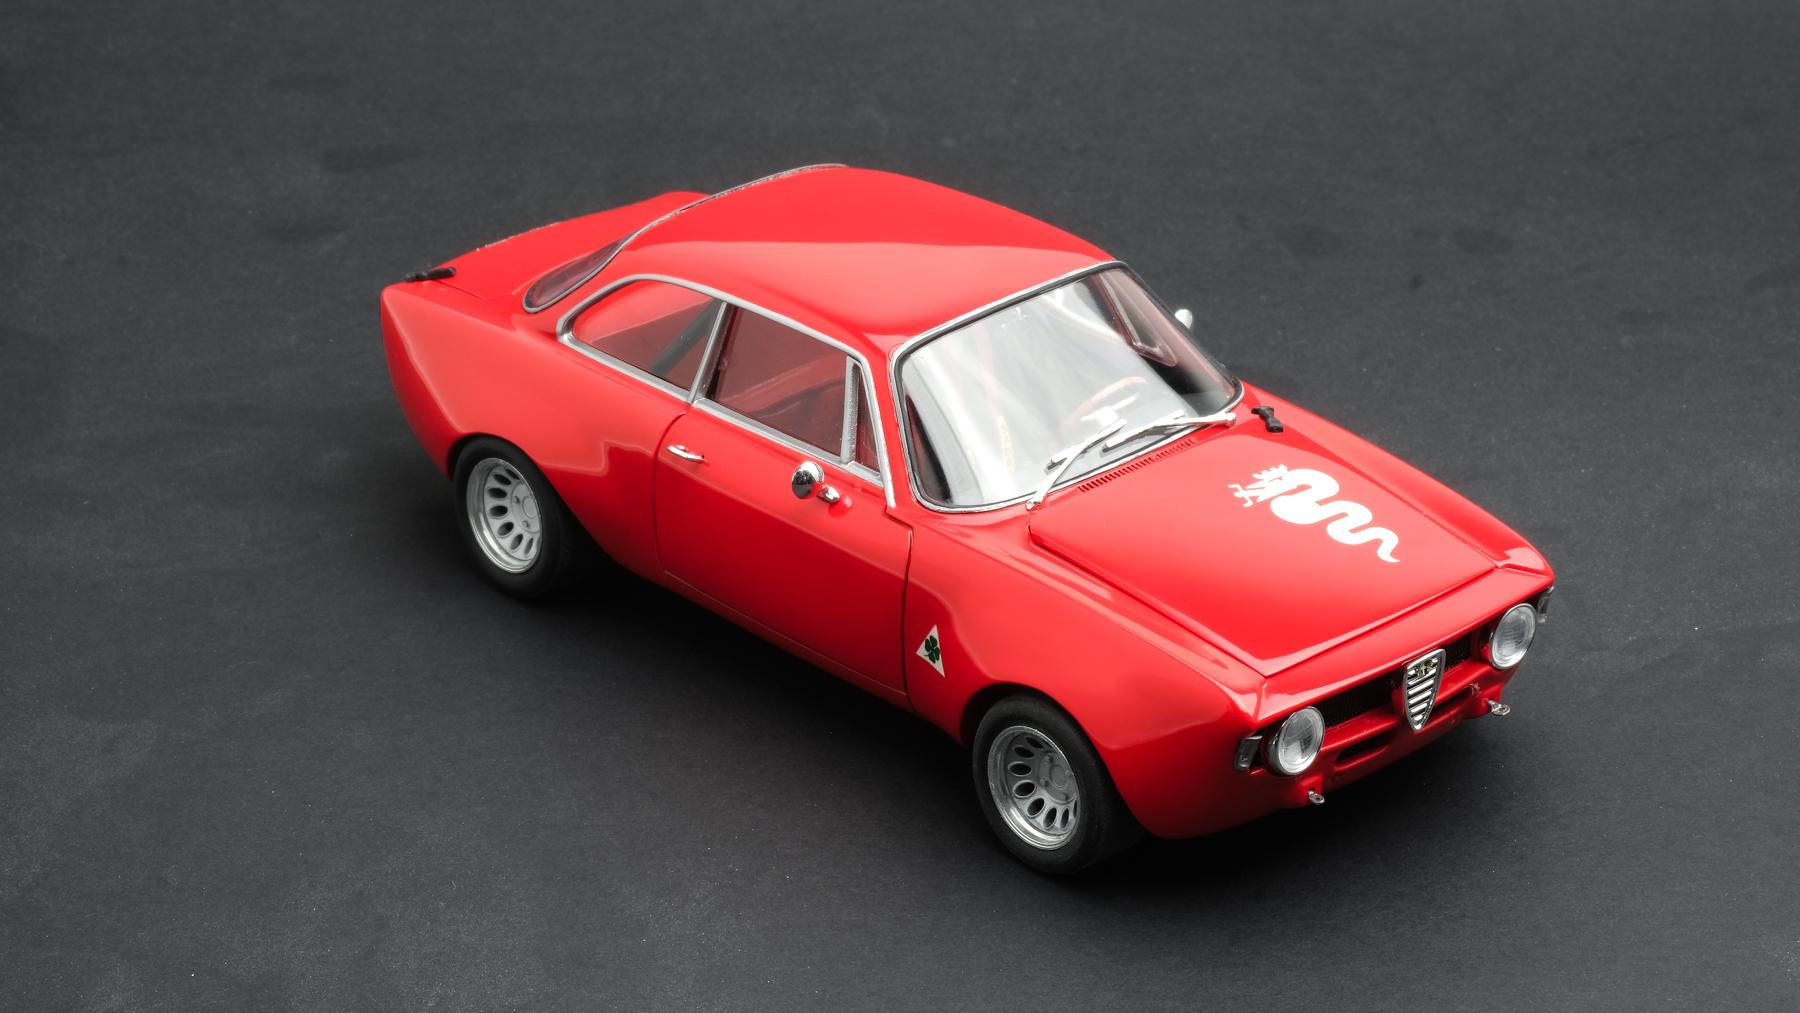
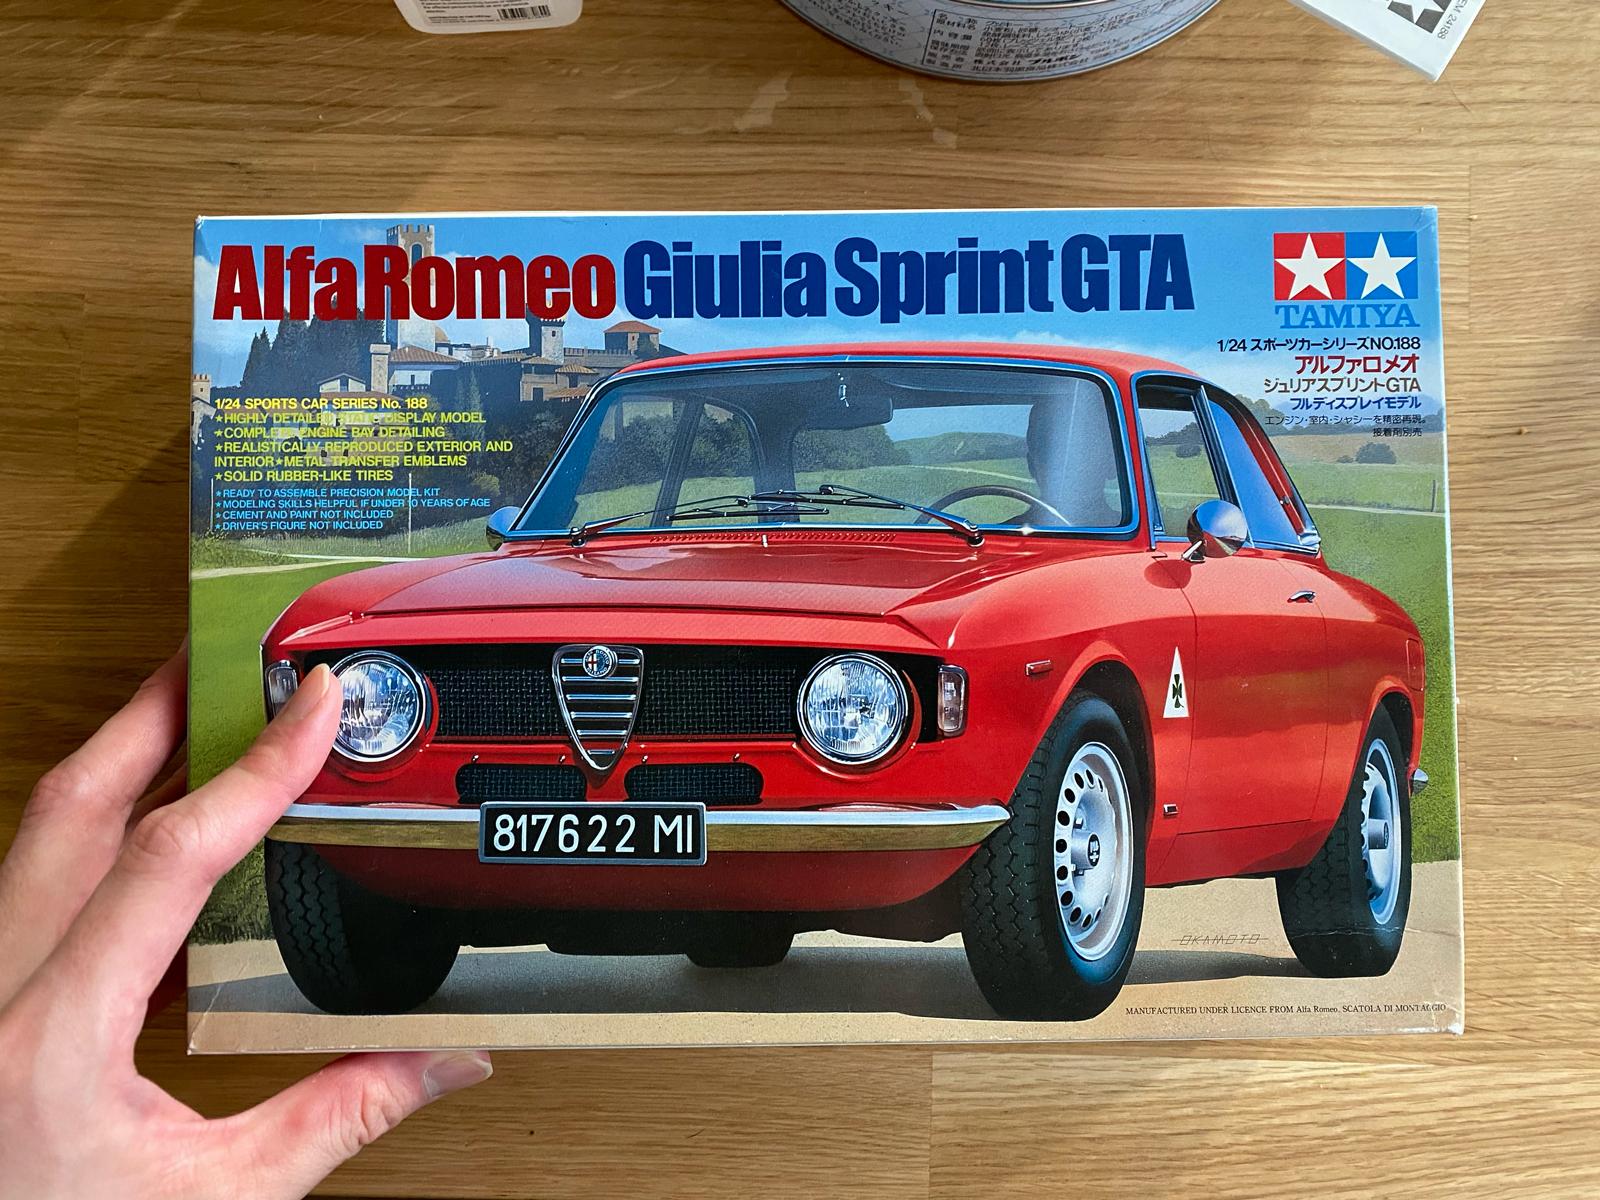
1970 Alfa Romeo Giulia GTA 1300 Junior (Tamiya + Scaleproduction transkit)
e30lover replied to e30lover's topic in Model Cars
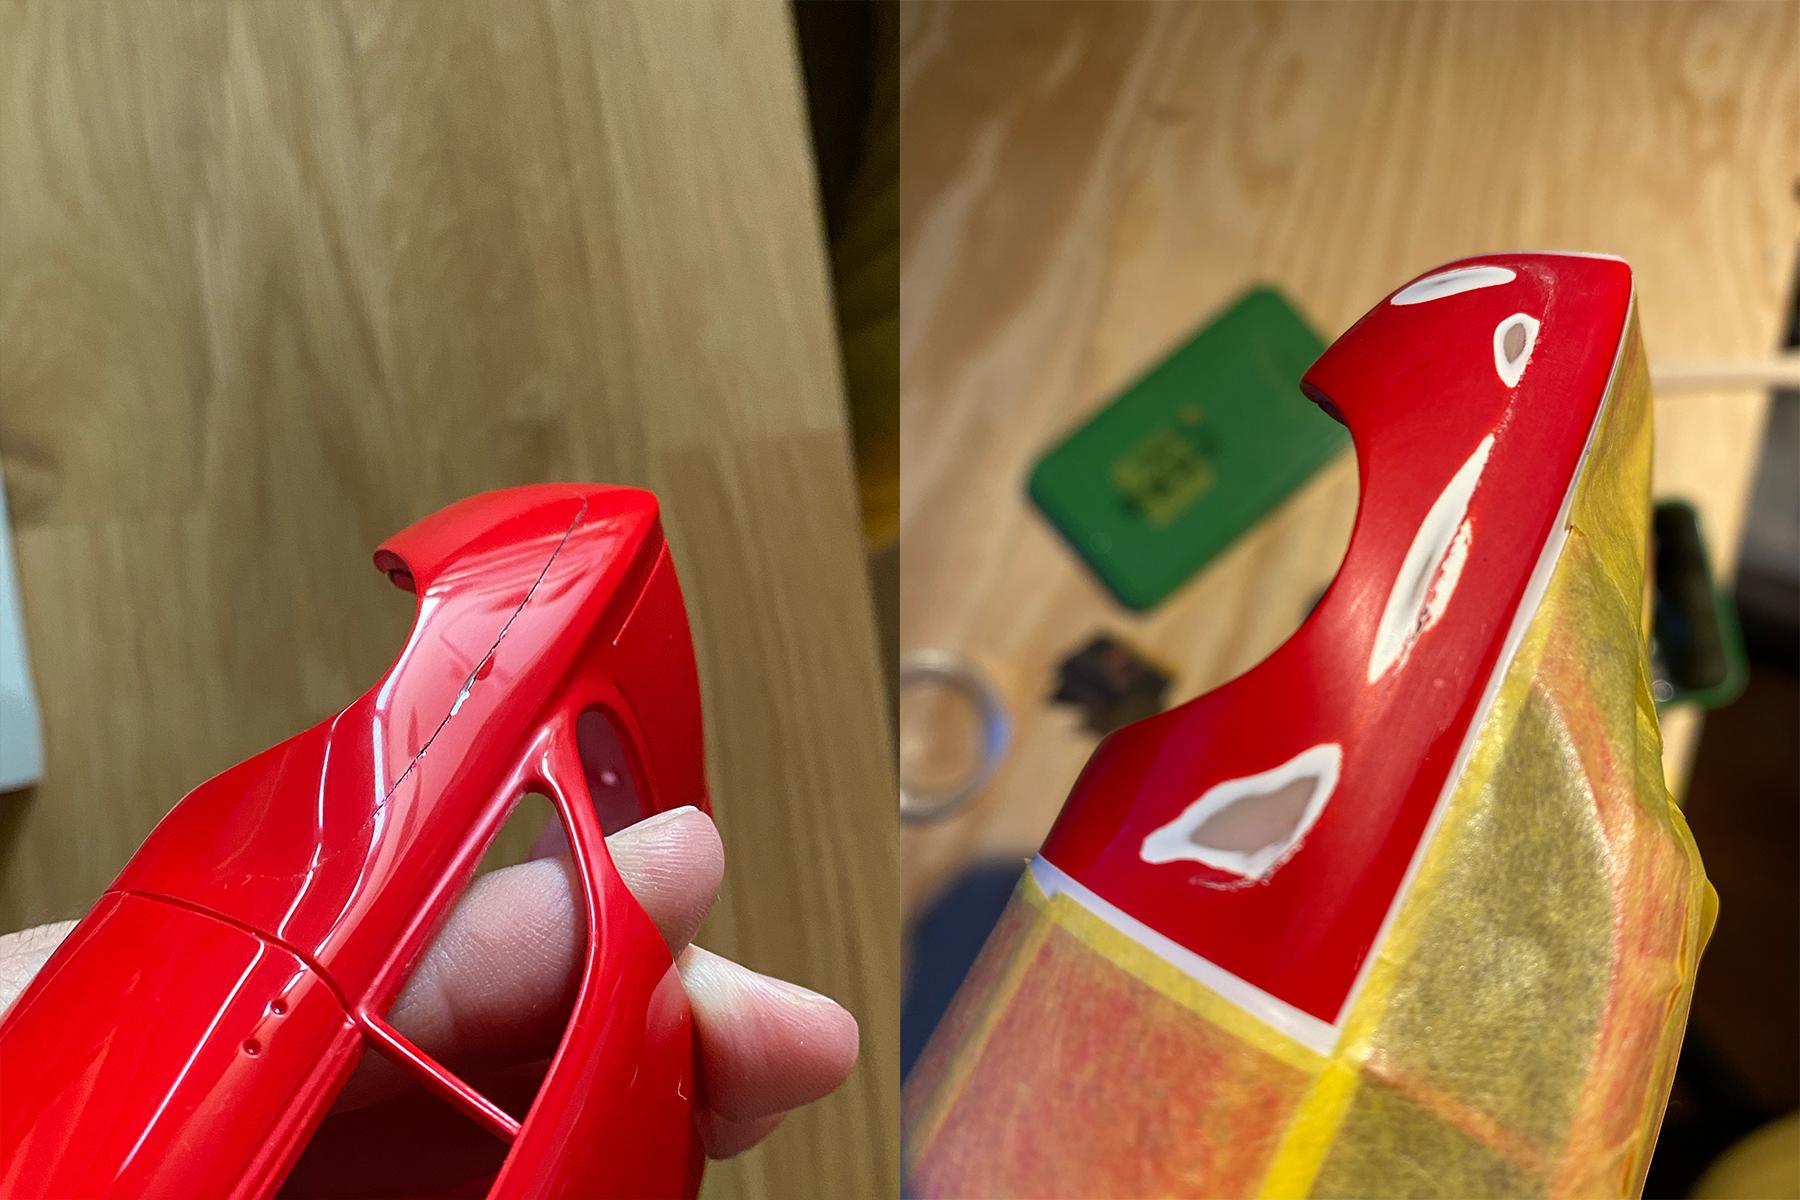
Thank you! Thanks a lot! I dropped the body on my desk when I was polishing it and cracked the rear quarter fender so I had to do a partial respray! Thank you! Thanks! Thank you! It's a lovely kit to build. It was a lot of hassle to make fender flares but definitely worth it! Thanks! Thank you! Thanks a lot! Appreciate it! Thank you! Thanks! -
I really like your build! Love the clean paint and vibe!
-
Here's my finished build with photos:
-
Thank you! Me too! I love old Alfas. I totally agree. More kits need to be made like these. Thank you! Thanks a lot! Thank you! I wish I can get another one of these and build box stock! Thank you! Thanks! Tamiya does re-release some other Alfa kits and RCs in every couple of years.. one day! Thank you! That's gonna look very period correct! Thank you!
-
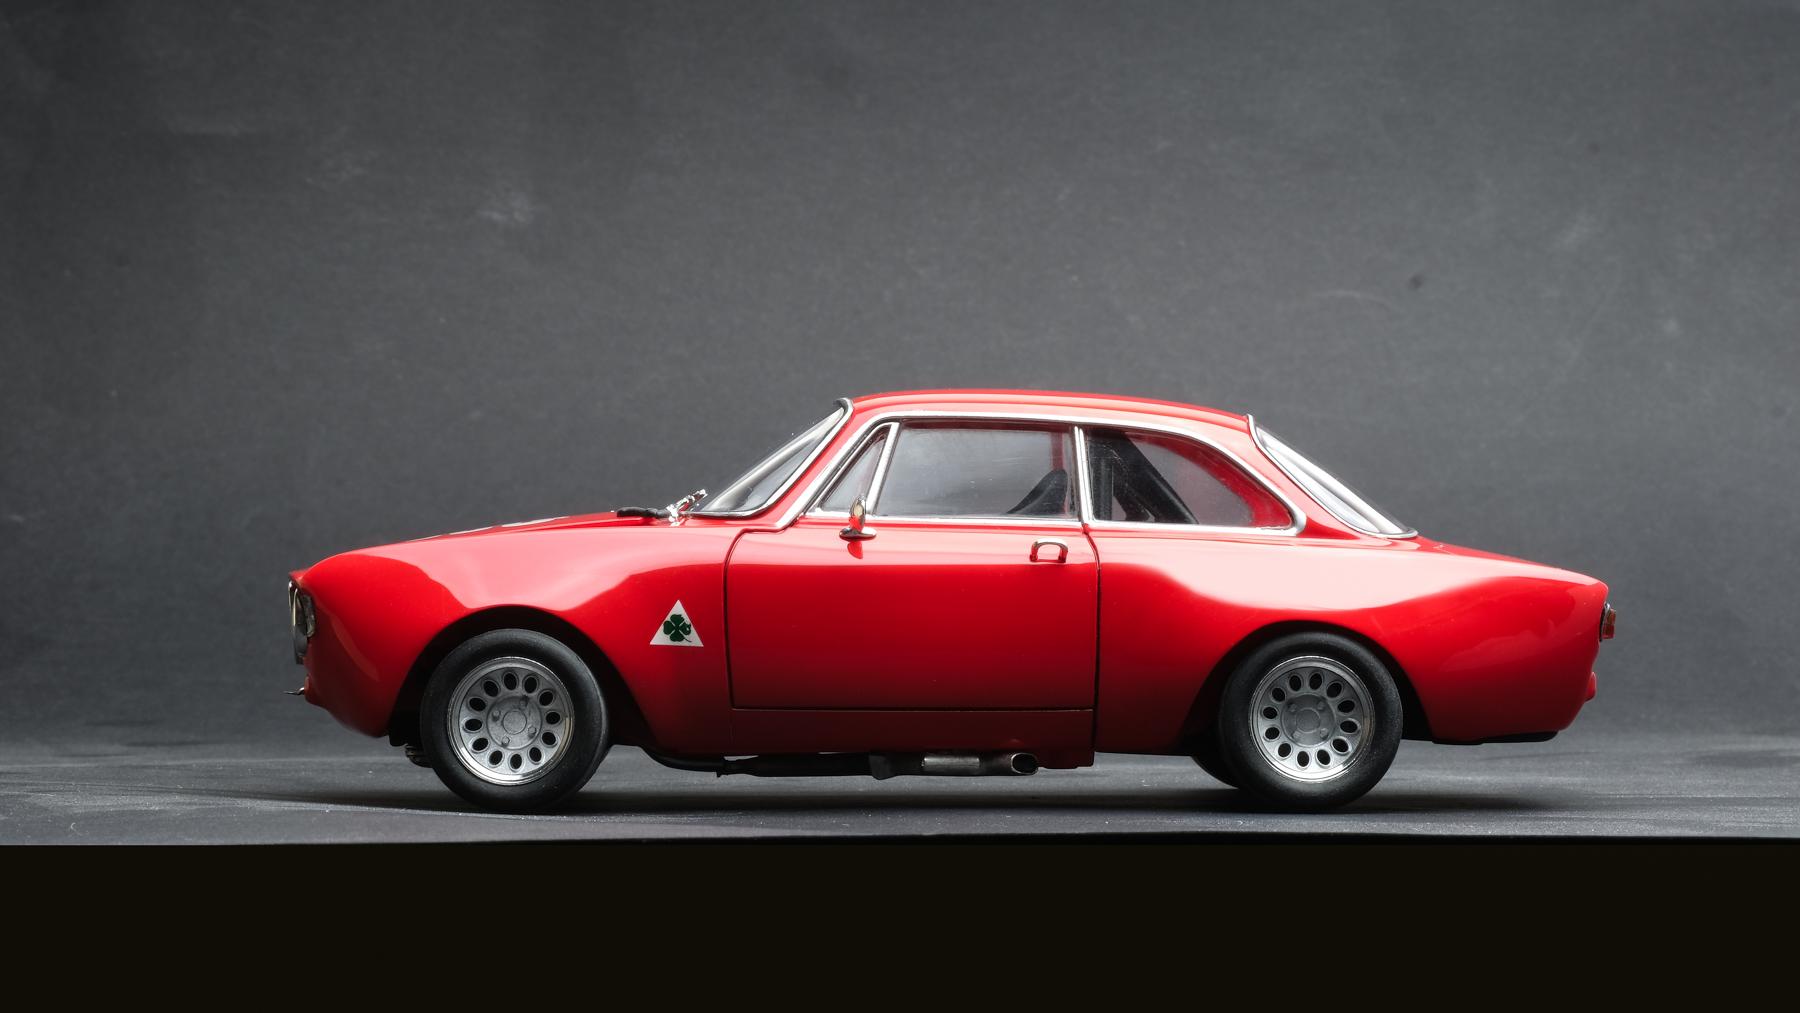
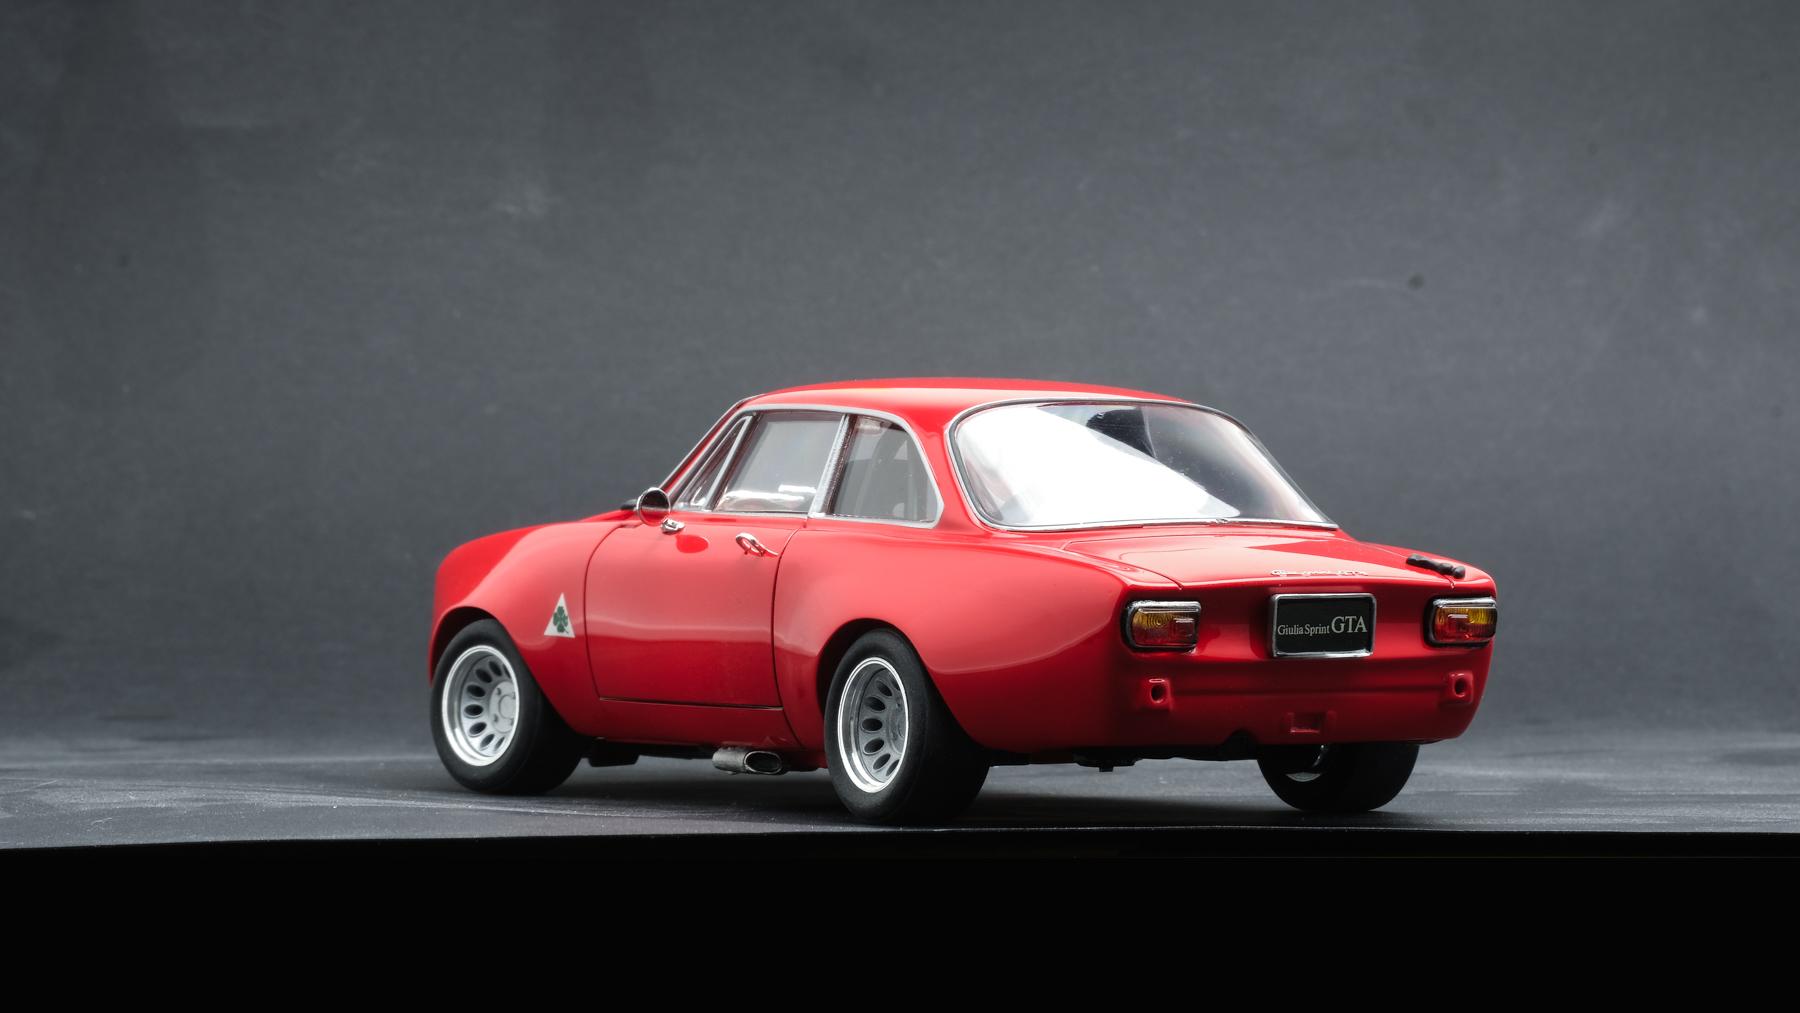
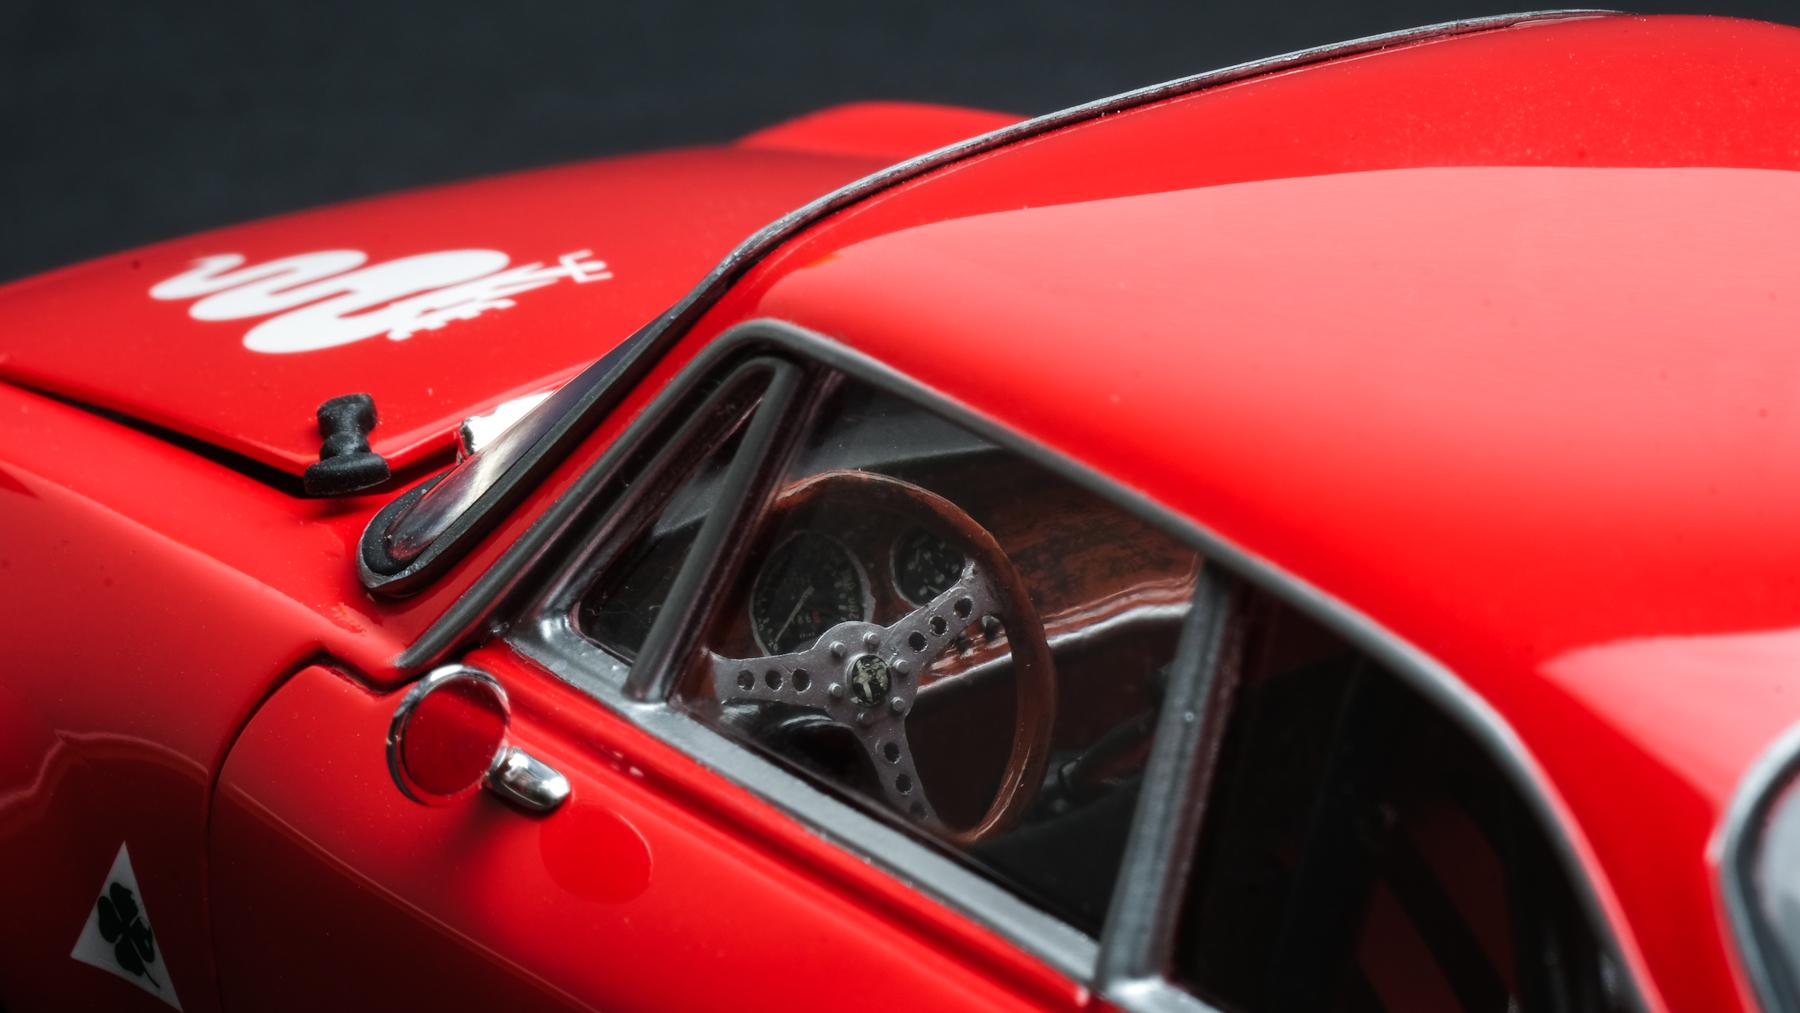
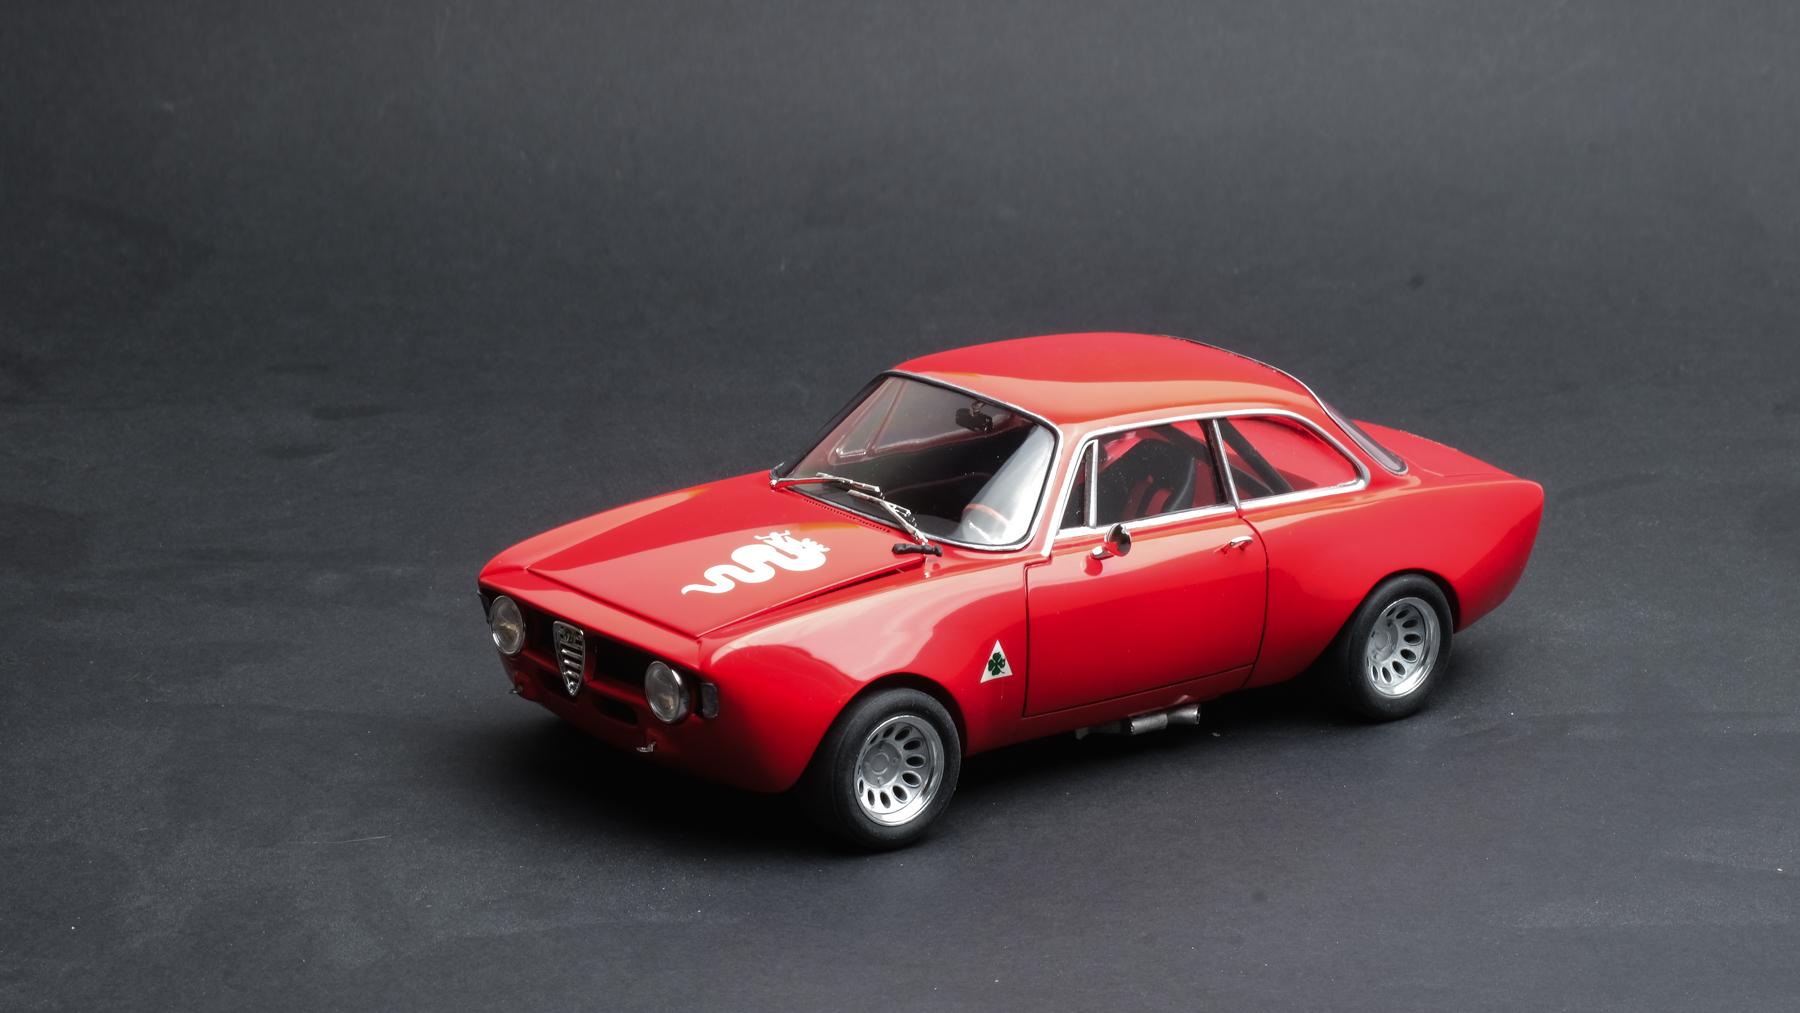
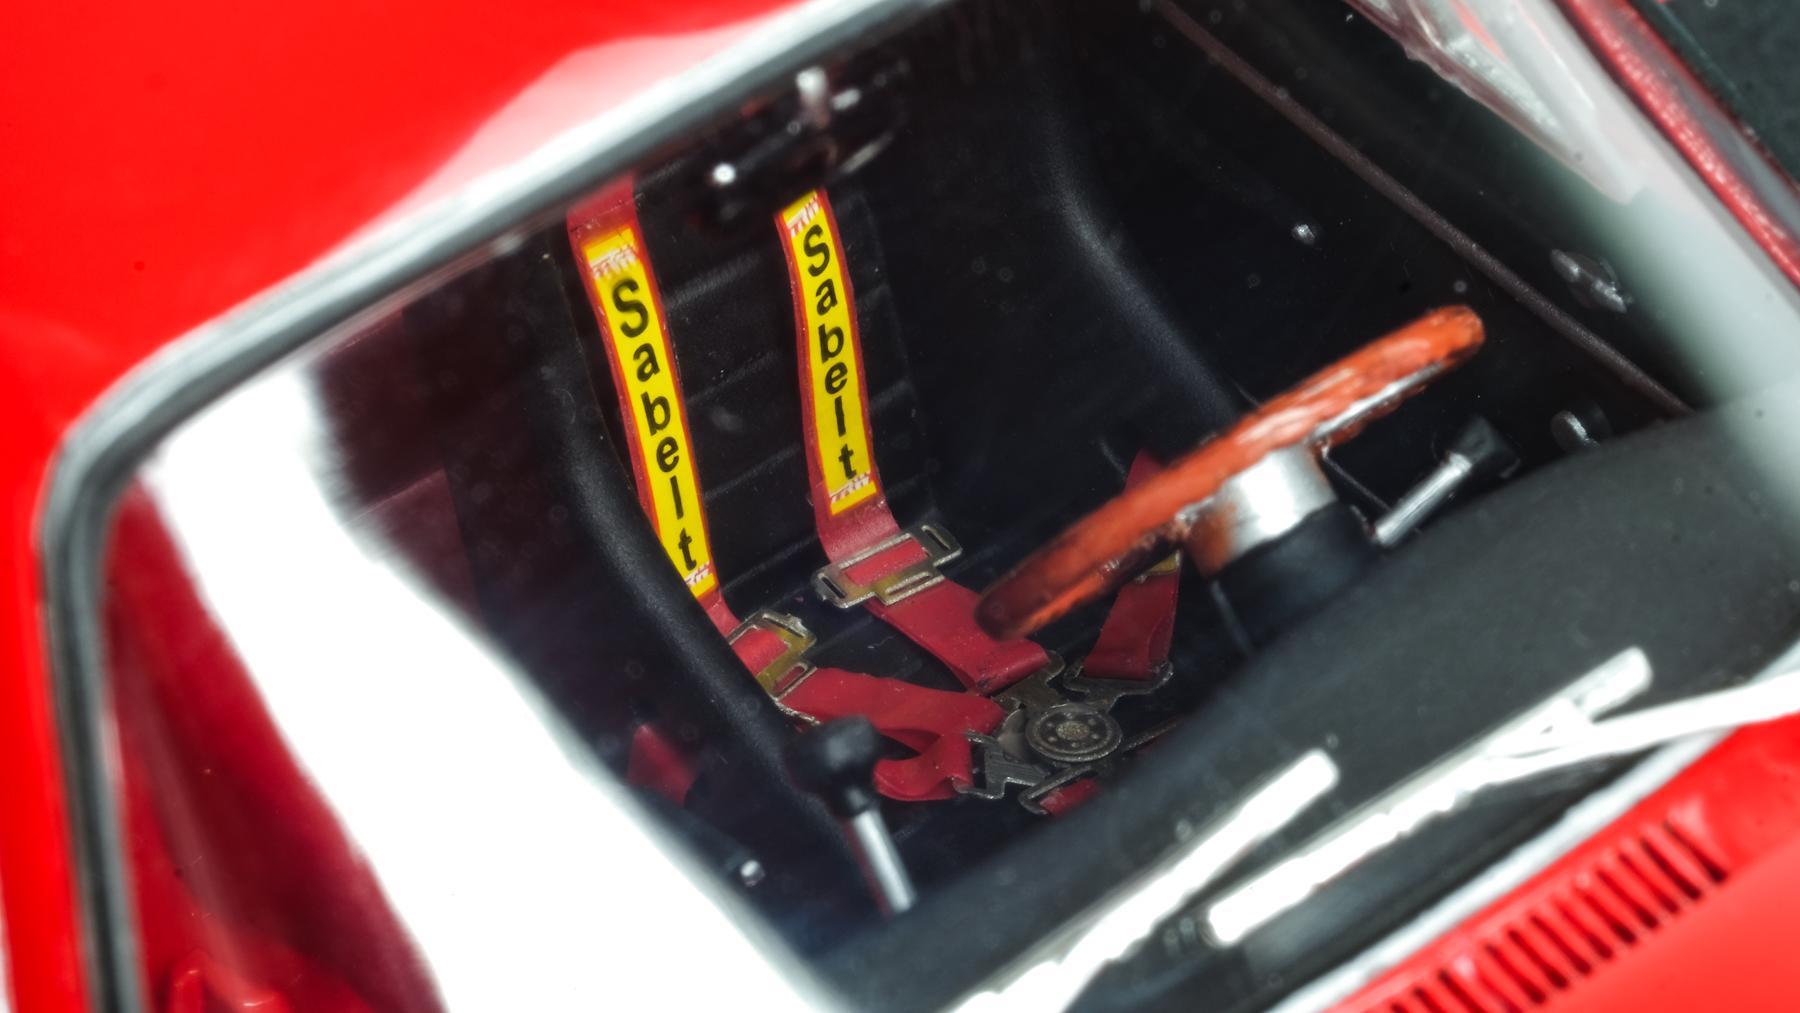
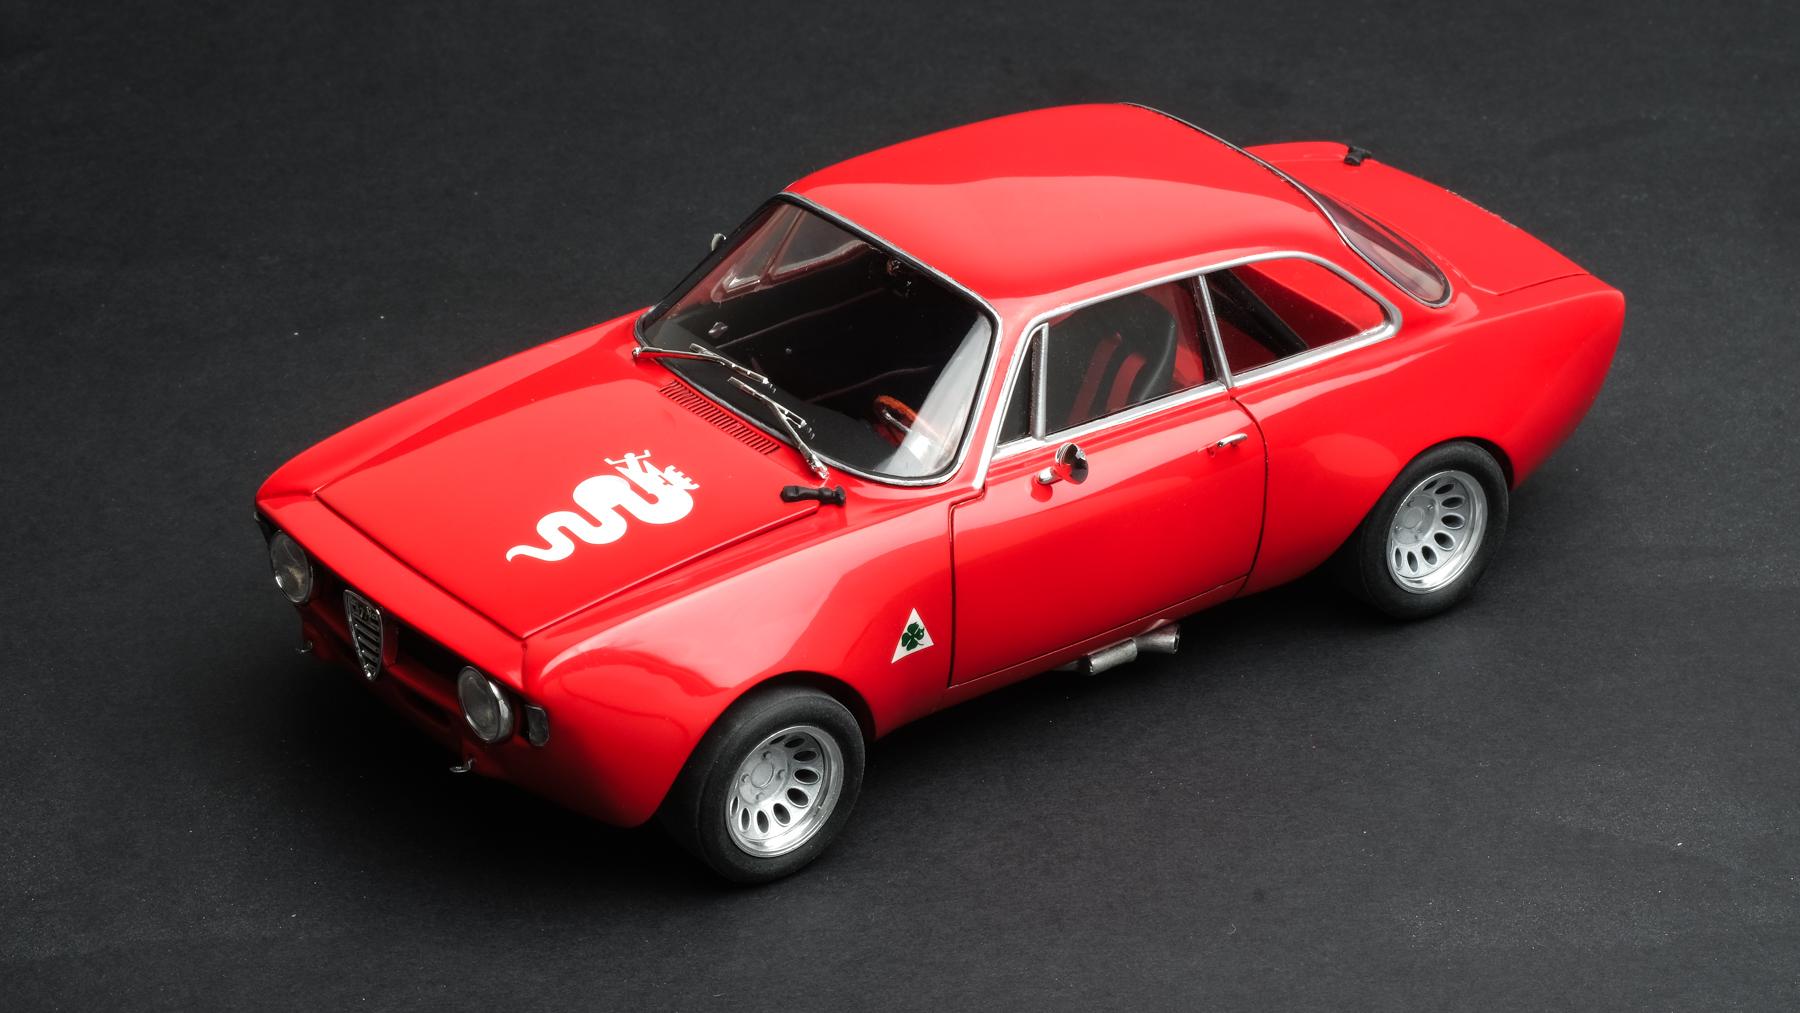
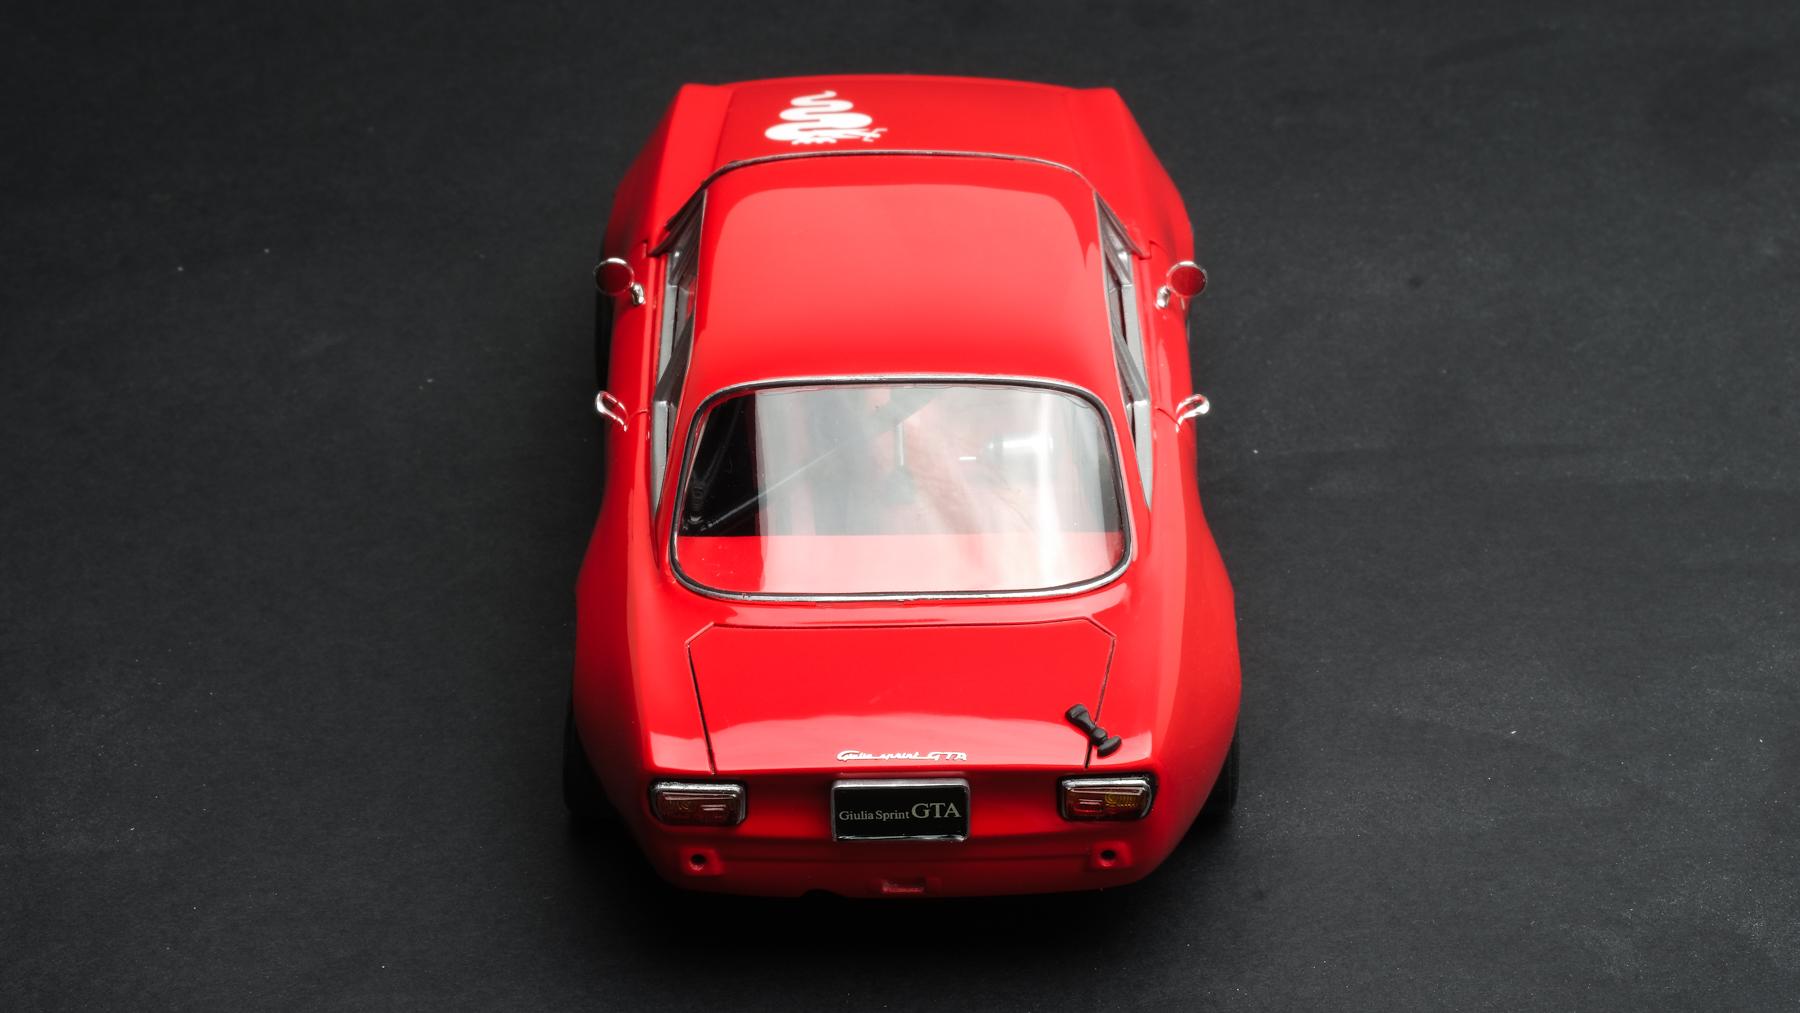
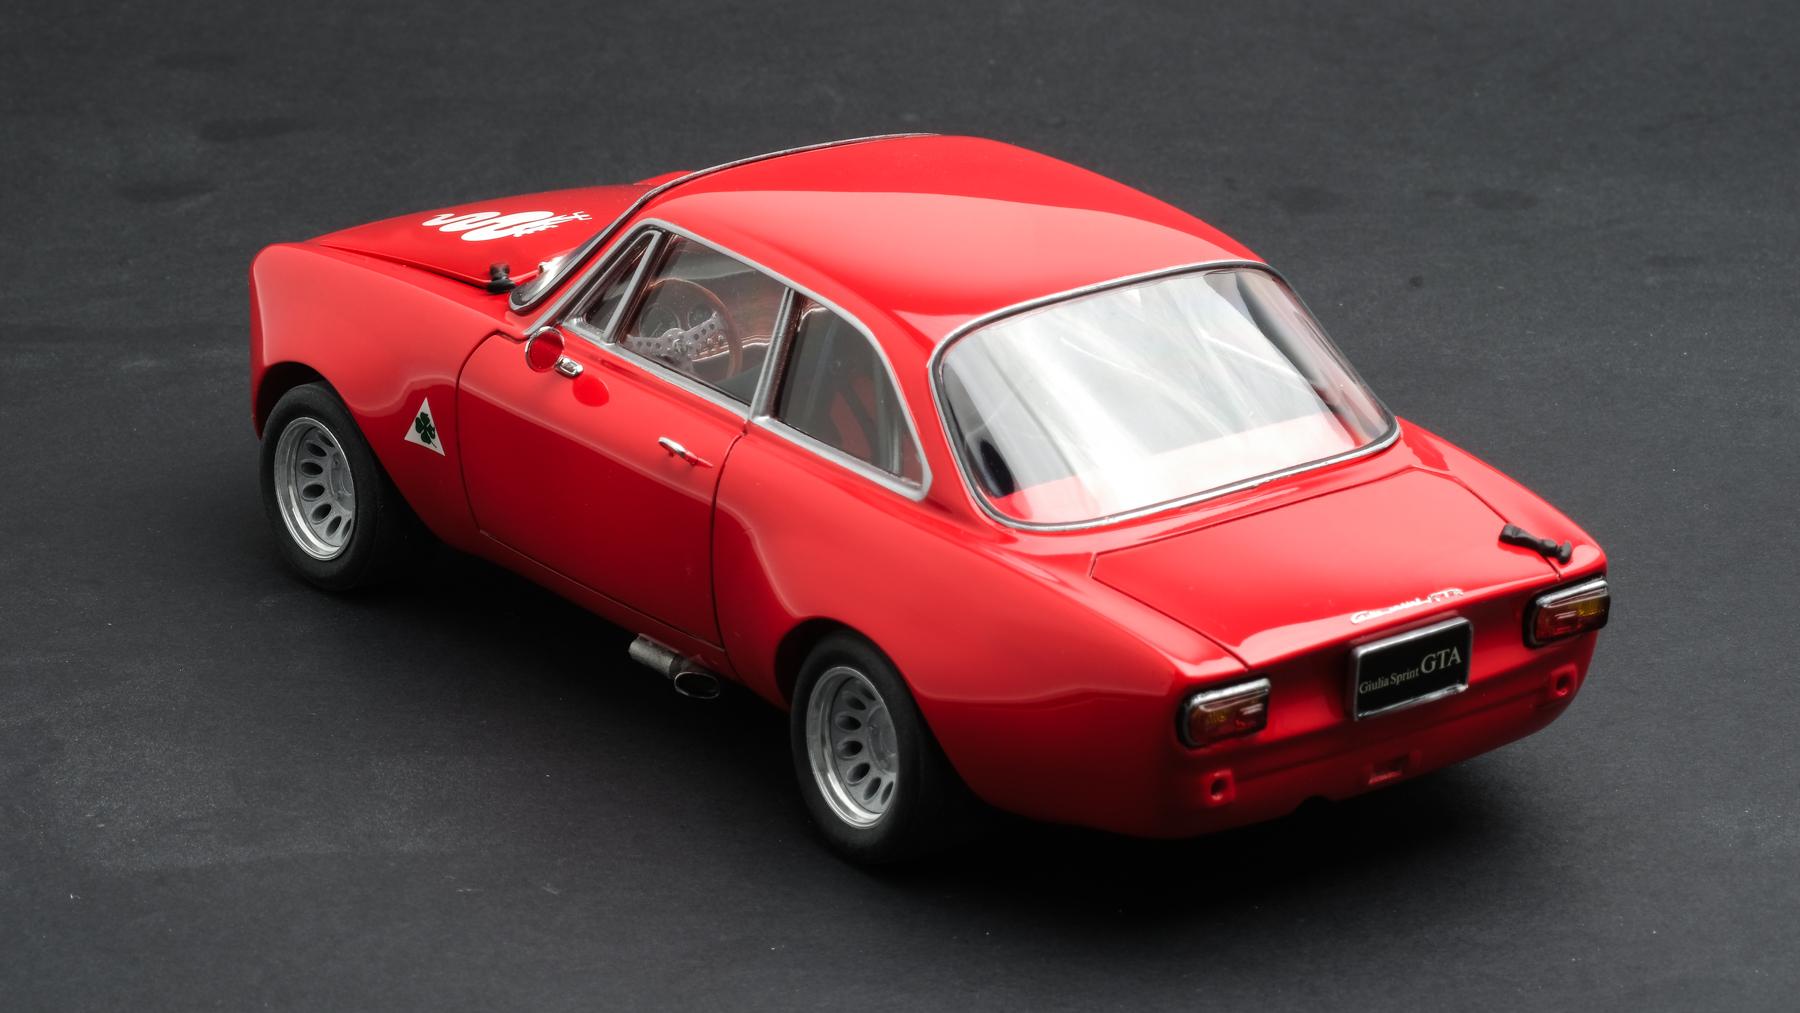
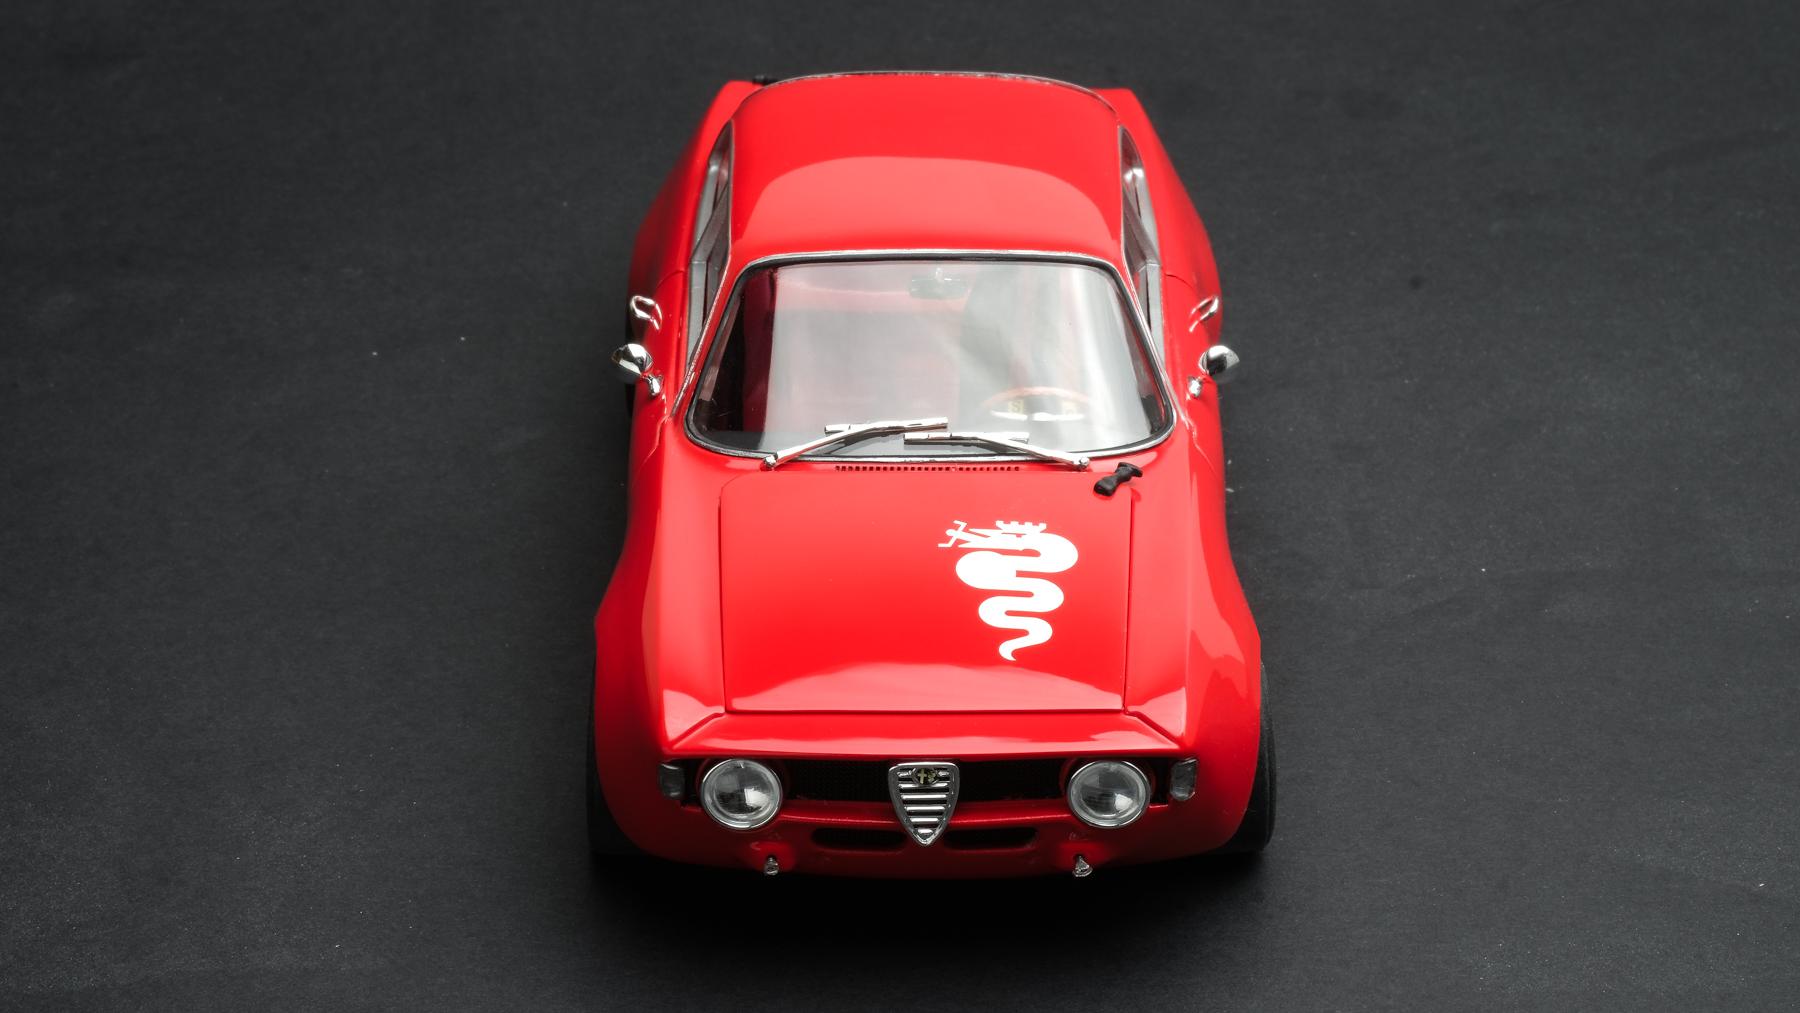
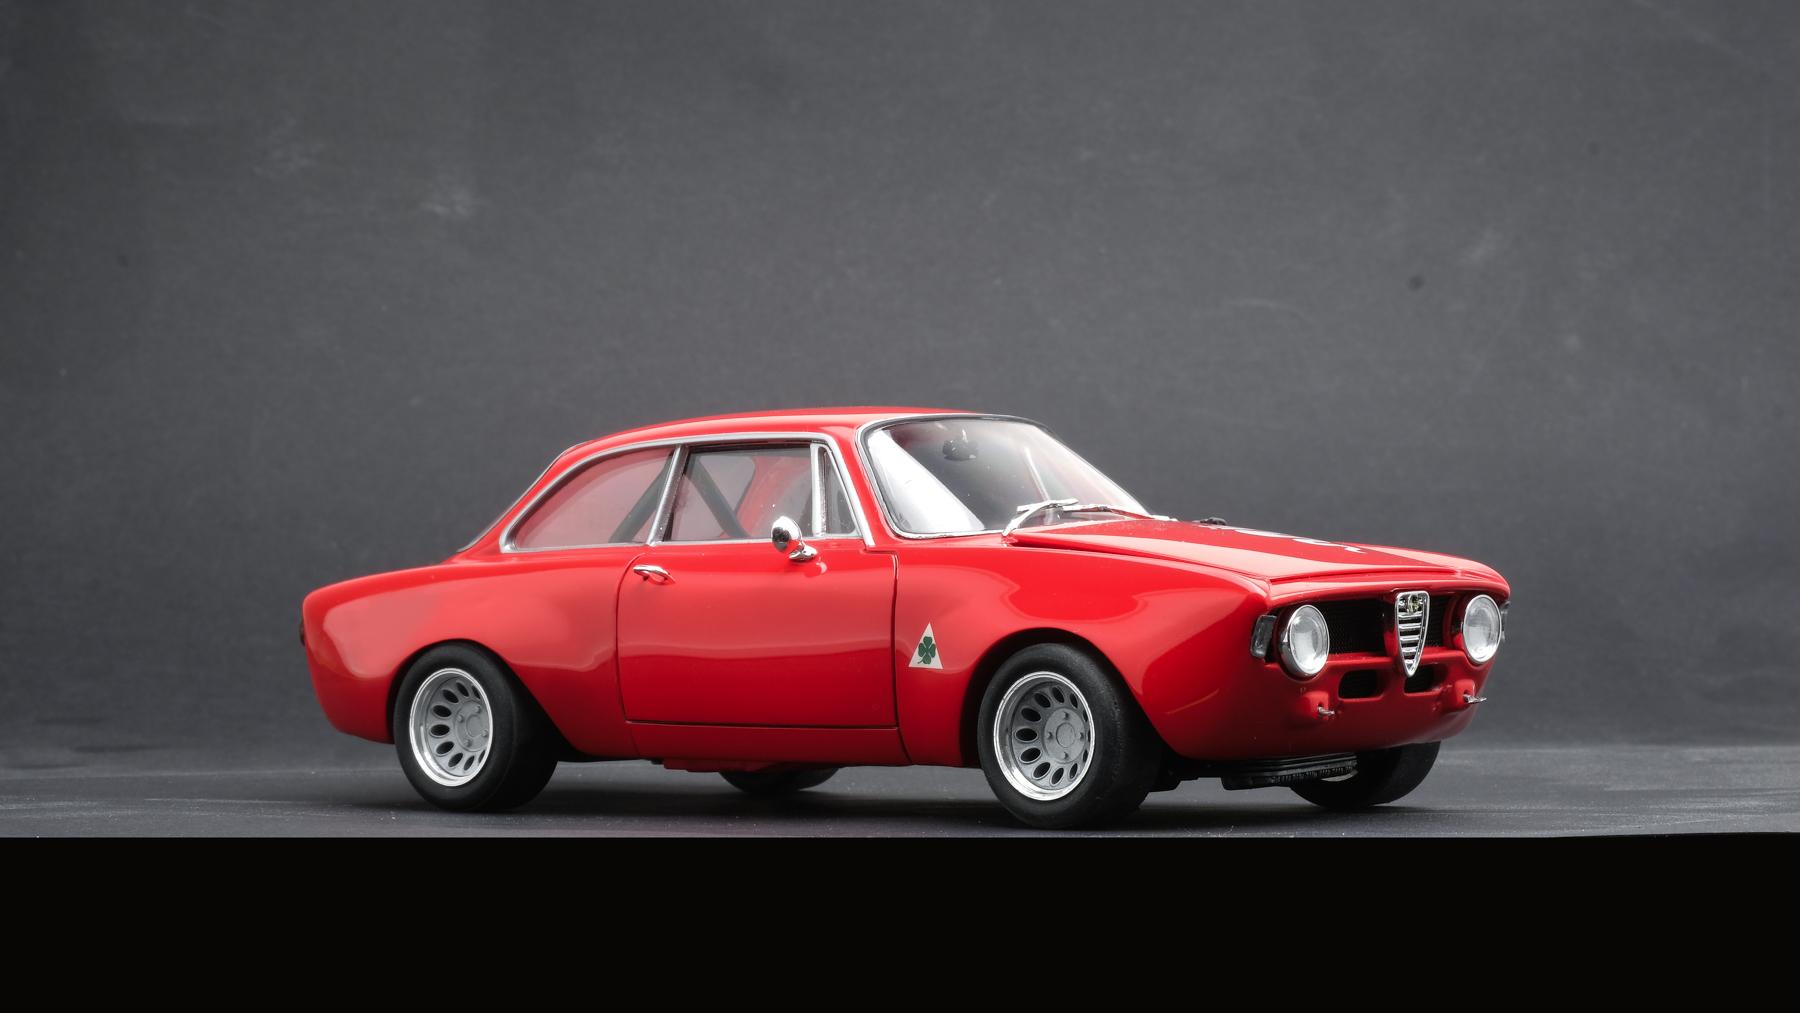
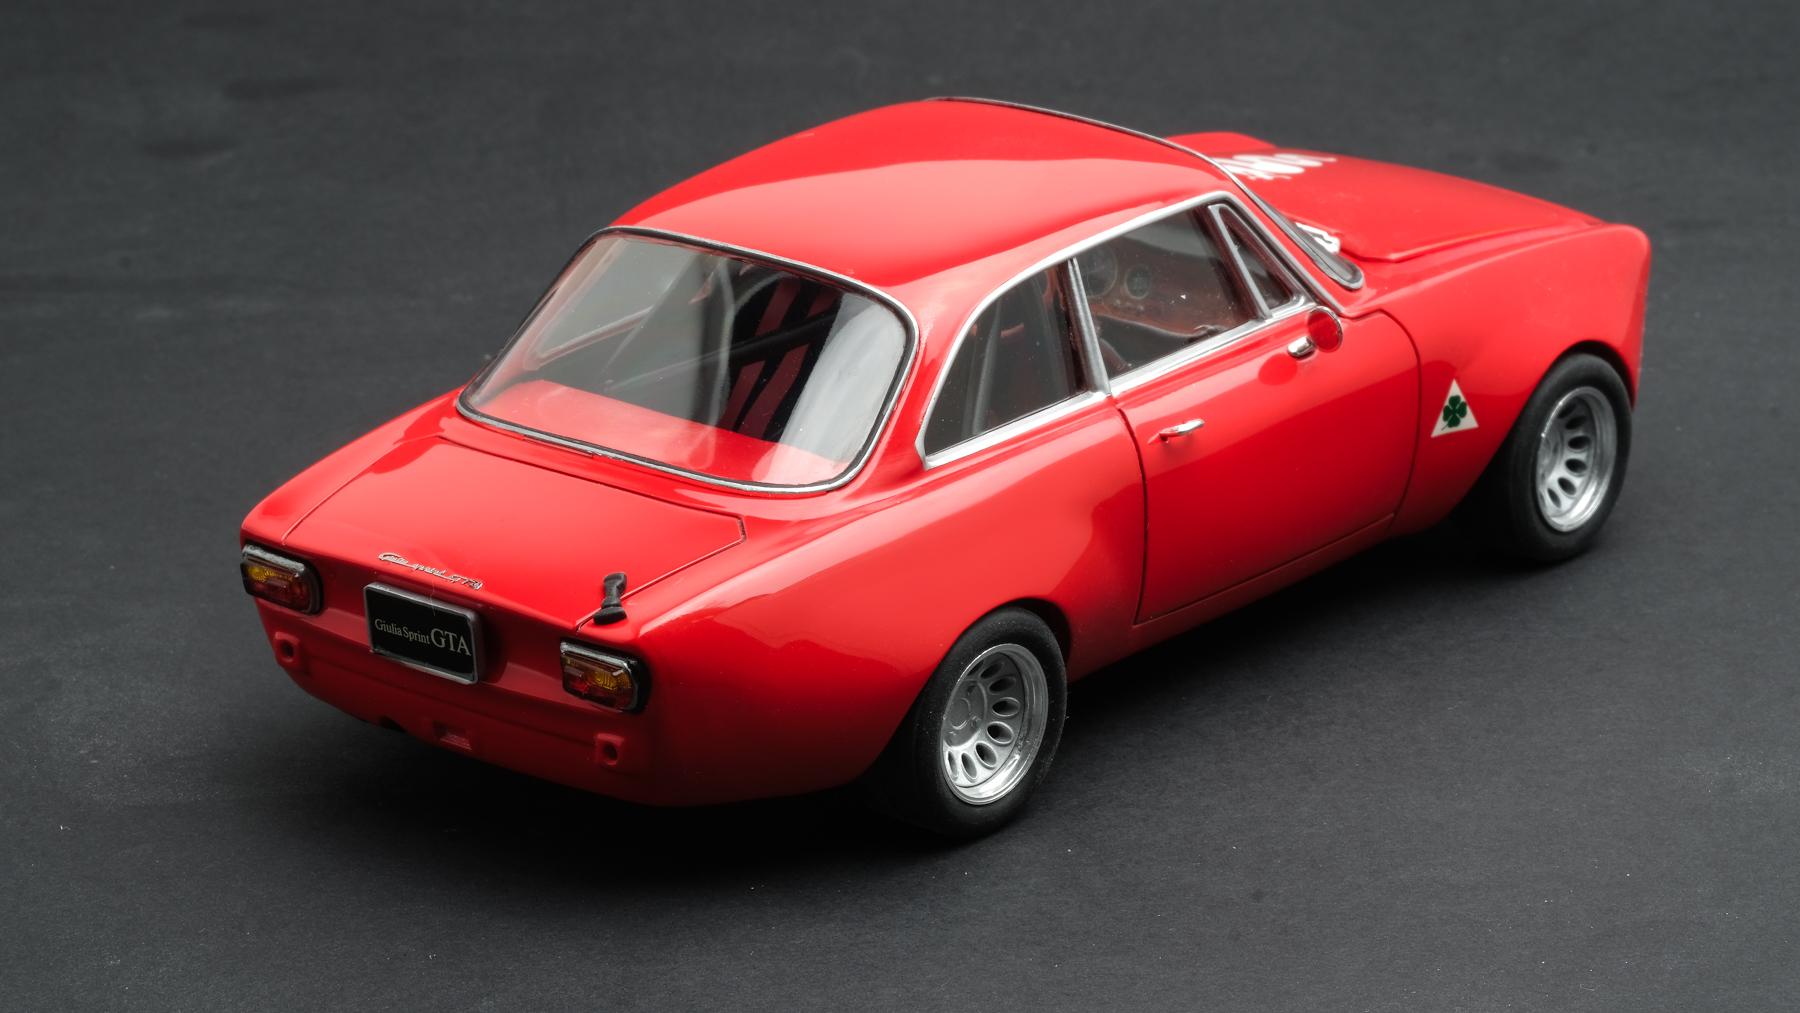
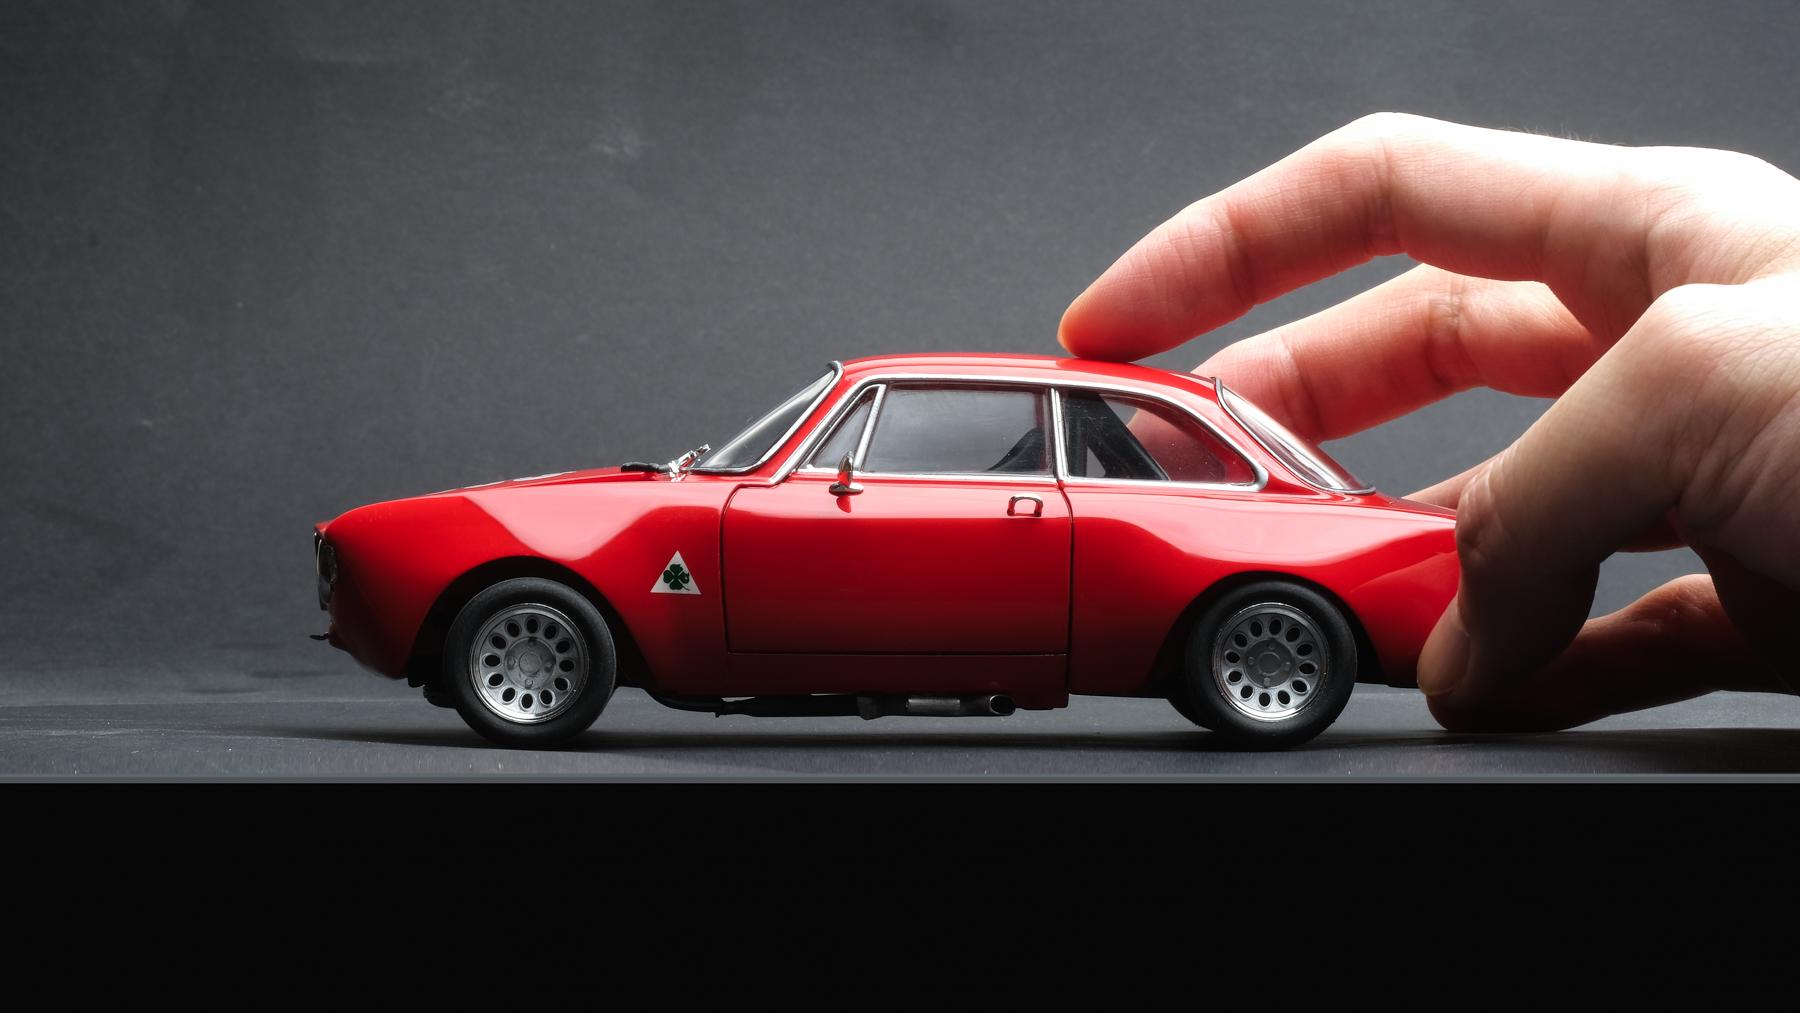
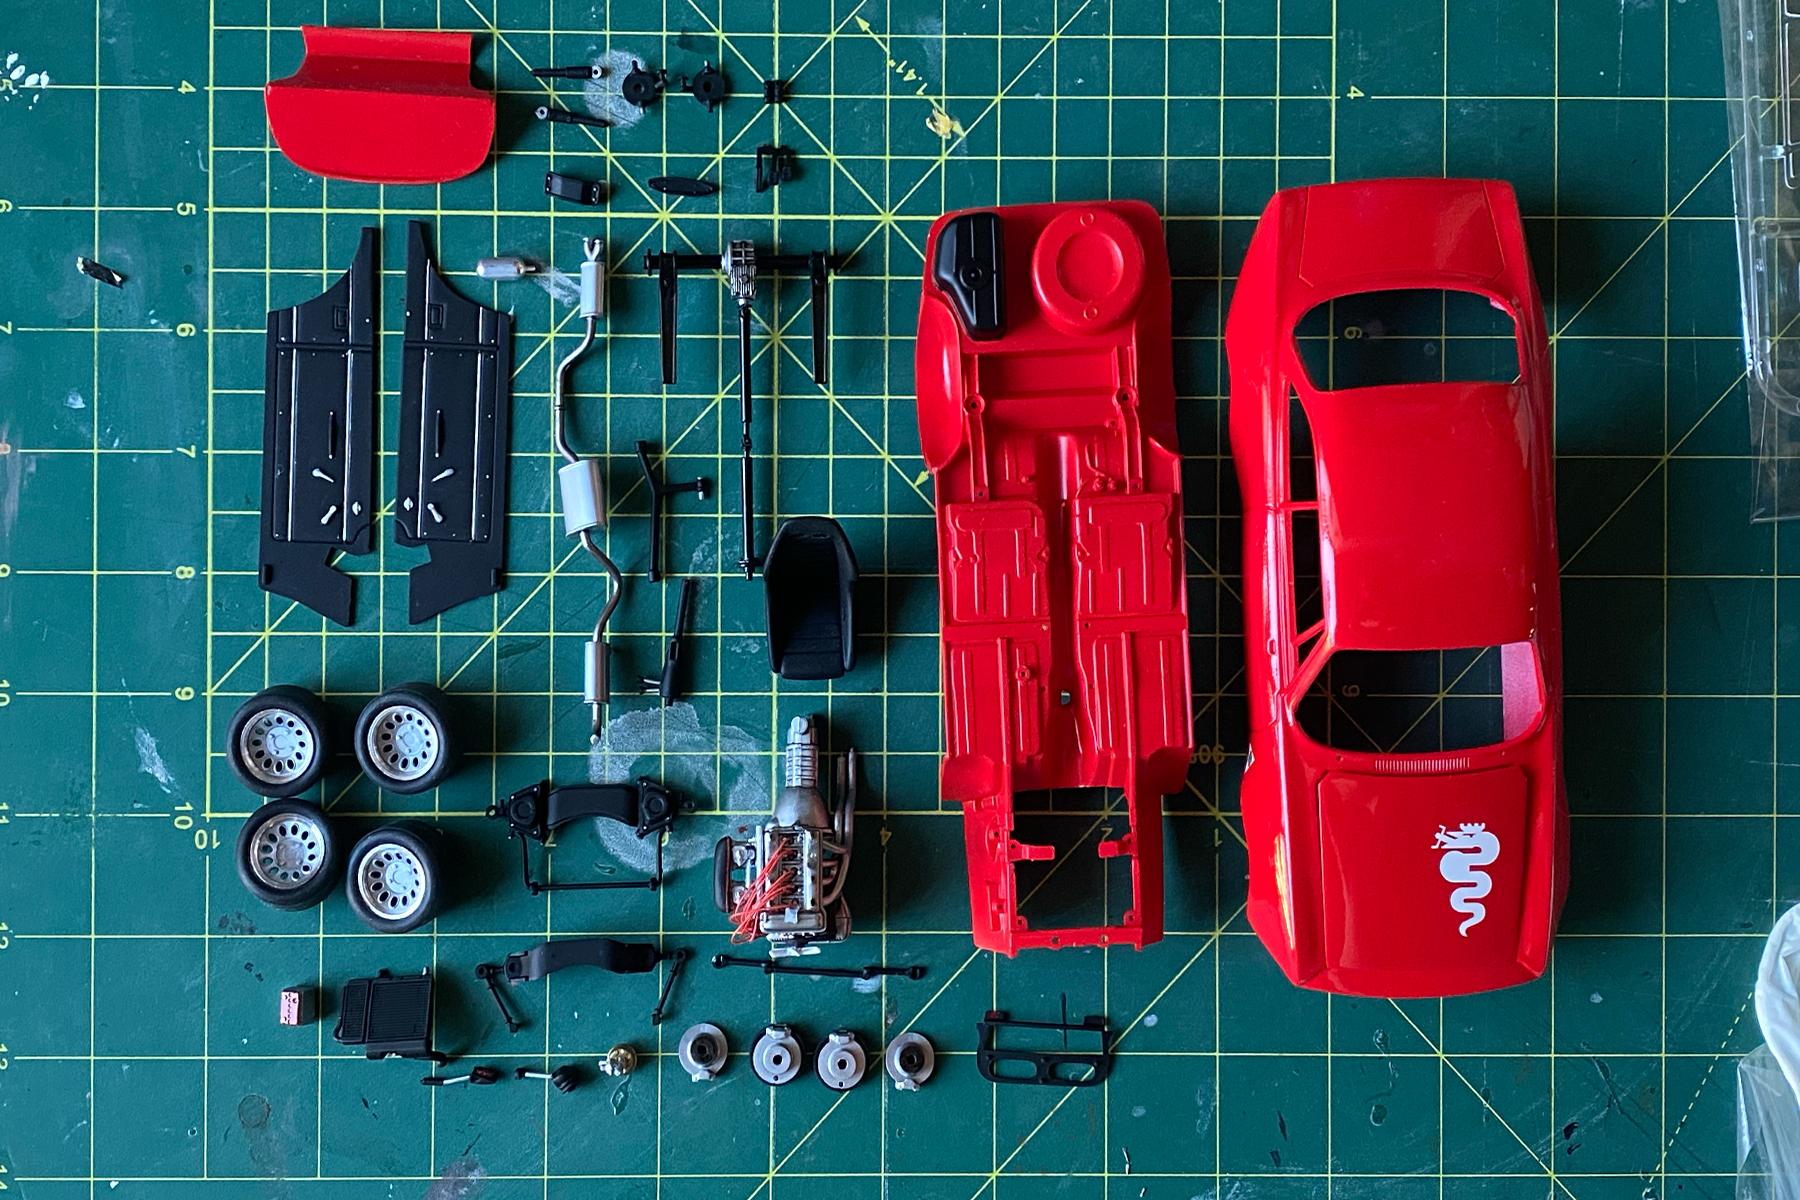
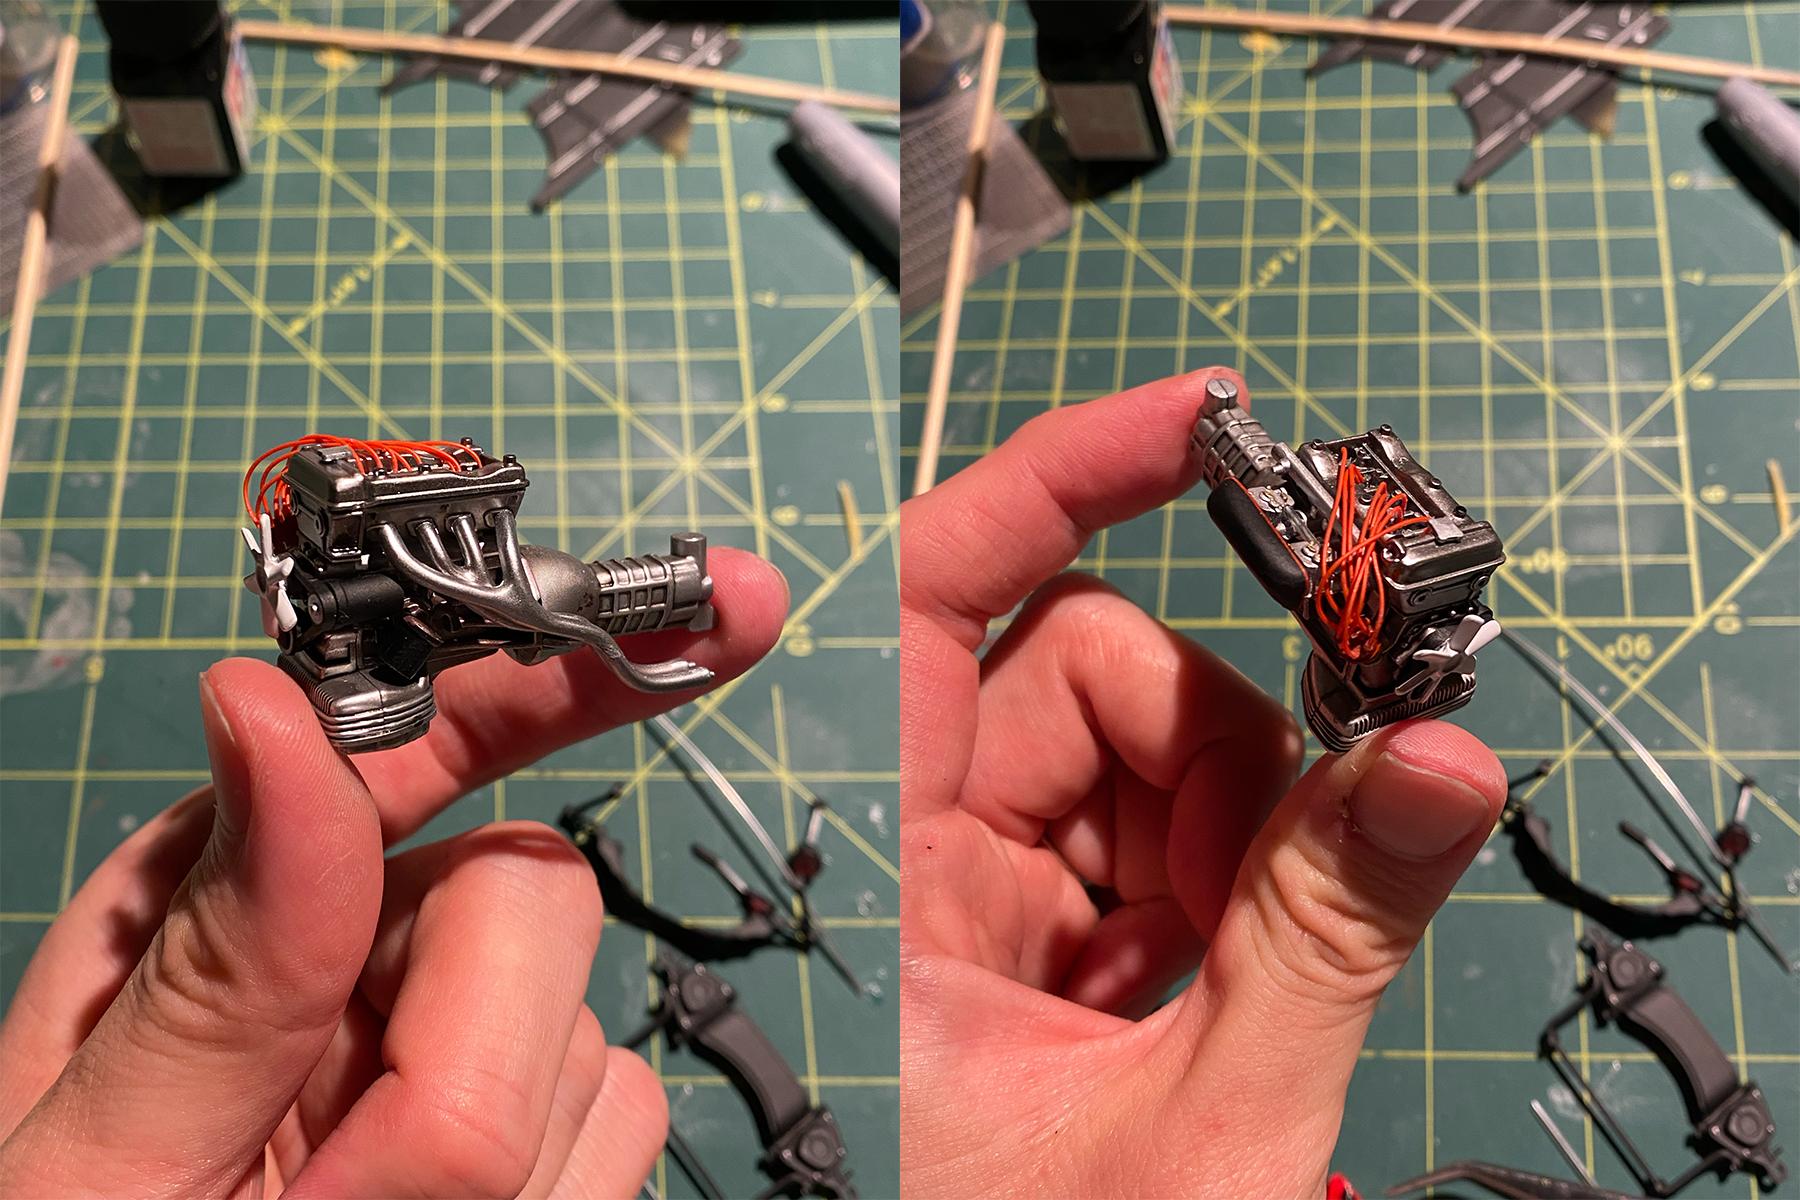
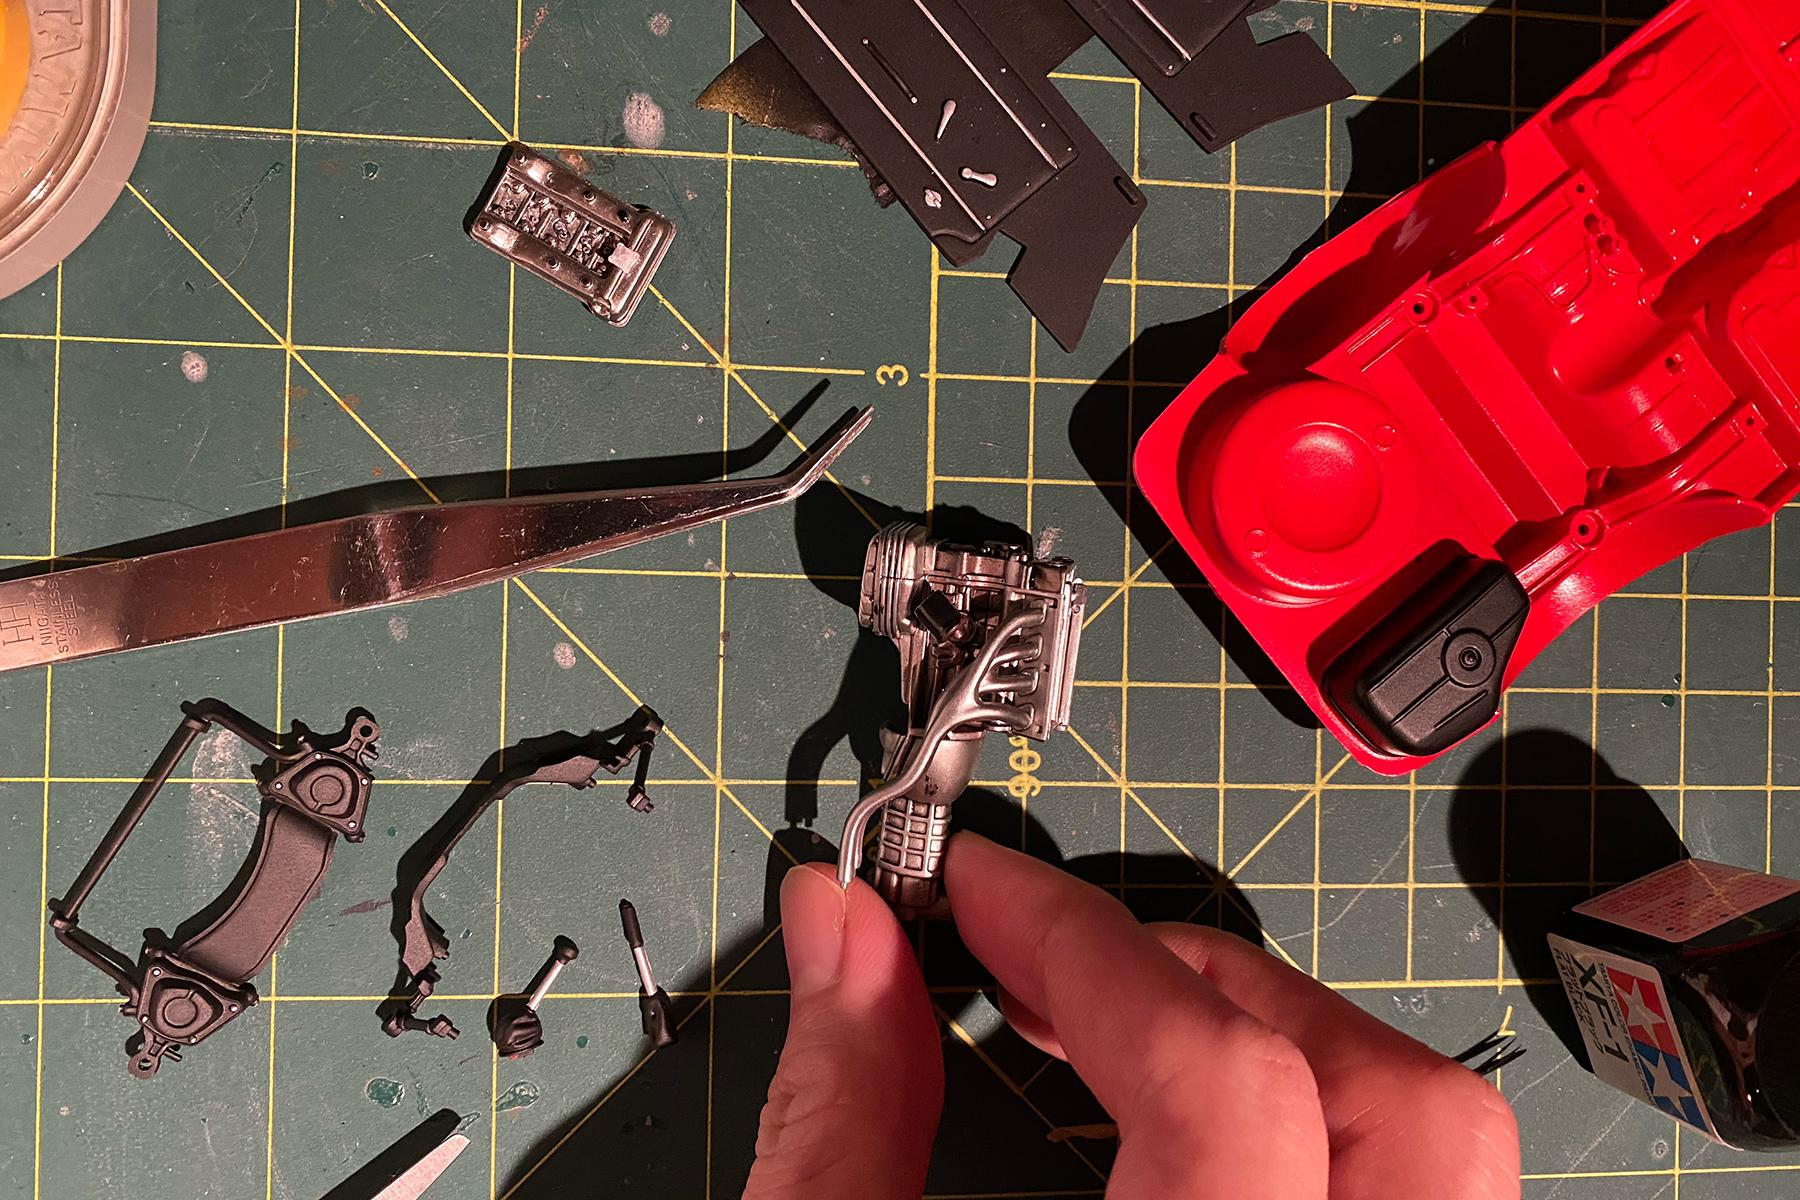
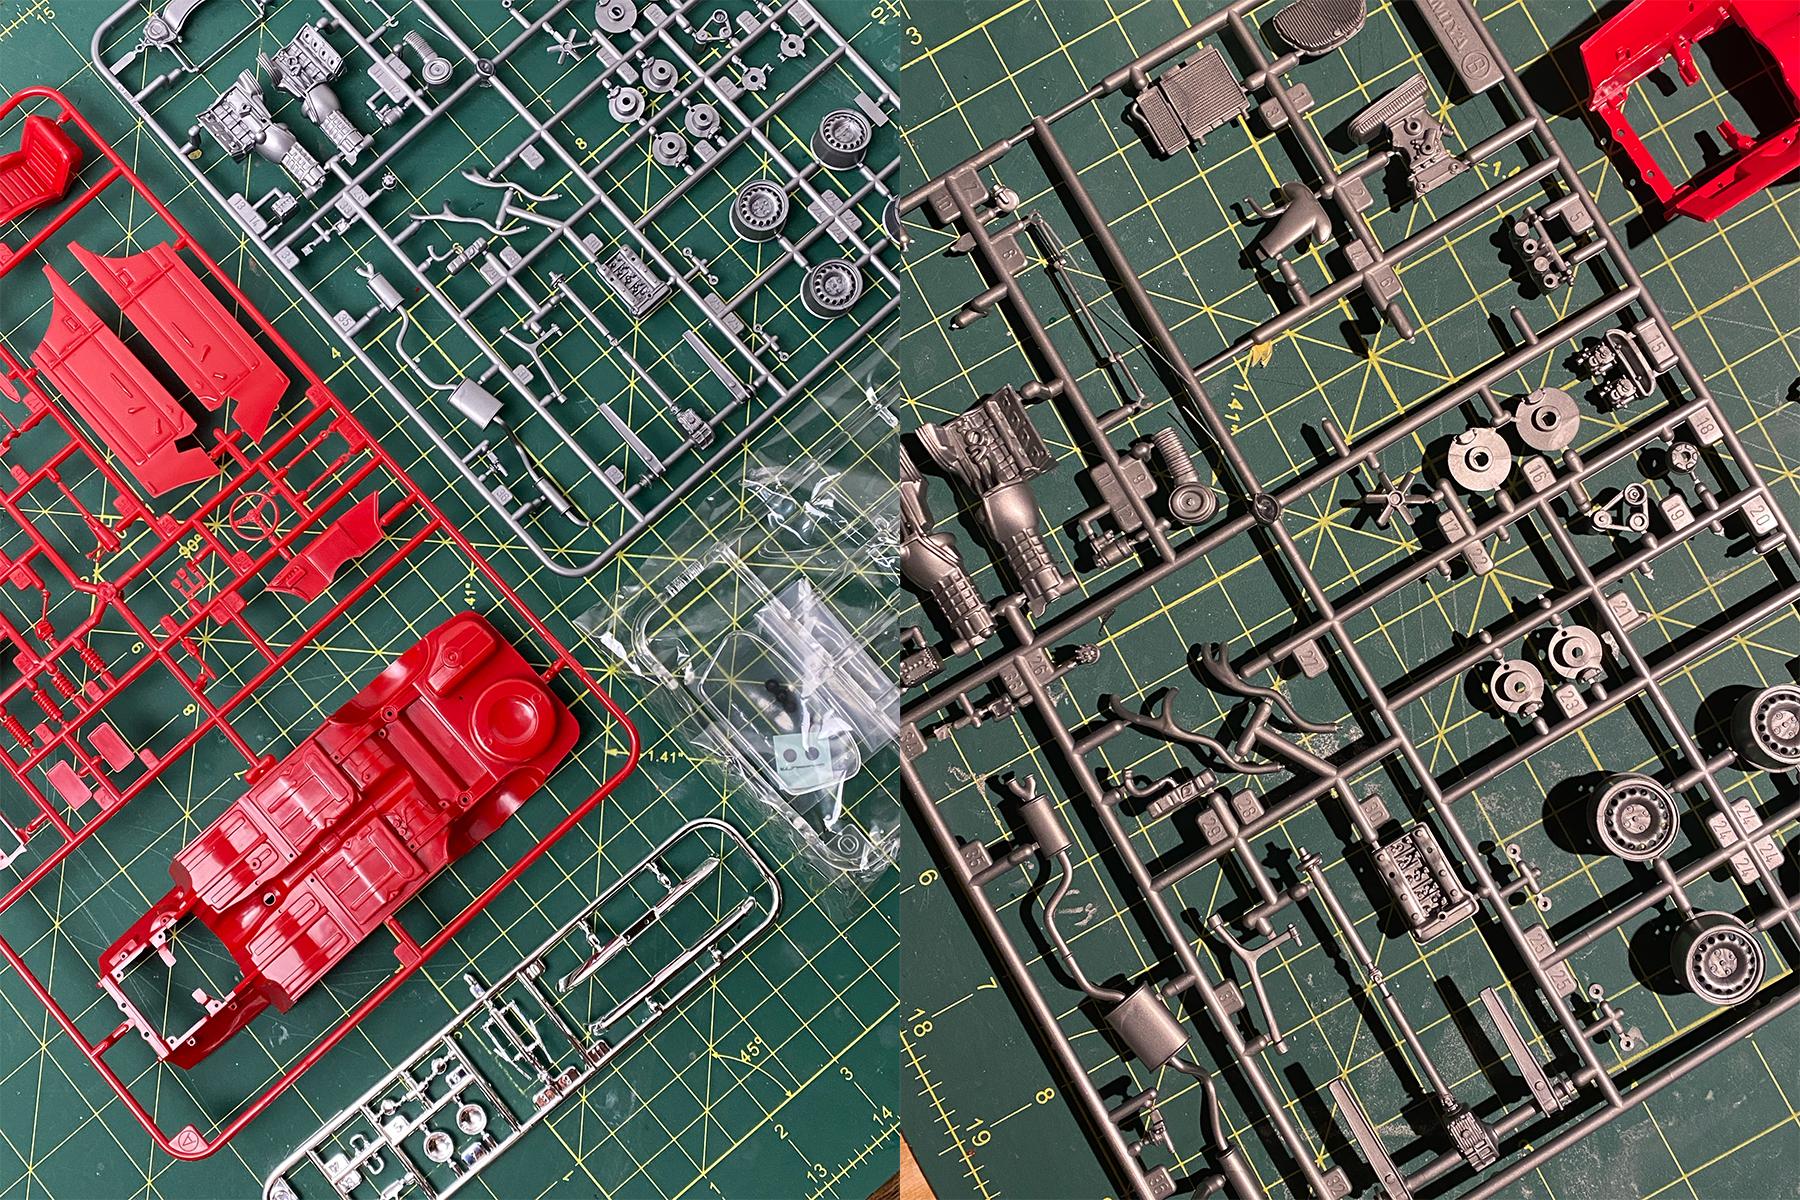
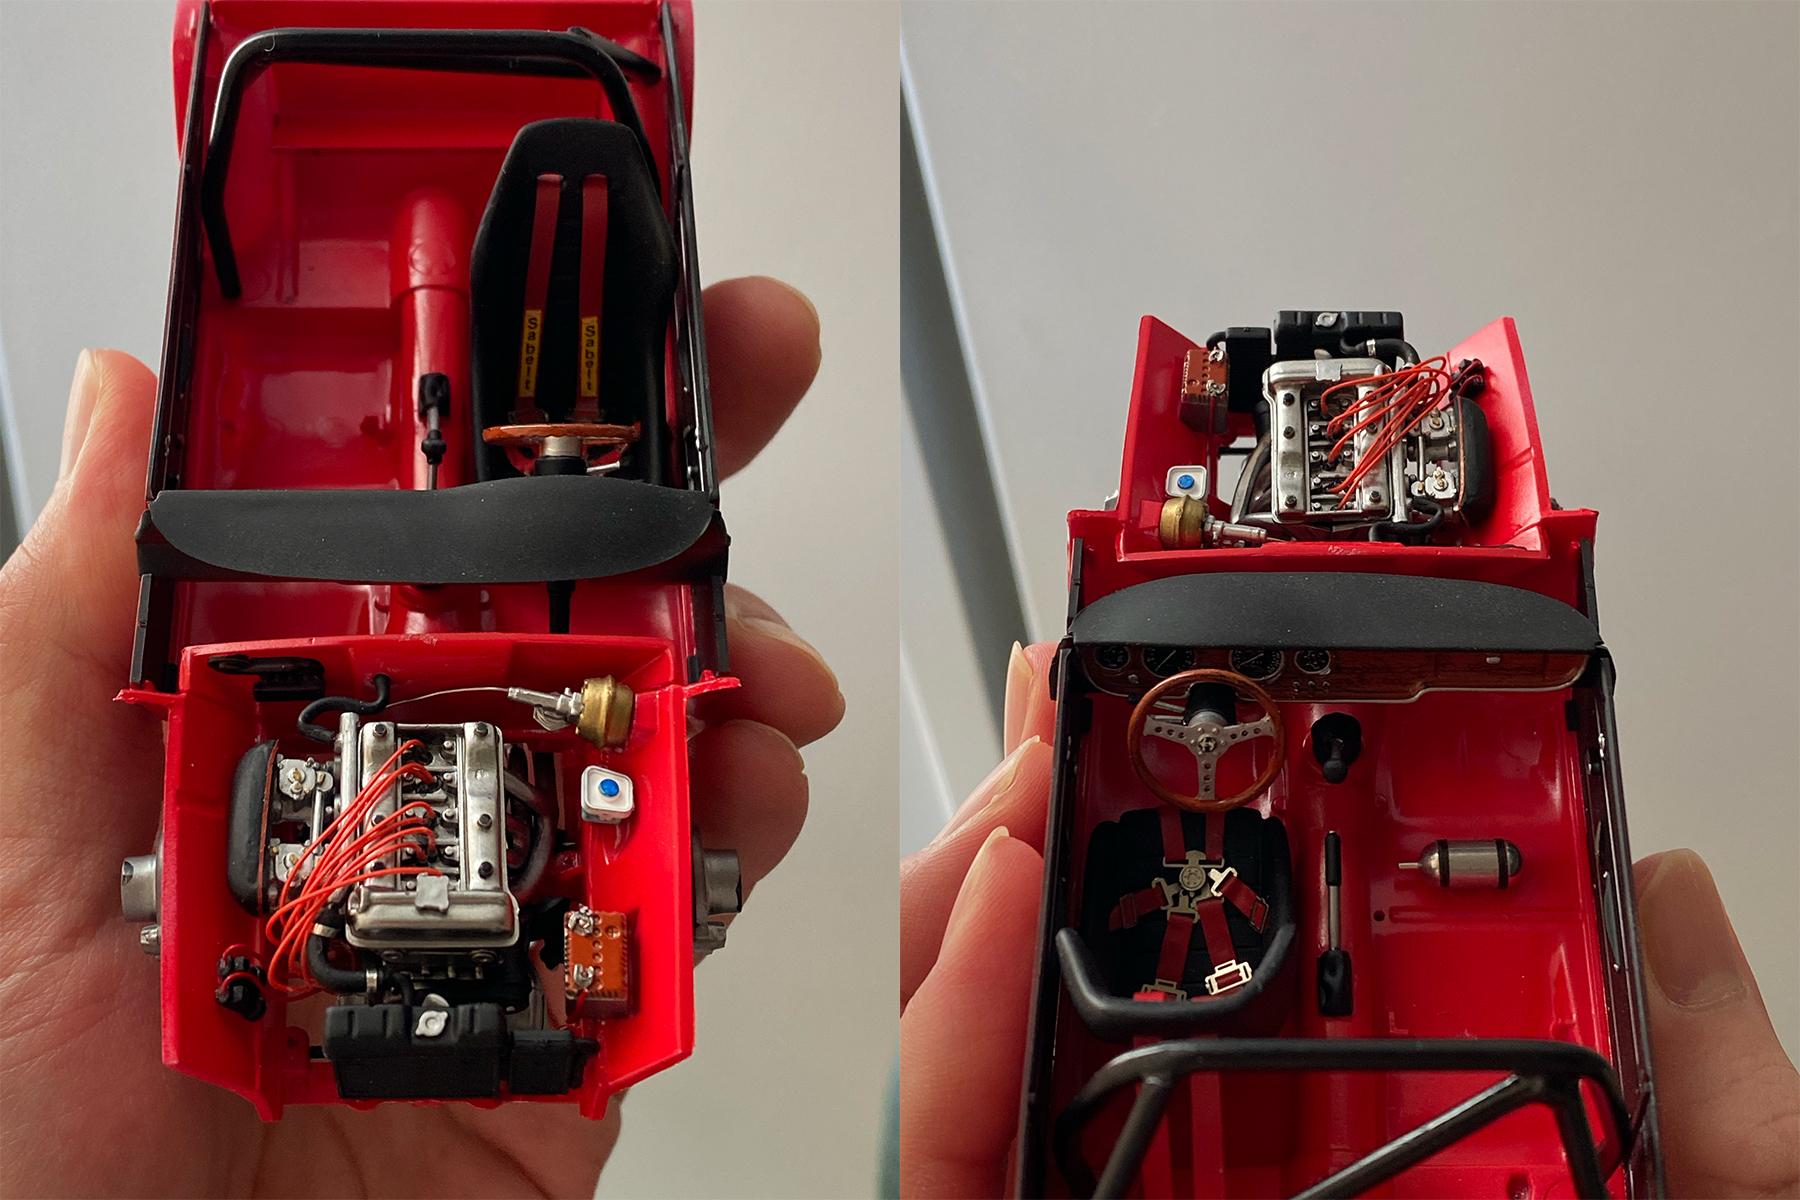
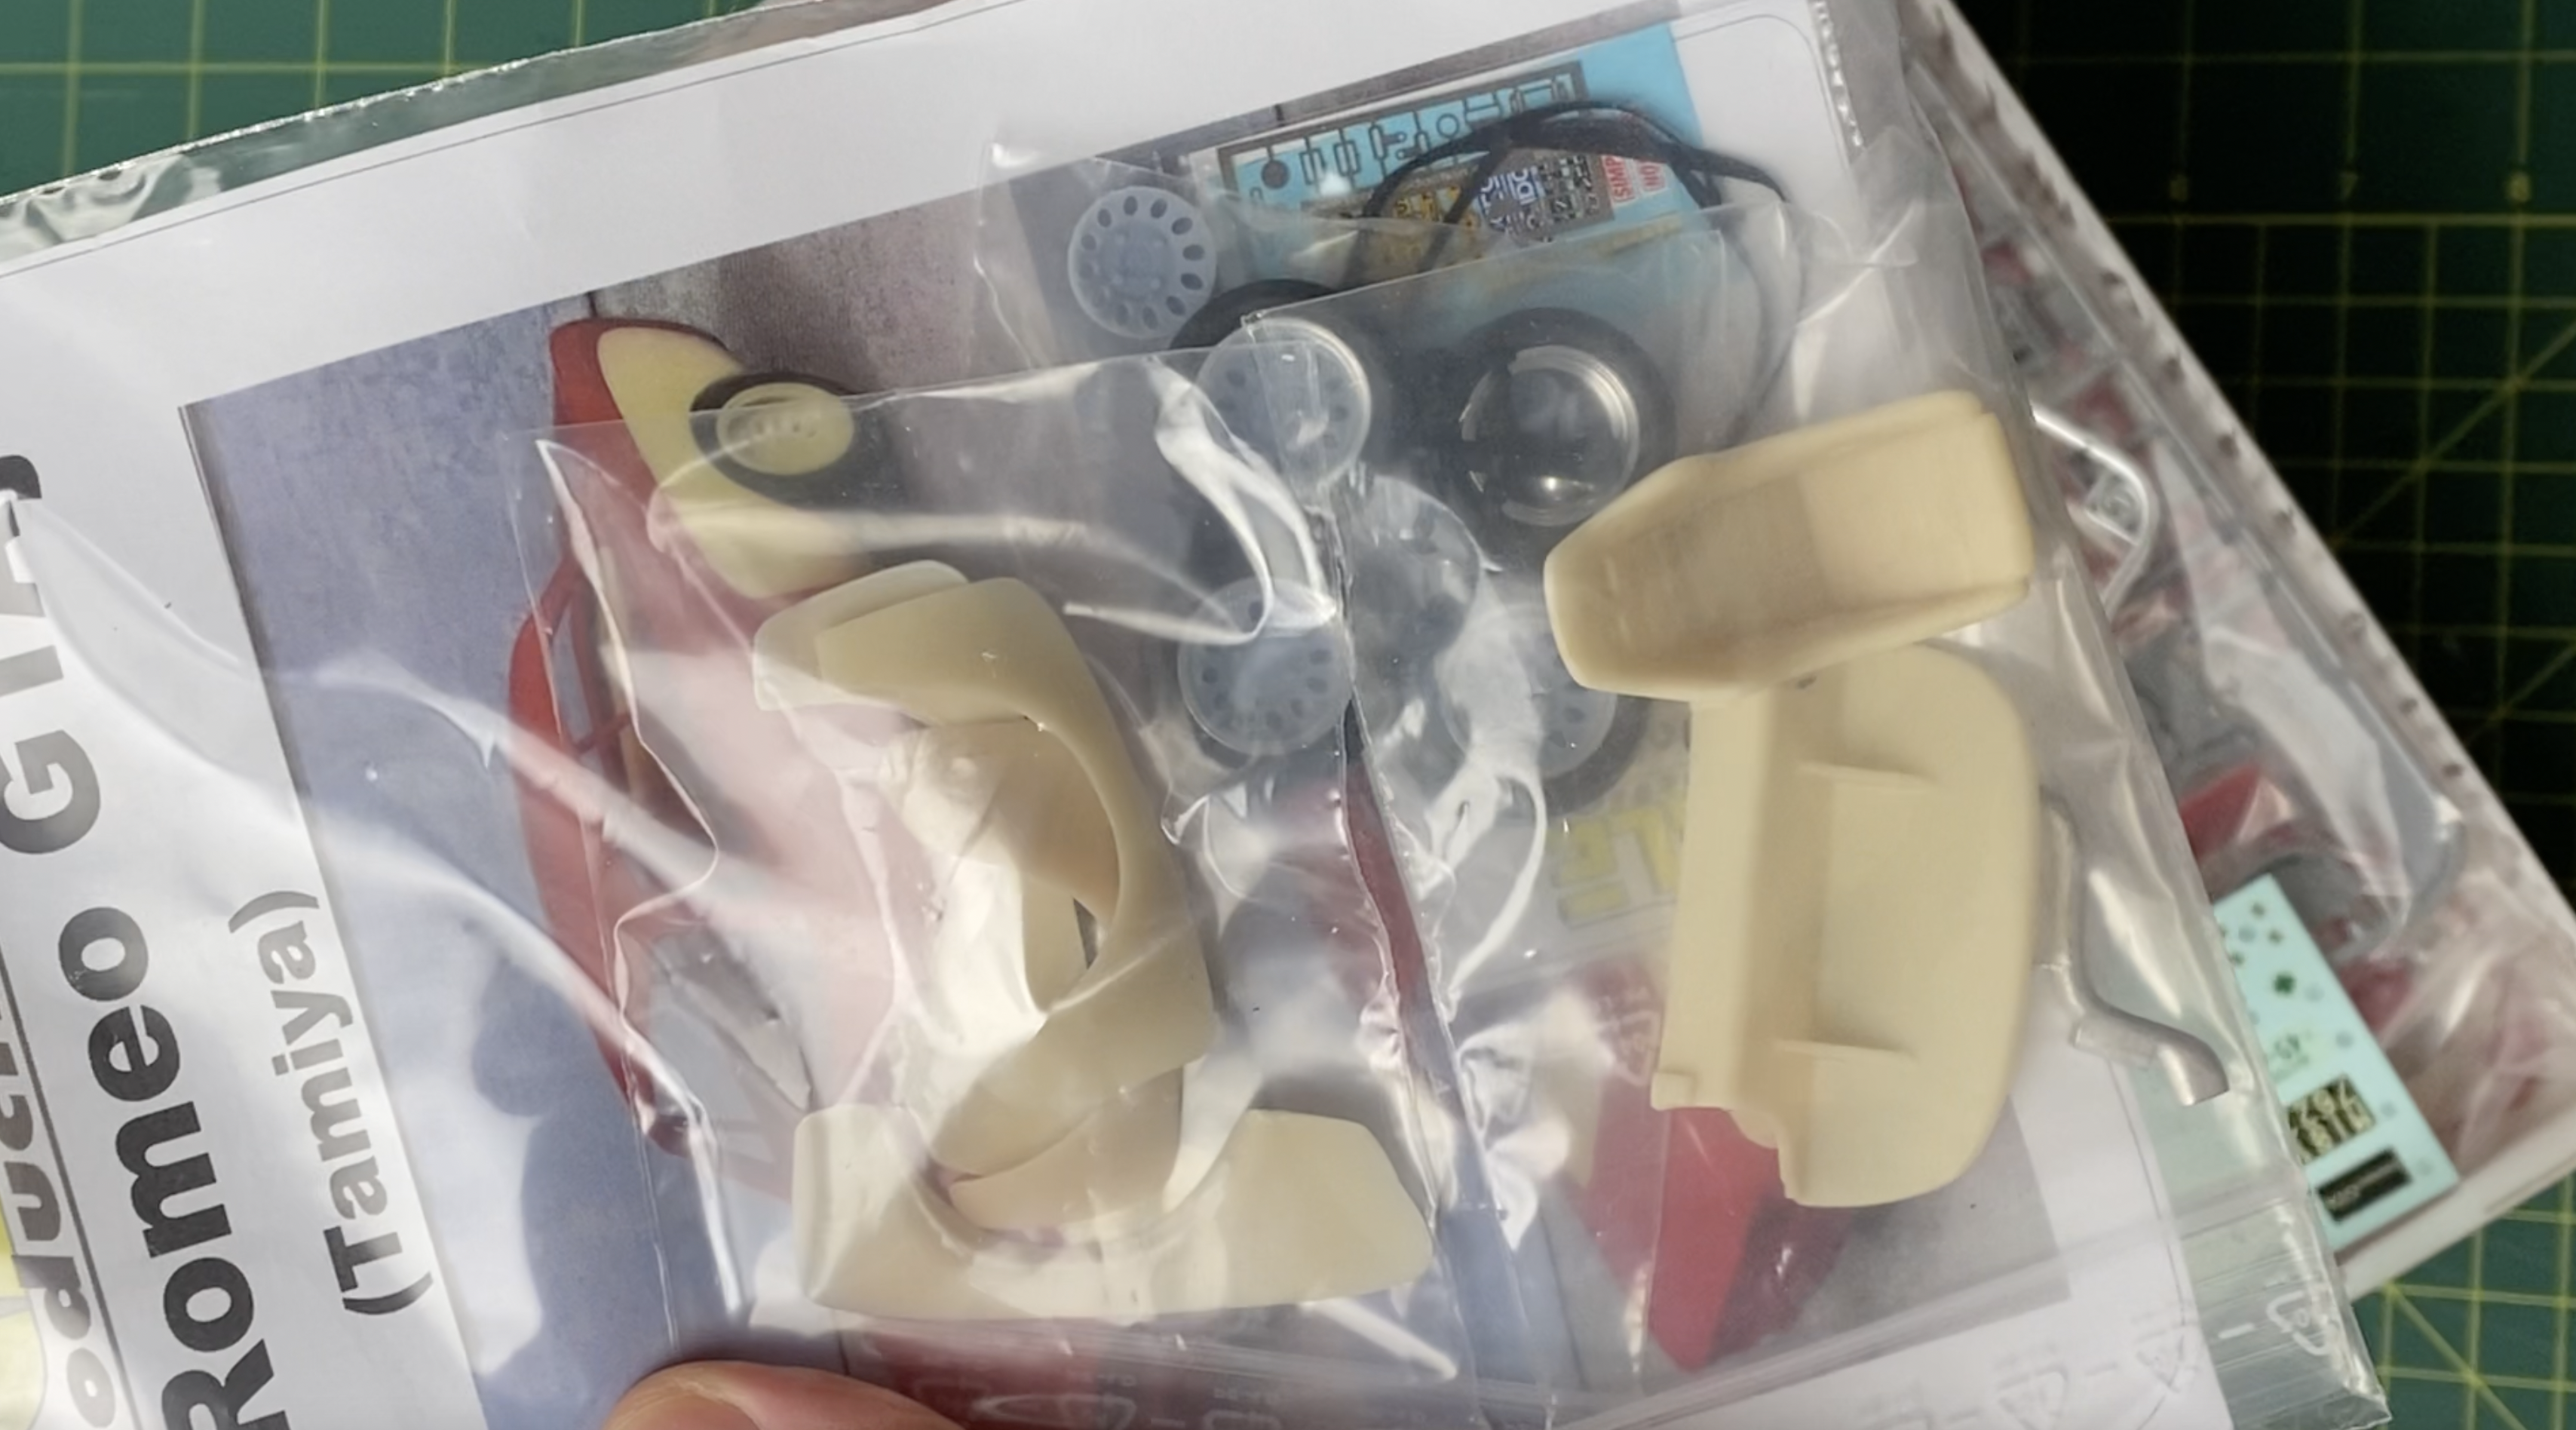
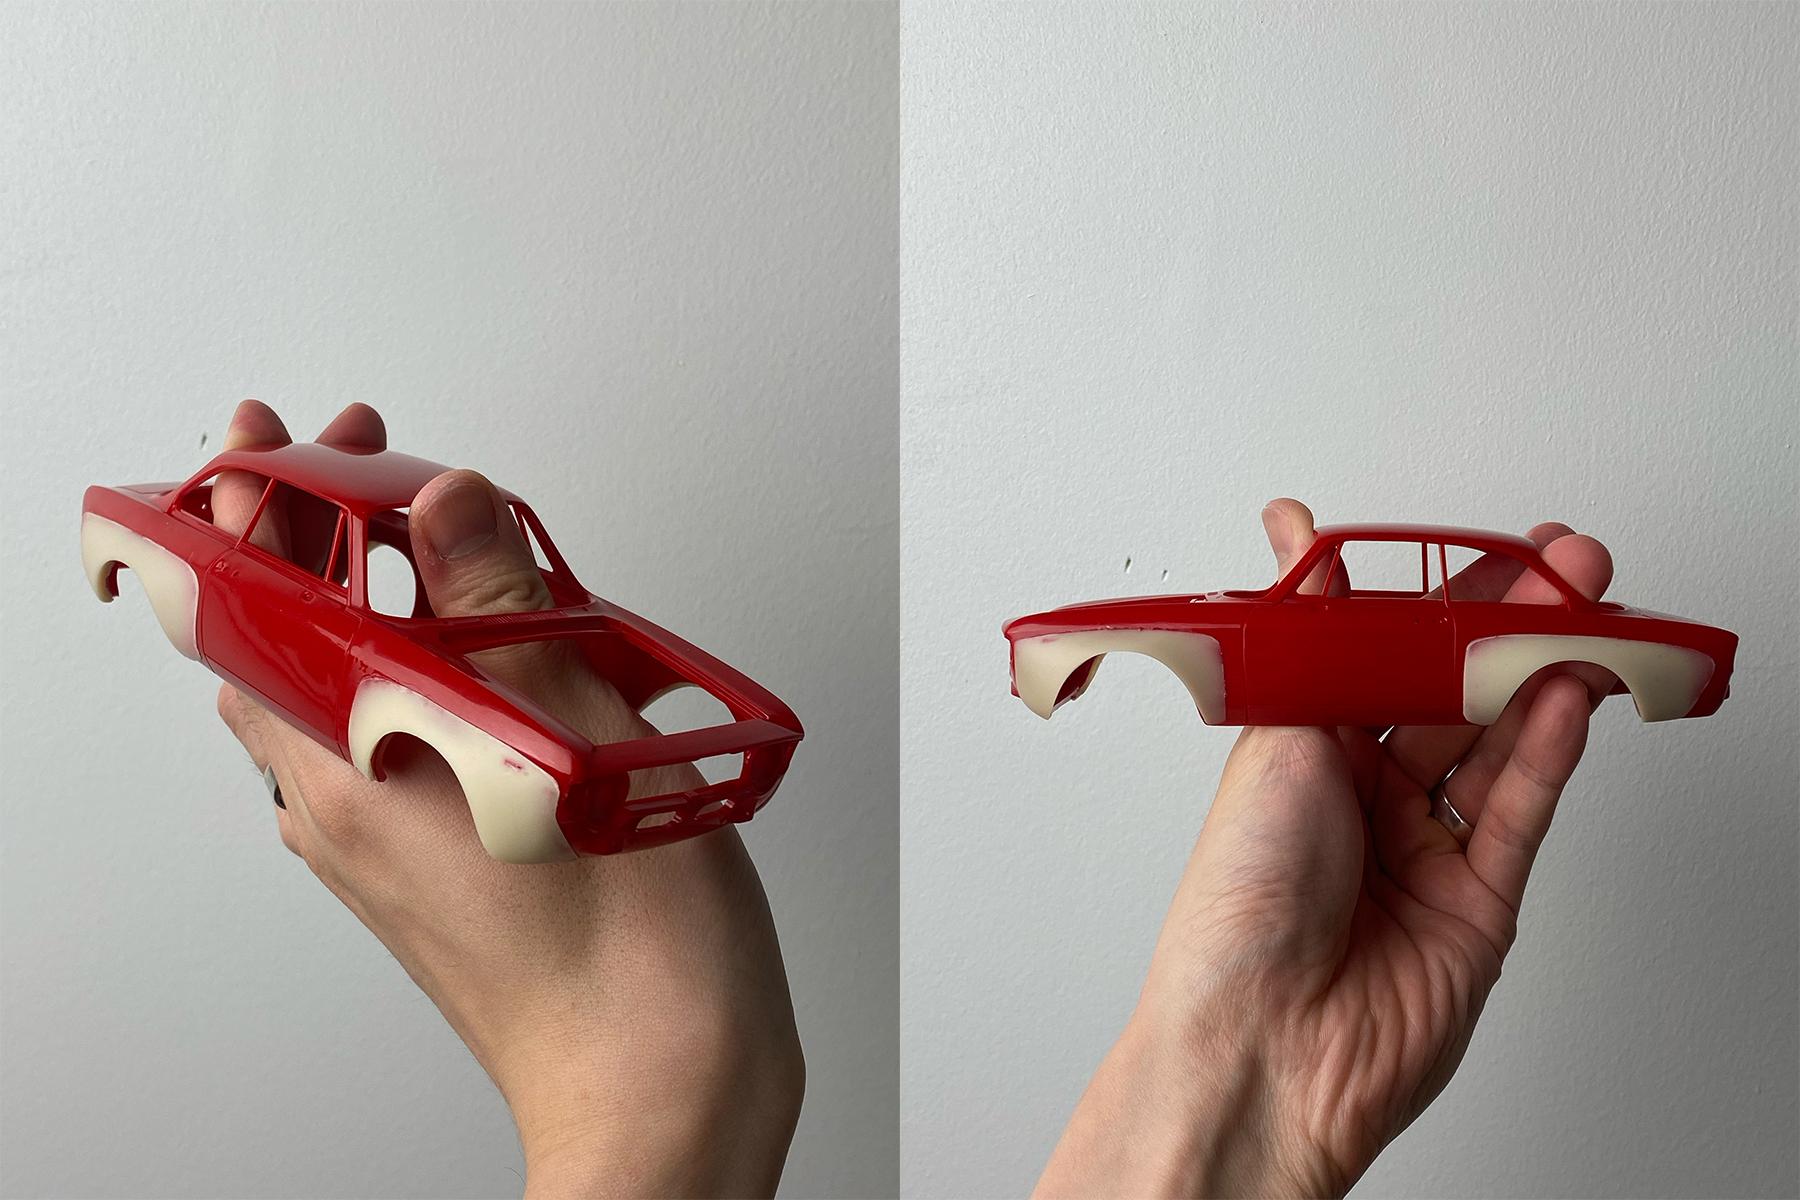
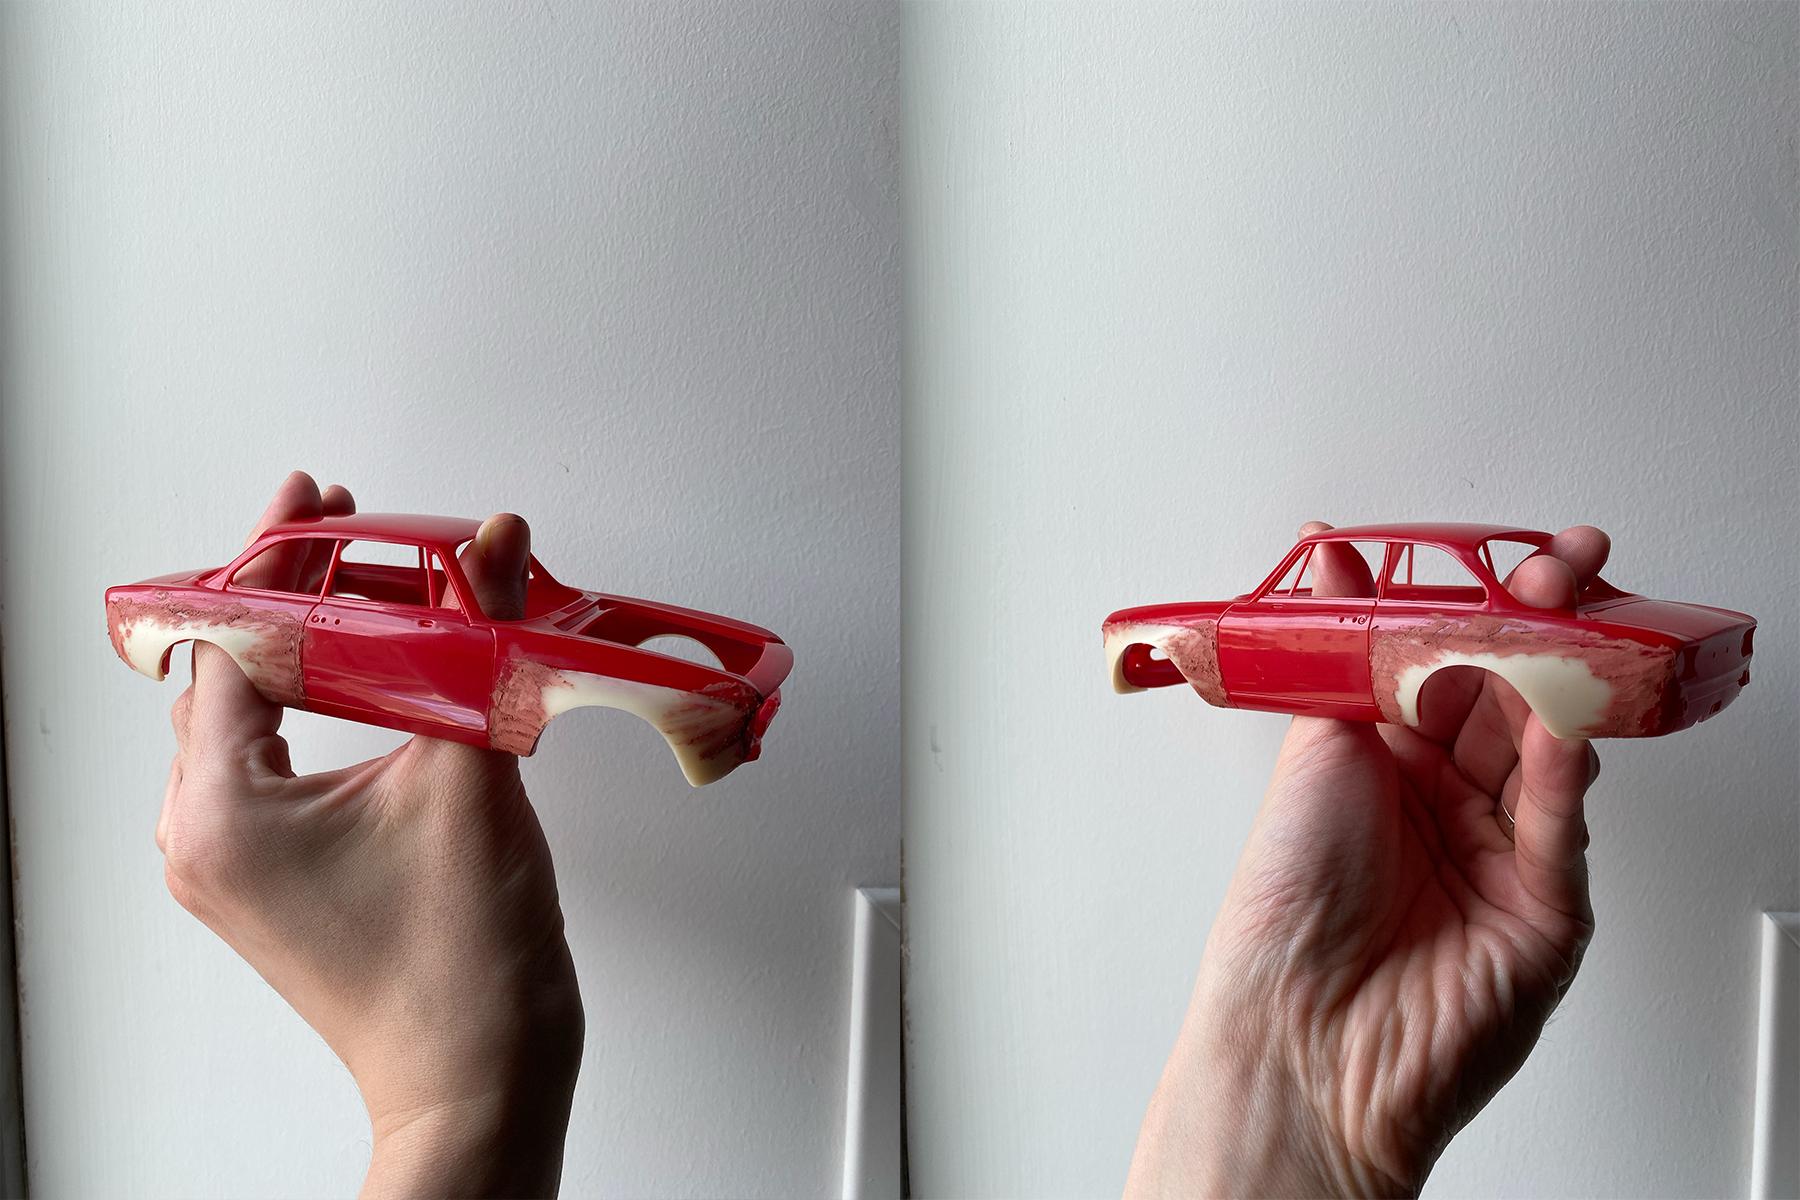
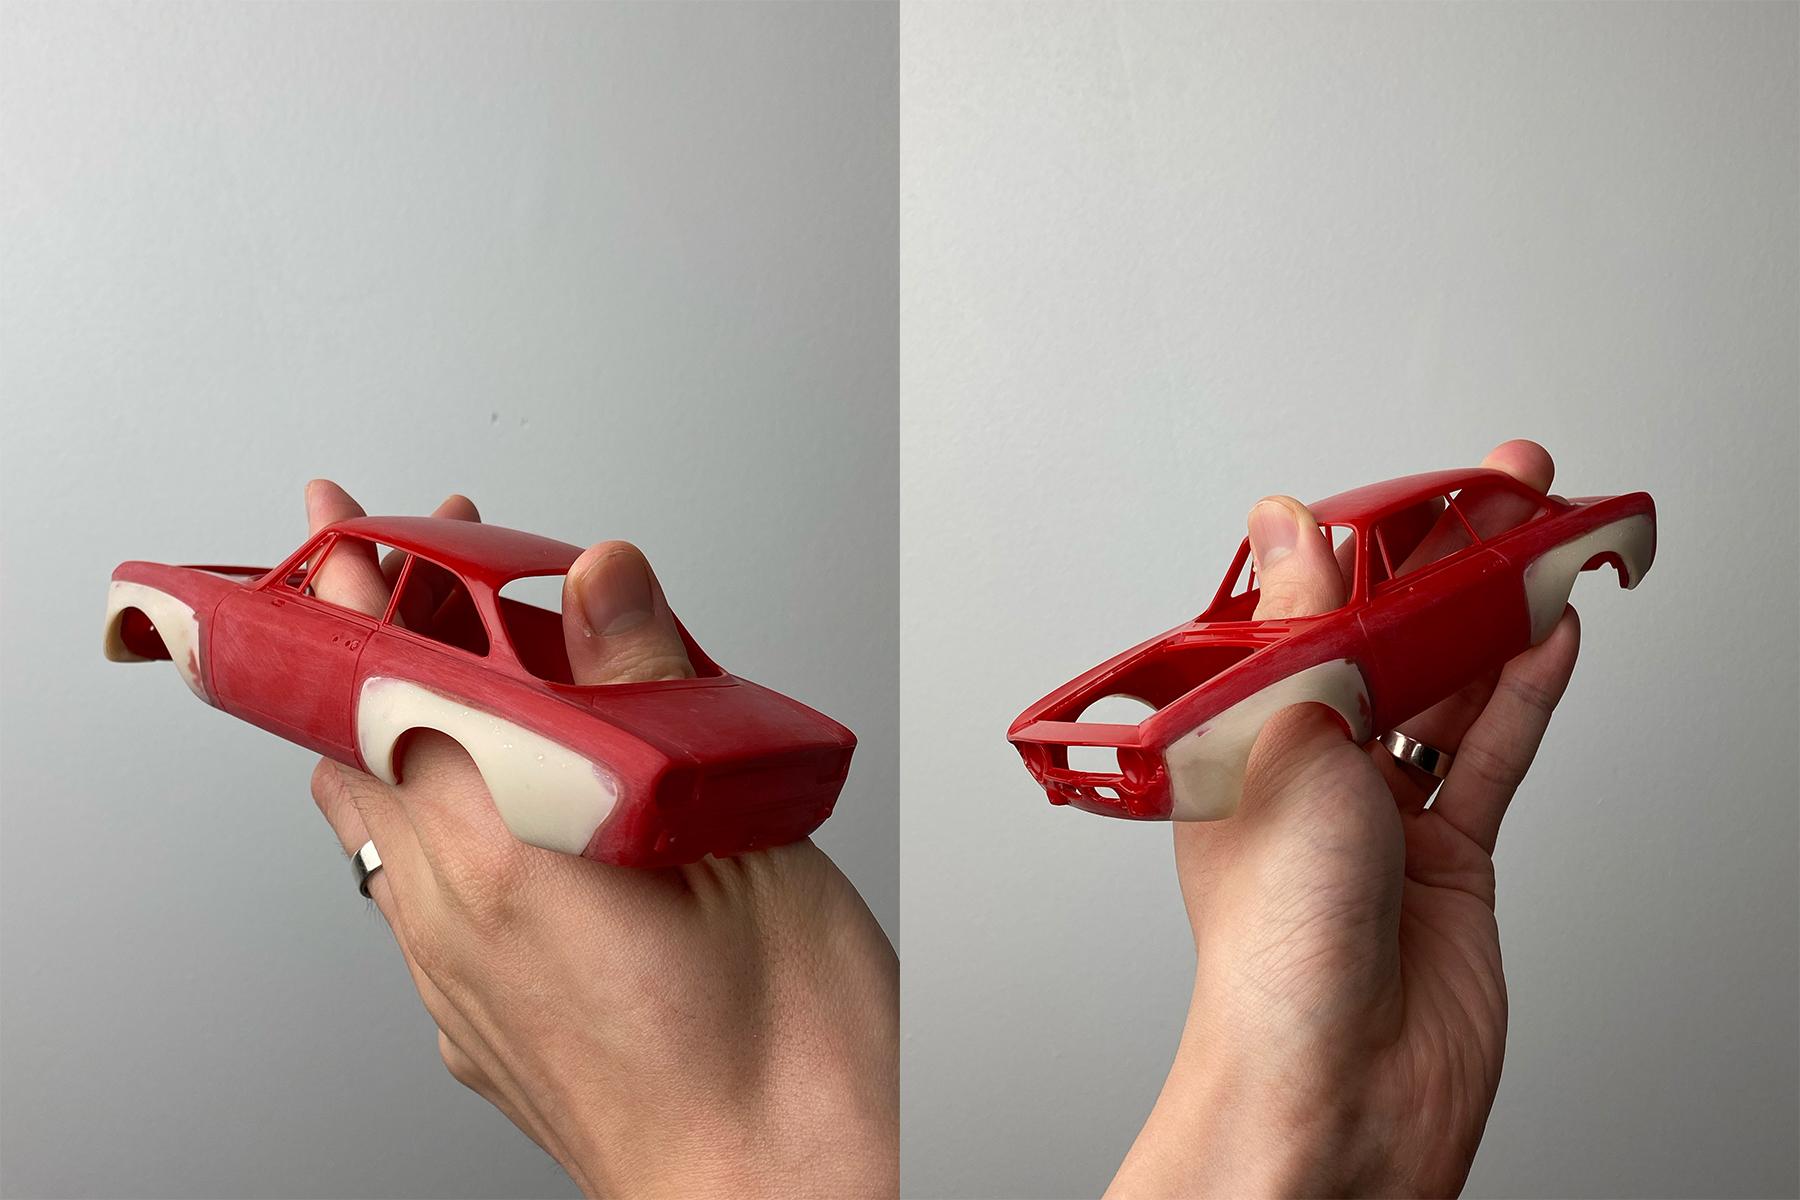
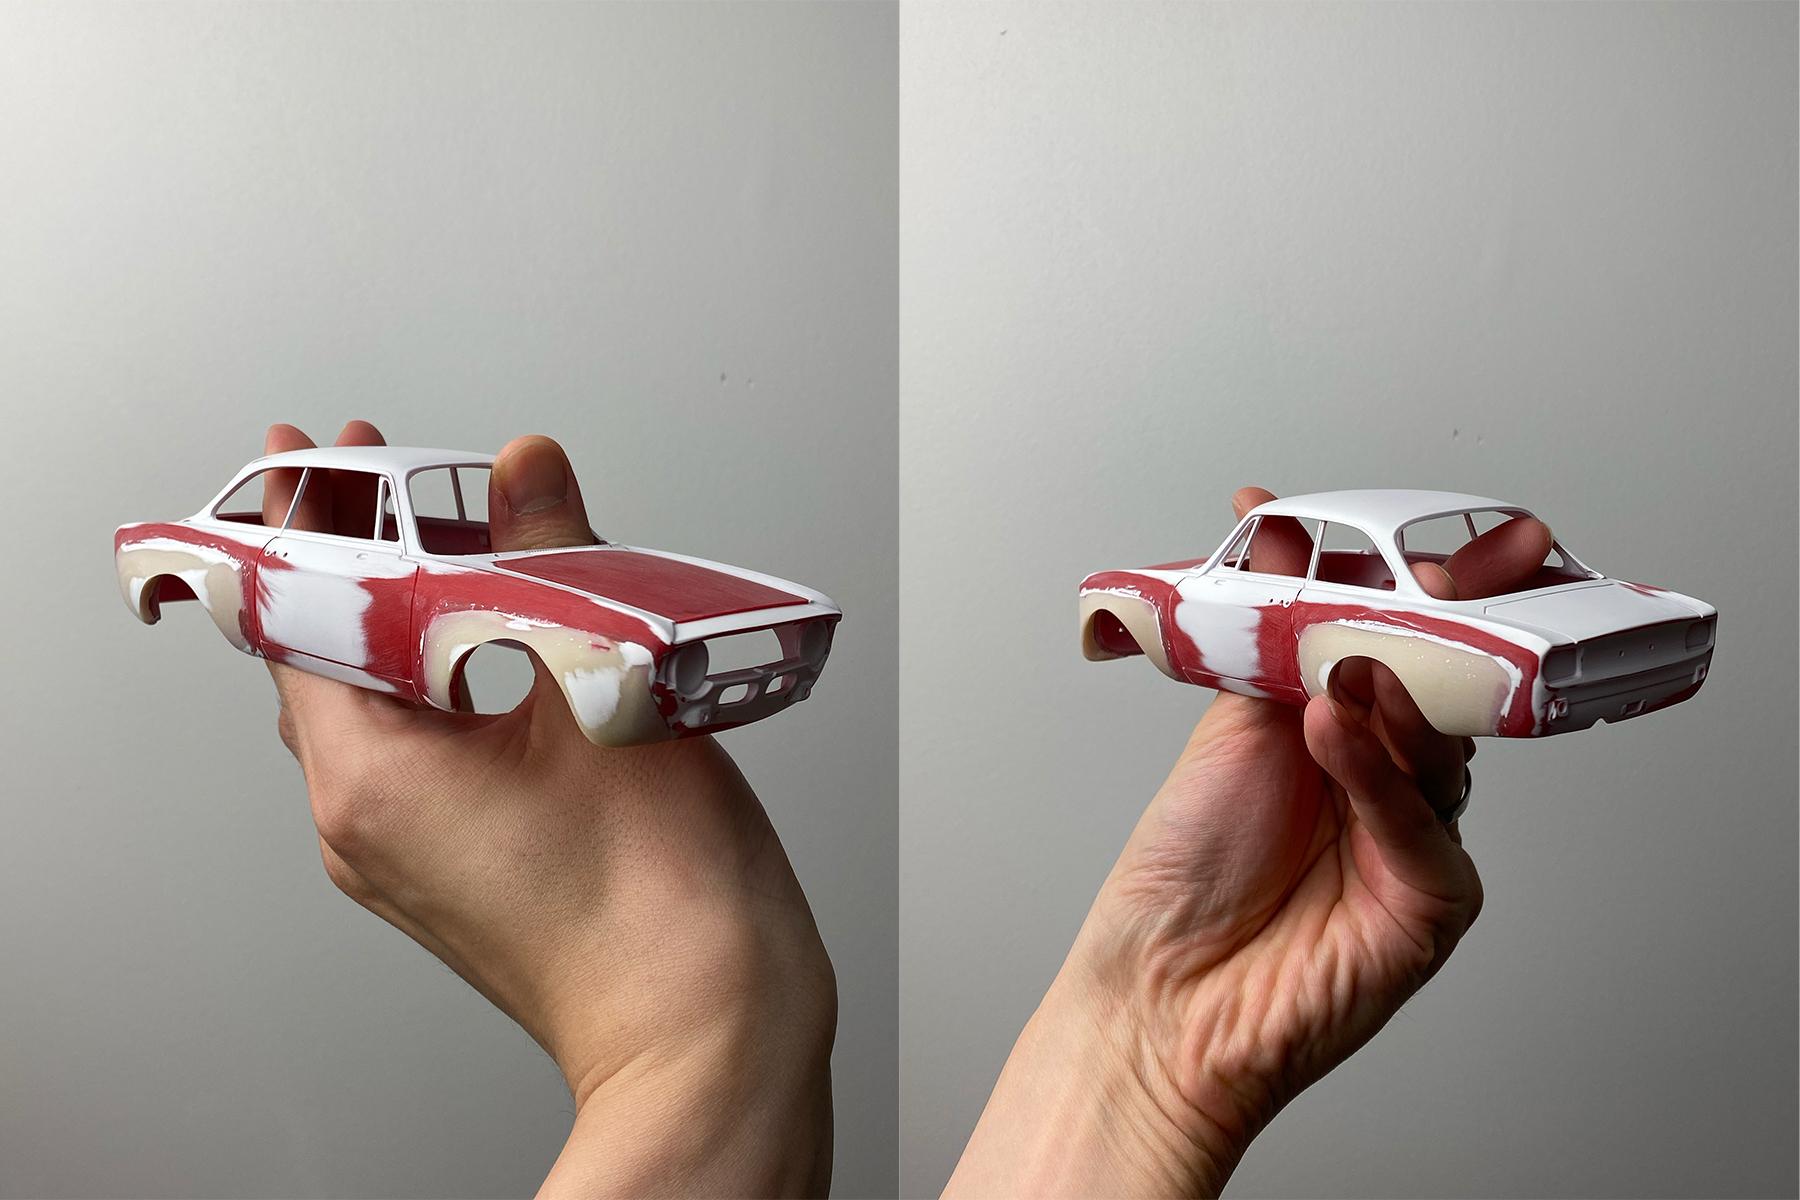
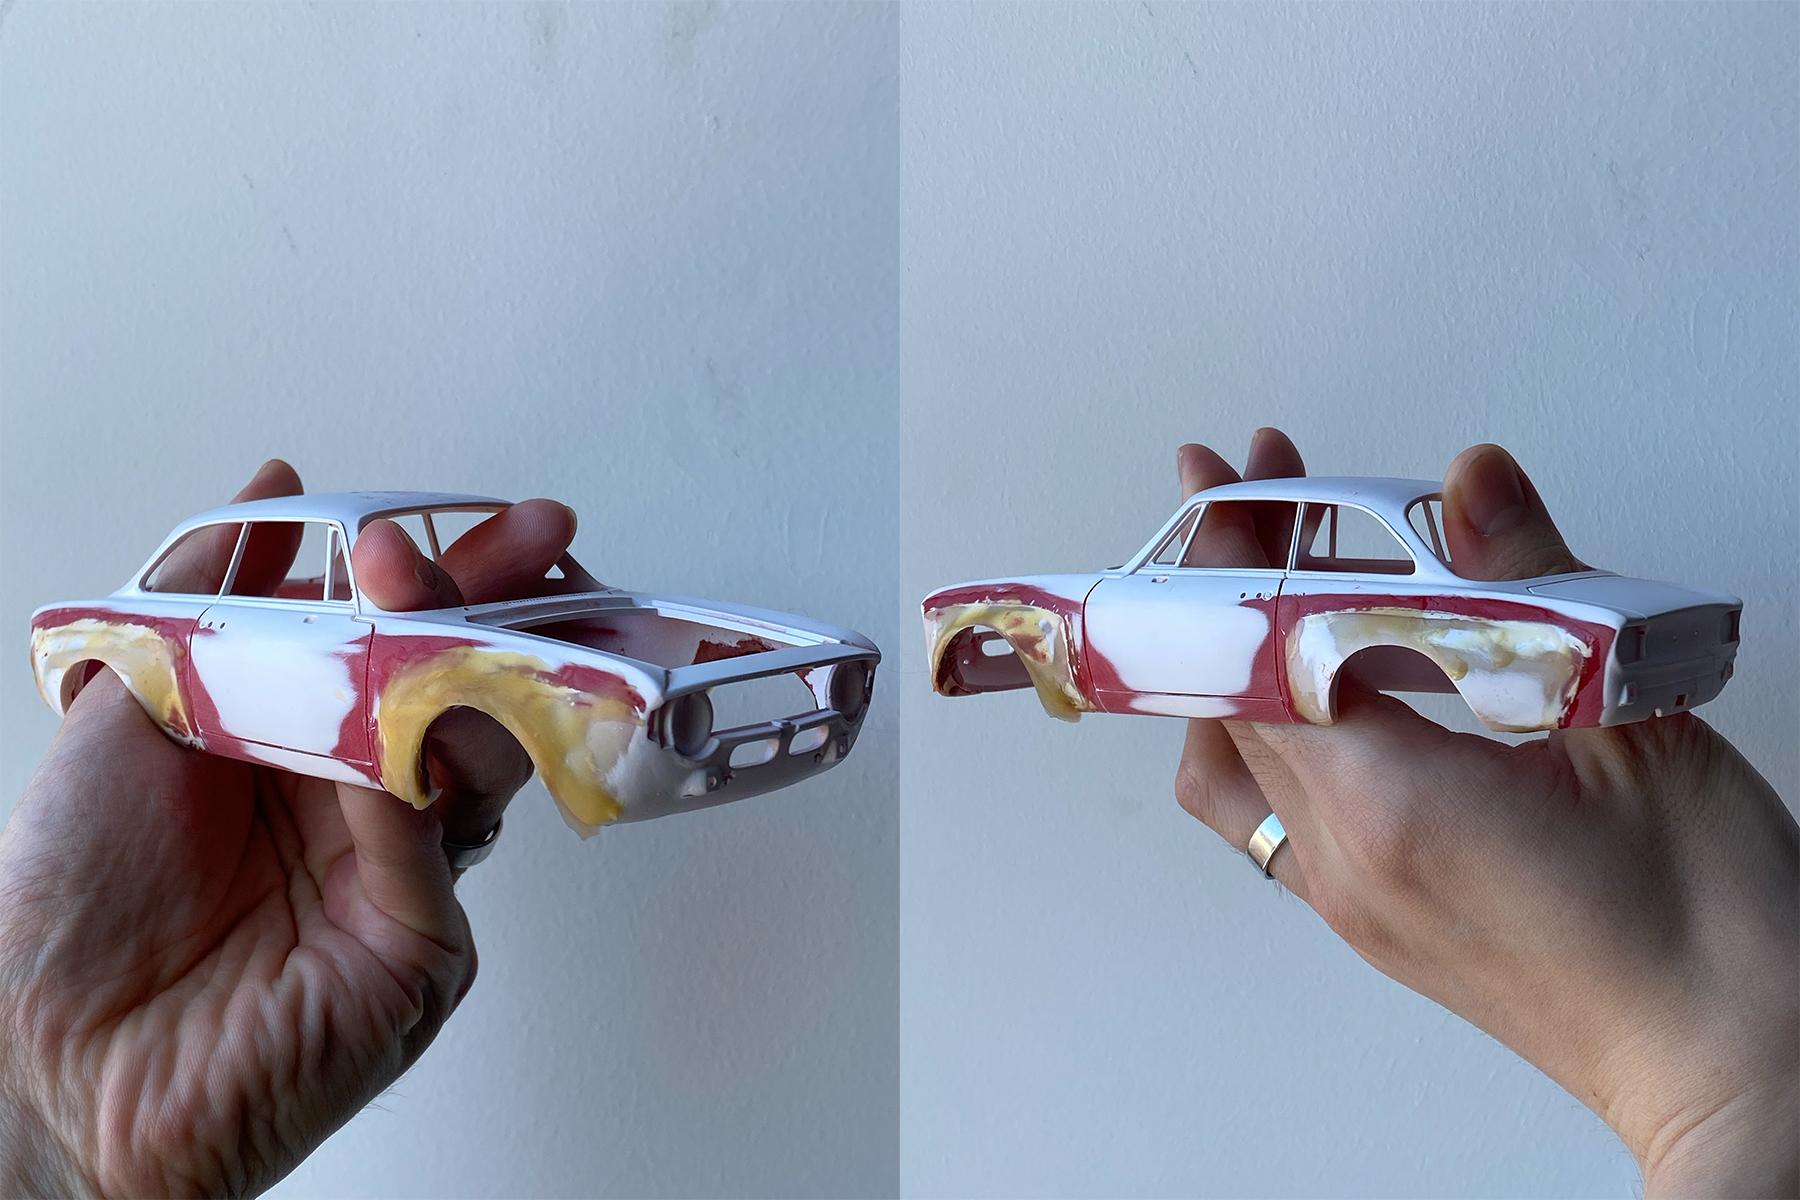
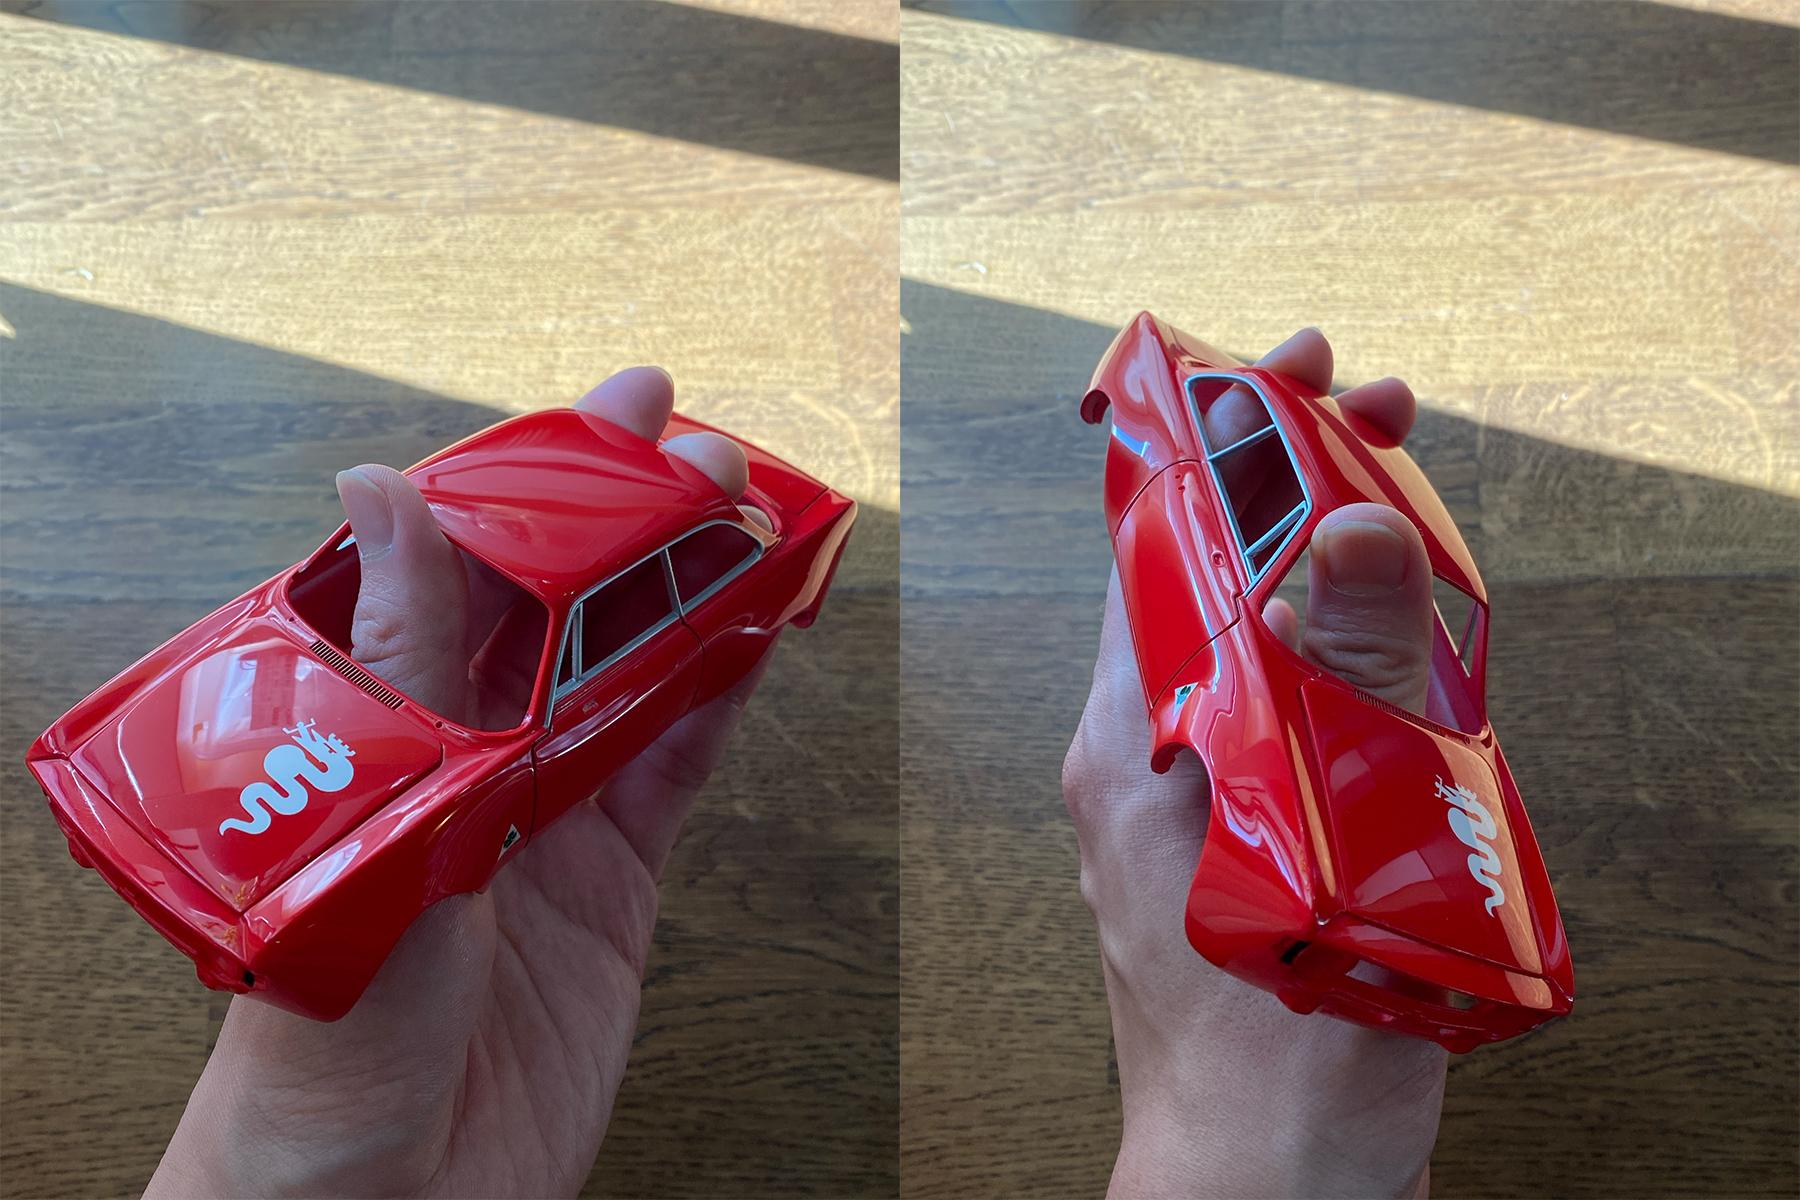
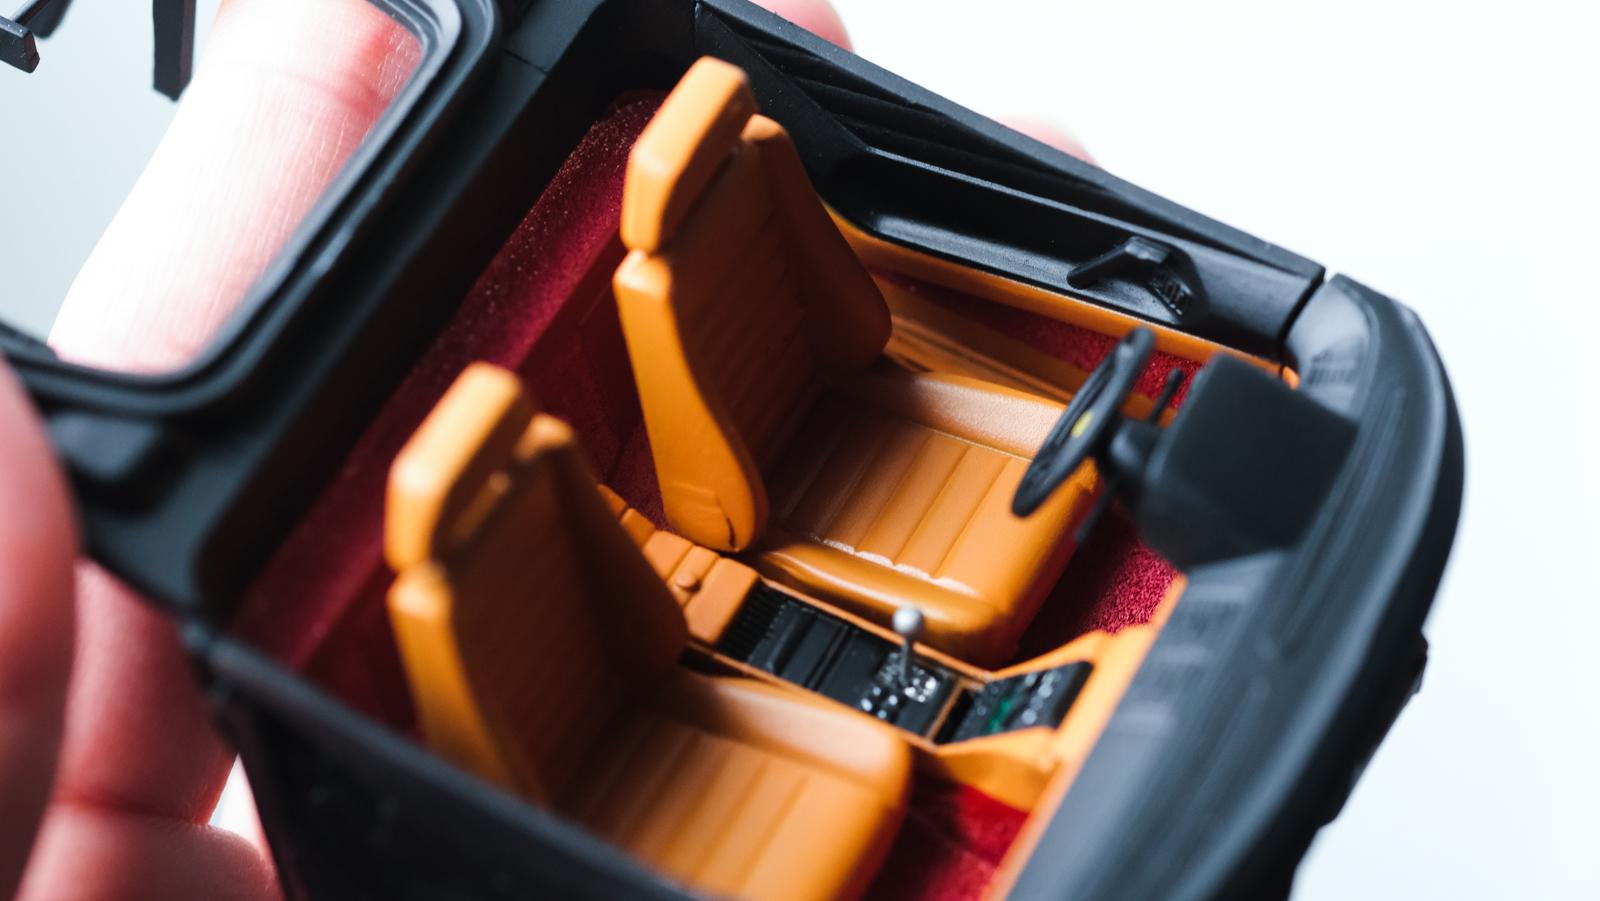
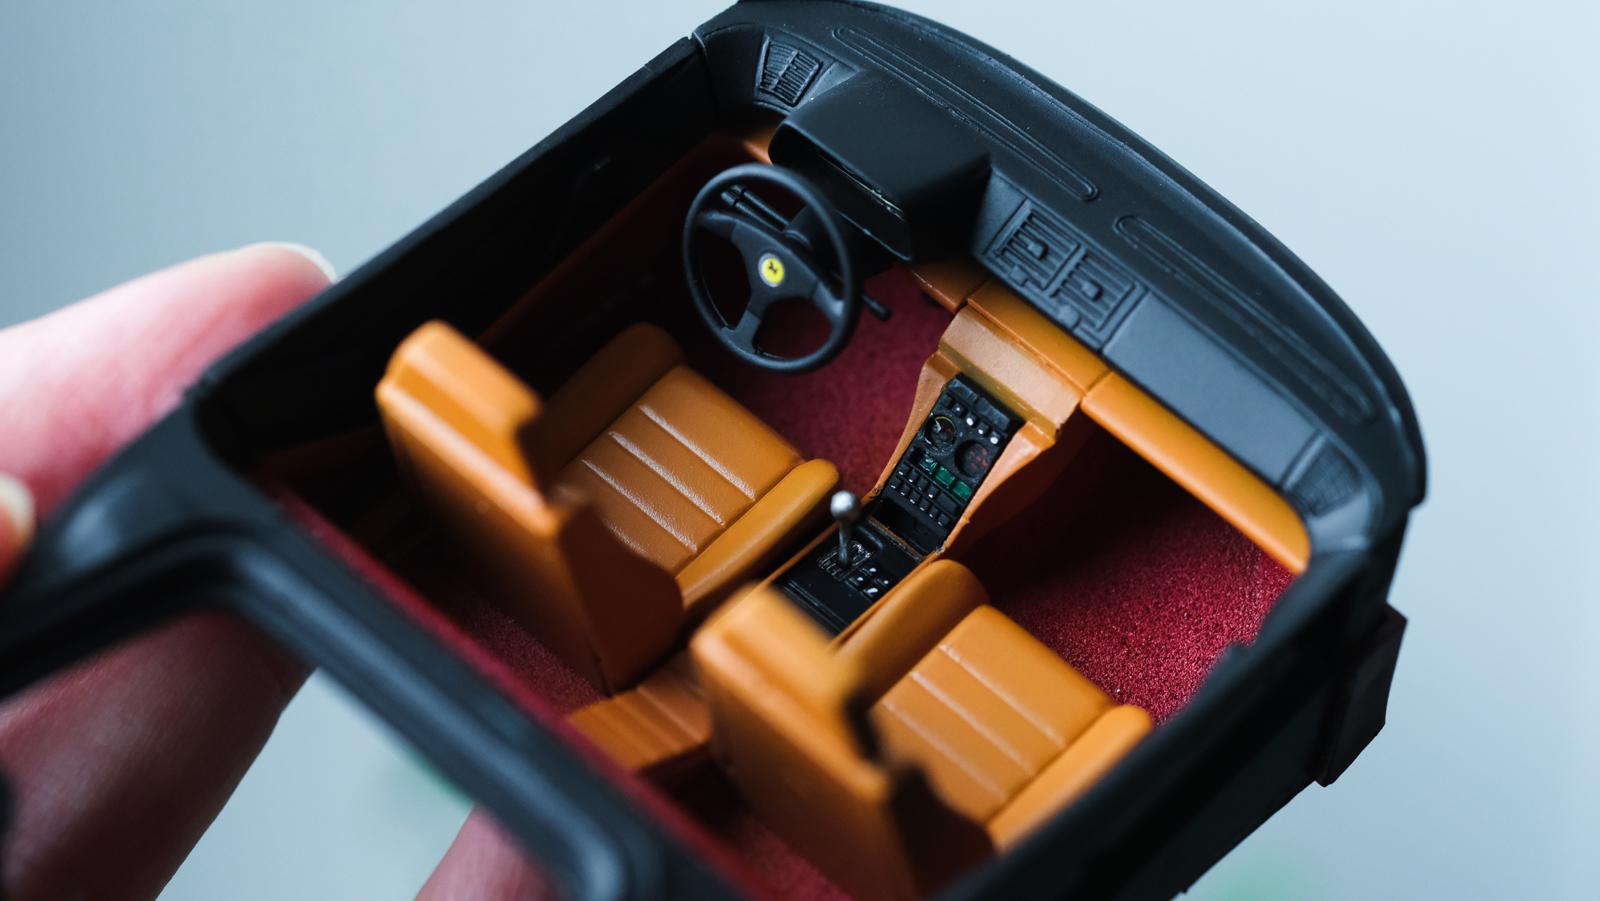
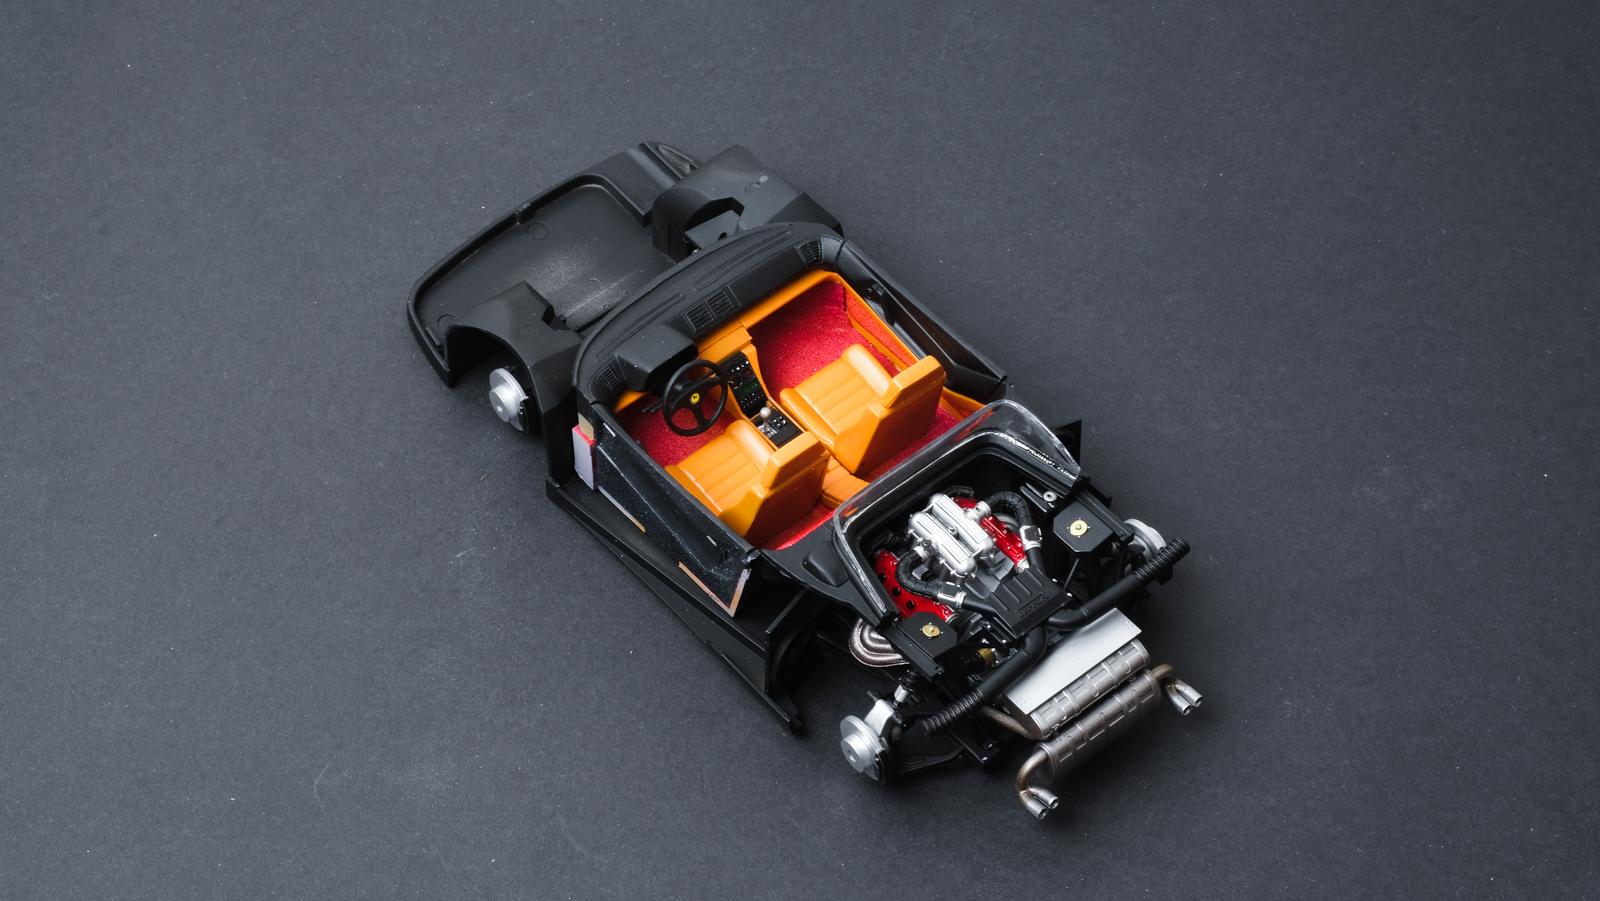
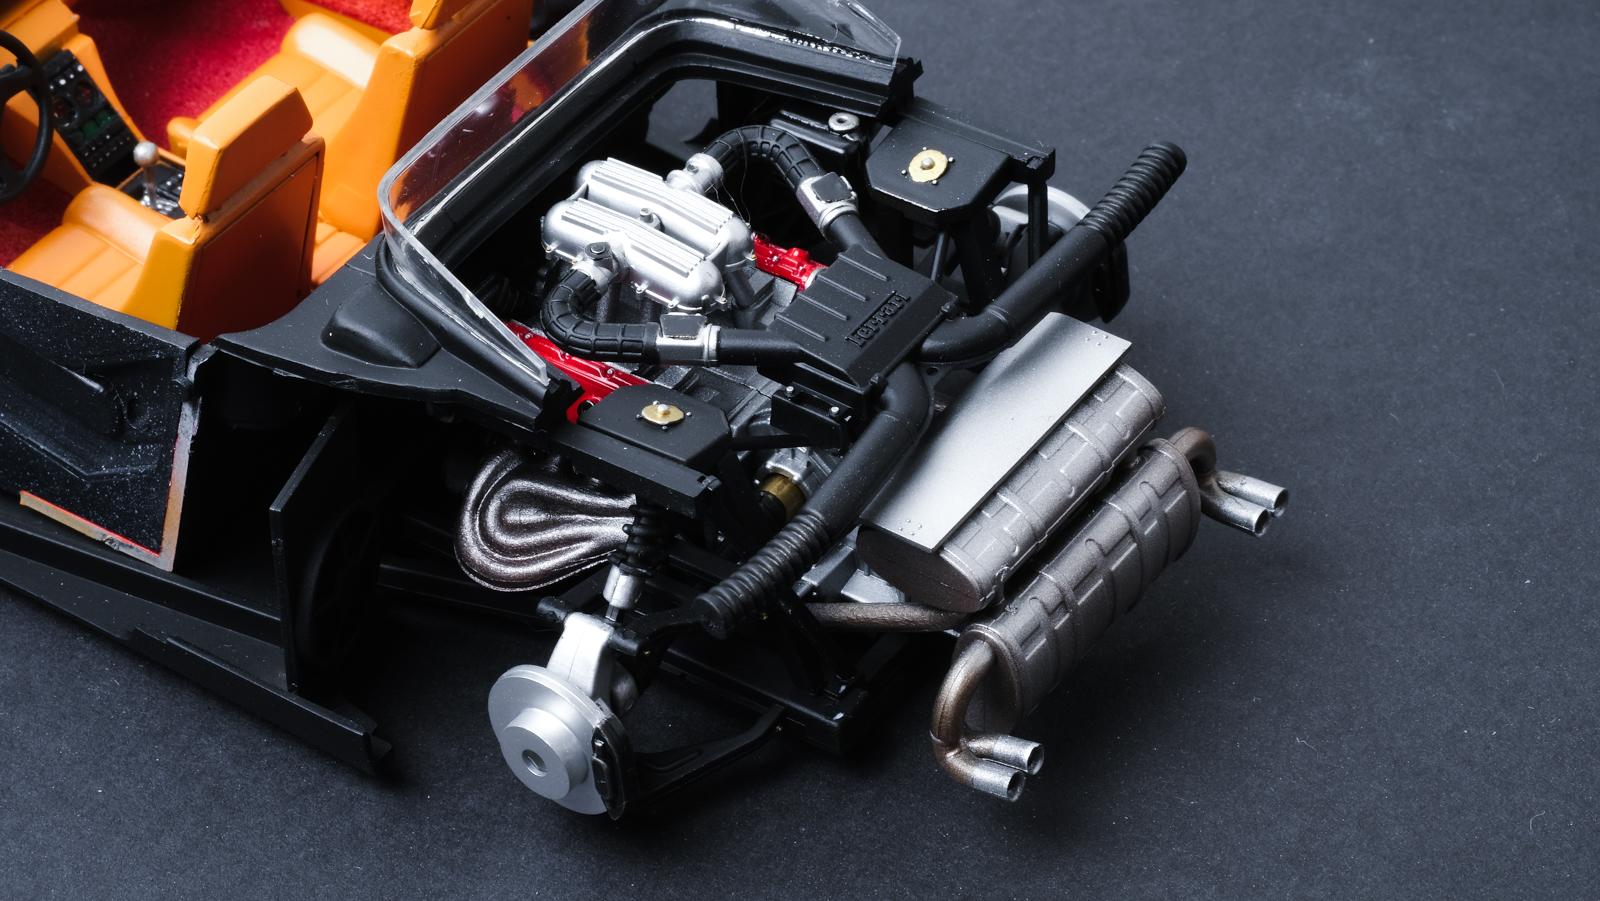
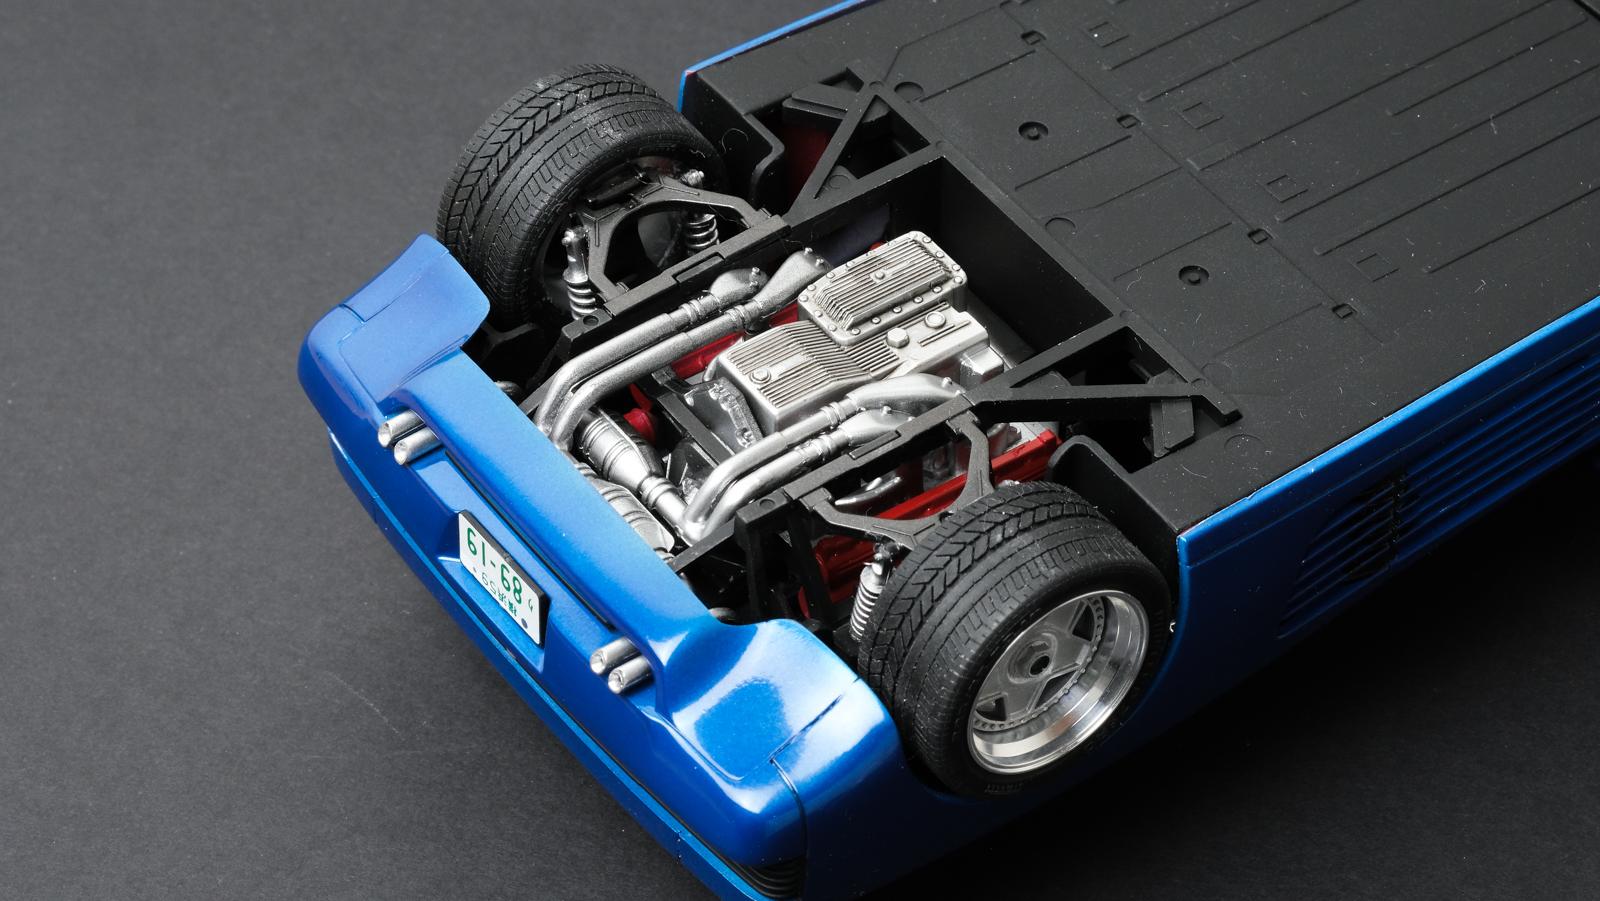
Hi all, Here’s my finished Alfa Romeo GTA 1300 Junior build! I bought the transkit from Scaleproduction long time ago and bought the Tamiya kit last year for almost $200. I had some ambitious plans but the resin fenders look quite different to the actual car, and it took too many correction to smooth out the part where the fender and body met, making the paint too thick with excessive use of primer. By the time I cracked the quarter panel, I just focused on getting it to the finish line. Here’s the full build detail: Glued resin fender > added putty > wet sanded with 800 and 1200 grit > added surfacer > inspected and repeated the process about 5 times Added Mr color’s Italian red > 1st clear coat > added decal > wet-sanded between 2~3rd clear coats to even out the decal with rest of surface Dried for 1 month > wet-sanded with 3000 and 5000 grit > polished with tamiya three-stage compounds Cracked the fender > maked the panel and did partial respray > dried for 3 weeks and re-polished the paint Made 5 point harness Painted woodgrain by airbrushing brown, dry-brushing with darker brown and finishing with clear coat Modified stock airbox to open type with putty and added ignition wires Used bucket seat, side exit muffler, and wheels from the transkit Made 5 point rollcage with styrene rods It’s definitely not my best work but I’m glad I finished it!

- 22 replies
-
- 13
-

-
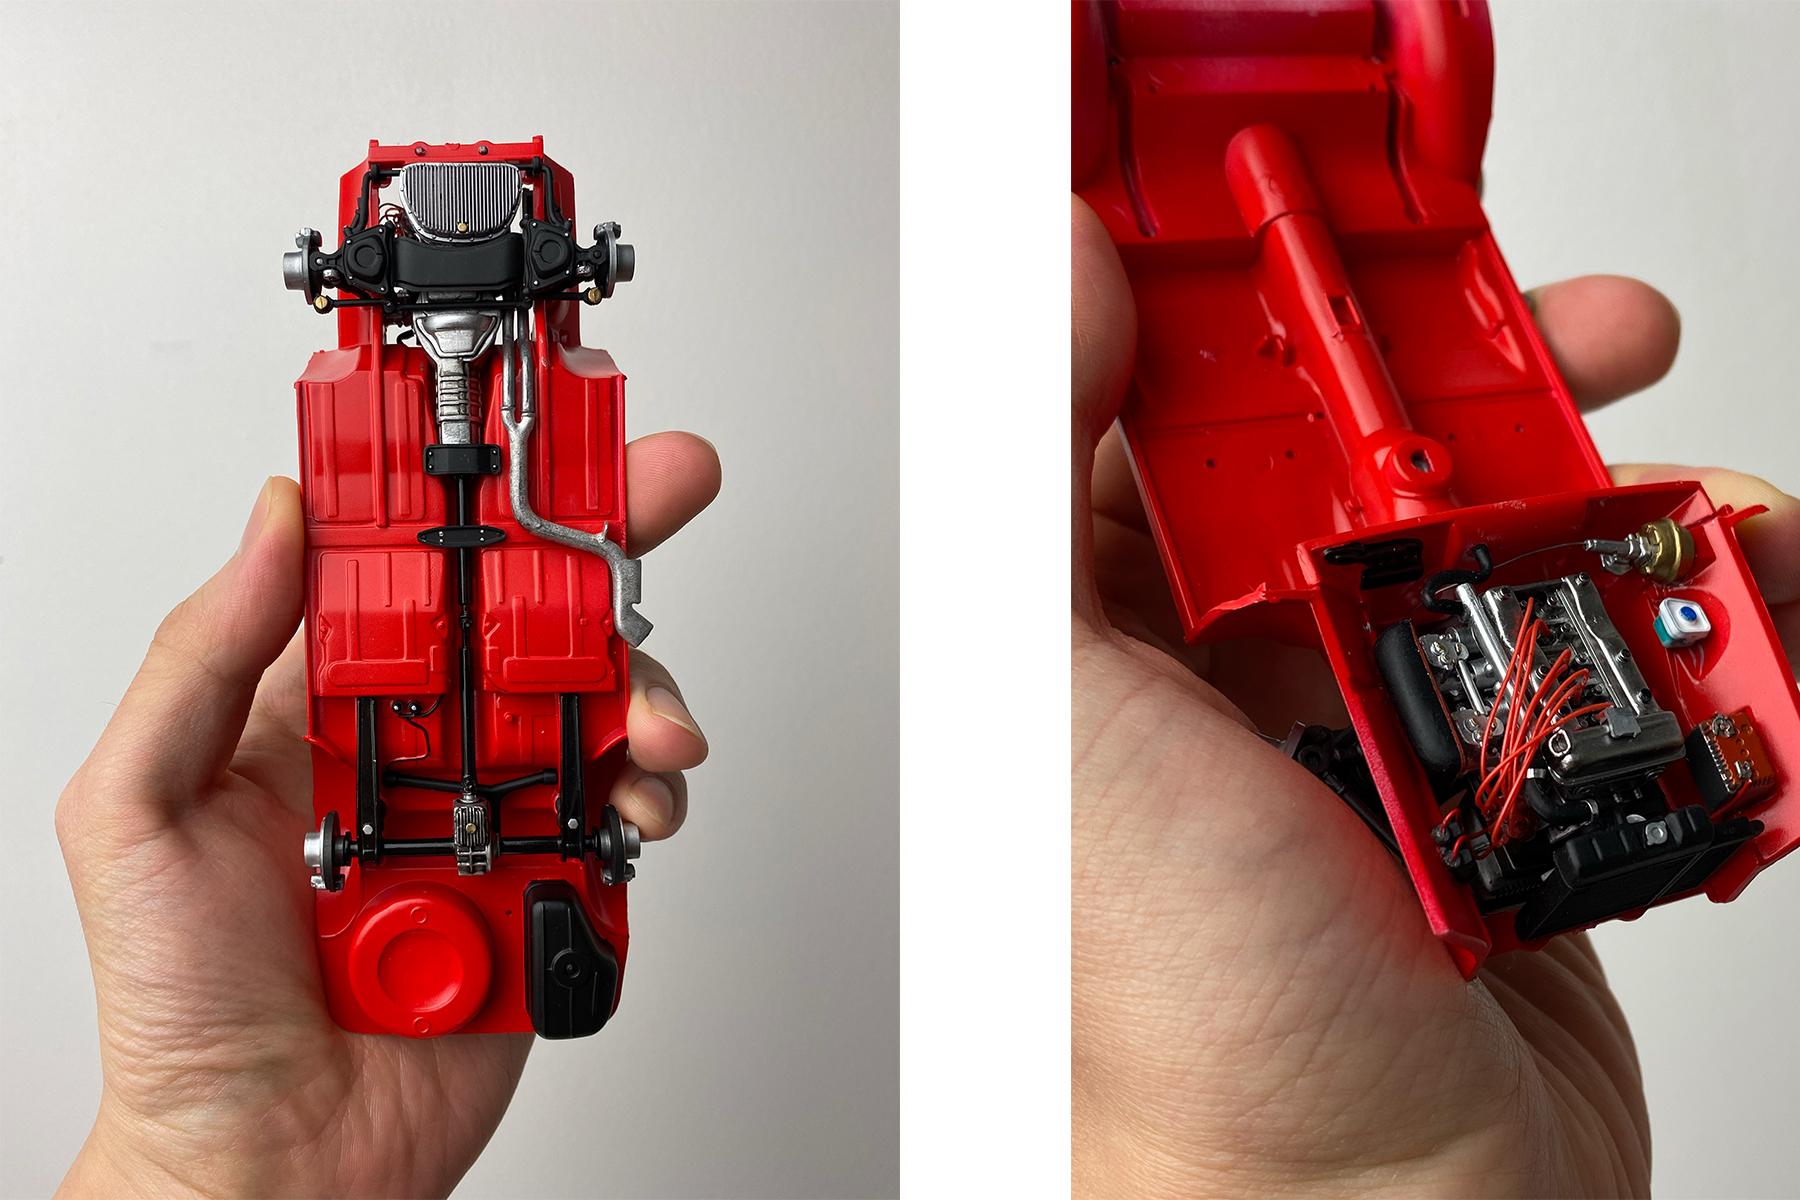
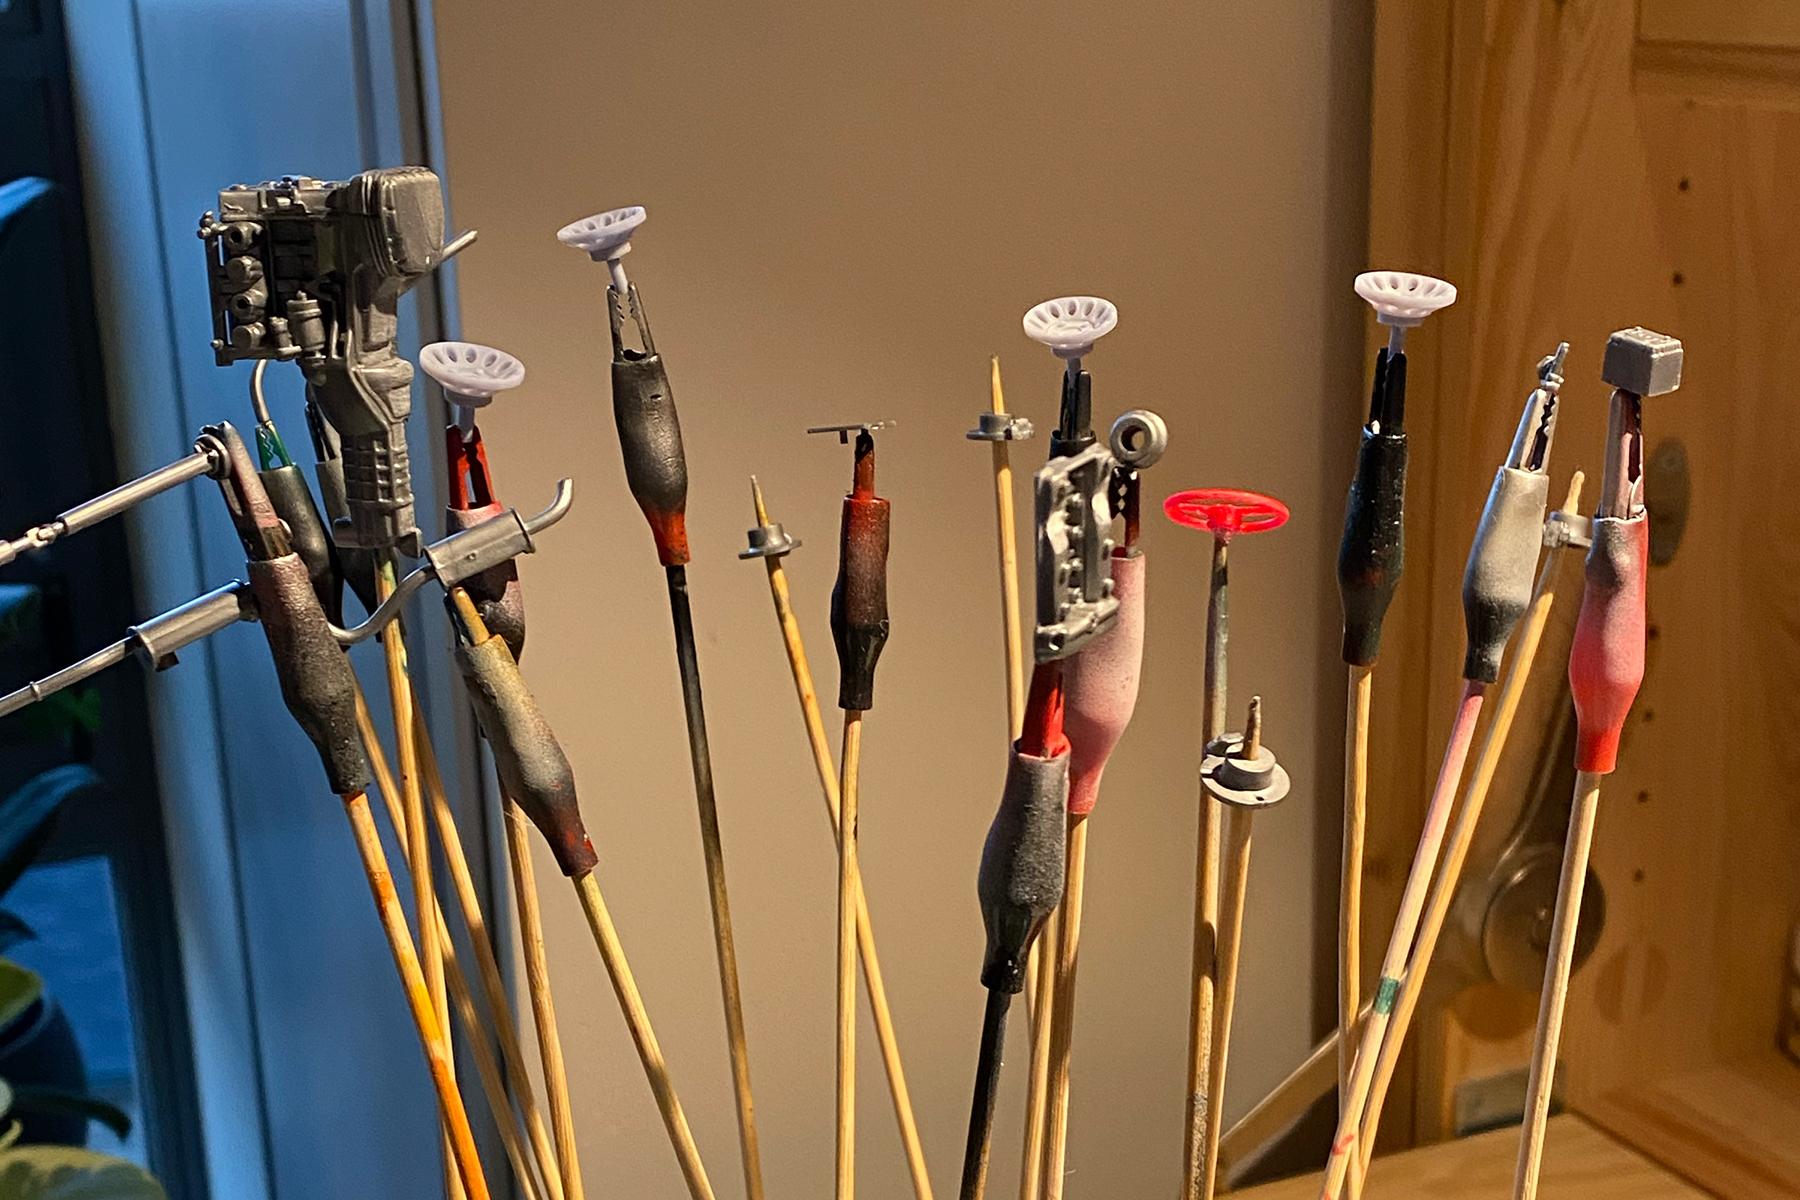
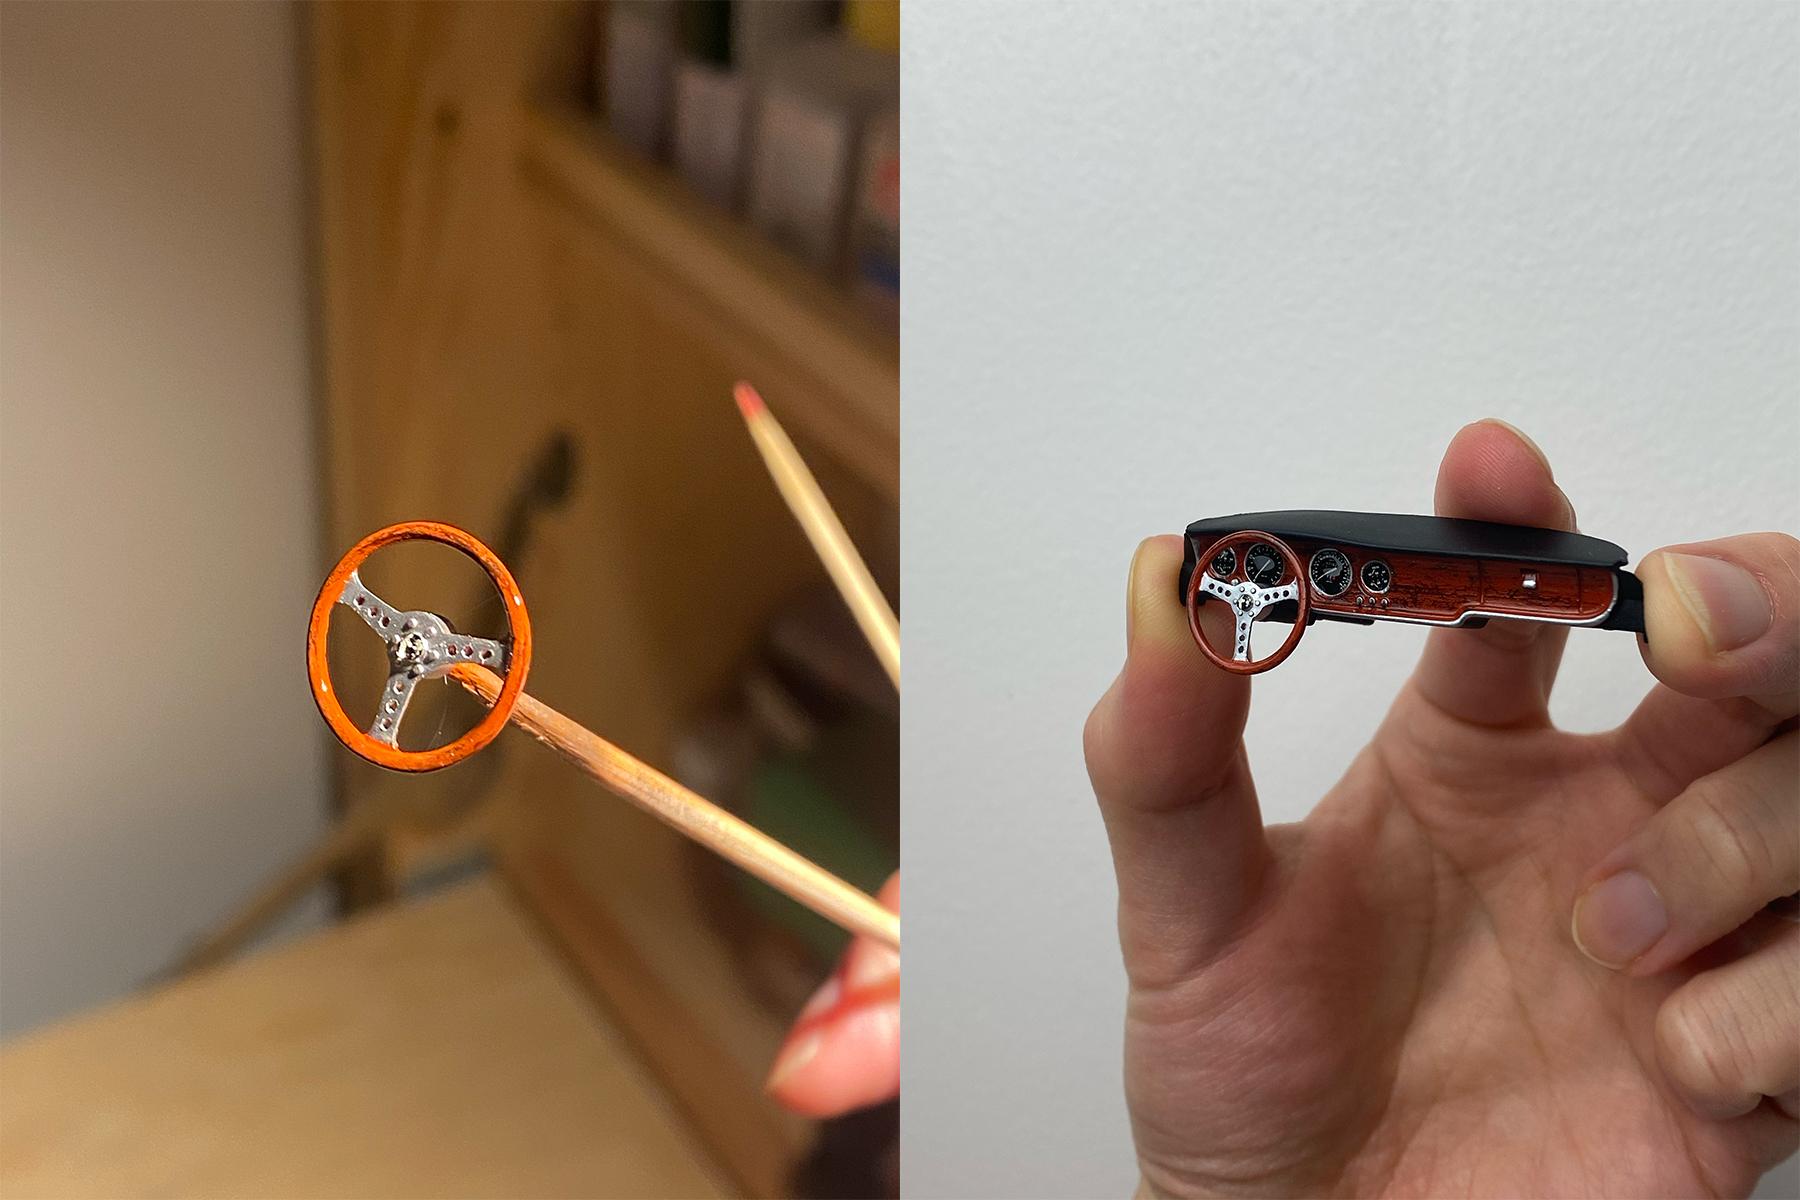
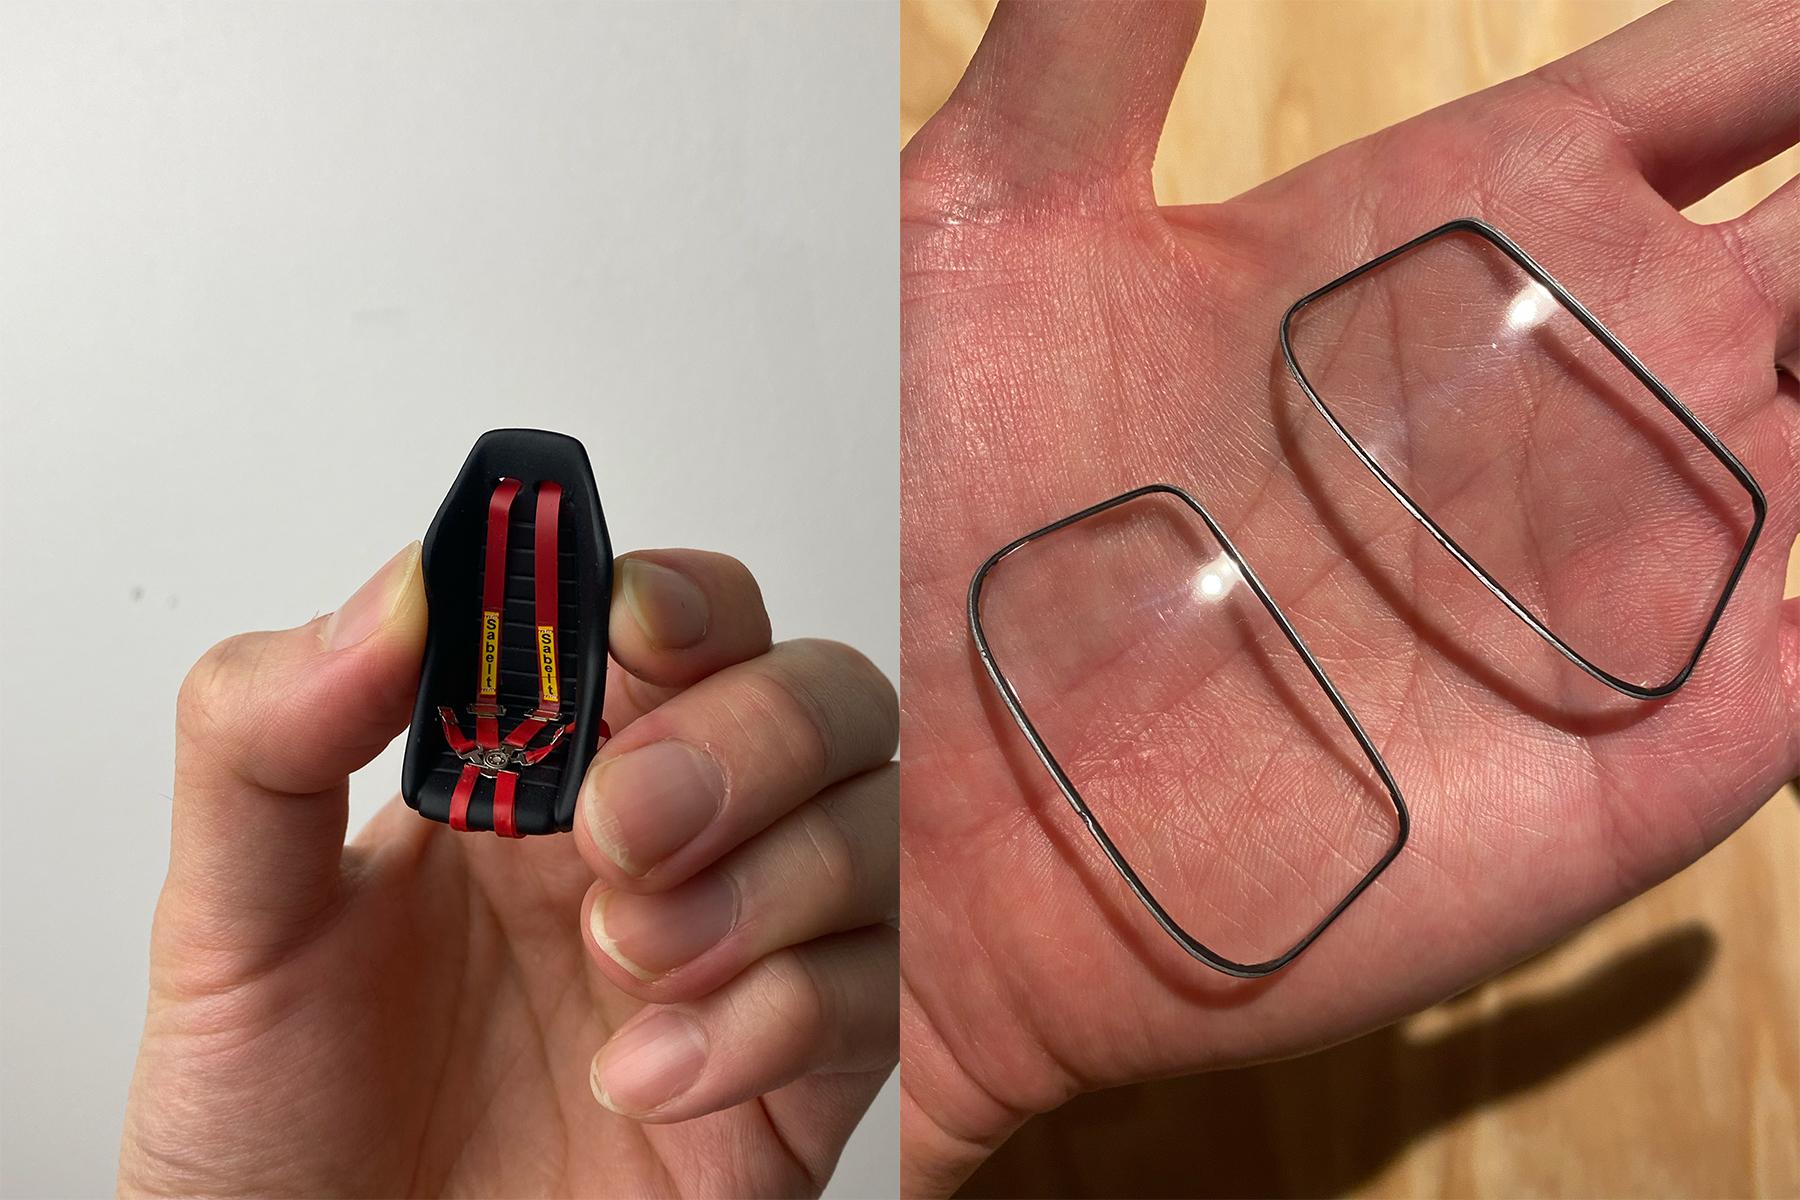
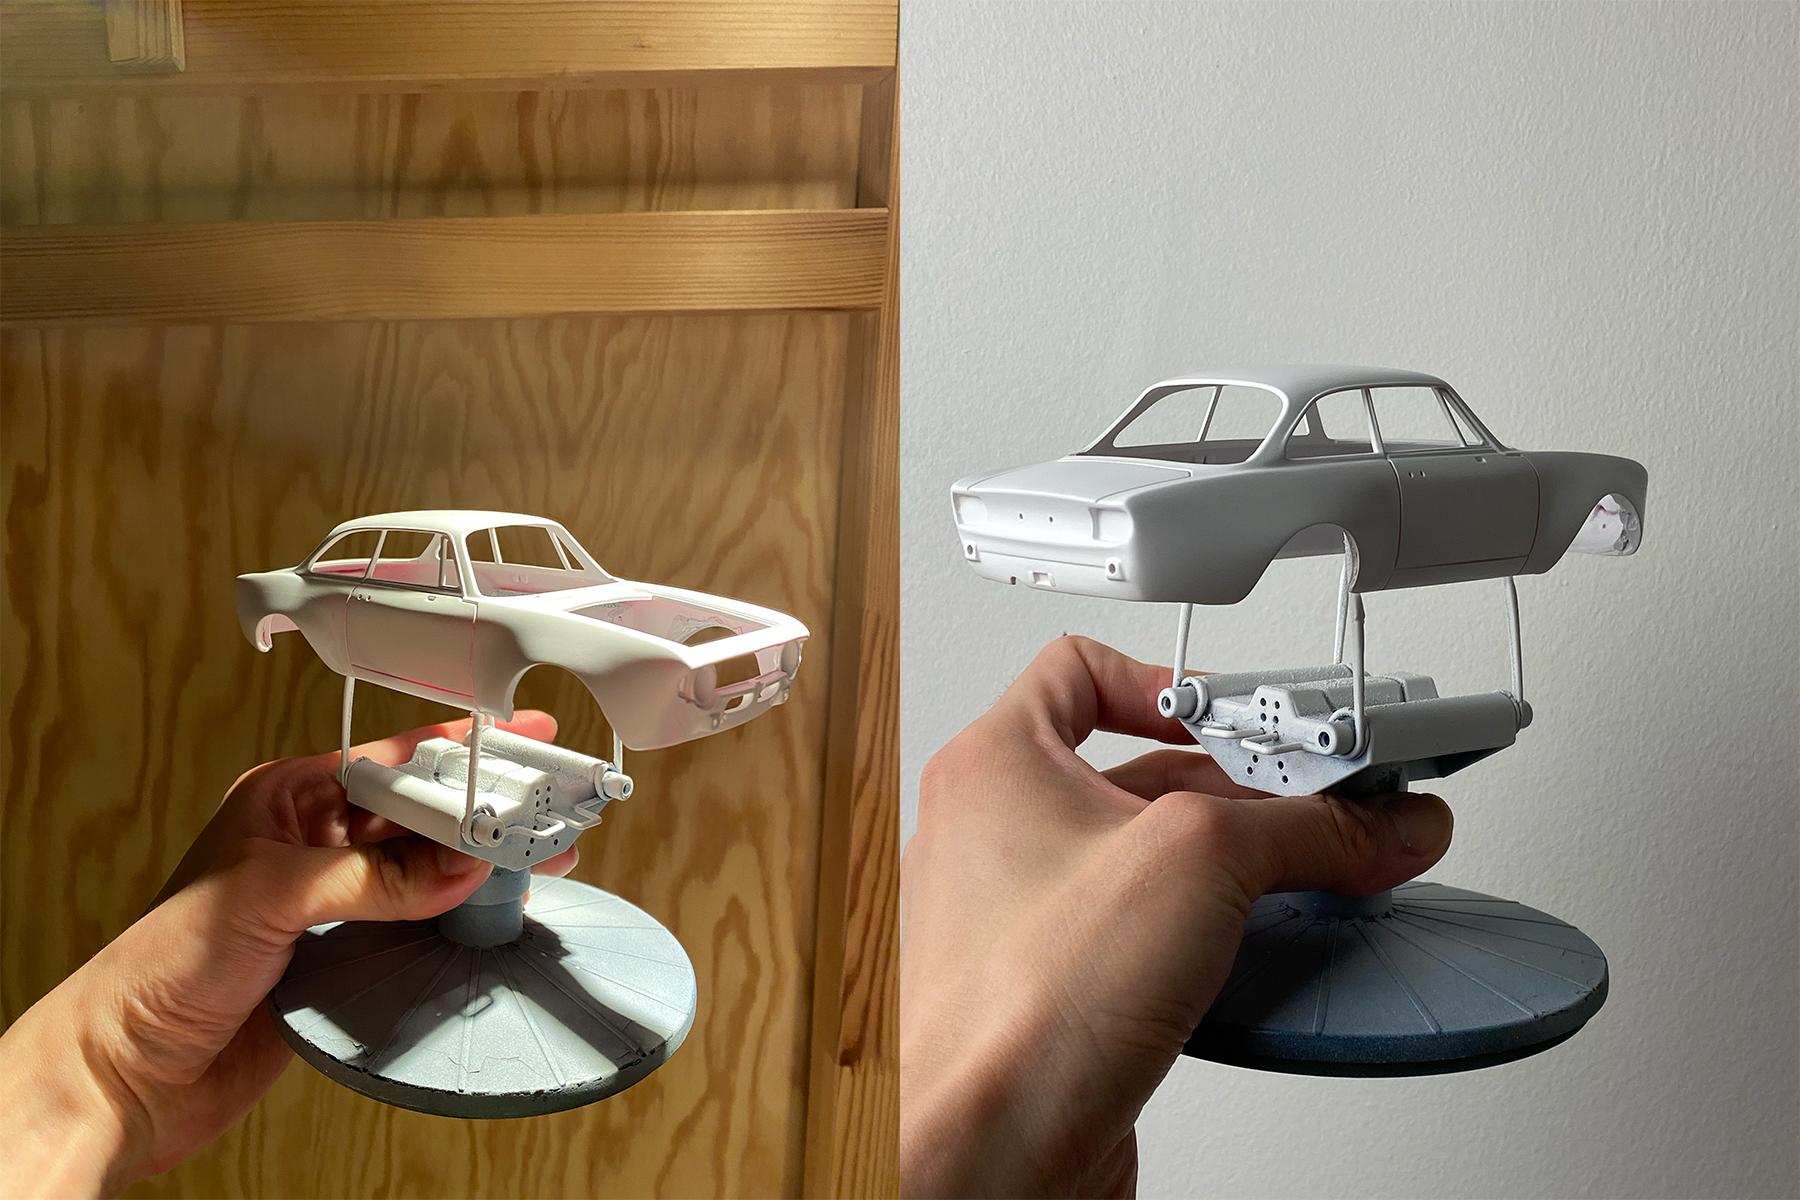
I usually start with the rest of the model after I lay the final clear coat on the body which takes about 4~6 weeks for it to fully cure and ready for polish. As always, 90s Tamiya kit looks impressive. IMO this is right amount level of detail that’s easy to build without having to mask everything or dealing with fiddly parts. First step is to clean/sand all the parts and organize them based on the colour. I added some light washing on the engine and painted door card trims with silver sharpie. The only modification I made was the stock air filter to open type. I cut a thin trip out of masking tape and painted it with red marker, then wrapped it around the air filter. I painted the valve cover and header with Alclad (over gloss black) - I couldn’t quite get to polished stainless steel feel but it’s pretty decent. I guess I need to practice it more. These are all the pieces that make up the chassis. Assembling was super easy. I added coolant reservoir from my parts bin though. With the interior, I decided to go with more track-focused look by ditching the carpeted look. To simulate wood grain, I airbrushed brown, dry-brushed darker brown with enamel, then laid clear coat (I also drilled holes on the steering wheel spoke). For dashboard, I brushed non-thinned clear on top of clusters and made toggle switch from flattened aluminum wires. I also made 5 point harness with spare PE seatbelts from Hobbydesign and cut seatbelt material from old Hasegawa kit. The Scaleproduction’s transkit provides a printed template for roll cage so I fabbed one up using styrene rods. A nice thing about this kit is that you attach front & rear windows outside and they have the moulding as part of the clear parts not on the body. This allowed me to mask paint in flat black, then paint the outer rim with silver sharpie. That pretty much covers - I’ll post the finished project soon!
-
Thank you! Thank you! Some of those Tamiya kits are fetching crazy dollars these days! Indeed! I think they could re-release this in the future as they still produce 1/10 RC Alfa Romeo models - which means it can re-negotiate the licensing with Alfa Romeo. Thank you! In real world 4 ft would be significant drop for sure! Thanks. Flared fenders always work I guess! Thanks a lot! Thank you! Gtam kits got correct fender but the wheels & tires seemed off scale - that being said it wouldn't hurt to grab a wheel set from Scale Production! 100%. I would've avoided a lot of hassle if I used epoxy type from the beginning - the resin fenders were essentially hollow which didn't have much surface to safely glue to the body.
-
Hey all, last summer, I bought one of my bucket list kits off of Ebay (paid almost $200 for it) and also bought the Scale Production’s GTA Junior transkit which included wider wheels, bucket seat, side exit muffler, and resin fenders. Actually I just finished the build but wanted to spend next little while to organize my pictures and share my process in this thread. When I mocked up the fenders on the body, I realized they looked different to the real car, so at this point I decided to make a smooth fender look instead of rivetted look of the real GTAJ. Retrospectively I would’ve gotten a better result if I used epoxy putty to modify these to match the real car. I started smoothing out the fenders with 3M glaze putty and Tamiya light curing putty - but even after getting perfect smooth surface thin line would appear between the resin fenders and body after applying primer. I tried my usual method of filling micro gaps with tamiya cement but I couldn’t get to the perfect surface. Eventually I ended up sanding away too much material so I reconstructed fenders with putty, and grafted the surface with mixture of white putty and Tamiya cement which seemed to do the trick. At this point I’ve had 20+ hours in just getting the body ready for base coat.. which I could’ve avoided if I corrected the fenders with epoxy putty before completely gluing them to body first. With body looking already looking too thick (I usually aim to lay thin paint as thick paint ruins the look of the scale model), I continued with my usual process - 2 base coats, 3 layers of Mr color’s super clear (and smooth out the decal with rest of paint surface), and dry for 1.5 month. After the paint was completely cured, I cleaned up the surface with 3000 grit and 5000 grit and proceeded with 3-stage Tamiya polishing compounds. As I was polishing with the finishing compound, my finger slipped and I dropped the body on the work bench. It was 2 inch fall but still was enough to crack the rear quarter panel. If this was $50 kit I would’ve just tossed the body and order a new one, but I couldn’t really do that for a kit that’s been discontinued for 30+ years. I masked off the body, glued the crack with cement, smooth out the surface with white putty, and added base color and clear coat. (this added another 4 weeks of curing time) With red I knew I would not be able to perfectly match the color but it looked passable. This is after masking and painting windows trims and adding panel line wash. I don't like how thick the paint is but it is what it is.. next will be engine, underbody and interior!
-
Hopefully I can build more this year! Thanks! Thank you! Thanks a lot! They're 18" Autostrada Modena from Scaleproduction: https://www.scaleproduction.de/product_info.php?info=p2523_18--autostrada-modena.html Thank you! Thanks! Thanks a lot! Thank you! Love the moebius kits! I have another in my stash. Thank you! Thanks a lot! Thank you! Thanks! Thank you!
-
Thanks I wonder what extra it costed back in 80s to spec with those individual colour combos! Thank you! Some kits just work well as OOB for sure. Thank you! Ferrari sure had some of the most incredible shades of blue colour codes. Thanks! Italeri kits typically need better wheels & stance - they do have some really nice Ferrari kits though! Thank you! I had issue with wavy surface on the hood which I wasn't able to fully correct. Thanks! Thank you! I'm sucker for non-red extrior and blue/green/red interior! Thank you! I highly recommend all older Hasegawa kits! They're great fun to build.
-
I haven't built as many as I wanted in the beginning of the year - hopefully I can make more in 2023!
-
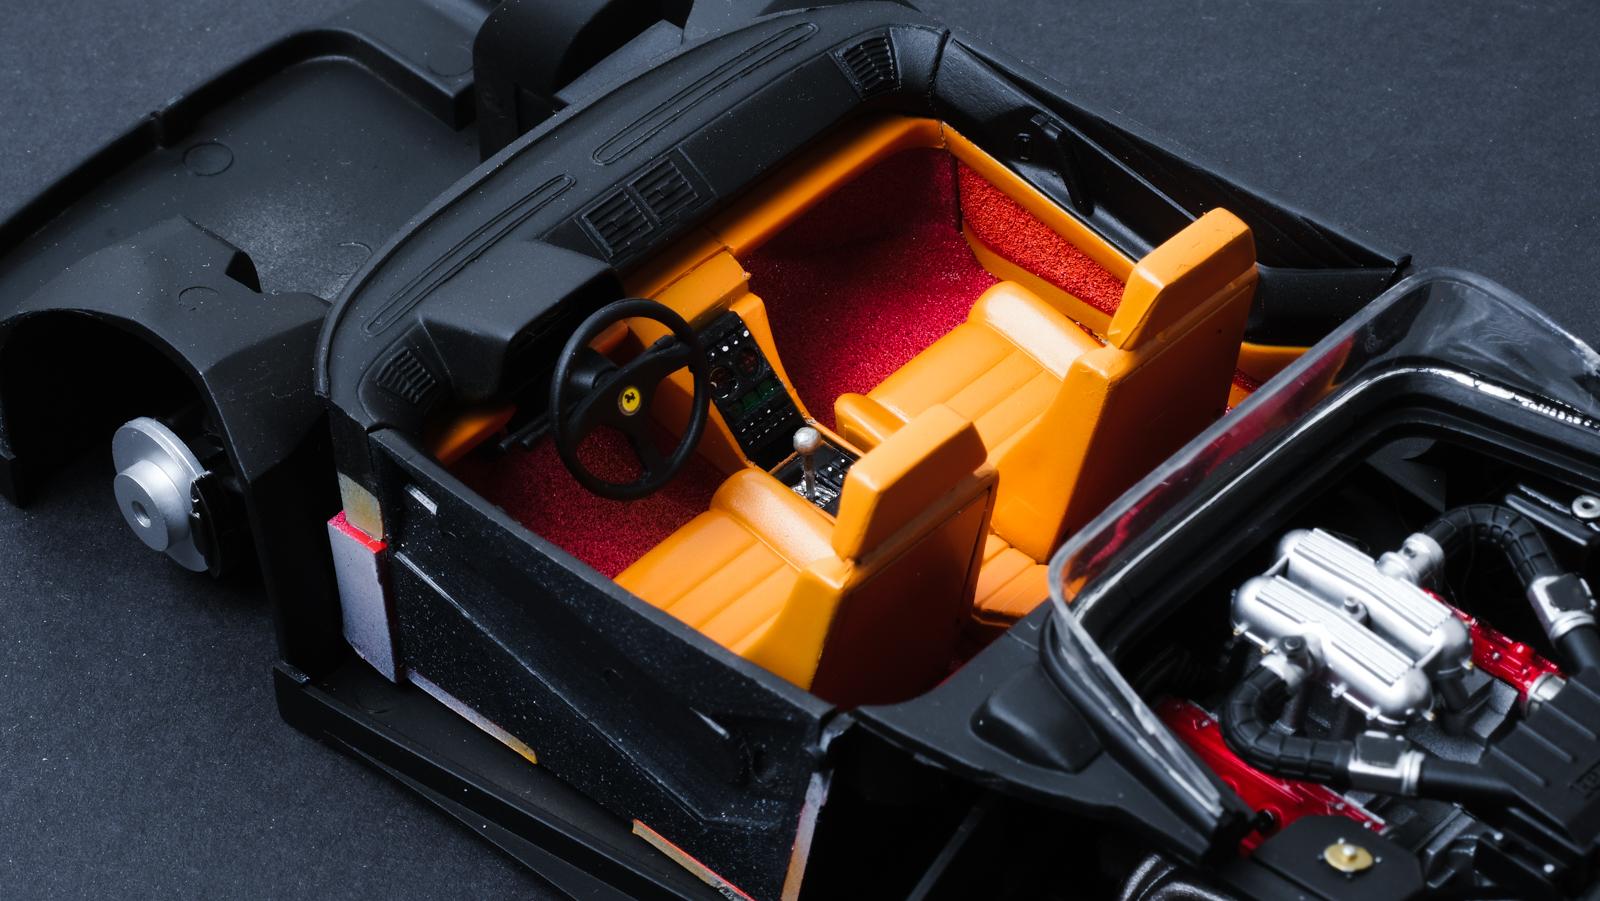
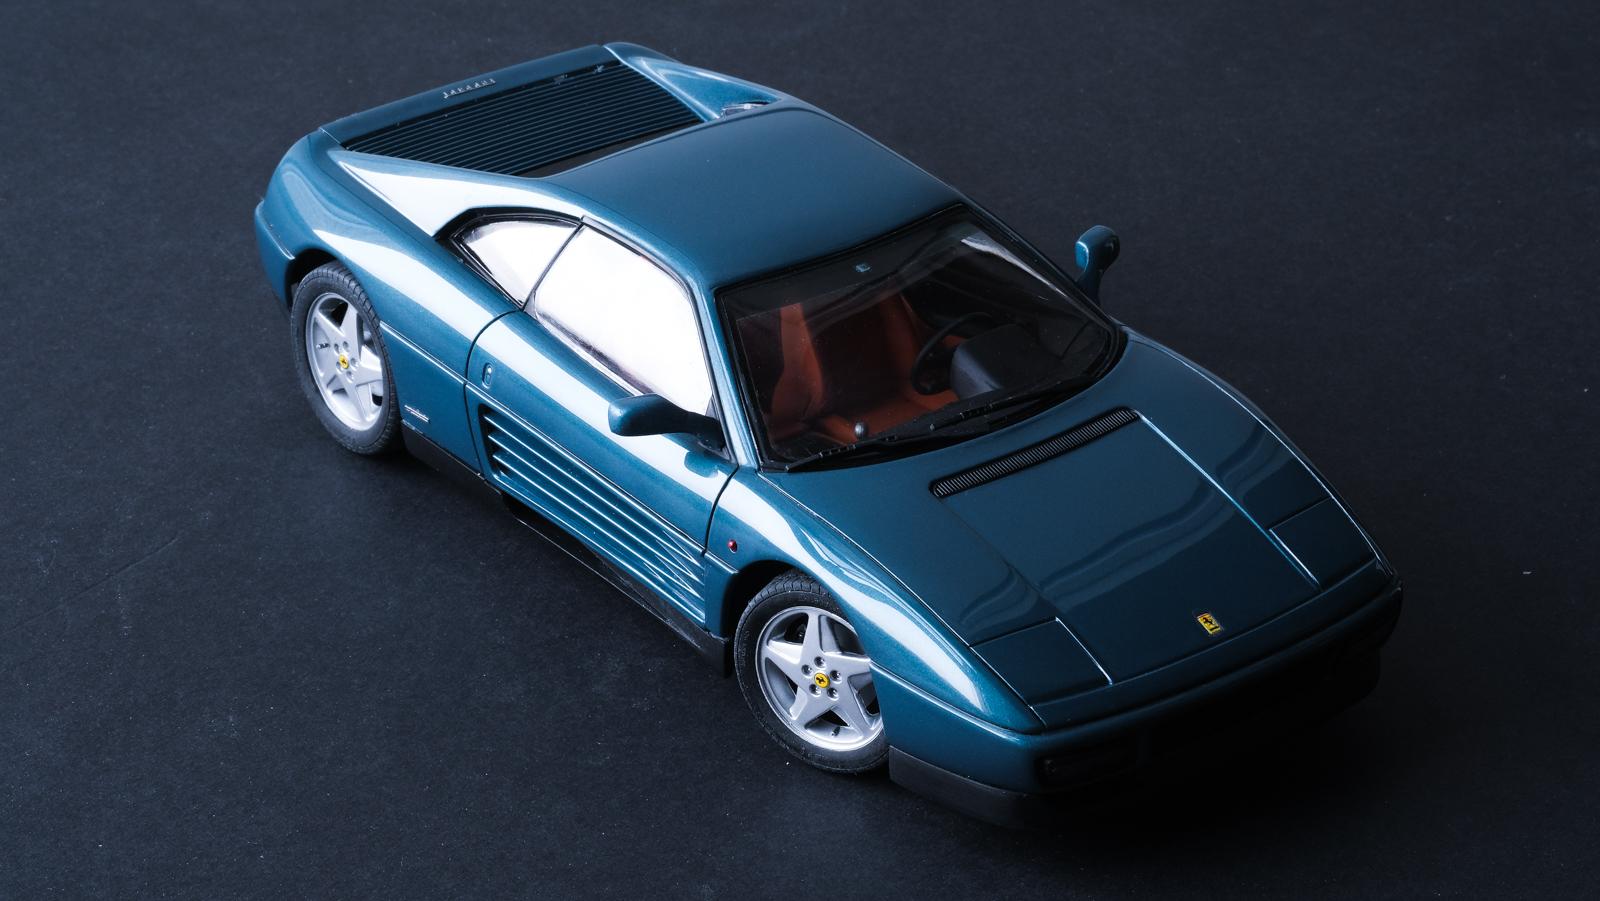
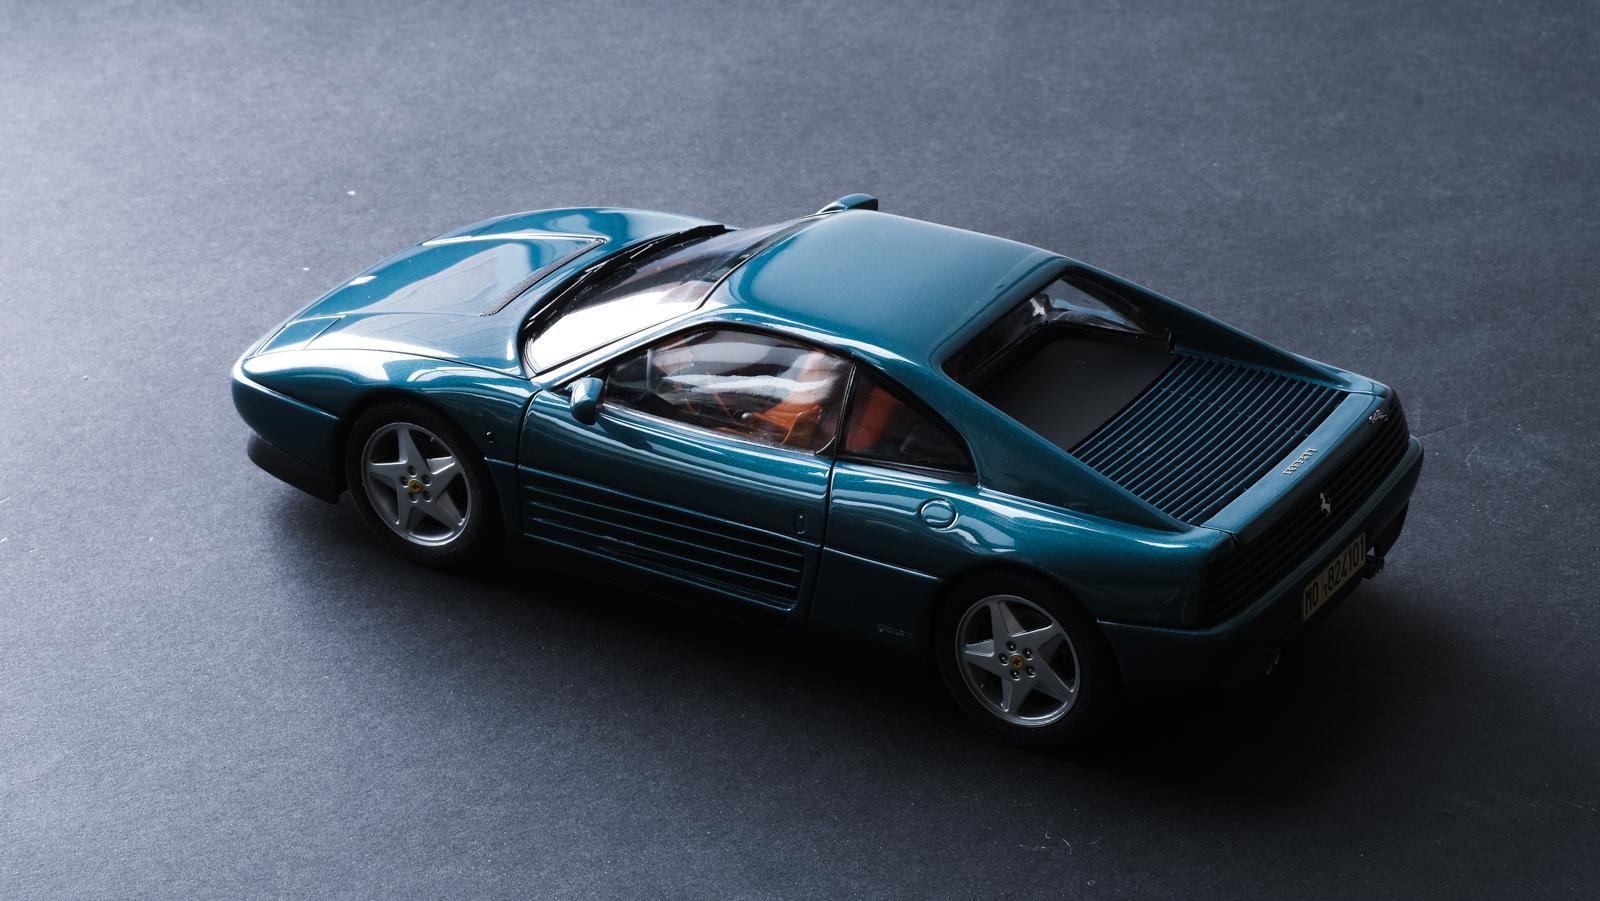
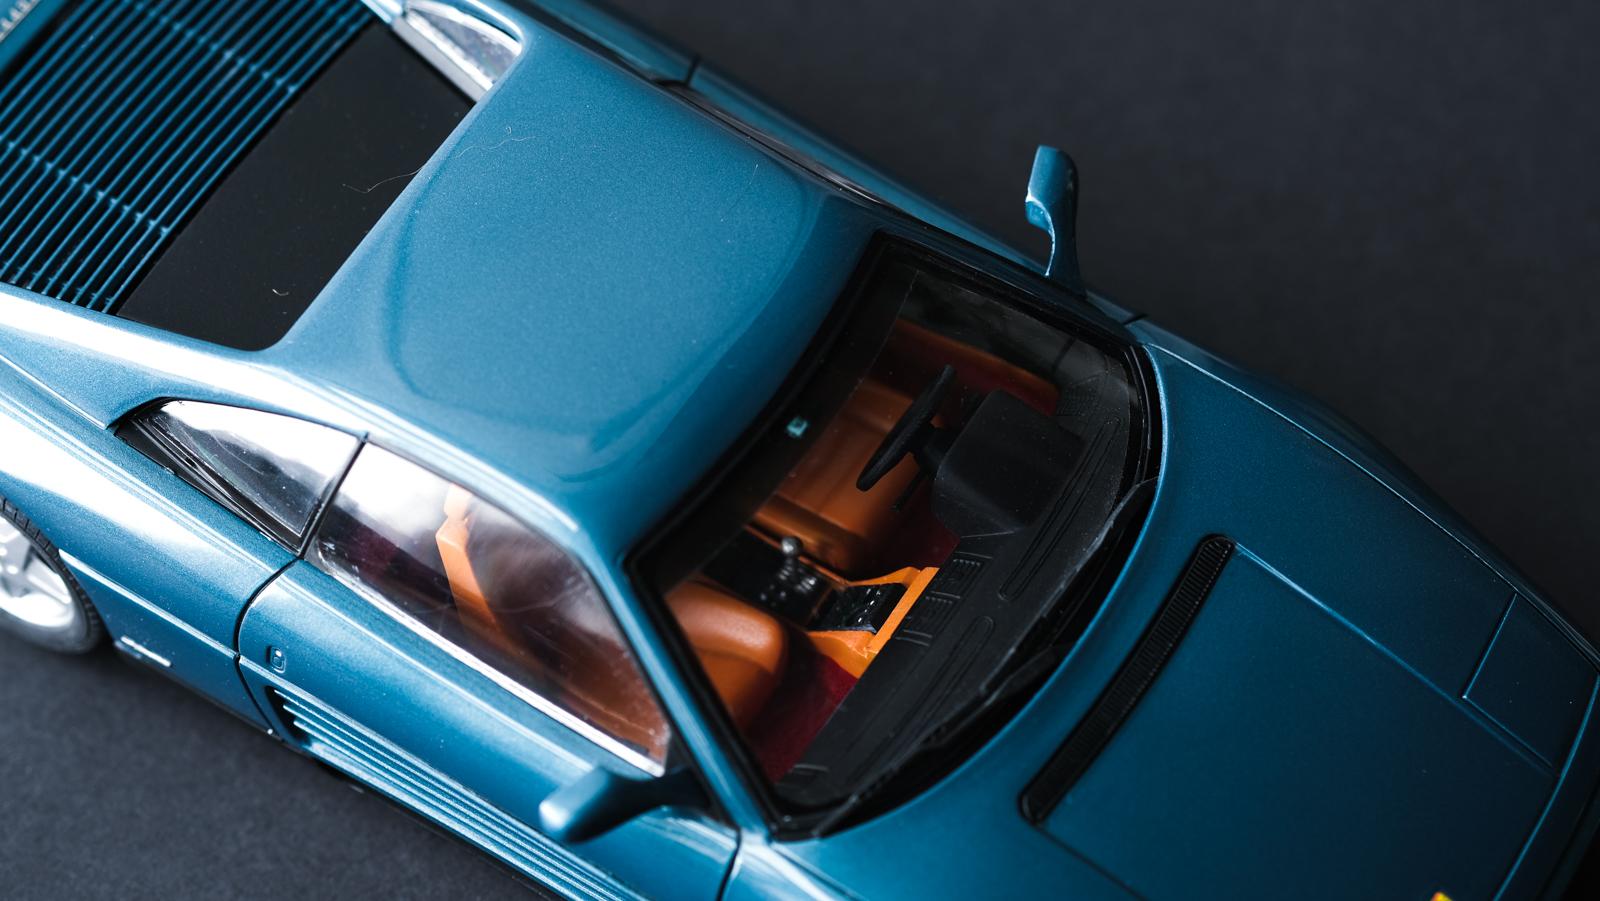
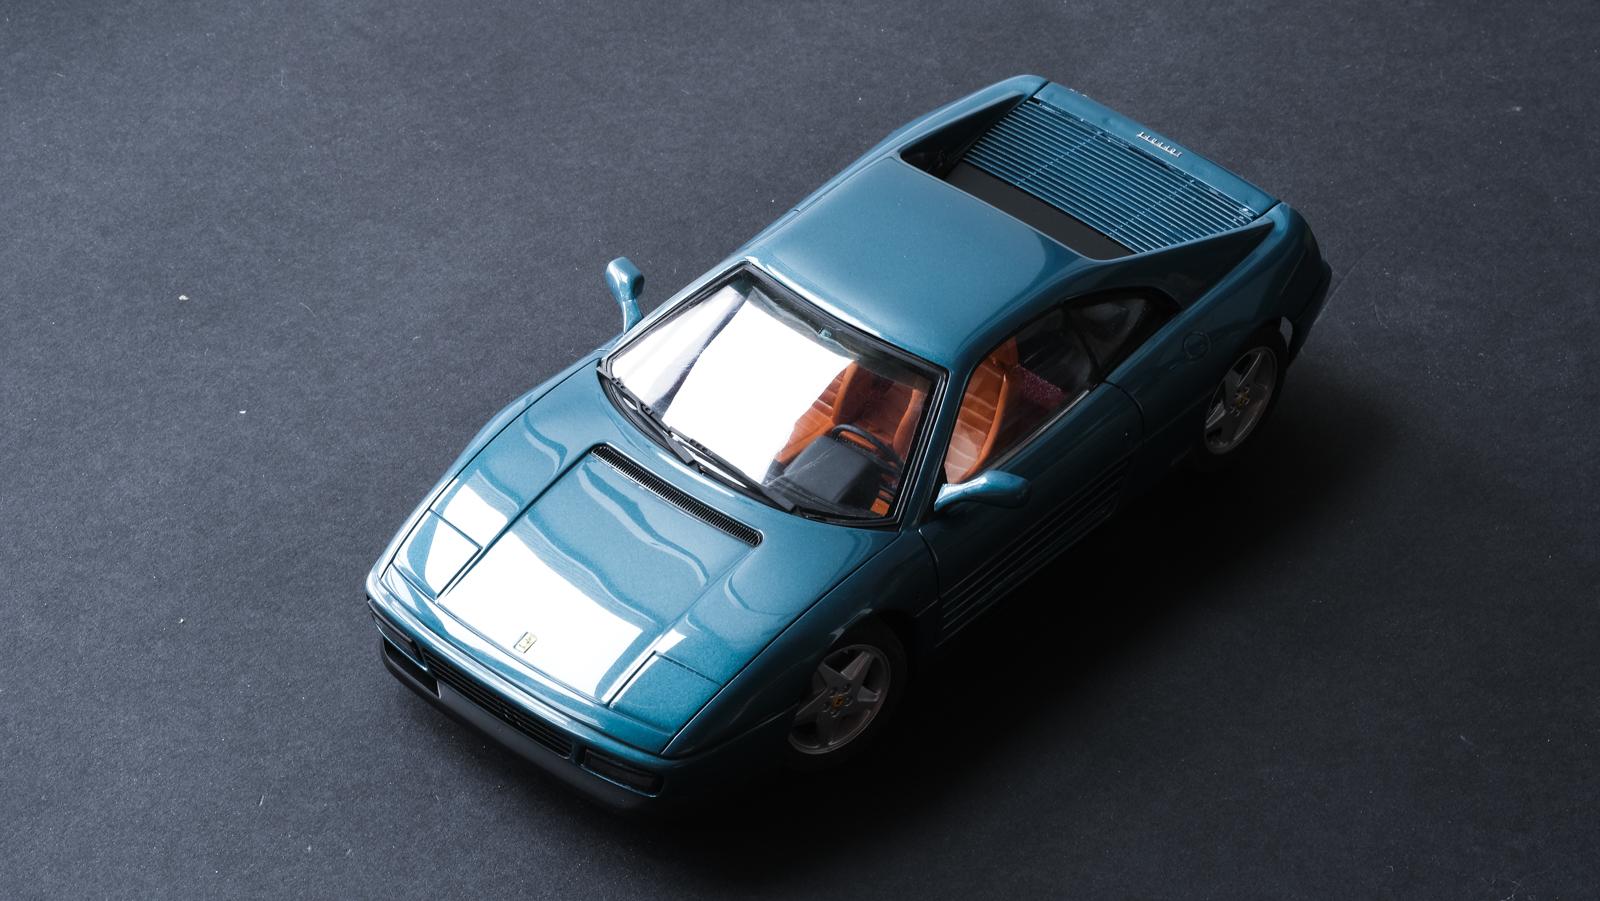
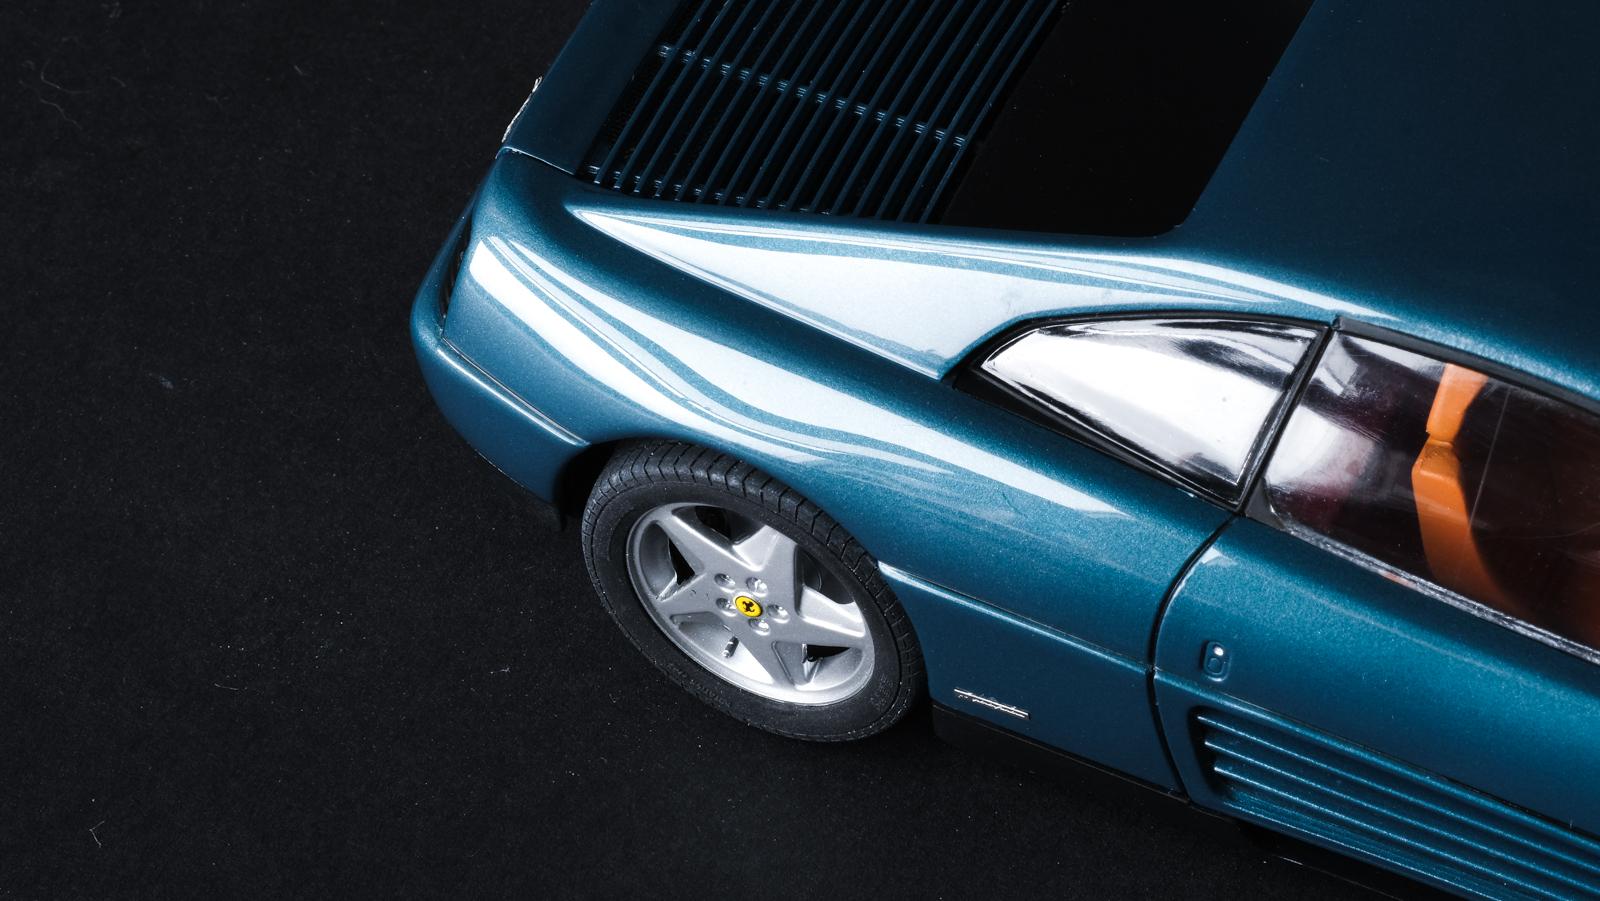
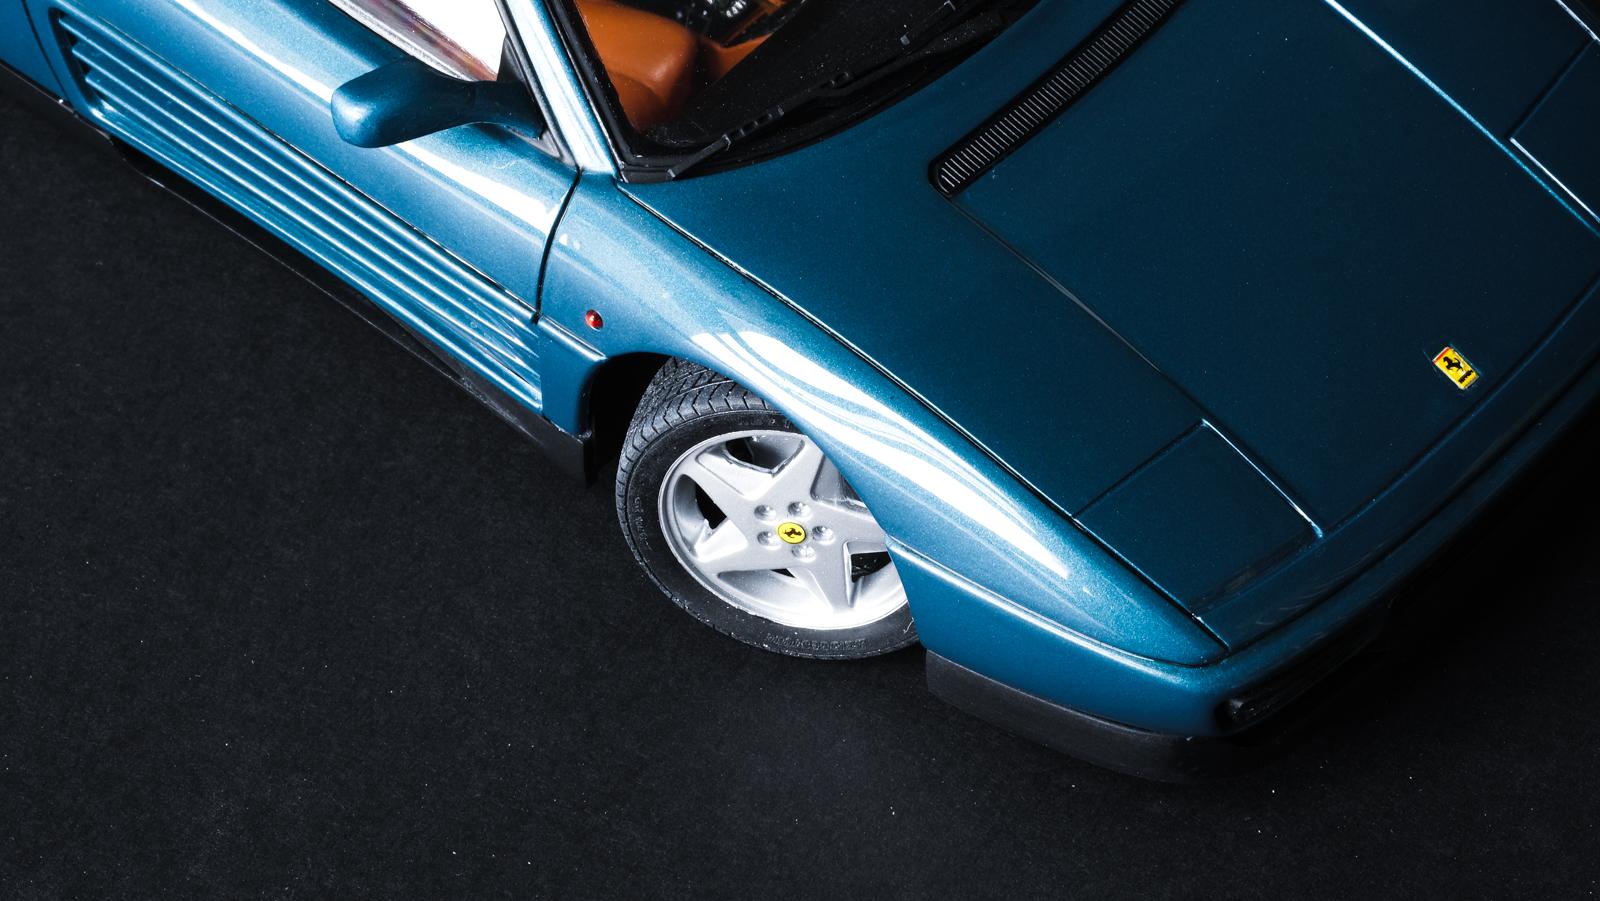
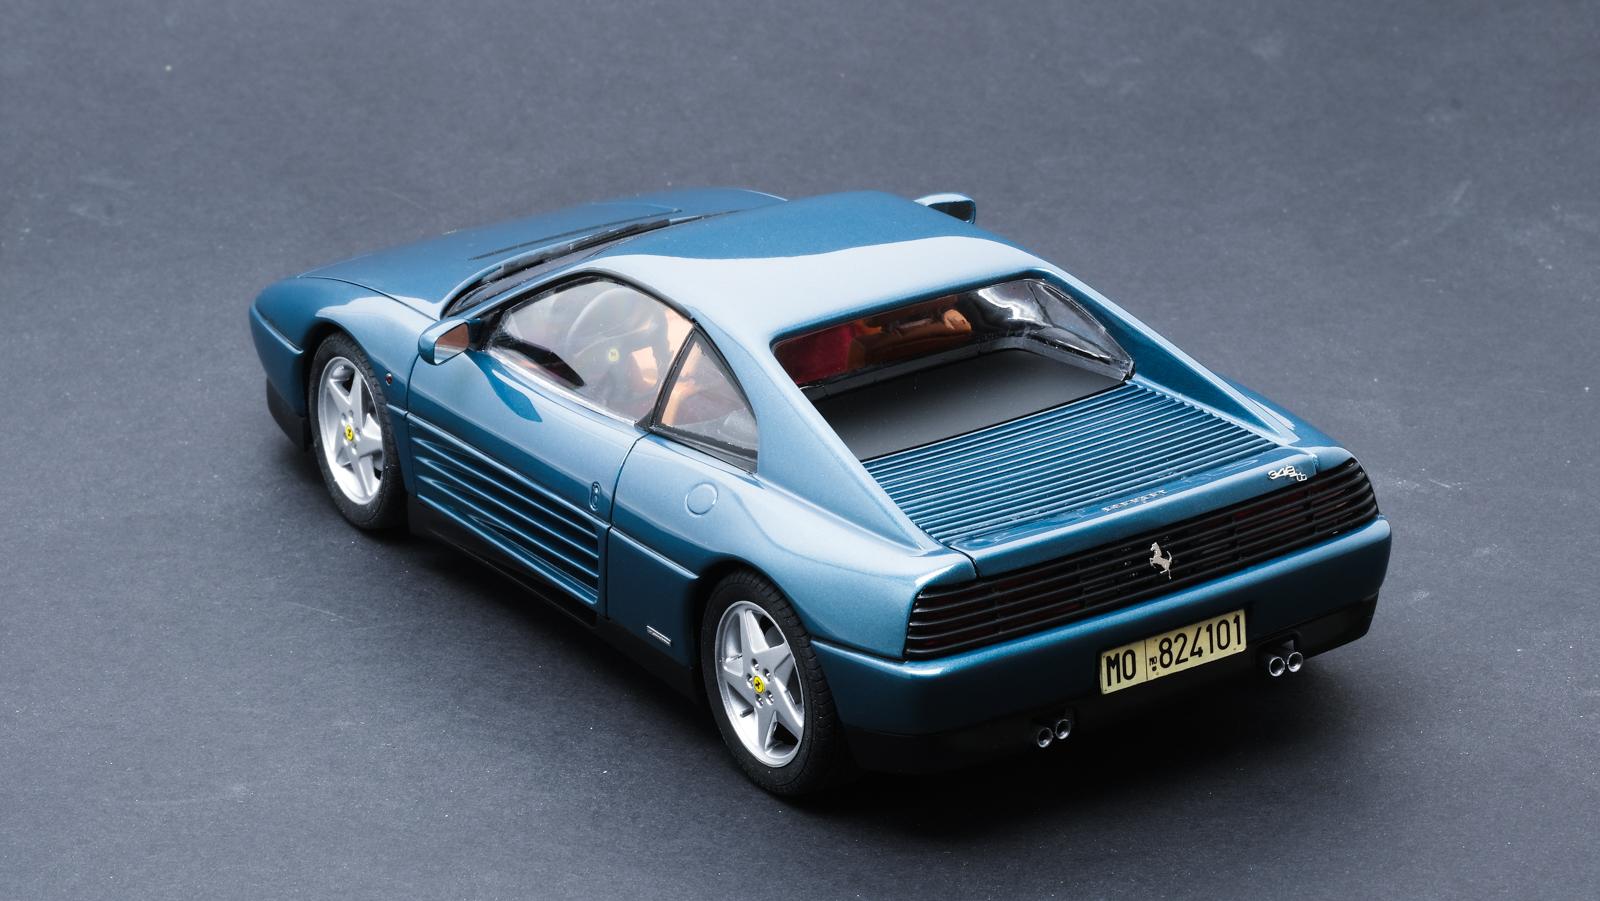
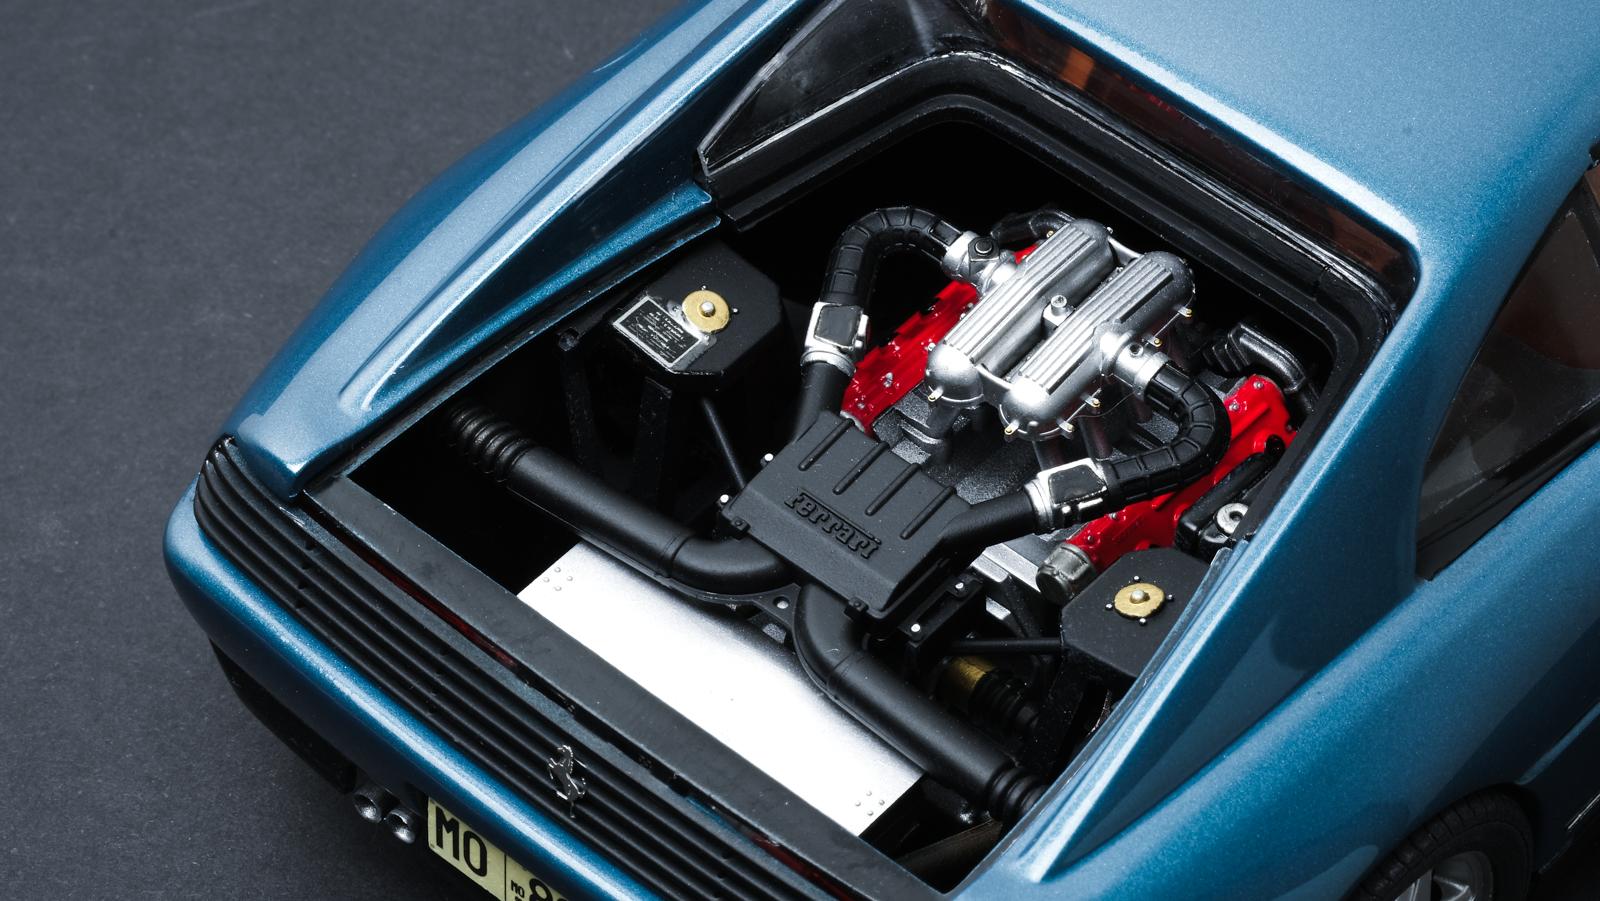
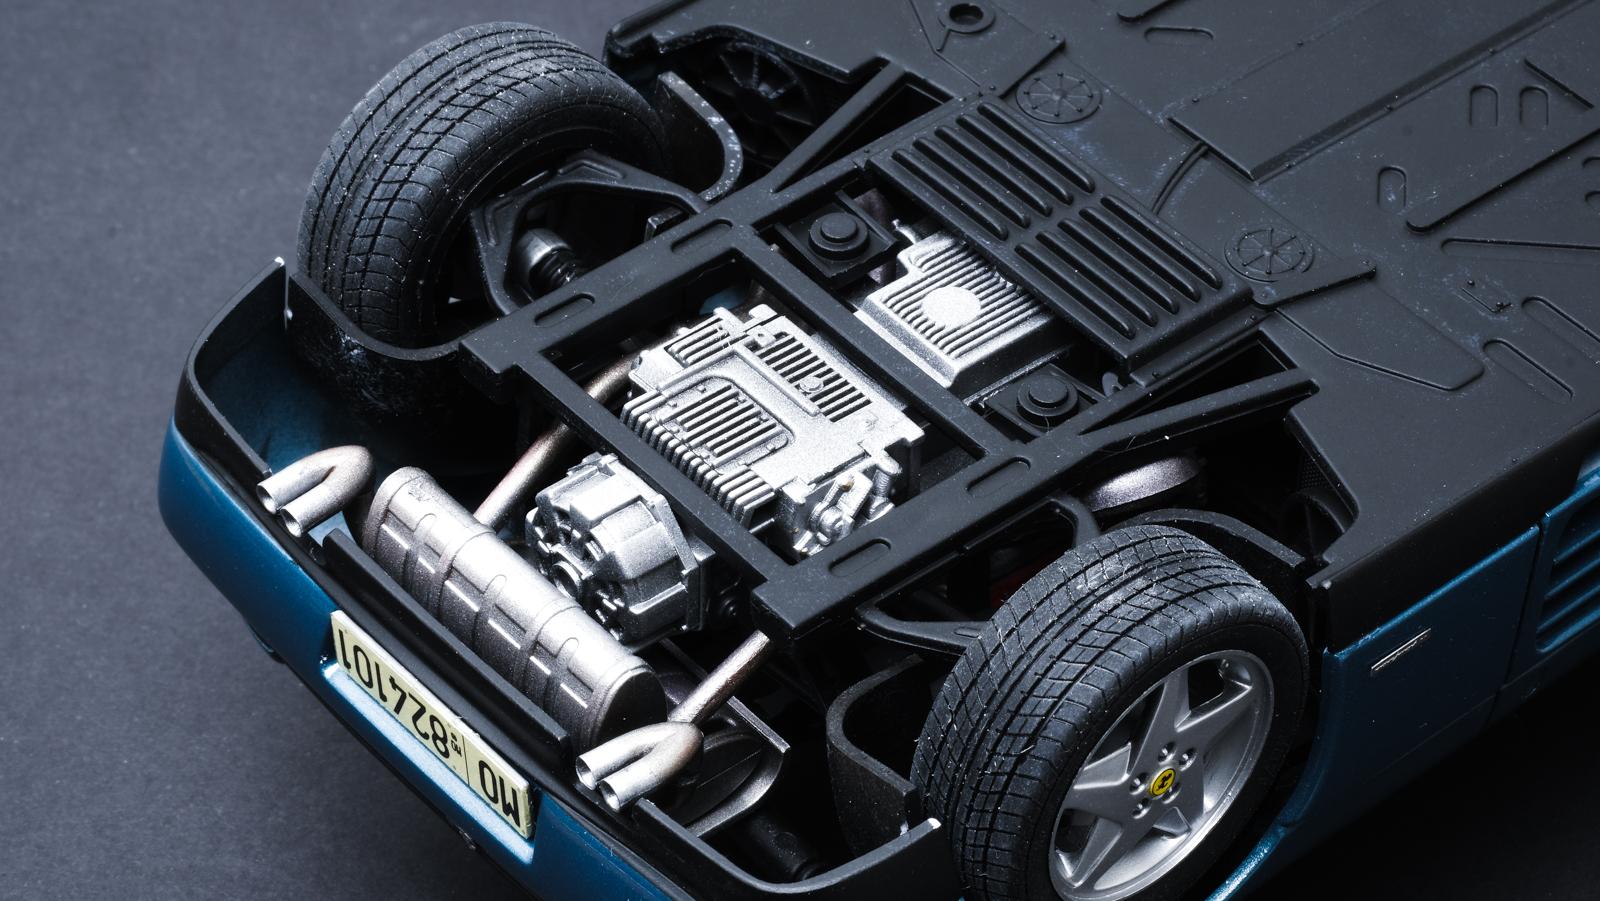
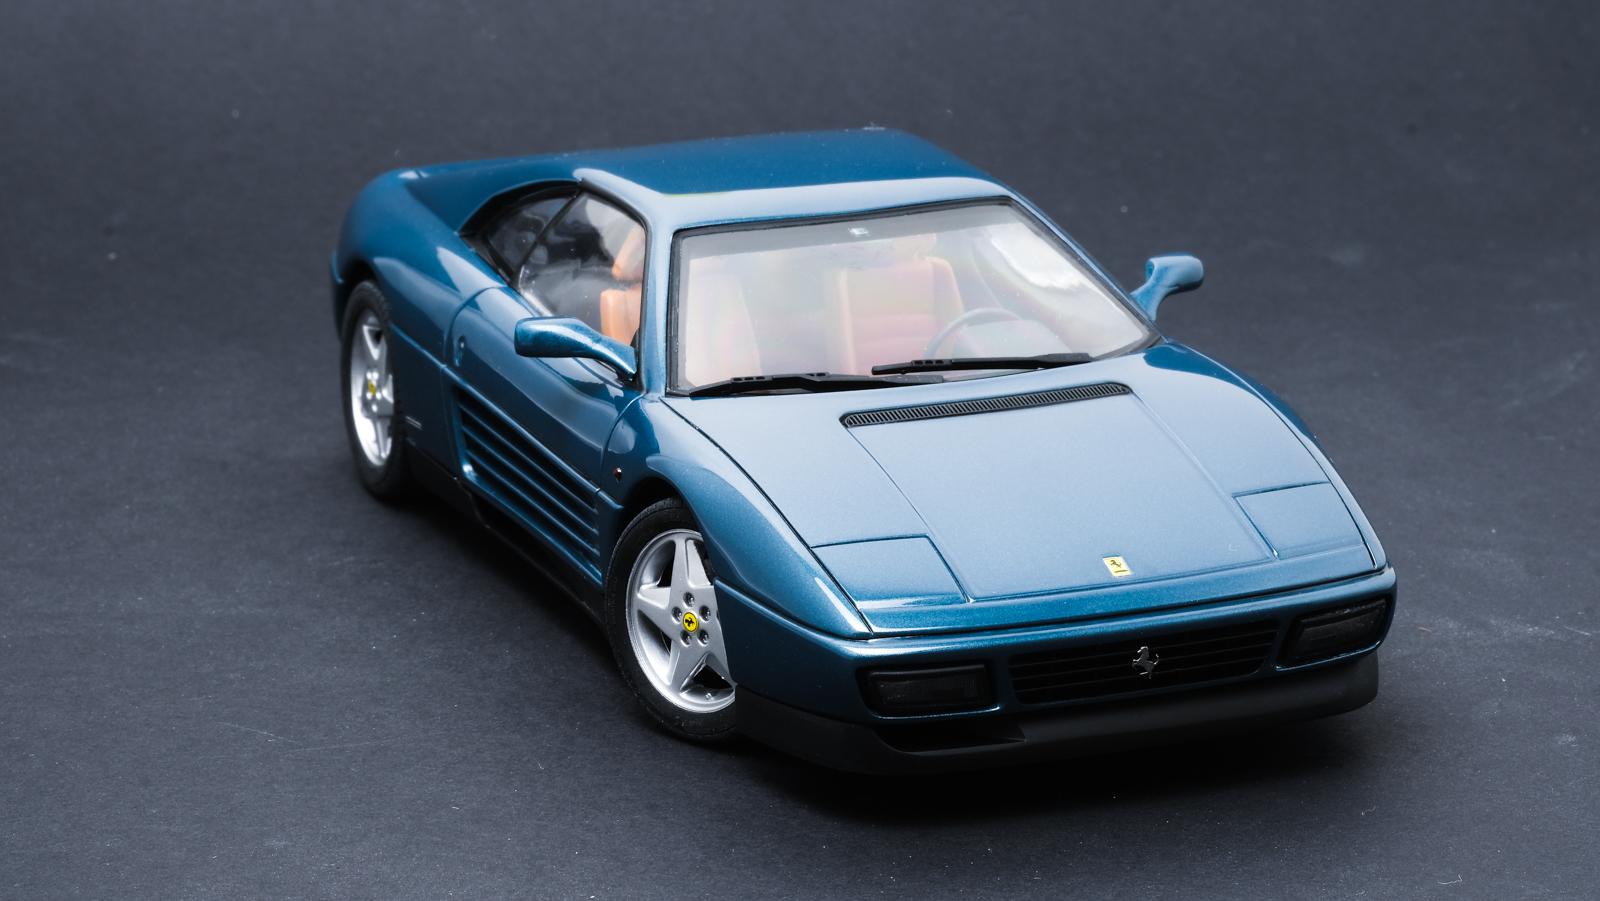
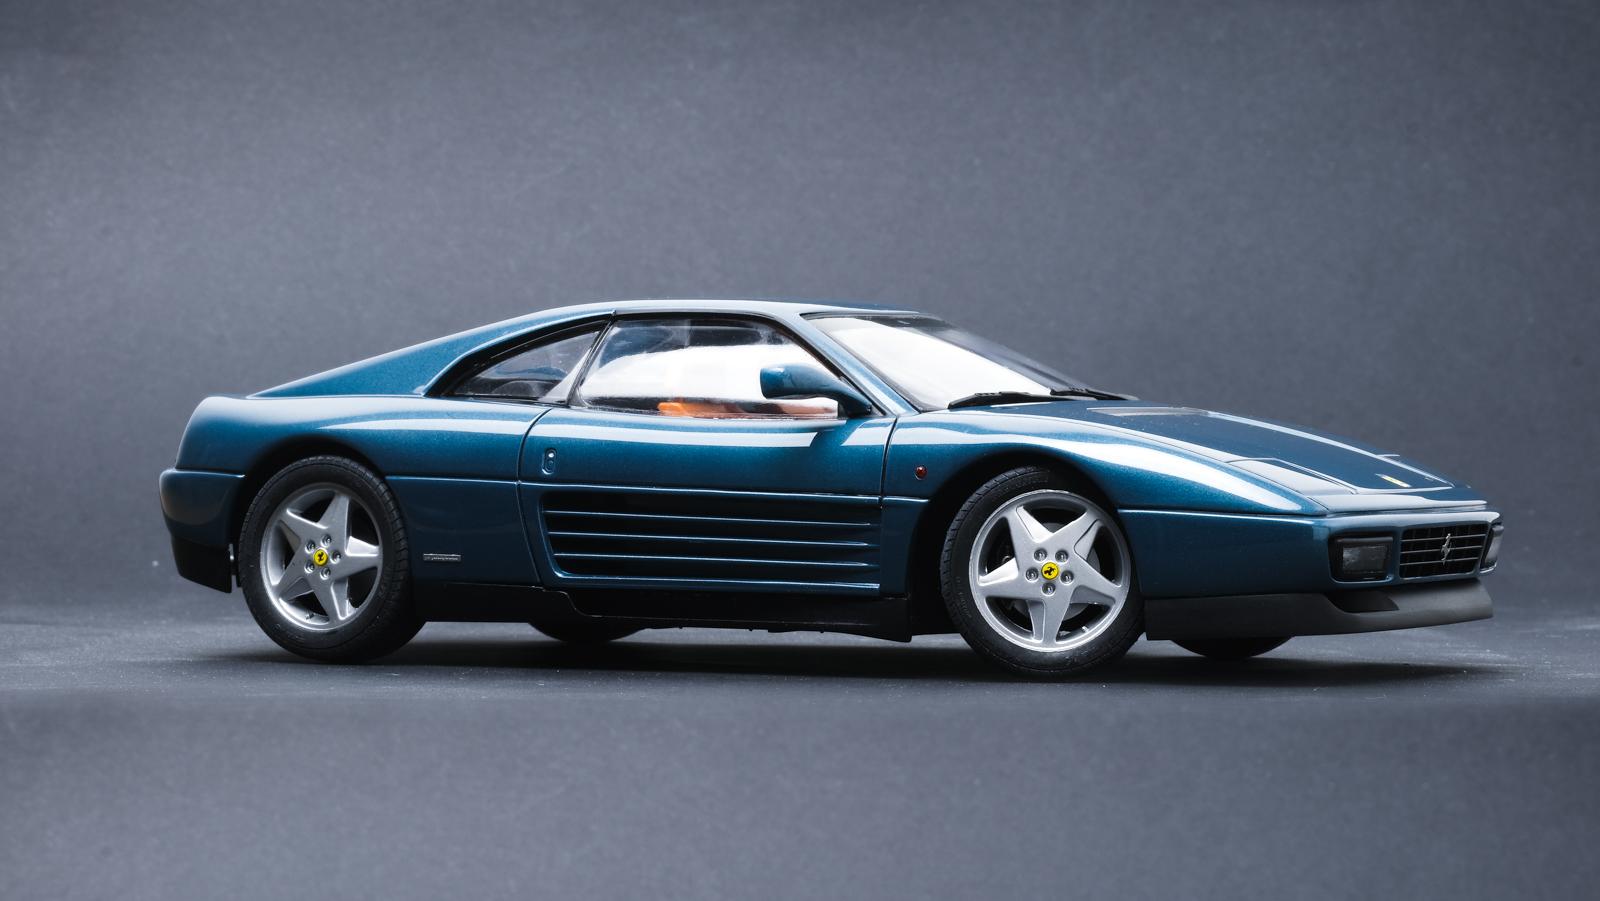
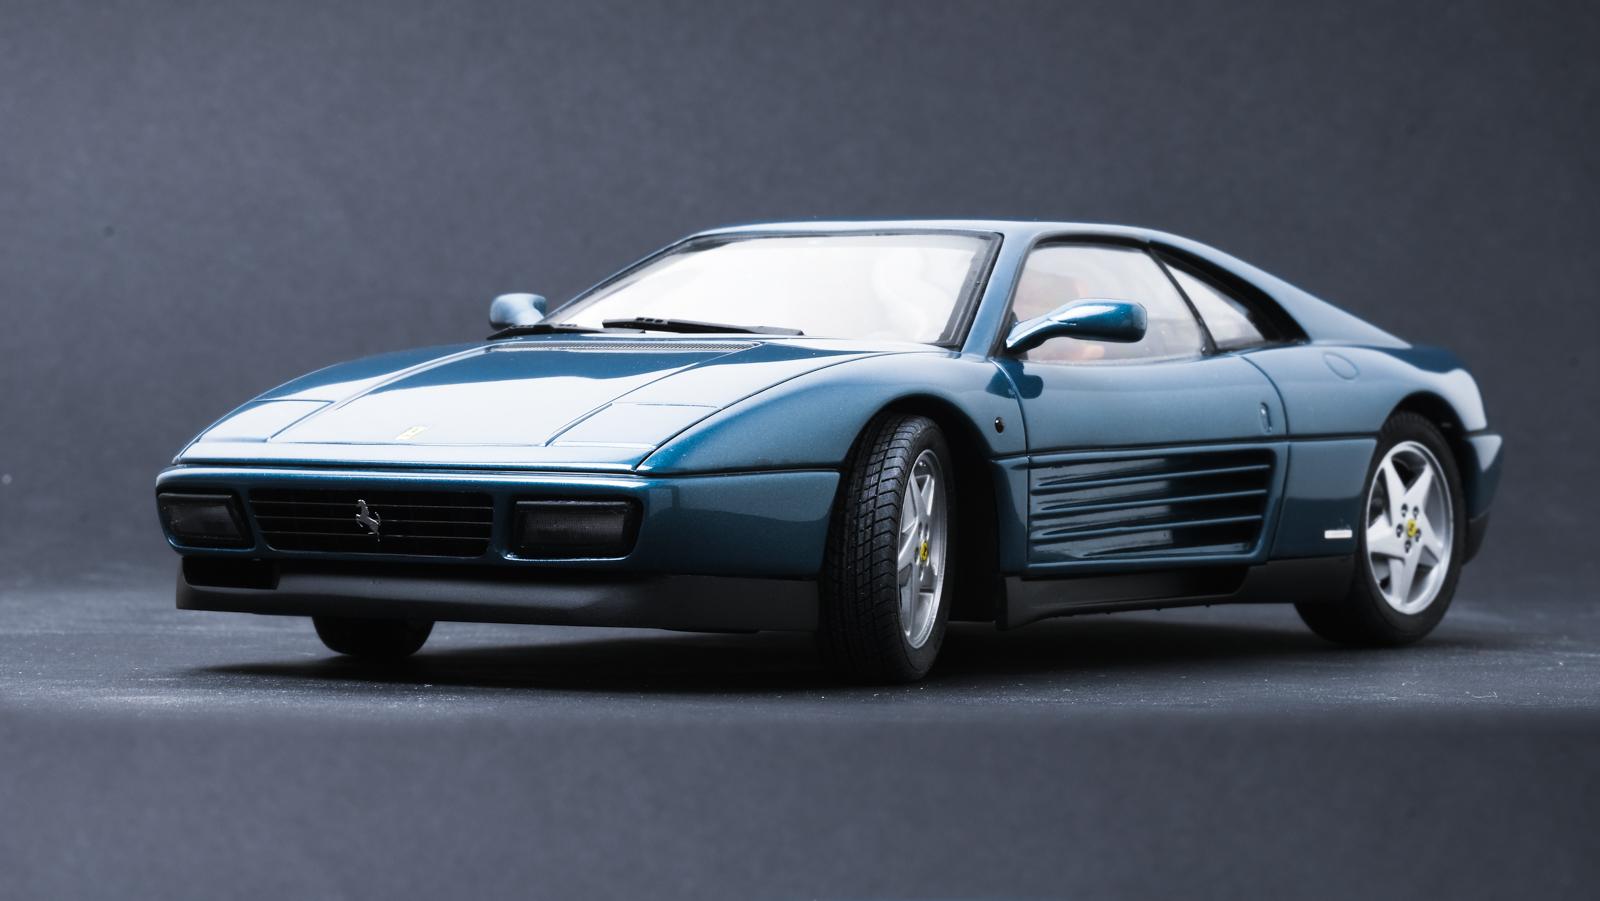
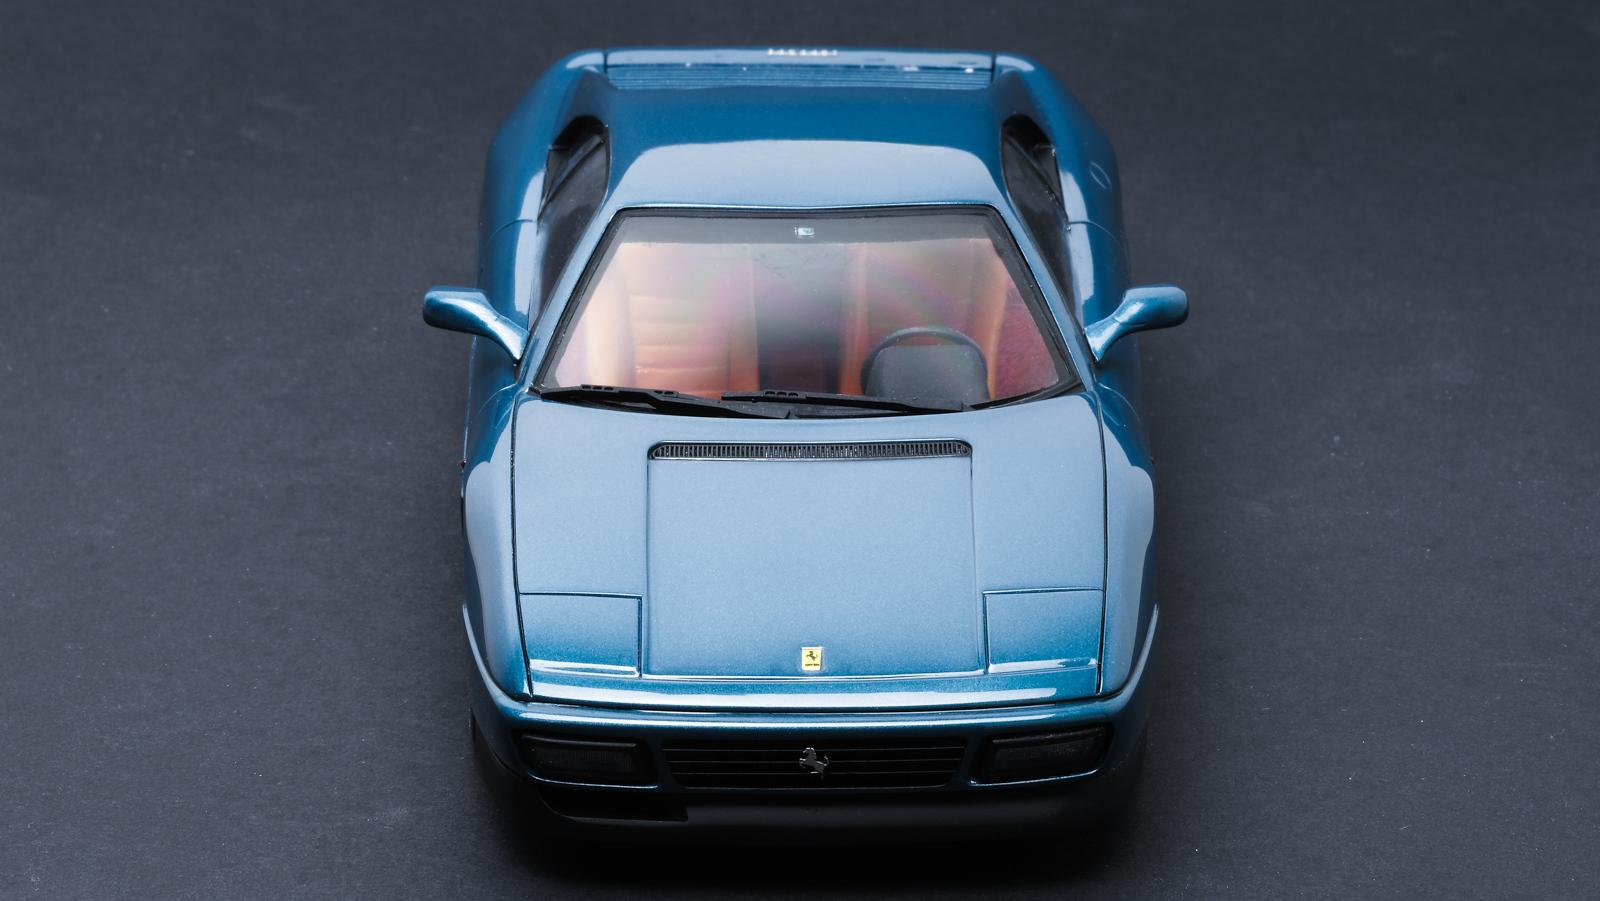
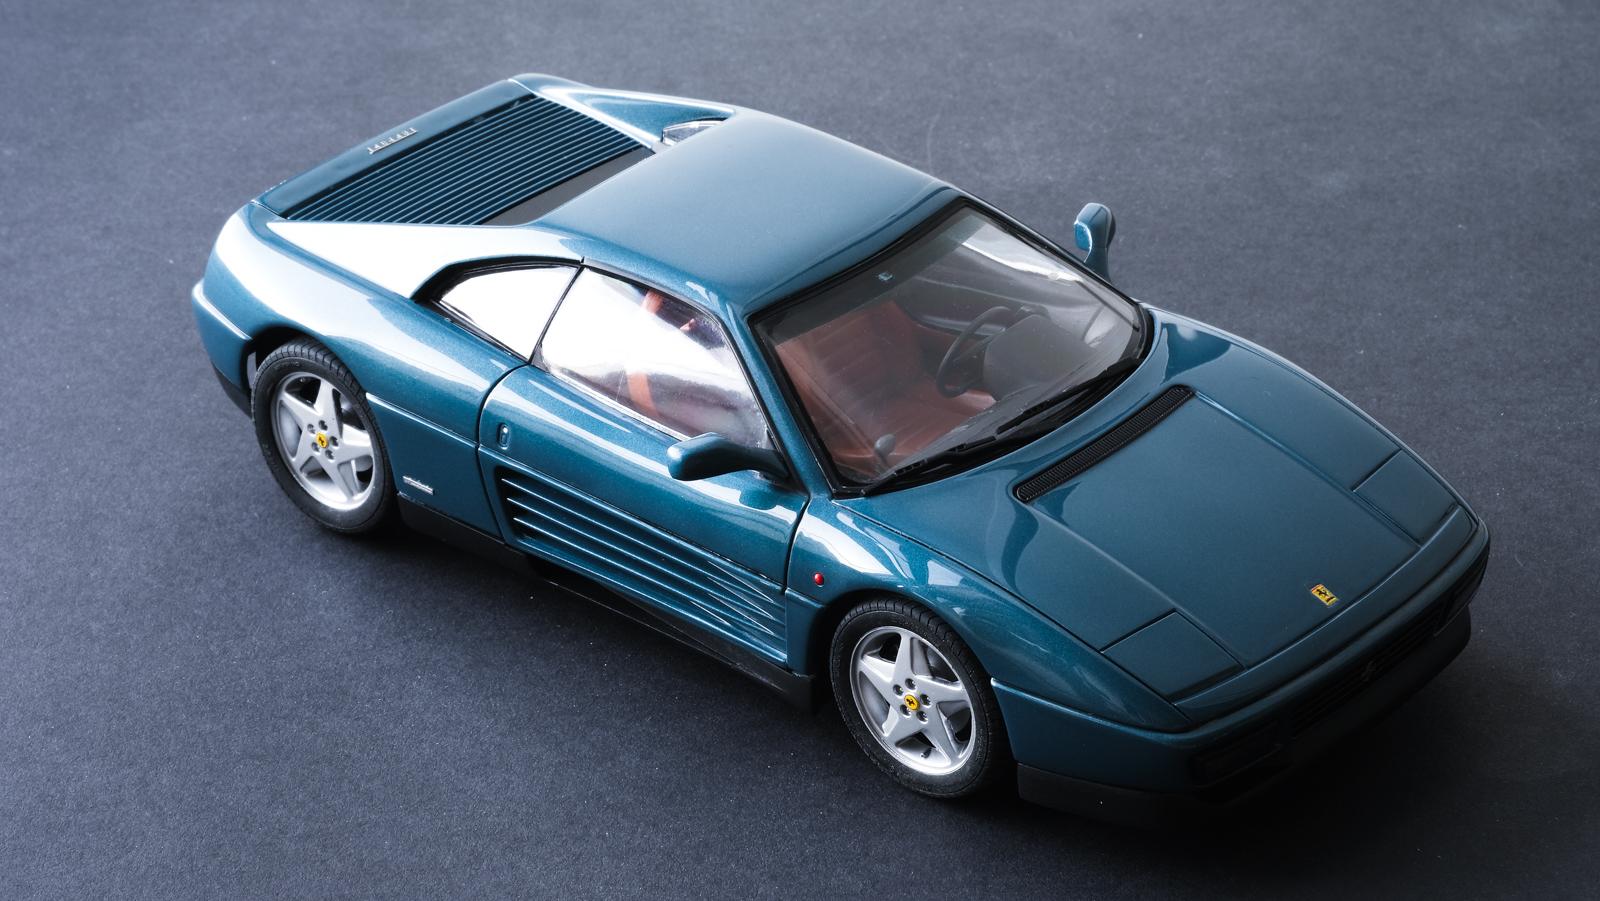
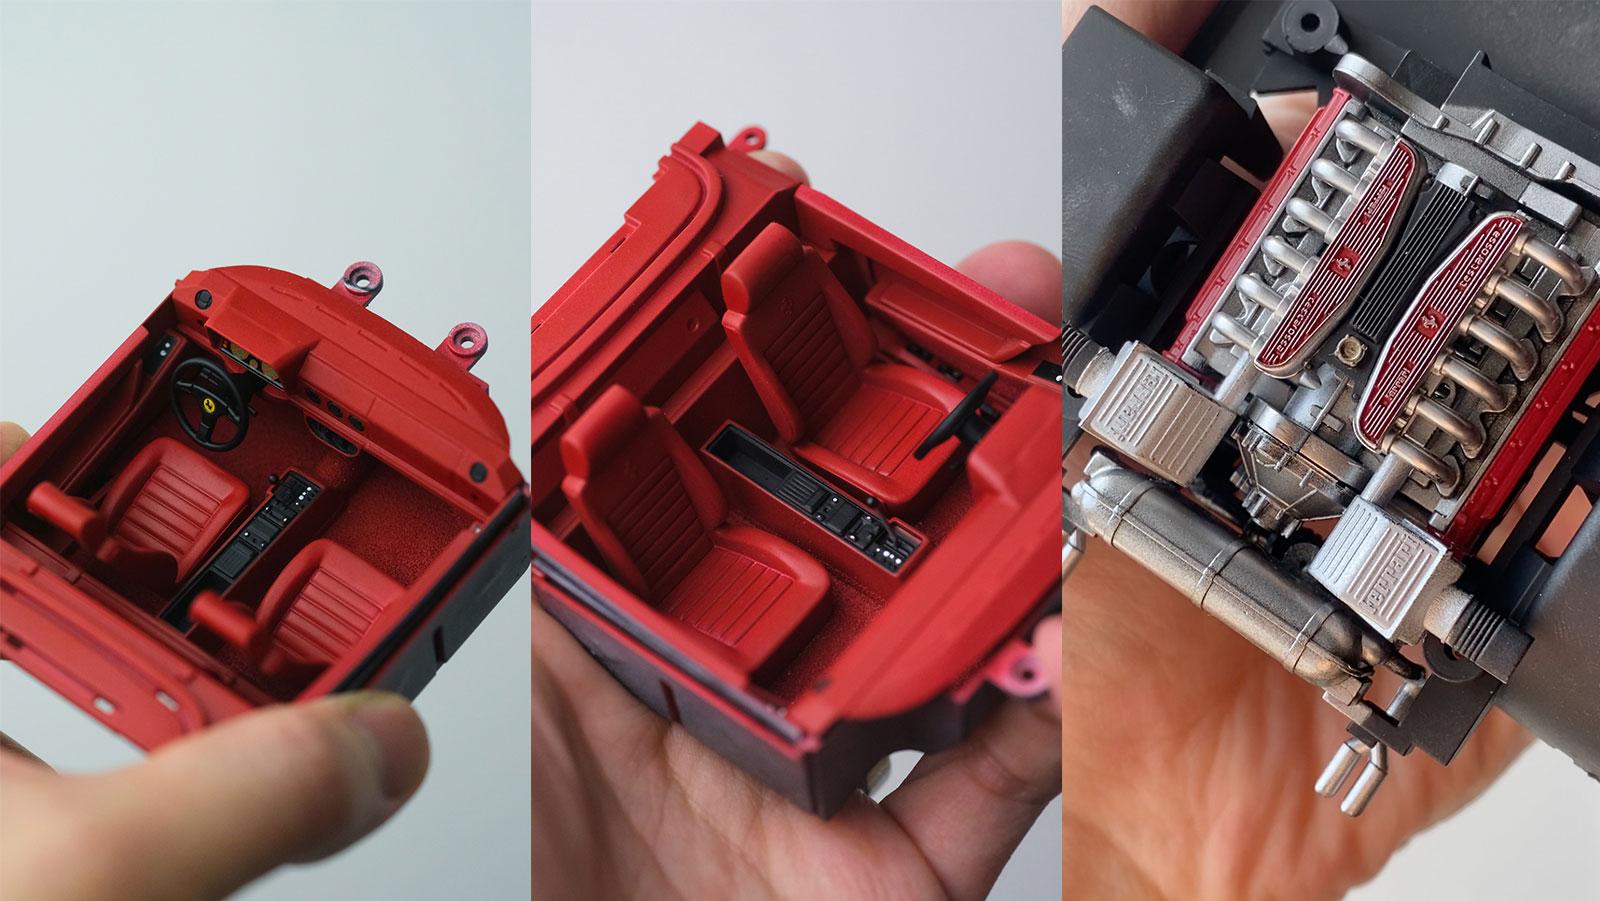
Hi everyone, here’s my latest build - 1/24 Hasegawa 348TB. This time I decided to build straight from the box without any aftermarket rims or modification. As per the usual older Hasegawa full-detail kits, it has full engine, chassis and suspension details which assembles like a real car, but fitment was a bit of challenge especially when assembling the body with chassis. Personally I hate red Ferraris because Ferrari makes beautiful non-red colours too but 90% of Ferrari you see on the streets are in red. With 348 I decided to simulate one of rarer colours - Blue Medio. As for the interior, I saw a beautiful photo of tri-tone interior (black, tan and red) and decided to replicate that. Full build detail: Scribed panel lines and wet sanded all body panels with 600 > 1500 grit Laid grey surfacer and further corrected the surface with 1500 grit Laid r color’s GX silver and tiny bit of metallic green as base coat Laid a mixture of clear blue, cobalt blue and little bit of black on top Added 1 clear (mr color’s super clear III), wet-sanded with 2000 grit Added 2 additional layers of clear coats and cured for 1 month Wet-sanded with 3000 grit sponge and polished with Tamiya 3-stage compounds Added embossing powder for carpets and masked interior 3 times to paint tan > red > black. De-chromed the wheels and repainted them Overall it was fun full-detail kit but etching emblems were kinda tricky to apply. It’s not my cleanest build but definitely had fun building one. Thank you for reading!
- 16 replies
-
- 10
-
-
The paints are kinda wavy in flat places which I find being very hard to correct! Thank you! Thanks! I can never decide which one I upload lol! They're straight out of box - being snap tite kit I didn't have to touch it at all which helped! Thanks! Thank you! I always use Mr color's paints Ferrari cars look best in blue or brown in my opinion!
-
Thank you! Thanks a lot! Thanks! I love all the popup-era Ferraris! I was surprised to see how they looked when I popped the box. Very un-fujimi like! Thanks! You are 100% right! I realized all the research photos I was looking at as reference, were actually Blu Chiaro not Blu Sera. One of classic car listings site put the Blu Sera instead so I think I went with that instead. It did confuse hell out of me as I was making because I was seeing bunch of different colours! The real F40 Speedlines were 17" and weren't as wide as the rims I used. They're 18" (Autostrada actually made them from 16" to 18") : https://www.scaleproduction.de/product_info.php?info=p2523_18--autostrada-modena.html
-
Brightest red you can achieve would be a clear red on top of silver (I use Mr color with self leveling thinner).
-
This E30 has been a daily driver for the last 11 years.
-
I could've used one step finer sandpaper before moving onto the polishing steps! Yes I'm on Instragram Thank you! Thanks! Thanks! It's really just more prepwork! Thanks a lot! Thank you! Ferrari has so many beatiful non-red colours to pick from. Thanks a lot!
-
Amazing details!
-
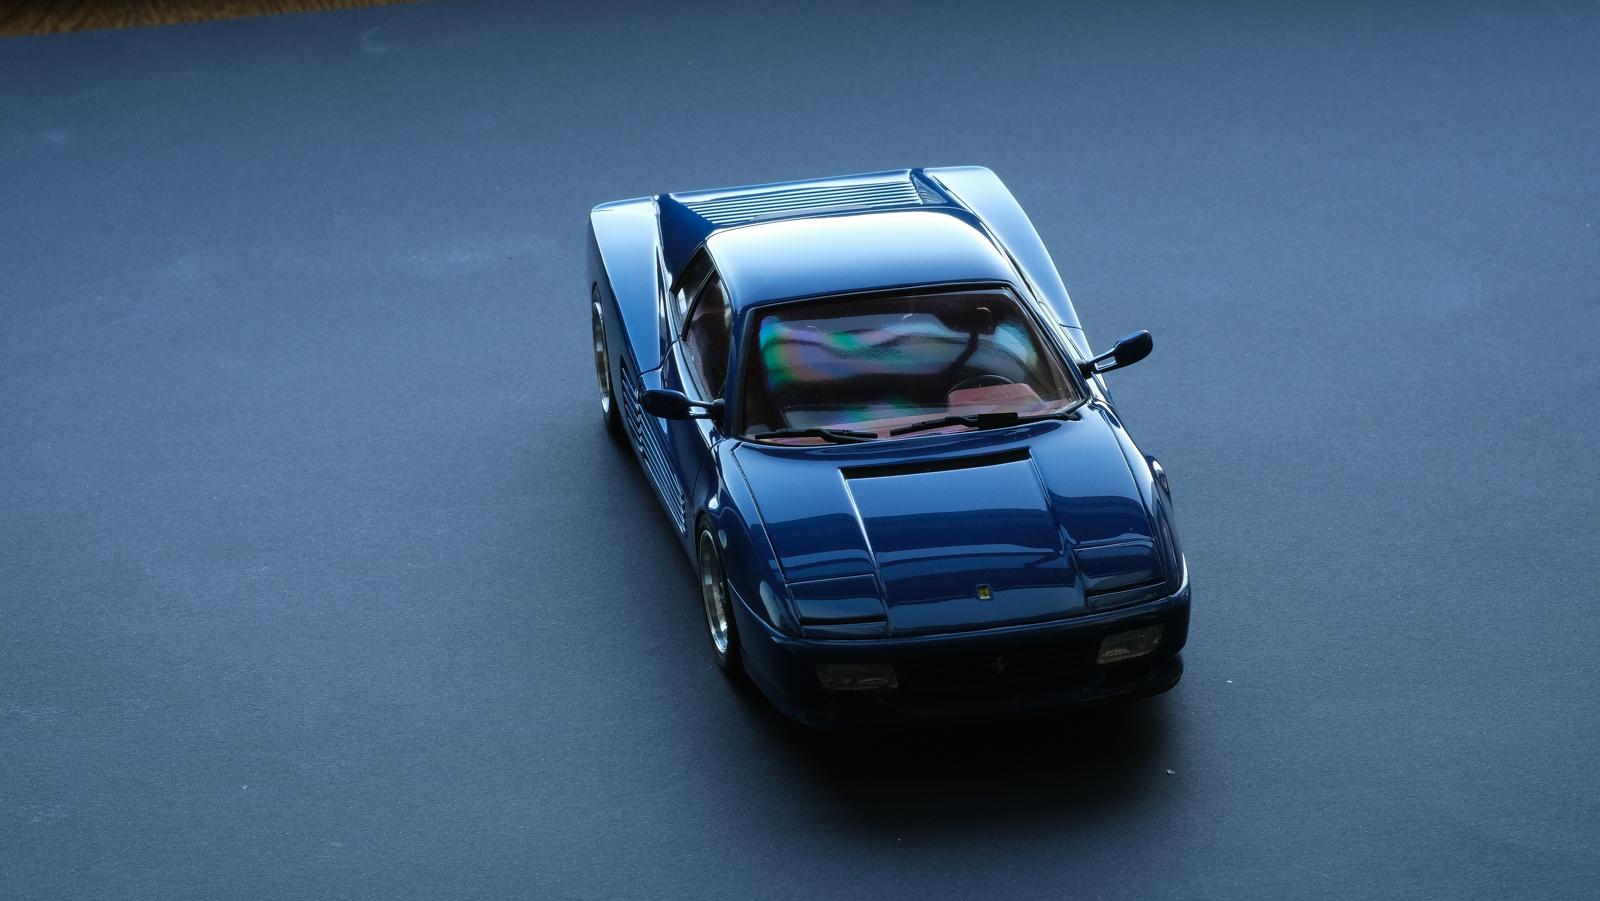
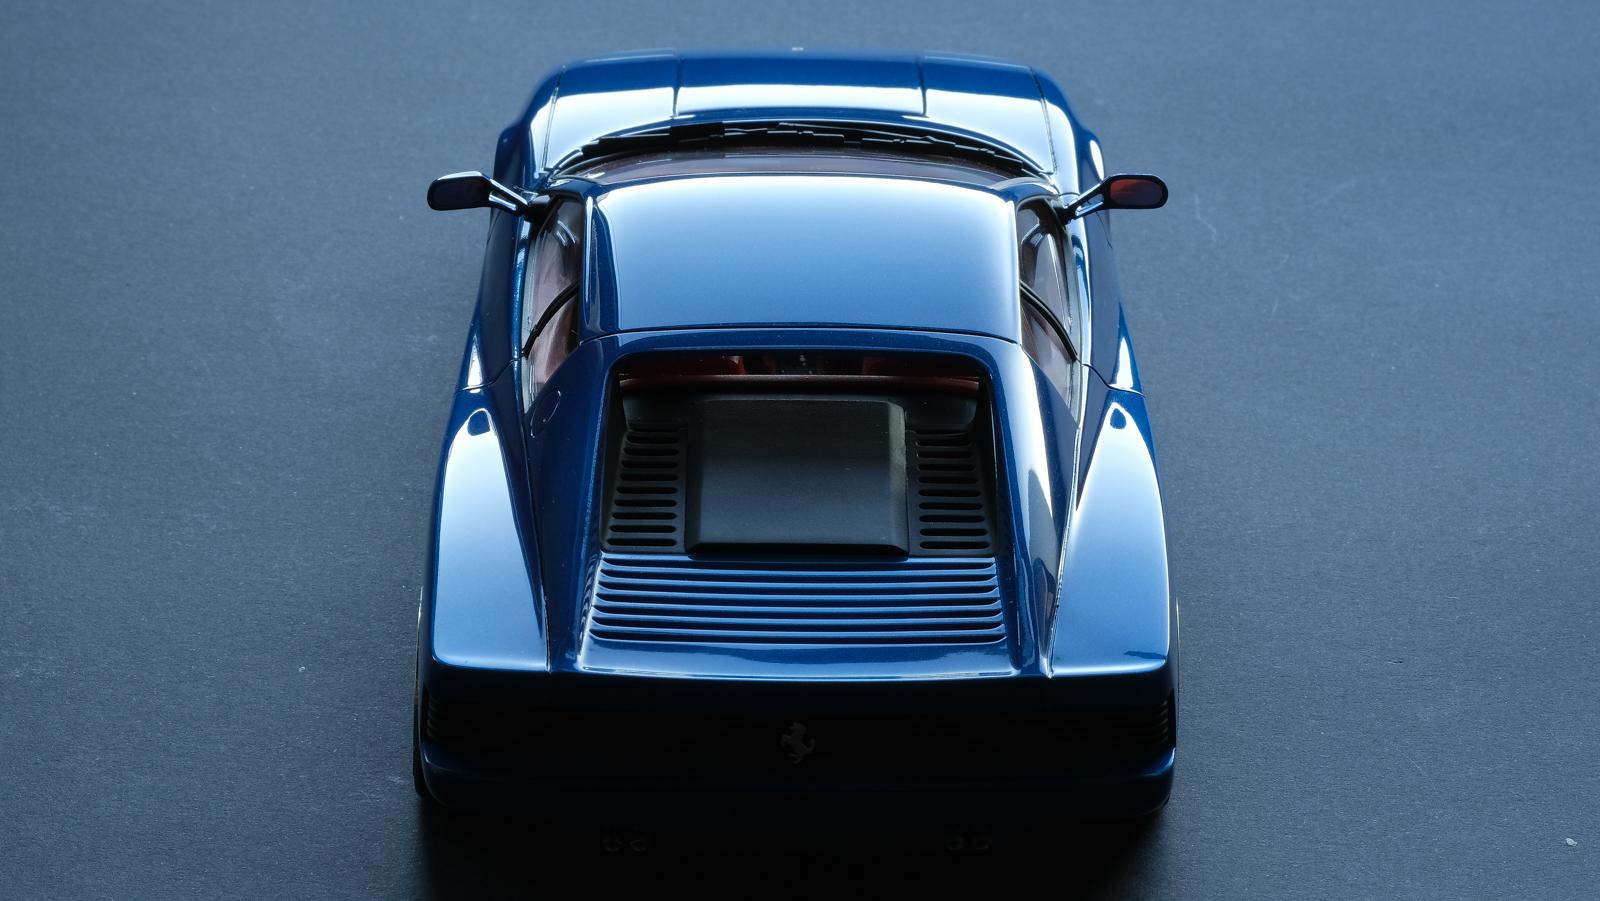
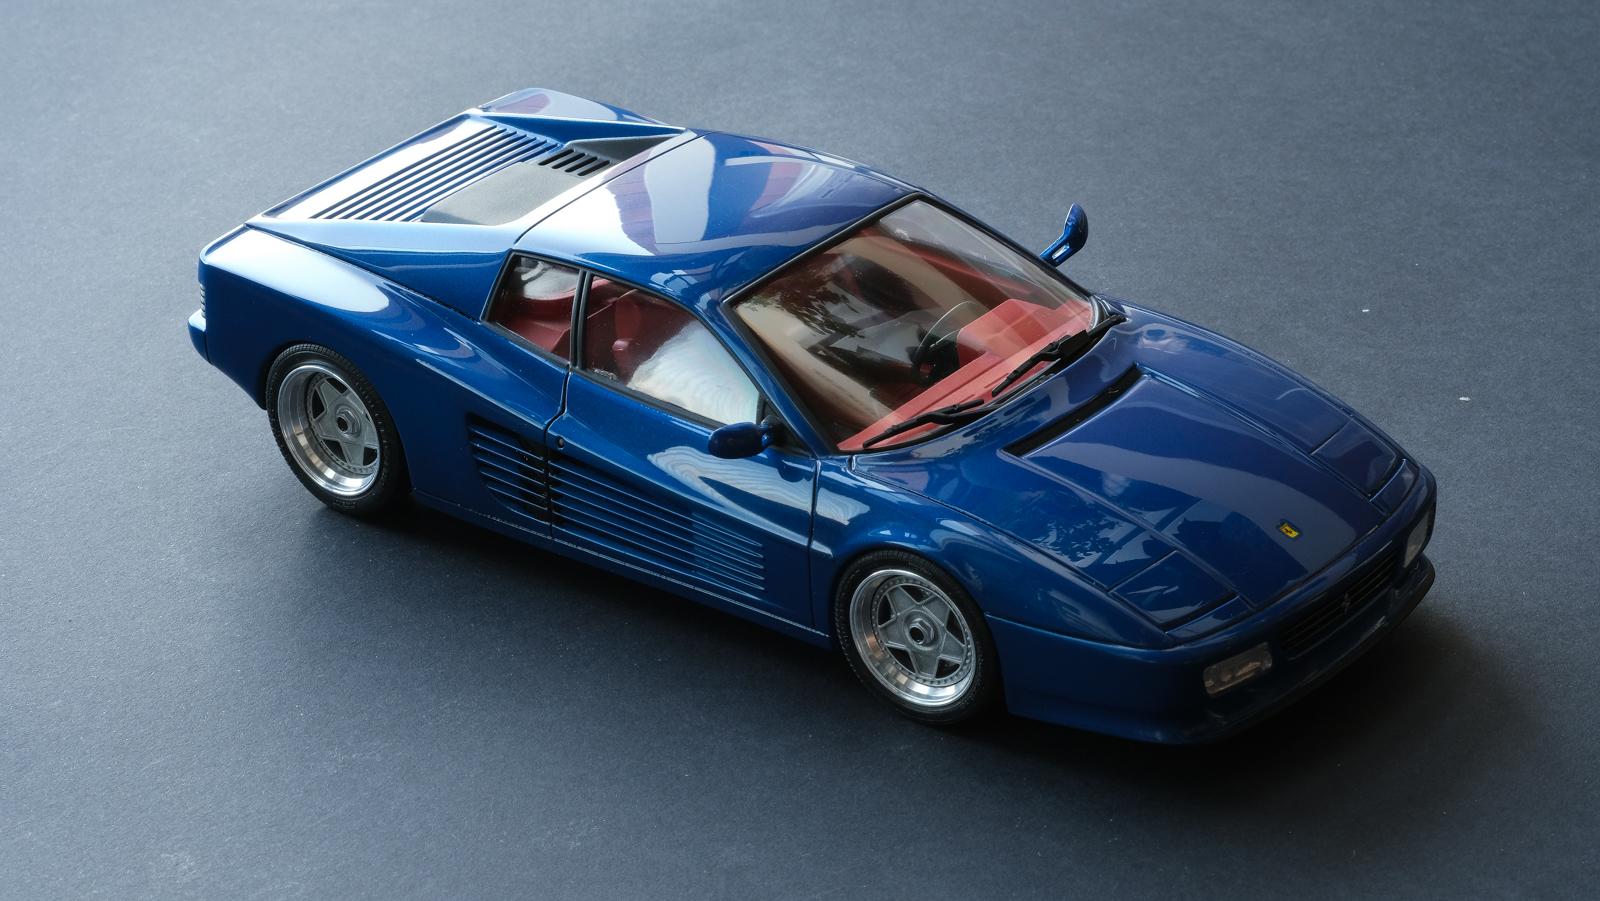
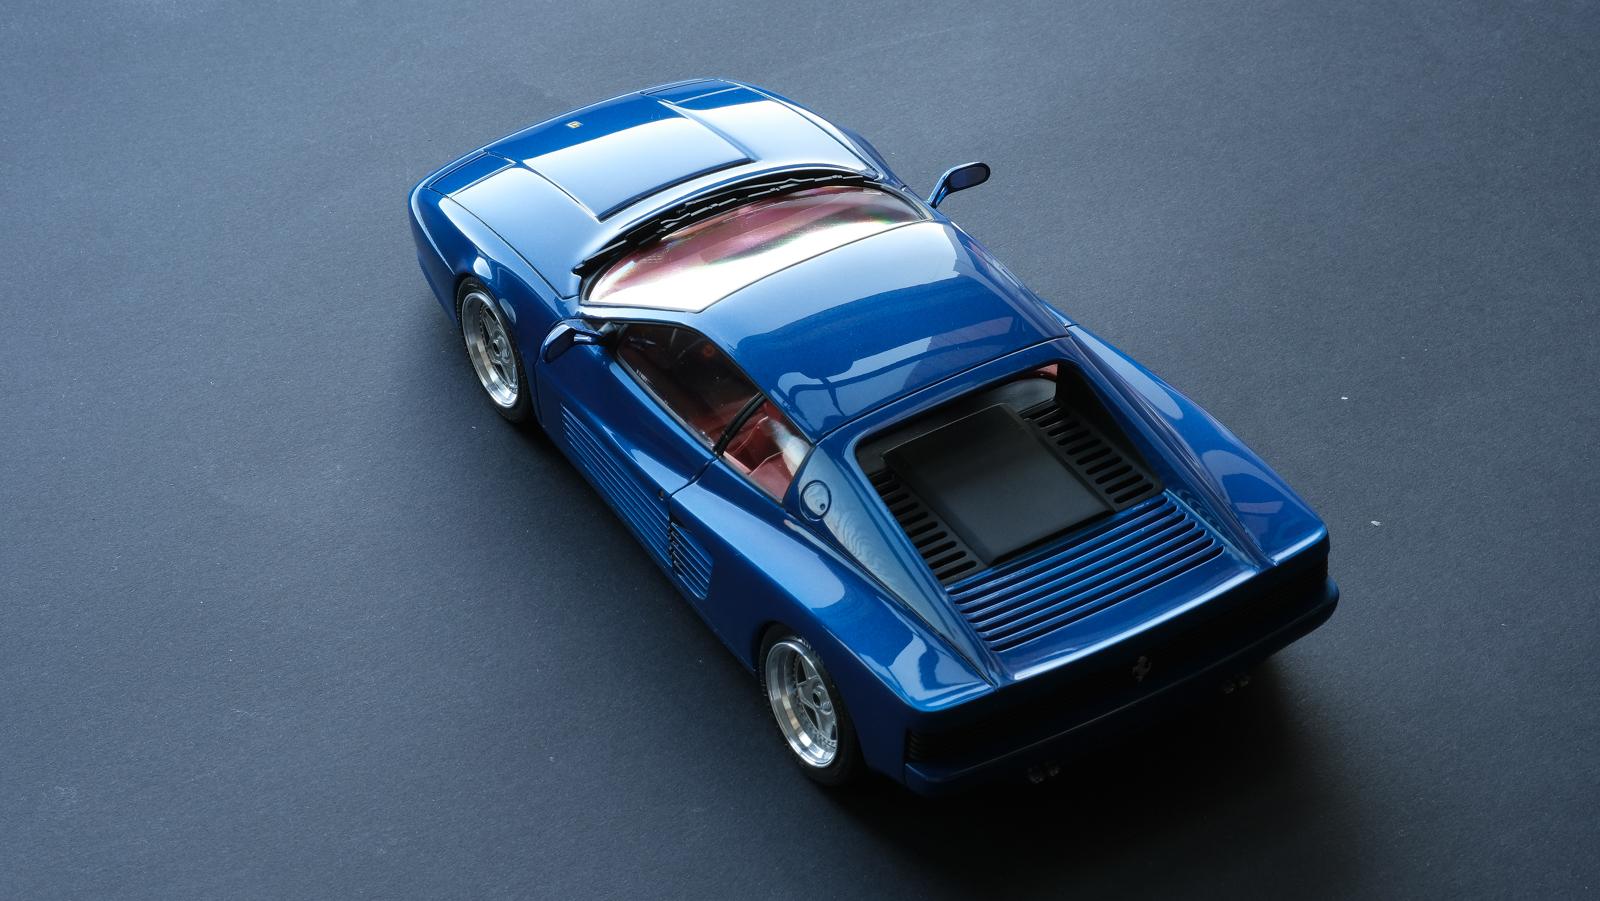
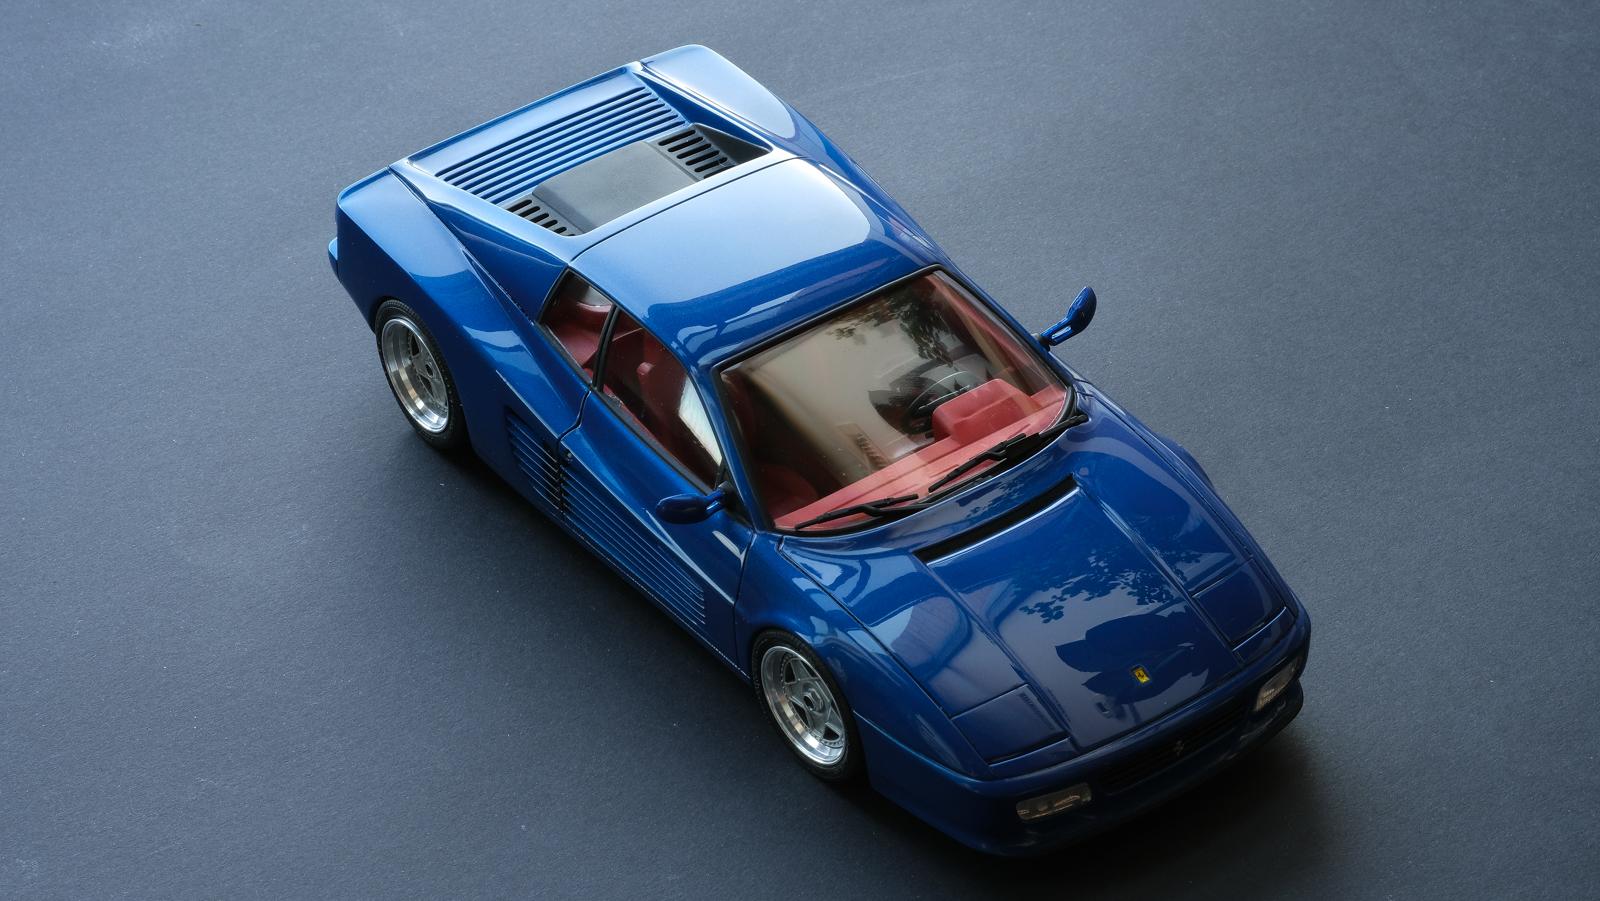
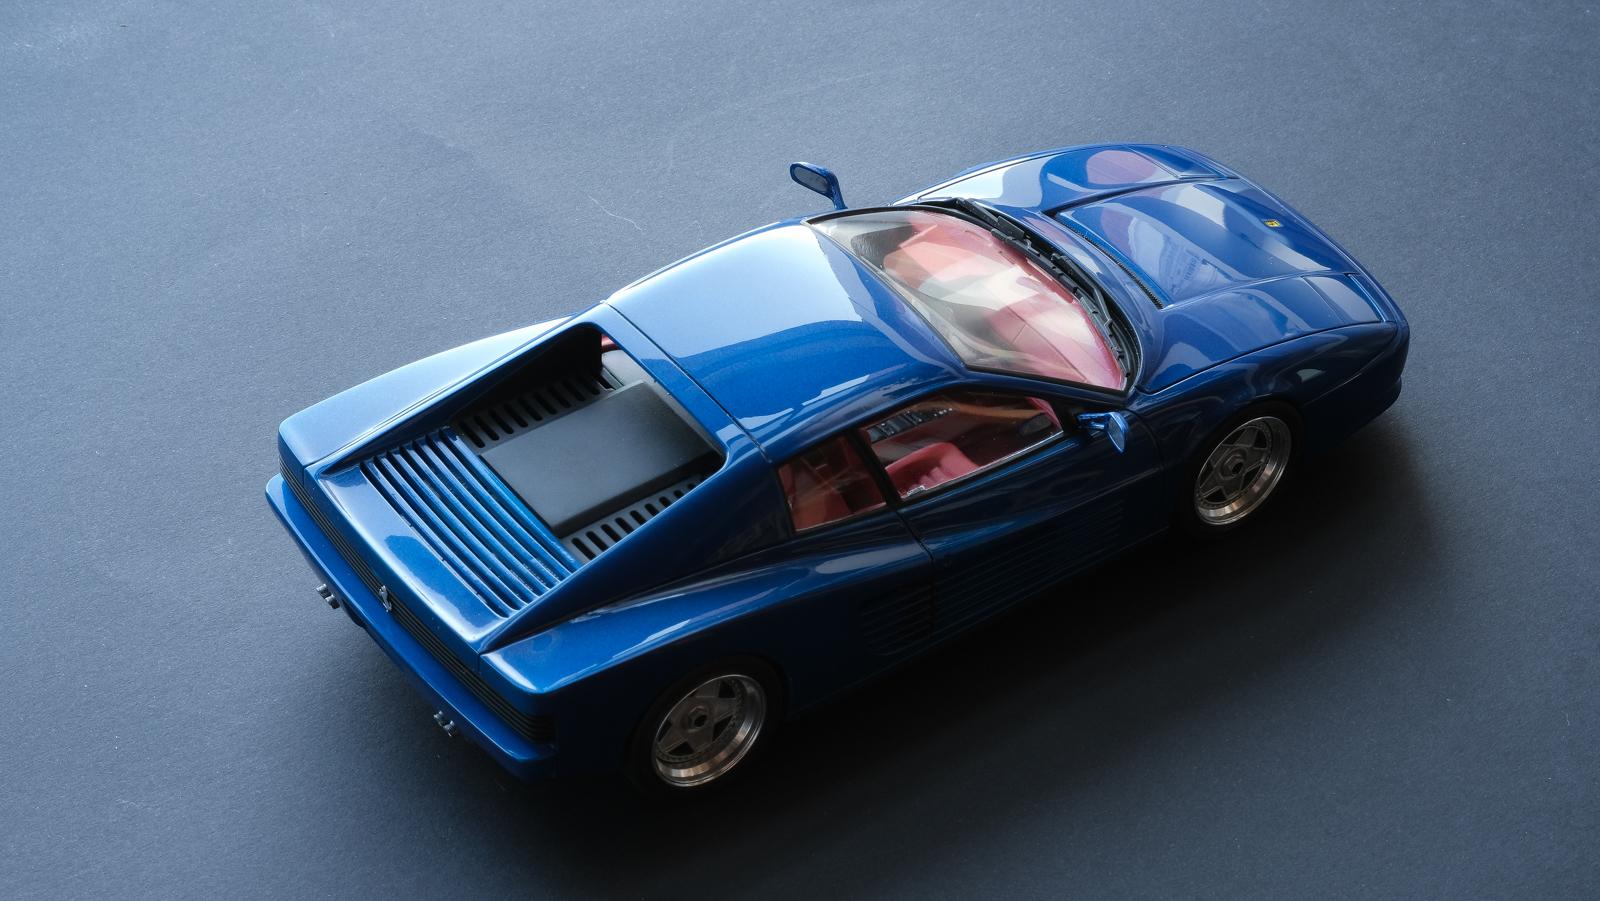
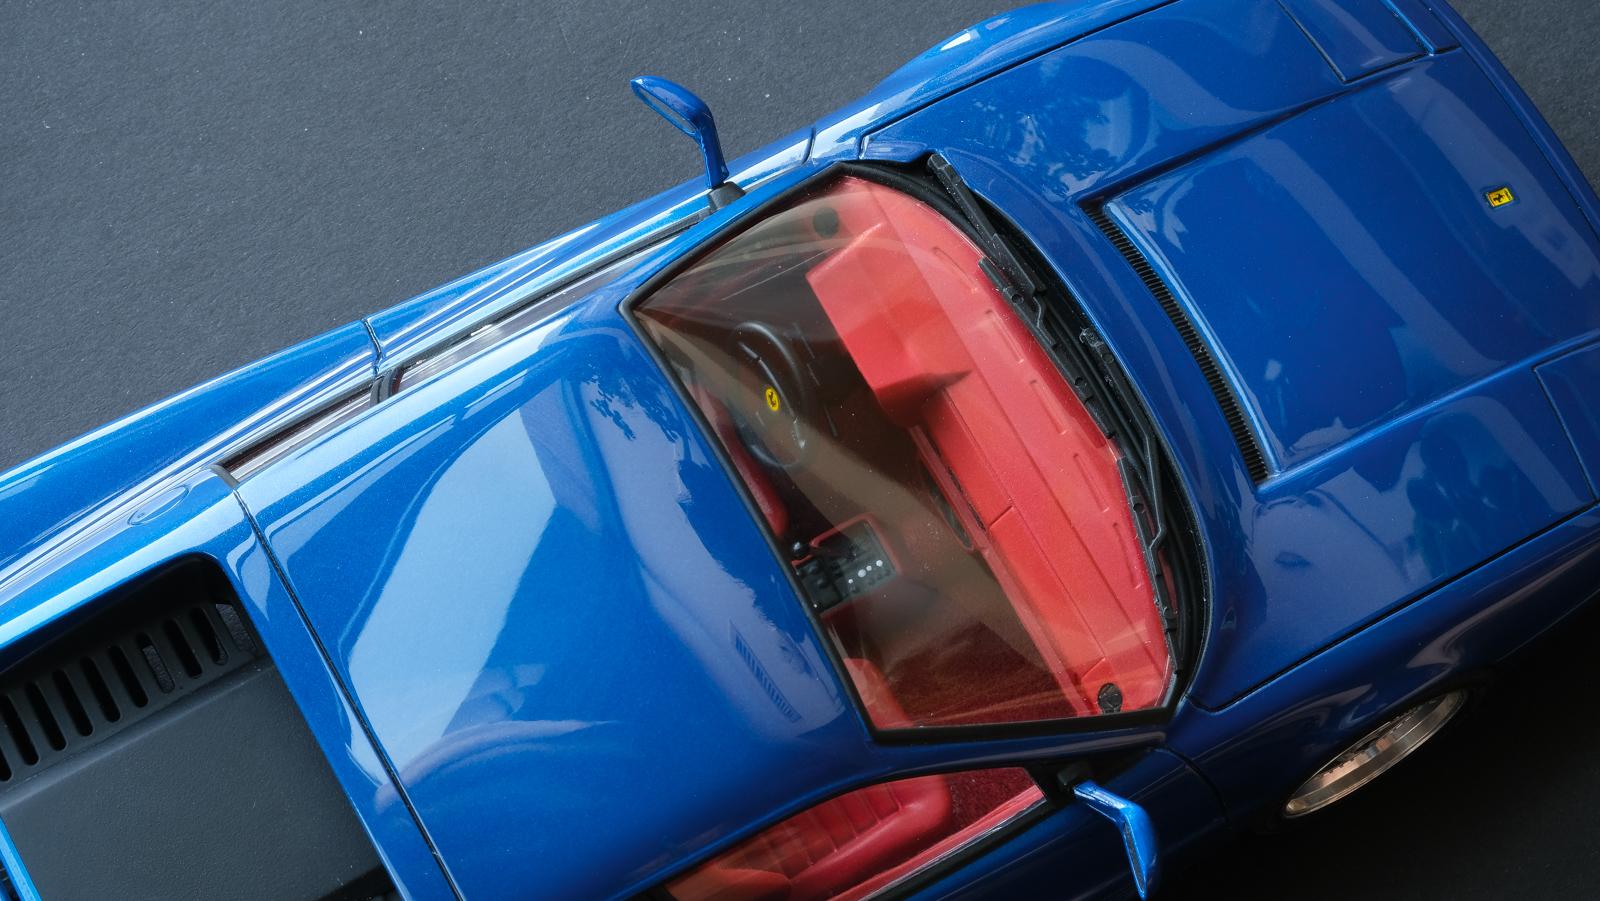
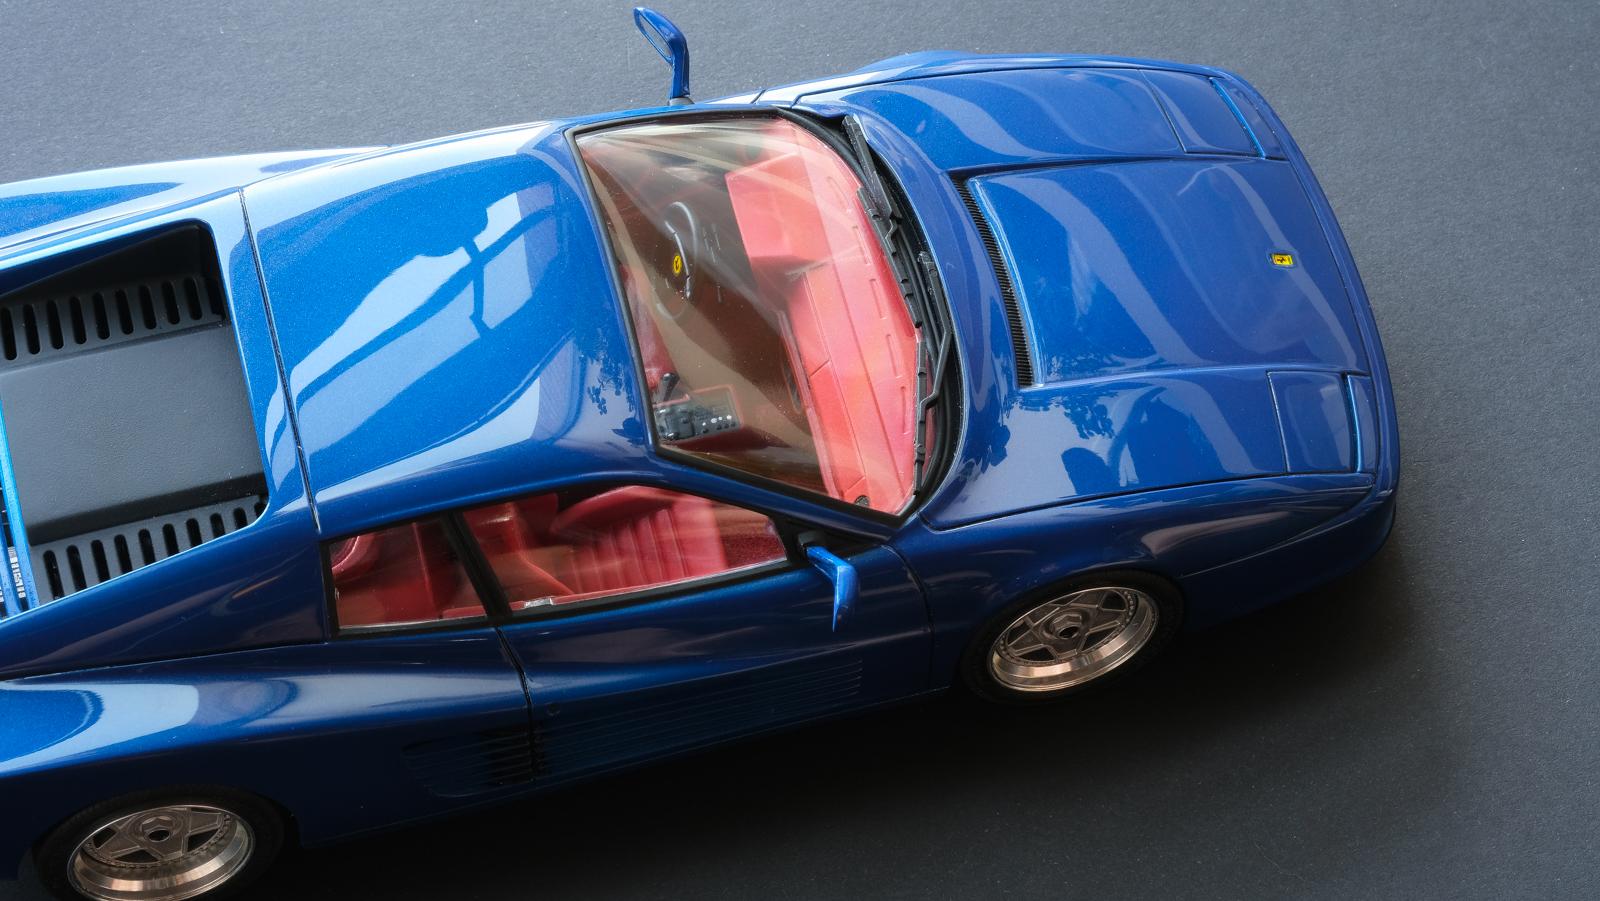
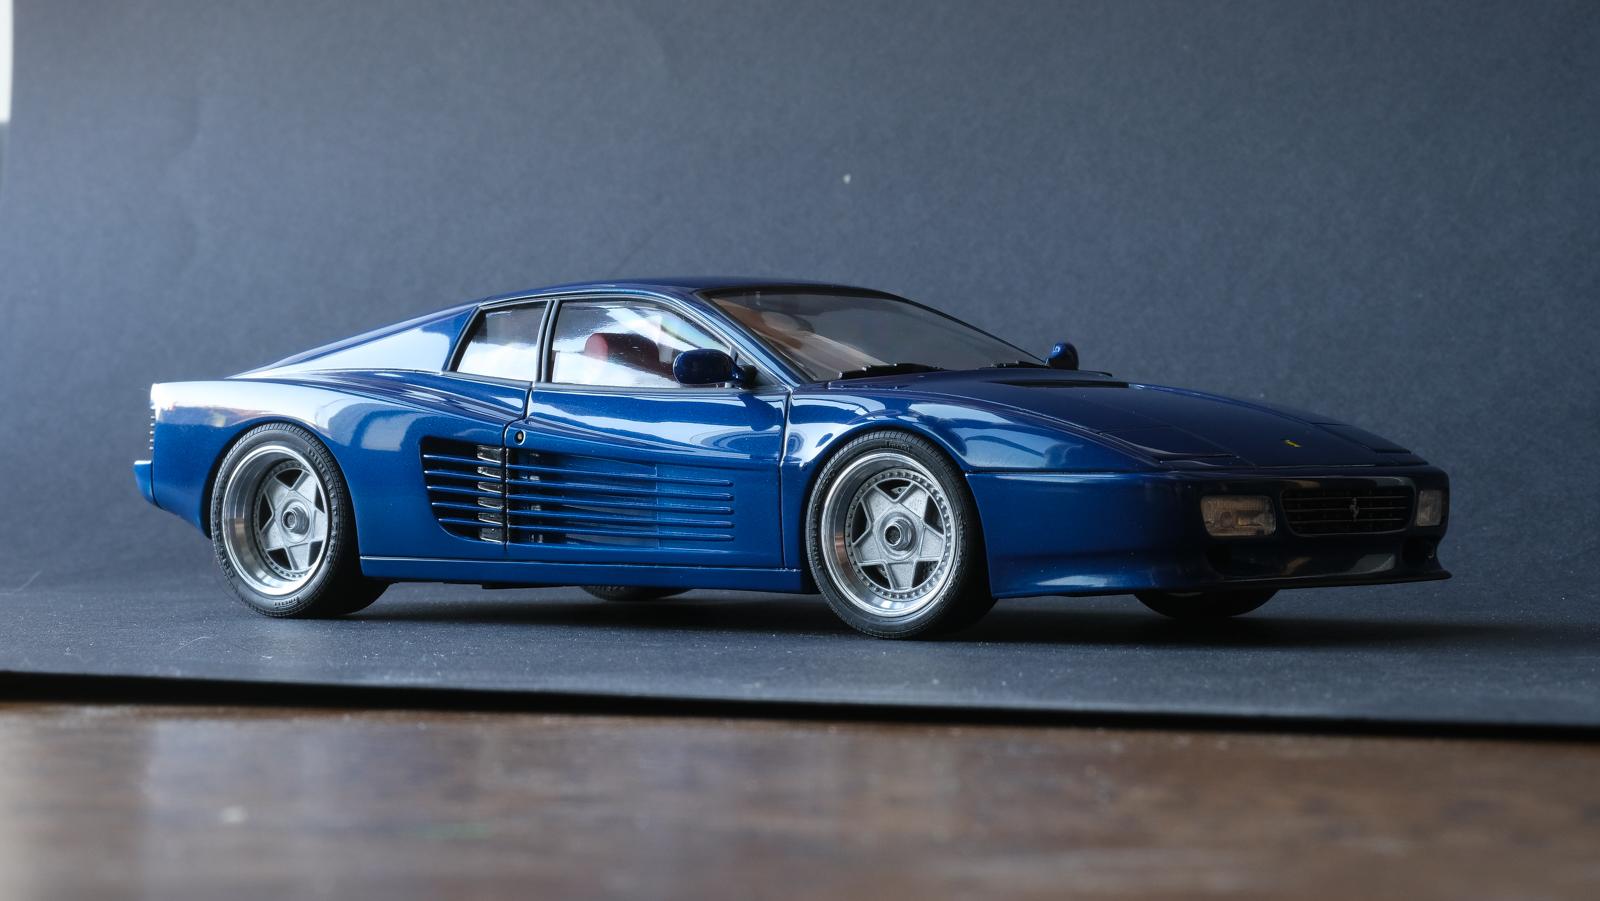
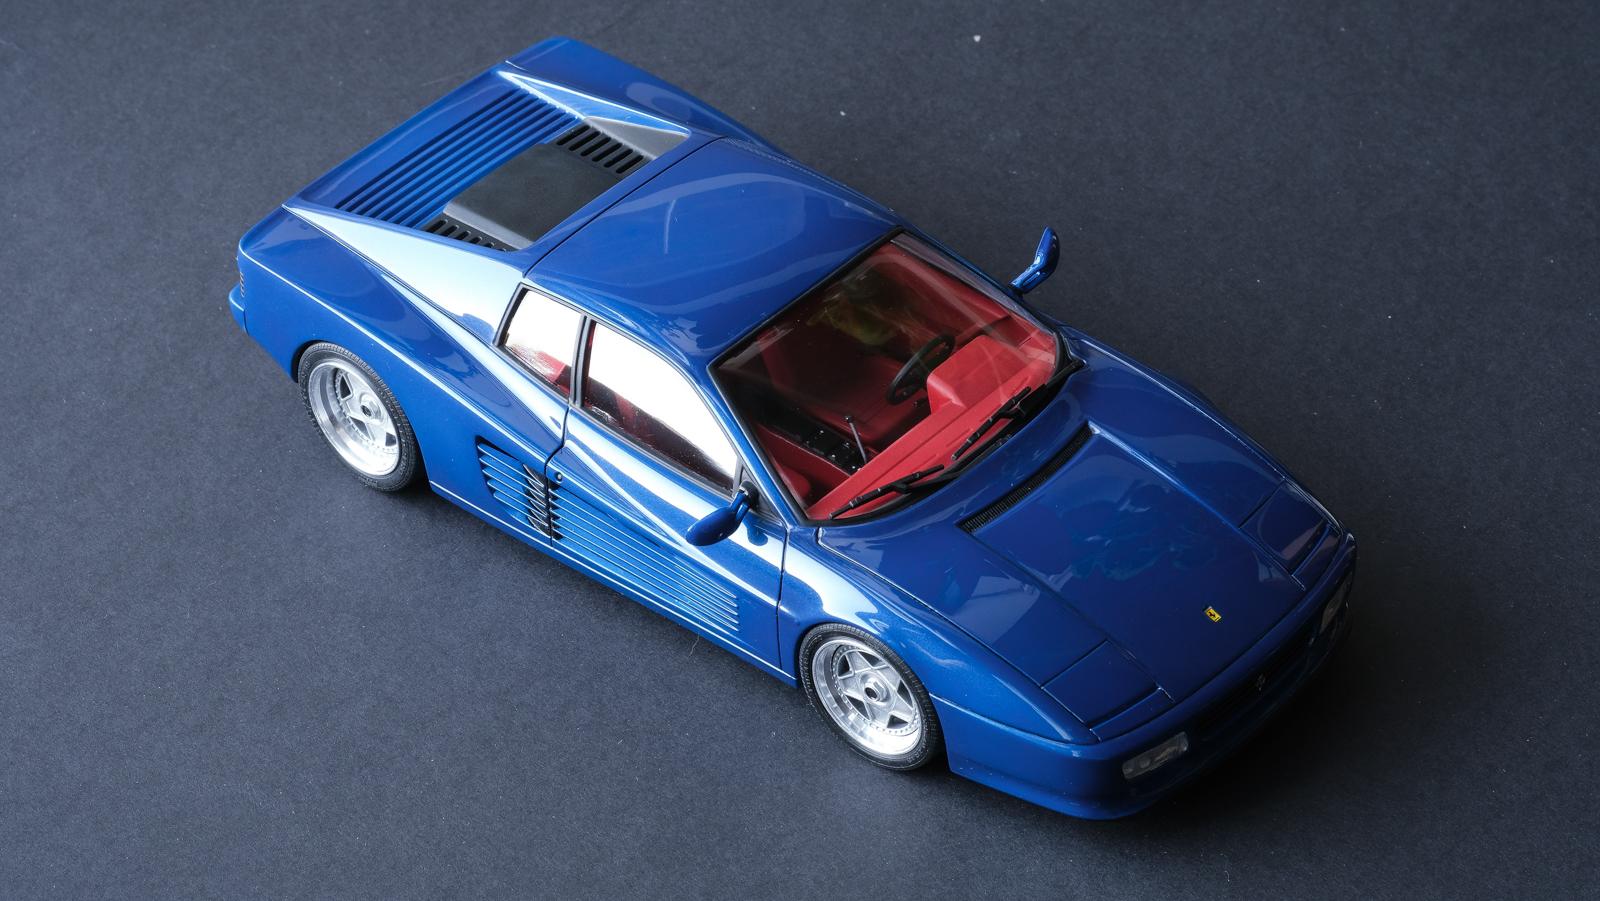
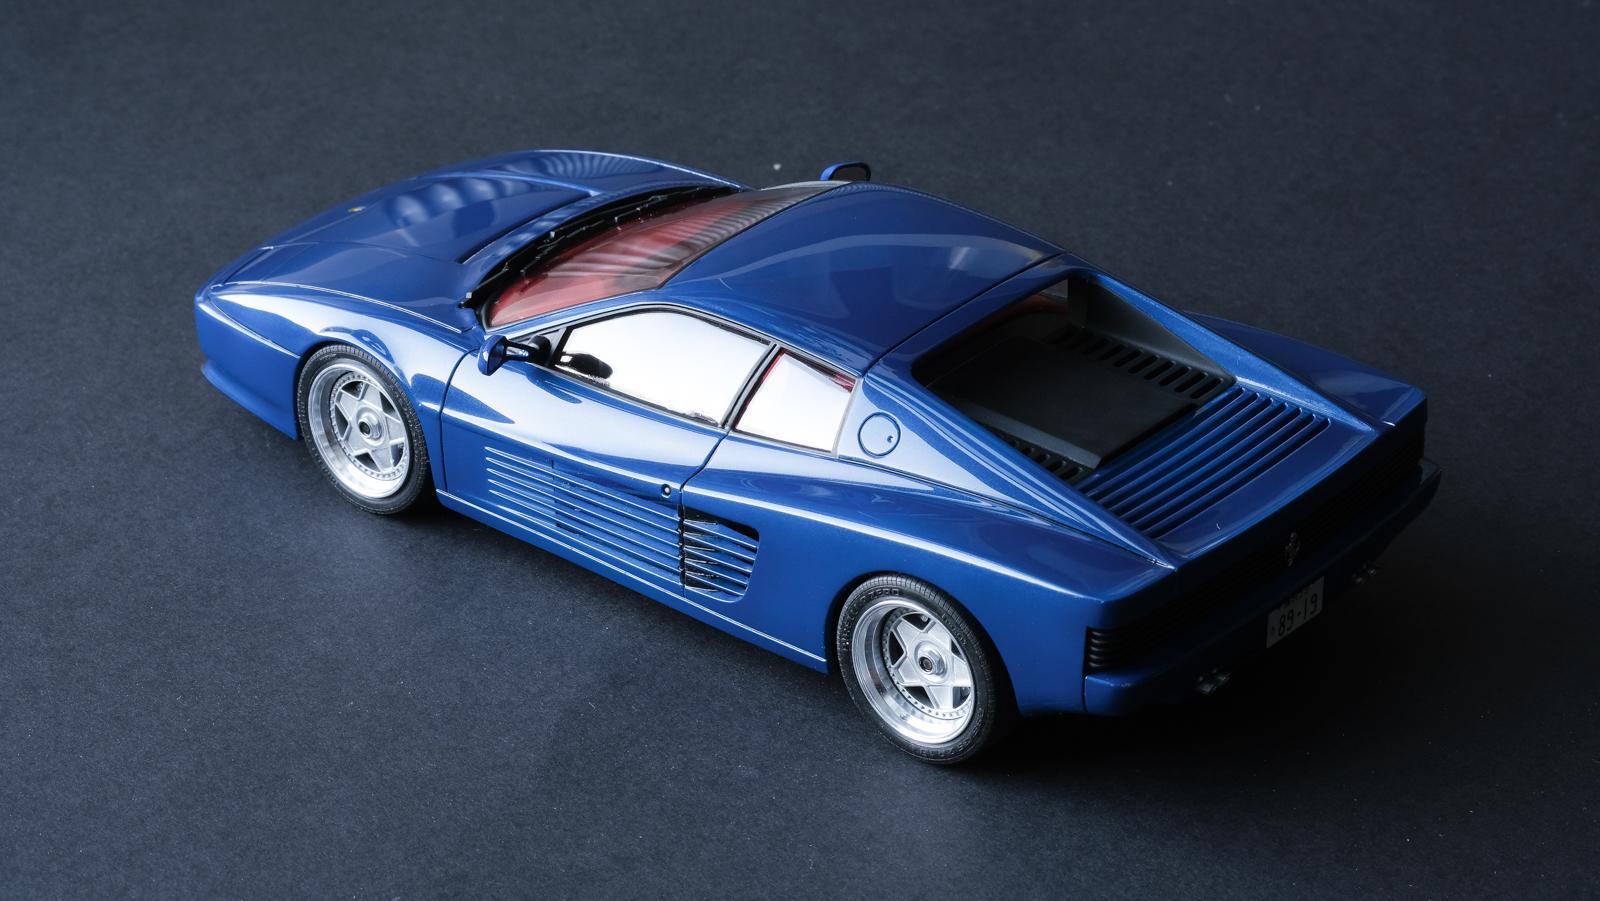
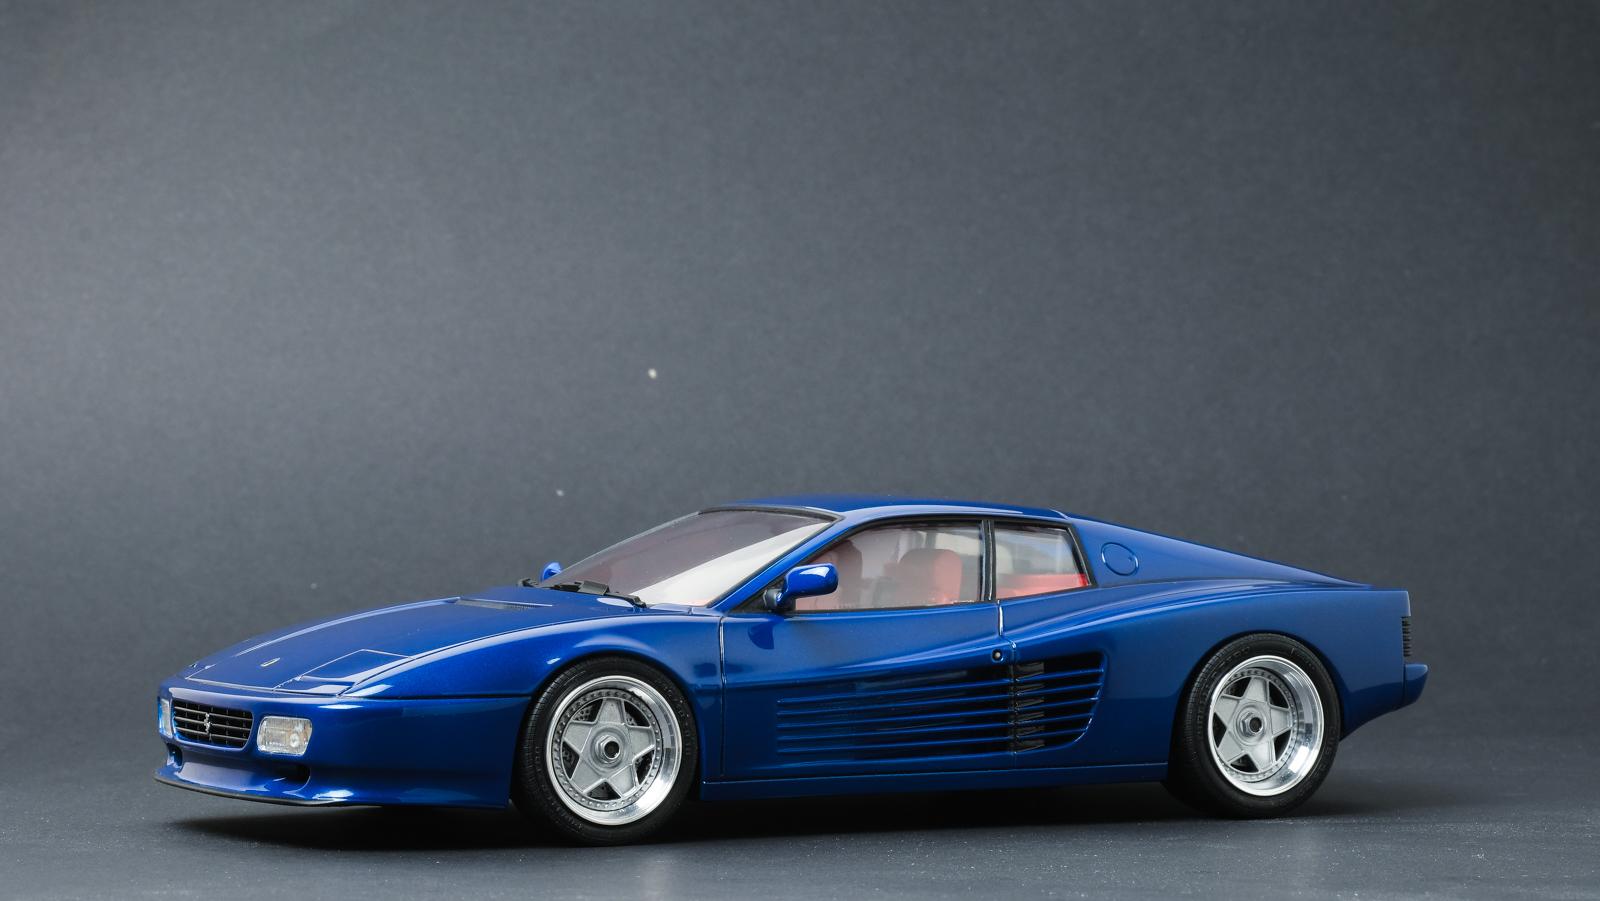
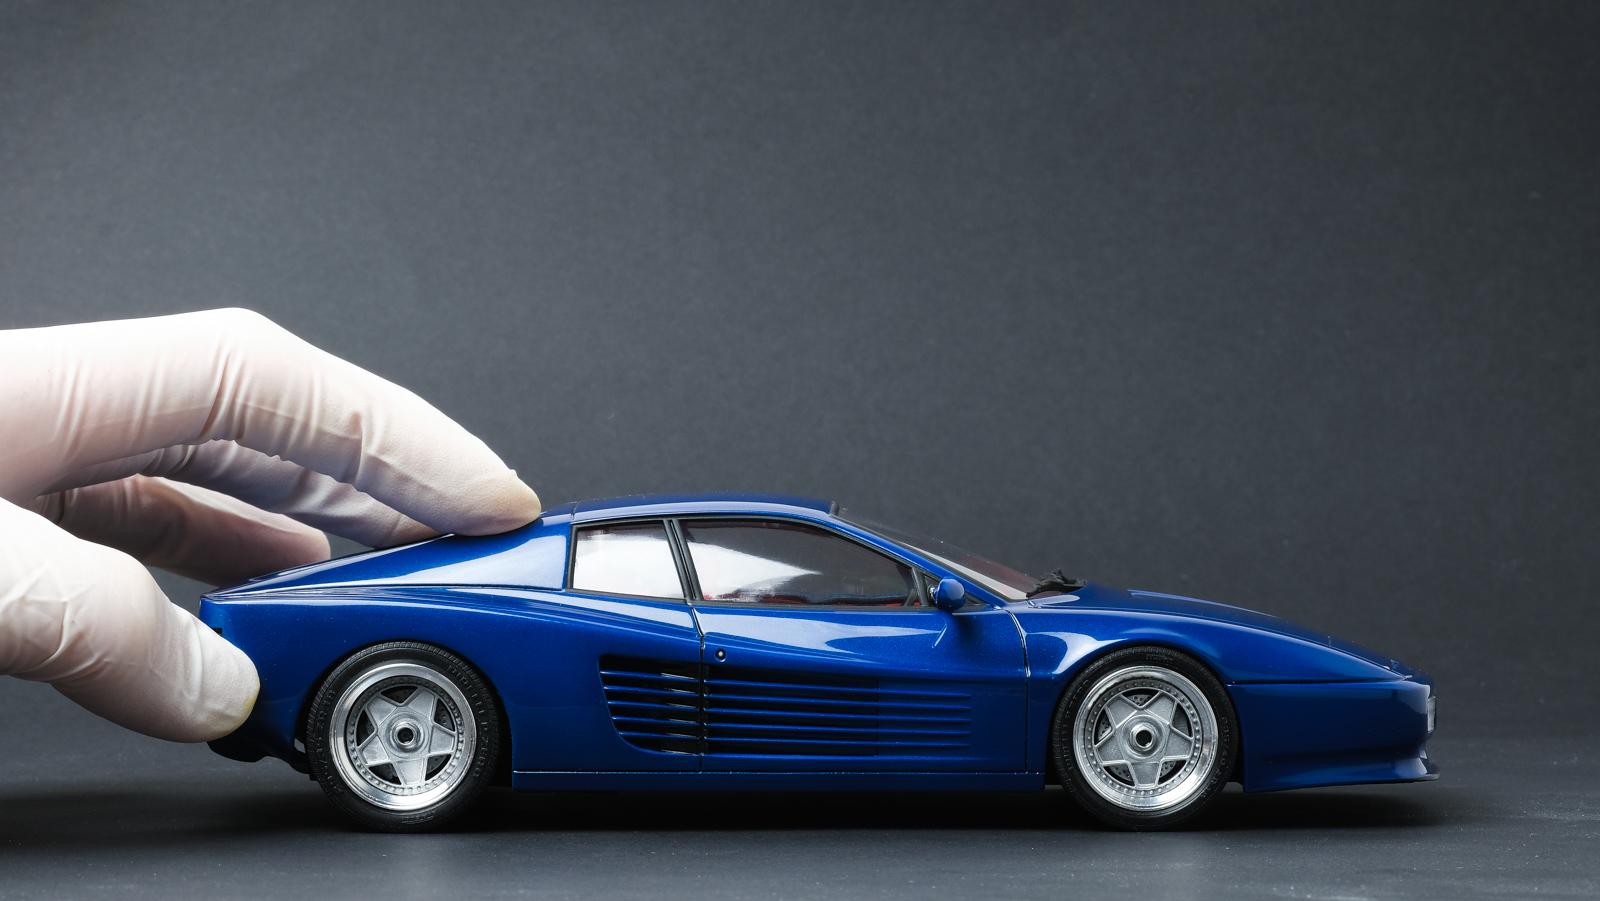
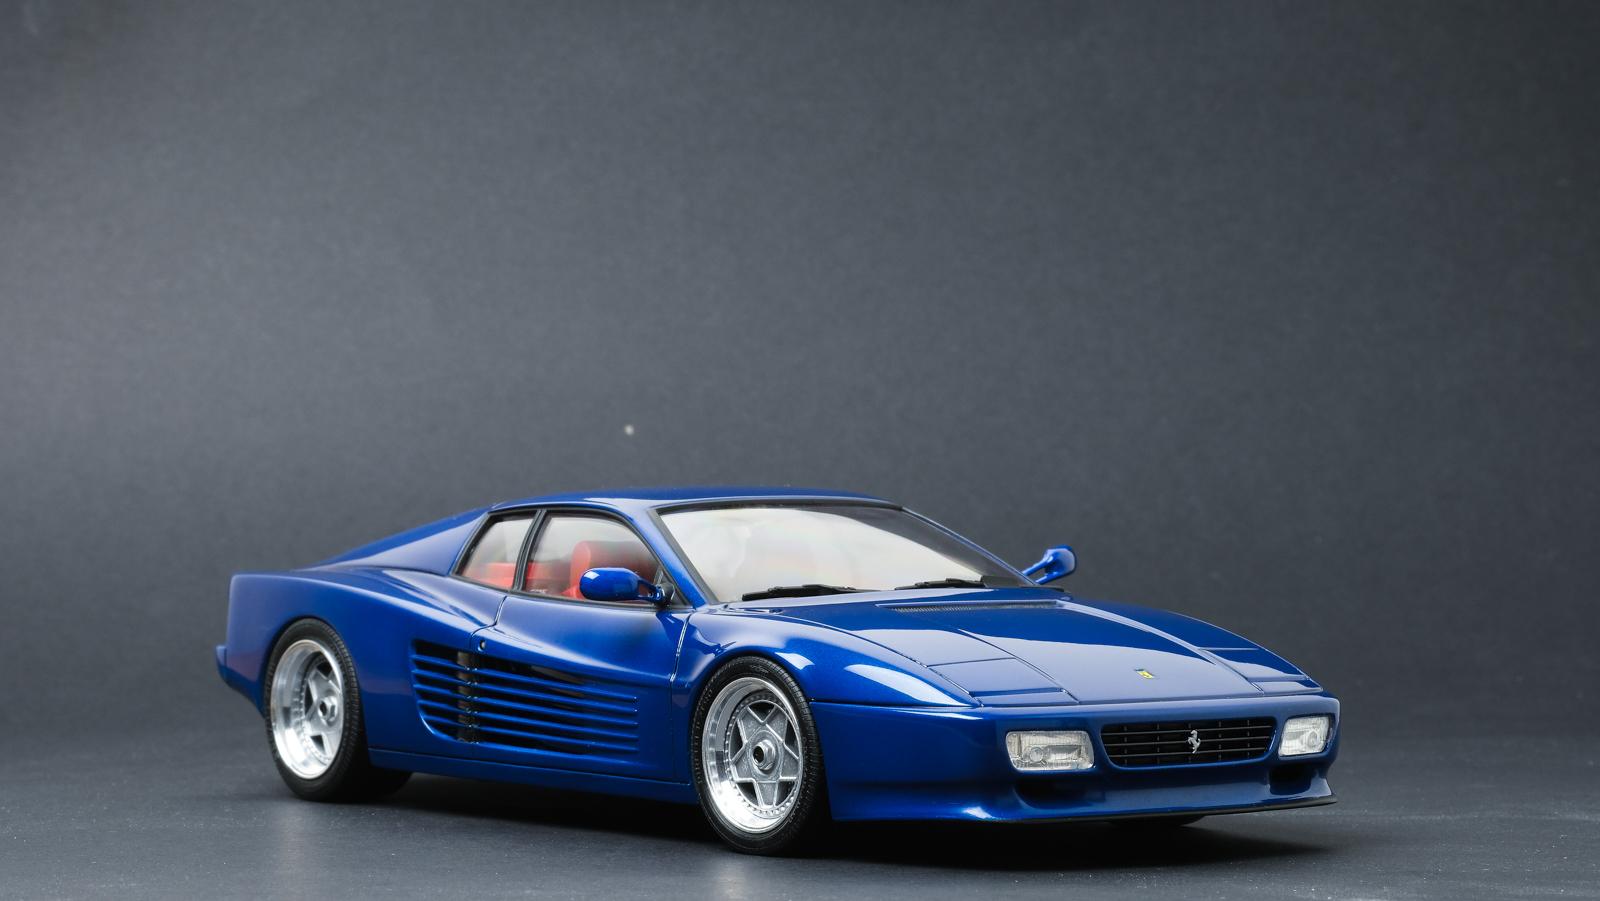
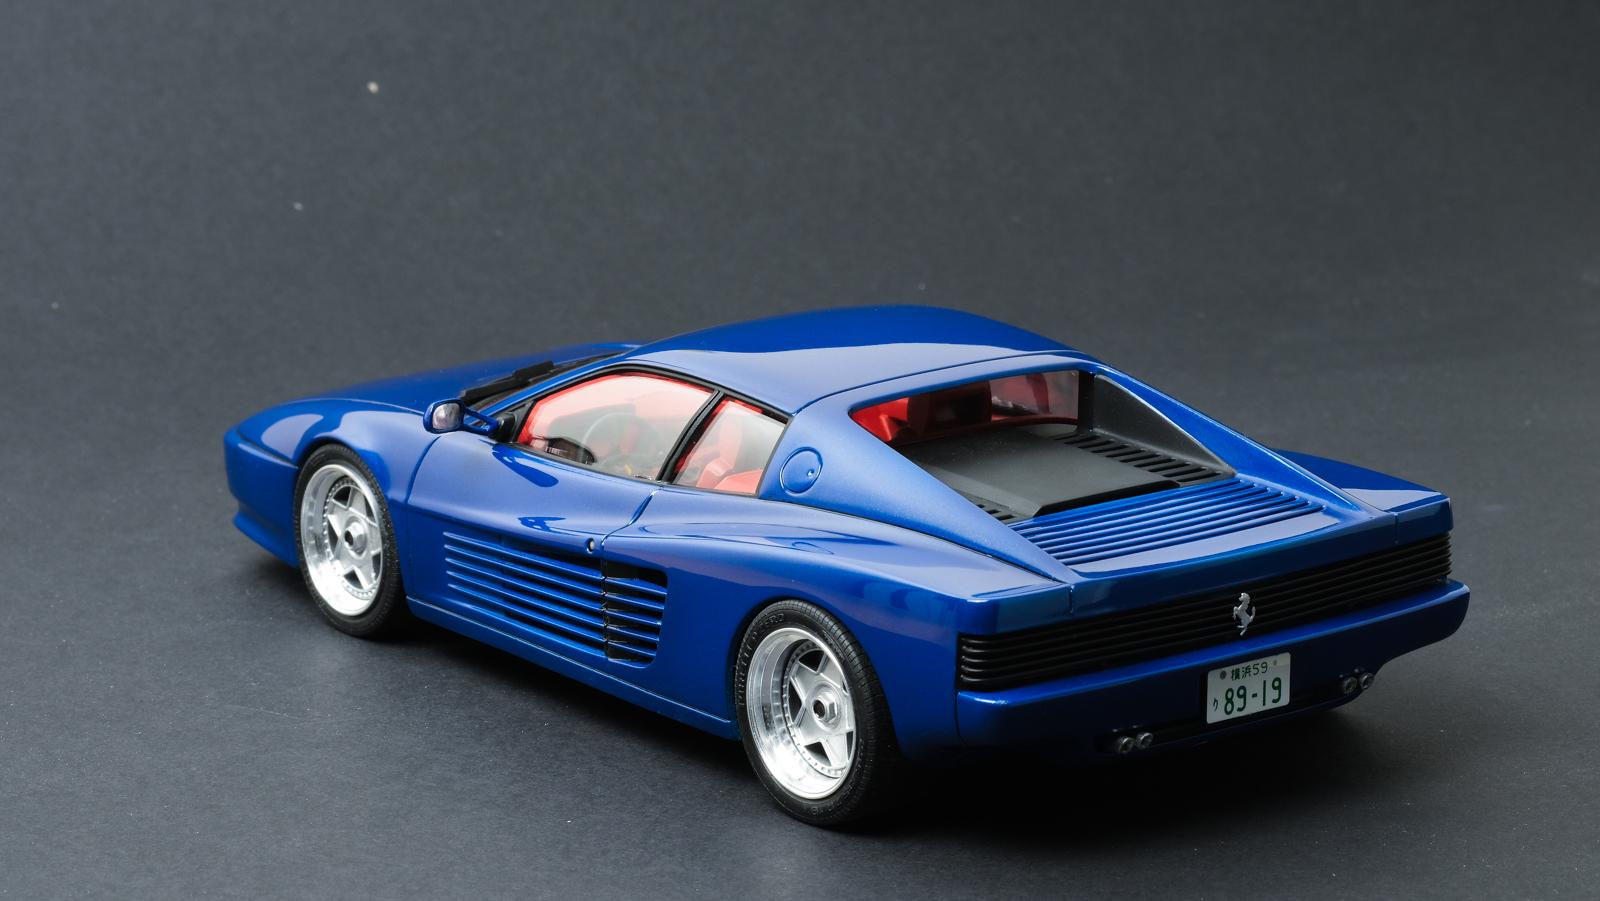
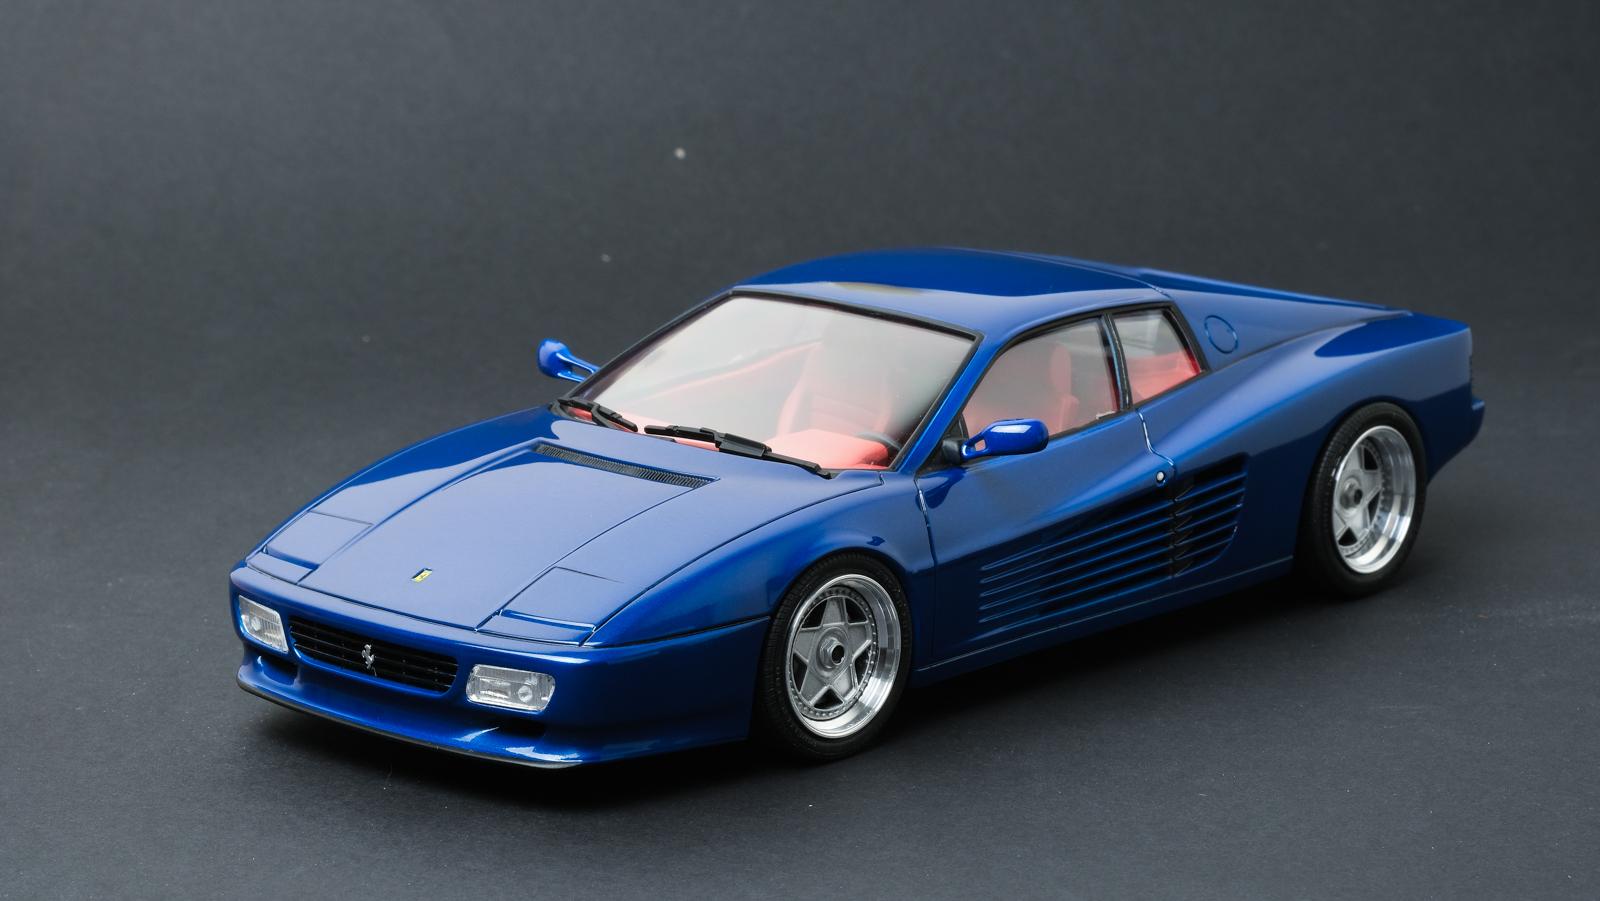
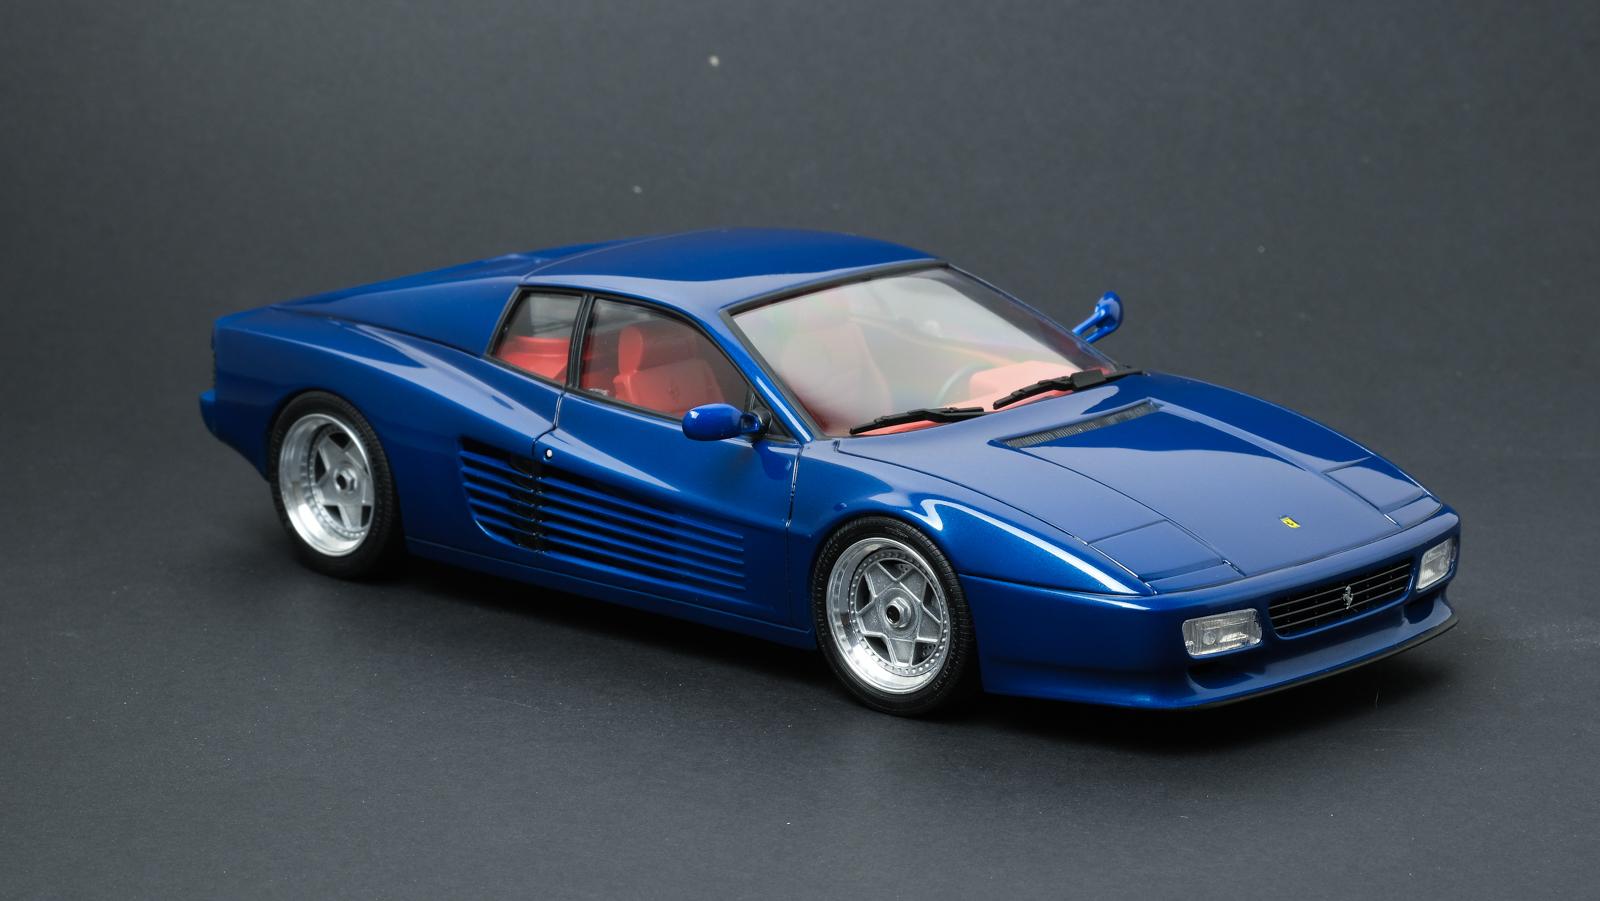
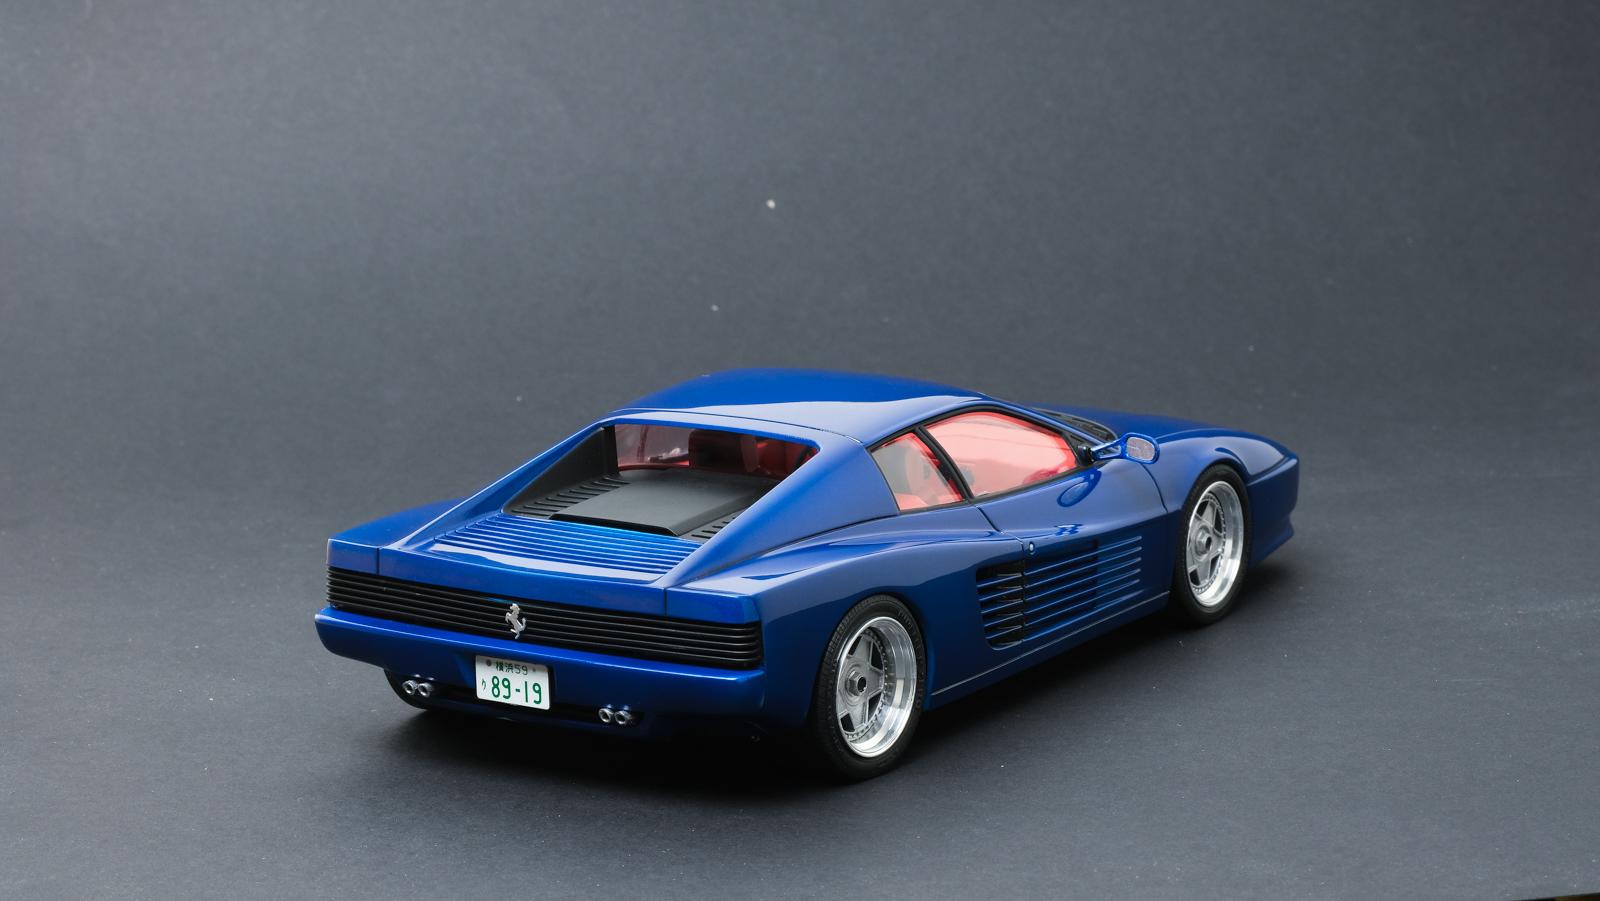
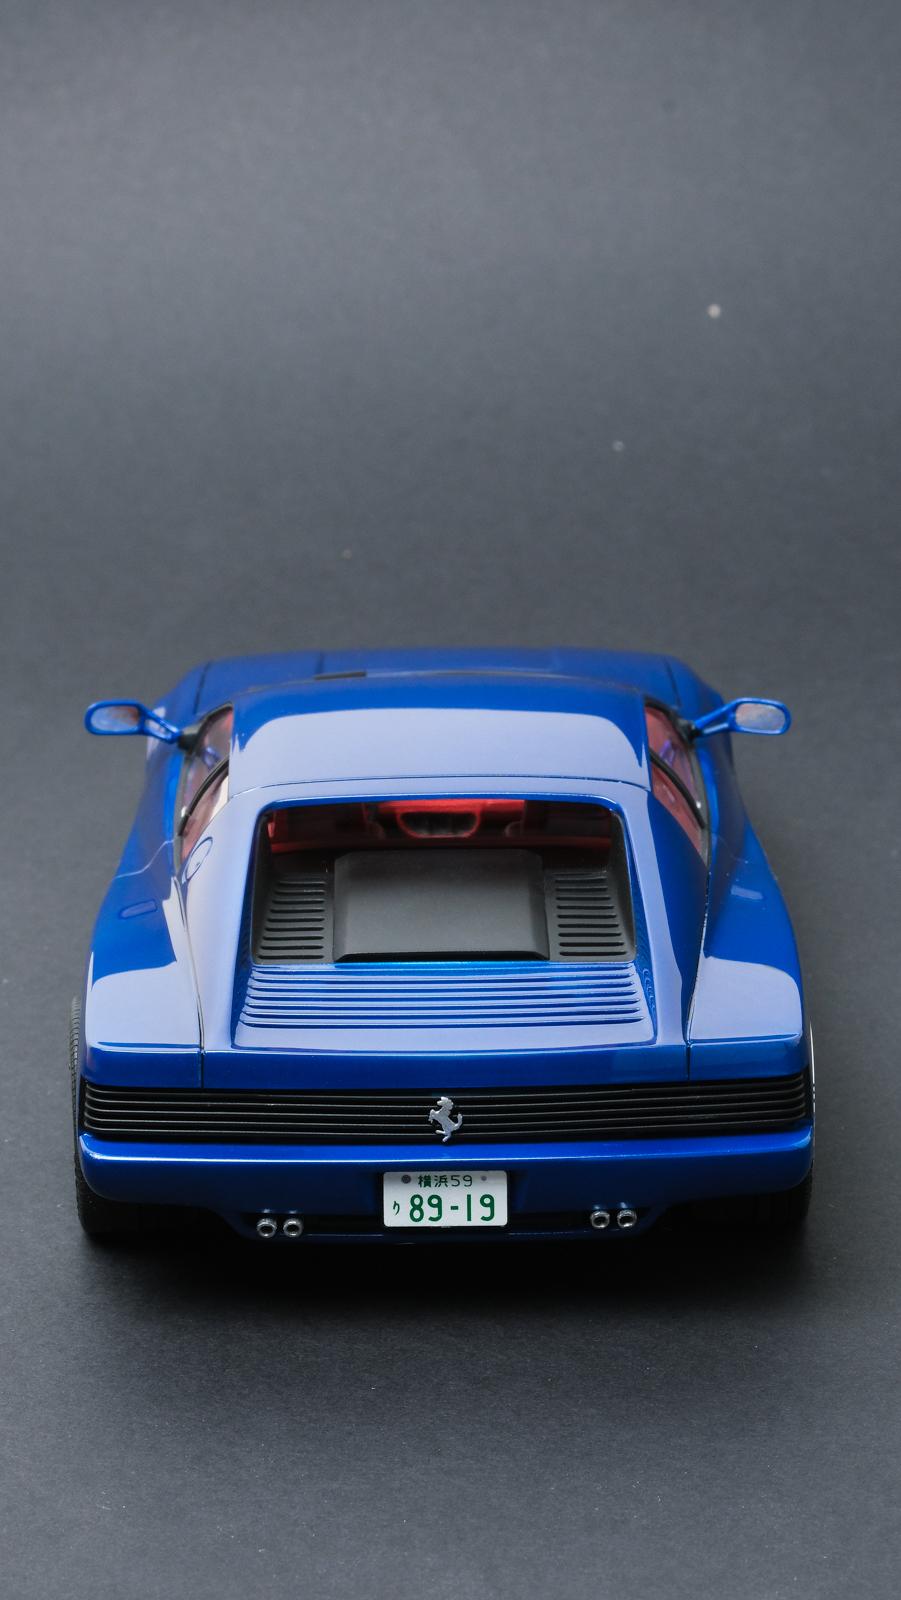
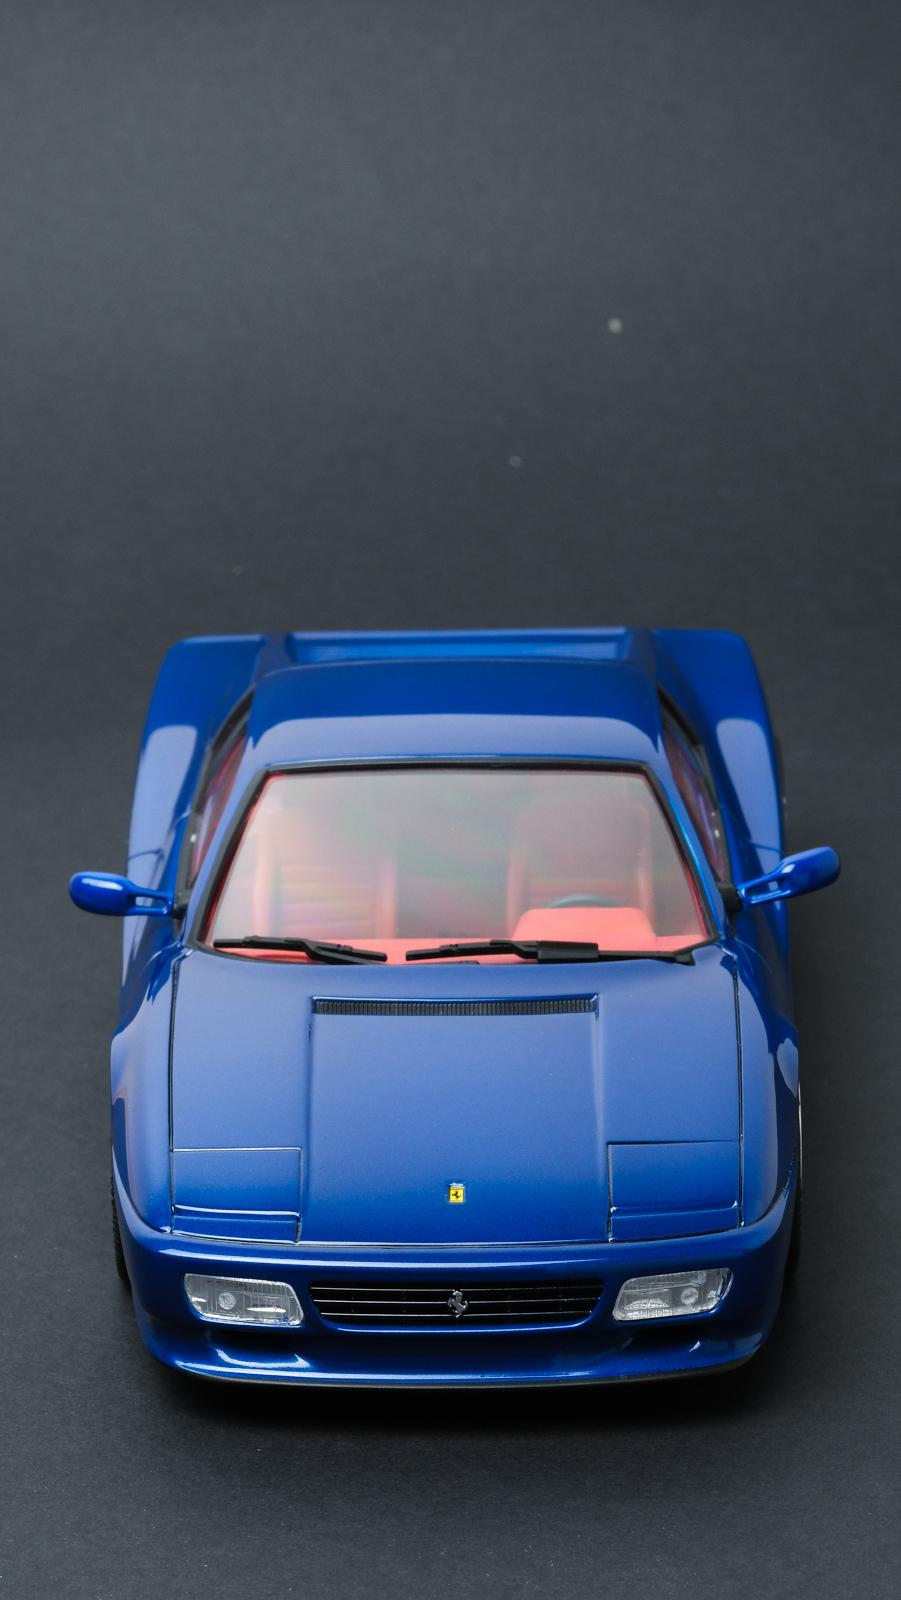
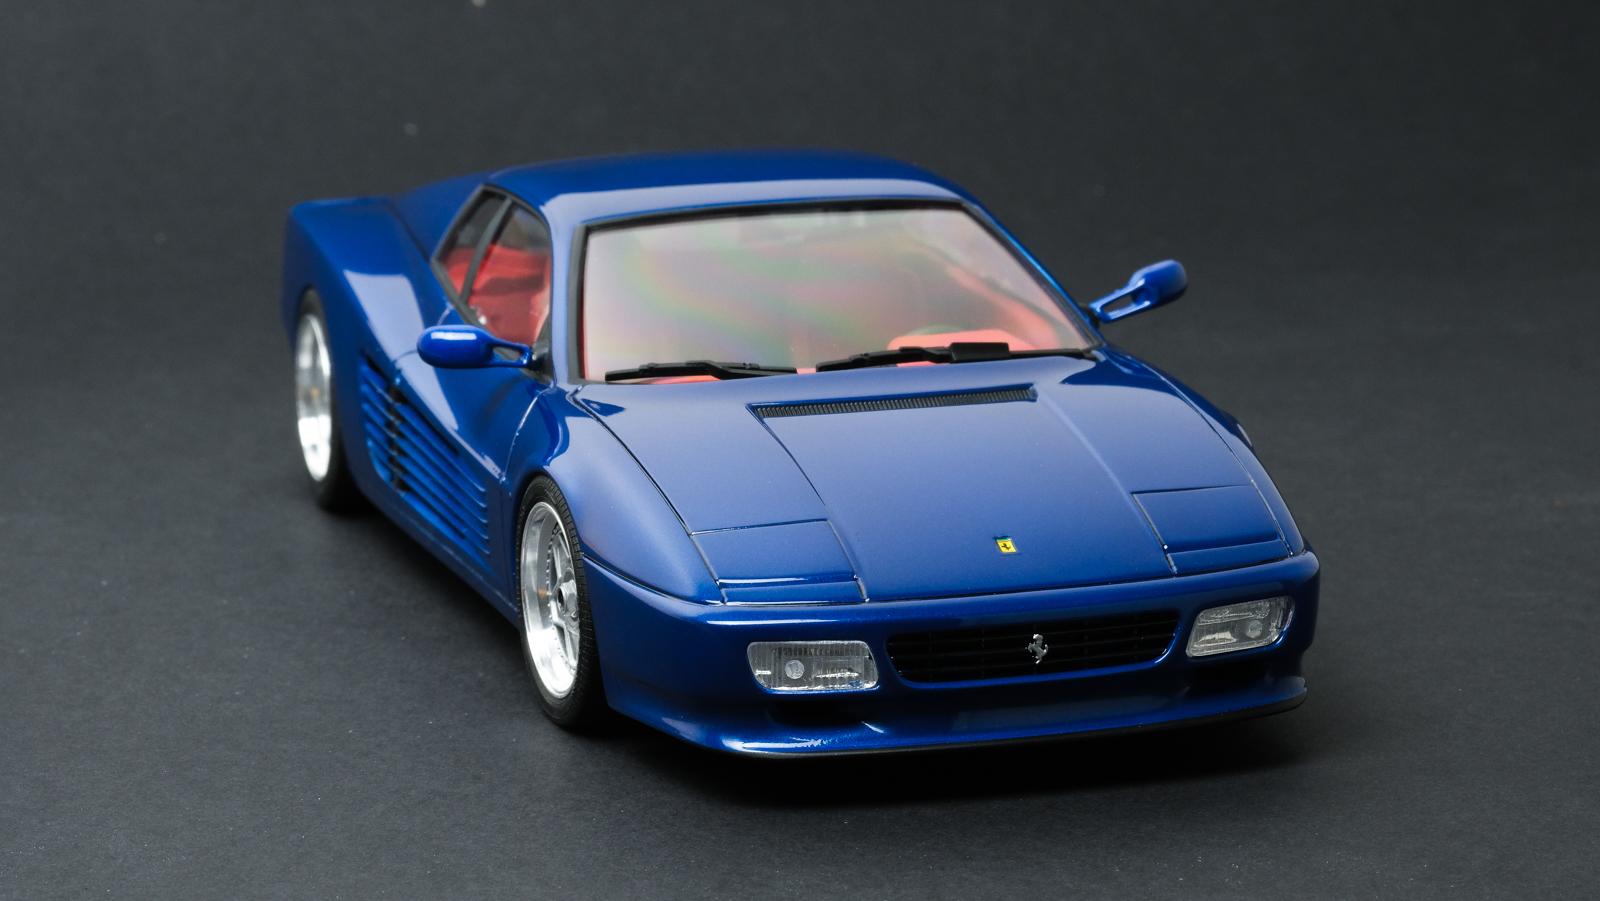
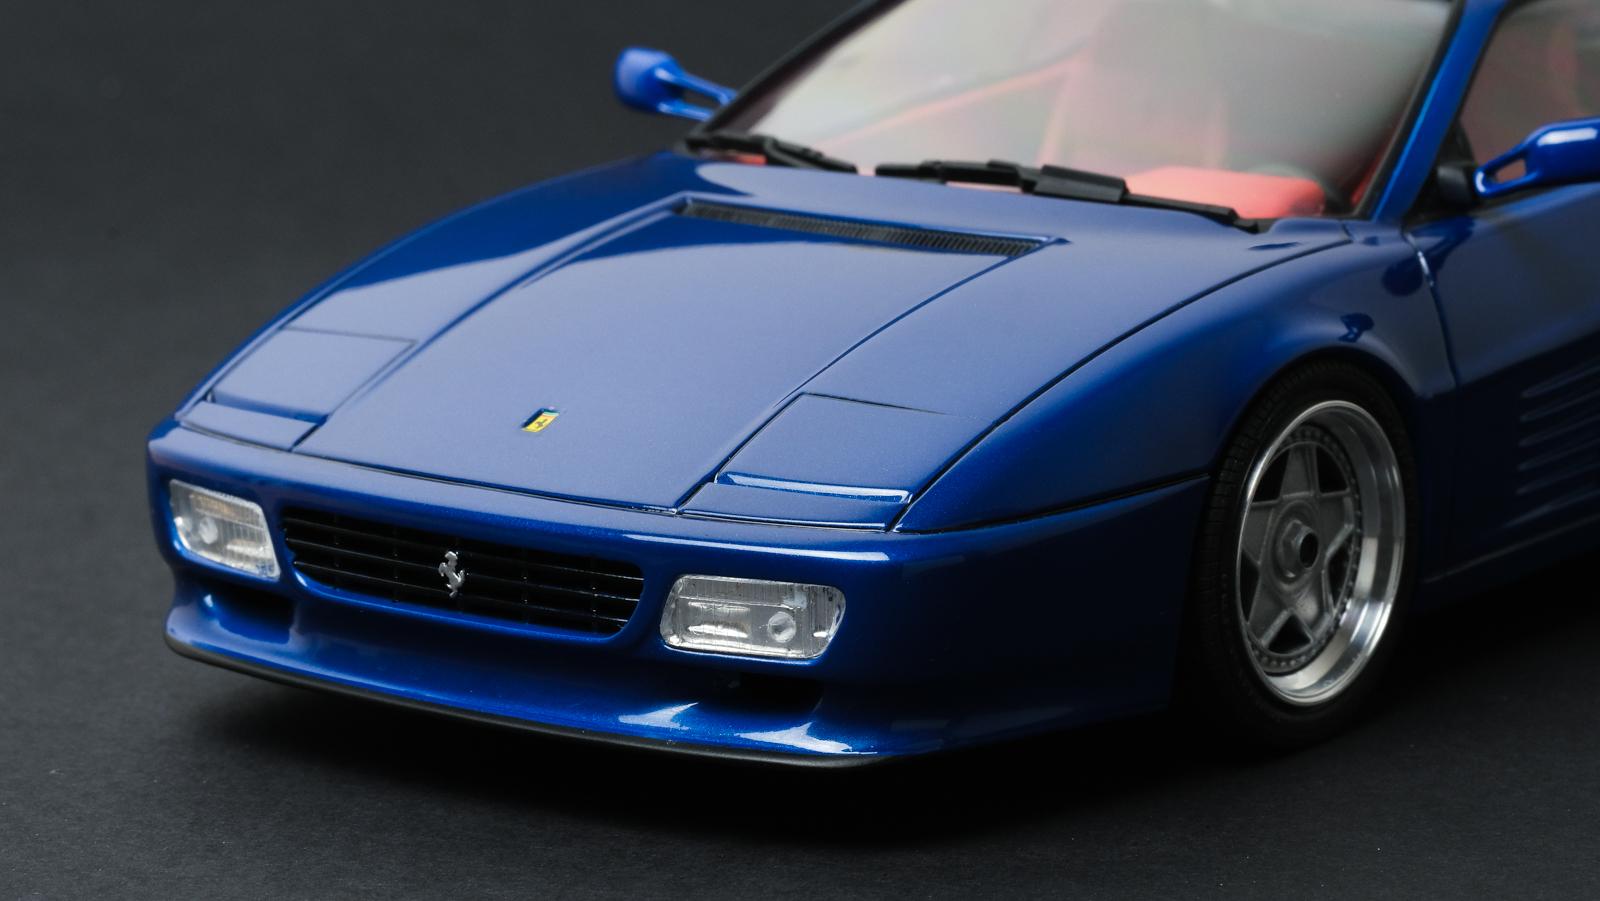
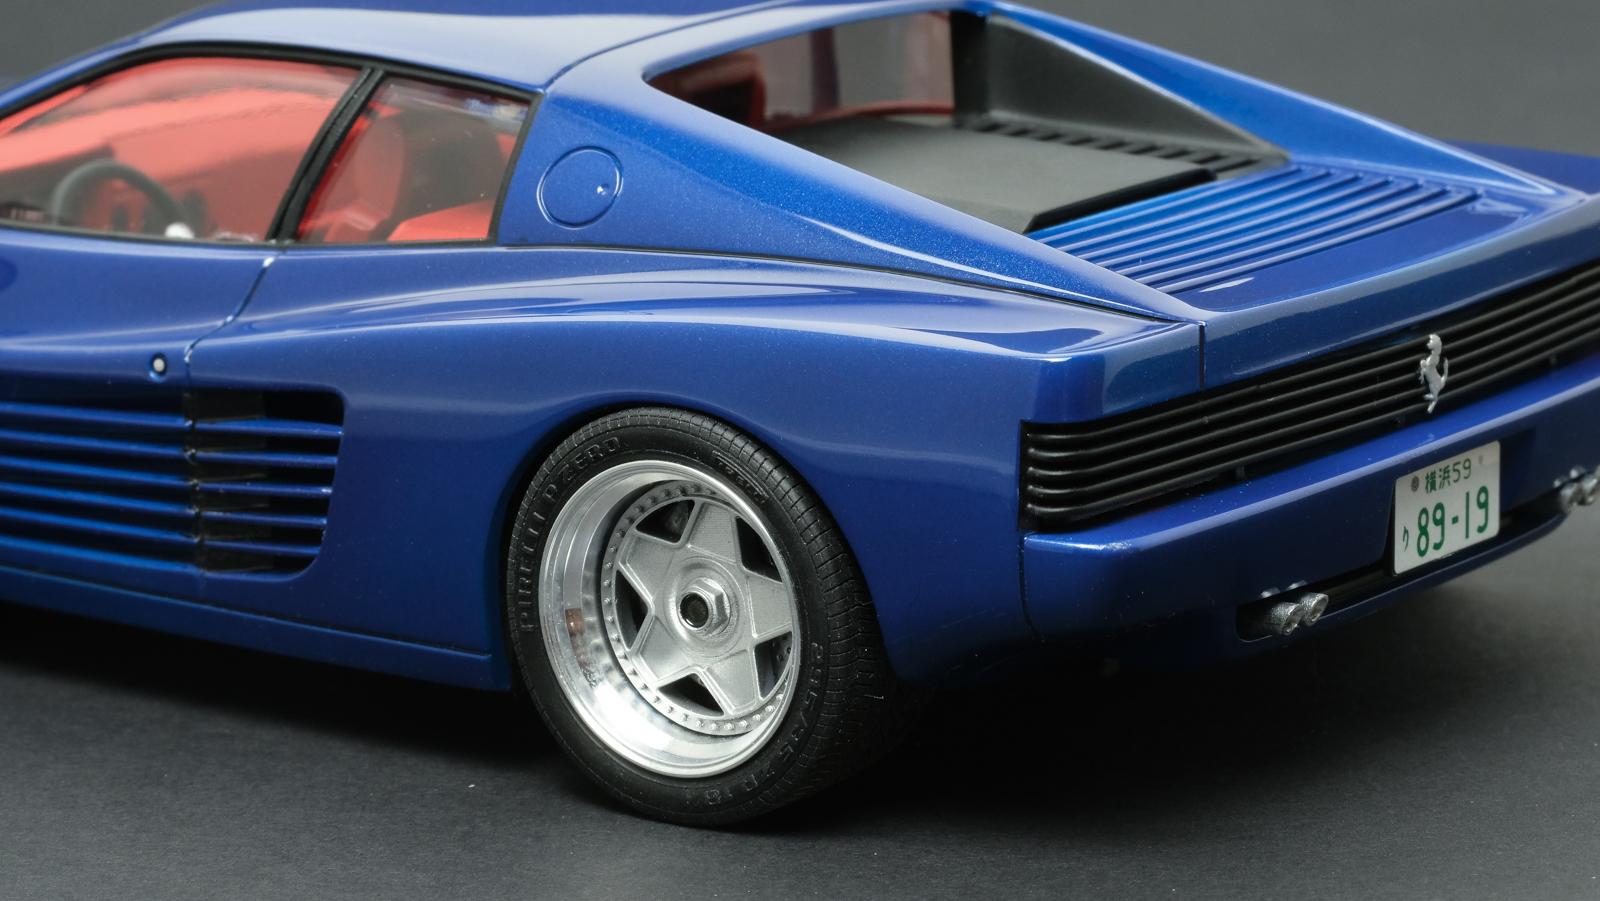
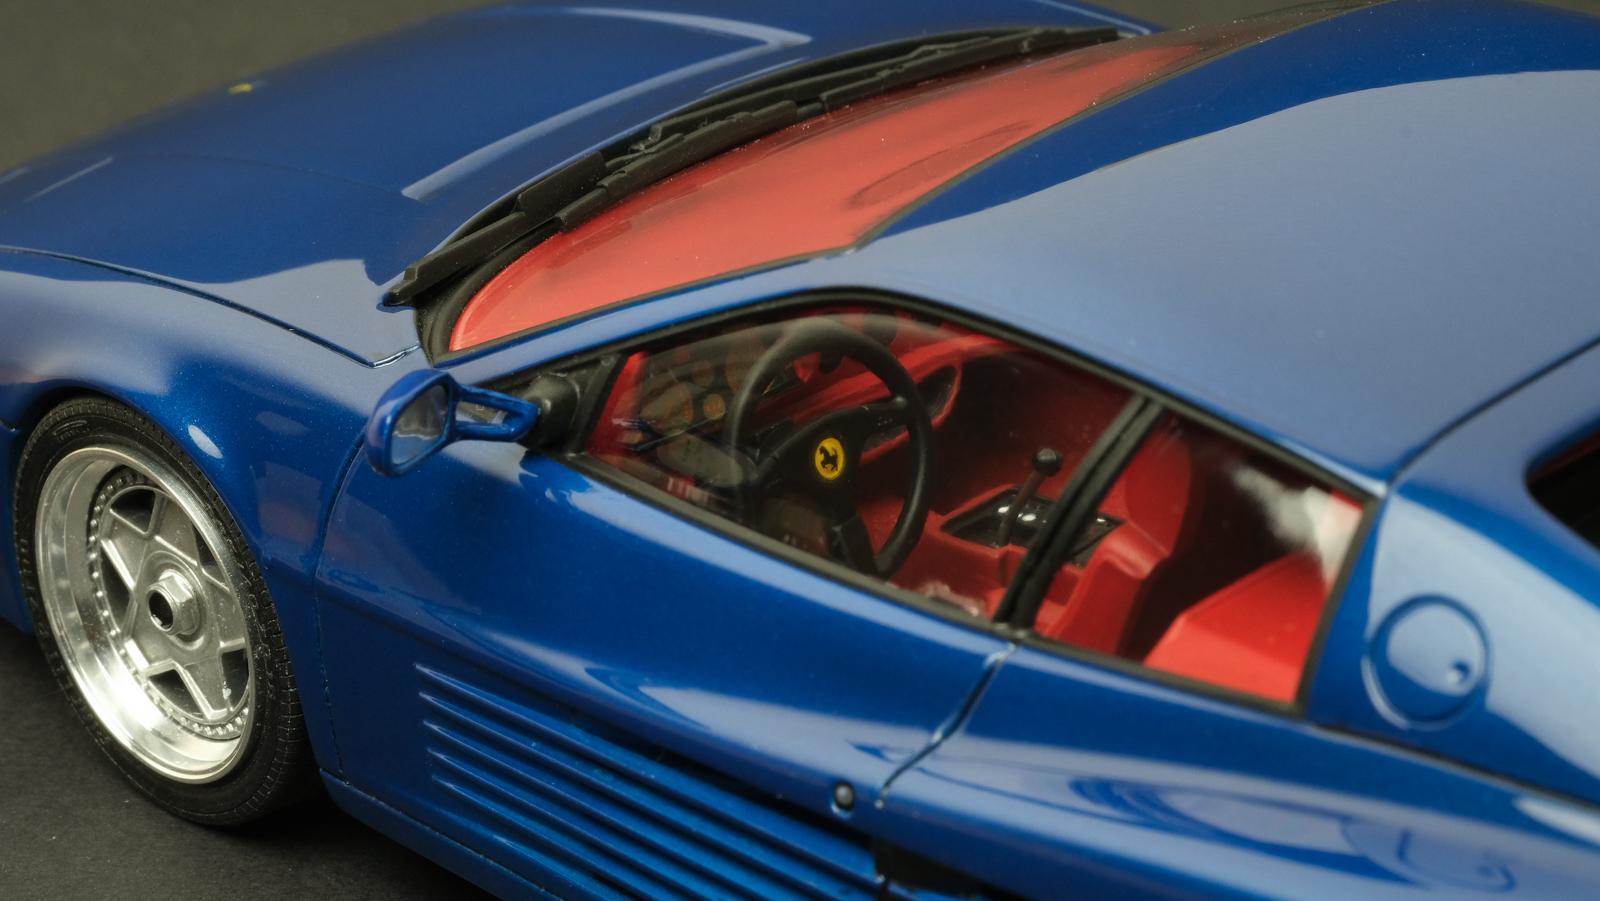
Hi all! Here’s my finished 512TR build - it’s Fujimi’s old kit from early 90s which I bought from Ebay. As for the build concept, most Ferraris in the era including 512TR were sold with red, yellow and black but I personally don’t like red, especially red on Ferrari. So I wanted to paint it with Blue Sera(period Ferrari colour from 70~90s) . As with most of older colours, you don't really see visible metallic flakes - so simulate that I painted silver as base colour and laid mix of cobalt blue, pure blue, clear blue, clear green and tiny bit of black on top. I also wanted to jazz up the wheel so I bought Scale Production’s Autostrada Modena (Japanese copy of F40 Speedline wheels) wheels. This time I wanted to give slightly more attention to my surface as it's always hard to get even surface finish on flat, angular body - I couldn't quite get the desired result I was looking for (for me it's always roof and bonnet that's really difficult to get mirror like reflection) but overall the paint turned out alright. Here’s the full build detail: The kit got the panel line wrong (panel lines in front of popup headlamps were missing) so I used panel line scribe tape to create a new panel. Overall panel lines aren’t that deep so I scribed all of them Prepped the body with 600g > gunze surfacer > 1500g and airbrushed silver as base coat Airbrushed the blue mix on top until I got the shade I wanted Laid 3 layers of Mr color’s super clear III (wet sanded each layer with 2000 grit) and let the paint fully cure for 1 month. Wet sanded with 3000g sponge and polished with Tamiya three stage compounds Masked & painted all the plastic/rubber trims then gave a light panel wash with Tamiya panel liner As for the interior, I glued embossing powder for the carpet part and airbrushed mixture of red and tiny bit of black, and finished with flat clear Painted engine and exhaust with various shade of silver, copper and black and used red enamel for the valve cover - engine parts are made up with only 5 parts but they look wholesome after assembling. I was initially disappointed to see snap-tite parts and dead decals that turned into mush as soon as I put them into water(I ended up using decals from my other Ferrari kits), but as I started building I was pretty impressed with the quality. Overall it’s a great, simple kit that can actually built without glue(It was first time seeing snap parts that actually work as intended!).
- 32 replies
-
- 15
-
-
Beautiful SL320 and equally beautiful kit! You really nailed the two tone silver look there.
-
Beautifully detailed work with great photography! Your photos of real car makes me want to get the same kit and paint it with the same colour. I think it can be achieved by painting gold as base coat, and paint with mixture of clear green and couple drops of black
-
Really impressive work! Is the rocker panel painted or BMF'd?
-
Fantastic colour combo and clean build! I have a similar Moebius kit and this makes me wanna build one soon.
-
1952 Hudson Hornet Convertible two-tone (1/25 Moebius)
e30lover replied to e30lover's topic in Model Cars
Thanks a lot! I need more Moebius kits in my stash Thank you! Thanks! I feel like I need larger backdrop and reflectors to get sharper contrast.