e30lover
-
Posts
367 -
Joined
-
Last visited
Content Type
Profiles
Forums
Events
Gallery
Everything posted by e30lover
-
1952 Hudson Hornet Convertible two-tone (1/25 Moebius)
e30lover replied to e30lover's topic in Model Cars
Thank you very much! Thanks a lot! Thank you! Appreciate it! Thank you! Thanks! -
1952 Hudson Hornet Convertible two-tone (1/25 Moebius)
e30lover replied to e30lover's topic in Model Cars
Thank you! Woodgrain was fun to paint and I'm now thinking what other kit I can try the same method again. Thanks! Thank you! I did a quick search on those diecast and they look fantastic! Thank you! I have another Moebius kit (plymouth belvedere) which I wanna build using some aftermarket wheels. Thanks a lot! Thank you! Thanks a lot! Thanks! Thank you! Thank you! Thanks a lot! Thank you! Thanks! Thank you! I tried Thanks! Thank you! Thanks! Thank you! I like the Jefferson green too! I could've done a cleaner job at masking side trims.. Thank you! Thanks so much! Thank you! Yes I apply primer right on the bare plastic -
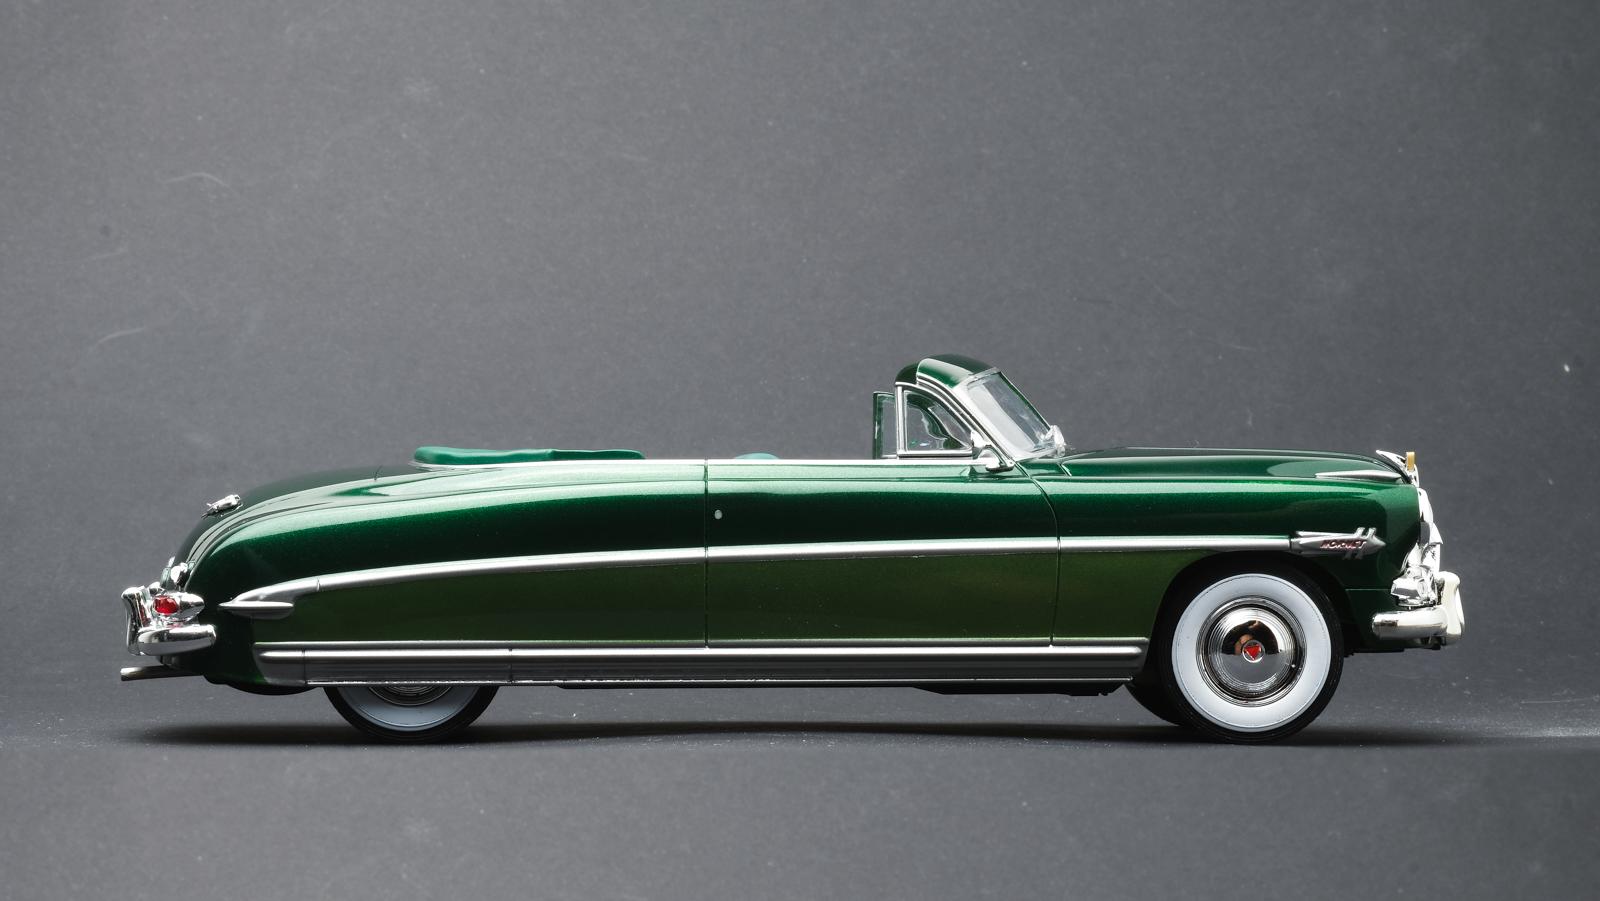
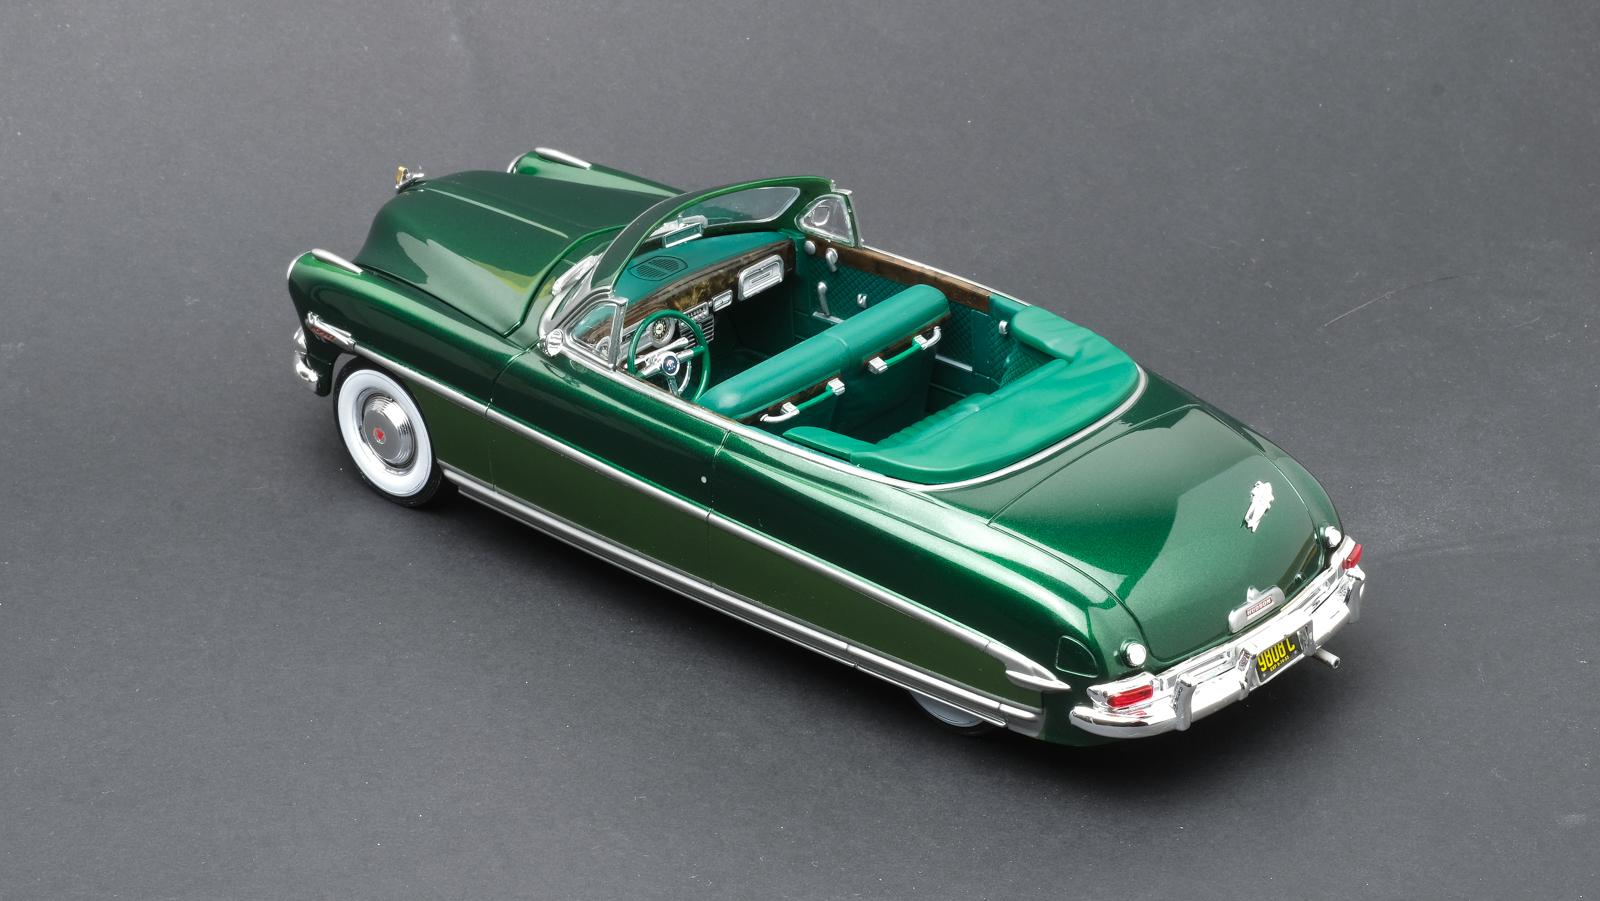
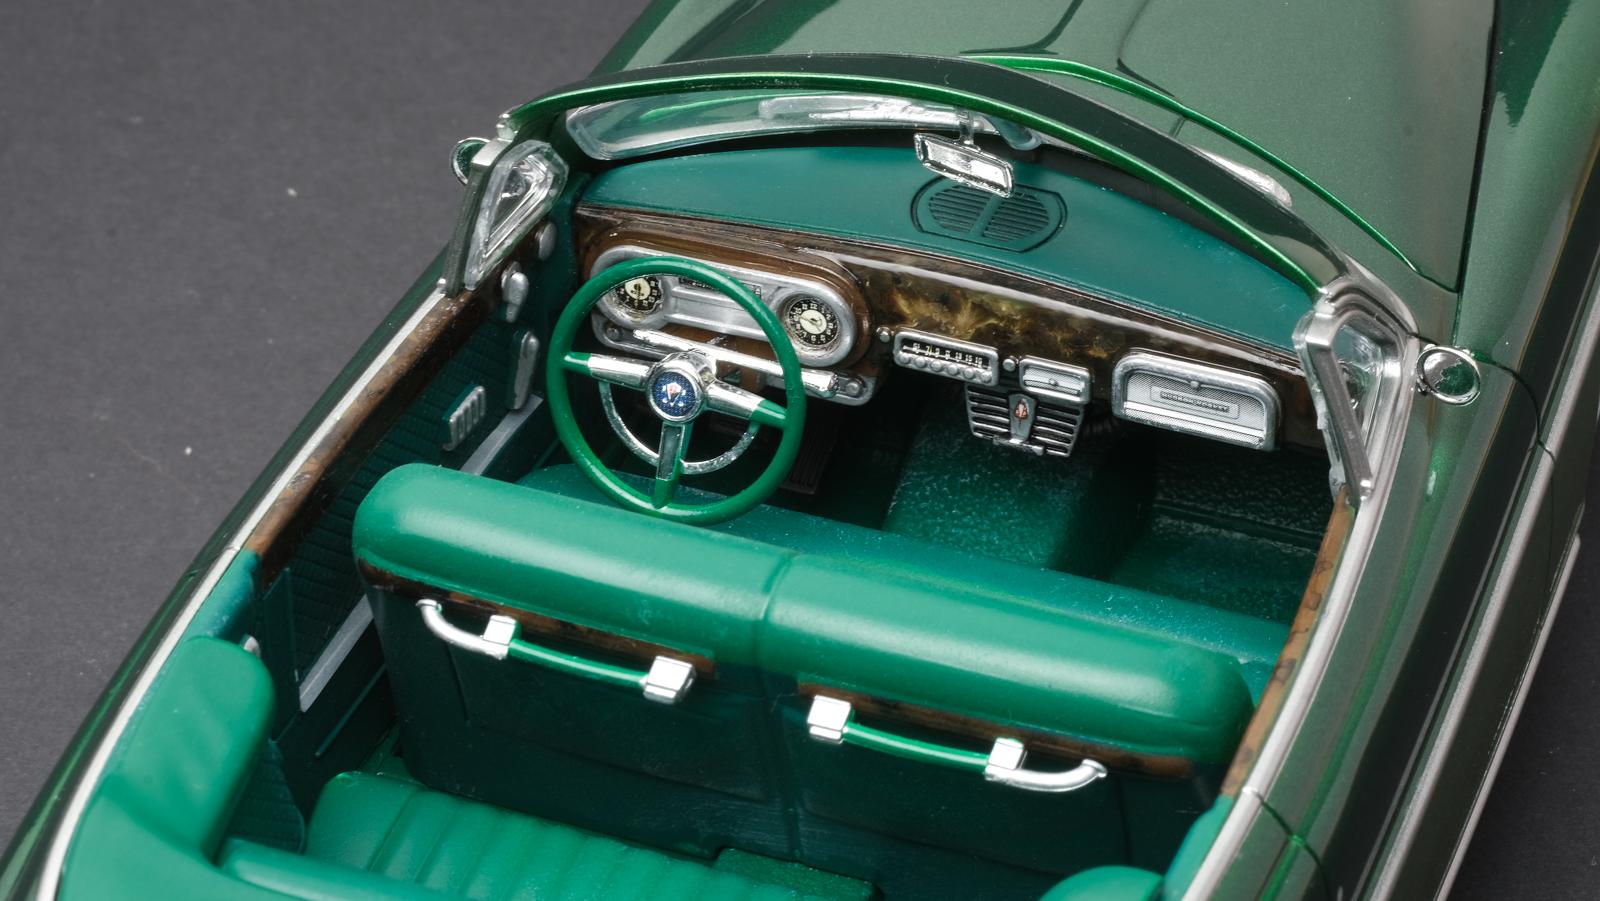
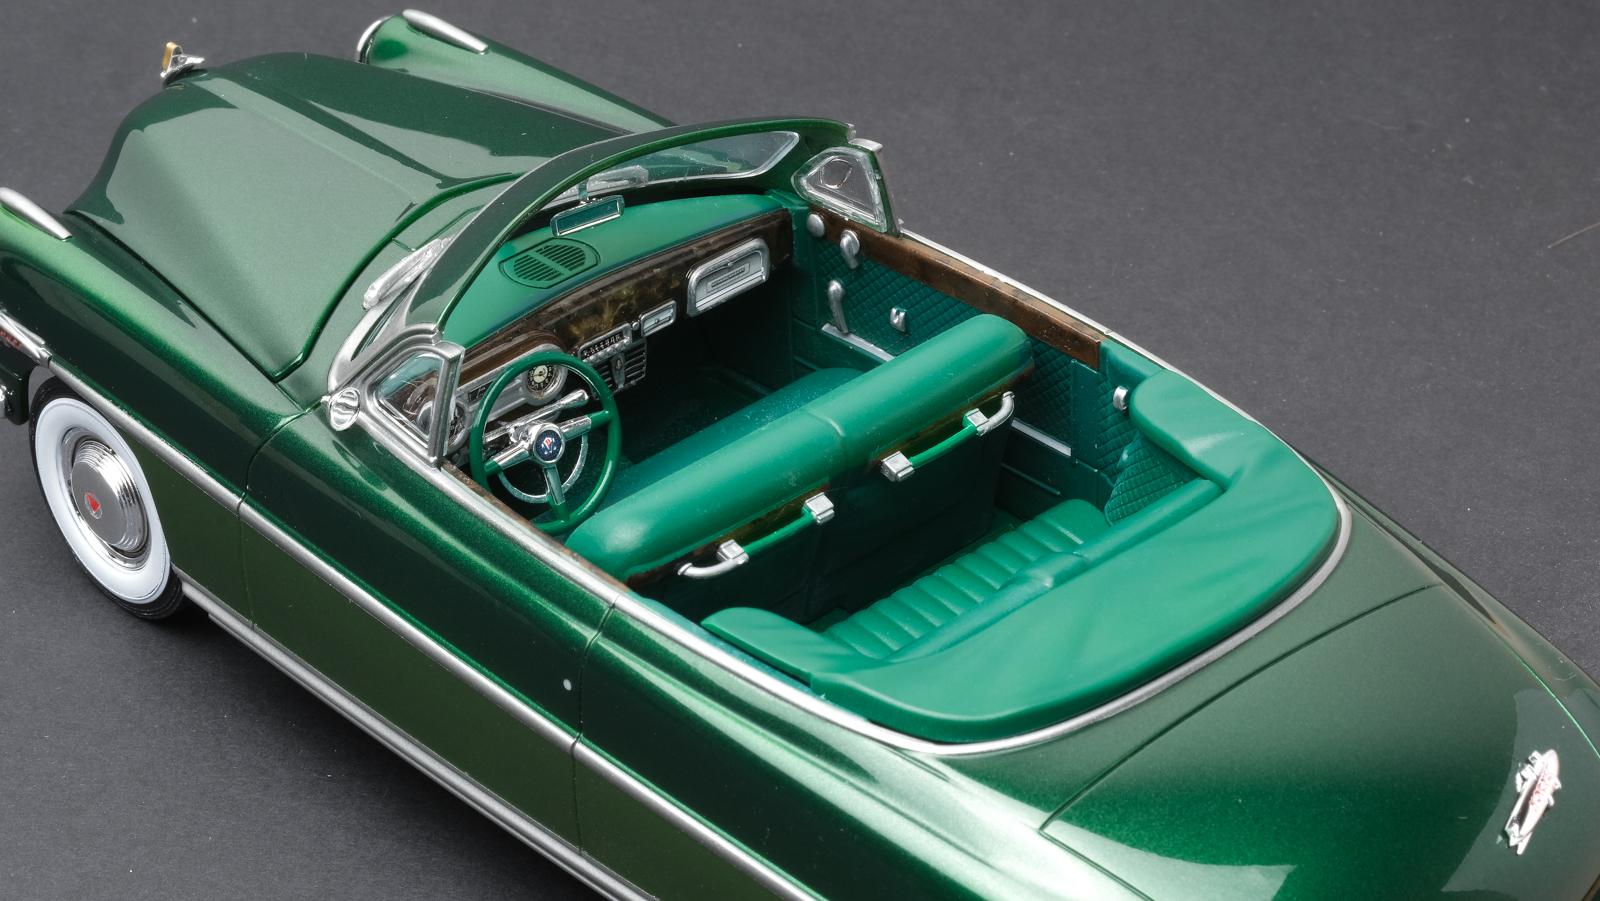
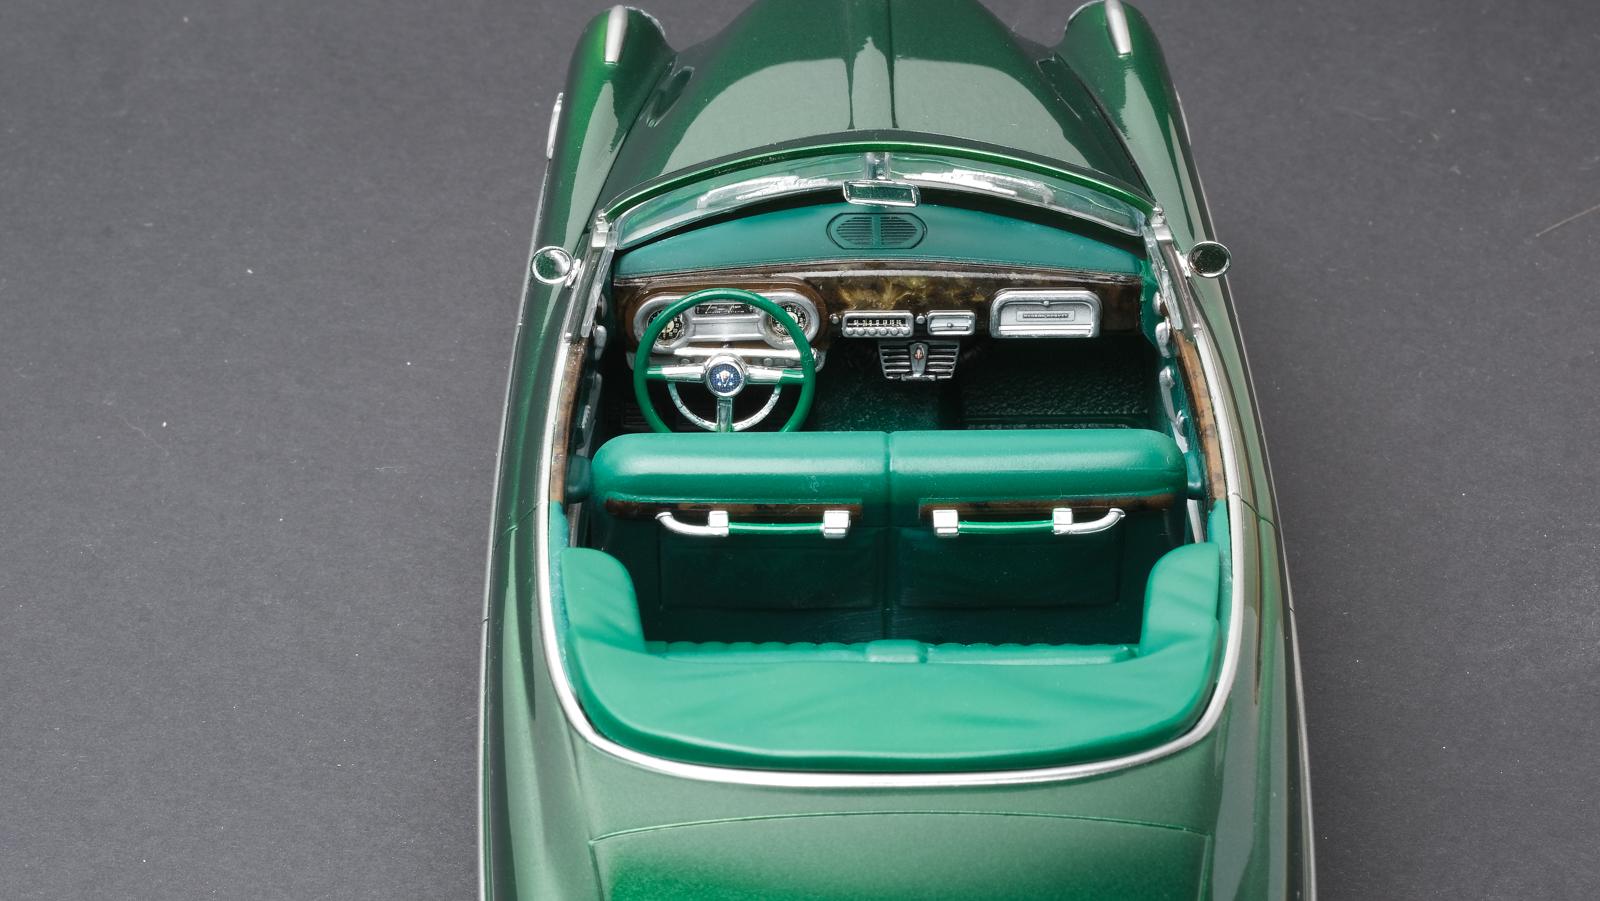
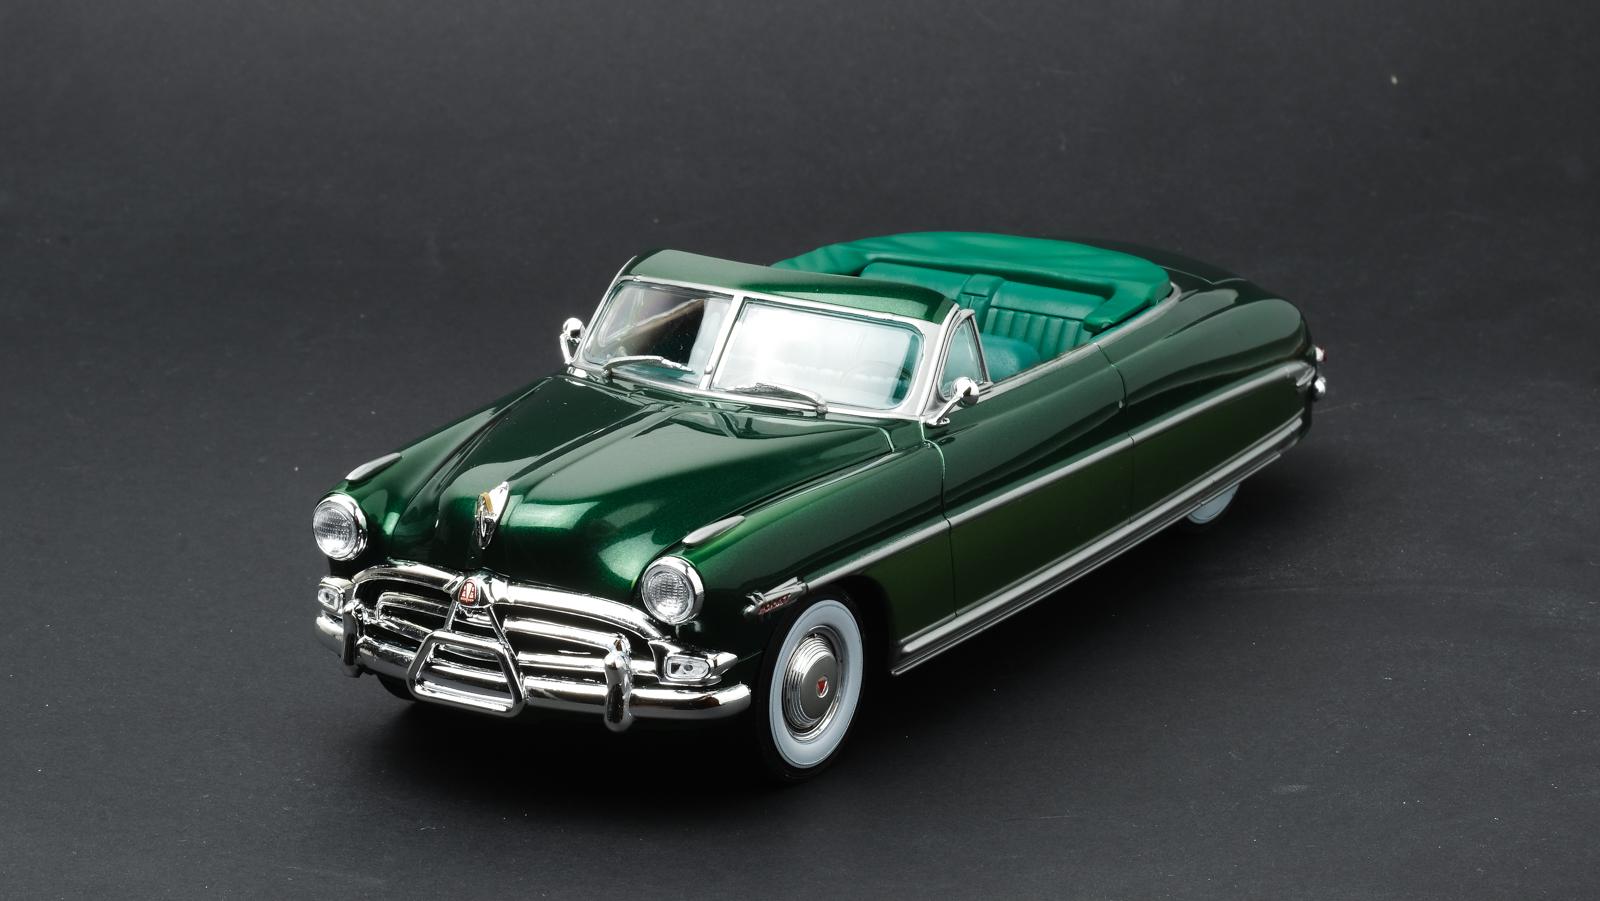
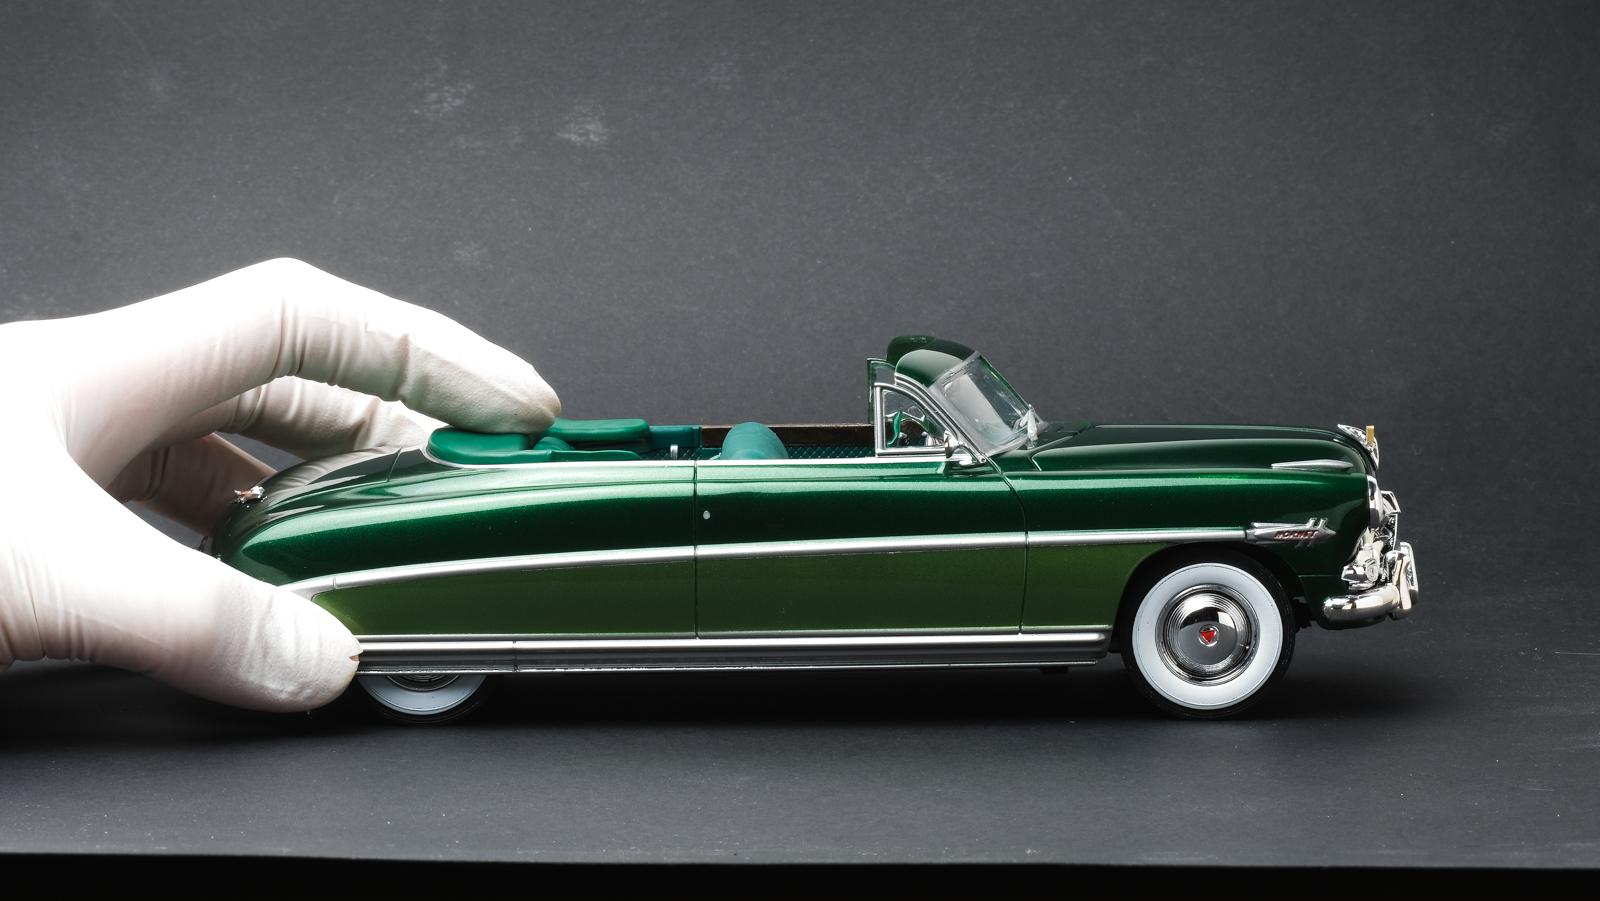
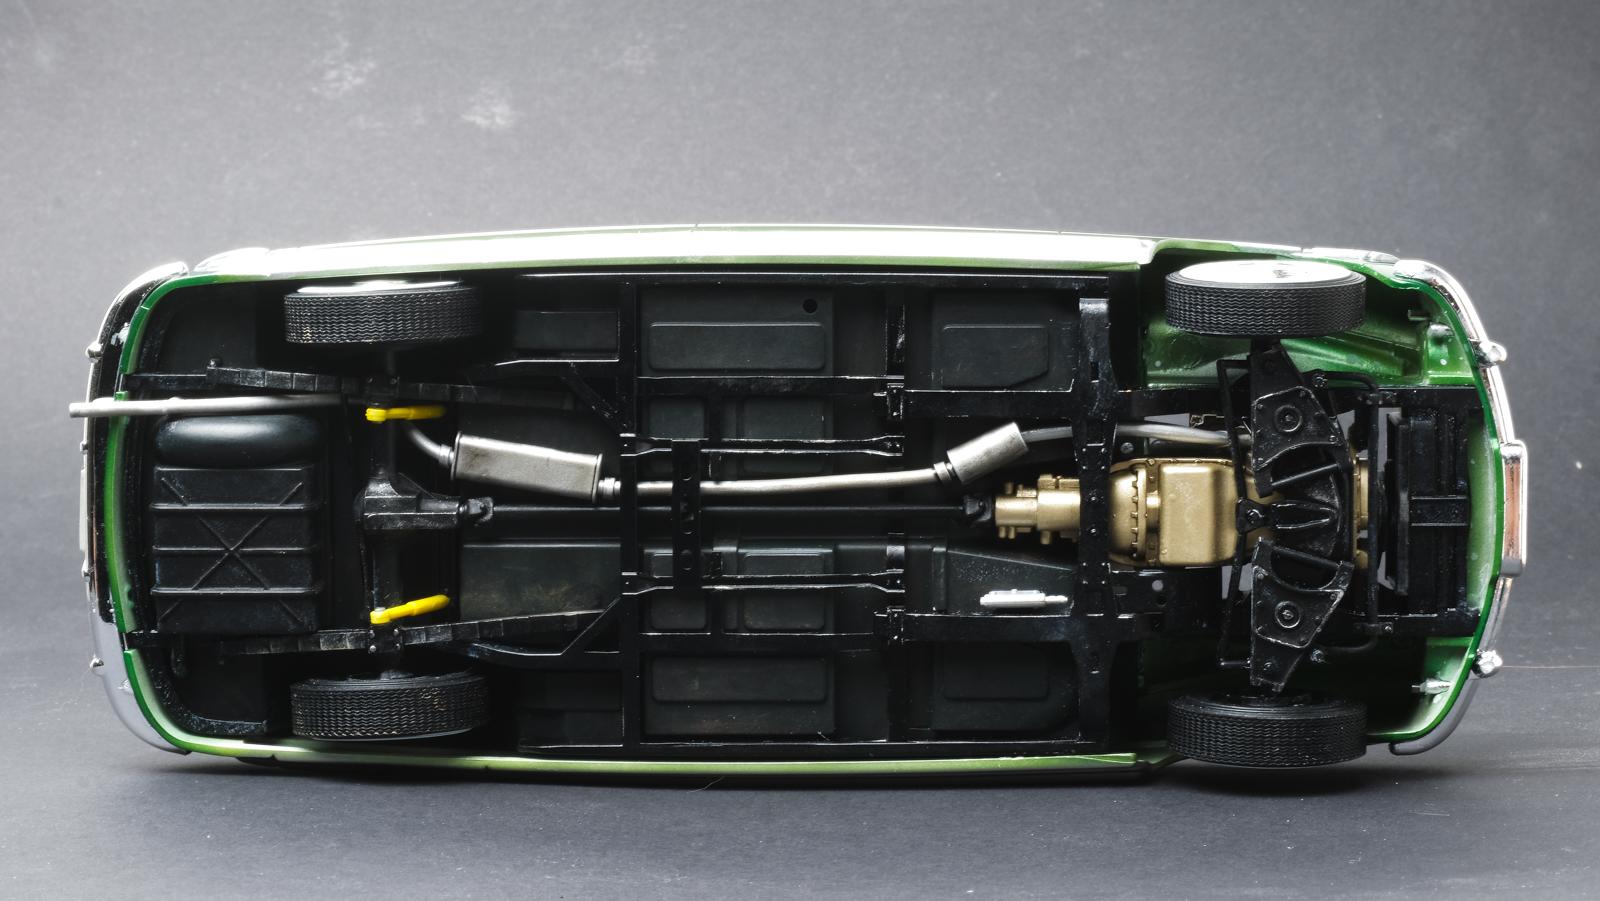
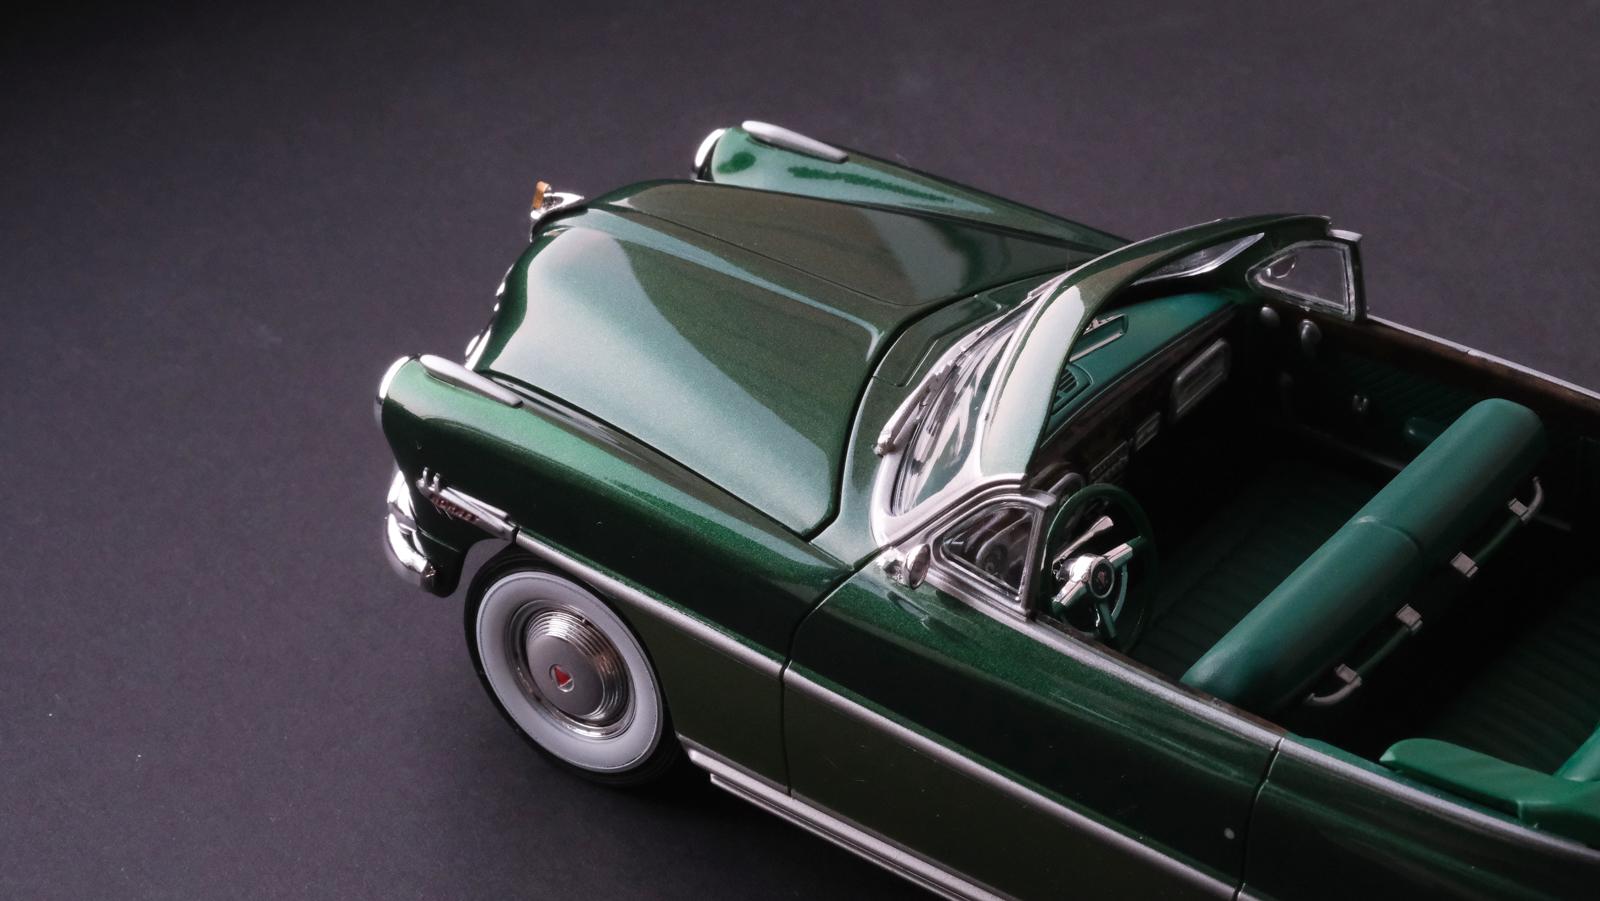
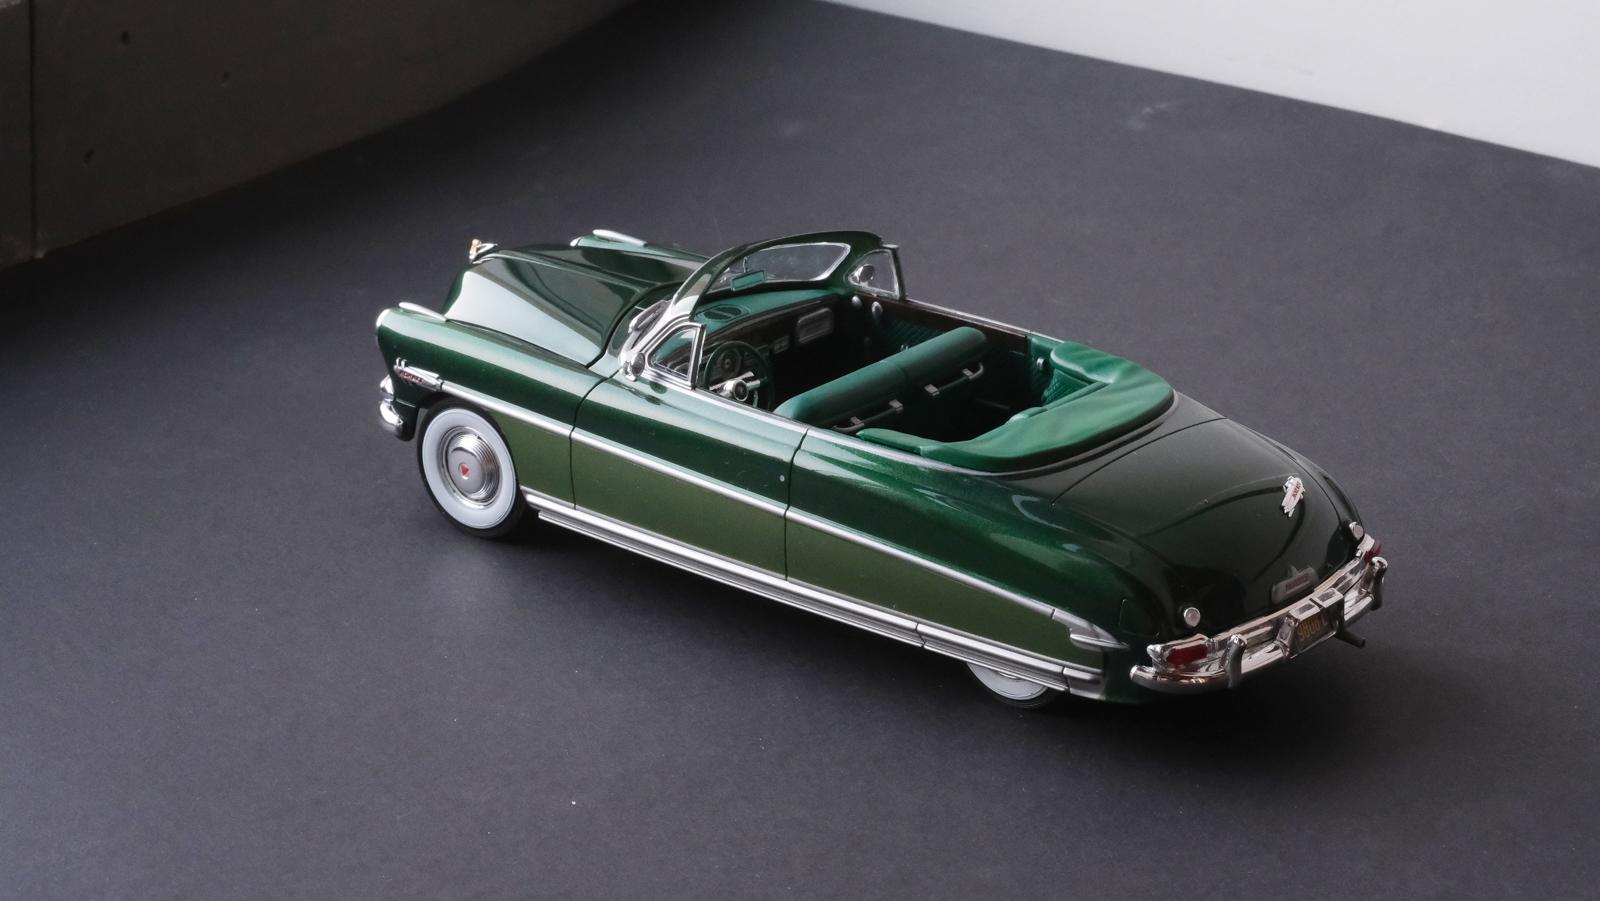
Hey all, Here’s my latest build - Moebius 1/25 52’ Hudson Hornet. It’s my first Moebius kit so I decided to do a box straight build - the whole experience feels very similar to how some of Revell Germany - lots of parts so they require minimal amount of masking, very realistic construction which got kinda handful to securely assemble. Here’s the full build detail; All the panels showed some level of warpage and bunch of sink marks, so I filled sink marks, shaved door handles, scribed panel lines then corrected all the panels with 600 grit sandpaper (to get even panel surface across the body) Applied Mr color’s while surfacer then wet sanded with 1500 grit I wanted to get some nice two-tone that’s close to stock 52’ color combo but slightly deveated from it - so that paint would ‘pop’ a bit more Mixed Mr color’s super fine silver, leaf gold and metallic green to get lime-ish light green Airbrushed mixture of Mr color’s clear green and black on top half to simulate Jefferson green Painted the underbody and suspension with combination of gloss black, flat black and flat dark grey then added light weathering effect Added ignition wires and PE hose clamp to the engine bay Added 3 layers of Mr color super clear II with wet sanding after first clear coat Let the paint cure for 1 month then wet sanded with 3000 grit sponge and polished with Tamiya compounds Airbrushed the interior with mixture of Tamiya’s green & pure blue As for the woodgrain I make & airbrushed brown, brush painted with Tamiya acrylics (lighter and darker browns) then brush painted lacquer clear on top of it Masked off the body and painted the chrome bits with Mr color’s aluminum Because this kit just put the spruce gate right at the middle of parts, I had to strip chrome out of headlamp bezel where the mark was too obvious - plastic somehow melted a little bit so I used leftover parts from Ebbro DS kit. I lost the front emblem while doing so I made one up with leftover PE Apart from couple of issues such as decals that has weird white outlines acround the artwork, as well as wheels not fitting at all without grinding out the female portion inside the wheels, overall it was an enjoyable build and I can’t wait to build another Moebius kit! Thank you for reading!

-
This has to be one of the best example of BMF applied. What a lovely build!
-
I can't believe this is old 1/24 monogram kit .. Fantastic color combo and equally fantastic photography! How did you find airbrushing Molotow - do you have to thin with modeling thinner? I heard it becomes easily smudged when you touch it.
-
Absolutely beautiful! Good call on painting with Alclad instead of BMF and using kit chrome plating. That green interior is gorgeous!
-
Thank you! Thanks a lot! Appreciate it!
-
1/24 Porsche 917K 71' Le Mans Winner
e30lover replied to e30lover's topic in Other Racing: Road Racing, Salt Flat Racers
Thank you! Thanks! Yes 917 is such a timeless looking racer. Appreciate the compliment! Thank you! Thanks! I would've loved to grab a detailed engine kit by HRM but couldn't find one. Thank you! -
1/24 Porsche 917K 71' Le Mans Winner
e30lover replied to e30lover's topic in Other Racing: Road Racing, Salt Flat Racers
Thank you! Thanks! -
Thank you! Appreciate it! Thanks! I removed a lot of material from top and inside of bumpers - also cut out the mounting dowels and glued straight to the body so they fit more flush.
-
True - I definitely miss seeing them on the road! Thank you very much! Thanks a lot! Good point! I should've at least carved some slits there. You've done a great job at getting the vent holds in there! Scale Production's BBS wheel helped. Some of these wheels from older Fujimi kits are pretty bad!
-
Beautiful model and diorama! I love the lighting that looks like a street photoshoot at night!
-
I've had the e30 for 10 years and I too wish to add that to my garage one day! Thank you! Thank you! Thanks a lot!
-
Thank you!
-
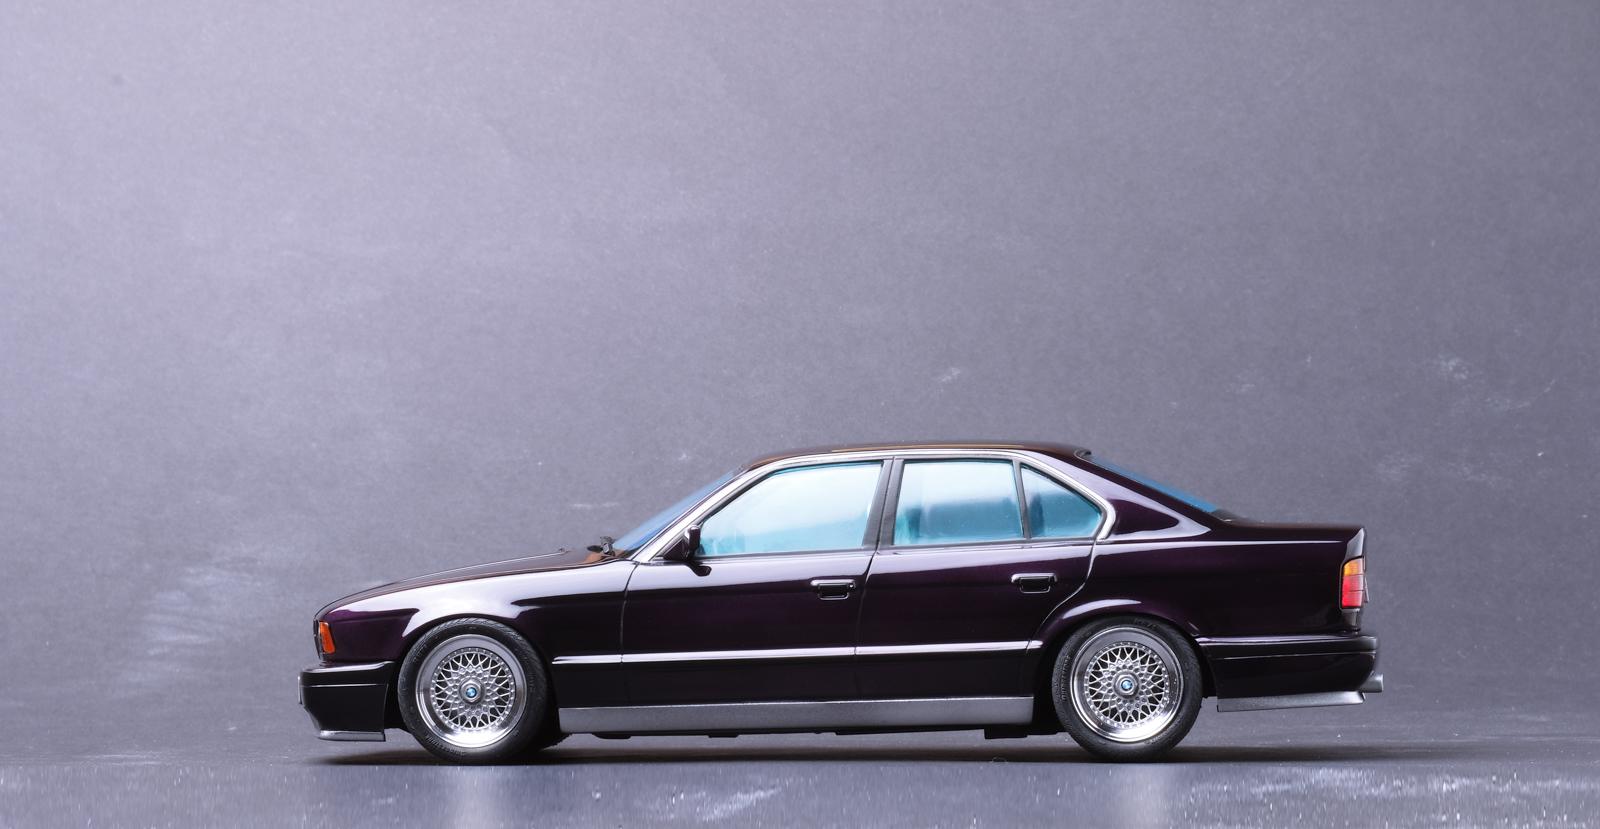
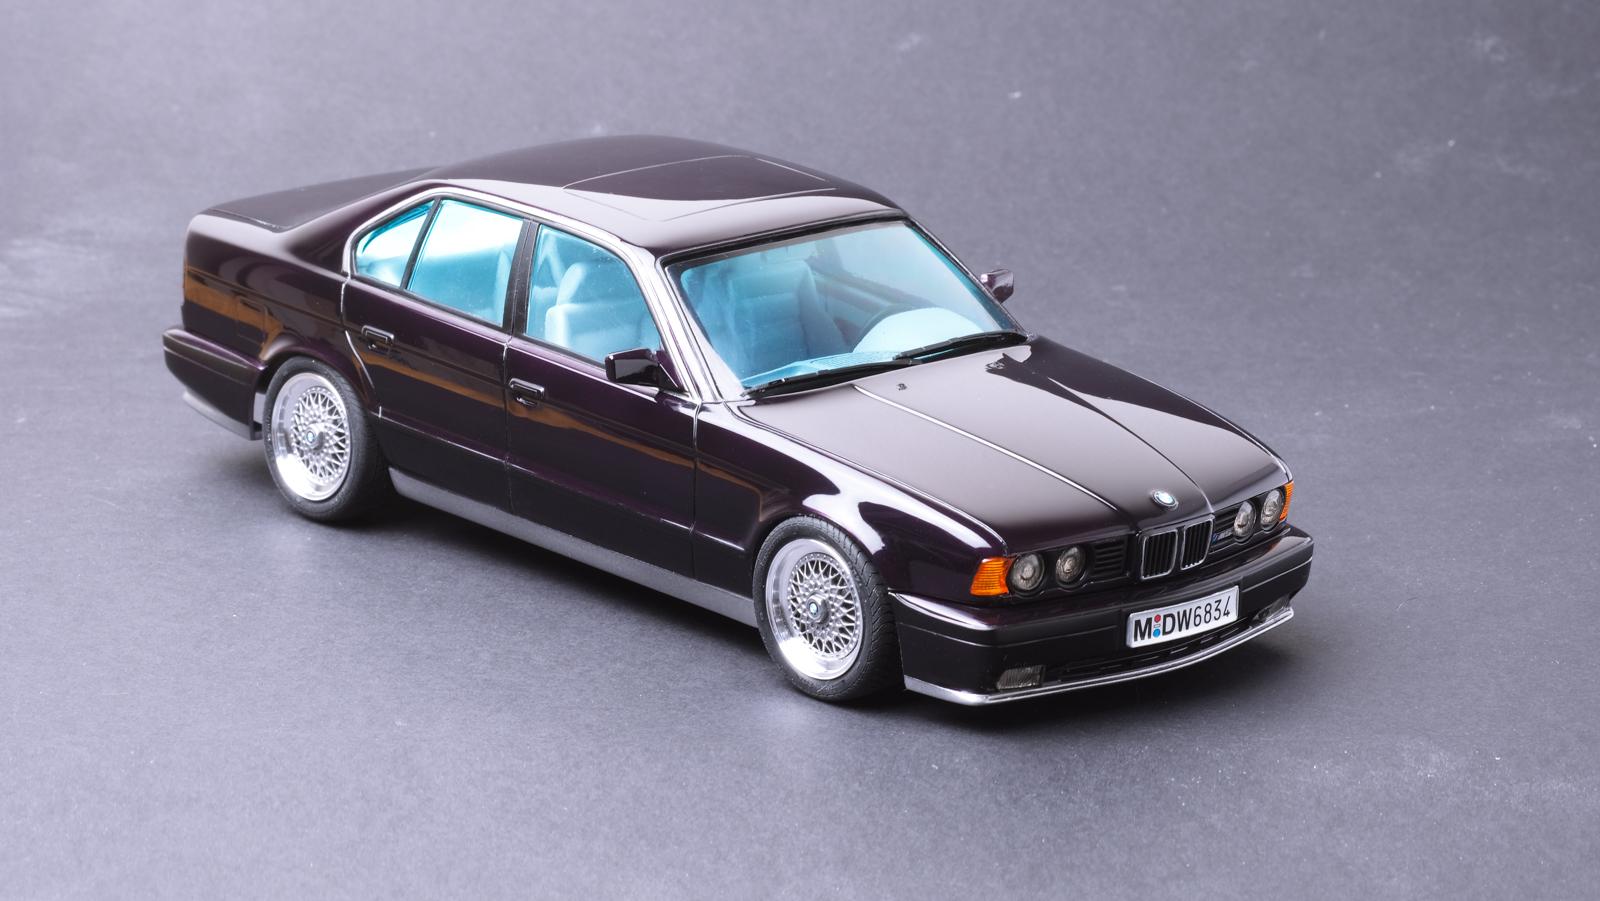
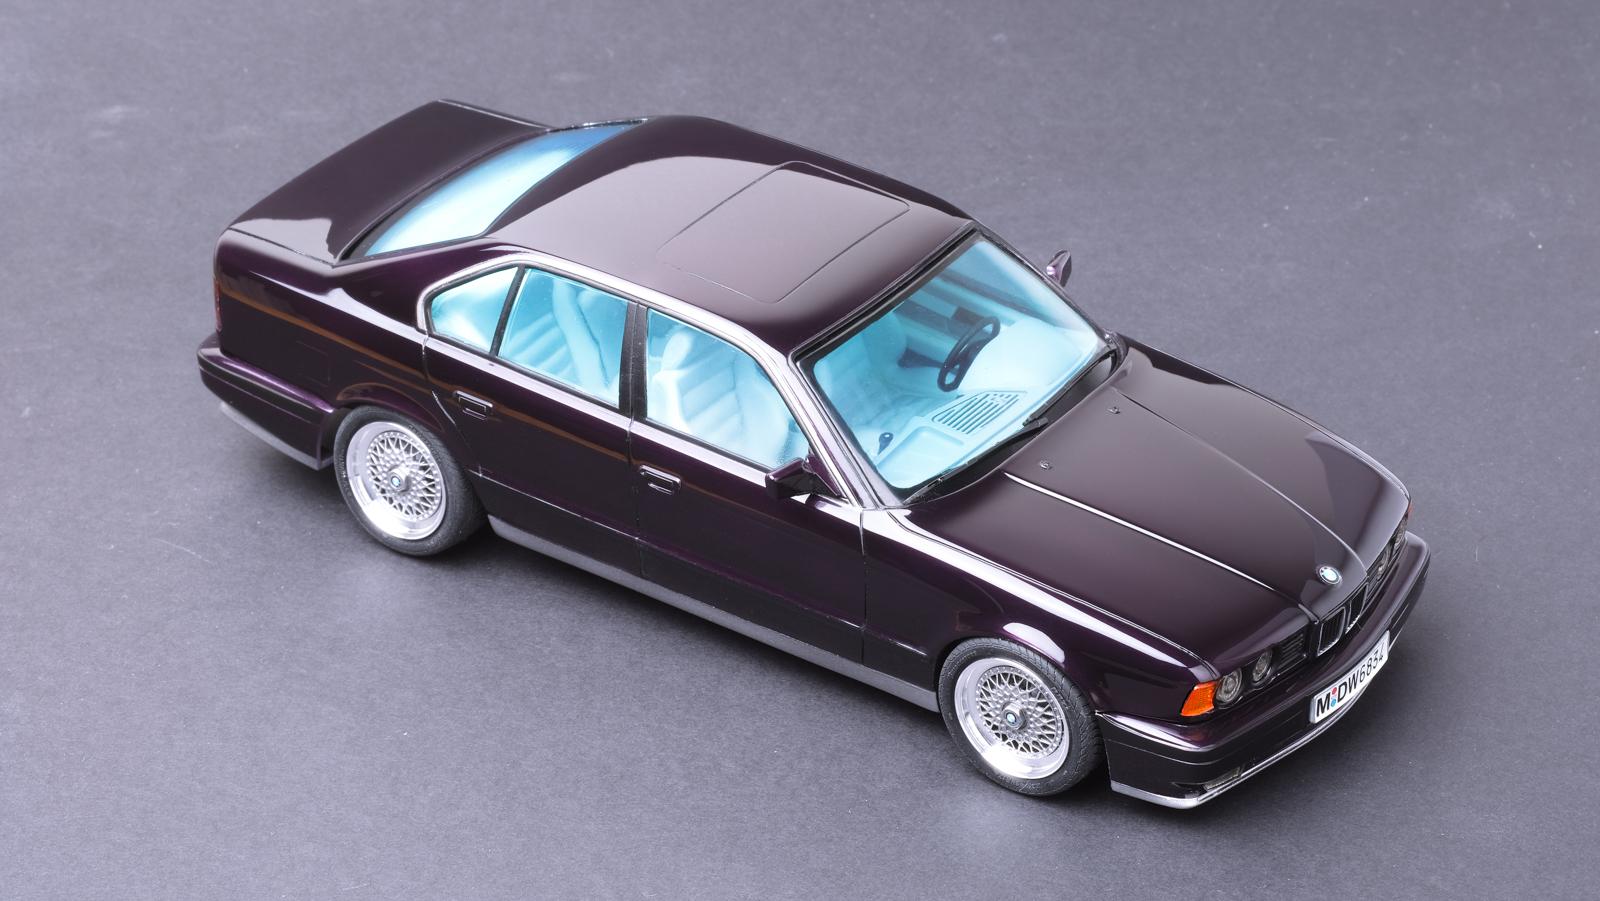
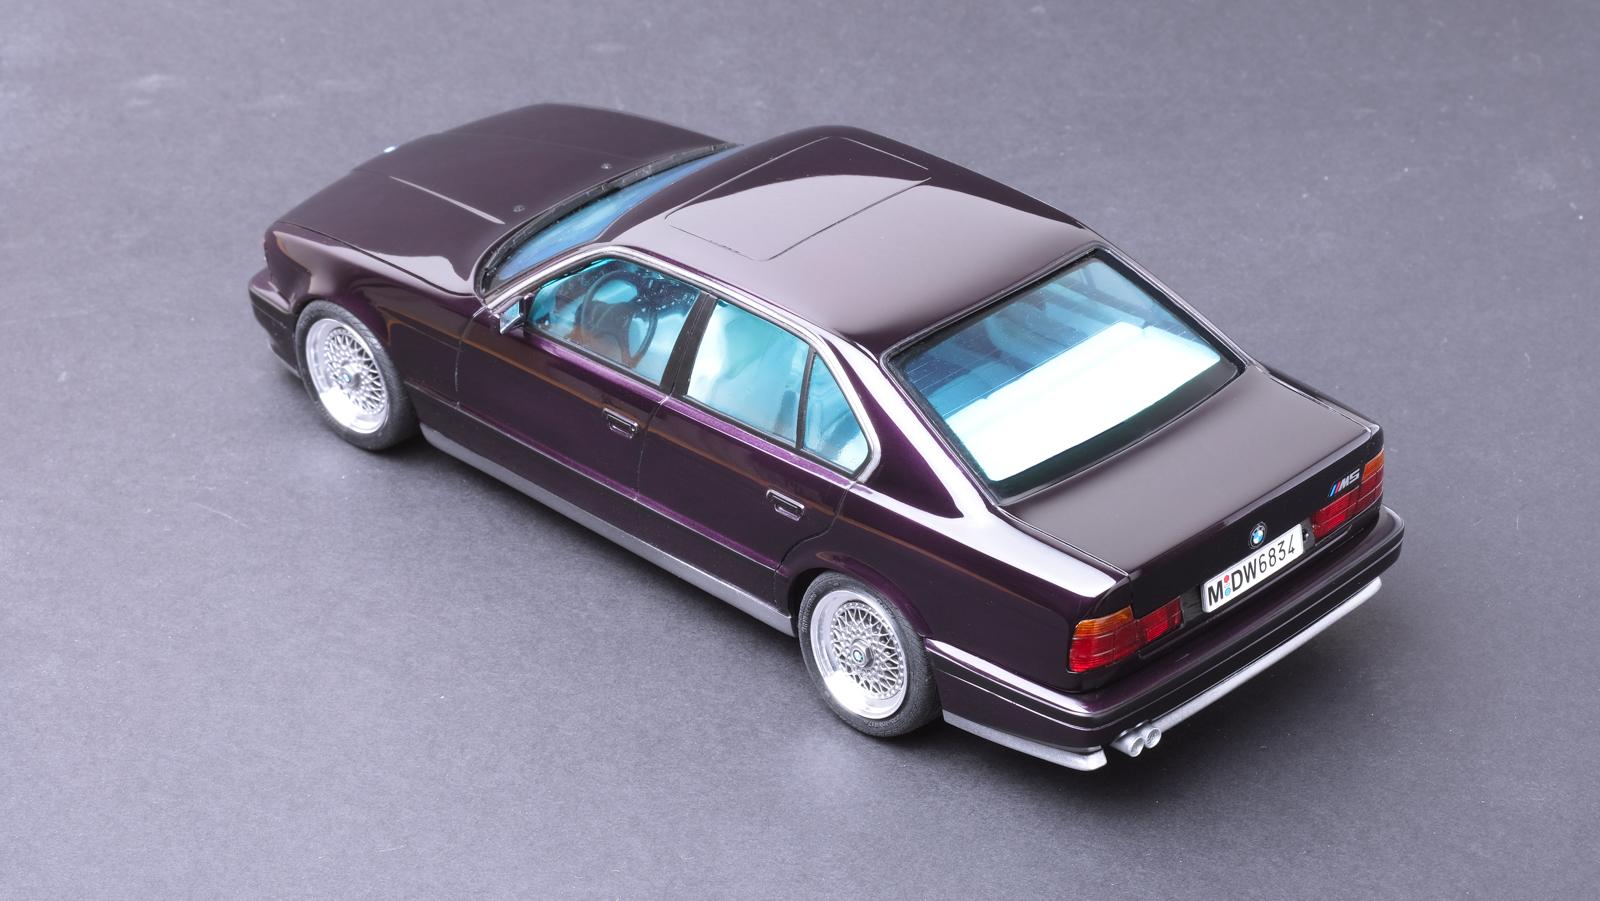
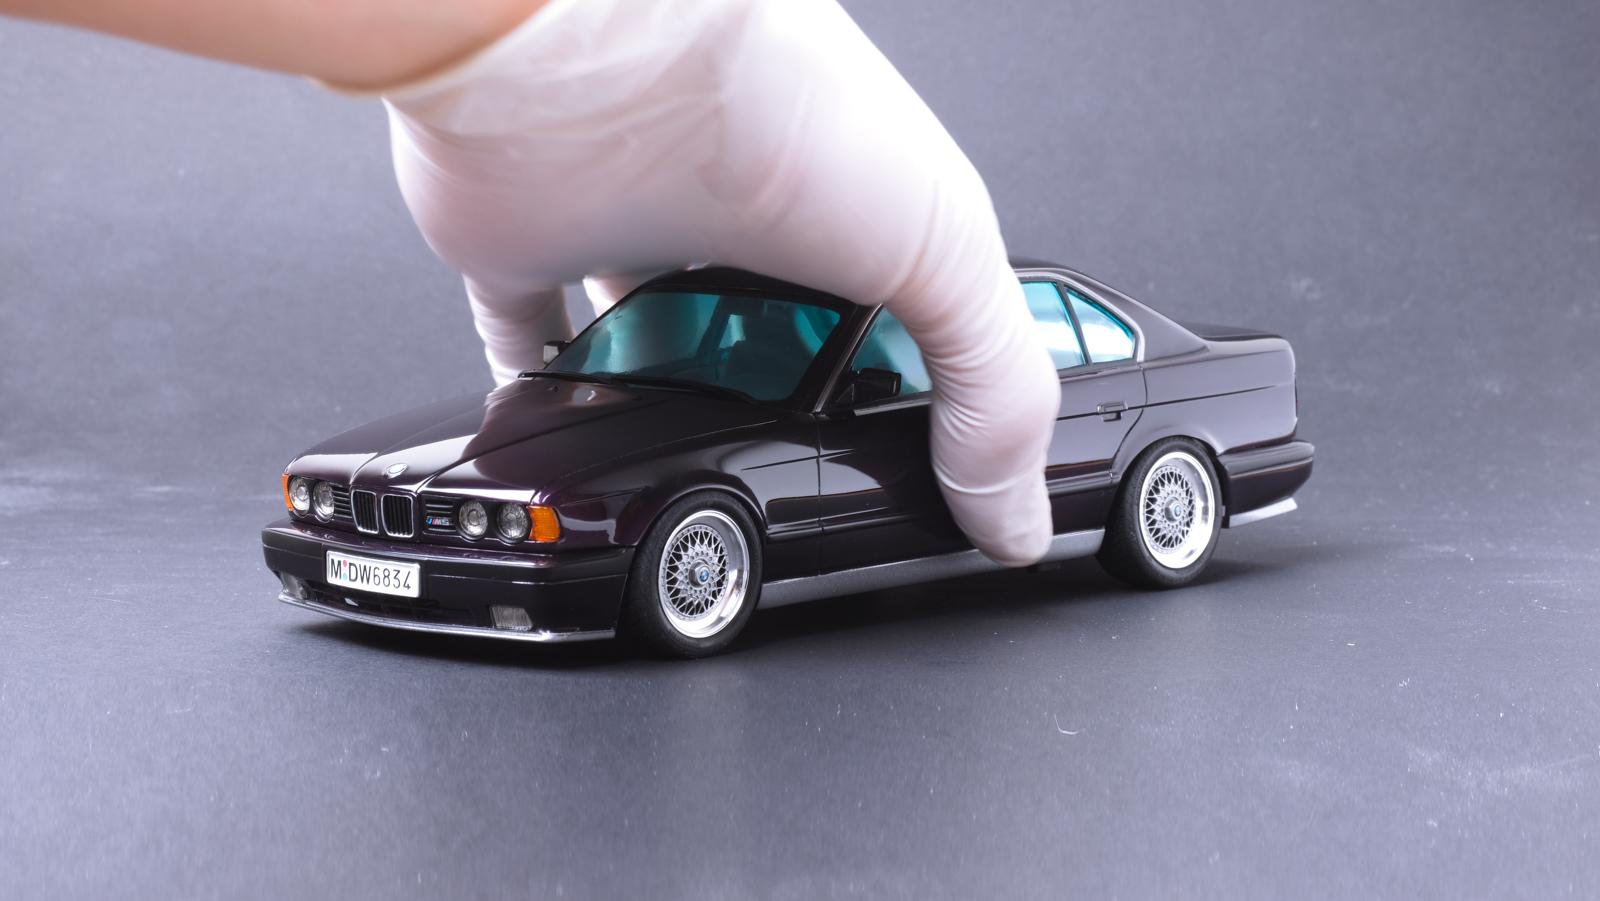
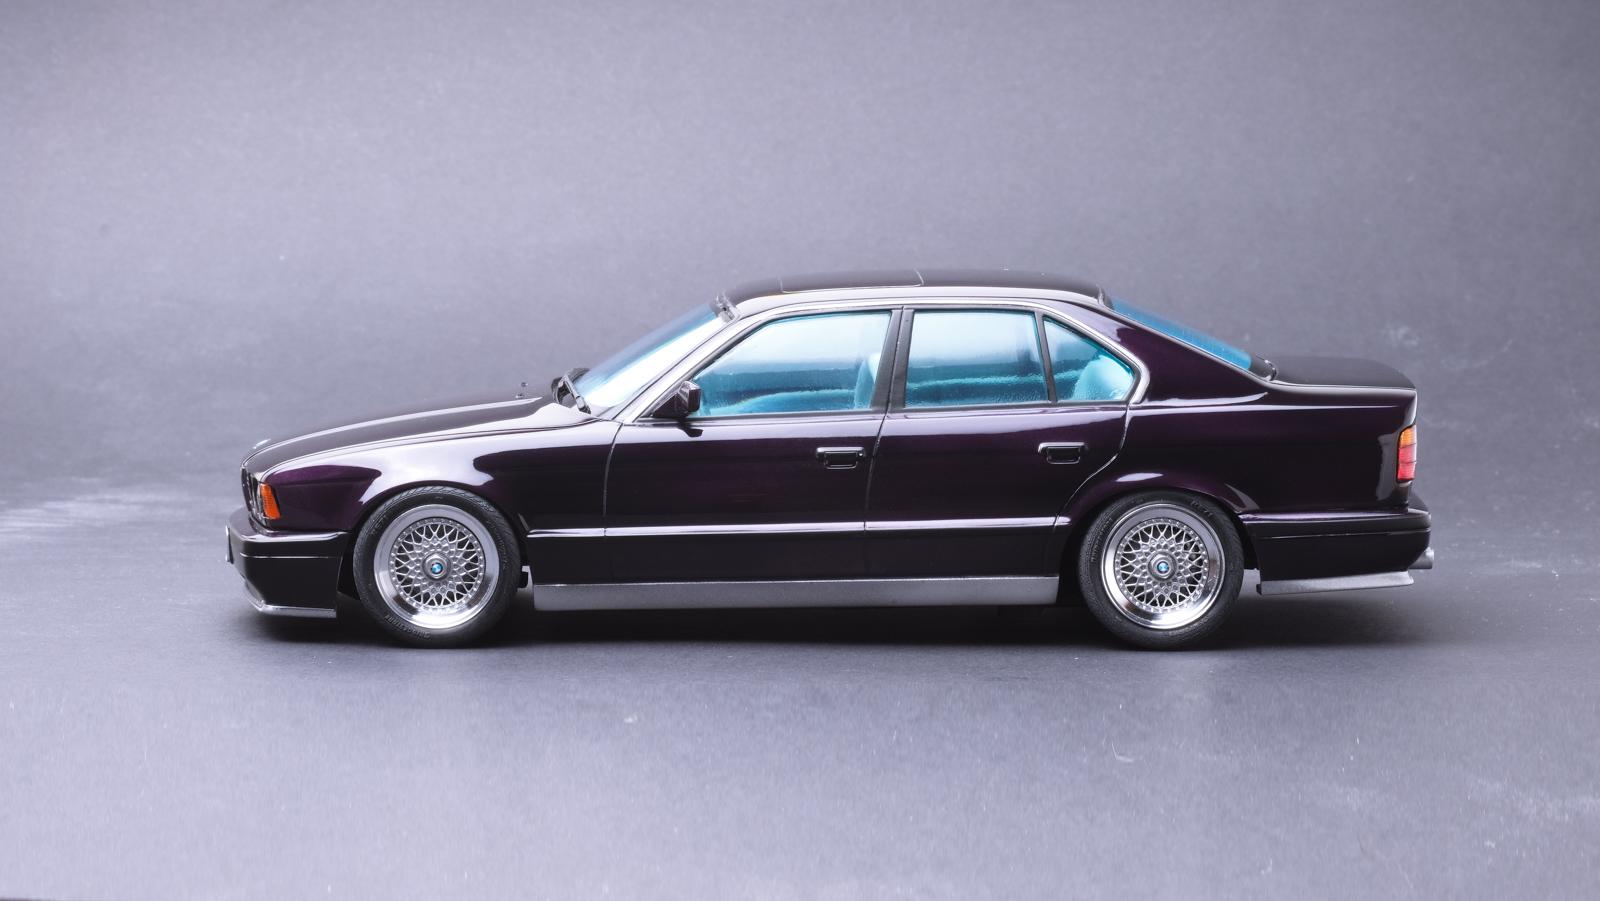
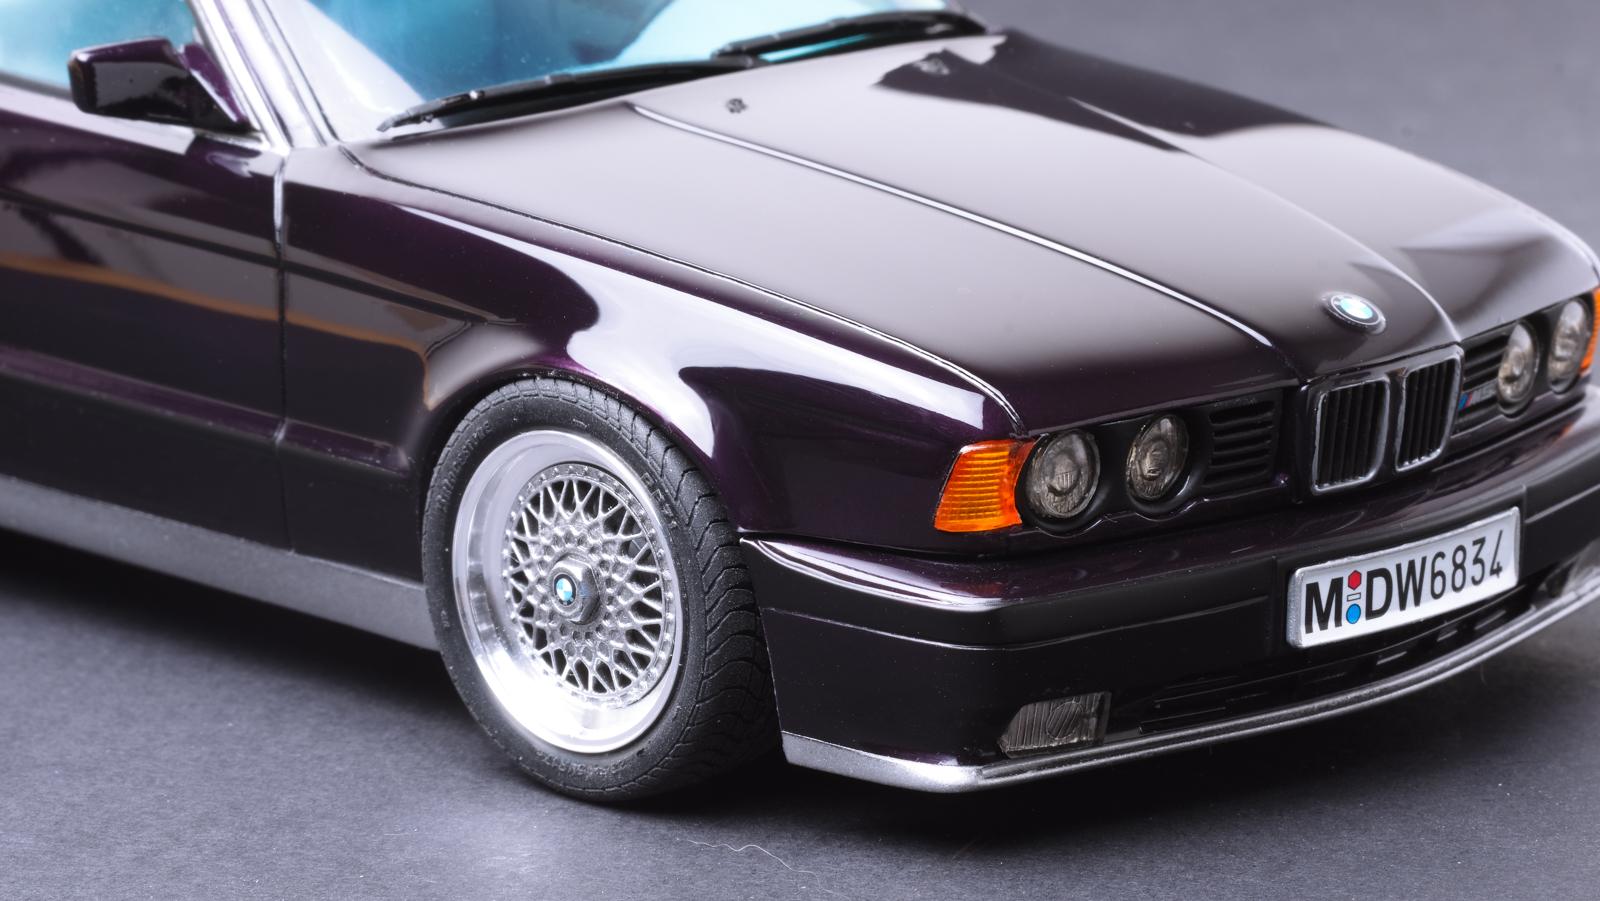
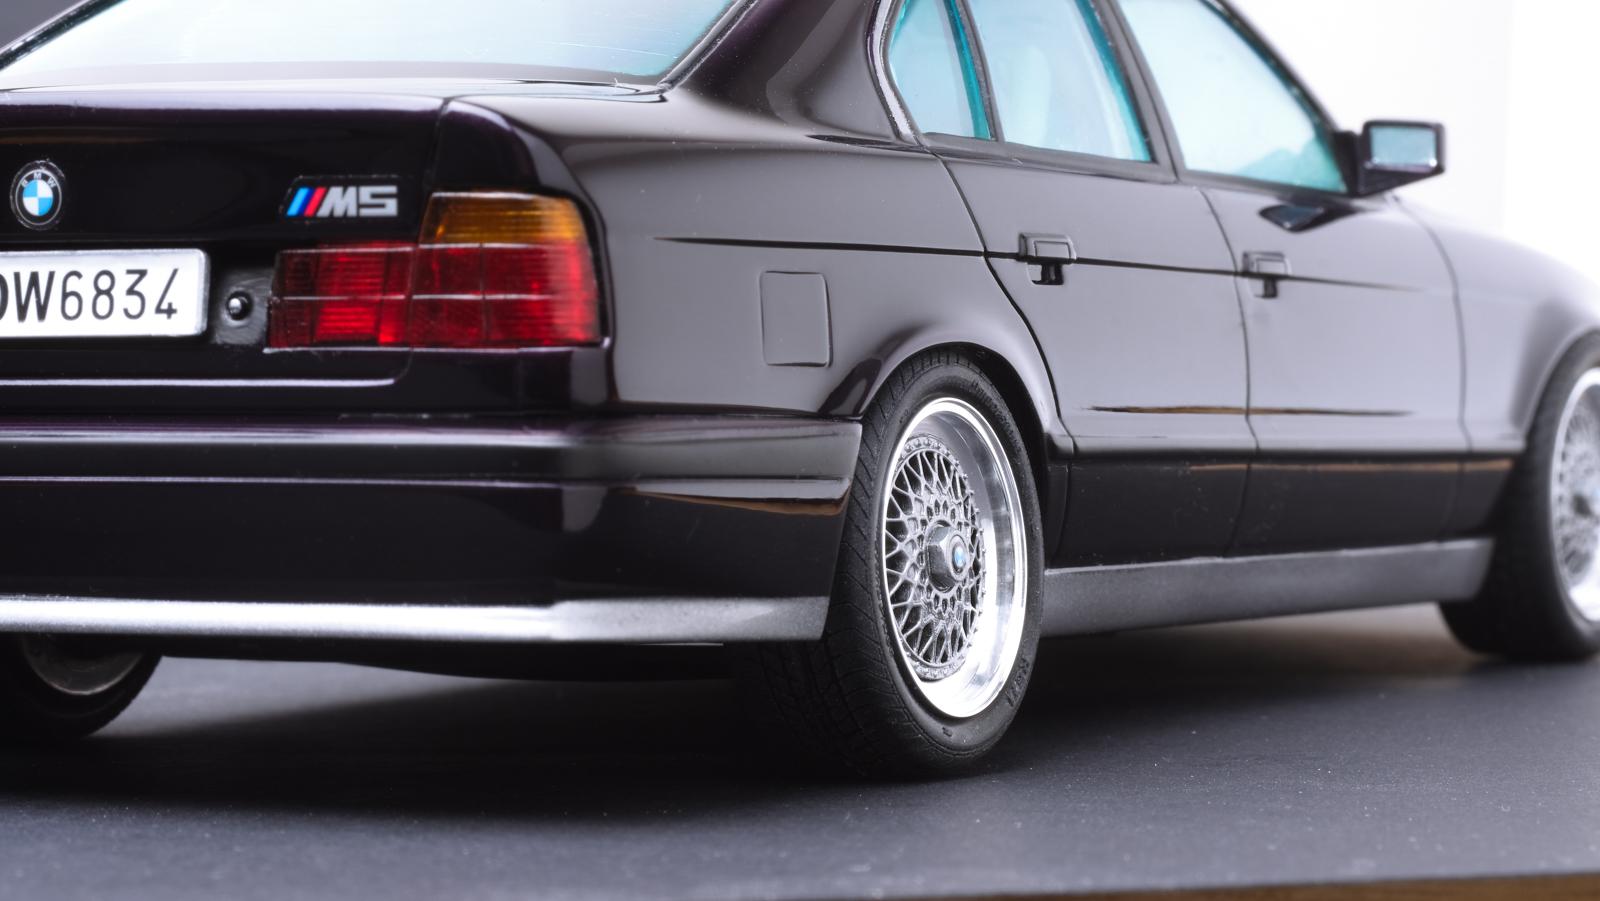
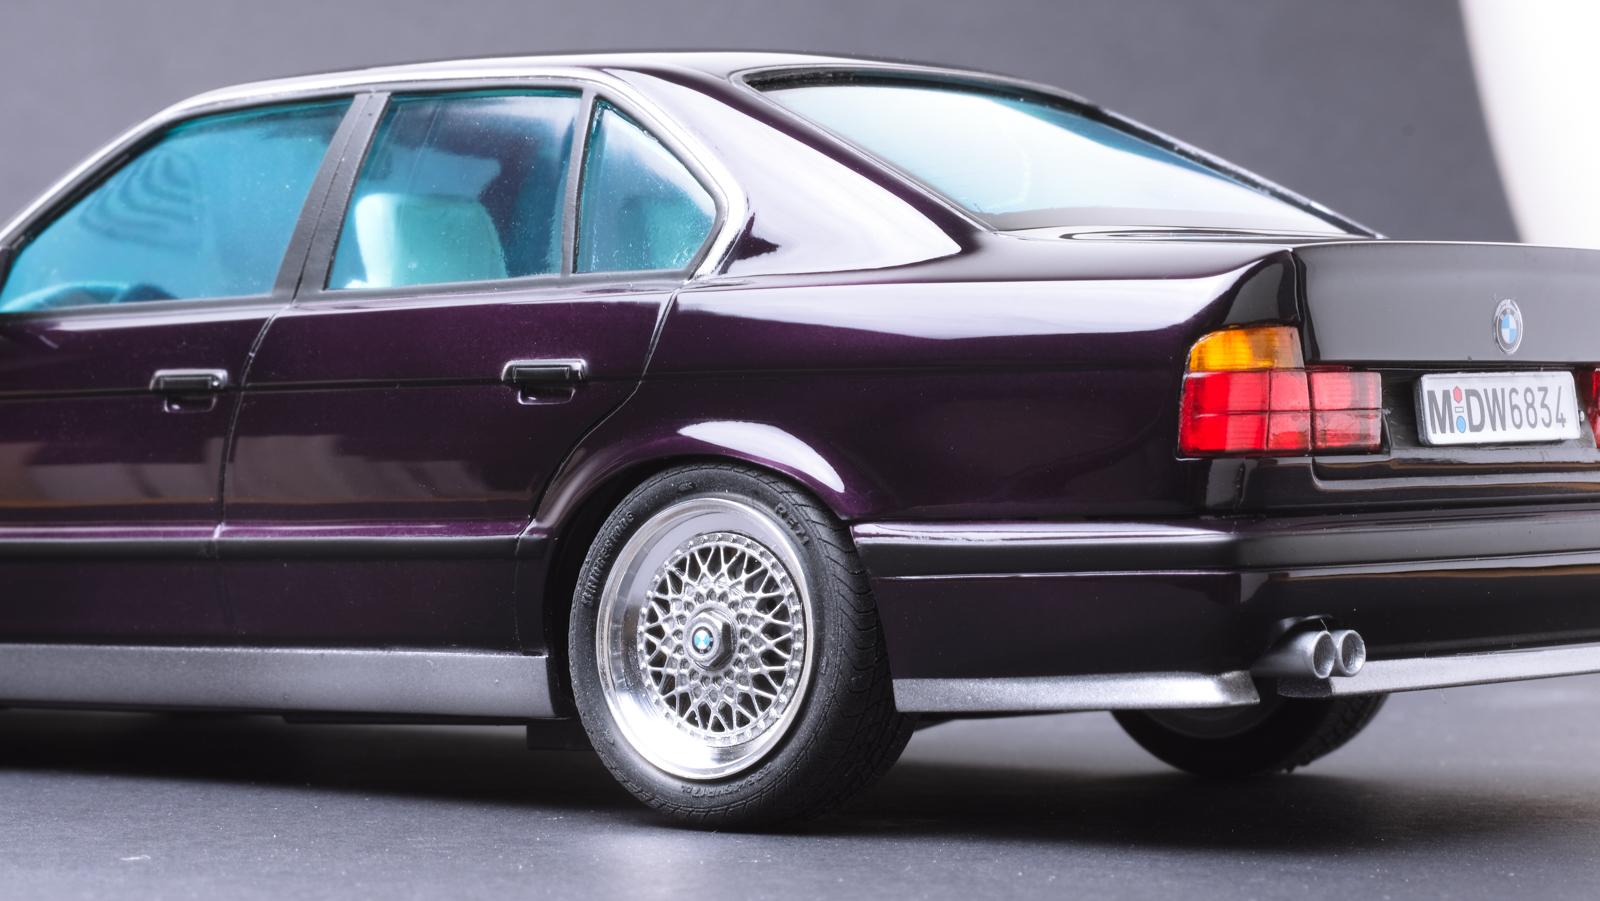
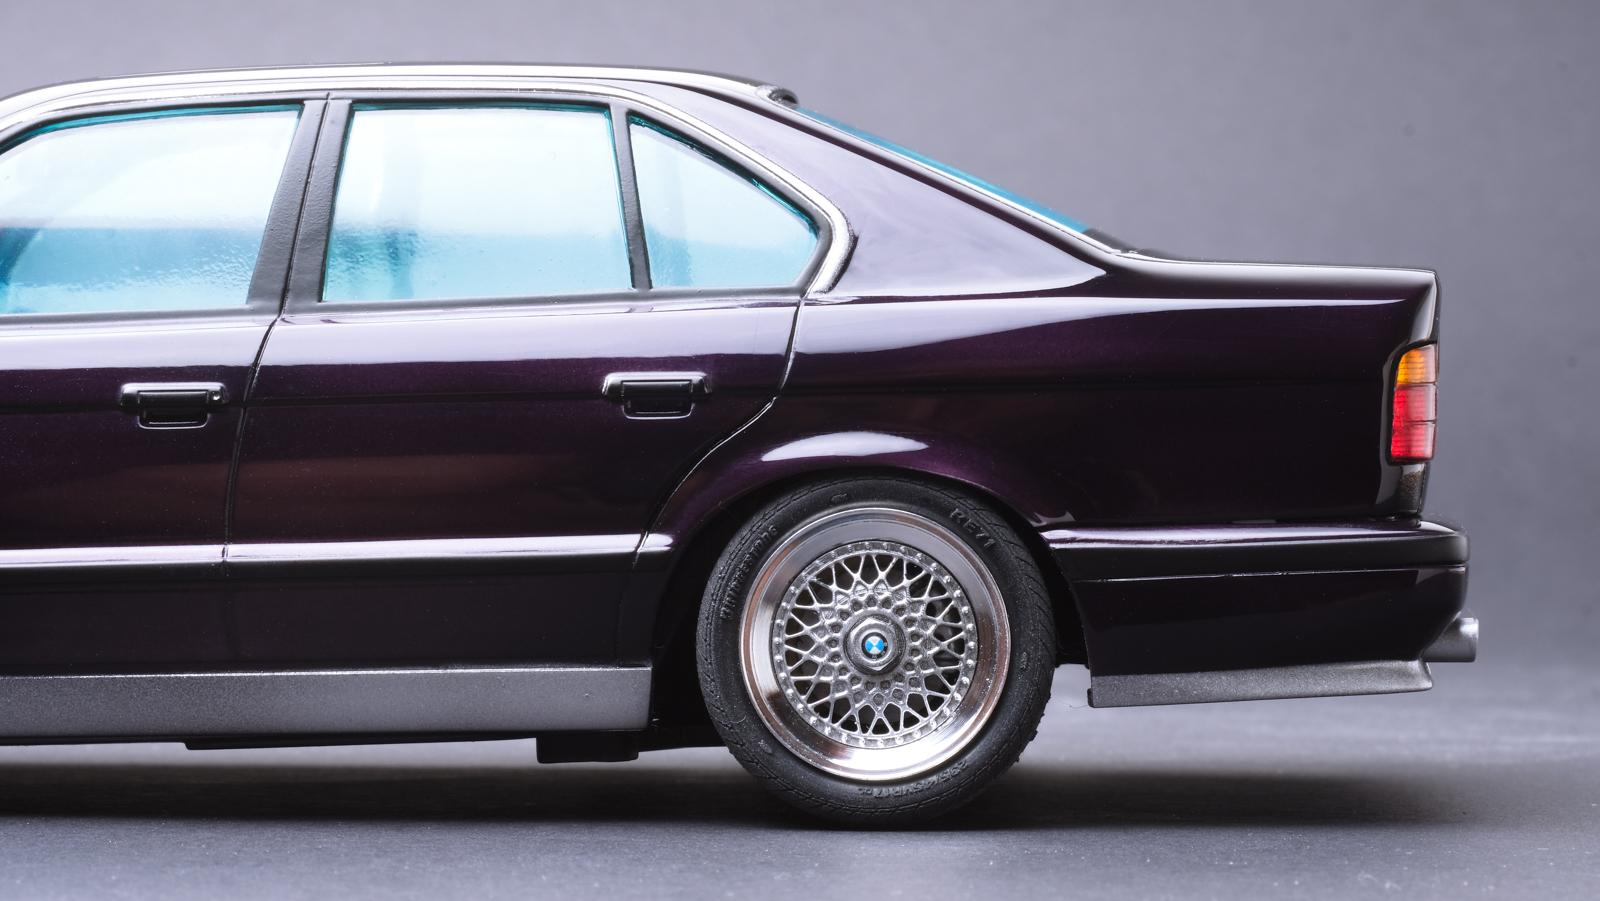
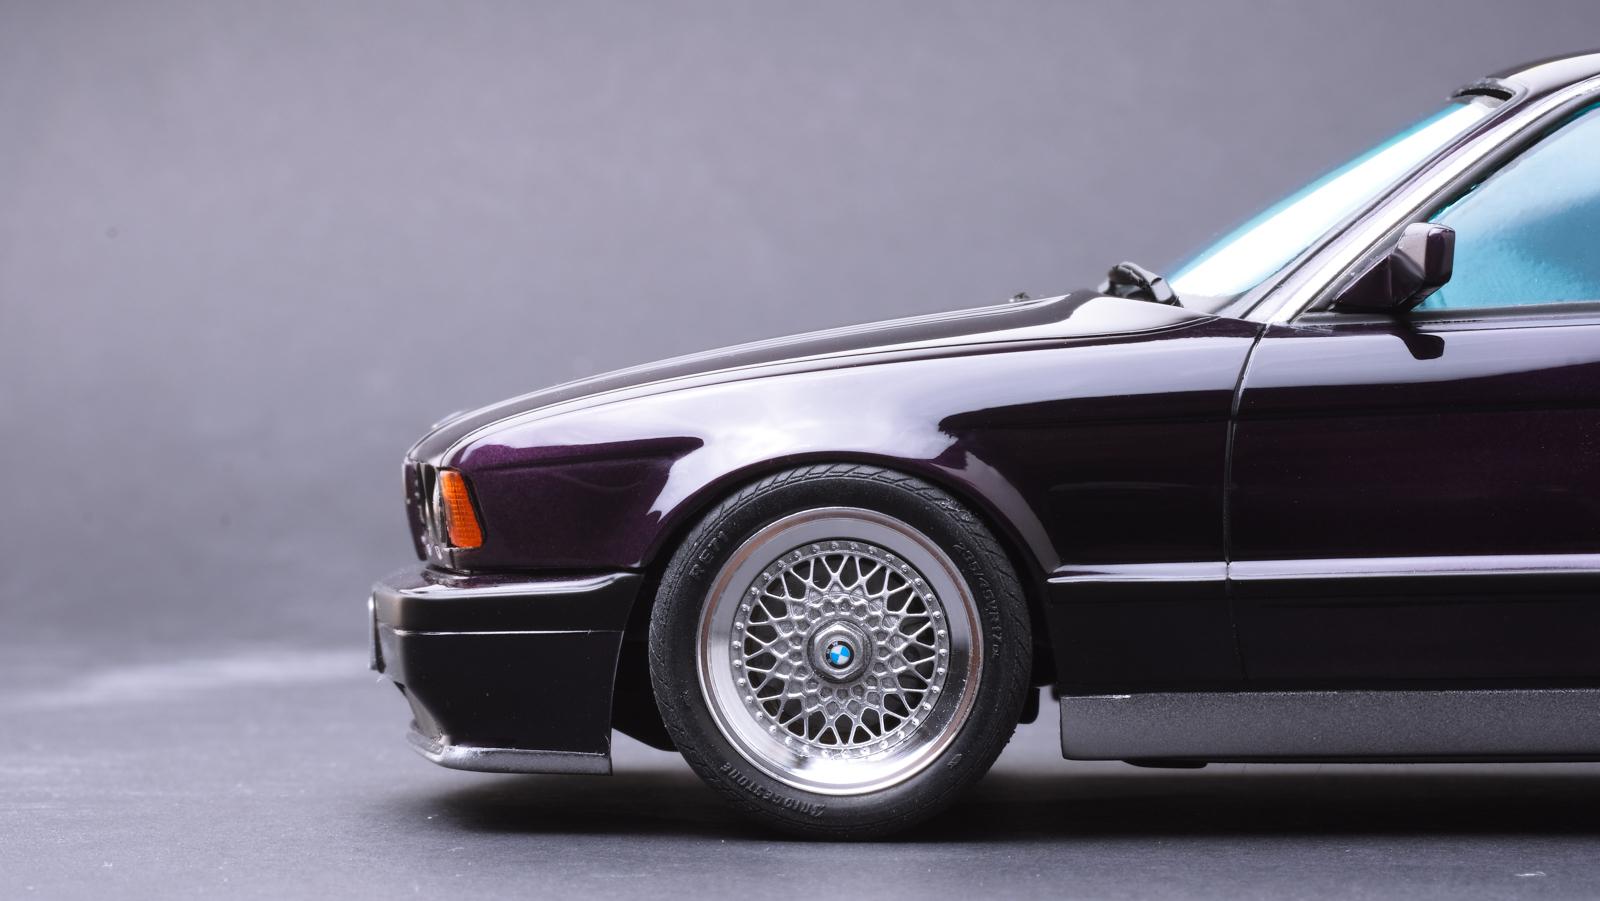
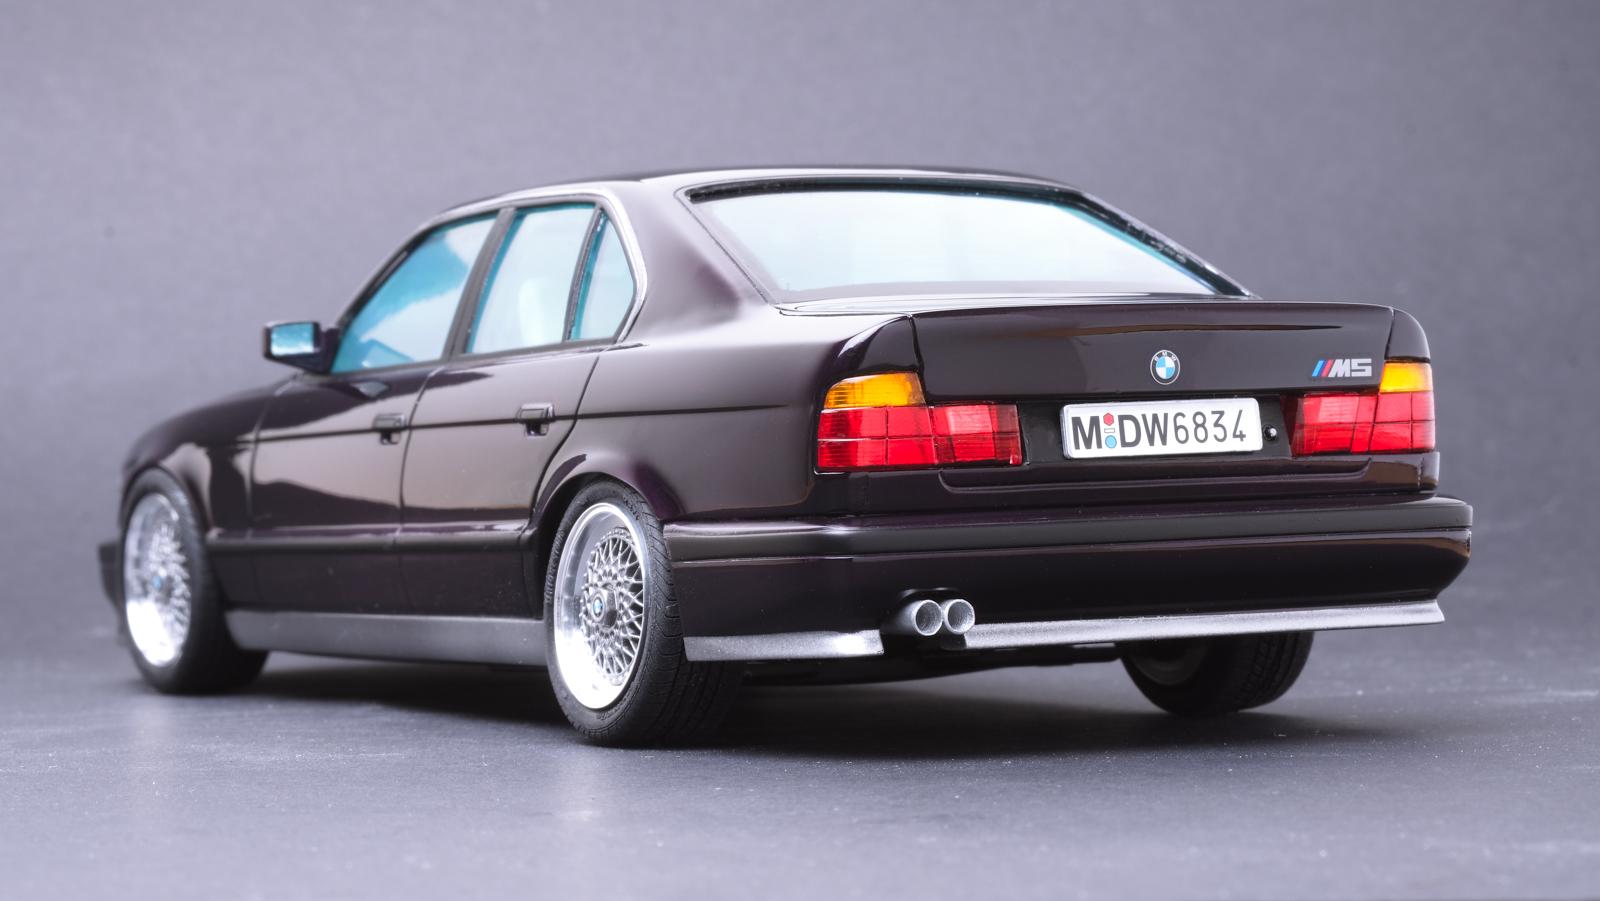
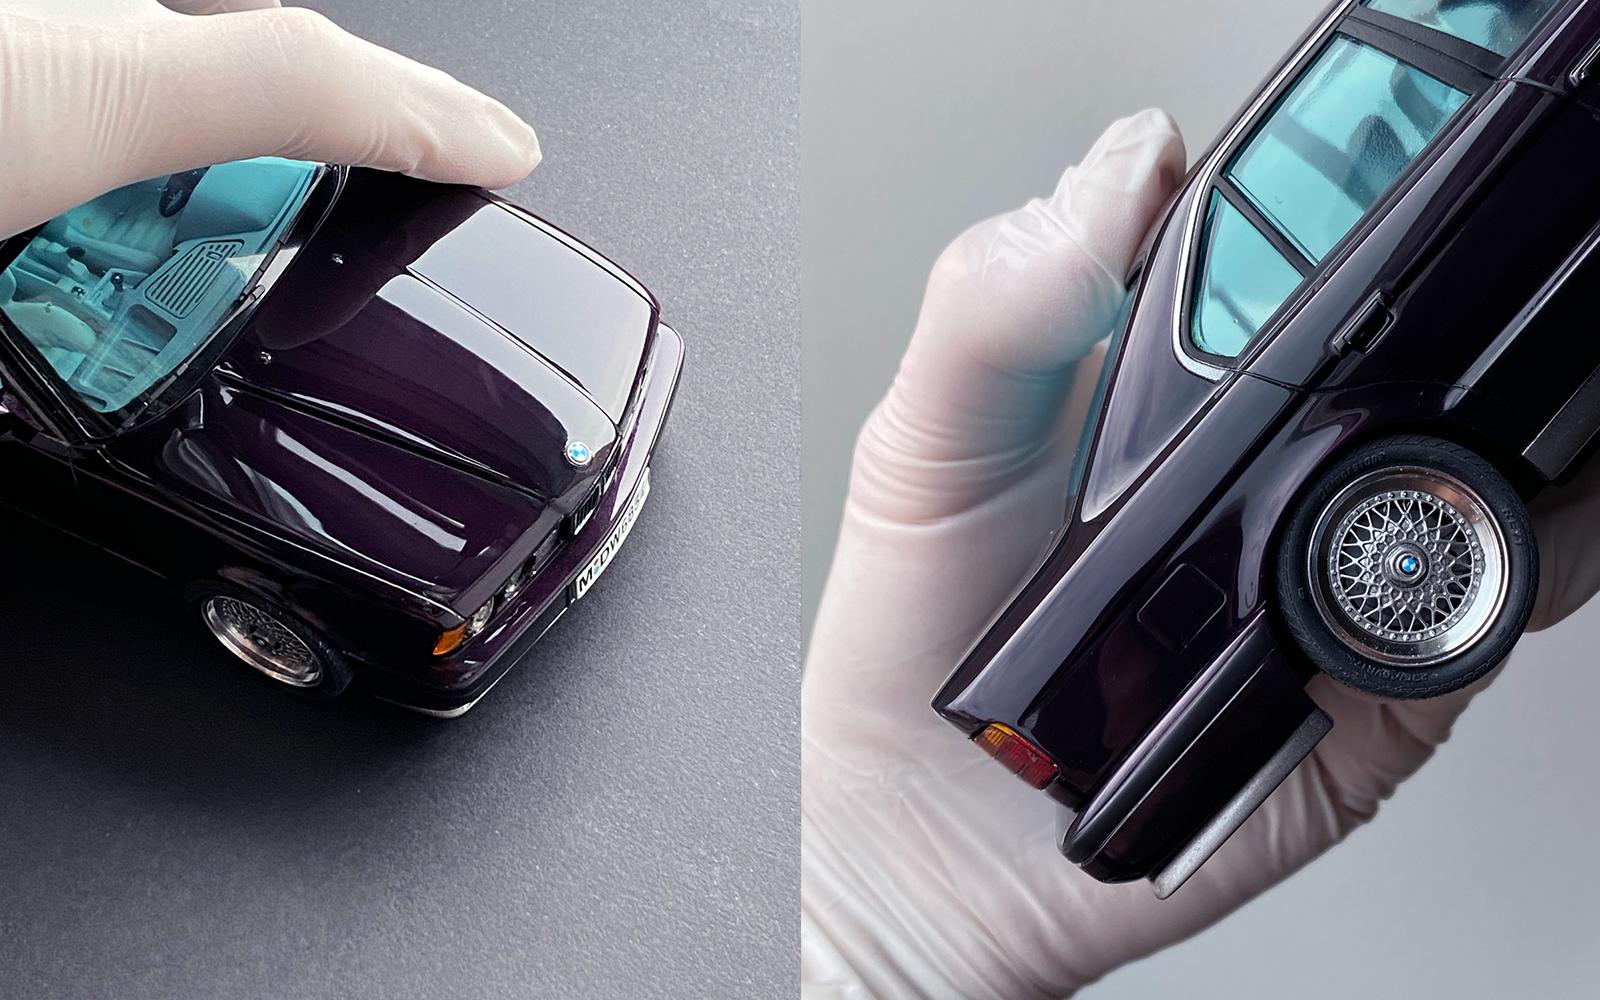
Thank you! If I had to pick one car to drive all season it would probably be the E34 M5. Thank you! I did spent too much time brushing off the dust! Darker colour is always pain in the ass to shoot ? I noticed that too. Just fixed now - appreciate the compliment! Great point! I might have to increase the thinner & clear ratio and give more generous coat to eliminate that - the clear is probably too thin to do any serious polishing but I'll give it a shot next time!
-
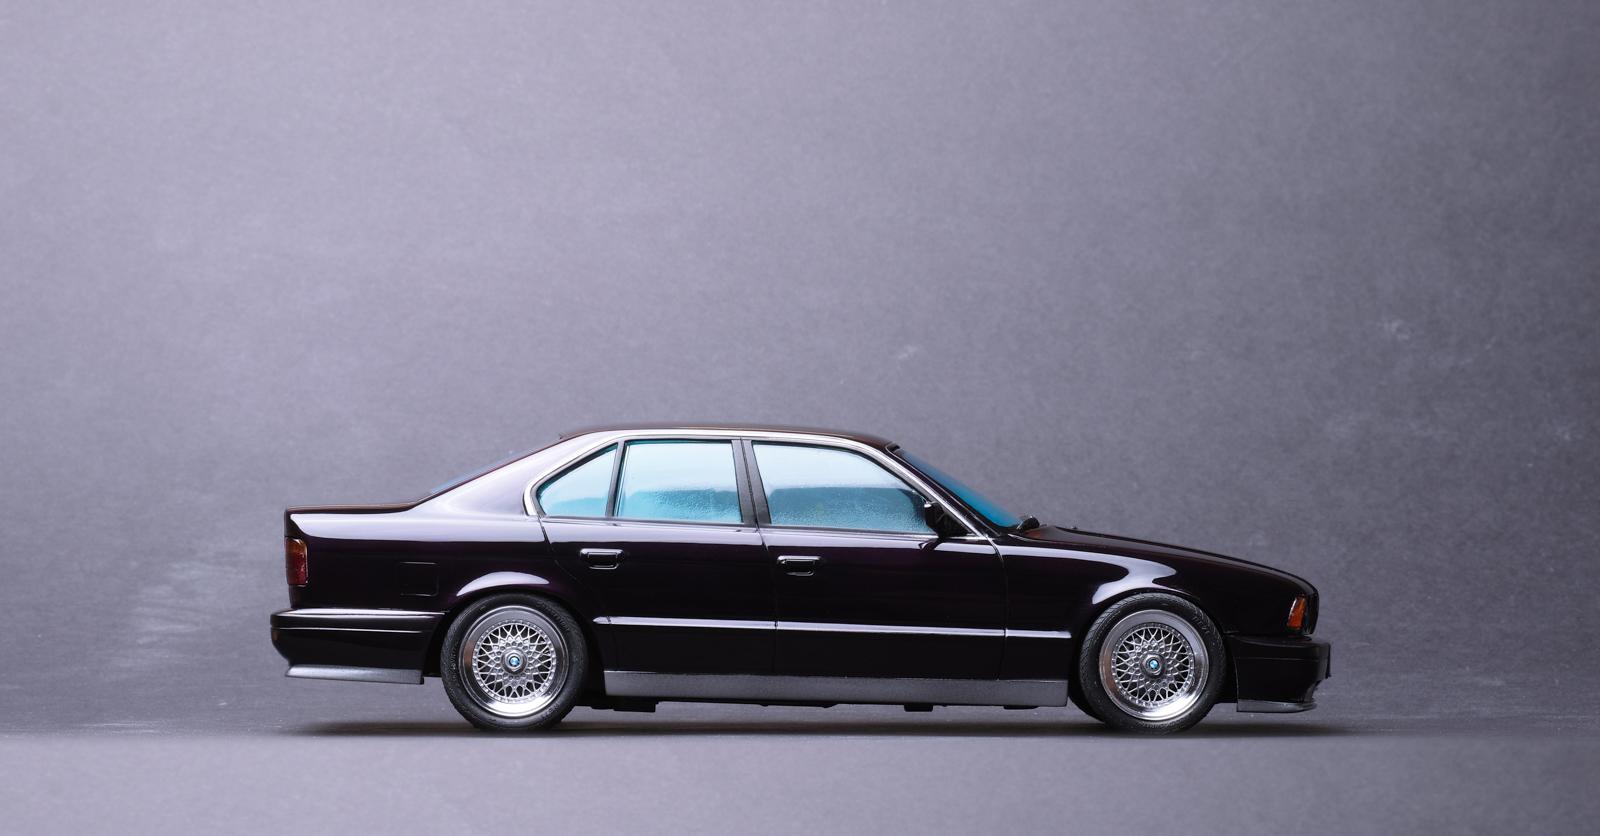
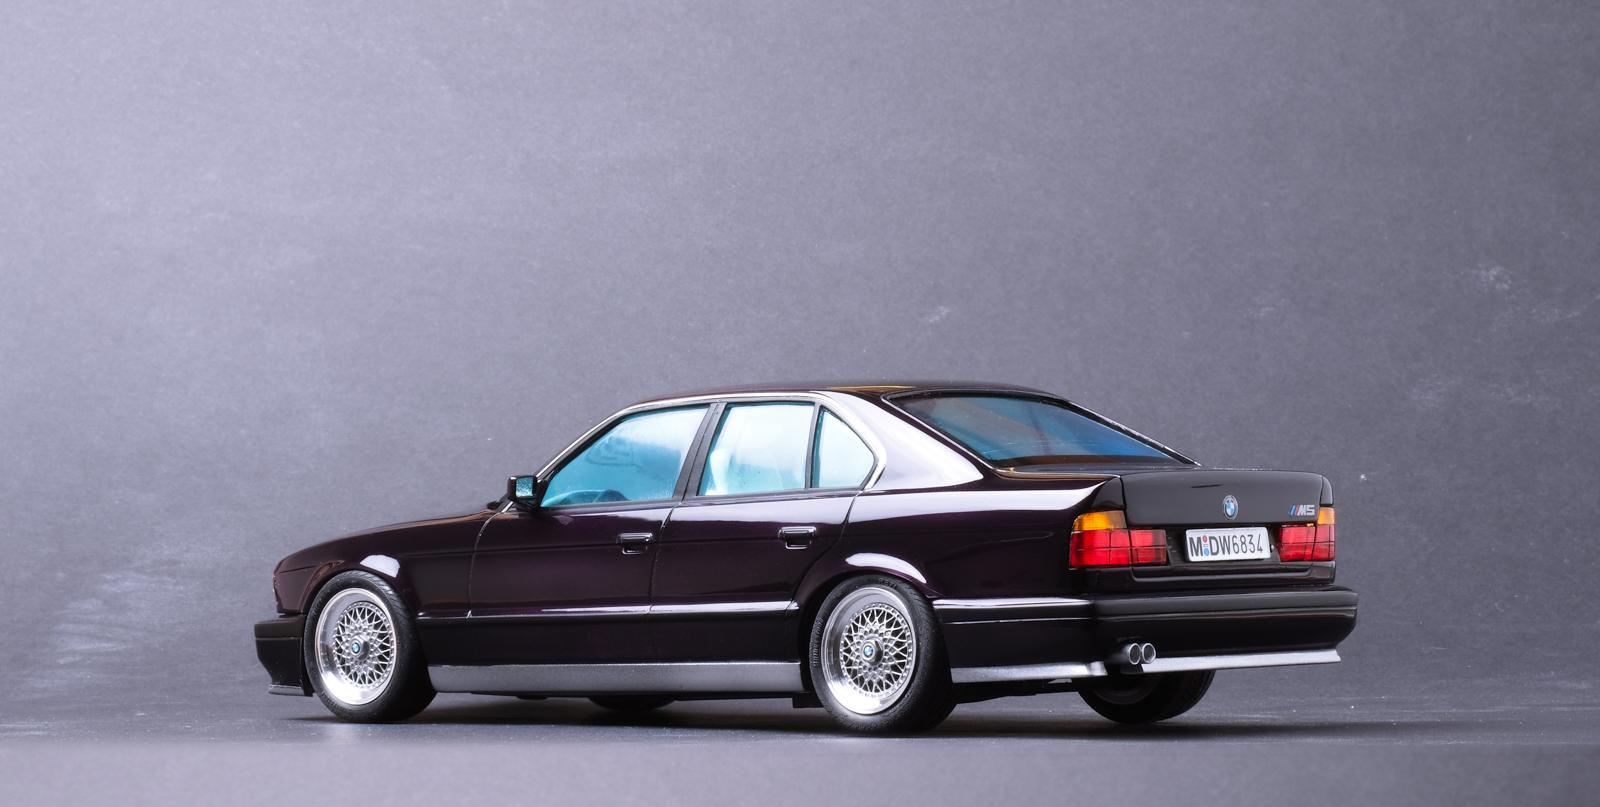
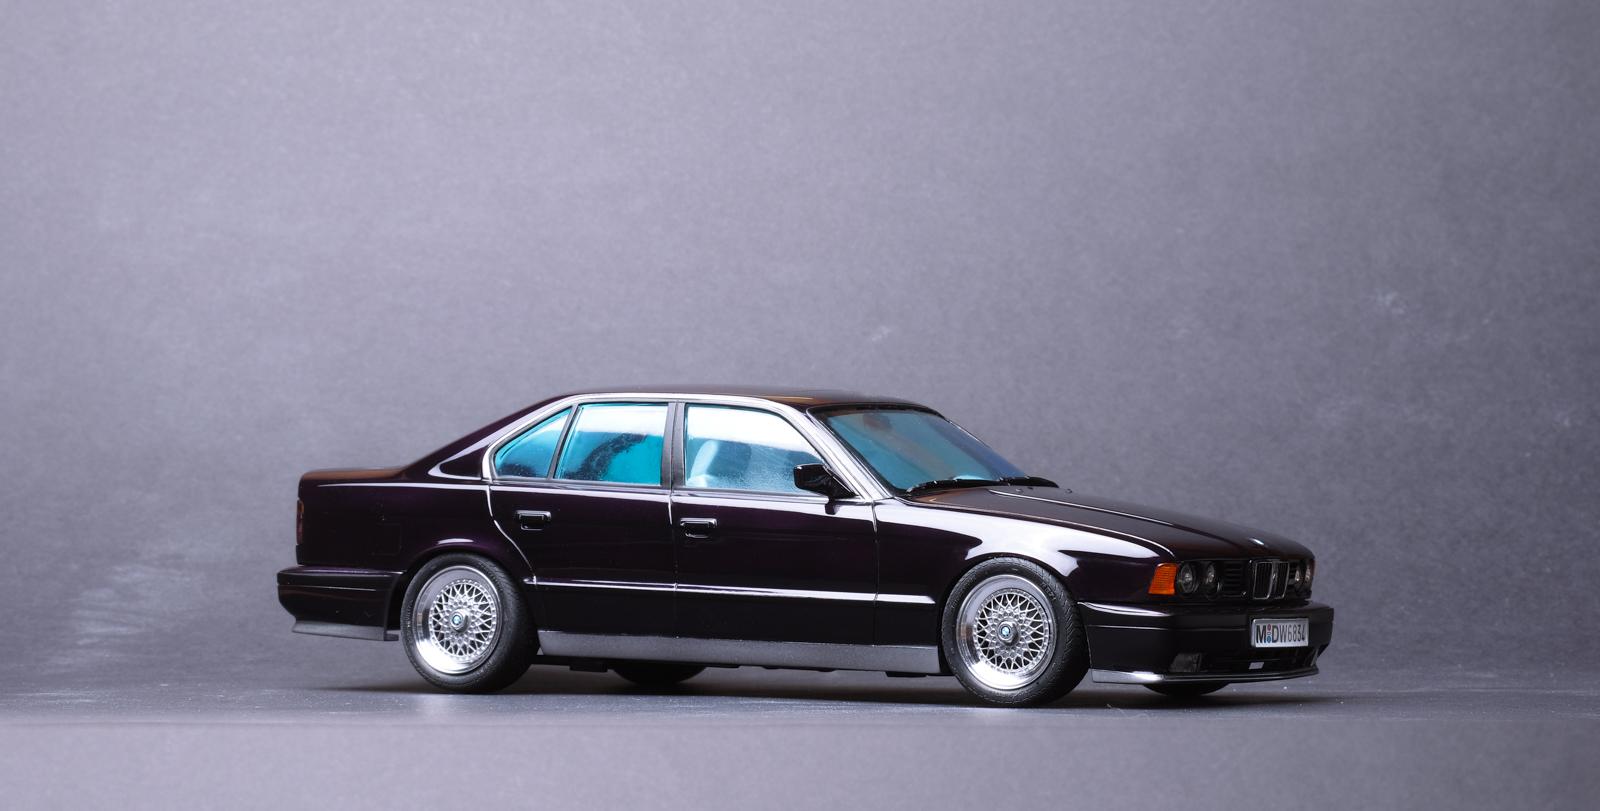
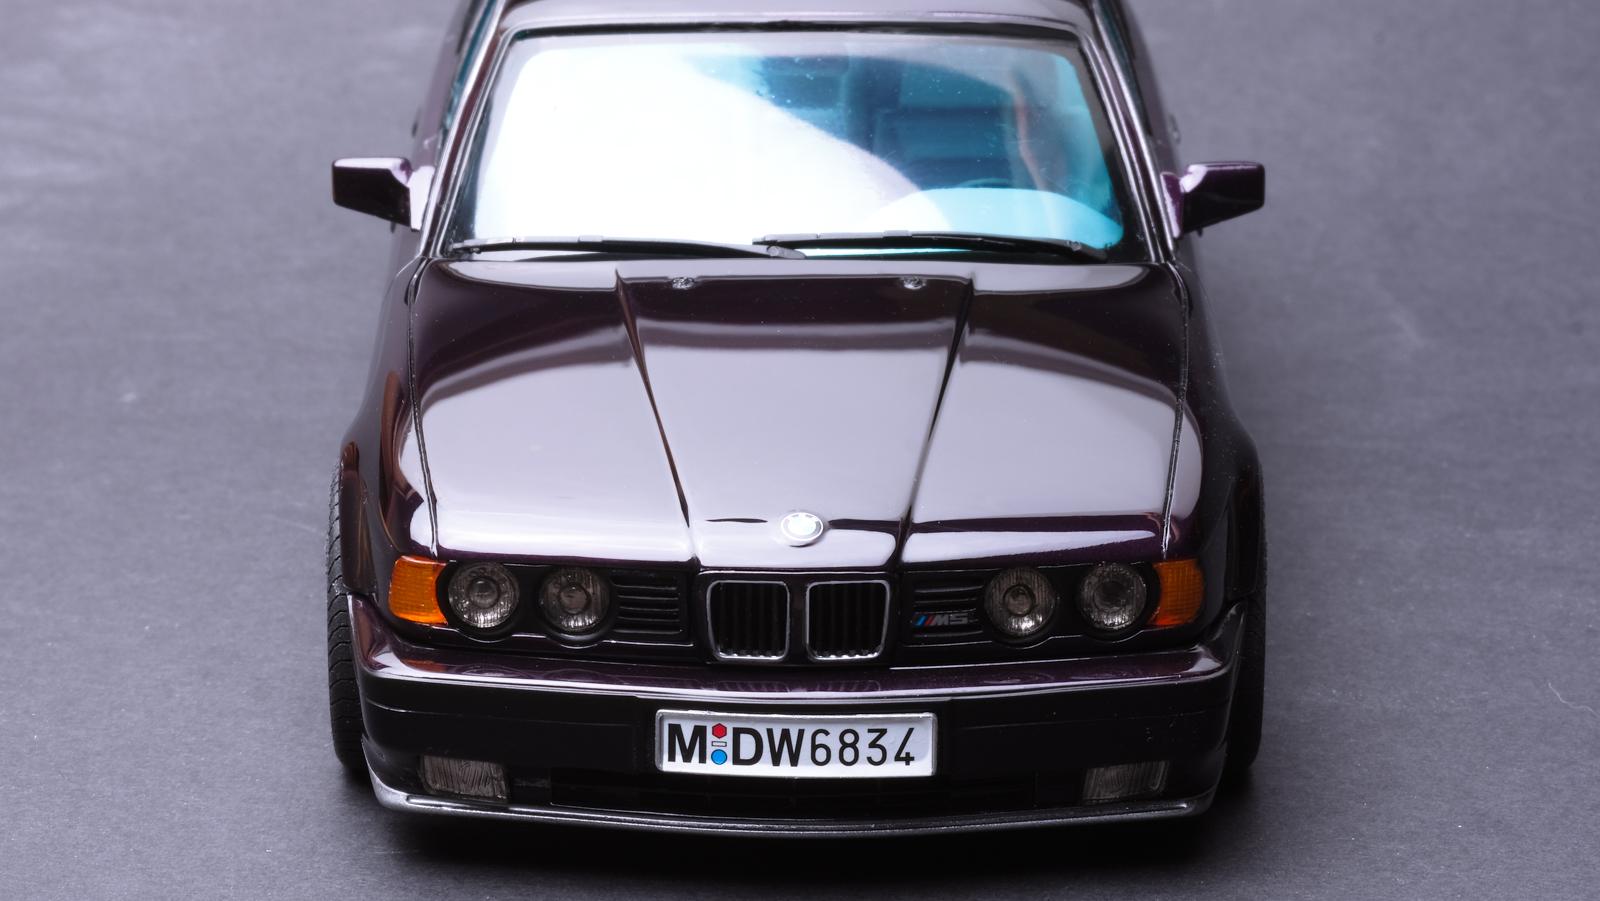
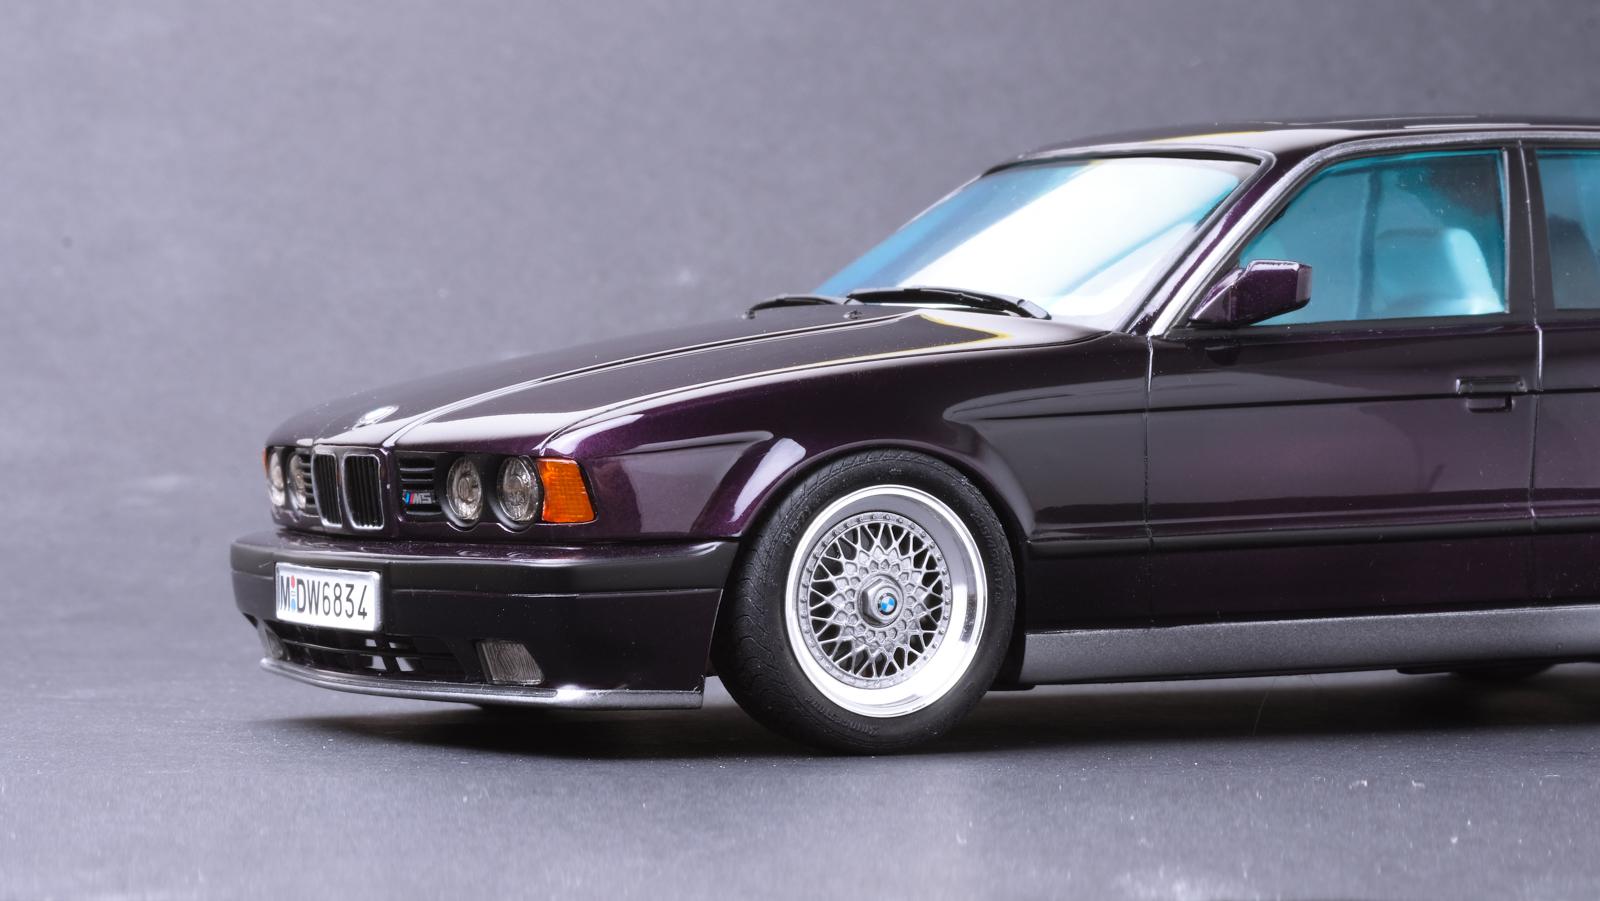
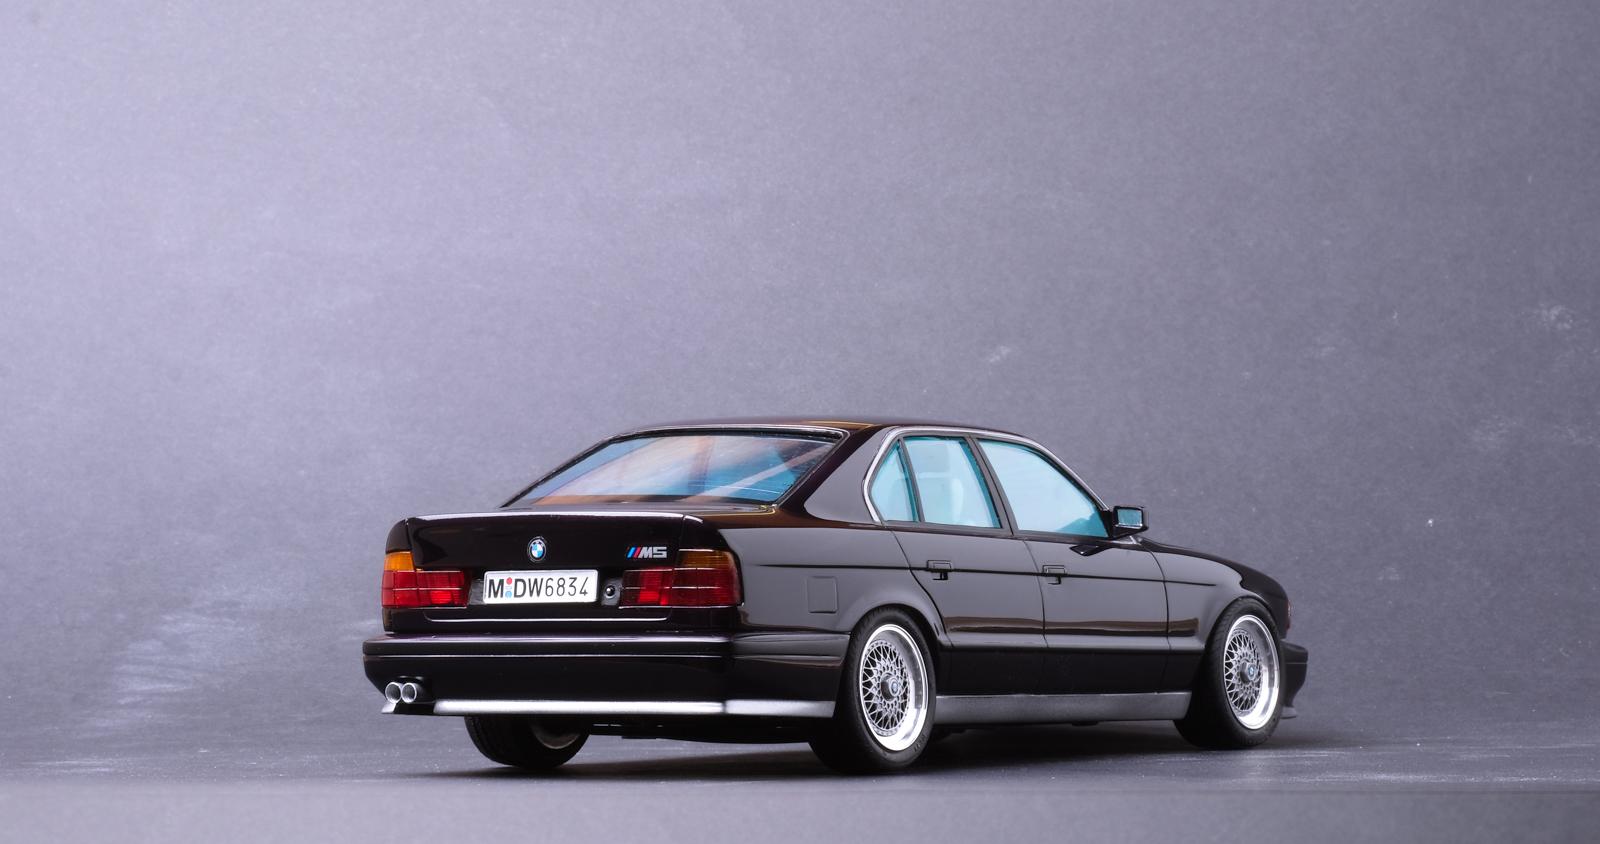
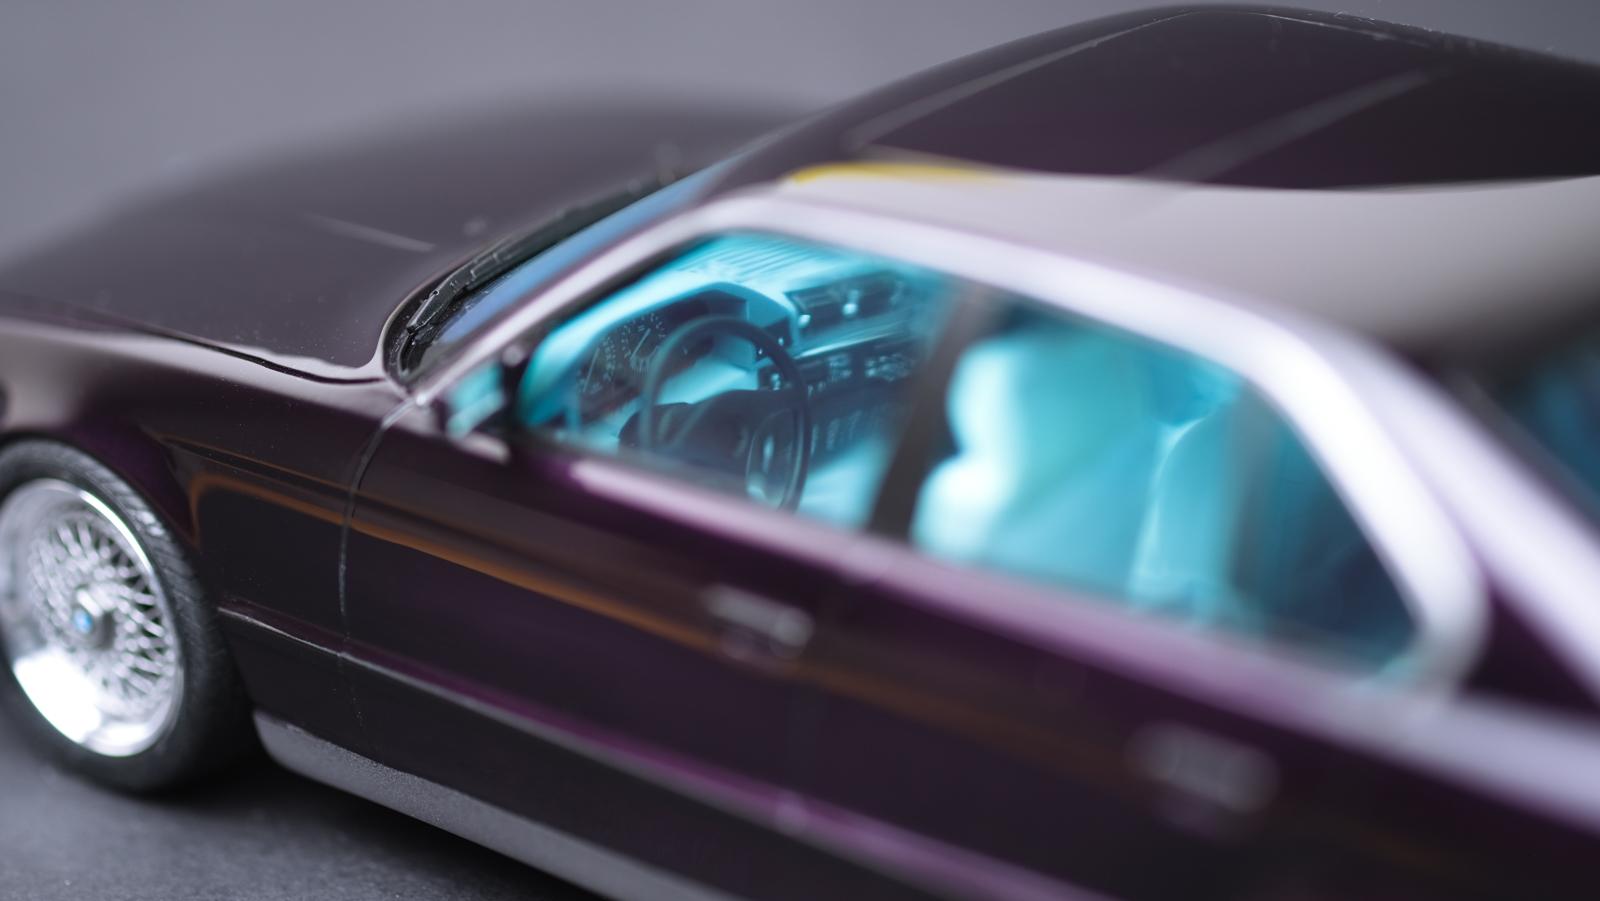
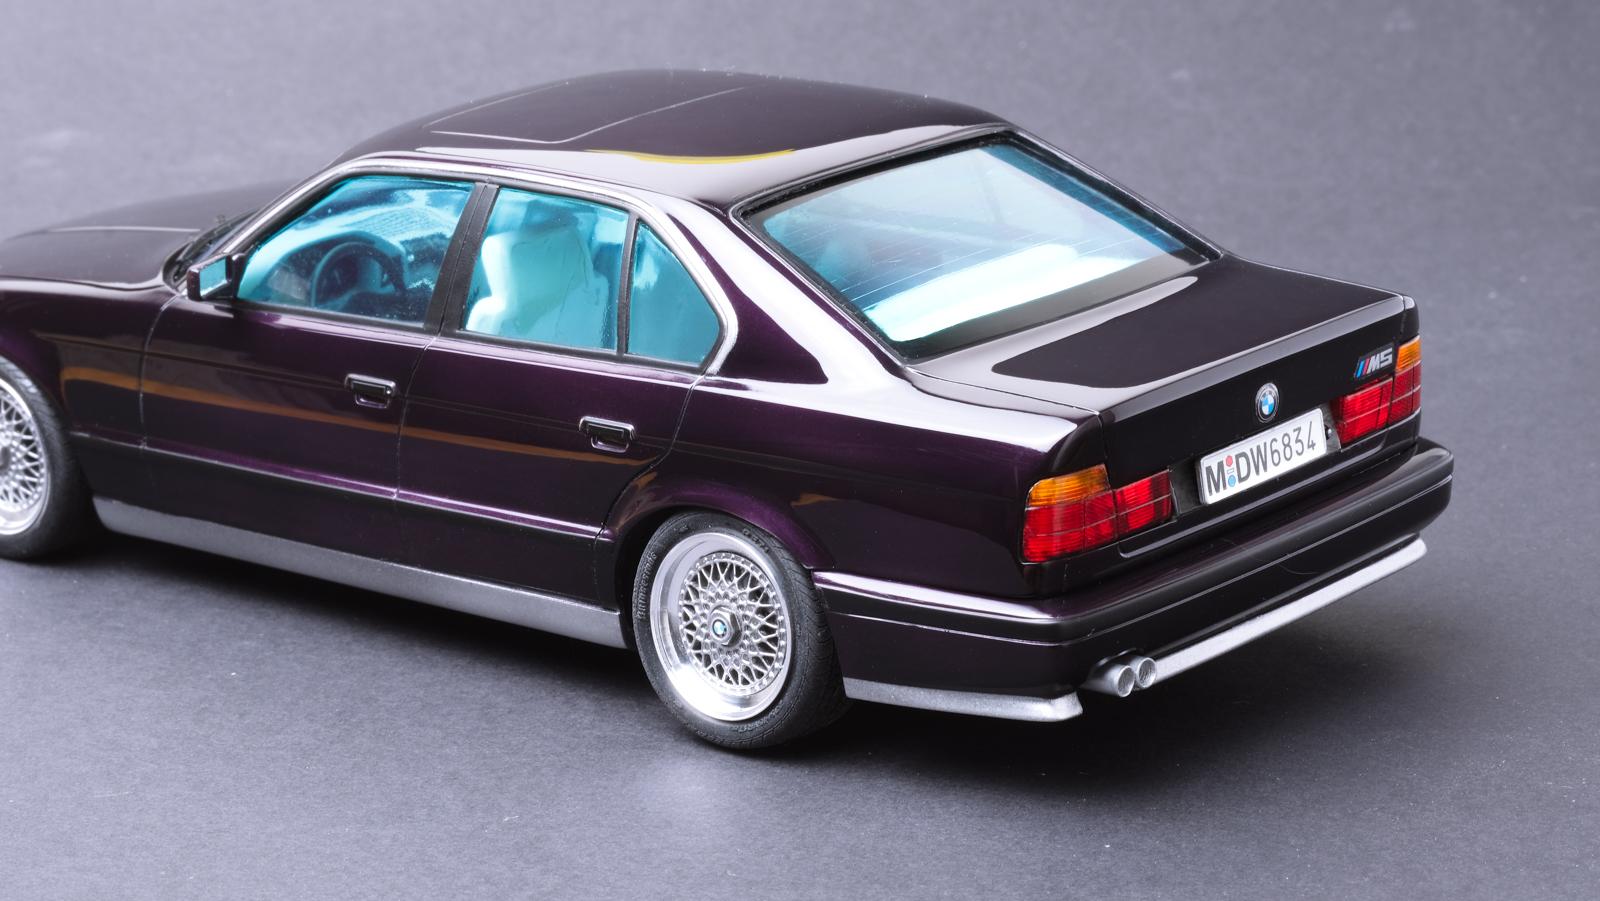
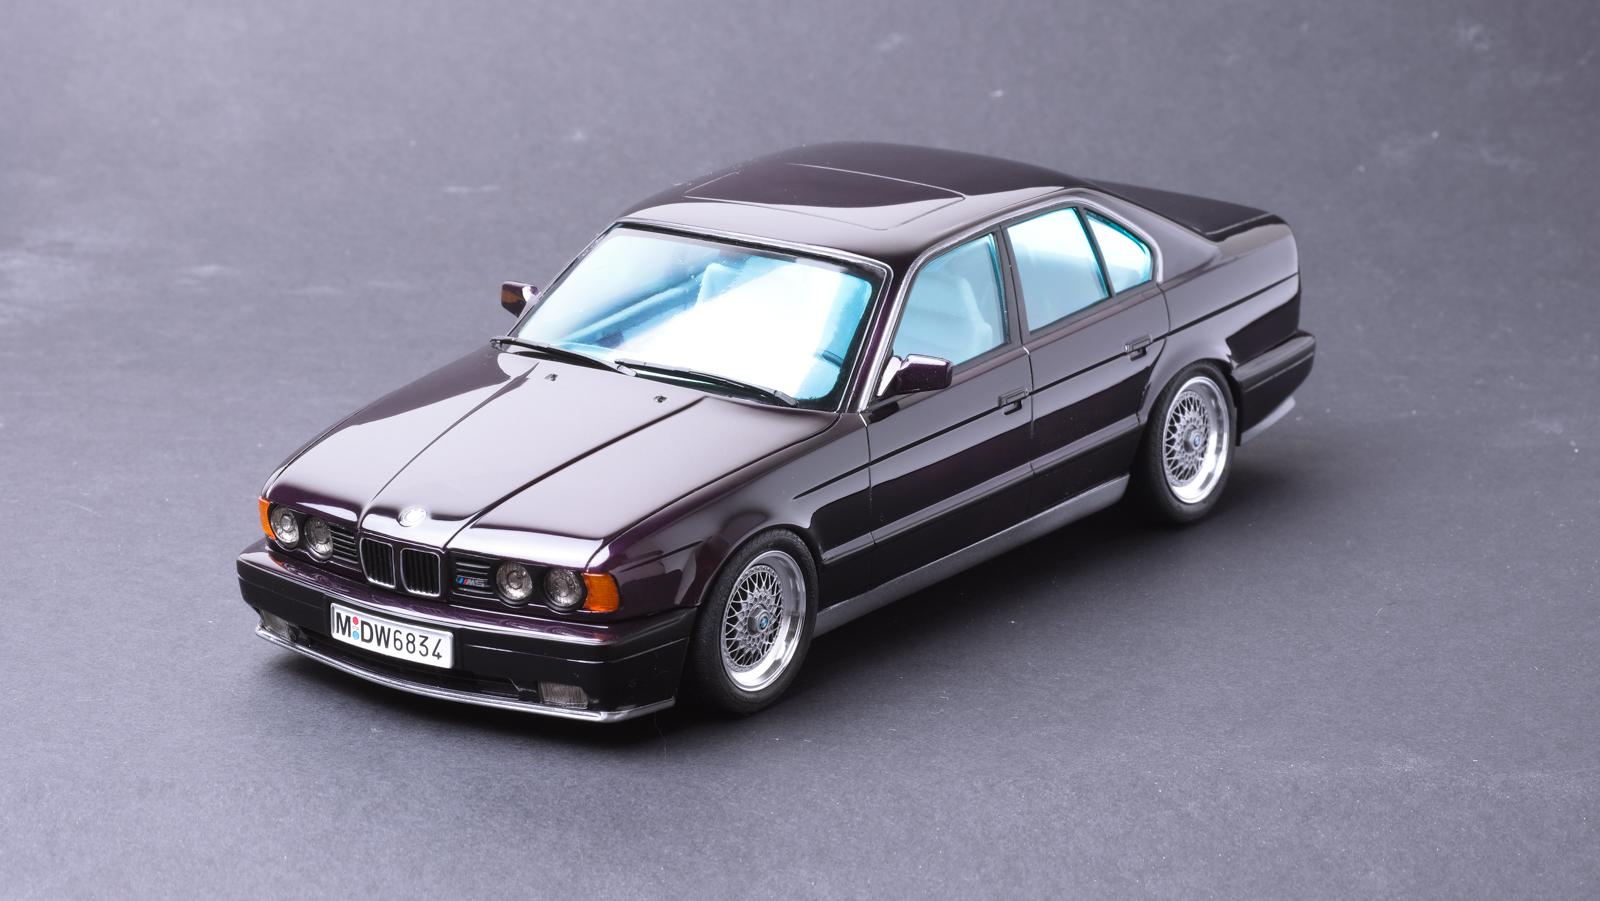
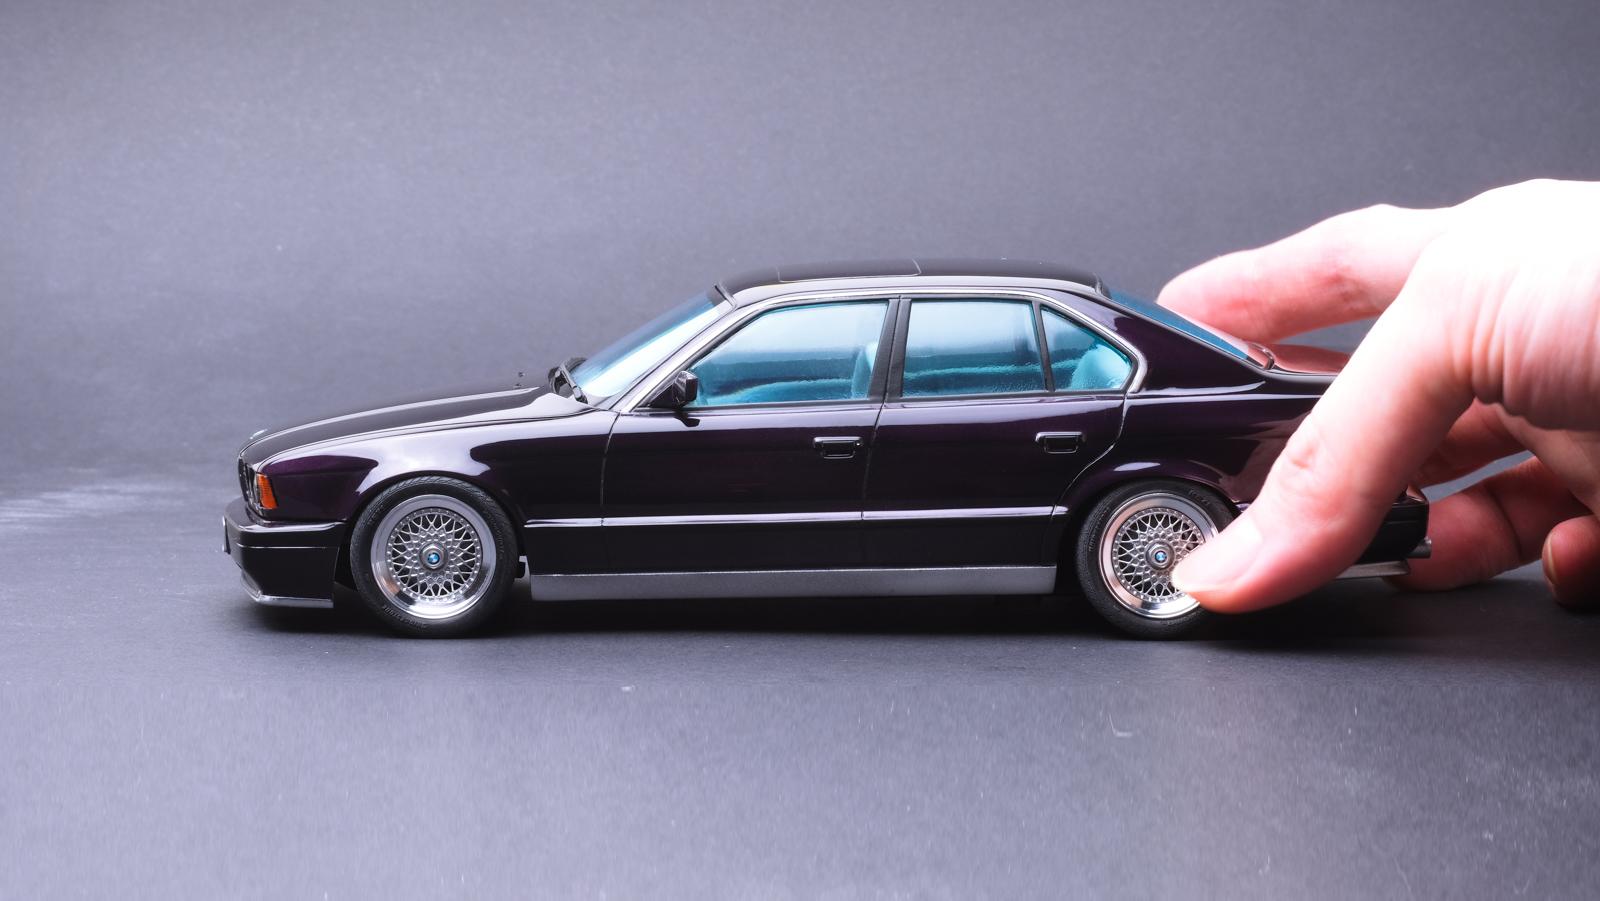
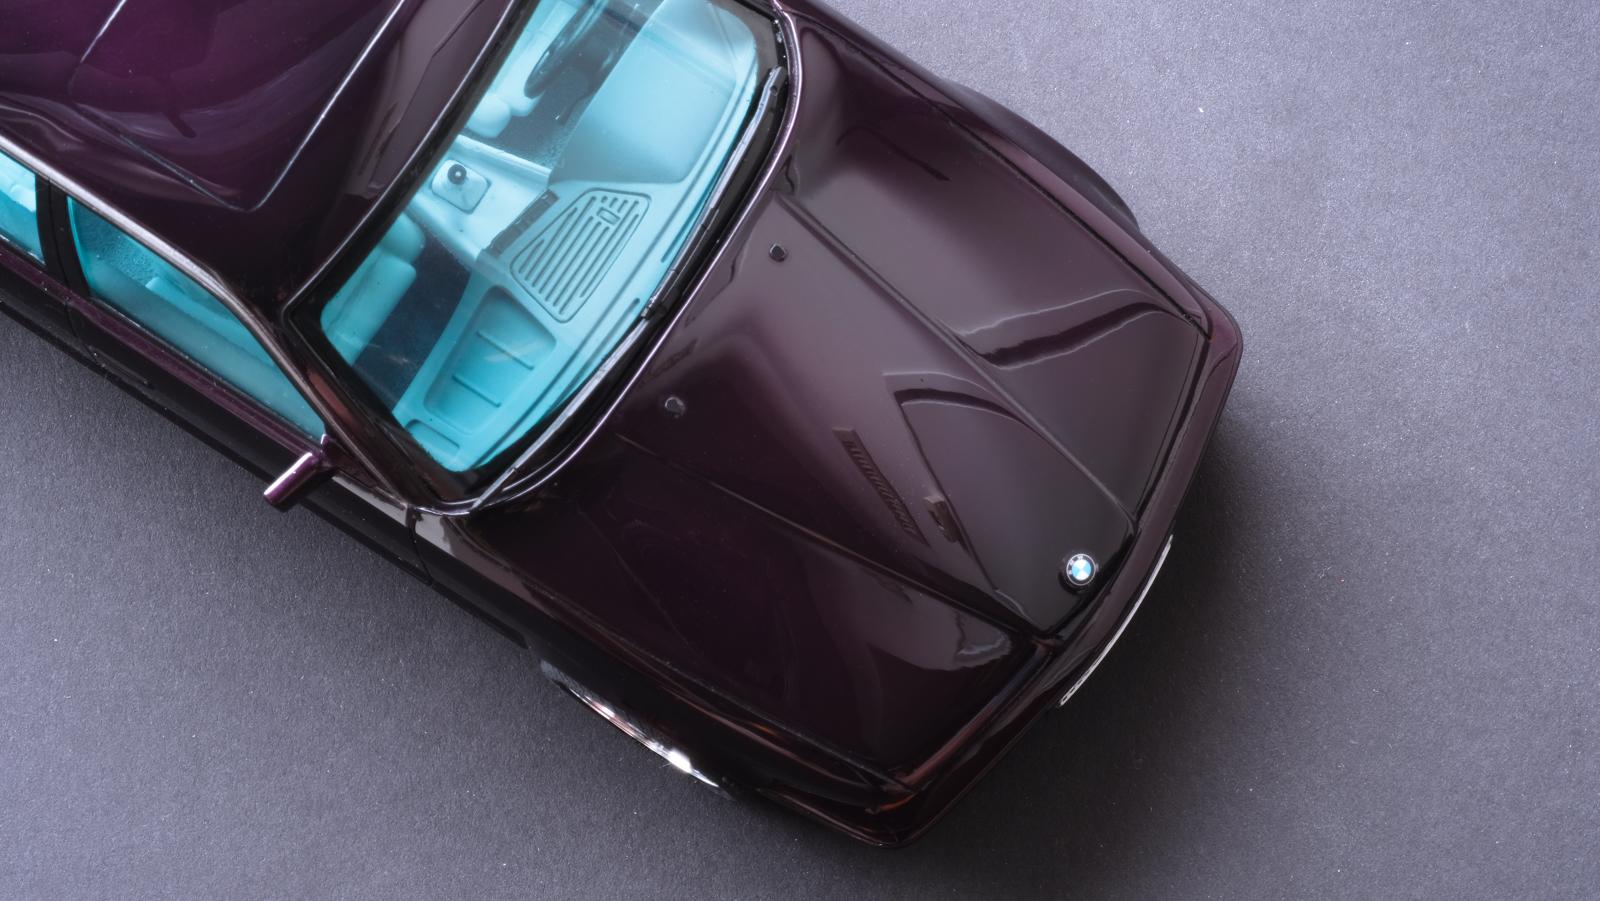
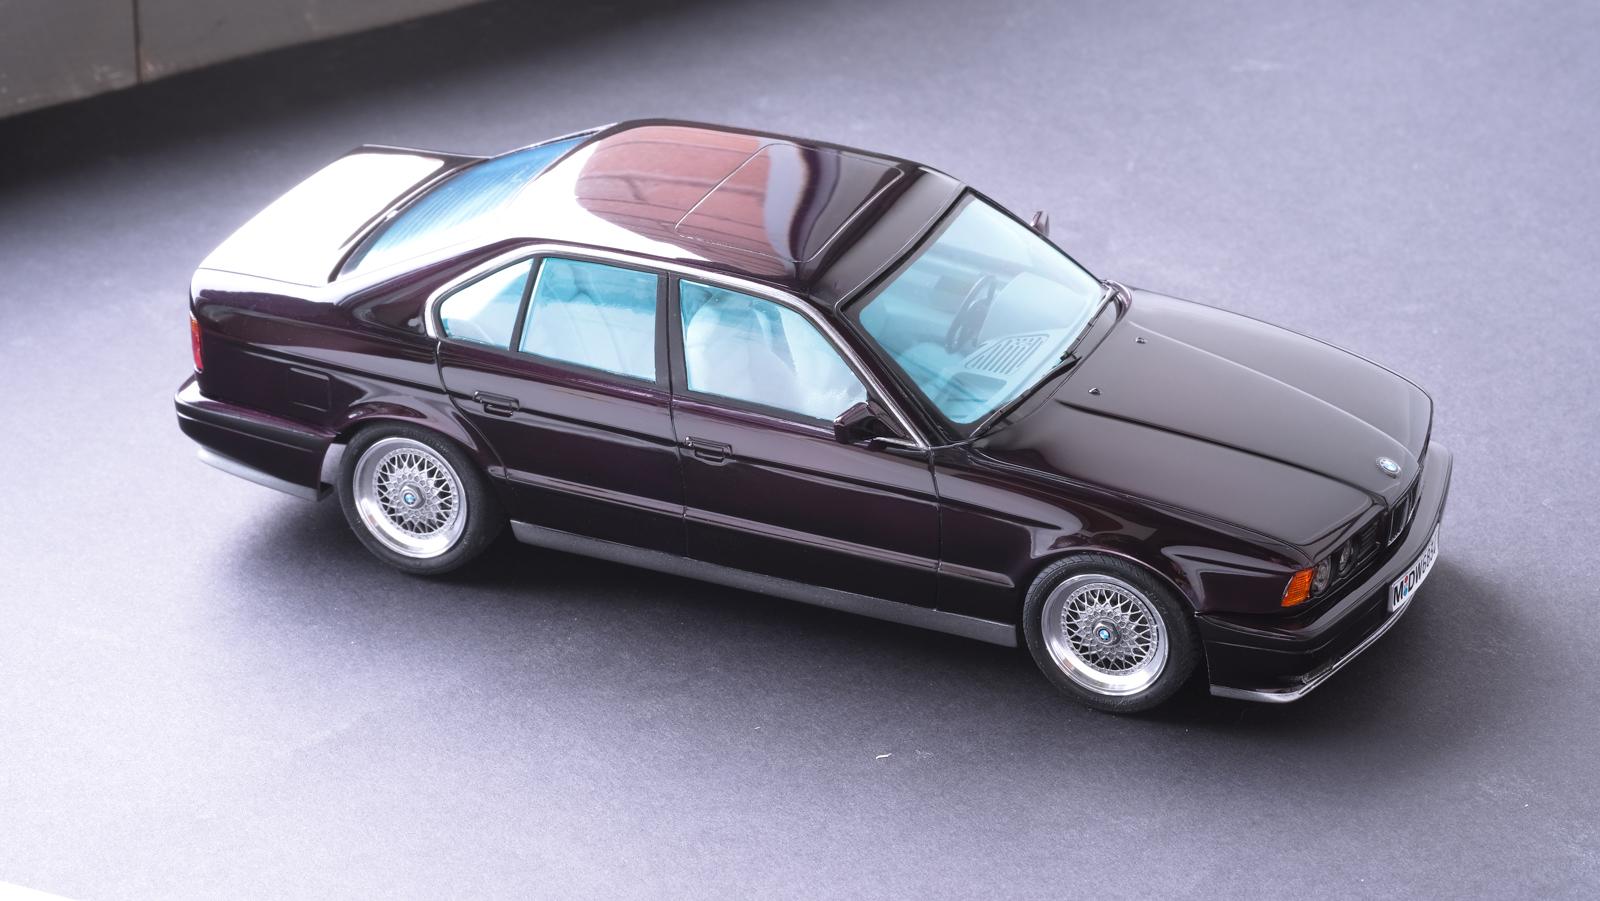
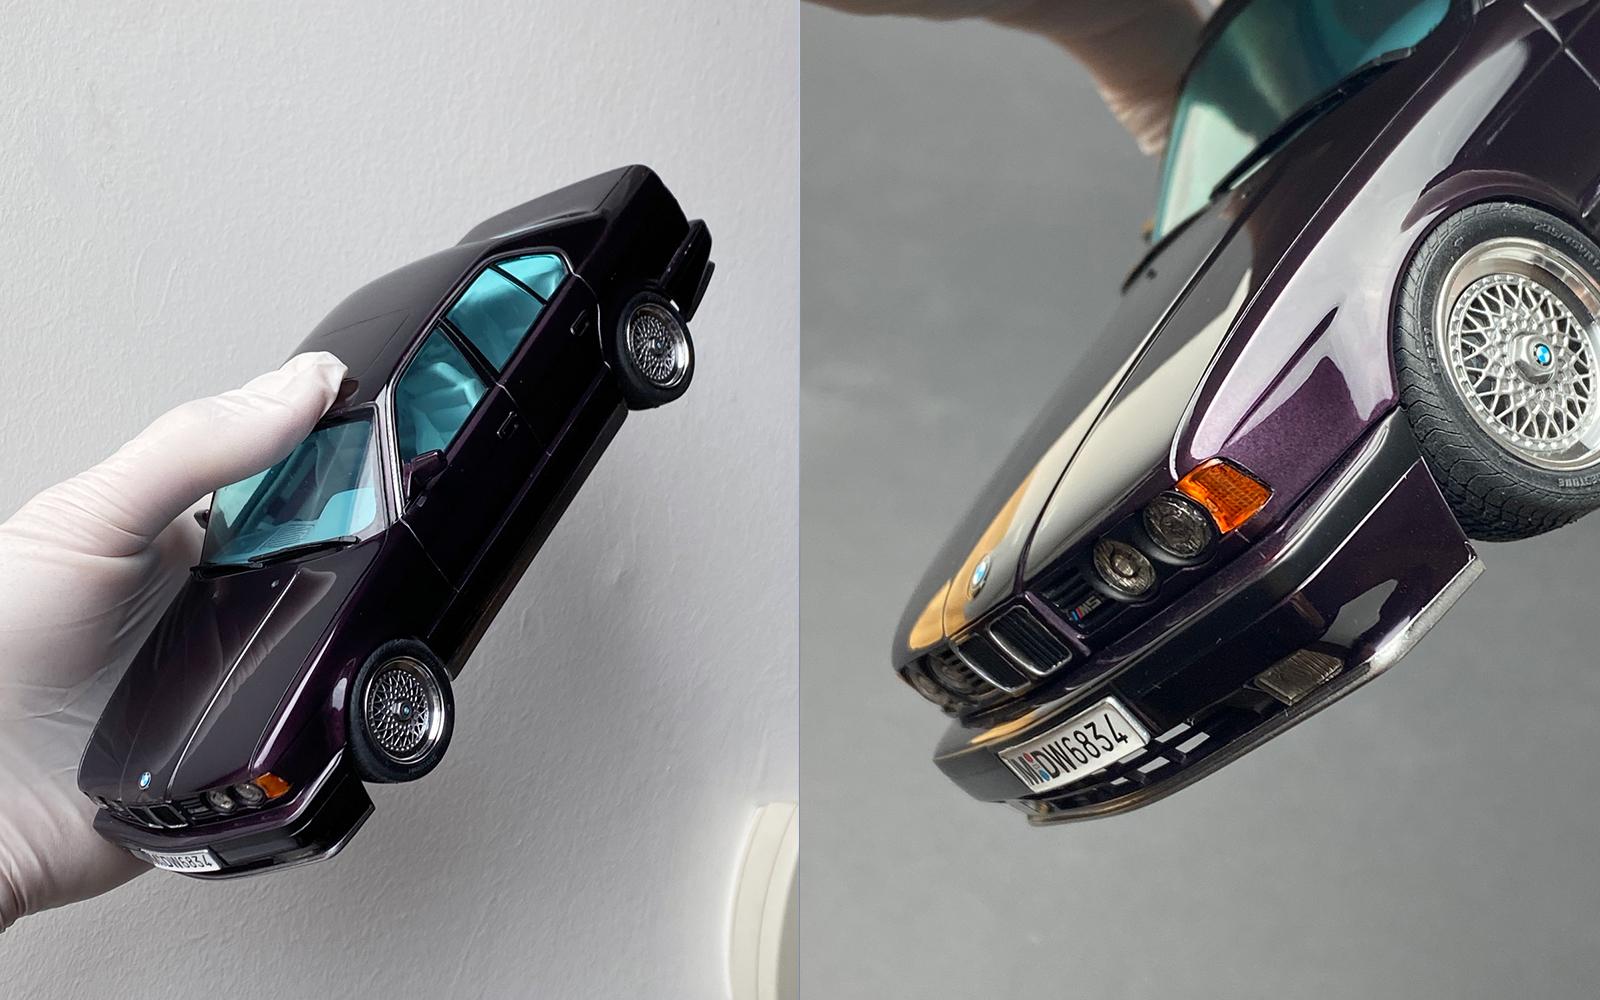
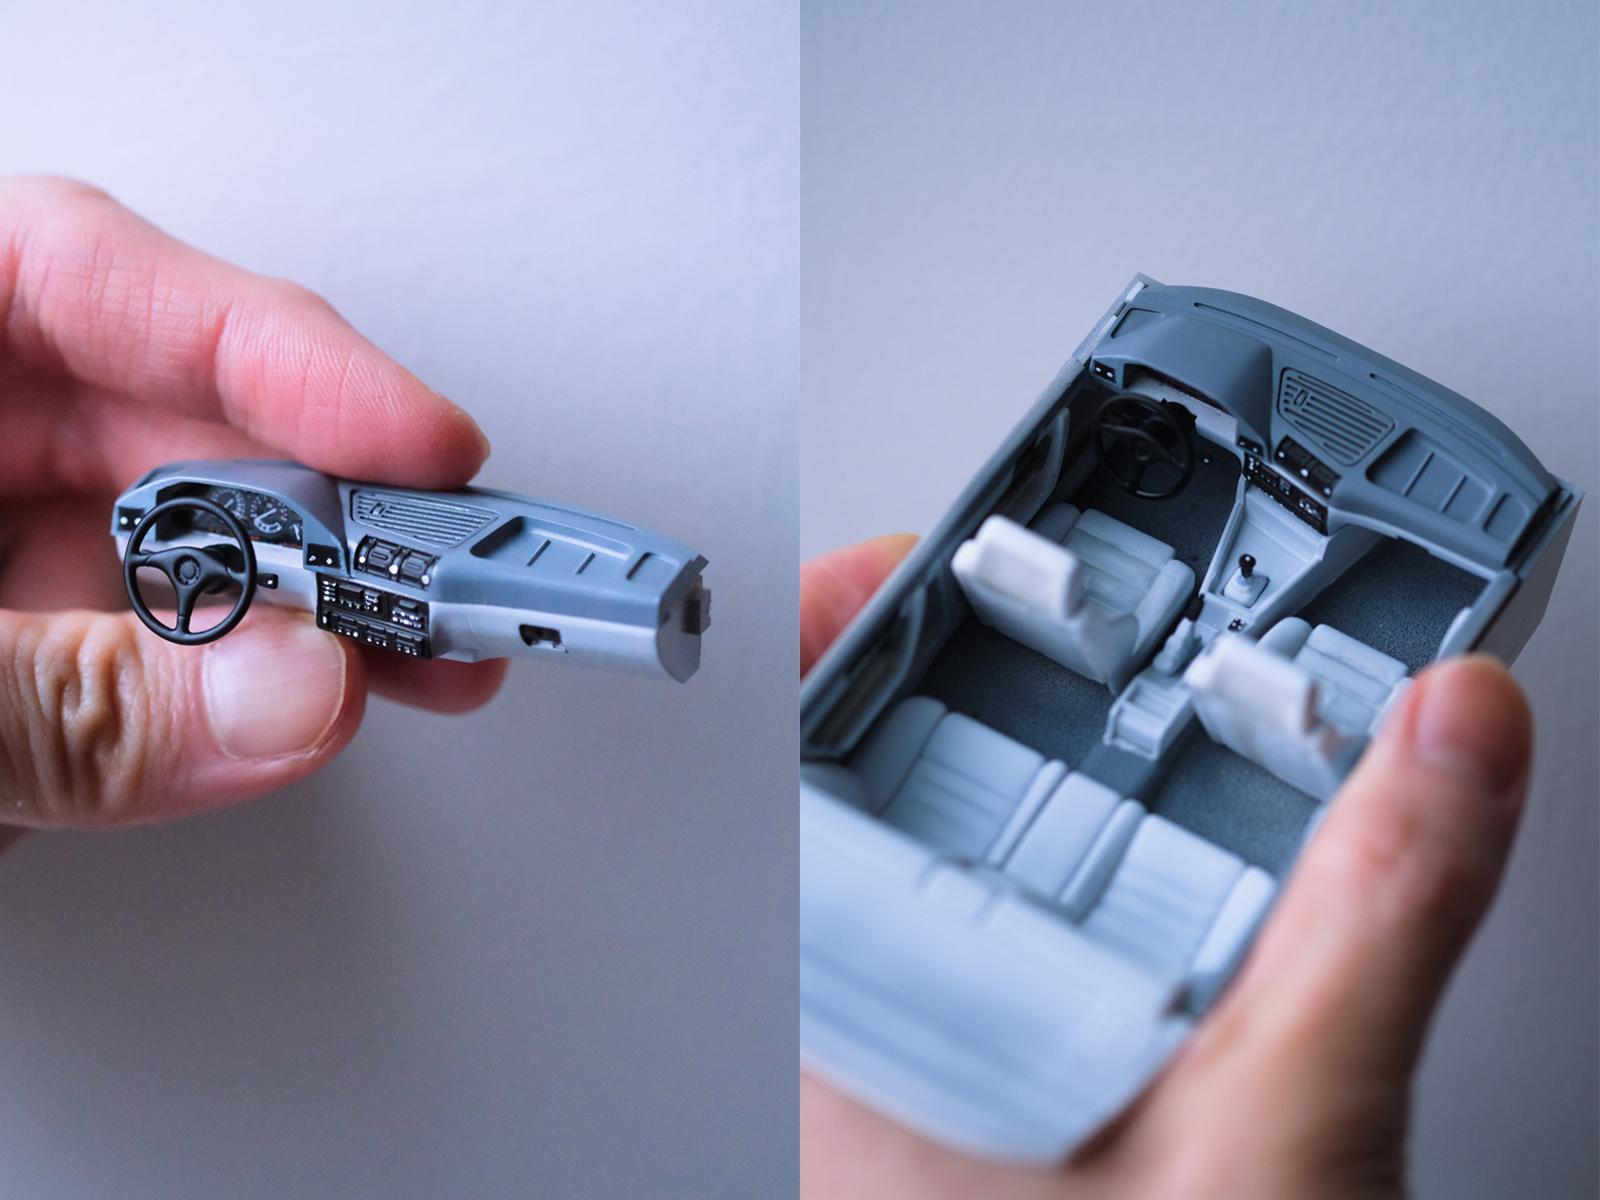
Hi everyone, Here’s my latest finished build - 1/24 BMW E34 M5. This is a reissue of old Fujimi curbside kit. Mold quality is pretty subpar with sink marks, holes coupled with shallow, irregular panel lines which I spent good amount of time correcting them before doing anything else. The biggest issue with this kit is that the front and rear bumpers are much thicker than real car and if you build box straight it will look terrible. To fix this I had to grind a lot of materials from the top and inside so they fit more flush to the body. As for the build concept, I wanted to simulate my favourite BMW colour (Daytona Violet) with a clean OEM+ look, so a set of period correct wheels, Ground Control or KW coilover, smoked Hella + all red MHW tails on otherwise stock exterior was the goal. For the interior I opted for popular E34 M5 interior color which is silver grey. The kit doesn't provide 3 spoke m-tech steering wheel so I picked up something that resembles OEM Nardi 3 spoke from my parts bin. Here’s the full build details: - Filled all sink marks and holes, scribed body panels and sanded the body with 600 > 1000 grit - Sanded the slits on side grilles as they were too thick and fixed the side skirt as the kit body comes with non-M5 version - Flocked the carpet with embossing powder - Added surfacer and wet sanded the body with 1500 grit - Painted silver as a base coat - Painted a mix of Mr Color’s GX103 and GX102(deep clear blue and deel clear red) on top of silver - this way the shade of purple will show lighter as it reveals the base silver under natural light but otherwise appear very dark. - Painted clear (Mr Color Super Clear III) - as usual, I applied 3 coats with 2000 grit wet sanding in between the steps, and let the paint fully cure for 1 month - Polished the paint wiht 3000 grit sponge and Tamiya compounds - Masked the side trim and painted with silver to simulate “chromeline” - Masked again and painted all the rubber bits - Painted headlamp parts with smoke clear - Masked rear tail and painted clear orange, masked off the reverse light to paint rest in clear red, then removed the masking and lightly painted the area with clear red to get pinkish look - Painted windows with mixture of clear, clear blue and clear green to get the 90s factory tinted look - Painted the centerpiece of BBS rims (Scale Production 17") to nogaro silver (BMW’s slightly greyish silver) - Made muffler tip with styrene tubes (The kit muffler looks incorrect and it doesn't have holes) Overall it was an easy build after fixing the body issue. Thank you for reading! Below photos are shot with iPhone - I think these feel like better representation of what it actually looks like. When I take photos with my camera the colors appear slightly darker.
-
1/24 Porsche 917K 71' Le Mans Winner
e30lover replied to e30lover's topic in Other Racing: Road Racing, Salt Flat Racers
Thank you! It was tedious to level the surface with clears but I'm glad I didn't do any grave mistake. Thank you! Thanks a lot! -
1/24 Porsche 917K 71' Le Mans Winner
e30lover replied to e30lover's topic in Other Racing: Road Racing, Salt Flat Racers
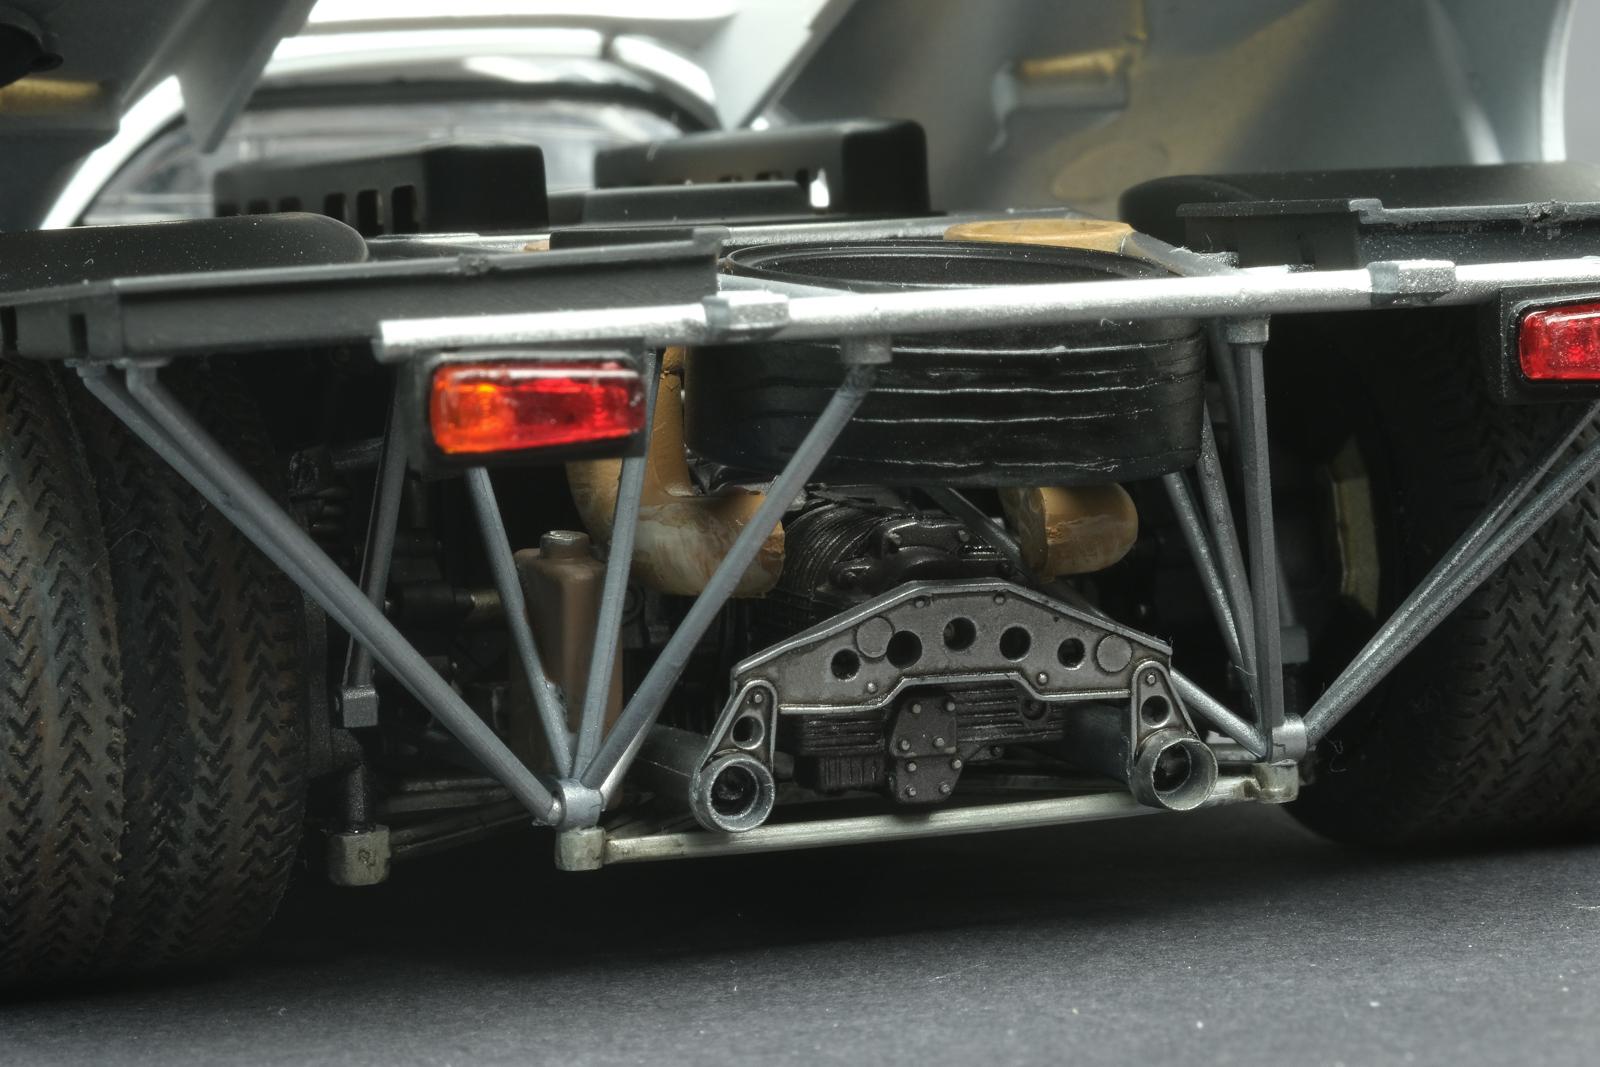
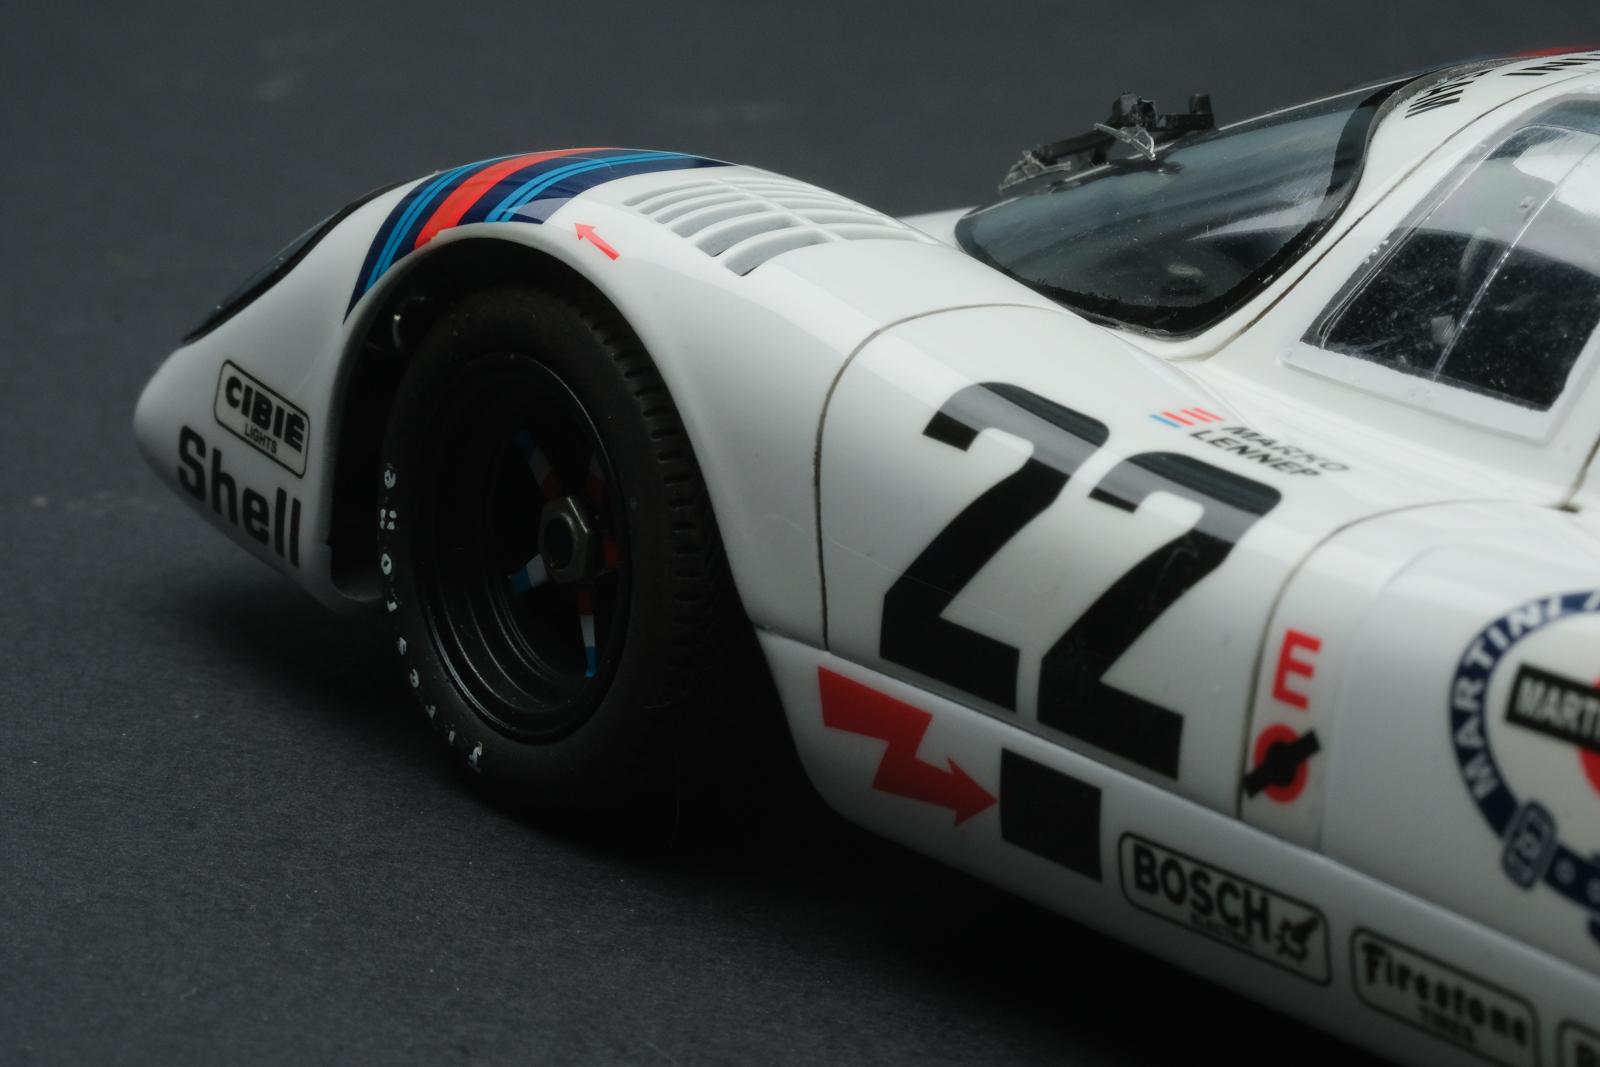
Thank you! Thanks! Yes I built this based on how Porsche Classic keeps this in showroom and car shows (they left the mechanics as is and only restored the body - they don't actually run this car like some other 917s and they just haul it to shows and back to museums etc): https://www.classicdriver.com/en/article/cars/le-mans-winning-porsche-917-was-one-hit-wonder Thank you! Thanks! Appreciate it! -
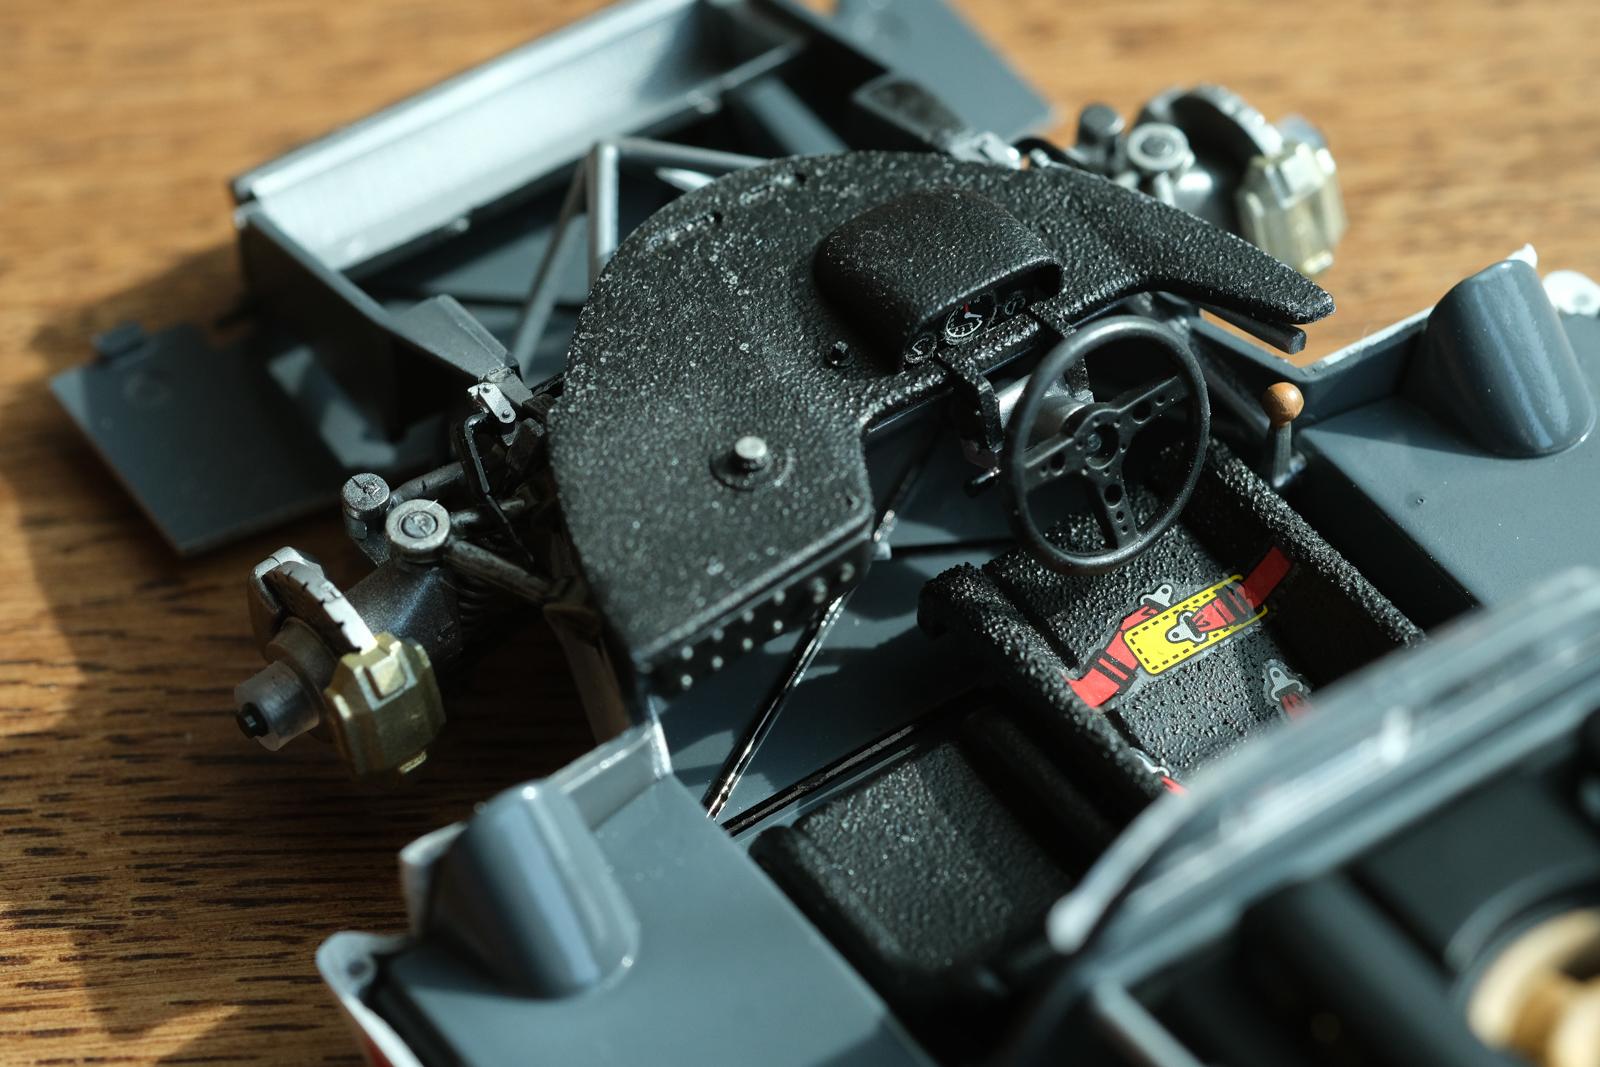
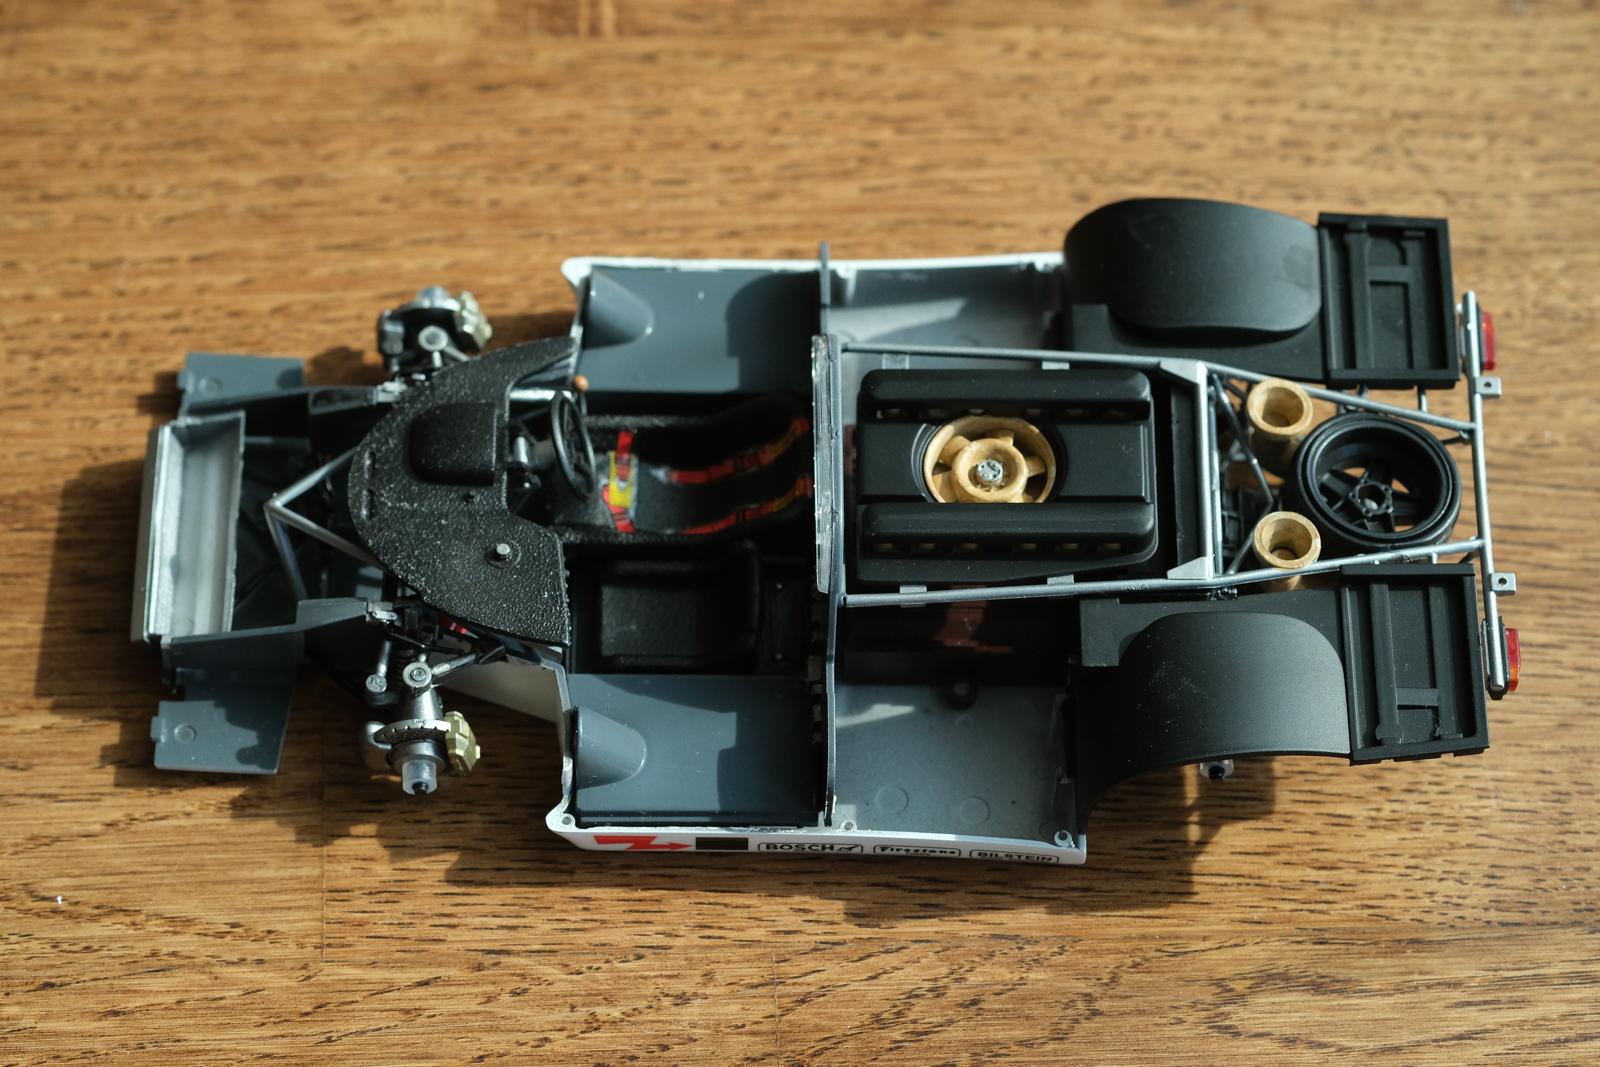
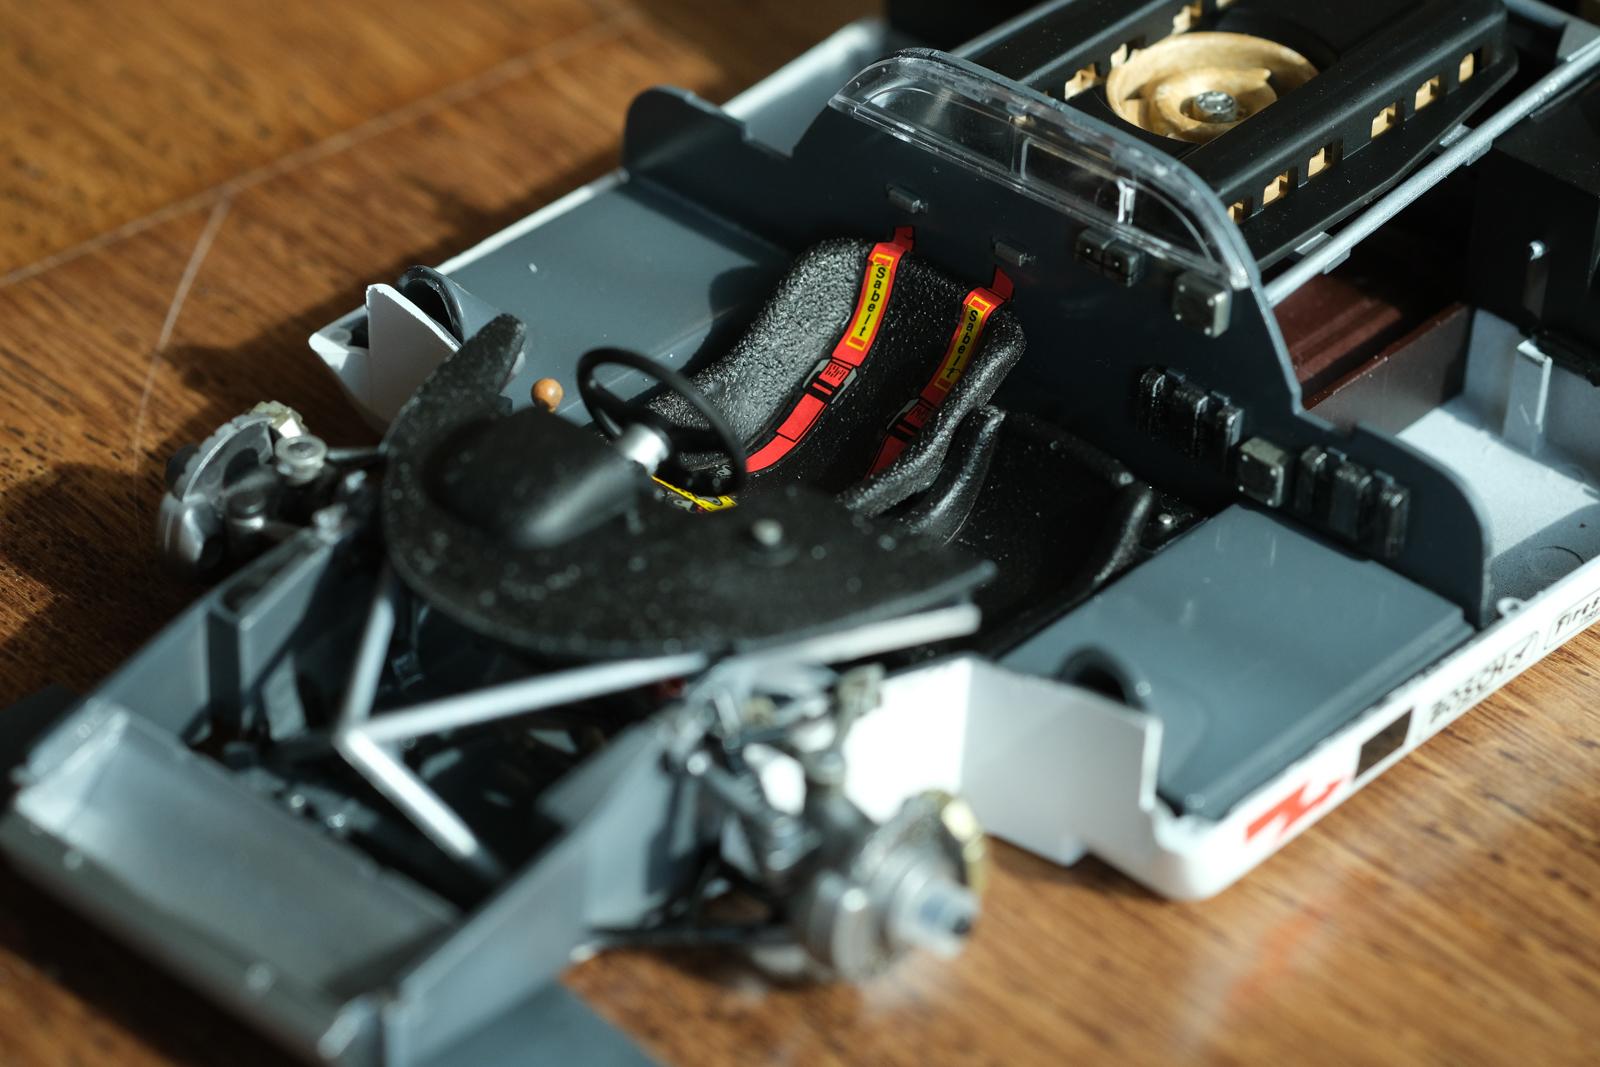
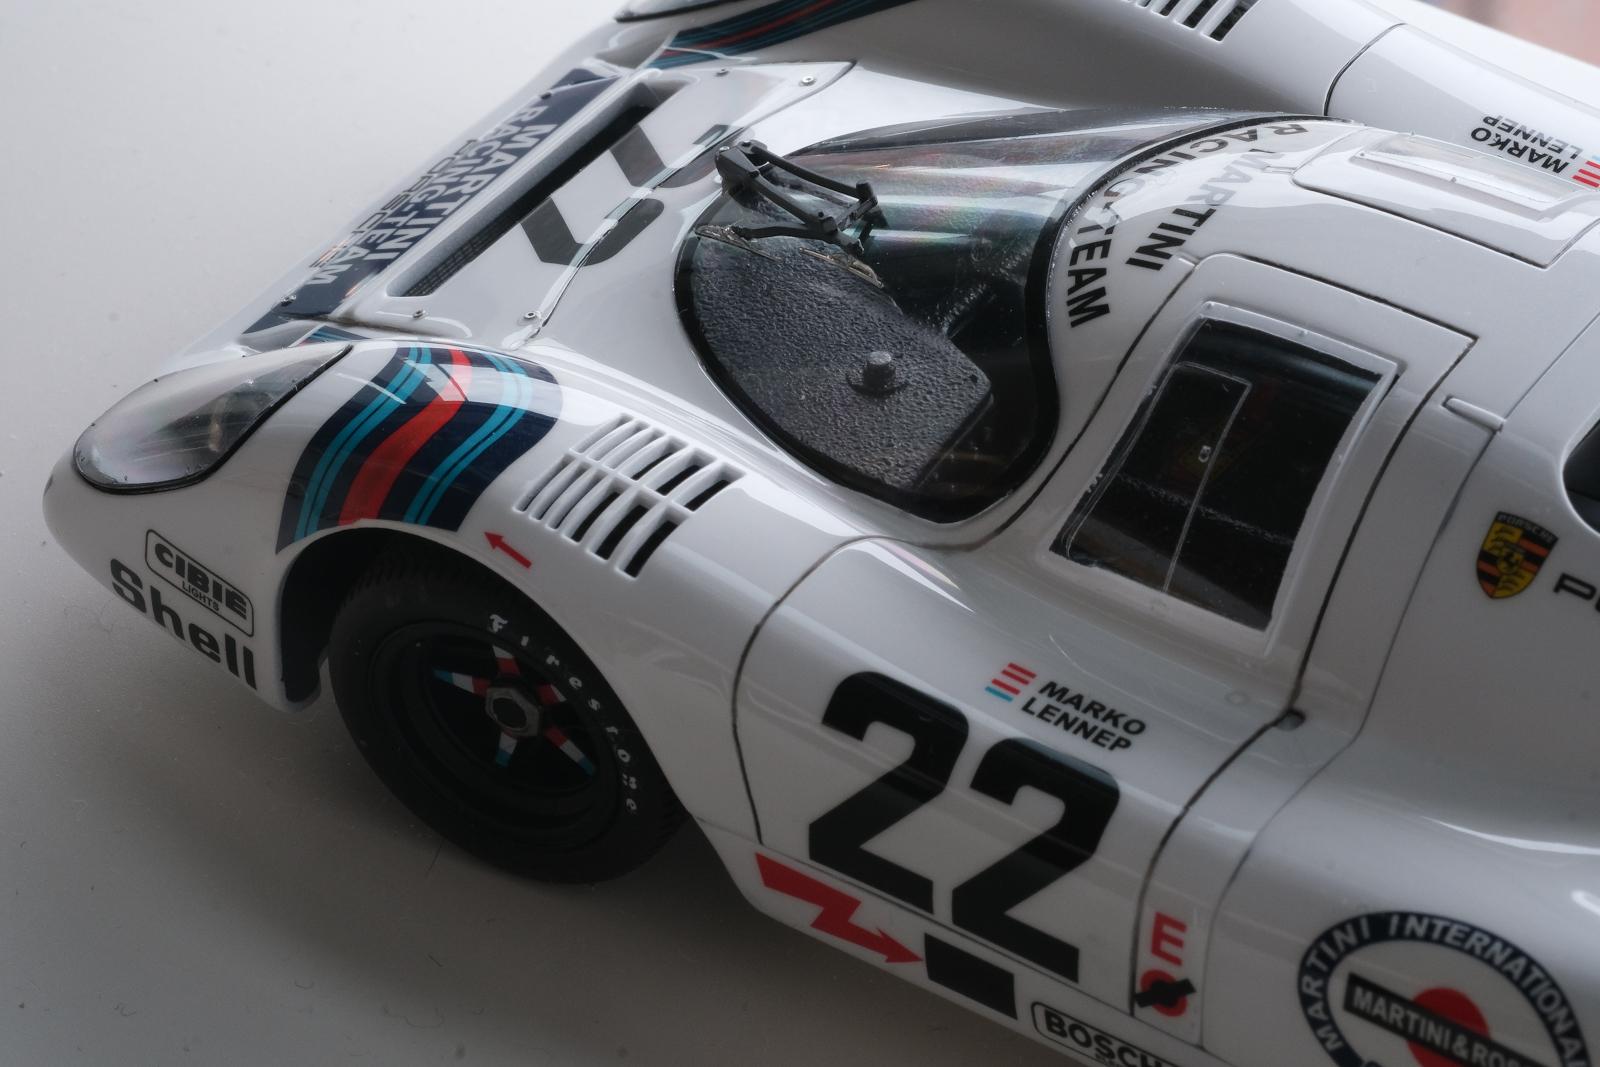
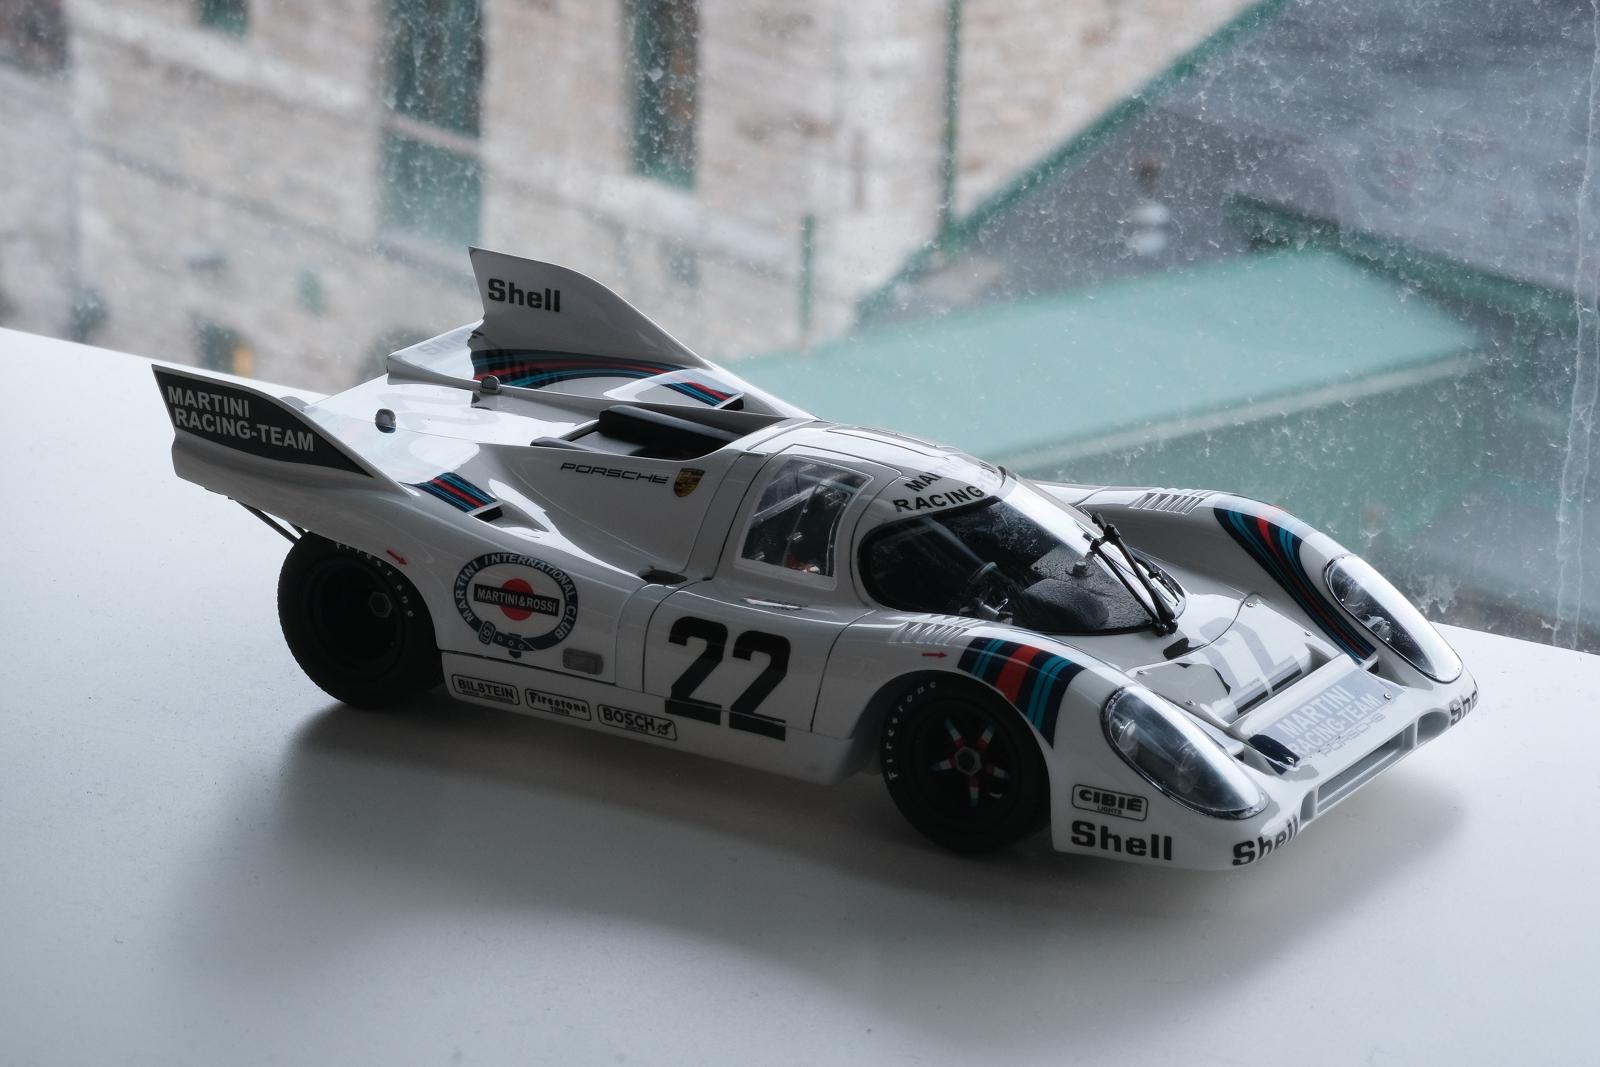
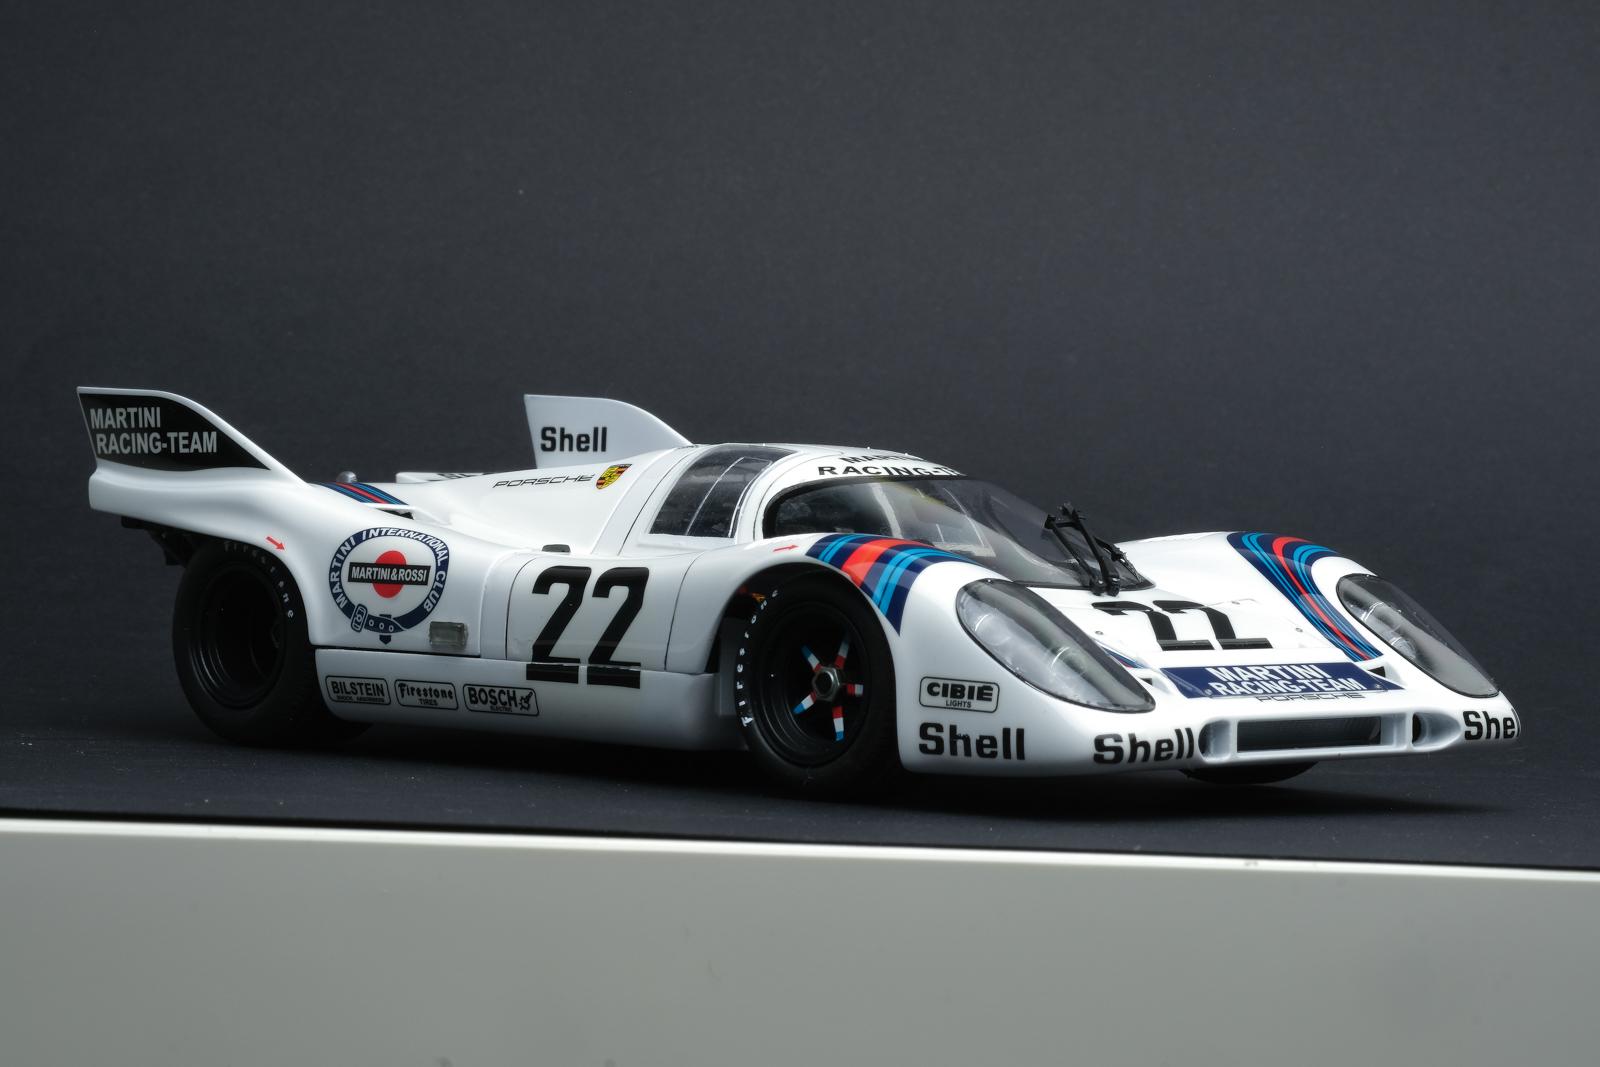
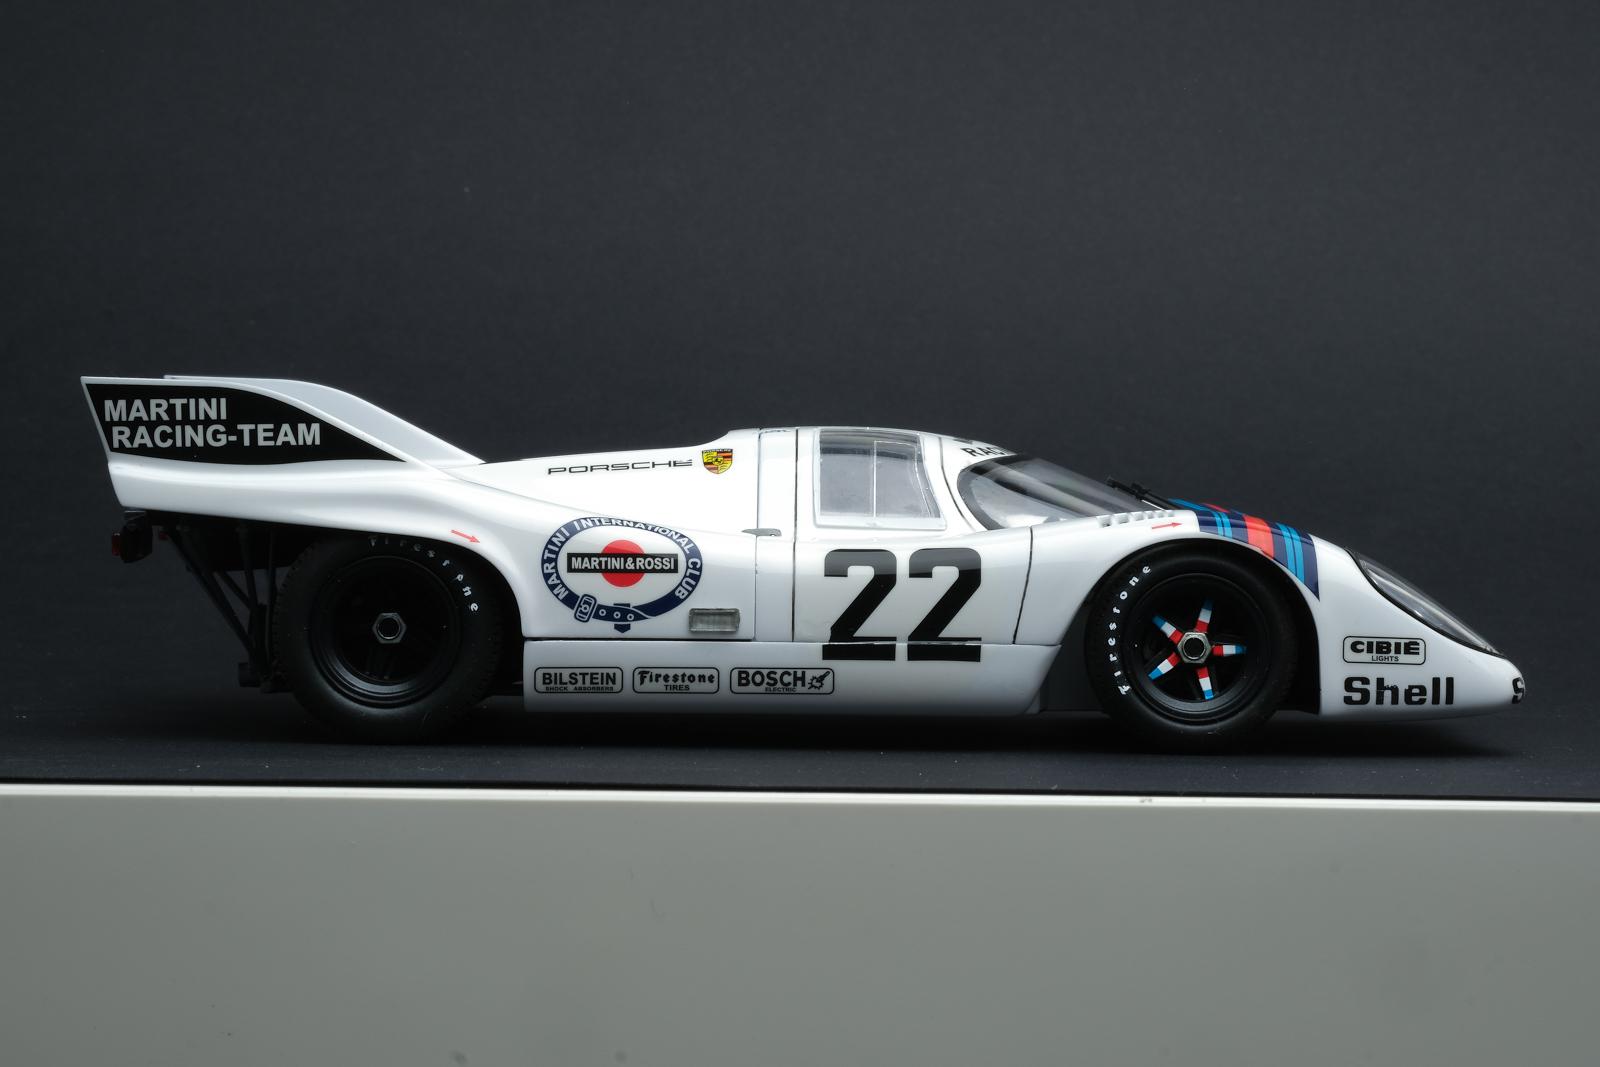
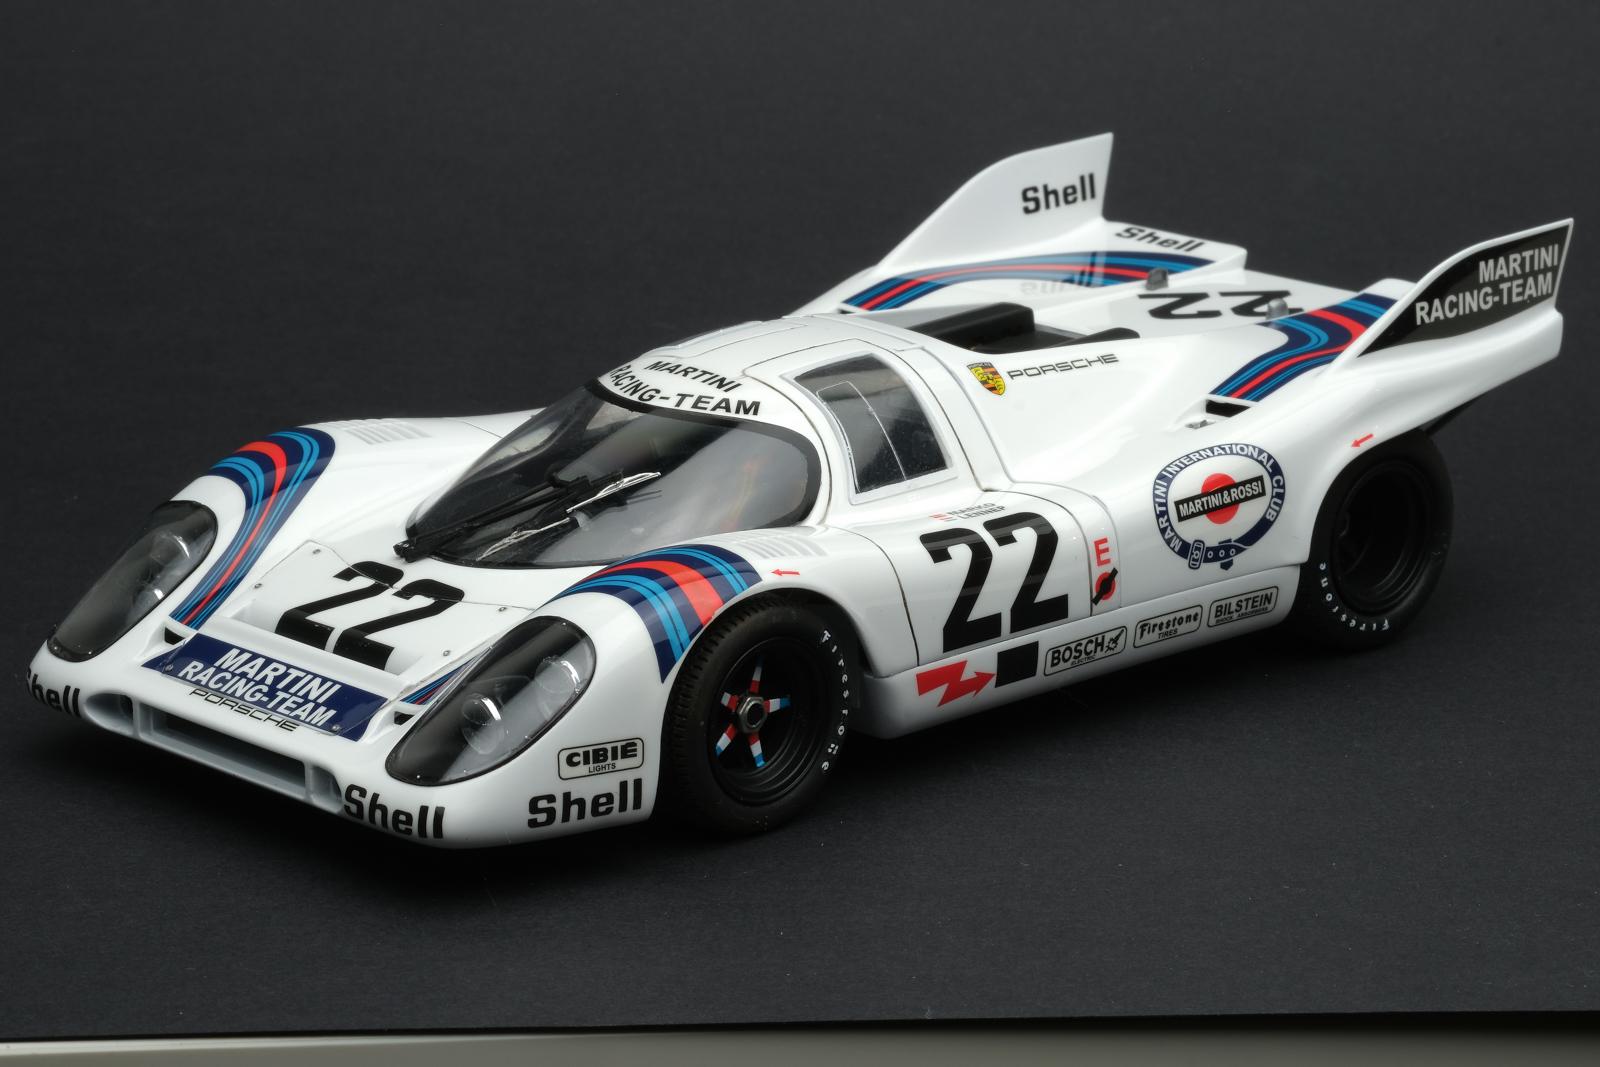
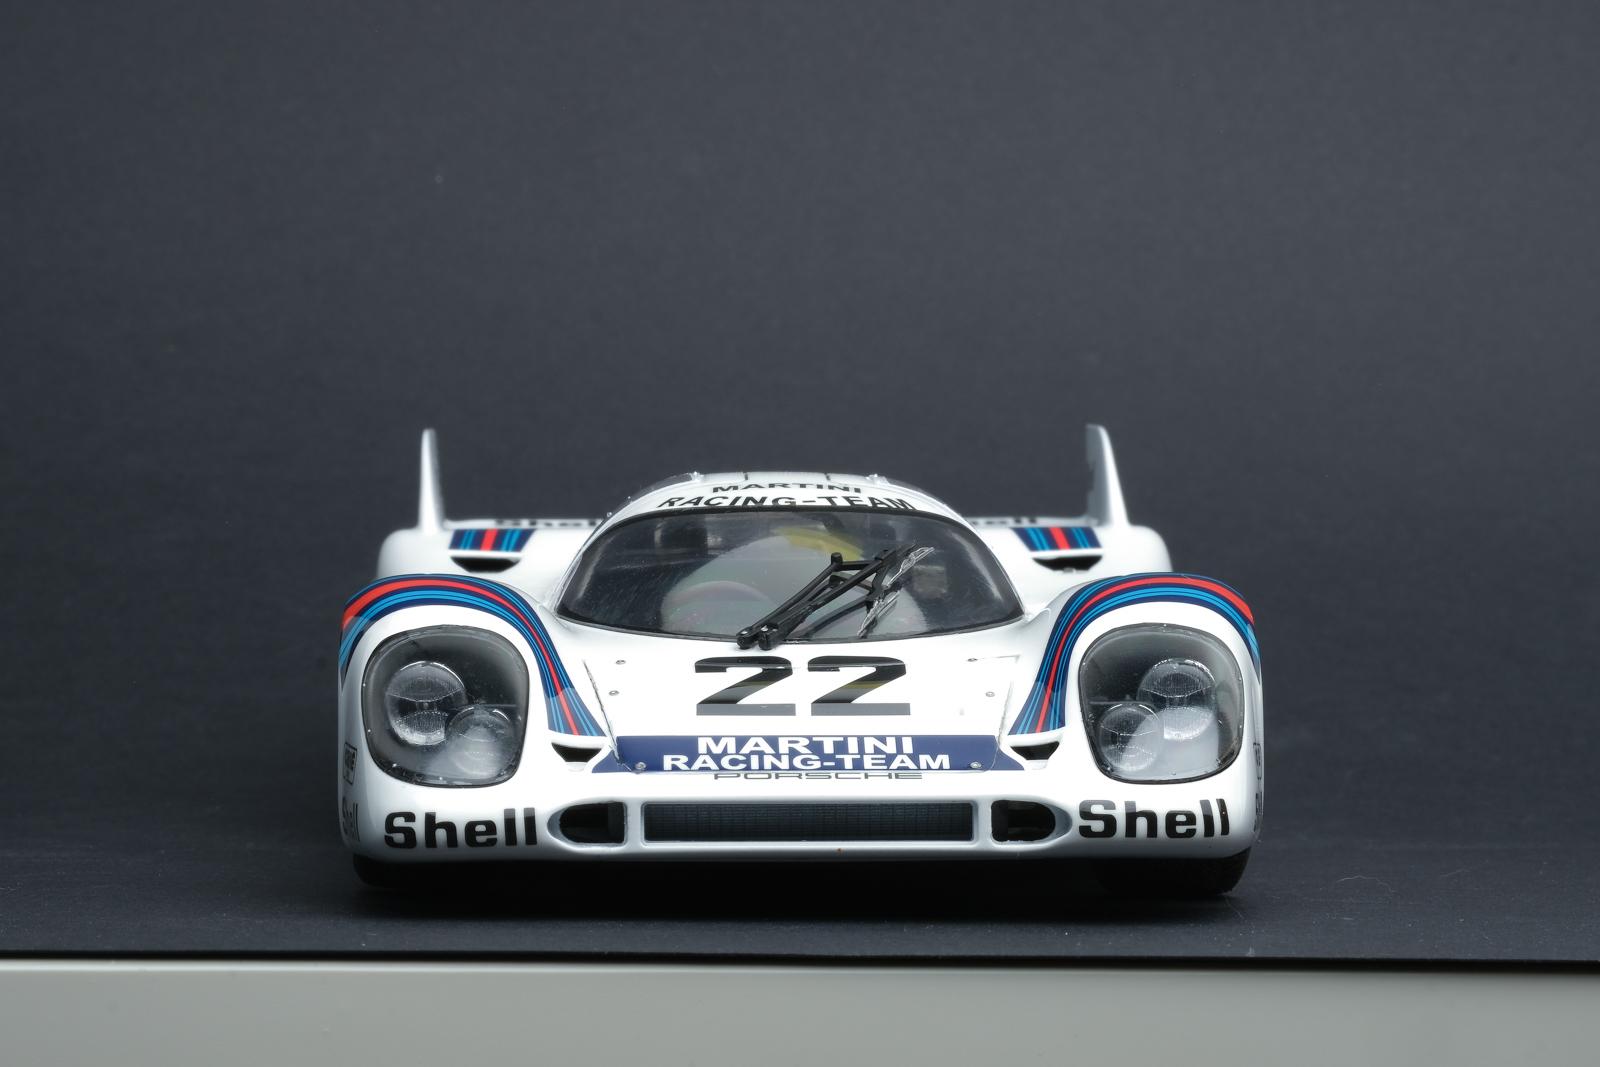
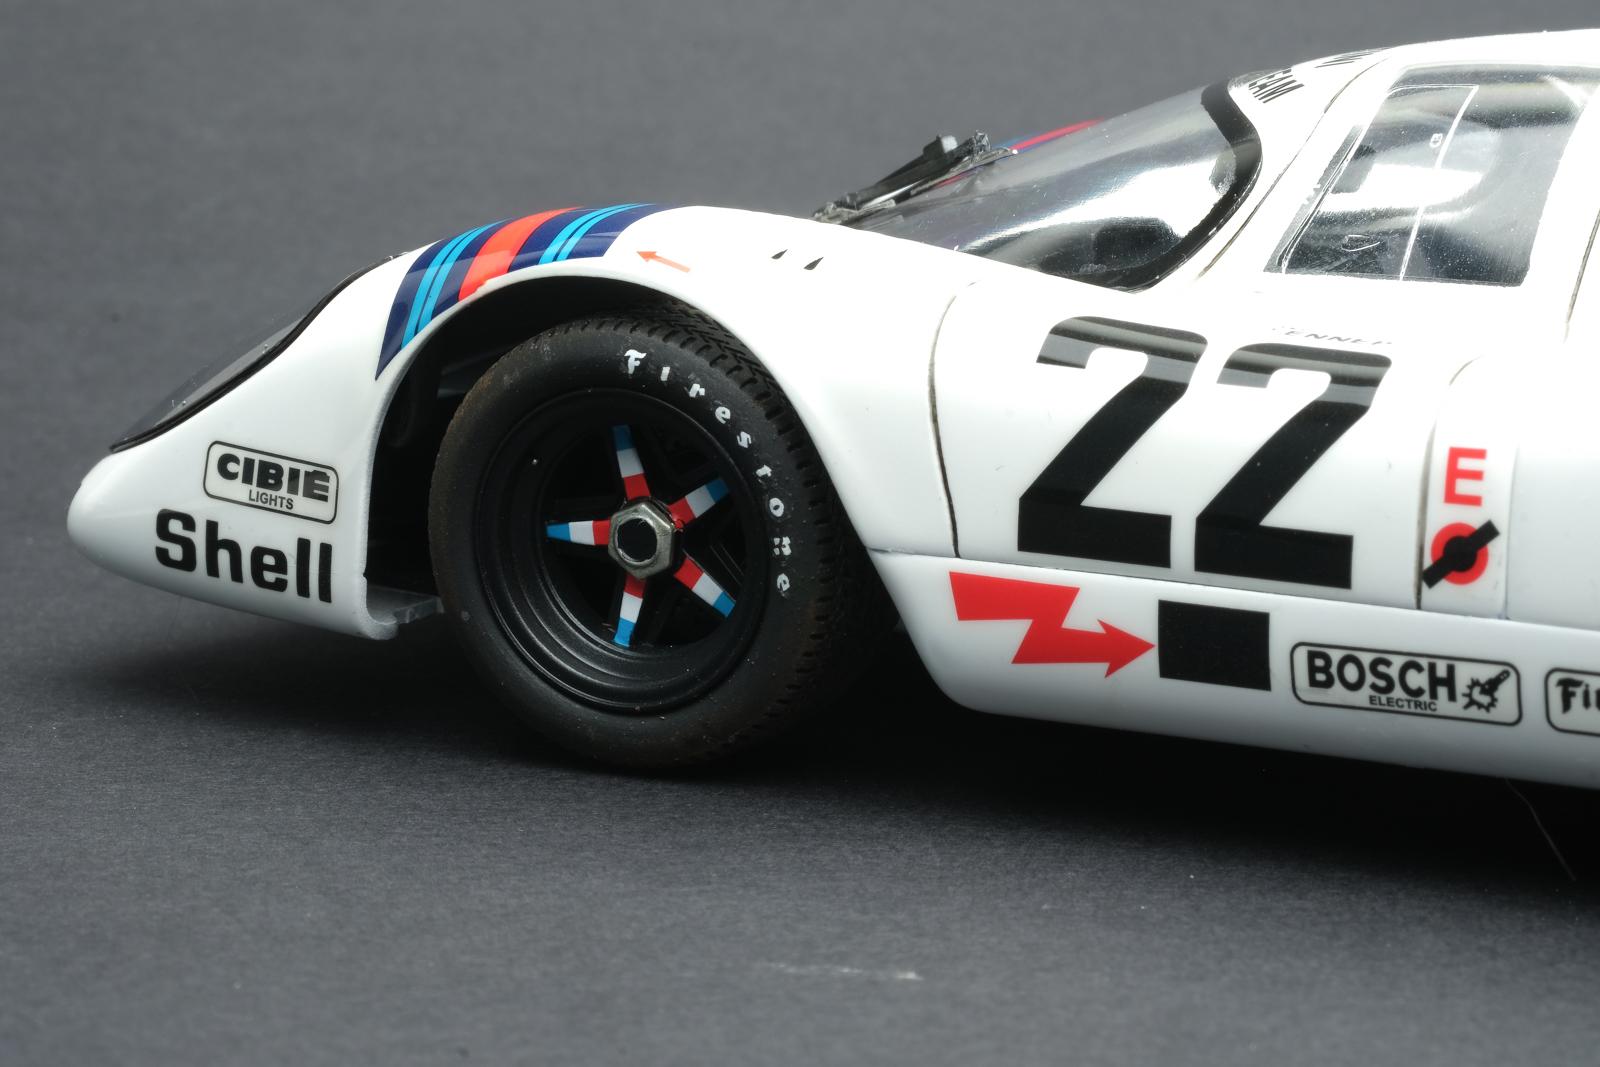
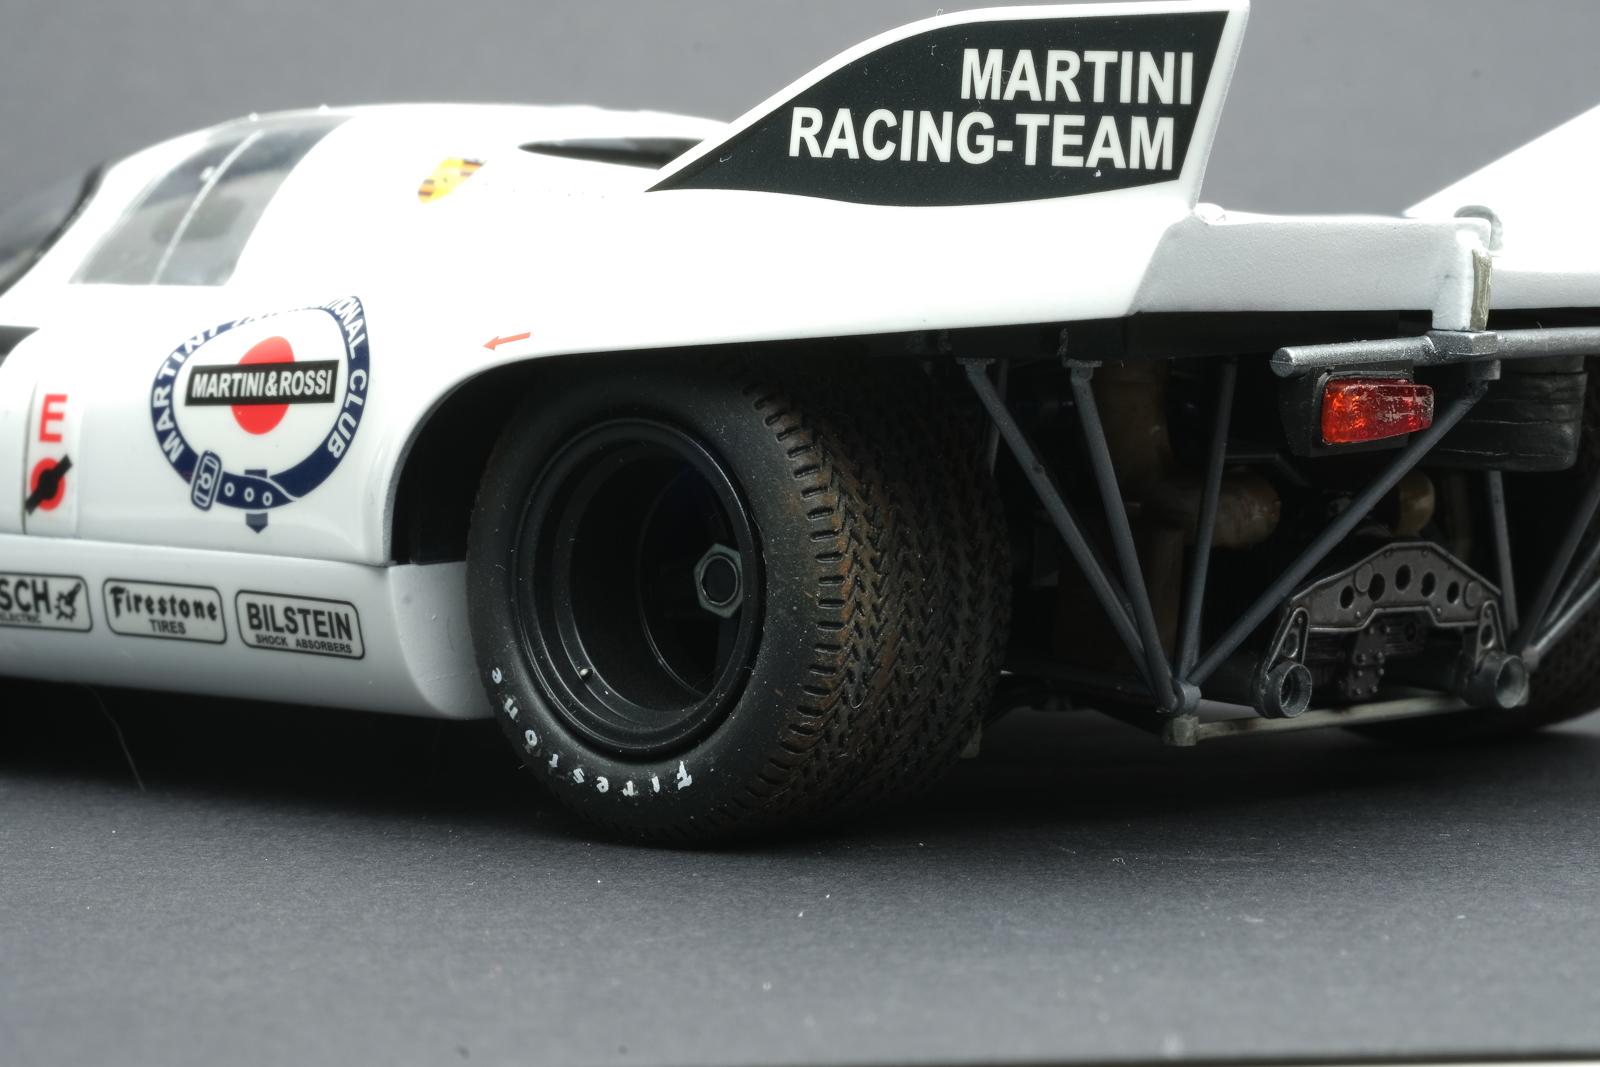
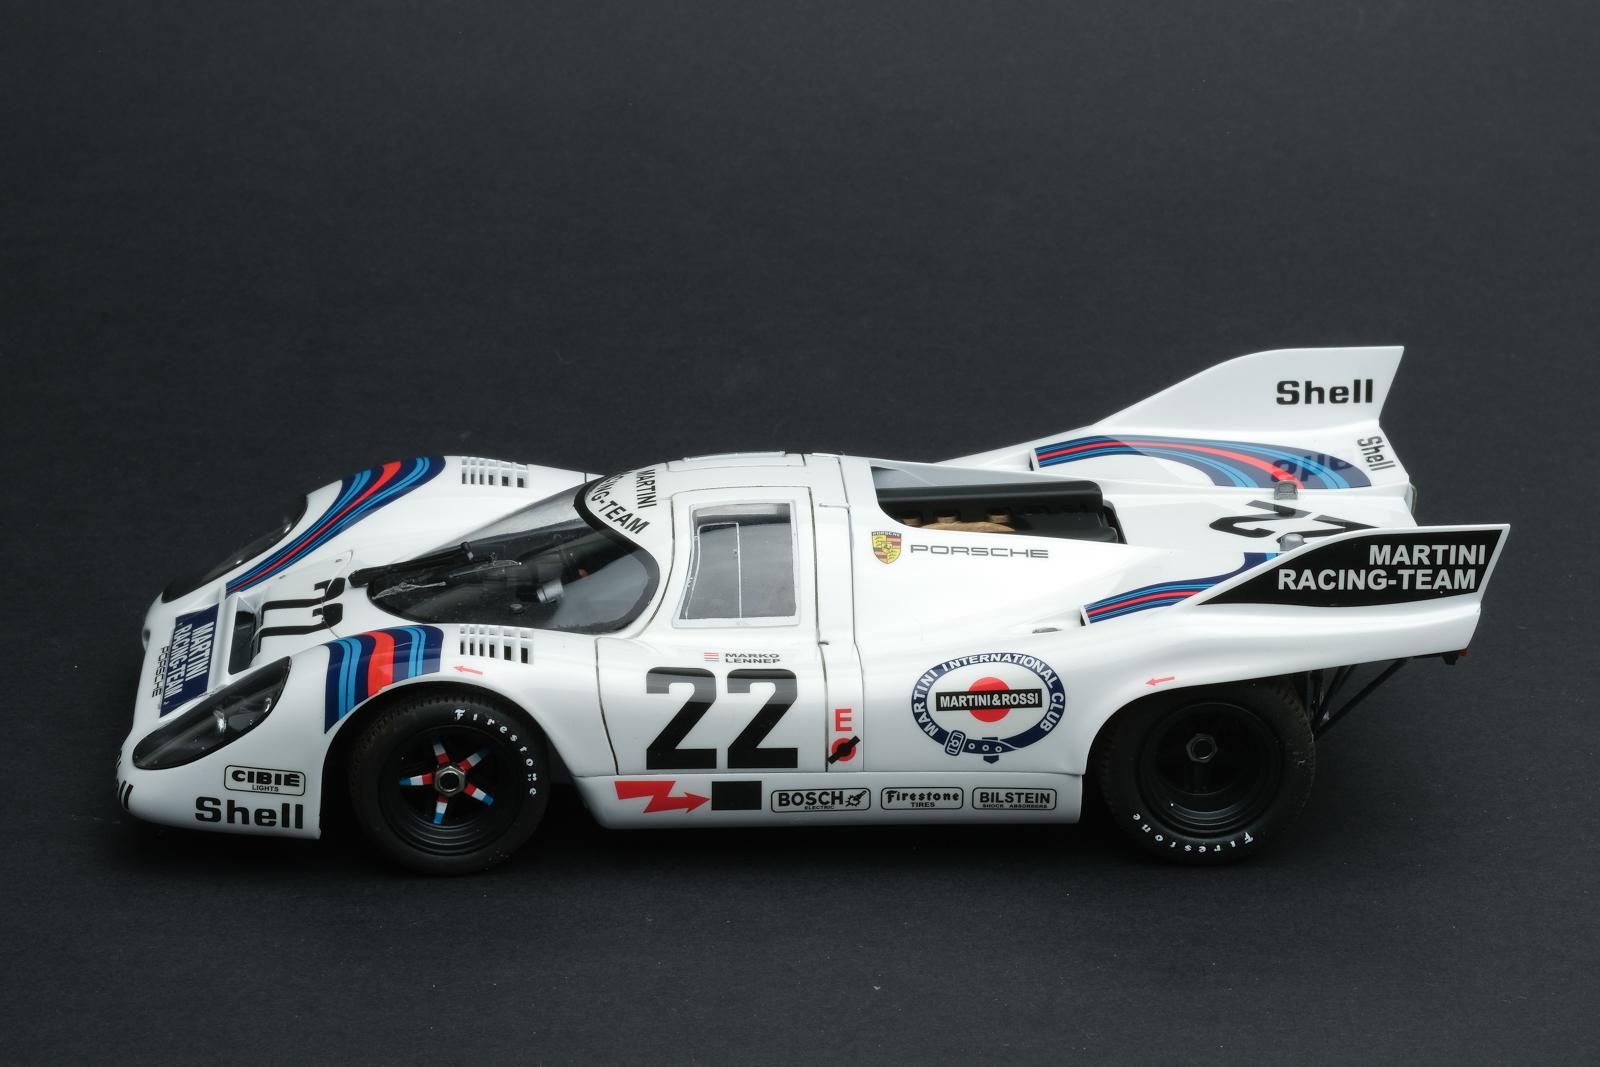
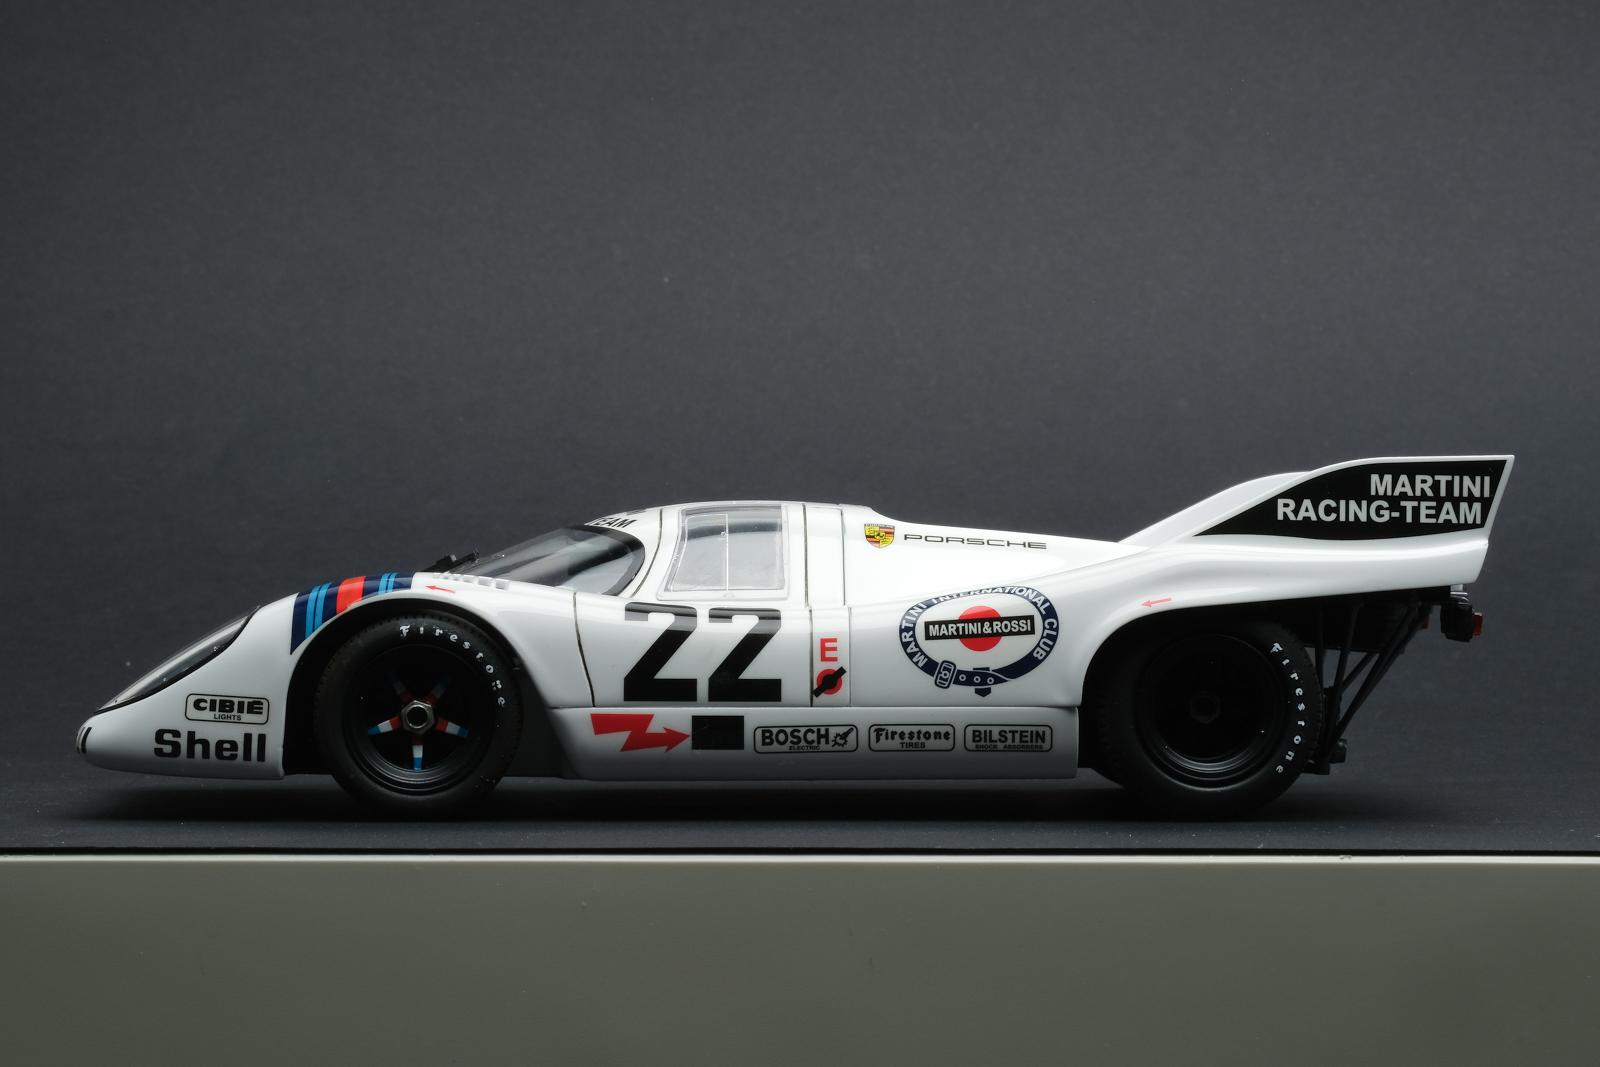
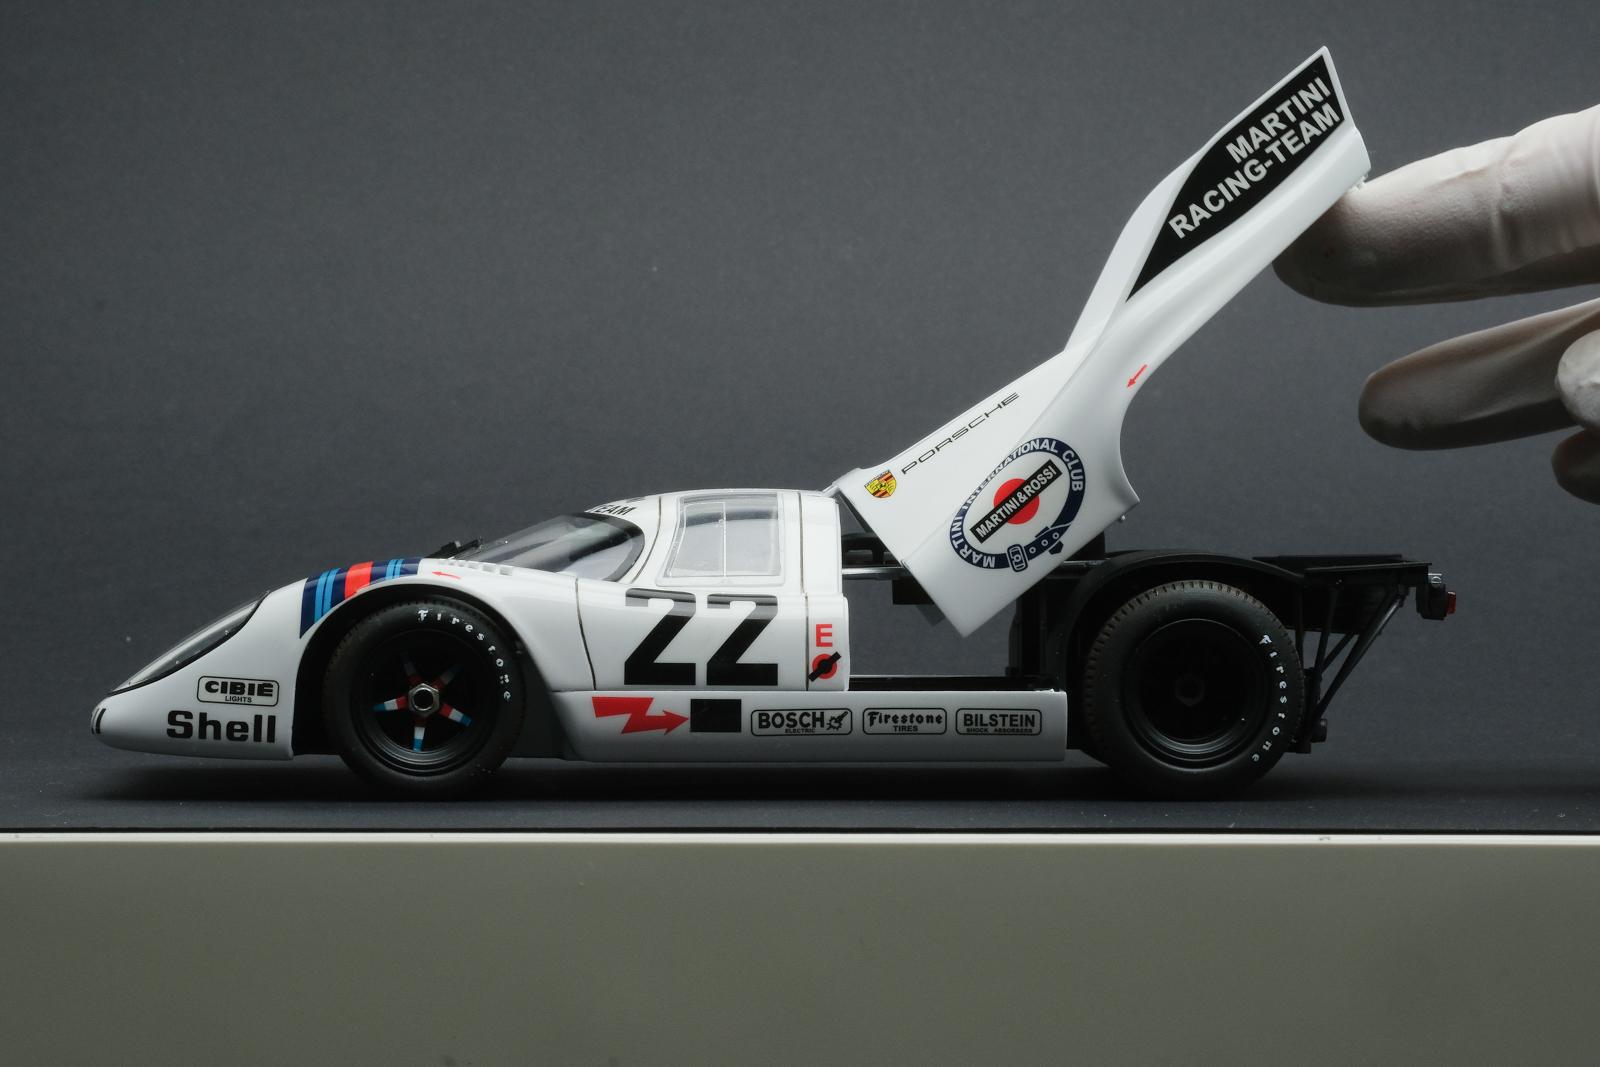
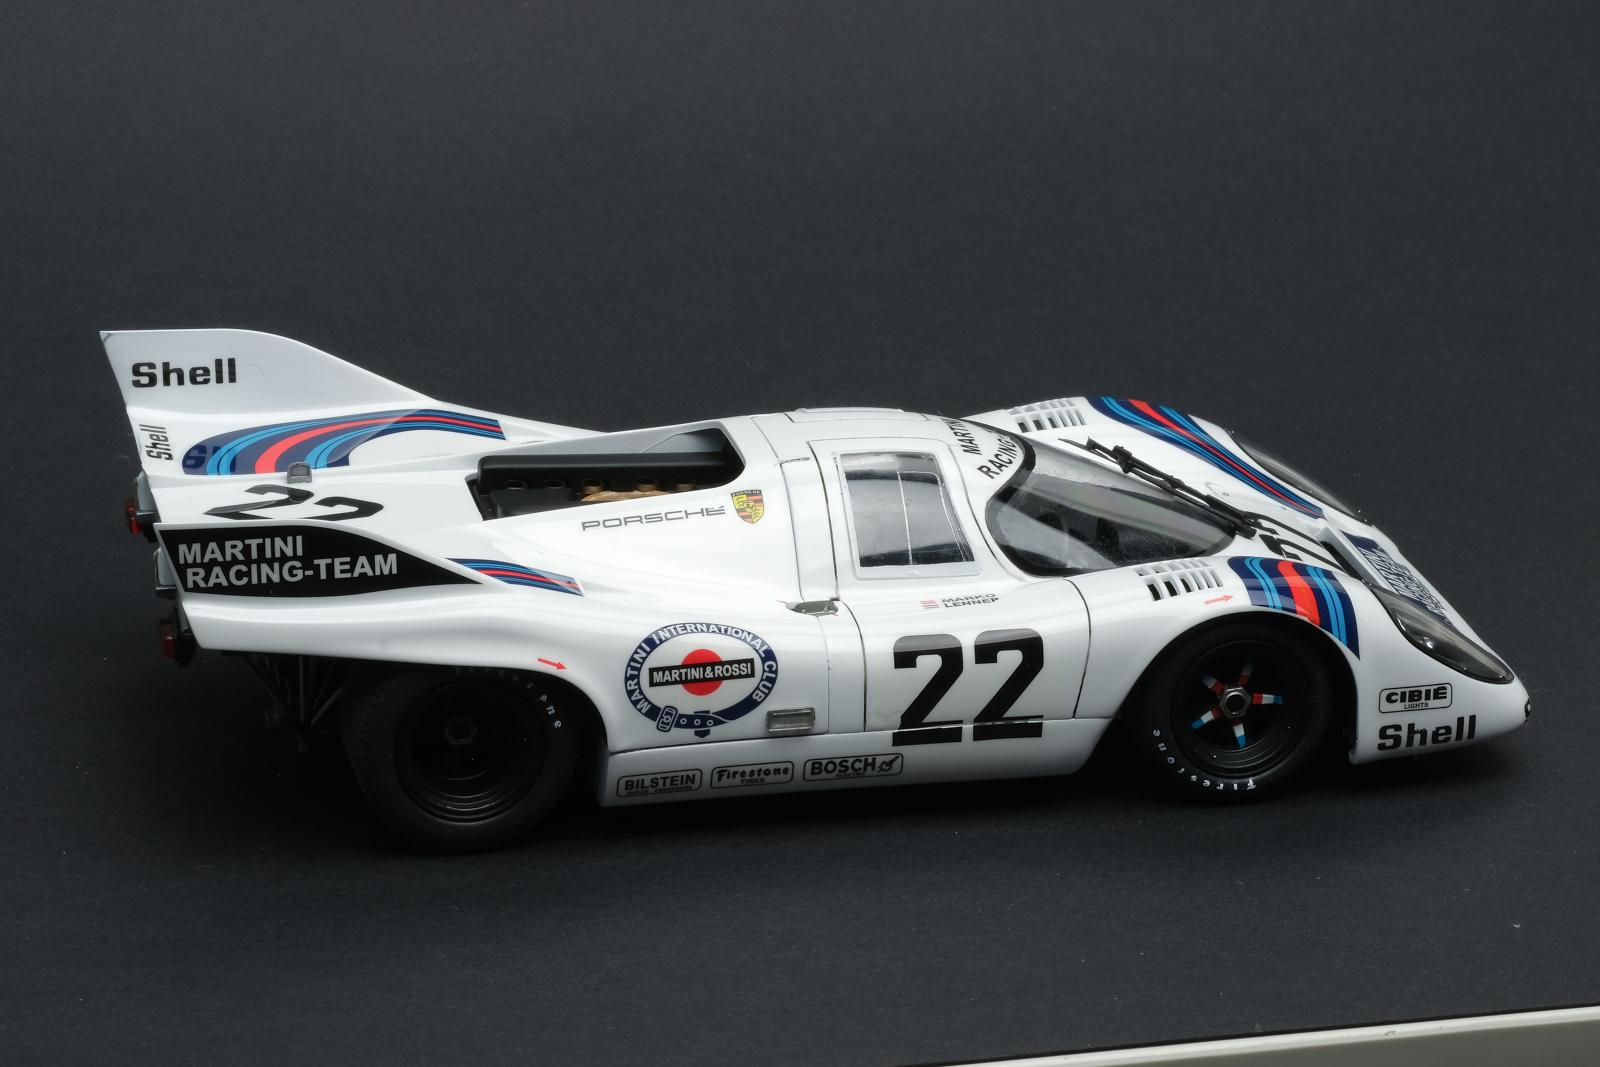
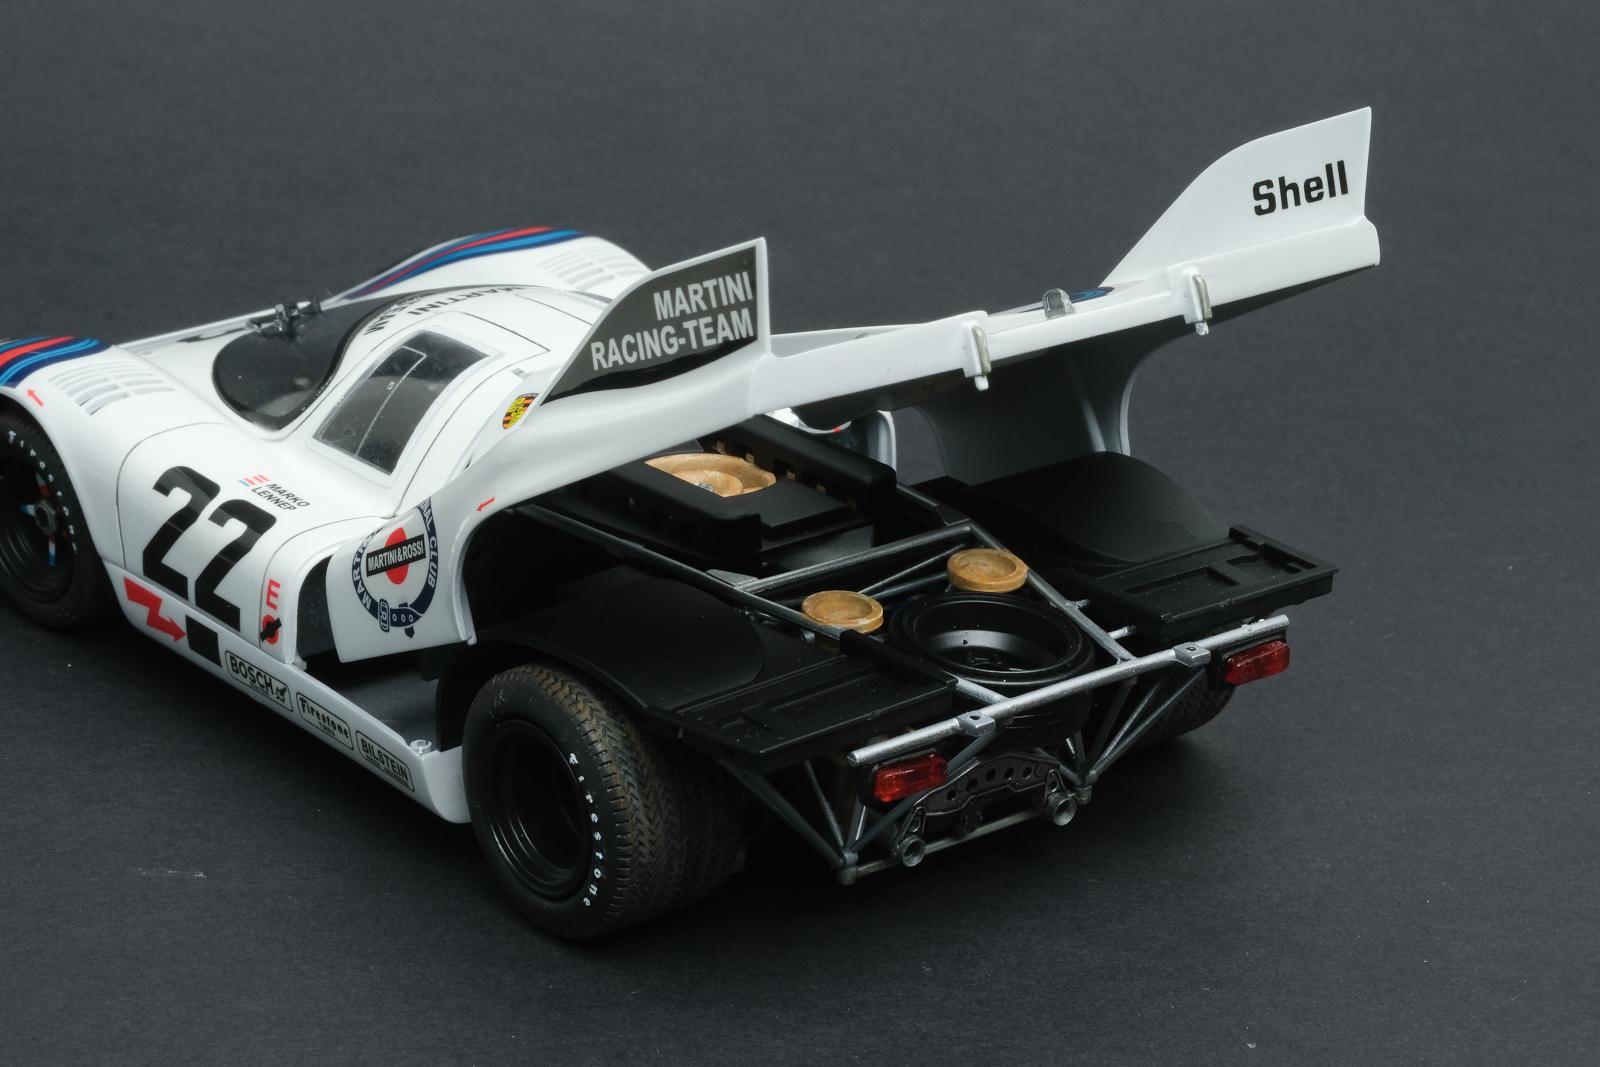
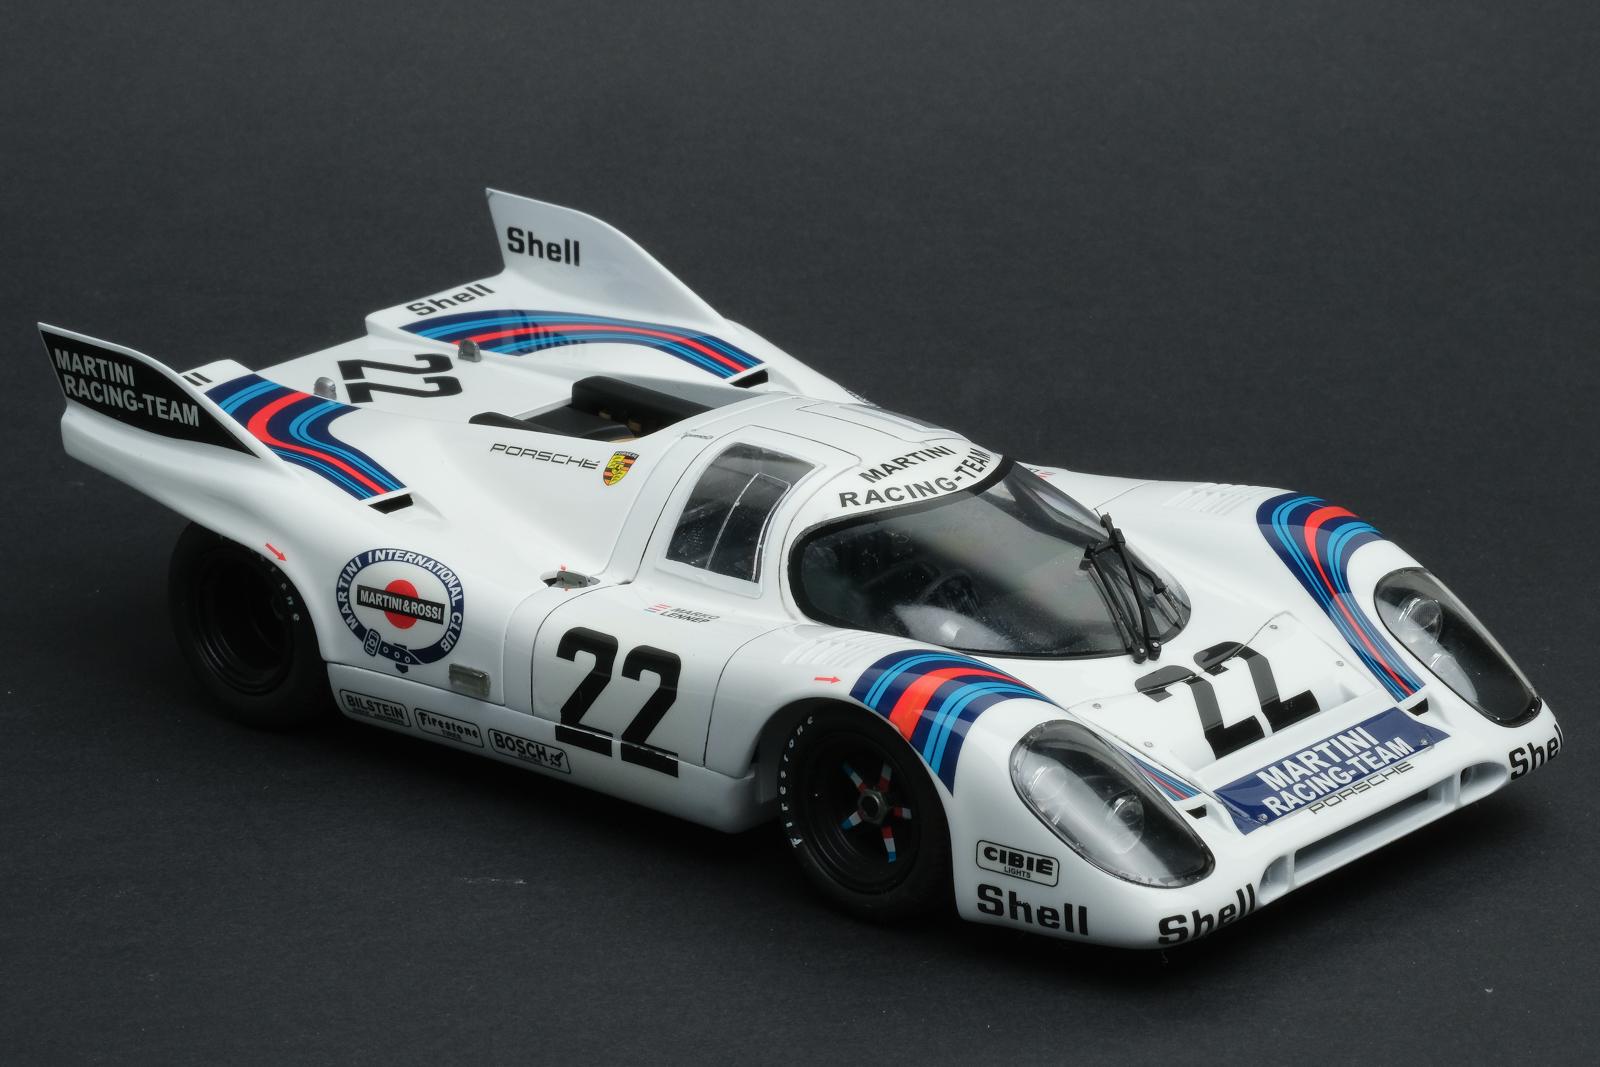
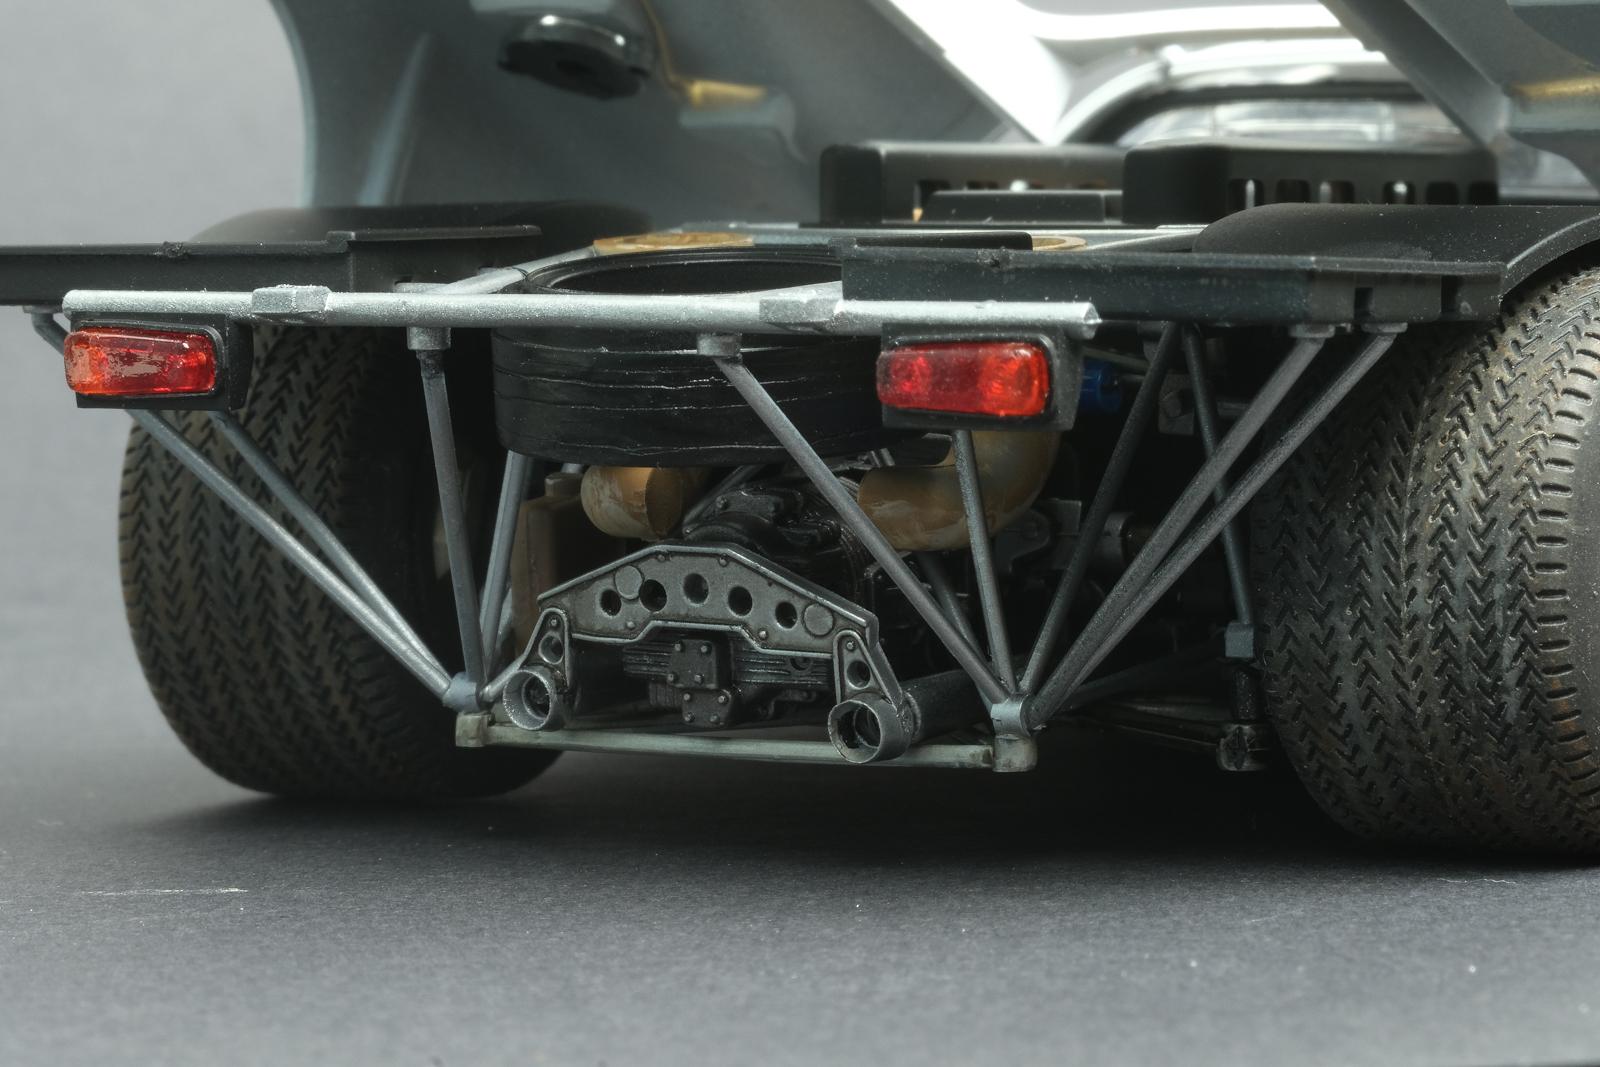
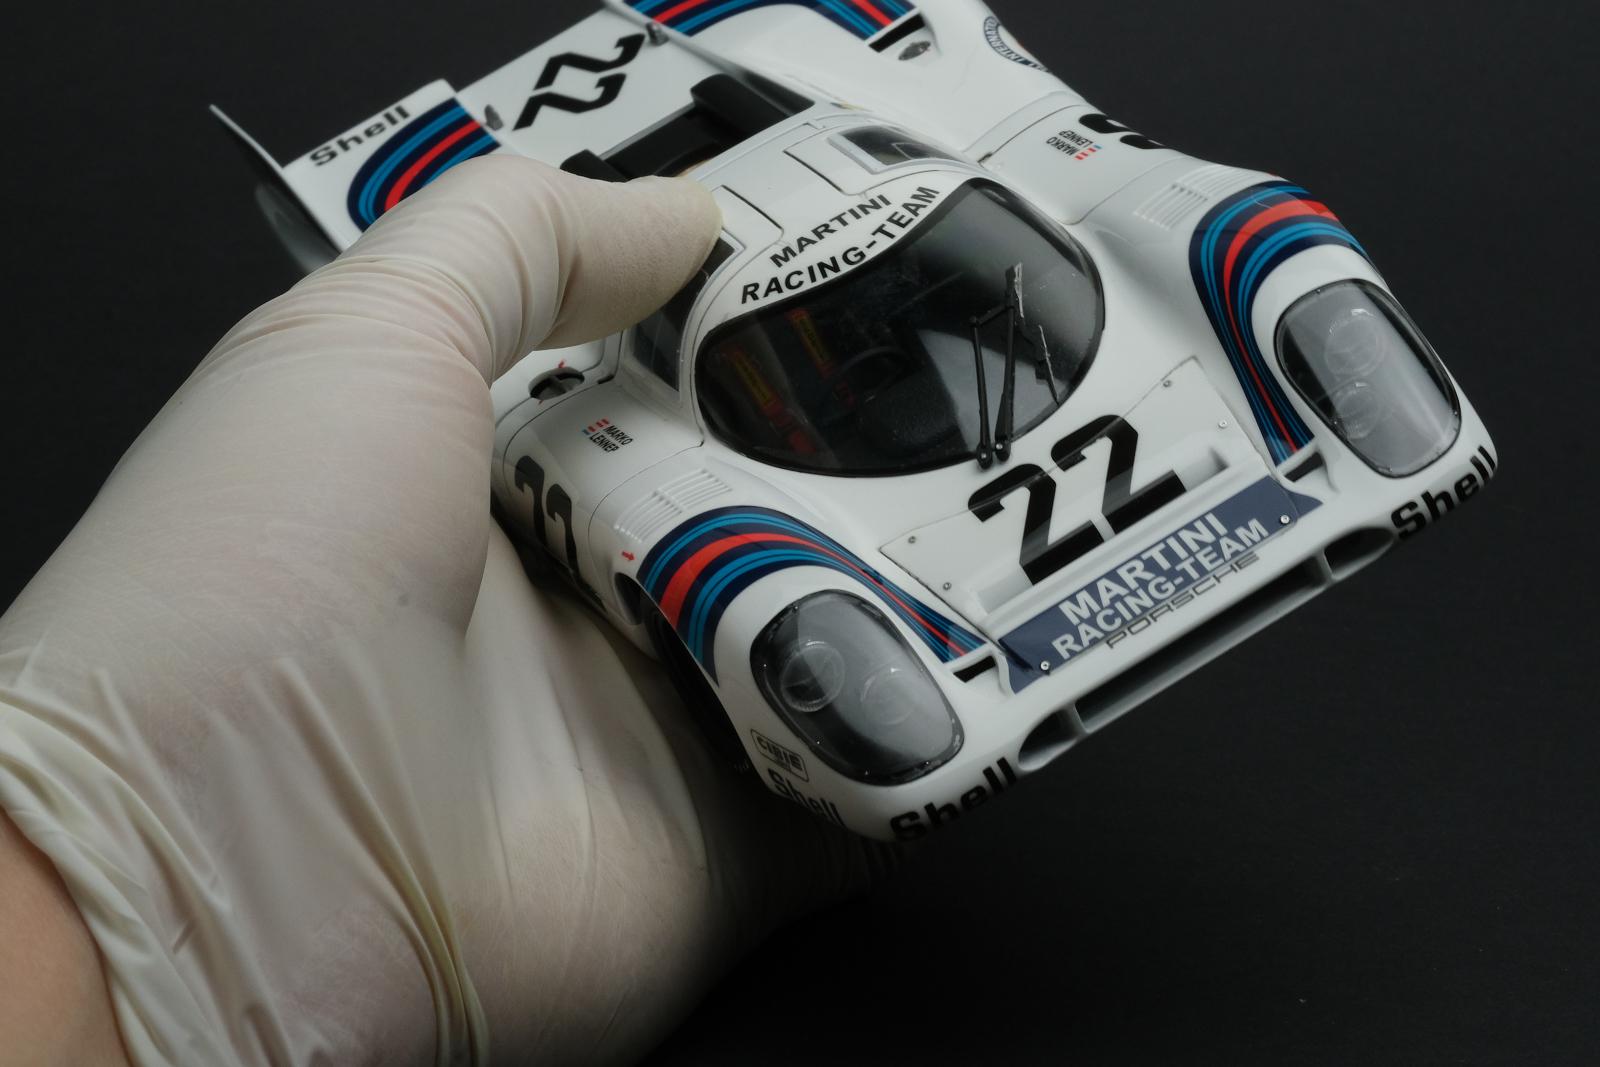
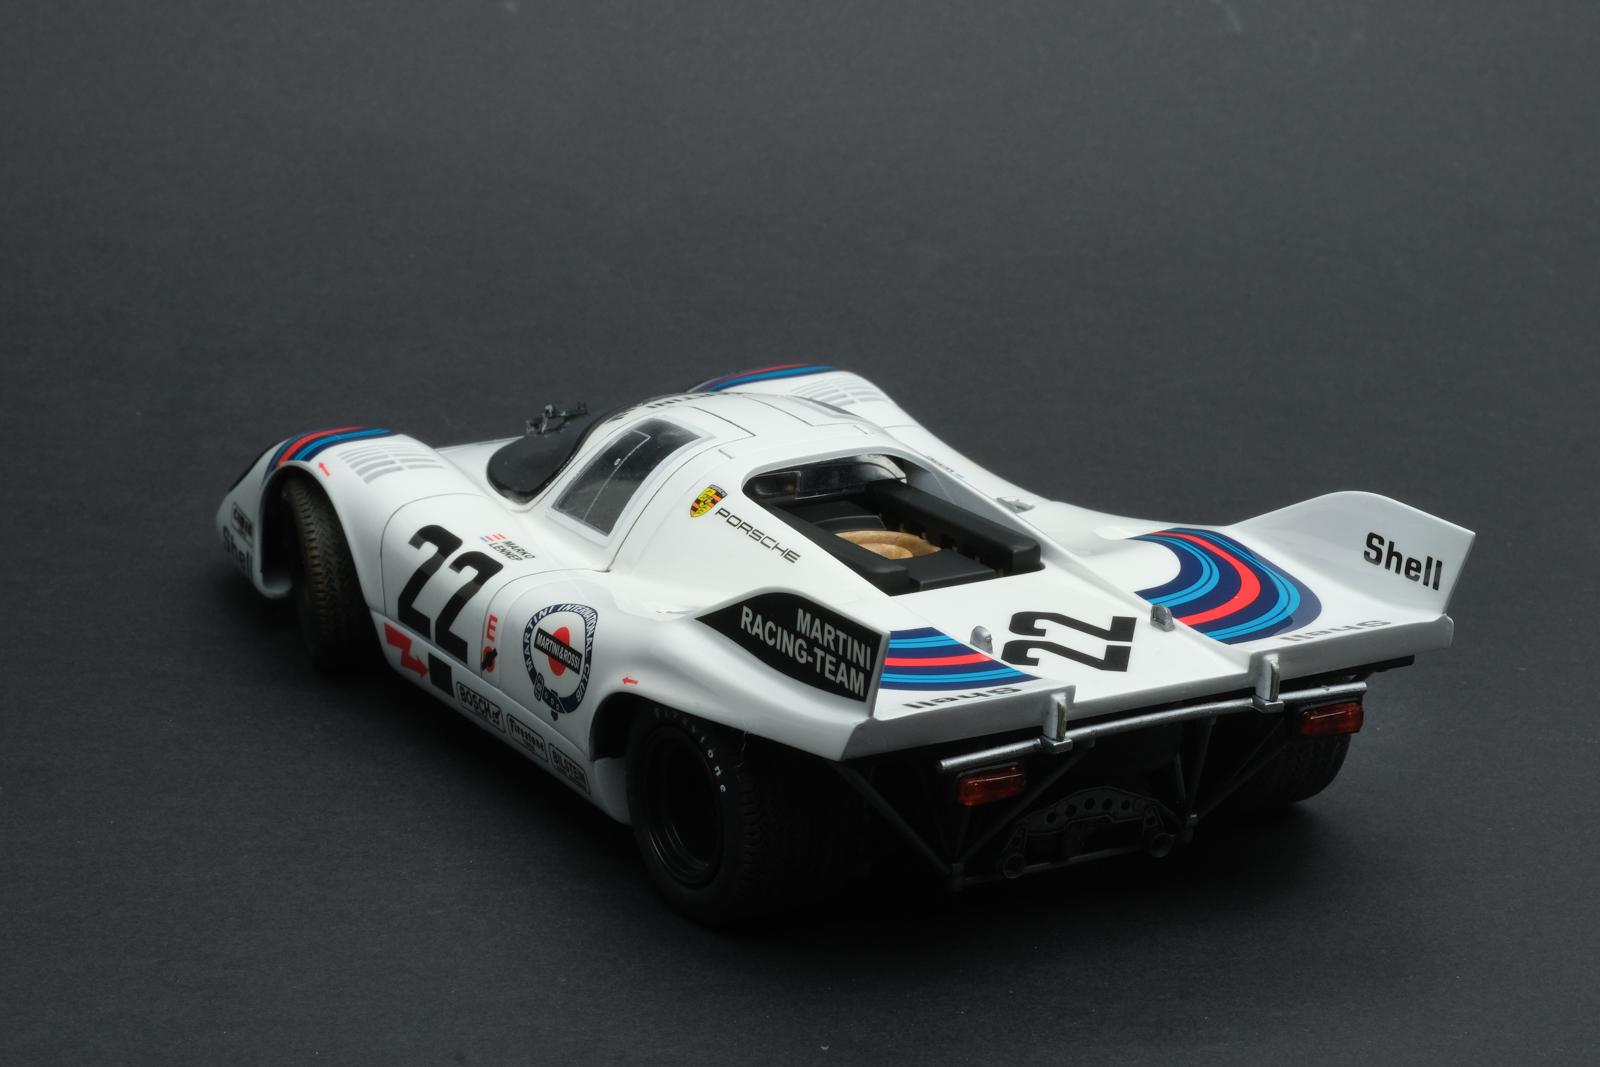
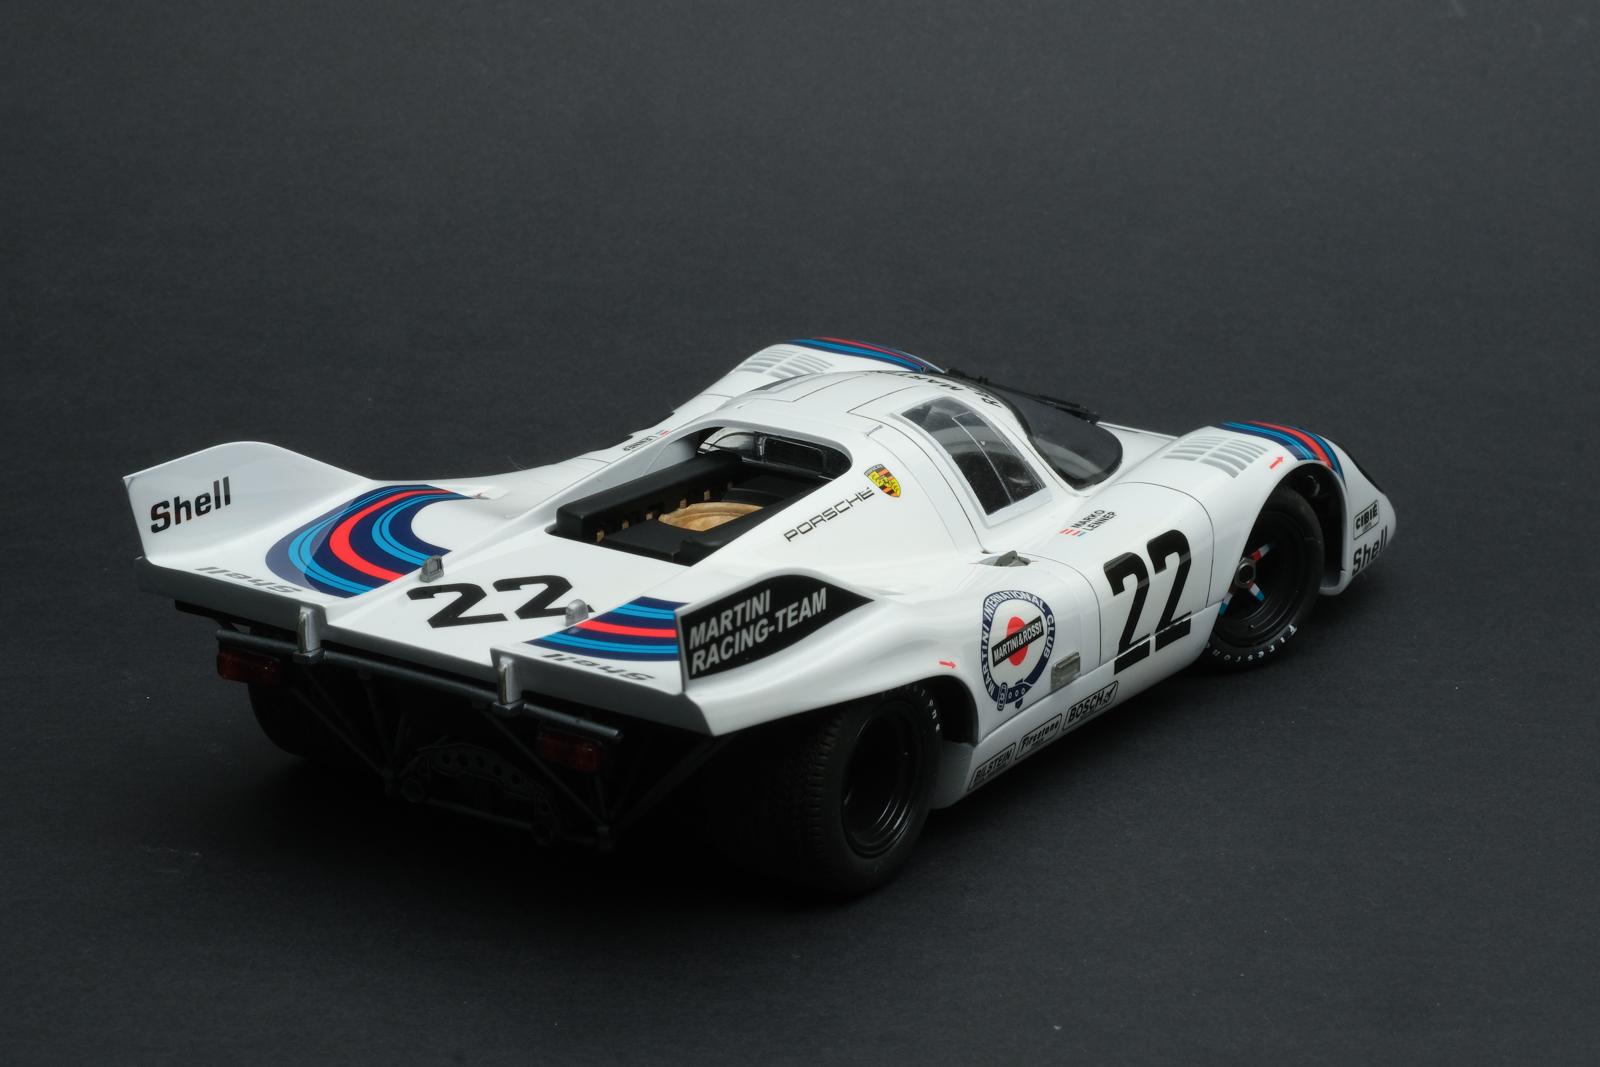
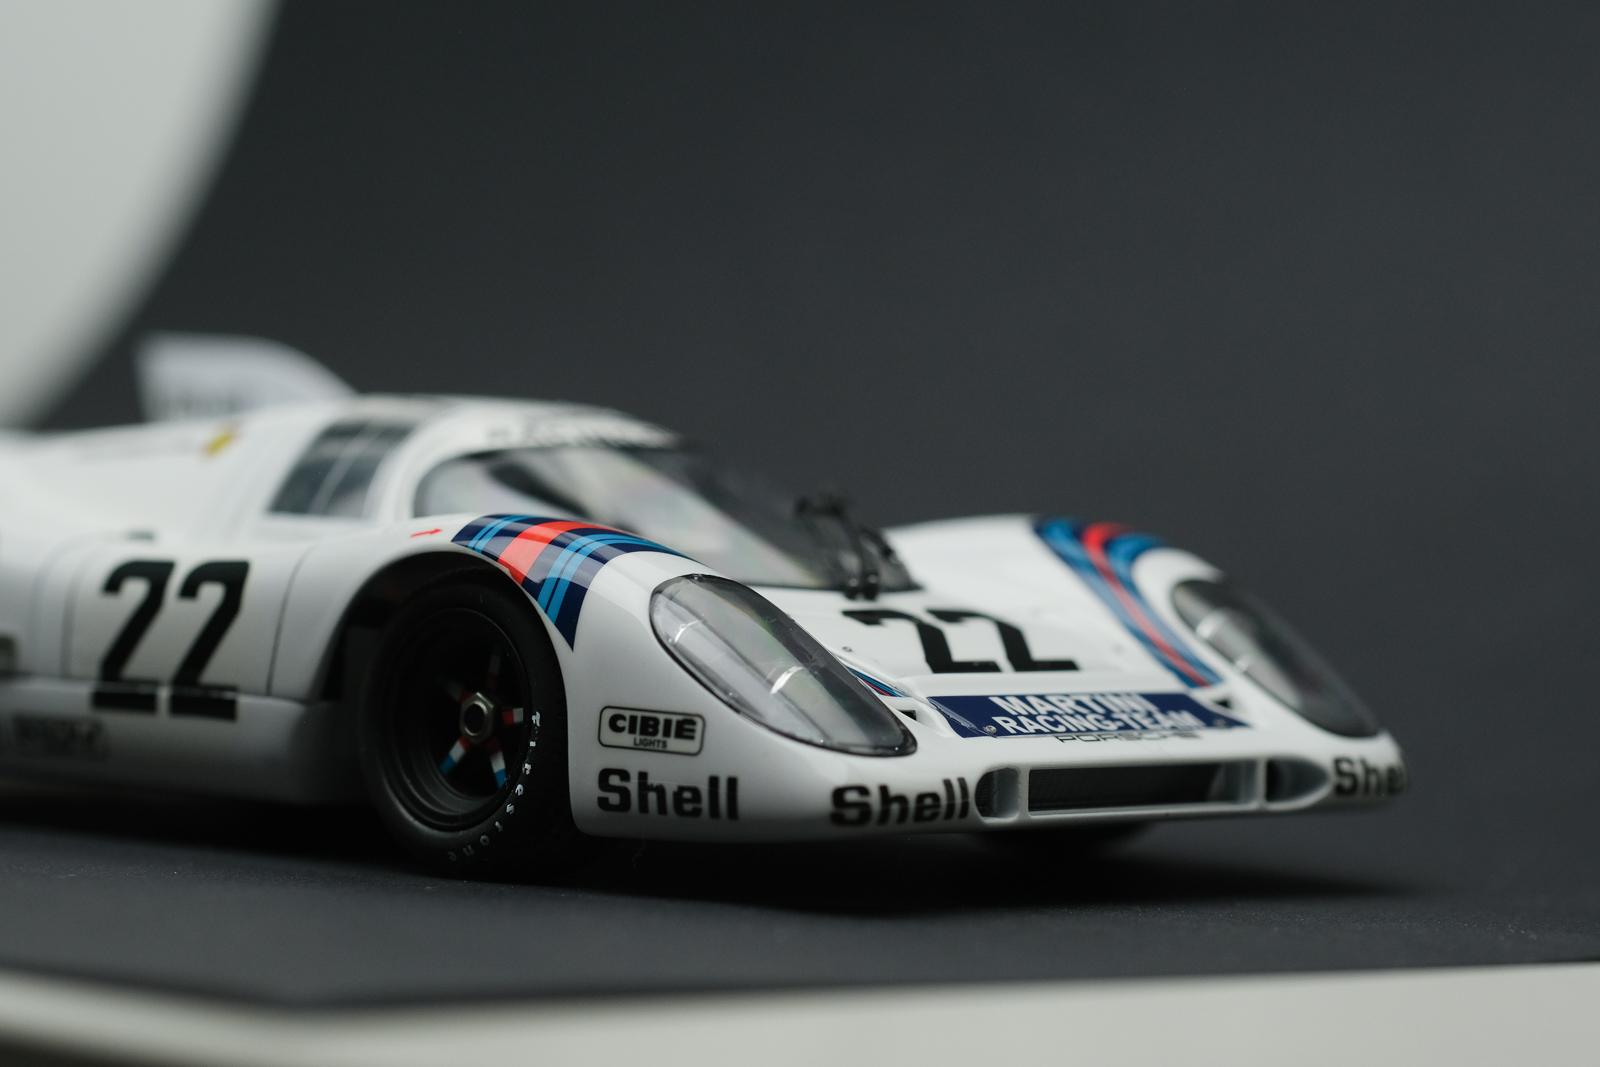
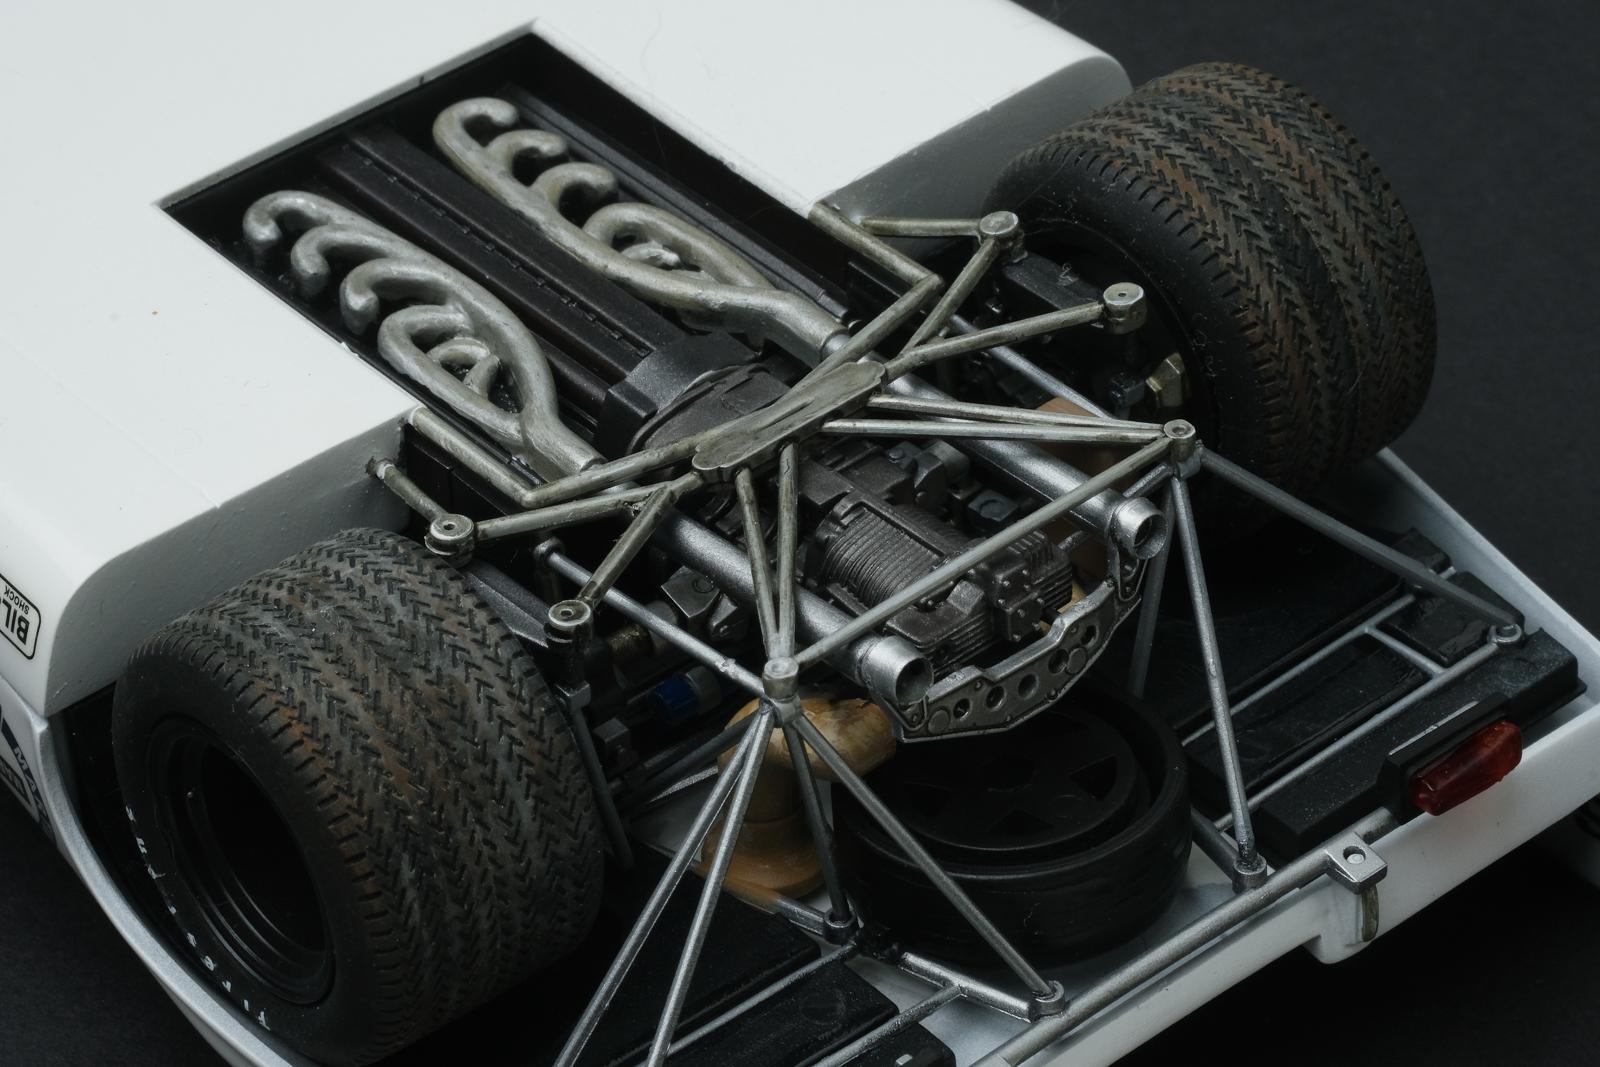
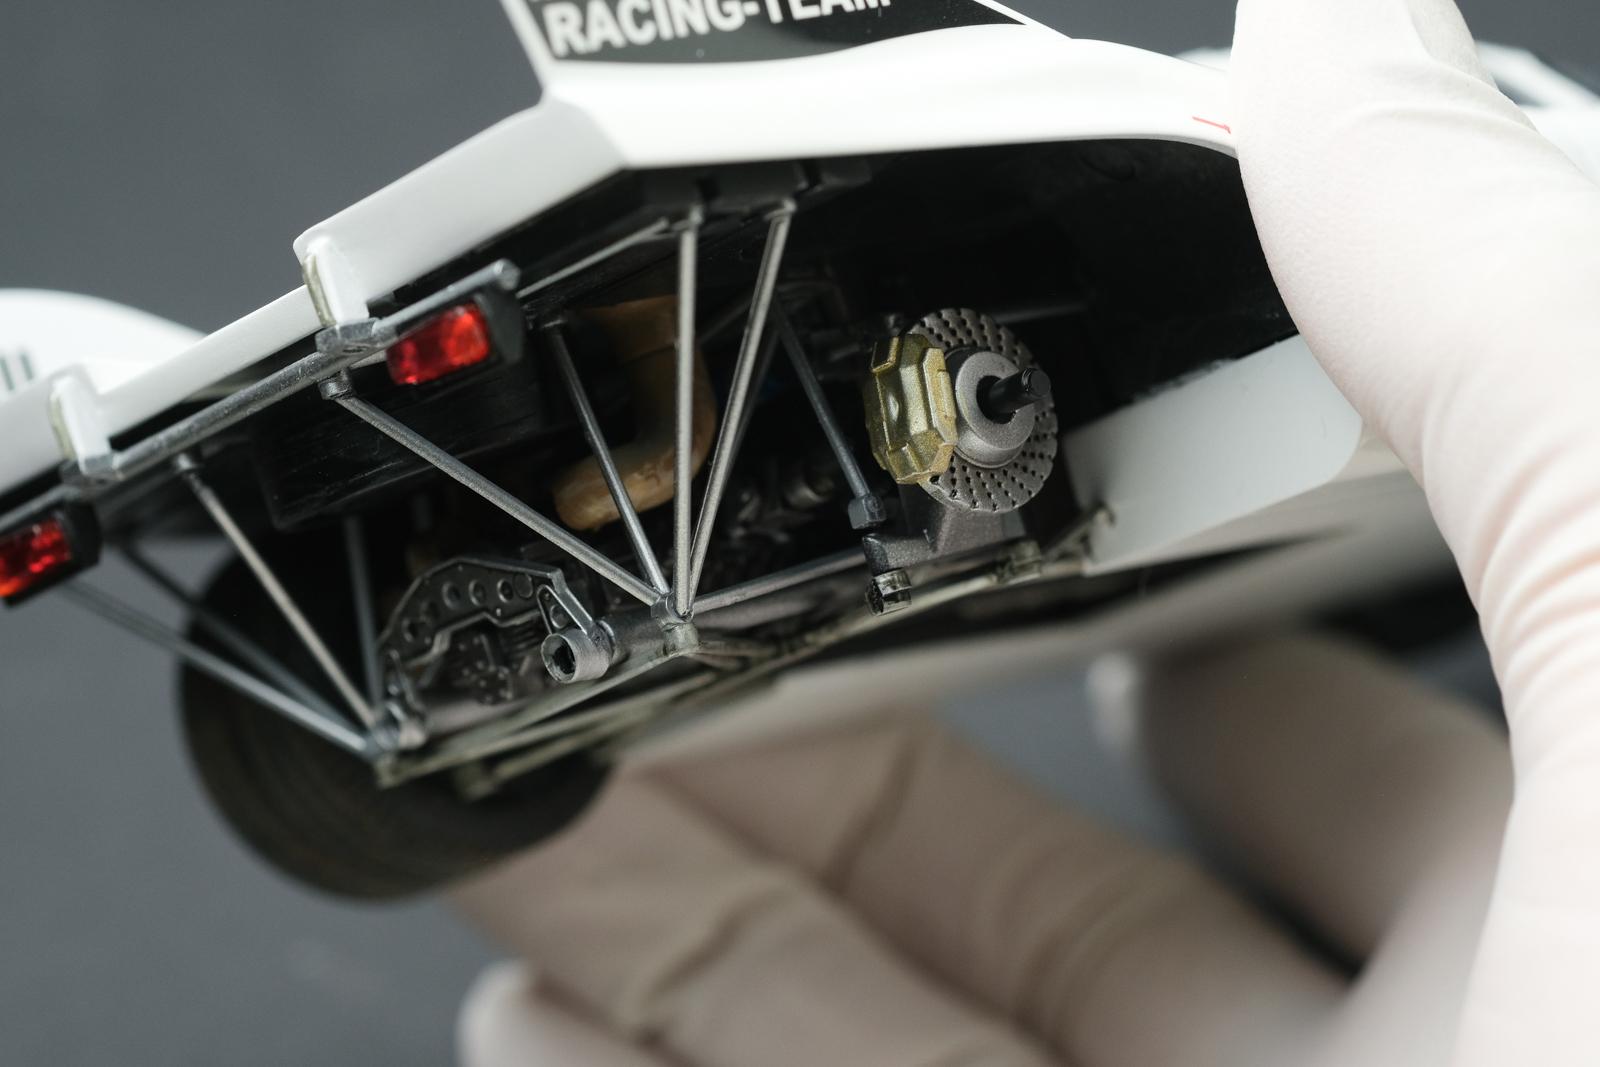
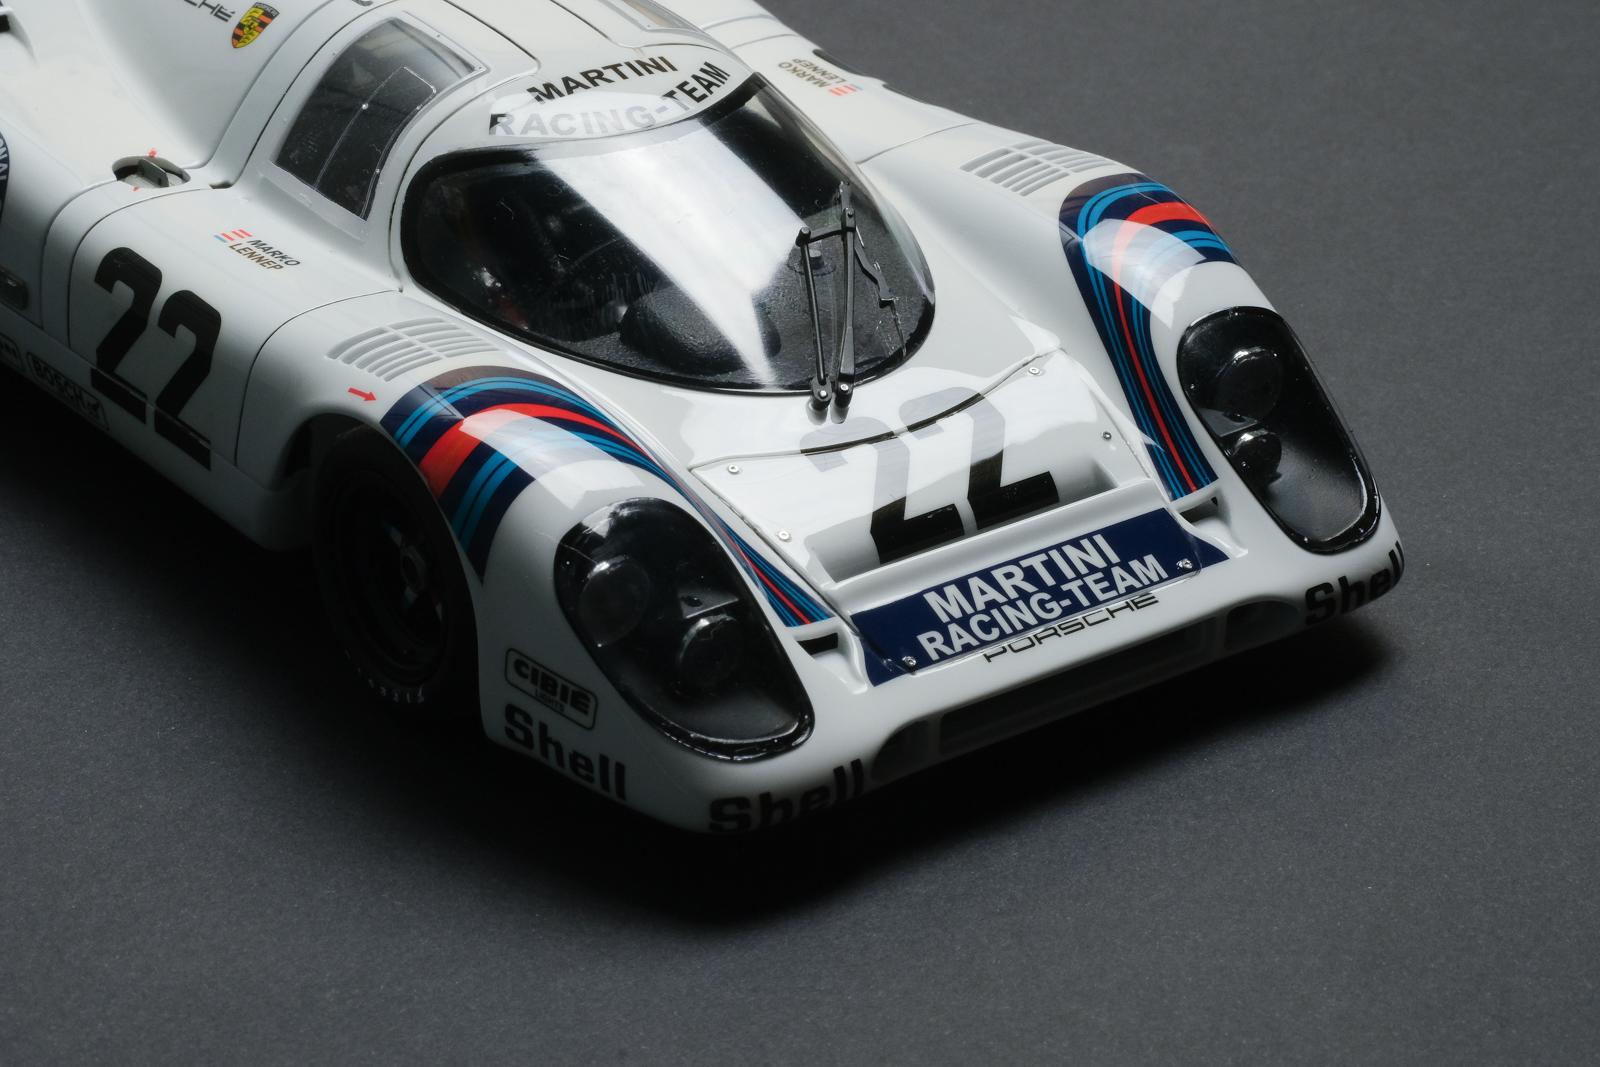
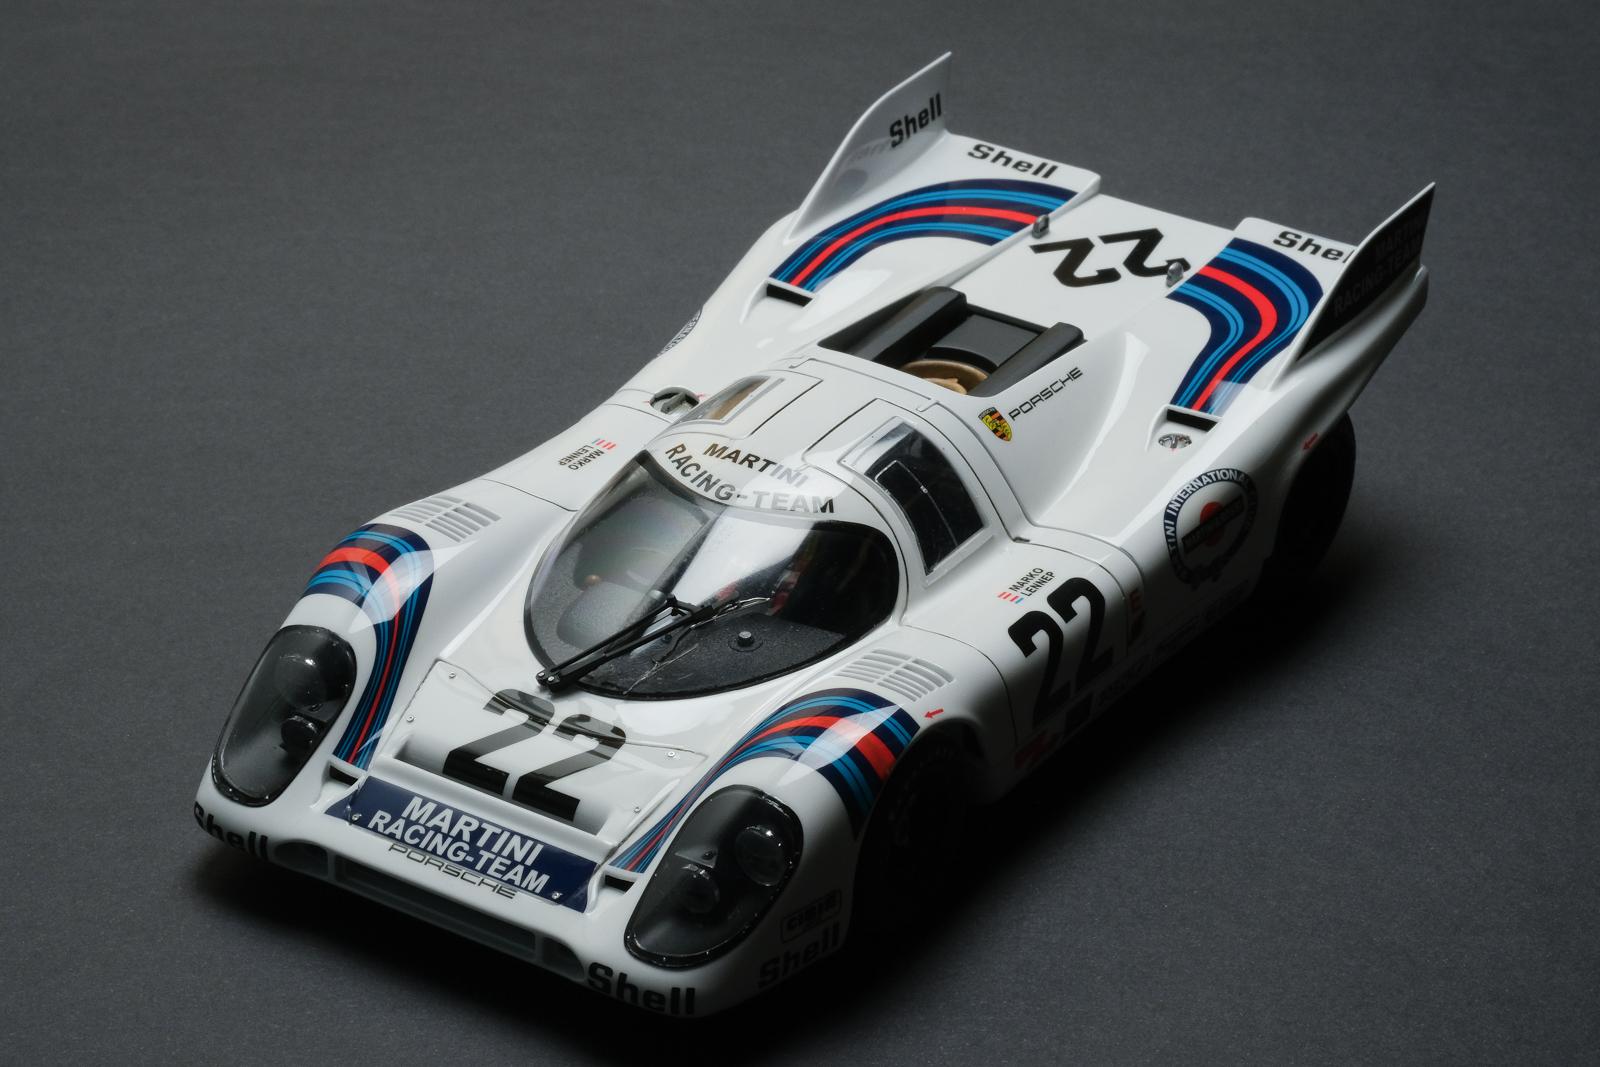
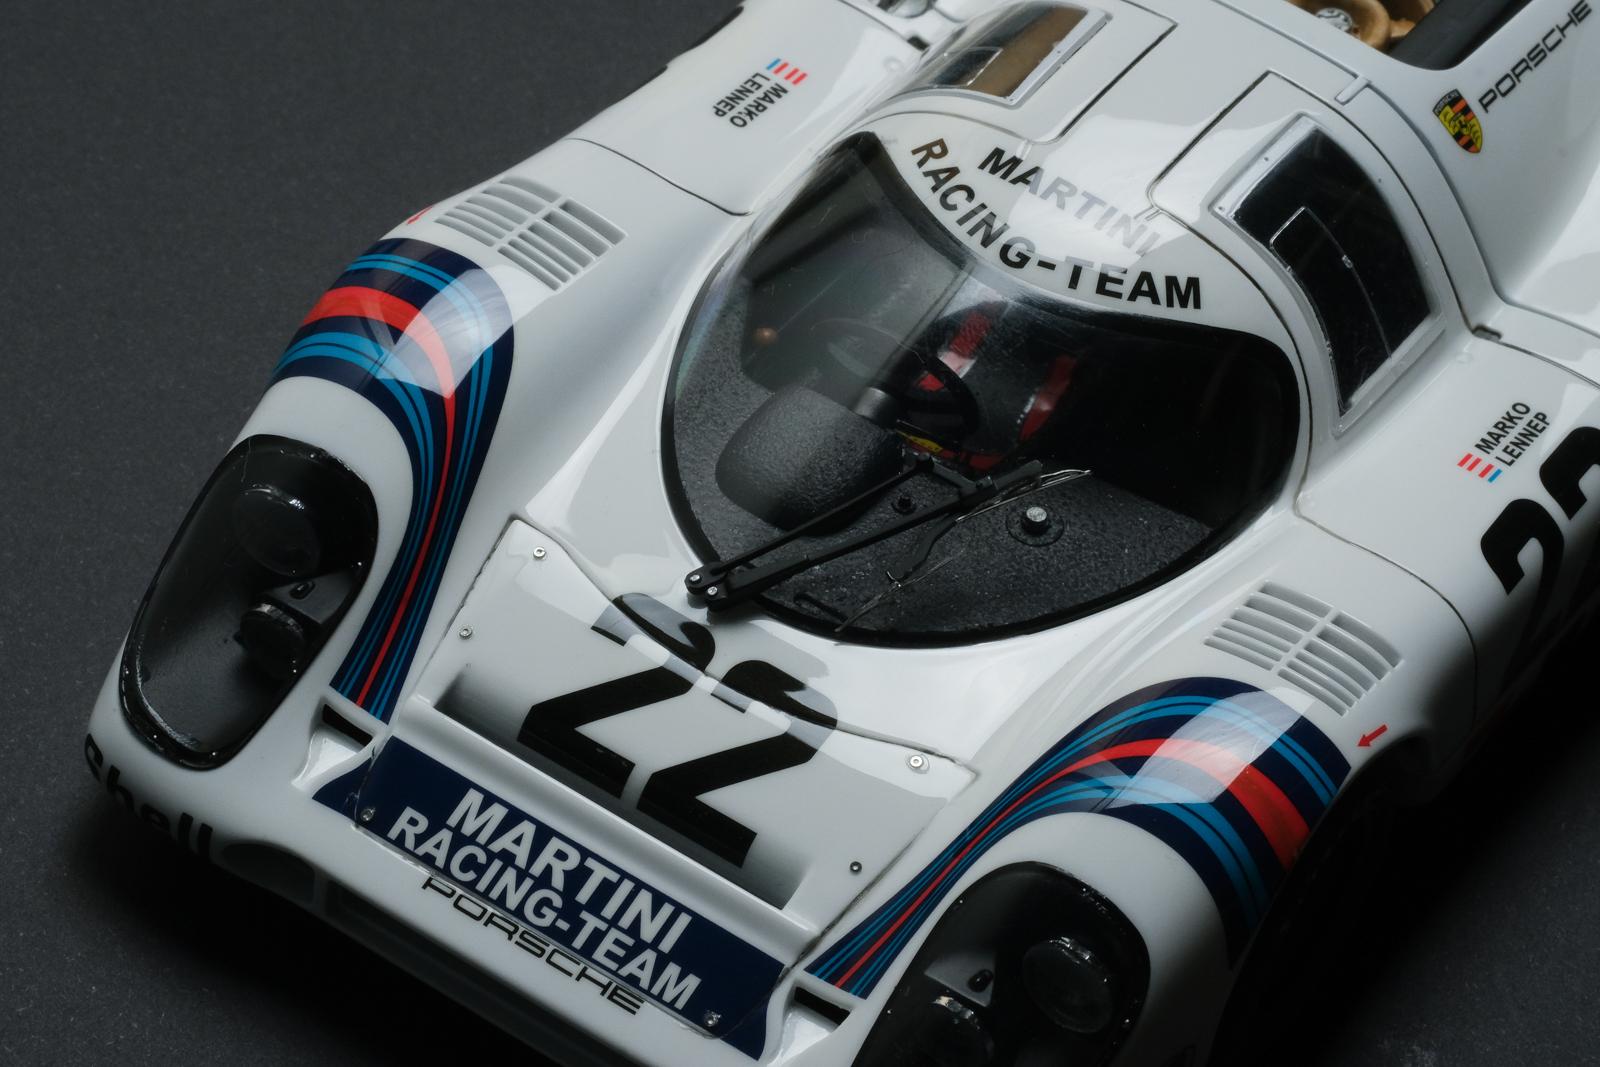
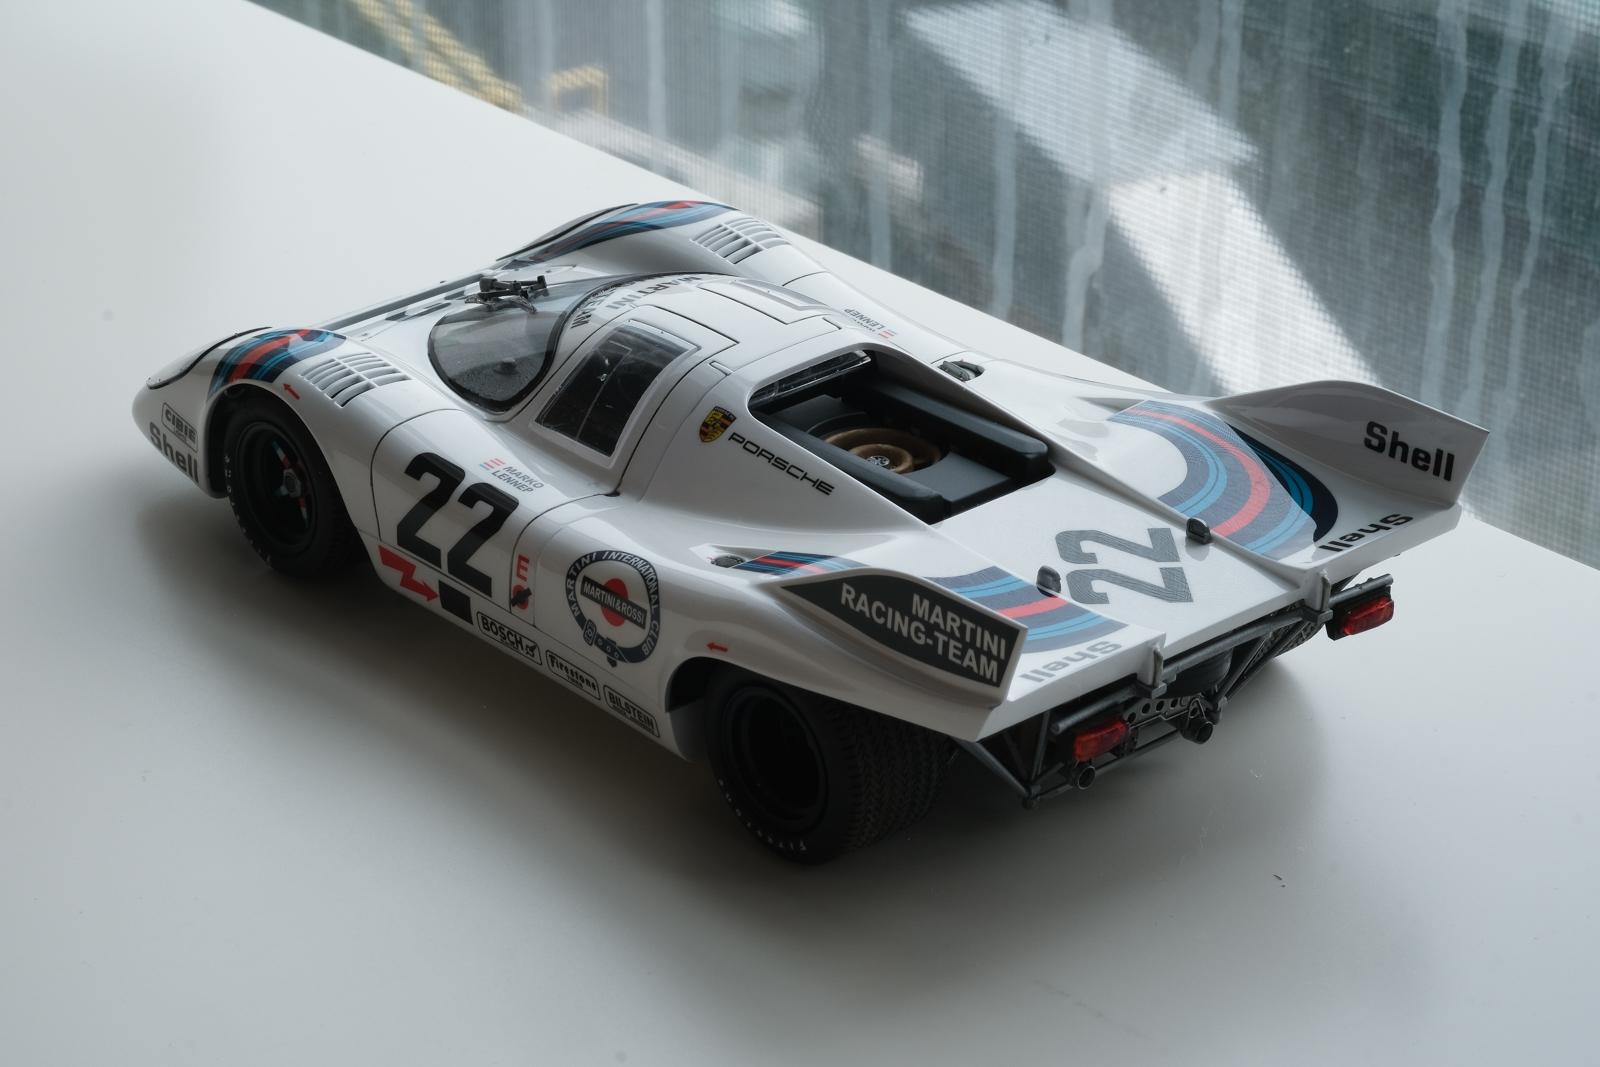
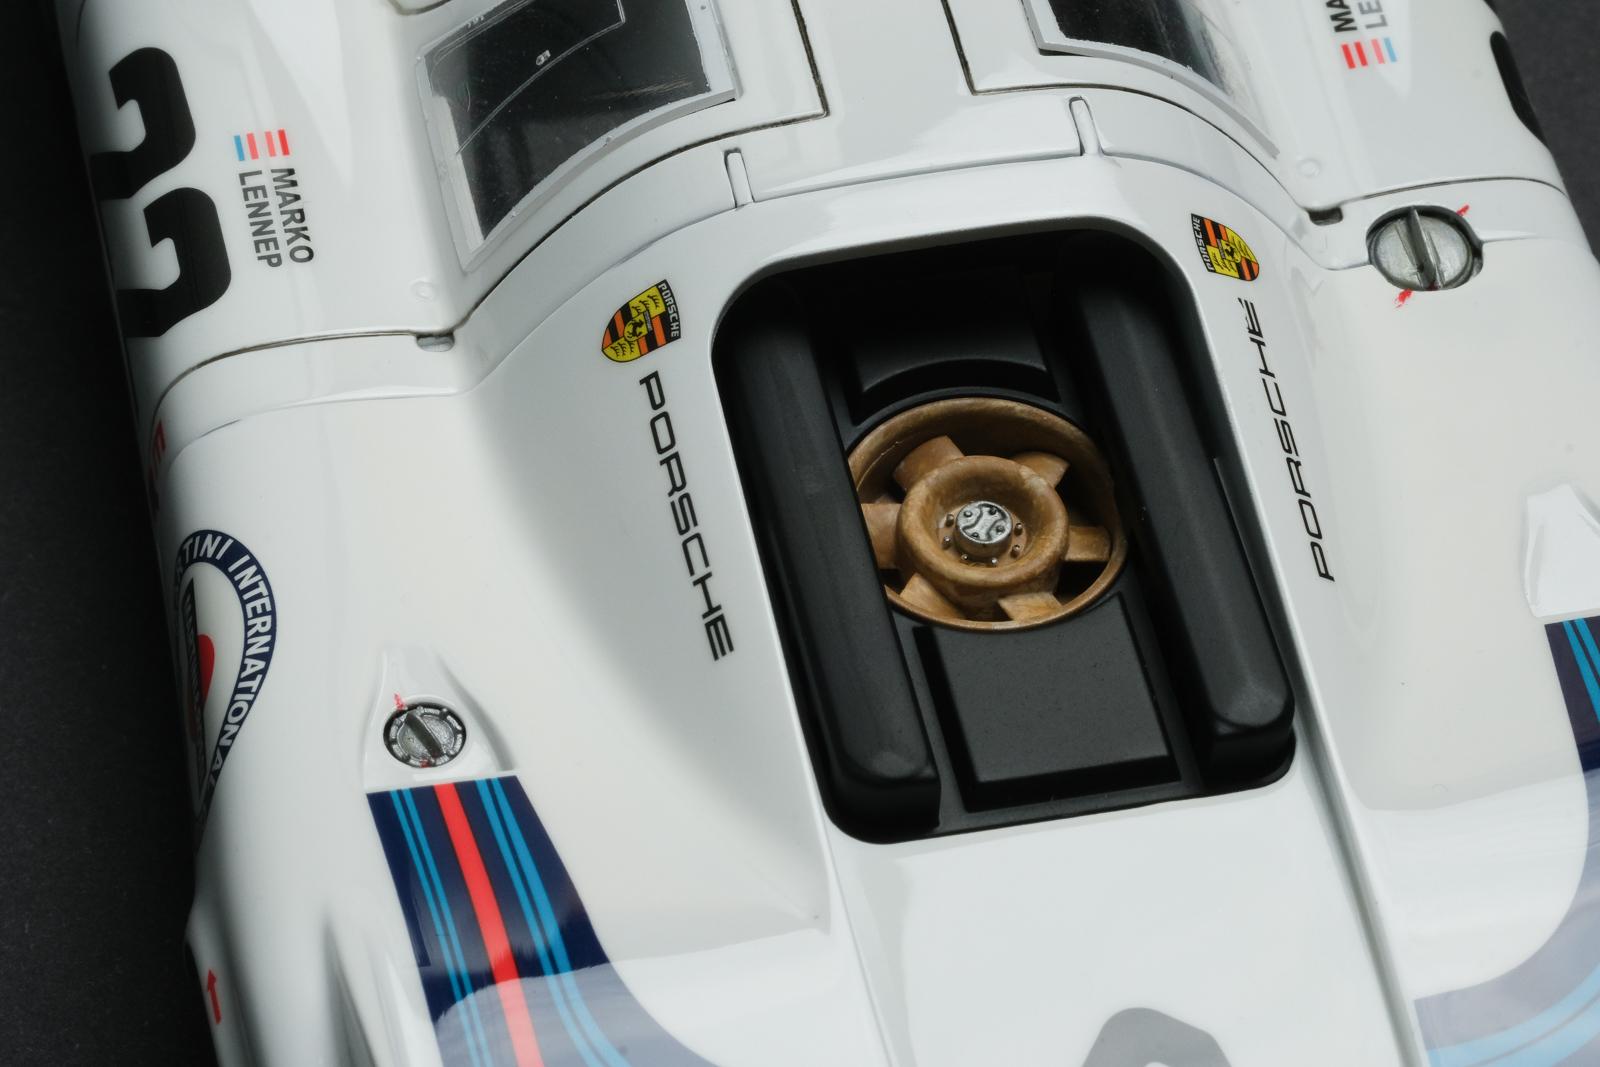
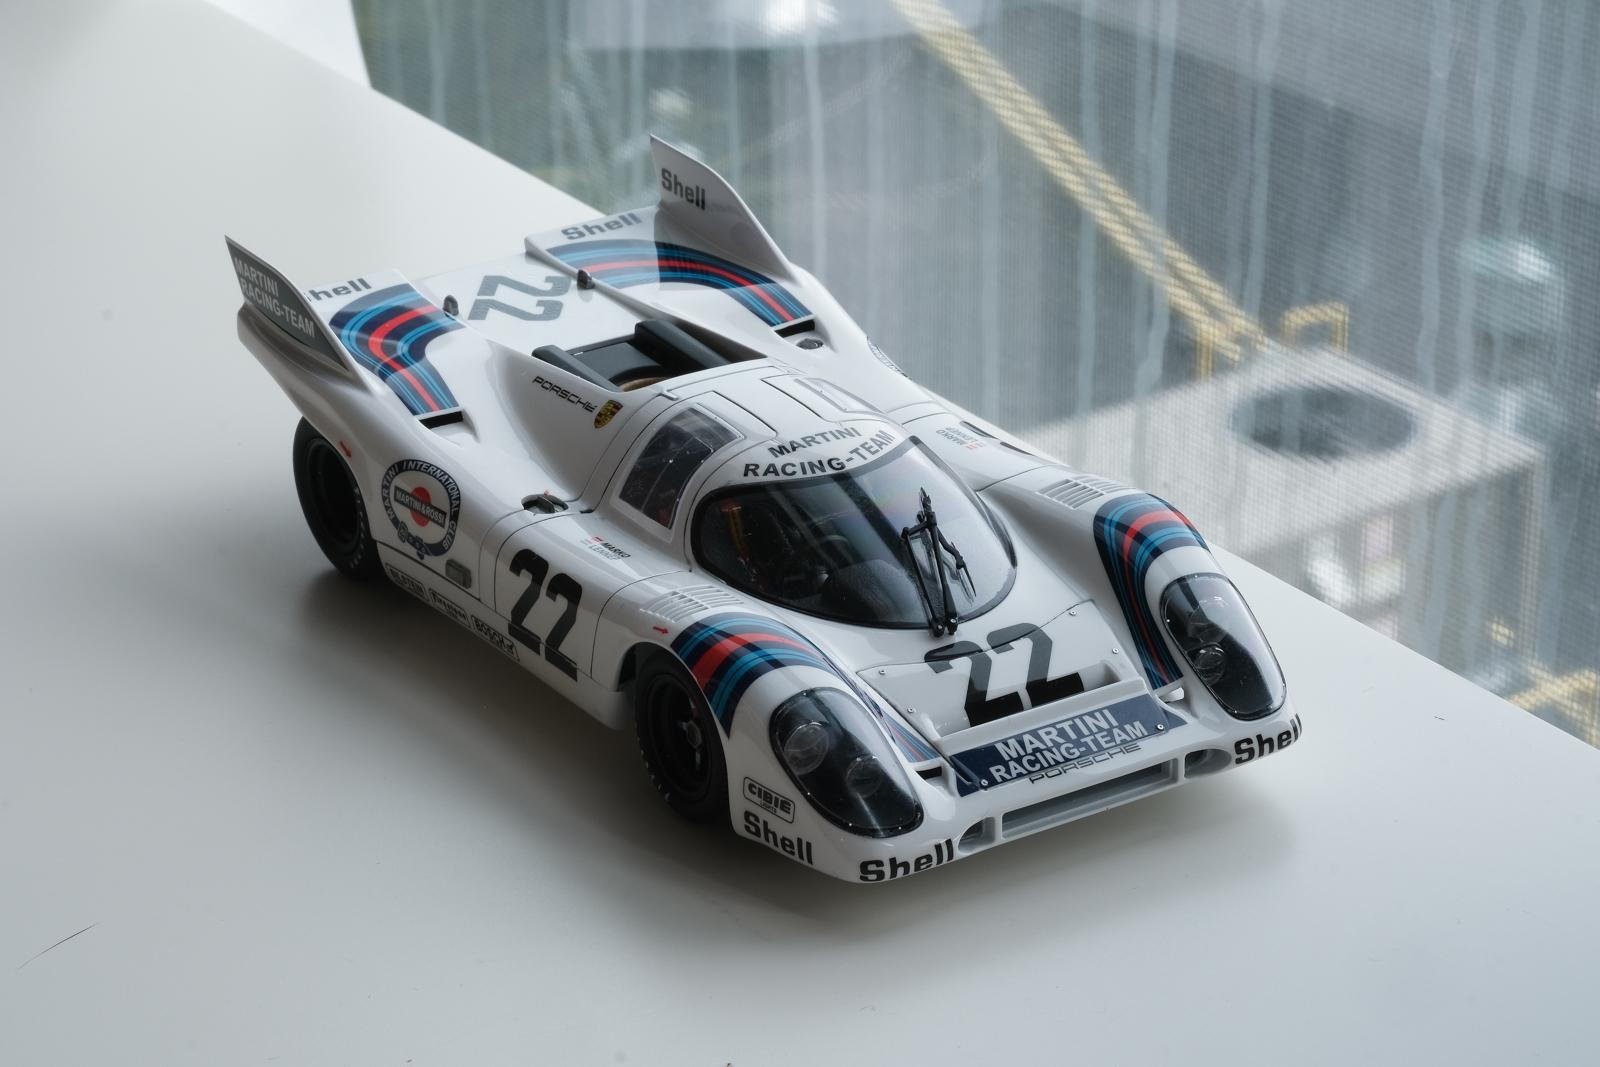
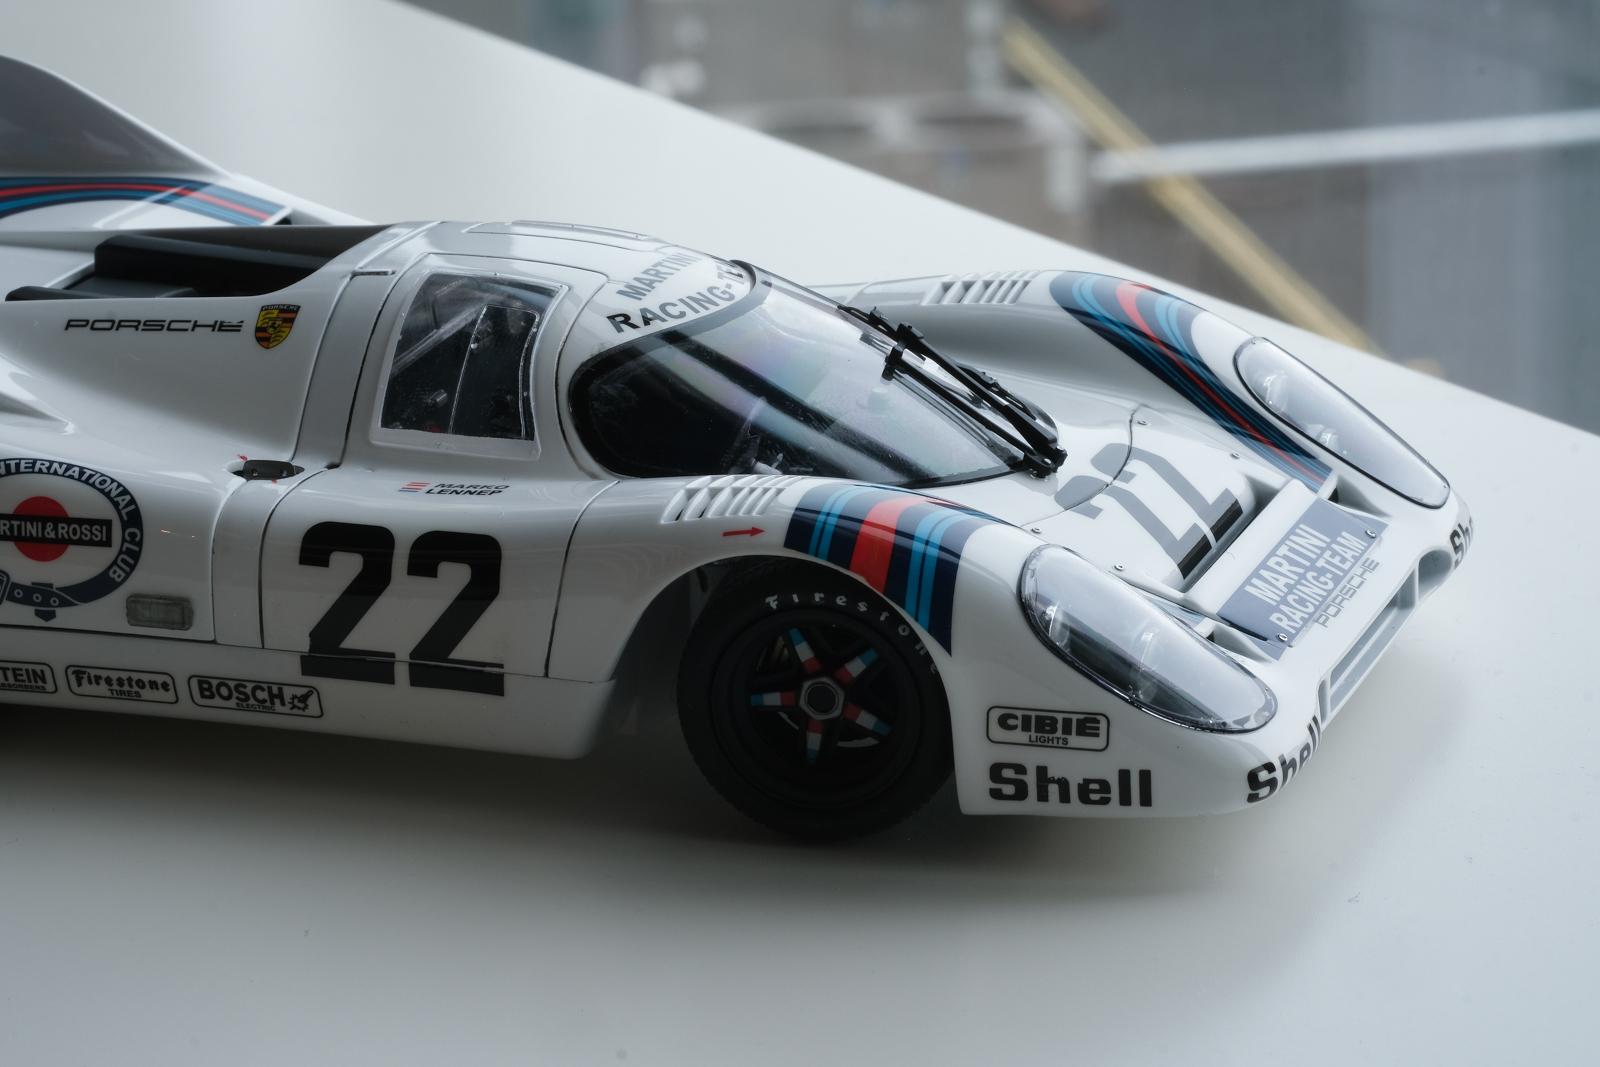
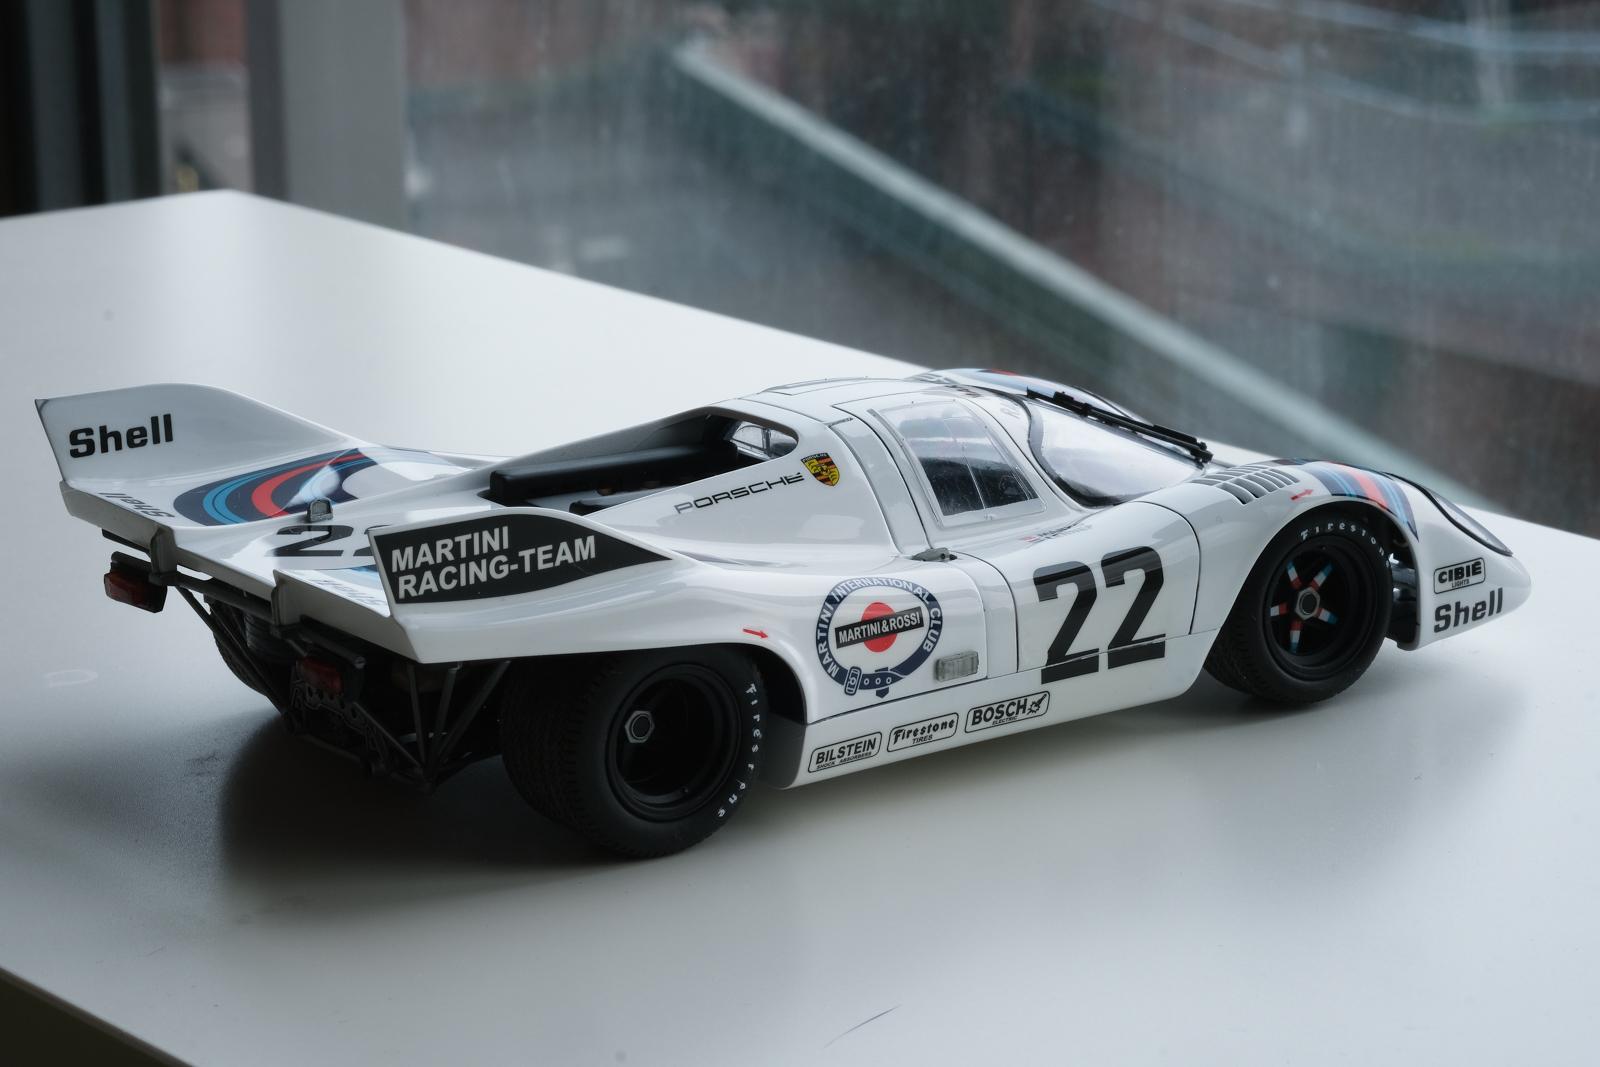
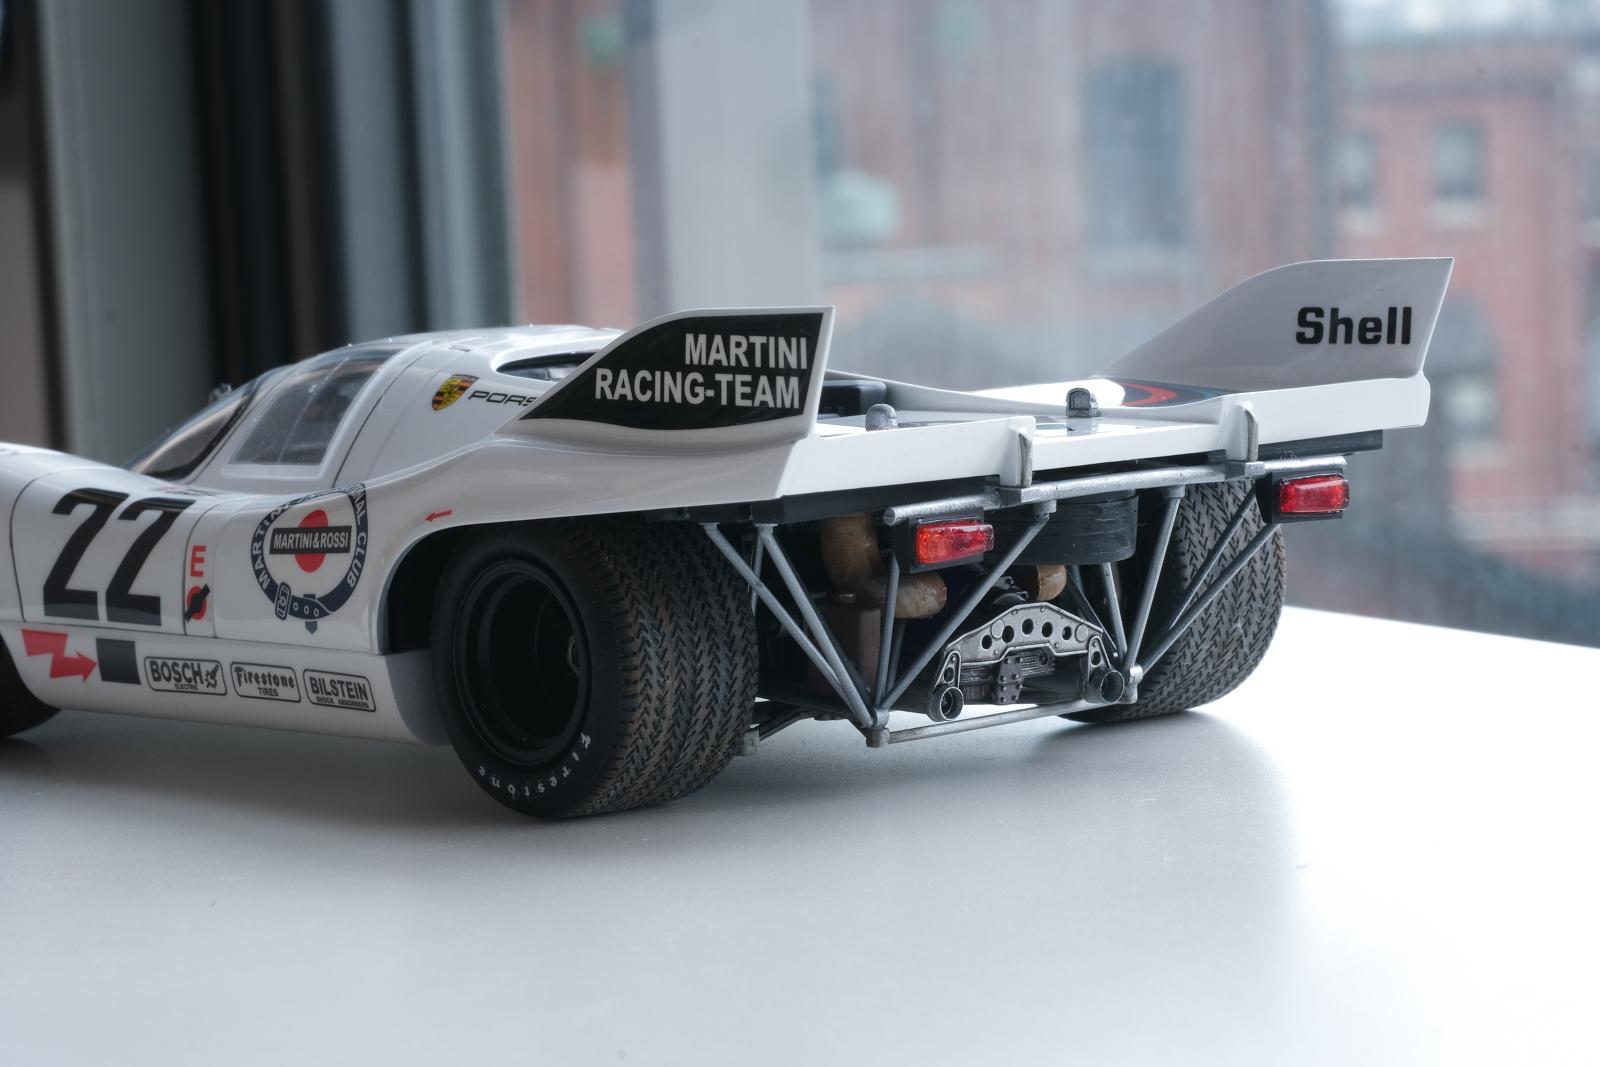
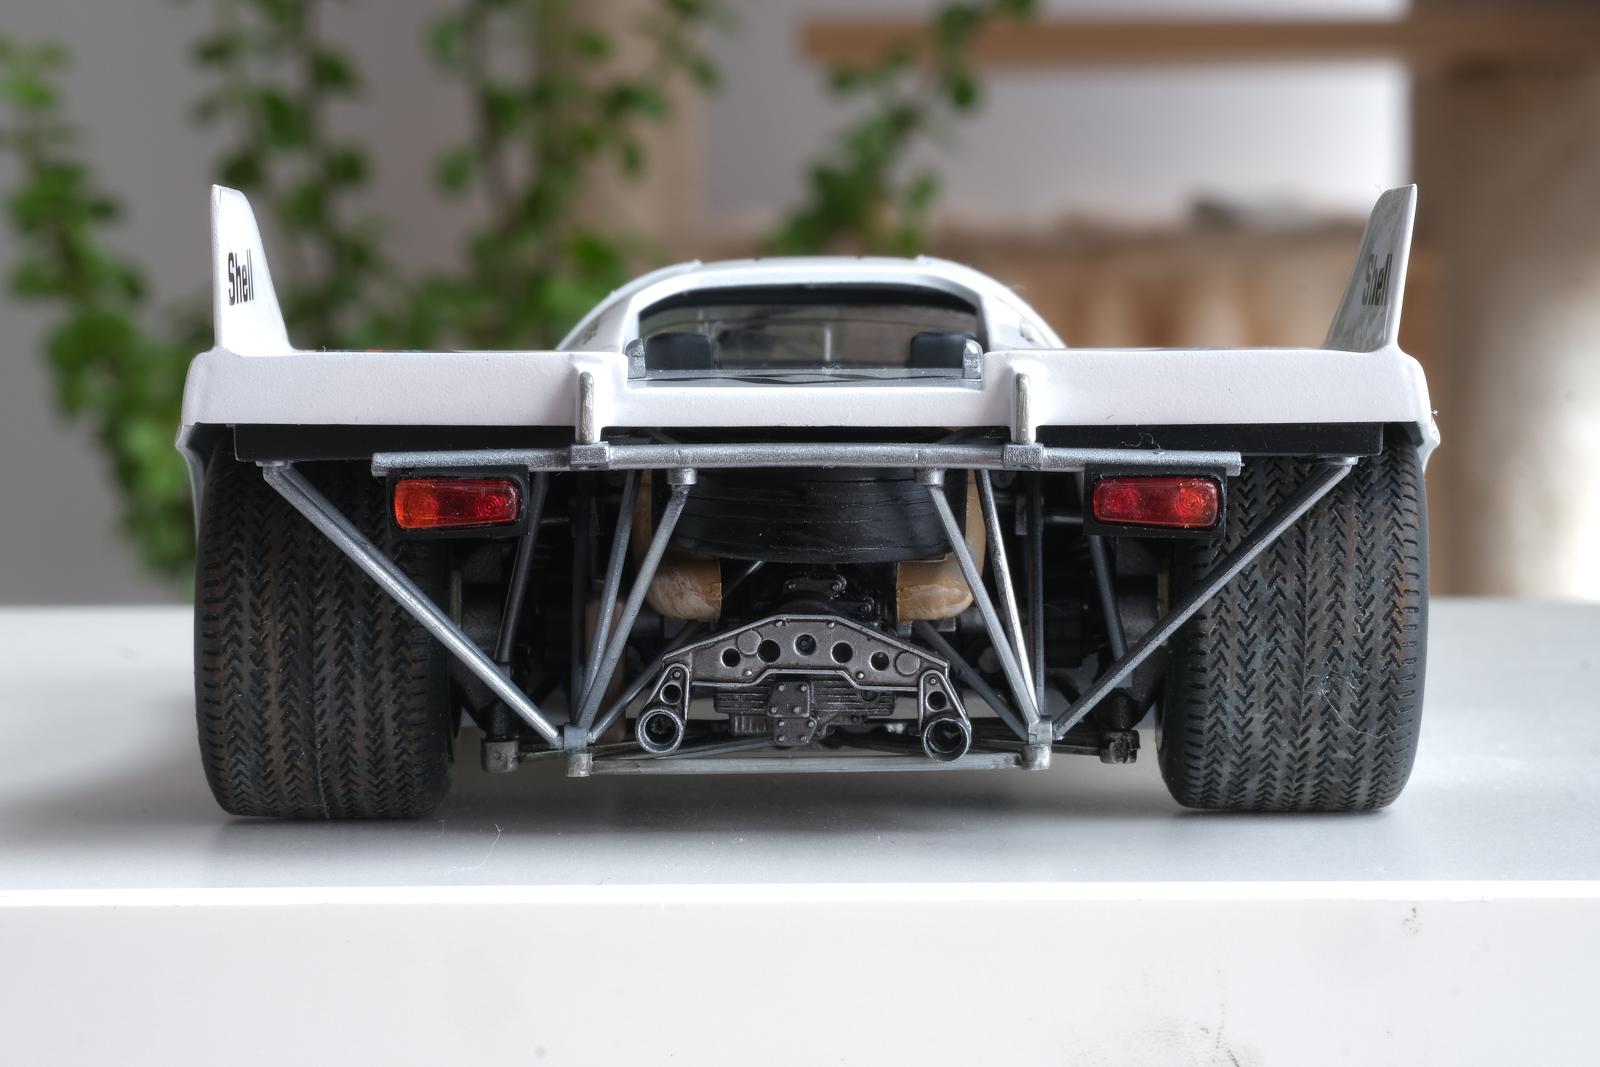
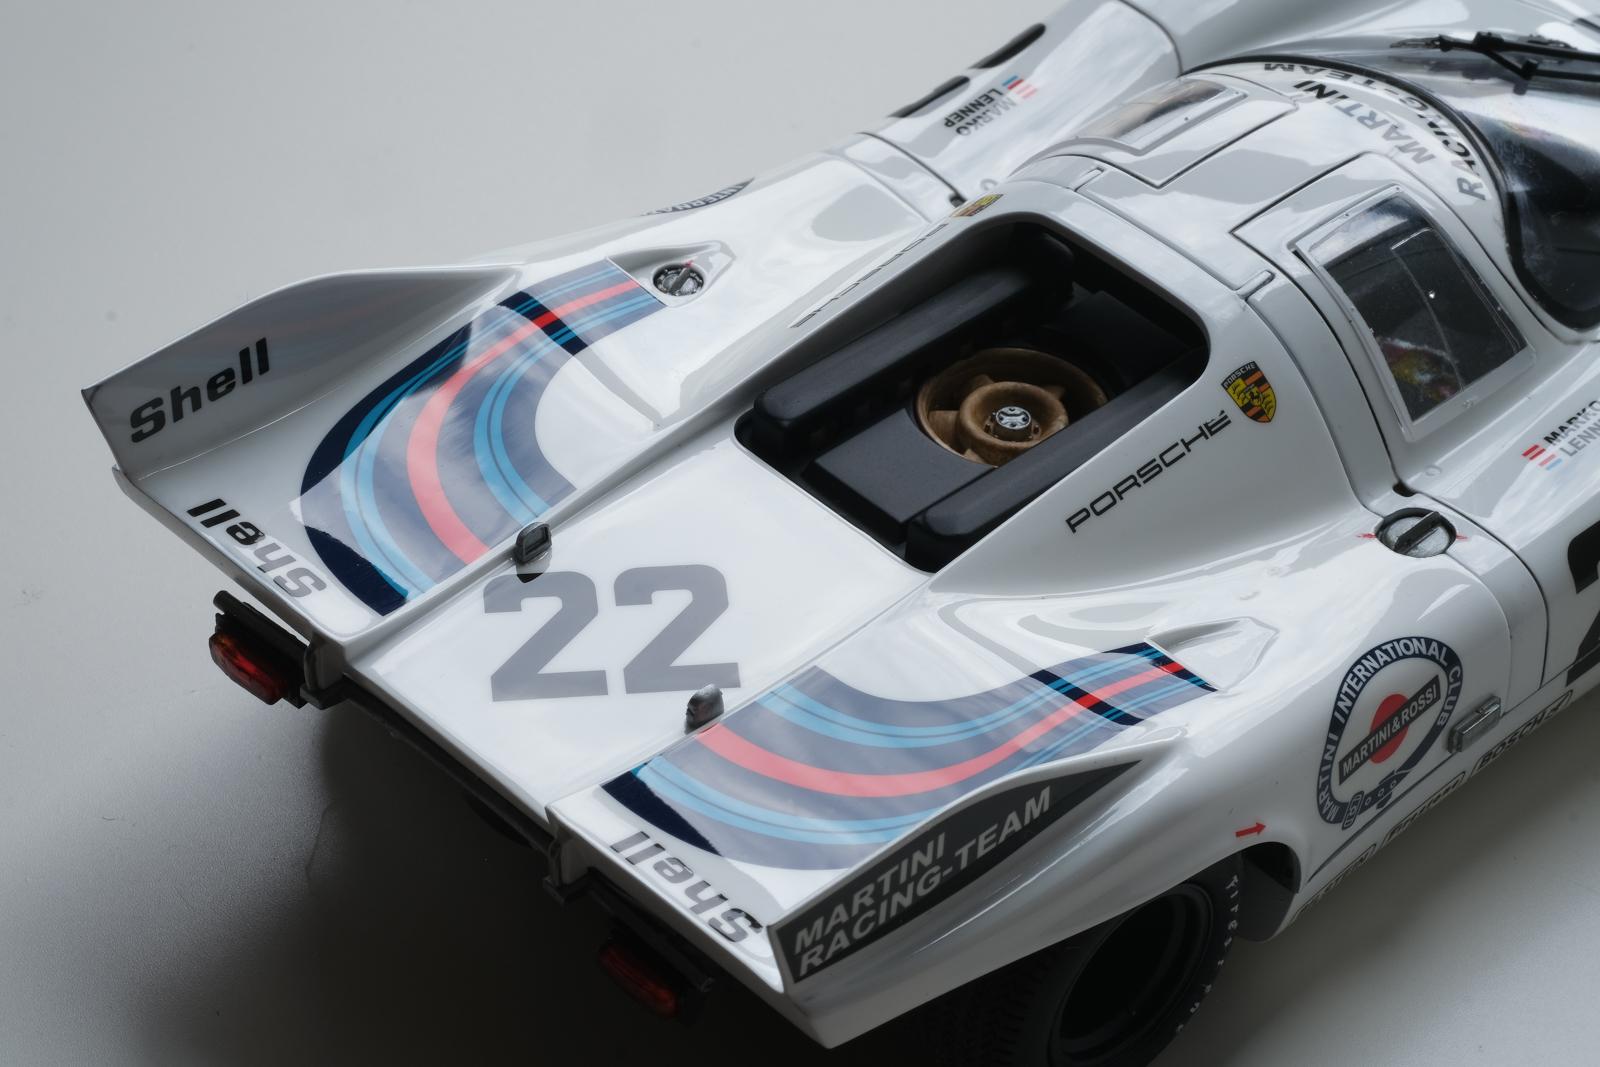
Hi all, this is the belated full build post for my 917K 71’ Le Mans winner build! I built this last year fall but my work life has been busy and didn’t end up posting this here. My focus for this one was to simulate the actual car (body damage from the race was repaired and Porsche Classic kept it in museum condition while leaving the interior and mechanical parts unrestored), so I focused on getting seamless paint surface, removing any bumps on the surface created by decal thickness, then added light weathering around mechanical bits and tires.The full detail follows:- Scribed the panel with and glued the body parts - Sanded all the glue lines and prepped the body with 600 grit sandpaper- Sprayed grey surfacer and white surfacer and sanded with 1500 grit - Airbrushed 2 layers of base coat (mixture of pure white and racing white) then laid decals- Airbrushed Mr Color’s super clear III and sanded the surface with 1500 grit, which I repeated the process about 3 times until I completely evened out the surface and decal thickness- Sanded the body with 2000 grit and airbrushed the final coat with more diluted clear, then cured the body for a month- Painted the floor with gloss grey (mixture of black and racing white)- Sprayed seat and dash with 3M spray adhesive to give texture- Airbrushed the suspension and engine with various shades of metal colours, gave enamel wash, then dry brushed with silver- Added weathering effect with pastel on tires then sealed with flat clear- Brushed the cooling fan with acrylic then airbrushed lacquer on top to simulate kevlar texture- Polished the body with Tamiya 3 stage compounds and added panel line wash- Masked and airbrushed headlamp surroundings in flat black- Sharpened fuel filler caps then painted with Mr Color’s aluminum Hope y'all enjoy!
-
Super clean work with awesome photography tricks. I'd love to build one of these as well!
-
Love the color and the backdrop. Such a clean build!
-
Thank you! Thanks a lot!
-
Thank you! Interesting, I saw that picture somewhere on the web as I was researching reference photos! The kit just needs panel scribing and maybe cutting one-piece front & rear windshield part into separate pieces to adjust the gap.
-
Thank you it was very fun to build one! Thanks!
-
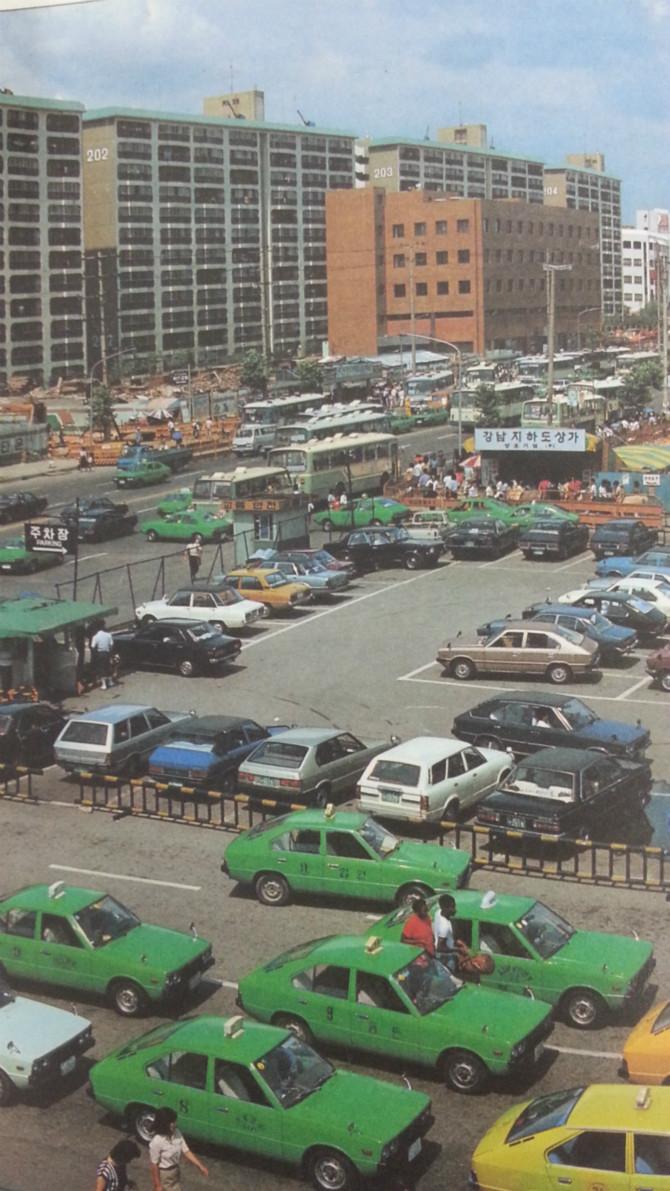
Yes it is! I saw a few of these on local hobby store as well so I think they're widely available. Thank you! I just saw yours as well. Awesome color choice and it really suits your car! Thank you. I'll probably build another one next year with better paint! Thank you. Pony was certainly loved in Korea as these sold like crazy back in the day! Thank you! Thanks! Thank you very much! Thanks! Thank you! It could've been smoother if I could even out the paint before clear.. but the layer was too thin. Thanks!