Pierre Rivard
-
Posts
2,579 -
Joined
-
Last visited
Content Type
Profiles
Forums
Events
Gallery
Everything posted by Pierre Rivard
-
Car is done, just waiting not so patiently for the wheels to make it across the pond. ?
-
Maserati A6GCS Spyder
Pierre Rivard replied to absmiami's topic in WIP: Other Racing: Road Racing, Land Speed Racers
Working suspension, that's scratch building extraordinaire! -
1963 Galaxie light weight
Pierre Rivard replied to ShawnS's topic in Other Racing: Road Racing, Salt Flat Racers
Wonderful build and it's always fun to get the story of the real car this replica is based on. These were big performers on the NASCAR scene but it's hard to imagine it could compere in road racing. John Raeburn must have been a really good driver. -
Body looks impeccable and color spot on for french blue. Great work.
-
MFH Tyrrell 006
Pierre Rivard replied to 2whl's topic in WIP: Other Racing: Road Racing, Land Speed Racers
Wow Paul, amazing build. Looks 1/1. The MFH kits come with an amazing level of detail but you need an expert to assemble one the way you did. I really miss Formula 1 of that era. Today's cars are big and all look the same. Whoever can figure out the better floor edge winglet design will dominate... -
GT40 MkII...LeMans 1966
Pierre Rivard replied to Mothersworry's topic in Other Racing: Road Racing, Salt Flat Racers
Gorgeous, paint looks like it's still wet. -
Ferrari 156 "Sharknose"
Pierre Rivard replied to Bilingham's topic in Other Racing: Road Racing, Salt Flat Racers
Technology and artistry joining forces in a spectacular way. Incredible replicas of historic race cars. -
I always enjoy your beautiful builds Mario. I was waiting for a non James Bond version to be released but your artfully converted the kit. Too bad Revell did not get the shape of the body quite right, especially the roof and greenhouse. Hard to understand with today's scanning and design tools.
-
Mercury GT40 MKII-B
Pierre Rivard replied to Phildaupho's topic in Other Racing: Road Racing, Salt Flat Racers
Another wonderful GT40 Mr Dauphinee. The mods on the engine cover and dual carb setup look very well integrated. Unfortunate about the brittle decals, what was the source for these? -
1:16 Gunze Sangyo 1937 Rolls-Royce Phantom III Sports Saloon
Pierre Rivard replied to Anglia105E's topic in WIP: Model Cars
I'm happy you decided to keep the cream/black theme as it looks very very good. I can see it on the lawn at Ascott... Curious about your polishing. Do you wet sand a bit or go straight to the compounds? -
Dirt track vette
Pierre Rivard replied to Vettegasser's topic in WIP: Other Racing: Road Racing, Land Speed Racers
Wow, it looks fantastic. Really worth the wait. -
Jason Hupin (Jack Modelling) has just printed these for me. I should receive them in about 7-10 days. Last piece of the puzzle!

-
Has anybody heard of?
Pierre Rivard replied to MarkJ's topic in General Automotive Talk (Trucks and Cars)
I like the Santa Cruz. Unless you have to tow big loads it makes so much more sense than a full size pick up. The Hyundai/Kia group has come up with a lot of great vehicles in recent years Congratulations! -
Engine looks mighty good Ken. I love your upgrades on the front end and the mix of colors and textures. It adds a lot of realism to it. I agree with you, perhaps a push rod against Ferrari's twin cams, but also 7 vs. 4 liters.
-
Tips for Repairing Broken Windshield Pillar
Pierre Rivard replied to In2Carz's topic in Model Building Questions and Answers
Quite possibly Ace, you know that stuff better than me. It's just that I've had much better results with Canopy glue... Maybe It's just in my mind. OK, gotta go, shrink appointment...? -
Tips for Repairing Broken Windshield Pillar
Pierre Rivard replied to In2Carz's topic in Model Building Questions and Answers
Canopy glue. Wipe off anything oozing out with a wet Q-tip and this way you can glue it to the glass without damaging it. -
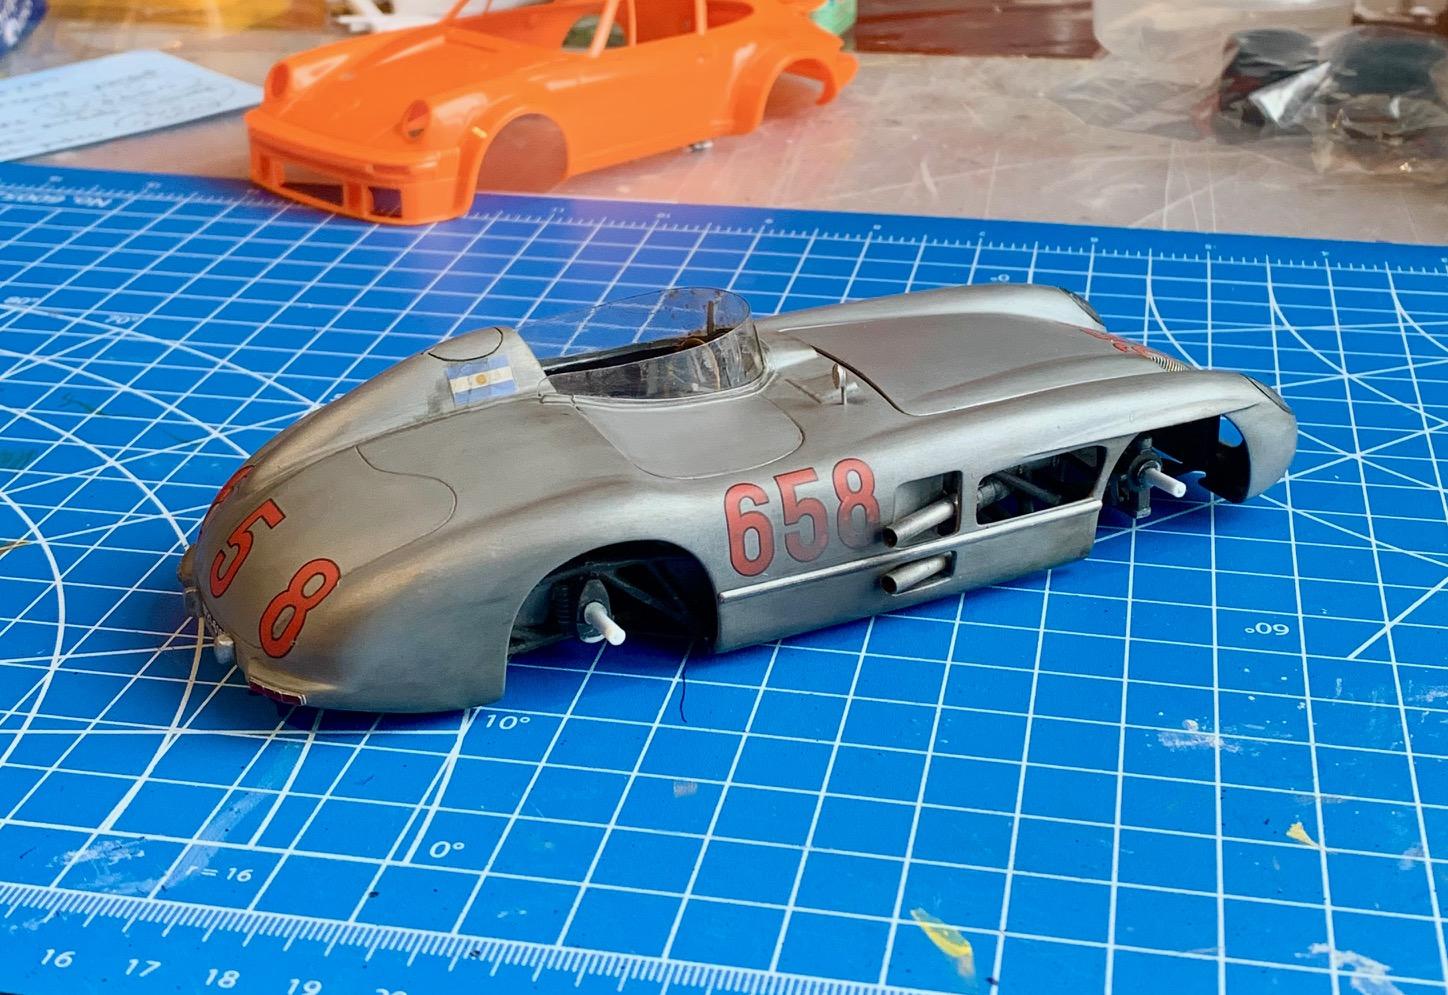
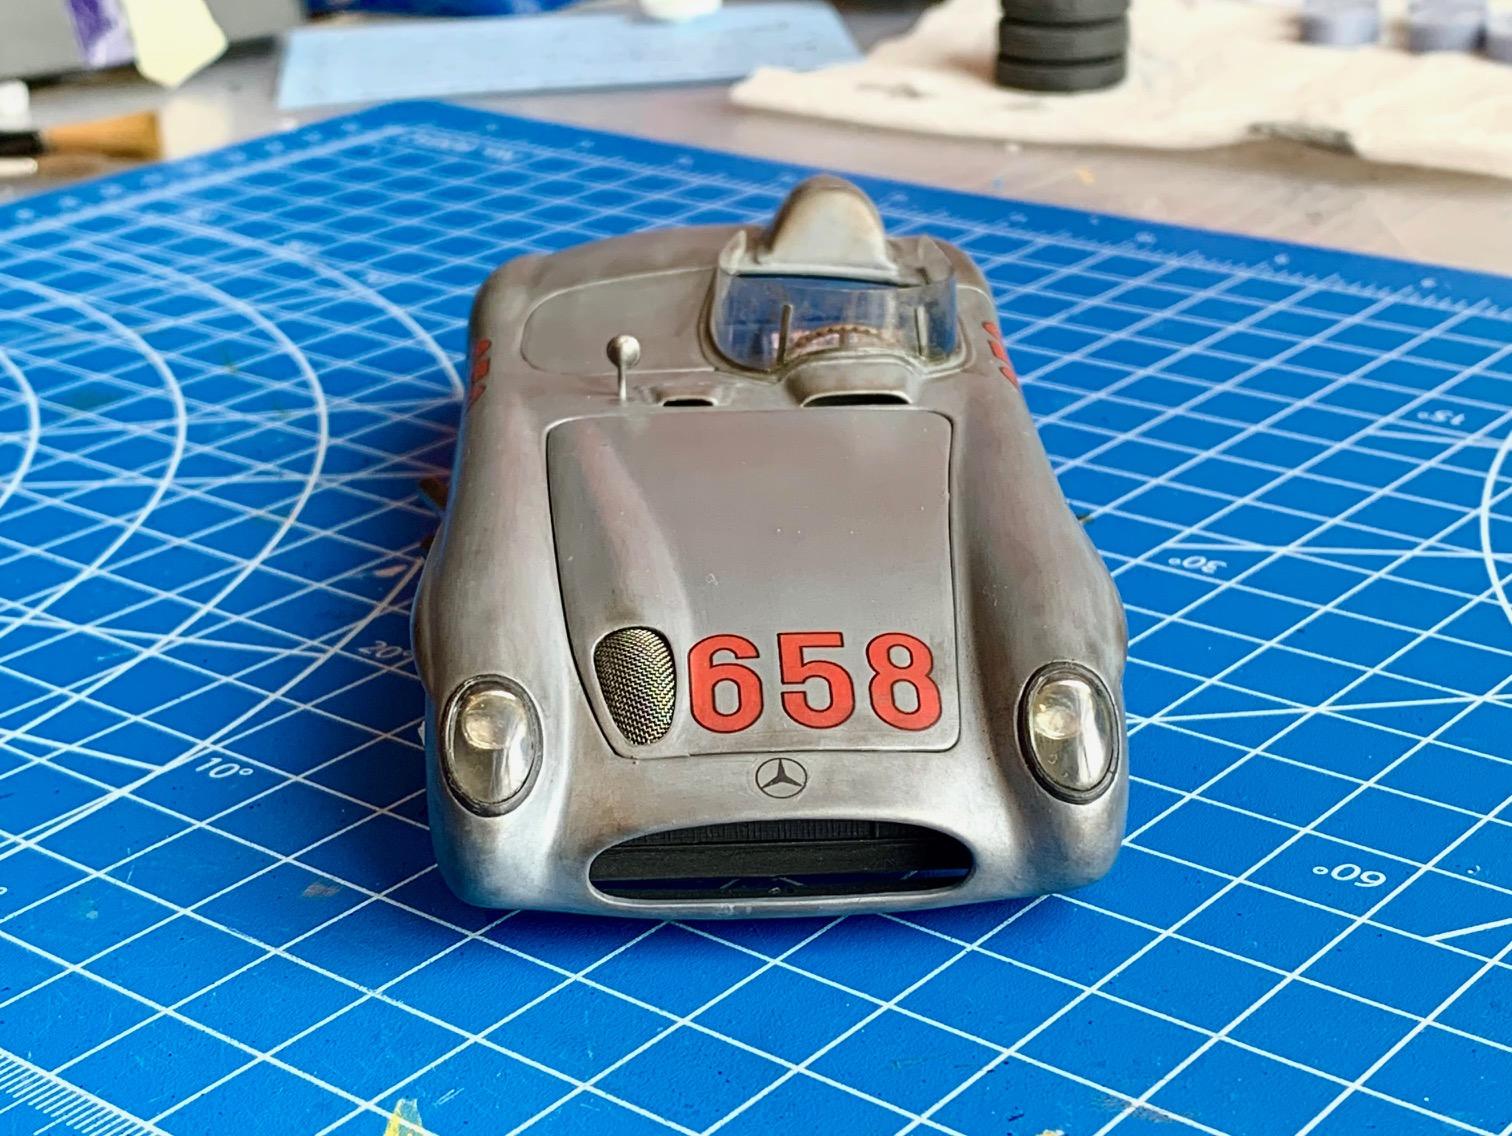
Tamiya... I need relief from complicated builds after the Alfa 8C, Ferrari 250swb and MB 300SLR...
-
You got me curious and into research mode. The 2 cars featured in the Mille Miglia are Ferraris and were owned by Fox Studios and entered in the 54 race (no results though). This enabled them to get race footage in addition to the studio work. Both of them are still "with us"
-
A beautiful build Thomas and your display/photo setup looks so real one could think it is a real full size race car. Well done!
-
I toned down and finessed the weathering and happy with the results. So this one goes into waiting mode until I receive the set of wheels from Jason.
-
pretty cool stuff, and the real race footage in the movie shows what kind of roads they were dealing with. I doubt modern race drivers would man up for that.
-
In 1955 the distance was 992 miles. It's a race against the clock and the clock does not stop at check points (about 20 of them) and refueling stops. The Moss/Jenkinson team started at 7:22 am and crossed the finish at 17:29 for a winning time of 10:07 at an average of 97mph. The Fangio car I am building started at 6:58 and finished at 17:37 for a total time of 10:39, driving alone and running on 7 (one cylinder fuel feed broken) for half the race. On public roads, crossing dozens of towns, crazy stuff!
-
Personally I just like to slowly dry brush the pigments one little spot at a time. I'm still working out the technique over silver but I found it was easier to do on a red car (like your Maser?). Matt clear after decals, oiled earth wash and then dry pigments.
-
Thanks Ken, I agree. I did touch up a few overdone areas with light slate grey pigments to tone it down and it looks more balanced that way.
-
The rest of weathering... with these products...and the results. Might need to tweak some more...but could make it worse...not sure...