Pierre Rivard
-
Posts
2,579 -
Joined
-
Last visited
Content Type
Profiles
Forums
Events
Gallery
Everything posted by Pierre Rivard
-
Sauber Mercedes C9
Pierre Rivard replied to kensar's topic in WIP: Other Racing: Road Racing, Land Speed Racers
Looking at the back end of your chassis picture, you really have a way to make these metallic finishes look so real. This and supreme detailing mare for quite the realism experience. Inspiring. -
1/25 Chevy Nova Salt Rat
Pierre Rivard replied to Pierre Rivard's topic in Other Racing: Road Racing, Salt Flat Racers
Thank you Claude. This was completely new to me and I very much enjoyed it. Your salt cars inspired me and I am hooked. I'd like to build one every year at least. Look forward to the Rive-Nord club event! Thank you so much Francis. I get bored easily so building the same kit twice cannot happen. The only way forward is trying new things. This was a first time supercharged V8, first time rat rod style paint and first time salt car. Versatility keeps me motivated. Thanks Steve. I surprised myself with the paint job. It was fun and easier than expected. Thanks Chris. A bit off the wall but definitely an enjoyable build. -
New F1 movie. Anyone interested??
Pierre Rivard replied to gbdolfans's topic in General Automotive Talk (Trucks and Cars)
Watched the teaser/trailer. Doesn't feel good. Feels like... hey let's do a remake of Driven... We have not been treated with too many really good racing movies. For now Grand Prix, Le Mans, Rush and Ford v Ferrari are the ones that make the cut with me. I doubt this new one will. -
New F1 movie. Anyone interested??
Pierre Rivard replied to gbdolfans's topic in General Automotive Talk (Trucks and Cars)
Absolutely! -
Donnie Allison's '74 Monte
Pierre Rivard replied to Belugawrx's topic in Stock Cars (NASCAR, Super Stock, Late Model, etc.)
You have produced an absolute winner. The body modifications fix all the kit's inaccuracies. Most impressive is the front end & bumper. It looks so spot on. The engine in this kit may be a bit generic looking but with all your added detailing and paint finishes the whole engine compartment now looks very cohesive. Altogether a most impressive replica of this beautiful race car. -
Nova Salt Flat Racer
Pierre Rivard replied to Pierre Rivard's topic in WIP: Other Racing: Road Racing, Land Speed Racers
Merci Francis. This one was built very fast. I did in 3 weeks what I usually do in 8. I just wanted it finished to clean up the bench for a self imposed 5 month break (travel and golf on the menu). I'm happy you like the result, one of these rare builds where everything falls in place. Even the weathered painting process, something I had not even tested came out good. Next project (fall) will not be so easy, a Fernando Pinto resin kit. -
1/25 Chevy Nova Salt Rat
Pierre Rivard replied to Pierre Rivard's topic in Other Racing: Road Racing, Salt Flat Racers
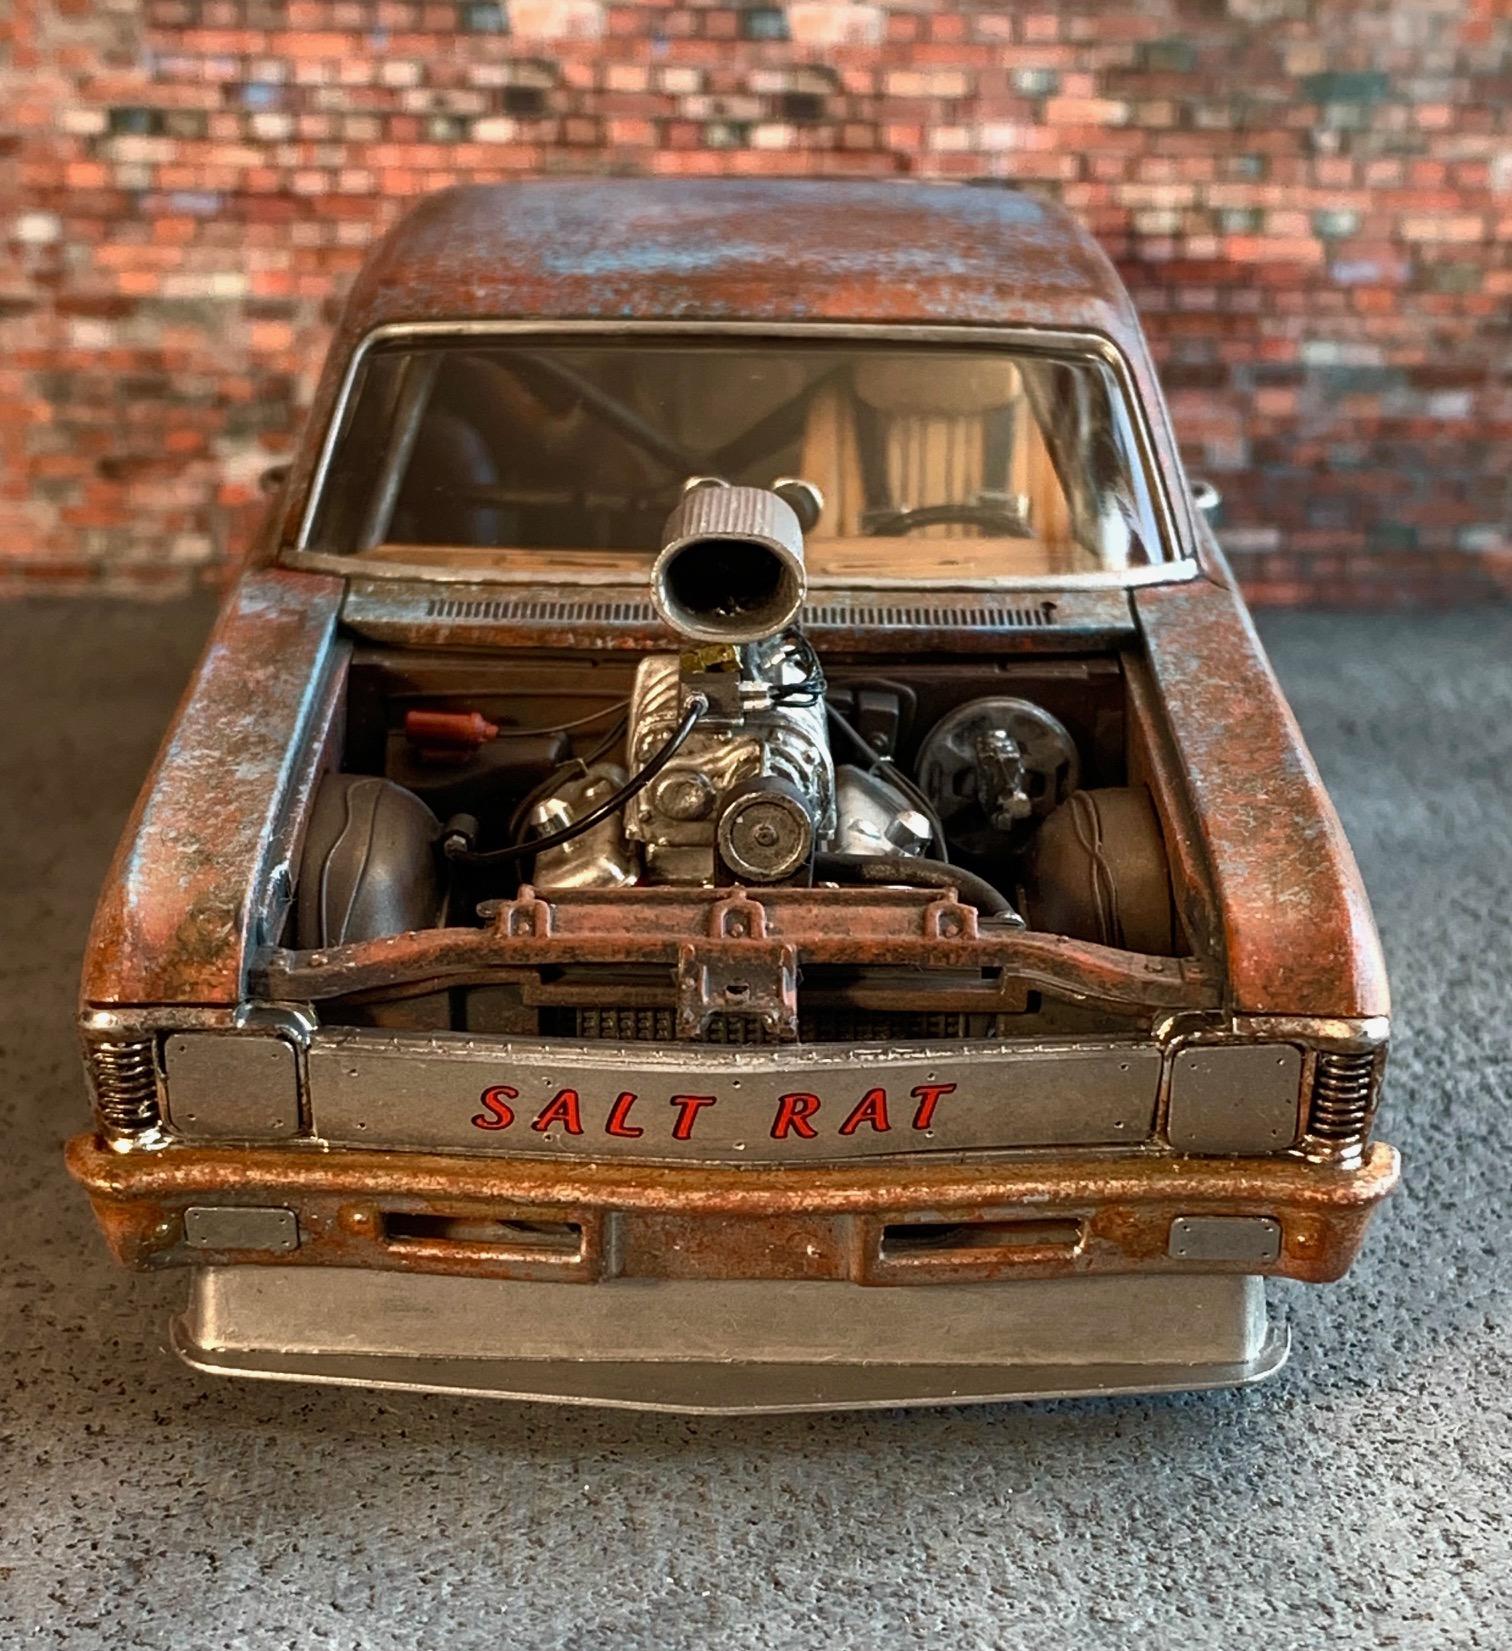
Thanks Rich. I usually try to replicate a real race car at a specific race venue, which requires research of facts and replicating it as best we can. In this case I did research salt racing but the car is is pure imagination. Refreshing change. Thanks Kyle. A strange combination but researching LSR at Bonneville indicated there are many many strange combinations out there. So why not? I have about 700 hp, was geared for 200 (foolish me) but inexperience, aero of a brick (well... it IS a brick), stability issues, not enough ballast... So we went 170 on the first run, spun on the return run. We'll be back next year... salt fever! -
Proof that simple vintage kits can be shaped into wonderful replicas when creativity, skills and resolve are fully leveraged. Fabulous effort!
-
1/25 Chevy Nova Salt Rat
Pierre Rivard replied to Pierre Rivard's topic in Other Racing: Road Racing, Salt Flat Racers
Thanks Ken. I built this thing too fast to fully enjoy it. I need that vacation! Thanks Chuck. Making our builds look like real cars is what we always try to do but only occasionally achieve. Thank you sir. I just painted a 12x12 board to match the salt and use my laptop screen as a background. Works surprisingly well. This new technique for creating this paint effect has produced surprisingly good results. Actually easier than trying for the perfect paint job. I like the look and will definitely repeat the experience. Thanks Larry, much appreciated. Like I said, I just found neat pictures and used my laptop screen as the background. Quick and easy but it does look pretty cool! You are so right Bill. Your words perfectly describe what this build is about. Thanks! Thank you sir, it is actually my first LSR build but I am fascinated with these so these is definitely more of them in my future Thank you Andrew. I ended up adding more details to this build than I initially planned but it has come together quite nicely. It helps when we start with a good quality kit such as this Revell Nova is. -
Lovely kit isn't it? Hang in there man!
-
Nova Salt Flat Racer
Pierre Rivard replied to Pierre Rivard's topic in WIP: Other Racing: Road Racing, Land Speed Racers
-
Nova Salt Flat Racer
Pierre Rivard replied to Pierre Rivard's topic in WIP: Other Racing: Road Racing, Land Speed Racers
Thanks Carl, much appreciated Thanks Charlie, actually much quicker than my usual pace due to a deadline to "close the shop" for travel. Well you are here now and that means a lot. Thanks for the constant support. Thanks a lot Chris. Mad a few mistakes with regulations but we showed up. Let's try to pass inspection! Thanks Mark. The weathering piece was tons of fun. Not bad for a first try. Likewise Claude, an immense pleasure to meet yesterday. Your job is to bug me until I cave in and participate in November. I think I could be convinced... Thanks Ken. Just posted under glass -
1/25 Chevy Nova Salt Rat
Pierre Rivard posted a topic in Other Racing: Road Racing, Salt Flat Racers
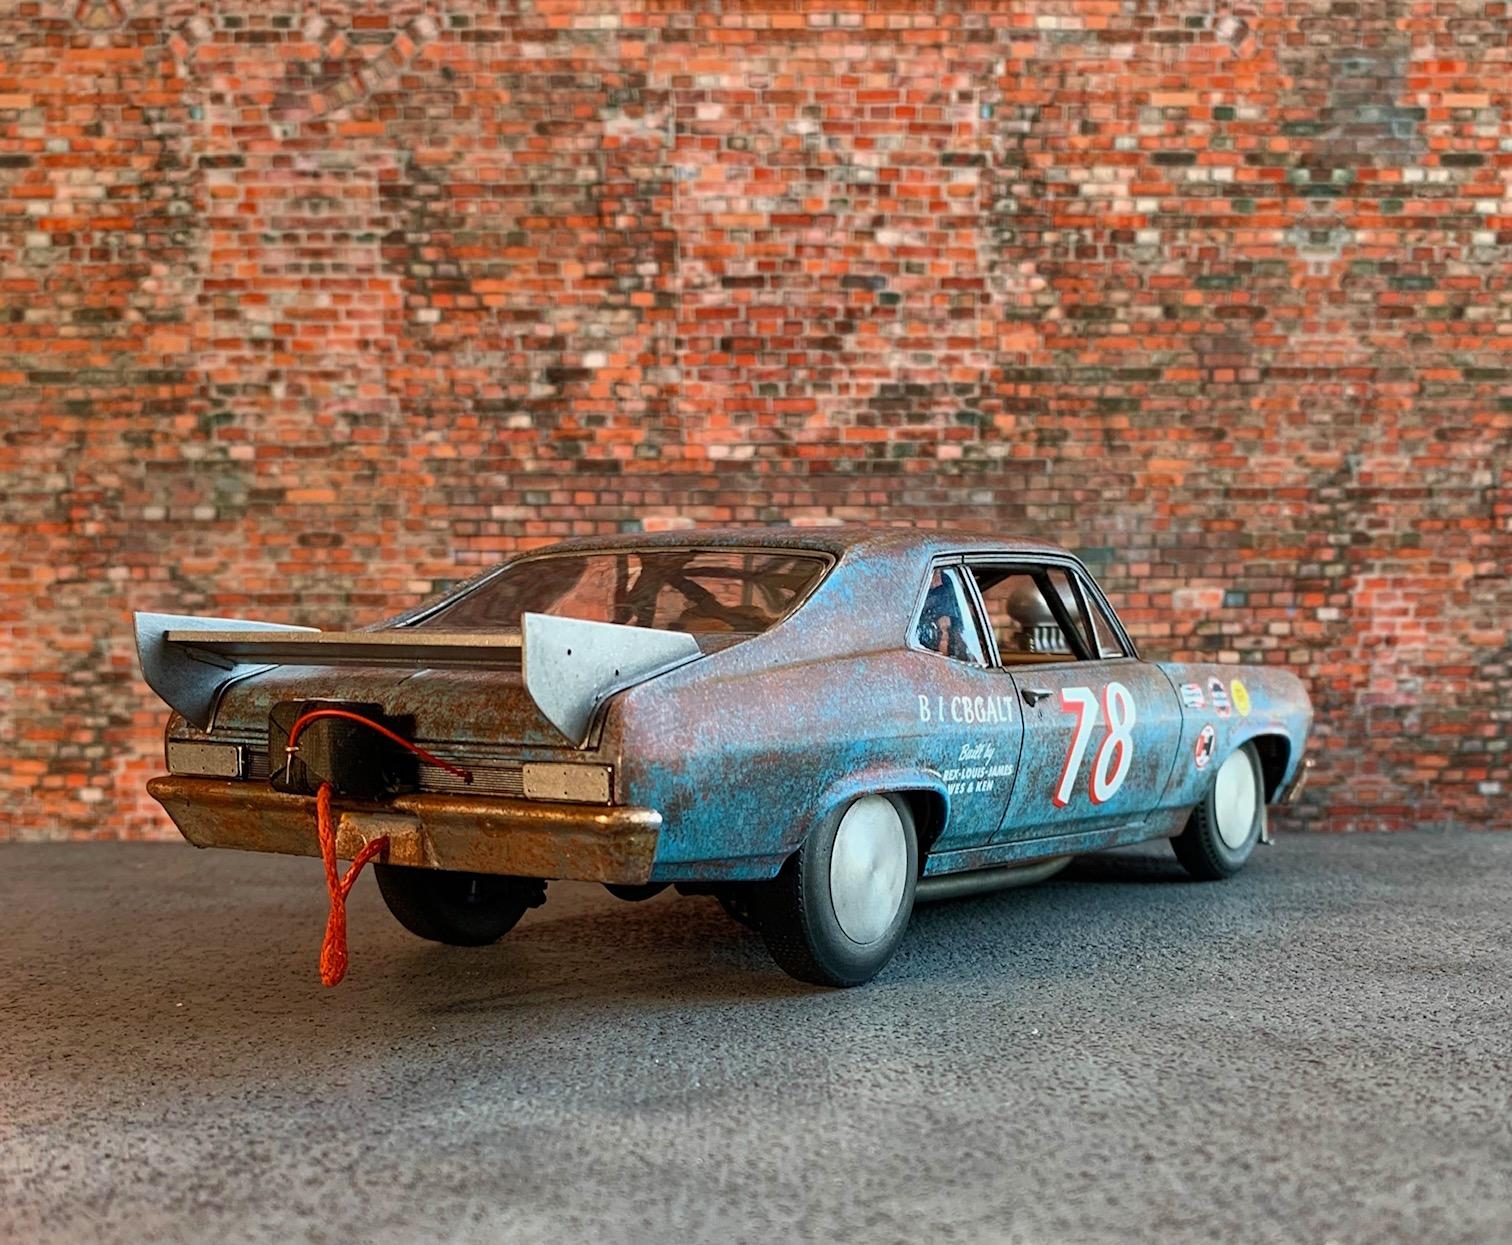
A bit off the wall. Imagine a low budget effort run at Bonneville. It starts with a barn find 72 Nova. The sun burnt paint with plenty of surface rust makes it look ratty but the structure is sound. Fix up the chassis, build a nice 427 with a 6-71 blower and Hilborn injection, add the mandatory roll cage and lets go racing! So it is an improbable, unrealistic endeavor but it adds up to a fun scale model build. I started with a Revell Yenko Nova kit and mashed in parts from the spares and some home made aero elements. Paints are all Vallejo acrylics either brush or sponge applied. The car was designed to run in the B engine size Classic Blown Gas Altered class. It looks like a rat but is meant to be a salt racer, so a SALT RAT it is.
- 36 replies
-
- 23
-

-
Nova Salt Flat Racer
Pierre Rivard replied to Pierre Rivard's topic in WIP: Other Racing: Road Racing, Land Speed Racers
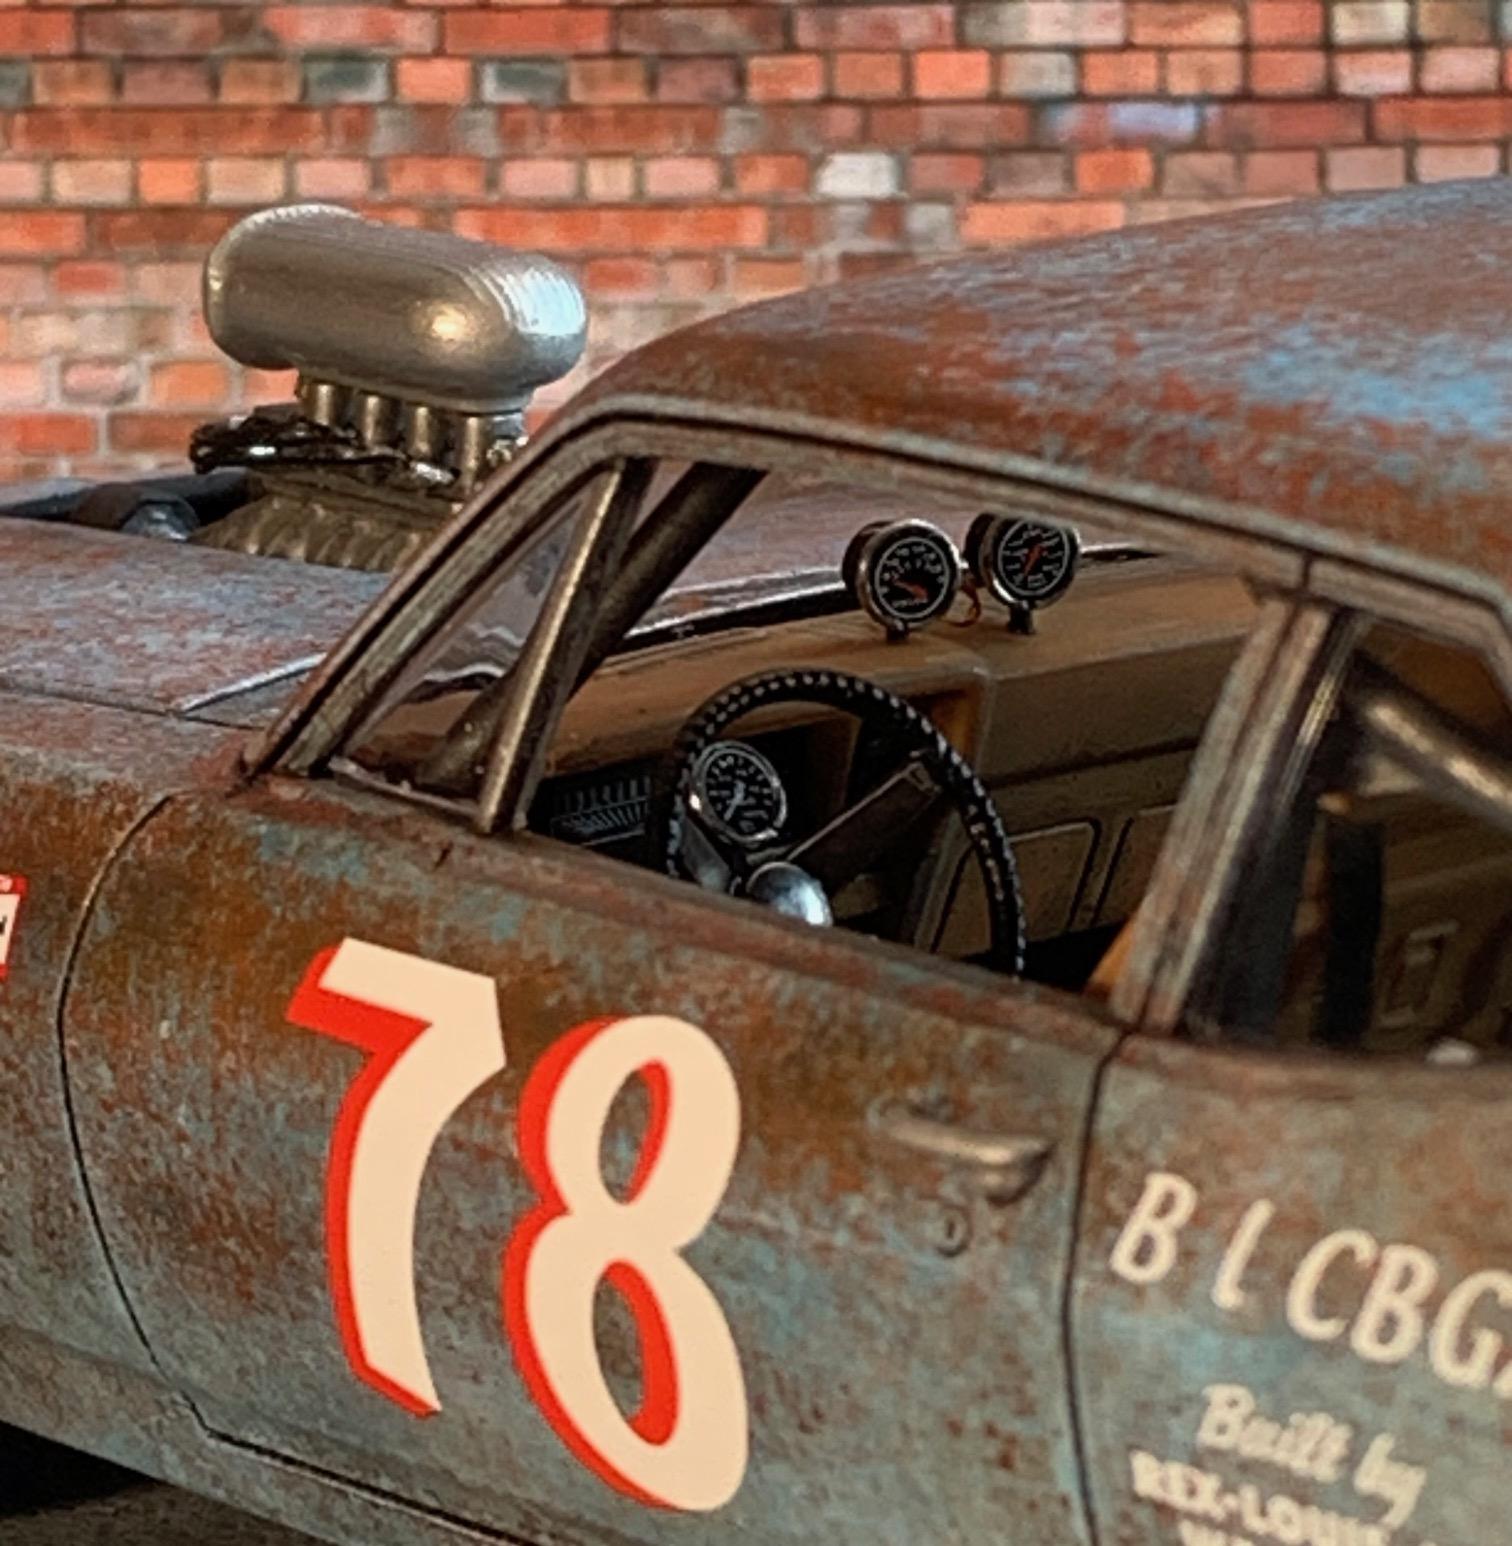
Made a parachute Re-did the rear wing which was too big. Brush painted aluminium and sponge finished with a slightly lighter shade to give it an unpainted aluminium look Engine installed and chassis installed to body, which allowed the final engine component sets to be integrated: ignition coil to firewall and inline fuel pump to right inner fender. I decided to leave the bumpers rusted, and fabricated sheet metal inserts to block off lamps and grille inlets Last item on the check list: exhaust dumps, made from 4mm Evergreen tubes with ends hollowed out. This one is done. I'll try to post photos underclass tomorrow.
- 128 replies
-
- 10
-
-
Nova Salt Flat Racer
Pierre Rivard replied to Pierre Rivard's topic in WIP: Other Racing: Road Racing, Land Speed Racers
Last set of updates for this build I had to rush to finish. I wanted it done before final preparations for an extended vacation. Aero hubcaps are from Parts by Parks. Original finish on first photo. I flat cleared them and added graphite dry pigments (photo 2)
-
Nova Salt Flat Racer
Pierre Rivard replied to Pierre Rivard's topic in WIP: Other Racing: Road Racing, Land Speed Racers
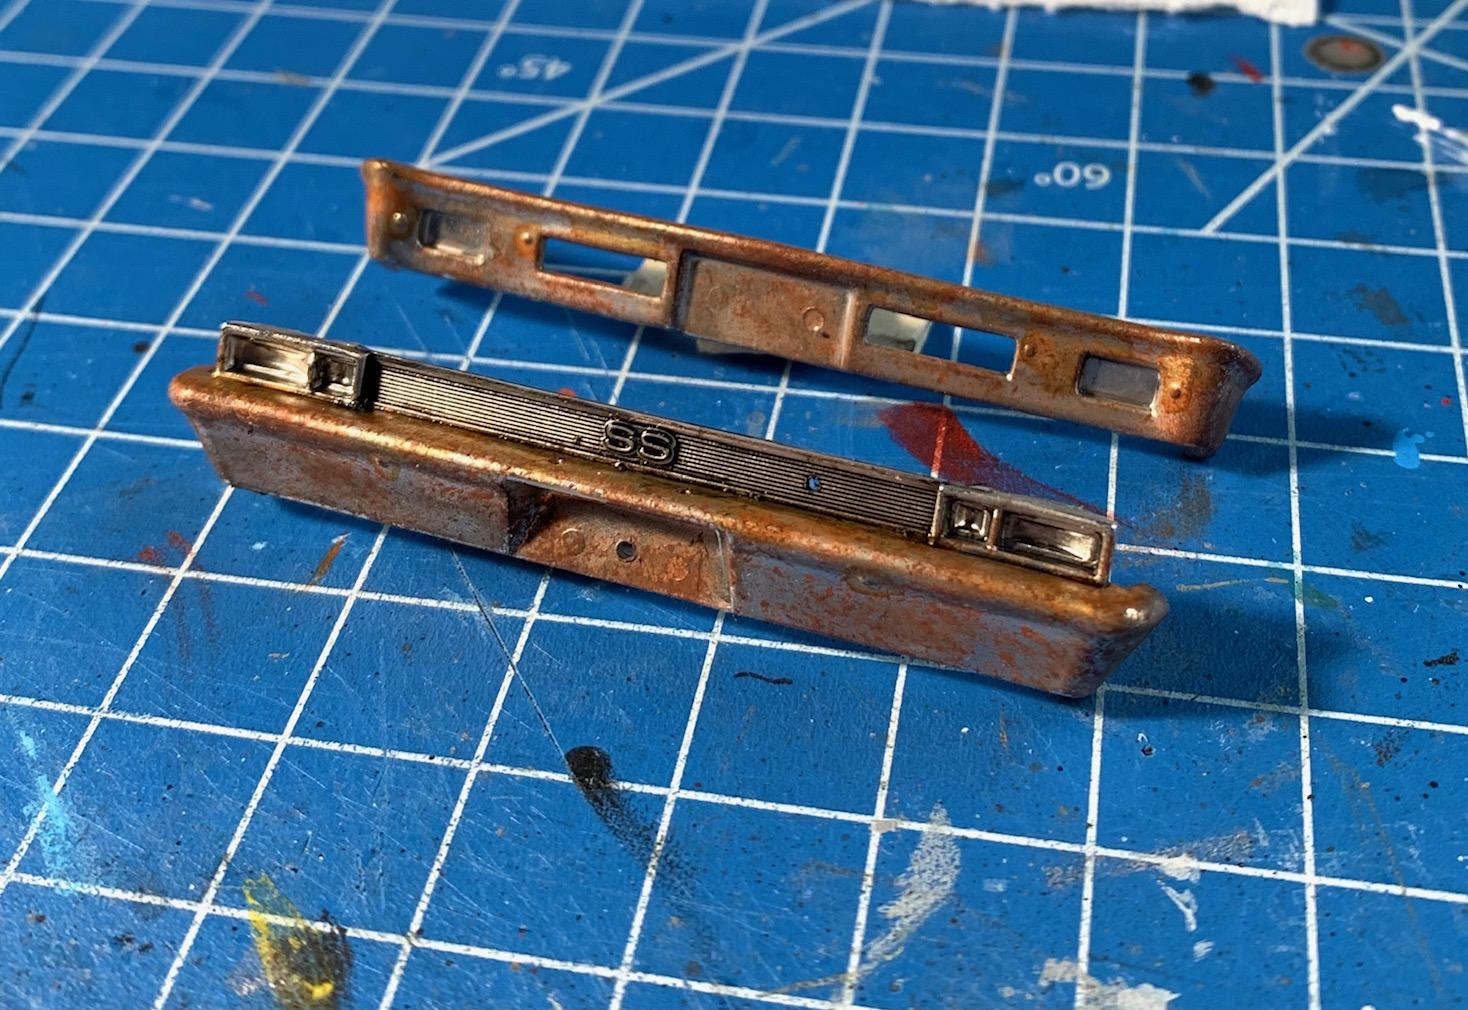
I have a question? I finished the bumpers with rust effects. I'm not sure it is good enough, and perhaps too much of the rust theme here. I'm considering stripping them and going for a black finish. Might make the car look a bit more sinister. So what do you guys think, keep the rusty chrome or go with a black finish?
-
Nova Salt Flat Racer
Pierre Rivard replied to Pierre Rivard's topic in WIP: Other Racing: Road Racing, Land Speed Racers
I fixed my big boo boo with the roll cage and dash fighting for space. Interior may not pass inspection but it is finished.
-
Nova Salt Flat Racer
Pierre Rivard replied to Pierre Rivard's topic in WIP: Other Racing: Road Racing, Land Speed Racers
Thanks for providing valuable insight Chris. I have extremely limited knowledge and obviously making mistakes here. I'm dating this build to a 1995-2000 run and (wrongly) assumed rules were not as strict then. If you are shooting for 250, does that mean you already have your red hat? -
ARII Chaparral 2C
Pierre Rivard replied to Mark W's topic in WIP: Other Racing: Road Racing, Land Speed Racers
Brown or unpainted fiberglass inside, black padding for the driver seat, brown/bare fiberglass for the passenger "seat" -
Nova Salt Flat Racer
Pierre Rivard replied to Pierre Rivard's topic in WIP: Other Racing: Road Racing, Land Speed Racers
I started with Gofer lever type belts but ended up using only the 4 elements latching together (end of each strap). The shoulder adjusters were excessively fragile so I went to spares for these. The Gofer straps are also too wide for my taste (about 3mm) so I went with narrower straps from the spares. -
Nova Salt Flat Racer
Pierre Rivard replied to Pierre Rivard's topic in WIP: Other Racing: Road Racing, Land Speed Racers
And not so great stuff that needs serious fixing. After I mocked up everything I decided to make a change the front cage post... and forgot to check again. Dash panel butchery in process...
-
Nova Salt Flat Racer
Pierre Rivard replied to Pierre Rivard's topic in WIP: Other Racing: Road Racing, Land Speed Racers
Thanks Niko, the interior does not look inviting but it was on purpose for this build. Funny.... I thought I had stolen this from you? The shifter is just a pin from the jewelry section at Michael's, the booth is inspired by MarkJ's method. Steal is such an ugly word... Good tip Noel. I need to try that. The braid belts don't look too convincing. Thank Mark for that. Pretty easy and effective. Thanks Phil. I like to try new ideas. Might even do a Deuce! 😄 -
The fuel tank does have a nice metal motif. Your efforts to color/texture variations really works here. Double bonus points for doing that on a part that will be covered by the body.
-
Thanks Jim. Same here, such a beautiful race car Got mine on E-bay, waiting patiently for a reasonably priced sealed box. Bonus picture, with the big dog of 1966. Luke or Dark Vader?
-
Early '50s Bonneville Streamliner
Pierre Rivard replied to W-409's topic in WIP: Other Racing: Road Racing, Land Speed Racers
The chassis set up looks very promising. The rear axle & spring arrangement looks exactly like the one on the early 50's Goldenrod. Are you setting this build with removable panels (or complete body) to allow a good view of the chassis/drivetrain/cockpit? Cool project!