Pierre Rivard
-
Posts
2,579 -
Joined
-
Last visited
Content Type
Profiles
Forums
Events
Gallery
Everything posted by Pierre Rivard
-
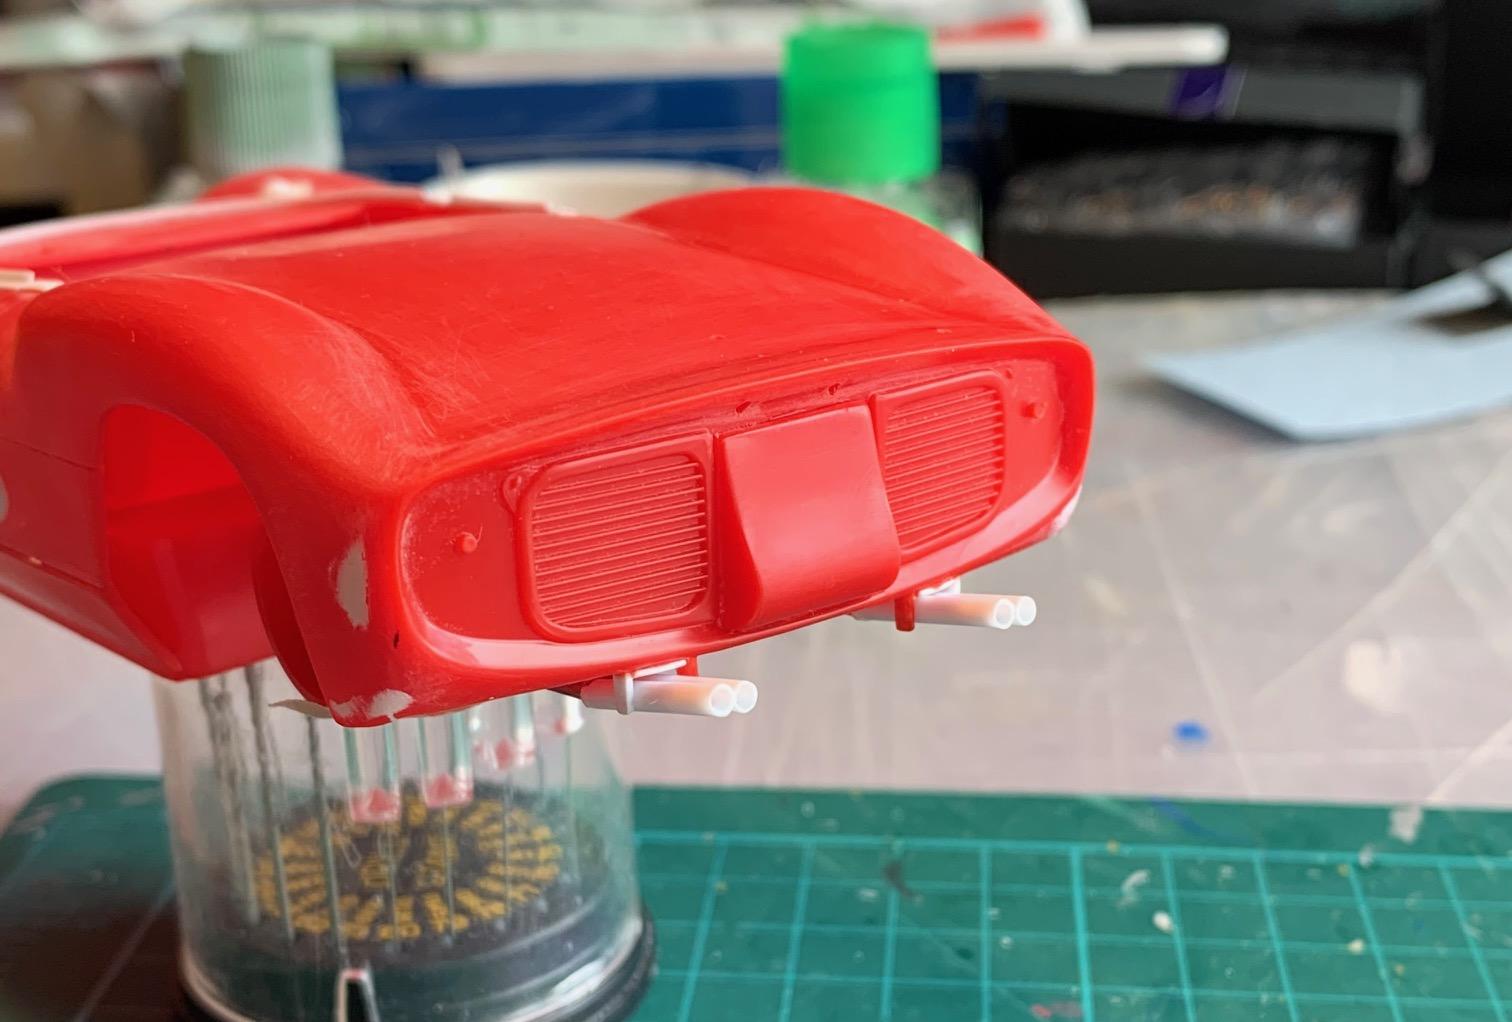
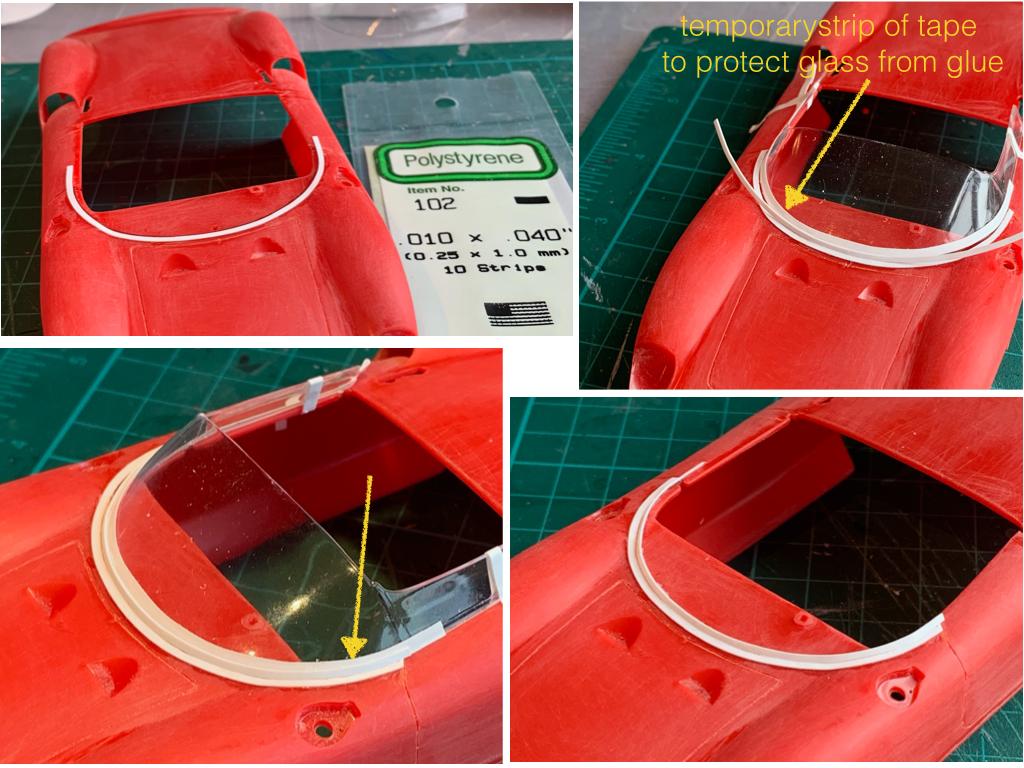
Drilling o.5mm holes in canopy flange I fabricated. I'll be inserting 0.5mm silver painted bits at the end of the build to simulate the little rivets holding the trim pieces to the body. Slight mods to front end to reflect the opening as the car was. The kit only had one opening. I also added hooks for hoisting the car at pit stops. On the back side I built better exhaust outlets with drilled 2mm rod. The body is now ready for prep and primer apply.

-
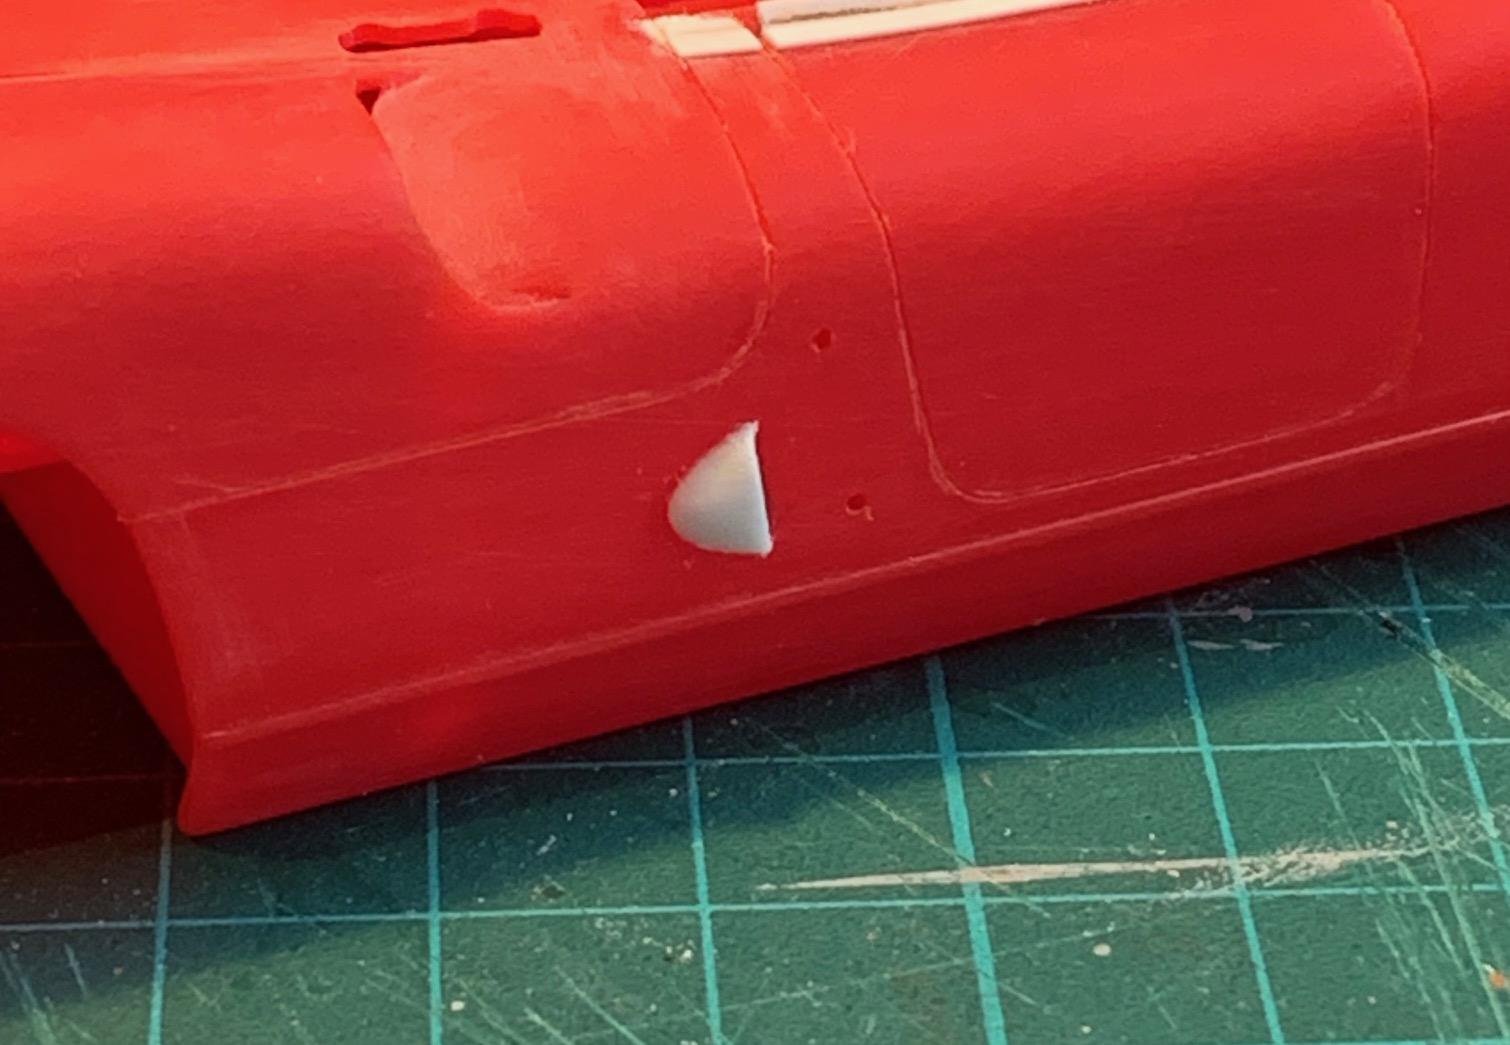
4 lite scoops needed to be added on this car. two that I assume are fro rear brake cooling and two adjacent to the hood, use unknown. starting with 4mm and 3,2 mm tubes, slice end piece at an angle. Some putty to smooth out these to be added after glue has dried up.
-
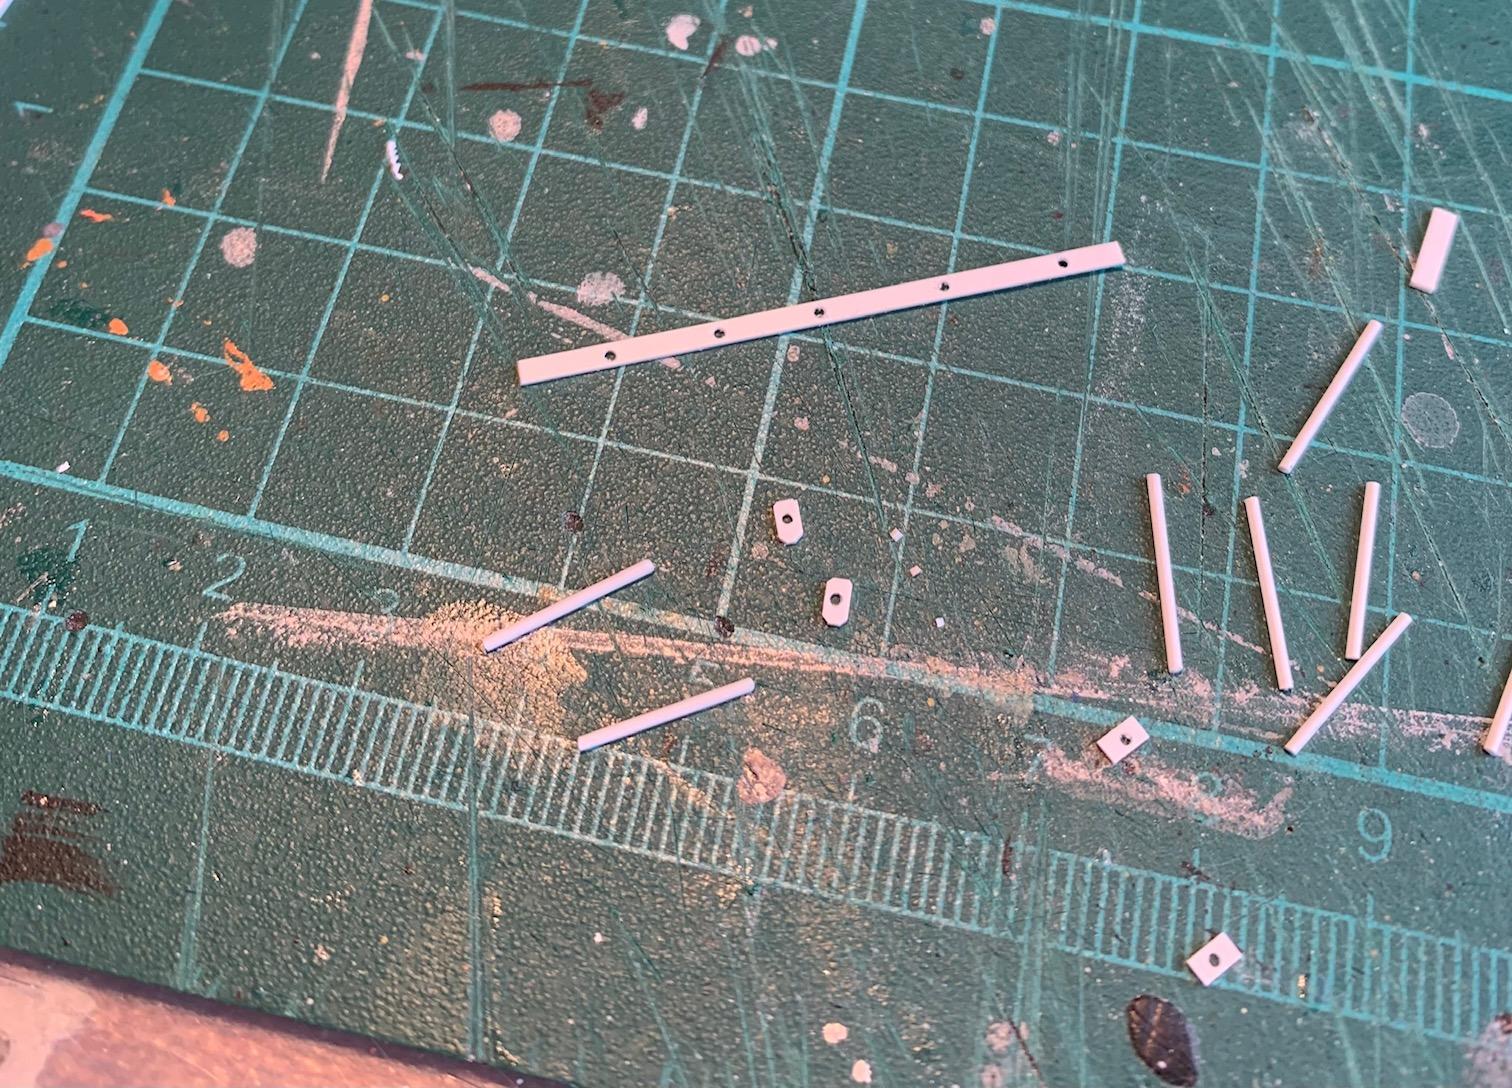
I sanded off the marker lights for racing number ID on the body sides and making my own with pins, so I can finish them separate from the body. Total of 8 needed for this build. A bit of finesse sanding to be done when prepping for paint.
-
To WIP or not to WIP
Pierre Rivard replied to atomicholiday's topic in General Automotive Talk (Trucks and Cars)
If we don't show our work and exchange learnings and ideas what's the use of the forum? The w.i.p. section is my absolute favorite. You see cool stuff happening, discover ideas and get inspired by subjects I might want to build someday. I post w.i.p. of my builds unless they are just OOB that do not have special issues. That's rare though because I always make changes to my builds. I do w.i.p. not because I think I have really special stuff to show but yes, occasionally, I might come up with an idea useful to others. The main reason for me is that I love the exchange of ideas with other builders and I welcome them posting ideas or tips on my own thread. It keeps things going and helps me figure out solutions along the way. -
Getting there. Still need to clear the wheel issue. That's right after I'm done with body mods.
-
Don't, I like the input. Keep it coming.
-
Yup, that wiper blade thing scared me but in the end it was pretty easy to do. Working on these old kits is always fun.
-
Thanks Maxx. I'm making it up as I go. If you have any ideas don't hesitate to jump in.
-
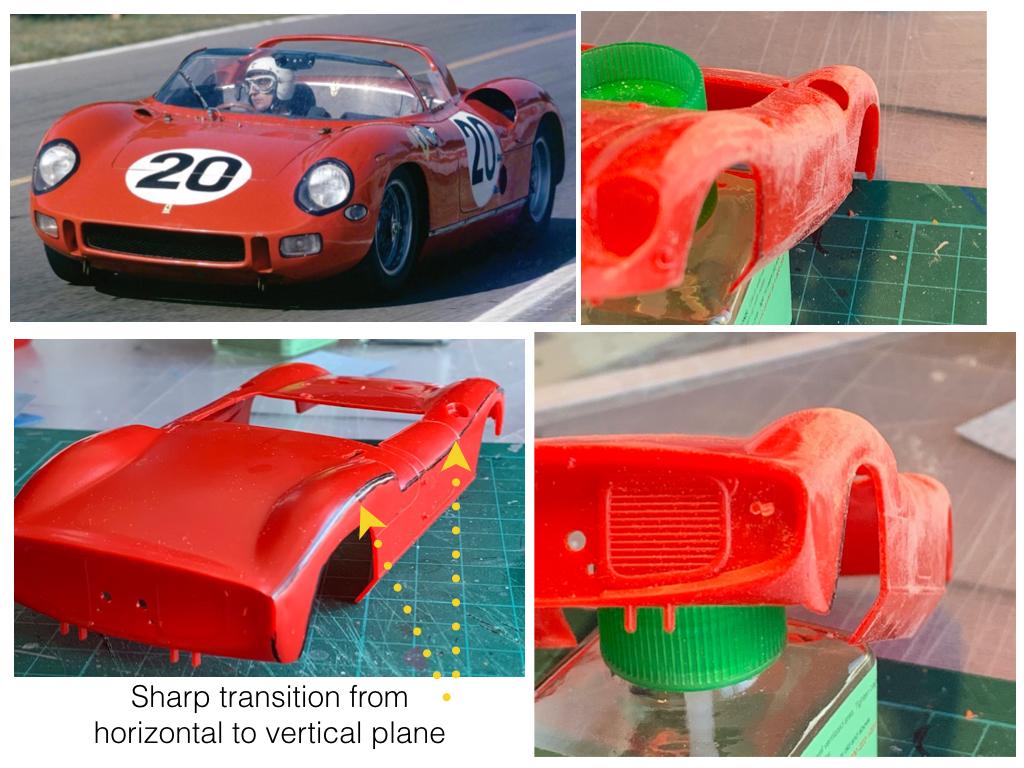
Work started on the body. Initial job was to try to correct the shape that looks odd to me. The 275P is a bit slab sided by design but the way the body is molded exaggerates the effect because the transition from horizontal to vertical planes is very abrupt. I was able to remove a significant amount of material thanks to the fairly thick casting. I also tackled the canopy to body integration, starting with taking out the molded in wiper, a first for my and quite a stressful operation.
-
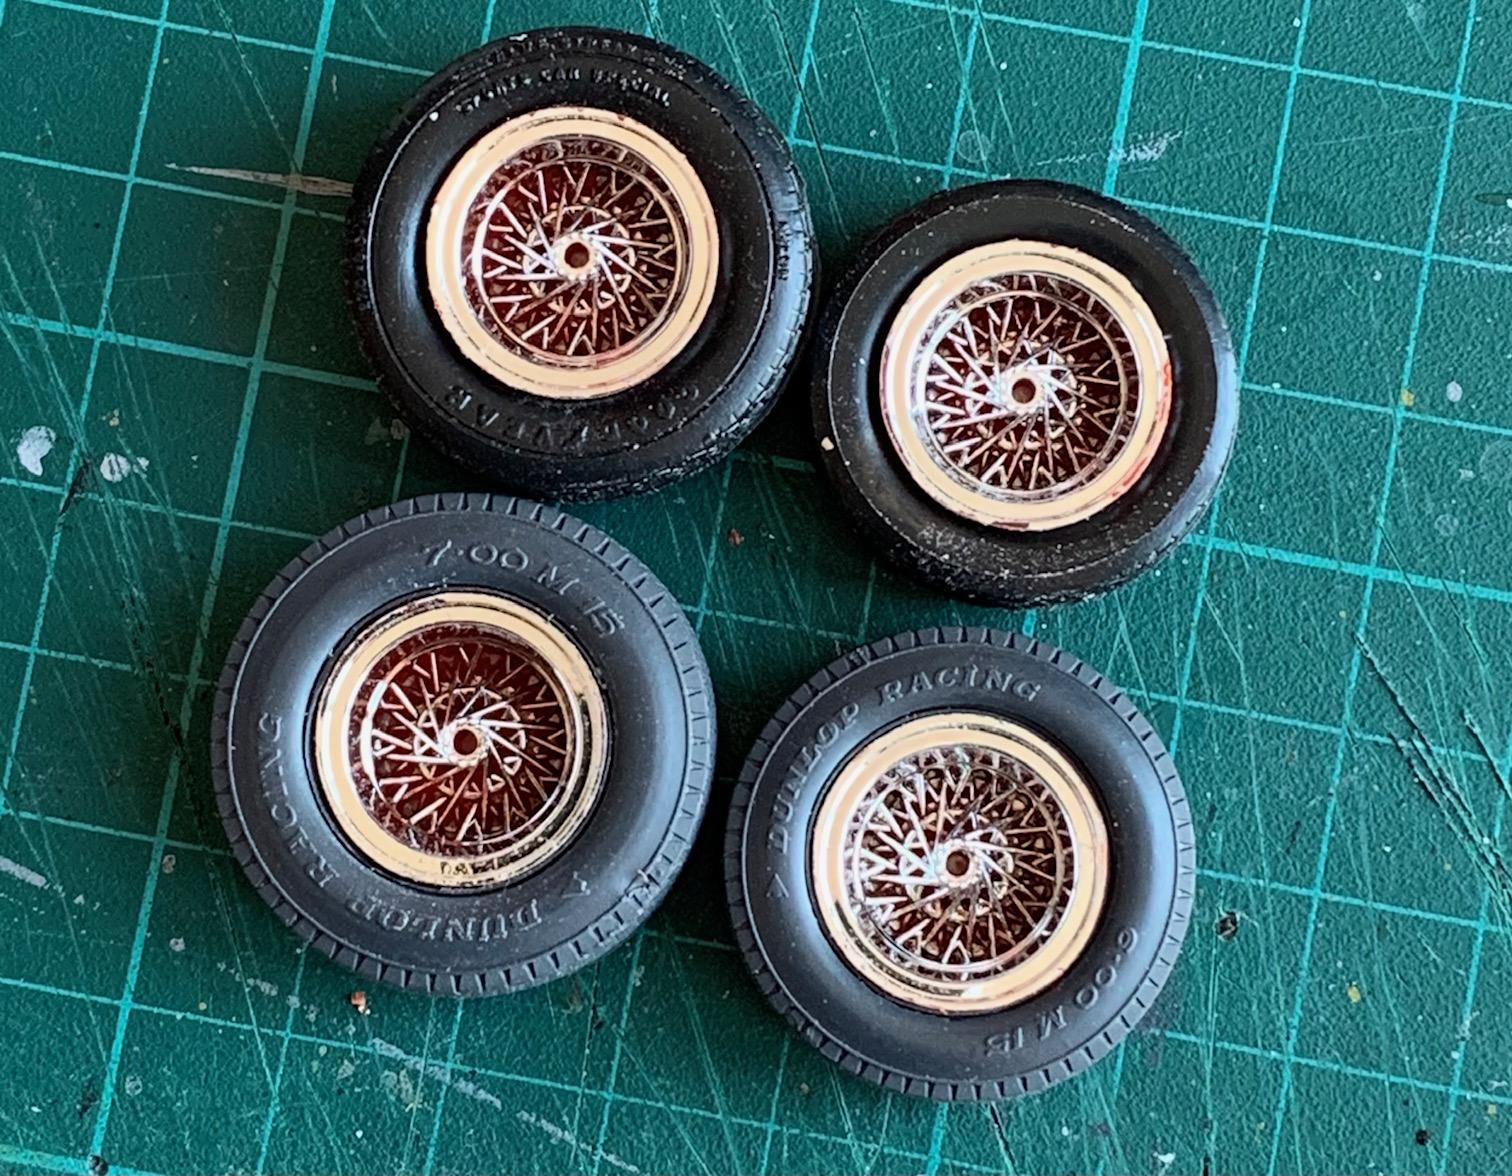
Looks like you have found the parts needed to solve the issue of the front and rear wheel configuration. The Protar wheels are indeed very finely cast. You have not explained what the Italeri parts are from though. Looks like the most useable of the 3 tires is the Monogram. Hope you will do the wheel/tire set and post. I don't have these parts available but working on an idea I will share when I get the parts together.
-
yup, underside of body shell has "Monogram c 1964" molded in. It's crude but I'll try to make it more presentable.
-
1963 Super Torque Ford
Pierre Rivard replied to MarkJ's topic in WIP: Stock Cars (NASCAR, Super Stock, Late Model, etc.)
Looking good Mark. A lot of carving and sanding needed for these Galaxies but they look so good when you transform them into race cars. Your Fireball Galaxie was the inspiration when I tackled one of these 2 years ago. -
Alan Moffat 1969 Boss Trans Am Mustang
Pierre Rivard replied to Dave B's topic in Other Racing: Road Racing, Salt Flat Racers
It was worth the wait Dave. Beautifully done, I am particularly impressed by the flares which flow seamlessly into the body sides. Lots of mods needed to transform it to the exact replica of the race car but that's what scale modeling is all about. Bravo! -
Excellent model Matt. 1/8 must be tough because the detailing is so visible. This car is one of the F1 giants and you pulled off a beautiful replica.
-
70s Era Asphalt Modified
Pierre Rivard replied to OldNYJim's topic in WIP: Stock Cars (NASCAR, Super Stock, Late Model, etc.)
Just caught up with this one Jim. You do beautiful work and your printing of nuts & bolts adds tons of realism. Superb work overall! -
This is incredible work Daniel. The level of detailing and finishes is mind bogling. Scratch building extraordinaire! Can't help but shake my head thinking of these old dragsters with the engine ahead of the driver, with the risk involved with blow ups. And to think that axle diff is so close to...well you know!
-
Thanks Helmut for pointing out. That P2 was listed in the Motorsport Images database of the 64 race and I did not spot the mistake. Anyhow, I've decided to go for chassis 0816 as the 64 Le Mans winner. I am also getting a better handle on why the Dunlop tires look so big on my mockup. I measured the body vs specs of the 250/275 P body. The ratio is 1/25.4 on length and both wheelbase and body width are at 1/25. So it's a 1/25 scale kit, not 1/24. The kit tires don't look so good but they are a good size at 1/25 scale.
-
Still working on my tire solution. I re-did my search of tire dimensions on the 275P. Dunlop rears were 700M15 with a 706mm diameter scaling to 29.4mm at 1/24 The fronts were 500M15 with a 648mm diameter, scaling to 27mm at 1/24 The HRM Dunlop on my mockup are 30mm rear (0.6mm oversized) and 27.9 mm front (0.9mm oversized) The kit tires are 27.7mm rear (1.7mm undersized) and 25.5 front (1.5mm undersized) New mock up with both tire sets. Which looks more balanced? The slightly oversized Dunlops or the significantly undersized kit tires? Go figure...
-
Great insight Helmut and you got me thinking what I need to do here. I'm honing in on 64 Le Mans for my subject. There were 6 Ferrari P cars in that race and an interesting mix. 3 275P entries, #20 (the winner) and #22 had the 63 body style, #21 had the new 64 body. 3 330P entries, #14 and #19 had the new body but #15 had the 63 body. I scanned the Motorsportimages files and came up with these comparisons. My learning is that the differences between the 63 and 64 bodies were much more substantial than I had originally perceived, different back end, front end & hood, engine air inlets, airfoil, windshield angle etc. A big learning for me.
-
The rad has that perfect polished metal look. I hope the Molotow paint holds up. It's spot on for appearance.
-
First item is looking at tires. The kit tires are not good, too wide but mostly they have a very poor thread definition and embossed Goodyear lettering. I could work around that but digging in the stash I found a set of resin Dunlops from HRM and they look much better if a bit oversized in diameter, by an equivalent 1.3 inch for the fronts and 1.1 for the rears. Using kit wheels as place holder in pictures and the mock up, until I receive the set I ordered. Mockup compared to full size car (chassis 0818). The profiles are not identical but reasonably similar. Making a list of items I will need to address on the body.
-
Thanks Gary, I did not know about these. Now I don't have to fit my build to whatever decals I have in my spares.
-
Thank you Steve, I appreciate the offer but I think I'd like to do a version that retains the original body design with the wing/roll bar, so 63-64 campaign.
-
1963 Super Torque Ford
Pierre Rivard replied to MarkJ's topic in WIP: Stock Cars (NASCAR, Super Stock, Late Model, etc.)
Absolutely agree. You're making something here. These old NASCAR are very interesting subjects providing you want to put the work in, and you obviously are my friend. -
Well...0820 as it finished would be interesting...but ugly! As I am researching a bit about this line of 250/275/330 P, which frankly I know nothing about, I realize that the back end configuration changed along the way in a bigger way than I thought. I'm not sure what chassis / when the change happened. The kit is clearly based on an earlier version. I might be able to change it but not sure If I could do it justice. Gotta think about this. Advice & info from the experts are most welcome.