Pierre Rivard
-
Posts
2,579 -
Joined
-
Last visited
Content Type
Profiles
Forums
Events
Gallery
Everything posted by Pierre Rivard
-
Wow John, such inspiring work. I just took a class in body alteration techniques. Awesome, awesome build in so many ways. Where did you get the elbow line fittings?
-
Front engine Ferrari for sure. 315S or 330 LM TRI are very tempting...
-
Go for it Steve, and please share the progress along the way. as you know the kit is basic and needs a good dose of TLC, but it's such an important car. Thank you Jon. The support is heartwarming. Thanks Kurt. I love your work on Ferraris, quite elaborate transformations. Very imaginative. Thank you Daniel. I marvel at what you do with metal. I think it is safer for me to stick to styrene Thank you Bill Appreciate the feedback Roger. Thanks JC. I do my best to apply some of the lessons from professor Reckner. I agree. For me fixing the body shape was number one and the wheels right after. I got these printed wheels from Jack Modeling in France. Fronts are as printed and the rears I modified. They do add a good dose of realism to the model.
-
Thanks Rich. I'd love to see this Ferrari display of your's. Must be awesome. Thanks Jim, appreciate the interest and support. Thank you Helmut. Your input is always so valuable. I very much enjoy our exchange of ideas and I hope you will post updates on your 275P build. No doubt it will be great, Thanks Jason. I was puzzled by this one until I realized what was wrong with the shape of the body, which in the end was easily fixable. The rest was all about adding the detailing and it suddenly looked more model than toy. Worked out better than I initially thought it would. Thank you Bruce. A few of these, like the leather straps, were a first for me and I am pleased with the result. Merci Mr Dauphinee. Support much appreciated.
-
The body looks mighty fine Mike. What's the plan for the chassis, just use the MPC stuff or going for a more accurate reproduction?
-
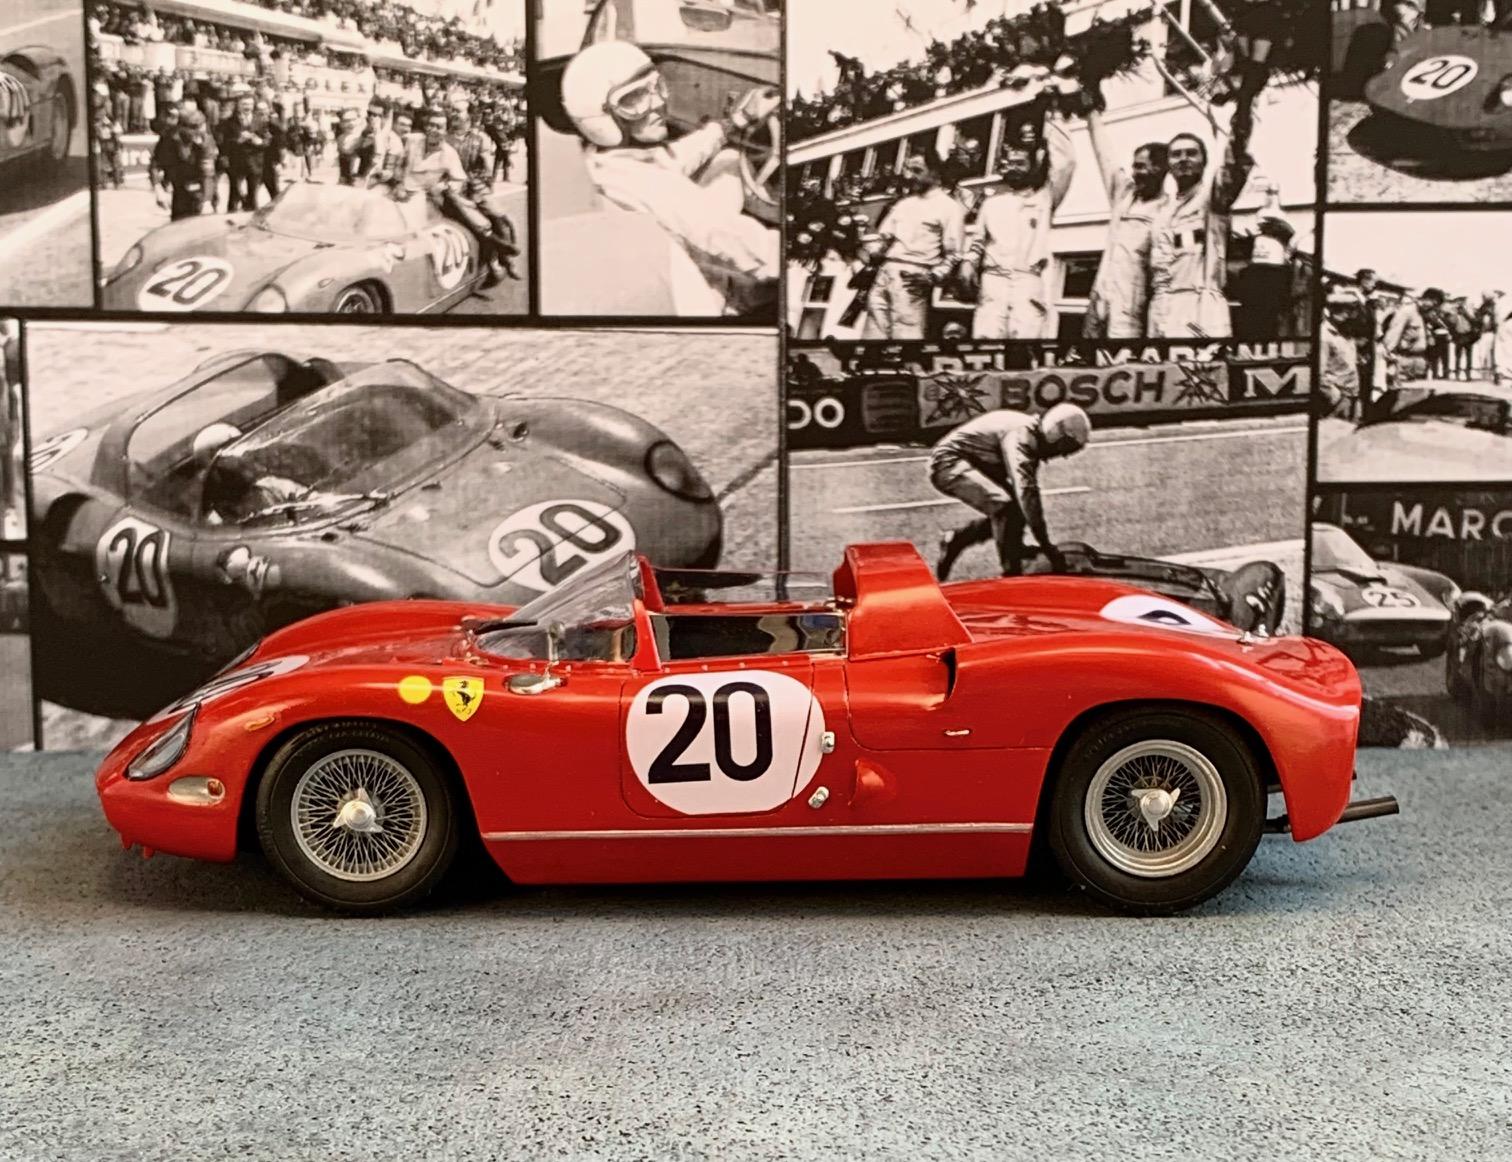
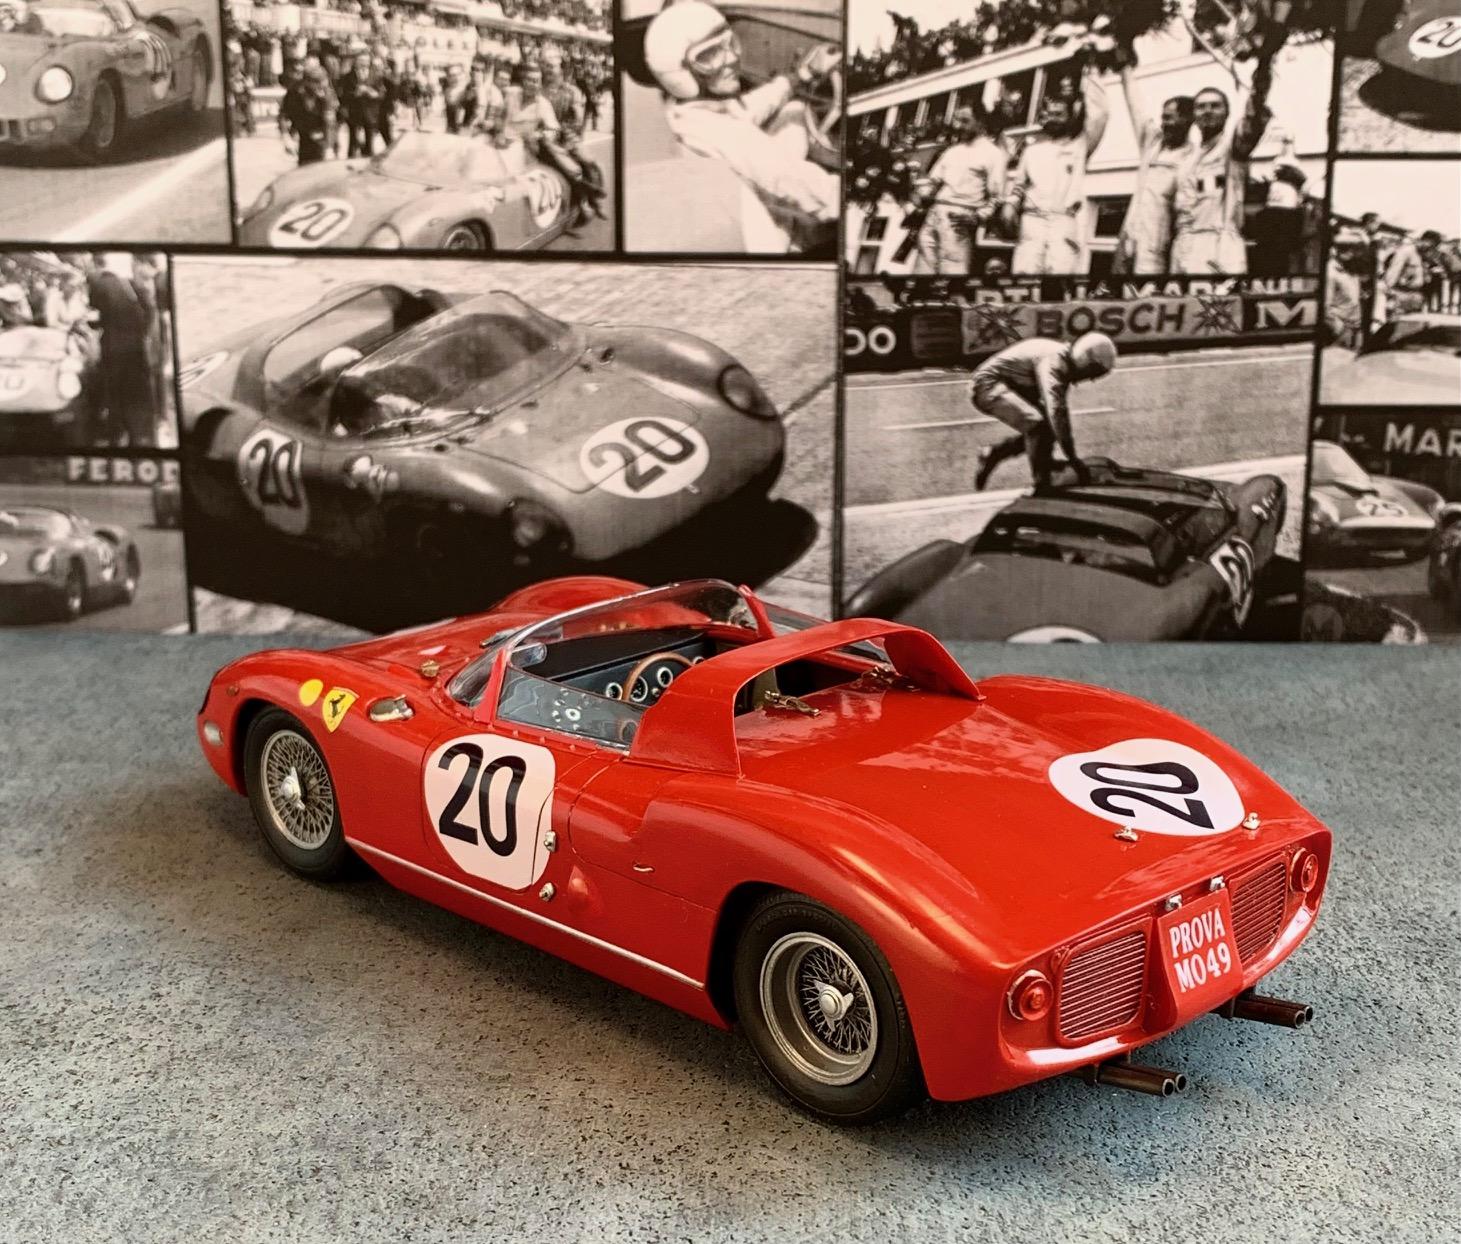
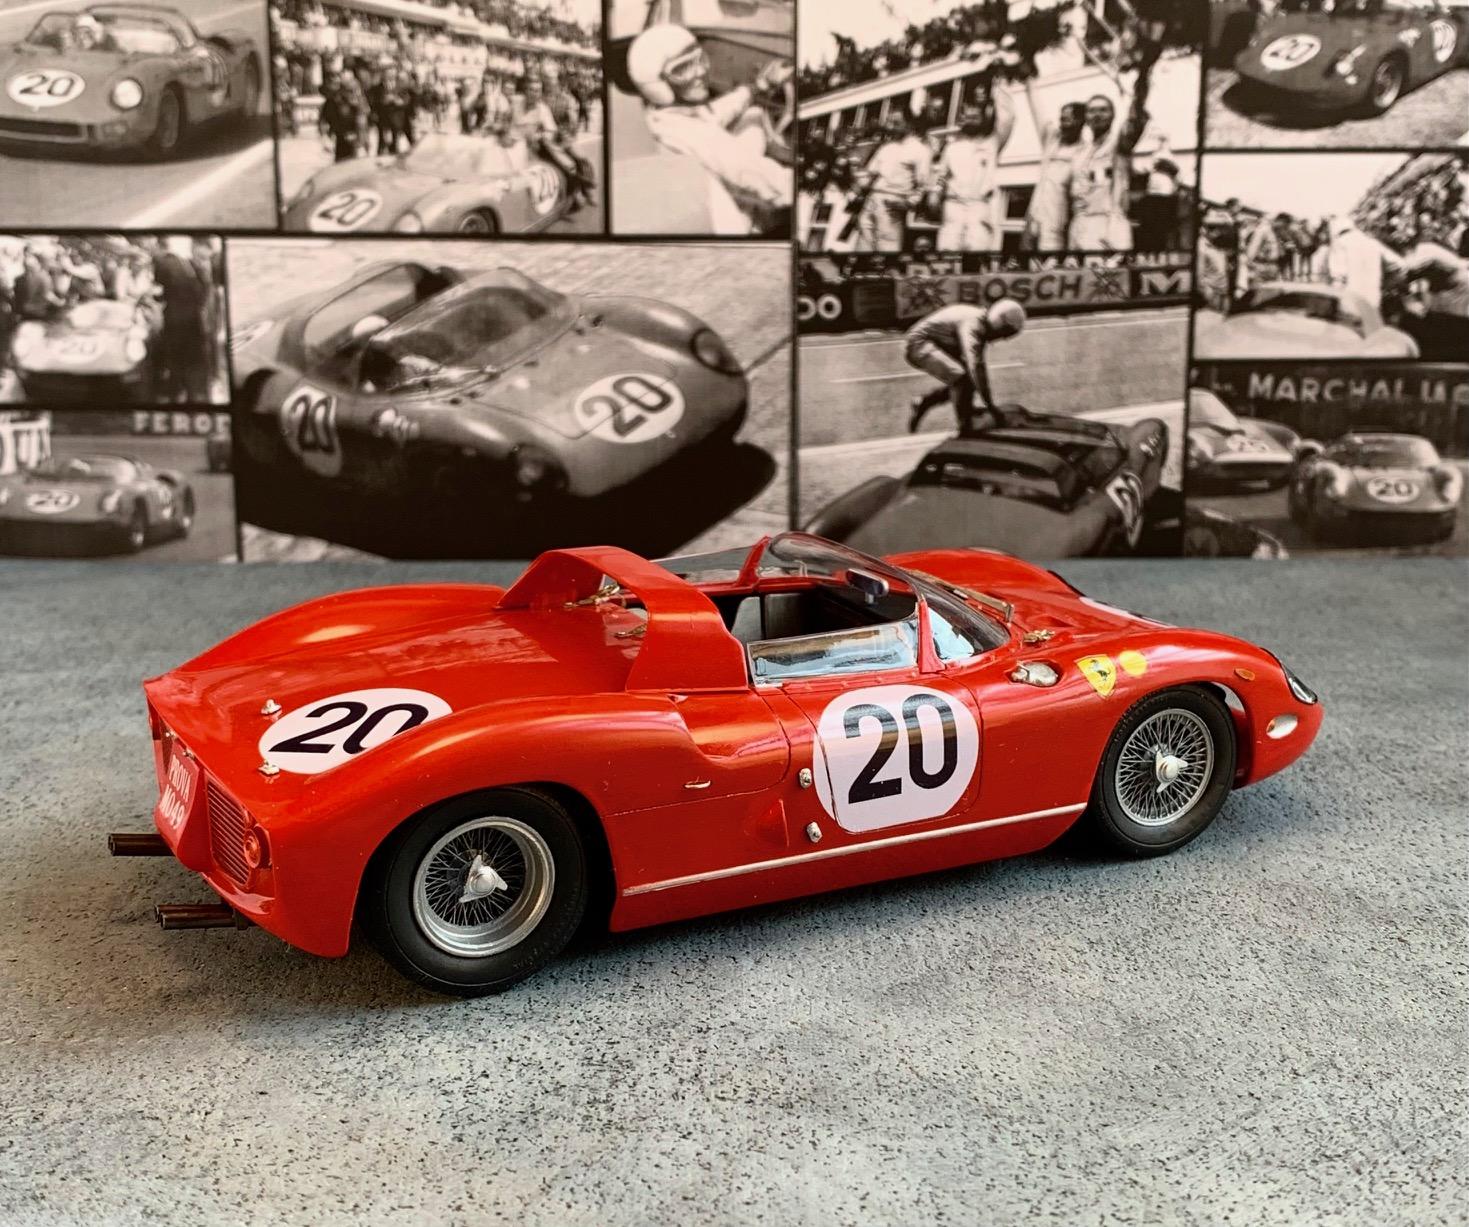
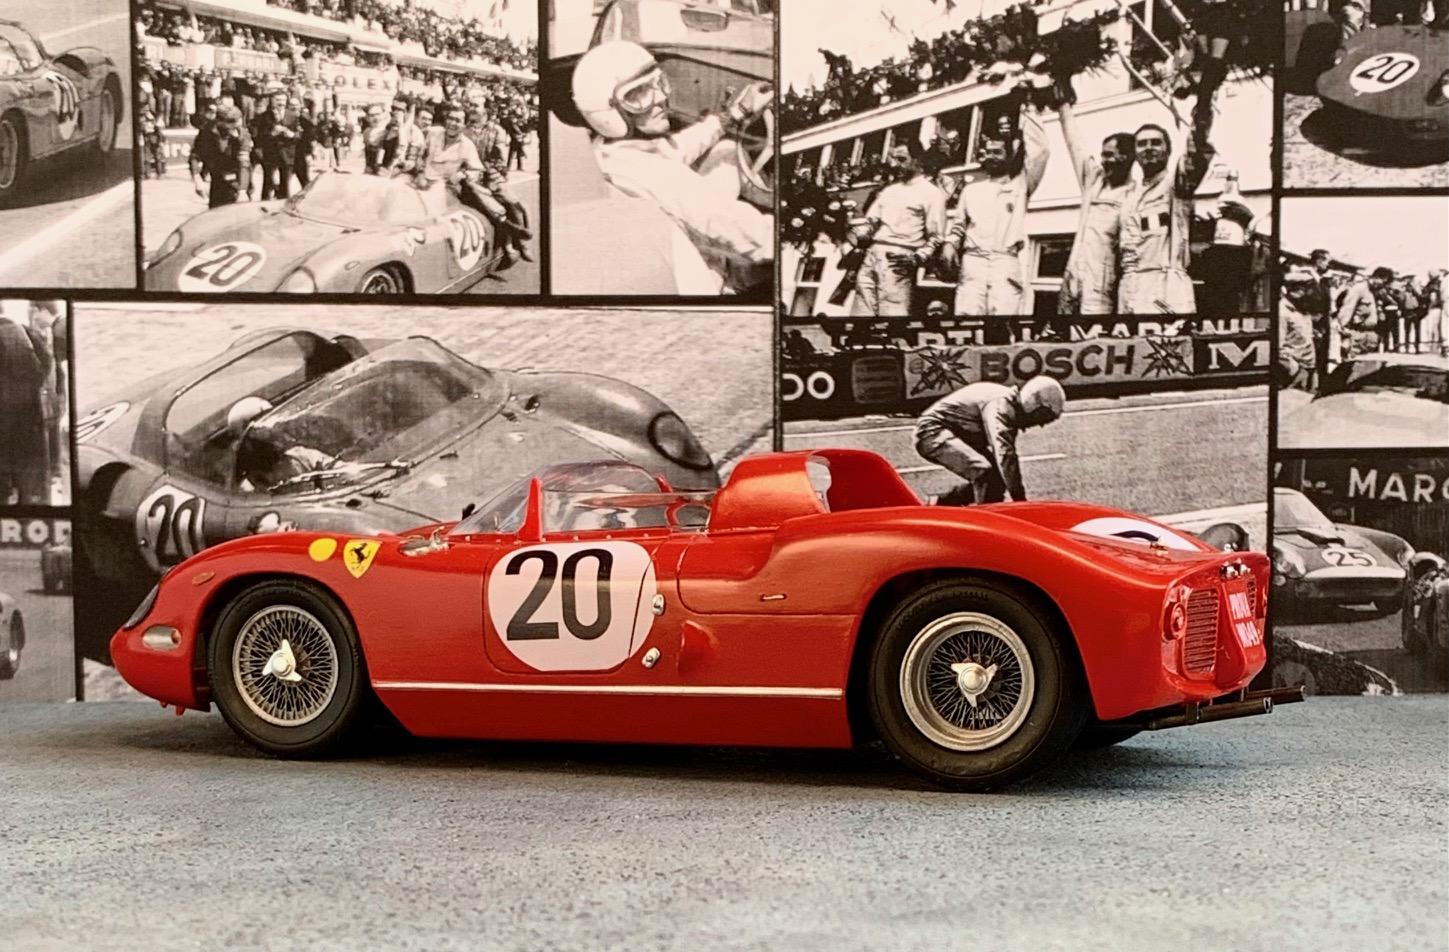
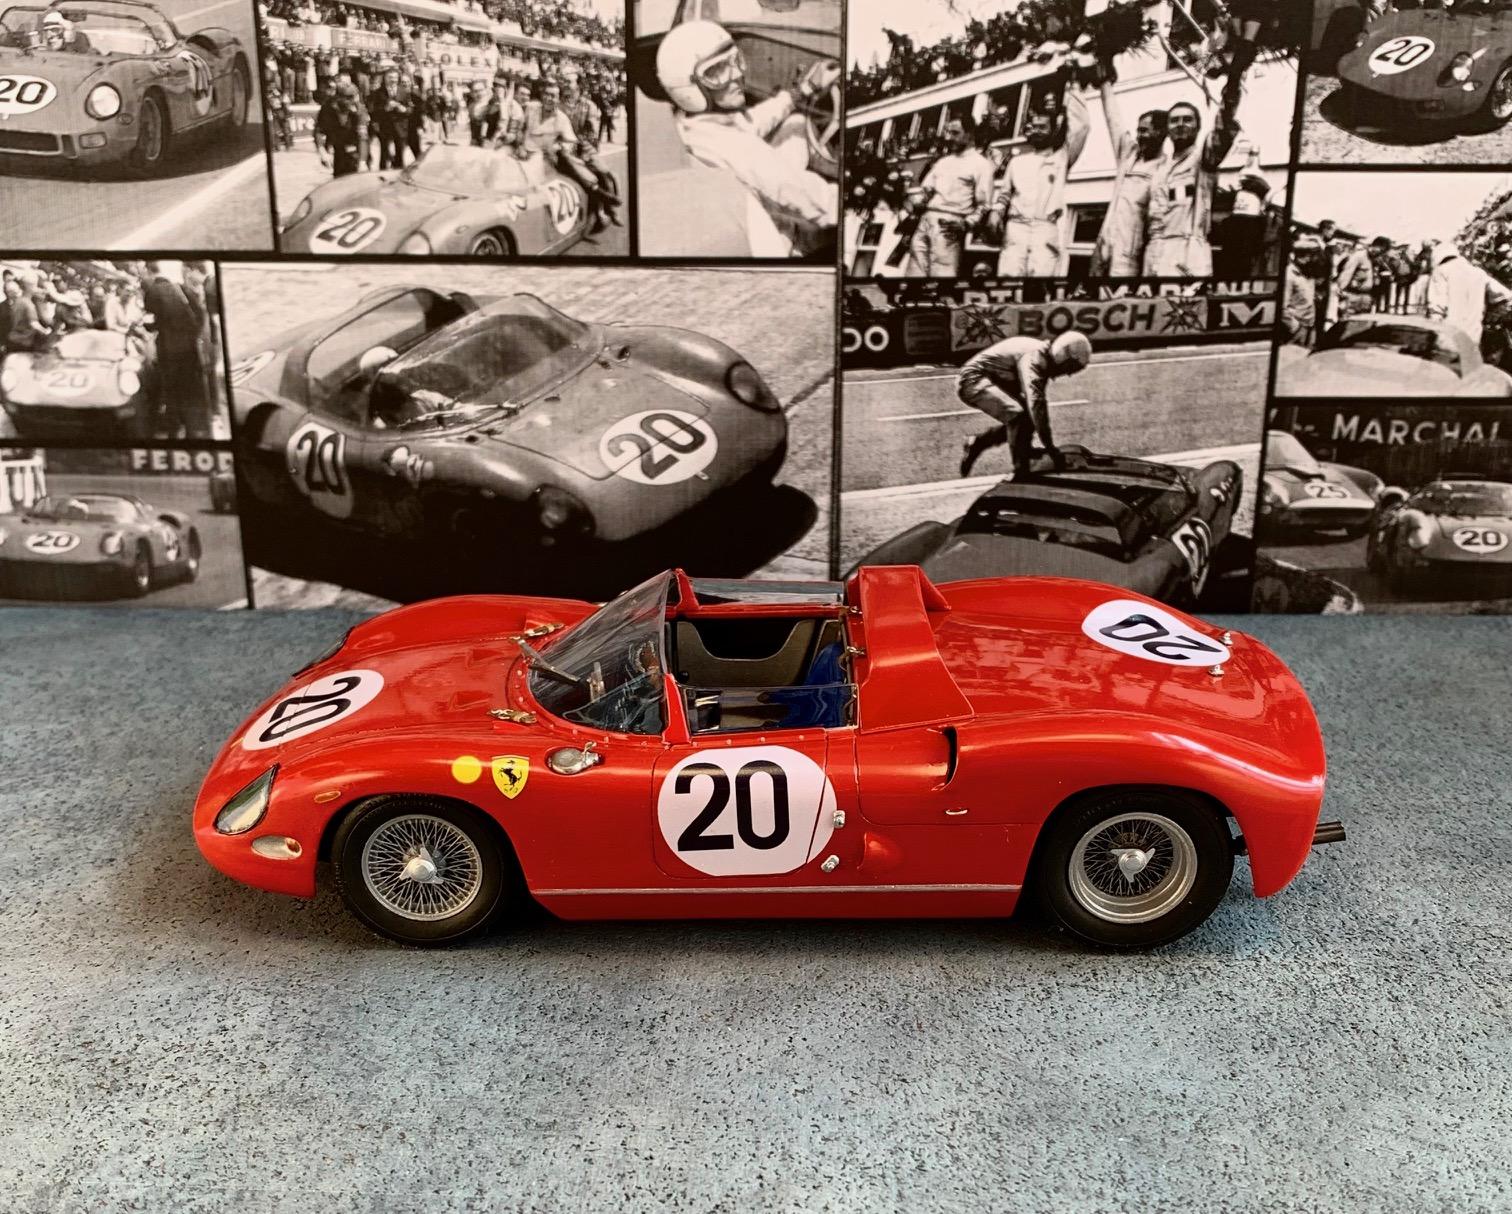
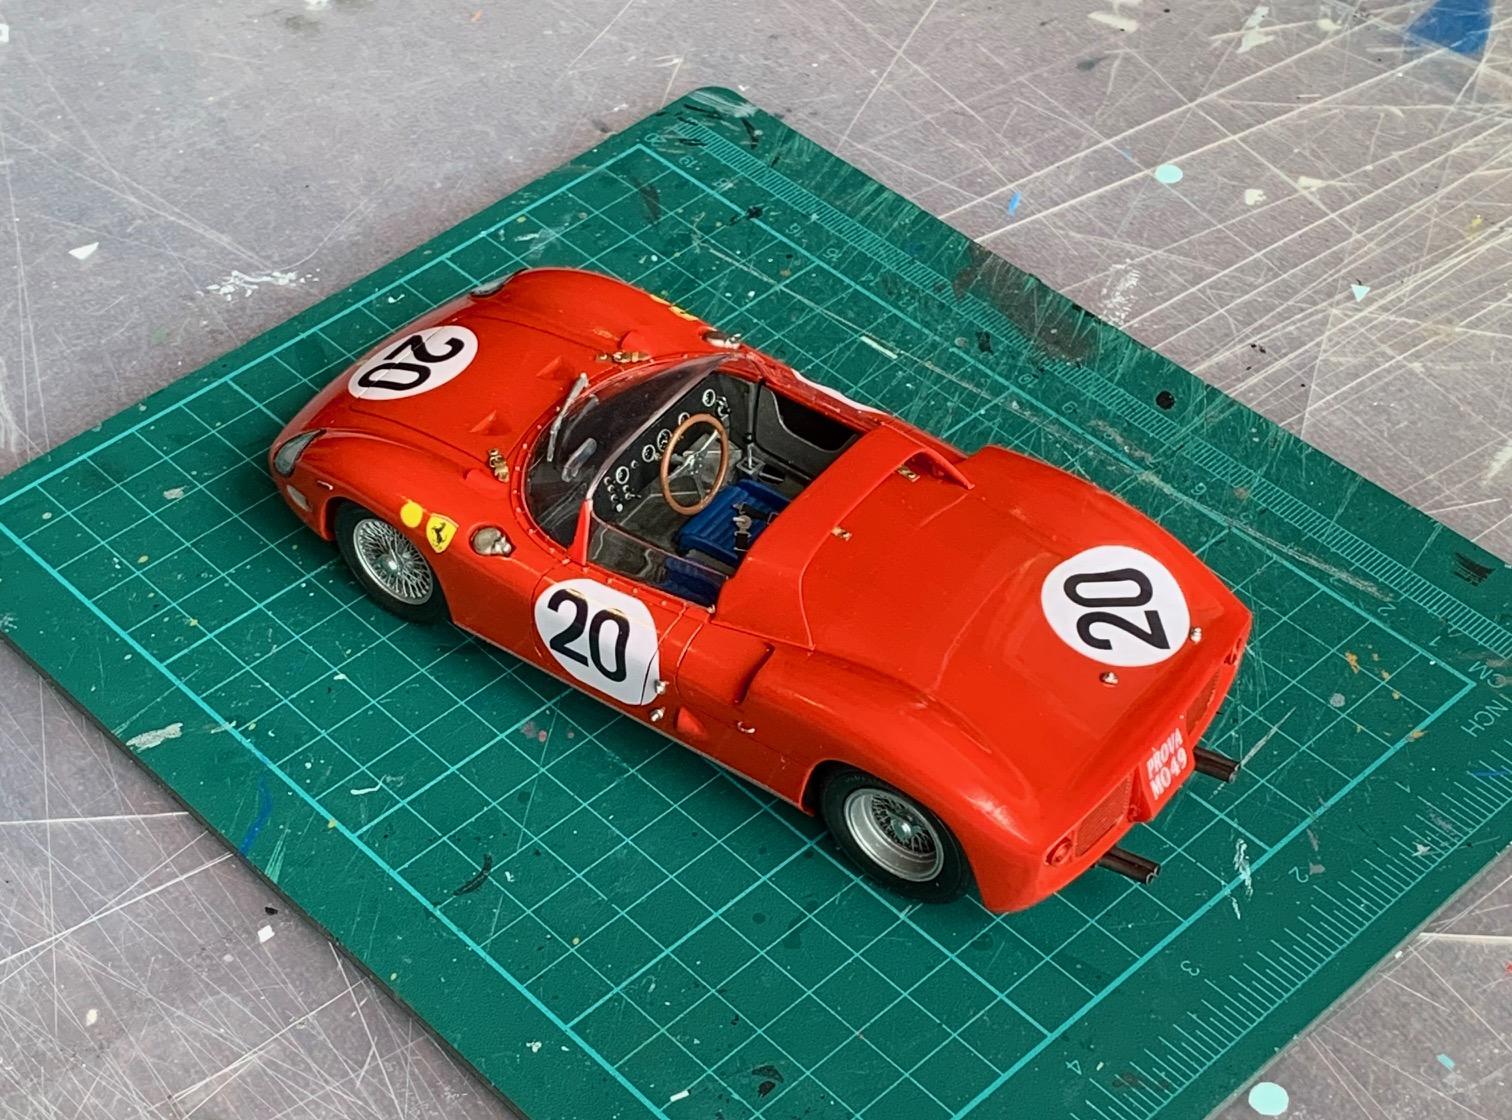
1964 Le mans 24 hours winning Ferrari driven by Nico Vacarella and Jean Guichet. Curbside Build from an old Monogram kit with body modifications and some detailing components, as covered in the w.i.p. section

- 38 replies
-
- 10
-

-
Always a nice feeling when you get one done, and this one is! Full set of pictures to be released in under glass section later today.
-
Ok ok, next project in the fall... perhaps a nice FPPM kit?
-
1963 Super Torque Ford
Pierre Rivard replied to MarkJ's topic in WIP: Stock Cars (NASCAR, Super Stock, Late Model, etc.)
That's too bad. I understand the feeling. Making it through paint is the hardest part of the build (for me) -
70s Era Asphalt Modified
Pierre Rivard replied to OldNYJim's topic in WIP: Stock Cars (NASCAR, Super Stock, Late Model, etc.)
I just caught up to your build. WOW! I love the detailing, the finished, funky 70's colors and the way you have finished all the metalized parts. Thanks for sharing, this is inspiring work. -
Awesome work Andy, as your's always is. I've never done a resin car and looking at this tells me I don't have the skills yet for this. Until then, watch and learn. Great stuff!
-
1/8 Pocher Lotus 72
Pierre Rivard replied to Chris Smith's topic in Other Racing: Road Racing, Salt Flat Racers
Awesome build, looks very real with the subtle weathering added to all the mechanical elements. The Lotus 79 is always talked about so much but to me the 72 is the quintessential Lotus. -
MFH Ferrari 333SP 1/12
Pierre Rivard replied to 2whl's topic in WIP: Other Racing: Road Racing, Land Speed Racers
Absolutely -
Fugimi Lamborghini Countache 5000 qv: WIP
Pierre Rivard replied to David G.'s topic in WIP: Model Cars
It looks good, very very good David. I'm happy you and the car survived the body to chassis marriage. Considering all the comments about the Fujimi it appears to be a great achievement to make it to this step. Now you can see the finish line. -
The body has been polished, decals applied and seal coat with the aim to achieve a smooth with a toned down gloss level. Although the design of the decals is very simple they provided a bit of a challenge. Very thin and "wrinkly" but I managed in the end. So all that is left is the final assembly of the various trim pieces.
-
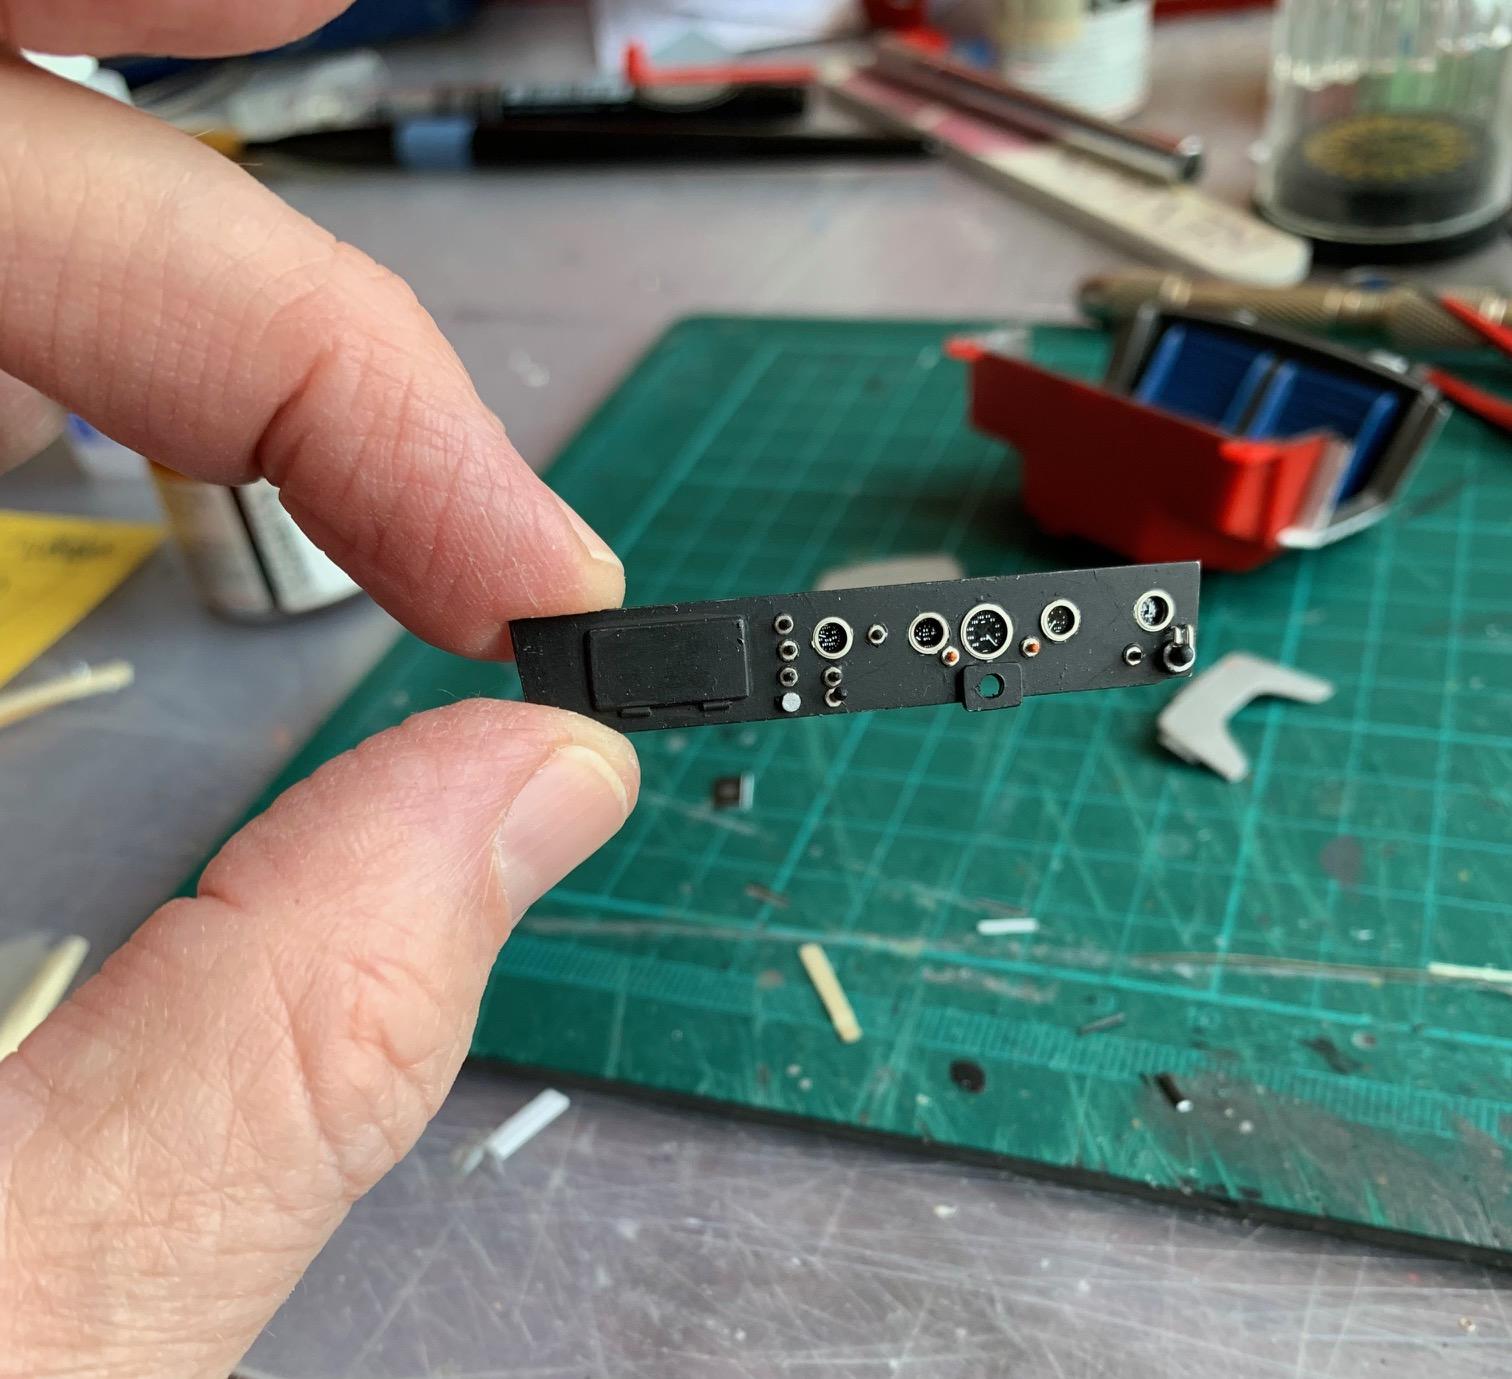
Thaks Steve. Bezels are Model Car Garage.
-
This is wild, imaginative and beautiful. Gives me inspiration to try something like this. Thanks for sharing this wonderful build
-
Body and paint look superb Gerald. I'd love to see this in Petty blue or just all black! ?
-
For what it's worth Ray, I think matte white will be better than chrome for these.
-
Thank you gents. I am very happy with the results. The decals arrived today. Thanks Gary for pointing me to the right supplier. When I bought they were pictured on a red background but It was a nice surprised to see them printed on a clear film. So polish the body, decals & installing body trim pieces is all that is left to do.
-
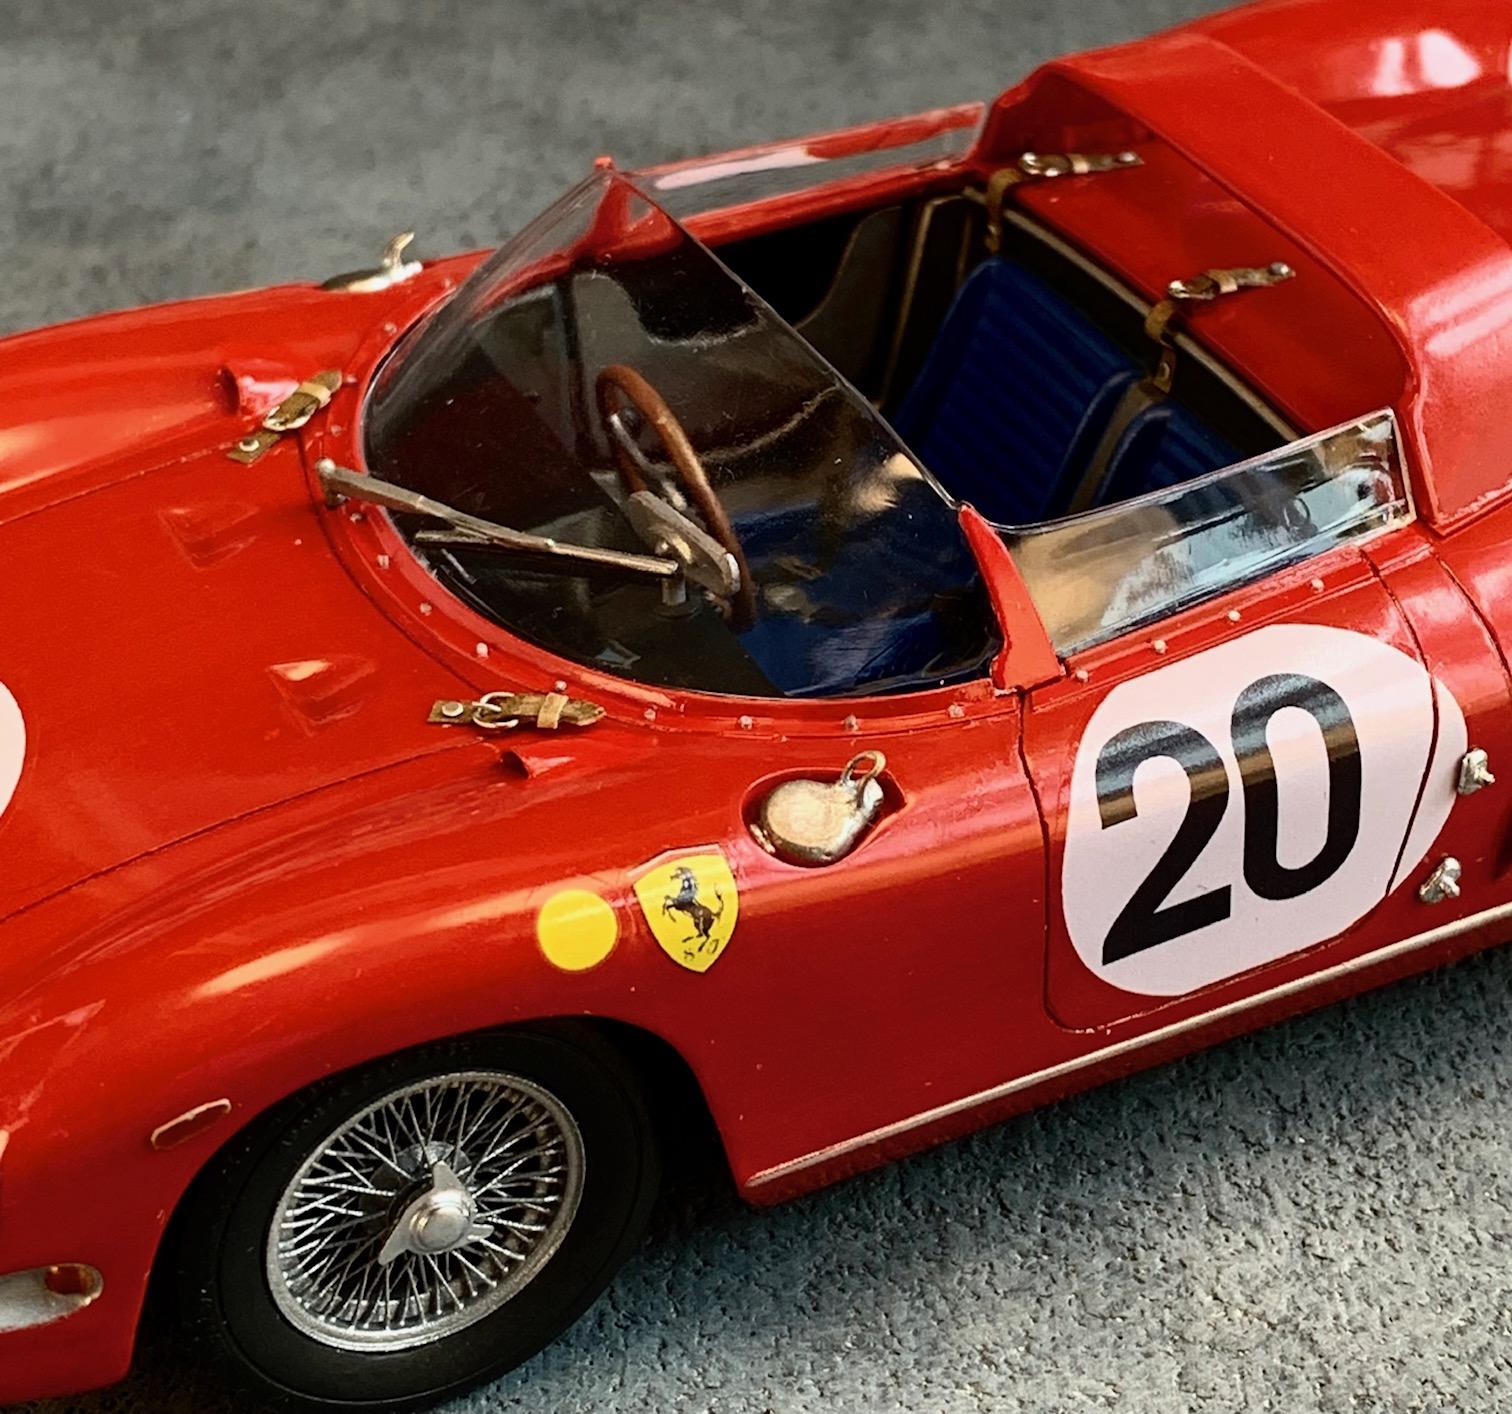
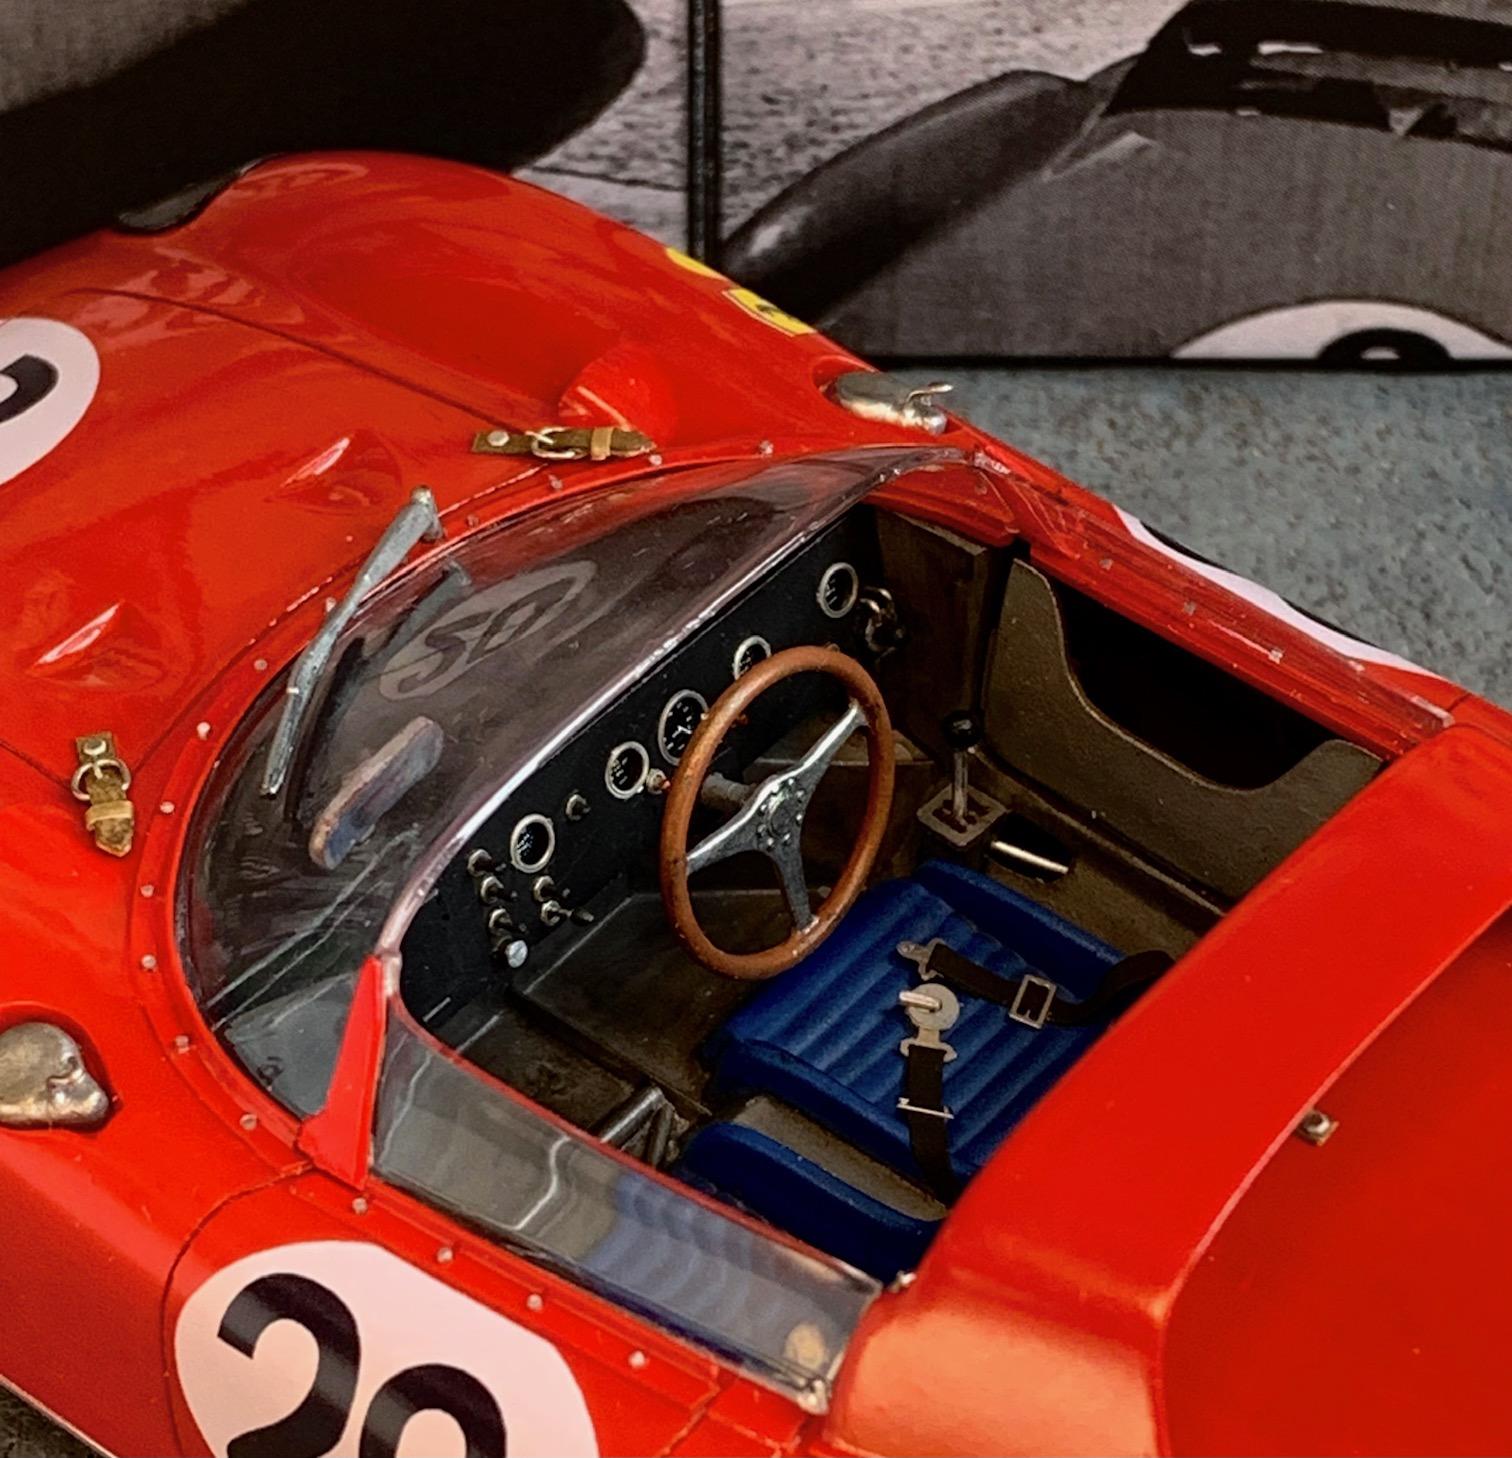
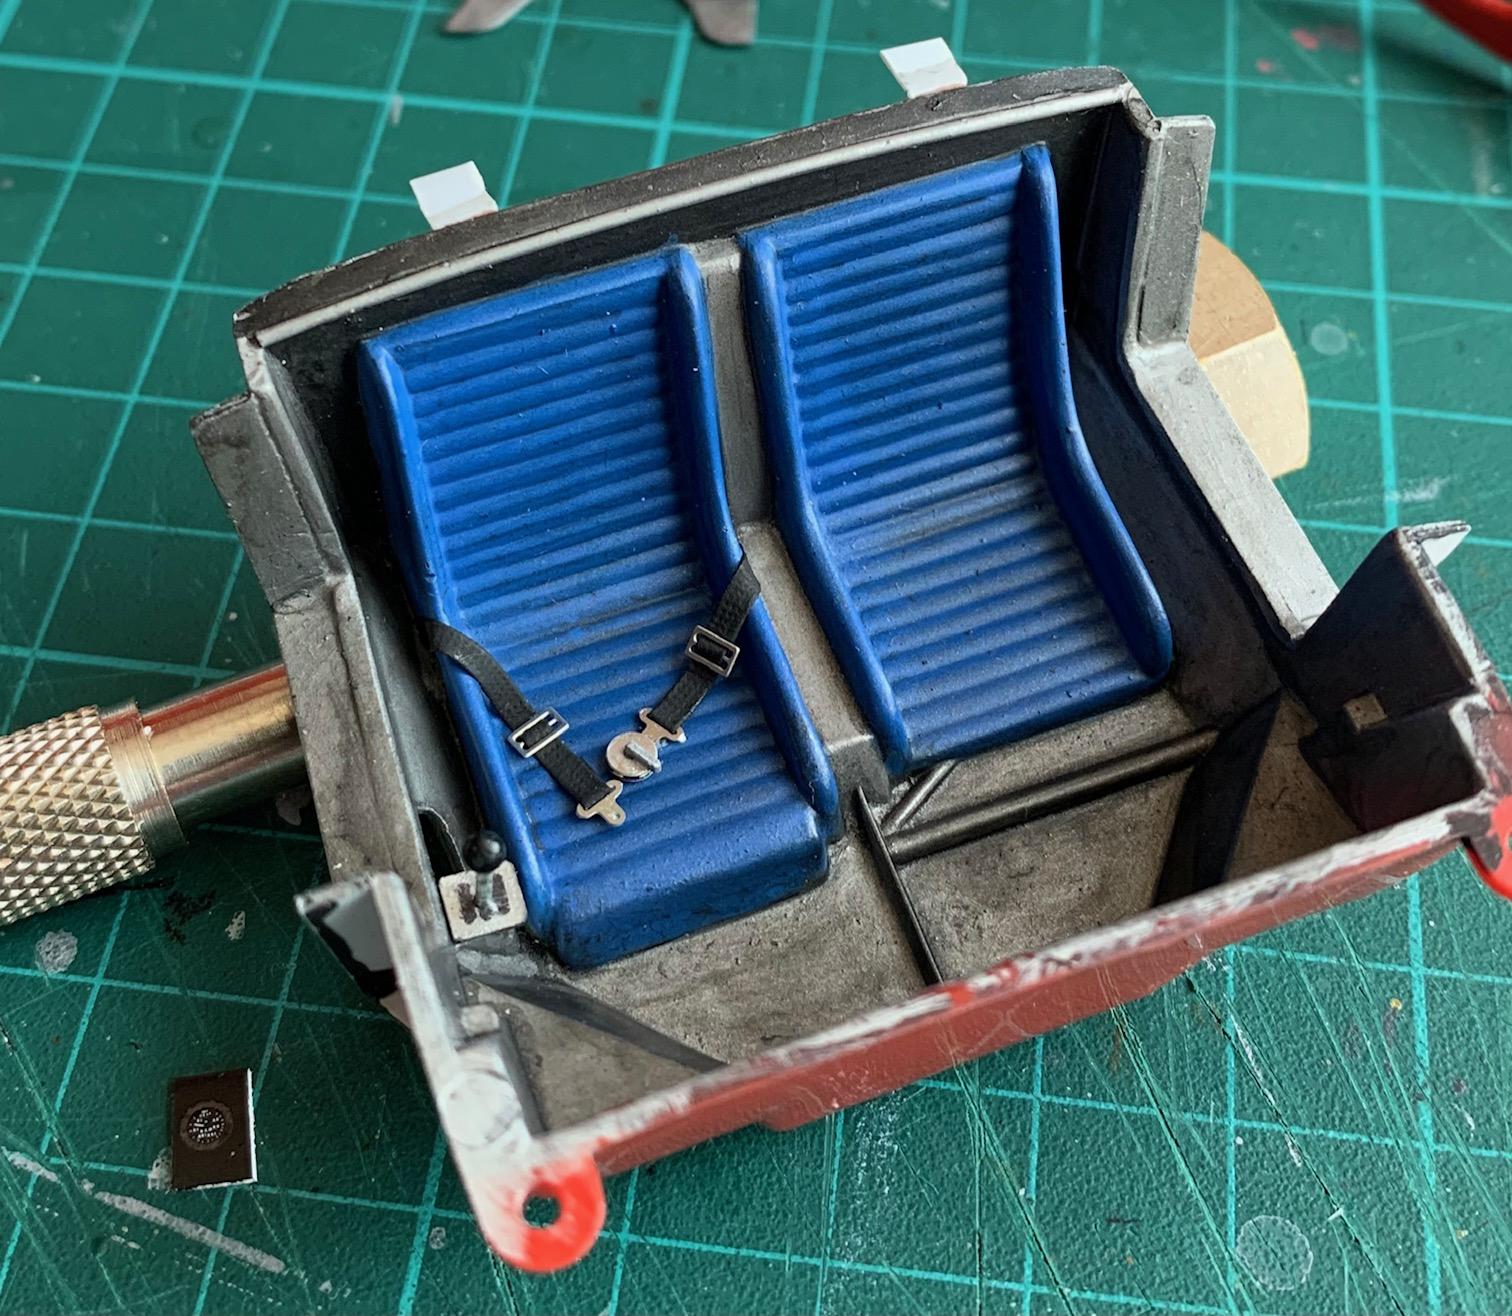
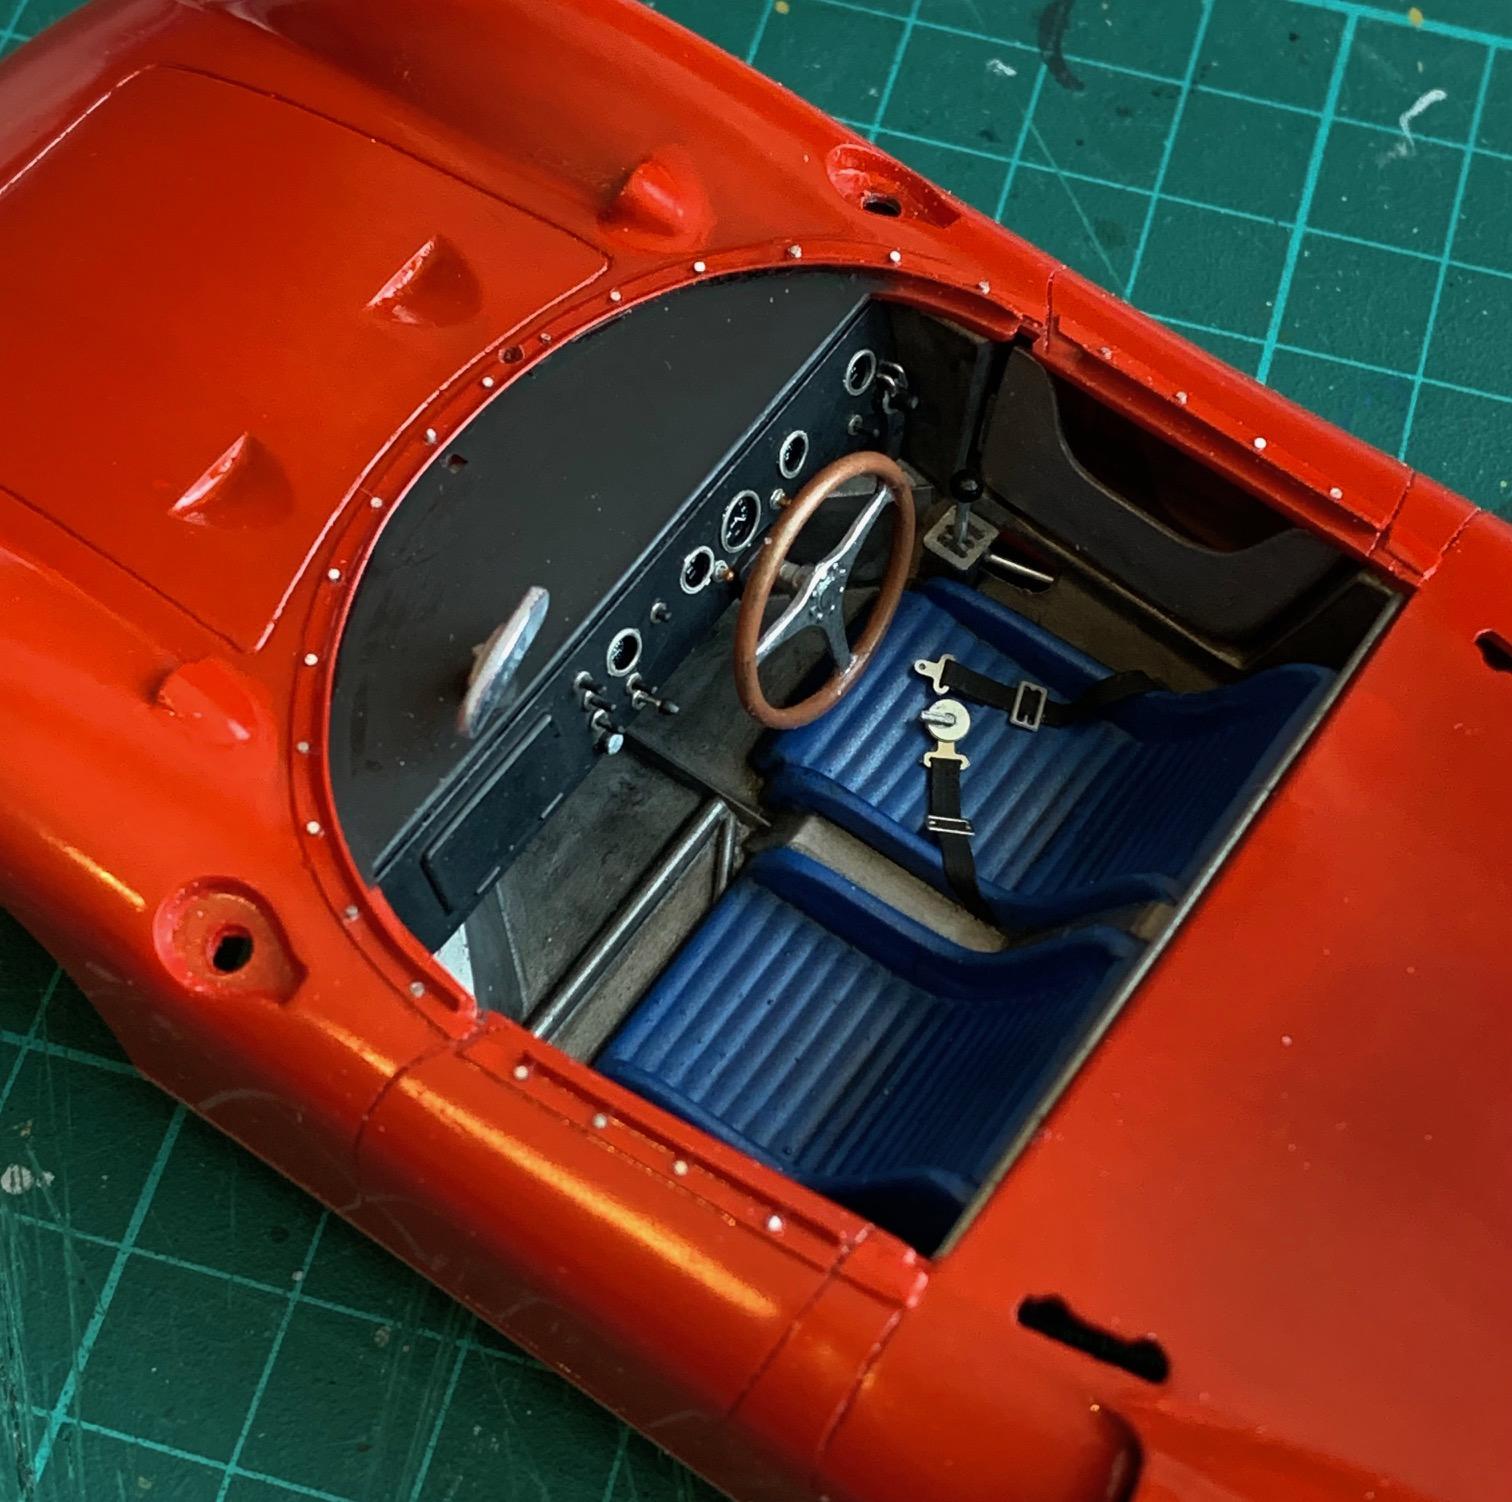
Last piece of fab for the interior is the seat belt. Interior is finished and test fitted (but not glued yet) to the body. I forgot to mention that I moved the steering column position about 2 mm to the right to better center it over the driver's seat.
-
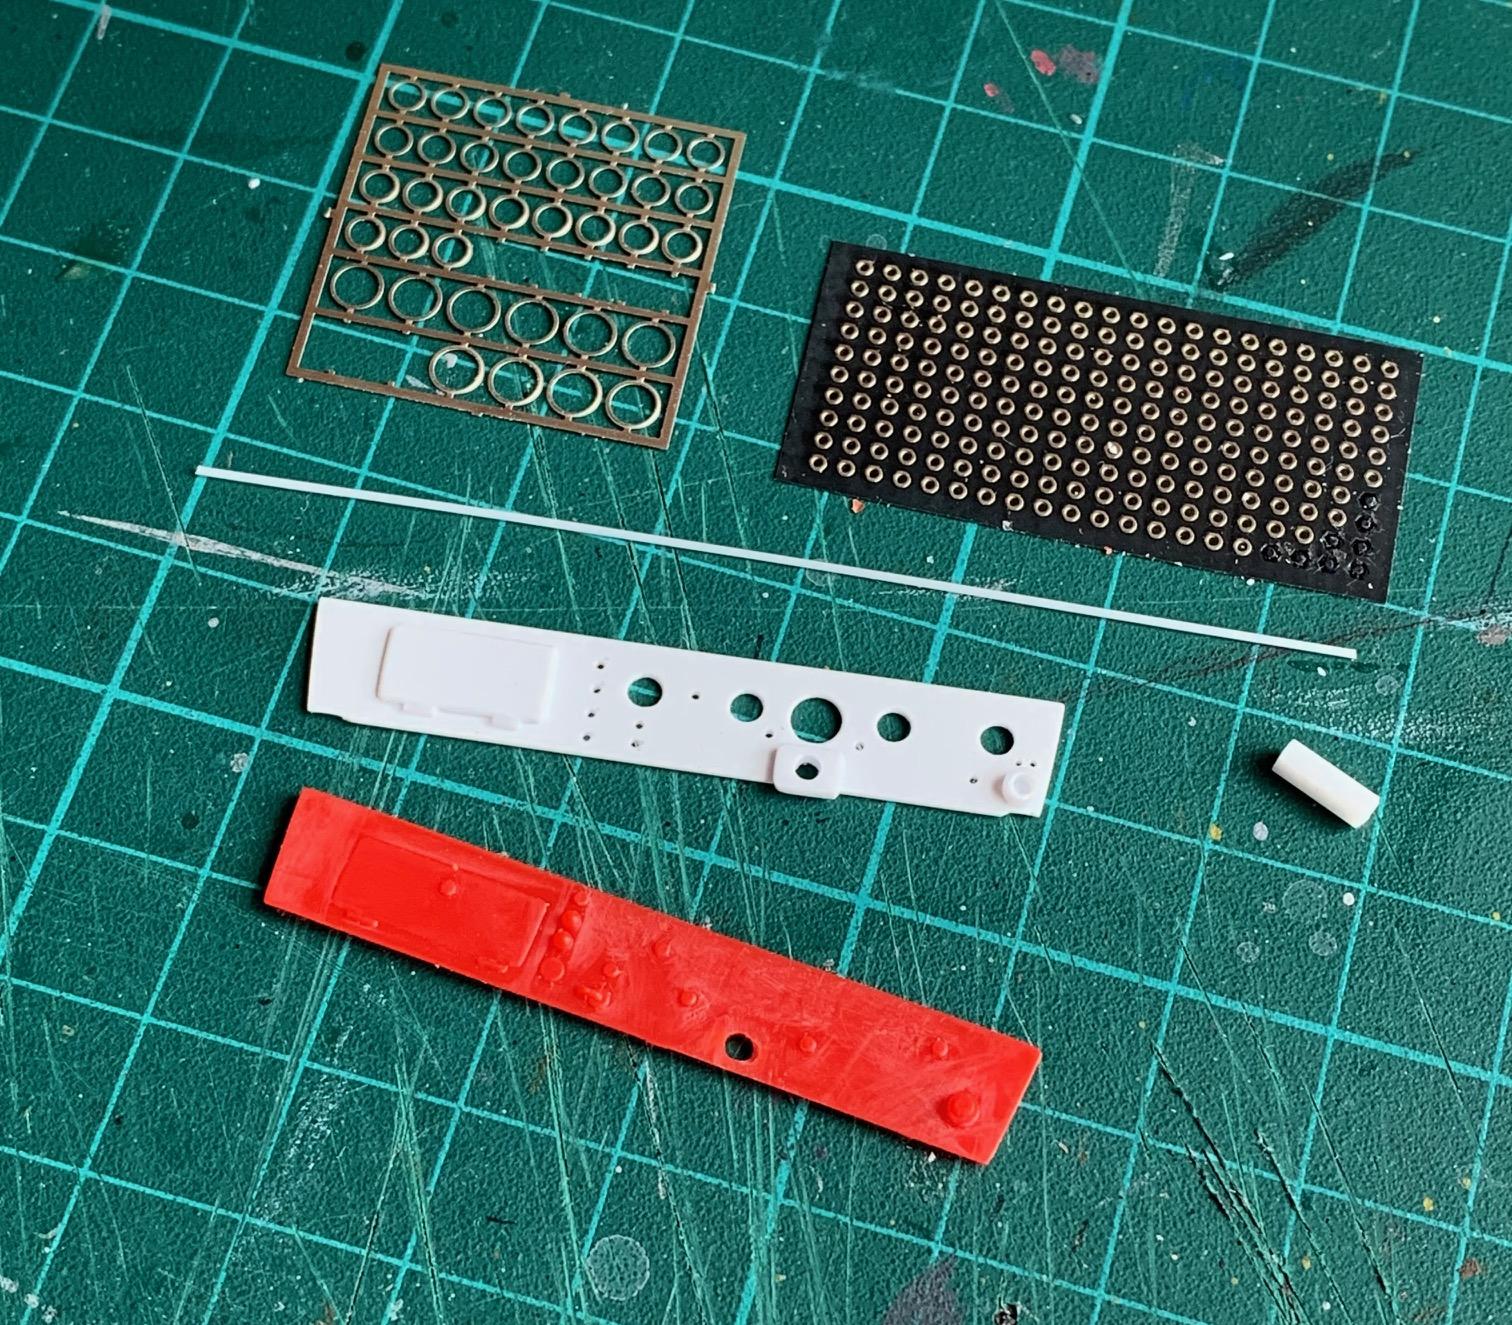
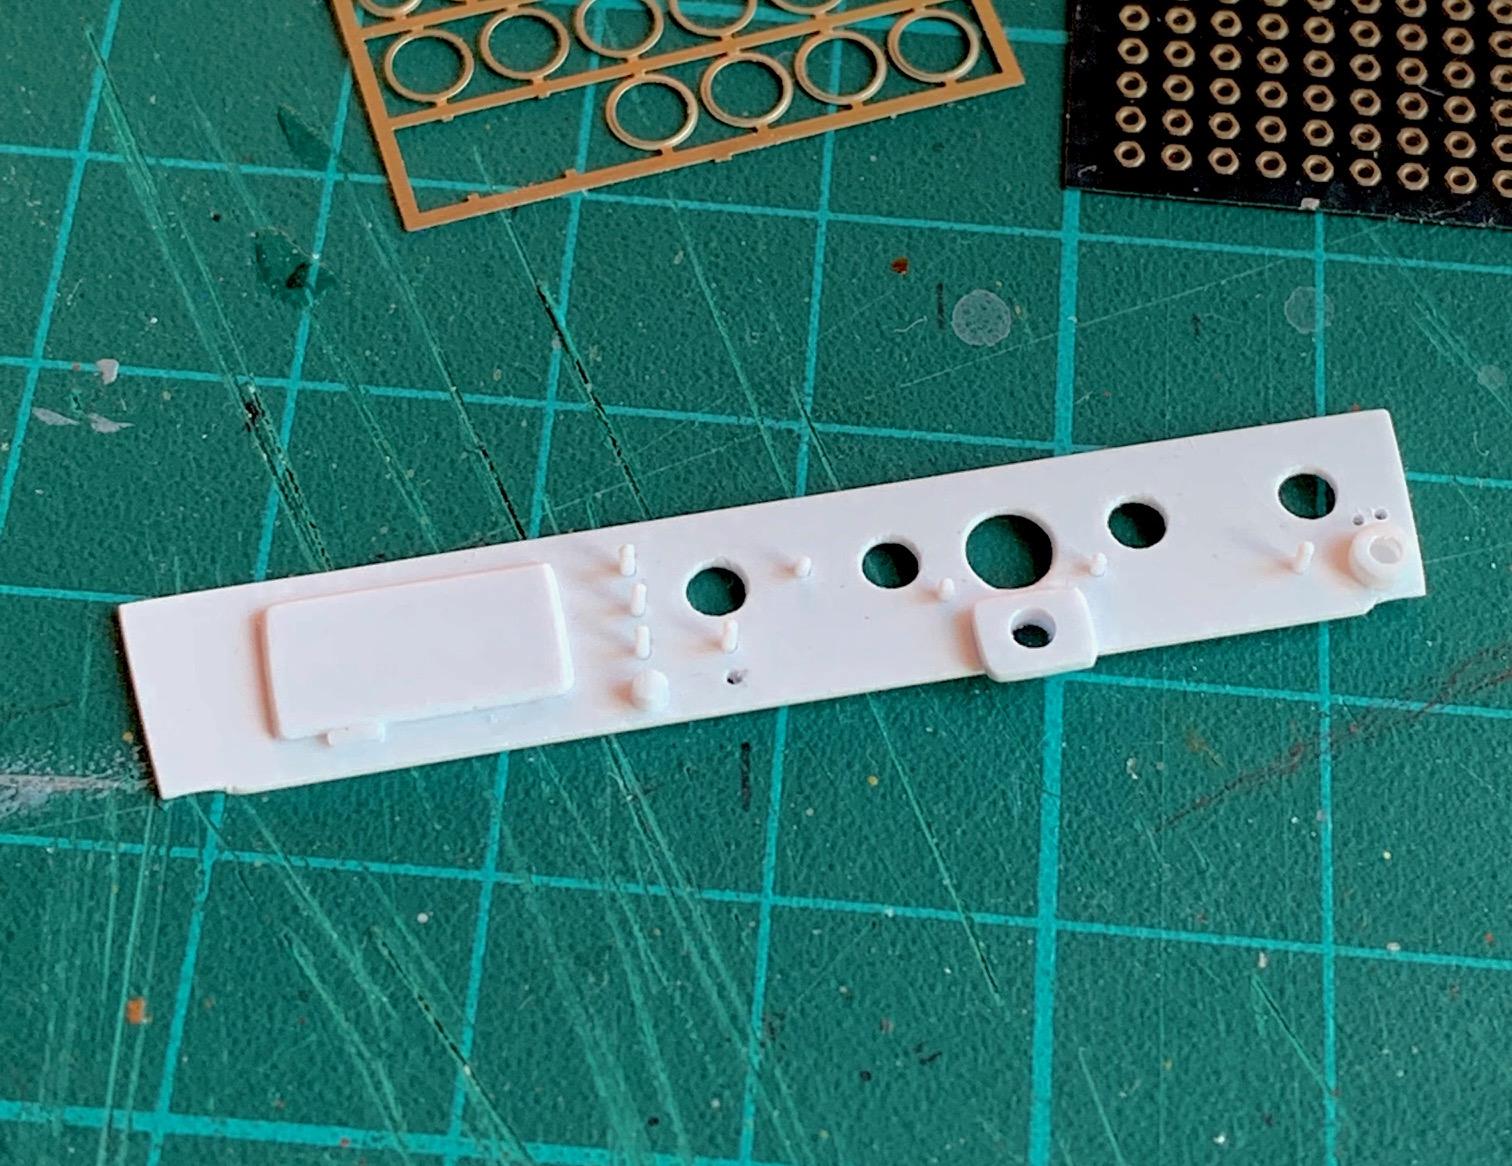
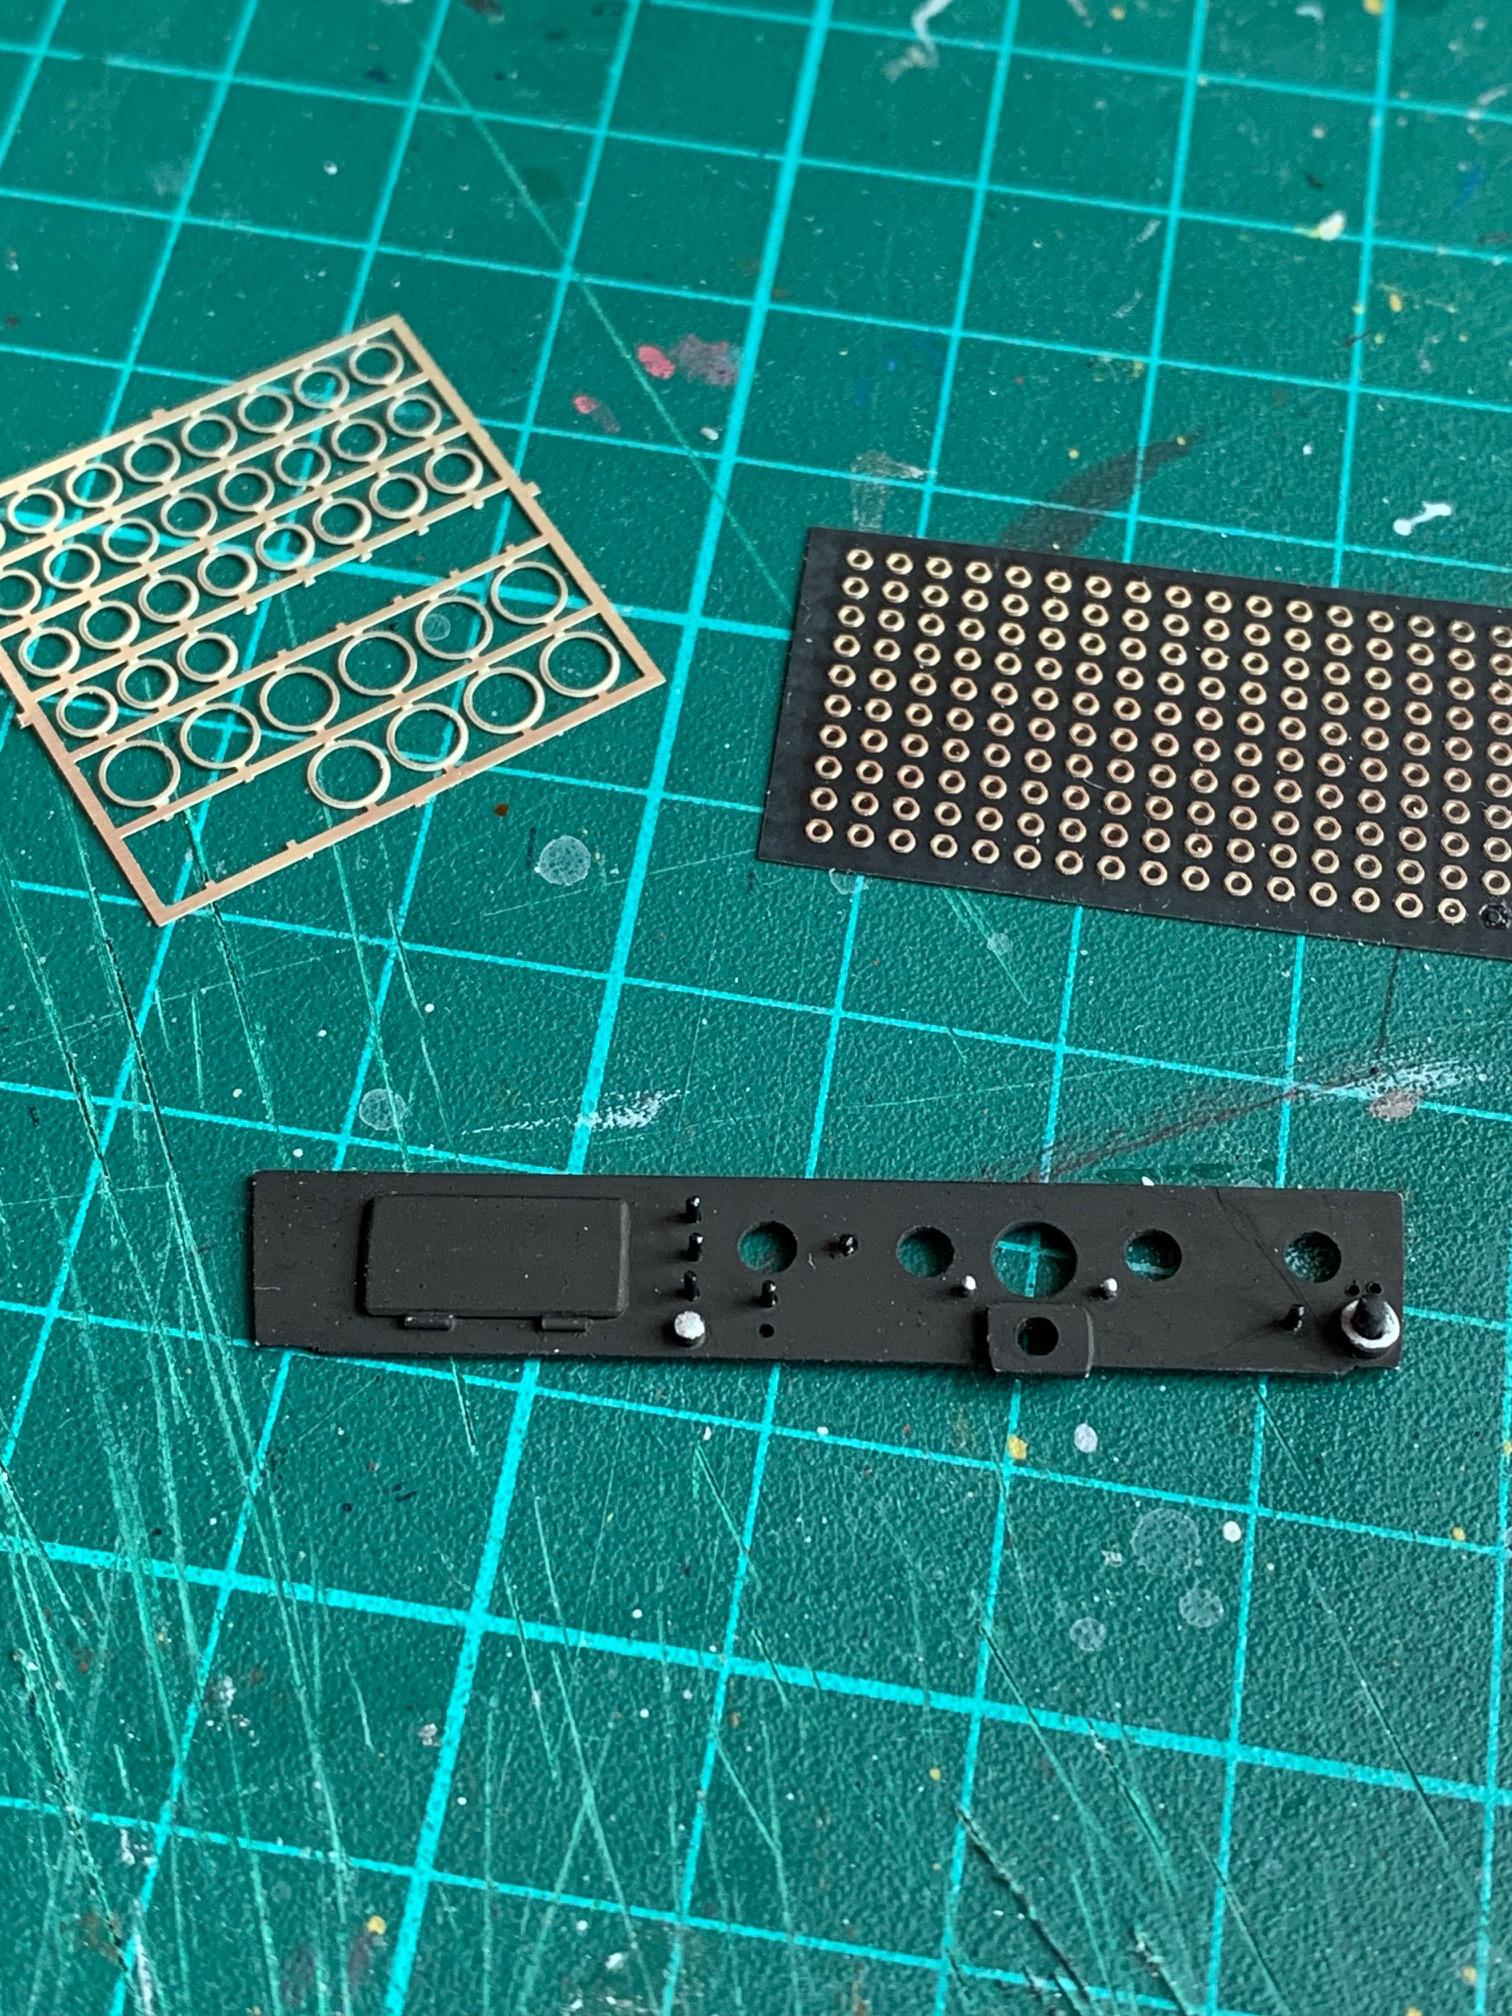
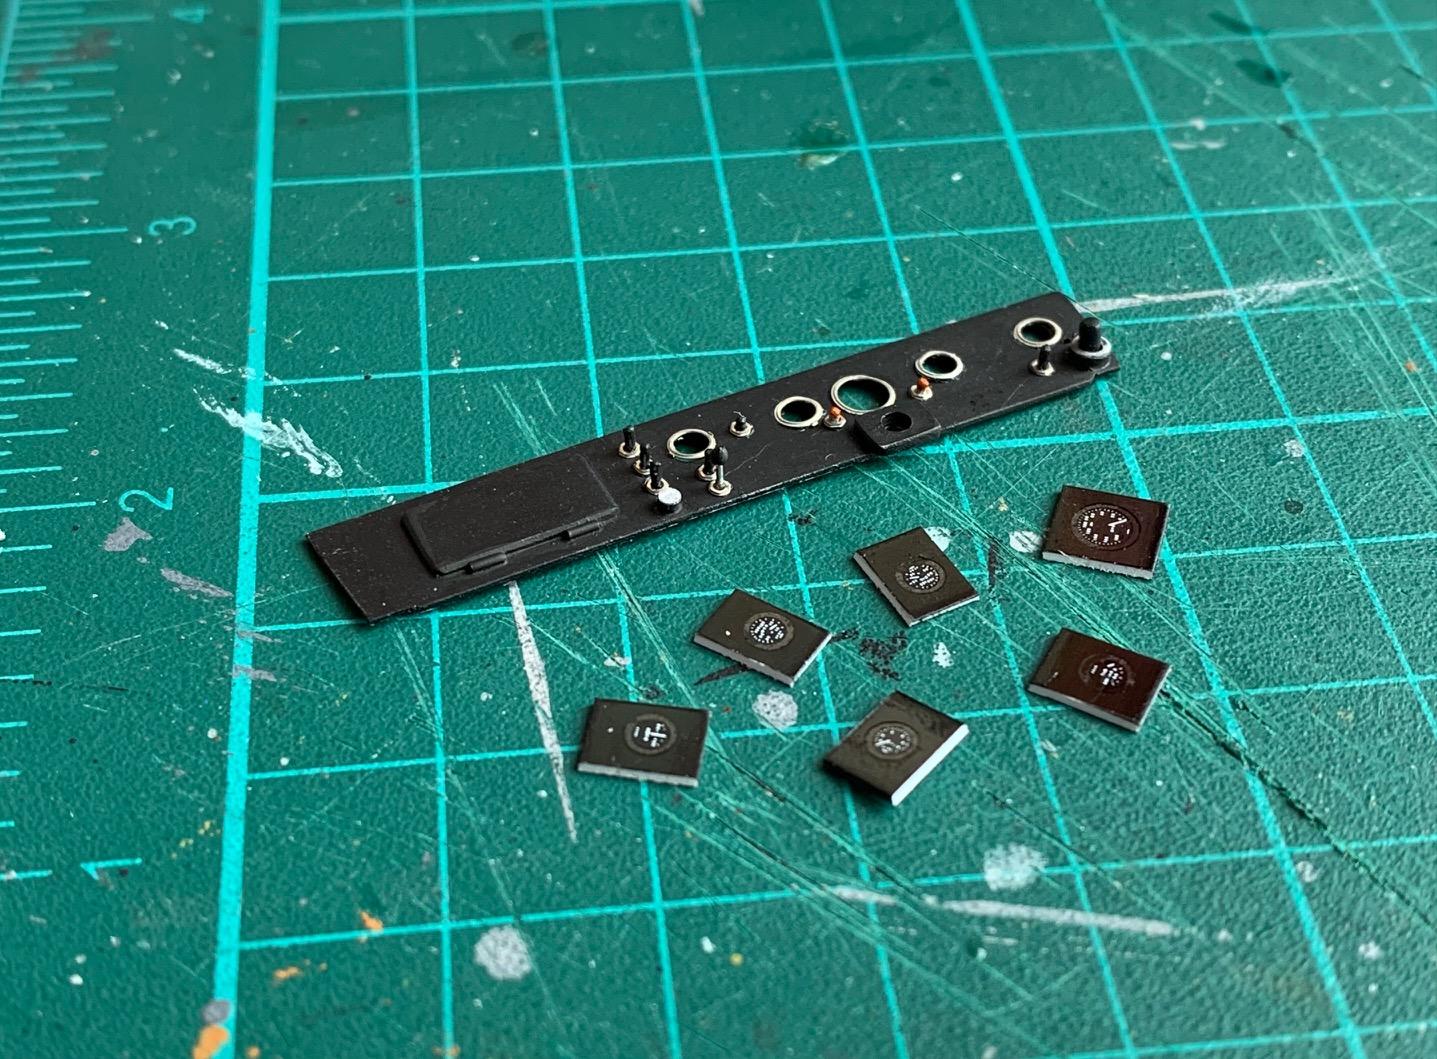
Dashboard has been fabricated from 0.5 mm styrene sheet, 0.5 mm rod, craft wire, PE bezels and washers and gauge decals from the spares. I never did this level of detail before. Small stuff to deal with but very enjoyable.
-
Shelby Cobra 1963 Le Mans Coupe
Pierre Rivard replied to Gramps46's topic in Other Racing: Road Racing, Salt Flat Racers
very nice Gary. Thanks for sharing these builds from the past. -
Thanks guys. I think it is taking shape. I think I need to do a new dashboard as the kit piece is not much to look at.