plasticprime
-
Posts
164 -
Joined
-
Last visited
Content Type
Profiles
Forums
Events
Gallery
Everything posted by plasticprime
-
 Thanks very much!
 -
Thank you!
-
Terrific job on the camera! It was a monochrome, single tube, image-orthicon camera. Misty moons ago when I was in production, we had color Ikegami HL-79As which were 3-tube plumbicons. Even after we had transitioned to 3-chip Sony cameras, some clients preferred the old Ikegamis for their rendering of flesh tones.
-
Revell '41 Willys "Feelin Groovy!" gasser
plasticprime replied to the60falcon's topic in Drag Racing
Super nice! -
1971 Blue Max Mustang Funny Car and the Summer Battle Royale...
plasticprime replied to Coyote_6's topic in Drag Racing
Beautiful build! Very nicely done! MPC kits always seem to be a hassle, so you've displayed great perseverance to end up with such a great finished product! -
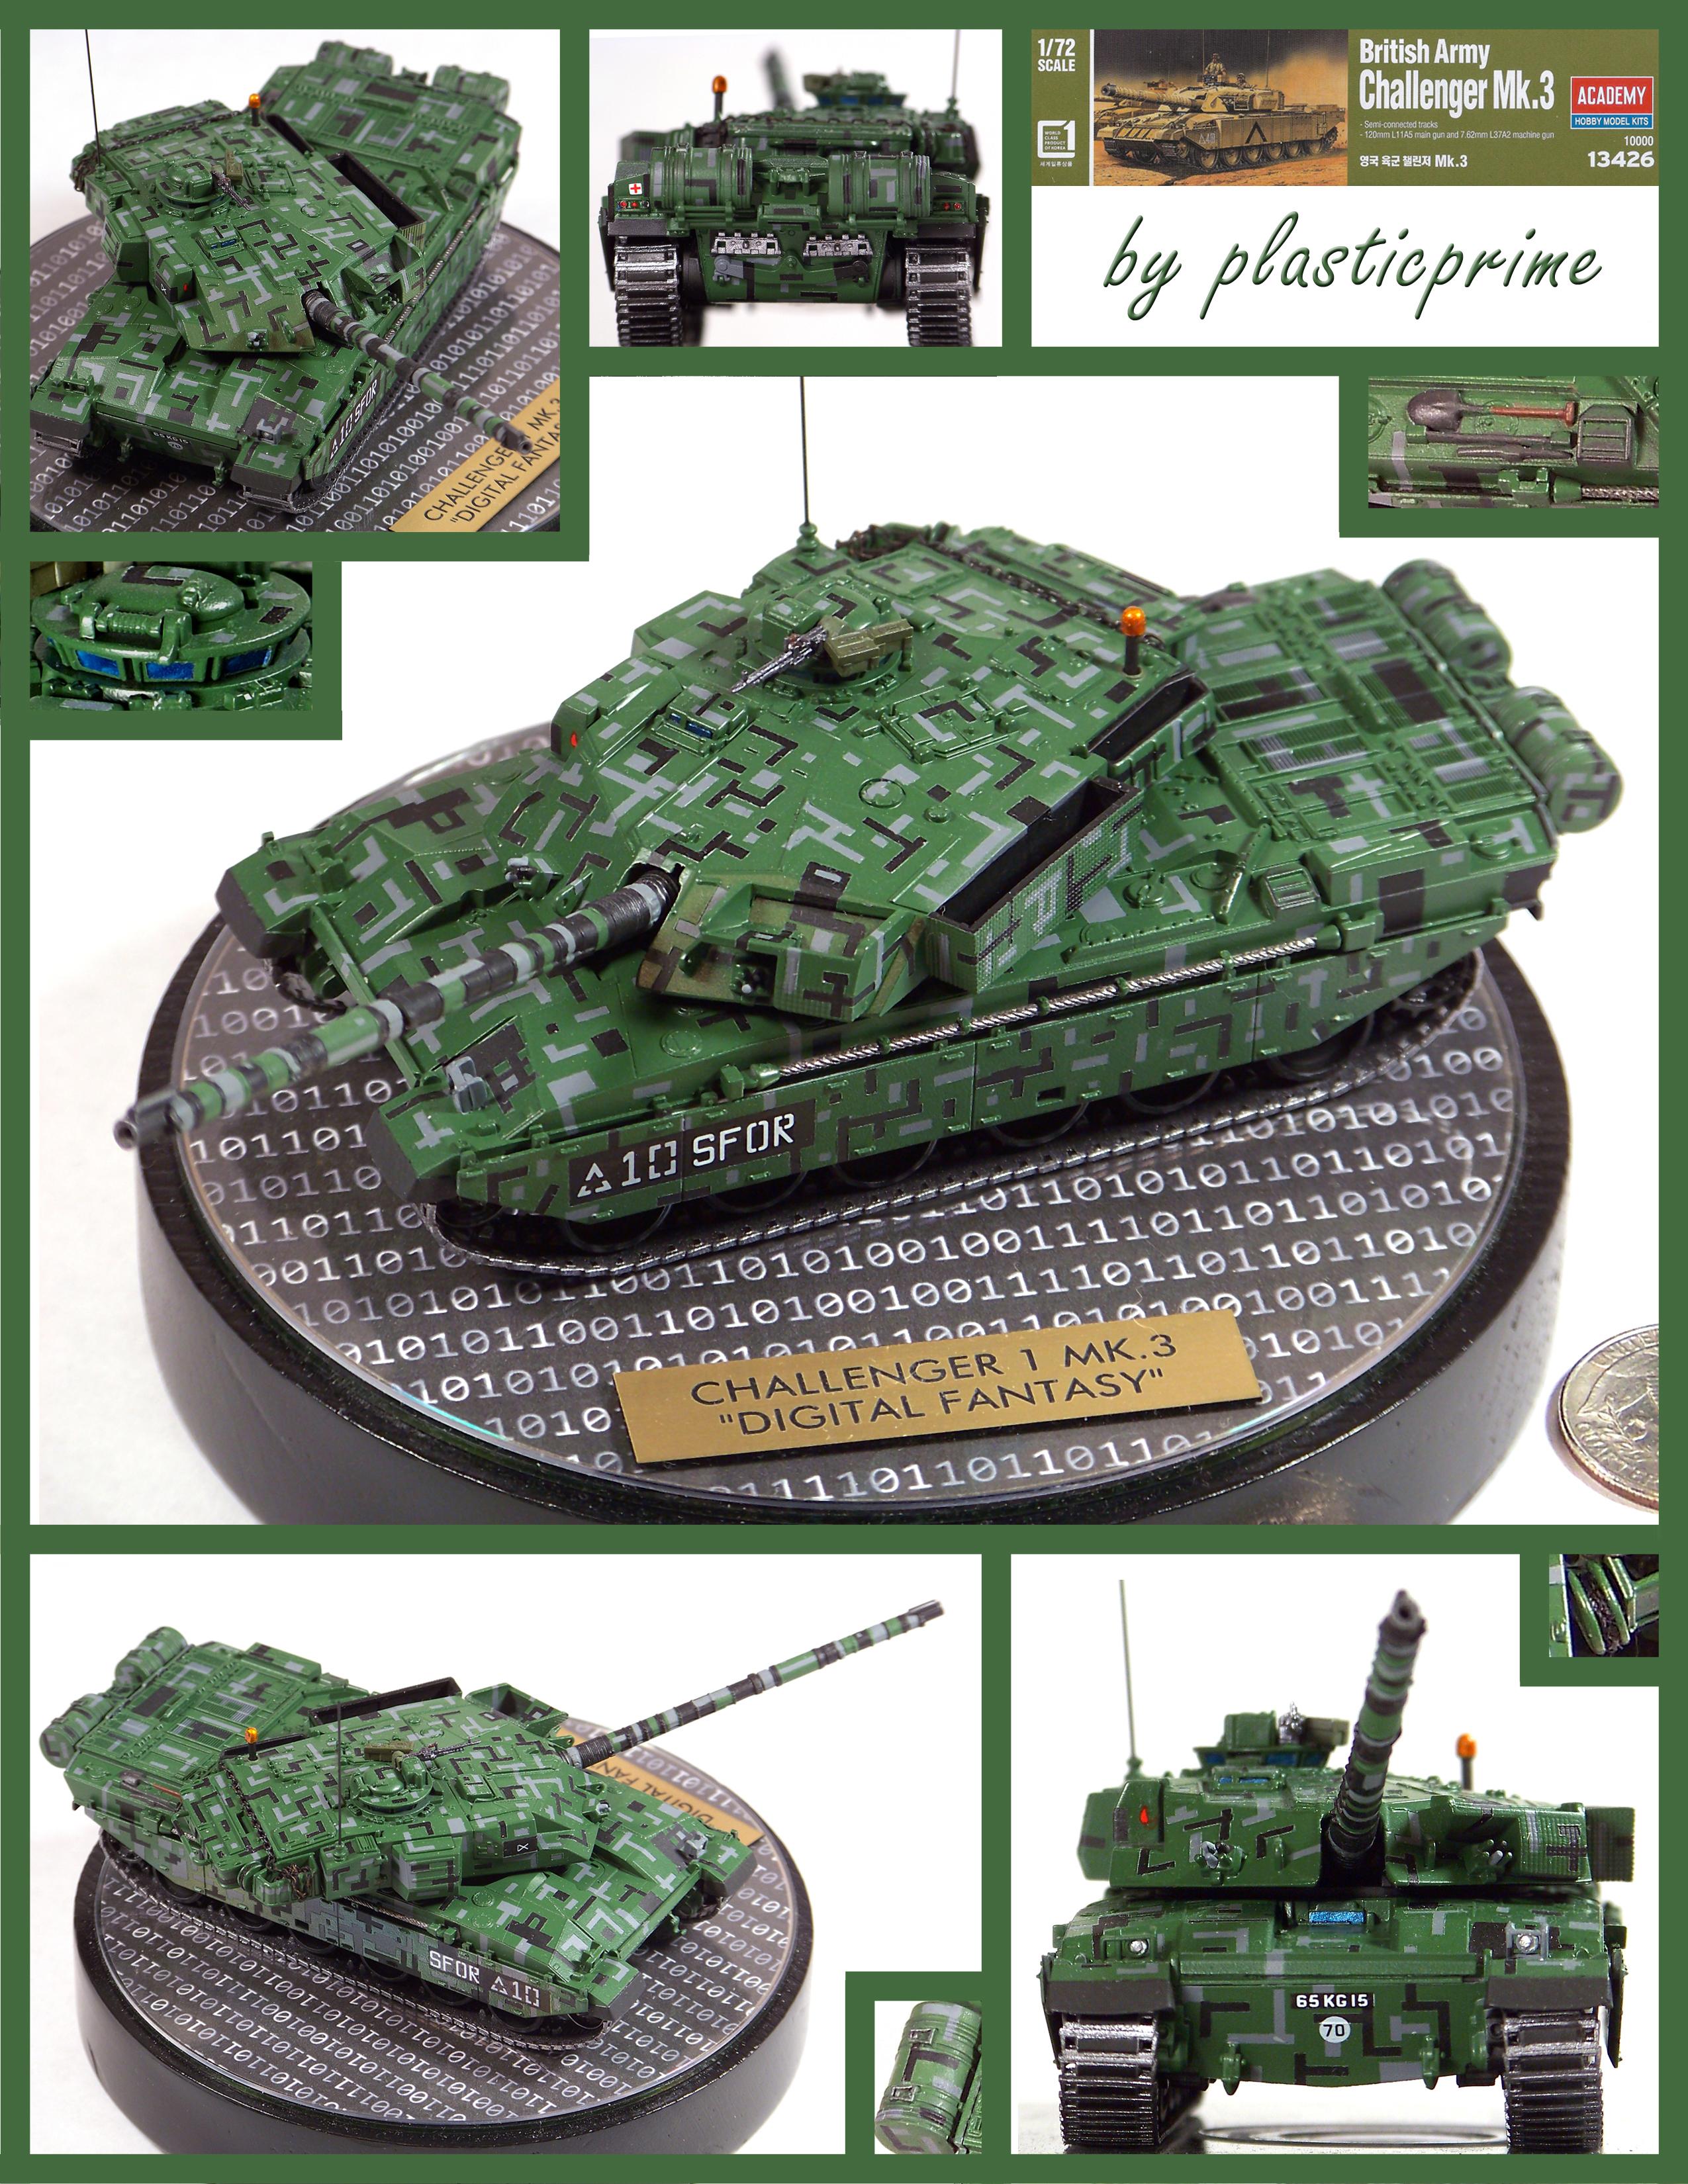
1/72 Academy challenger 1 Mk. 3 = This build was inspired by photos of an experimental digital camouflage scheme painted on a Challenger 2 and depicts what an early prototype scheme might have looked like on a Challenger 1 Mk.3 – which to the best of my knowledge, never had such a scheme applied to it – thus the “Digital Fantasy” aspect. It was accomplished using rattle cans (no airbrush) and required the cutting and masking of many hundreds of tiny little pieces of Tamiya 1mm masking tape which were applied with tweezers and a toothpick. This is what the tank might have looked like, in more or less pristine shape, from the paint workshop prior to field testing. The turret antenna, beacon light, and vision ports forward of the commander’s hatch were scratch built, and I filled the communication cable spool with fine black thread. Binary artwork was turned into a CD label, which was then applied to an actual CD and mounted onto the wooden base. A protective clear CD blank was applied over the CD. The circular wood base was purchased unfinished from a craft store and then sanded and painted semi-gloss black.

- 4 replies
-
- 6
-

-
- 1/72
- challenger
- (and 1 more)
-
Thanks for the kind words, Jim! Yes, some of the Coastal Kits bases are really nice.
-
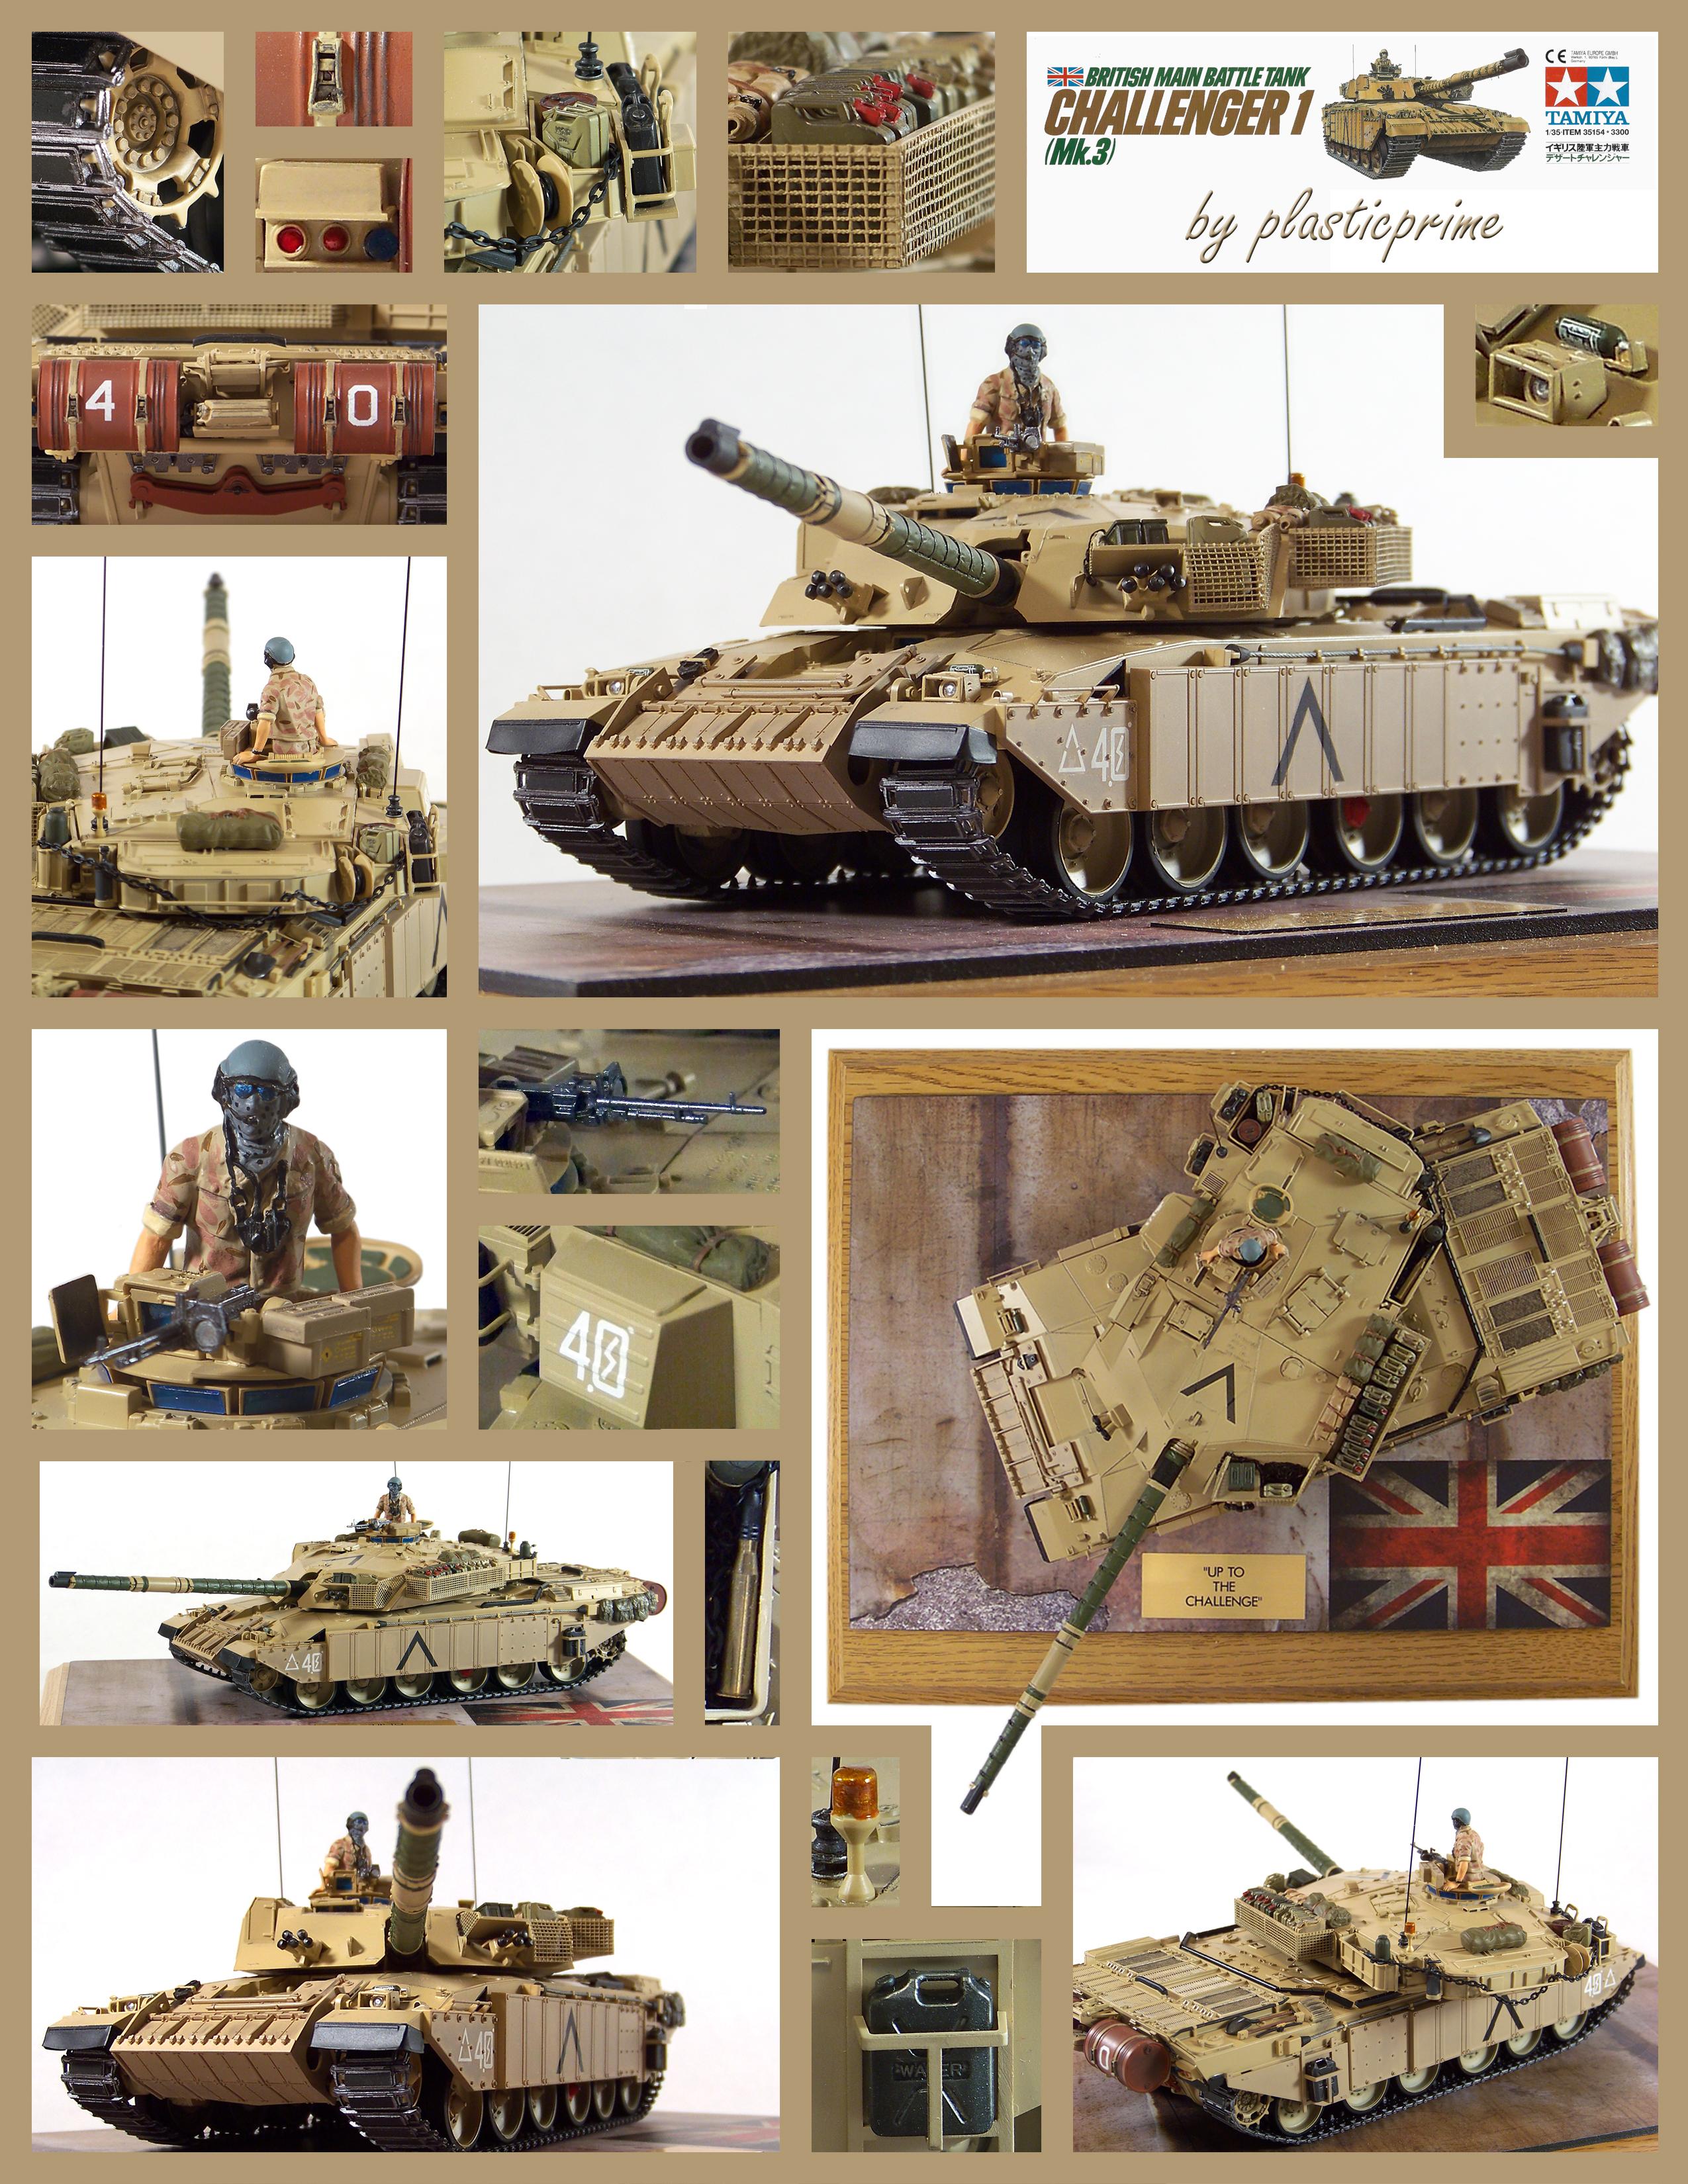
TAMIYA 1/35 CHALLENGER 1 MK.3 – Paint is all Tamiya TS rattle cans except for the commander figure which was done with a combination of TS rattle can paint and hand-brushed Tamiya acrylic paints. The base is composed of a Coastal Kits British base that I applied to a varnished wooden plaque. The nameplate (“Up to the Challenge”) is from Crown Awards. Stowage and assorted items are from the spares box and various accessory kits.
-
Thank you very much for the kind and encouraging words! They're very appreciated!
-
I love it! Super nice build of a Galaxie - one of my all-time favorite cars! I'm originally from the Buffalo area, although my Pop bought his Fords from Athoe Motors in Batavia. We had a Galaxie station wagon.
-
Thanks! If Takom kits build nothing else, they build patience!
-
This kit truly played the part of “The Beast of 1,000 parts” oh so well. (It may not actually have been 1,000 pieces, but it had to have been pretty darn close.) If you enjoy fiddly little parts with no discernible glue points, then this kit is for you! And as an added bonus, some of the intricate detail you’ll labor so diligently to complete will be – surprise! - completely covered up by subsequent assemblies! Way cool! I found this kit so maddingly frustrating that there were numerous times when I nearly chucked it – and everything else I have associated with the hobby – into the trash. However, I persevered and eventually brought the beast to bay. But it wasn’t easy. I gave up on the individual link tracks that came with the kit (after stomping them into the ground with fiendish delight), and finally bought a set of T-Rex tracks which were incredibly easy to assemble and had fantastic detail. The kit supplied metal tow cables were also impossible to fit, so I settled for a tow chain instead that I made from jewelry chain. There were innumerable instances where I drilled itsy bitsy holes in parts and used wire pegs to affix them as there seemed no other way to do it without drowning the darn thing in glue. I used rattle cans for almost all of the painting and carefully used Tamiya masking tape, which came in especially handy for the side skirts. The primary color was Tamiya TS-2 Dark Green, and I used other shades of green for the barrel, turret accessories, stowage, etc., to provide some color contrast. I recalled a T-55 reference photograph in which a single fuel drum was a light blue, and I had some light blue handy, so used it for both, along with some oil-related decals from the spare box (the oil-related company referenced in the decals was a US brand that ceased operations years before the T-55 AM2B went into service, but ask me if I care). The psychopaths at Takom that designed this kit should be forced to build it themselves – would serve them right. Main lesson learned from this build? Easy! - it’s only Tamiya armor kits from now on!
-
57 Chevy Boat
plasticprime replied to Just Jim's topic in All The Rest: Motorcycles, Aviation, Military, Sci-Fi, Figures
Beautiful build and a very cool idea! It would certainly turn some heads at the boat ramp. -
Tri-X was good, but for ultra fine grain, you needed Pan-X - had an ASA somewhere near 25, depending upon which version you used. I'm pretty sure I used D-76 to develop it and even with a simple, basic Durst enlarger, it made outstanding prints.
-
This was intended to be a homage to a similar car a friend of mine (Lynn) once owned, but a variety of missteps resulted in what you see now…similar to the vehicle in question, but substantially different, too. It’s mostly stock except for a plethora of aftermarket decals and the shifter and rear slicks, which came from the spares box. I raised the rear end with styrene shims to better accommodate the larger slicks. The paint is all Tamiya lacquers and acrylics – TS44 Brilliant Blue for the engine, TS-42 Light Gun Metal for the exhaust headers and pipes, TS-6 Flat Black for some of the body/hood and interior, and TS-8 Italian Red for the main body and parts of the interior. Tamiya acrylics were brush painted for details. When we went crusin’, we had Boston, Van Halen, and Deep Purple cranked up on the old 8-track, thus the LPs on the back seat deck. I wasn’t about to attempt scratch building scale 8-tracks, so I figured LPs would get the point across, and even then, I had to manipulate some of the artwork to make it “readable” at 1/25 scale. Funny thing about this car – the real one, that is – it attracted tickets as if they were magnetized and it was the world’s largest - and loudest - magnet.
-
How does Santa manage to stay so cool with such hot helpers? Christmas magic, I guess! Amazing build!
-
An impressive build in any scale, but especially so in the fairly diminutive 1/72 size. Excellent photos as well!
-
Just when I think I've finally convinced myself that the closets are full enough of unbuilt kits, and I've no need to buy another for the next five decades. some one posts a build like this and I already know there's going to be an new addition to the family. Terrific build! I love it! I've yet to take the dive into airbrushing, so I'm wondering of you rattle-canned this beauty or decanted the TS-47 and airbrushed it? If you used the rattle can, how did you like using it? I've found the Tamiya TS spray cans to go down smoothly - I don't have the patience for enamels, so the Tamiya lacquers work well for me.
-
Rattle can "glop" leakage
plasticprime replied to plasticprime's topic in Model Building Questions and Answers
Thanks! This is very informative! I assume the "pea" (or "rattle") is contained in the blue area of the diagram and helps mix the liquid and propellant mixture prior to spraying. Despite what others have experienced, I currently have 3 cans of Tamiya exhibiting the same leakage and one of those is 2-3 years old and still in the original shrink wrap. I also have a few ancient cans of Testors enamel that are 45+ years old that have no leakage at all. So go figure. -
Does anyone know what this glop is that appears to be leaking out from the seams of some of my rattle can spray paints? It's somewhat sticky, but fairly odorless. The age of the can doesn't seem to matter and it's happening with both Testors and Tamiya paints (enamels and lacquers). Some ae exhibiting just a bit, and some are like the one in the photo. They're all being stored inside, upright, at room temp. Are they still good to use?
-
Despite repeating others, all I can say is WOW!!! This build is beautiful...almost beyond belief! (But I do believe!) This is a level of craftsmanship that one can only aspire to...
-
Great job on both! The stowage items on the Bradley look terrific, even if they are suspended by magic! Rivet counters hate 'em, but you can't beat Tamiya kits for overall value and quality. I still have a functioning 1970's Leopard with the dual stick remote box!
-
Great photos! Would like to know how you digitized them from the original slides.