plasticprime
-
Posts
164 -
Joined
-
Last visited
Content Type
Profiles
Forums
Events
Gallery
Everything posted by plasticprime
-
A really unique build that displays a high level of skill and craftsmanship. Terrific!
-
Beautiful build! As previously mentioned, the wheels are especially nice!
-
Looks great! Great job!
-
 Looks great to me! I had the original Aurora Frankenstein release as a kid, along with Dracula and The Wolfman.
 -
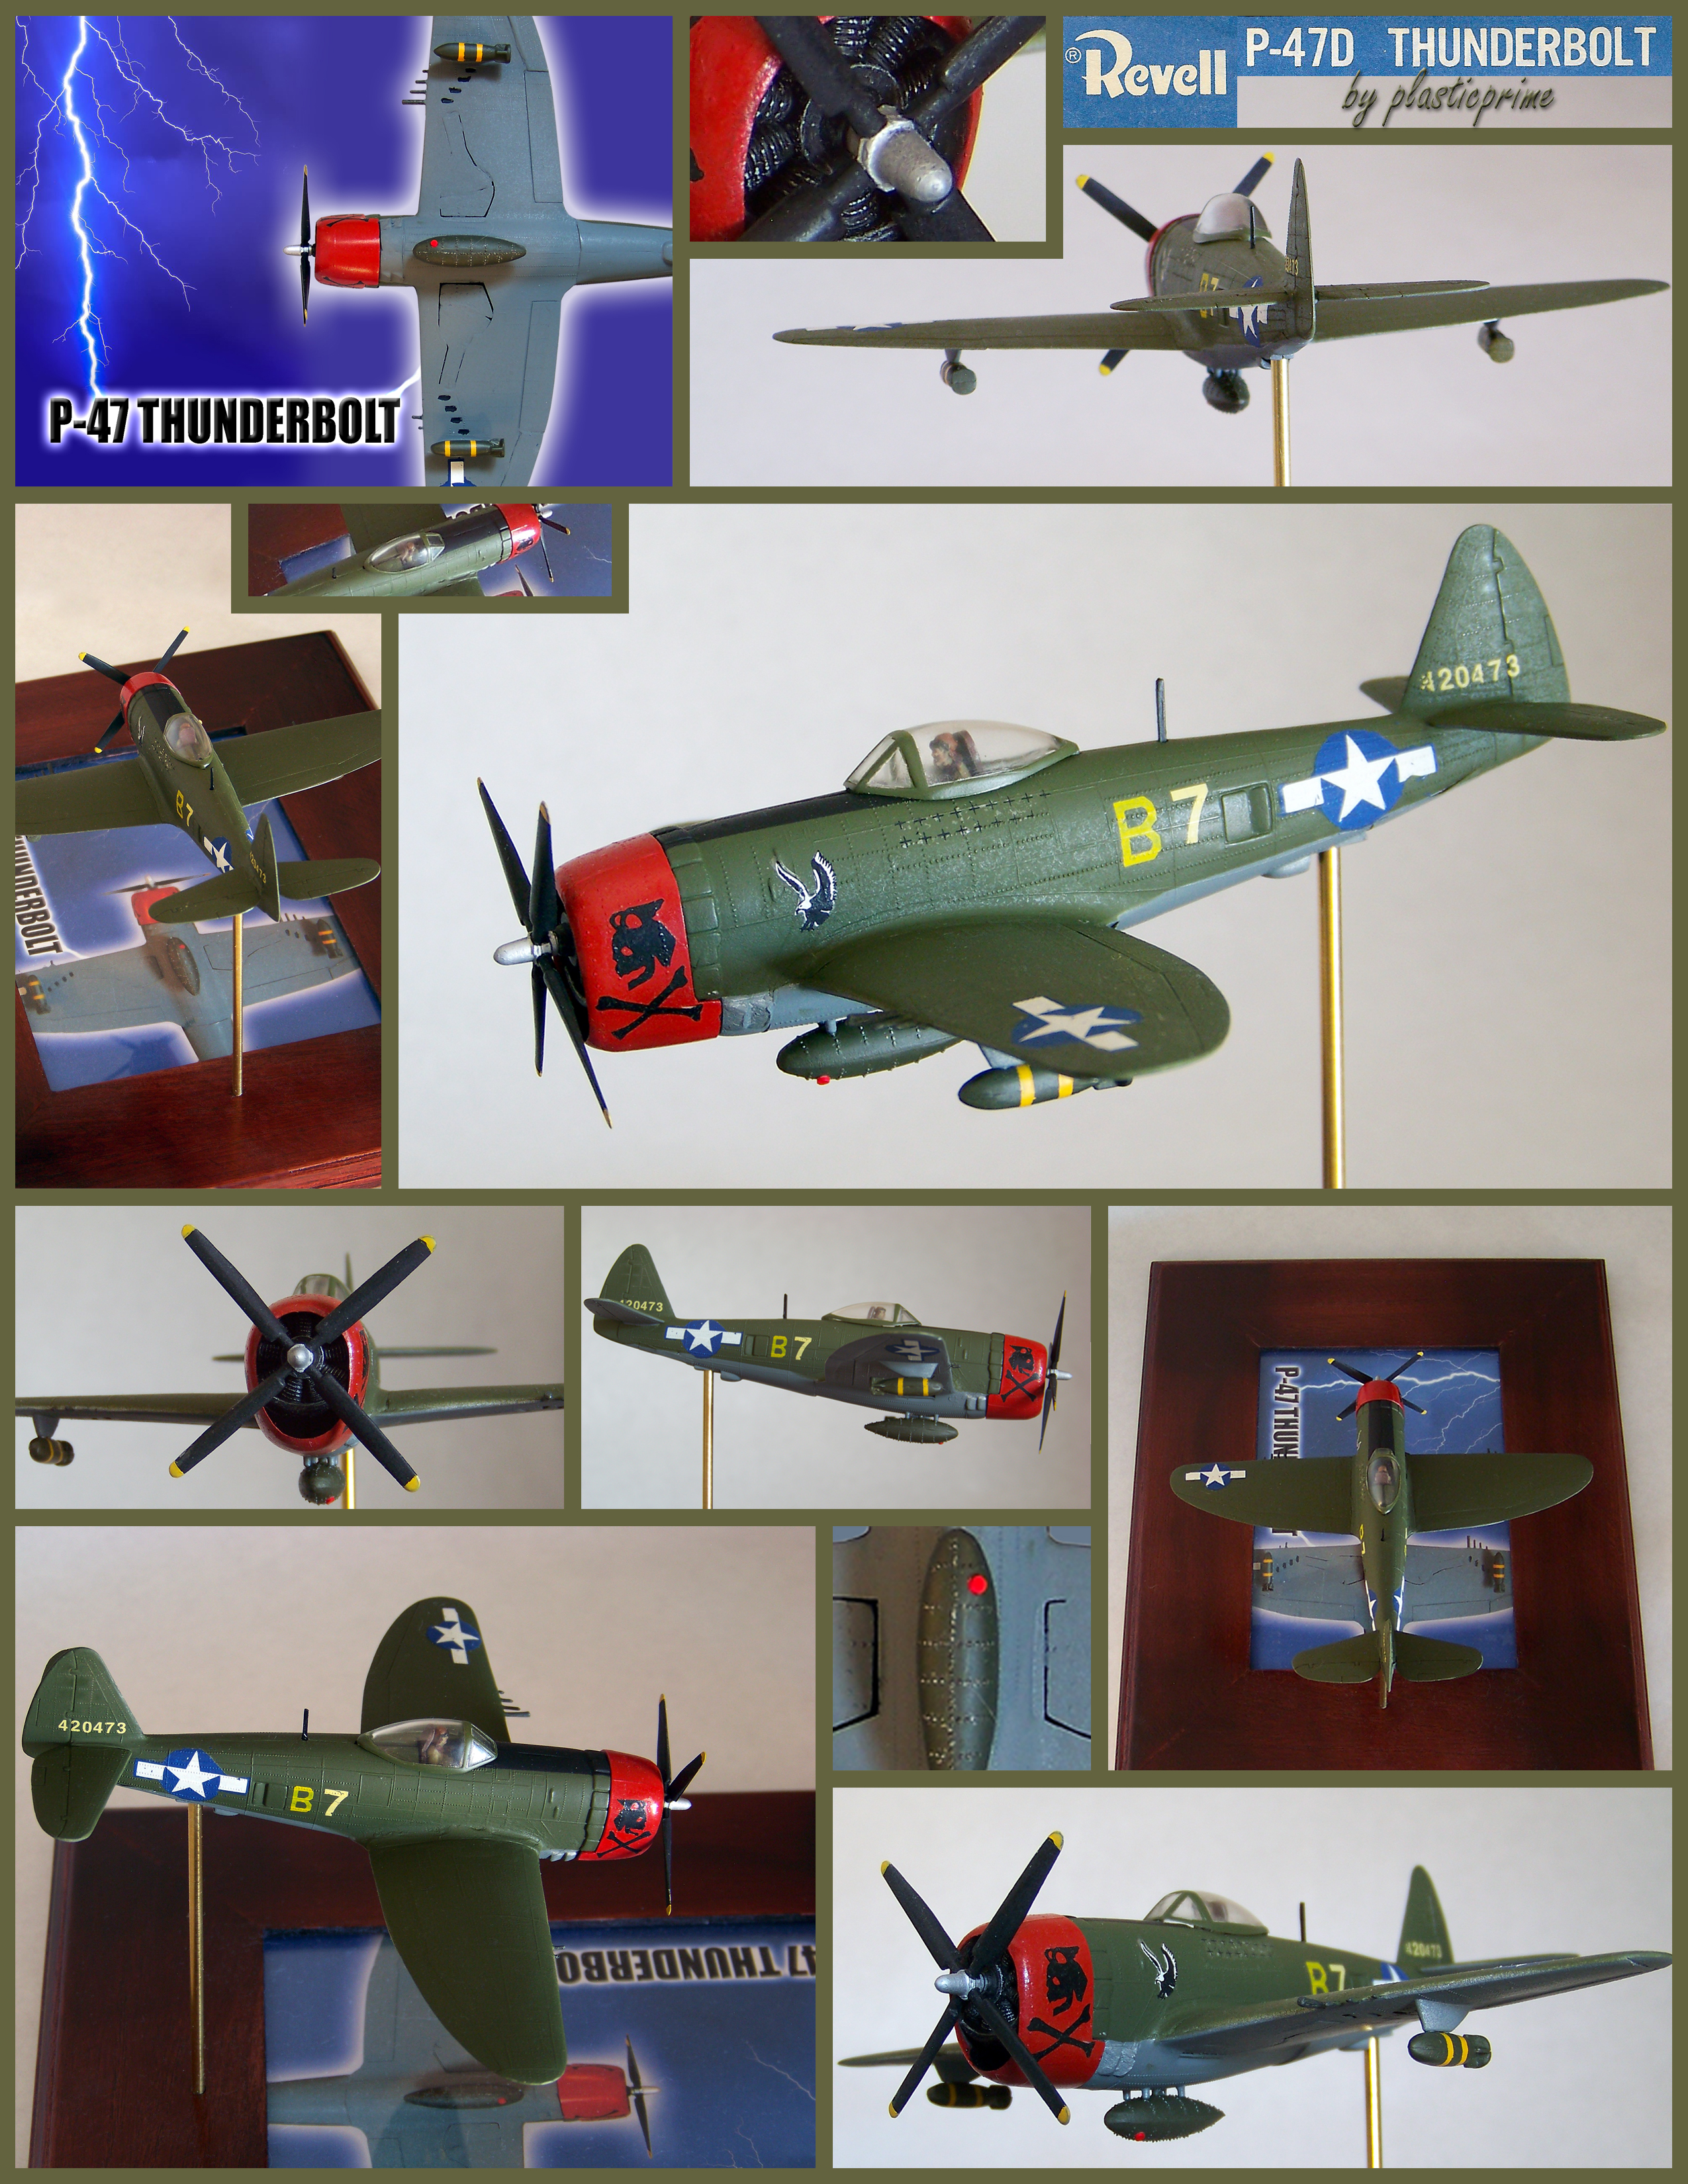
This P-47 was part of a “Battle of Berlin” 1/72 scale kit I purchased in 1976. I had put the fuselage together in “glue bomb” fashion and sprayed it with an old rattle can of Testors silver with the idea of blowing it up with a firecracker as part of a Super-8 film. That never happened and it was thrown into a junk box, which I recently came across. I decided to resurrect it and practice techniques I’ve never tried before. This was my first attempt at masking with tape (all rattle cans - don’t have an airbrush). I still had the original decals, many of which disintegrated upon use, but careful fidgeting with Micro Set & Sol saved some of them. I used yellow dry transfers to fill in the gaps. Back in ’76 I had originally attempted to paint the canopy by hand and then tried to remove the less than satisfactory results with turpentine, which completely fogged it. I found some online tutorials on restoring clear parts and finally got it so you could at least see through it. I scratch built a red fuel cap for the underbelly tank and had to build a new antenna mast. I mounted the finished model on a brass rod and used a picture frame as the base. The picture frame was unfinished, so I sanded and stained it. I created the graphics for the frame and used a photo I took to create the impression of an underbelly reflection. None of this is historically accurate, but I like the way it looks and I think I managed to salvage something reasonable from a total write off.

-
Thanks - I appreciate it!
-
Thanks everyone!
-
Superb build - great in every aspect!
-
Love it!
-
Ford GT 2017 in "Liquid Red" (w/ scratch-built extended rear wing)
plasticprime replied to Tommy124's topic in Model Cars
Amazing work! Paint is flawless and overall build is wonderful! -
This is one of those models where the real accomplishment is just in finishing it, especially true in this case since I started it more than 40 years ago. I bought this kit at a hobby shop out west when I was in college. I had no car, no TV, and just an 8-track player and headphones for entertainment, so building a model seemed like a good stress reliever. I had barely started this when school got in the way and back in the box it went. When it was time to head for home after graduation, I had to cut the box in half to get it in a suitcase. Then it sat in an attic for 15 years or so and finally made a cross country move with me…until…I finally finished it. Talk about delayed gratification. I scratch built some of the parts that been lost or broken, drilled out the grenade launchers, and made a simple base from an old picture frame, which I stained. I added a few accessory items to add a little more interest. The tracks are the kit’s rubber band ones and someday I’ll get around to fixing the sag…say in 40 years or so.
-
I can only echo what has already been said - fantastic build!
-
Top notch work! Excellent in every detail!
-
Love it!
-
Thanks to everyone for the nice feedback!
-
Beautiful build! Terrific job! And the film's been playing lately on some of the over-the-air movie channels. (Speaking of car chases, the one in "The Seven-Ups" ain't bad either - and the director of that particular film was also the producer on "Bullitt" and "The French Connection.")
-
'69 Dart GTS...just like I would have built it in '69
plasticprime replied to pack rat's topic in Model Cars
Love it! Great job! -
This is the Revell snap-together 2015 Mustang kit. This was my first try with aftermarket parts: wheels, tires, and disc brakes & calipers; photo-etched radio dial, speaker grills, and various Mustang emblems; military lenses for the front lights positioned under the grill; and acetate instrument panel dials. The rear-view and side mirrors are from an unbuilt ’69 Mustang kit. I drilled holes in the side mirrors and receiving holes in the body and used thin pieces of wire to act as pegs for mounting. I fabricated exhaust pipes from aluminum tubing. I found some photos of the real headlights, printed them out and cut them to size for the body openings. For the back license plate, I used photo-etched Mustang and GT emblems on the plate holder from the unbuilt ’69 kit. The paint is Testors Mystic Emerald green.
-
Thanks to everyone for the kind words on this build!
-
Thank you!
-
Thank you!
-
Thanks!
-
Thank you!
-
Thanks! Is the HobbyBoss Pilot #1 kit still in production? (The packaging looks kind of old.) FYI: Your comment piqued my interest so I browsed through the reference library. There's an illustration on pg. 26 of the Osprey M26/M46 book (author: Zaloga) that's very similar to the HobbyBoss Pilot #1 box art. There's also a photo of Pilot #2 on pg. 22 of the Squadron Pershing/Patton In Action book (#40). Thanks again!
-
This was my first funny car kit and proved to be quite a challenge. Parts fit was poor, and in my kit there was so much flash it was hard to tell where the flash ended and the parts started. I scratch built the butterfly valves on the blower; used a black wash on the rear wheels; drilled out the exhaust pipes; scraped the chrome from the blower belt and added a yellow decal from an armor kit (.50 cal ammo box - it looks cool anyway); drilled and built mounting pegs for the parachute and fire extinguisher; scraped off the chrome from the front axle nubs and painted them clear blue; and painted the rear brakes red. Body paint was Tamiya Metallic Blue with two coats of Tamiya clear. I didn’t like the decal design on the box art, so I cut the decals and arranged them in a different layout.