BK9300
-
Posts
1,988 -
Joined
-
Last visited
Content Type
Profiles
Forums
Events
Gallery
Everything posted by BK9300
-

Western Star 4900 FA plow truck
BK9300 replied to BK9300's topic in WIP: Model Trucks: Big Rigs and Heavy Equipment
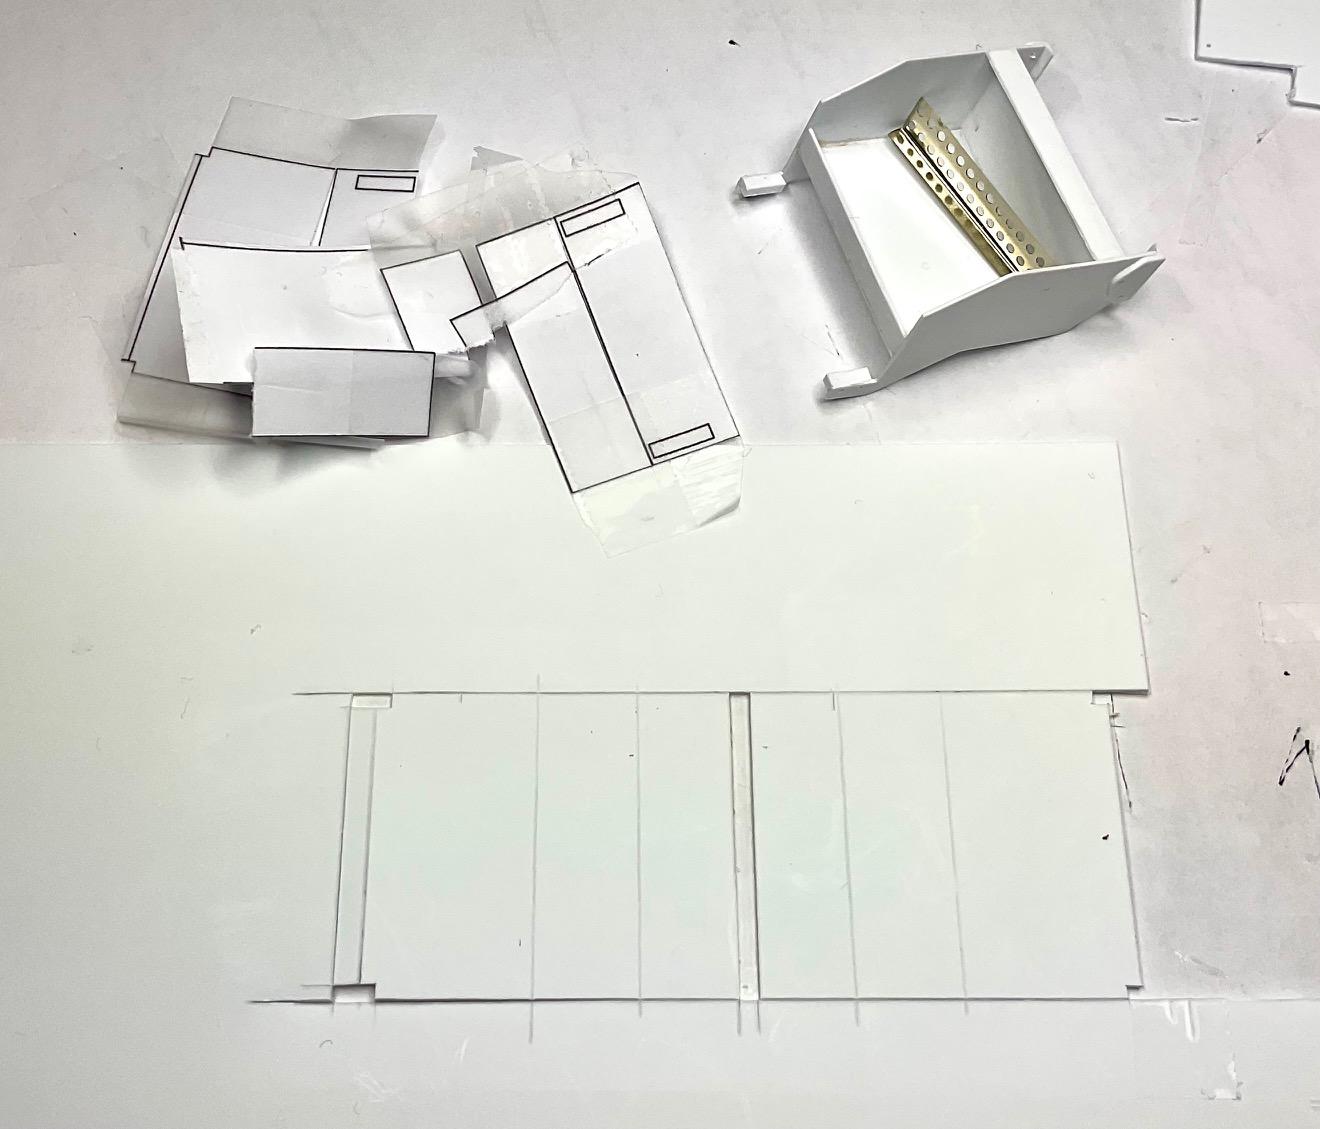
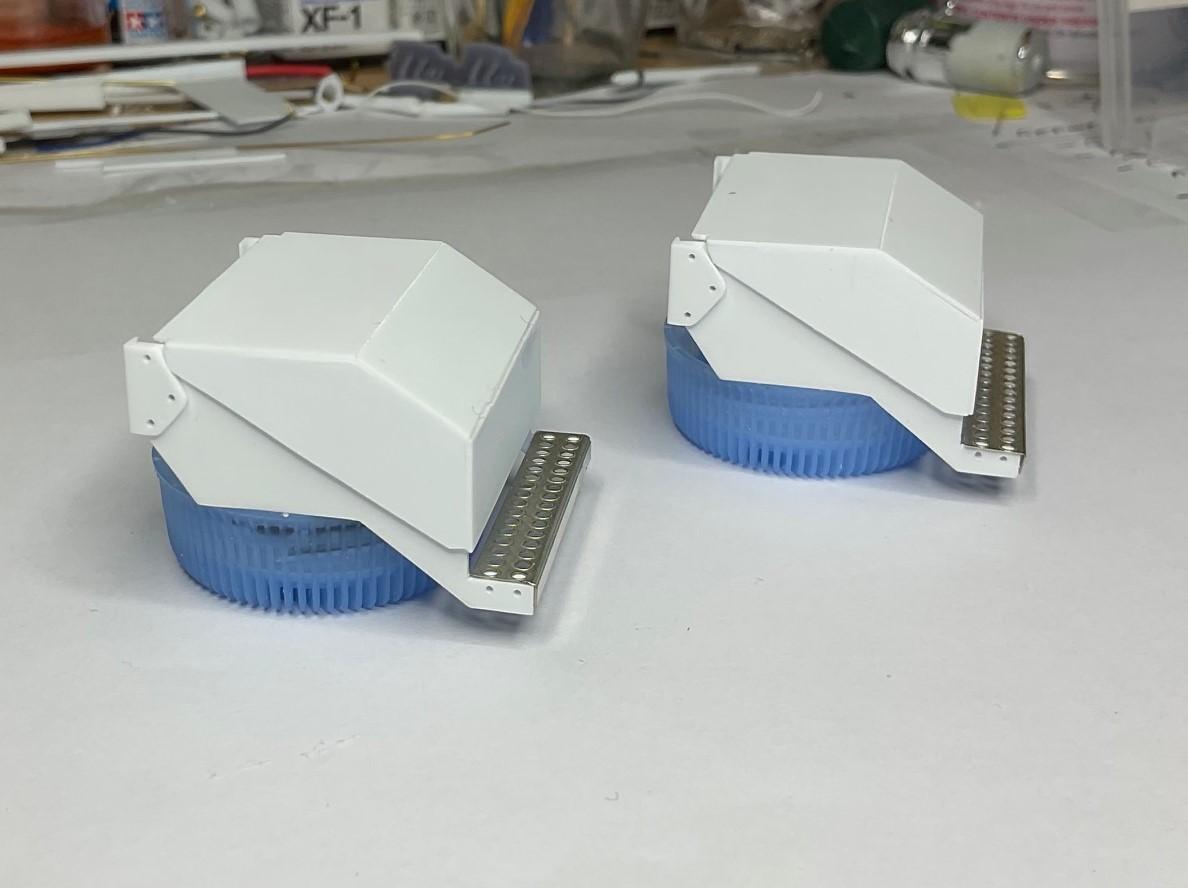
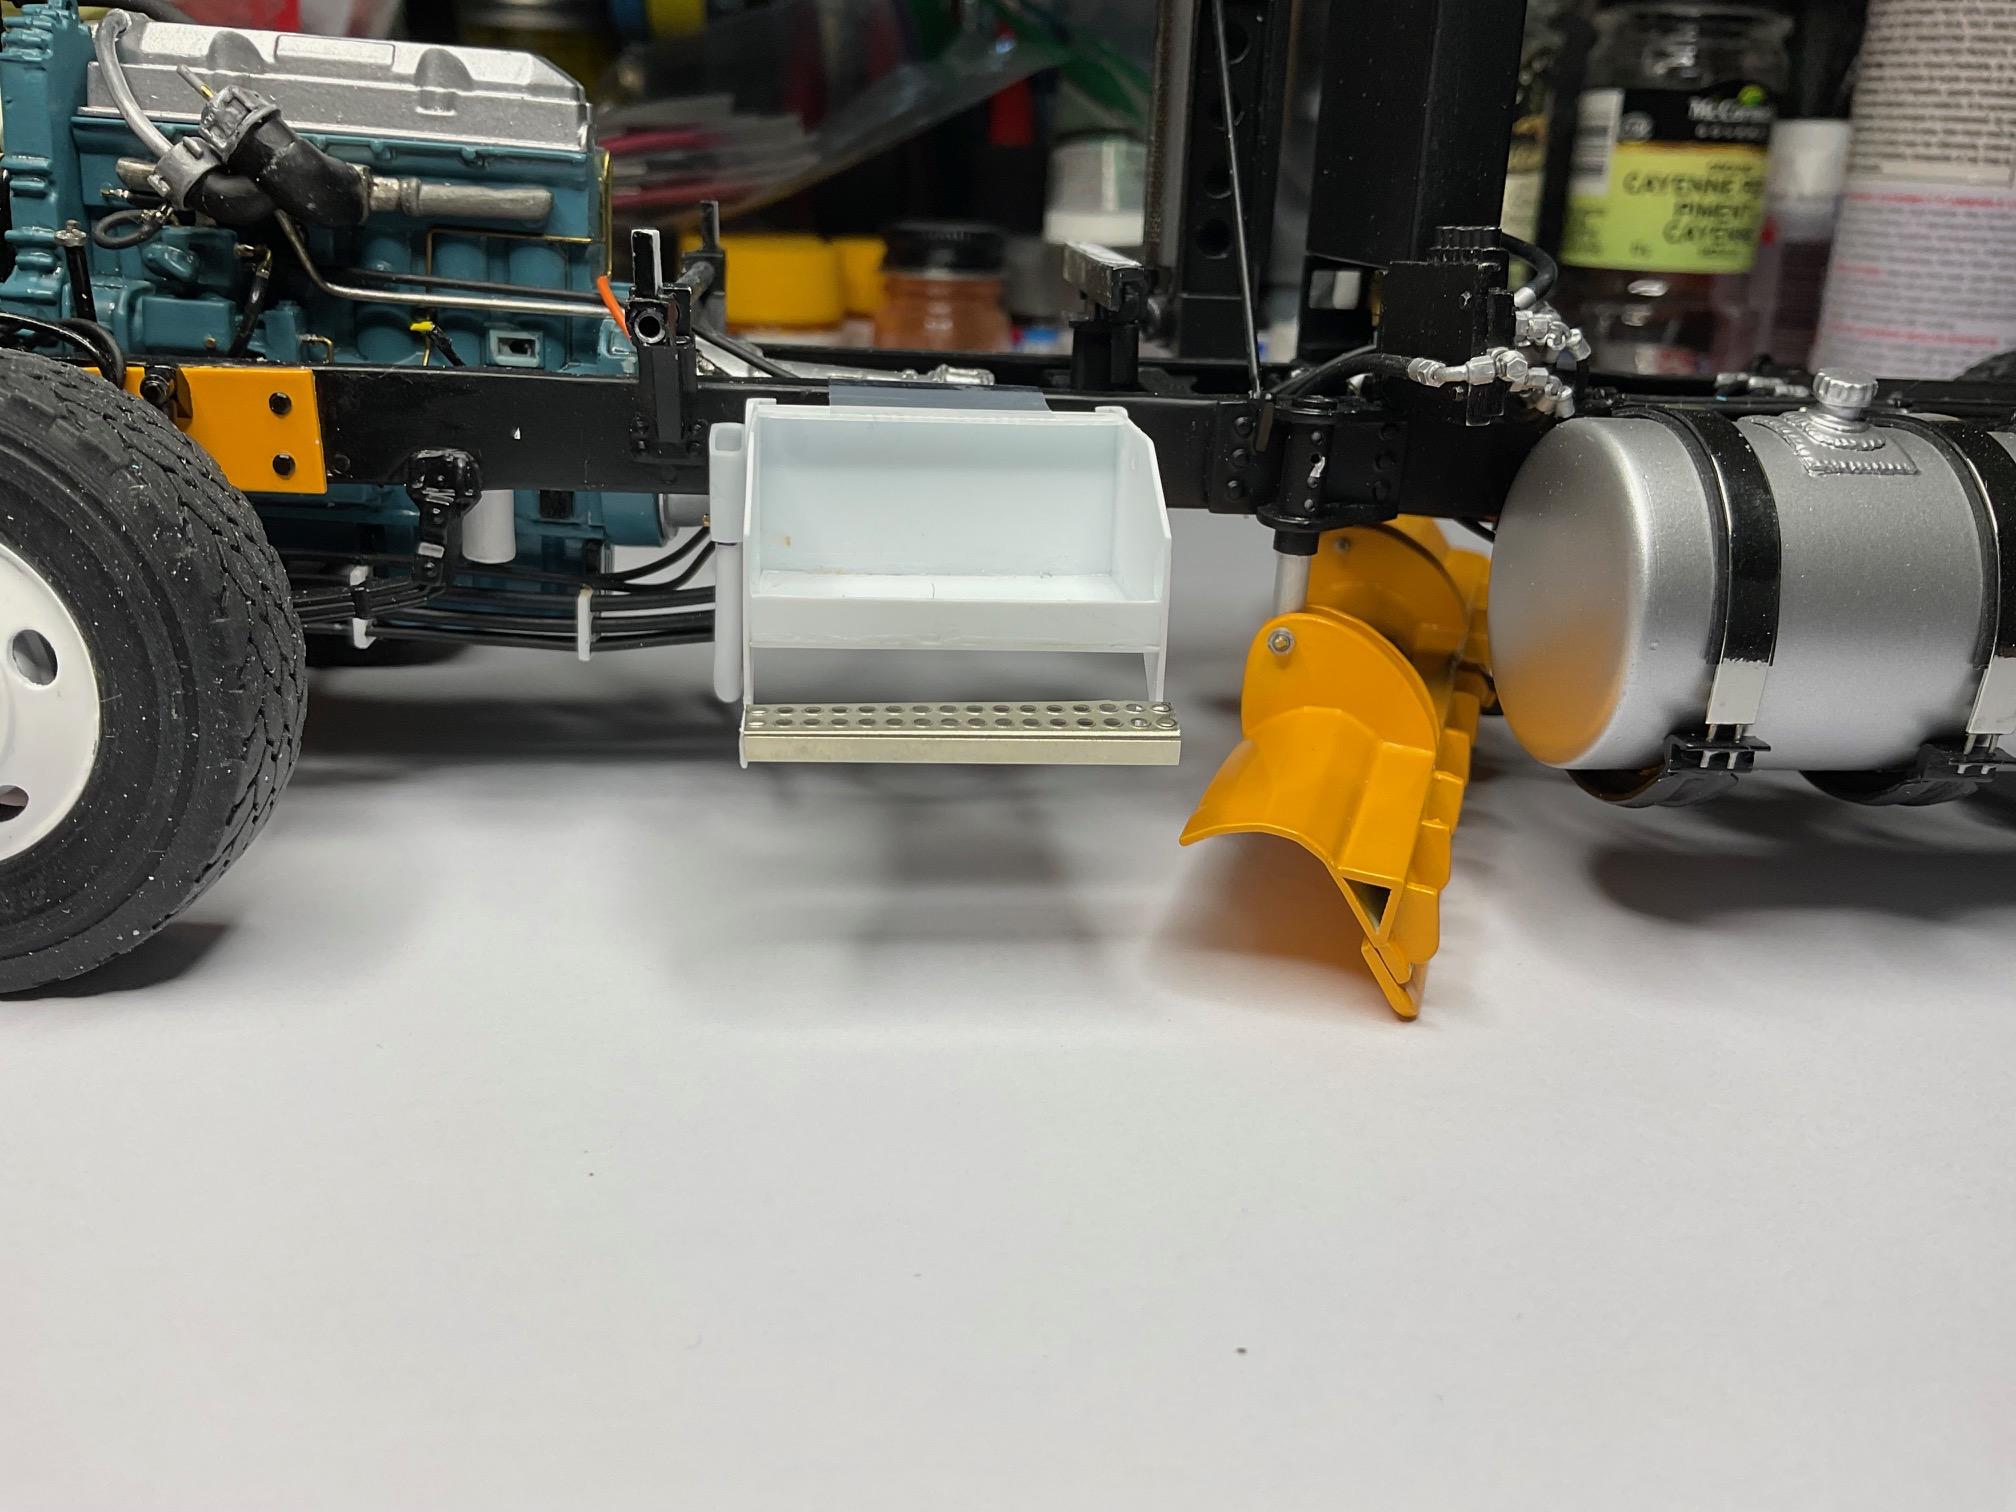
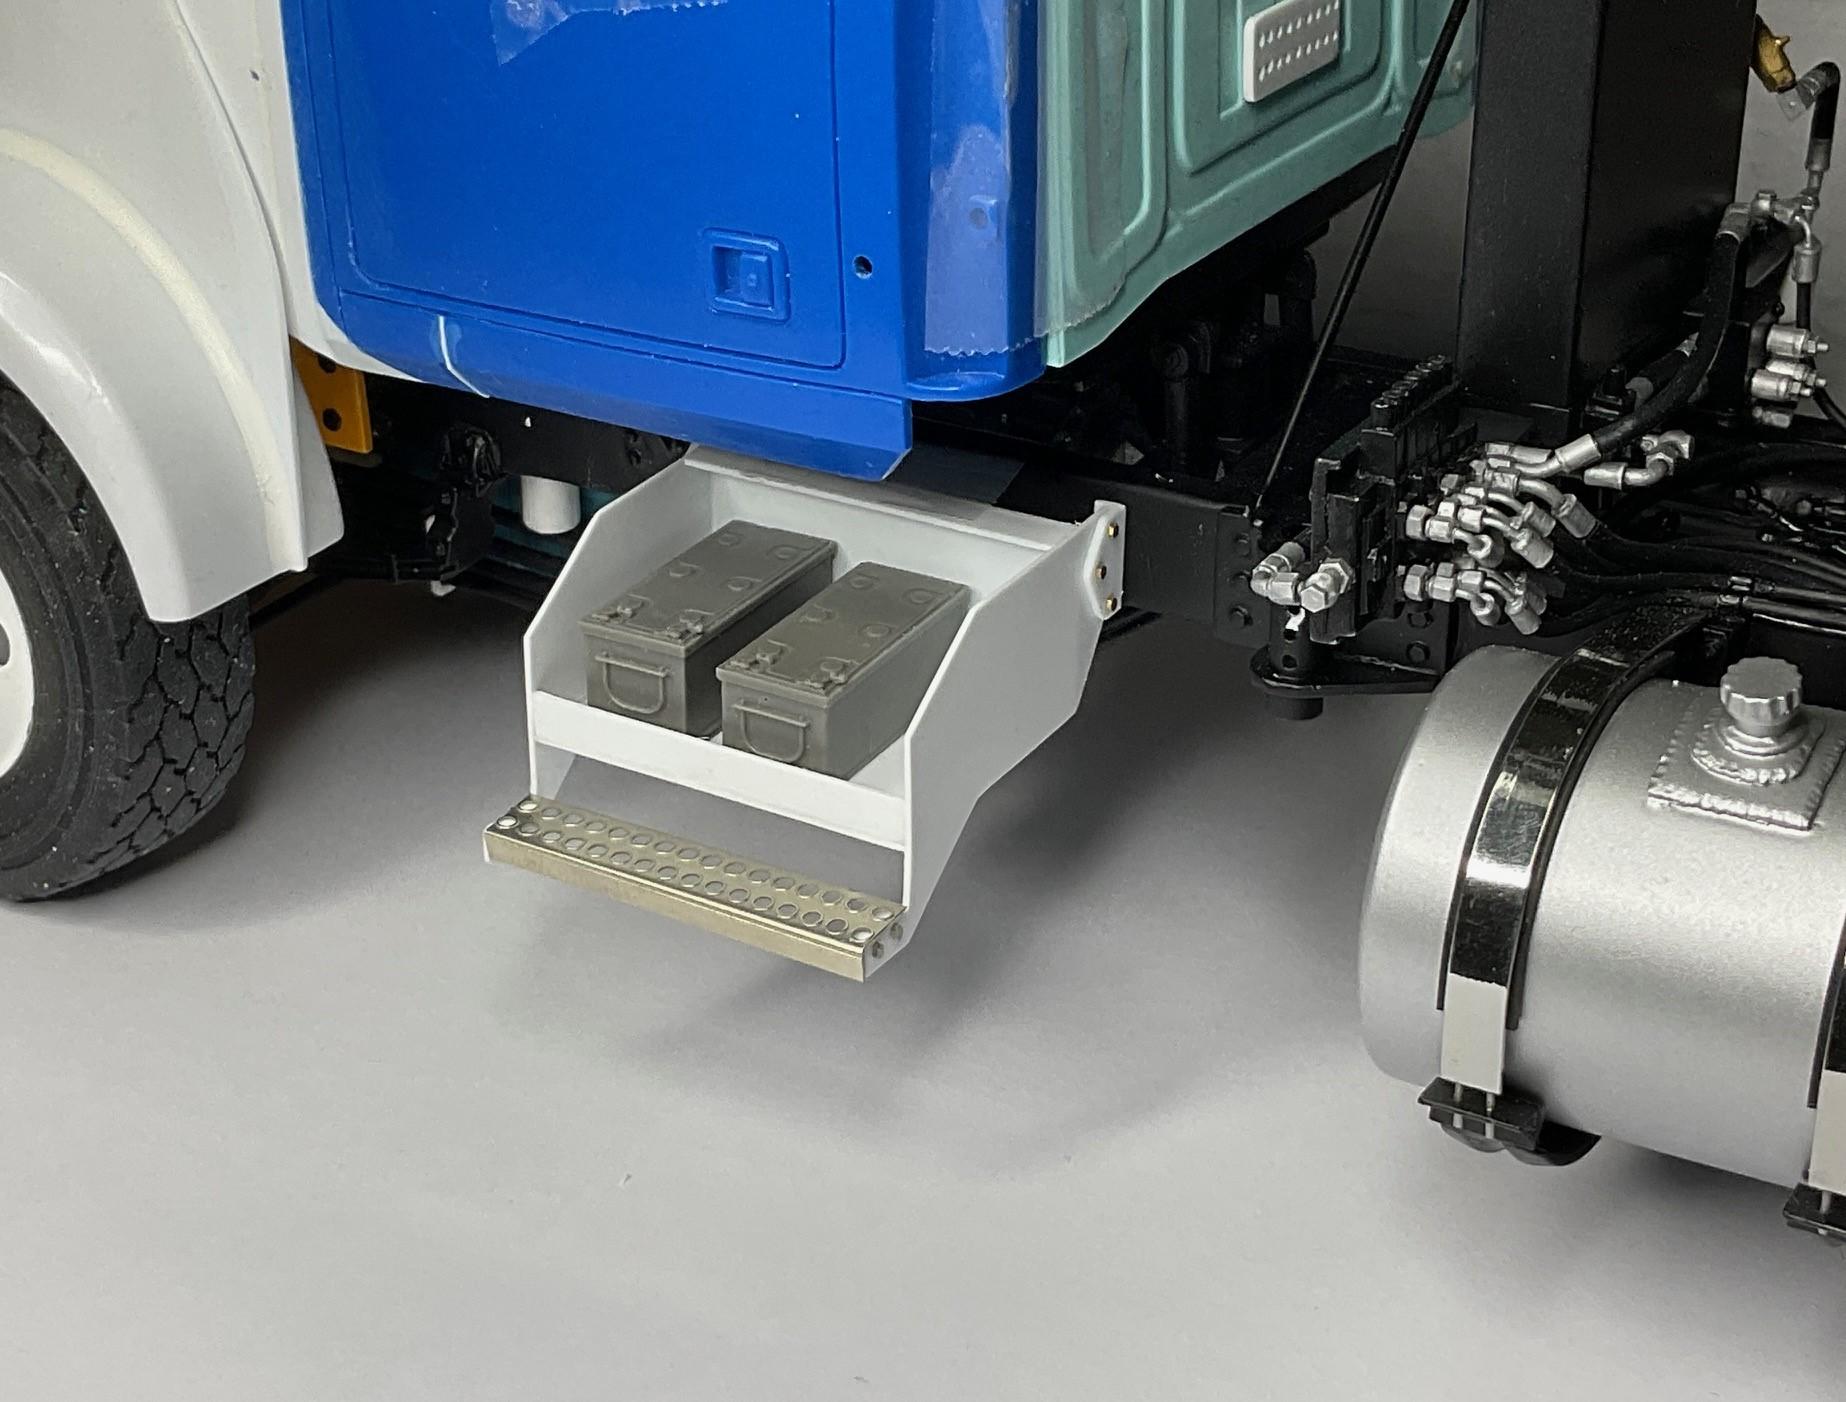
Had a bit of an anxious moment at 4:30 am today - I found myself quite wide awake, wondering if the battery box would be in the way of the underbody plow. So, that was first on the list for today and all turned out ok. Got some more done on the boxes - made the covers that I will now need to see if I can cover with thin, diamond plate from CTM. Set the truck up with the underbody plow in place and mocked up the battery box again - lots of clearance. (step tread looks a bit warped but I think it will lie straight once epoxied in place) More patterns for the covers - scored the cover lids where the bends are needed - Covers are made - I added 'cleats' at the inside, back edges of the covers that slip over the back edge of each box and hold the cover in place. I still hope to attach sets of those little photoetch and rubber hood latches from CTM - more small holes to drill! Once the diamond plate has been epoxied to the top surface of the covers, I will need to add two brackets and a step to each box. Again, the boxes will be painted satin black and I'm leaning towards painting the cover/step assemblies aluminum - there is a bit of room between the covers and the boxes so paint won't bind the covers. I'm hoping to end up with the boxes looking close to this - Thanks again, to all who have a look and thanks, too, for the generous comments along the way!
-
Western Star 4900 FA plow truck
BK9300 replied to BK9300's topic in WIP: Model Trucks: Big Rigs and Heavy Equipment
Thanks, Steve - glad you like all the 'stuff' - I know you're a stickler for the details in your builds, too! Thanks, Jürgen - well, definitely some manufacturing going on, but the production line isn't going very fast! As far as the Marmon - the 'Rolls Royce' of trucks - I don't know if I could make a cab and hood from scratch. -
Western Star 4900 FA plow truck
BK9300 replied to BK9300's topic in WIP: Model Trucks: Big Rigs and Heavy Equipment
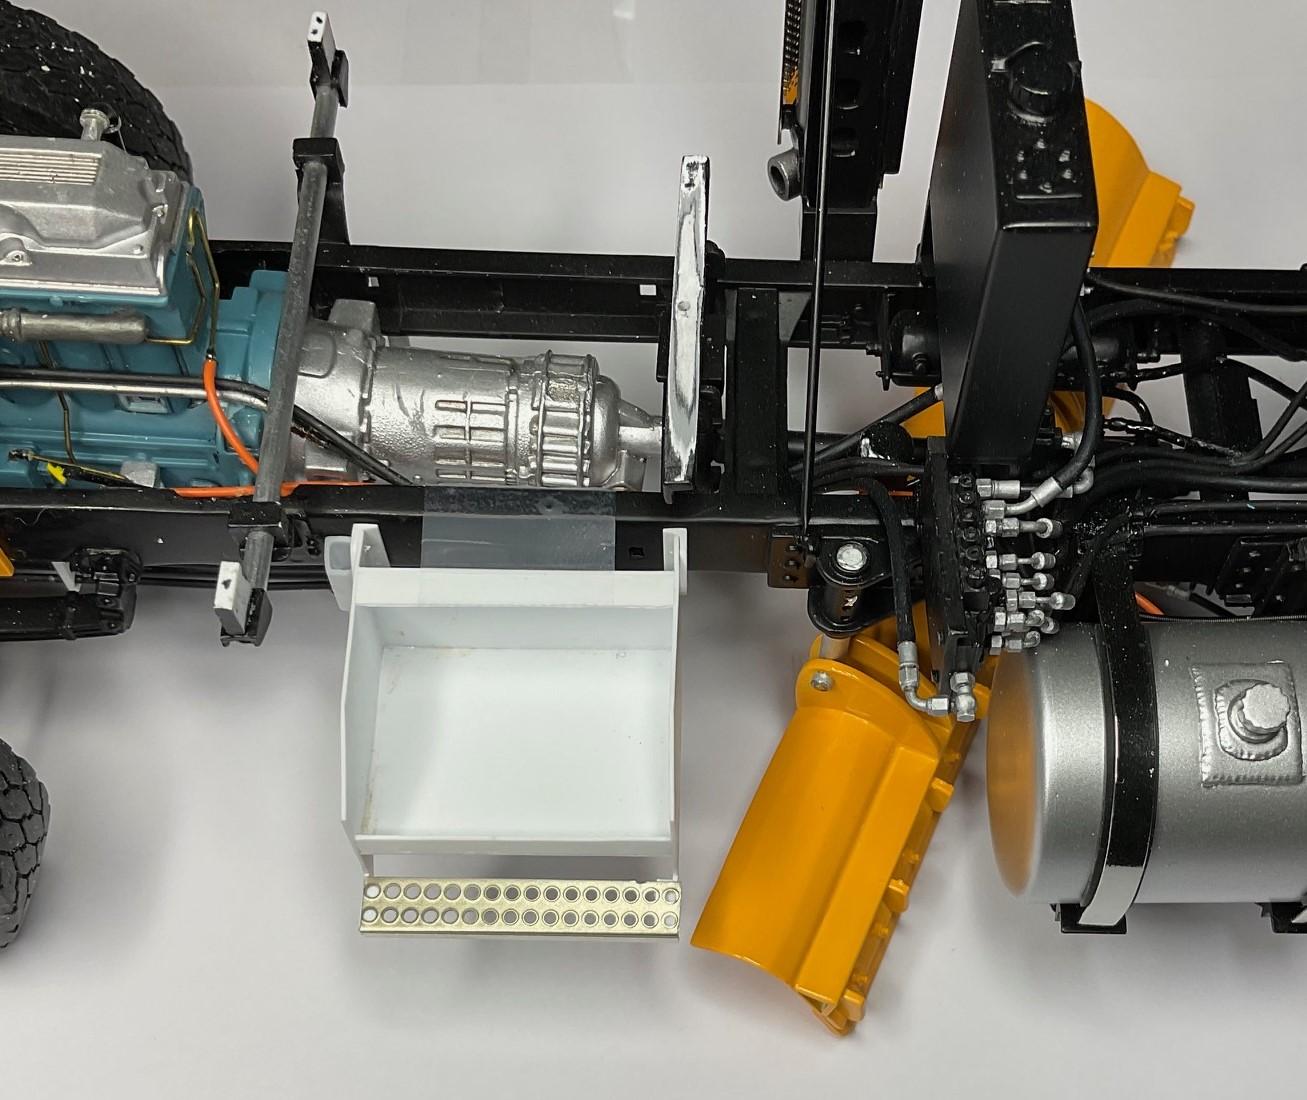
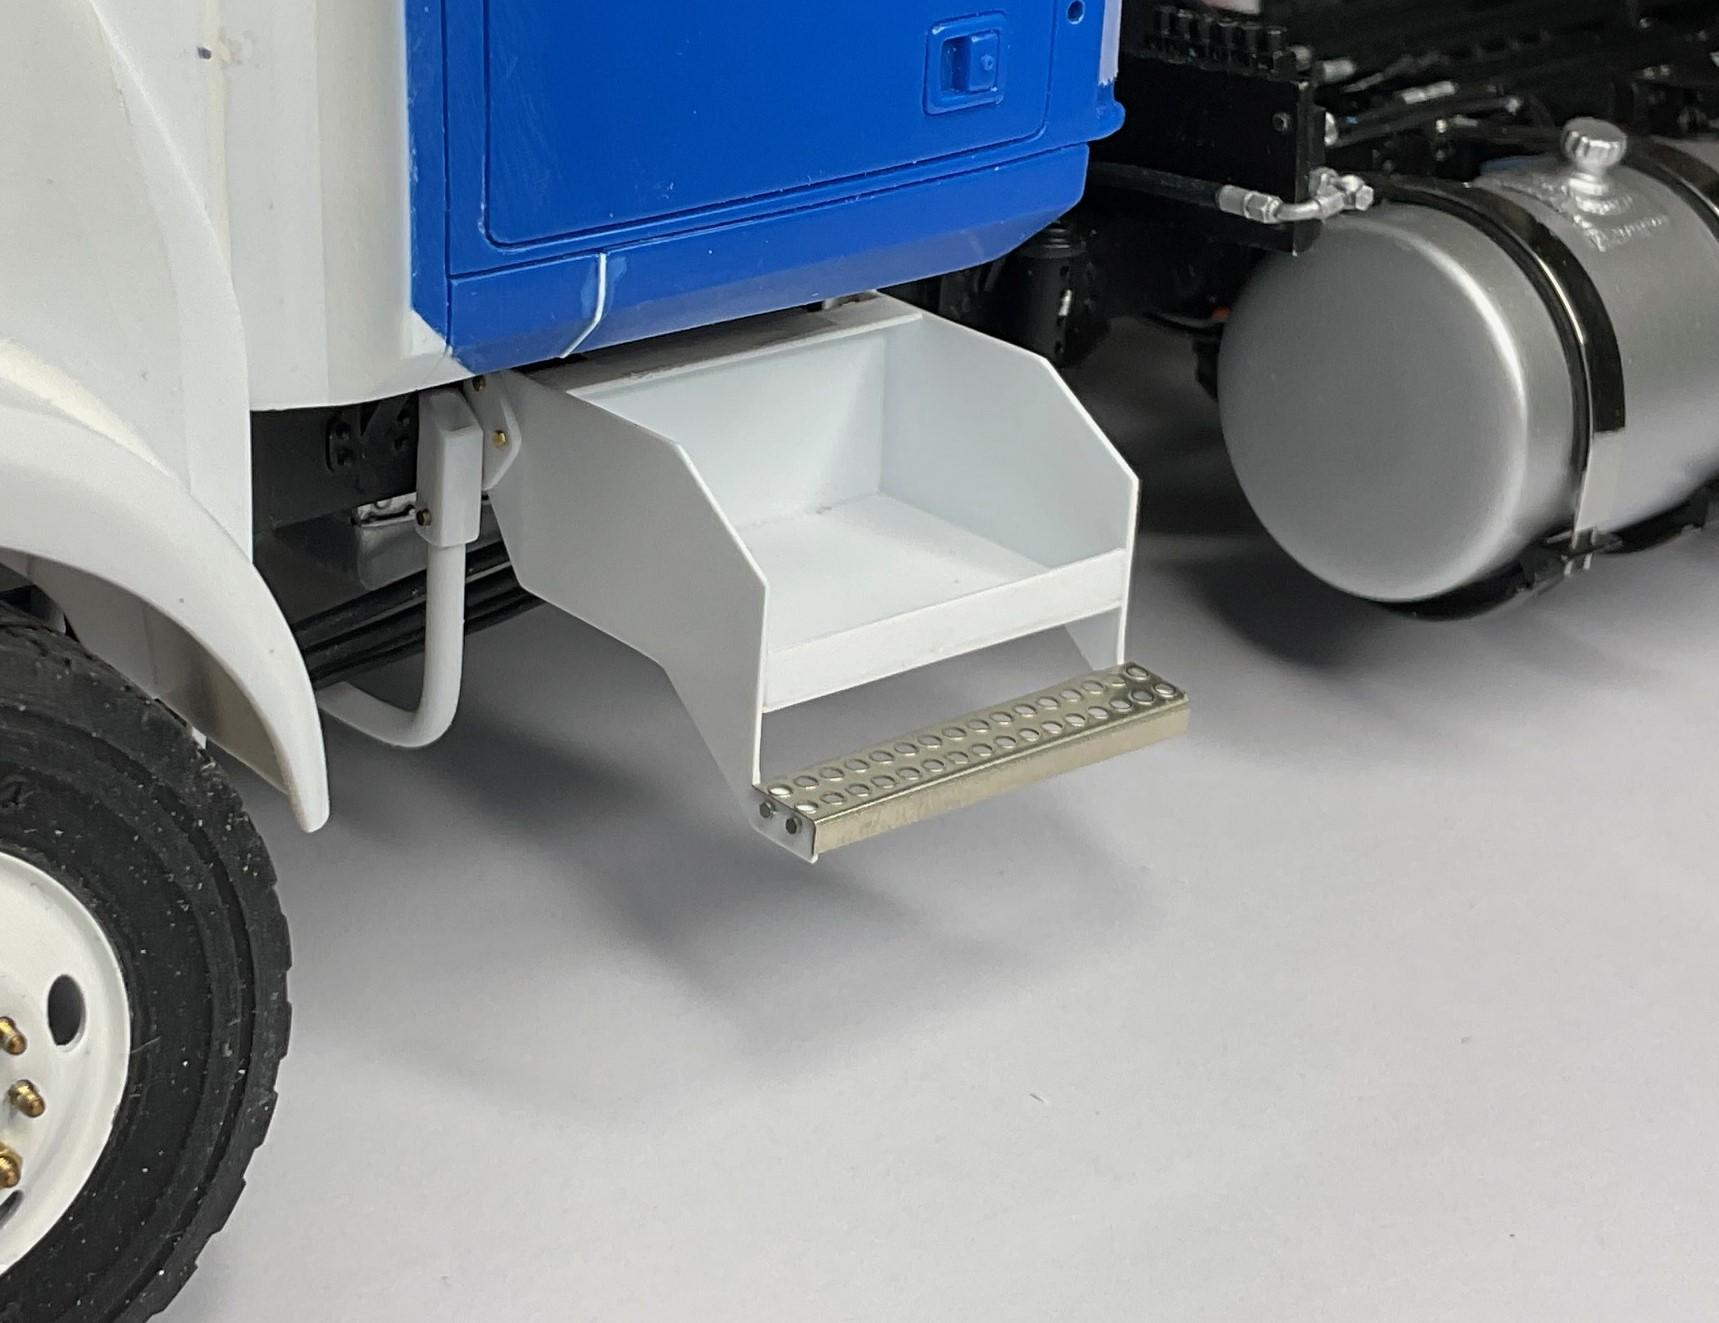
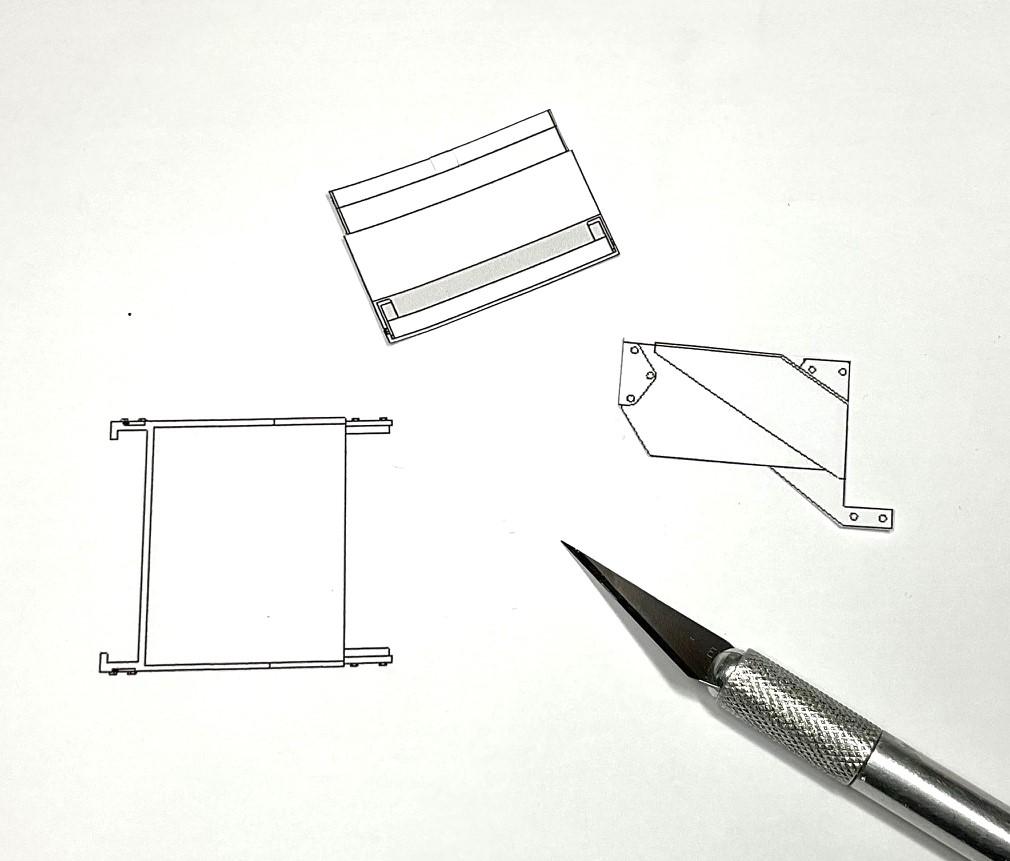
Yesterday afternoon, after taping down the pieces to a piece of 0.5mm sheet, I started cutting the pieces out and soon decided that the 0.5mm stock would look too thick, so I transferred all the cutout patterns to a sheet of 0.25mm sheet and carried on. I did get all the pieces for the battery and tool boxes cut out late yesterday afternoon, but still have more to do for the covers. Did a bunch of sanding and edge truing this morning, then spent the rest of the morning and afternoon solvent gluing all the box pieces together, with wait times in between for joins to set up. I used my aluminum miter box as a line-up tool, to square the starting seams as best I could. Some more hardware to be used - those tiny, aluminum and brass hex rivets from Top Studio will 'bolt' the mounting flanges to the box as well as the supports for the perforated steps from Auslowe. The diamond plate will need to be cut to make the top layer of the covers for the boxes. The basic boxes have been assembled, with some of the pieces for the covers in the background - definitely much happier having used 0.25mm stock instead of 0.55mm - looks more to scale. Managed to cut the metal steps to length using several careful, pressure cuts with an X-acto blade. 'Bolts' are only in temporarily - will need to be trimmed to length and CA glued in. Perforated steps mocked in place - boxes will be painted satin black The underslung cross member and the battery box mocked in place This pic looks like a lot of room between the back edge of the fender and the edge of the battery box. It's that way on the real truck, too - maybe needs to be that way because of the cross member? Don't know the answer to that! The batteries I have are from CTM, but are listed as 'European truck' batteries, with both posts on same end. I also don't know if there are North American batteries like this, but I am converting them to bolt posts, or threaded terminals, and will put the posts on opposite ends of the batteries. Will hopefully get the covers made tomorrow!
-
Western Star 4900 FA plow truck
BK9300 replied to BK9300's topic in WIP: Model Trucks: Big Rigs and Heavy Equipment
Very kind of you, Francis. And about results, sure looking forward to your upcoming posting(s) of progress on your machined engine for the Demon! -
Beautiful build! And I'm still in awe of your diorama setup...
-
Another beautiful creation from your work bench, Germán! You bring very talented skills to your model making.
-
Tremendous job, Mark! You devoted a huge amount of time, dedication and determination to this project and should be rightly proud of the result you have created. Well done!
-
Western Star 4900 FA plow truck
BK9300 replied to BK9300's topic in WIP: Model Trucks: Big Rigs and Heavy Equipment
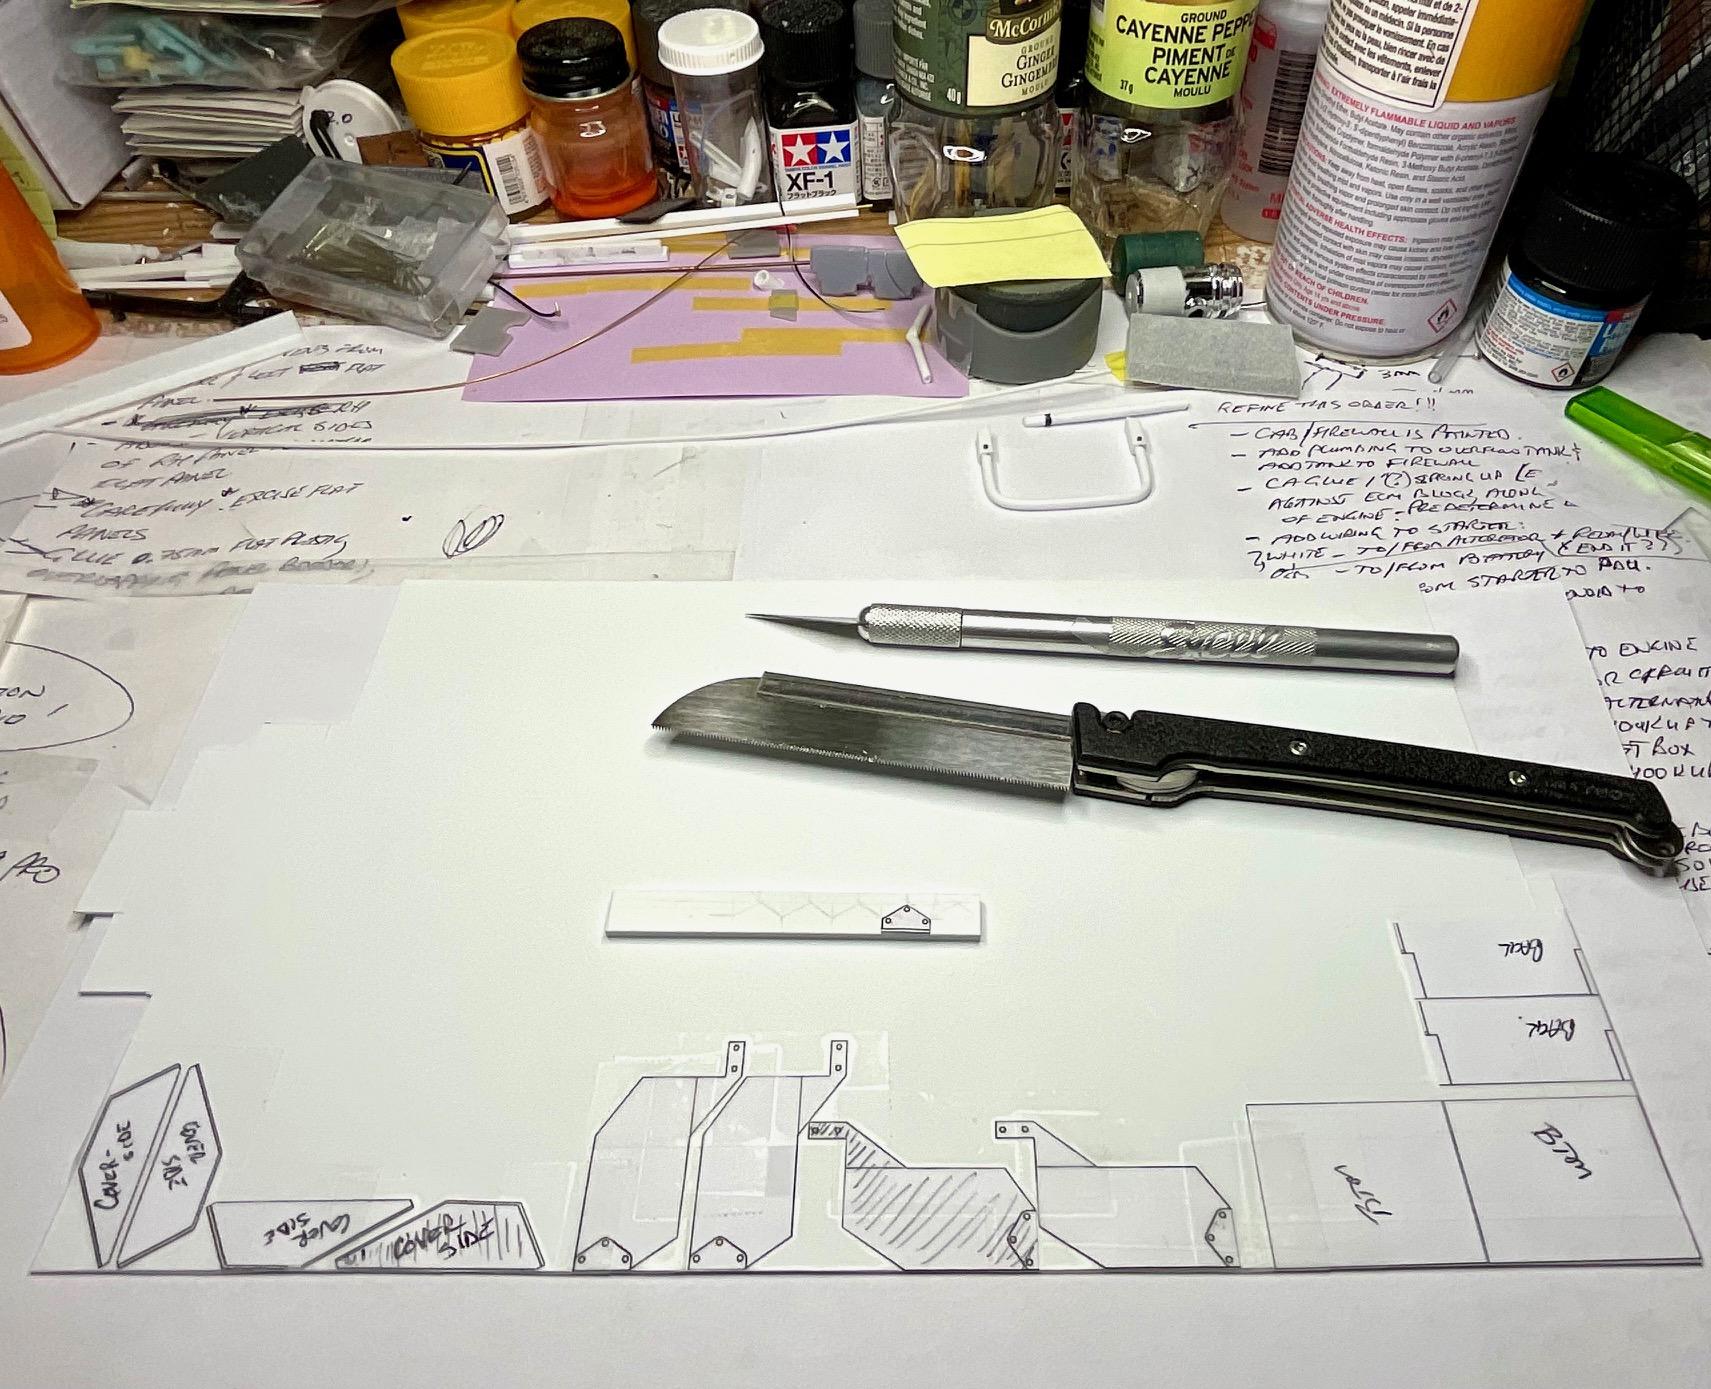
I've not stopped work on the dash, but as is happening more frequently, I'm needing to jump around to get all the finishing to come together. I need to paint the cab, finish the interior, and wire the firewall, which includes a bit of wiring from the engine. I will need to finish the starter wiring and that led me to the battery boxes and my distraction from the dash! So, my list is good for what's left to do - not so much for the order in which to do things. I finished cutting out all the pattern pieces for the battery box / tool box steps and taped them all down to a 0.5 mm sheet of styrene. In the past, on this build, I've cut out the pieces with a razor saw. I read somewhere, recently, of someone simply scoring the plastic and snapping the plastic along the score, like I've done with gyproc. I'll have to give that a try on some of the longer, straight cuts, to see if it will speed up the process a bit! Not much accomplished today, and choosing to cut out parts in this manner has, overall, certainly added lots of extra time to the build, but I get to end up with a custom part and will be certain of having finished battery/tool boxes that are solid and represent the real Western Star boxes. lots more cuts to make. . . I've seen some examples of photo etch battery cable ends available online, but they are very small and I don't always have good luck applying CA glue. So, looking at lots of truck battery pics online, I'm going to modify some resin batteries I have, into bolt post batteries and use some of the Scale Hardware fasteners to bolt the battery cables in place. If I use 0.5mm brass rod, I can use pliers to flatten about 1.0mm of an end, shape it a bit and drill a bolt hole in it. Then I can cut off the flattened section, with a bit of extra length, and insert it into a suitable size wire for the battery cables and bolt them into place. That's the goal anyway. This has become a much more involved project than I first imagined, but it's been a very rewarding experience - both the project's modeling and the opportunity to see all the great work going on in the forum. I very much appreciate all your comments along the way, so, hopefully you can endure to the end - it is in sight! Take care.
-
Western Star 4900 FA plow truck
BK9300 replied to BK9300's topic in WIP: Model Trucks: Big Rigs and Heavy Equipment
Thanks, Steve! Yes, Jeff have a good idea about the punch and I've had success with the dryer in the past, so all worked out well! Thanks a lot, Gary - don't know how you do more than one build at a time - I wouldn't have room or be able to keep things straight! Thanks very much, Mark - I appreciate you having a look! -
Excellent detailing and paint finish, Randy (like the rusting weld seams on your exhaust piping!) - terrific job!
-
1/25 AMT Peterbilt 359 California Hauler
BK9300 replied to cifenet's topic in Model Trucks: Big Rigs and Heavy Equipment
You created a very striking model, Steve - congratulations on a job well done! -
Nice tribute to your Dad’s truck - great memory to preserve.
-
D9R Armored Bulldozer
BK9300 replied to Scale-Master's topic in WIP: Model Trucks: Big Rigs and Heavy Equipment
That’s a real brute of a machine - would be humbling to stand beside one in real life! -
69 Dodge Polara CHP Cruiser in Queue.........
BK9300 replied to Scott Eriksen's topic in WIP: Model Cars
Great job with the foil work, Scott. Your interior is going look like the real deal when your done, too! -
Western Star 4900 FA plow truck
BK9300 replied to BK9300's topic in WIP: Model Trucks: Big Rigs and Heavy Equipment
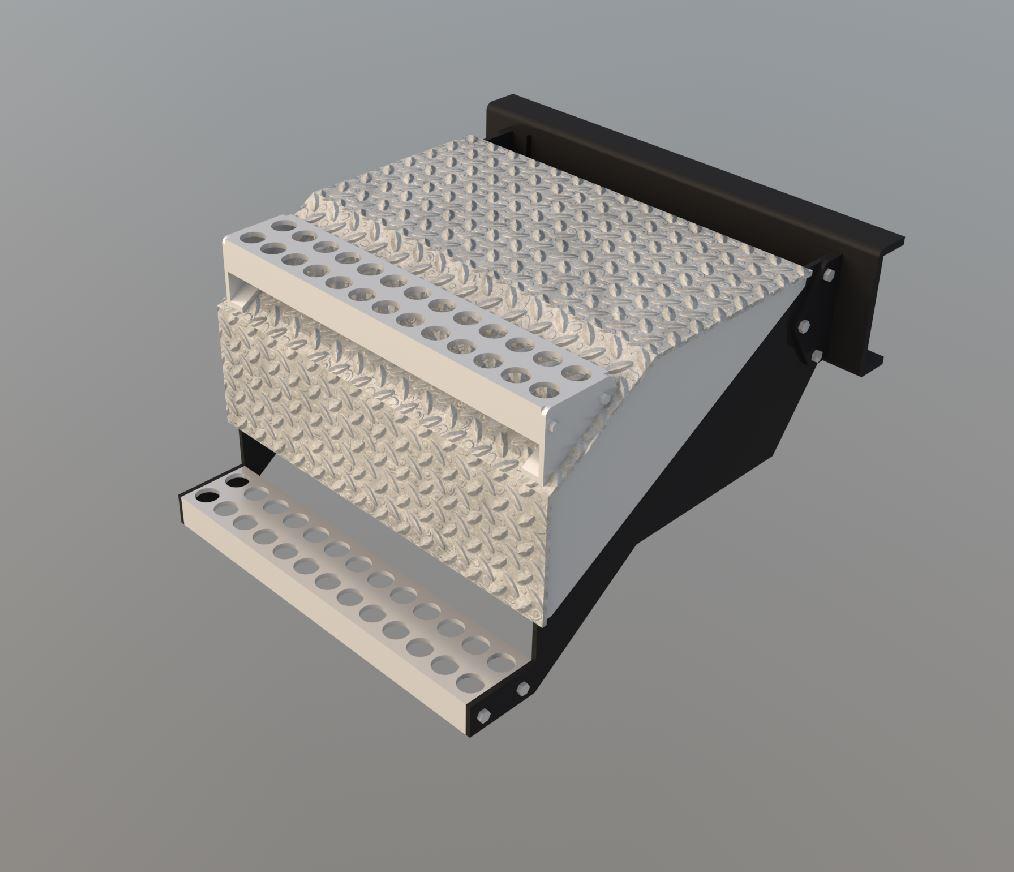
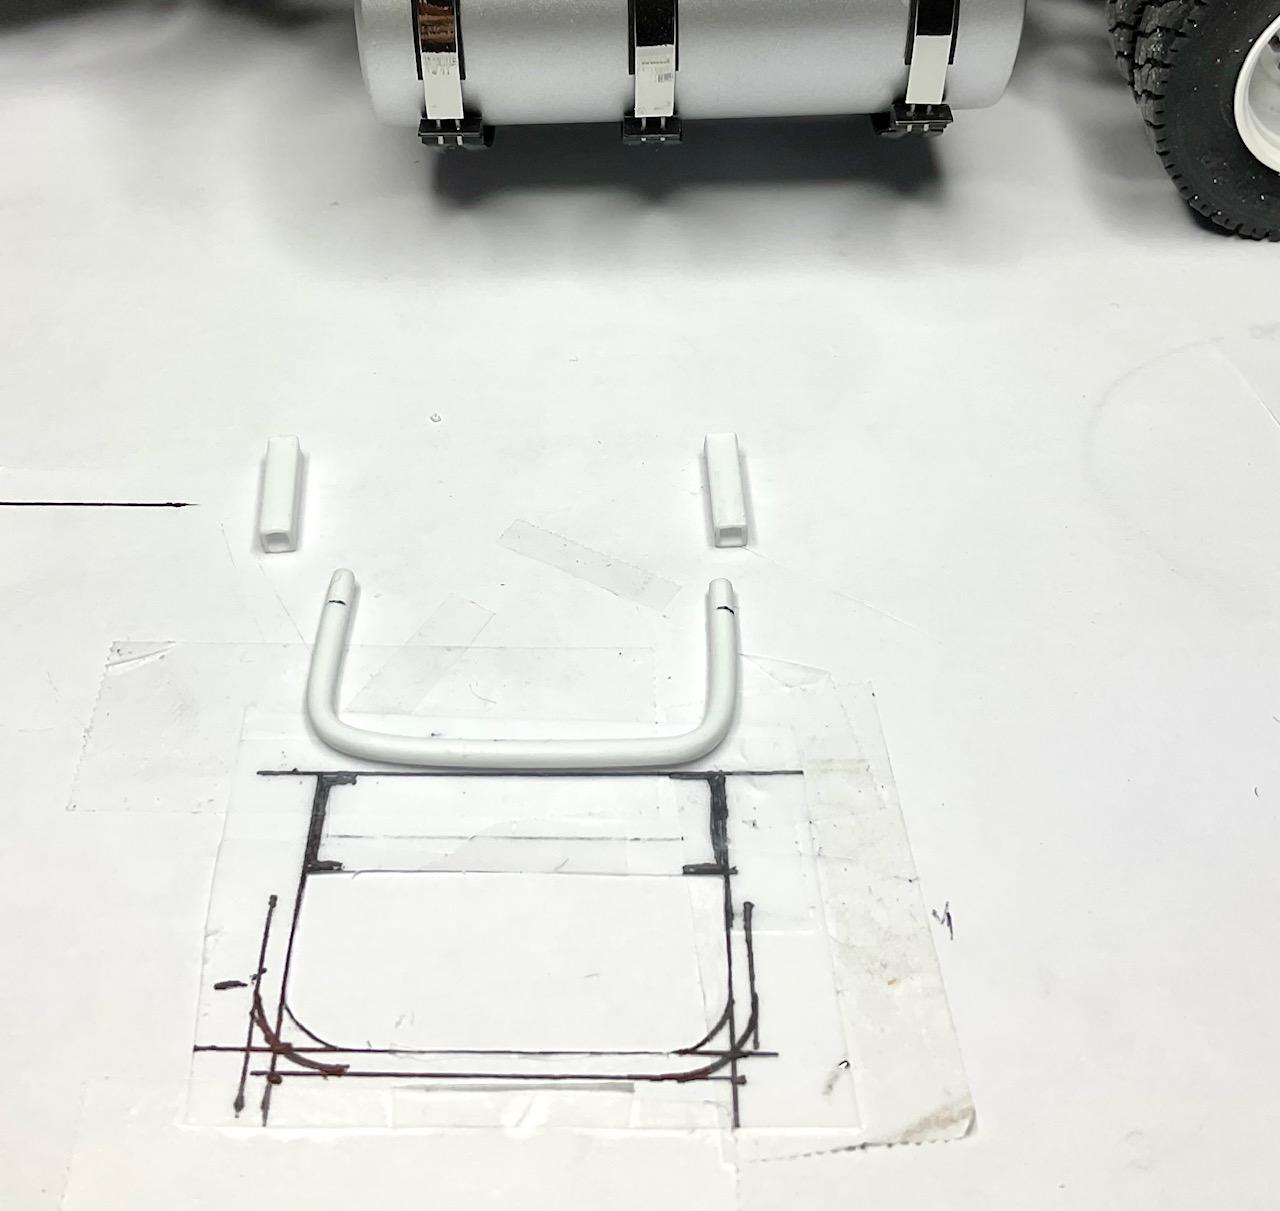
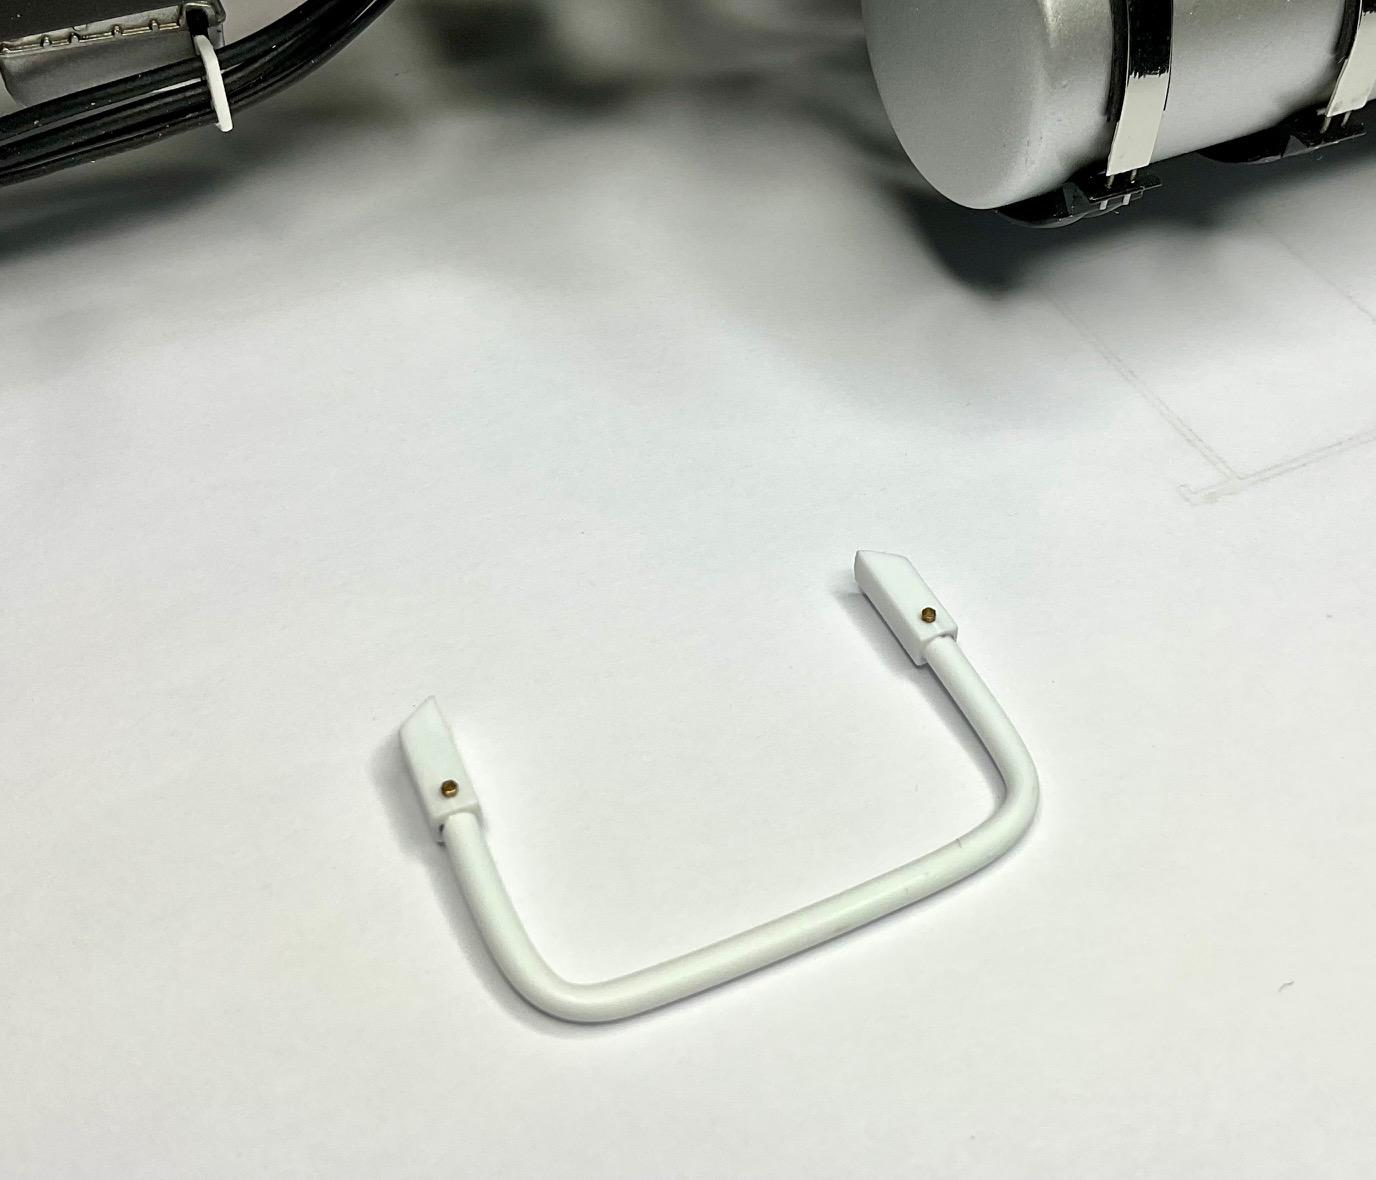
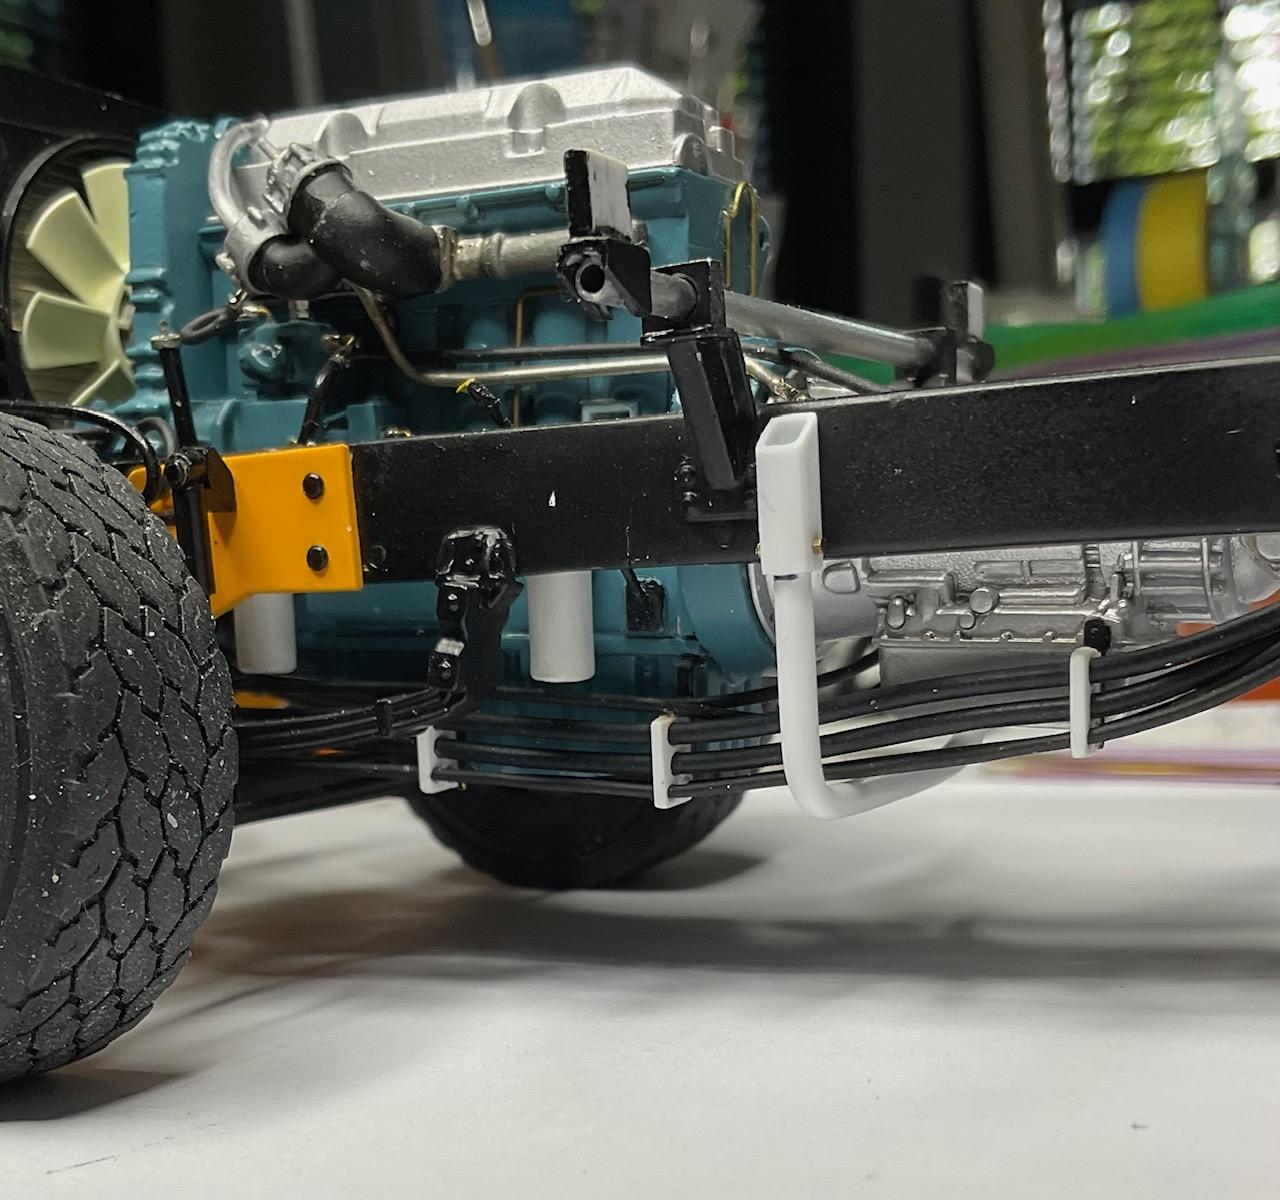
After the work I did on the dash yesterday, I am now undecided about clear coating the dash - not sure I could suffer the decals being damaged. I'll either need to experiment on some of the extra dash inserts I have, or invest in a UV light and use clear, curable, resin as gauge glass. Still need to do paint touch ups and can't brush paint any kind of area with lacquer so more masking may be in the future! While deciding that, it was onto other things. Little bits keep getting added to the 'to-do' list. I added one yesterday but was able to get it off the list today - I saw in a couple pics of the real truck that I had missed an underslung cross member that sits slightly rearward of the front of the transmission housing. Also got a start on printing patterns from Sketchup for the battery box/step and it's twin, a tool box/step on the passenger side. This is the cross member that I missed adding along the way - I initially tried to form the 2 mm rod using a candle - that was a failure! Ended up using an old hair dryer and got a decent result. The cross member and frame mounts are bolted together using Scale Hardware fasteners A couple mockup pics of the crossmember in place - the second pic shows frame mount slightly lower as in the pic of the real truck The battery box and tool box steps will butt up against the edge of the cross member frame mounts - did a few checks with the cab in place to confirm and match against pics of real thing Driver's side battery box/step modeled in Sketchup - the step treads will be photoetched items from Auslowe, purchased from ST Supply, and the metal, diamond treadplate is from CTM - not sure how the step brackets will be attached to treadplate, but likely drill a couple holes under each step bracket and use epoxy or Scale Hardware fasteners. The 'aluminum treadplate' cover/step assembly is designed to hook over and onto the box frame along the edge of the cover nearest to the frame. The sides of the cover will also be held in place with CTM, rubber hood latches, hopefully! All the needed patterns have been printed, with a couple cut out, ready to be taped down to styrene sheet and cut out with a razor saw. Should be able to get these two boxes made relatively quickly - I'm thinking the most difficult part of these will be securing the hood latches in place strongly enough. Good enough for today, and thanks for having a look!
-
Western Star 4900 FA plow truck
BK9300 replied to BK9300's topic in WIP: Model Trucks: Big Rigs and Heavy Equipment
Thank you, Francis! I'm finding the finishing detailing very taxing - it seems that the building of the various sub-assemblies (sander, plows, hydraulic system) were done with much less stress than these fiddly, finishing details. But, 'in for a penny', etc - will carry on! -
Western Star 4900 FA plow truck
BK9300 replied to BK9300's topic in WIP: Model Trucks: Big Rigs and Heavy Equipment
Thanks very much, Jürgen! -
Your builds are always so masterfully painted - very rich looking interiors, too.
-
Western Star 4900 FA plow truck
BK9300 replied to BK9300's topic in WIP: Model Trucks: Big Rigs and Heavy Equipment
Thanks, Jeff - the punches worked out well. -
Western Star 4900 FA plow truck
BK9300 replied to BK9300's topic in WIP: Model Trucks: Big Rigs and Heavy Equipment
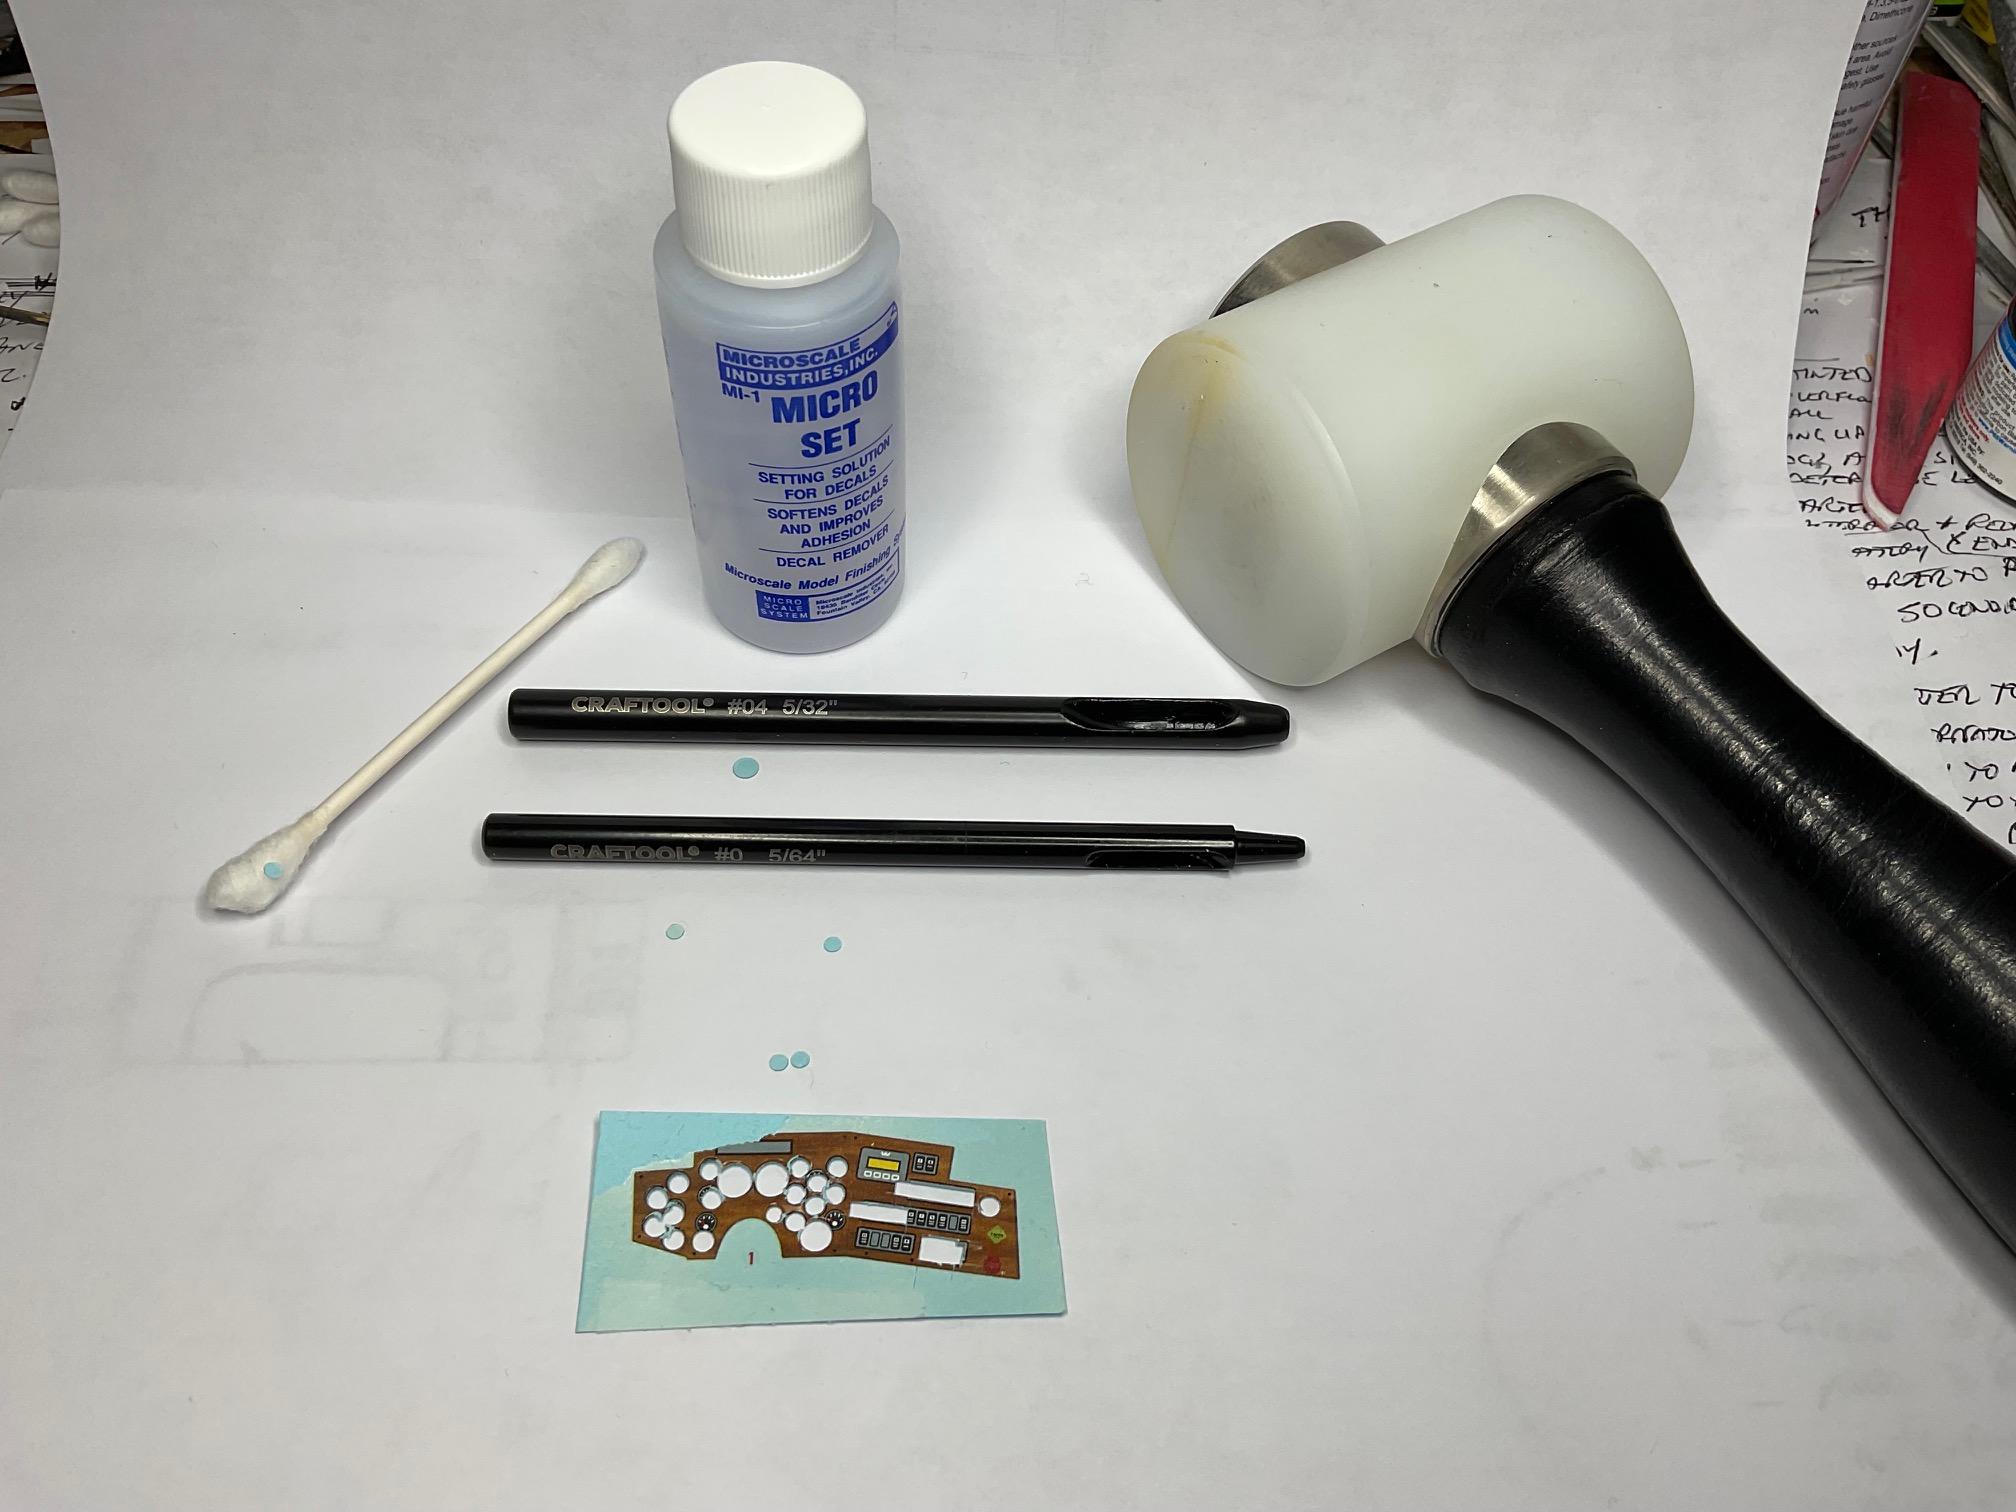
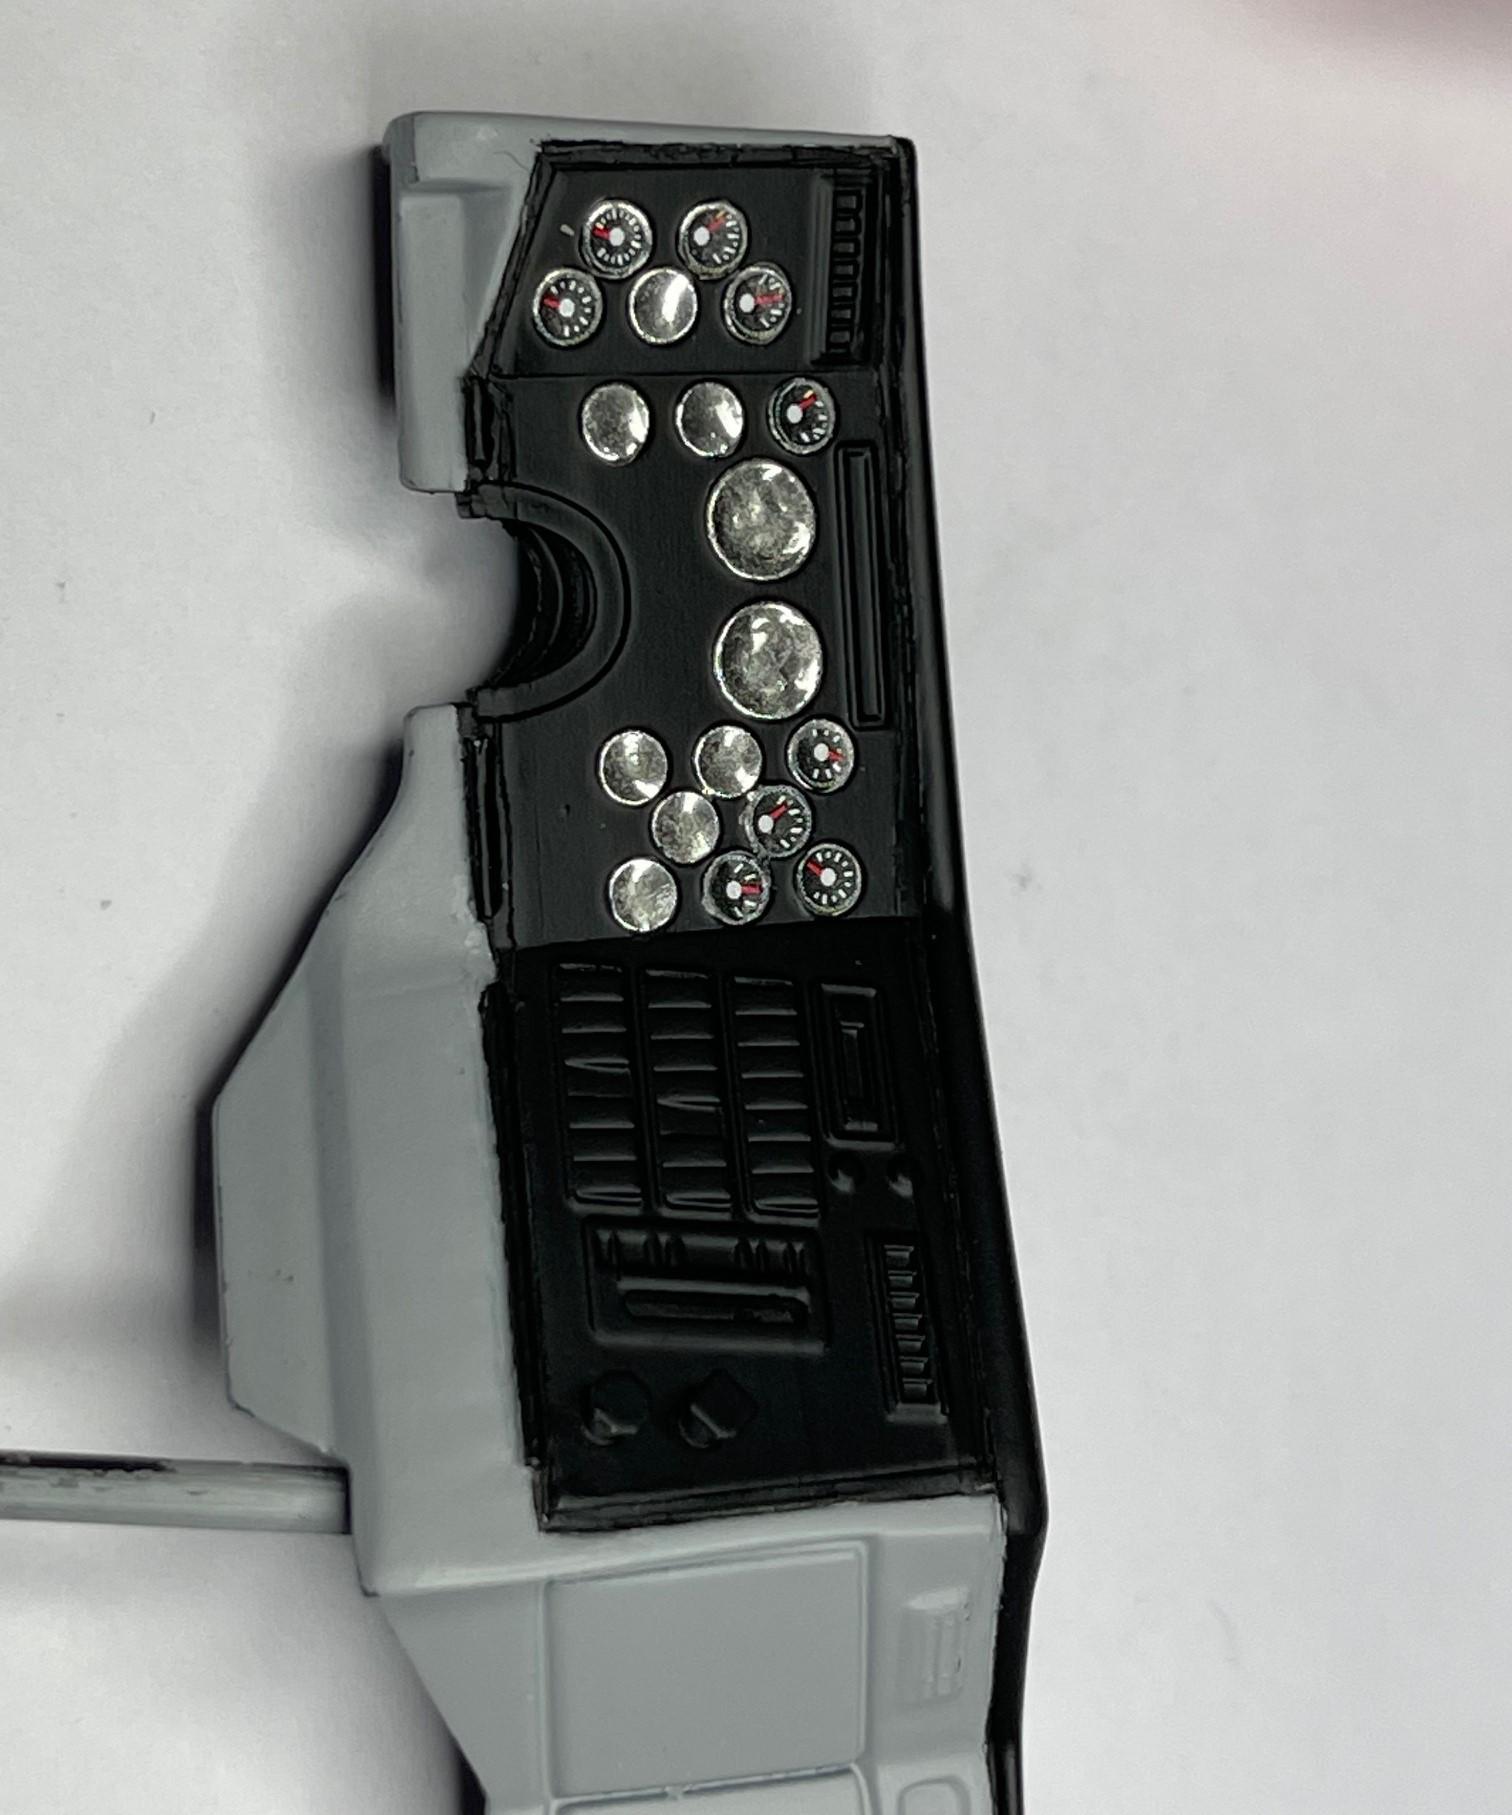
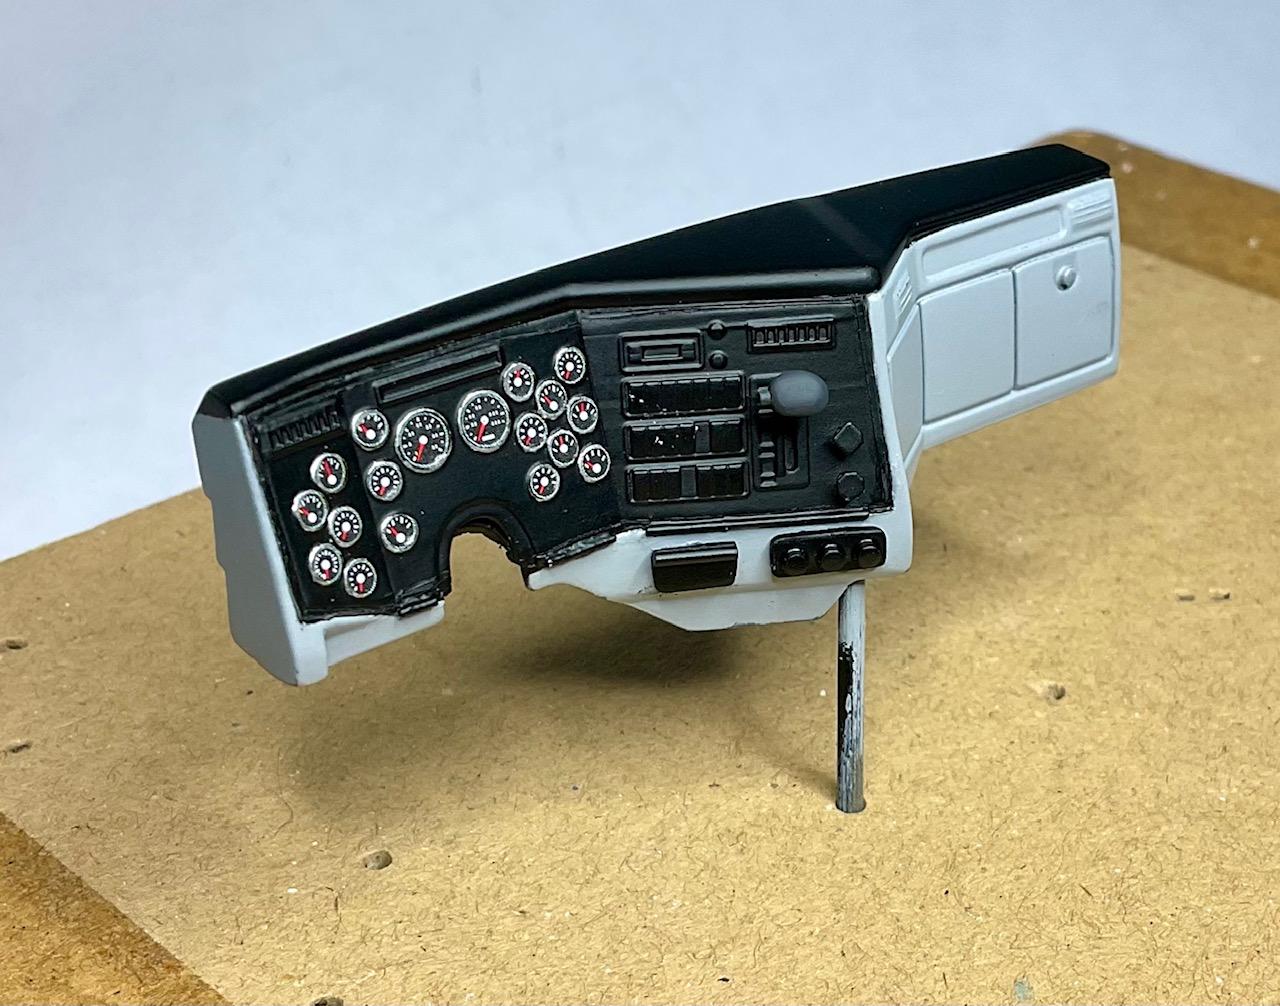
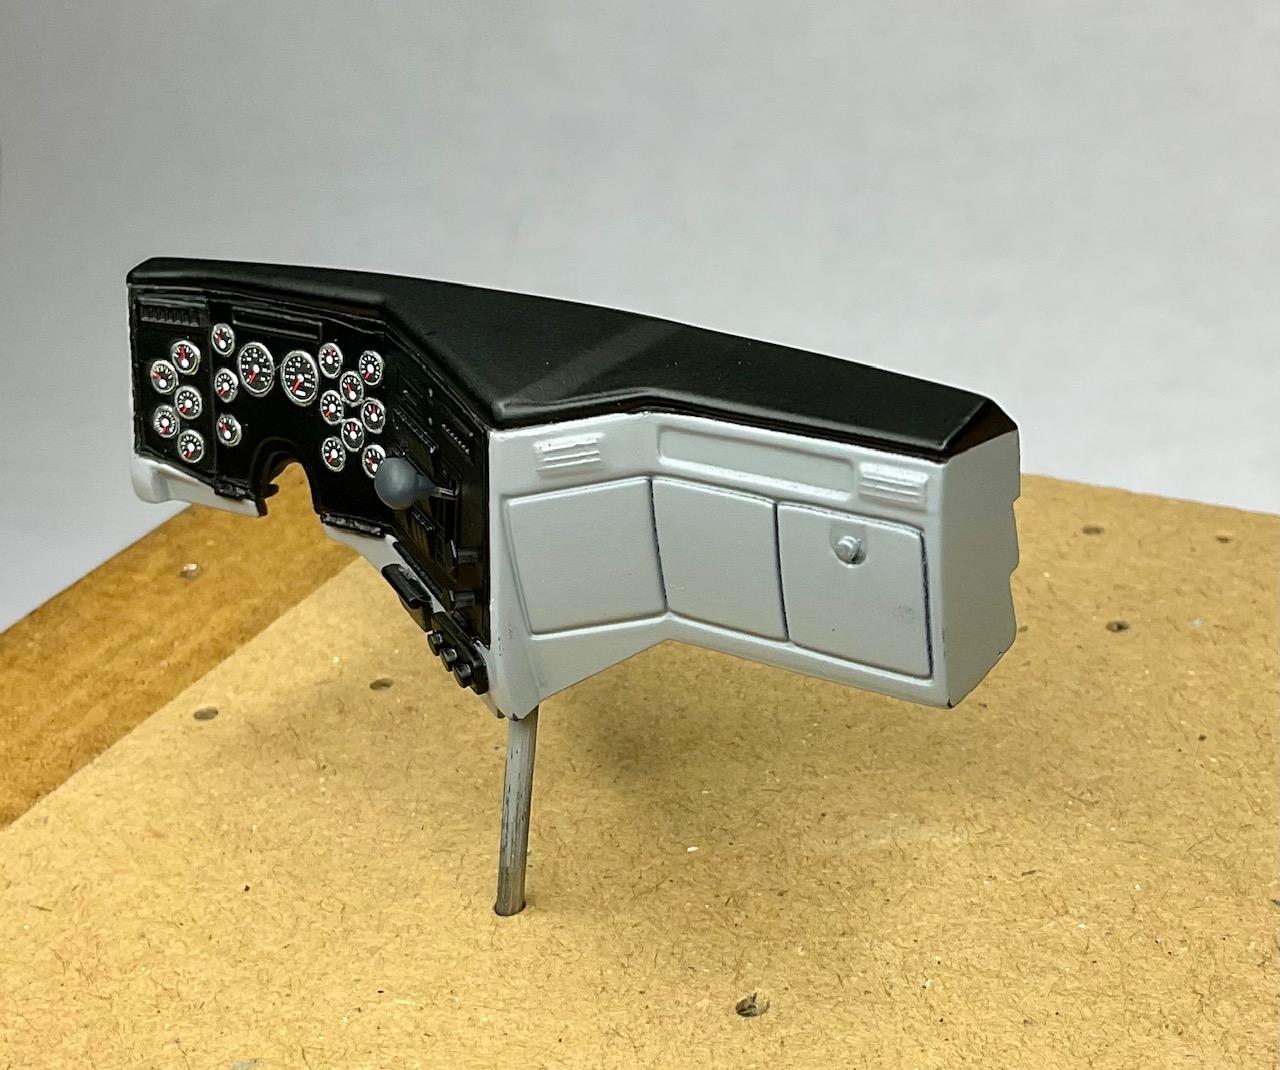
Feels good to be back at this project after a bit of time away from it! In the never ending re-ordering of build priorities, I felt I needed finish the dash, then all the other work to finish the cab off so I could get back to working on the firewall wiring. Feels pretty disorganized sometimes. Still, feeling good to be working on any part of it again - that is, until I actually started in on some details for the dash board! More stress to follow. . . This is how I had left the dash a couple weeks ago. I then set out a few items to attempt to decal the gauges on the resin printed dash panels. I was crazily thinking I might need to cut them out with small scissors, but Jeff thoughtfully suggested I try and find a punch instead (thanks Jeff!). I did find, and ordered, a few leather working punches that were small enough to do the job. I set about punching out the gauges - good thing I had two sets, because I messed up several with poor alignment before tapping on the punch Then, before I attempted the decaling, and looking at the dash again, I felt it was too plain. One of the trucks in the company's Nelson, BC fleet had a black dash top and black panel inserts with rest of the dash in a grey similar to the colour I had painted the dash originally. So I did some masking and re-painted the dash like that real truck, re-chromed the gauge openings and set about the tedious process of adding gauges Using the two decal sets, I managed to get all the gauges decaled. I tried to add the decals to the rocker switches, but they wouldn't stick and looked off, so I removed them. Some touch-up need as I managed to scuff a couple of the switches, as well as some of the dash lower edges while handling the dash to position the decals. Also added the ashtray and the heater/AC control switches. I put the trans shifter handle in and took a couple pics. Looks fairly decent, if you don't look too close! Will also need to add some dark panel liner around the fuse panel covers and glove box, and see what I can do about painting the two heater vents above the fuse panels. Then I want to spray the dash with satin clear and hope I don't lift the decals - a few light coats first to set things, then a bit heavier final coat, I'm told. After the clear has set, I will need to paint the yellow parking brake and red supply switches on the right hand dash panel - that will be a tester, too. Stressful day at the bench, but glad to be back working on the truck again! Take care.
-
D9R Armored Bulldozer
BK9300 replied to Scale-Master's topic in WIP: Model Trucks: Big Rigs and Heavy Equipment
Huge amount of detail in that cab interior and your ‘worn’ seats look quite realistic - well done! -
Nova Salt Flat Racer
BK9300 replied to Pierre Rivard's topic in WIP: Other Racing: Road Racing, Land Speed Racers
Fantastic detailing, Pierre - very interesting subject! -
T41 Bugatti sport coupe
BK9300 replied to charlie libby's topic in WIP: Other Racing: Road Racing, Land Speed Racers
A stunning amount of detail to look at in your frame - a tremendous accomplishment overall! -
Excellent work, Ron - it’ll be a brute when it’s finished
-
I'm late to your latest post, Jeff, but Jurgen and Bren have you really set up for a unique model! Look forward to seeing it come together.