BK9300
-
Posts
1,986 -
Joined
-
Last visited
Content Type
Profiles
Forums
Events
Gallery
Everything posted by BK9300
-

MACK SUPERLINER HEAVY HAUL
BK9300 replied to Swamp Dog's topic in WIP: Model Trucks: Big Rigs and Heavy Equipment
You're making terrific progress, David - really like how it's all coming together. If this truck is going to work in the patch, that nice paint could get muddy in a hurry! Great job. -
1/25 AMT Peterbilt 359 California Hauler
BK9300 replied to cifenet's topic in WIP: Model Trucks: Big Rigs and Heavy Equipment
Maybe you're not happy with your air cleaner at the moment, but you've got to be pleased with all the other details - the polished, reflective paint job on your cab and hood, and all the detailing on your frame. Looks great, Steve! -
KW 86 inch Aerodyne
BK9300 replied to k100's topic in WIP: Model Trucks: Big Rigs and Heavy Equipment
Your frame detailing and now, weathering, really brings it all to life - well done! -
KENWORTH K123 Cabover
BK9300 replied to Brutalform's topic in WIP: Model Trucks: Big Rigs and Heavy Equipment
Your weathering is being built up very realistically - like how the leading edges of the rear suspension/drives are a bit more dirty! Very nicely done. -
69 Dodge Polara CHP Cruiser in Queue.........
BK9300 replied to Scott Eriksen's topic in WIP: Model Cars
Looking good, Scott! Resin printed items sure open up the modeling possibilities, but it's also very frustrating to work with! (did you ever find a shotgun?!) -
Simply amazing work, Tim - beautiful.
-
Revell's Peterbilt 359: WIP
BK9300 replied to David G.'s topic in WIP: Model Trucks: Big Rigs and Heavy Equipment
Well done on your dash detail paint, David - those details really stand out. -
Neat trick, Jeff (and Gary)! Looks like the curve will keep it's shape.
-
Very nice progress, Ron - lots of challenges you're overcoming!
-
Lowboy by Double Take Replicas
BK9300 replied to landman's topic in WIP: Model Trucks: Big Rigs and Heavy Equipment
Too bad kits like this aren't available anymore - going to be a great looking trailer once it's finished. -
Mack Superliner
BK9300 replied to Jürgen M.'s topic in WIP: Model Trucks: Big Rigs and Heavy Equipment
Going to look very impressive, all loaded up, Jürgen! Will you have room in your new cabinet for this, or will it go up on a shelf? -
GMC B7000/Holmes 750...
BK9300 replied to Tom Hall's topic in Model Trucks: Big Rigs and Heavy Equipment
Great scratch building, Tom - definitely a heavy duty wrecker in its day. The Holmes wrecker looks really good. -
No doubt there will be lots to learn from this - will be interesting and the first time I will have been able to follow along, in real time.
-
Welcome to the forum, Tom - great background story! Got to love scratch building - you get to end up with something no kit could provide.
-
Nice buildup of the leather seats - the lighter tones on the high spots sure looks like the real thing.
-
’72 Dodge Demon Drag Racer 1/25 scale
BK9300 replied to AmericanMuscleFan's topic in WIP: Drag Racing Models
The black plastic is a good idea, Francis - looks good in its natural state and the result is indeed convincing. Still trying to imagine how your rotary chuck is positioned perfectly for each subsequent hole in the brass seat. Even if there are degree indicators, not sure I could get them to line up exactly 45 degrees apart from each other - maybe 44 or 46 sometimes - you're very precise. -
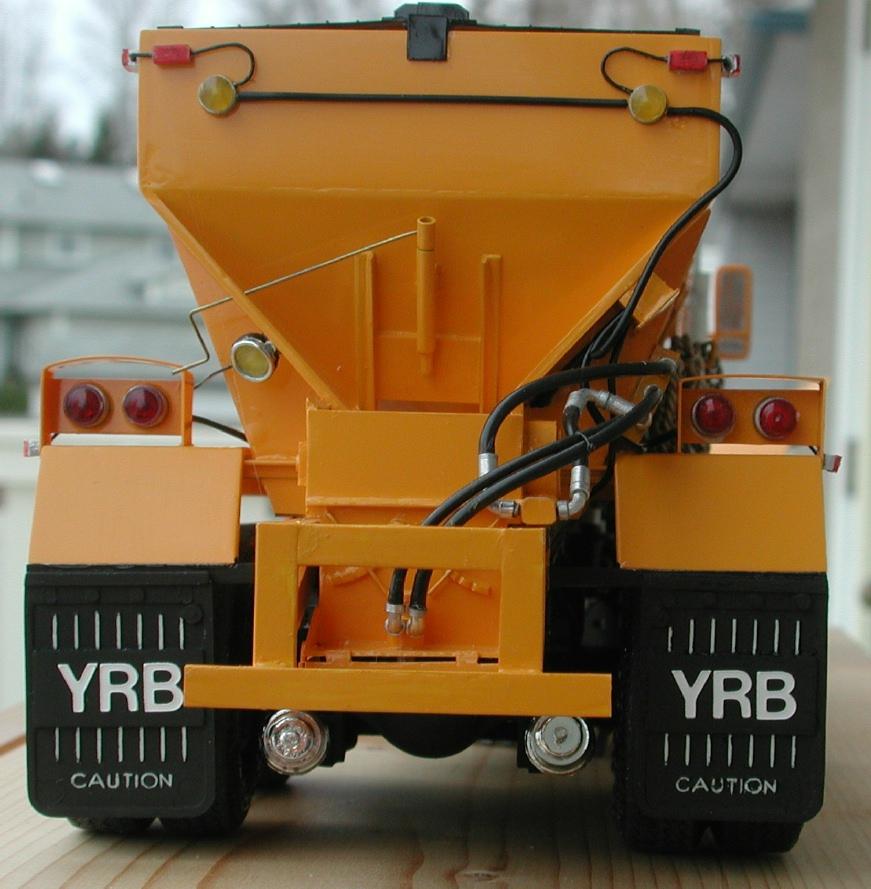
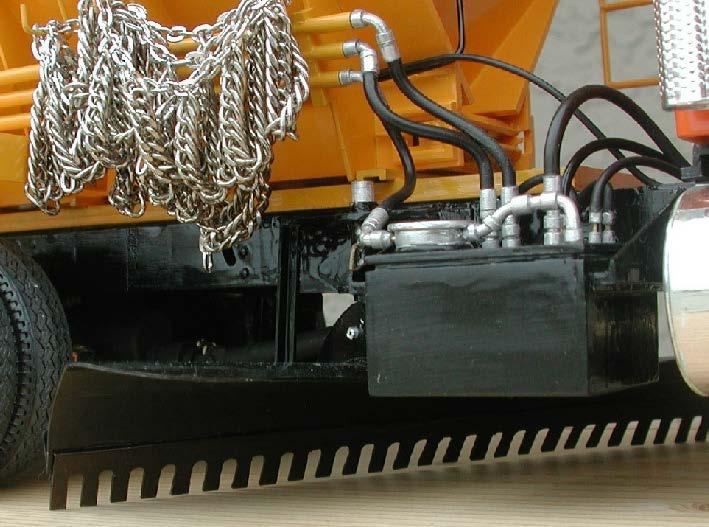
Western Star 4900 FA plow truck
BK9300 replied to BK9300's topic in WIP: Model Trucks: Big Rigs and Heavy Equipment
Thanks, Steve - like the chains, the ‘fingers’ on the ice blade are a bit large and wide for scale! -
Revell's Peterbilt 359: WIP
BK9300 replied to David G.'s topic in WIP: Model Trucks: Big Rigs and Heavy Equipment
That’s a good idea, David - really finishes off the sides and back wall of your cab - very interesting solution! -
Western Star 4900 FA plow truck
BK9300 replied to BK9300's topic in WIP: Model Trucks: Big Rigs and Heavy Equipment
Very kind of you to say, Gary - thanks. The goal was an improvement over the model from 1991 and I think that's happened! A couple pics from the archives - 1991 version - Chains are just a 'bit' out of scale! This truck had 'compact ice' removal blades on it, and an old Del Hydraulics side mount hydraulic tank, with fittings made from aluminum tubing - no aftermarket back then (that I knew of, anyway)
-
Western Star 4900 FA plow truck
BK9300 replied to BK9300's topic in WIP: Model Trucks: Big Rigs and Heavy Equipment
I don't think I have any room for electronics to make sound, Jürgen - imagination will have to do! -
Blue Rig Completed
BK9300 replied to Chariots of Fire's topic in Model Trucks: Big Rigs and Heavy Equipment
Another build well made, Charles. The different colouration in your hose racks are realistic, too. -
You've presented a lot of very nice builds along the way, Ken - this one is no exception. Would be very interesting to see a 'group' photo if that's at all possible!
-
Western Star 4900 FA plow truck
BK9300 replied to BK9300's topic in WIP: Model Trucks: Big Rigs and Heavy Equipment
Steve, I’ll need to think about the smoke - I told Gary I wasn’t wiring in the key! -
Special build, Steve - really likes the camera! (not sure how I missed it before but like the roof antenna addon)
-
I'd say so, too. I've got a panel line tool, but not sure I'd get four, new lines in as straight as you have - looking good!