BK9300
-
Posts
1,988 -
Joined
-
Last visited
Content Type
Profiles
Forums
Events
Gallery
Everything posted by BK9300
-
 Should look great with the tank skid hooked up to the winch line.
 -
This is turning out to be another magnificent build, Steve - once up on its ‘feet’ again, will be an even more amazing looking truck!
-
Western Star 4900 FA plow truck
BK9300 replied to BK9300's topic in WIP: Model Trucks: Big Rigs and Heavy Equipment
Thank you, Francis. Lots to look at in the pics, but I might need that magnifying lamp handy for people to see some of the details when it’s finished! -
They look spectacular as stand alone models - I imagine a great sense of accomplishment being felt when you look at them. Wonderful work.
-
I think I need to do this, too - been having trouble with the smallest bits not being gripped as well.
-
MPC's Datsun Truck As A Beater
BK9300 replied to oldcarfan's topic in Model Trucks: Pickups, Vans, SUVs, Light Commercial
I think you did a terrific job of making this little truck look well worn - great job with the rust staining and faded paint - very nice build! ! -
Restorod Autocar
BK9300 replied to Gary Chastain's topic in Model Trucks: Big Rigs and Heavy Equipment
Very beautiful truck, Gary - just a pleasure watching it all come together! -
1/25 AMT Peterbilt 359 California Hauler
BK9300 replied to cifenet's topic in WIP: Model Trucks: Big Rigs and Heavy Equipment
Your paint repairs look to be well underway, Steve - the truck will look fabulous, no doubt (it already does!) -
This will be a great build for you. I like the clever placement of your magnets - not likely to even be noticeable once you've prepped the body. I'm already guessing where the battery for your lights is going to go...
-
Really excellent handiwork, Greg - very delicate work you've accomplished here!
-
First saw the Monocoque Mustang as a model built by John Teresi and interviewed by Doug Whyte on Youtube. Quite the car (and model!). Sound like you got goldmine's worth of pics for your blueprints
-
Just tried to post an update with pics and still no stated option at bottom of quote box to either ‘drag and drop’ or ‘choose files’. Only visible option is the ‘Other Media’ drop down in lower right hand corner.
-
Western Star 4900 FA plow truck
BK9300 replied to BK9300's topic in WIP: Model Trucks: Big Rigs and Heavy Equipment
Thanks very much, Dan and looking forward to an update on your car hauler trailer! -
Mack Superliner
BK9300 replied to Jürgen M.'s topic in WIP: Model Trucks: Big Rigs and Heavy Equipment
Jürgen, it is very interesting to watch the endless ideas you have come to life - the trailer will look great with a couple of Mack's on it! -
1/25 AMT Peterbilt 359 California Hauler
BK9300 replied to cifenet's topic in WIP: Model Trucks: Big Rigs and Heavy Equipment
I agree with the others on your paint - it looks very good. And like Gary said, "...own worst critics". Given all we've seen of your approach to this build so far, you'll likely resolve the issues you don't like! -
And rightfully so, Ismael - apart from your obvious skills, you must have extreme patience to detail your engine to this level - right down to the spark plug wire tip connectors!
-
Western Star 4900 FA plow truck
BK9300 replied to BK9300's topic in WIP: Model Trucks: Big Rigs and Heavy Equipment
Too funny, Gary - not wiring in the key switch, but I do have keys! So, I have three kinds - square it is! -
Western Star 4900 FA plow truck
BK9300 replied to BK9300's topic in WIP: Model Trucks: Big Rigs and Heavy Equipment
Thanks, Jeff - appreciate you letting me bounce my ideas off you! I appreciate it, Steve. At least I won’t be any shocks doing this wiring! -
I'm going to have to stock up on some of those bolt heads - can think of lots of places I could have used some along the way. Good to see this project underway!
-
Resto Rod Autocar
BK9300 replied to Gary Chastain's topic in WIP: Model Trucks: Big Rigs and Heavy Equipment
Terrific work going here, Gary - should be some blue ribbons in store for this one! -
Western Star 4900 FA plow truck
BK9300 replied to BK9300's topic in WIP: Model Trucks: Big Rigs and Heavy Equipment
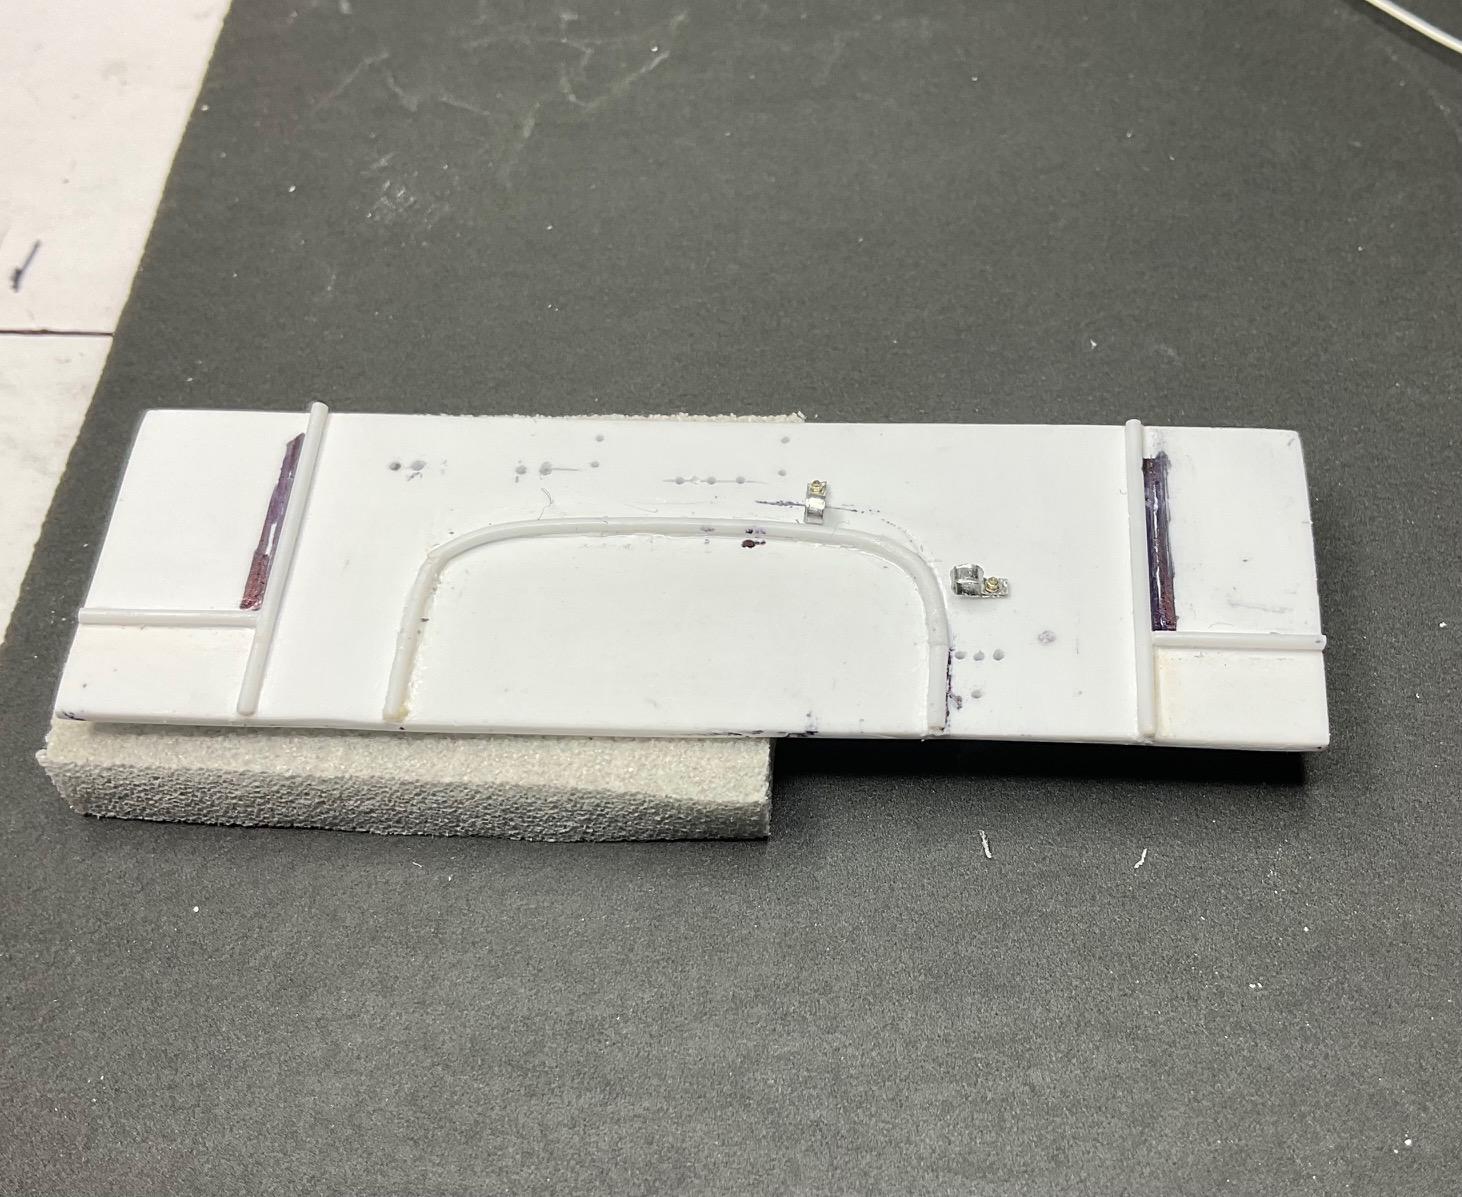
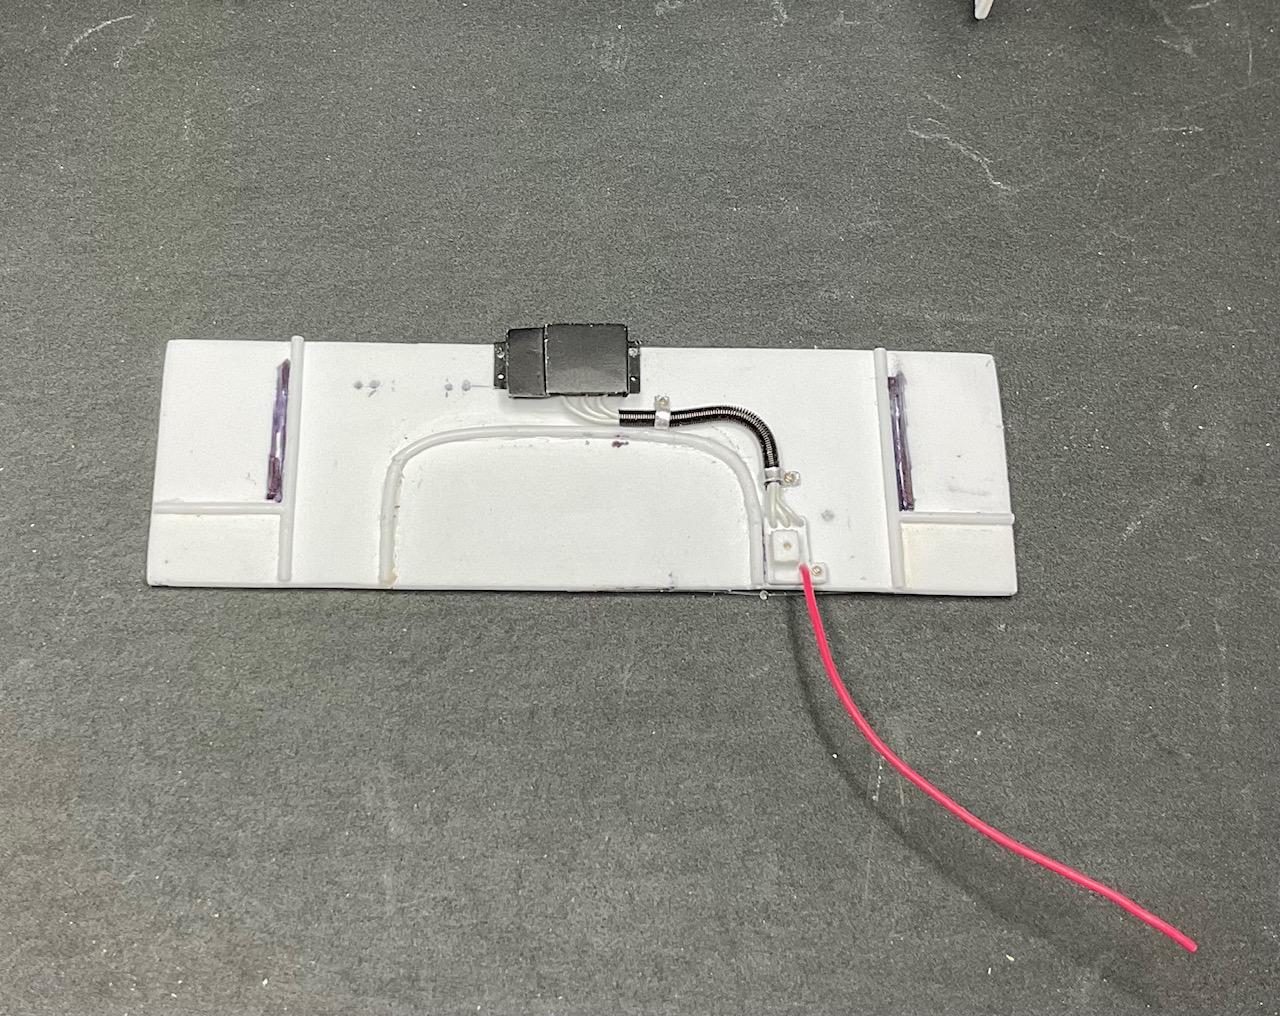
Just spent a few hours making, then discarding some prototype wiring for firewall. One of the problems I was having is that the Wave springs are very flexible over the 5" lengths they come in, but not so much over a 1" length. I am going to use a copper wire core for two of the longer runs, to hold the loom shape, but that didn't work well for me in my attempts this morning. After more thinking, I decided to try and do part of what is done on the real truck - I needed to see about making hold down clamps. I fabricated a semblance of a Power Distribution Unit, that will mount below and to the side of the steering column. In the center of the pic are two attempts at clamps, made from 0.2 mm sheet aluminum. The white wires are the main feeds from the PDU up to the fuse box and the red wire is coming from battery via the starter. I'm dropped down another size for the Wave spring, using a 1.5mm one instead, and more of those tiny, Top Studio bolts! I had to CA glue the clamps to the temporary firewall because they kept swiveling on the bolt when I tried to feed the spring/loom through the clamps. I'll be making more anyway, for other parts of the harness - I just needed to see if this would work Am very happy how this is turning out! This is one run of five runs I hope to create, that will collect into two, 2.0 mm looms that will run under the cab 'terminating' out of sight along either side of the frame. It's a far cry from the complexity of the real thing, but will still satisfy my goal for the impression of harnesses. Given how this had to be made, and some troubles I had orienting the firewall to be able to place things, I think I have to change how I was going to put this together on the model's firewall. Had hoped to build everything on temp firewall and then just 'plug' it all into the model's firewall. Might still be possible - I'll have to cross that bridge later! Have to go and re-do some painting from work done yesterday. Take care!
-
Pleasure watching this little jewel come together - wonderful fabrication skills.
-
Western Star 4900 FA plow truck
BK9300 replied to BK9300's topic in WIP: Model Trucks: Big Rigs and Heavy Equipment
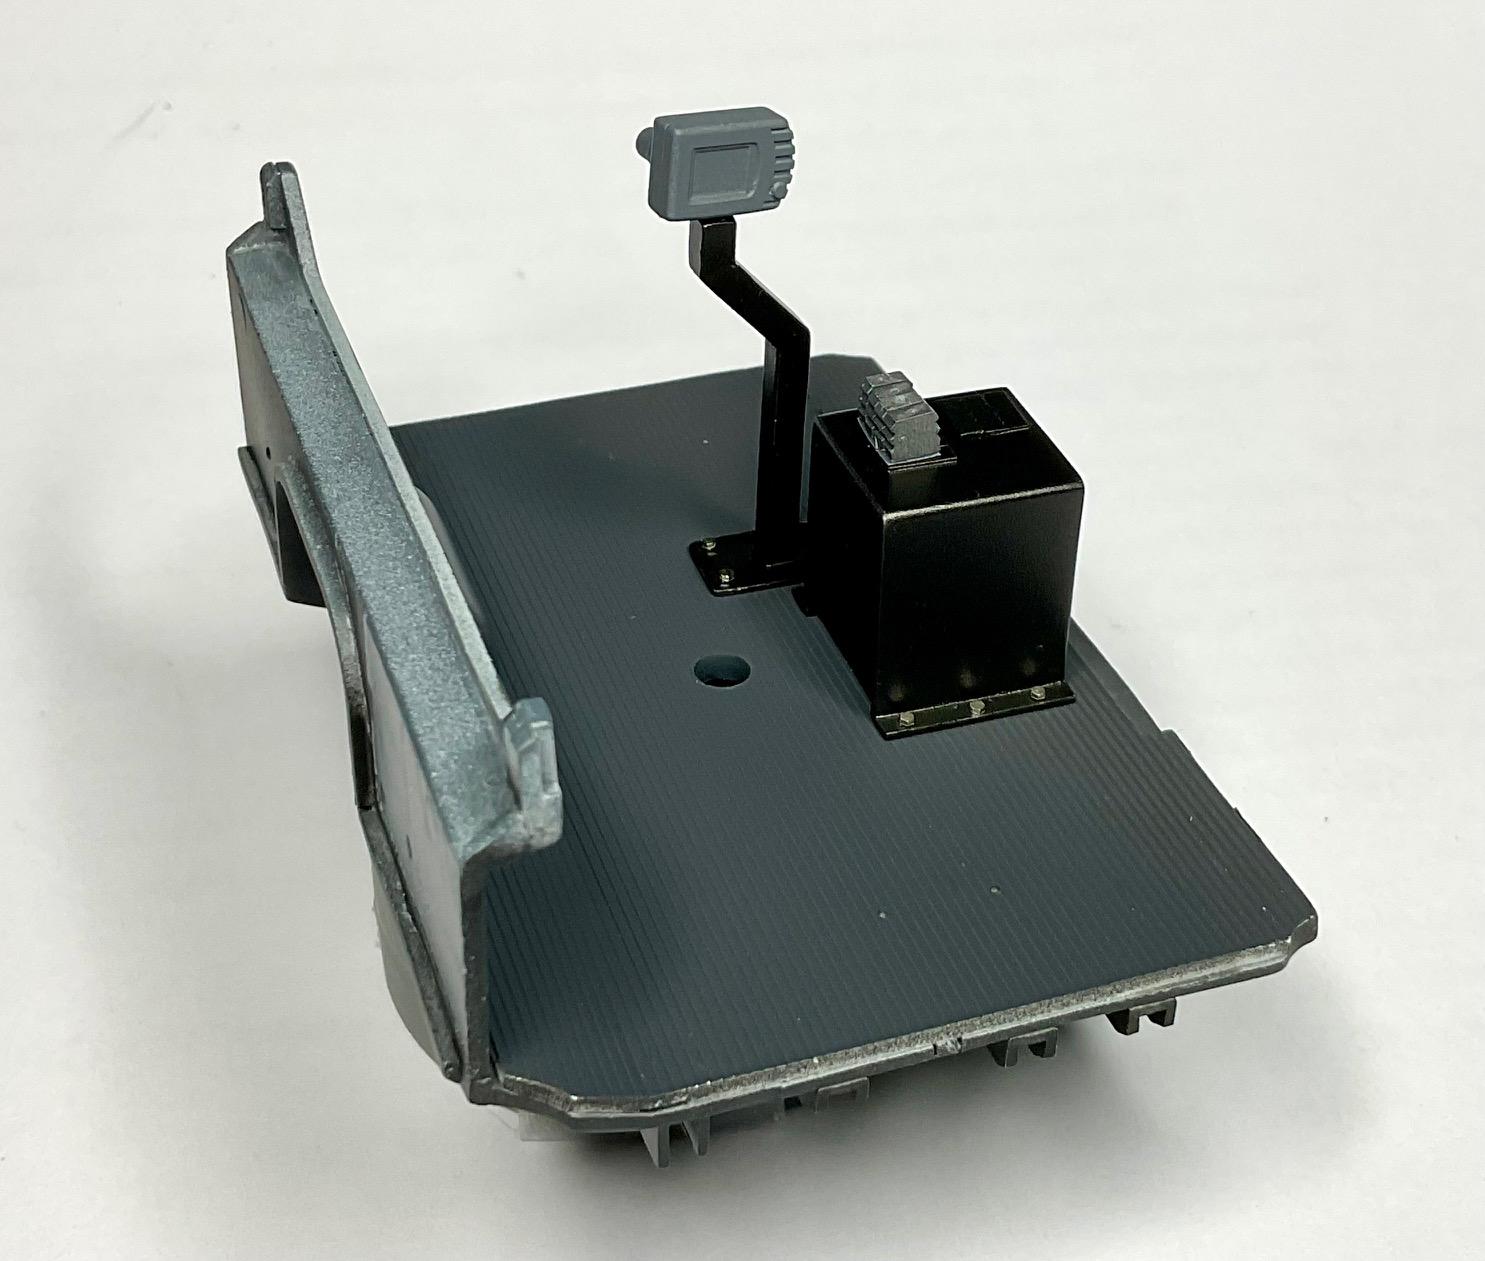
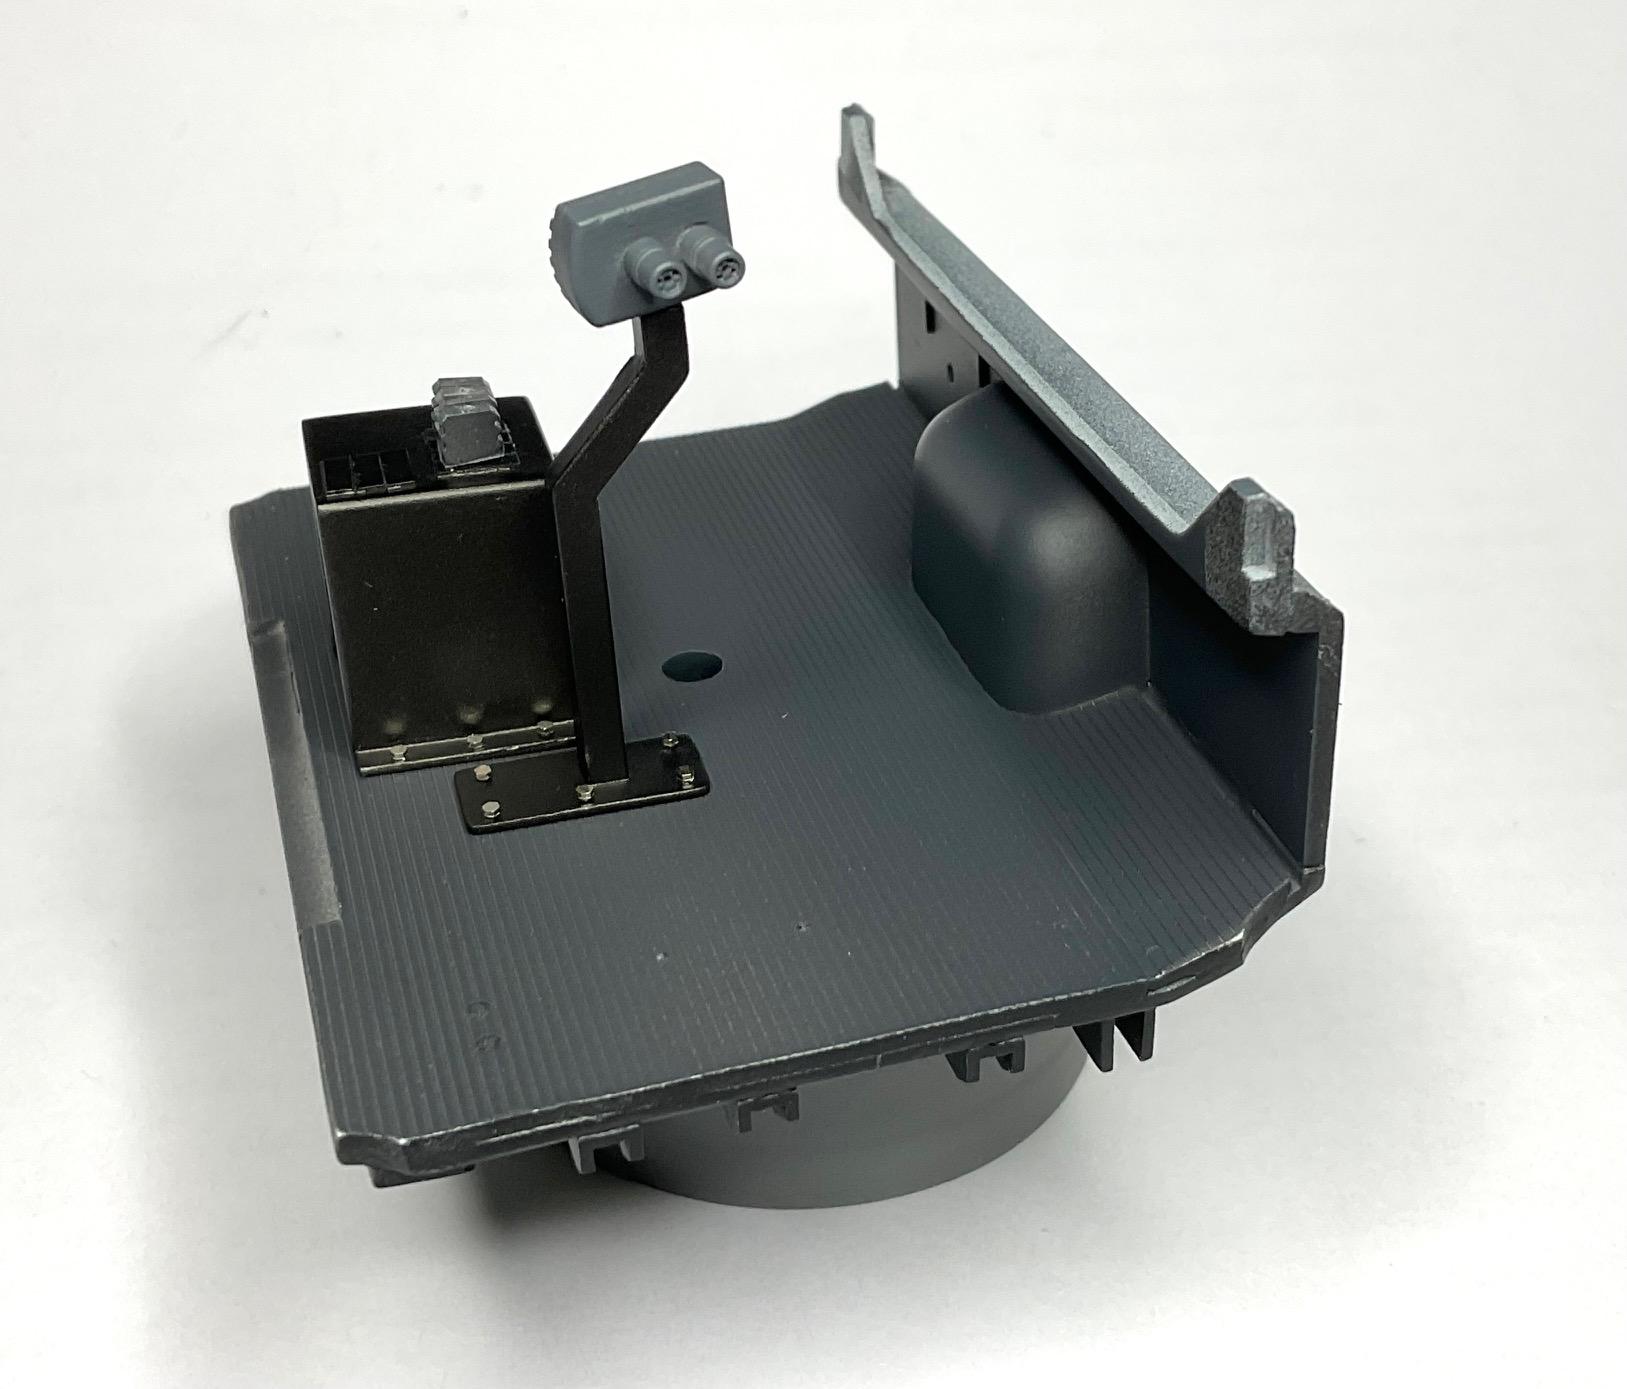
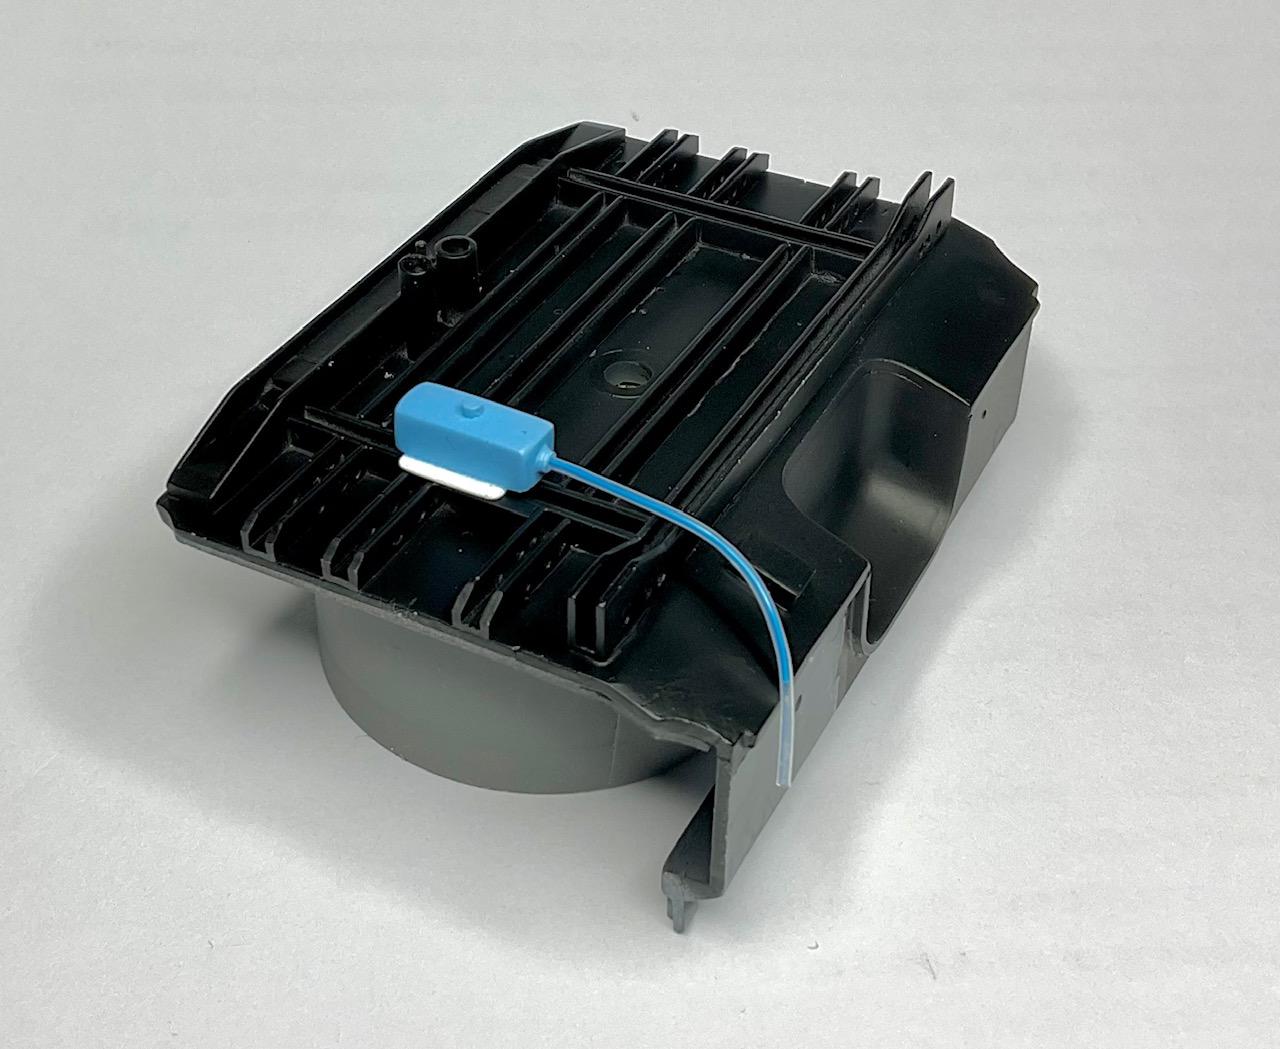
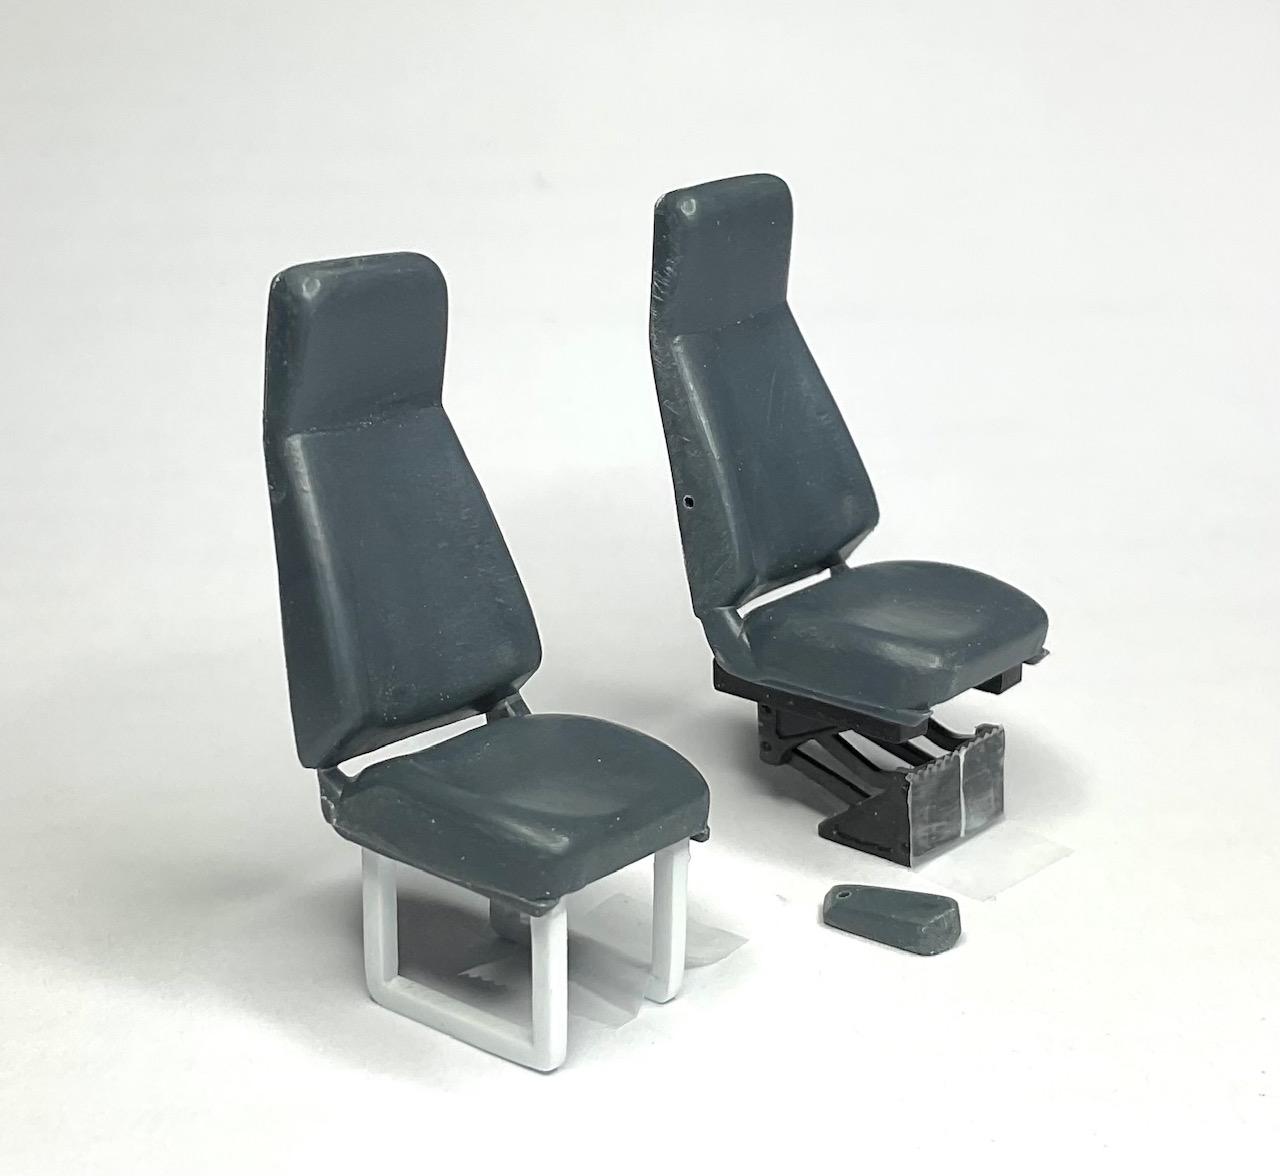
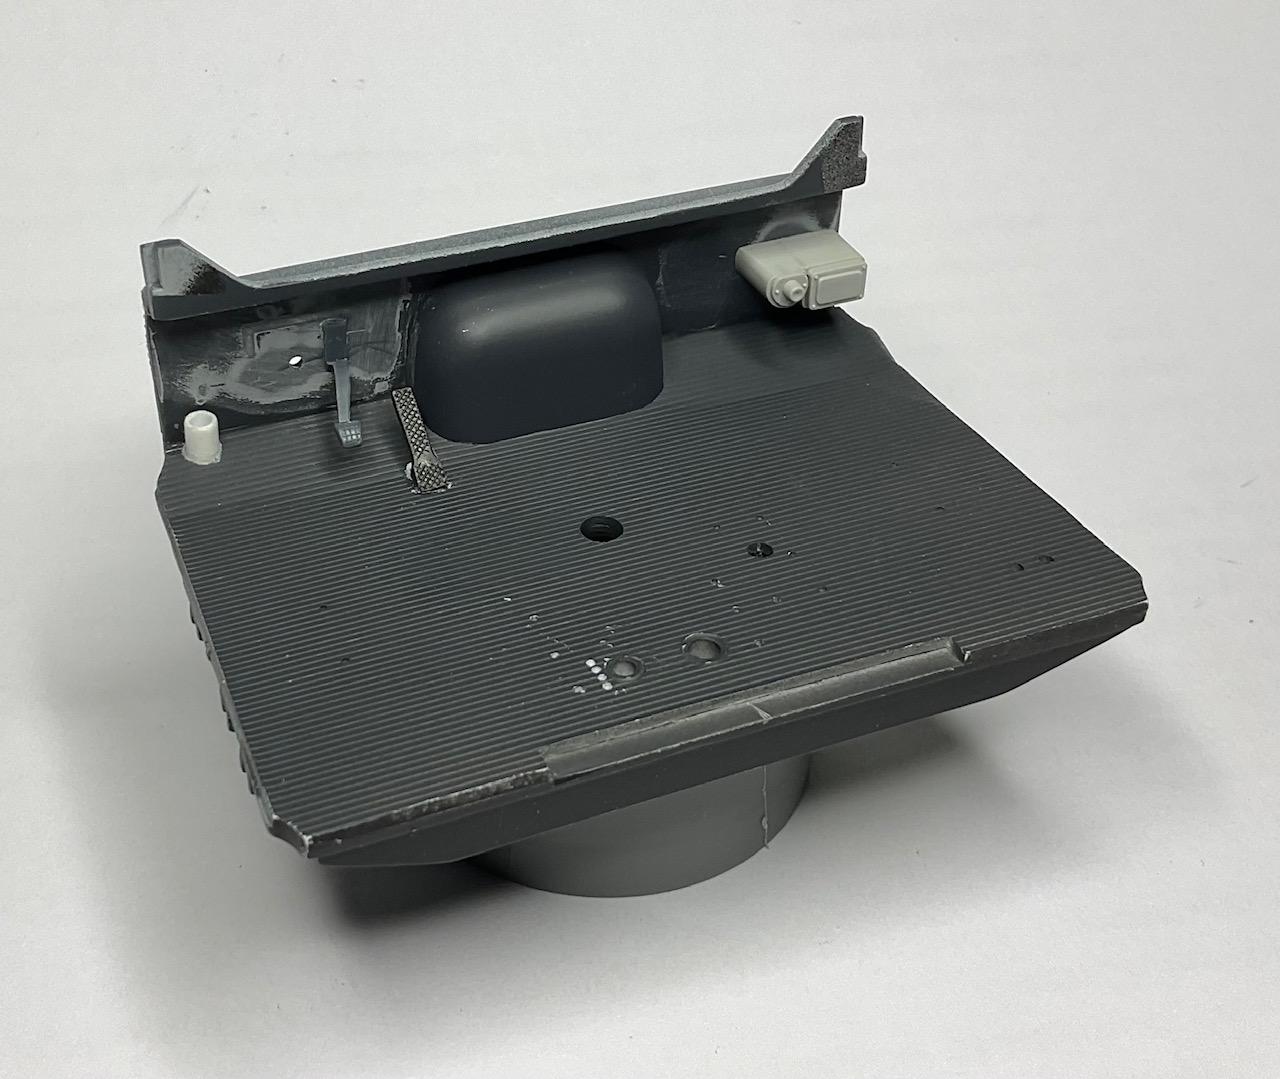
Tried to do some work on the firewall today, but quickly found that I had no clear idea, for the moment, about how to make a couple of the parts or how to 'wire' them all together. Going to have to let thoughts about that process ferment for a bit till the way forward becomes a little clearer! Only got a bit of painting accomplished yesterday and today I managed to drop the mast for the monitor and needed to repair and repaint it. Also forgot to add a couple items the interior before painting it yesterday, so, you'll see a couple pics with the floor painted and then another pic with those extra items added in. I'll need to repaint the interior floor again tomorrow. Another little touch up I had wanted to do - I added a bit of white to satin clear and sprayed three light coats on the reservoir. To my eye, that has toned down the original blue and the satin clear goes a bit of the way to looking like an opaque container with the fluid in it. To me, the fluid in the reservoir should look slightly different than the fluid in the clear filler hose I added a bit of flat white to the Rubber Black, as the real truck's floor mat had a bit of a grey look to it - could have just been the light I was looking at the truck in, but I'm pleased with the contrast between the steel of the control tower and the floor material. The hydraulic control boots are just sitting on the control tower, taped so they won't fall over The monitor's electrical outlets are drilled for small wiring to be added later No comfort for any ride-a-long passenger in these trucks - would be pretty rigid, I'm imagining! So, at some point while painting yesterday, I realized I had more things I had wanted to add to the interior front wall - by the driver's left foot, there is a pass through for some air lines from somewhere up in the dashboard, the brake and accelerator pedals and the heater from the Alaskan Hauler kit. Also, at the back under the control tower area, there are four more holes drilled - these holes are for the vent lines from valving controls under the control tower Short update today - spent lots of time thinking and fussing with what to do about wiring firewall. I'll see what the next few bench sessions produces - take care!
-
Western Star 4900 FA plow truck
BK9300 replied to BK9300's topic in WIP: Model Trucks: Big Rigs and Heavy Equipment
Always good to hear from you, Francis - repeat away, if needed because I sometimes forget - thanks! -
’72 Dodge Demon Drag Racer 1/25 scale
BK9300 replied to AmericanMuscleFan's topic in WIP: Drag Racing Models
Genuine fabrication, indeed! It will be interesting to try and find all these goodies once the project is completed. Marvelous, as always!