BK9300
-
Posts
1,991 -
Joined
-
Last visited
Content Type
Profiles
Forums
Events
Gallery
Everything posted by BK9300
-
 Can't get over how big that engine is - nice progress so far!
 -
1/25 AMT Peterbilt 359 California Hauler
BK9300 replied to cifenet's topic in WIP: Model Trucks: Big Rigs and Heavy Equipment
Informative documentation along the way, Steve. A couple very interesting solutions to your tank strap rubbers - they both look great! Haven’t mentioned it yet, but your photography set-up is almost studio like - very neat, with no distractions in the photos, and easy to see your added details. -
Western Star 4900 FA plow truck
BK9300 replied to BK9300's topic in WIP: Model Trucks: Big Rigs and Heavy Equipment
Steve, I can always use 'two cents' - appreciate the tip! Am definitely happy with the progress, and plan to get the test painting underway soon as it's dry. I hope that I get to show it to you in person someday! Thanks, Steve. -
Western Star 4900 FA plow truck
BK9300 replied to BK9300's topic in WIP: Model Trucks: Big Rigs and Heavy Equipment
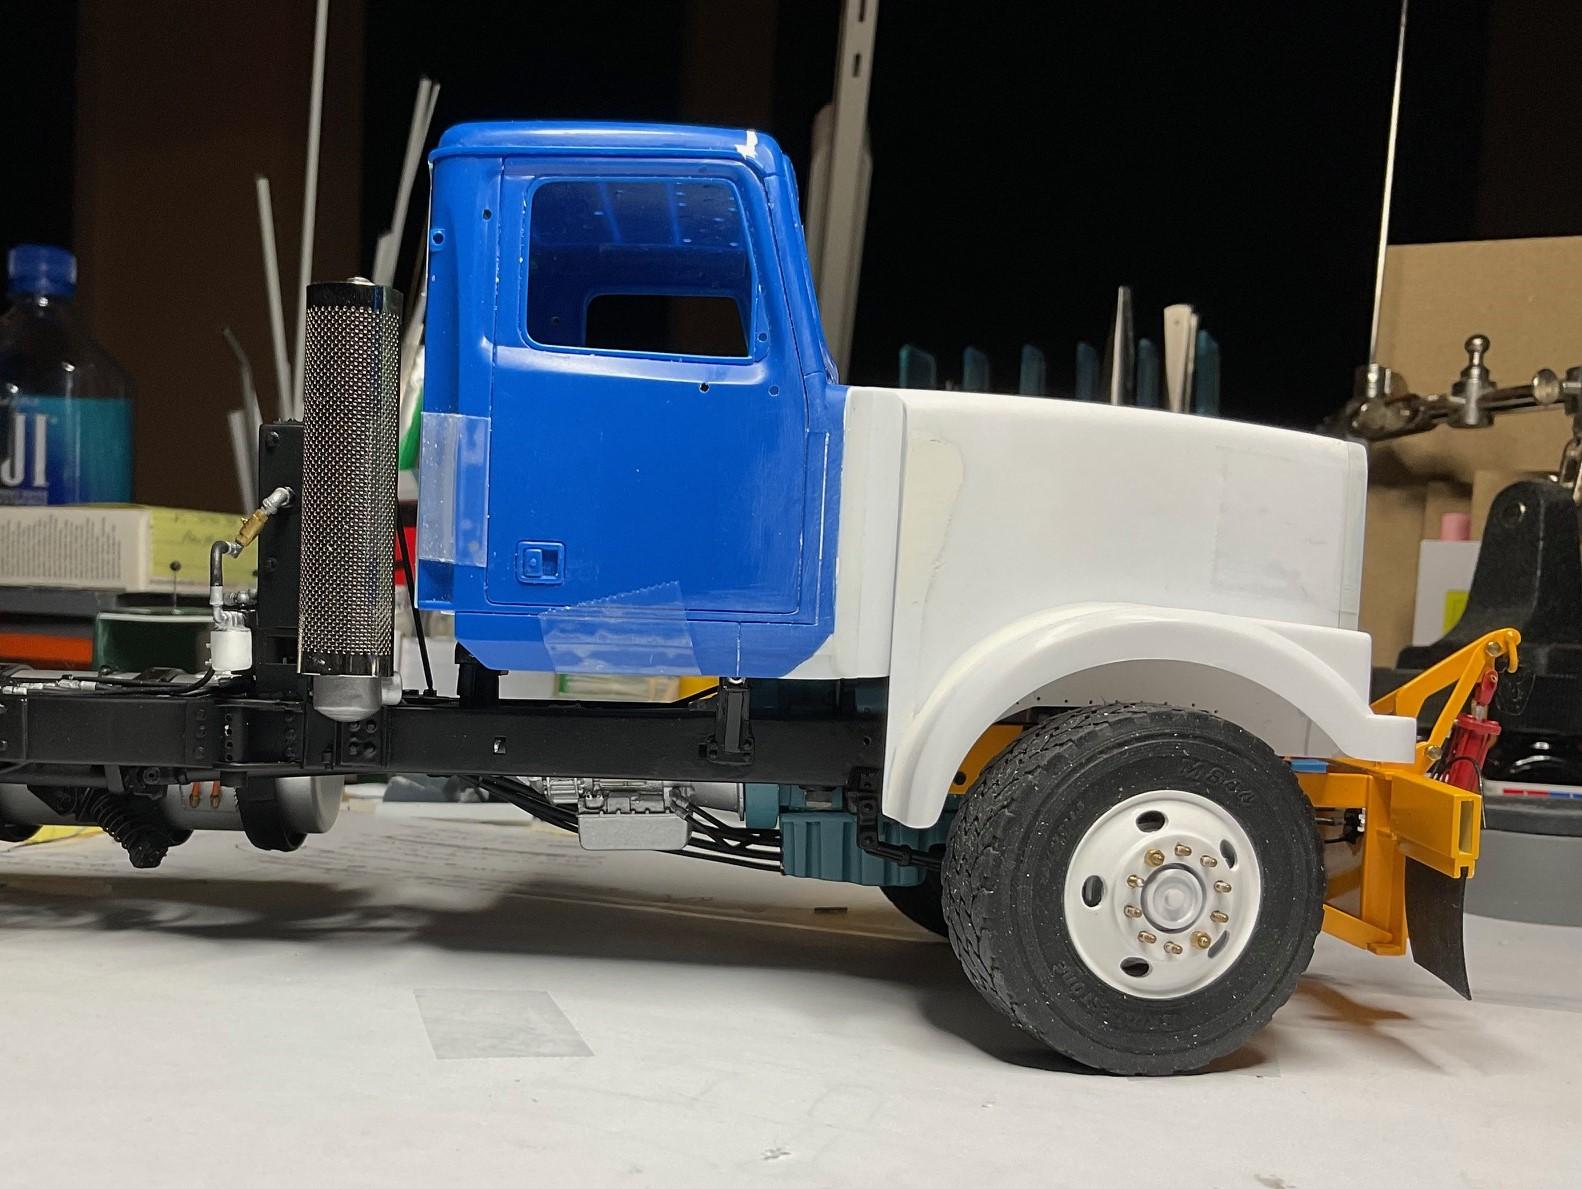
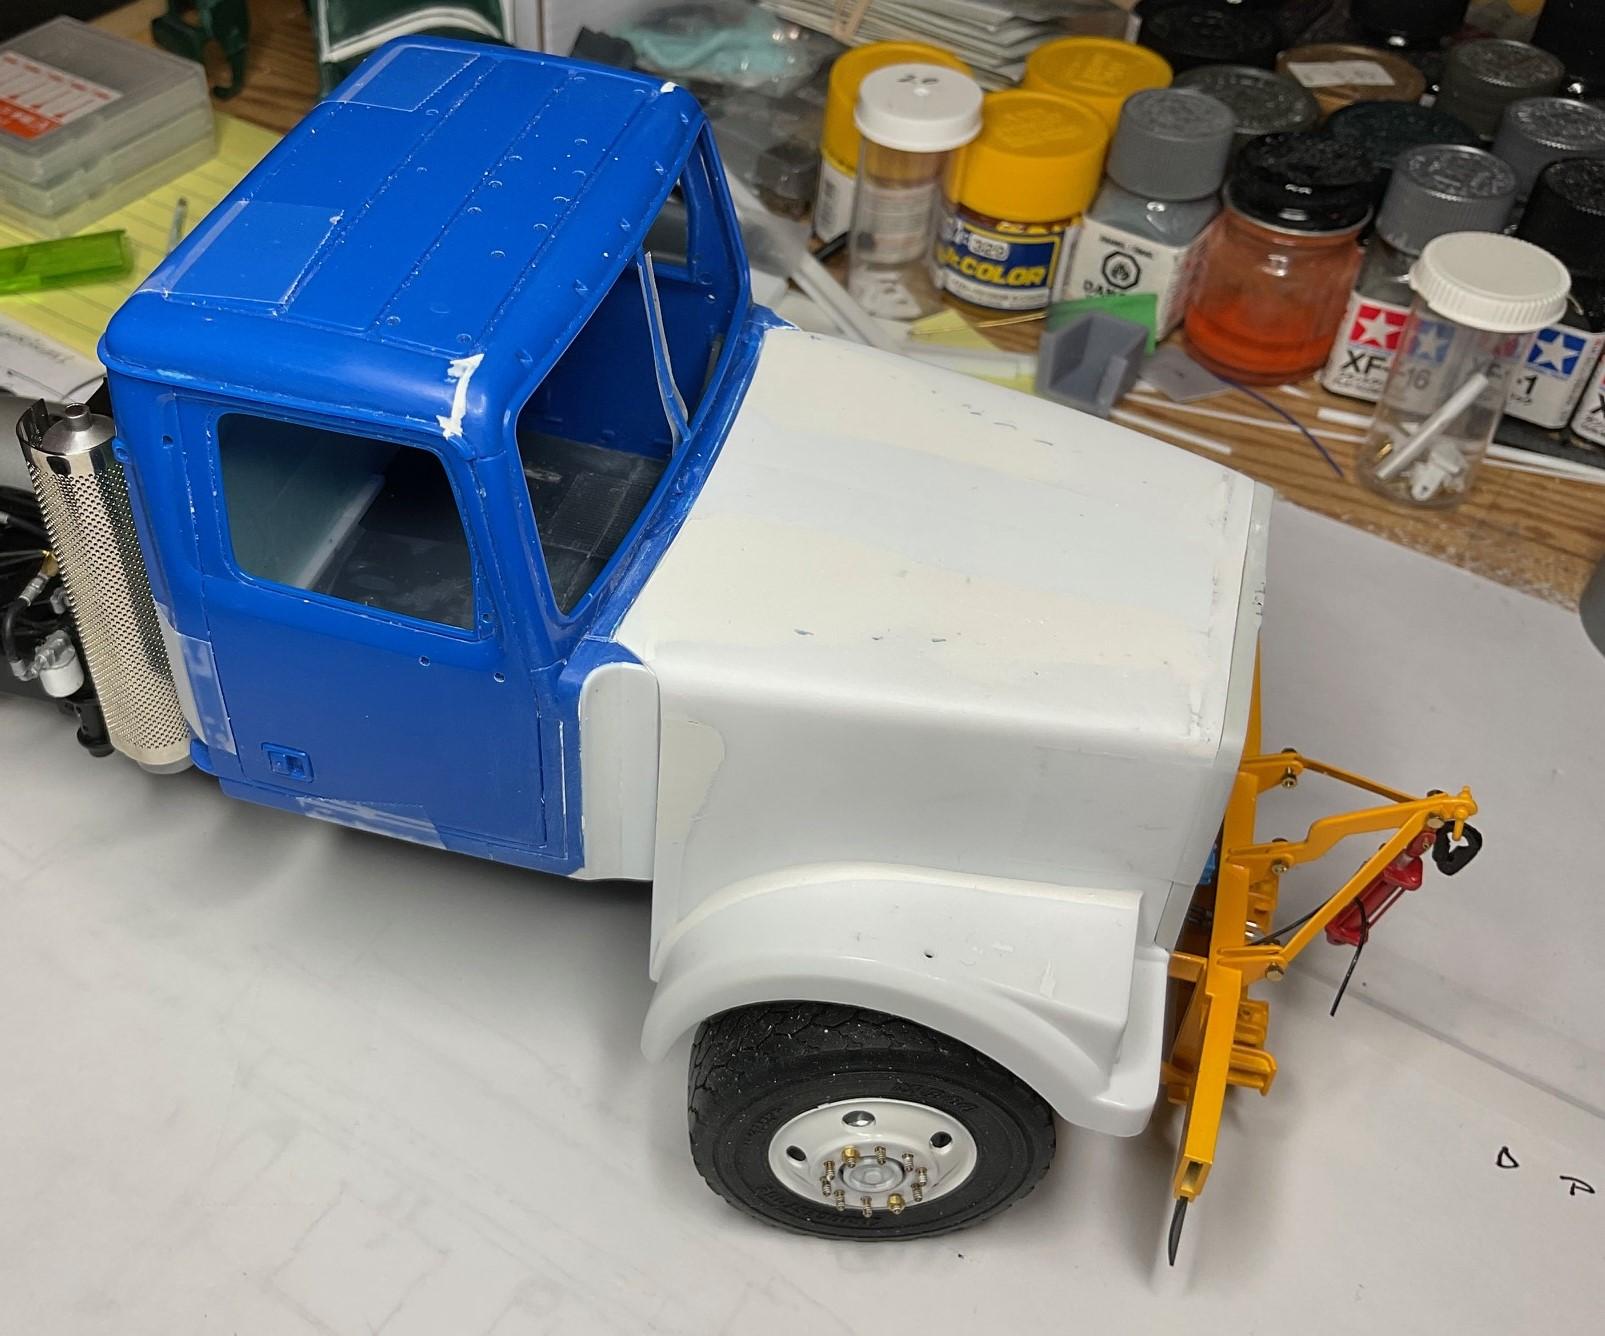
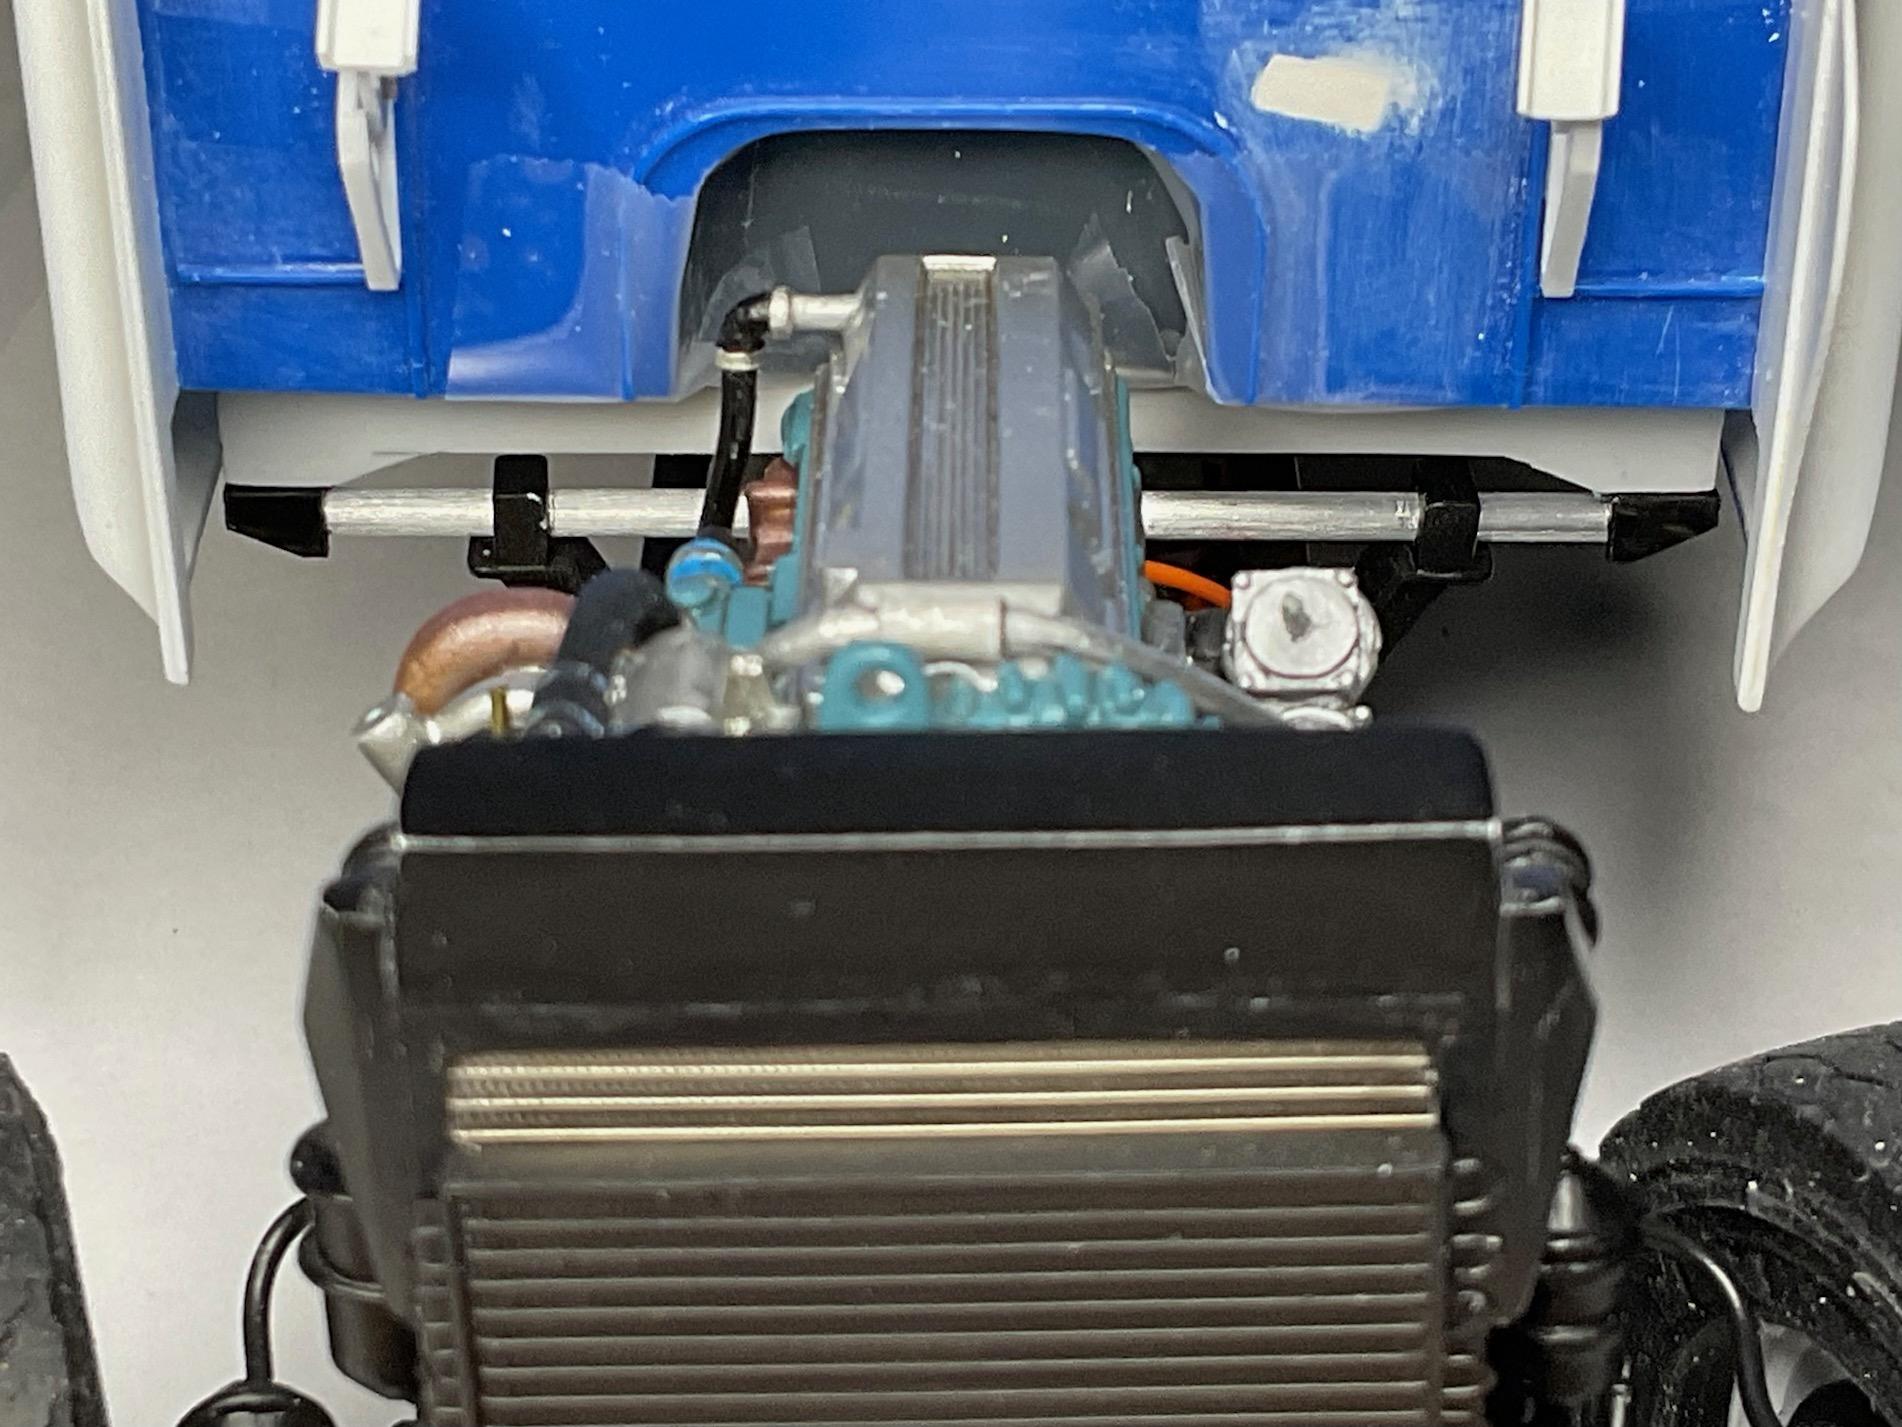
Wet and miserable here today and not much accomplished inside either. Spent a bit of time yesterday getting the spare hood and a scrap piece of white styrene ready to do the test painting, but that will need to wait for a drier day. Also got a bit done on underside of floor pan - not lots, just carrying on! Ready for the 'Rockford' test paint job! Cut, drilled and placed the remainder of what I wanted to do underneath the floor pan. I didn't think about taking many pics underneath the cab of the real truck, but I did get a few. A glimpse of some future detailing - Didn't finish the hood supports yet, because I finally glued the inner hood brace in place and have always (mostly!) let newly glued items set up over night. Perhaps tomorrow - take care!
-
Western Star 4900 FA plow truck
BK9300 replied to BK9300's topic in WIP: Model Trucks: Big Rigs and Heavy Equipment
Thanks, Victor! Was going to go out back today and see what would happen, but was raining all day - all ready to go, though! -
Western Star 4900 FA plow truck
BK9300 replied to BK9300's topic in WIP: Model Trucks: Big Rigs and Heavy Equipment
Thanks, Randy - sure don't want to go through the 'Big One' they say could happen out here on the West Coast, if that was only a piddlin' 4.7! Glad how the cab worked out and, as I said a bit ago, sure can't discount a bit of luck was present! Thanks again. -
Ol' School A Model
BK9300 replied to freightshaker2's topic in WIP: Model Trucks: Big Rigs and Heavy Equipment
Beautiful inspiration pic - going to be a great looking build! -
So many quality enhancements to this little car - great progress so far!
-
Always liked a twin-steer anything, Ron - are your front suspensions made of white metal? Looks very sturdy!
-
KW 86 inch Aerodyne
BK9300 replied to k100's topic in WIP: Model Trucks: Big Rigs and Heavy Equipment
Got to love it when paint starts going on - looking real good, Mark! -
Western Star 4900 FA plow truck
BK9300 replied to BK9300's topic in WIP: Model Trucks: Big Rigs and Heavy Equipment
That's too funny! Not to worry - I'm actually glad you got me thinking about it. I'll definitely do some test painting before going ahead on the model itself. -
I sure agree with Jeff - many of your builds have lots of extra details added in along the way, but this build seems to be the most detailed yet. Marvelous accomplishments being produced!
-
Great start to the forum, Mike! I like the aggressive tread on your truck's tires - where did you pick them up?
-
Beautiful detail work, Tim - being metal, and even at this scale, I would think that your Lenco has a noticeable 'heft' to it - looks great!
-
Western Star 4900 FA plow truck
BK9300 replied to BK9300's topic in WIP: Model Trucks: Big Rigs and Heavy Equipment
Well, Francis, Steve and you have me thinking much differently than I was yesterday. I don't have a good answer at the moment, but I am very glad to be directed to doing some tests, first, before making a potential mess on the cab and hood. I've been using Tamiya primers so far, both grey on the frame and white on the sander, so we'll see. Thanks! -
Western Star 4900 FA plow truck
BK9300 replied to BK9300's topic in WIP: Model Trucks: Big Rigs and Heavy Equipment
I’m thankful things turned out well, too, Steve. There was a good bit of relief on this side as well! You make a good point about the paint - I hadn’t considered that. So, maybe some tests would be safe thing to do. I have two Constellation kits, and one has a very warped, blue hood. At the risk of too much paint, will paint the hood with grey primer, then white primer and a couple final coats of body colour and see what happens. Thanks for that! -
Western Star 4900 FA plow truck
BK9300 replied to BK9300's topic in WIP: Model Trucks: Big Rigs and Heavy Equipment
Thanks, Jürgen - I appreciate that! -
Western Star 4900 FA plow truck
BK9300 replied to BK9300's topic in WIP: Model Trucks: Big Rigs and Heavy Equipment
The fit turned out well - always good to have a bit of luck involved! Thanks, Steve. -
Western Star 4900 FA plow truck
BK9300 replied to BK9300's topic in WIP: Model Trucks: Big Rigs and Heavy Equipment
Thanks, Jeff. I don’t know about easy - it took a couple hours of fussing and fidgeting before brave enough to put glue to plastic! Have some more fiddly details before paint, but looking forward to that, too. -
Mack Superliner
BK9300 replied to Jürgen M.'s topic in WIP: Model Trucks: Big Rigs and Heavy Equipment
I agree, Jürgen, once you get a project underway, you make good progress right away! Will you be making a pass through in the front of your sleeper compartment? -
Pony Express 70s BB/FC ex M/T Pinto
BK9300 replied to Ian McLaren's topic in WIP: Drag Racing Models
Such amazing creations from your work bench - so many details. Even the tires look more rubber like than many I’ve seen. Wonderful results! -
Western Star 4900 FA plow truck
BK9300 replied to BK9300's topic in WIP: Model Trucks: Big Rigs and Heavy Equipment
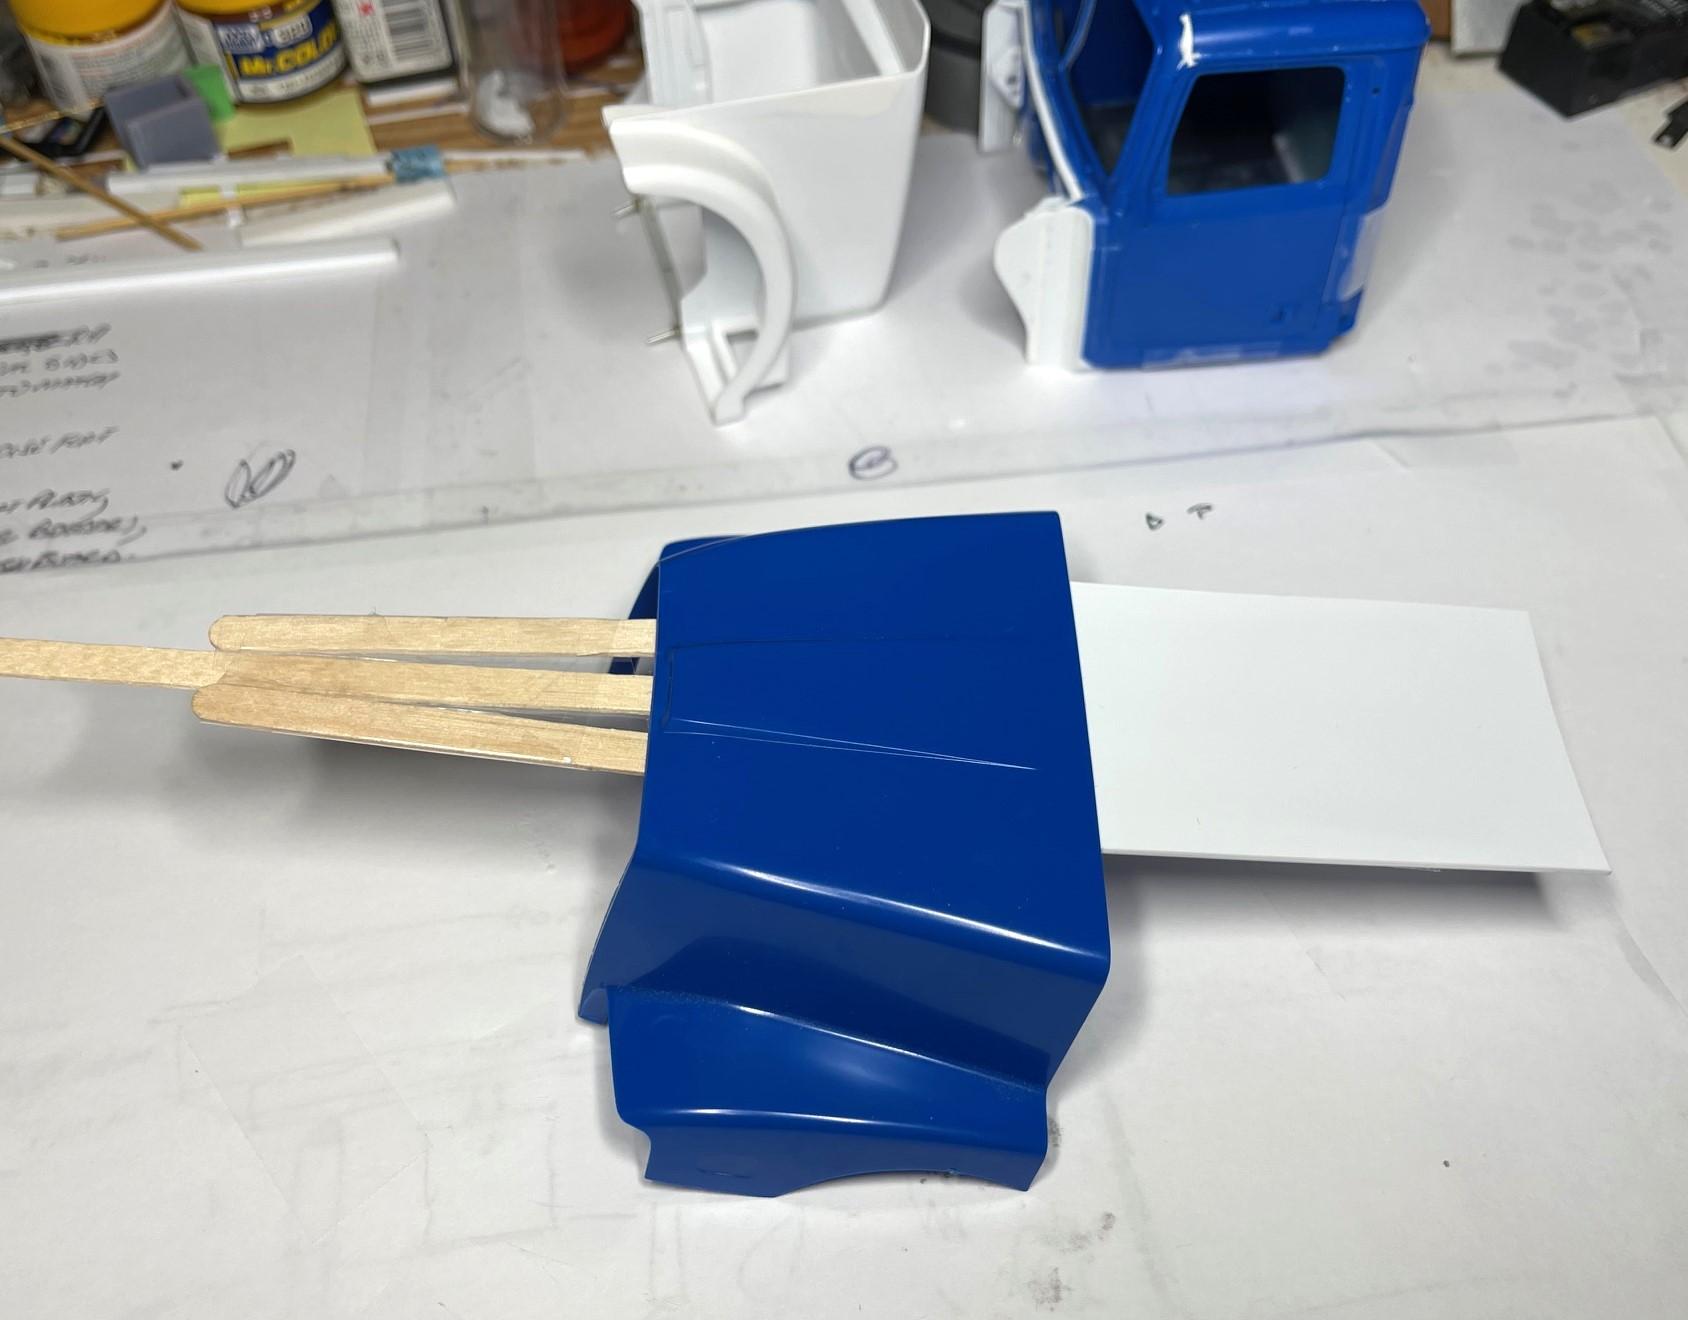
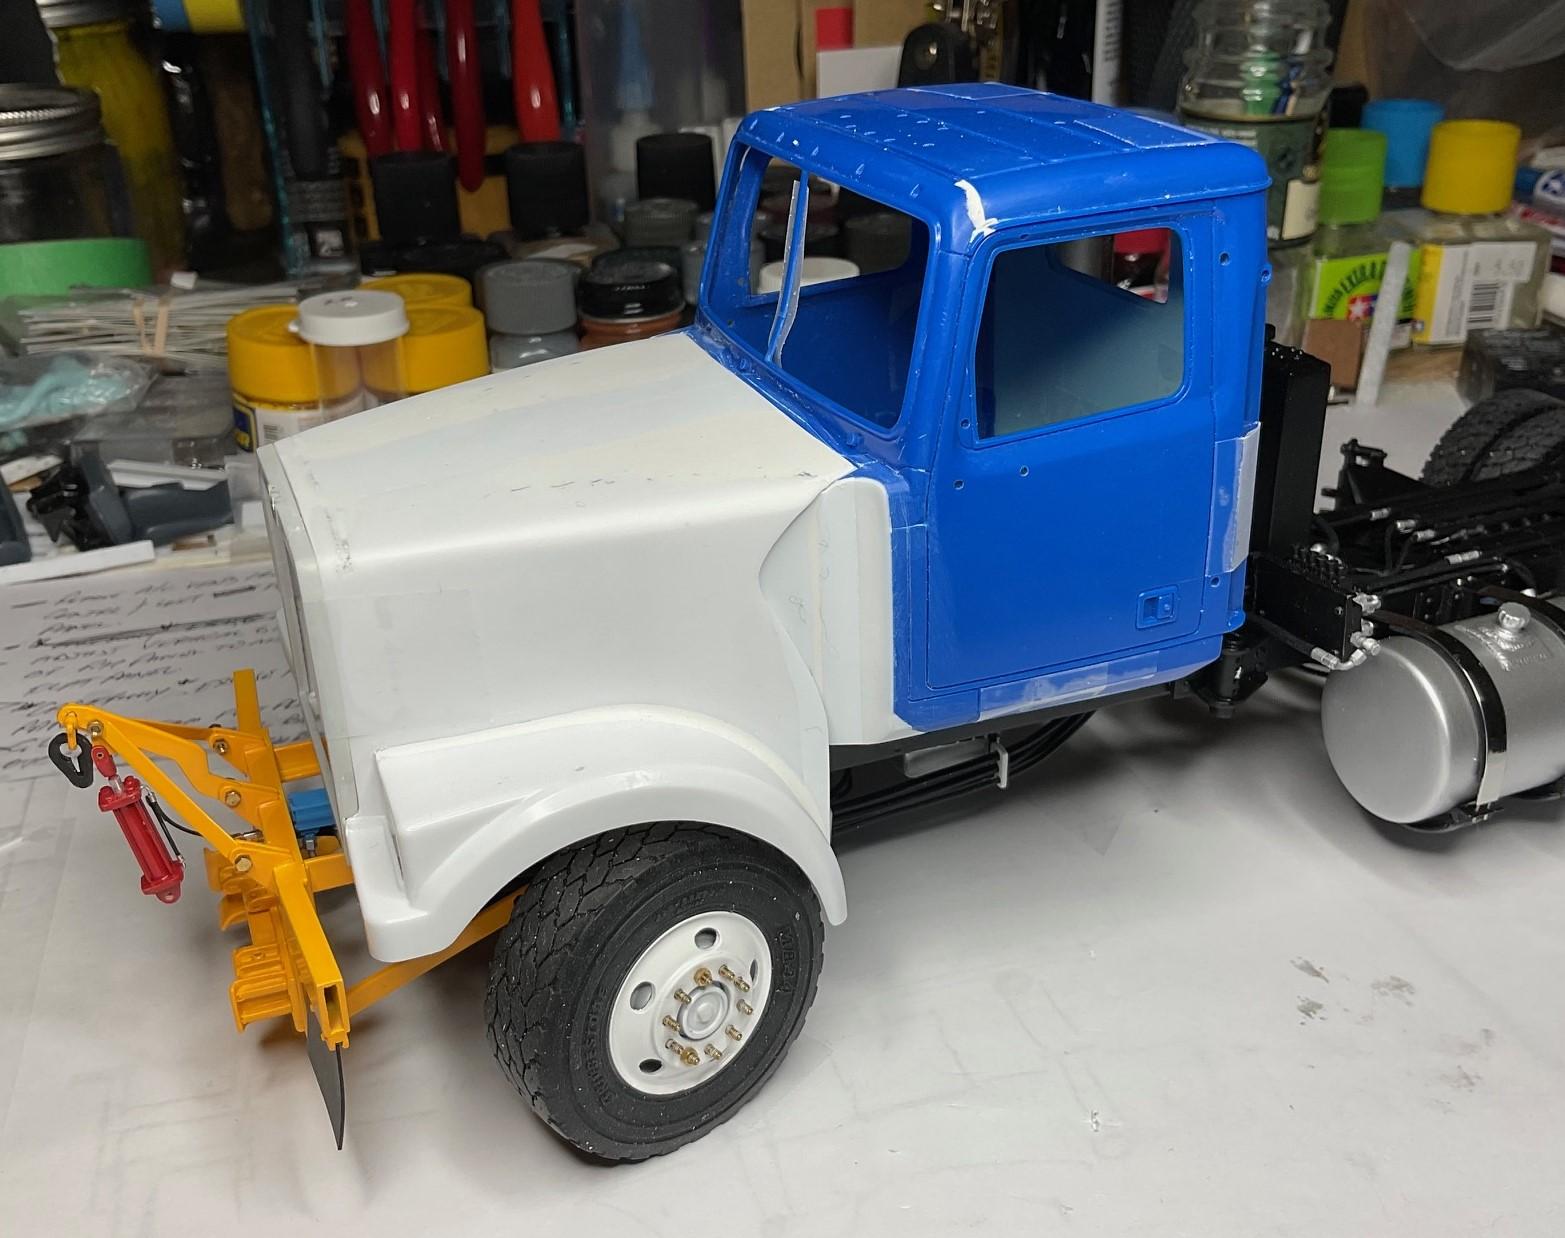
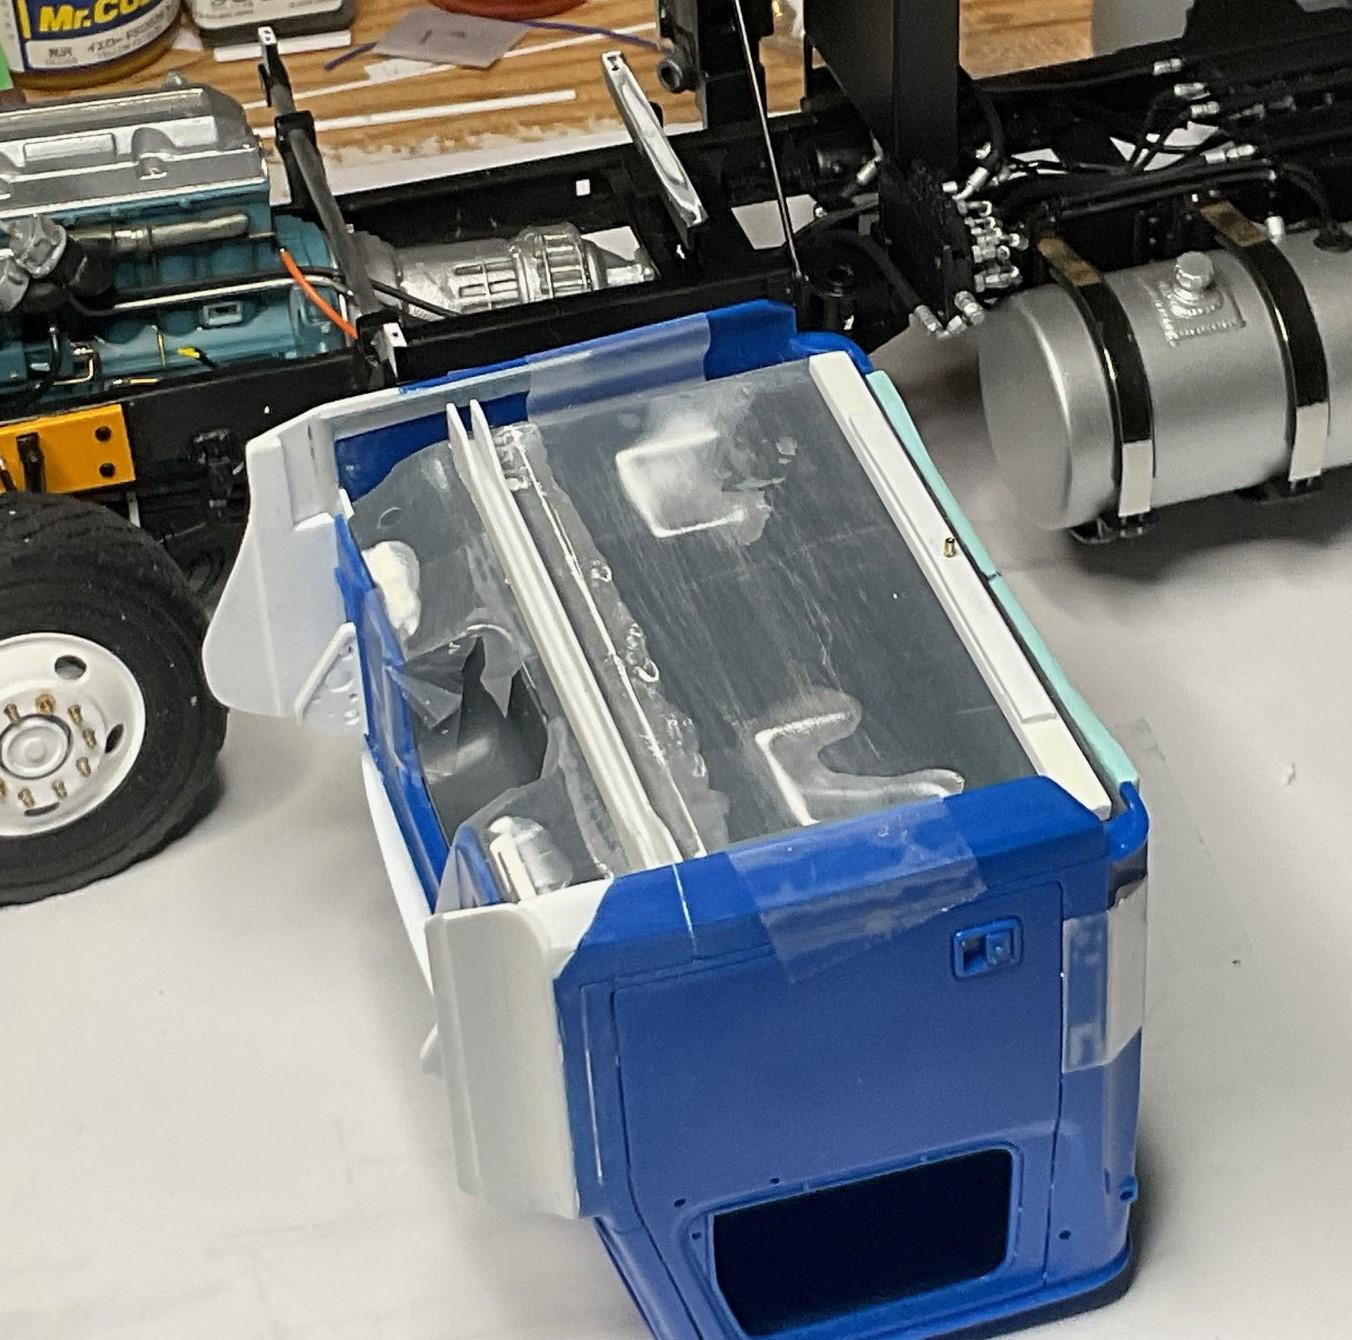
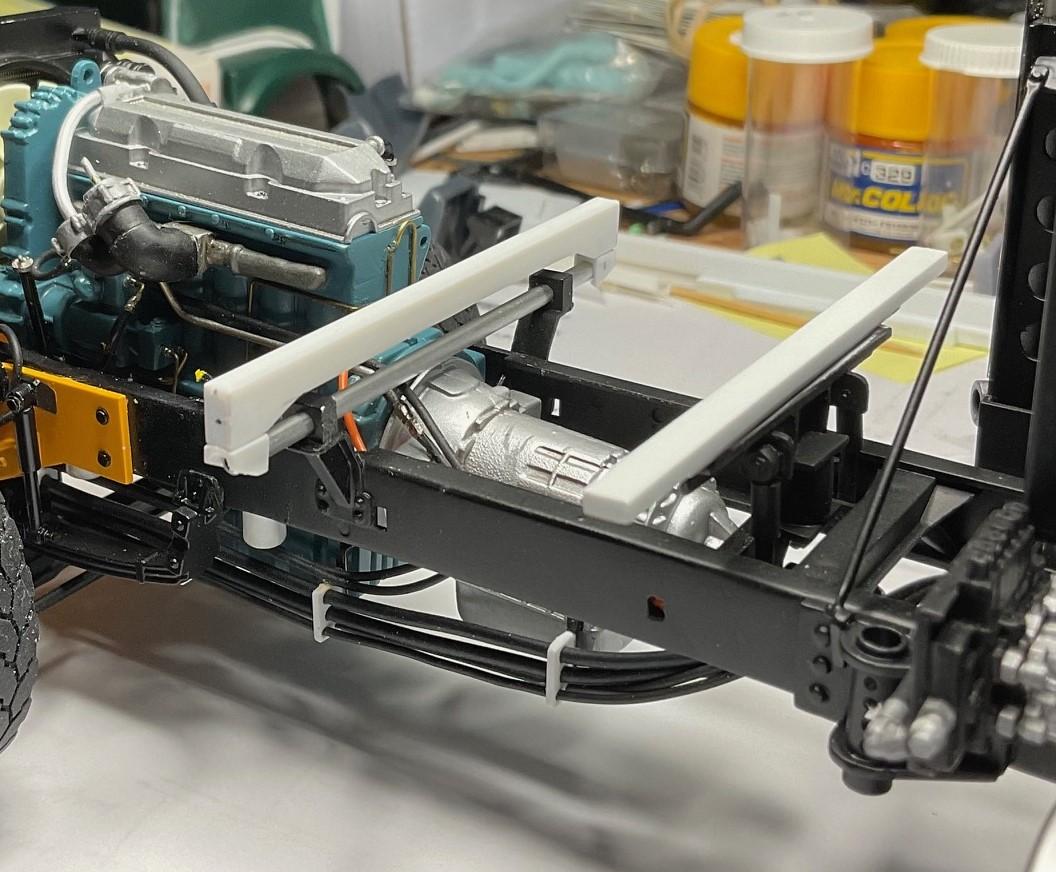
Had a good result today - this was the test of my plan to set hood/cab unit on the cross members, check final fitting, then glue the top of the cross members and re-set the hood/cab back down on them - all while having the hood's hinge bolts lined up in the hinges. Thankfully, it turned out well. I had to make a small adjustment to line hood and cab up, once I took the tape off, but looks good! The was the end result of setting the hood/cab back on top of the cross members, after applying glue. I can now easily set and re-set the cab on the frame and the hood will be lined up with the cab. I can now layout the few remaining cross members supporting the floor pan and cab. The hood is no longer taped to the cab and is free standing. Will still need to CA glue hinge bolts into hinge mounts, eventually. Very happy with fit of back edge of hood against cab - being supported at back edge by flange installed a ways back - no more tape on hood holding it to cab! Now I can figure out where to cut out hole for air intake plenum from air cleaner Also, need to get on with finishing the hood support mounts that come off the inner brace and line up with the other half of the supports on the firewall. Short update today, but sure relieved with how the day turned out. Take care!
-
Awesome scratch building, Steve - I can well imagine the difficulty of adding all that detail!
-
Wow - beautiful job! Your interior just pops.
-
Western Star 4900 FA plow truck
BK9300 replied to BK9300's topic in WIP: Model Trucks: Big Rigs and Heavy Equipment
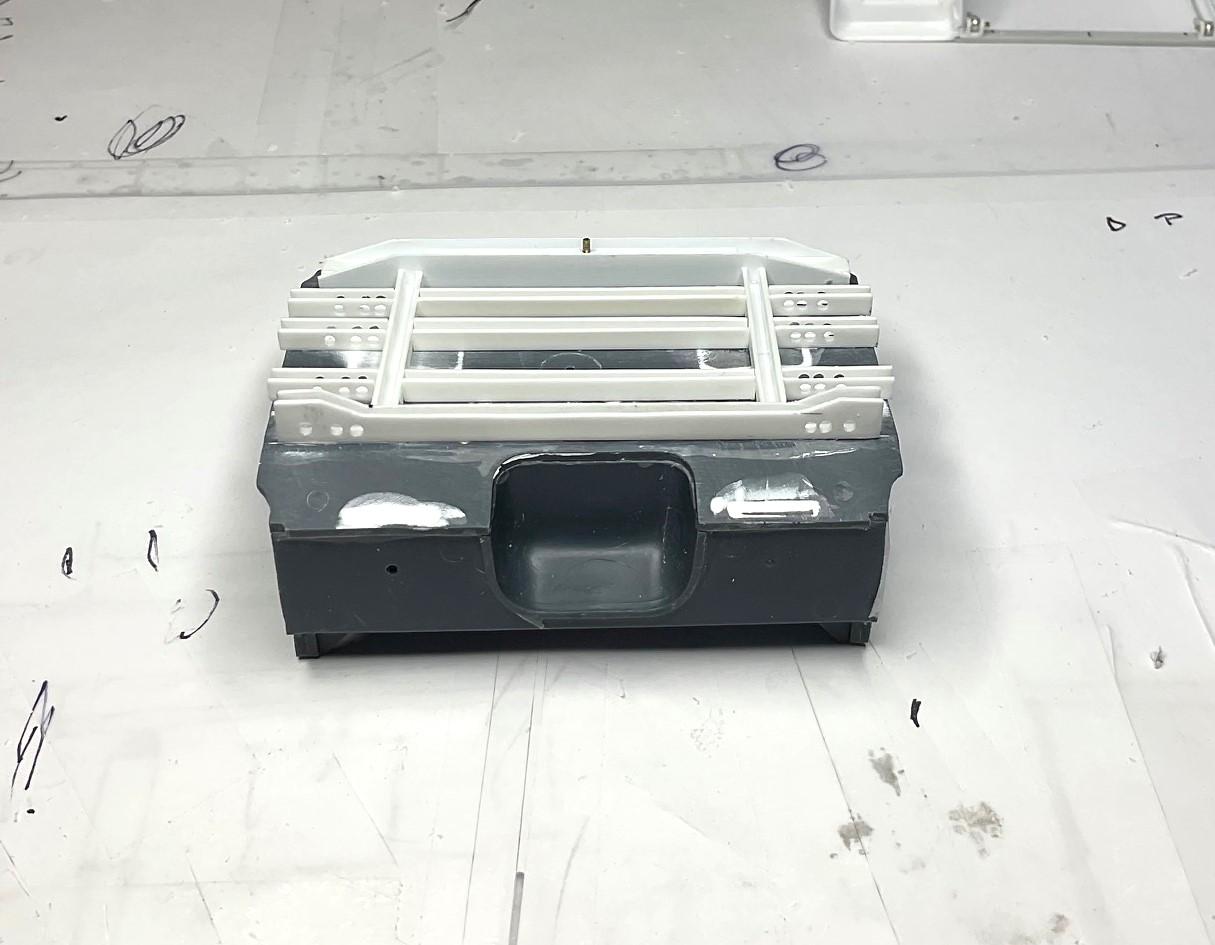
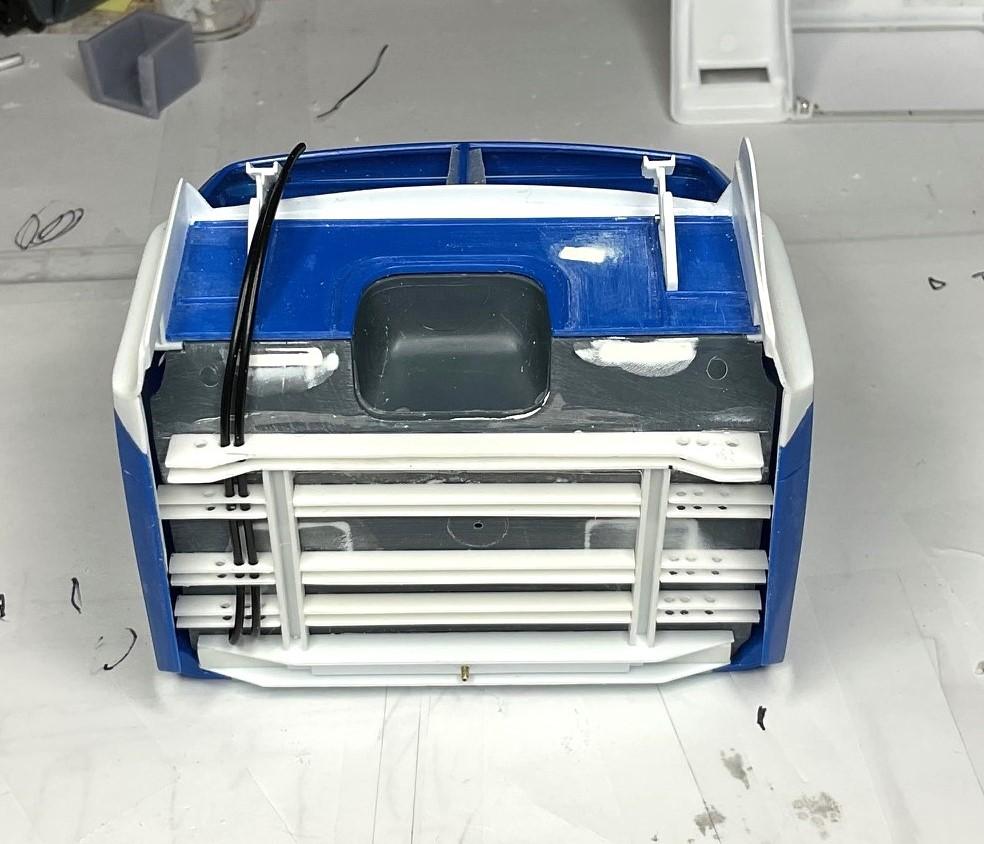
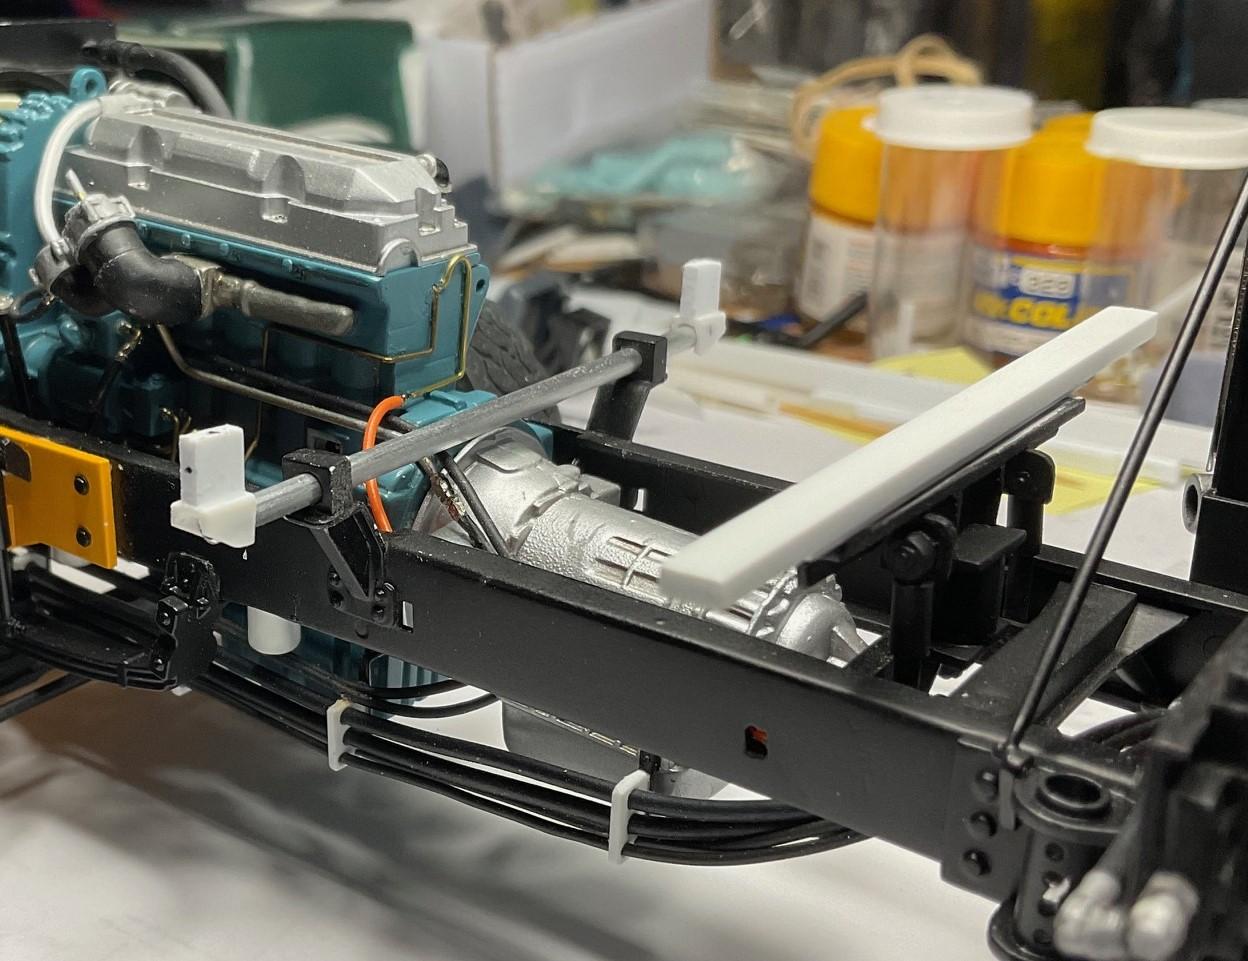
Kind of an exciting moment early this afternoon - sitting at my bench when a kind of a low roar started outside and a couple seconds later the house is trembling a bit and a few seconds later, it was over. Was a 4.7 earthquake about 55 kms away - never experienced that before! My wife and I, and the two cats, a bit unnerved by that. Found a way to do the cab floor pan supports so the cab could be removed, for additional work, until the cab is finally ready to be glued in place. The pinned support at the top of the pic will locate into the top of the rear cab suspension; the parts in the lower left form the balance of the front cab/floor pan supports Rear floor pan cab support sitting in place; I will be painting the front cab supports and CA gluing them and the tubular cross member in place Once the front cab supports and cross member are glued in place, the front, rectangular tube cross member and the rear cross member will have solvent glue applied to them and the cab/hood/floor pan unit will be set in place, starting with the hinges up front, and the hood/cab/floor pan tilted back down onto these two cross members. I'm hoping to keep the rear cross member lined up properly until glue sets. Then, I should be able to lift off the cab with the front and rear cross members glued in place to the floor pan, and the cab/hood alignment all working properly as well. I will then be able to set the cab/floor pan unit back onto the truck in its final position as many times as I need to, to finish adding details to the cab and underneath it as well - that's the plan, anyway! Rectangular and tubular cross members visible - cross members not glued to floor pan yet! Tomorrow, should be able to test fit hinges/hood/cab assembly on top of cab supports and if all looks lined up, I can get the supports glued to the bottom of the floor pan. If all goes well, should be able to test if hood opens and closes ok and if so, then finish the other few crossmembers under floor pan. I remain very appreciative of all your comments - take care!