BK9300
-
Posts
1,991 -
Joined
-
Last visited
Content Type
Profiles
Forums
Events
Gallery
Everything posted by BK9300
-
Beautiful craftsmanship, Andy - well done on a very nice build.
-

1974 Econoline camper
BK9300 replied to Repstock's topic in WIP: Model Trucks: Pickups, Vans, SUVs, Light Commercial
This is cool - great progress so far! -
Mercedes Benz SSK
BK9300 replied to Pierre Rivard's topic in WIP: Other Racing: Road Racing, Land Speed Racers
Striking amount of detail in your engine compartment, Pierre and just a wonderful job on the interior and steering wheel especially! -
You did an awesome job, Scott - from the scratch building to your engine detailing and all parts in between - very cool build!
-
Western Star 4900 FA plow truck
BK9300 replied to BK9300's topic in WIP: Model Trucks: Big Rigs and Heavy Equipment
Was able to finish assembling the hood hinges last night and this morning, with a little cleanup left to do. Now I need to modify existing frame brackets to make a bit of room for the hinge mounts to fit to the frame. Then will get the mounts painted and glued to the frame and get on with the rest of the hood/cab alignment. Everything assembled last night and left to set up over night. 'Bolts' going through hinge mount are just sitting in place - will CA glue them in place once the hinge mounts are glued in position on the frame, and holes drilled in frame for bolts. Getting the grille surround ready for a test positioning on truck The existing frame bracket behind the hinge mount needs to be modified a bit before the hinge mount will snug up tight to the frame - getting closer! Might need to temporarily pin hinge mount to frame, without gluing the mount, to see if the grille surround (and hood) will lay out properly when opened. Lots of plastic 'dust' to clean up, despite my efforts to keep assembled parts clean. @Steve H posted about getting a Dspiae mini vacuum for his bench - have to look into that. Have a good rest of your weekend and thanks, as always, for having a look!
-
It must be hard to do what you want in a build, having arthritis - all the knowledge is there, so, hoping your build goes ok!
-
Revell's Auto Transport Trailer: WIP
BK9300 replied to David G.'s topic in WIP: Model Trucks: Big Rigs and Heavy Equipment
David, been following along - you and Dan are making very complicated trailers! Have you noticed whether or not the trailer frame deflects when loaded with your model cars? -
Western Star 4900 FA plow truck
BK9300 replied to BK9300's topic in WIP: Model Trucks: Big Rigs and Heavy Equipment
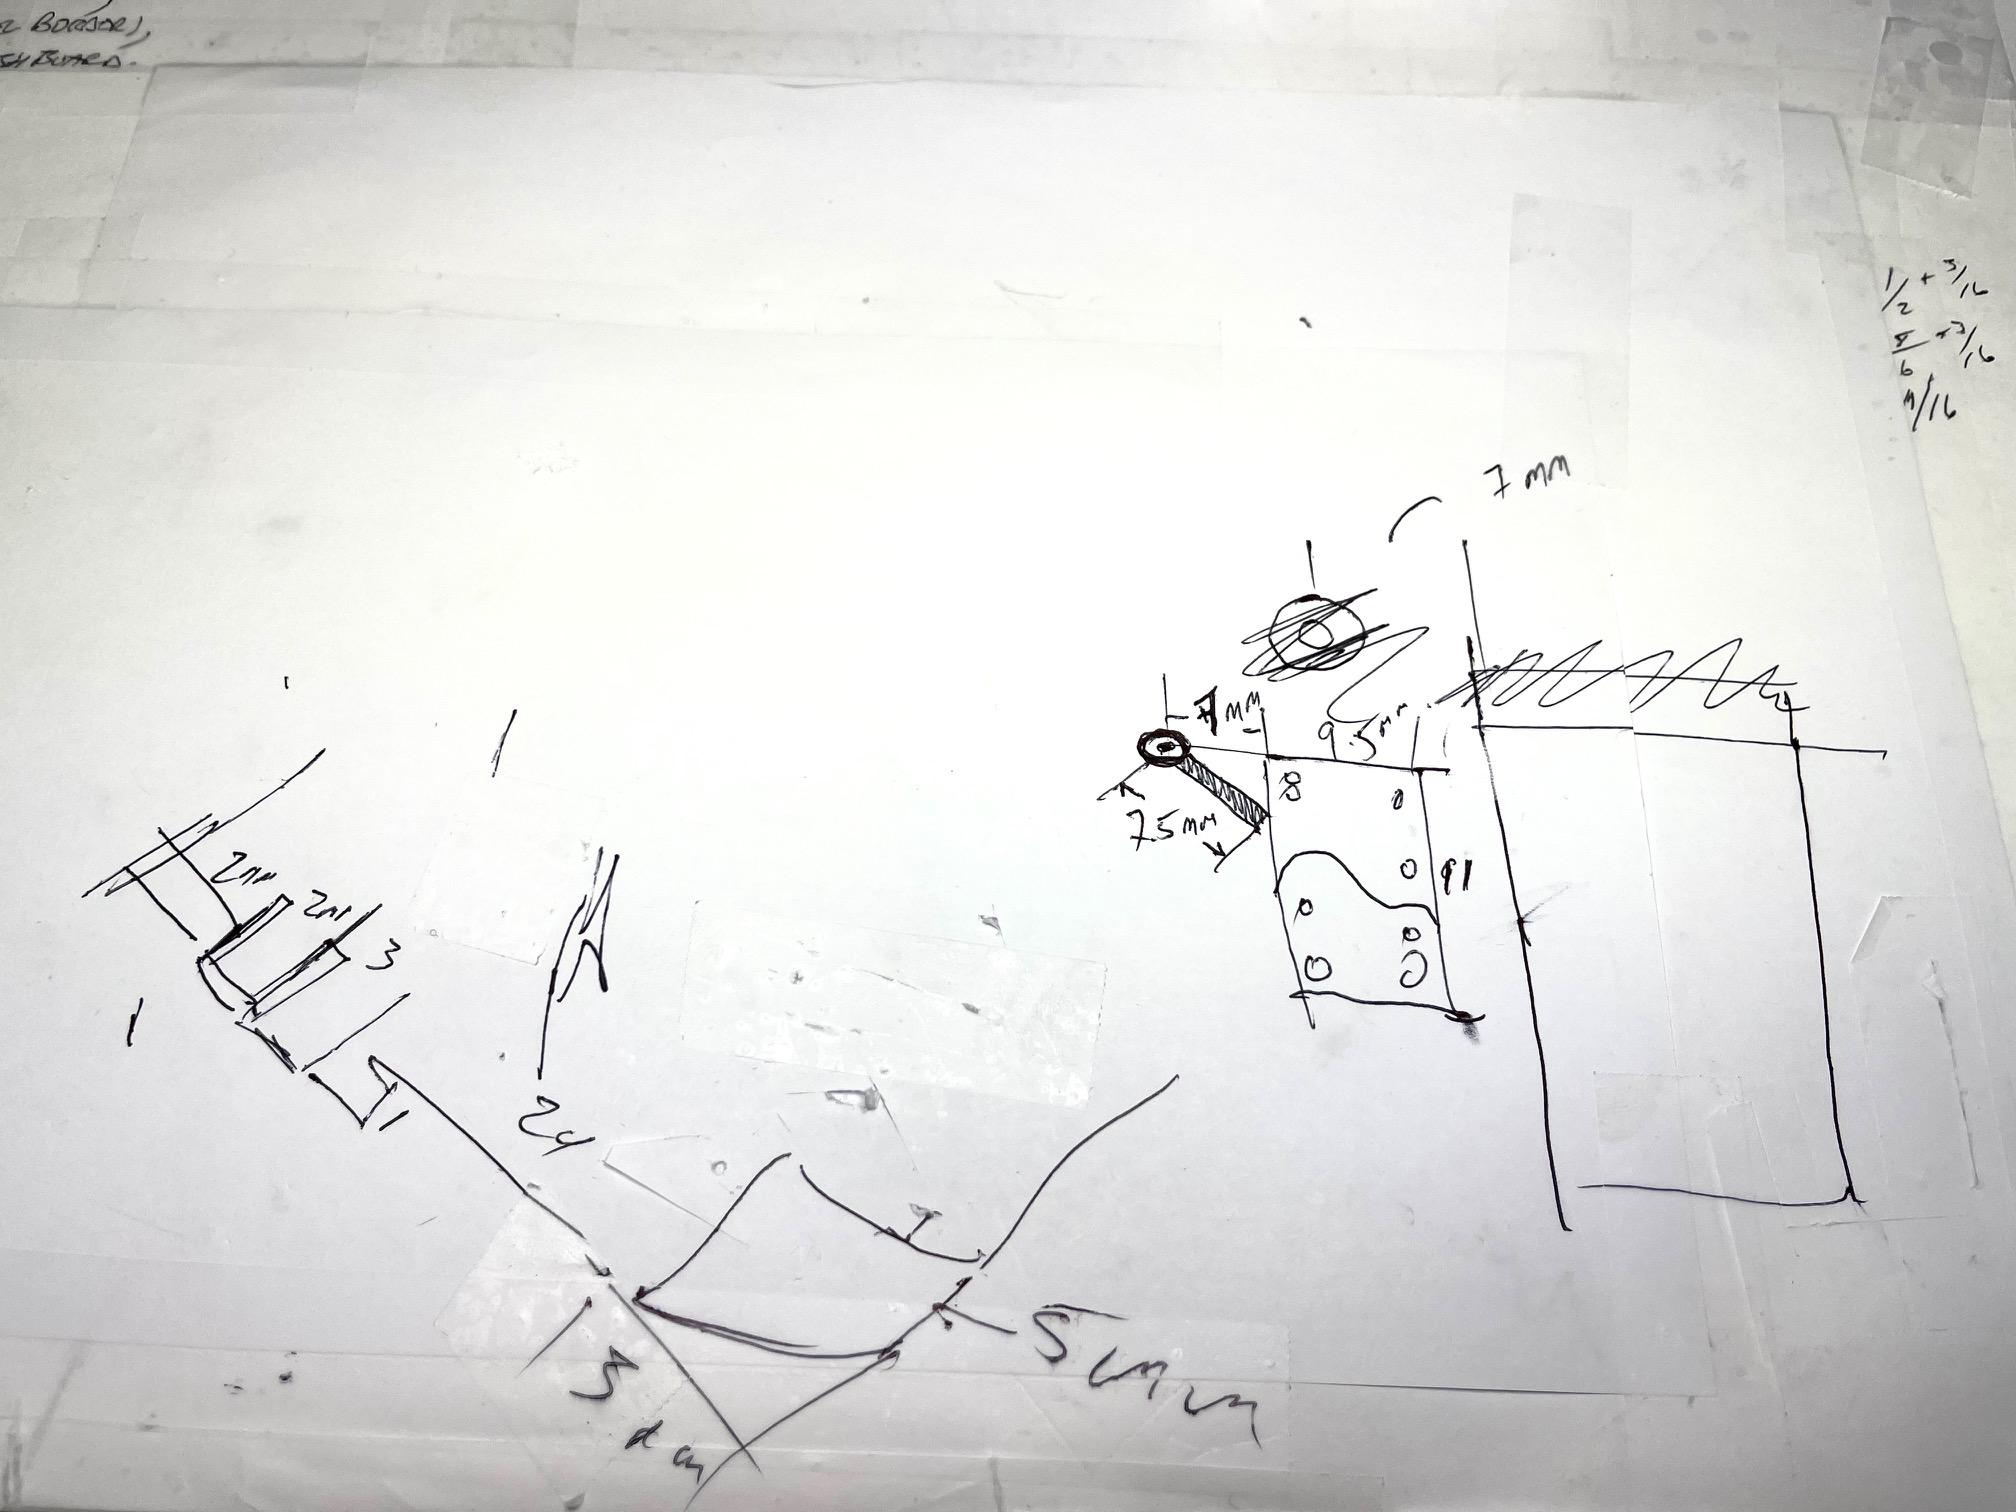
Thanks, Steve - I keep replacing the paper on my work space - if I had kept it all, there would be a scrap book full of my doodling about how I might have to make things. Can’t do without drawing along the way! -
Western Star 4900 FA plow truck
BK9300 replied to BK9300's topic in WIP: Model Trucks: Big Rigs and Heavy Equipment
Too funny! I could make a neat incision, but that would be all I would know how to do! -
That, and having a very steady hand like yours, to do the detail painting - very precise!
- 766 replies
-
- 1
-

-
- stalled builds
- quick builds
- (and 2 more)
-
1/25 AMT Peterbilt 359 California Hauler
BK9300 replied to cifenet's topic in WIP: Model Trucks: Big Rigs and Heavy Equipment
Progress is happening! Your decisions along the way may be deviating from your initial plan, but all your attention to detail will pay off in the end! -
Kenworth 925 - Strato Models
BK9300 replied to carsntrucks4you's topic in WIP: Model Trucks: Big Rigs and Heavy Equipment
Tremendous work, in crafting your hood - looks great, -
Western Star 4900 FA plow truck
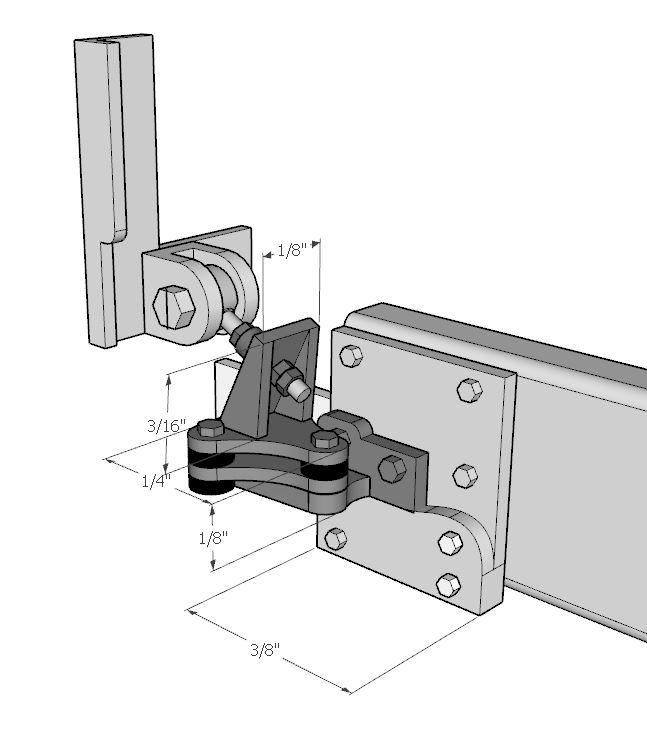
BK9300 replied to BK9300's topic in WIP: Model Trucks: Big Rigs and Heavy Equipment
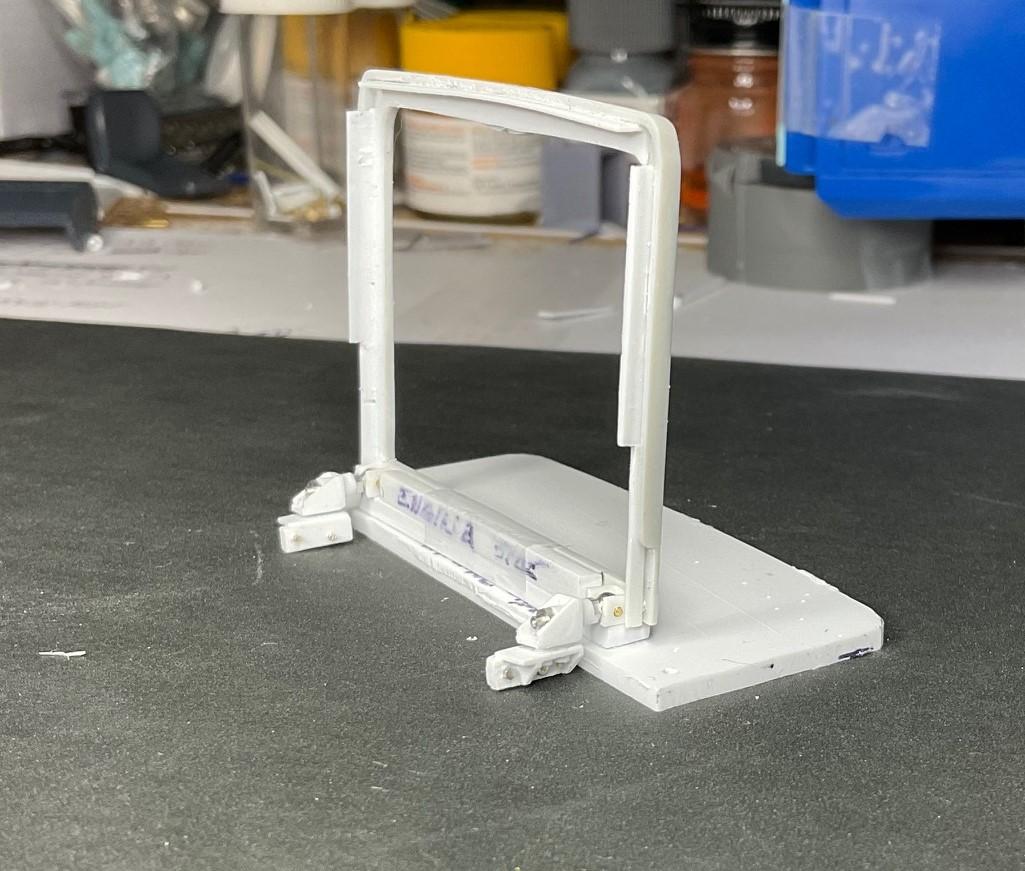
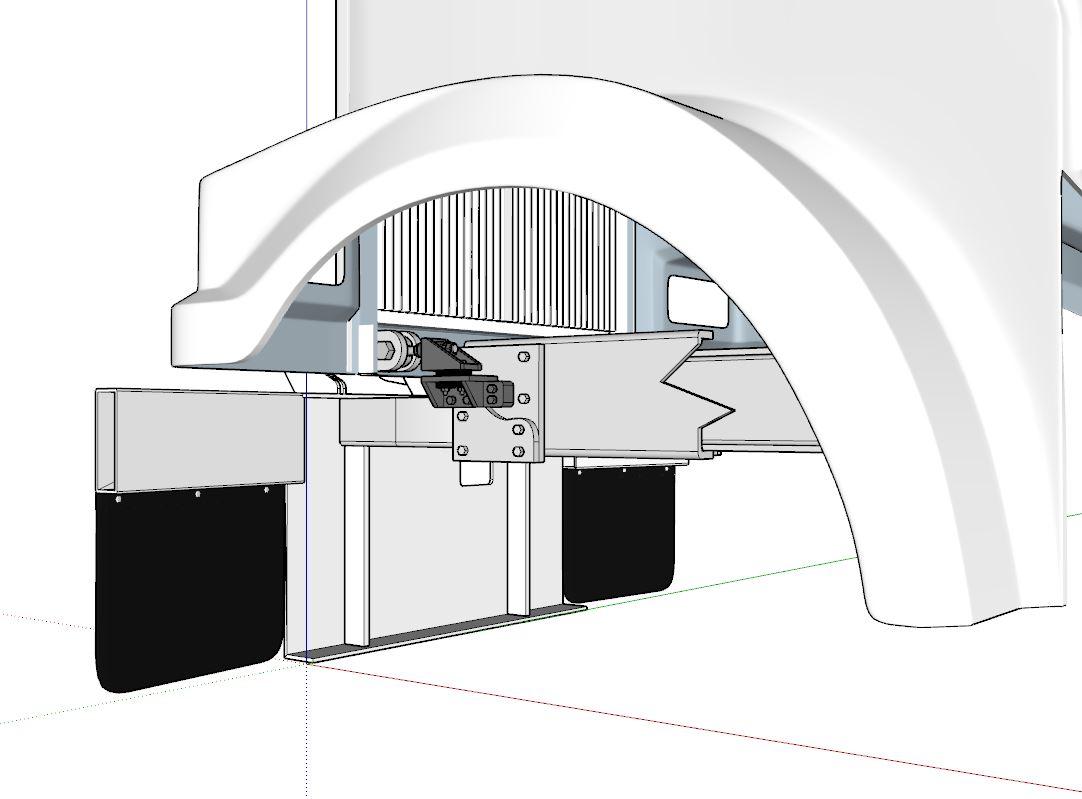
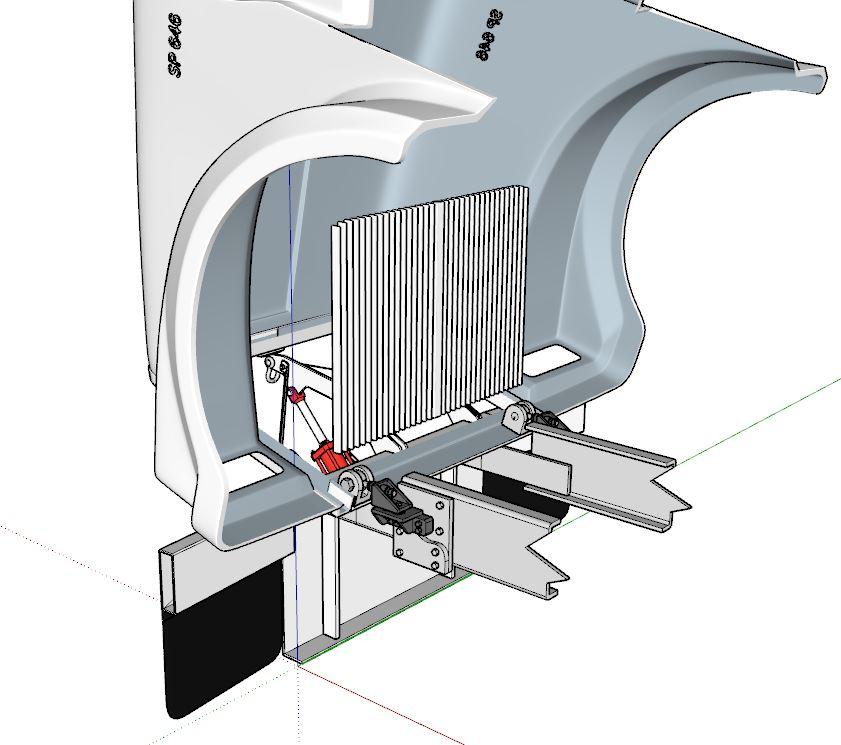
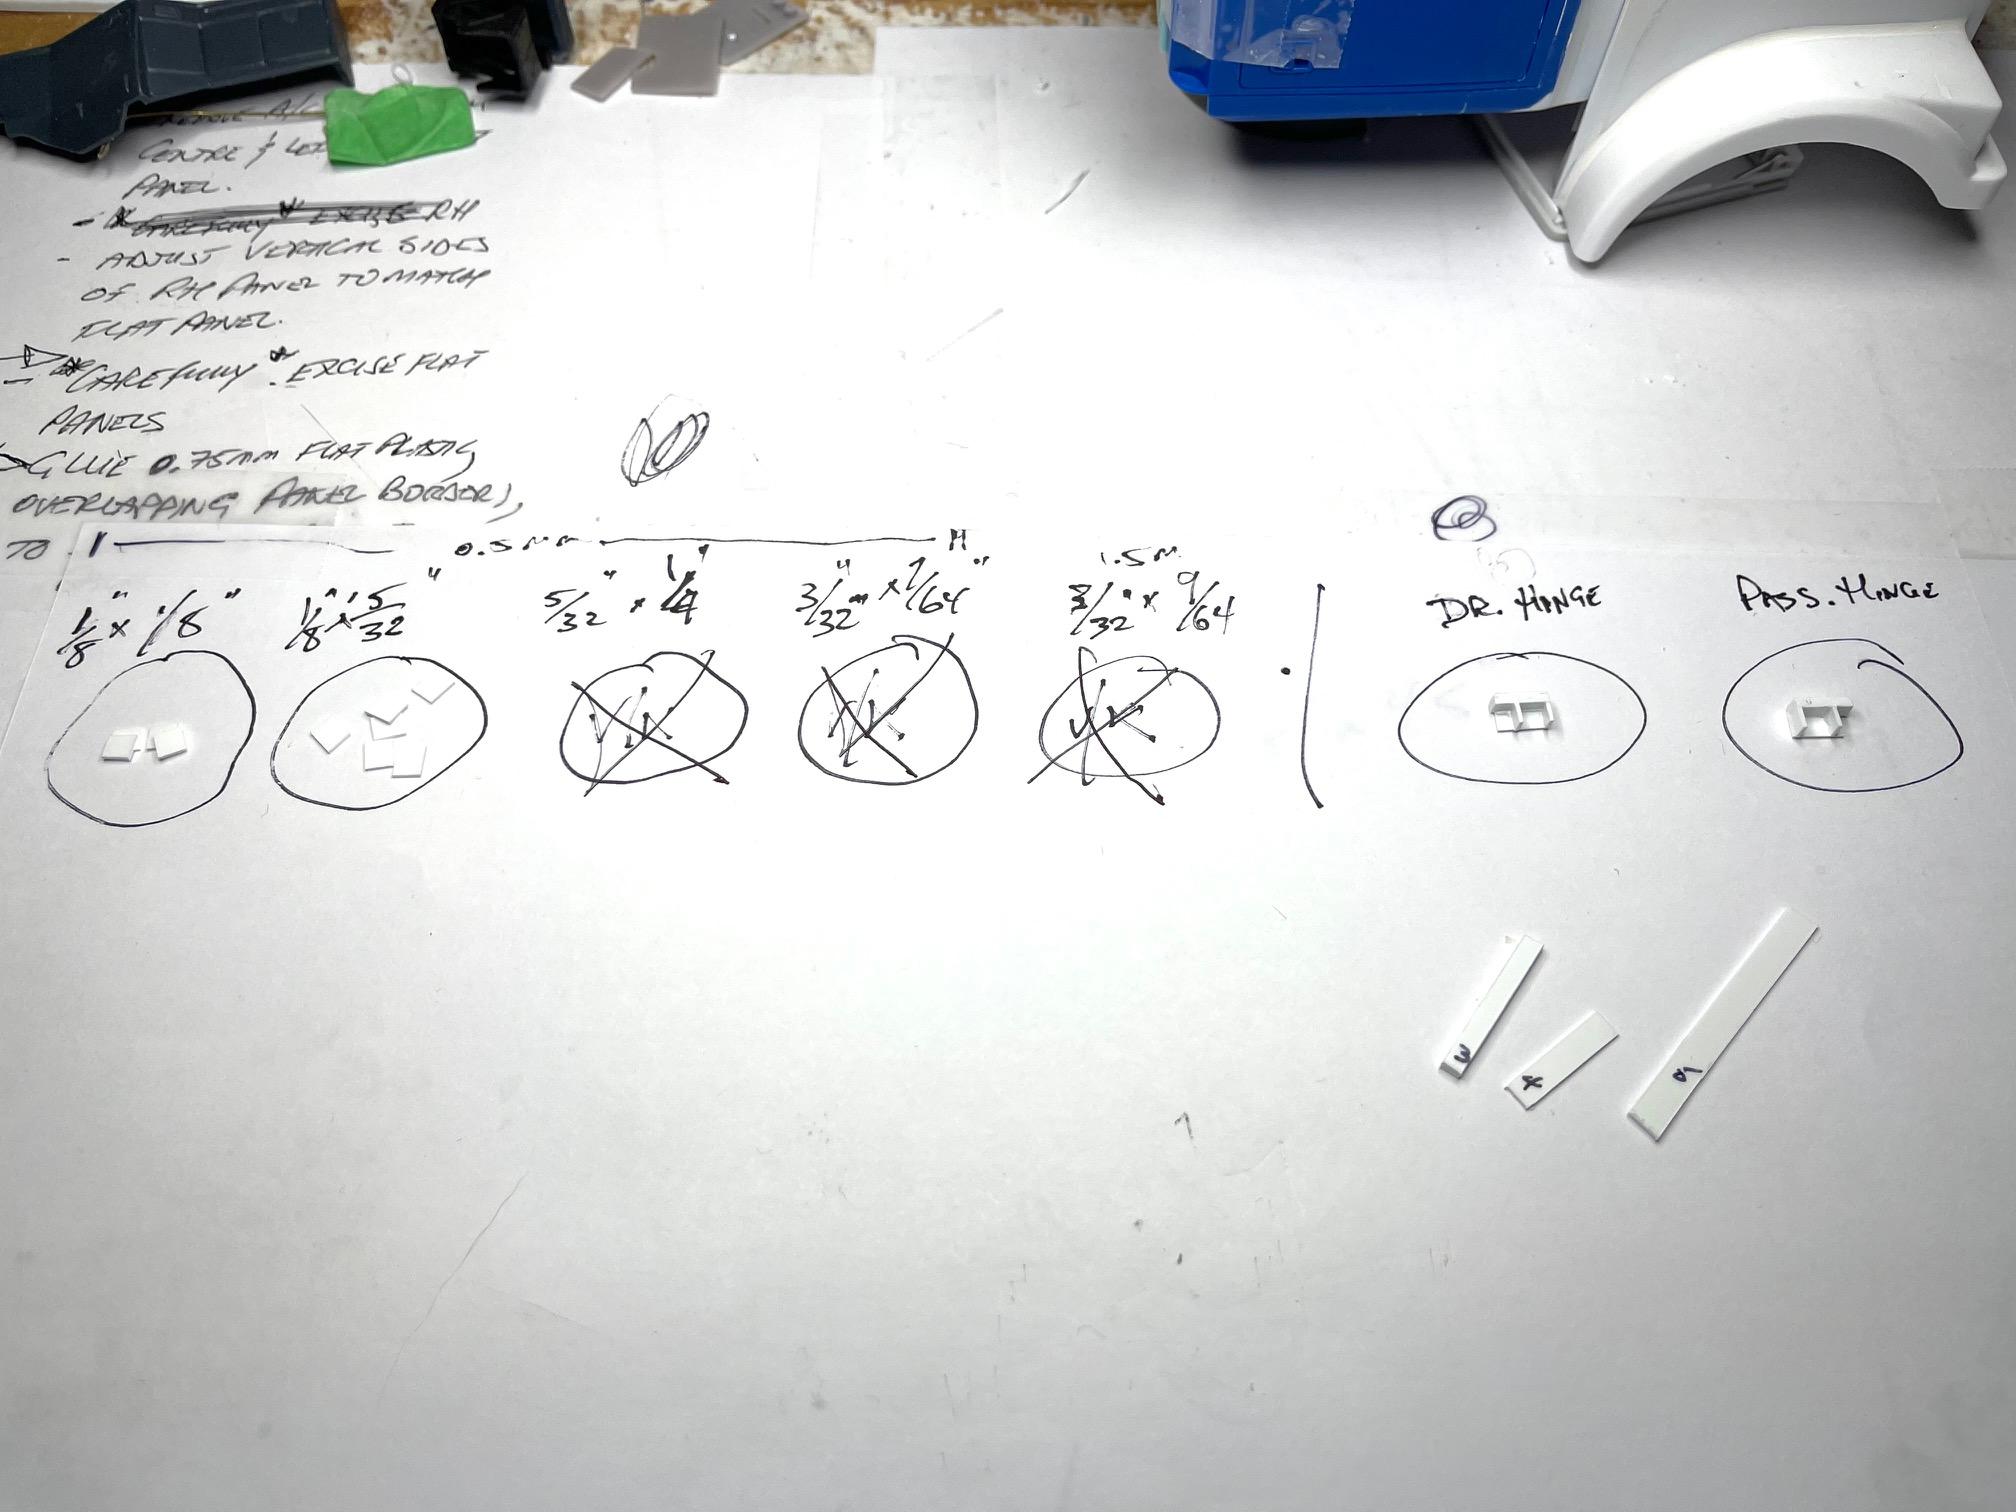
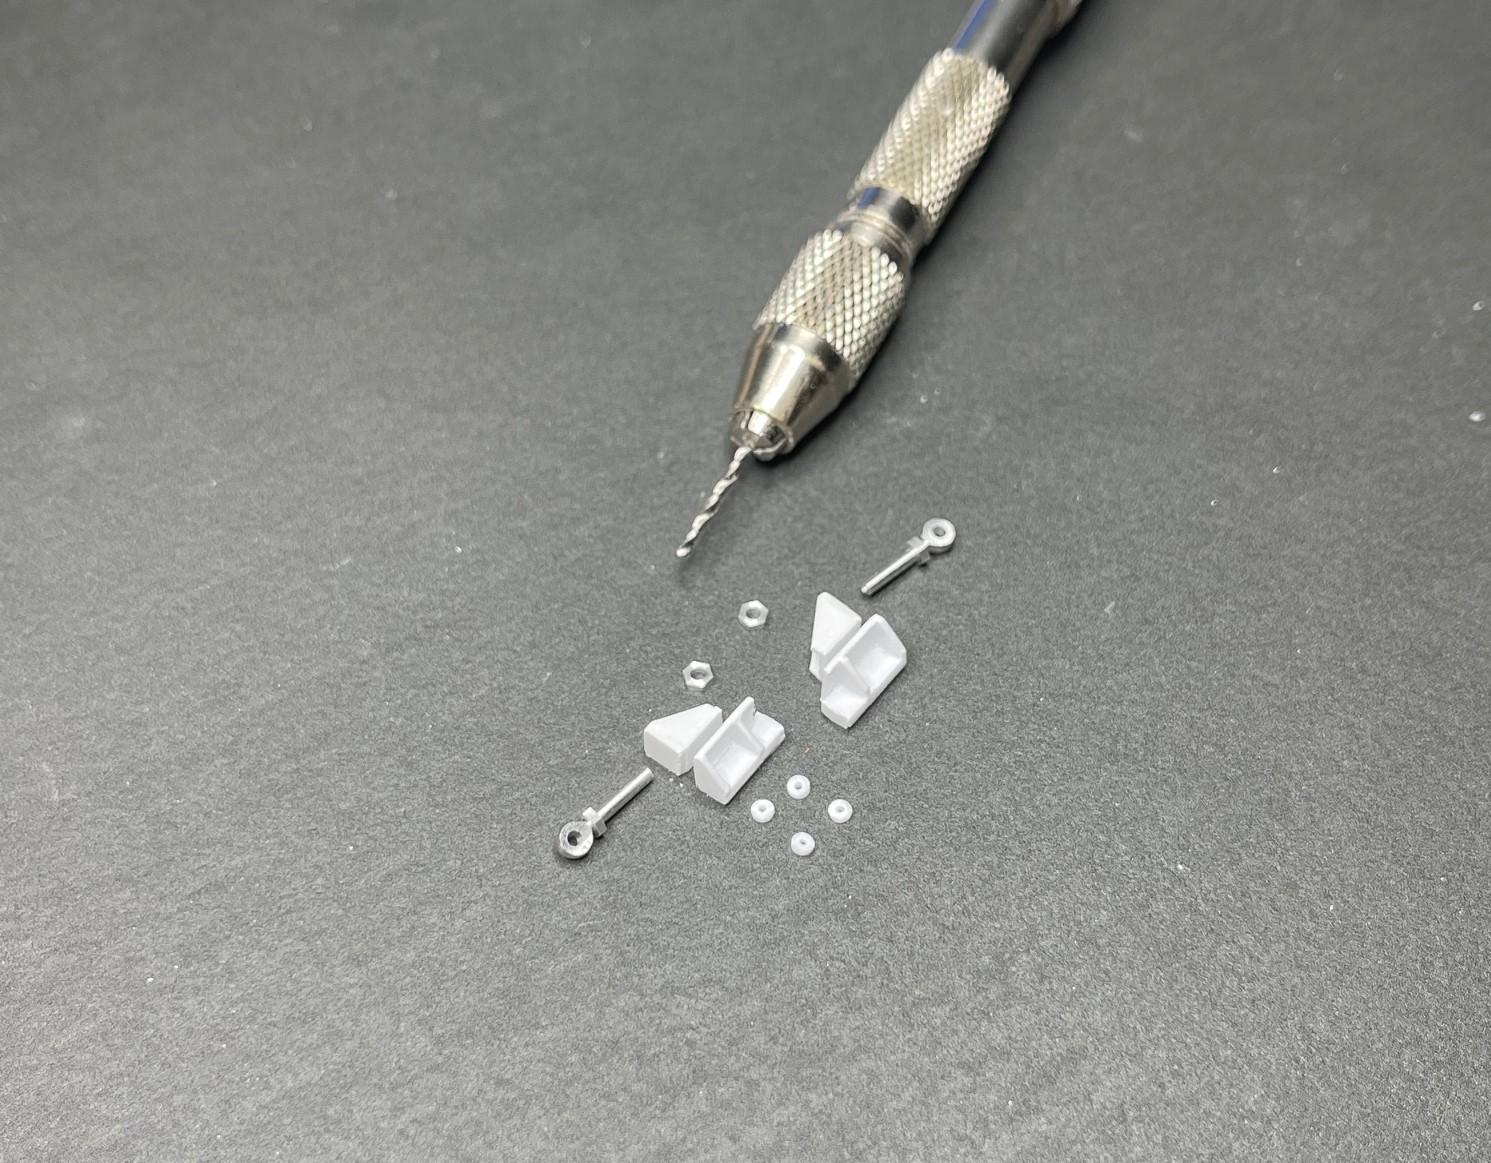
Been stressing a bit about the hinge mounts. I needed to get the finished size to be as close to my Sketchup design as possible, or I would be off center with the hinge bolt that passes through the upper part of the hinge mount. Then it became clear that, if I built the hinge as designed, but mounting it on the hinge bolt first, rather than on the frame, I could locate the hinge mount to the frame much easier than the other way around. So, didn't get much bench time in yesterday, while messing with the design in Sketchup, but ended up feeling better about how to proceed! I added this pic in because I don't do all my 'design' work in Sketchup! (mostly, I do though, because I'm a messy writer) While making sure about the hinge design, I imported just the hood, grille and front plow lift bumper from the truck 3D model, to better see the fitment of everything involved - all the items in the next two pics are exactly the size they are, or will be, on the physical model. While doing this, I could also pivot the hood open, centering on the pin in the hinge bolt, and it became clear that, in spite of all the measuring along the way, the hood might not quite open all the way before contacting the plow lift arm. I can't (won't) move the hood forward slightly, because that affects the hinge bolt, hinge mount placement and then lastly, the fender wheel openings would be off center with the front axle - it's going to stay that way at this point! A final reference pic printed out to keep checking back to as I cut out all the pieces for the hinge mounts Partially assembled, lower hinge mount portions (at right), with upper section pieces waiting to be assembled Upper and lower hinge mounts made, with light filing/sanding done - 'rubber' washers need to go between upper and lower sections and the front of each hinge needs to be drilled for the hinge bolt. I'm going to use 0.5 mm brass pins to connect together the upper sections, rubber washers, and lower hinge sections to strengthen the whole mounts. Will also pin the mounts to the frame after they have been glued in their final position on the frame. Enough for today - progress on hinges feels good at this point but we'll se how it goes come time to attach hinge mounts to frame! Take care.
-
Excellent detailing on your engine and painting on your front suspension parts. Like the idea you came up with for the aftermarket wheels - good stuff!
-
Stock '37 Chevy sedan delivery
BK9300 replied to traditional's topic in Model Trucks: Pickups, Vans, SUVs, Light Commercial
Very well planned and executed build - love all the functioning doors/hood - beautiful job! -
1962 Marmon-Herrington HDT
BK9300 replied to Jürgen M.'s topic in Model Trucks: Big Rigs and Heavy Equipment
Well done, Jürgen - another fine addition to your display area! -
Farm Floater Truck 1/24th scale
BK9300 replied to Randy D's topic in WIP: Model Trucks: Big Rigs and Heavy Equipment
Beautiful work, Randy - might almost expect the monitor to light up - very fine (tiny as well as excellent) work being done here! -
Western Star 4900 FA plow truck
BK9300 replied to BK9300's topic in WIP: Model Trucks: Big Rigs and Heavy Equipment
Thanks for this, Steve! Some unposted photographs have also shown me more than a few issues that needed fixing before I could post new pics! Thanks for the kind words, Victor - I appreciate it. -
I decided that I needed to build Big Rigs
BK9300 replied to Screaminhelo's topic in Welcome! Introduce Yourself
Welcome to the forum, Bill - I agree with Donato - lots of builders who will answer any questions you come up with! -
Mercedes Benz SSK
BK9300 replied to Pierre Rivard's topic in WIP: Other Racing: Road Racing, Land Speed Racers
You've crafted an amazing dash, Pierre - lots to pick up from following your builds. -
Western Star 4900 FA plow truck
BK9300 replied to BK9300's topic in WIP: Model Trucks: Big Rigs and Heavy Equipment
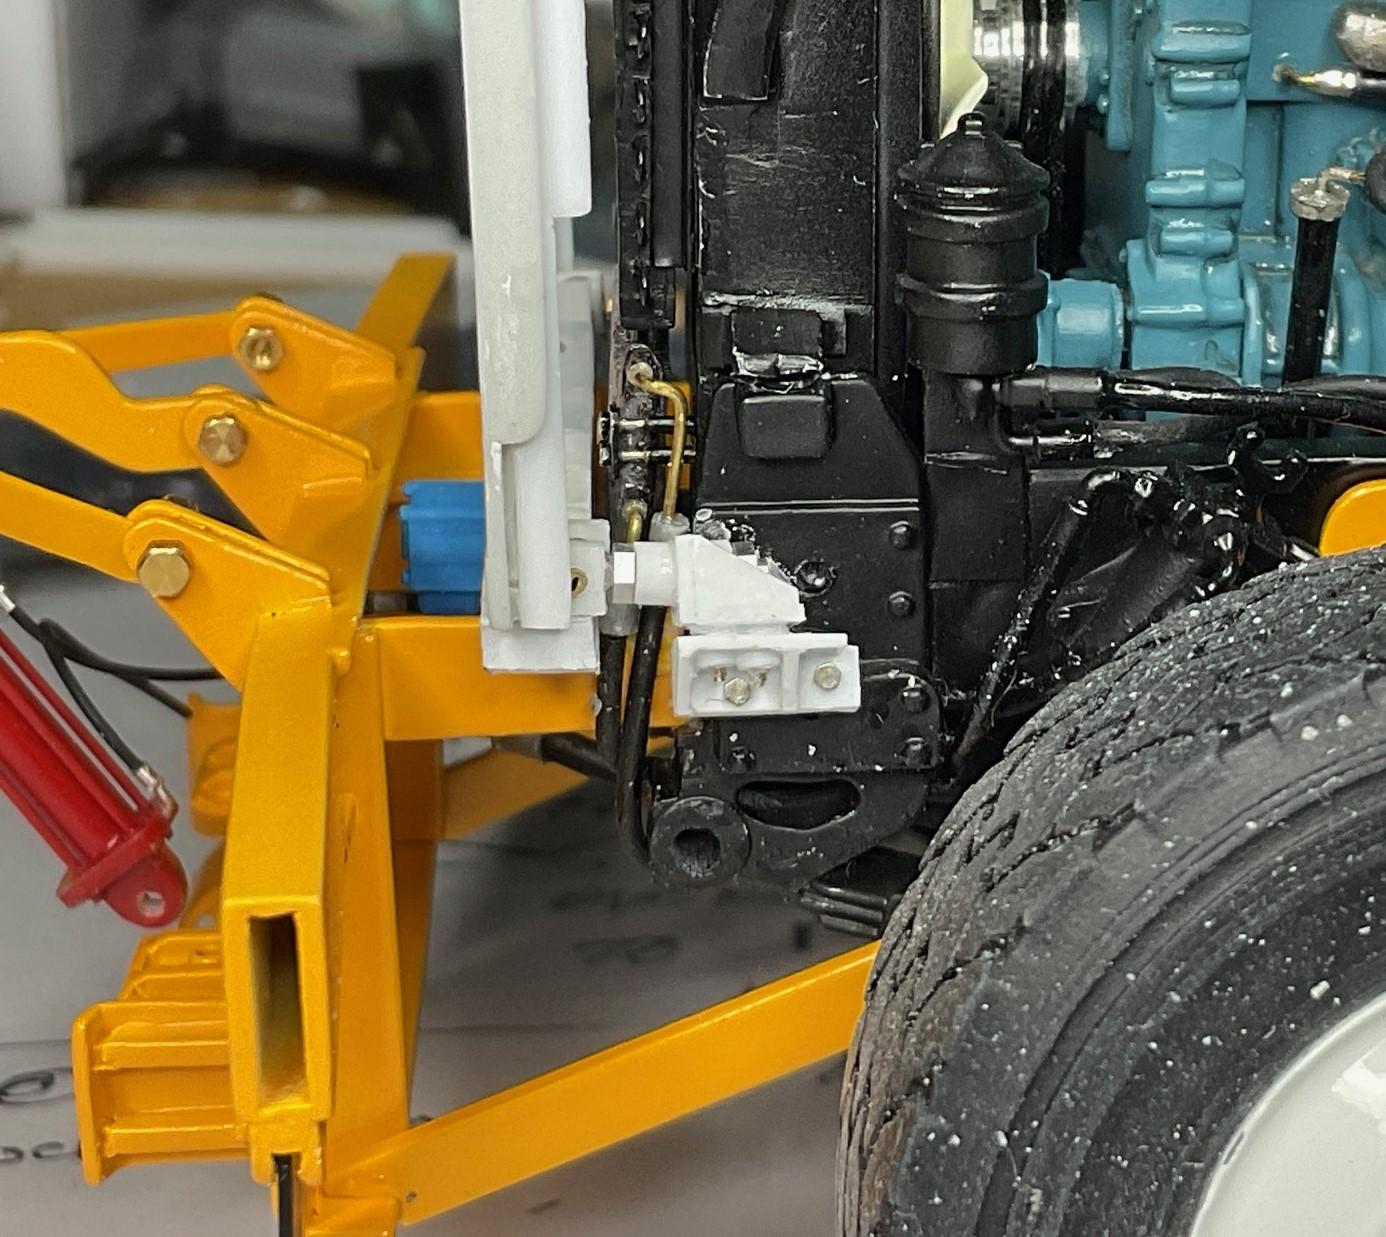
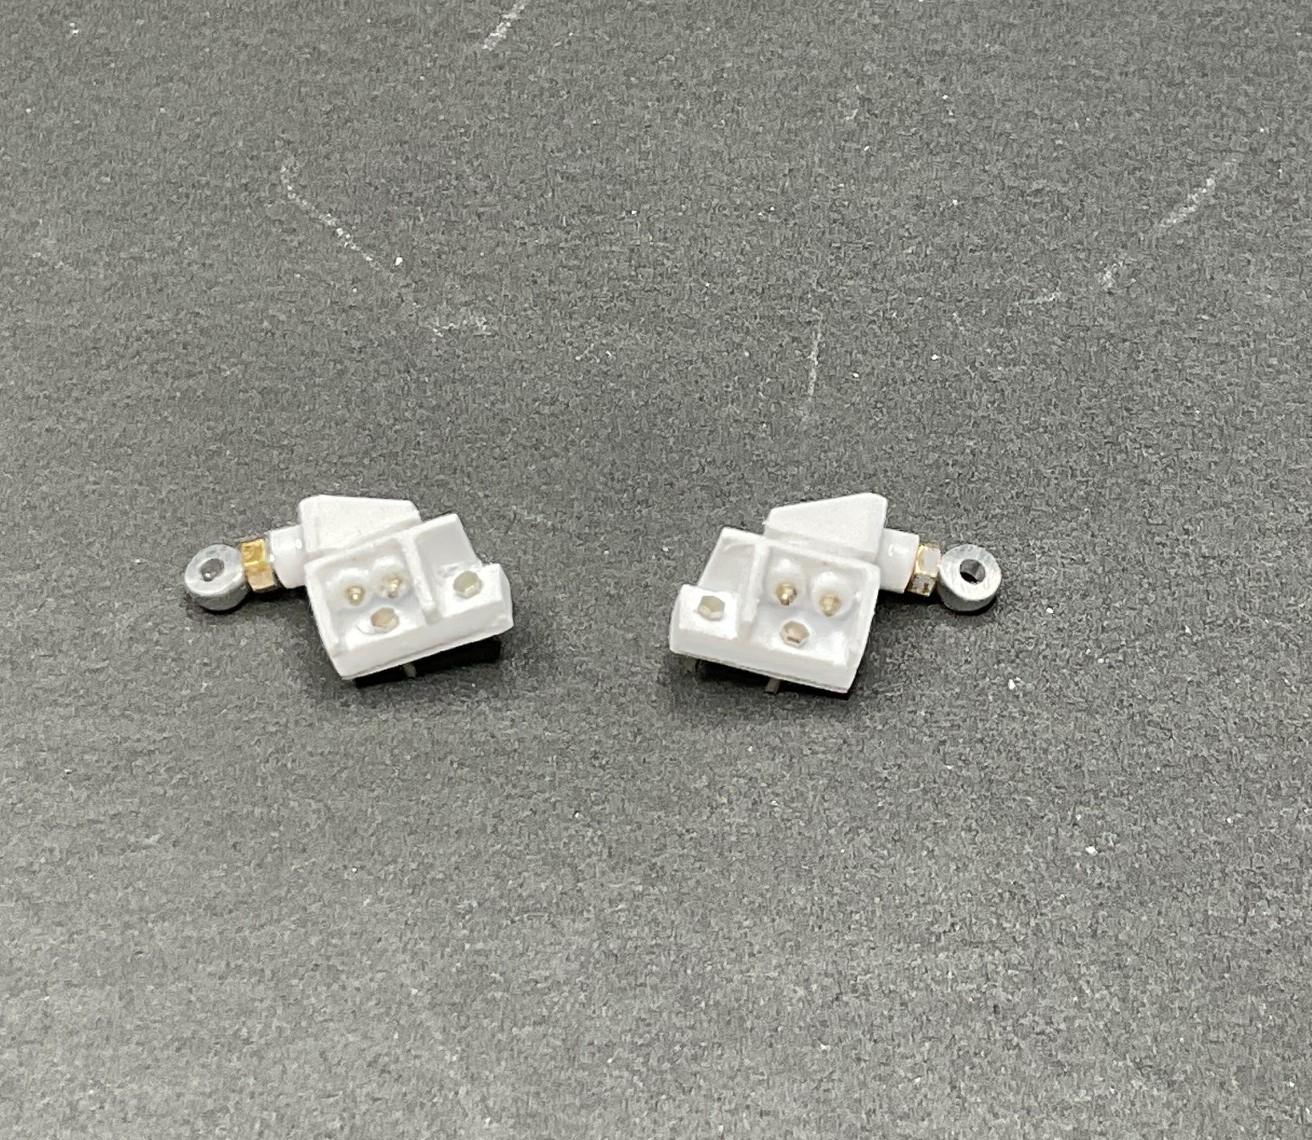
Quick update on the hood hinges - after some assistance from one of YRB's equipment managers, I now had two choices for hinges. Apparently, there were at least two types of hinges found on 2010 WS 4900's. The hinges on the truck I am modeling are more complex than the hinges made on trucks earlier in that model year. I posted a pic of the more complex hinges previously. I had a go at 3D modeling versions of both types before deciding. The newer 2010 truck had these type of hinges - The same model year, but produced earlier, had these type of hinges - I made an attempt at the newer type hinges, but was not satisfied with the results. The older type of hinges are model year correct and, in my opinion, will be an achievable compromise. All the elements in the hinges are sized to be made out of 0.5 and 1.0 mm sheet stock. Either of these hinges likely could have been 3D printed, but the hood will be opened from time to time and I feel that making them out of styrene will leave them stronger than resin ones, given my intent to be opening the hood for display. Bit of a set back today, but will be moving forward with older type hinges! Take care.
-
Western Star 4900 FA plow truck
BK9300 replied to BK9300's topic in WIP: Model Trucks: Big Rigs and Heavy Equipment
Thanks very much, Jürgen - still plugging away! Appreciate that, Steve - 'stuff' is slow going at the moment! -
Peterbilt 379 RV
BK9300 replied to vincen47's topic in WIP: Model Trucks: Big Rigs and Heavy Equipment
That’s a heck of a model, Victor! Beautiful combo, with the cargo trailer, and amazing graphics - awesome job. -
Peterbilt 379 RV
BK9300 replied to vincen47's topic in WIP: Model Trucks: Big Rigs and Heavy Equipment
Your RV body is coming along great - wonderful repurposing of the doll house doors! Your last two pics really show the detail of your awnings. Its all going to be very impressive in black paint! -
That's awesome, Steve - even if Peterbilt thought of it first, might be the first of its kind in 1/32!