BK9300
-
Posts
1,990 -
Joined
-
Last visited
Content Type
Profiles
Forums
Events
Gallery
Everything posted by BK9300
-

Western Star 4900 FA plow truck
BK9300 replied to BK9300's topic in WIP: Model Trucks: Big Rigs and Heavy Equipment
Thanks a lot, Steve - I think ‘daft’ sums it up perfectly, but sure is a great activity to spend time at! -
Western Star 4900 FA plow truck
BK9300 replied to BK9300's topic in WIP: Model Trucks: Big Rigs and Heavy Equipment
Found these links to a model truck museum in Leduc, Alberta. Some very interesting builds in these videos -
I have been following them as well - I should comment more often!
-
Very detailed work - great looking build overall!
-
There's a lot of invested hours on display here - more details are found the longer I look at the pics! Great collection when they're all finished.
-
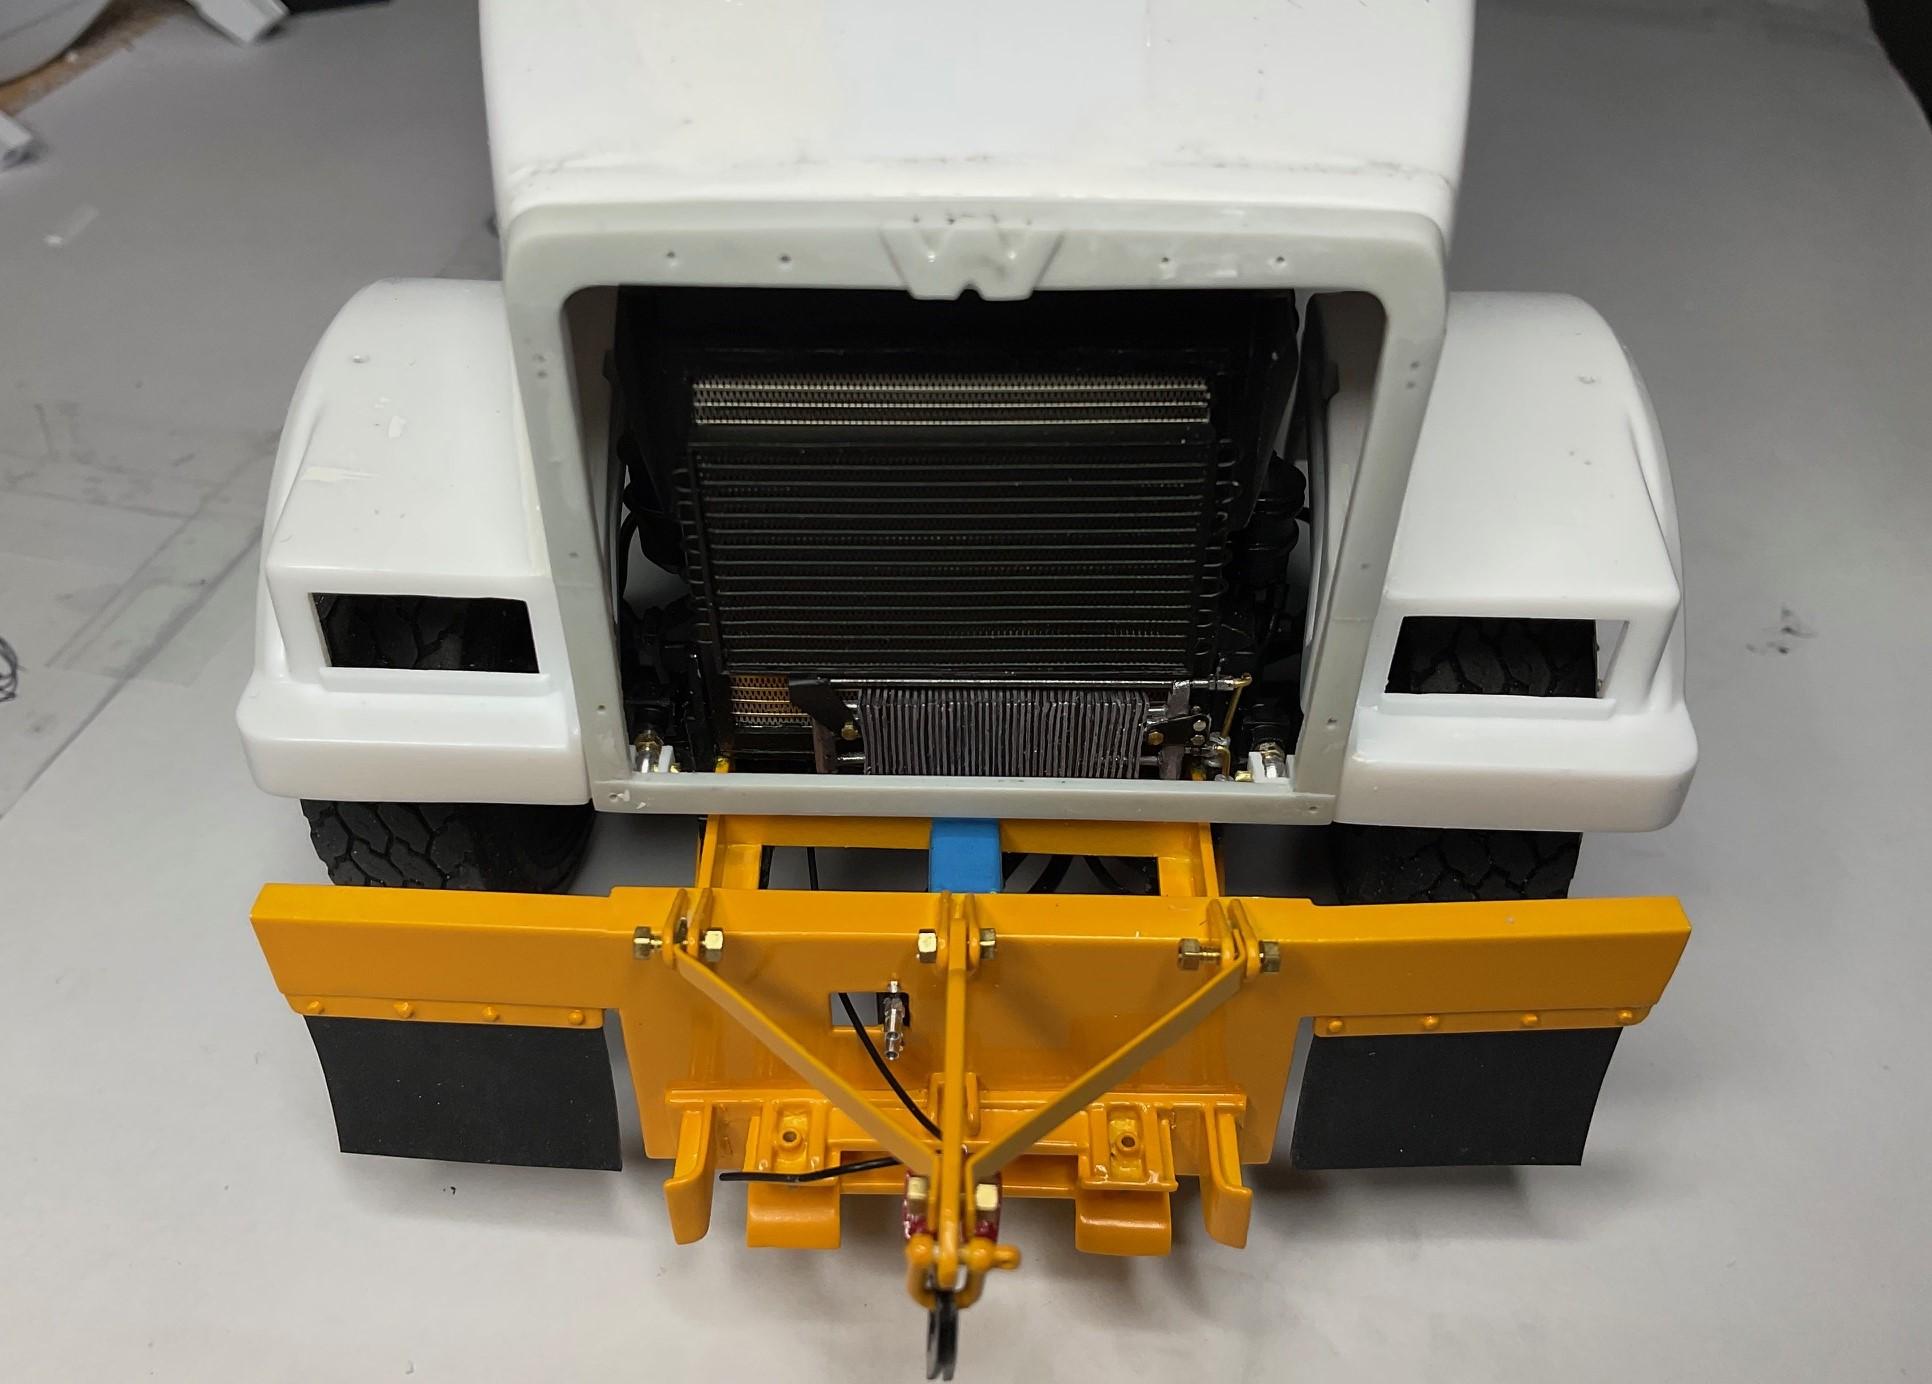
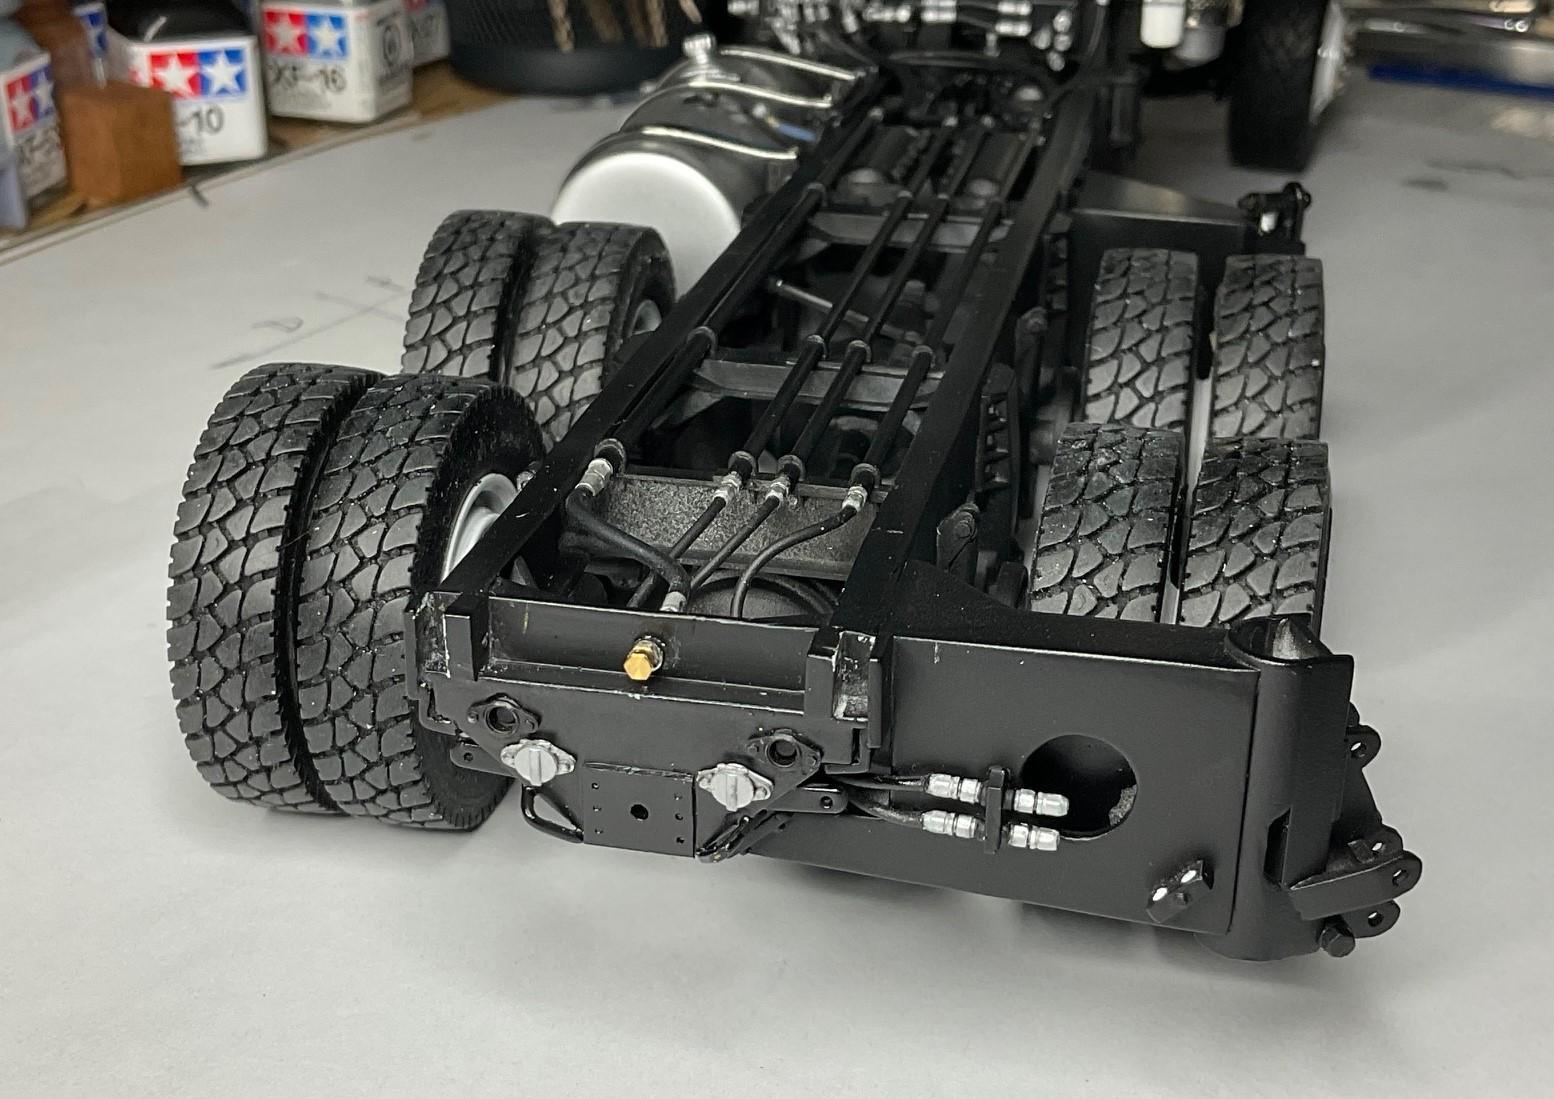
David, @Steve H let me know about your thread - it's a great idea! I see lots of cool details posted by automotive builders, so hoping a few hidden items on my plow truck build will fit in with the theme. Lots of hydraulic lines, a diverter valve, and electrical connections in rear cross member will be hidden once the sand hopper is attached to the frame. Also won't be able to see much of the scratch built AC condenser or the transmission cooler mounted on front of rad, which will end up behind the grille. I also added in the under cab supports for the floor pan, with wiring runs, which will almost certainly never be seen! Thanks for starting this thread, David - got some ideas for future builds going round in my head!

-
Western Star 4900 FA plow truck
BK9300 replied to BK9300's topic in WIP: Model Trucks: Big Rigs and Heavy Equipment
Thanks very much, Francis and I appreciate you following the progress! -
It must feel very gratifying to be nearing the end of this build - you've created an amazing piece of work and should be suitably proud! Look forward to your 'Under Glass' photo shoot.
-
I can imagine the media blasting produced a smile - the result is very impressive! Yourself, and others like Messers Laflamme, McLaren, Libby and Ditton (and some who I may not have found, yet), and who work in metal at this scale, produce some of the most amazing creations. Amazing to follow along.
-
AMT Exterior Post Doubles Vans
BK9300 replied to Bren's topic in WIP: Model Trucks: Big Rigs and Heavy Equipment
Been said before - your rust detailing is incredible! Those trailers must have seen some very salty winter roads! Any possibility of making logo decals for your flaps? -
1/25 AMT Peterbilt 359 California Hauler
BK9300 replied to cifenet's topic in WIP: Model Trucks: Big Rigs and Heavy Equipment
I can see them now - your truck is really looking good, Steve. I’m sure you’ll get the weight issue resolved! -
1/25 AMT Peterbilt 359 California Hauler
BK9300 replied to cifenet's topic in WIP: Model Trucks: Big Rigs and Heavy Equipment
Steve, really been enjoying your updates, however, I cannot see the three pics in your last post. Might just be my end, but I can see every other pic you posted, so not sure what the issue is. Hoping to get to see them later! -
Western Star 4900 FA plow truck
BK9300 replied to BK9300's topic in WIP: Model Trucks: Big Rigs and Heavy Equipment
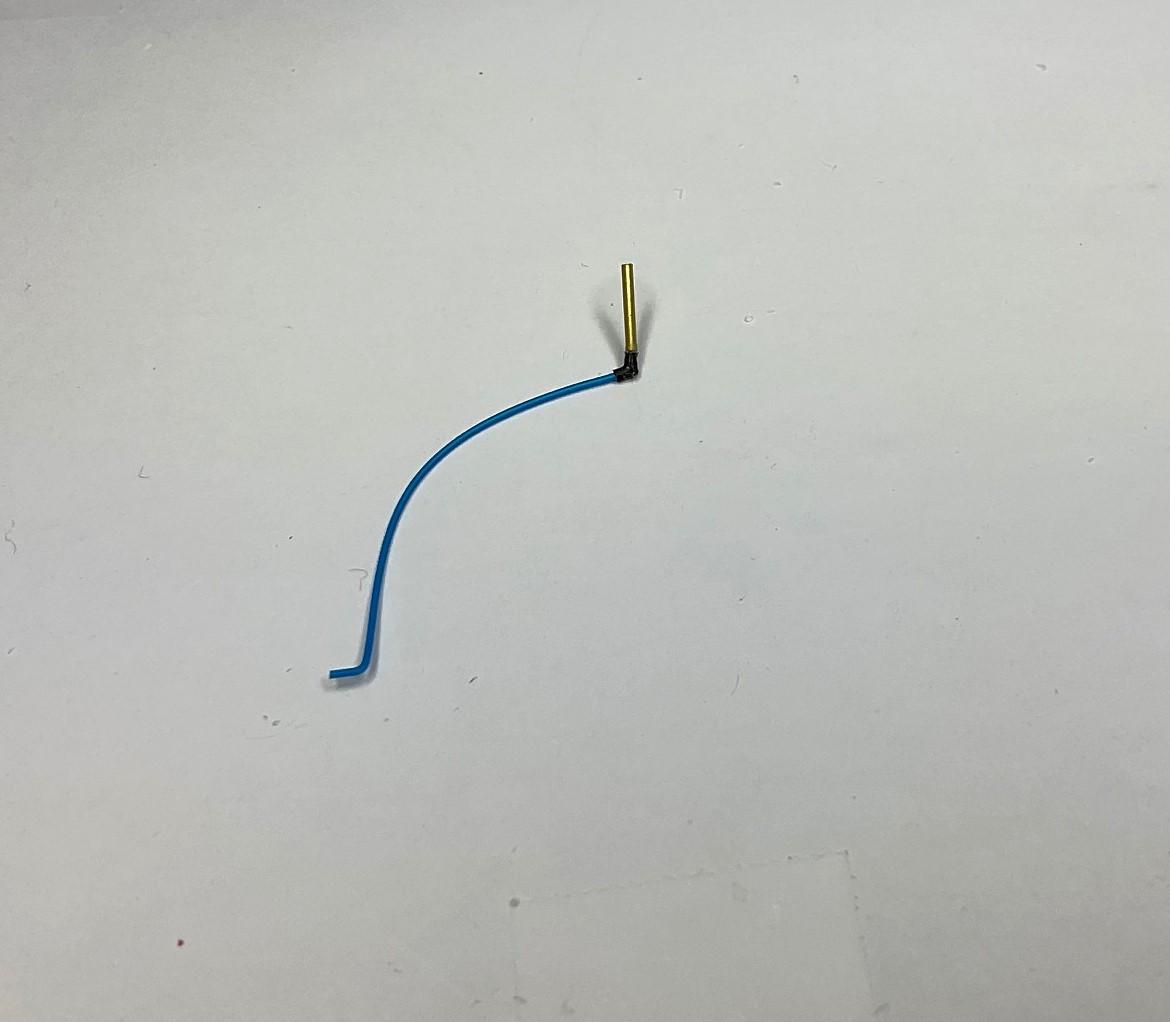
Thanks, Randy - lots that won't show very easily, but I feel the need to add the details in! The silicone boots are very flexible, but fragile. So, if I'm careful, I can slide the boot over the bends in the wire and only need to CA glue the wire into the brass tube 'fitting'. The 90 degree bends in the wire/air line hold the boots in place without glue. Appreciate your comments! -
Resto Rod Autocar
BK9300 replied to Gary Chastain's topic in WIP: Model Trucks: Big Rigs and Heavy Equipment
Dash board is looking awesome, Gary! Will you leave the exhaust tips level or angled back? What will you use for polishing the stacks? -
Western Star 4900 FA plow truck
BK9300 replied to BK9300's topic in WIP: Model Trucks: Big Rigs and Heavy Equipment
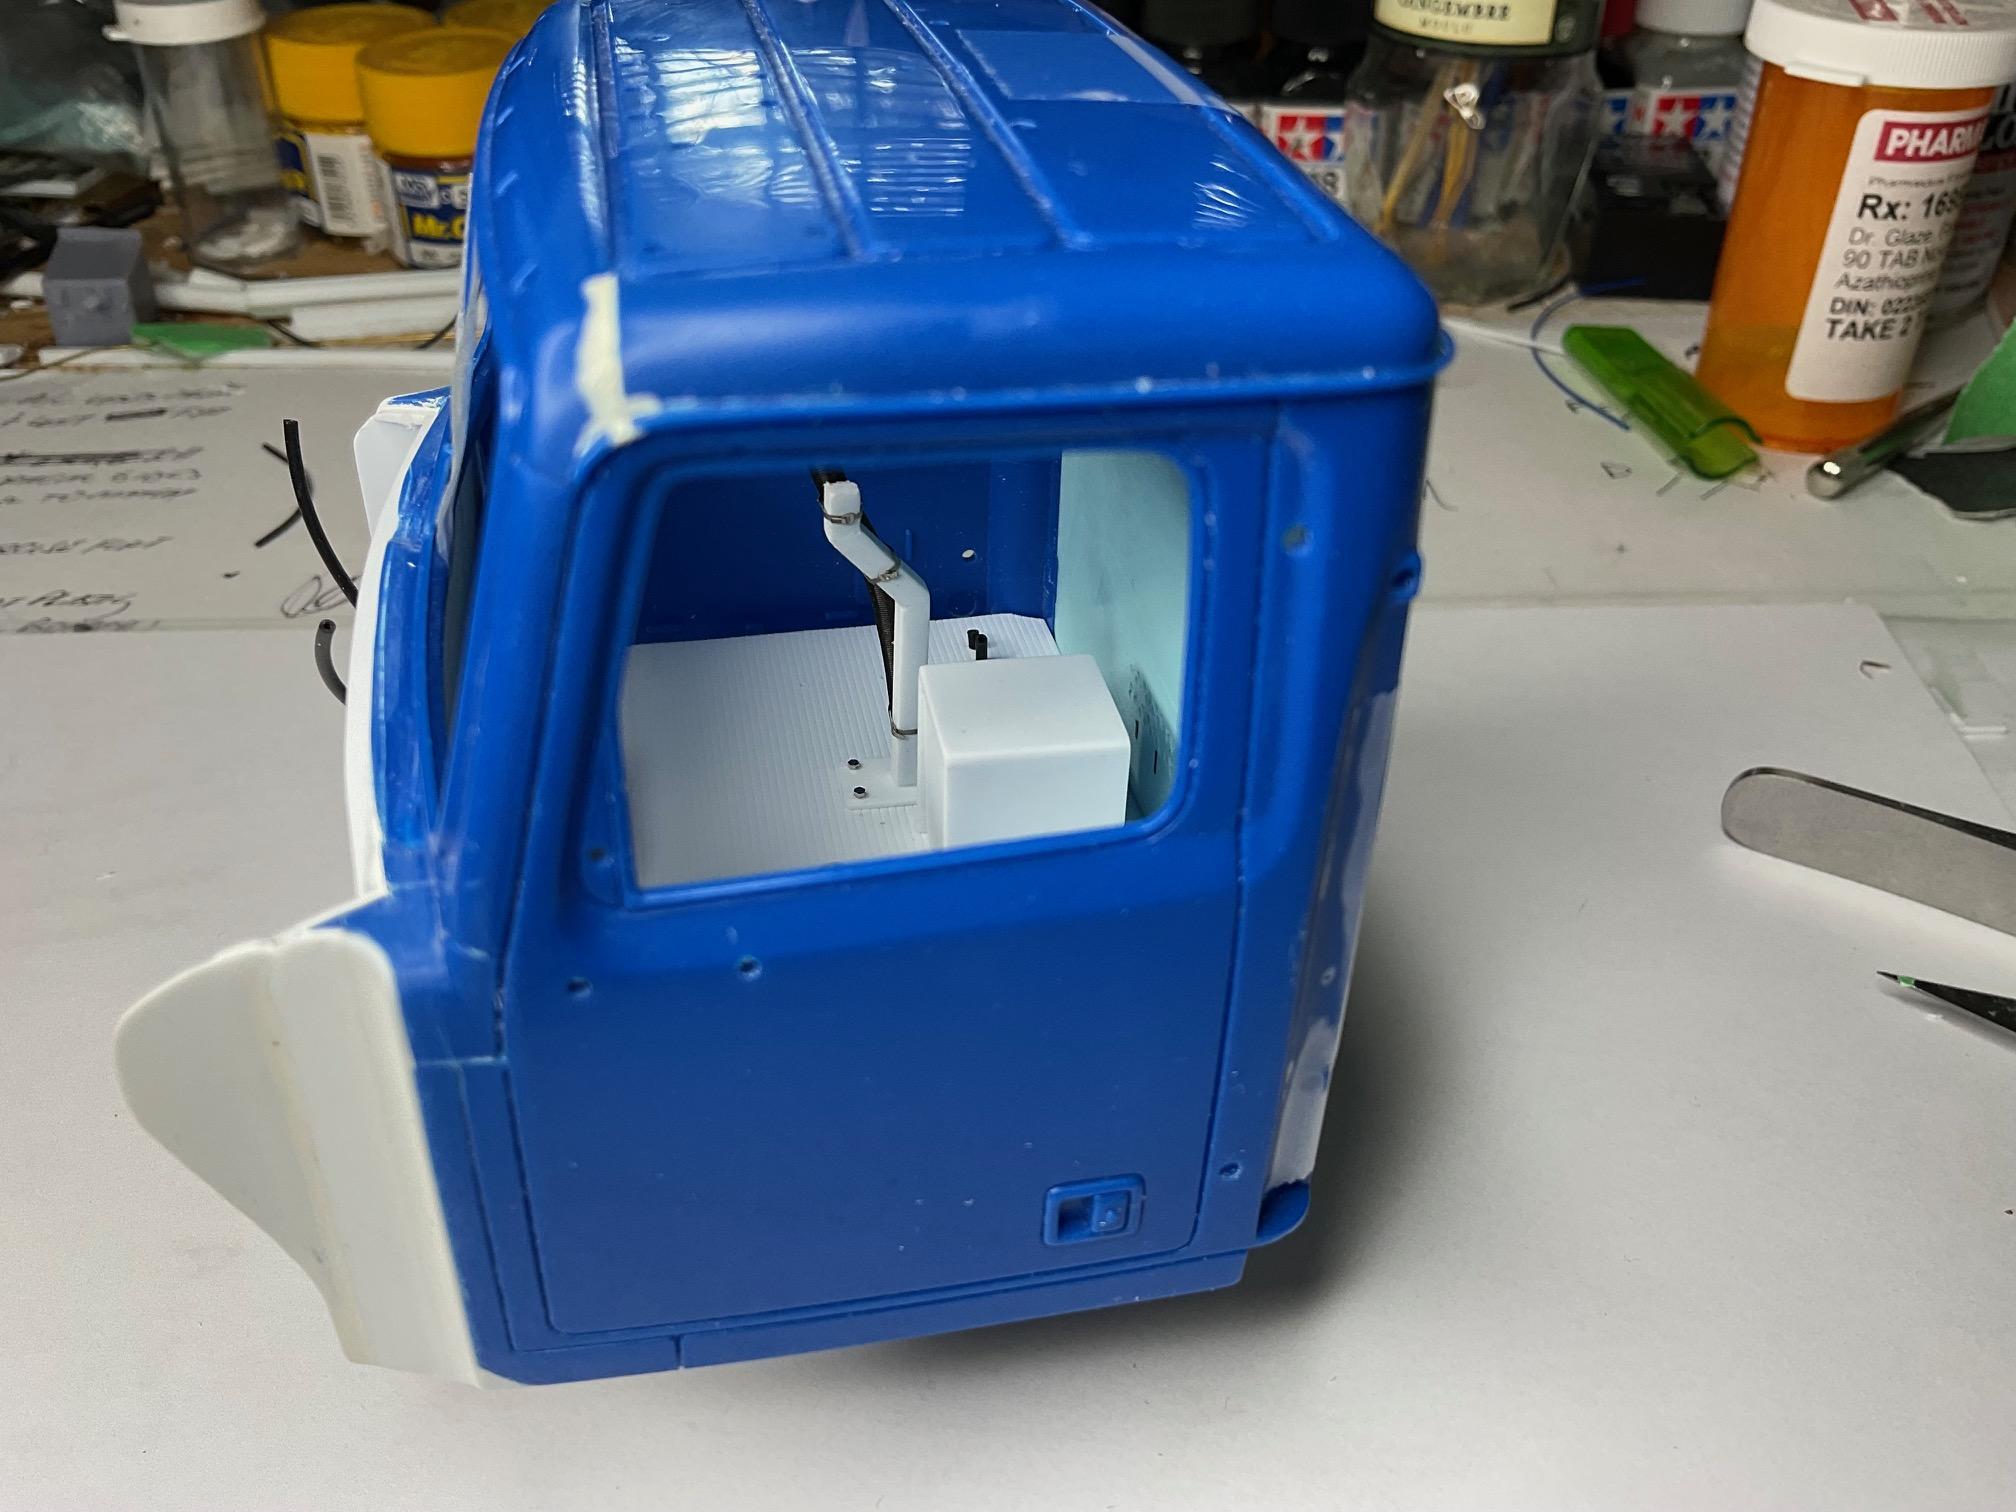
Thanks a lot, Steve - it’s nearing the end and the list of details to add is getting much smaller! I had a look for the thread you mentioned but haven’t located it yet - bet there’s a lot of good viewing in there! The tube is a 2.5 mm spring and is from Wave - I have quite a selection of sizes I found a couple years ago while first thinking about this model. Works very well for wire looms! Thanks, Steve. I have gone back and forth about opening the driver’s door, but decided not to do it. If I scaled the actual opening of the driver’s door, the dash would certainly be more visible, but it still wouldn’t open wide enough to view the control tower, past the front seat, any better than by looking through the windshield or either of the side windows. A job for a future build, for sure. Thanks, Gary! -
Western Star 4900 FA plow truck
BK9300 replied to BK9300's topic in WIP: Model Trucks: Big Rigs and Heavy Equipment
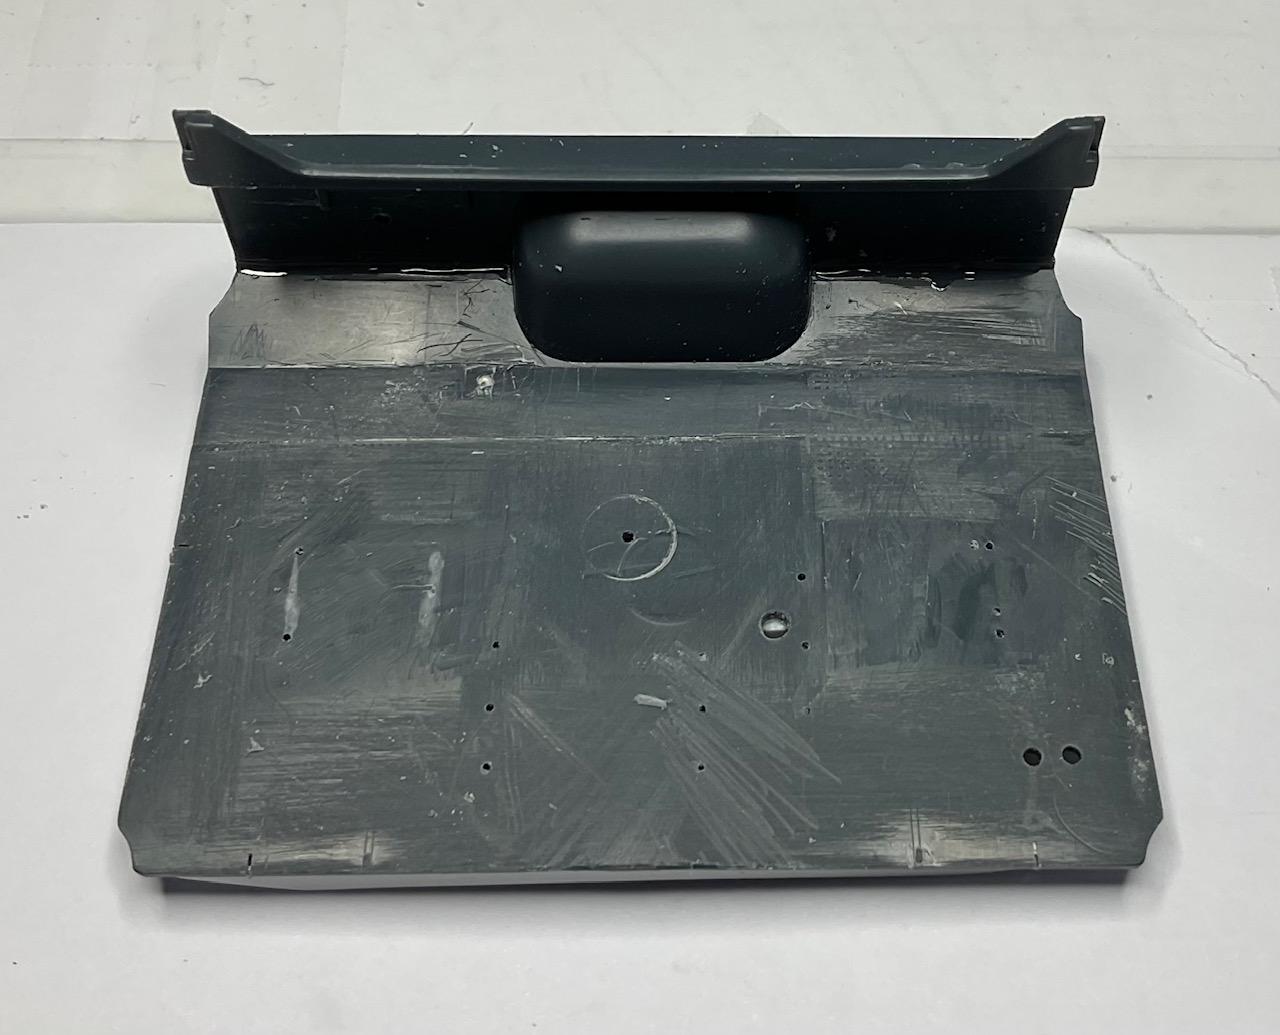
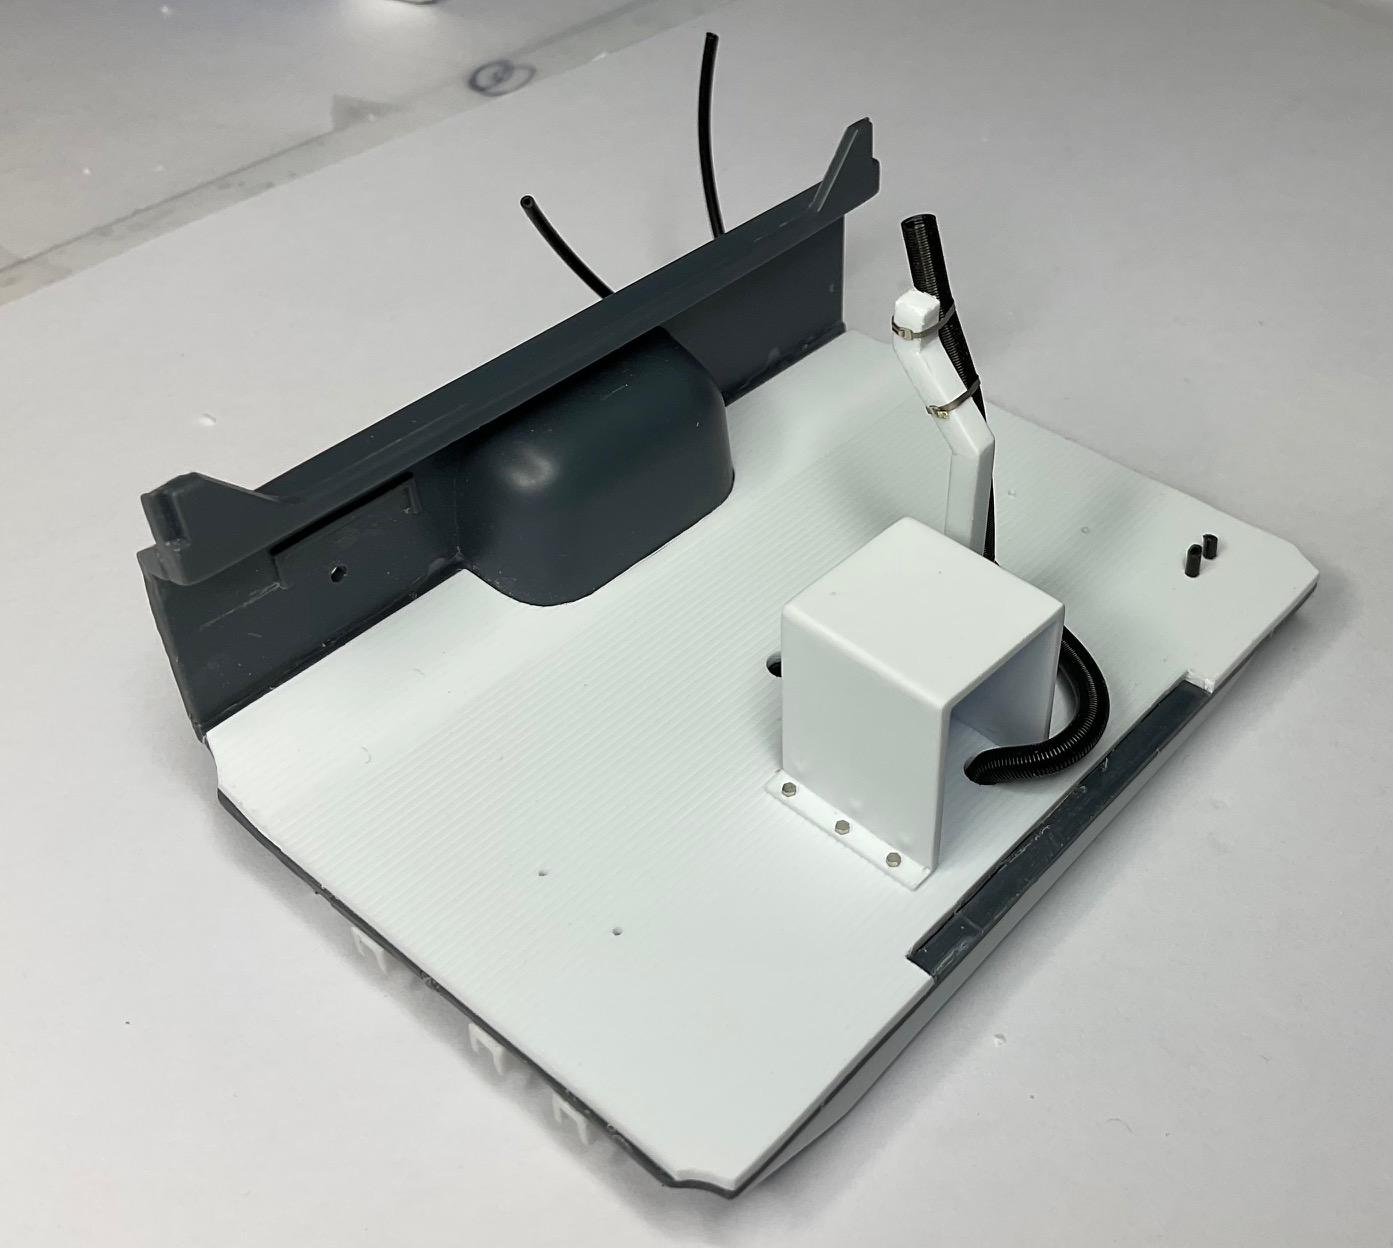
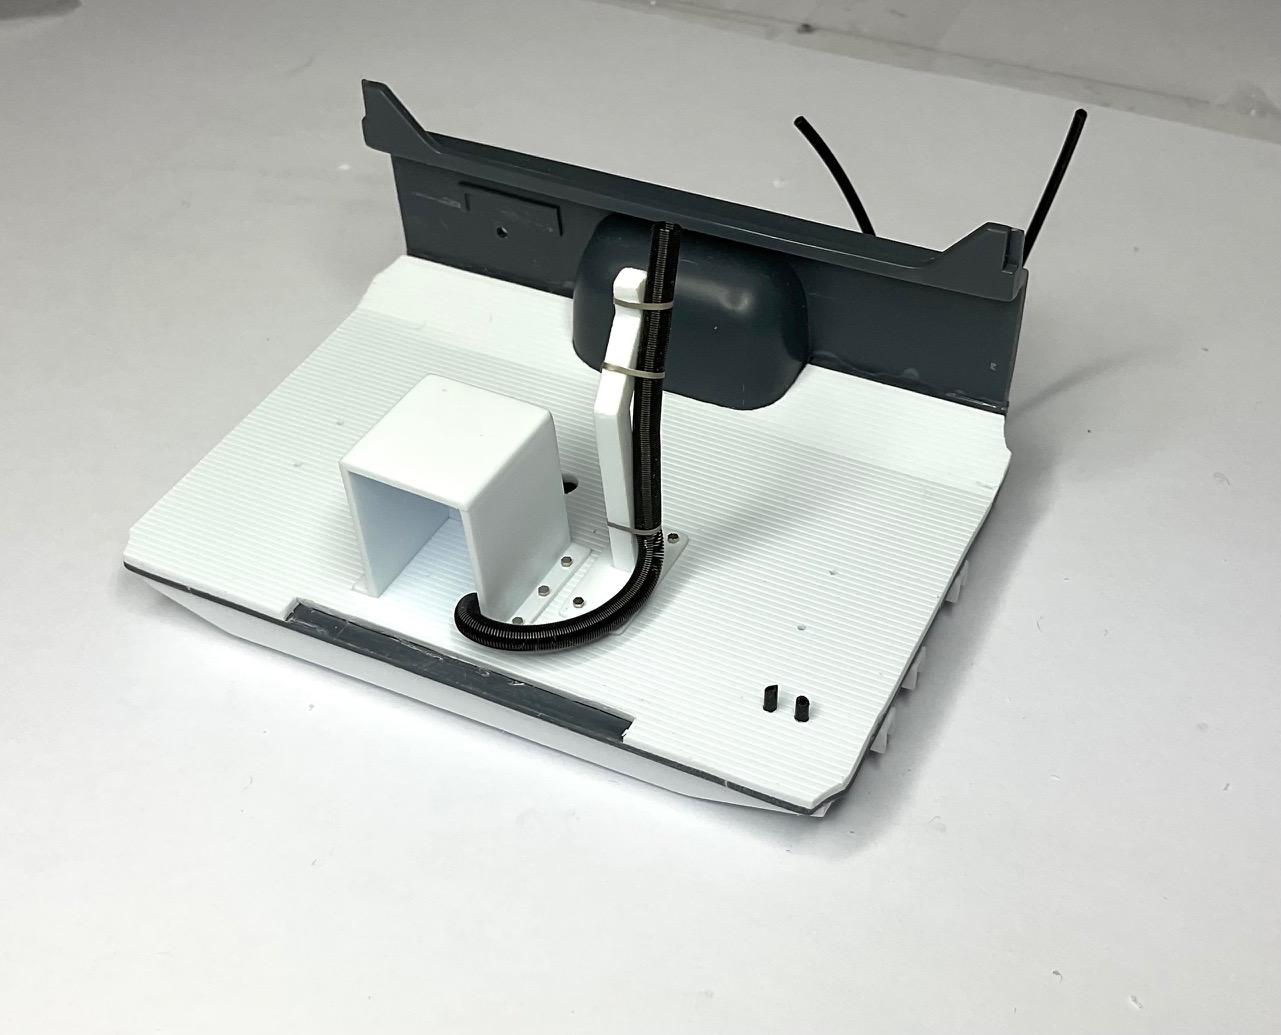
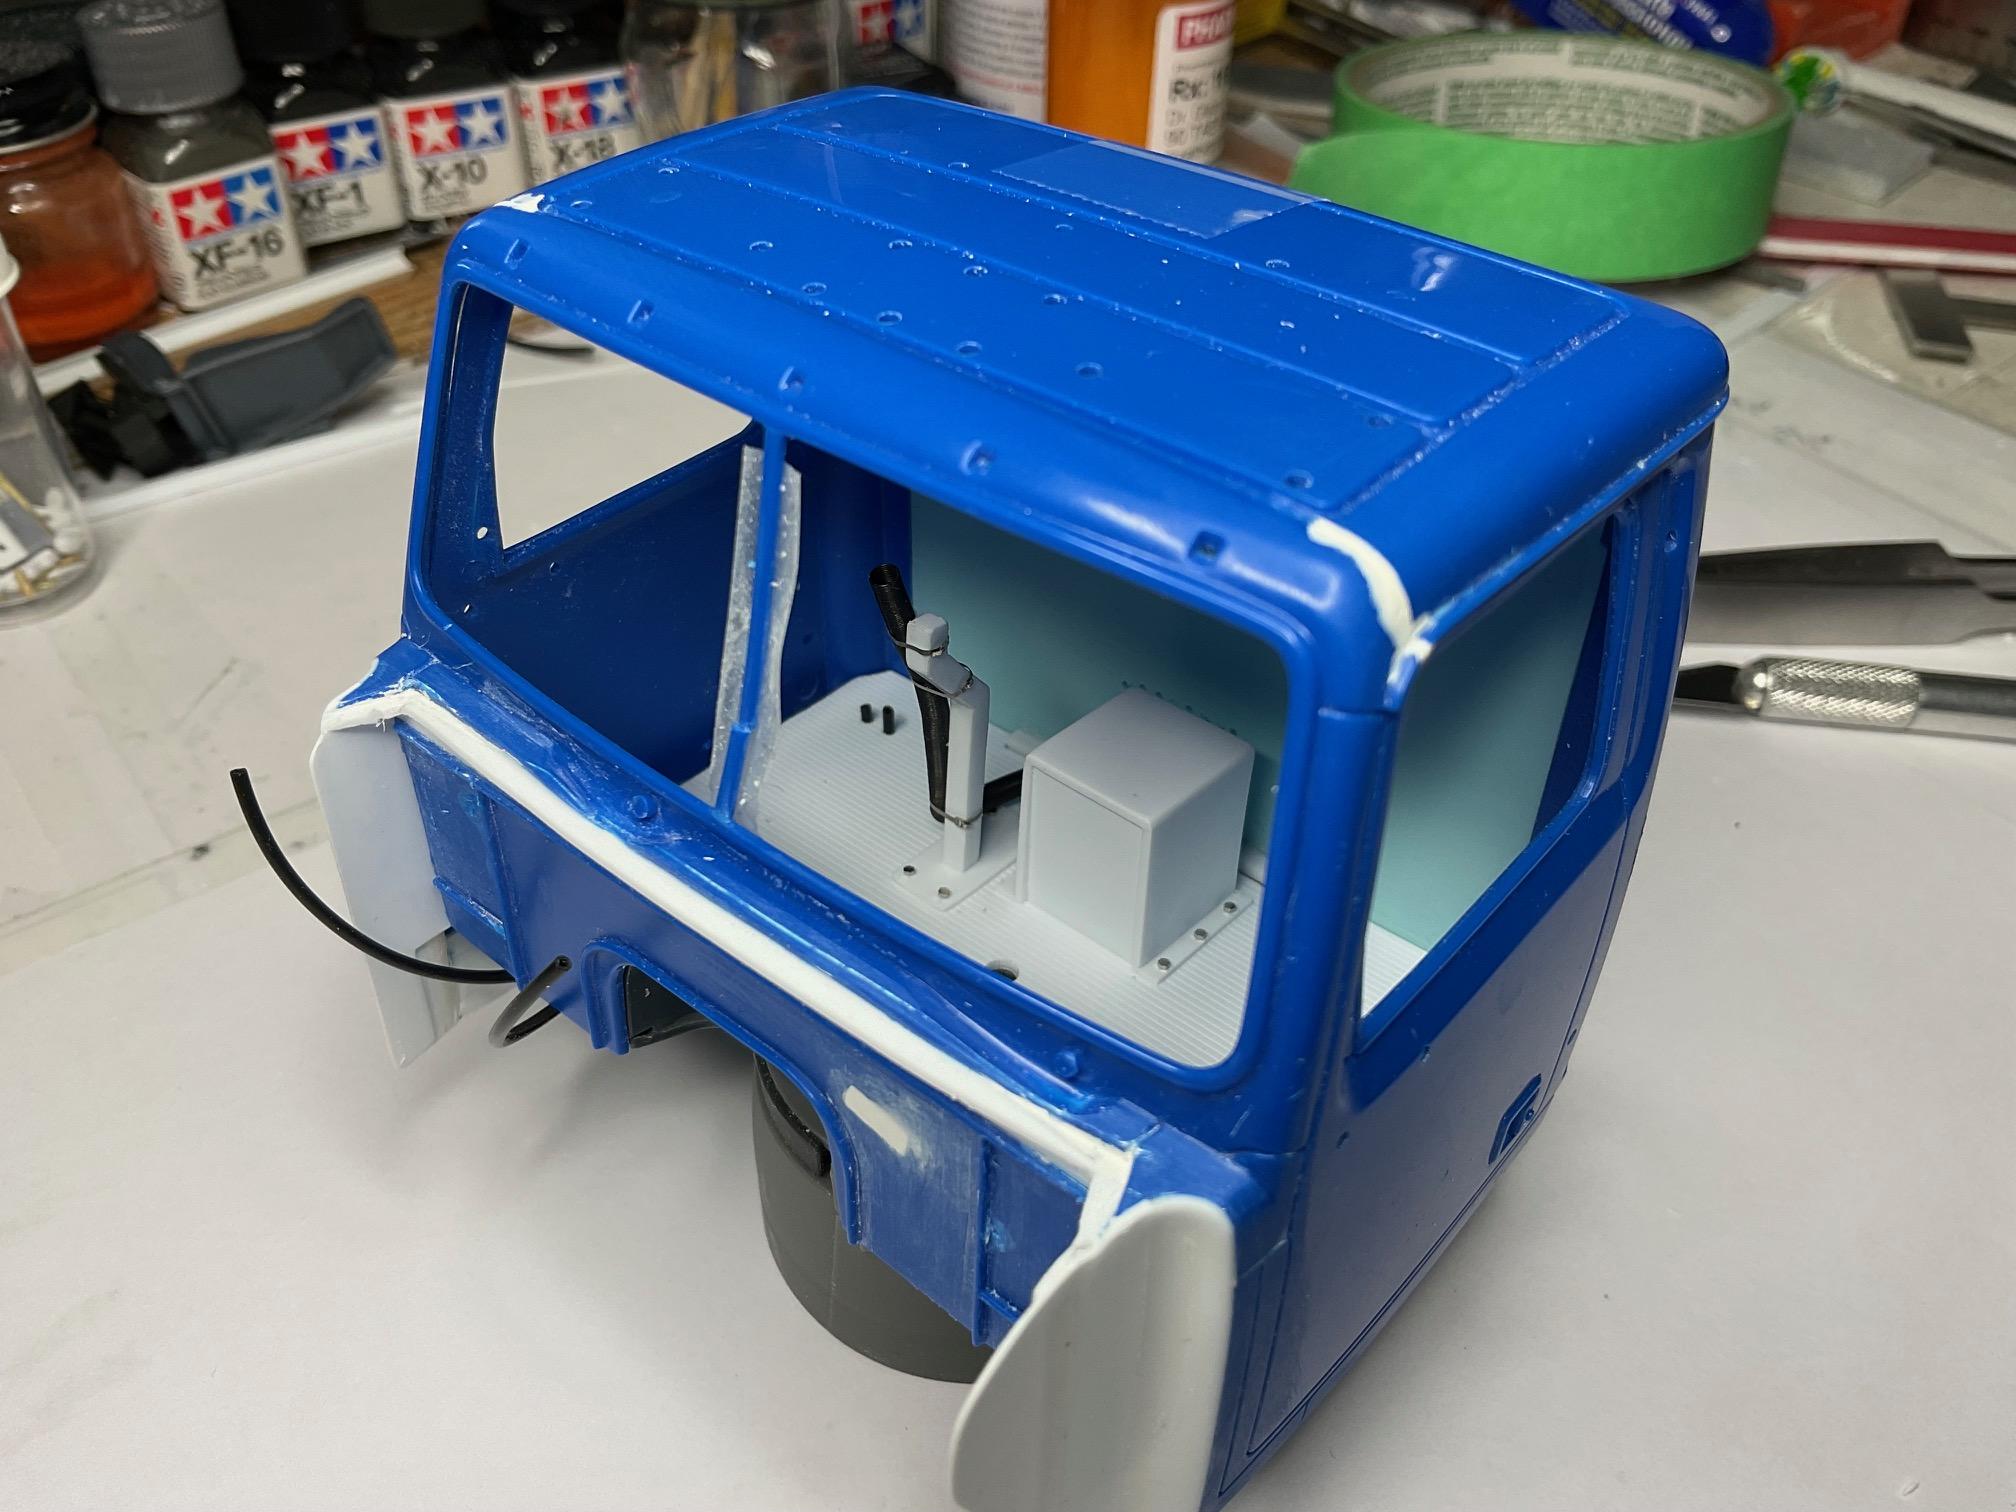
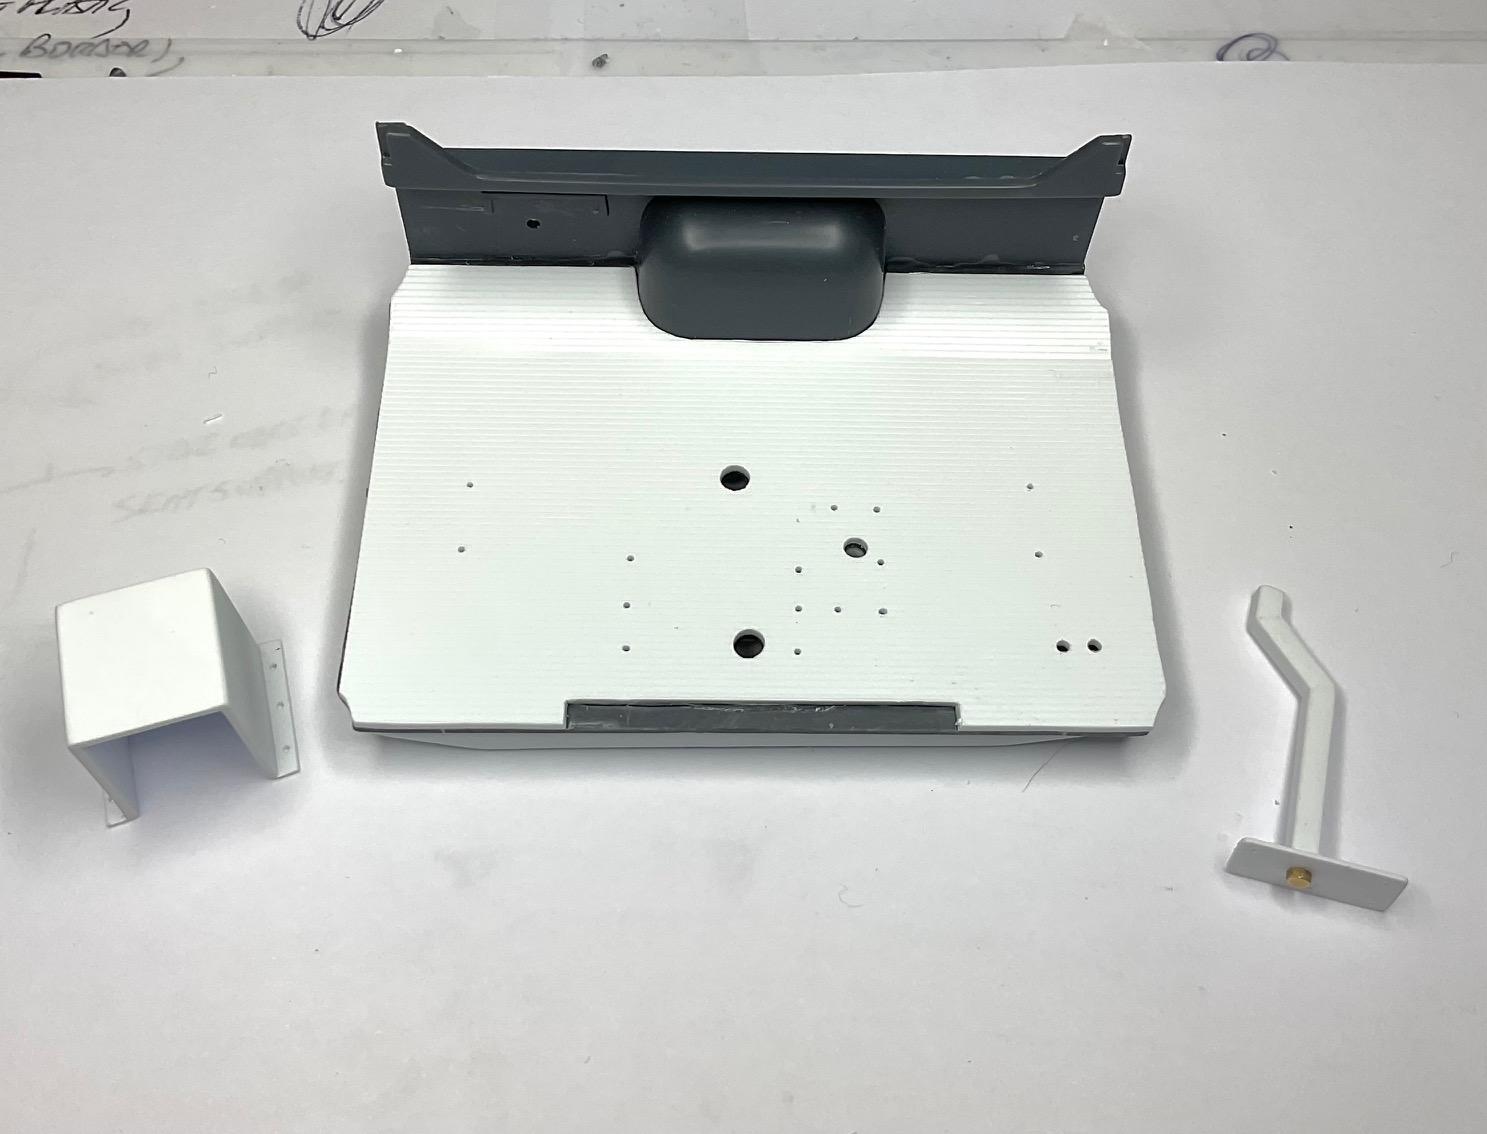
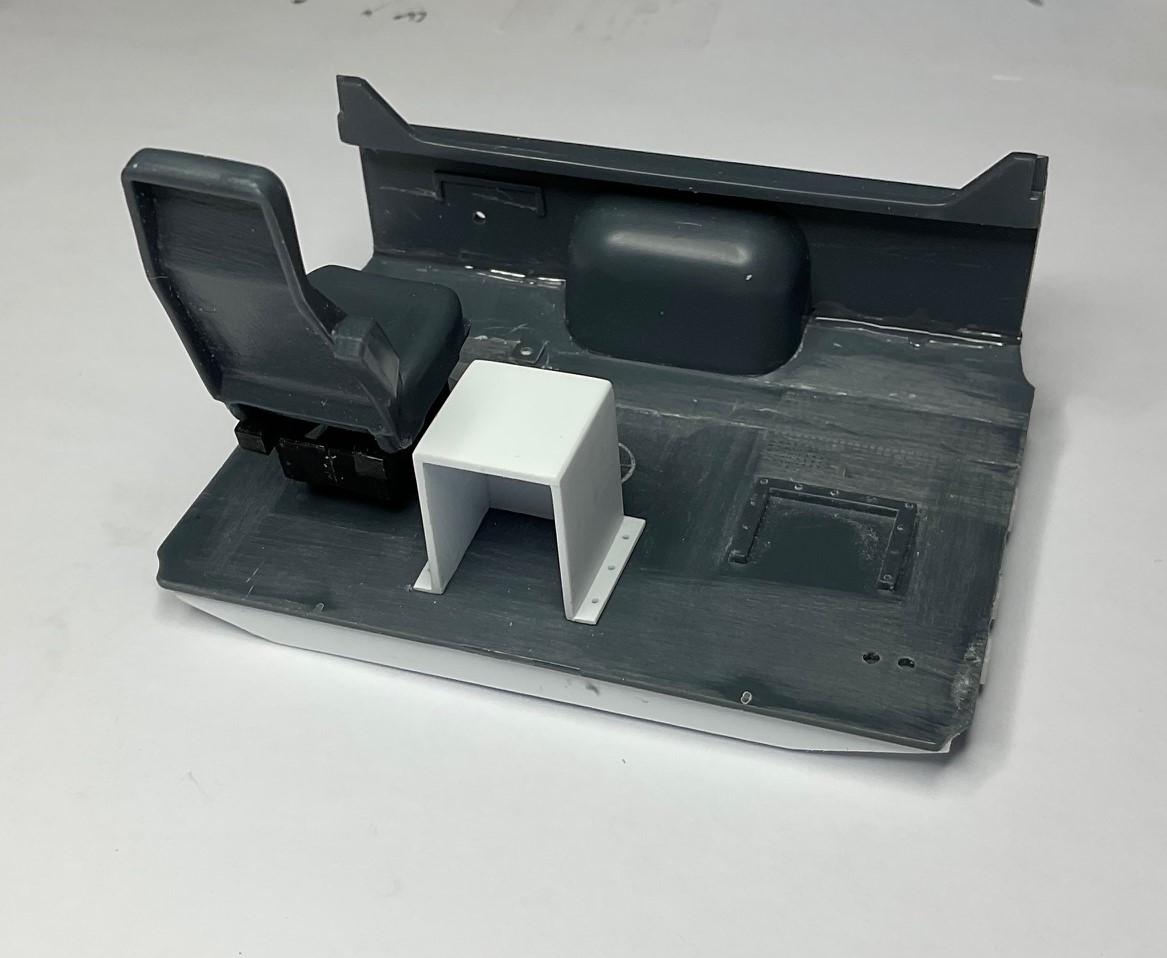
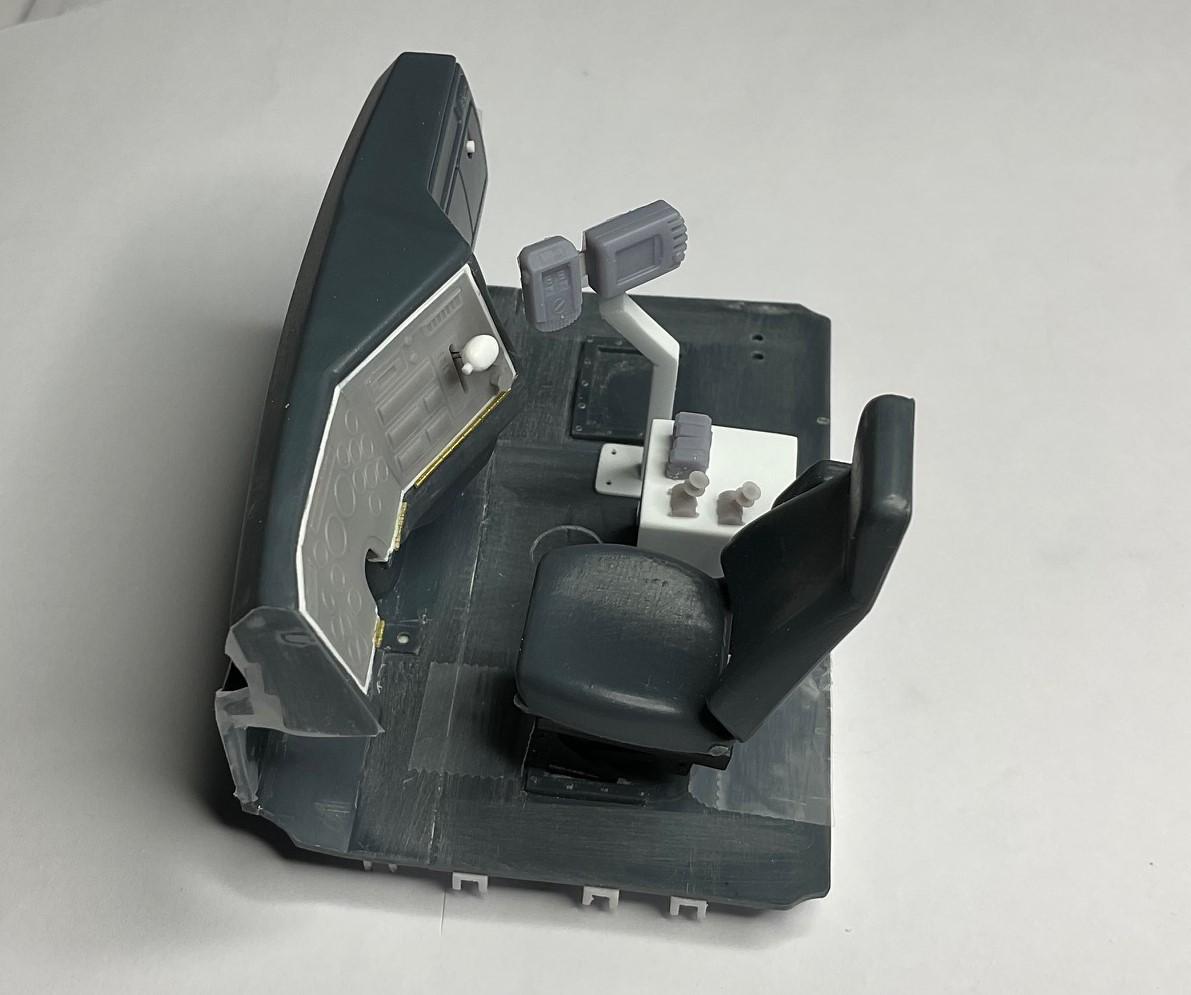
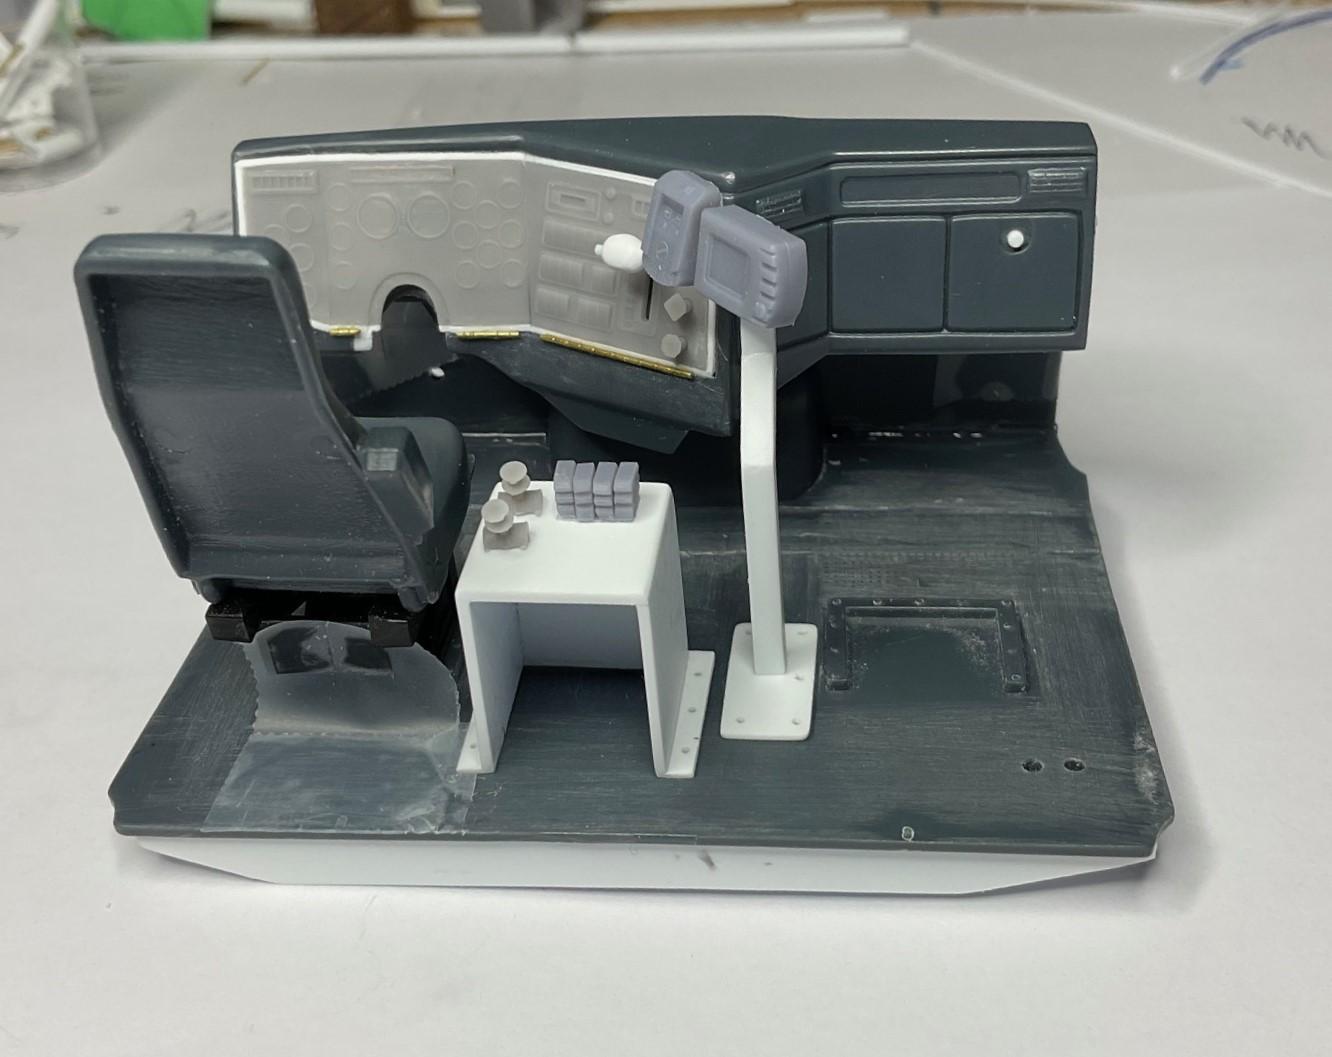
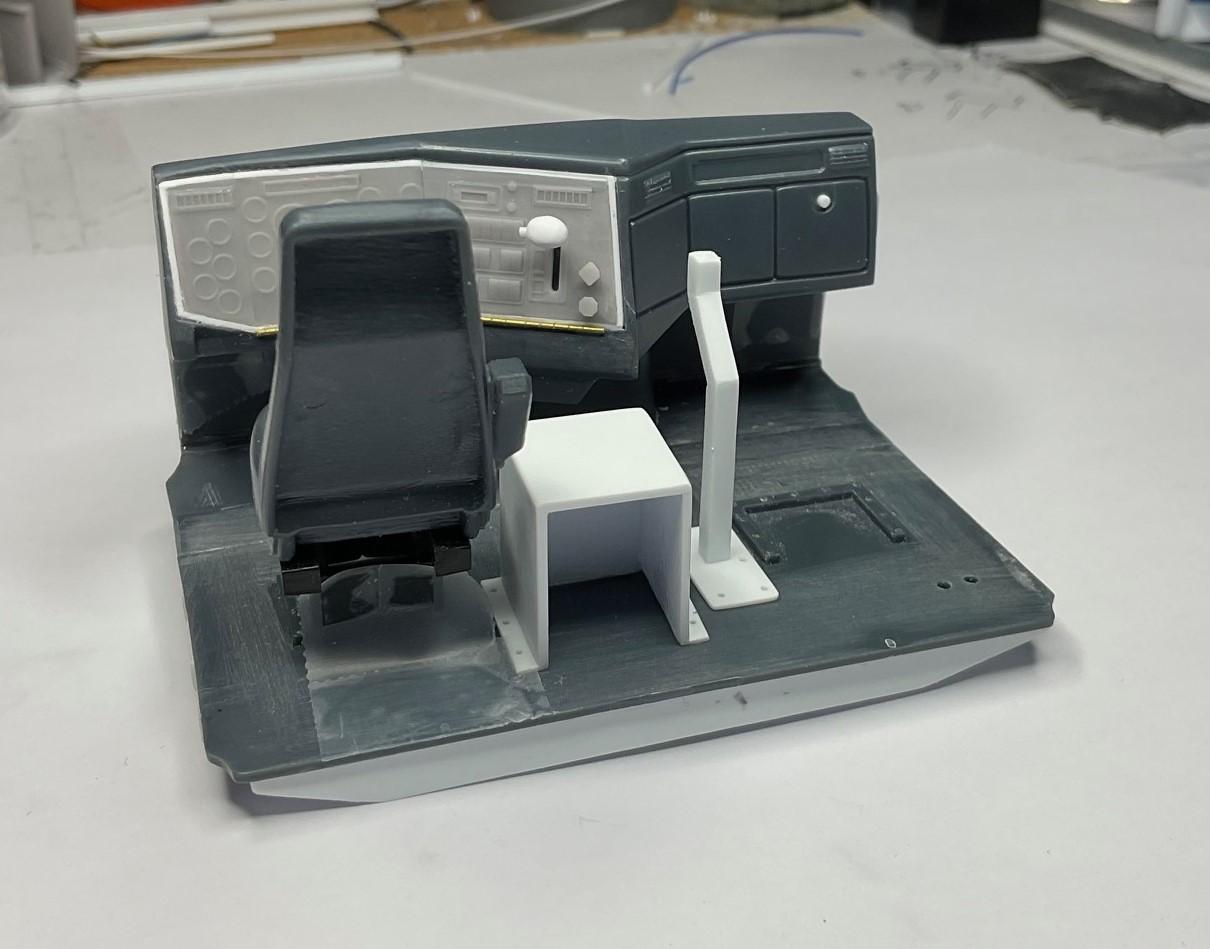
Thanks very much, @cifenet (Steve!) - still carrying on with the fiddly bits, for sure! I did more reworking of the interior floor, making it smooth, before adding scale, Evergreen siding, to simulate the rubber flooring in original truck. Also laid out all the bolt holes, wiring openings and the hole where a shifter would be in a truck with a manual transmission, that will have a cover plate added because this truck has an automatic. Removed the locators for the driver and passenger seat - the locations of the front and outside edges of each are now marked with 0.6mm holes Hard to see in the pic, with the angle of my light, but the Evergreen siding, 'rubber' floor mat is now in, holes re-drilled through from the bottom, and a hole added at the center, rear of the floor pan for wiring to the two monitors that will be mounted on the mast. The 'factory' manual transmission hole will be widened slightly and then closed with a cover plate. The cut out strip at the rear edge of the floor rubber, is for the floor pan locator I long ago attached to the bottom of the day cab panel. The rubber flooring detail is a bit more visible here. Also mocked up the tower and mast, with the bolts to attach them to the floor, and a collector wire loom that feeds several individual lines from two monitors out to various sensors/motors I had another go at trying to use the photo etch zip ties, but the edges of them are very sharp and all I could think about was the damage I would do to future paint on the mast while struggling to get them tight. Also need something I can paint black and insert into the spring 'loom' for the wires out the back of the two monitors - as it is now, I can see white through the spring. Maybe once the floor is painted rubber black, the stretched portions of the spring won't show through. And, it will be inside the cab, down low, so likely won't matter! The next couple pics were just to re-confirm that some detail will be visible through the side windows that will be left mostly open. And, hopefully, the windshield won't reflect or distort too much, and allow some detail to be seen/photographed through it. A valid question might be, "why am I doing all this detail work that won't be very visible"? Firstly, I'm doing it to finish off the inside in the manner of the rest of the truck, and the WIP pics will show the detail. Secondly, it has given me another opportunity to think about what else, and how else, to do detailing on future work. And, it's enjoyable, too! I'm getting close enough to being done that I'm thinking about how to photograph the finished truck - that's another mini project in itself! Take care.
-
Really enjoying your current, tribute build, Steve. Also think your ‘41 is pretty special, too! Do you have a build thread for it you could link us to? New pics of it in your parking lot would be stunning.
-
Western Star 4900 FA plow truck
BK9300 replied to BK9300's topic in WIP: Model Trucks: Big Rigs and Heavy Equipment
Work today took awhile, for the result achieved but I'm glad for the progress. Carried on with the styrene control tower and then the mast for the monitors. Cut out the inner portion of the flange material I had added yesterday afternoon, and drilled some bolt holes Fabricated the monitor support mast and its base and drilled more bolt holes Next couple pics are the monitors mocked up in place, along with the plow control lever boots and a couple valves. Looking at the two mock up pics, I think the mast is too tall - the tops of the monitors should be just below the top of the dash Will put in some ribbed, 'rubber' flooring tomorrow, shorten the mast a bit and maybe do some work on the bracket that attaches the monitors to the mast. Good enough for today!
-
Mack Superliner
BK9300 replied to Jürgen M.'s topic in WIP: Model Trucks: Big Rigs and Heavy Equipment
Apologies if I keep repeating myself, but everything always comes together better once primer/paint is on the frame - like your progress, Jürgen! -
Western Star 4900 FA plow truck
BK9300 replied to BK9300's topic in WIP: Model Trucks: Big Rigs and Heavy Equipment
Gary, I’ve had some side conversations with Jeff about this along the way. Don’t know at this point if the goal for the next build will be to out do this one, but sure will be looking for something interesting to tackle! I don’t have a familiarity with trucks and trucking in general, like many builders here - I was the ‘numbers’ guy in our company. So, for the near future, likely going to stick with equipment I am more familiar with and that would, or could, fit in YRB’s highway and bridge maintenance fleet. In my time with the company, YRB didn’t build many new bridges, and many of those were smaller, forestry road structures. But, a crane truck was often needed to place girders or work on a Howe truss structure, so maybe something like that. Have often thought about something with a twin steer and extra axles, to carry a bigger crane and still be ok with load restrictions here in BC! Lots of other ideas, too. Appreciate the question, Gary (and Jeff) - good to get the ideas in clearer focus - thanks! -
Western Star 4900 FA plow truck
BK9300 replied to BK9300's topic in WIP: Model Trucks: Big Rigs and Heavy Equipment
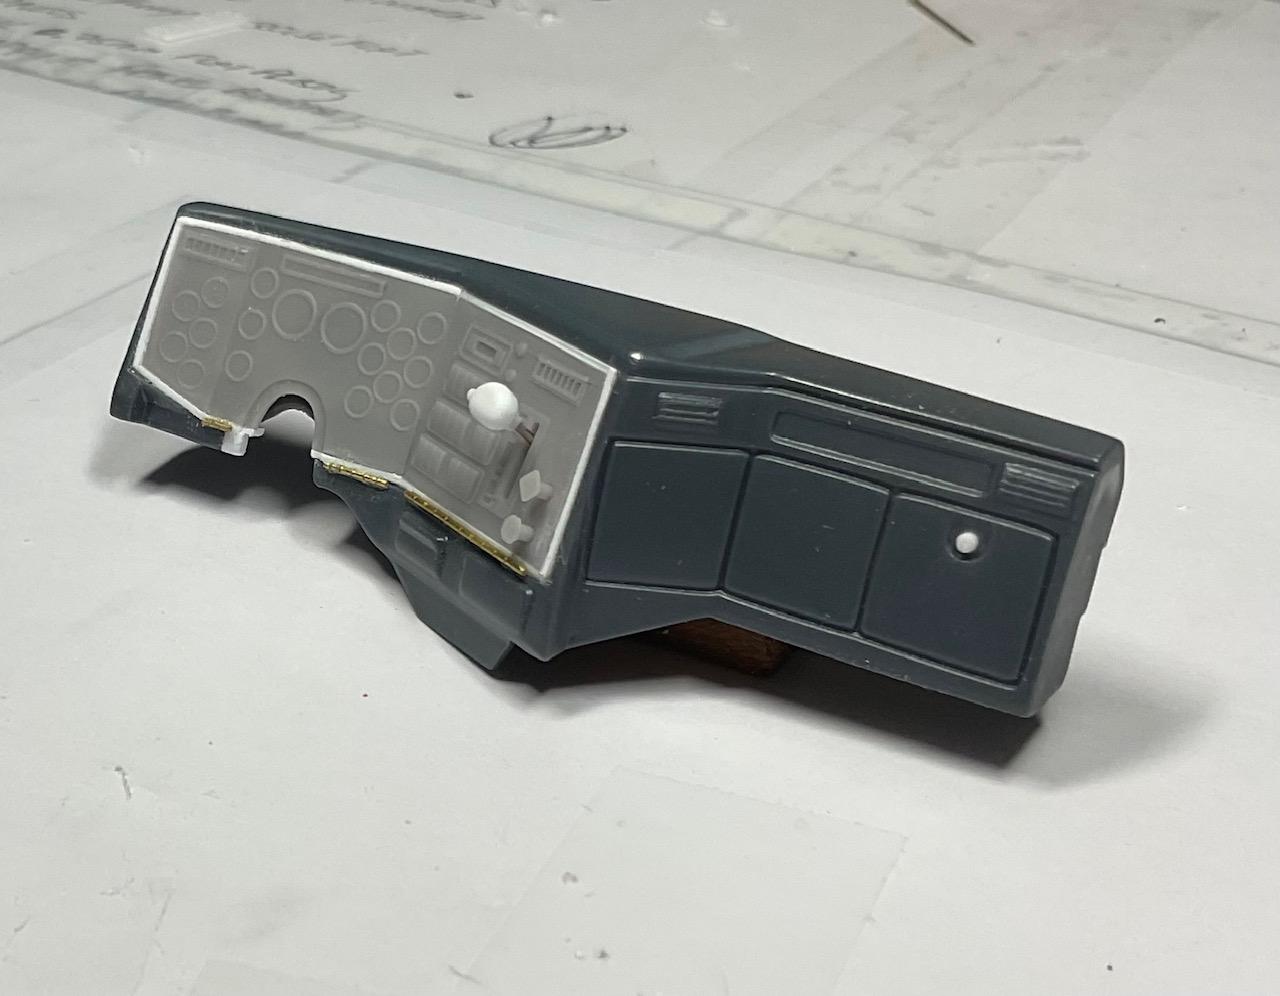
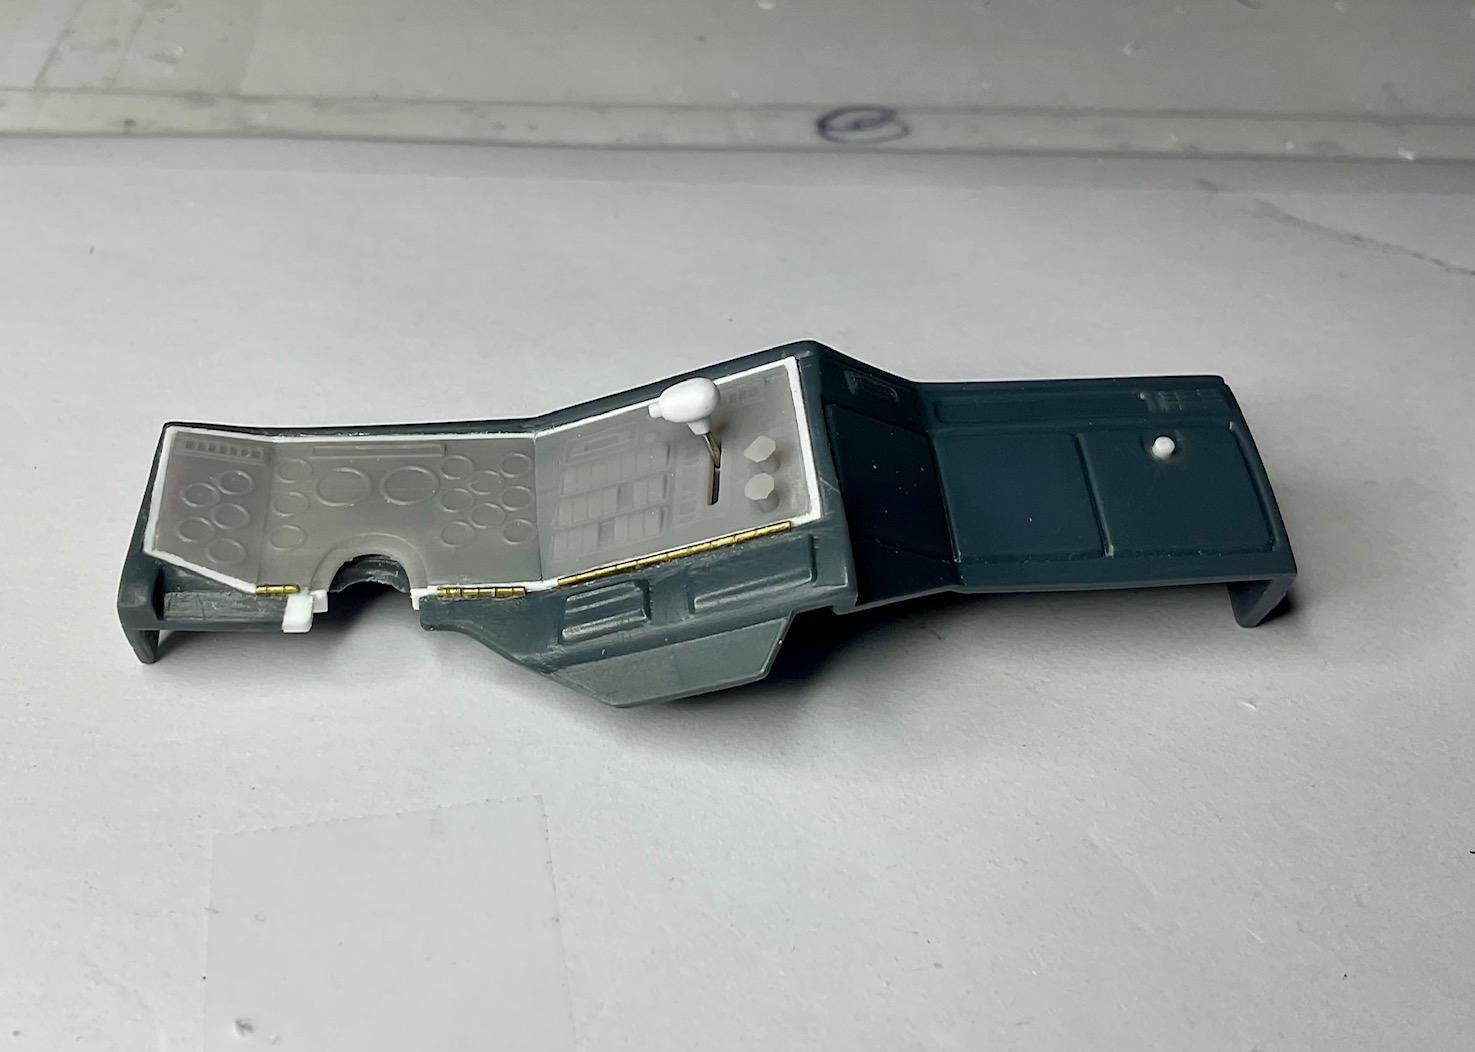
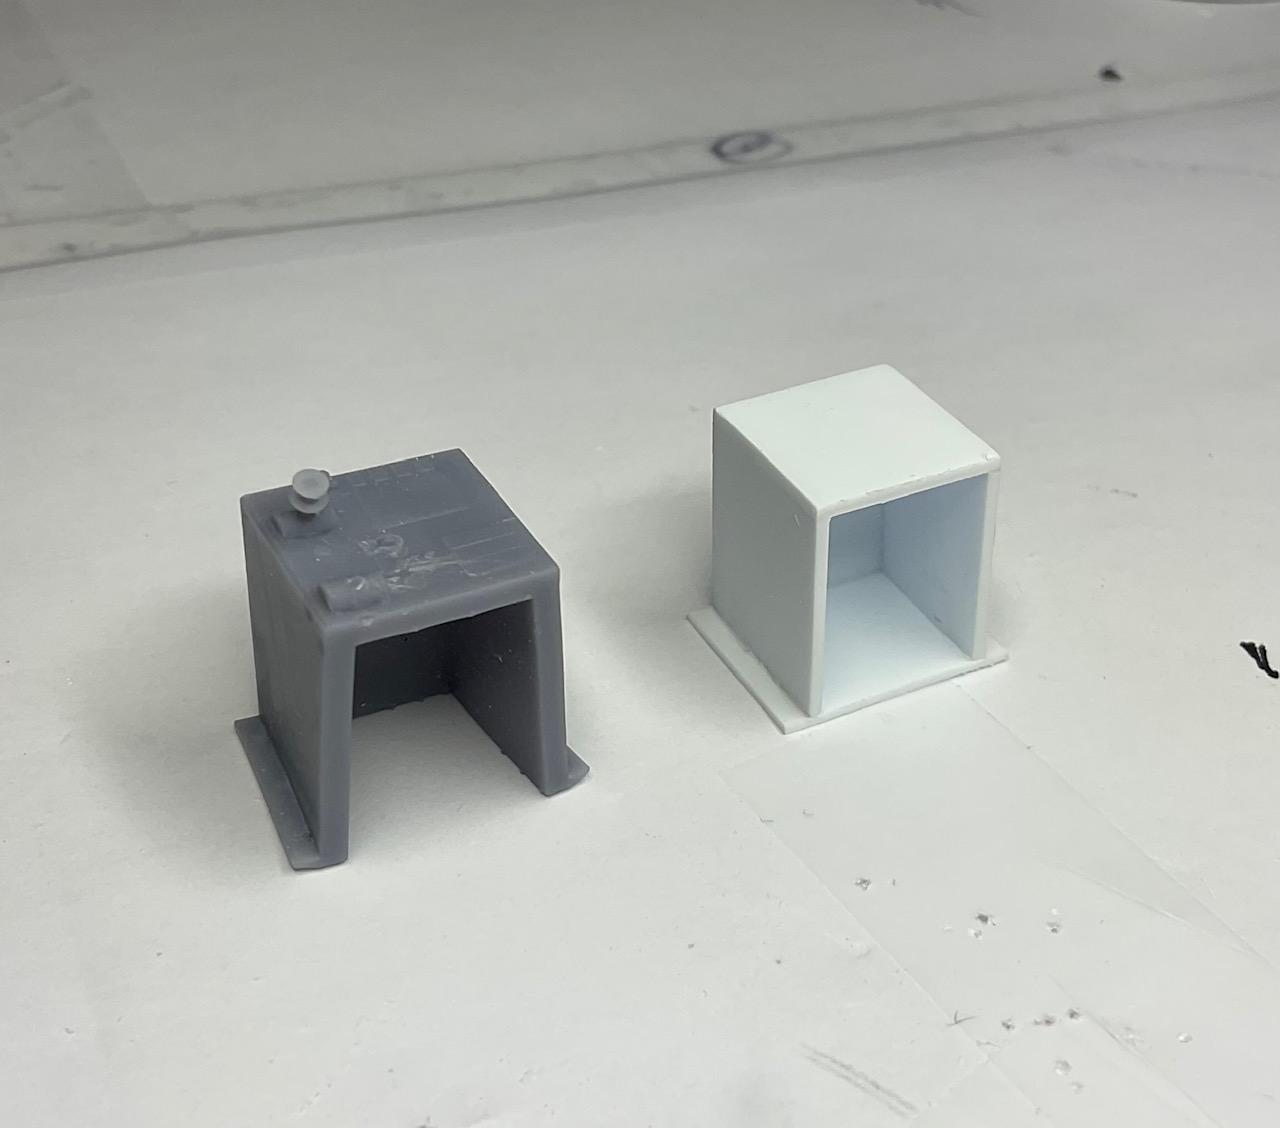
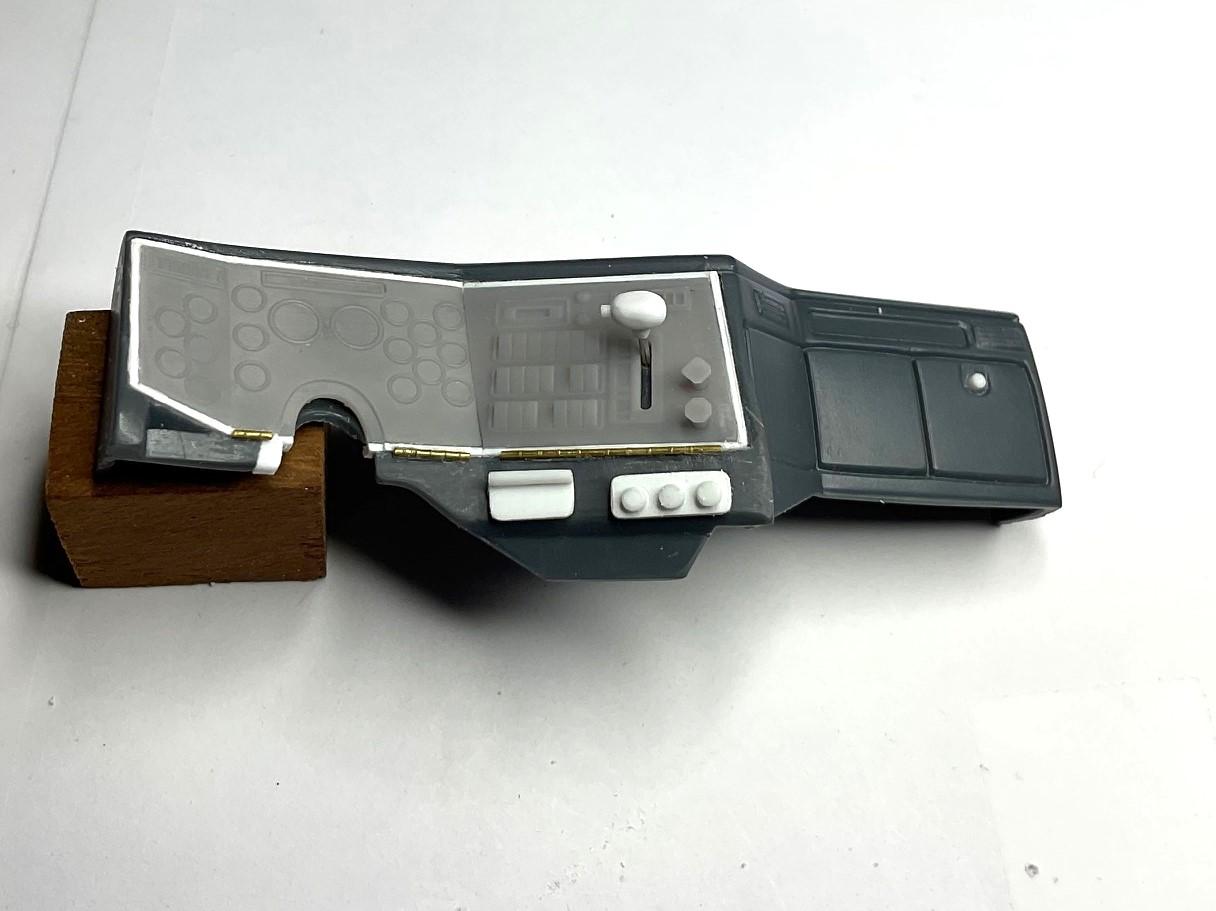
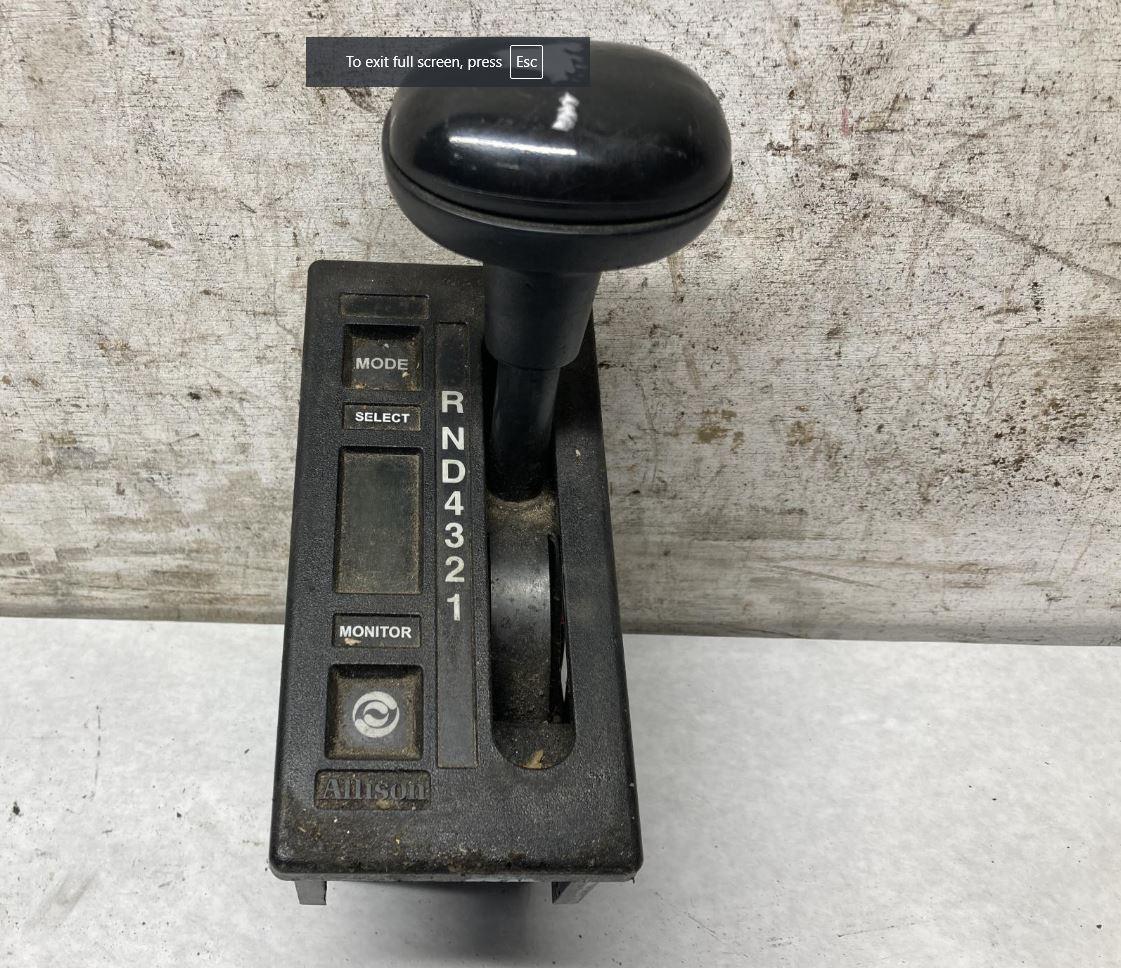
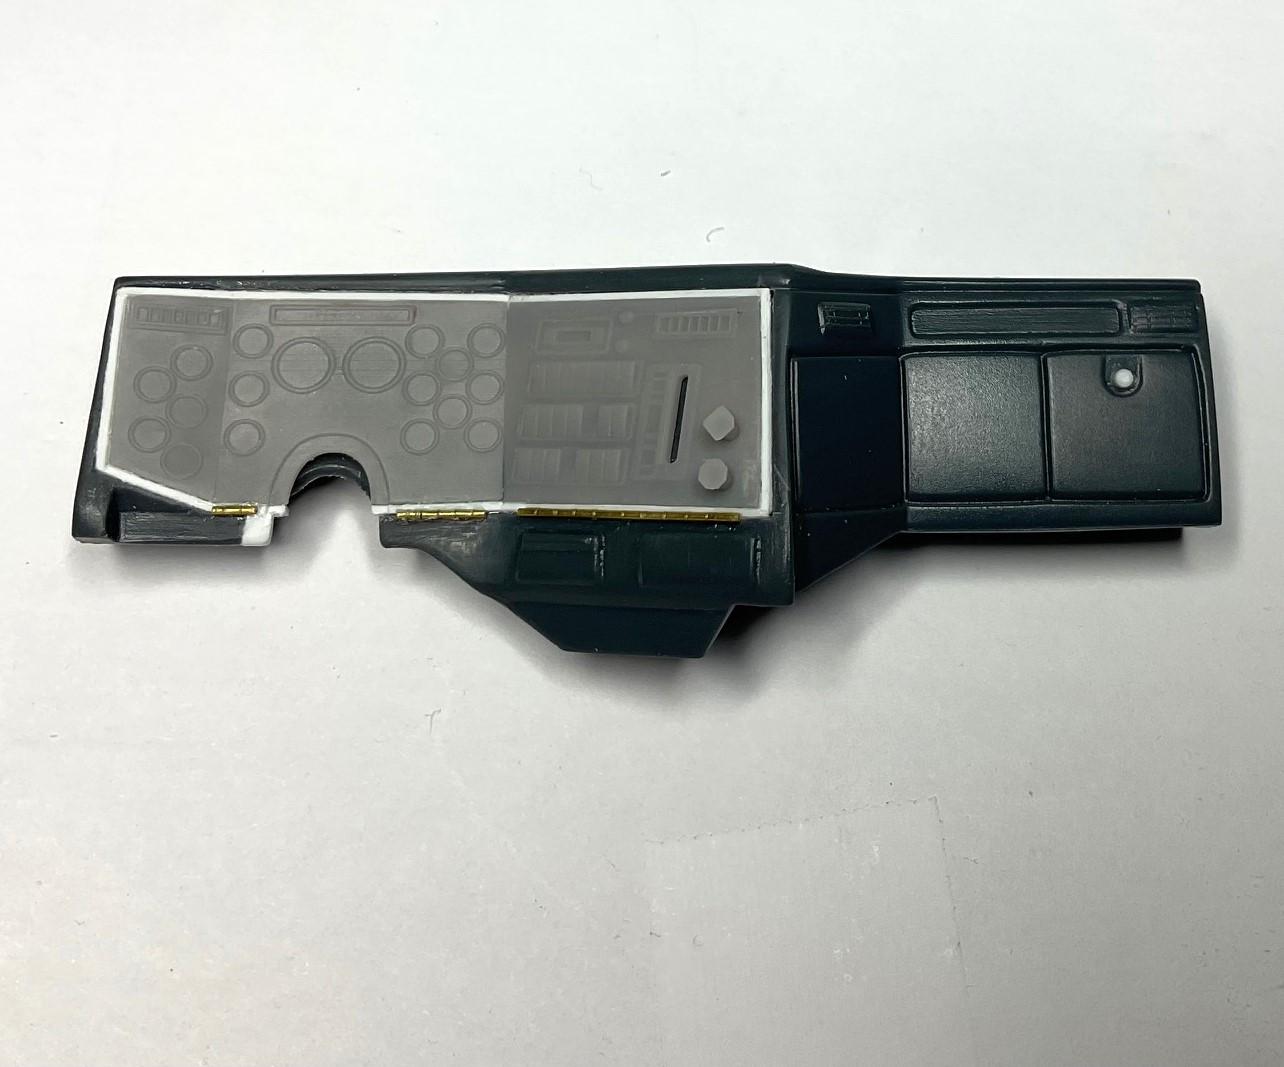
I did some work on the dash today, some of it a couple times - can't seem to avoid those do-overs! I found I needed to make a new control tower base out of styrene - the resin ones seem to be spreading apart a bit at the open edge on the back side for some reason. Sometime ago, I found a picture of an Allison automatic, dash mounted shift gate and handle. The shift gate is what I modeled into my right hand dash panel Using some 1.5 mm strip, and a section of a pin, I made a handle for the dash mounted shift gate Another view of the shift handle, but what stood out for me was how hard it was going to be to paint the ashtray and what's supposed to be the A/C and heater controls. I decided it would make masking off the dash panels easier, as well, if I removed the molded in ashtray and heater control and made separate ones I could paint and attach later I still have to do a bit of shaping on the ashtray and heater controls - they're a bit tall A new control tower underway - even though I had modified the design of the tower to have thicker walls for printing, the open back side is spreading on most of the towers I have. Must still be some stress and the easiest point to give is for it to widen? All the other parts of the control tower have been printed separately so, should be ok. Calling it a day - thanks, and take care!
-
Western Star 4900 FA plow truck
BK9300 replied to BK9300's topic in WIP: Model Trucks: Big Rigs and Heavy Equipment
Thanks, Steve - I like the look of the plug boots, too - should turn out good if I can keep the CA glue from showing! Not my favorite type of scratch building, but I am happy how it's turning out so far - thanks, Scott! Well, thanks very much, Germán - I'm glad you had a look! I've been a fan of many of your builds since last year - lots of detail in those engines of yours. -
Beautiful real truck and well done with your build - it must be very impressive in person!
-
Welcome to the forum, Corey - I think someone is going to be asked to do a tutorial on flames!
-
Western Star 4900 FA plow truck
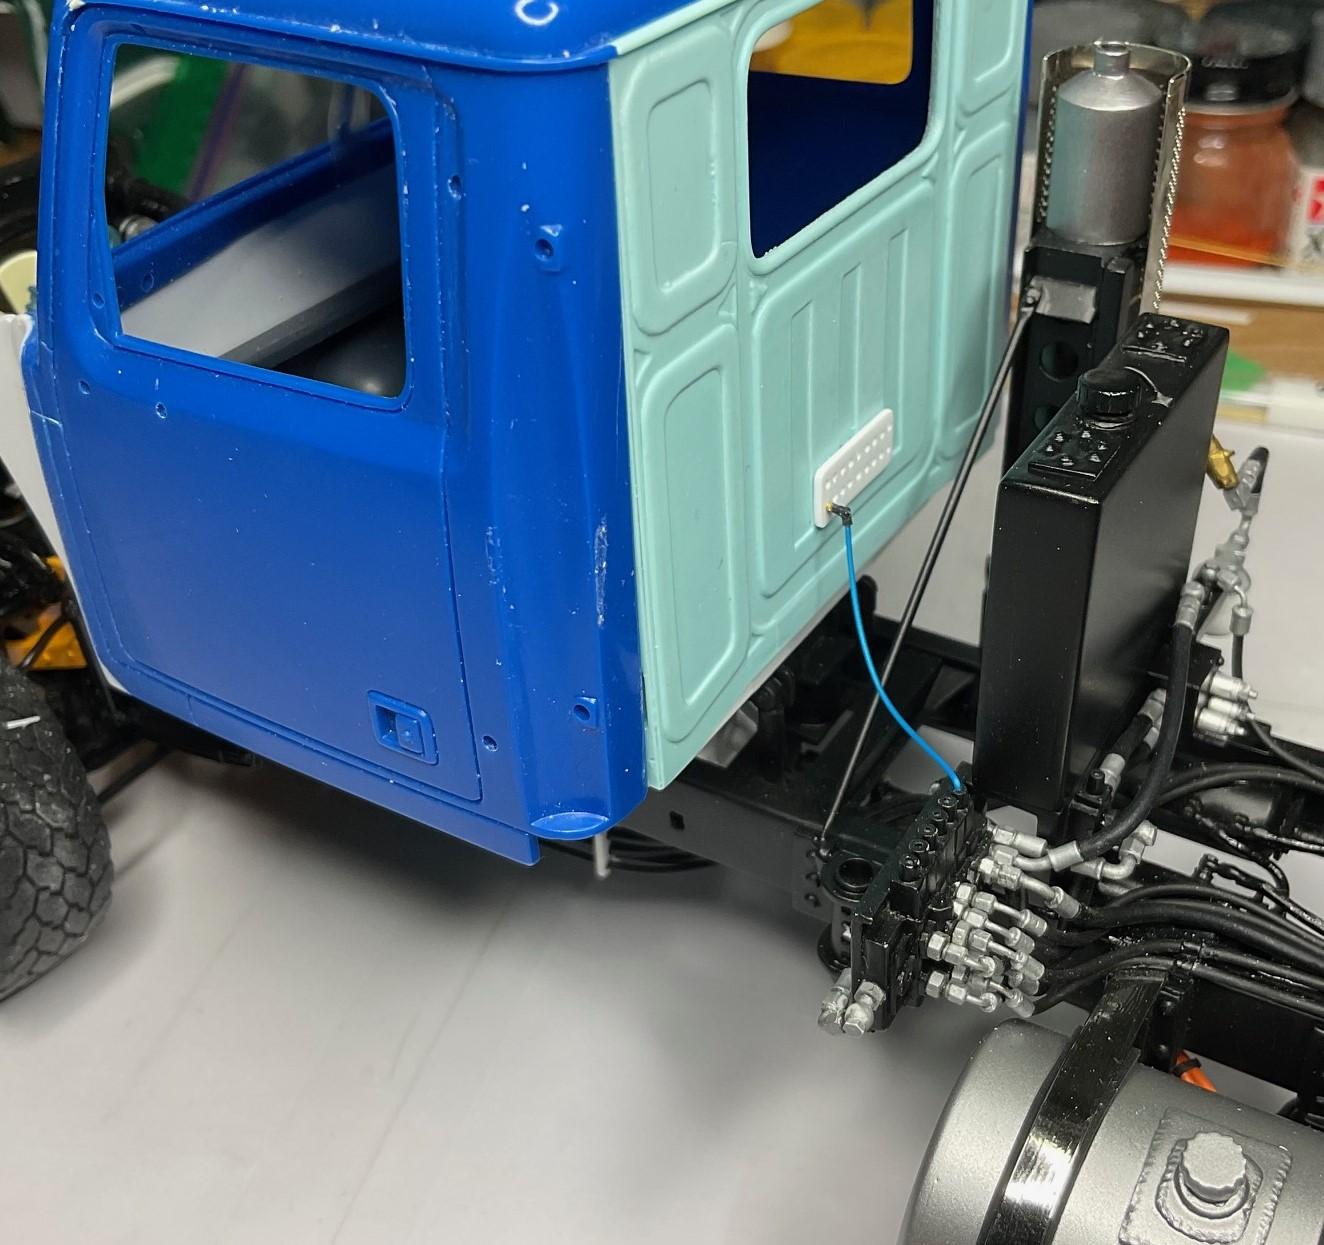
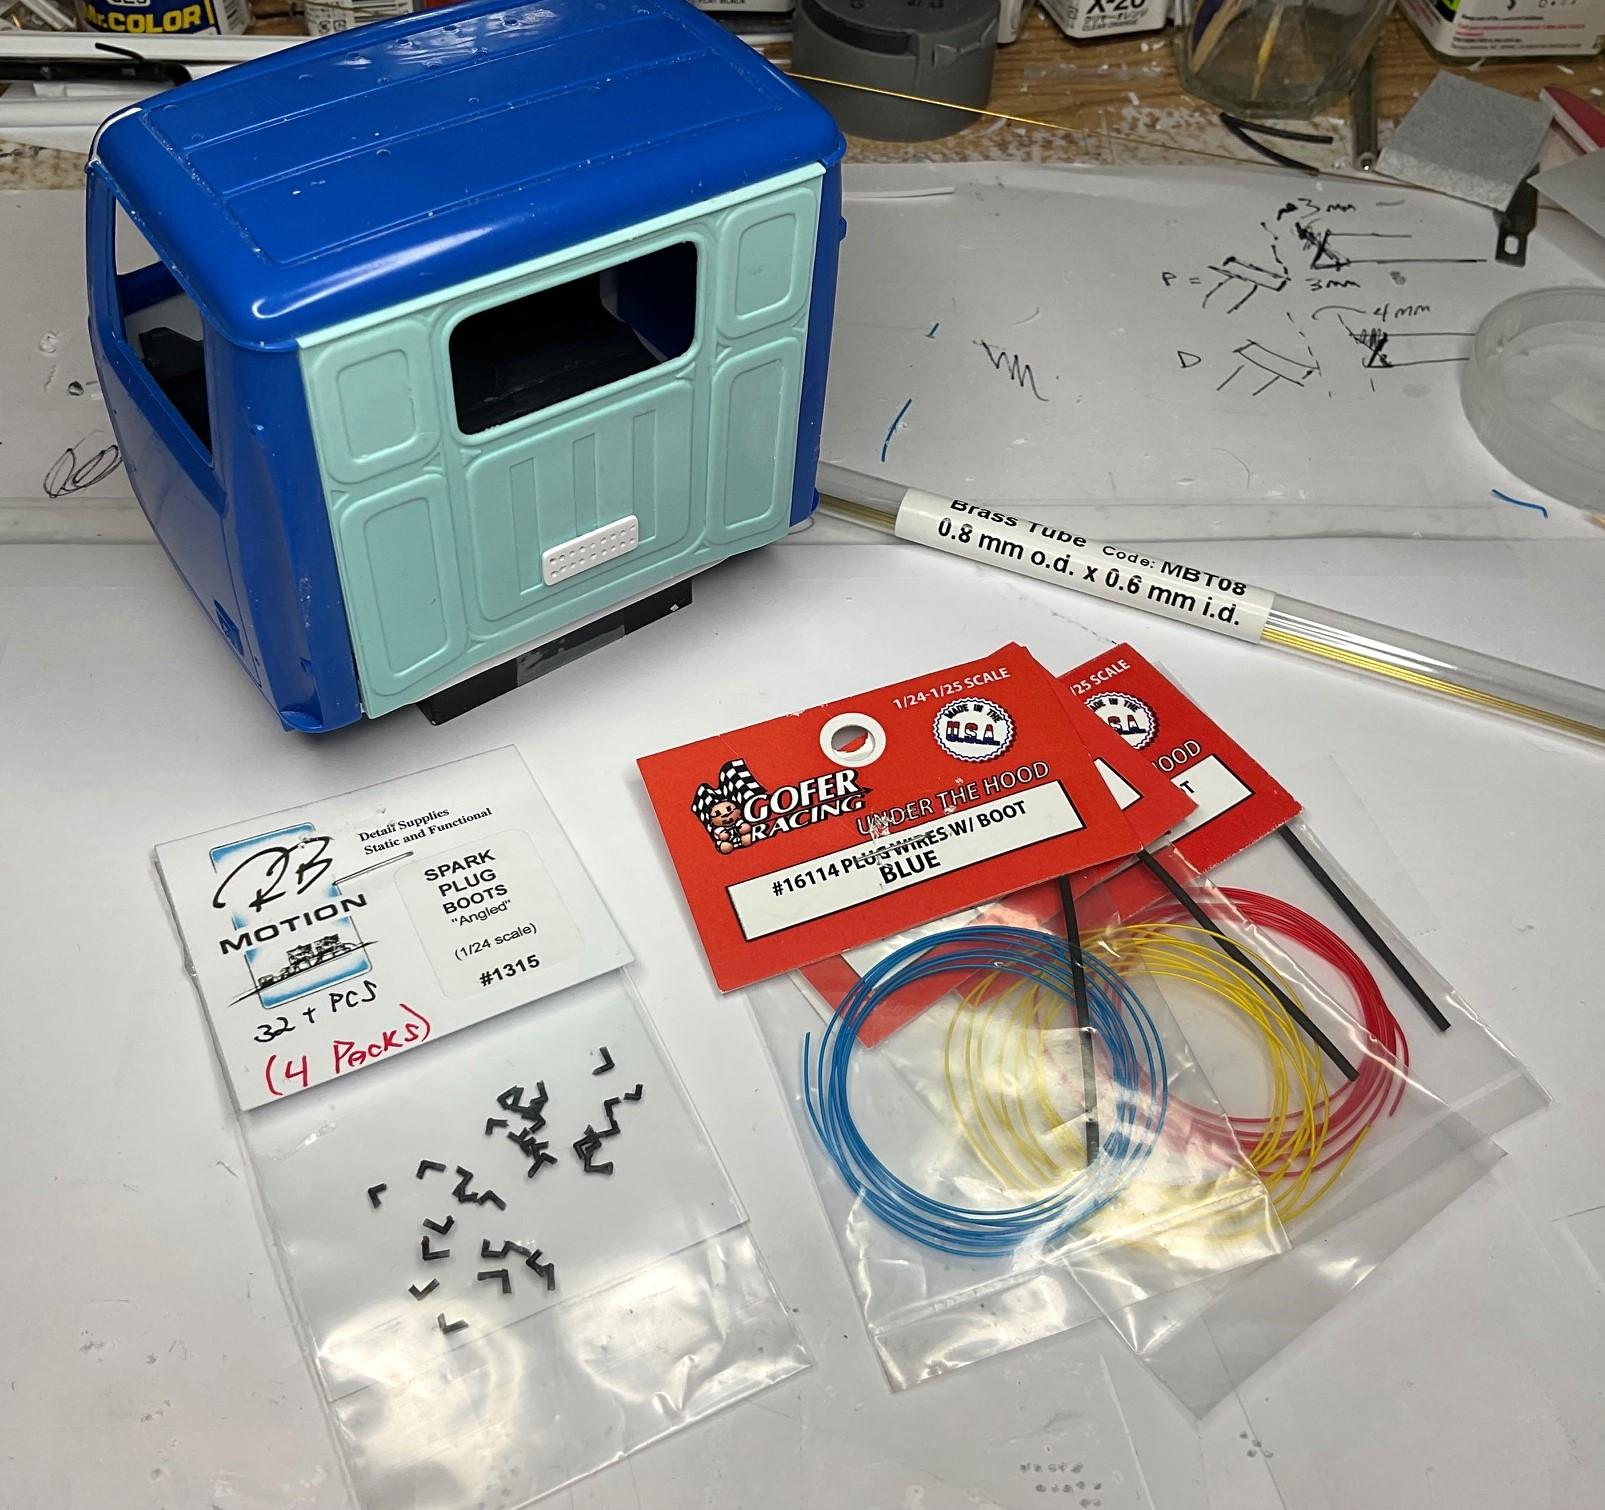
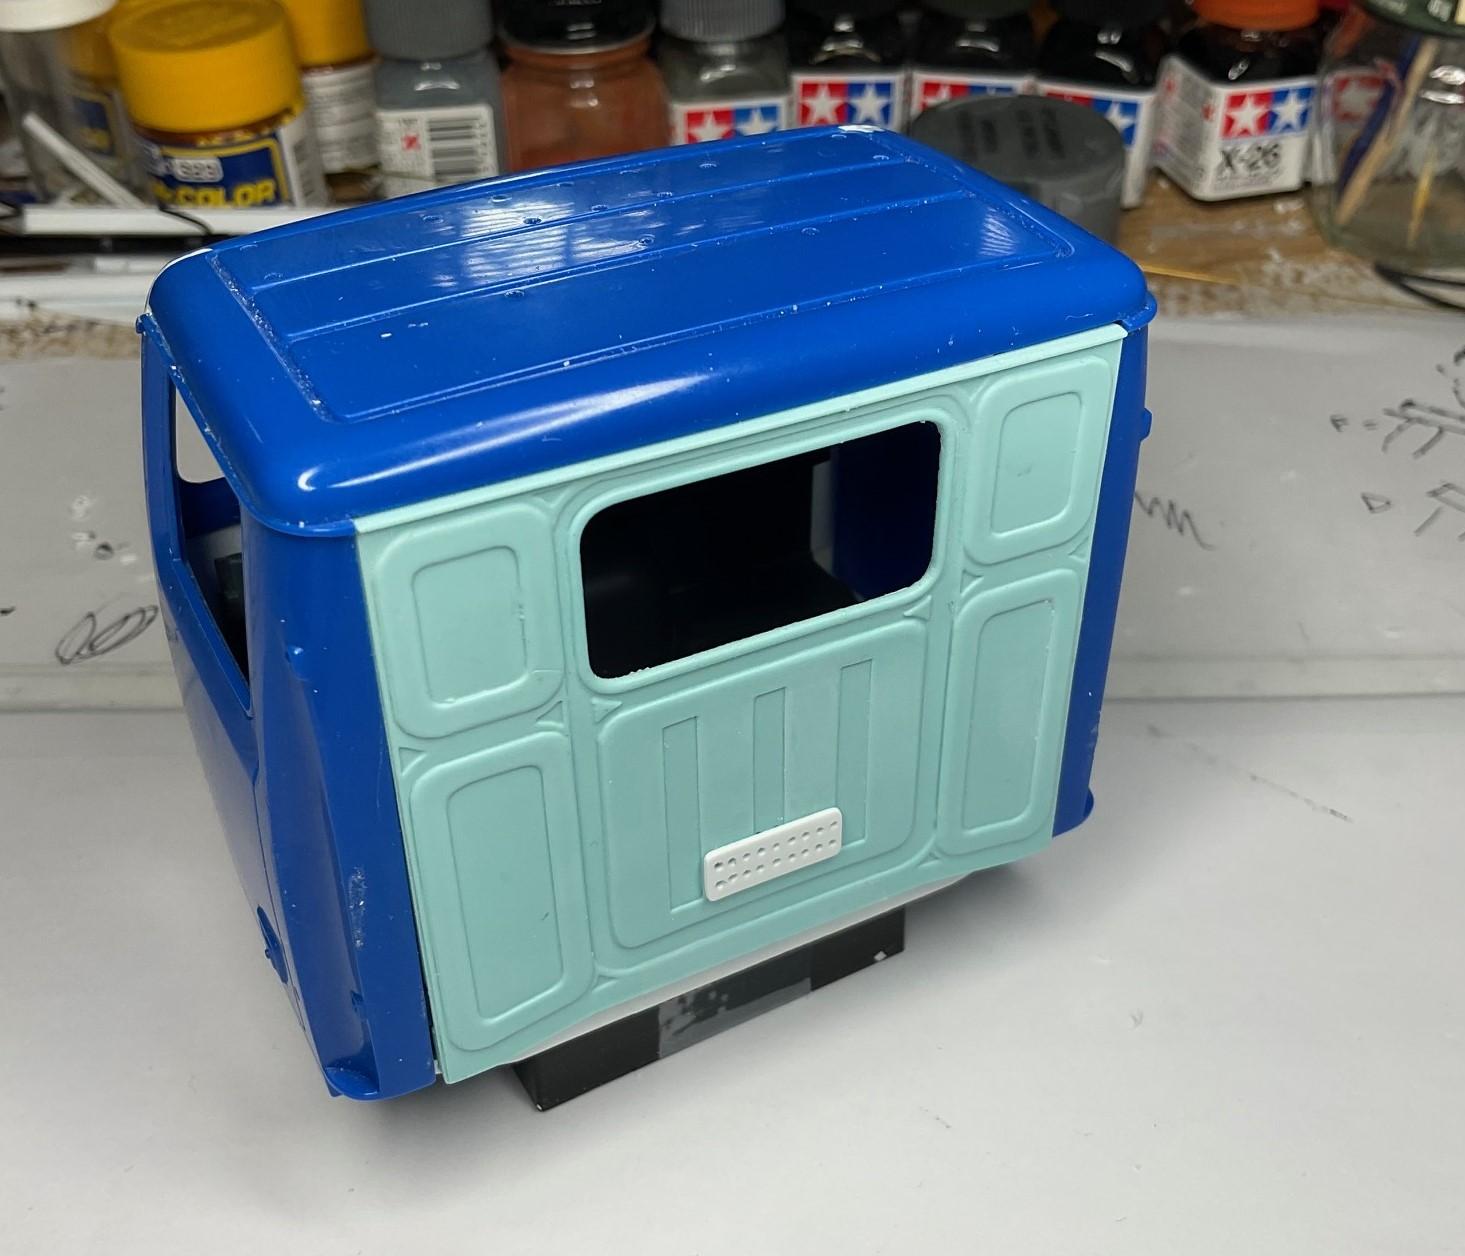
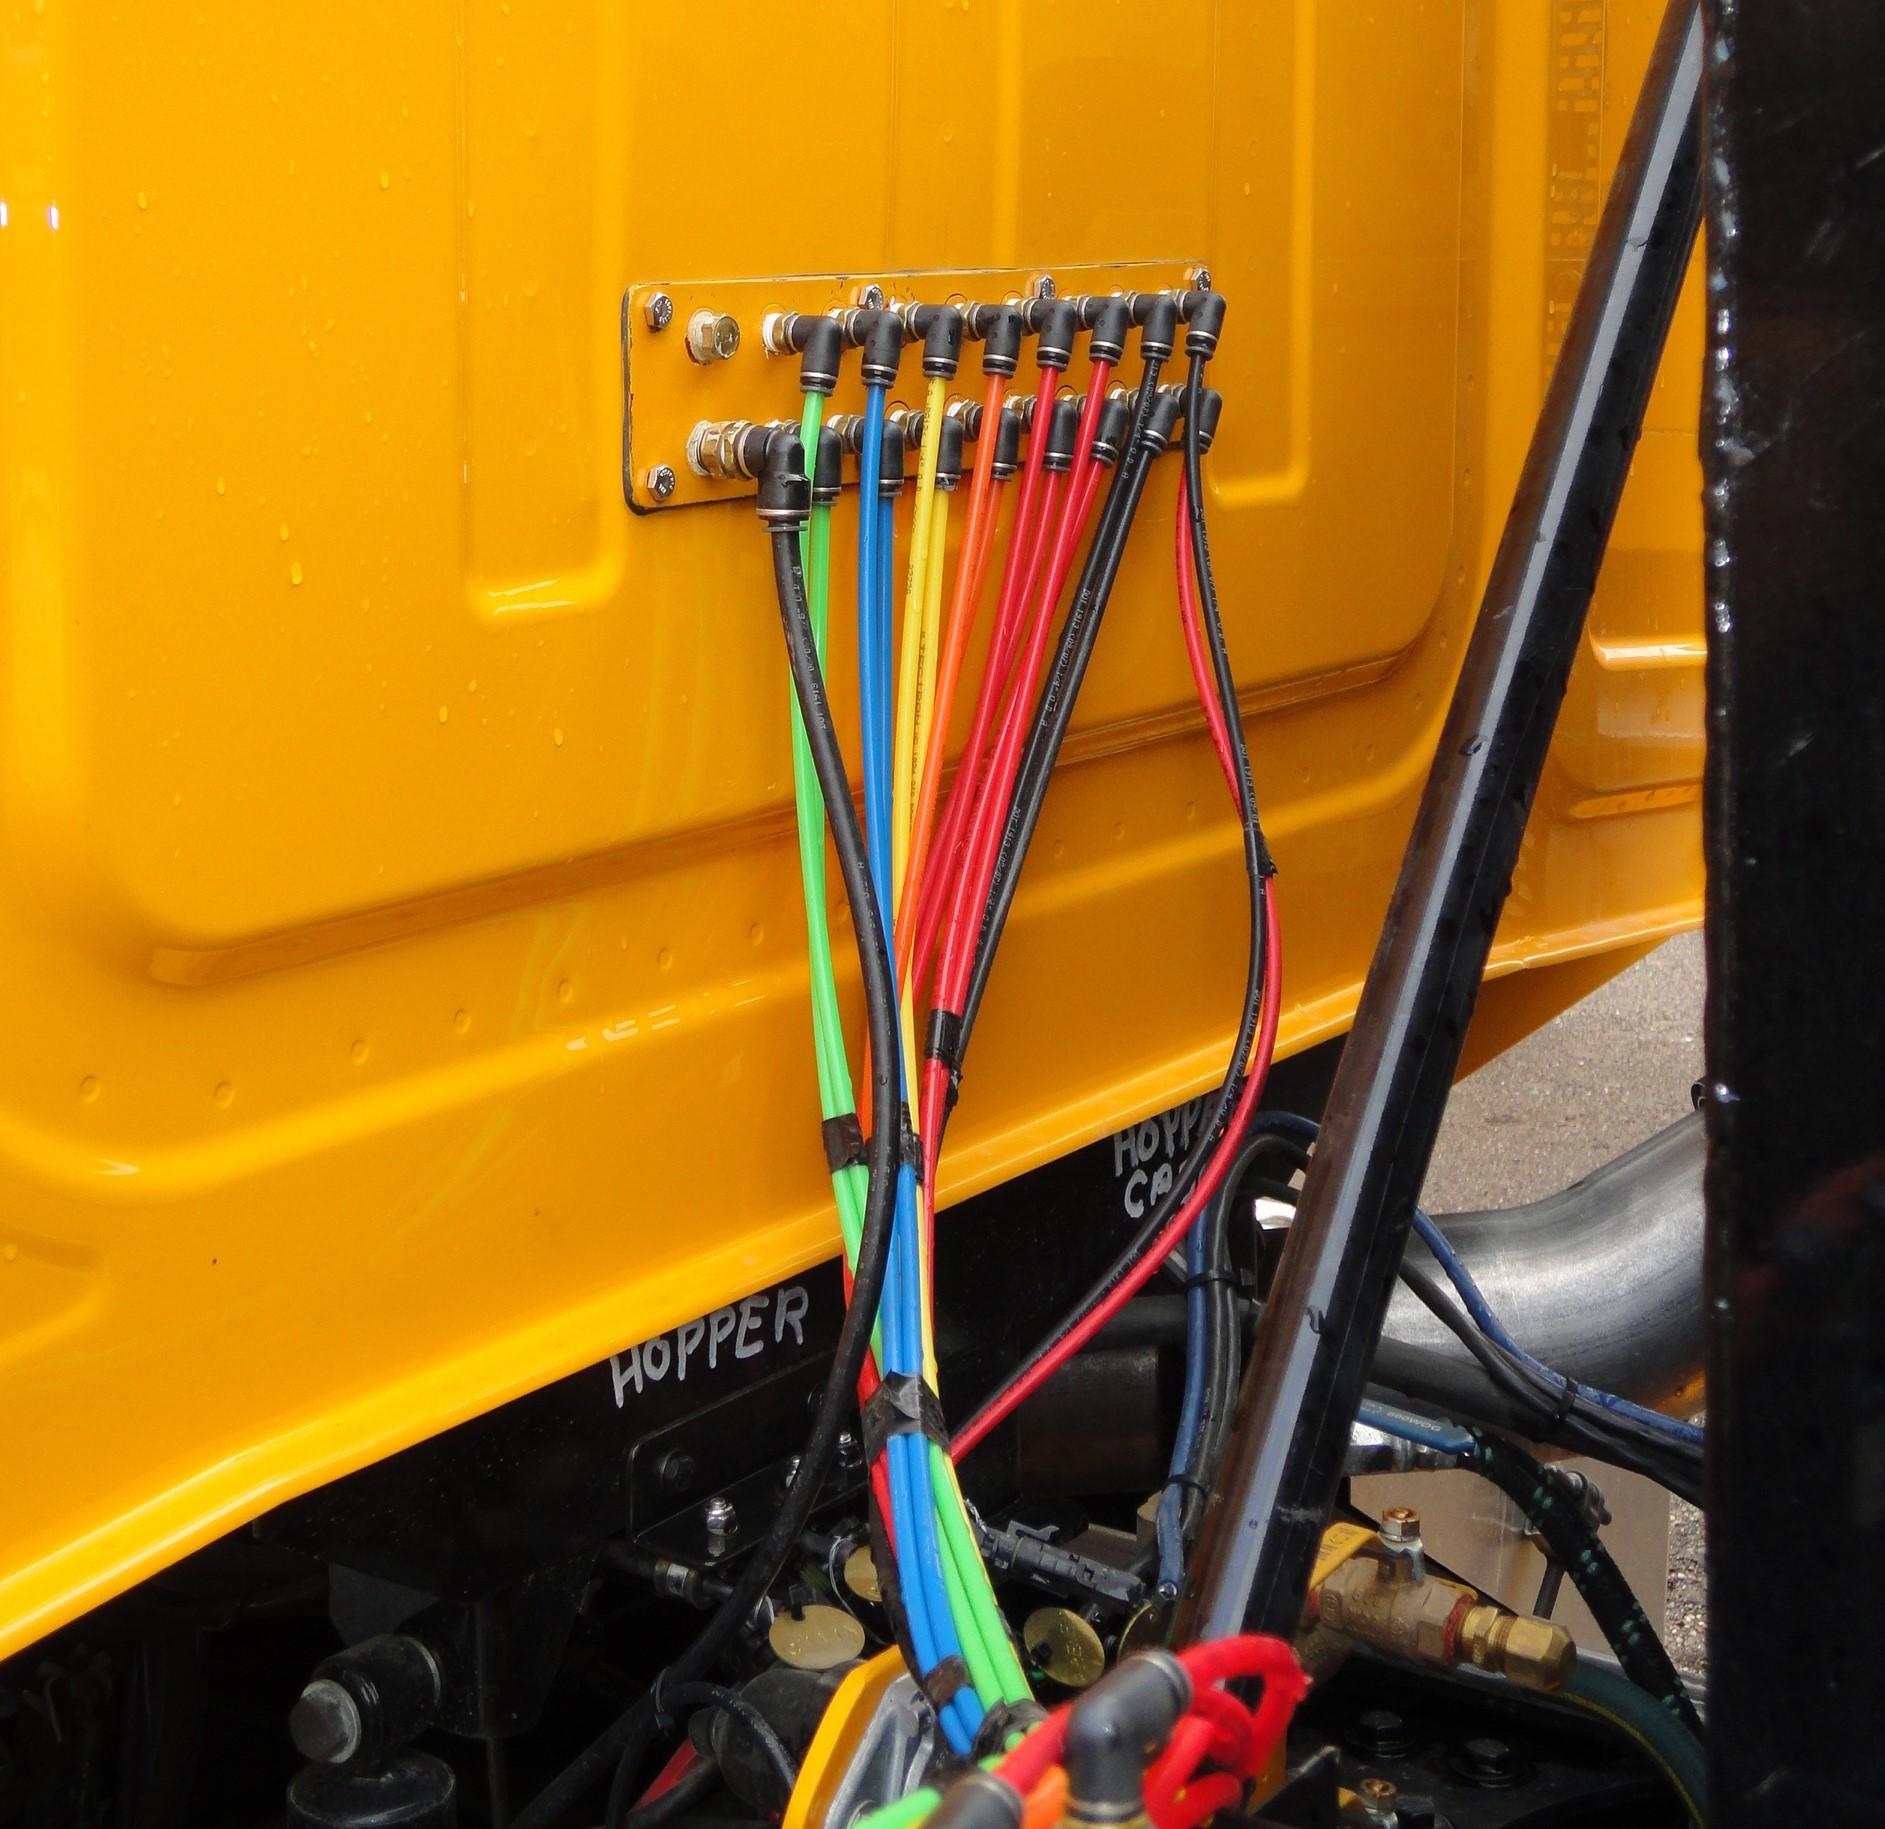
BK9300 replied to BK9300's topic in WIP: Model Trucks: Big Rigs and Heavy Equipment
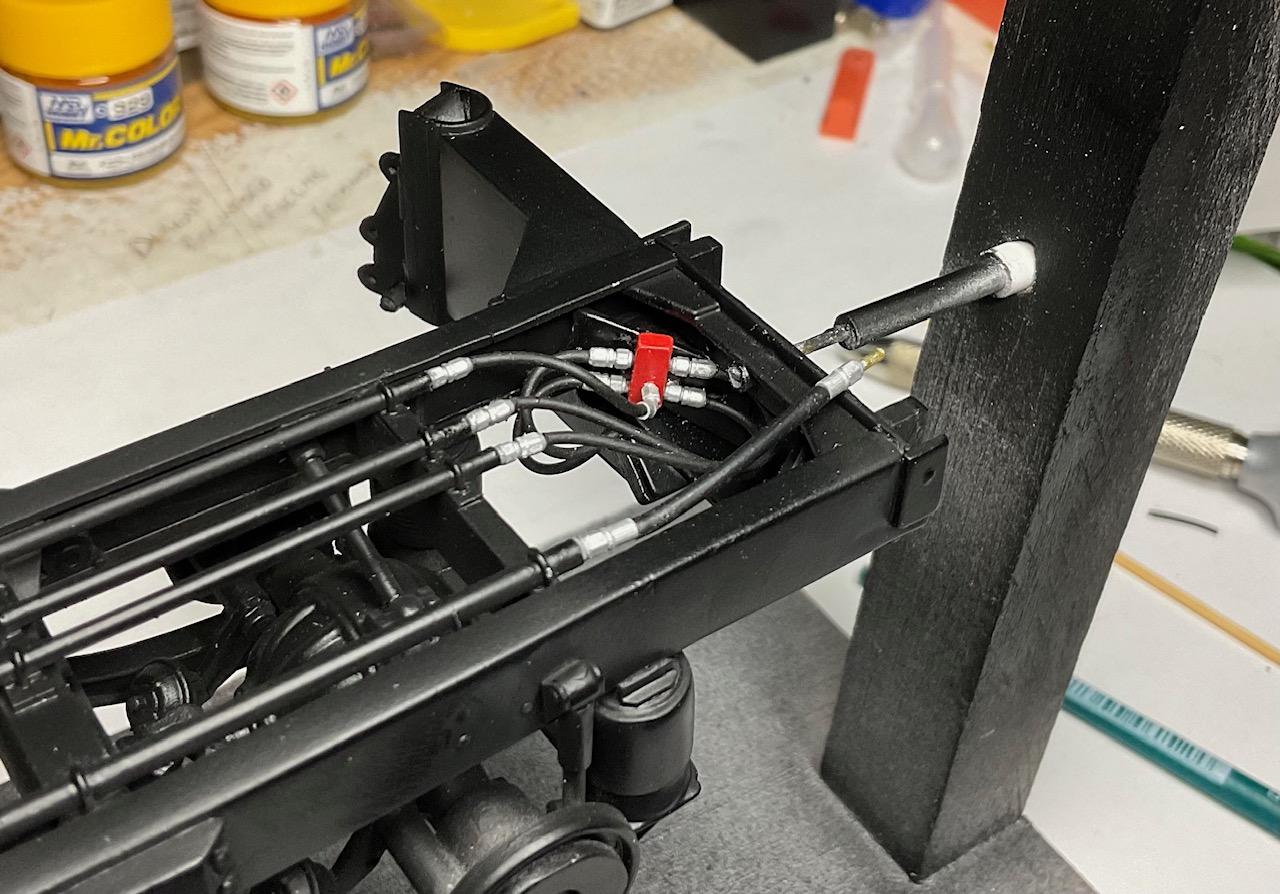
Got a little bit more done on the dash yesterday, but now need to make a trip to hobby shop for some paint before I do more on it. Carried on with some work on the back of the cab. I needed to make the mounting plate for the pass through air lines that supply the valves on the main hydraulic manifold. Added the short styrene filler strip under the center dash panel and the button for the glove box; also added some brass rod, rolled with the edge of an X-acto knife, to simulate the hinges to open the dash panels; a bit more detail to add then will start painting Made the mounting plate for air lines to the valve manifold; then got a bit side tracked, stopping to figure out how this might look when finished This another pic of real plate and air lines - at the very bottom of the pic, you can see a couple of the air lines at the valve manifold as well I had planned to use some brass tube to simulate fittings, some silicone, R&B Motion spark plug boots and some plug wire for the air lines Put together a sample air line to mock it up on truck Pretty good idea what this will look like when finished - the air line at the valve manifold will also have a boot on it when I put this all together Have the heater on in the shed and will do a couple coats of colour on the test hood later this afternoon - not seeing any bleed through from the blue styrene to the white primer, so far! Might seem like I'm bouncing all over, but it is making some sense to me and progress still happening - take care!