BK9300
-
Posts
1,991 -
Joined
-
Last visited
Content Type
Profiles
Forums
Events
Gallery
Everything posted by BK9300
-

Western Star 4900 FA plow truck
BK9300 replied to BK9300's topic in WIP: Model Trucks: Big Rigs and Heavy Equipment
Bren, Jeff, Dan and Francis - thanks to all of you for these, well, humbling comments! Hadn't intended my earlier comment(s) to downplay the way the build is turning out - I am very pleased with the progress - just observations that stand out to me! -
Western Star 4900 FA plow truck
BK9300 replied to BK9300's topic in WIP: Model Trucks: Big Rigs and Heavy Equipment
Thanks, Steve - reality check is always good! I’m my worst critic, but I am very pleased with the build. My comment about the real pics vs the model pics was not about being dis-satisfied, but an out loud, note to self about some things to be aware of for next truck. Thanks again, always appreciate your comments. -
Good to see an update, Jeff - your prep work is really paying off, looking closely at the detail in your pics!
-
Western Star 4900 FA plow truck
BK9300 replied to BK9300's topic in WIP: Model Trucks: Big Rigs and Heavy Equipment
I appreciate that, Steve! Sometimes the little details sure take a long time, but making headway overall. -
Western Star 4900 FA plow truck
BK9300 replied to BK9300's topic in WIP: Model Trucks: Big Rigs and Heavy Equipment
Thanks for that, Jeff - didn’t notice the bumper until looking at the pics later, and it hasn’t done any heavy pushing yet! -
Western Star 4900 FA plow truck
BK9300 replied to BK9300's topic in WIP: Model Trucks: Big Rigs and Heavy Equipment
Thanks a lot, Scott - closer I get to being done, seems more small stuff to sweat instead of less! -
1/25 AMT Peterbilt 359 California Hauler
BK9300 replied to cifenet's topic in WIP: Model Trucks: Big Rigs and Heavy Equipment
Coming along nicely, Steve! Try Spot Model, for Top Studio rivets, and Model Motor Cars for scale bolts. Can’t seem to post links without getting an error
-
Fine looking engine you’ve shoehorned into your pickup - looks very fast just sitting still. Really like the nice finish on fenders/firewall joints - very smooth!
-
Western Star 4900 FA plow truck
BK9300 replied to BK9300's topic in WIP: Model Trucks: Big Rigs and Heavy Equipment
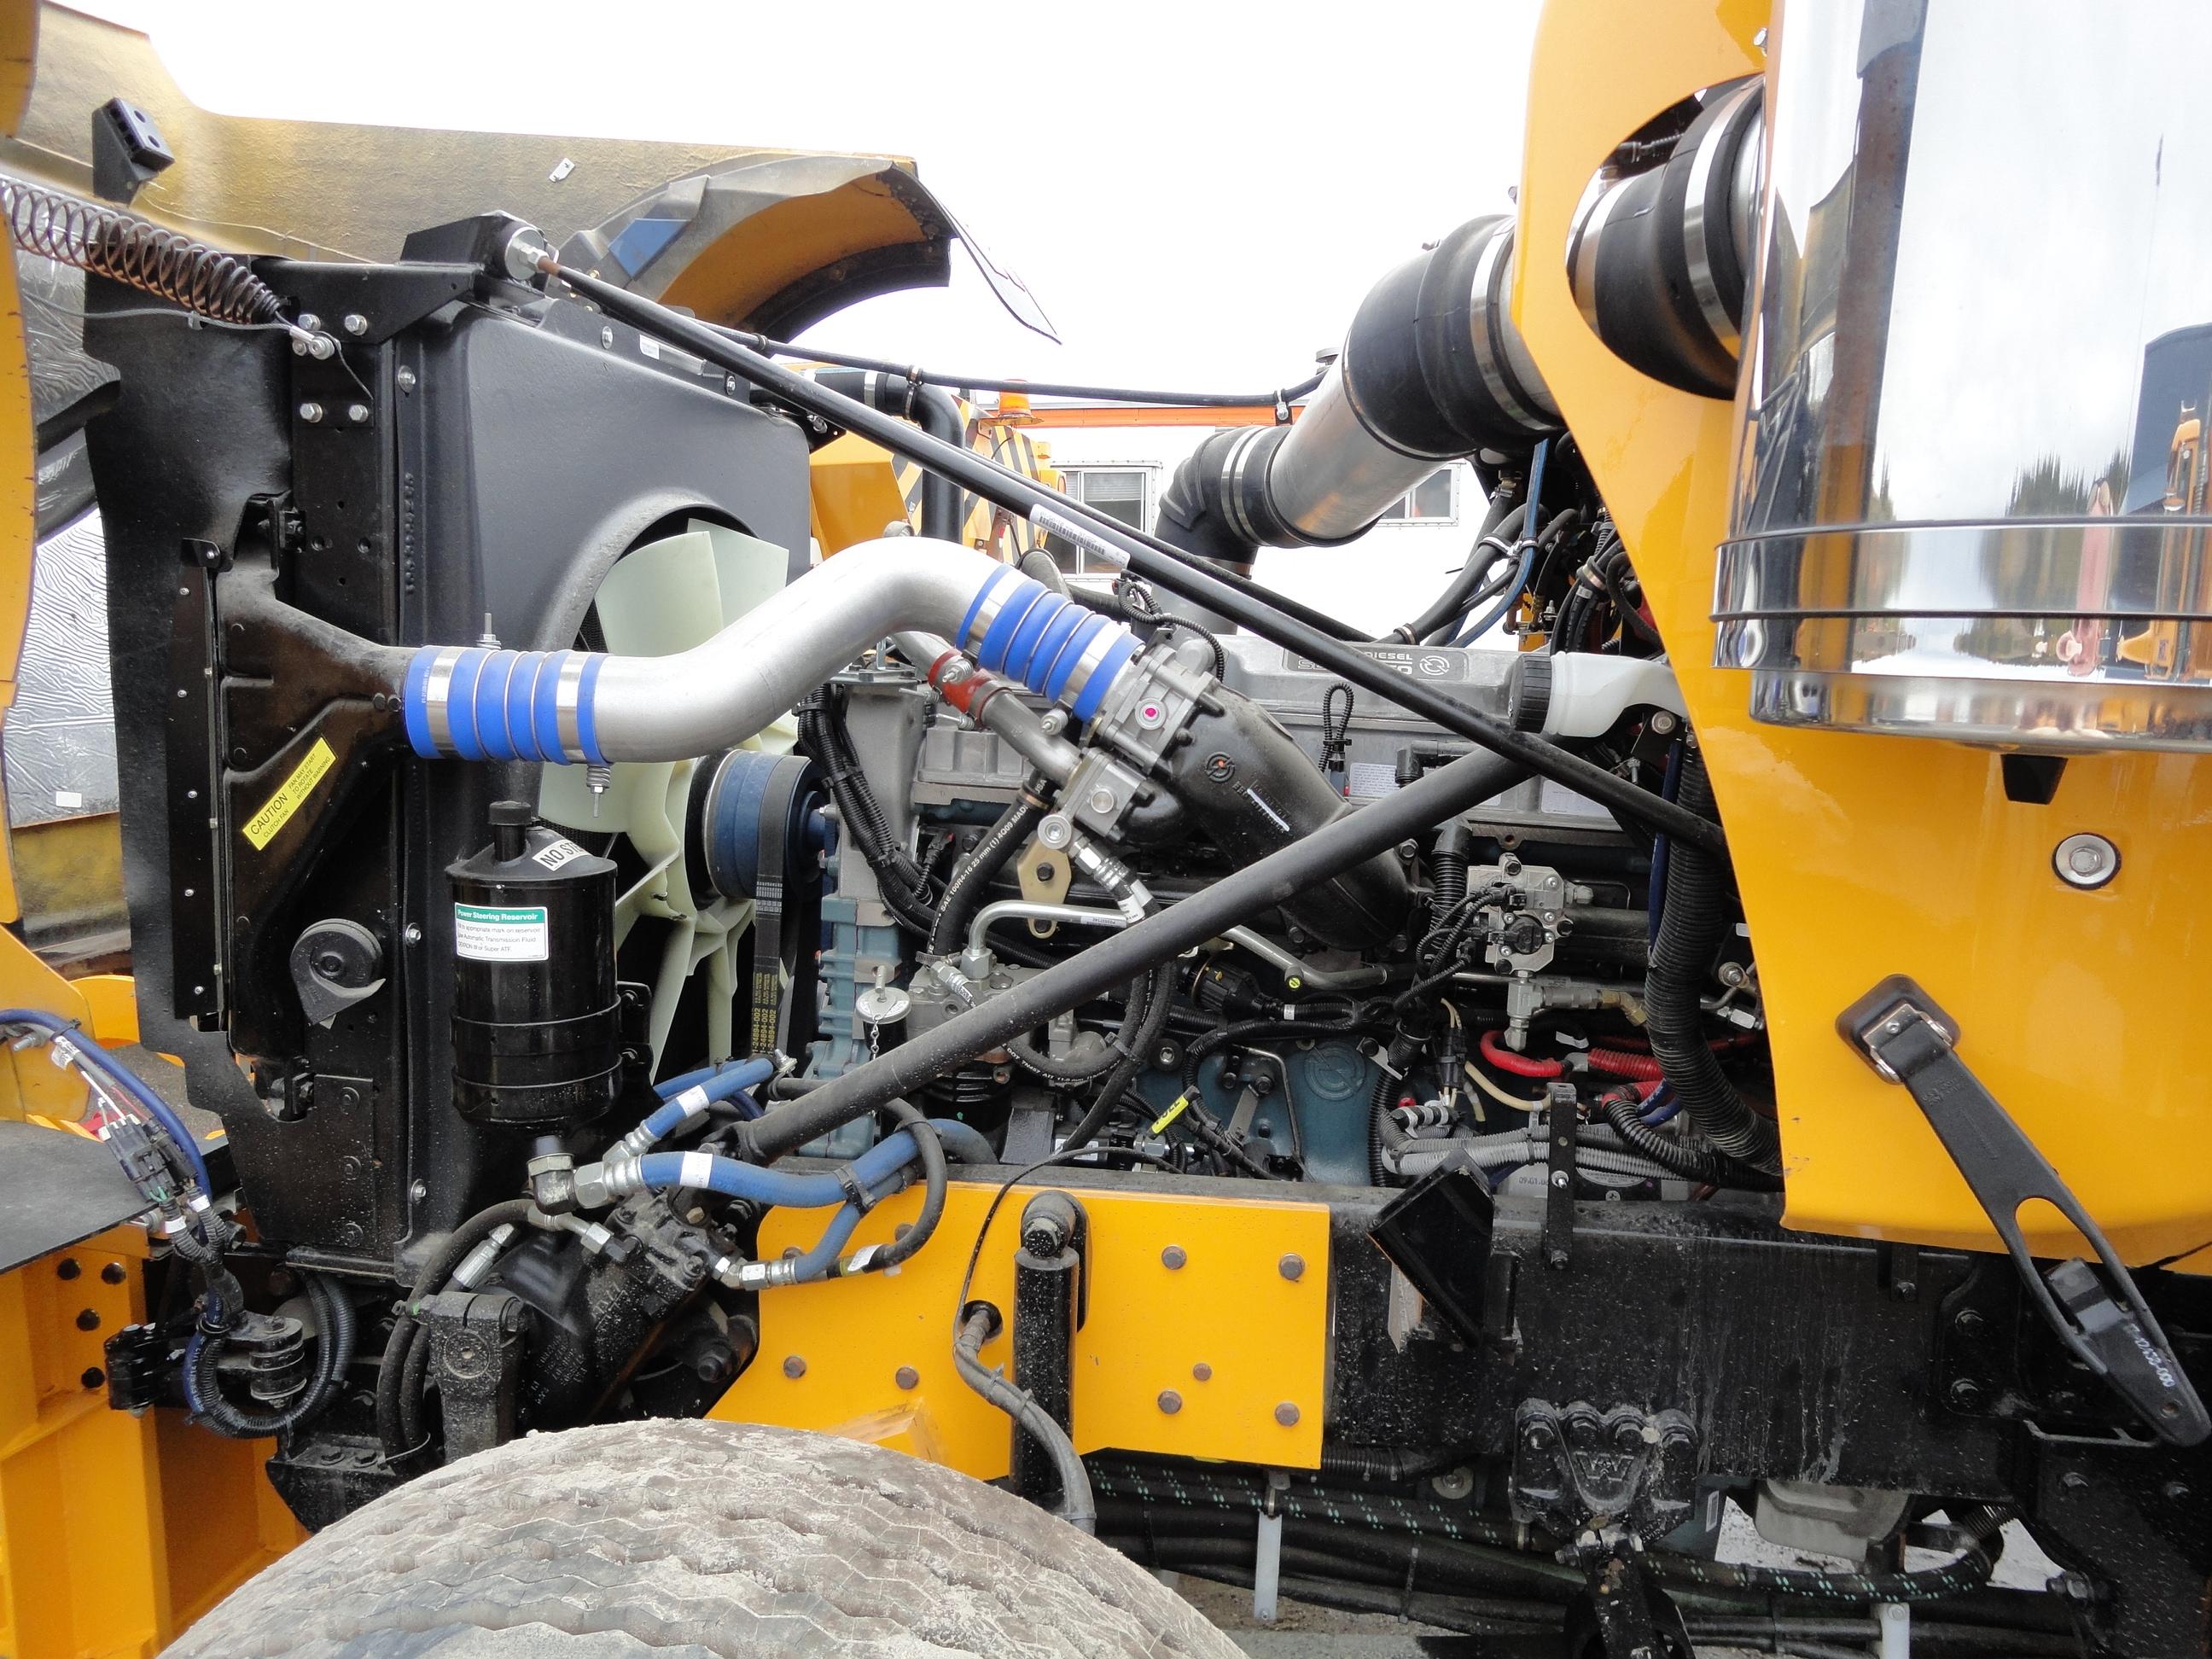
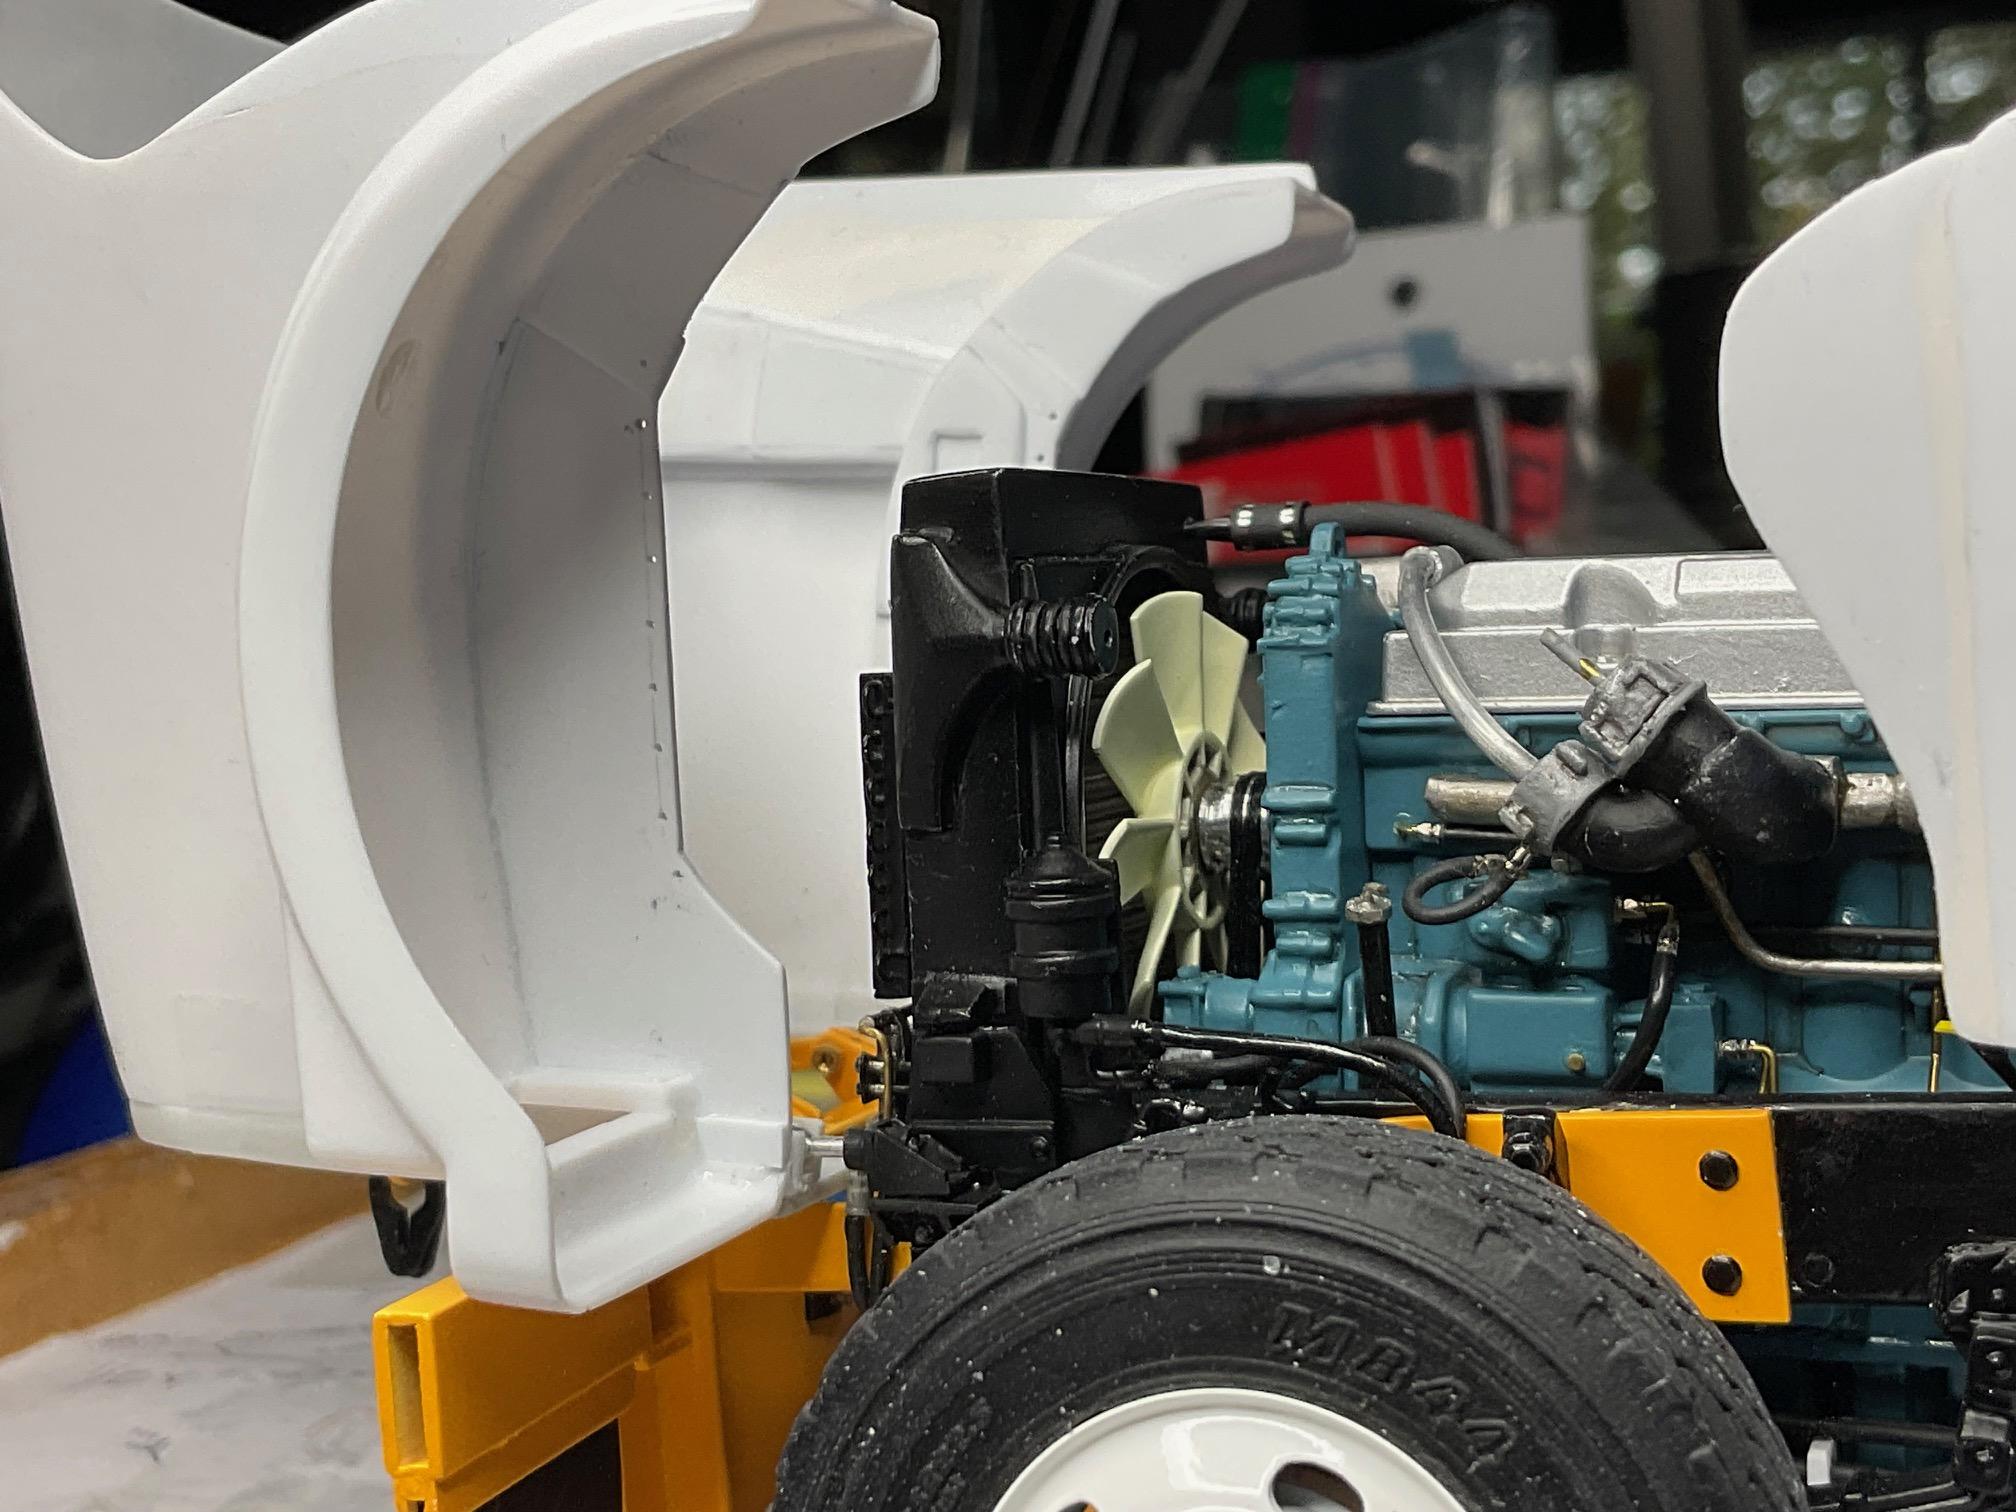
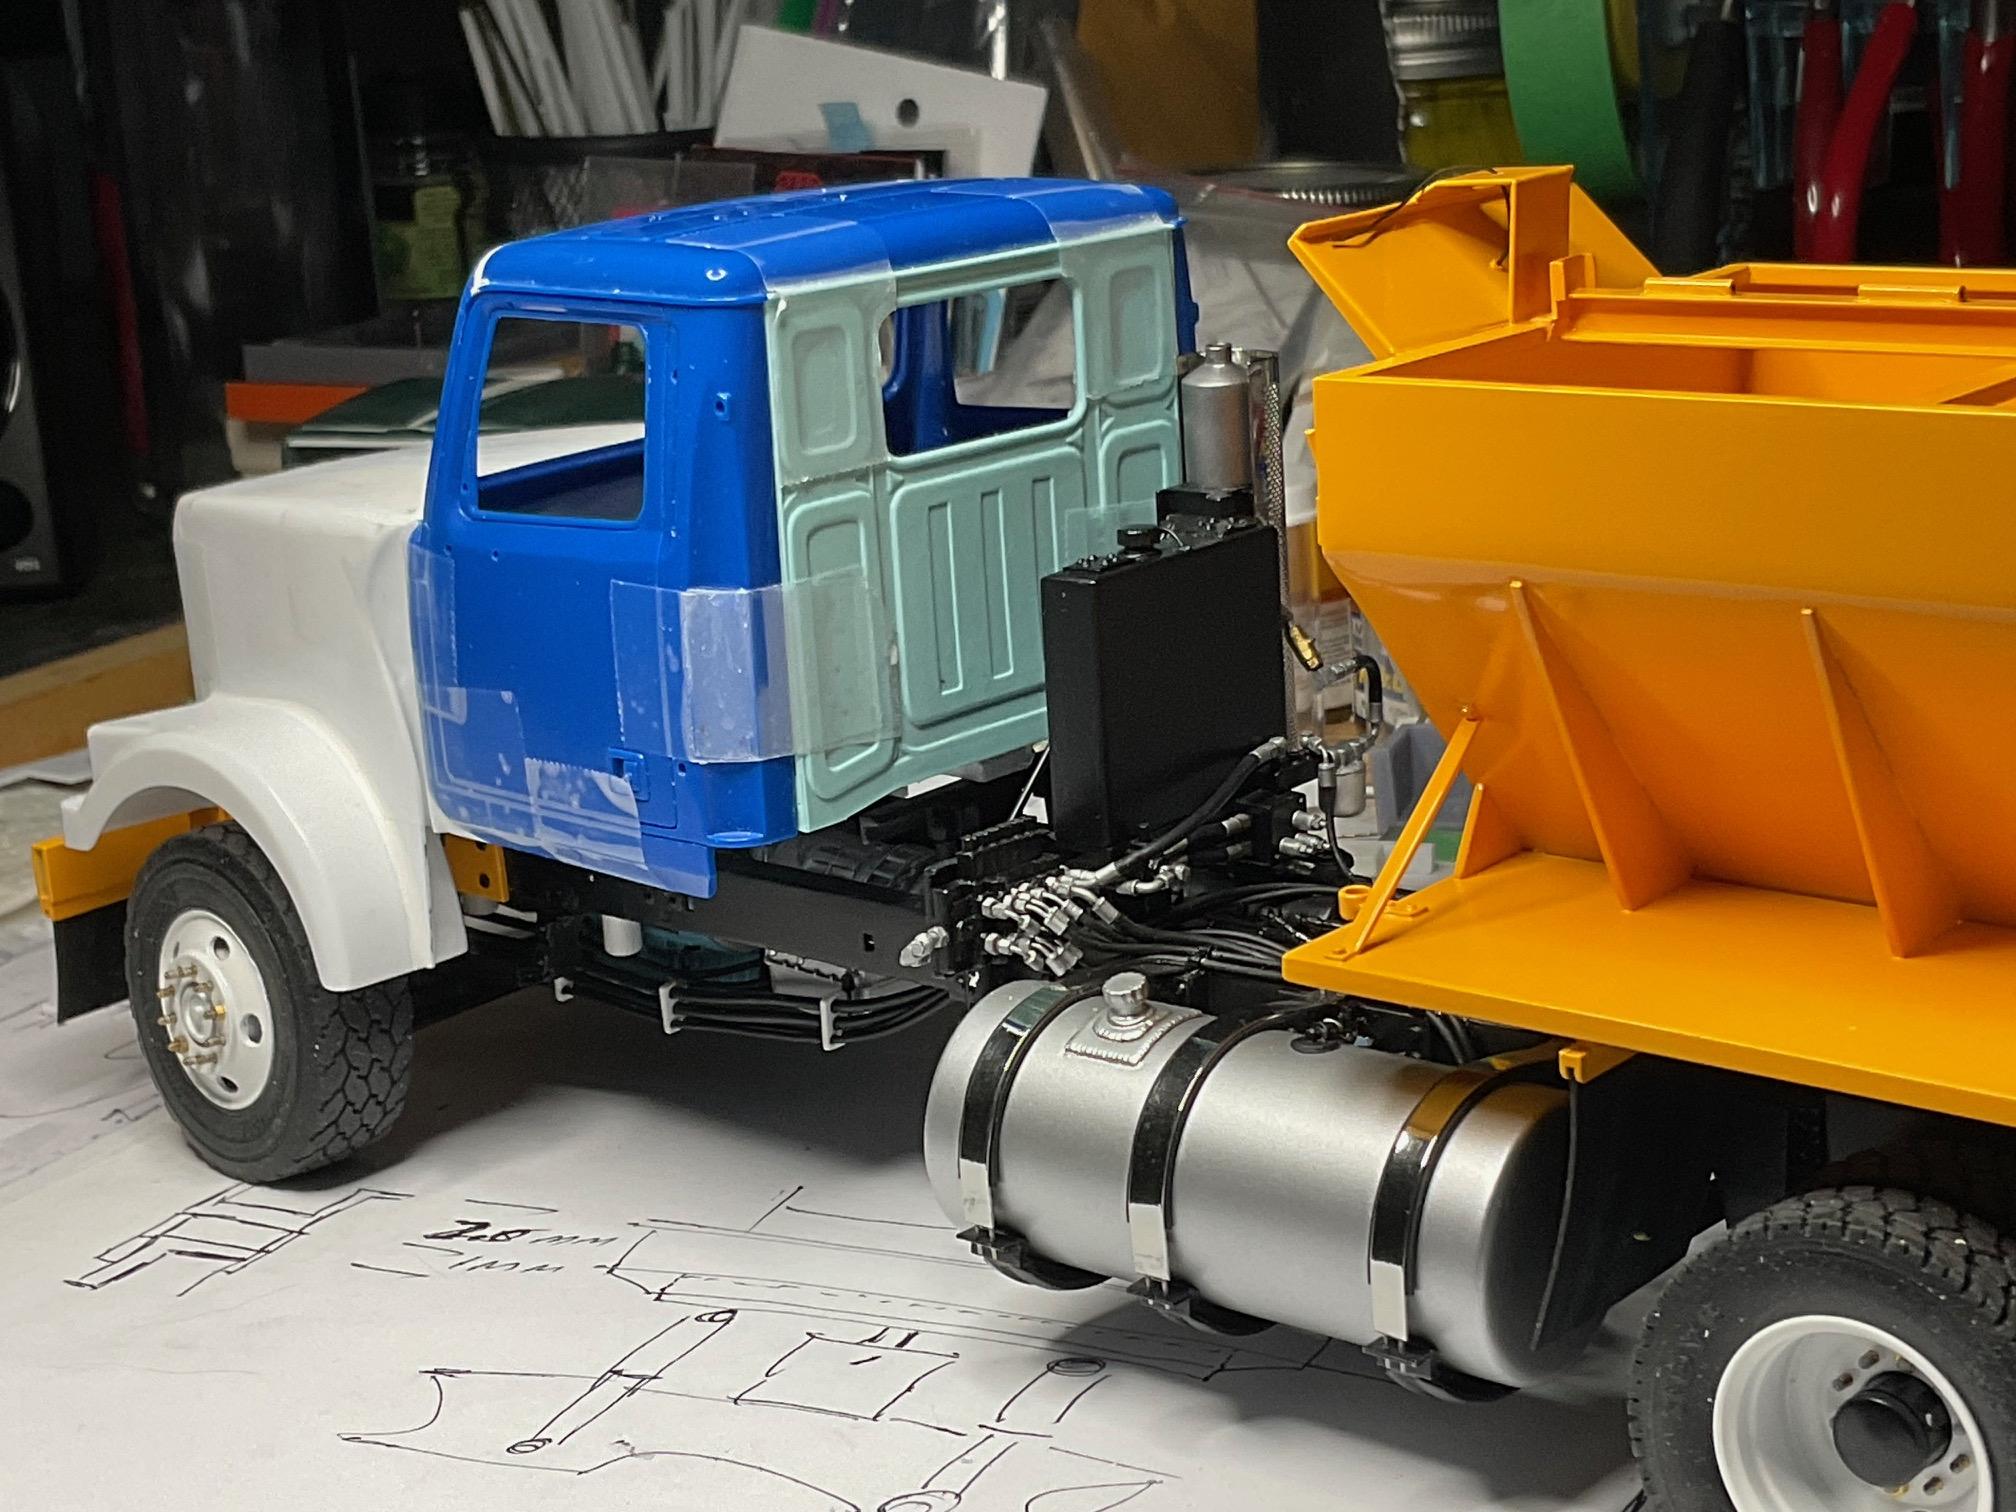
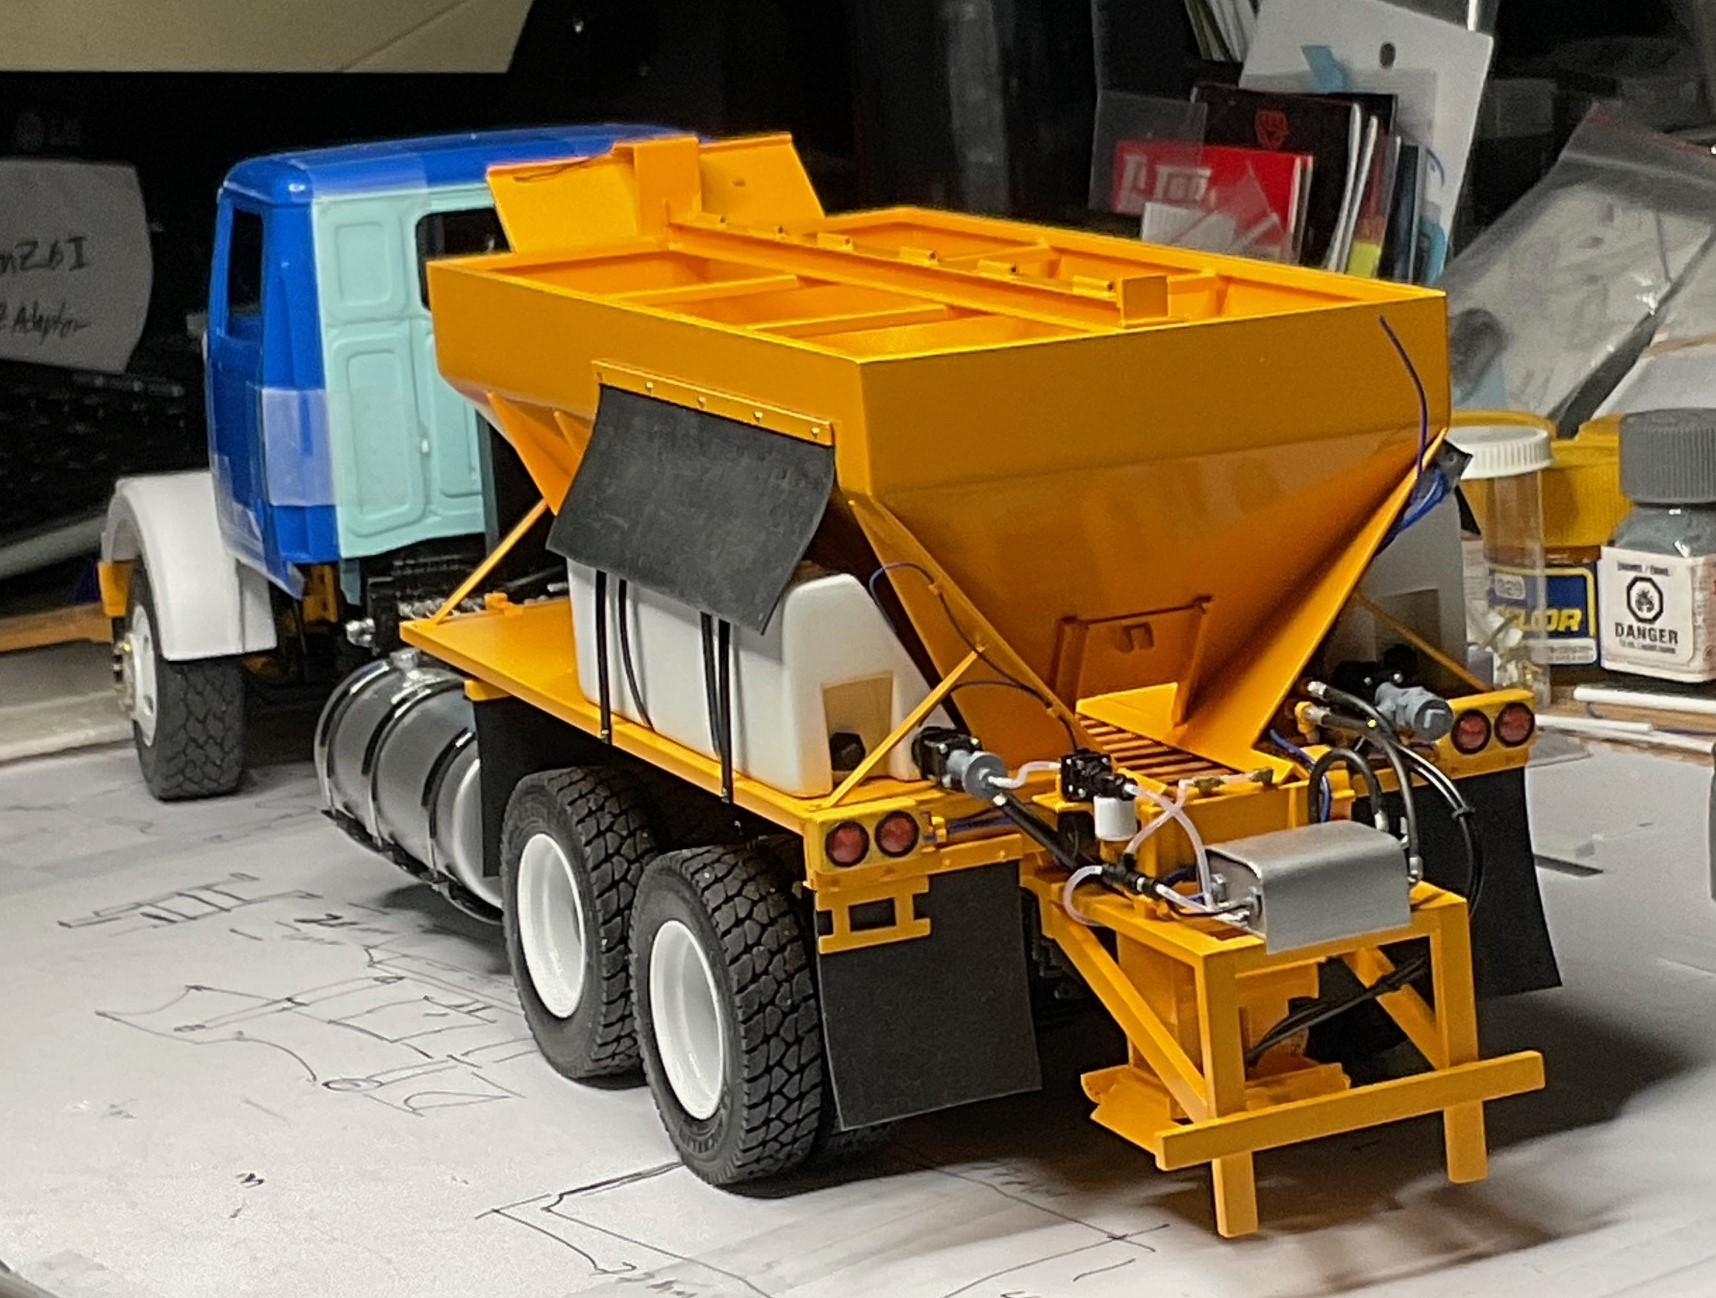
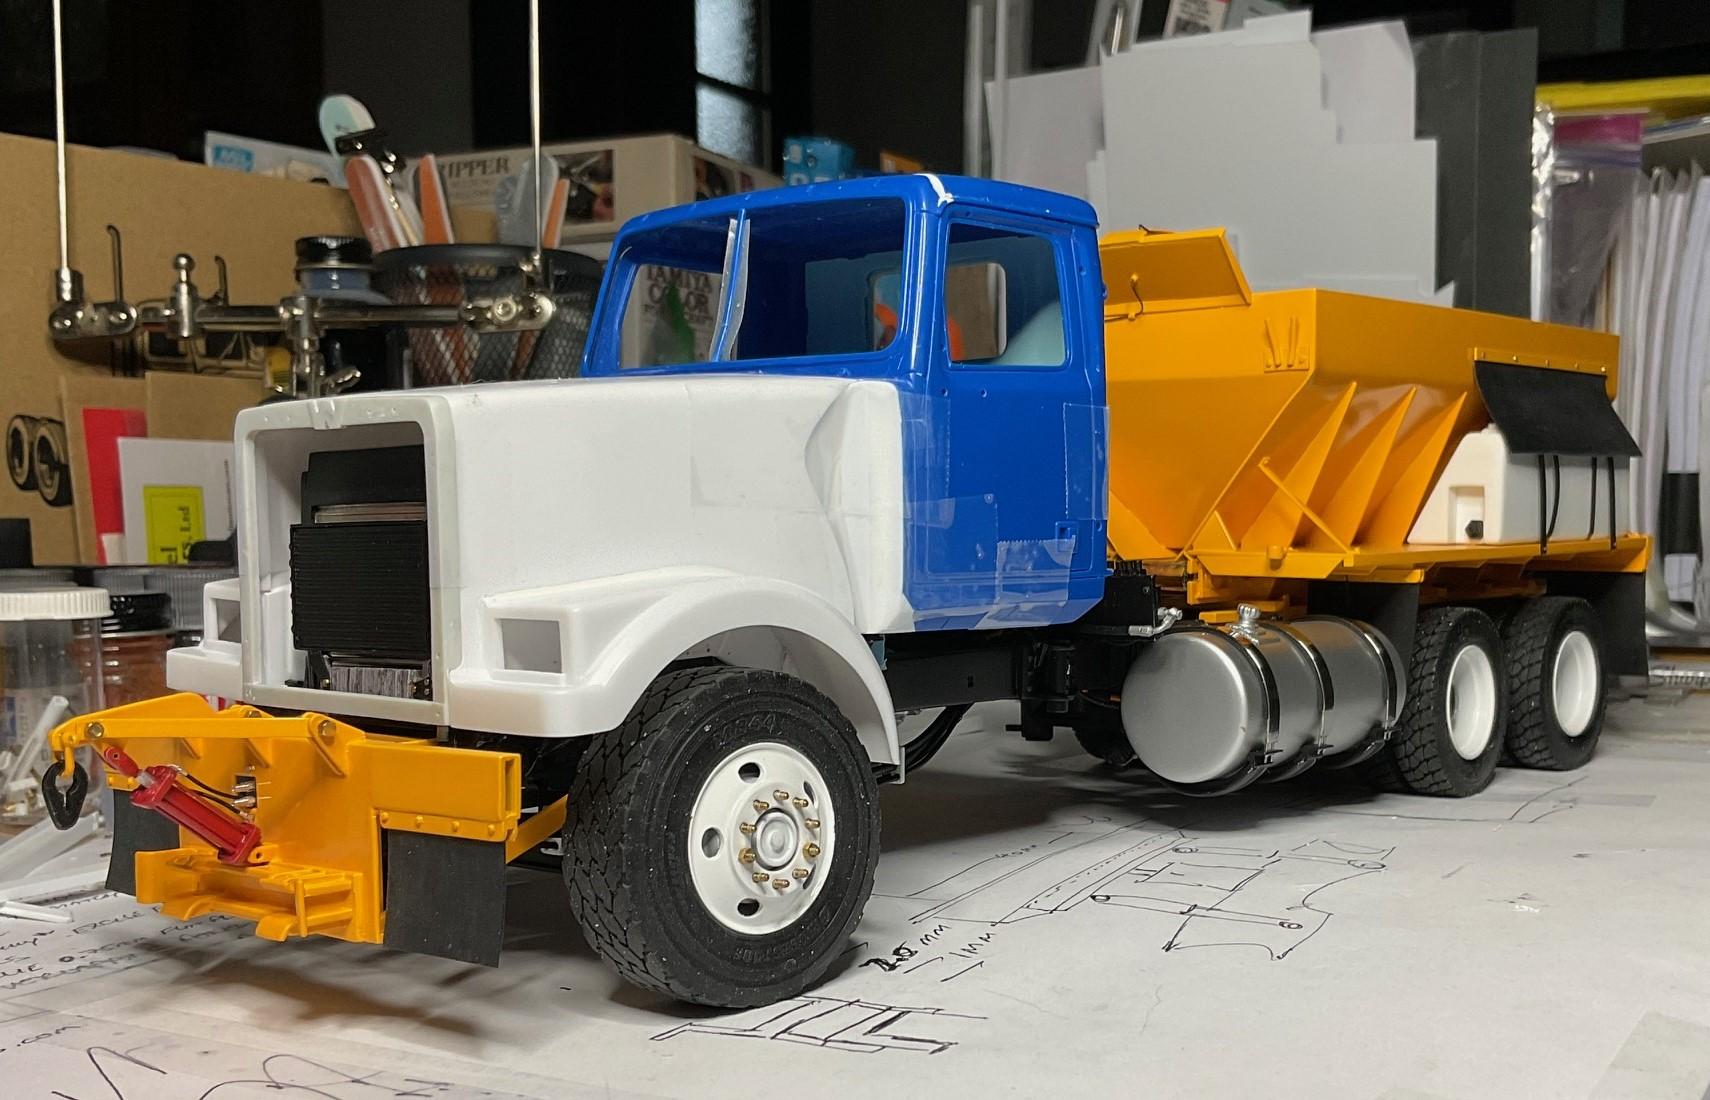
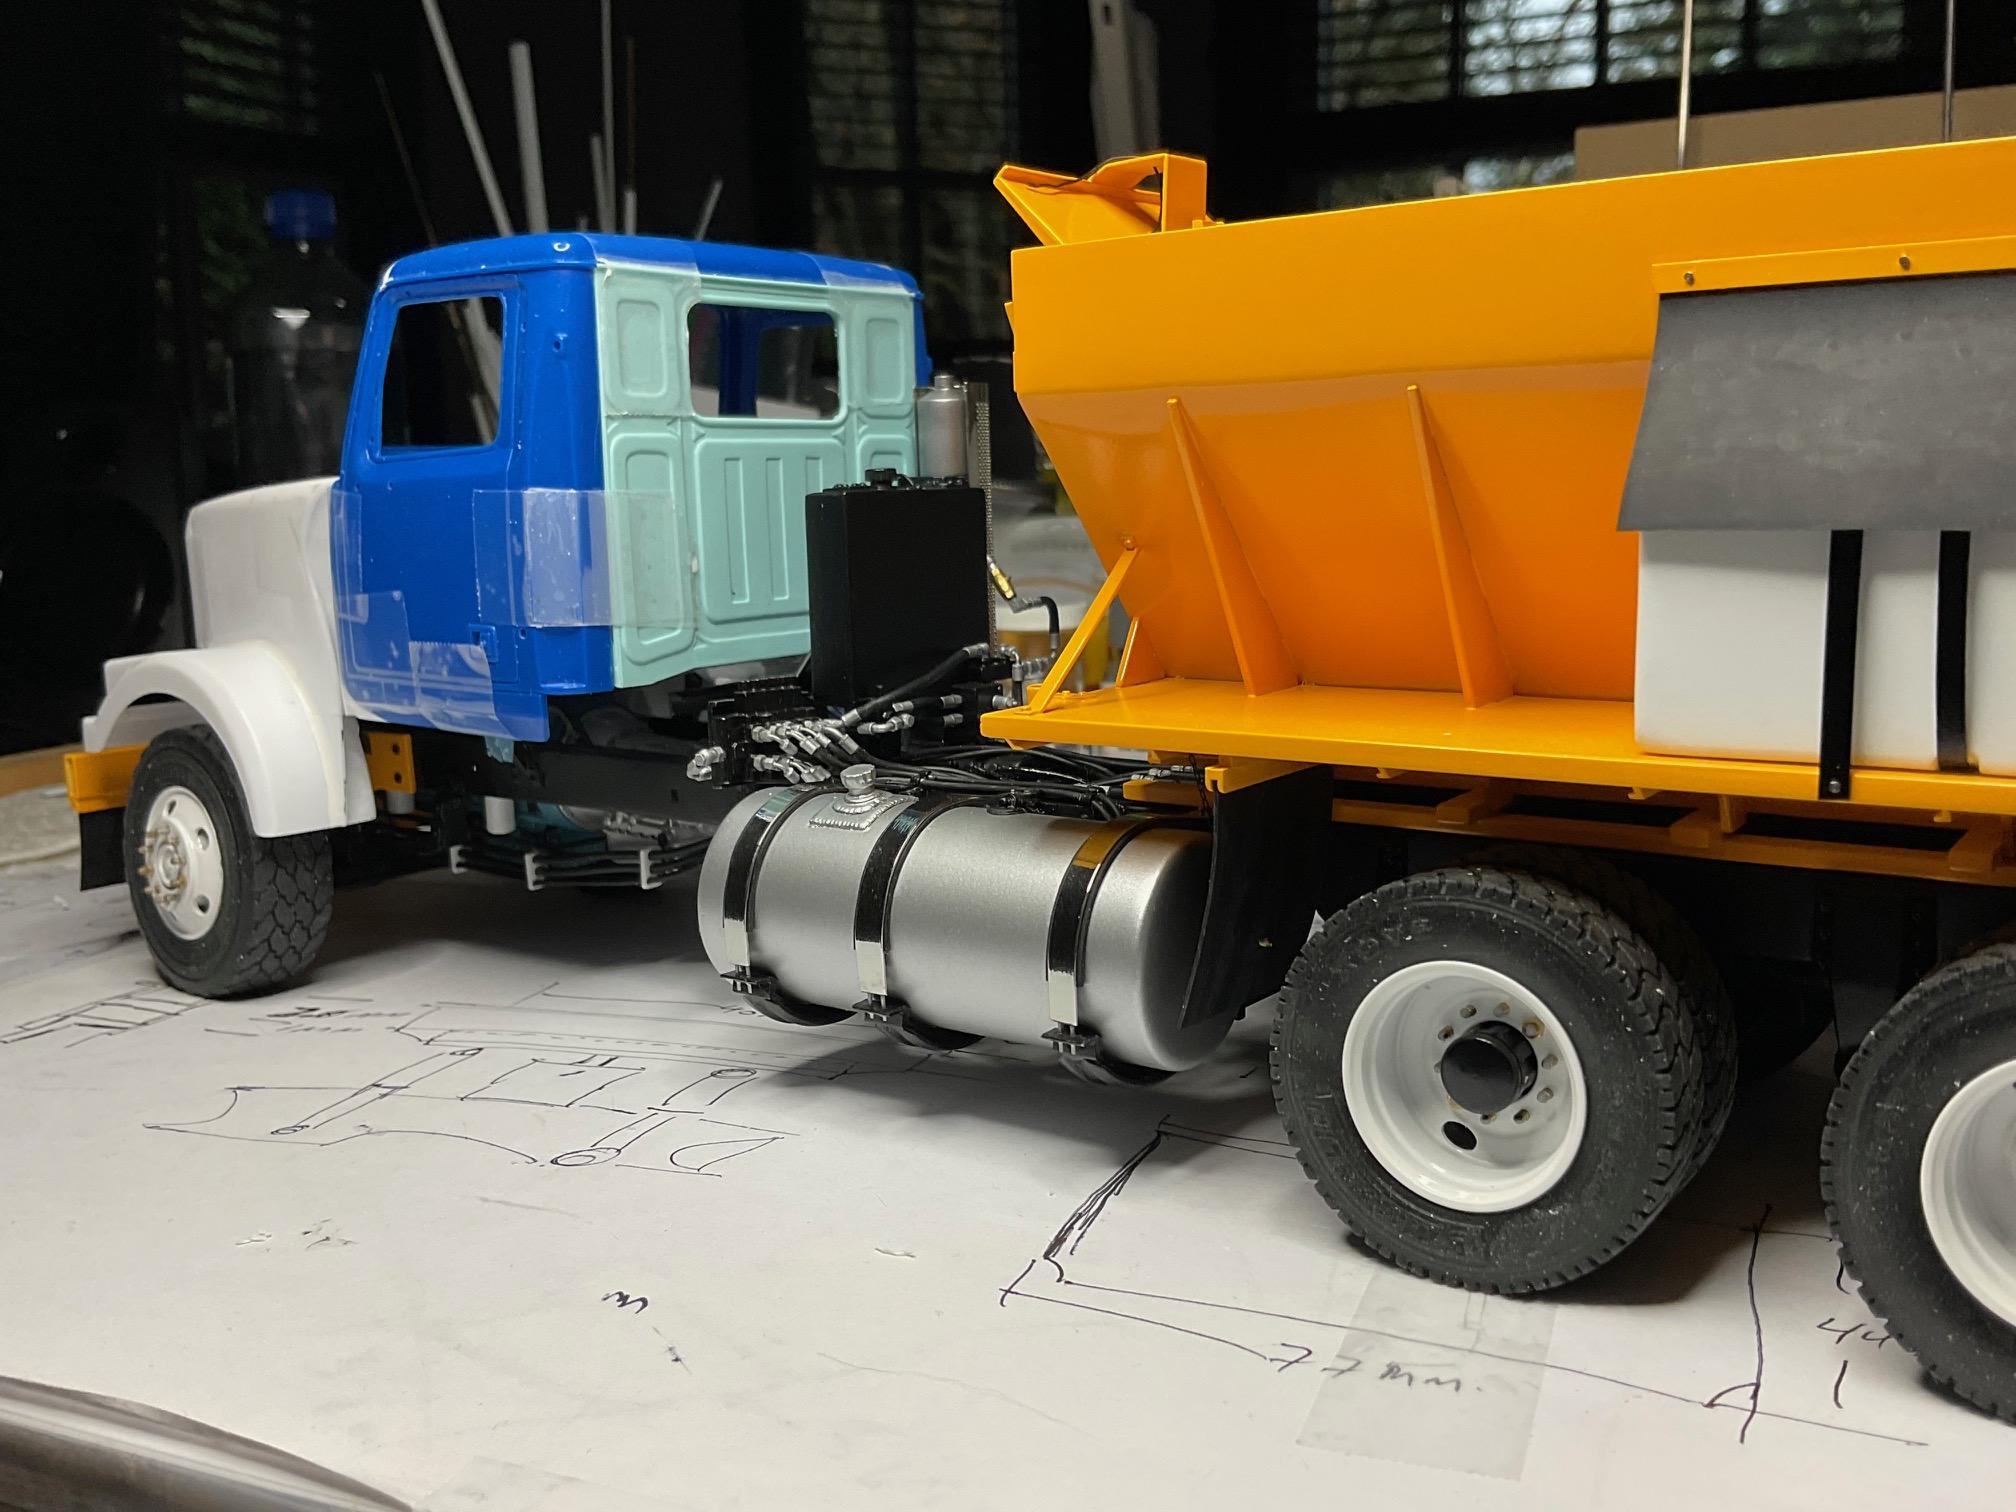
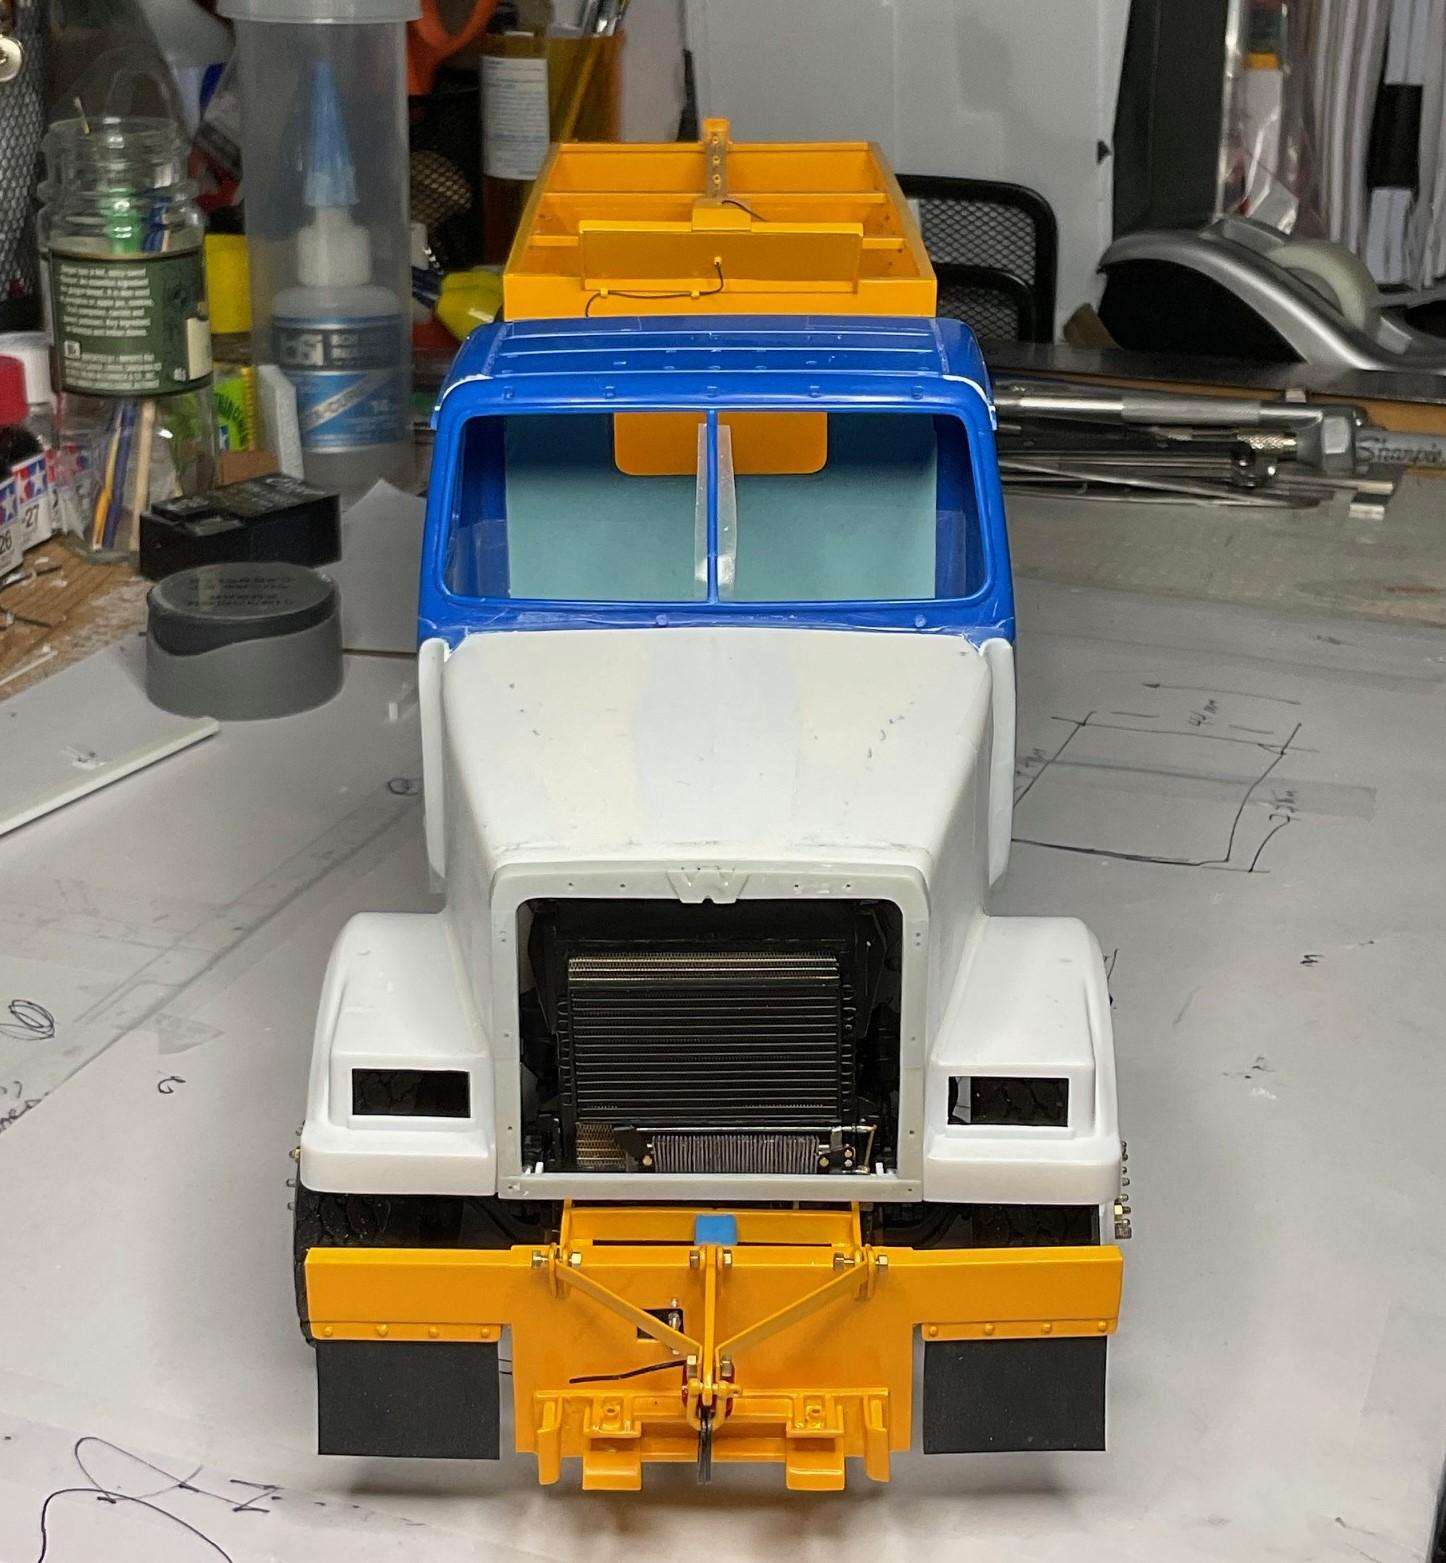
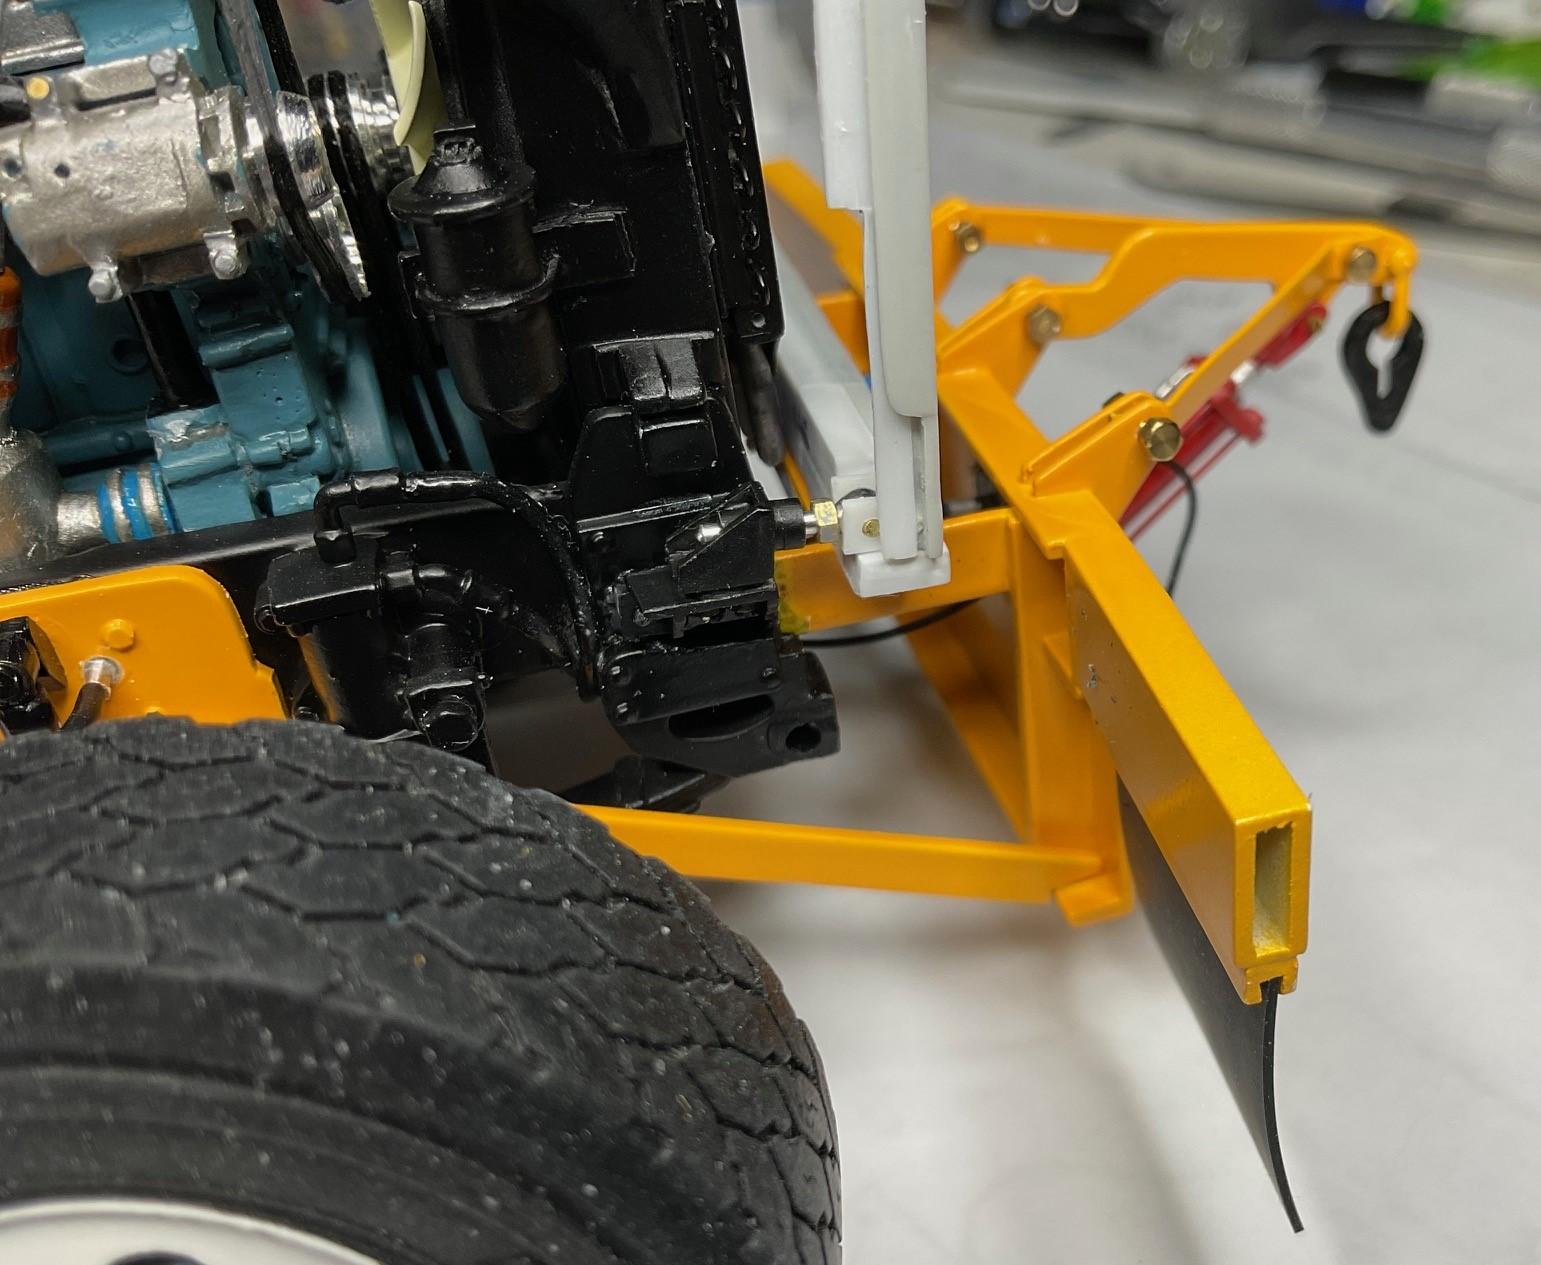
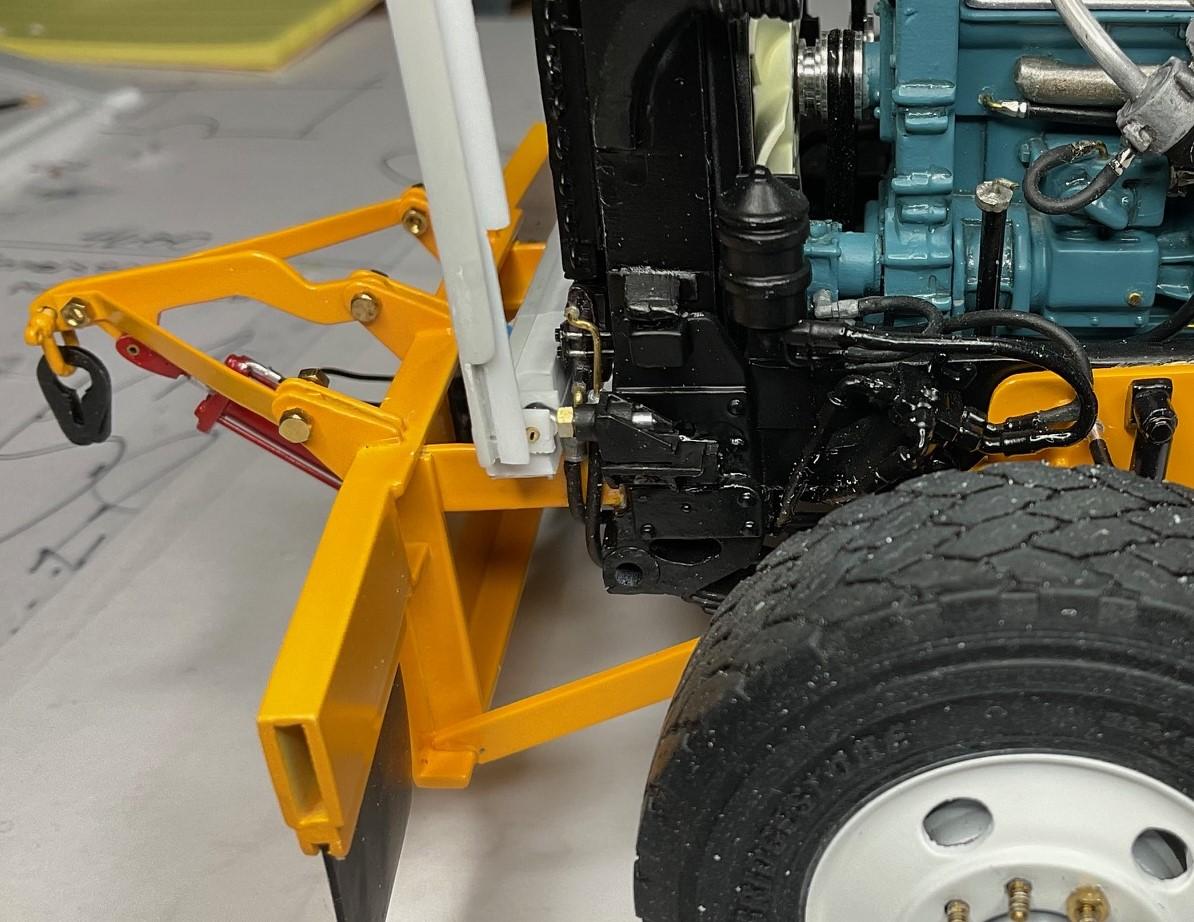
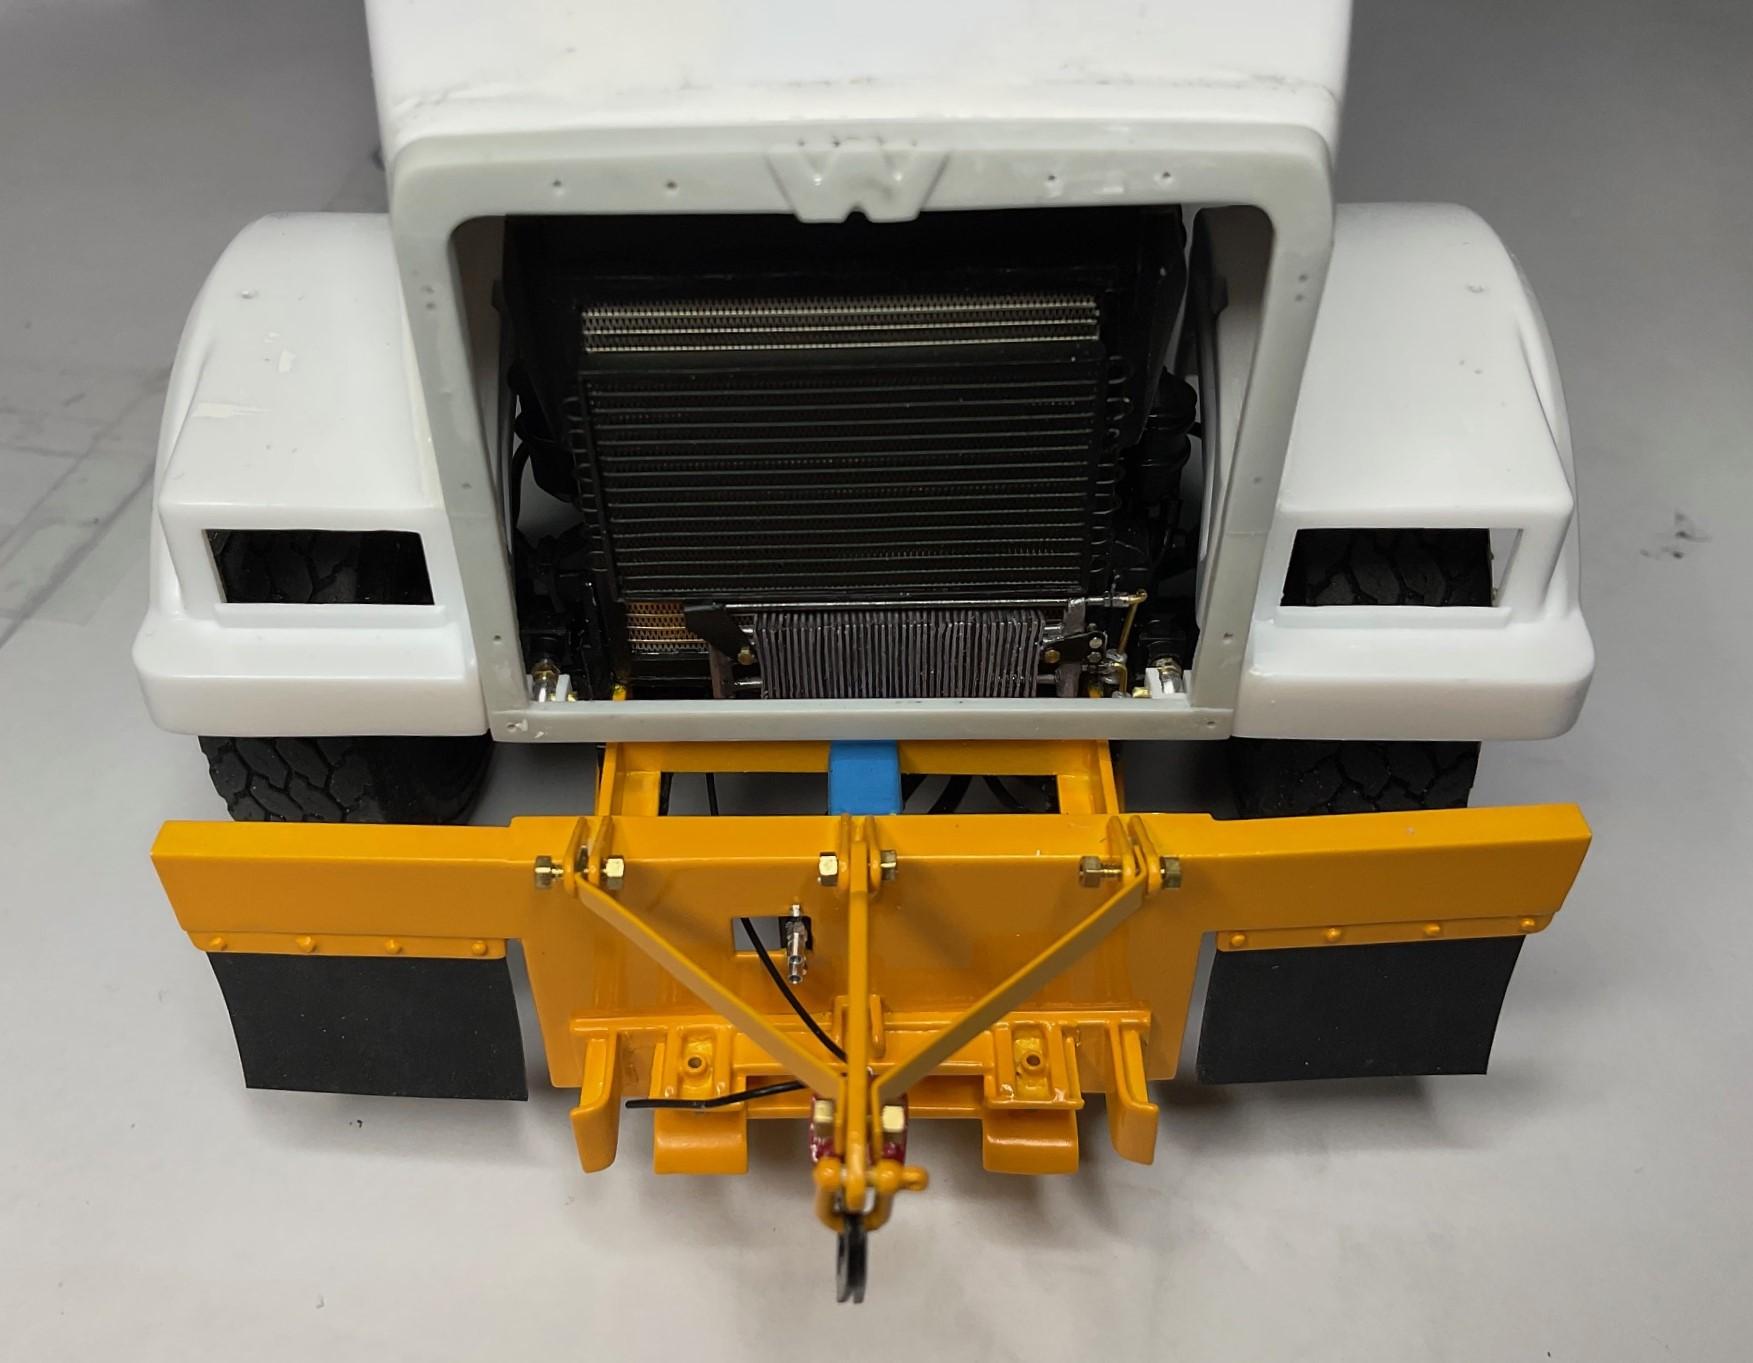
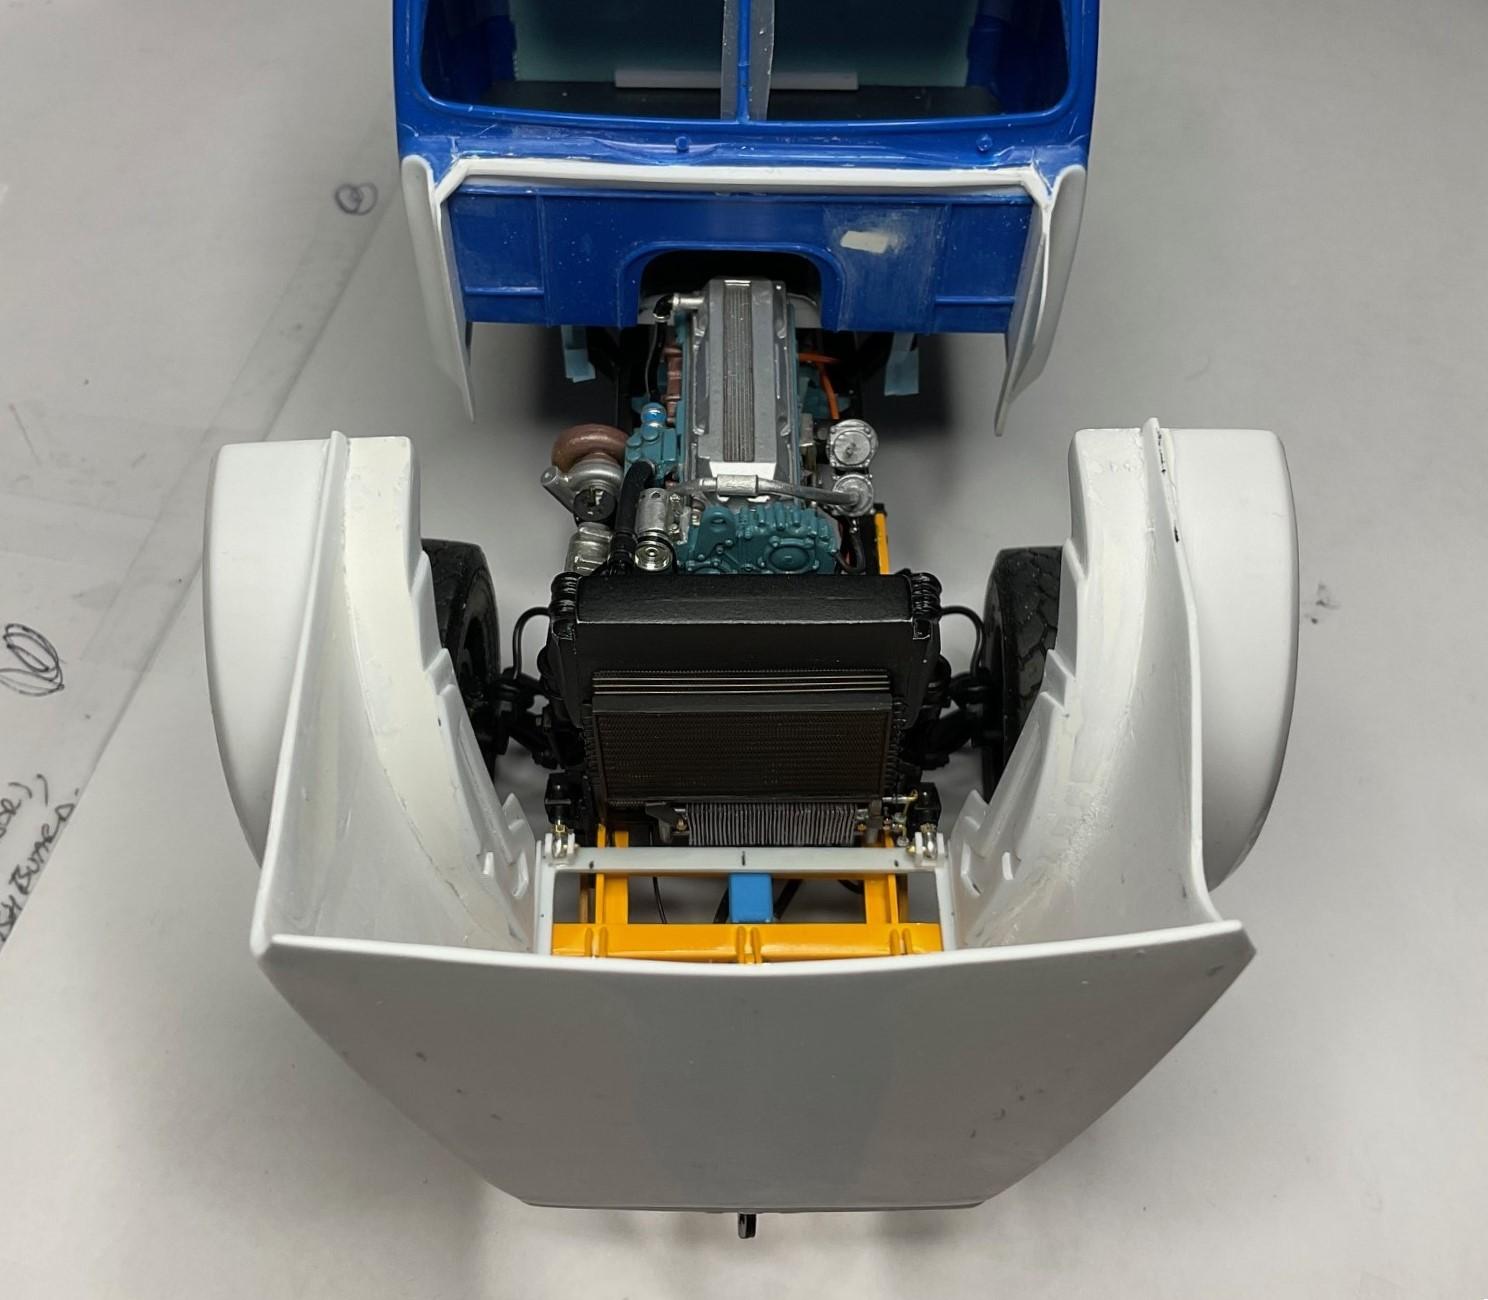
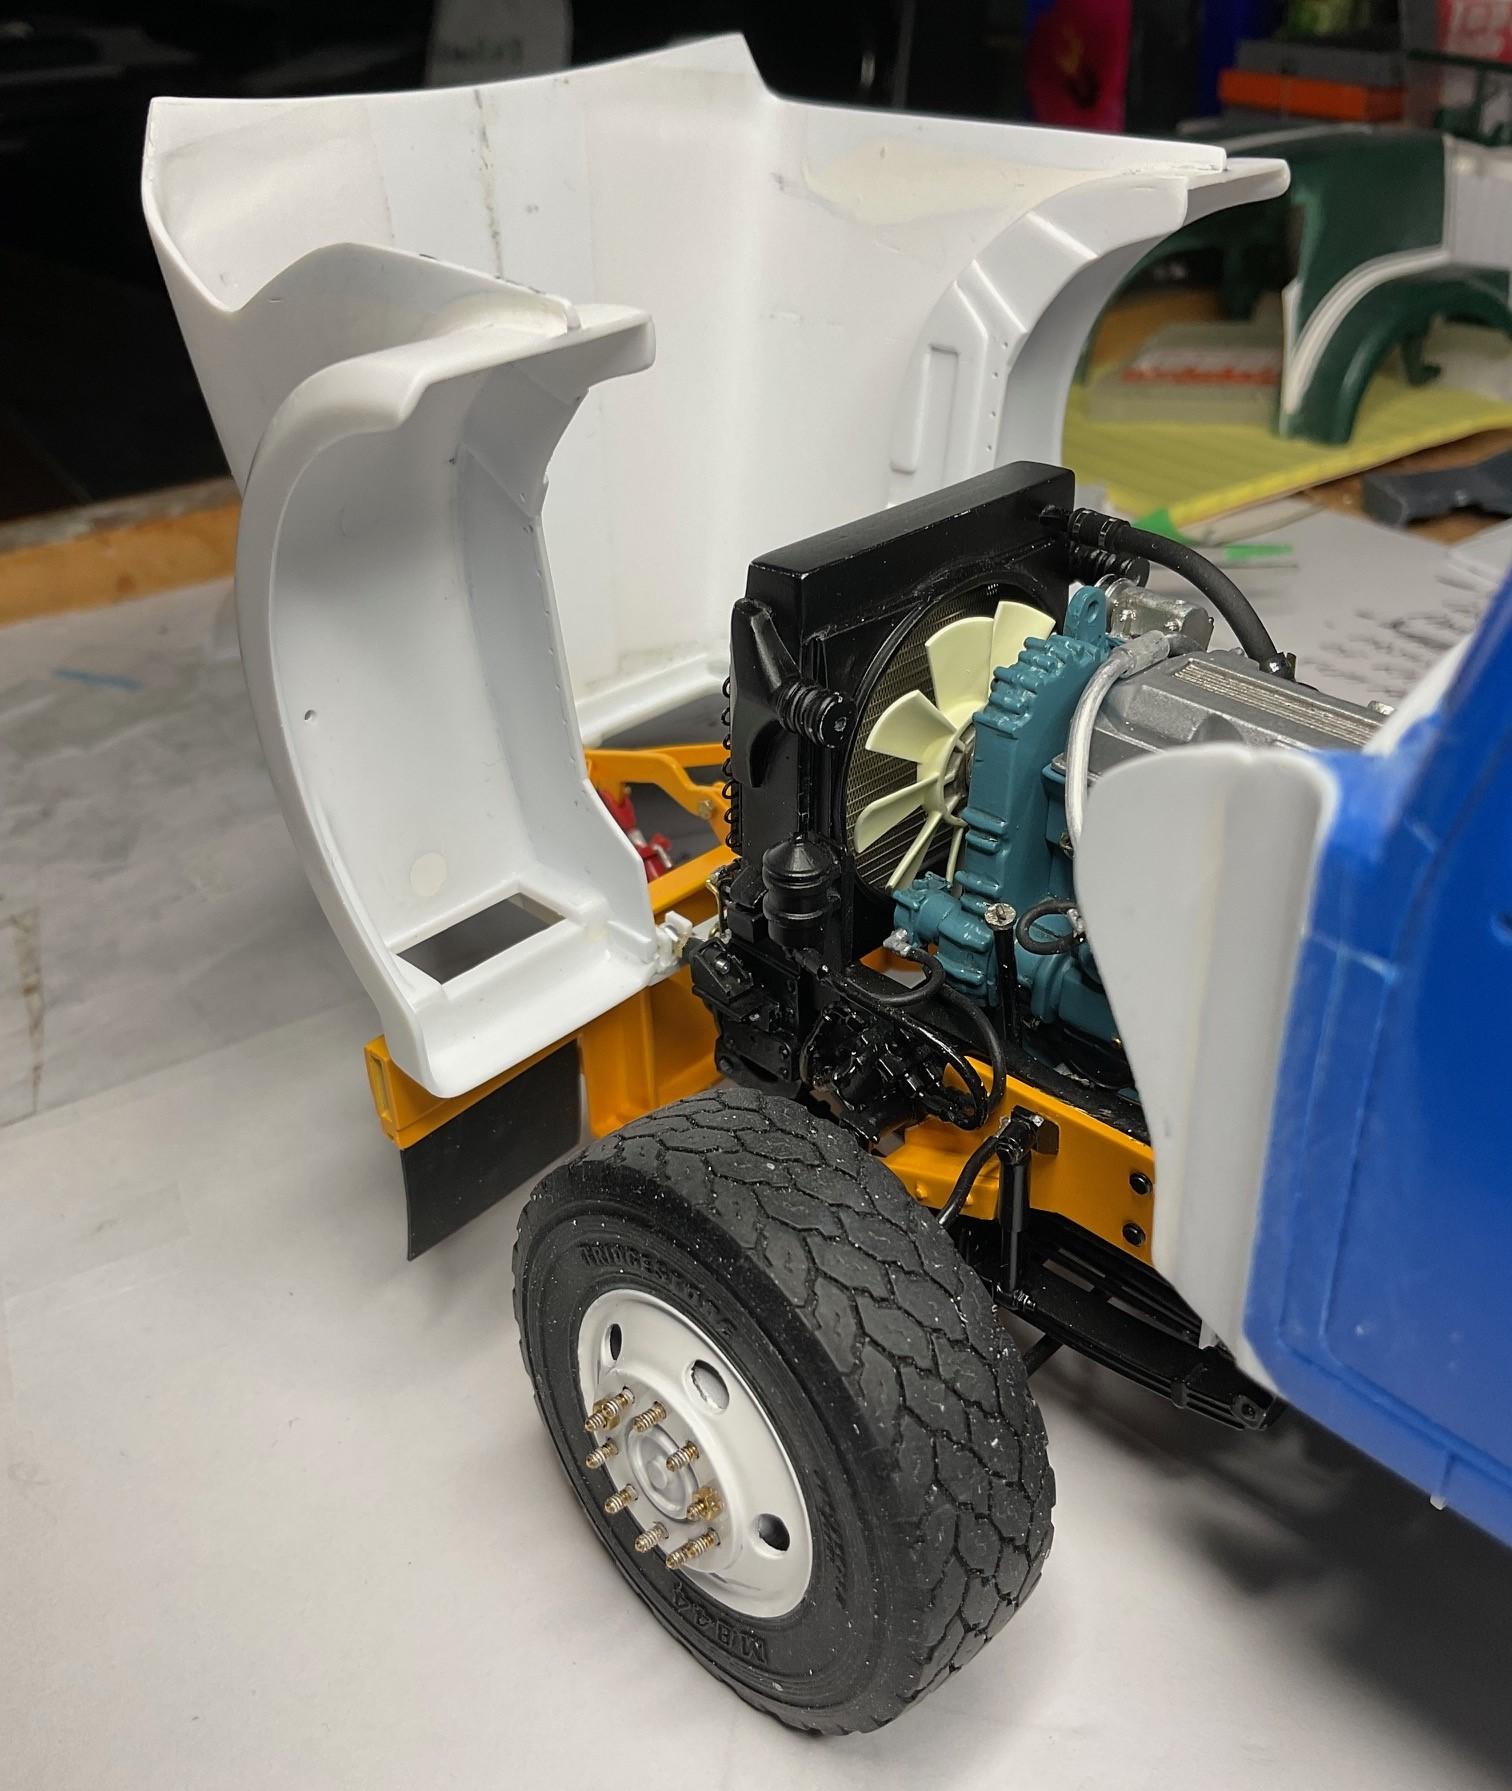
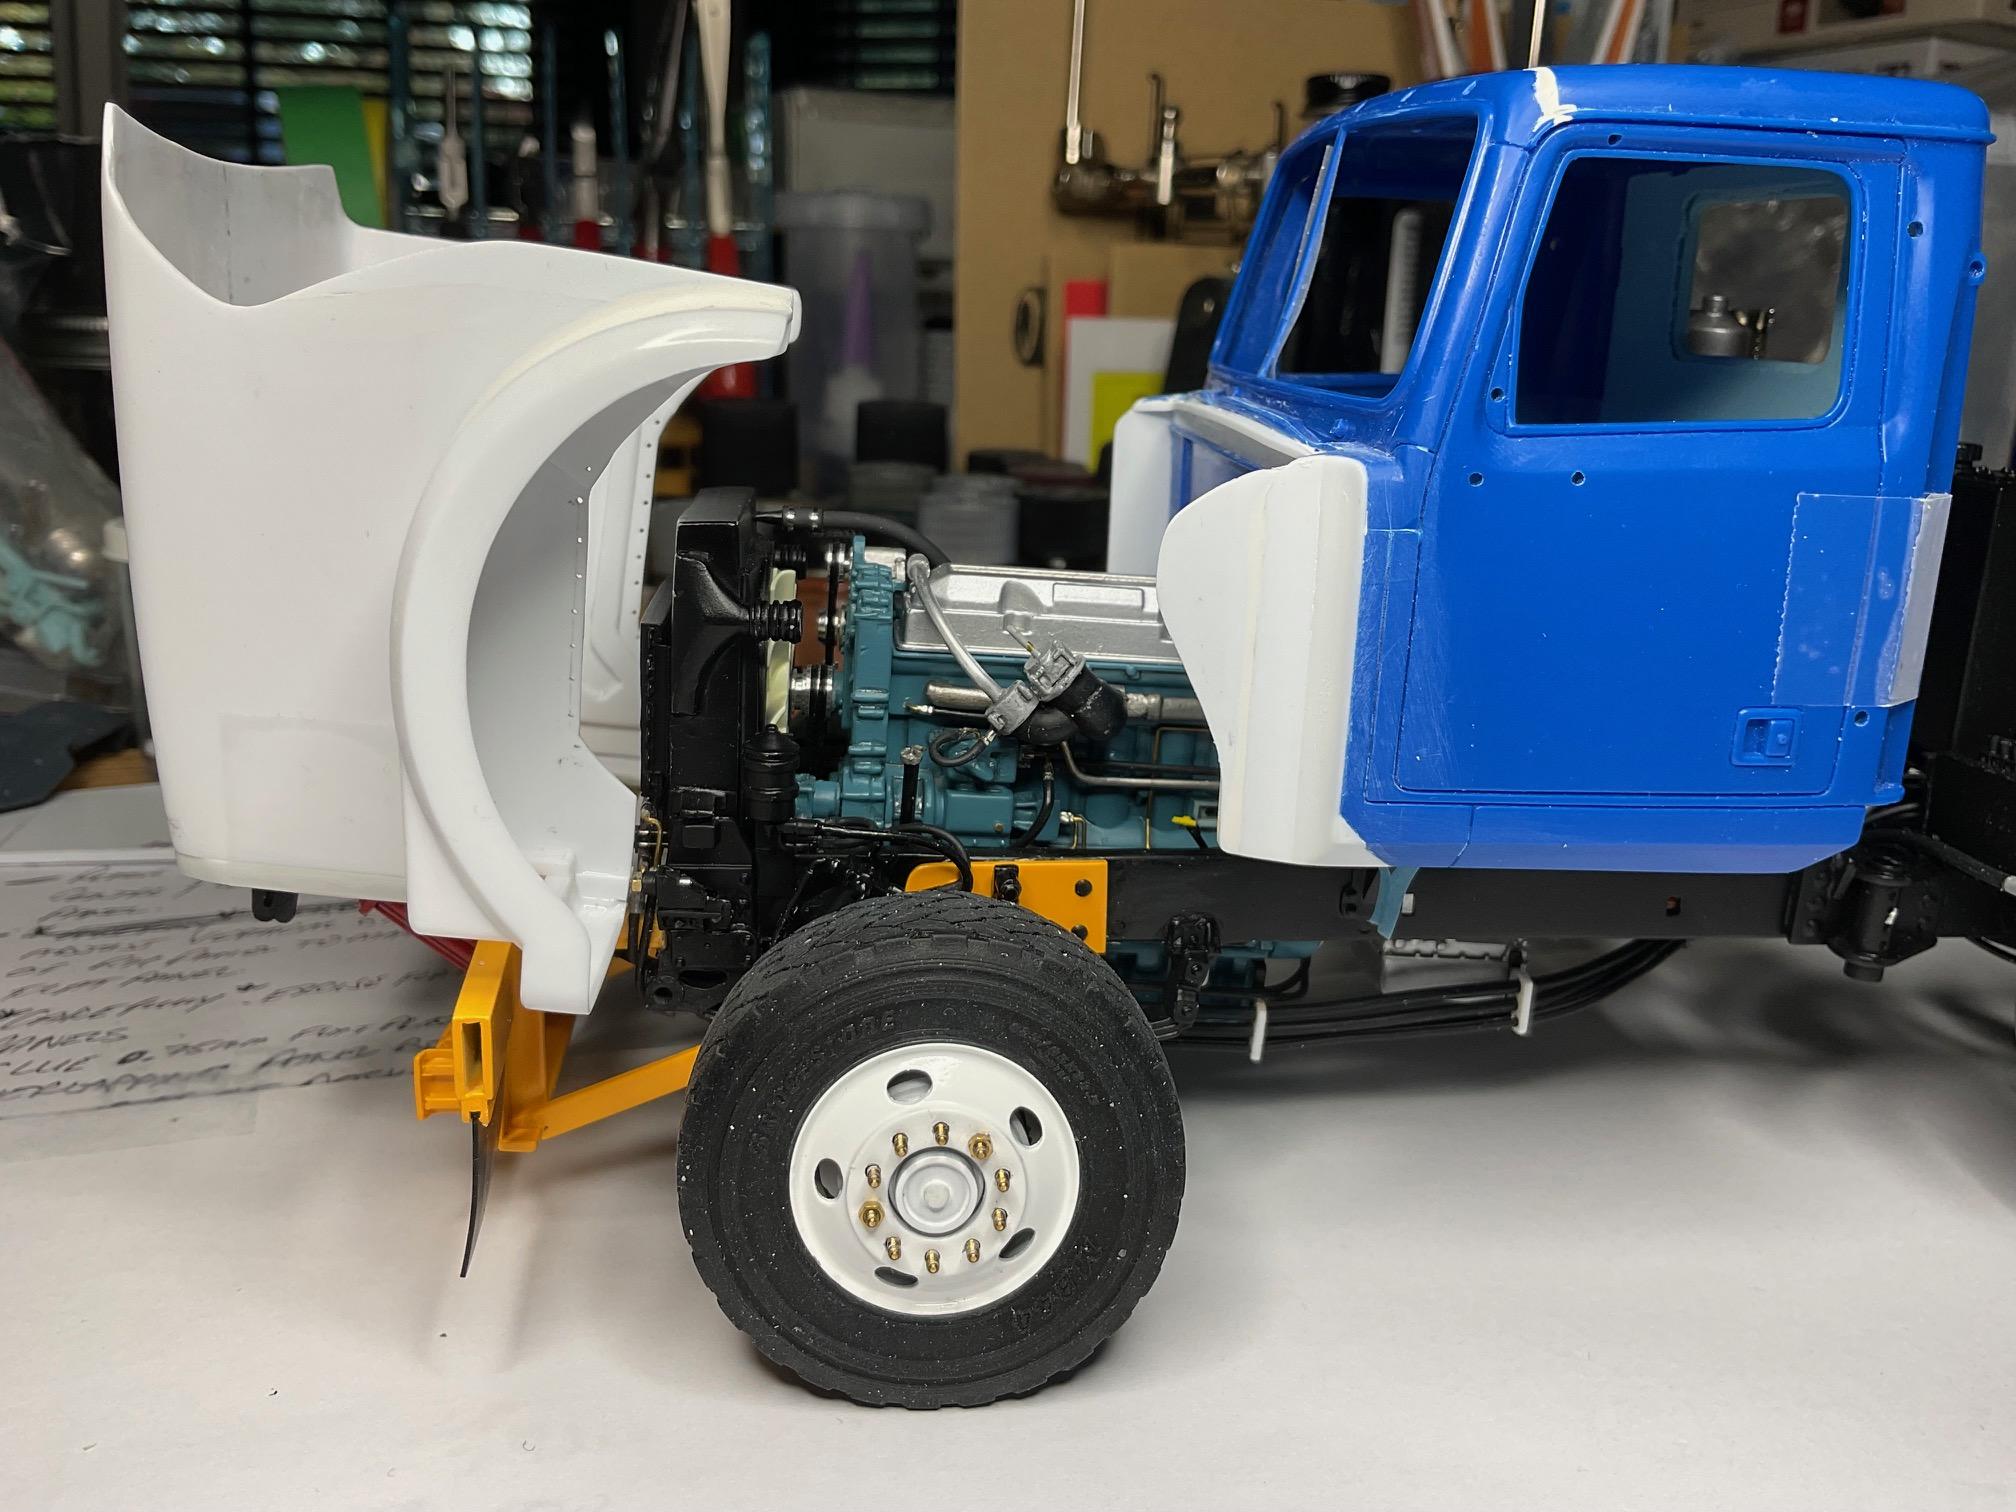
Got some time back at the bench after a couple days away. I soon had myself going in circles, trying to figure out a way to mount the cab/hood in place, temporarily, so that I could place, remove, and then replace them, consistently, while adding on other details prior to final assembly. I did settle on a plan for doing that, and figuring that out had me going back and forth between pics of real truck and the model. I guess I shouldn't be surprised, but sure seems like there are a lot of differences between the two. Made me think about how to do things differently for my next build - I have an example of that below. What little I got done today all began with me starting on the final portion of the hood supports and then figured I couldn't do that until the cab and hood were set reliably in position. And along the way, while positioning the cab/hood, I also just had to do a few more mock up pics of the truck with sander on! An example of the differences I was talking about - the subject truck, and.. some things I noticed when looking at pics of the model with the hood open, compared to the pic of the real truck - first chance I've had to do that! model's rad is too small - front to back and top to bottom - never paid close enough attention to proportions all those months ago engine is too big, or sits too high, or a bit of both model's fan pulley bracket is too low - raising it and the fan, adjusting the fan opening in the shroud and making the tank above the fan opening bigger might have gone a ways to filling up some of the space at the front of engine compartment next build, will need to do a few more checks along the way! I have a spacer block between the back of the cab and the air bag suspension - this will eventually be replaced with a floor pan crossmember that sits on top of the cab suspension The cab cross member is now just sitting in place - needs to be pinned for temporary placement Bottom of cab is now sitting parallel to frame rails - once I have all the under cab supports in place with pin locators, hood can tilt freely, and both cab and hood can be removed/replaced for the remainder of their detailing The cab and the sander body are reasonably aligned - might need a thin shim on driver's side front of sander frame (or not?); I can also see that I made the bumper assembly a bit out of level as well. To correct that, well, it's going to need to stay that way! A final three-quarter shot before taking it back apart again I'm also working on a plan for some better pics once it's ready for 'Under Glass' (a ways off yet!). The lighting on the bench is not great but works OK to show the progress. Need to go finish the rear cab floor pan crossmember, and a few others underneath there. Lots of fiddly little items going on, and I never did get to finishing the hood support. That will have to be tomorrow - take care!
-
Western Star 4900 FA plow truck
BK9300 replied to BK9300's topic in WIP: Model Trucks: Big Rigs and Heavy Equipment
Well, if such a project ever came to be, and, to the extent you think I could help, I certainly would. I do think, though, that there are lots of builders here who have far more technical experience from their days as operators or mechanics. These plow trucks have always been a favorite of mine; I have a thumb drive full of reference pics and several pages of hand drawings with measurements, plus my 3D model, to guide the build. My next project will need just a much research to fill the many gaps in my limited, first hand knowledge! -
Killer detailing on your wheels, Luke - right down to 'Forgiato'!
- 766 replies
-
- 1
-

-
- stalled builds
- quick builds
- (and 2 more)
-
1/25 AMT Peterbilt 359 California Hauler
BK9300 replied to cifenet's topic in WIP: Model Trucks: Big Rigs and Heavy Equipment
Great work on your rad and grille, Steve - the shutter(s) should be visible behind the mesh. 'Devil's in the details' and it's looking good! -
Peterbilt 379 RV
BK9300 replied to vincen47's topic in WIP: Model Trucks: Big Rigs and Heavy Equipment
Geez, Victor, the primer looks awesome - could be an expensive (very!) vinyl wrap job in real life! -
ongoing oilfield project
BK9300 replied to cdntrucking's topic in WIP: Model Trucks: Big Rigs and Heavy Equipment
Very detailed boom truck, Lewis - is your boom modelled after a particular real life version? -
Your shifter and shift tower are incredible - very good work, Steve!
-
Western Star 4900 FA plow truck
BK9300 replied to BK9300's topic in WIP: Model Trucks: Big Rigs and Heavy Equipment
Francis, thanks for your always generous comments, and I’d certainly sign up to watch you build a truck (I’ve seen the rear ends you make for your quarter mile beauties - I’m imagining something similar in a tandem version!) Appreciate that, Steve - sometimes a little luck is needed to get things to work as hoped and I think I got a bit lucky with the hinges! It does feel really good, Steve - was definitely some ‘agony’ for a time, though, waiting for everything to set in place! And I’m definitely getting one of those mini-vacs. Carl, I’m really glad you had a look - you’re such a positive supporter of builders in every forum - thanks again for stopping by! Thanks, Gary - very glad to hear from you and looking forward to seeing you back at your bench in due course! -
1/25 AMT Peterbilt 359 California Hauler
BK9300 replied to cifenet's topic in WIP: Model Trucks: Big Rigs and Heavy Equipment
Some fine paint work going here! Your fuel tanks are very smooth and shiny, as evidenced by the reflection of the rad in one of them. I know what you mean about the shine looking dark in photos (I’m guessing the ‘dark’ tank is reflecting a darker part of your space, off to the side of your light source - at least that’s what I thought was going on when something similar happened in photos of my chrome tank straps). -
1928-31 Mercedes Benz SSK
BK9300 replied to Pierre Rivard's topic in Other Racing: Road Racing, Salt Flat Racers
Your WIP was a pleasure to follow and your results are magnificent. A person might think they were looking at a limited edition Danbury Mint creation, although you have more detail. A very well done build! -
’72 Dodge Demon Drag Racer 1/25 scale
BK9300 replied to AmericanMuscleFan's topic in WIP: Drag Racing Models
I’ll second that - fabulous work. I’m doubt I’ll ever find my way to machine work like yours, Francis, but watching the steps you take with metal gives me inspiration to try similar process with styrene (not machining, but fabricating and assembling!). Learning lots along the way. -
8 Car Transporter (71 Mopar’s)
BK9300 replied to Mopar - D's topic in WIP: Model Trucks: Big Rigs and Heavy Equipment
Your mock up a couple pics back looks very cool with the cars in place - going to be very impressive with a full load! -
Revell's Auto Transport Trailer: WIP
BK9300 replied to David G.'s topic in WIP: Model Trucks: Big Rigs and Heavy Equipment
Thanks, Dan - was just curious. -
I agree - great colour combo!
-
Western Star 4900 FA plow truck
BK9300 replied to BK9300's topic in WIP: Model Trucks: Big Rigs and Heavy Equipment
Had some good success with the hinge mounts today - got them painted and glued in place, with lots of fussing (and a bit of cursing!) and baby sitting them till the solvent glue set up! Not much else to say - really happy that the hinges finally co-operated and set up in the right position - once they were set, I removed the spacer plastic from the bottom of the grille surround, taped the surround to the hood and set the hinge bolts back in the hinge mounts and took some mock up pics. . . Hood and cab are now sitting at what will be their final heights Feels good - now to get on with some cleanup on the hood, the front cab mount made and fixed in place and maybe some work started on interior. Paint is a little ways away just yet - take care!
-
Western Star 4900 FA plow truck
BK9300 replied to BK9300's topic in WIP: Model Trucks: Big Rigs and Heavy Equipment
Made me laugh because I've likely had the least 'hands on' mechanical experience of the people who post here! The hinge detail looks good in pics, but will probably blend into the frame once painted - thanks in any event, Steve! Thanks, Scott! I really tested the eyes making them - pretty much at the edge of capabilities here! -
This is an awesome build, Jon - one to be very proud of!