ctruss53
-
Posts
496 -
Joined
-
Last visited
Content Type
Profiles
Forums
Events
Gallery
Everything posted by ctruss53
-
Jurgen, welcome. And if you are going to hang around on here one thing I have learned is you need to rise above the trolls. No matter what you do or say, someone is going to tell you that you are doing it wrong. If they take it too far, there is an ignore button. I have a few people that were trolling me on ignore. My experience on the forum has been great ever since. I see a lot of replies about thread hijacking. I'll approach this a little more constructively than others have. I guess thread hijacking is something to watch out for. Keep a thread on topic. If you want to talk about something else, start another thread. There are no limits to the number of threads you can start. Plus if you start your own thread, then you have a place to talk about the thing you want to talk about and everyone that replies is there to talk about that thing you want to discuss. It's a win win situation. Have fun. Ask questions. Show off your builds in the right areas. And deal with the trolls by using that ignore button. And again. Welcome
-
Subscription Issues - Please Read
ctruss53 replied to Xingu's topic in Model Cars Magazine News and Discussions
I recently subscribed to the magazine. Then I read this thread. Now I am scared I won't receive my magazines. -
Shaping and sanding complex concave surfaces.
ctruss53 replied to ctruss53's topic in Model Building Questions and Answers
I am already past this point. And I have probably gooped in too much putty. haha The wheel wells are glued in, there is extra styrene in there to back it all up. The putty is gooped in there. I should have asked this before I gooped in the putty. -
Shaping and sanding complex concave surfaces.
ctruss53 replied to ctruss53's topic in Model Building Questions and Answers
Great info. I have learned the hard way in the past about putty cracking if not supported properly. I have styrene scraps glued in around the backside of the wheel wells to strengthen the bond between the body and the wheel wells. The foundation is there. I have never successfully puttied and sanded things smooth at this scale. Small patchwork I have done, but making smooth complex surfaces like this is a little challenging. -
Shaping and sanding complex concave surfaces.
ctruss53 replied to ctruss53's topic in Model Building Questions and Answers
Great thinking. I already did this part. The rear wheel wells are glued into the body. They weren't a perfect fit though, so I am trying to fill in all the gaps and cracks to get a smooth surface. -
Shaping and sanding complex concave surfaces.
ctruss53 replied to ctruss53's topic in Model Building Questions and Answers
On second thought, when looking for this reference photo I see many hot rods are built where they fill that area in so it is flush with the body. I don't know if that would look right on this particular car though. -
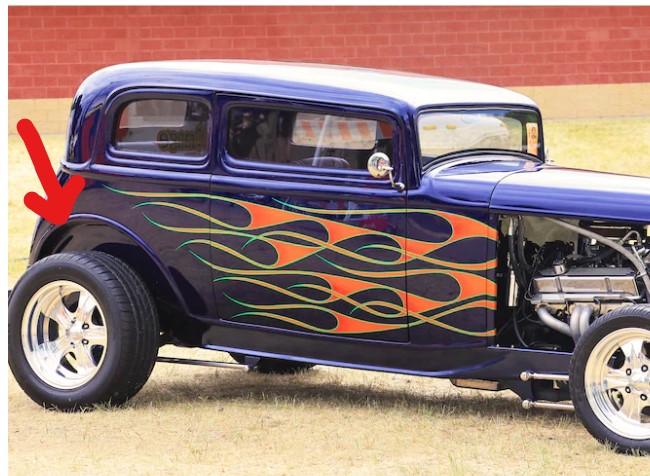
I am building my first hot rod, and of course I am doing it the hard way by building a hot rod out of a car that isn't originally a hot rod. I am trying to shape the recessed surfaces of the rear wheel openings. This car had fenders so the body sat on the fenders, and the fenders had the rear wheelwells in them. Since I cut the fenders off I am trying to figure out the best way to smoothly transition the wheelwells into the openings in the body that would have normally sat on the fenders. I don't have a good photo of the actual project, but here is a reference photo to illustrate the area I am talking about. What would be the best way to shape this, or sand this? Do I just slowly whittle away at putty with sand paper wrapped around a dowel? Or is there a better technique?

-
The example I am thinking of is I saw on youtube where someone thinned down oil paints with mineral spirits and then brushed it on as a wash to bring out details and add a little weathering. But in this video he was not specific about what type of paint he was doing this over. So I was asking about compatability so I would know what type of paint I can do this on top of. Based on your post, it sounds like this would work on acrylics, but not on lacquers? Mineral spirits would dissolve the lacquer paints I'm assuming?
-
Hi
-
I keep my spray cans in the basement, in my little storage room. As far as temperatures. You can store paint cans anywhere they will not freeze. You can get them cold, but don't store them anywhere that gets below freezing. And if you do store them where it is cold, make sure you warm the spray cans up before you use them and you will be just fine. Some people even warm up spraycans in warm water before use. I'm sure this helps, but as long as you are using quality paints, you don't really need to do this. Just bringing the spray cans inside the day before you use them should be good enough.
-
How big is your... stash?
ctruss53 replied to Pierre Rivard's topic in Model Building Questions and Answers
That Italeri Renault R5 rally car is a decent kit. But dry fit the rear suspension before you glue everything together. When I built mine there ended up being about 3/32" difference in wheelbase from drivers side to passenger side. I didn't notice until the body was on it and the rear tires lined up differently in the rear wheelwells from left to right. Other than that the kit was really nice and has great detail. I might even buy it again and build it right, looking out for that rear suspension issue. -
White doesn't work to prevent bleed through. You have to apply too much of it. I don't know why this works, but if you have a kit molded in a color that you don't want bleeding through, grab some silver paint in a spray can. I use Tamiya paints. Spray all the parts in silver. Just a couple light coats will do. Then prime and paint. Works every time.
-
I did some searching through the forums. This topic has probably been discussed, but I can't find the answers I am looking for. Solvents. I mainly paint parts with acrylics, and bodies with lacquers. I am trying to find a good place to look at what I can use to clean up paints, without damaging what is underneath. Example: If I paint a car body with lacquer. And I weather it. What can I use to clean up or thin what I am using to weather the paint without damaging the lacquer base coat. Or more specifically, I am looking at using oil paint and mineral spirits. Will mineral spirits eat lacquer paint? I thought that mineral spirits would not eat lacquer paints, but I read about people combining lacquer thinner and mineral spirits, but this was on wood. So, is there a quick reference chat maybe for what paints can be put on other paints. What paints can't be put on other paints. And what solvents can or can't be used on certain paints? This would be great.
-
Building more than one kit at a time.
ctruss53 replied to ctruss53's topic in Model Building Questions and Answers
This is all great input. I am kind of looking into this because my stash has grown to the point where I will need to build more than one kit at a time if I want to build them all. And I think that is the wrong way to be motivated to build more than one kit at a time. Having said that, I do like the batch building option. I have a few sets of similar cars and I could increase effeciency by grouping them together. Maybe not building them at the same time, but I could prep and paint them at the same time while the colors are out. Have them ready to build later. So, I might start trying this a little bit, to help with effeciency. But I need to make sure I don't feel like I have to do it to complete kits faster. -
Building more than one kit at a time.
ctruss53 replied to ctruss53's topic in Model Building Questions and Answers
I have only been working on 1 kit at a time until it is done. But at a rate of 3-4 kits a year, I have a life time of models in the basement. But there are so many more models I would like to build. So I am thinking about taking on more than one kit at a time. -
Enamels take weeks to fully cure. Lacquers only take a day or two.
-
As I read more and more posts, I see that a lot of you build more than one kit at a time. I have more kits in my stash than I would like to have. And I want to build more than 3 or 4 kits per year. So I wanted to explore building more than one kit at a time. What is your process for building multiple kits at the same time? Do you have all the parts for all the kits out on your workbench? Or do you pack them up and unpack as you switch kits?
-
Static is usually caused by dry conditions. I would wash the parts with soapy water and possibly even start using a humidifier.
-
I totally avoid enamels. They take way too long to dry. When painting 3D printed parts, plastic or resin, sand them smooth, or remove any construction leftovers like nubs or seams. Wash with warm soapy water. I use Dawn dish soap. Then use a high quality primer. I prefer Tamiya or Mr Hobby spray cans. They are lacquer based dry fast, and bond to nearly anything. Check for pits or texture you don't want, fill and re-prime as needed. Then use acrylic or lacquer paints to finish.
-
I use paint brushes almost exclusively to paint parts. I only use my airbrush on the body, and larger parts that need the best finish possible. I have found a few paint brushes I like. But I have wasted money on several I really don't care for at all. Lately my favorite brushes are from Green Stuff World. But honestly I would like more sources. And even better, something local that I can put my hands on before I buy it. I have a Hobby Lobby near me. There is a Blick in the area, and there are several Michaels locations. Do you have any recommendations for brushes?
-
I tried several test shots with different chromes. SMS and Alclad always came out ok at best. They never quite looked good enough though. But finally I gave the SMS Hyperchrome another attempt last night. I was very pleased with the results. I painted a valve cover, a grille shell, and some header tubes with Hyperchrome and I really like this stuff. Sorry I can't post pics right now. Whenever I share pics of a kit I am not done with, I always jinx the build and it ends up in the trash. I'll mention Hyperchrome when I am done with the build and share the finished product on the board.
-
So. If you buy a small GM vehicle, it is a Daewoo made in Korea. It still has a Chevy or Buick badge on it. I don't know about you, but I like saving money. So I will gladly buy an airbrush designed by Iwata, made in China, and save a load of money.
-
Workbench Tool Storage and Organization
ctruss53 replied to ctruss53's topic in Model Building Questions and Answers
I like those vertical angled racks. I'll have to look for something like that. I bought like $70 worth of organization cubbies from Hobbyzone USA. They are great designs, but I don't really like them. Like the brush storage is a couple of plates, but the plates are several inches apart and there are no tubes between the two plates, so brushes don't just find their home properly. And the first bruch rack was completely vertical. It was hard to select brushes when they were standing vertically in a group. So then I bought their brush rack that lays the brushes down at an angle. Problem is now the brushes are pointing right at me. Making them hard to see which one I want. I ended up chopping up the two modules and creating my own hybrid organizers. This prompted me to design my own. So now I am looking for someone that can make the design. But people charge a lot for router time, so I am actually exploring the idea of buying a router. I like rabbit holes I guess. -
What do you use for workbench tool storage and organization? Show me what you have for racks, or organizers. I was using a silverware drawer insert, but I outgrew it. Then I bought some of the modular workbench organizers from Hobbyzone USA. I am pleased with these for the most part, but they don't quite organize my tools the way I want them organized. Which leads me to a tangent question for all of you. Do any of you have a CNC router? Or do you know someone that does? I ask because I designed my own tool storage unit and now I am looking for someone that can produce it.
-
I have entered quite a few contests now, and I have never come across a contest where they penalize you for wheels that don't roll. And honestly if I ever found out I was penalized for that I would raise a big stink and make sure I get as many people as possible to complain as well. In fact I am in a model car club with several national award winners and I can't think of a single person that does not glue their wheels.