Wolf
-
Posts
160 -
Joined
-
Last visited
Content Type
Profiles
Forums
Events
Gallery
Everything posted by Wolf
-
Hey Chris, Any chance you might have a picture of the firewall for your model before you painted it? Cheers, Wolf
-
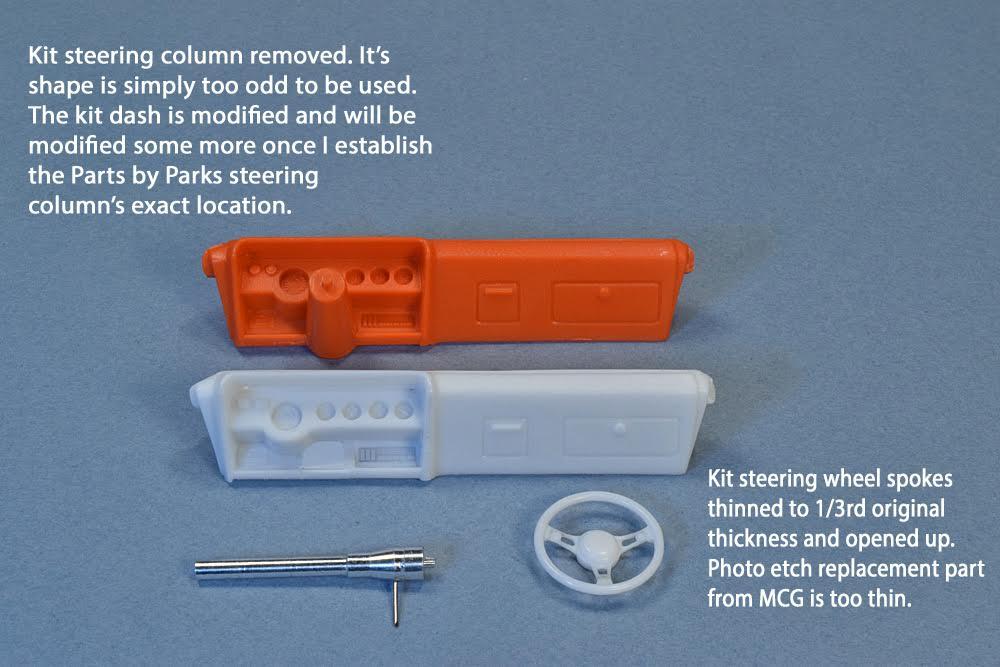
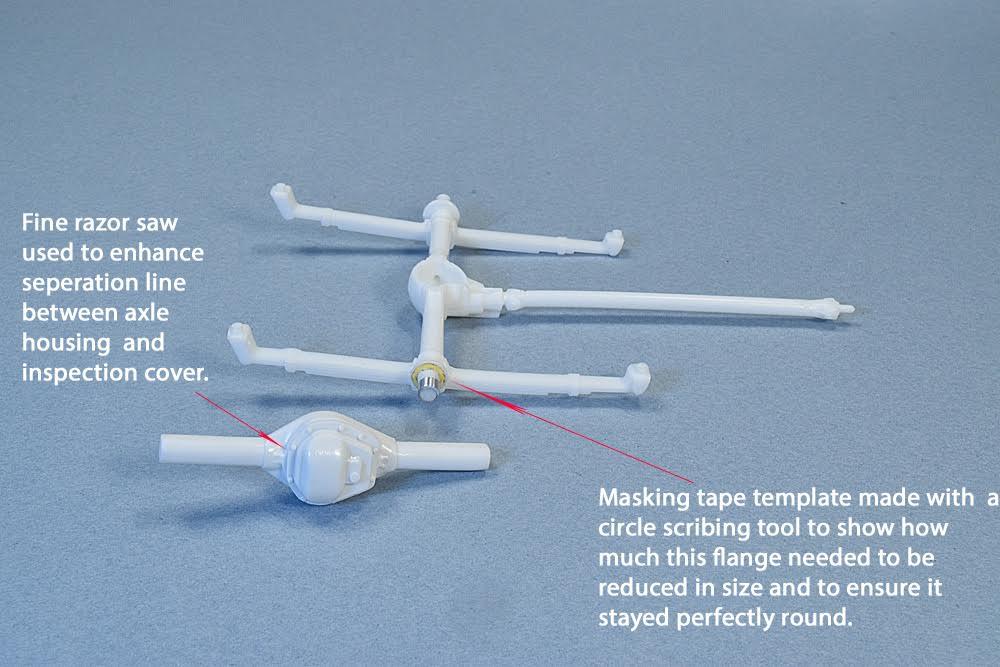
Thank-you gentlemen for looking in and leaving comments. Much appreciated! The following is stuff I was trying to get posted last night but kept falling asleep. Every few minutes I’d be startled awake when my i-pad would fall from my hands and smack down on my chest! It’s things like that which remind me that I’m looking at mid life through the rear view mirror. LOL! The kit dash and integral steering column didn’t strike me as looking too prototypical so the strange steering column will be replaced by one from Parts by Parks. I’ll have to scratch build the corrugated collapsible section and then add the steering wheel. As far as the steering wheel is concerned I decided to modify the kit piece rather than use the photo etched spoke assembly provided in the MCG set. The photo etch piece was simply too thin to look realistic. I opened up the holes in each spoke and then thinned each spoke by roughly 1/3rd it’s original thickness. Now that it’s been confirmed by John Shoe, the steering wheel will be finished semi-gloss black (for scale effect) on the back portion, and wood grain on the front. I think that’ll look sharp when finished. I’m still trying to decide whether I’ll leave the dash configured as is or modify it to represent the Rallye version the real 1:1 car came equipped with. If I do the conversion I’ll need to source a whole new set of instrument decals. I also started in on the rear suspension and modified the ends of the axle tubes to accommodate the Fireball drum brake wheel backings. These are very nice replacement parts for the kit pieces. They even include the small round protrusion to indicate where the brake lines attach to the brake wheel cylinder. Towards the bottom of the backing plate it’s apparent where the emergency brake cable attaches as it runs through to the self adjustment lever. Finally there’s even a long, thin, but shallow depression on the backing plate to indicate where the slot in the backing plate is located so a brake adjustment tool can be used to do fine adjustments to the brake shoe clearances to the drum. To add extra support for the Fireball wheel backings I added a small piece of aluminum tubing cut to length. The next pics will be self explanatory. There’s also a resin Dana 60 rear end that Is going to require some fettling to install correctly. Here again the aftermarket Dana 60 rear end helps to raise the level of detail provided in the kit. The next step will be fitting the Dana 60 rear end between the leaf springs and then applying the first layers of paint to some of the assembled components. Thanks again for looking in! Cheers, Wolf

-
Hi John, Yes, I'm trying to model the one and only Winchester Grey 'Cuda convertible as close as possible. I didn't want to have to but I guess I'm going to have to rebuild my kit dash to represent the Rallye option. I don't think there's too many other modifications I'll have to do although admittedly the steering wheel horn button is different than what the kit supplies as well. From what I can see, it looks like the steering wheel is two tone. It appears to me as if the back of the steering wheel is black with the front is a tan (possibly wood grain) color. At some point I may have to stop looking at details and just have fun building the car. LOL! Cheers, Wolf
-
Beautiful work so far Chris! I have the Revell '71 Hemi 'Cuda convertible on the go right now. The Fireball Modelworks carburetors are indeed little jewels. You'll love 'em when you see them in person. Overall you're working with a nicer kit than mine but I prefer the '71 grill over the '70. The 426 in your kit is also better detailed than the old Revell kit. I'll have to see how much I can do to turn a sow's ear into a silk purse with mine. I wish I had your Rallye dash. I may be forced to rebuild my kit dash to get what I want. Keep up the great work! Cheers, Wolf
-
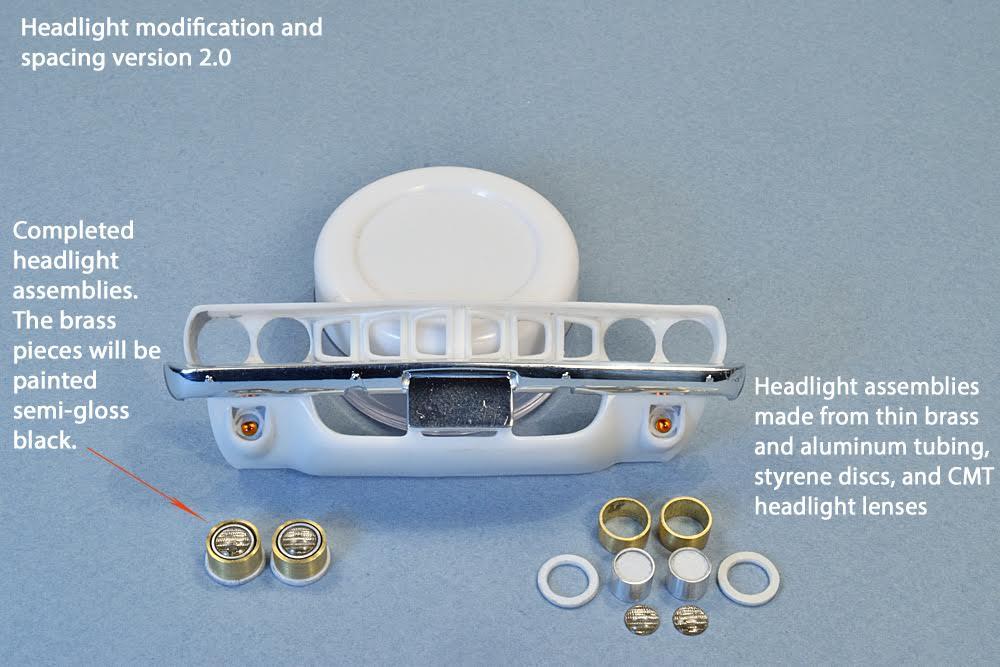
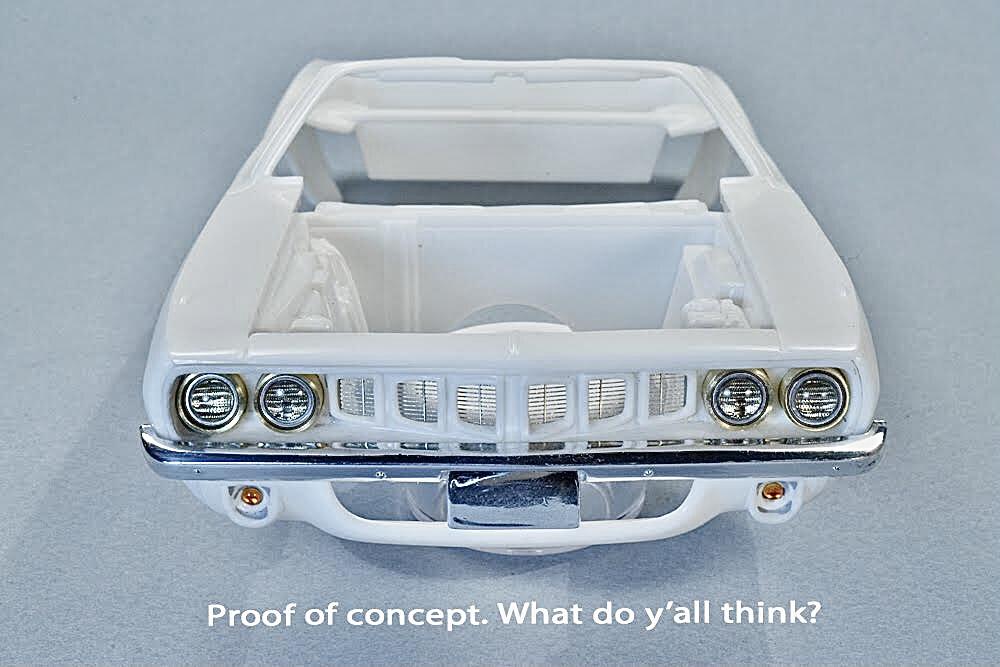
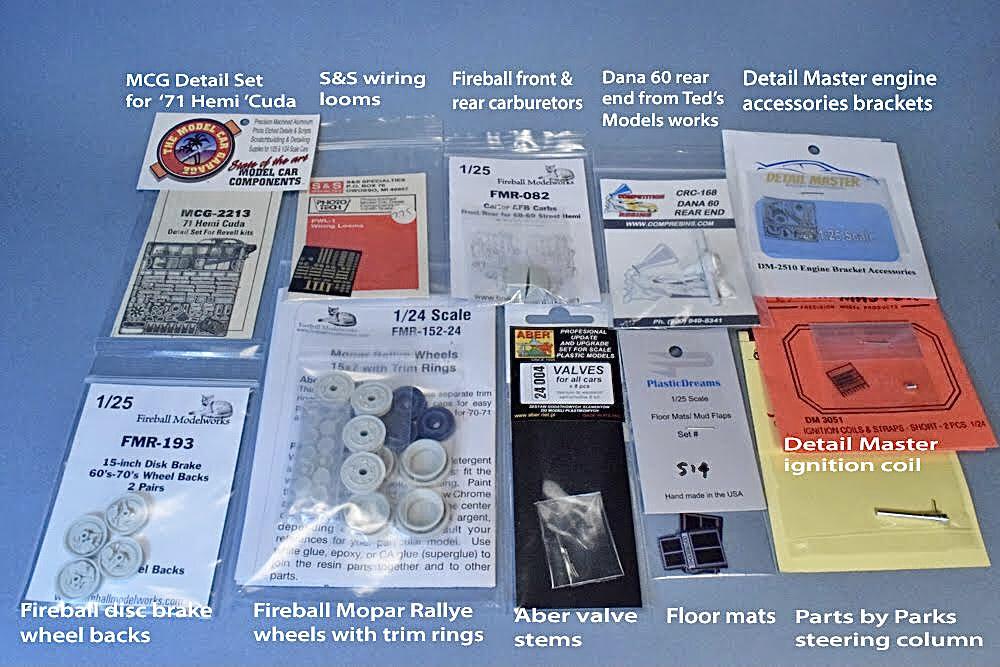
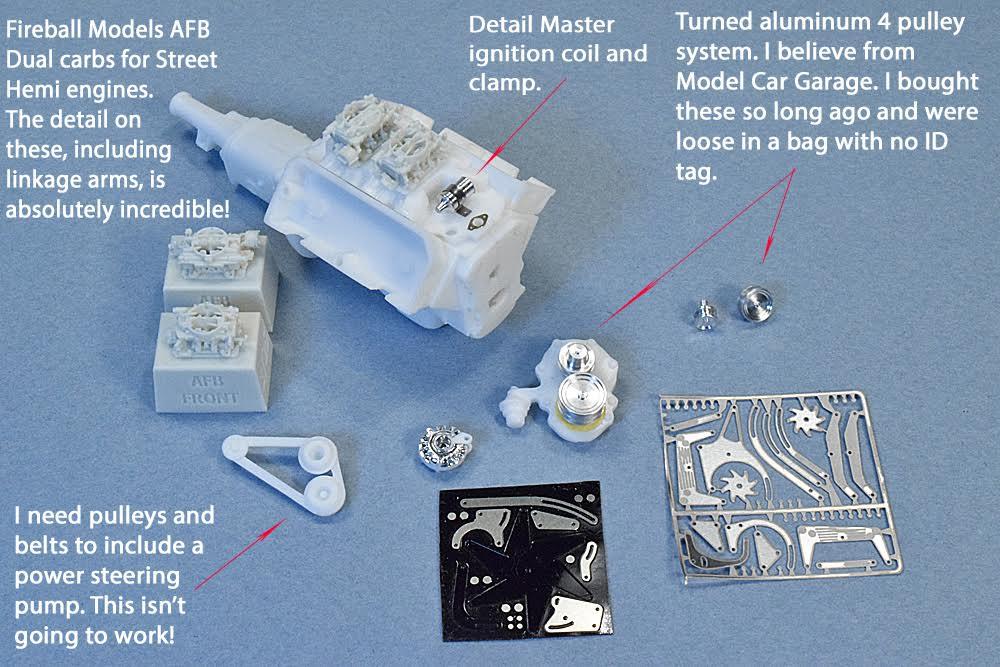
While waiting for more accessories to arrive for this build I haven’t been completely idle. I started reworking the headlight assemblies. Dry fitting my original version didn’t give me the look I was after. I decided to scratch build most of what I needed and fill the original headlight holes in the grill. That way I’d have a blank slate to start with. I took some thick styrene card and held it behind the original holes for the headlights. Then, using a high tech needle in a pin vise, I scribed circles in the styrene card using the existing holes as a guide. Then, using the edge of a pencil lead, I highlighted the scribed lines which showed me exactly where to trim the fill plugs to close up all four holes. Brass and aluminum tube with styrene discs were created and new holes were made to accommodate the new headlight assemblies. As originally planned CMT headlight lenses were the finishing touch. I then received almost all of the aftermarket parts I was going to use for this build. There’s no doubt I’m an aftermarket junkie eh? The end product reflects what I was hoping to achieve. Everything is mocked up and held temporarily with small amounts of white glue. I also started working on the Hemi engine. The first step was removing the moulded on ignition coil and replacing the upper rad hose mounting flange, which was lost while removing the moulded on coil, with the base of a 1/12 dzus fastener. I also dug up a set of drive pulleys for the belts that run the engine accessories. The kit supplies 3 pulleys but I needed 4 as this ‘Cuda has power steering. I also replaced the kit’s dual carburetors with some incredibly detailed ones from Fireball Models. They are absolutely gorgeous in my opinion! I bought two sets as the second set will go into my Hemi ‘Cuda coupe. So far it’s been lots of fun figuring out how to do stuff. Also purchased from Fireball were the multi piece Mopar Rallye wheels with trim rings. These are also brilliant and will look fantastic when painted, assembled, and mounted on to the kit tires. All the individual parts are keyed to guarantee exact alignment and the trim rings have fine dimples in them to indicate where the valve stems need to go. The valve stems come from Aber. They add that perfect little bit of extra detail to the wheel assemblies. That’s it for now but I’ll have more progress pictures to post very soon. Cheers, Wolf
-
 Wow! Man, there were some absolutely drop dead gorgeous cars there, but I can see why the ‘57 Chevy took top spot. That said I would have hated to have to decide where I’d place the rest of ‘em as they all looked fantastic. Cheers, Wolf
 -
Yeah Dave, It’s always the simple stuff that gets us. I wish you quick healing Dave. Then back to the Dart and the Bug. Cheers, Wolf
-
Judas H Priest Dave! Please tell me it wasn't while you were removing the unnecessary voltage regulator from the fan housing? I once had an Xacto knife roll off my bench and bury the blade into the top of my foot. Definitely not as bad as your injury. Is there anything I can continue building on the Bug for you while you recover? ? What colour are you planning on doing your Bug in? Cheers, Wolf
-
Boy, you're not kidding it's cursed! What did you punch after the Dart hit the floor? ? Cheers, Wolf
-
Nice little 1300 Beetle engine. I’ve worked on a few of those (I mean a lot!) in a former lifetime. Dave, if I may make a suggestion? The voltage regulator attached to the fan housing should be removed. It already has a voltage regulator attached to the top of the generator so you only need one. Why Tamiya provide the kit with two is something of a mystery. Just fill in the hole left on the fan housing afterwards. The ‘66 Bug was the last year for the 6 volt electrical system too. I have this same kit in my stash and was going to build it as my first contribution to this forum. Somehow the ‘71 Hemi ‘Cuda called out louder! Cheers, Wolf
-
Boy, I don't know how old or new your BMF is but yours looks like it lays down perfectly. The stuff I have is relatively new Ultra Bright Chrome Foil. If I'm in an different room than my model and I sneeze the stuff falls off if it even stuck on to begin with. As I said before, Beautifully done Sir. I suspect though that factory fresh paint didn't look as good as yours. Cheers, Wolf
-
Beautifully done Sir! Cheers, Wolf
-
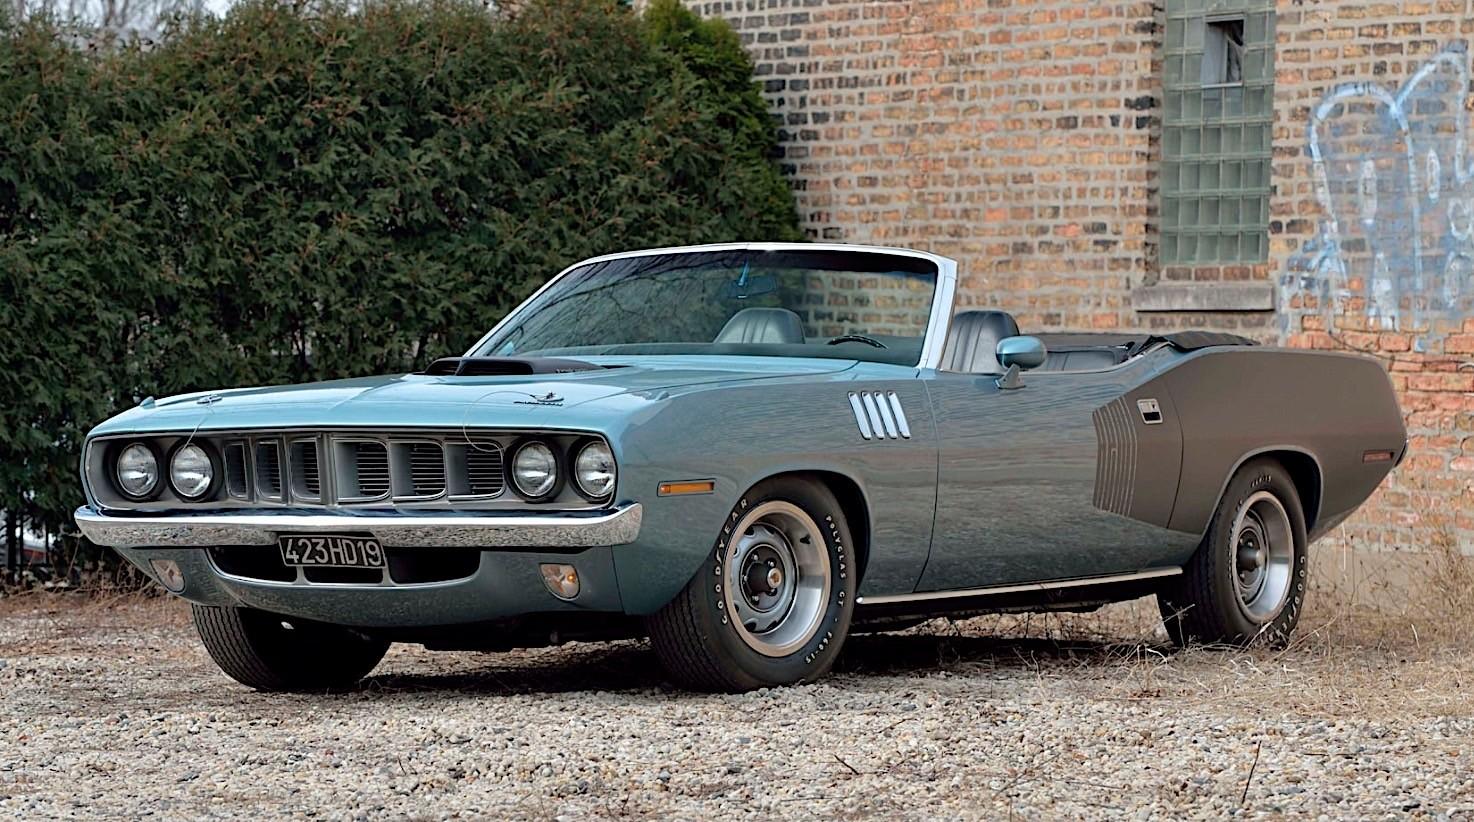
Thanks John, I’m not sure what colour the other exported ‘Cuda was but this one is the one and only in Winchester Grey. If I’m not totally mistaken it’s now back in the States. It’s just a gorgeous looking car. Cheers, Wolf
-
Hi Joe, It’s not really all that hard to sort out the headlight issue. It has been a bit time consuming though as I’ve deviated from my original plan plus I’m doing the modifications for two kits. The other thing I know needs attention is the poor kit supplied steering column which is moulded integral with the dash. It would also have been nice if Revell had supplied the option of having the Rallye instrument cluster as well. There’s always something to do but I’ll address these things as I work my way through. Cheers, Wolf
-
Thanks Carl, I’ve used theses CMT headlights on a couple of occasions before. They are really really nice and they make a big difference in the look of a rather simple detail. If I remember right the CMT headlights #24106 are slightly larger in diameter and may have worked a wee bit better. Cheers, Wolf
-
Thanks Dan, Yes, Winchester Gray, black interior with a bit of wood grain and chrome trim, and black billboard patches. Just like this one below. I’m also going to do a Coupe in Red with white billboards to compliment this one. At least that’s the plan……? Cheers, Wolf
-
Ouch! The outer package suggests a more aggressive adhesive but clearly that’s not at all a good thing. Wow. That’s really disappointing. I would do what you suggested and start over but what a PITA! Cheers, Wolf
-
Thank-you Keith. I’m hoping my Model Car Garage photo-etch bits, heater hoses, and spark plug leads arrive soon. Then I can cobble together more of a game plan for this build. I’m also waiting for Joseph from Fireball to contact me as I have a number of his items on a “want list” as well. I have decals for it already but may have to order more. Should be fun. Cheers, Wolf
-
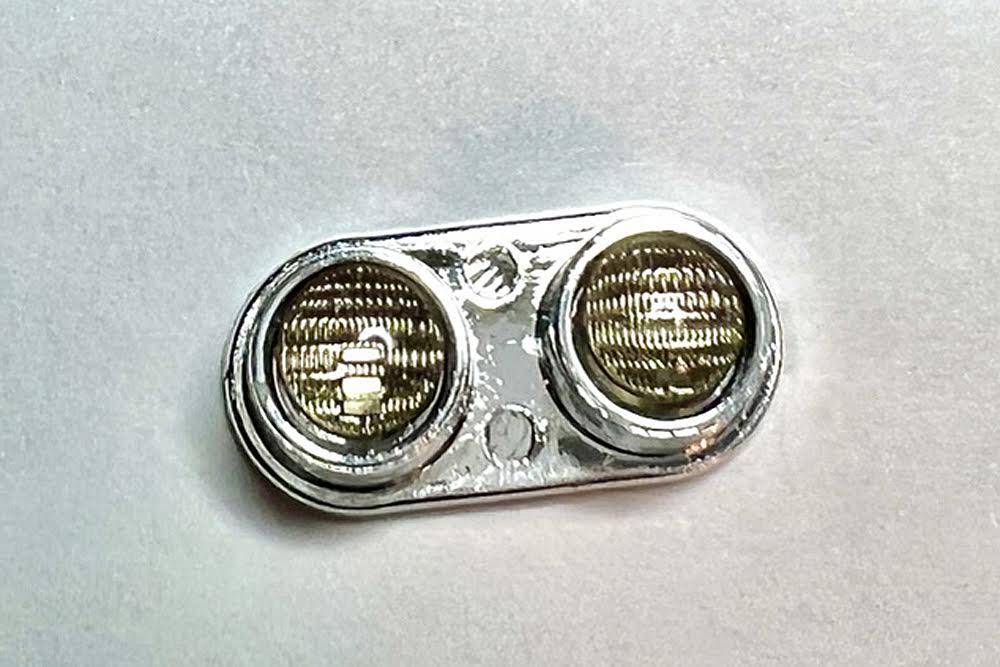
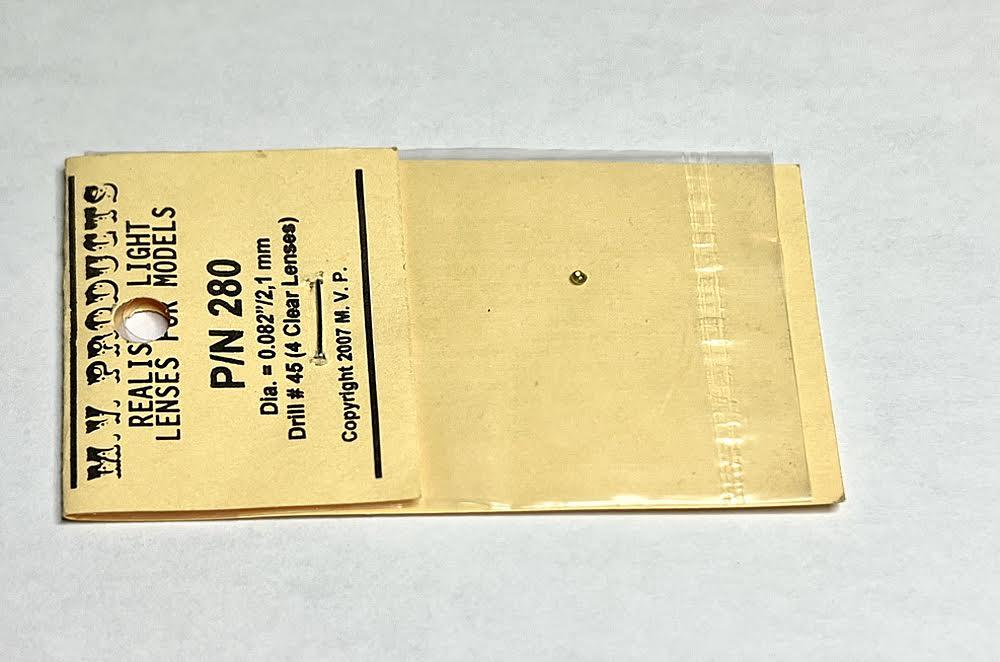
Humble beginnings, While waiting for some aftermarket items to arrive I’ve been browsing through the forums here and searching the ol’ inter web for images of the real deal. I’m trying to get a sense of where I want to go with this build. It’s been a very long time since I’ve built a car, not counting Tamiya’s big Africa Twin motorcycle, so looking at references and my Revell kit I’ve decided there’s a few obvious enhancements I can make. The first thing is the headlights on this kit. Aside from the odd distance between the high and low beam lights the lenses supplied in the kit are awful. To replace ‘em I’ll be using these: These lenses are convex on the front and flat on the back which gives them a very authentic reflective look. They come in a number of different sizes depending on their application. To fit them in the kit headlight housings is really quite easy. The lenses are just a bit smaller in diameter than the housing they’ll fit in to so I took advantage of the holes in the back of the kit part and used wood skewers to adjust the depth they sit. Here’s what I mean in the above photo. I had to sand the skewers diameter down but just enough to have a nice friction fit. The lens was dropped in place and then the exact height set permanently by adjusting the skewer length and securing them with some thin fast setting CA. The lenses will be permanently affixed with 5 minute epoxy giving me lots of time to ensure they’re centred and aligned properly. The image above is really too large but you get the idea. Once the lenses are installed the outer rim of the housings now become the headlight retaining ring. I’ll move the low beam headlight slightly inward and the high beam headlight slightly outward and use a larger brass tube thinned at it’s outer edge to become the black bezel surrounding the headlights. That should resolve the headlight position and size nicely. I also played around with the turn signal/park light assembly. Revell could have made this much easier if they had moulded what is supposed to be the lens in clear plastic! I used a couple of round burrs and drill bits to create the concave housing for the amber bulb. For the bulb itself I’m using an MV lens from the model railroad section. These are tinted a pale yellow but a small dab of Tamiya’s clear orange gets me what I’m after. I’ll make a mould of the chrome kit piece and use clear casting resin to make a new lens so I can retain the star shape on the lens face. Then I’ll drill a couple of small depressions on the lens face and fill ‘em with photo etch Phillips head screws for the fasteners. At least that’s my plan which should work out well. It’s a little difficult to see but the one side has been done, without the lens of course, and the opposite side remains untouched. I have a few things that need clearing off the work bench and some stuff to get in the mail before this project gets going but it feels good to have at least started. Cheers, Wolf (who loves his ‘Cudas but will likely never be able to afford one)
-
Nice! Hi Dave. Good ol’ scotch tape burnished over top the current decal on the air cleaner should make short work of removing the decal. If not that, you could always place the new decal directly over the old one. I’d just make sure they’re the same dimensions so wait until the new ones arrive. Got to love a big ol’ Hemi eh? Out of curiosity where did you source the alternator mounting bracket for the Hemi? I might need one like that. Regarding the BMF, yes, it takes a bit of practice to apply. If it’s an older batch it tends to loose it’s ability to stick. If it’s the new ultra bright chrome it’ll take wailing, gnashing of teeth, and lots of cuss words. I have an almost full sheet of the stuff and it’s essentially useless. The only thing it sticks to is the backing paper it came on. I’ll likely have to invest in BMF adhesive to make it work or toss the remainder. Cheers, Wolf
-
Hi Dave, These will help for the 383 emblem on the air cleaner. They give you quite a few nice engine compartment data plates as well. https://rayskits.com/detailupdecals/#uhanchor Cheers, Wolf
-
Ah, yes……. I know all too well about how things can move at the speed of life. Cheers, Wolf
-
Jason, Was this build ever completed? Based on these photos I’m looking to order Scale Finishes Winchester Grey for my own build of this kit. I also have the MCG photo etch set coming. I would love to see, if it indeed did get finished, how it came out. Cheers, Wolf
-
Spectacular! Love the colours on this car and that beautifully tinted windshield. Cheers, Wolf
-
Just out of curiosity, where did you get the ‘53 Buick Road Master body or was it a kit? That’s the first car my father owned when we came to Canada in 1960. Dark Green on the roof and light green on the body. I loved the waterfall grill and tons of chrome on the car. Cheers, Wolf