Jürgen M.
-
Posts
1,677 -
Joined
-
Last visited
Content Type
Profiles
Forums
Events
Gallery
Everything posted by Jürgen M.
-

My own Sundance
Jürgen M. replied to Rockford's topic in WIP: Model Trucks: Big Rigs and Heavy Equipment
Wow! How did you manage to make such an exact sun visor? -
My own Sundance
Jürgen M. replied to Rockford's topic in WIP: Model Trucks: Big Rigs and Heavy Equipment
Wow! Rockford, that's a beautiful build! Can't wait to see it finished! I used to build the 1/32 snap kits too but not one of them survived! I had a Freightliner COE with a reefer and a conventional with a tanker trailer. As they were gone I had comitted myself to 1/25 kits. No space for more! ? Keep going. I always loved "Movin' on"! Maybe I'll take a chance on that one in 1/25 some day! -
Diamond Reo/Montone dump body
Jürgen M. replied to Scott Eriksen's topic in WIP: Model Trucks: Big Rigs and Heavy Equipment
Amazing how many Kits have the same cab! Just for comparison: Autocar A64B cab: White Western Star cab:
-
Diamond Reo/Montone dump body
Jürgen M. replied to Scott Eriksen's topic in WIP: Model Trucks: Big Rigs and Heavy Equipment
Looks great! ? Beautiful build! Is that the Diamond Reo Kit from Amt? Just asking because the cab looks exactly like the Autocar and the Western Star cab. Seems that they use the same cab in several kits. I noticed that as I used the Autocar to build the Diamond T "Spider Mike" and the Western Star for the Brockway "Widow Woman". They both had the same cab! -
Another "Convoy" Truck!
Jürgen M. replied to Jürgen M.'s topic in WIP: Model Trucks: Big Rigs and Heavy Equipment
? I'll do my best! -
Thanks! I look at them every day! ? For those of you who are familiar with the movie, I am totally aware of the fact that "Big Nasty" and "Widow Woman" never drove together in the convoy because the Brockway had tipped over quite a while before Big Nasty, Bald Eagle and a few more actually hit the scene. Still they're all part of the story and I like em sharing the road in my own little convoy! ? What I'll do though is, when the "Bruhn Trucking" (don't know the CB handle of that one) Kenworth is finished, it'll take the rocking chair right behind the duck where it stays most of the time during the movie!
-
Another "Convoy" Truck!
Jürgen M. replied to Jürgen M.'s topic in WIP: Model Trucks: Big Rigs and Heavy Equipment
Where do you guys know all this from? ? I'm glad you do, I can learn so much here! ? -
Another "Convoy" Truck!
Jürgen M. replied to Jürgen M.'s topic in WIP: Model Trucks: Big Rigs and Heavy Equipment
OK, thanks again! ? I'll put in a 6 cylinder single turbo. I designed one as a standard engine more or less copied from an old amt Peterbilt kit. -
Another "Convoy" Truck!
Jürgen M. replied to Jürgen M.'s topic in WIP: Model Trucks: Big Rigs and Heavy Equipment
Hi Rockford, thanks for the info and your feedback! ? -
Another "Convoy" Truck!
Jürgen M. replied to Jürgen M.'s topic in WIP: Model Trucks: Big Rigs and Heavy Equipment
Thanks Harvey, so I wouldn't be doing anything wrong If I put a single or non turbo engine in that KW cabover? In the movie you can't see it anyway so why put more in than necessary? ? -
Peterbilt 359 "Black Magic"
Jürgen M. replied to Jürgen M.'s topic in Model Trucks: Big Rigs and Heavy Equipment
Thanks very much! I'm glad that "the old stuff" is still liked! ? -
Another "Convoy" Truck!
Jürgen M. replied to Jürgen M.'s topic in WIP: Model Trucks: Big Rigs and Heavy Equipment
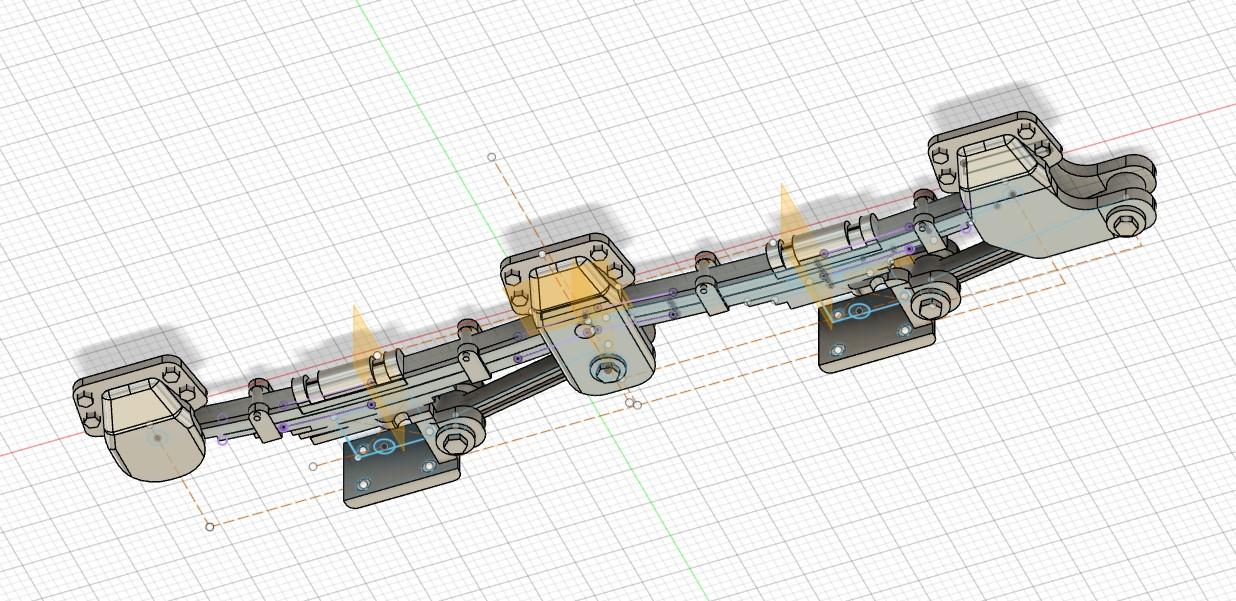
I corrected the 3D drawing. I think that does the job!
-
Another "Convoy" Truck!
Jürgen M. replied to Jürgen M.'s topic in WIP: Model Trucks: Big Rigs and Heavy Equipment
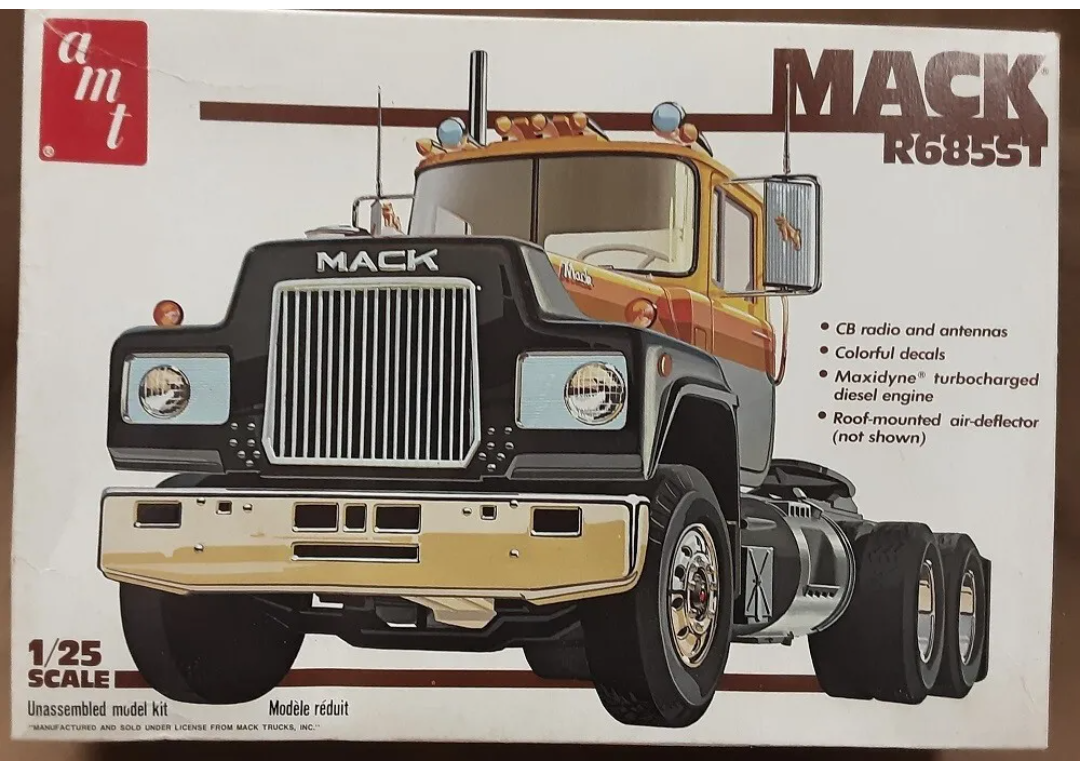
Thanks! You're right! I'll correct that! The drawings of the trailer suspension will help me on the trailer! Thanks for that too. I'm really learning! ? By the way, If I may ask one more thing? Did the Kenworths of the late 70ies all have twin turbo engines? I've been following some current builds and took a Look at older ones. I also searched in the www, I only found twin turbos except for my old W900 which I posted shortly. I'm not sure which engine to choose! Thanks! I began building Models at about 9! First only cars, then planes and ships and at 13 I got my first truck kit. It was the amt Peterbilt 359 1/43 kit with a wrecker and a tractor. They might not have been the best start into the world of truck kits because the parts we're quite small but I got them together and I was very proud at that time. Unfortunately we moved shortly afterwards and my parents didn't really care about my model kits so a lot of them didn't survive including the two Peterbilts. So my first "real" truck kit which survived till today was the Mack R685 that was transformed into "Rubber Duck" as soon as I had seen the movie! -
Really nice work on that! Can't wait to see the further progress!
-
KW W925 work over
Jürgen M. replied to Jürgen M.'s topic in Model Trucks: Big Rigs and Heavy Equipment
Yes they do! Thanks! I can't remember in which sequence the rest of the old ones were built but it was sometime between 1984 and -89. Then I had a looooooong break till 2017 or so. I'll show them all anyway. ? -
Another "Convoy" Truck!
Jürgen M. replied to Jürgen M.'s topic in WIP: Model Trucks: Big Rigs and Heavy Equipment
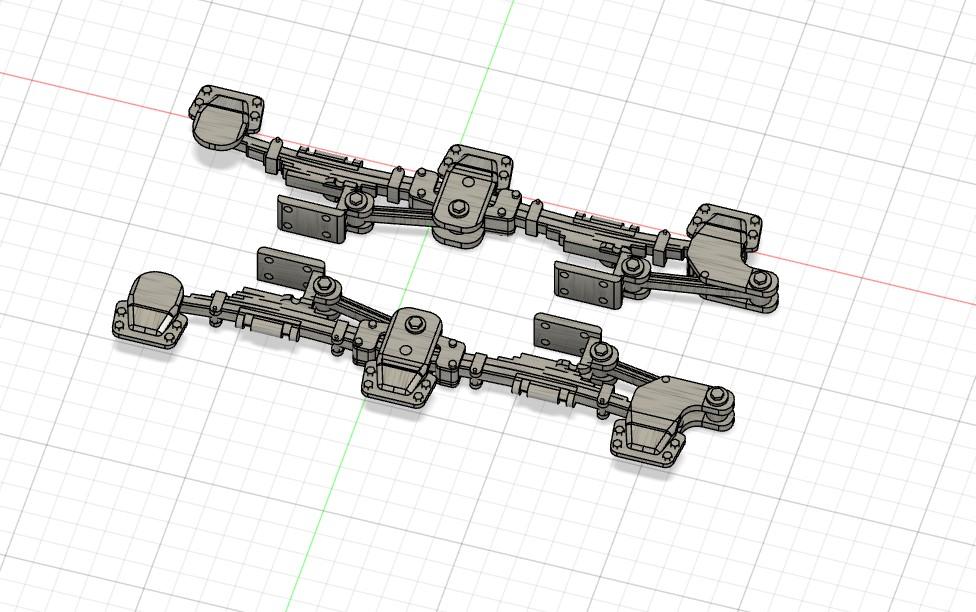
I designed the 4-spring suspension. OK, I admit it´s not exactly like the one in the parts breakdown but I did my best. I designed it in one piece per side to make it a bit easier to build later. I don´t know what those pins (no. 19 in the drawing) are called in English but I´m gonna make those out of 1mm brass rod. They´re too thin to print.
-
Peterbilt 359 "Black Magic"
Jürgen M. replied to Jürgen M.'s topic in Model Trucks: Big Rigs and Heavy Equipment
Thanks you! Back then I didn't know much about them and there was no Google either! Glad you like it! ? -
KW W925 work over
Jürgen M. replied to Jürgen M.'s topic in Model Trucks: Big Rigs and Heavy Equipment
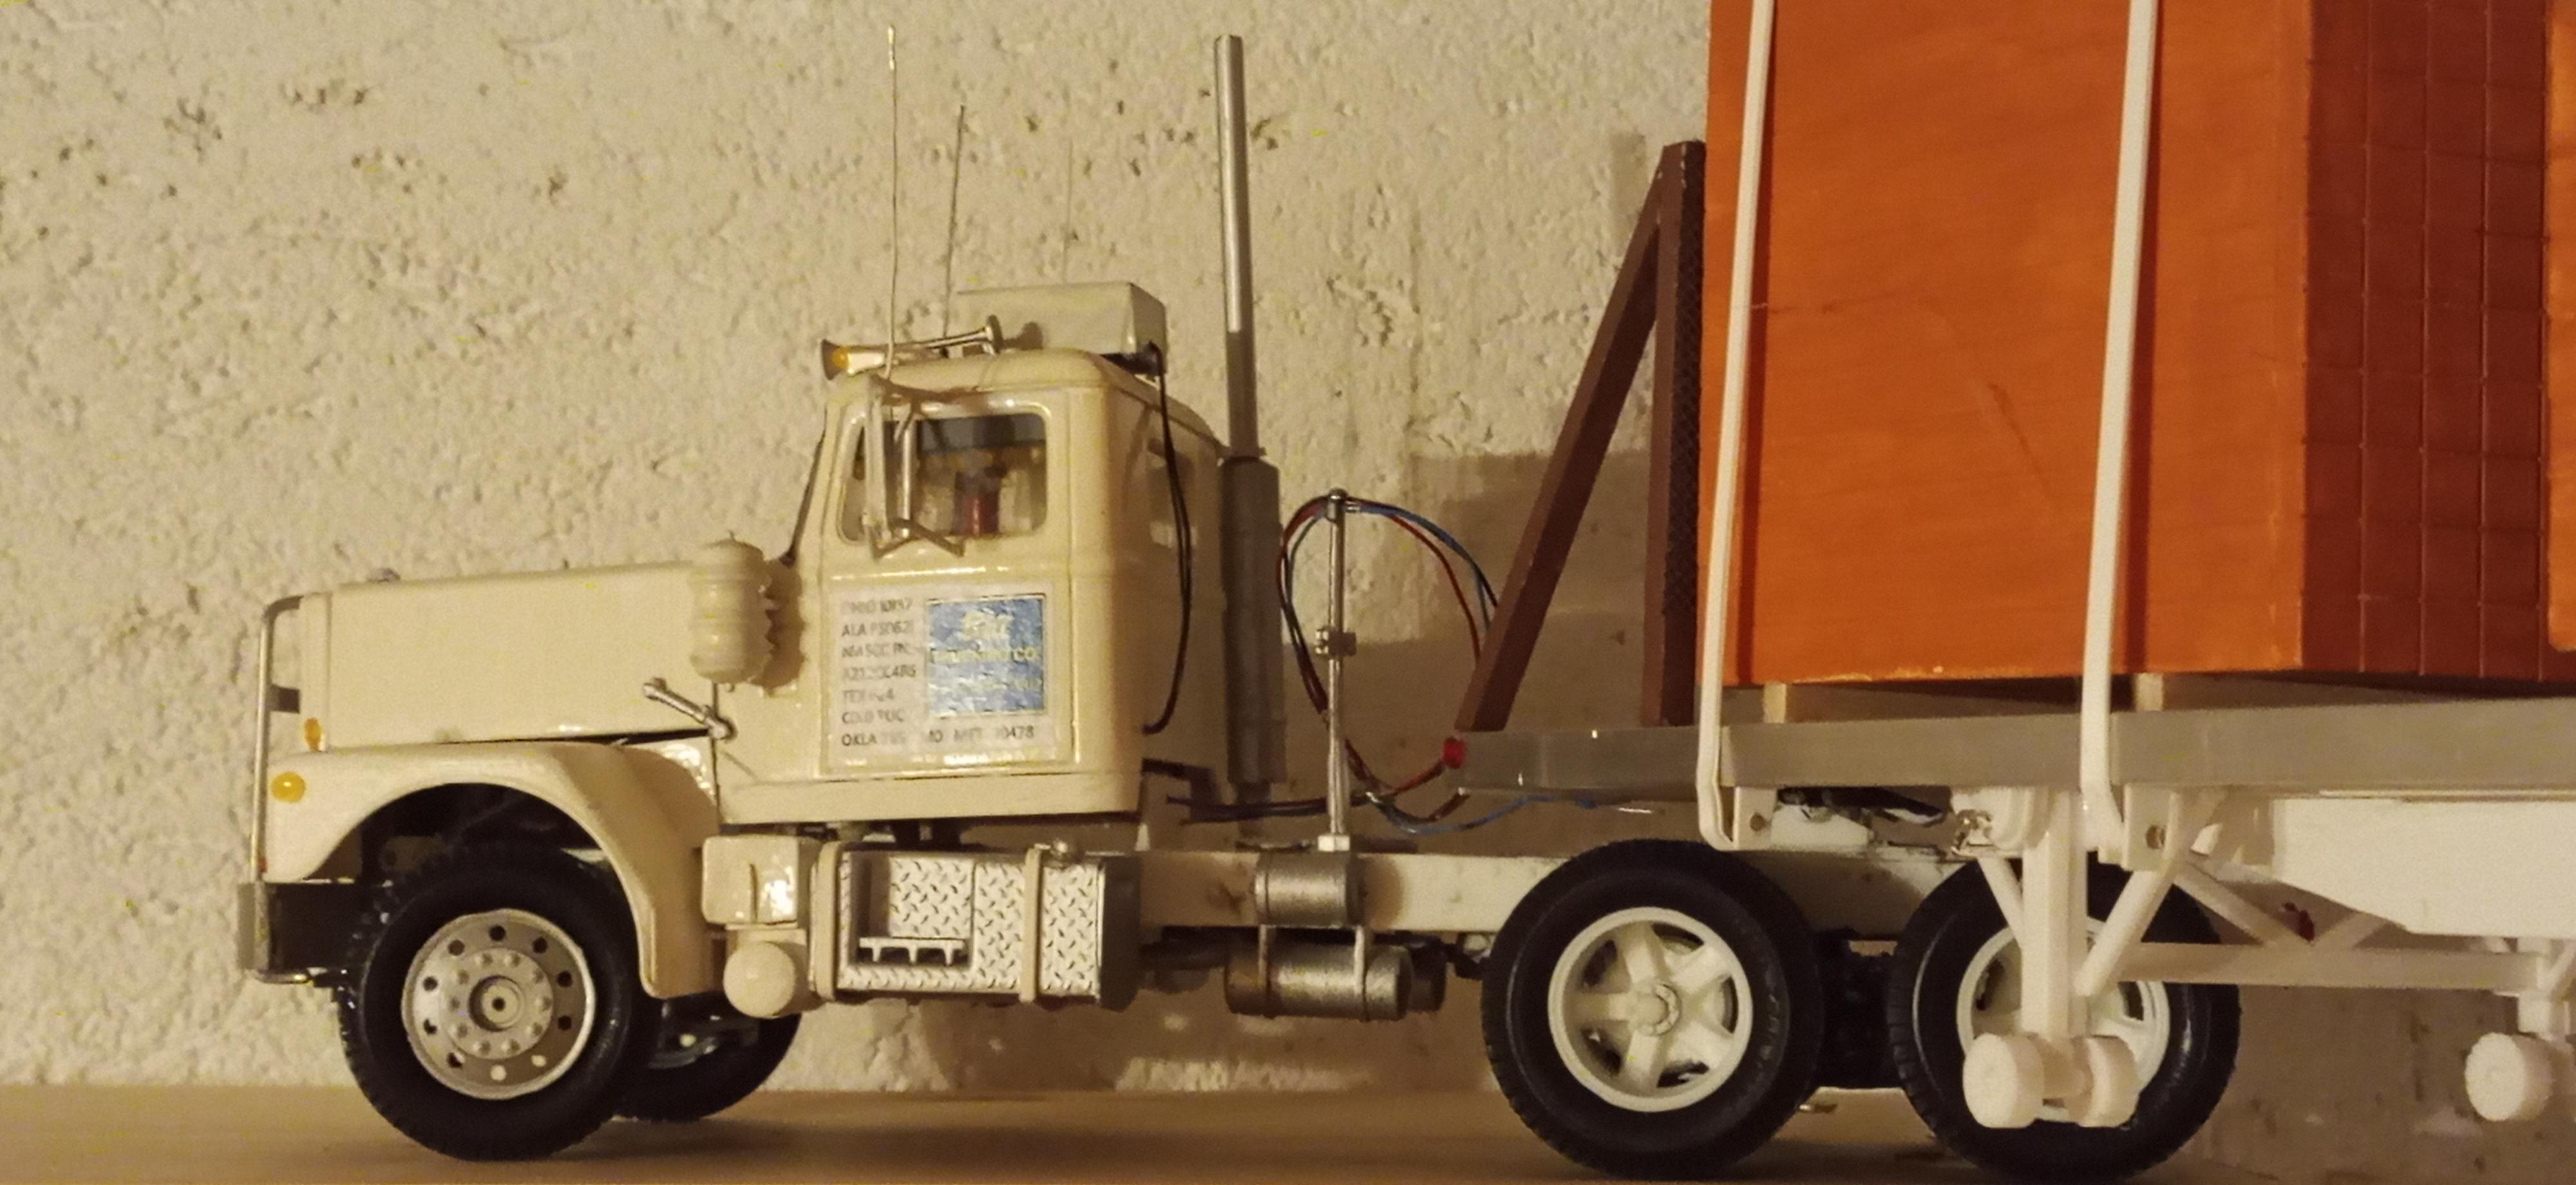
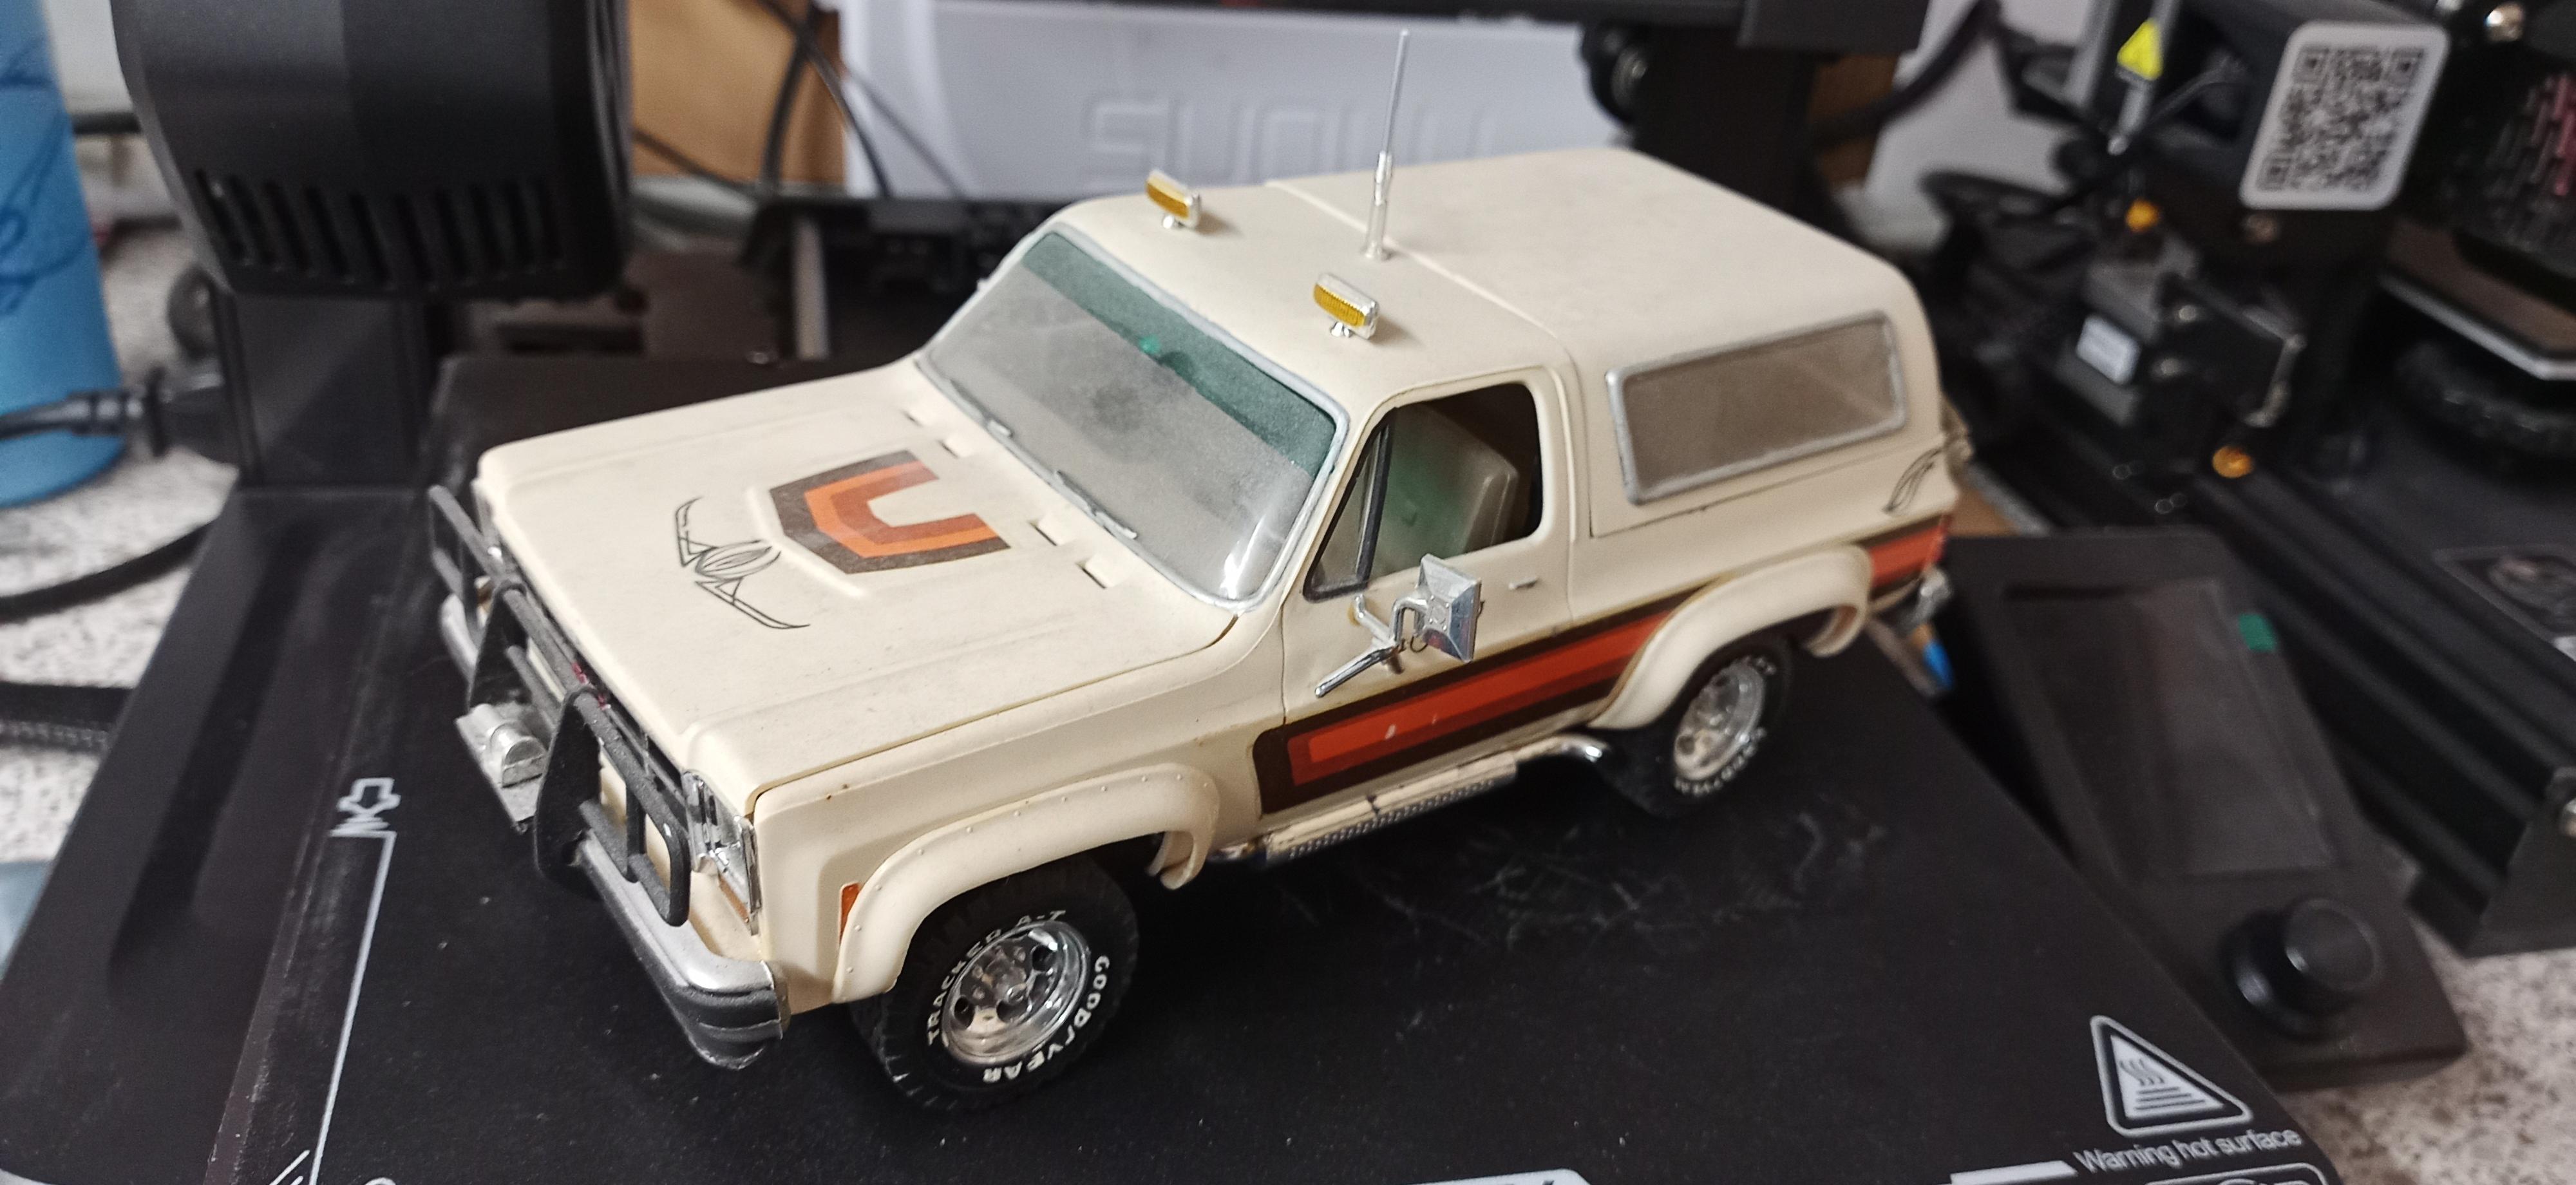
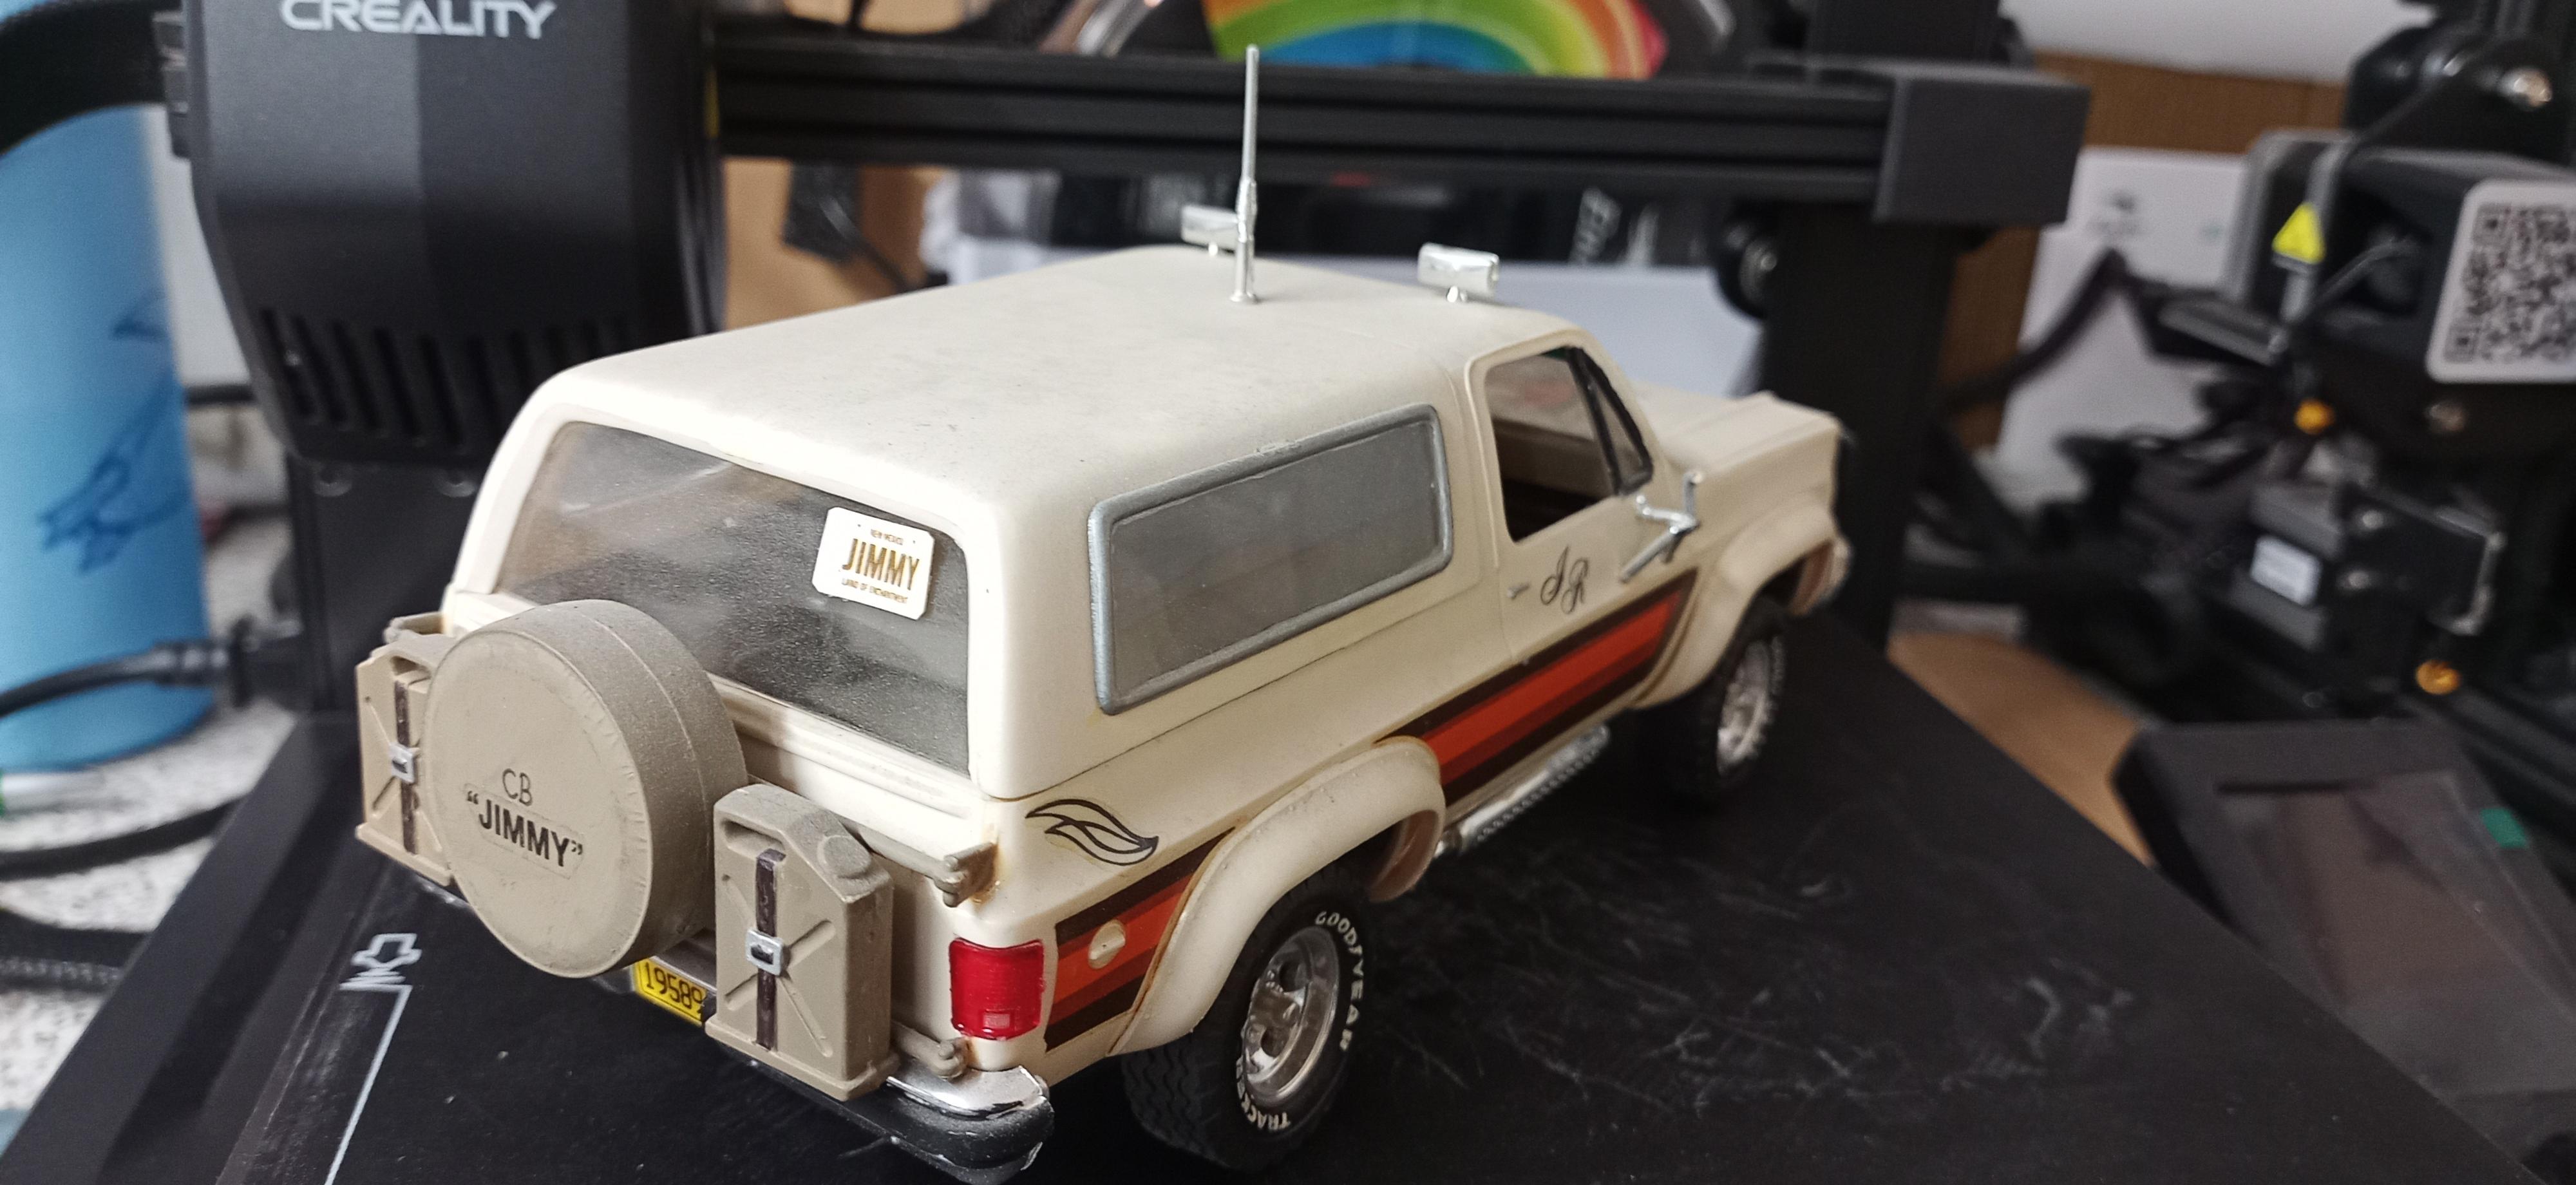
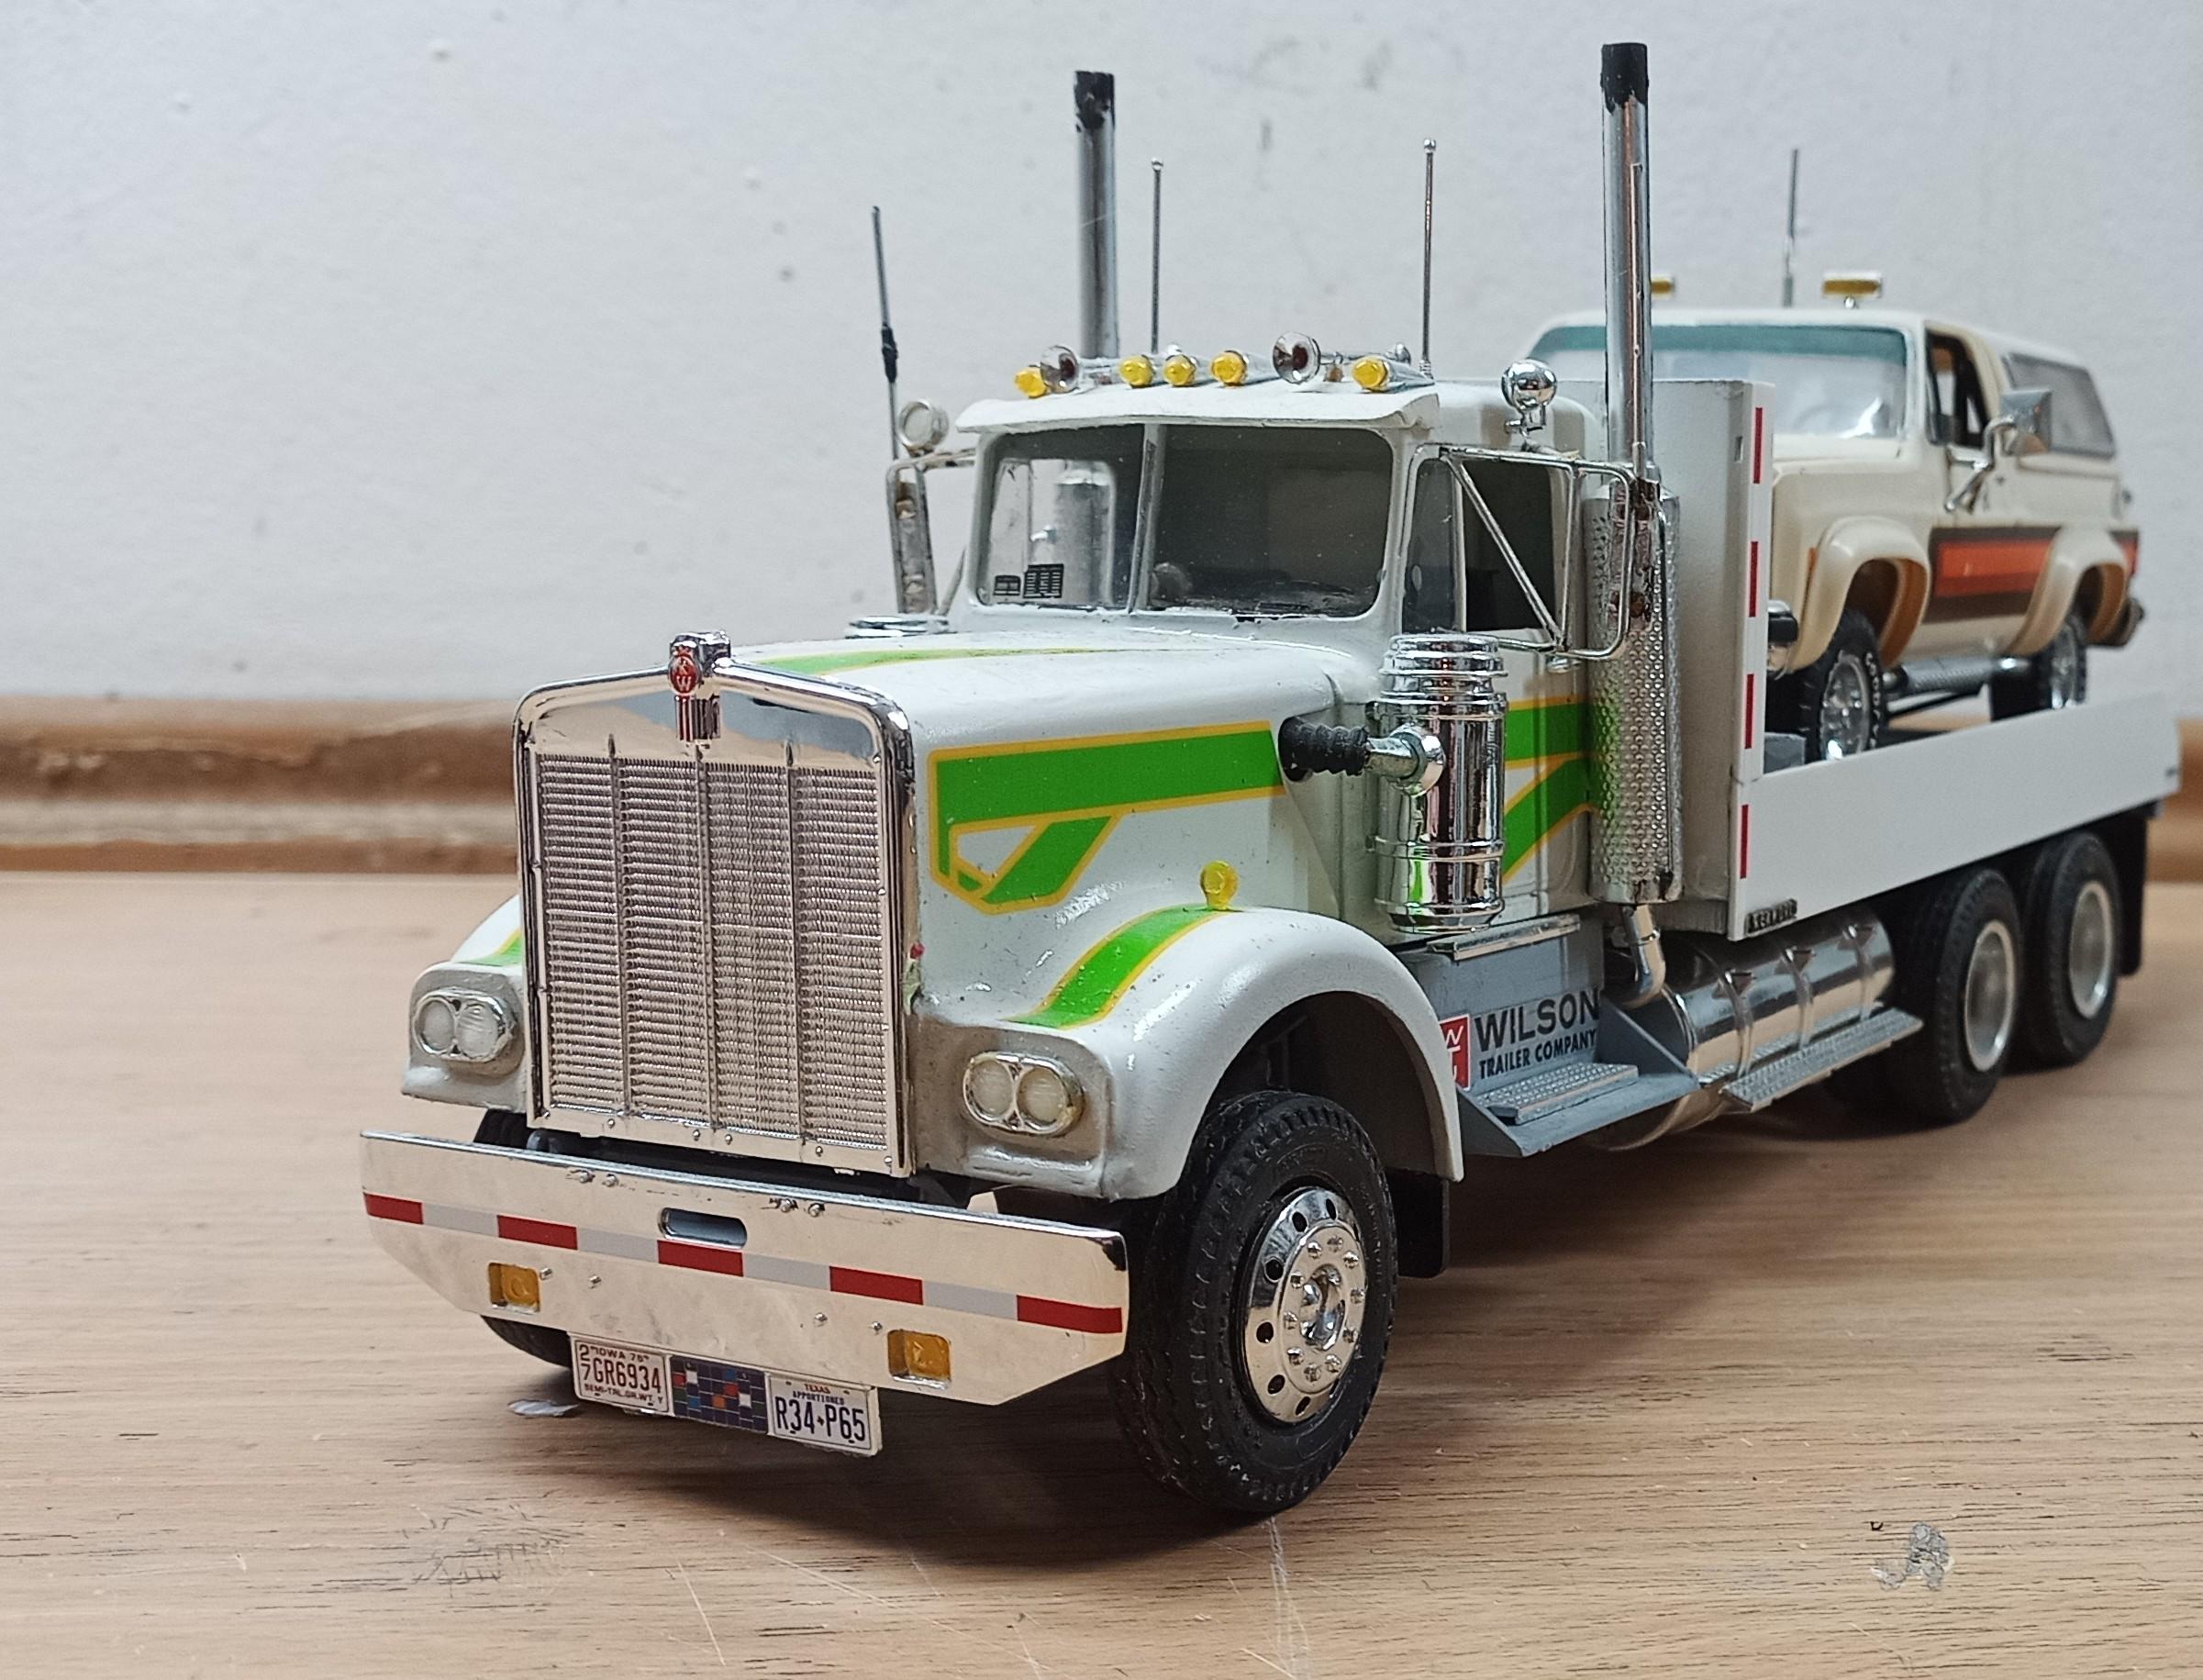
By the way, the 4x4 on the back is a GMC Jimmy. Don´t think that kit is available anymore. I had bought that in the US in 1978. This is it: One mirror is missing, I might print that to replace it. Please excuse the dust on it; I haven´t cleaned it in quite a while! No painting done on that one except for the window seams, the green sun protection strip and the straps on the gas canisters. Oh yes, I am aware of this vehicle belonging in the "suv-category" but I thought it might not matter since it's the load of a heavy truck. Won't happen again! ?
-
KW W925 work over
Jürgen M. replied to Jürgen M.'s topic in Model Trucks: Big Rigs and Heavy Equipment
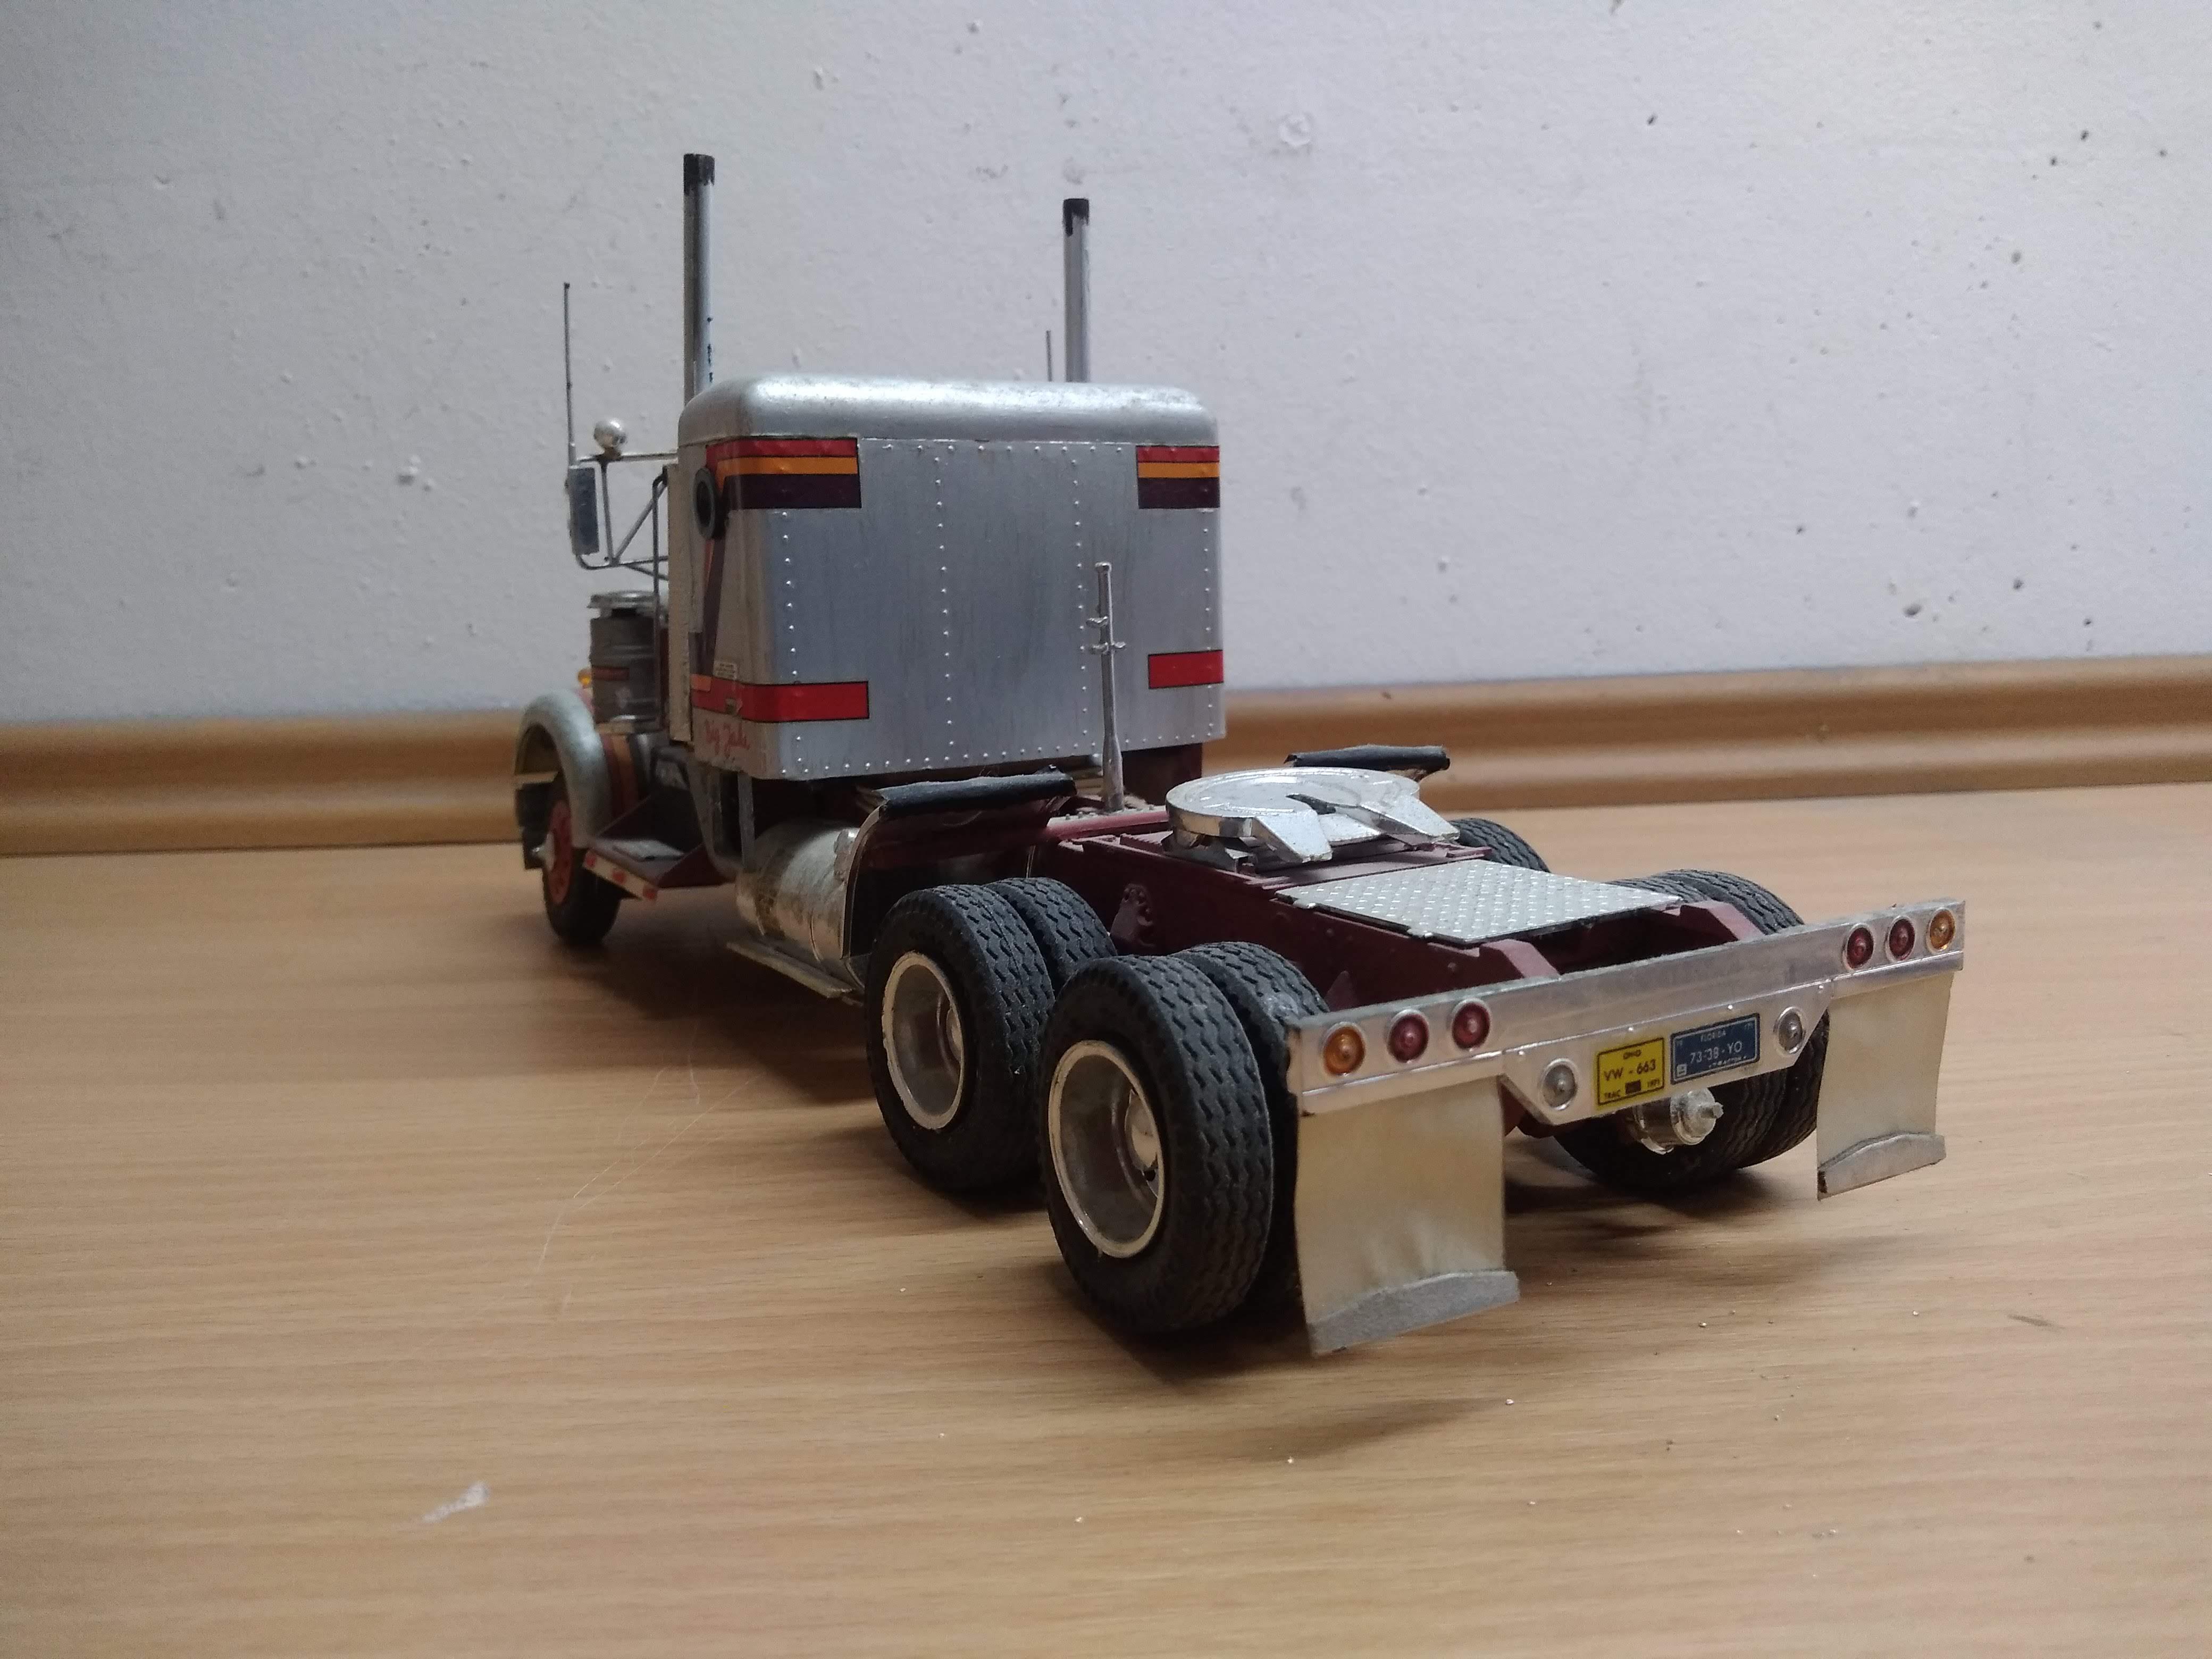
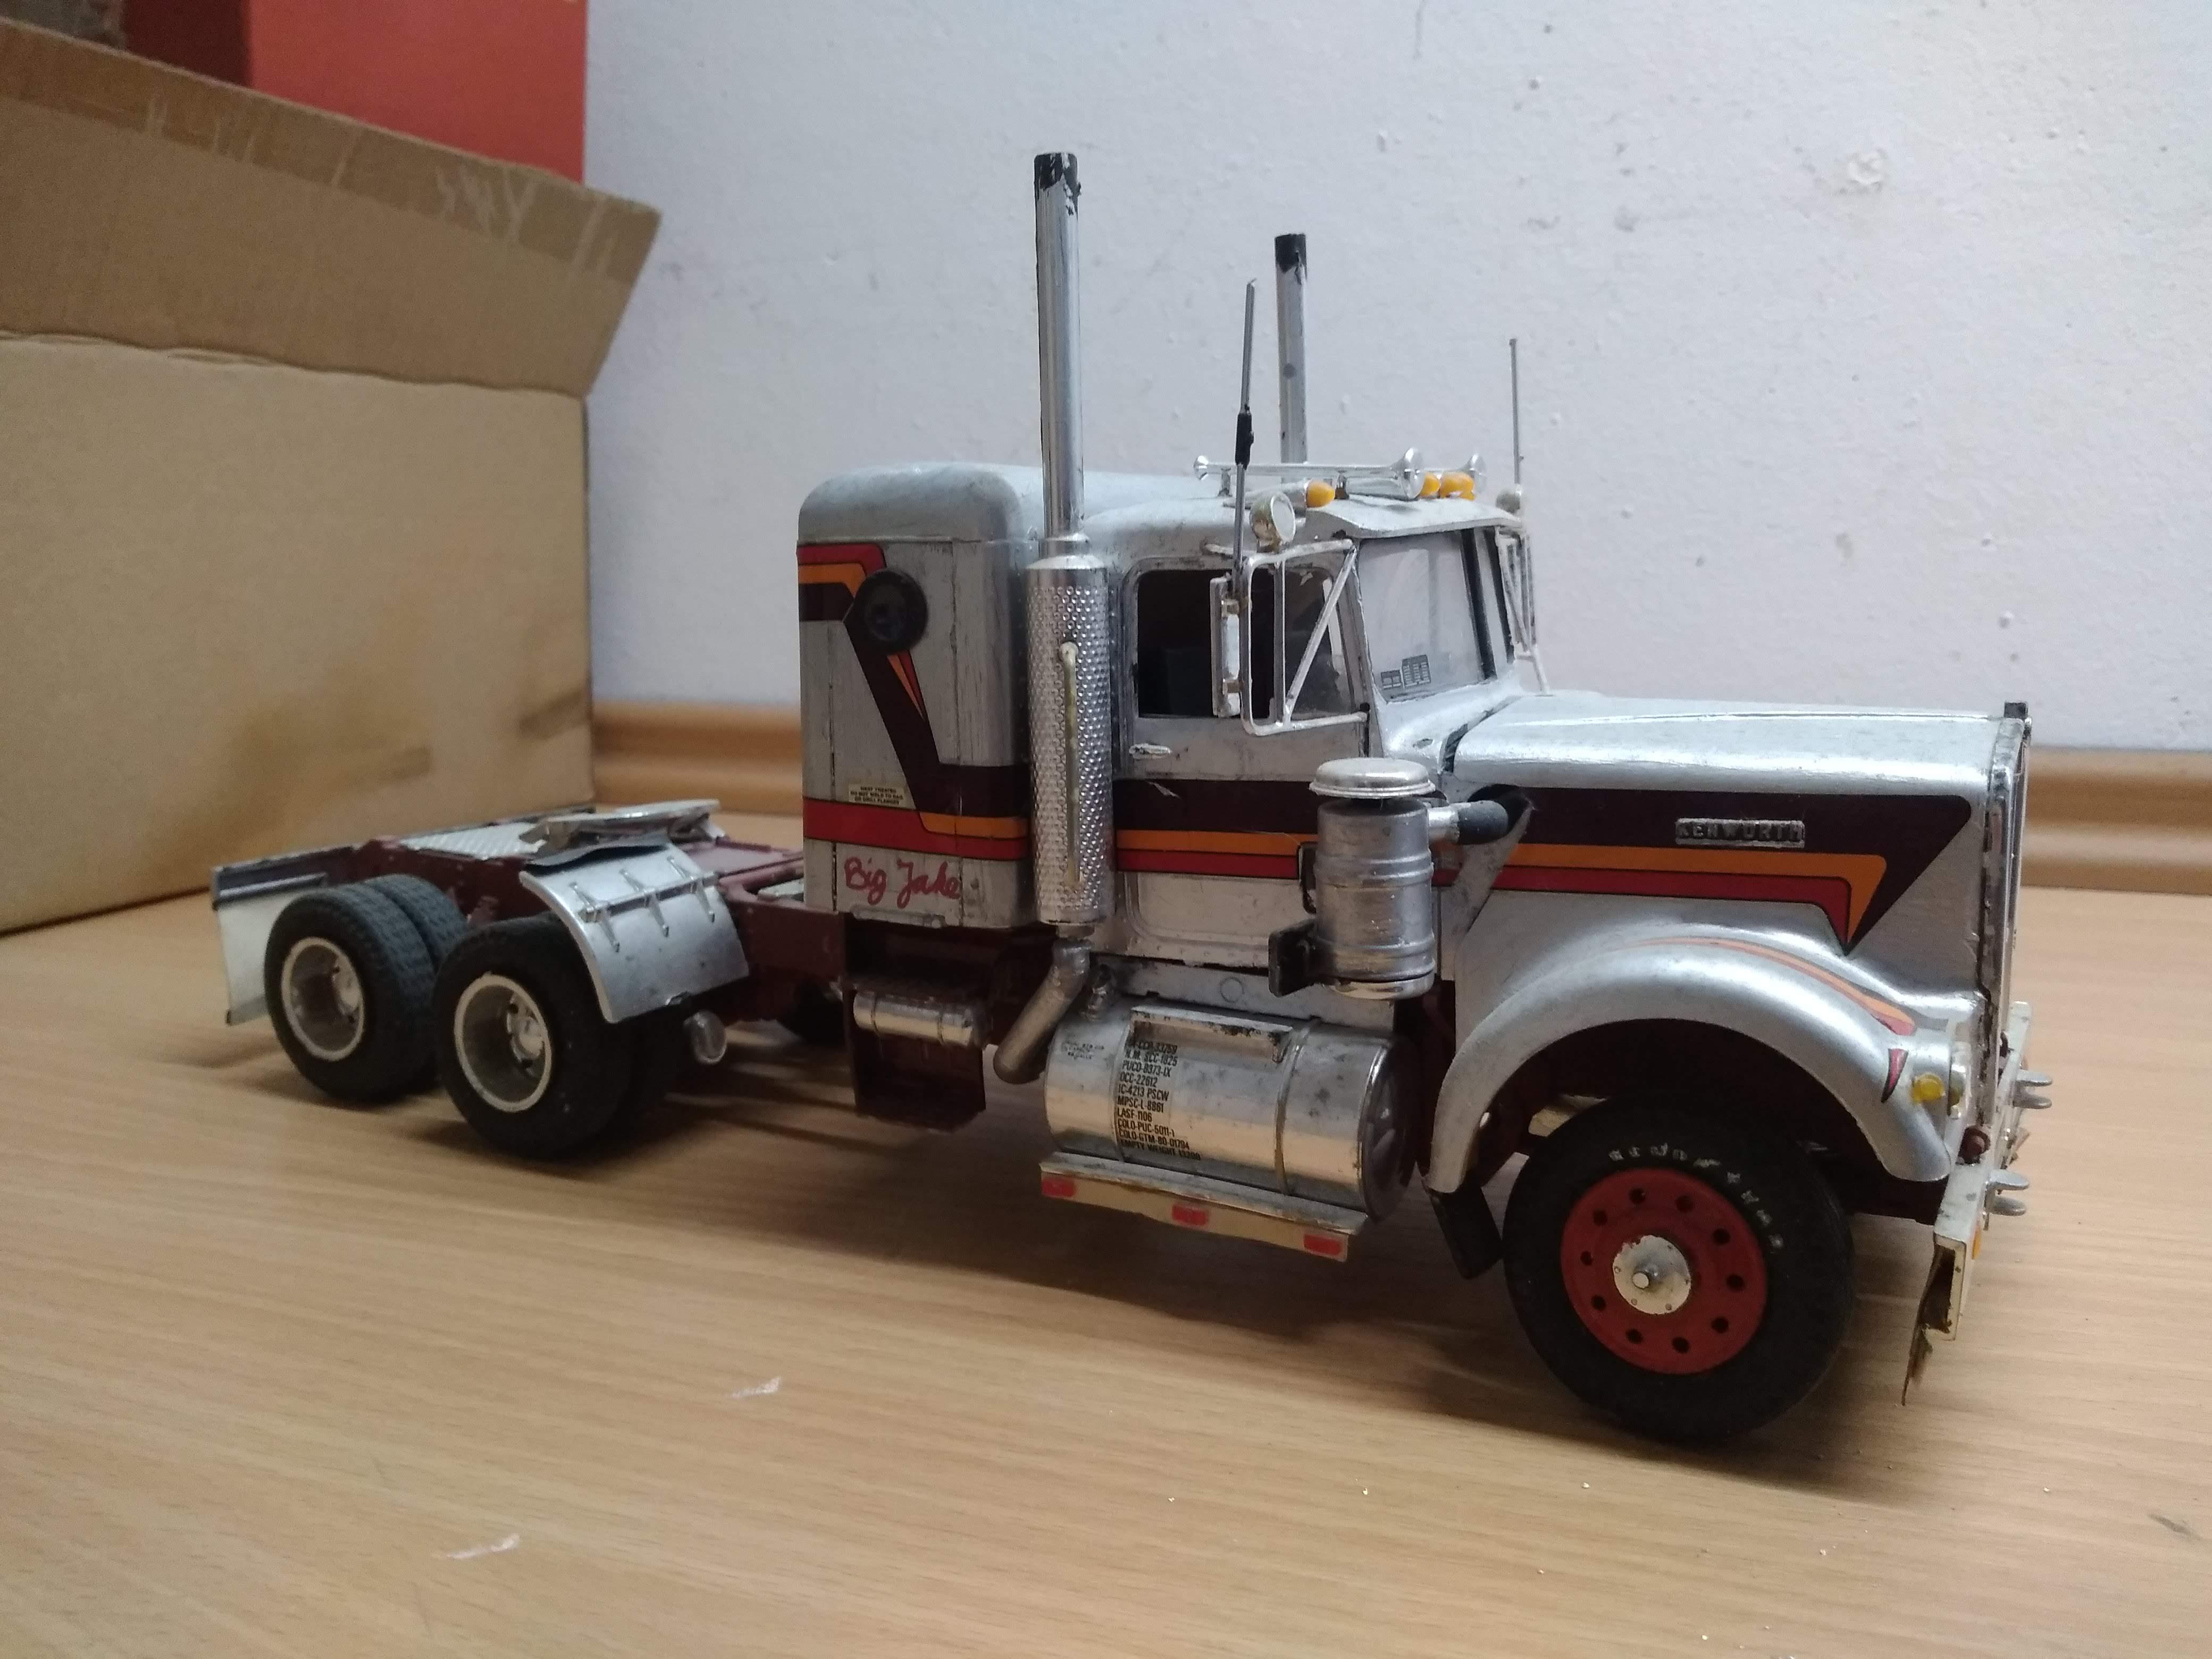
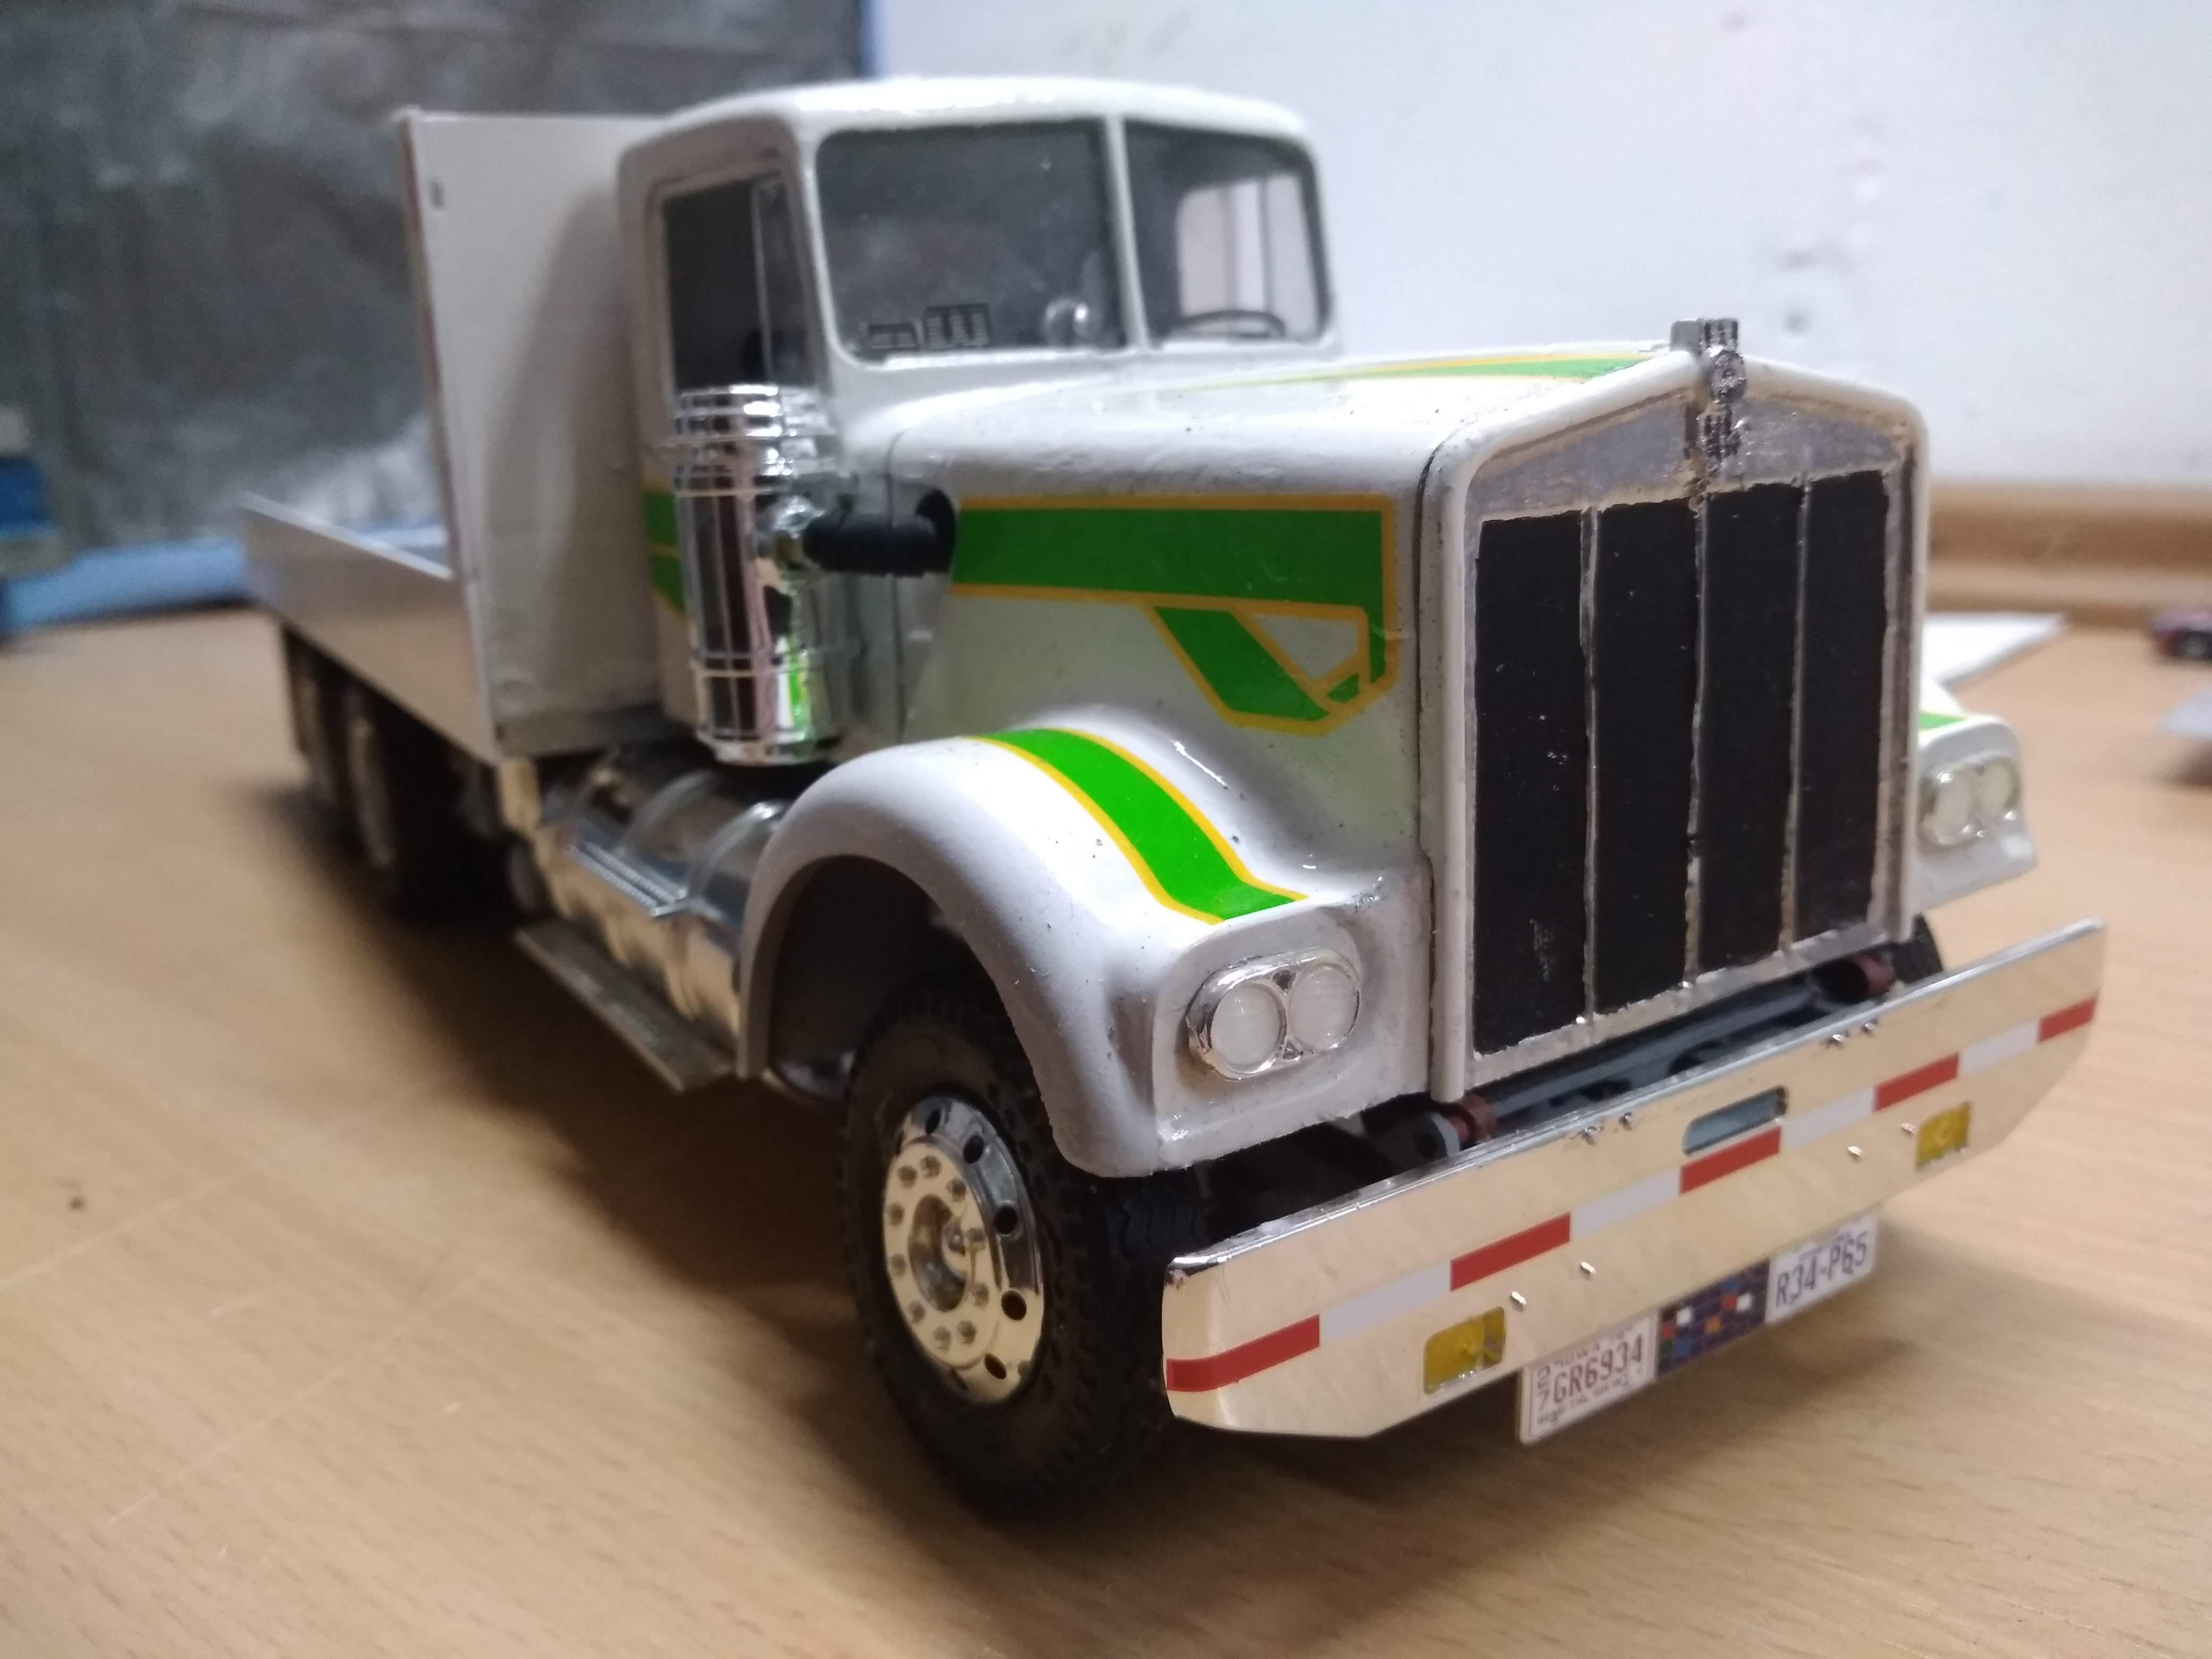
Thanks. Looks better than before, that´s for sure! The grille is from a Revell easy kit KW W900 Aerodyne of which I had used the chassis for the Marmon cabover. That was before I started printing 3D. The cab of that KW I then used for the Diamond Reo conventional. The bumper is from a Freightliner conventional kit, the fuel tanks are from a Ford LTL 9000 road train which didn´t survive moving. -
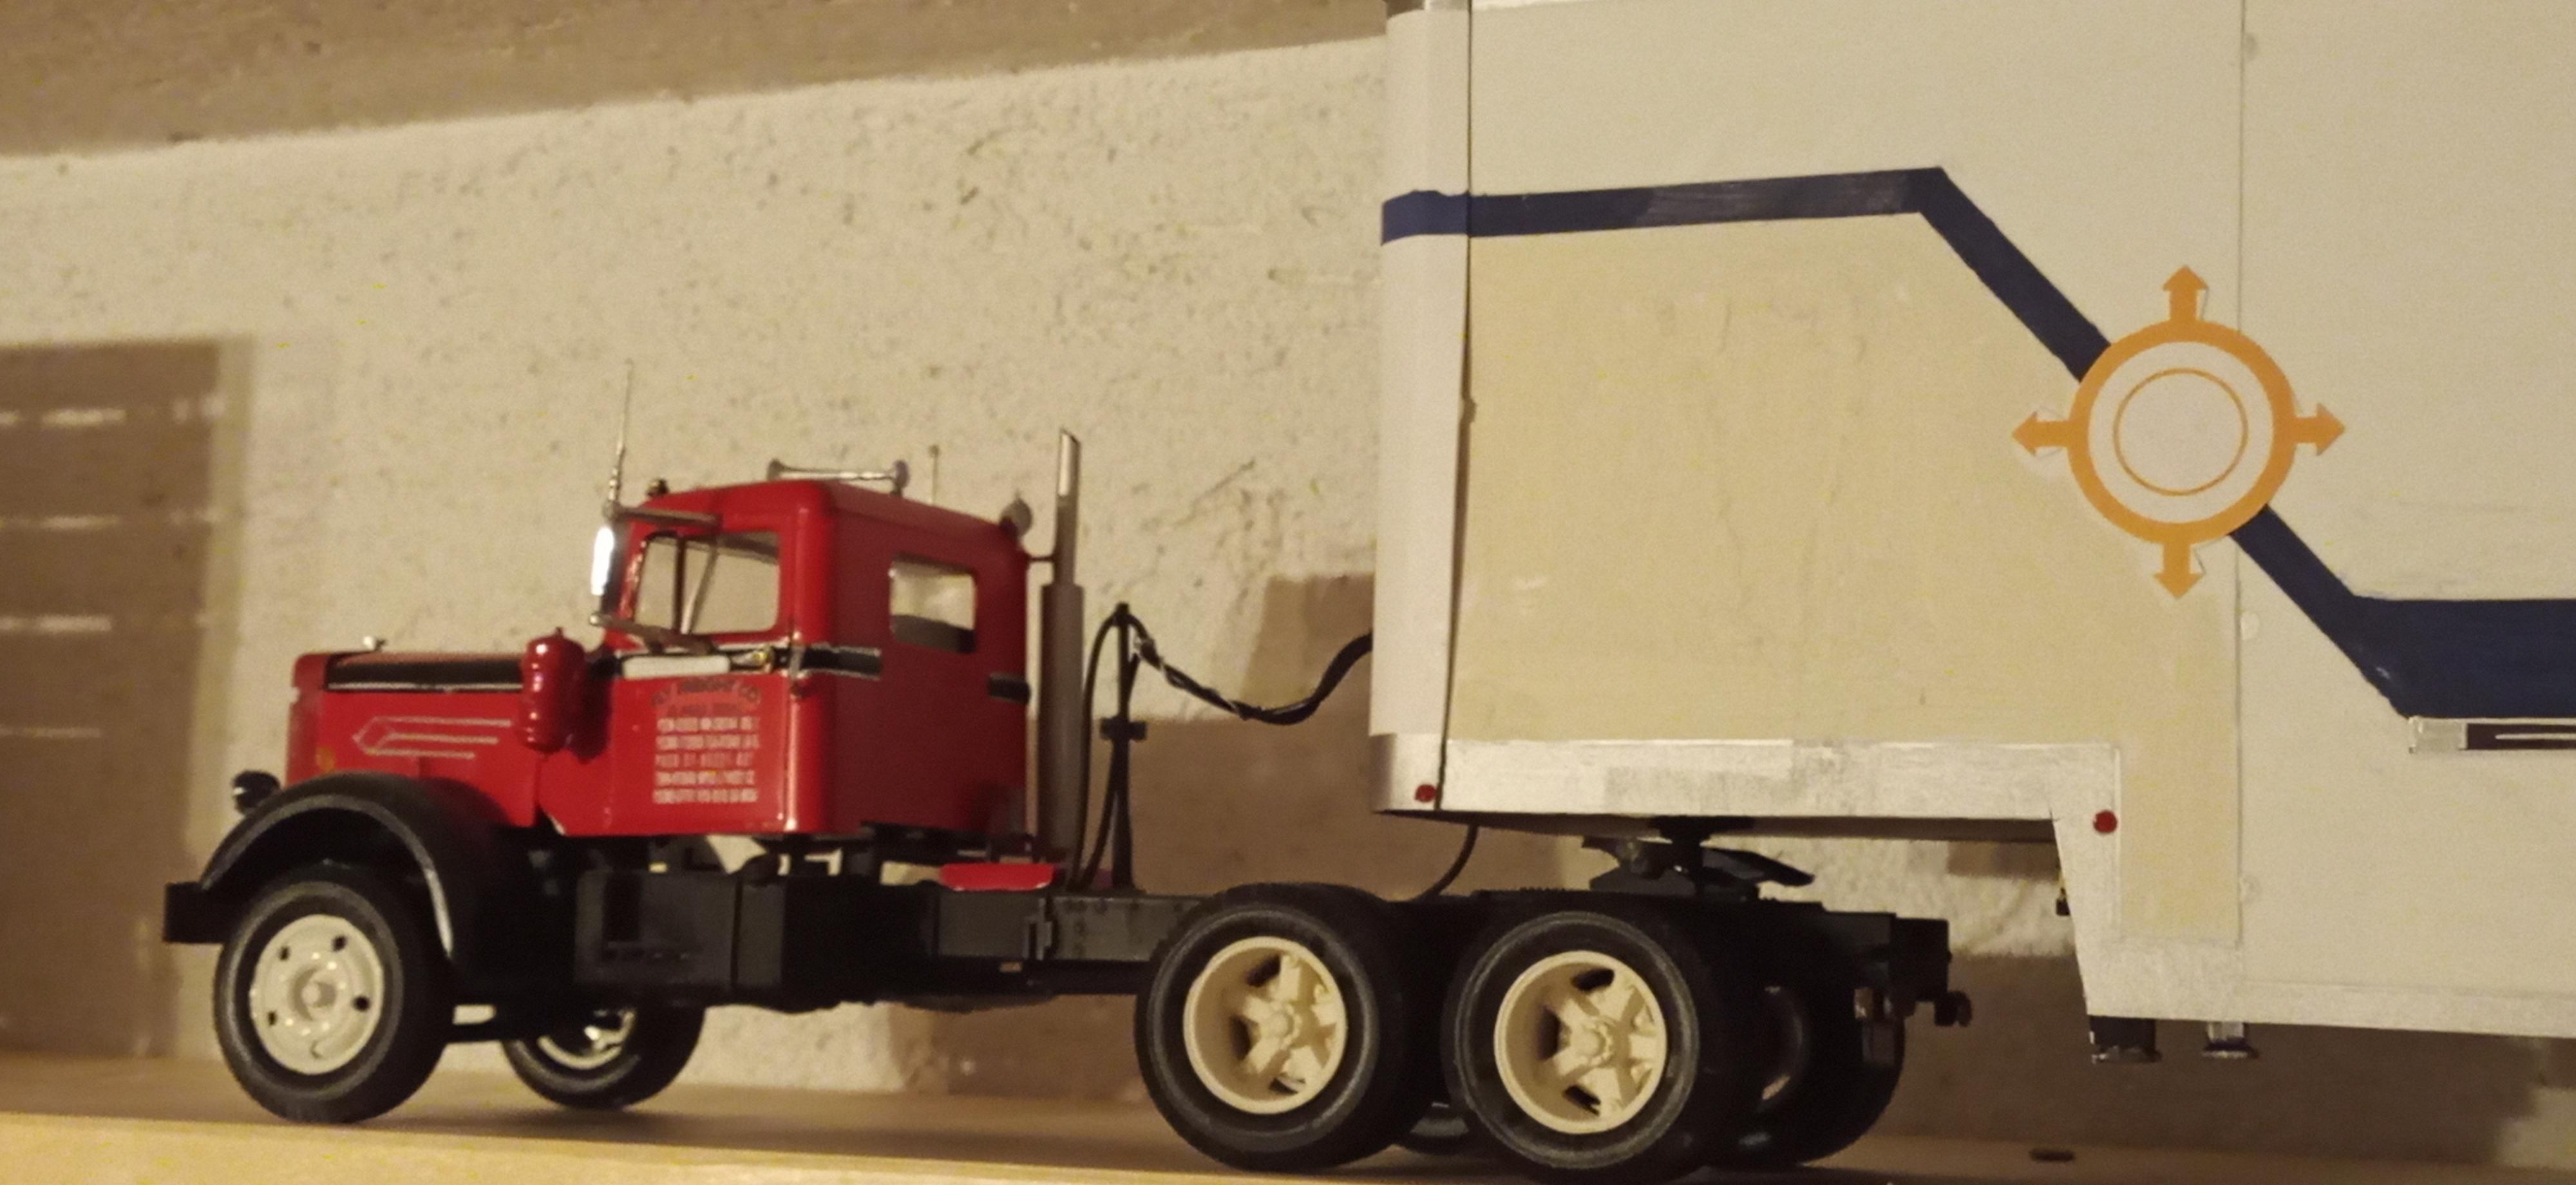
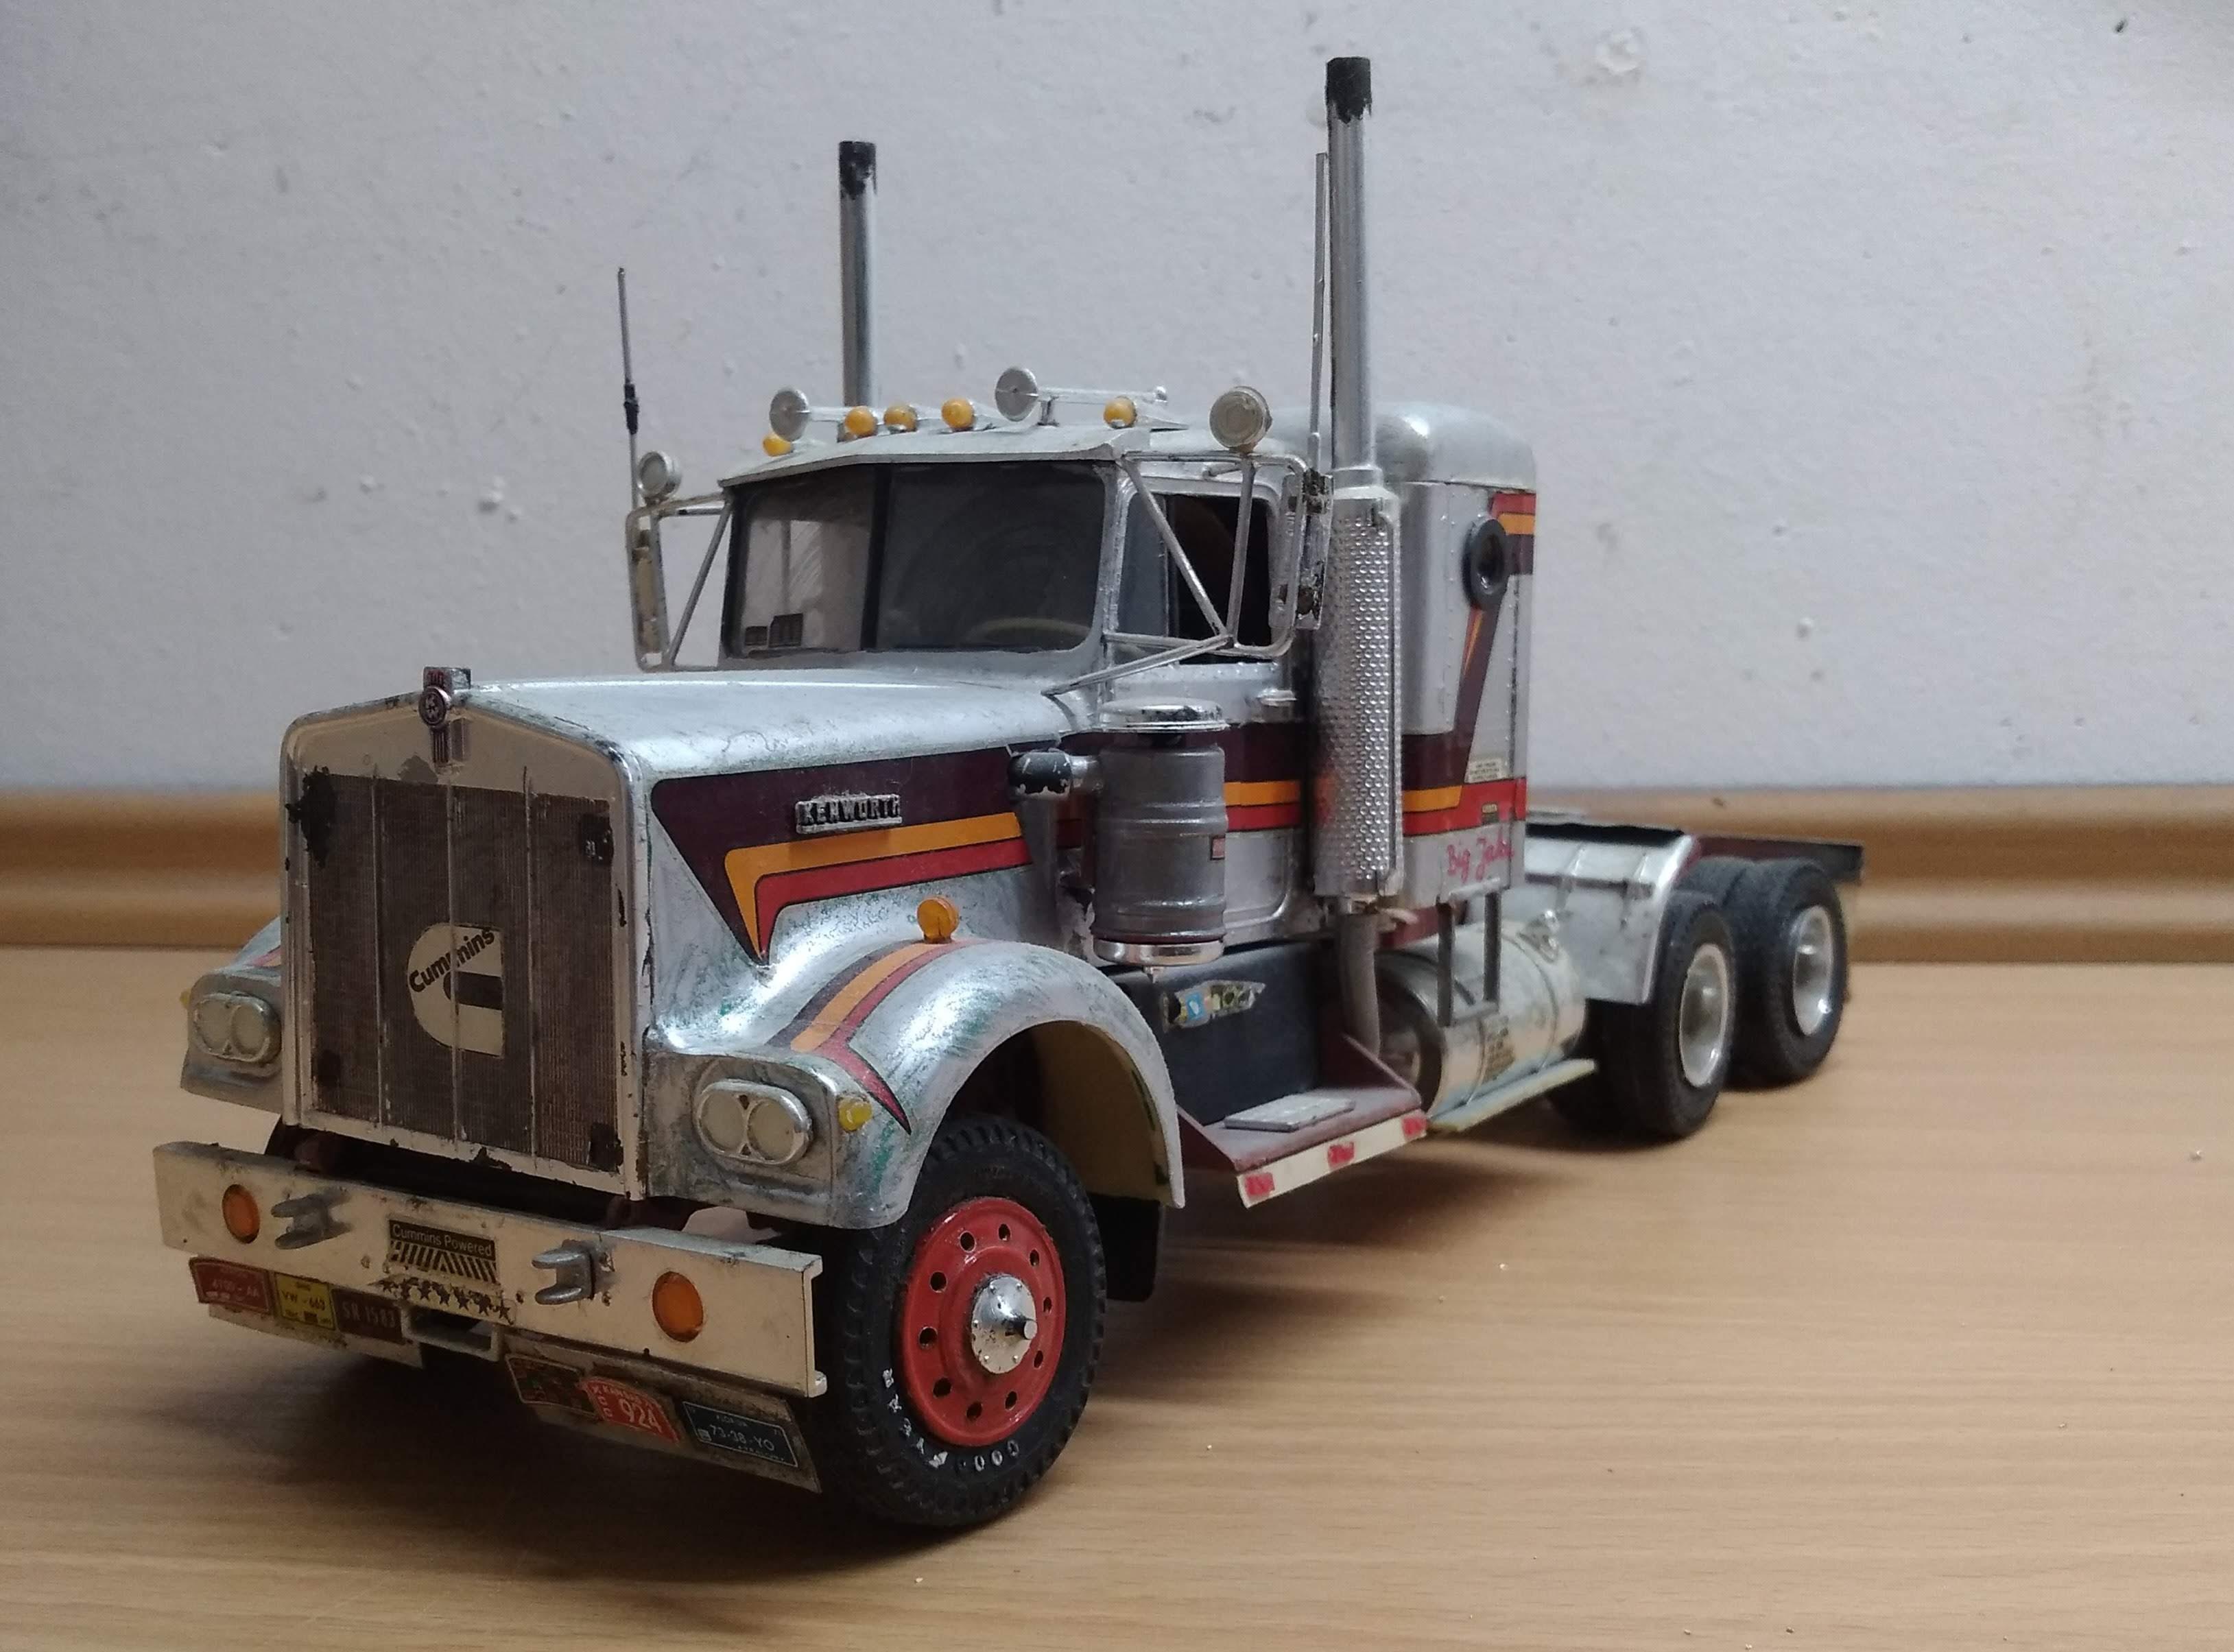
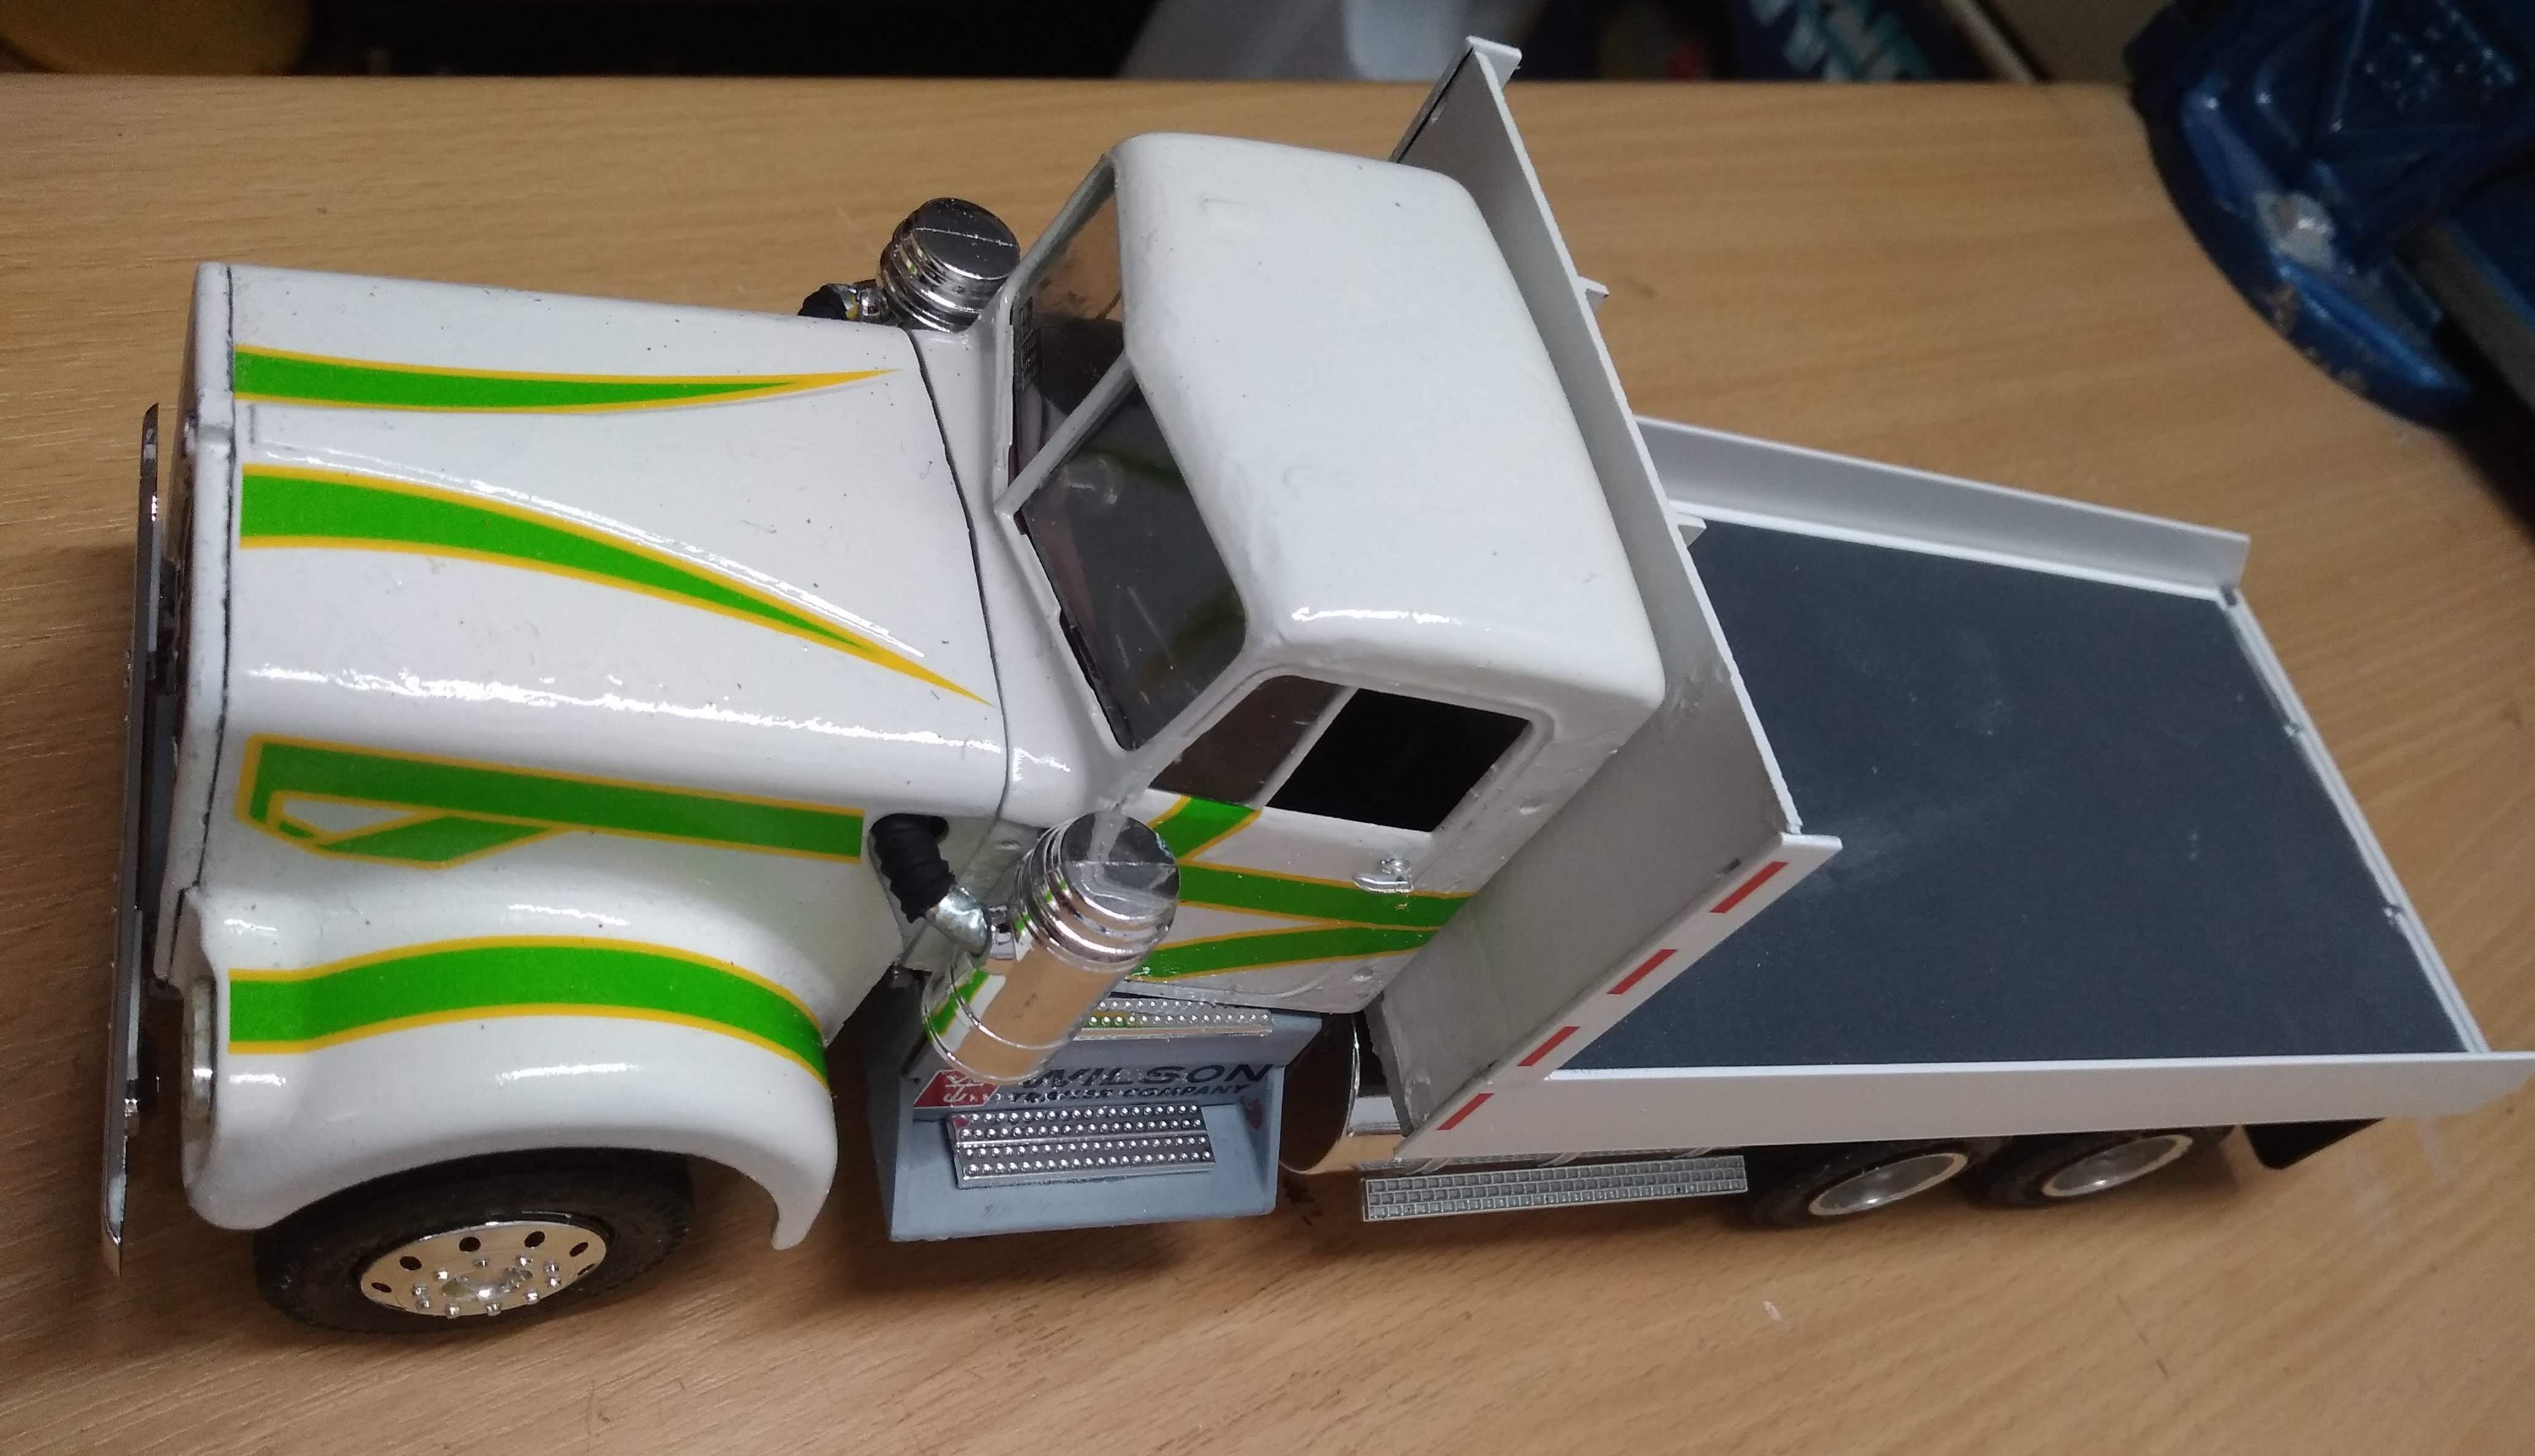
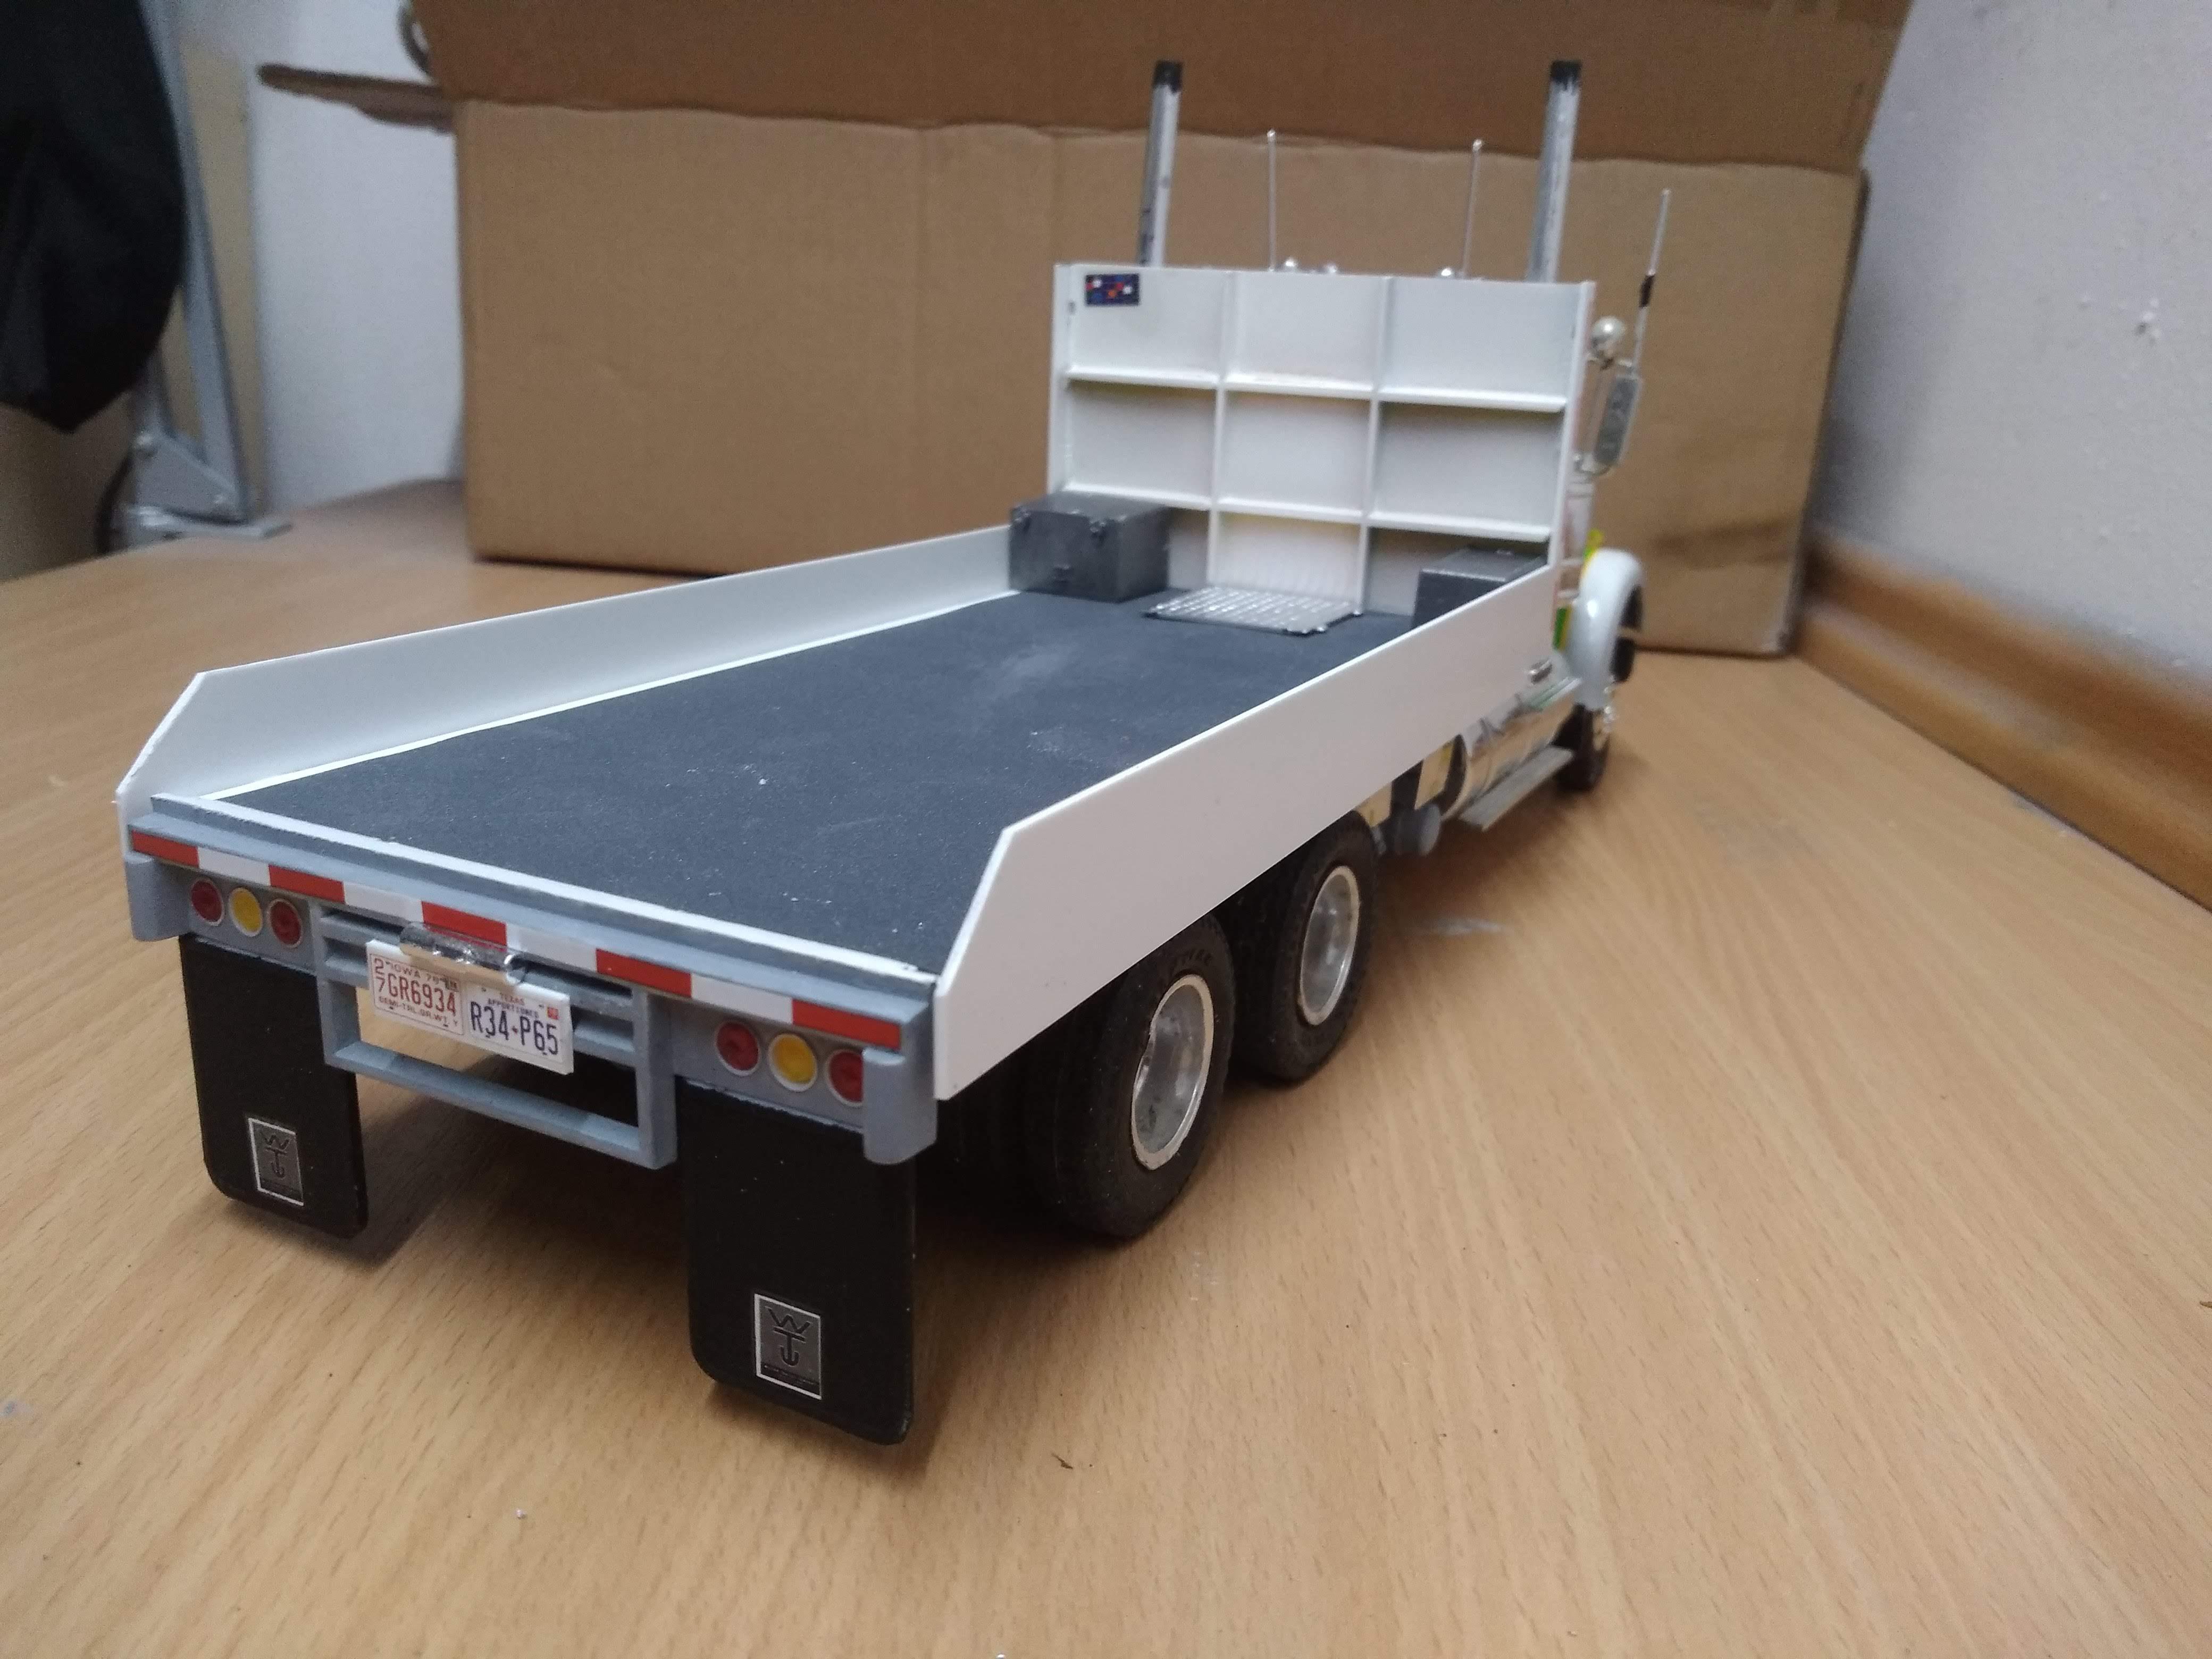
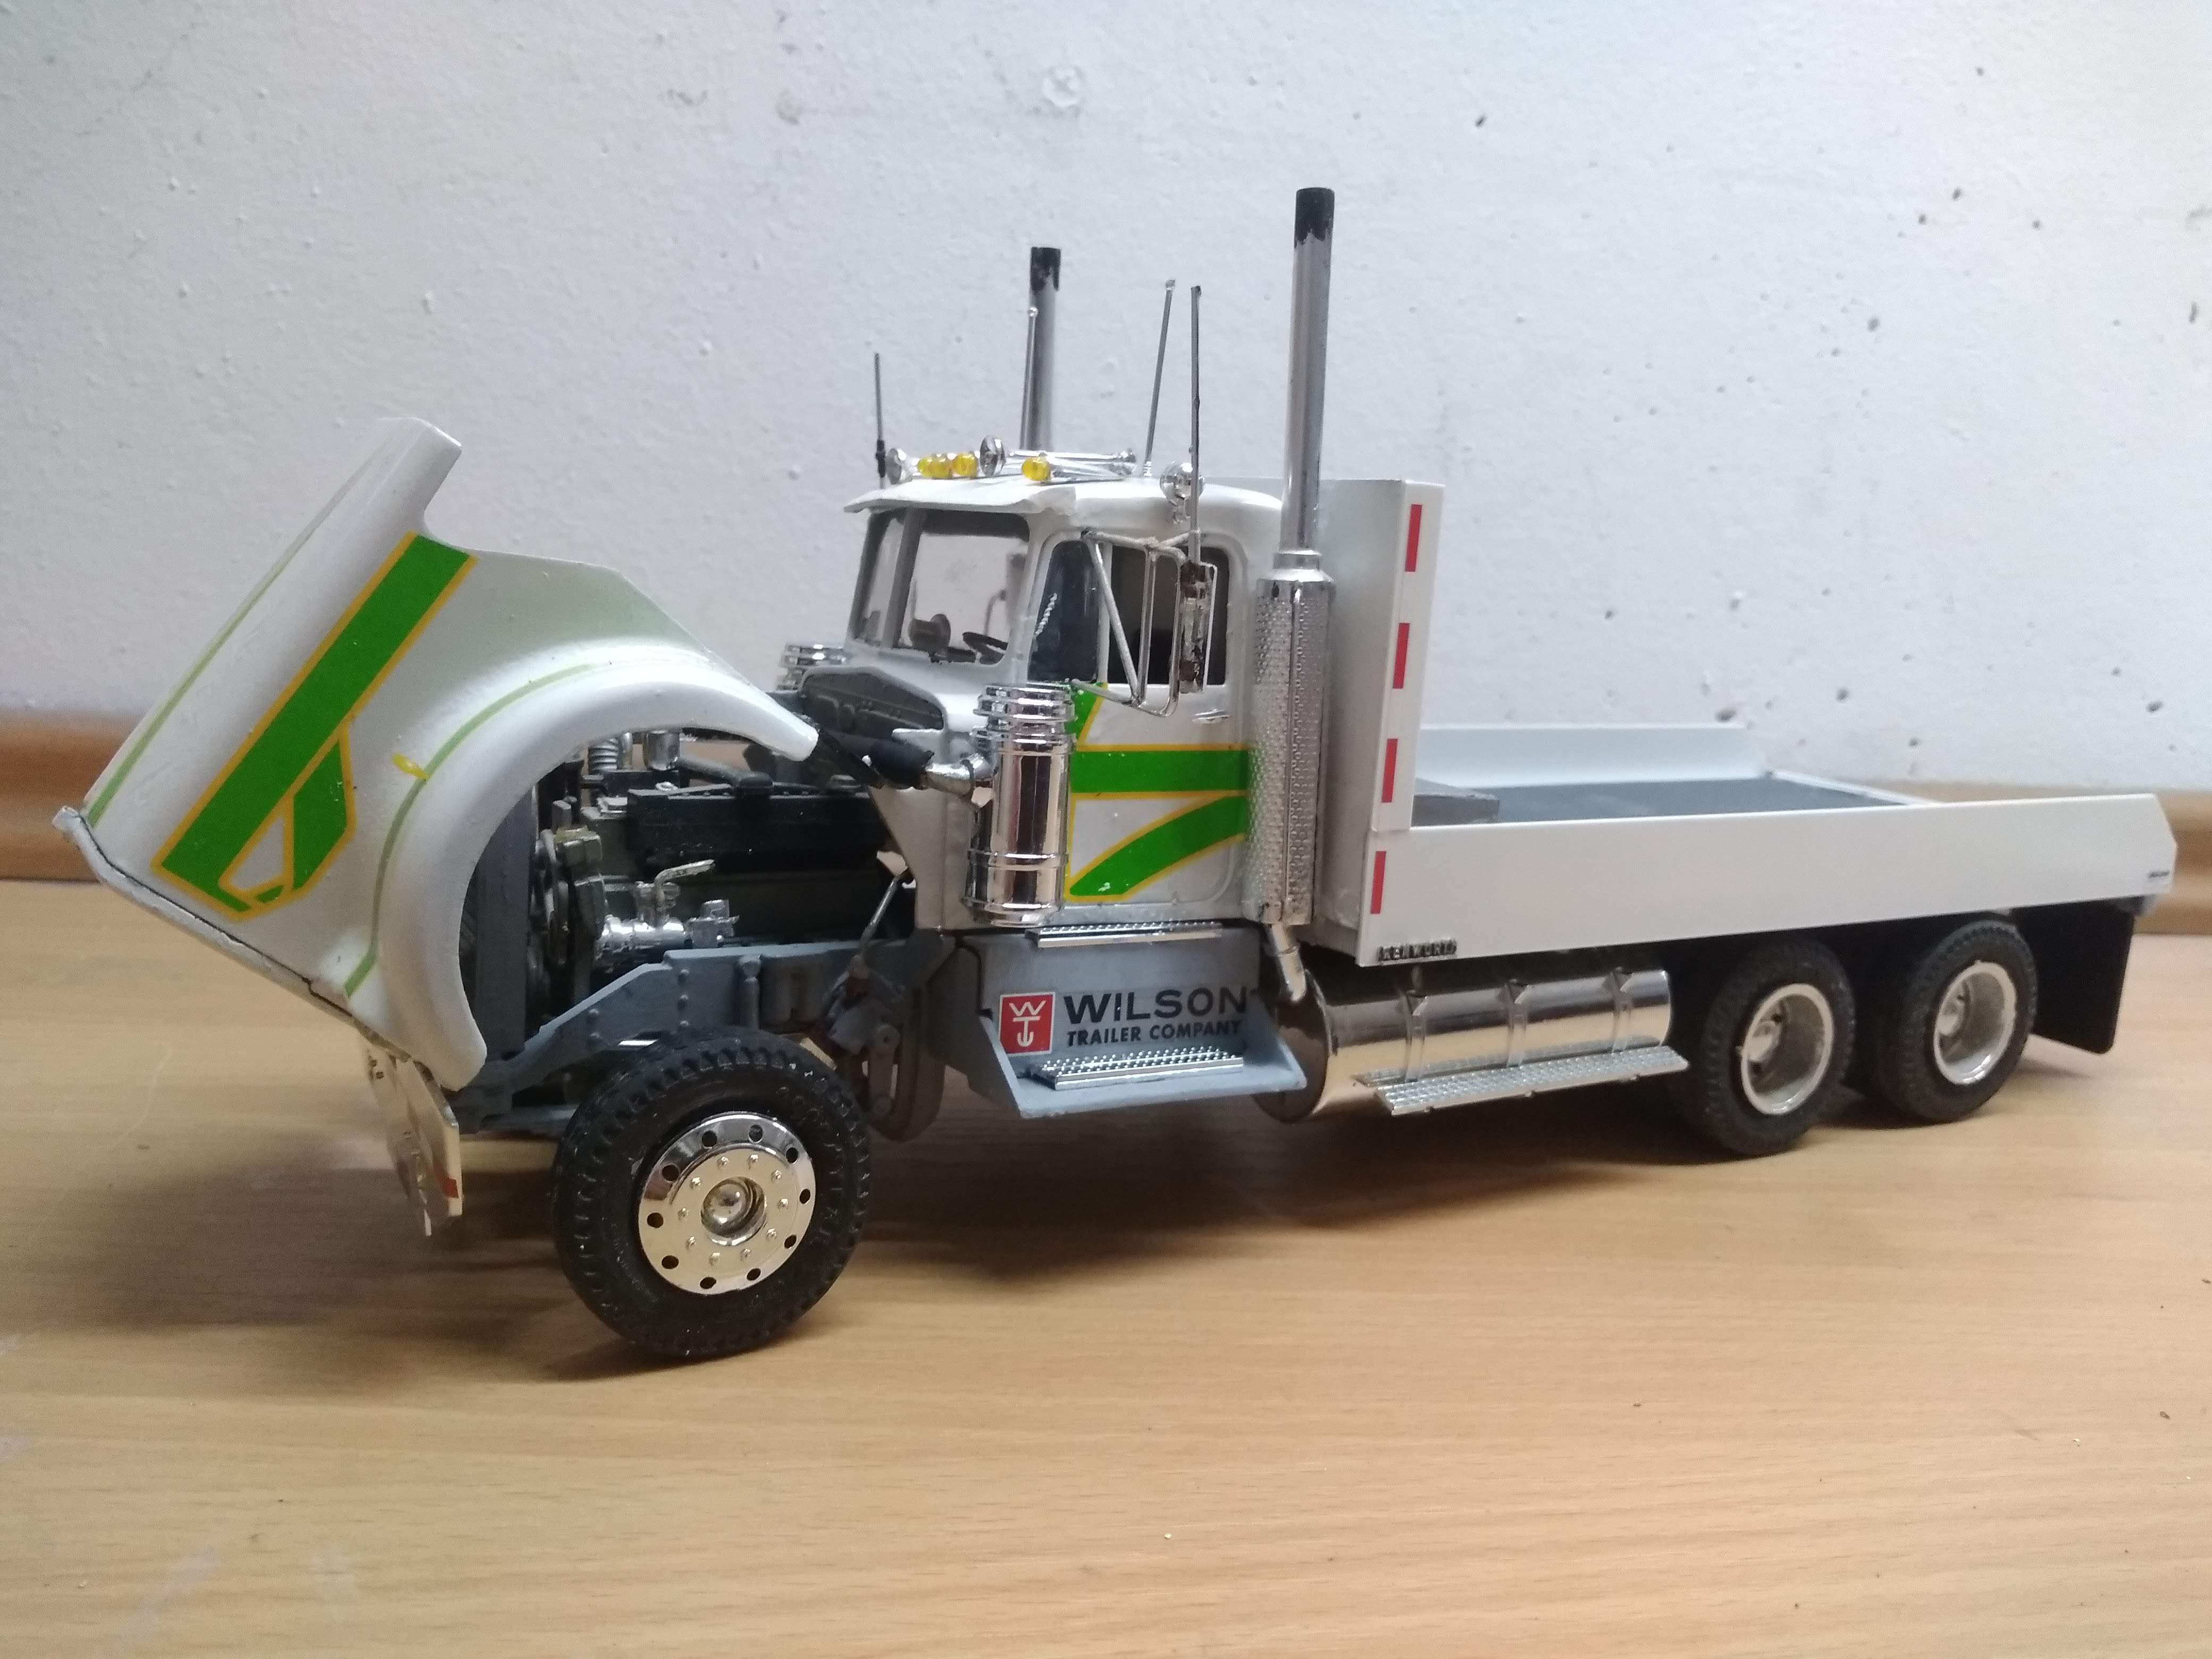
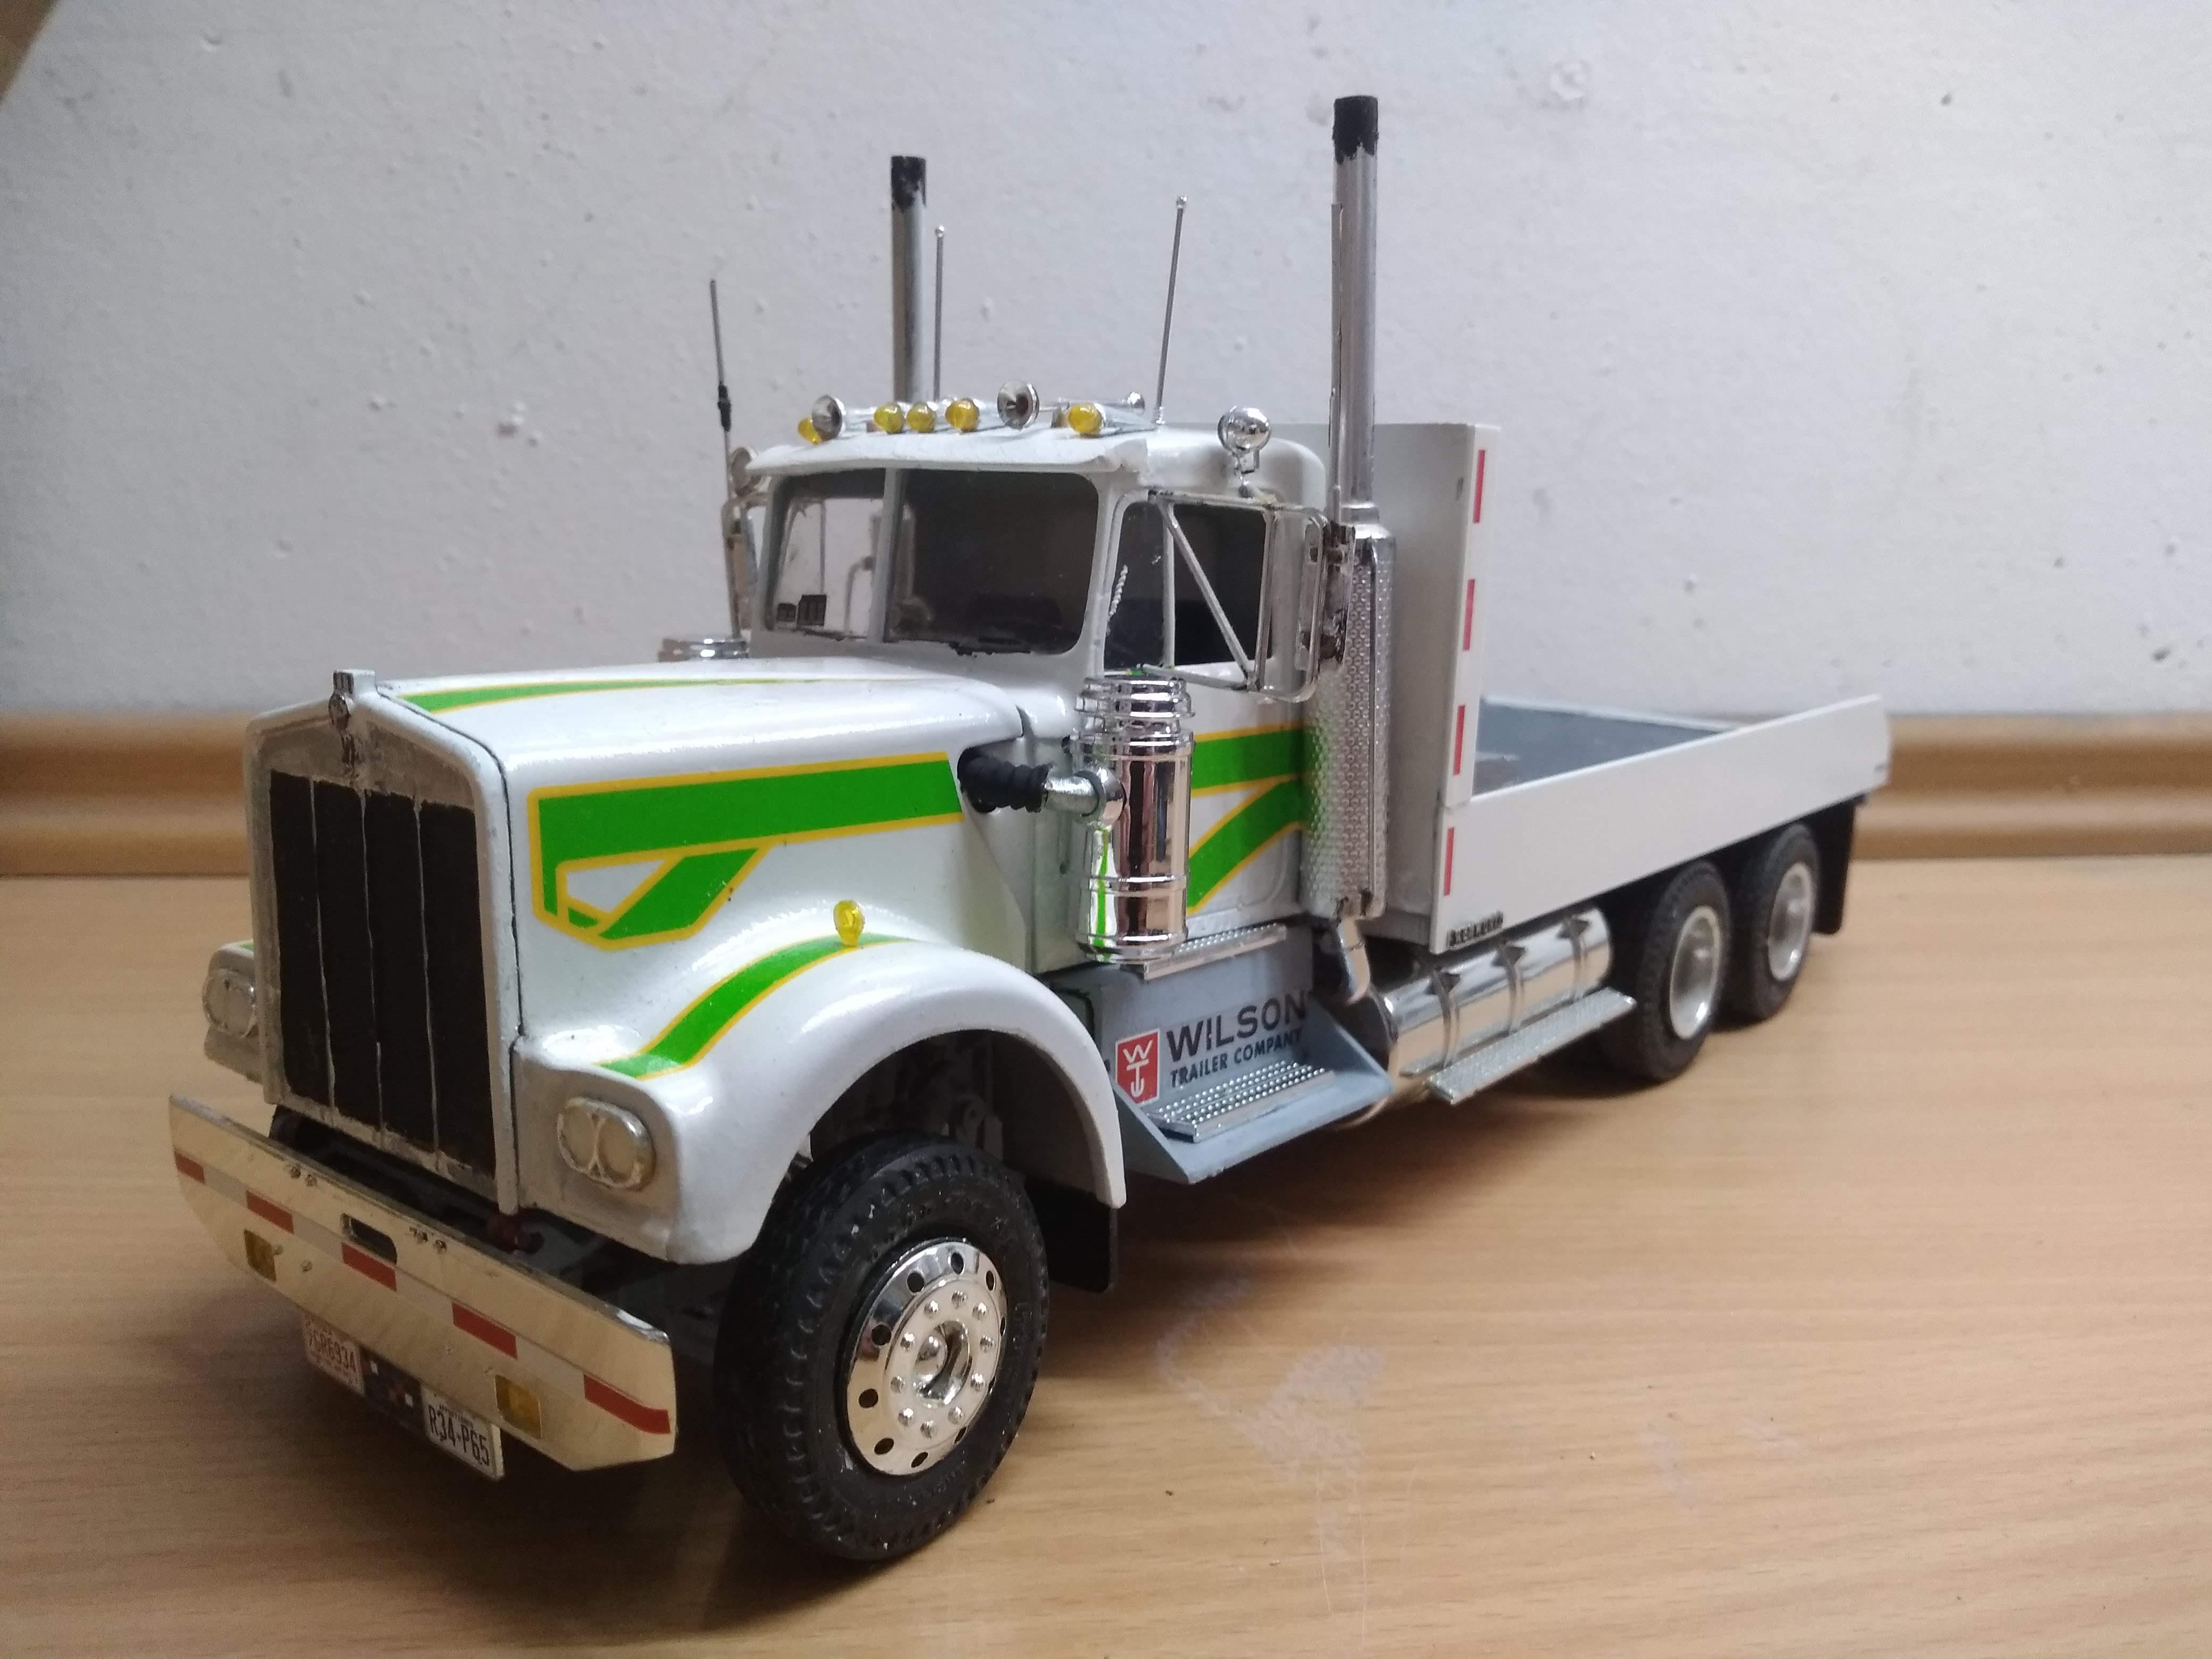
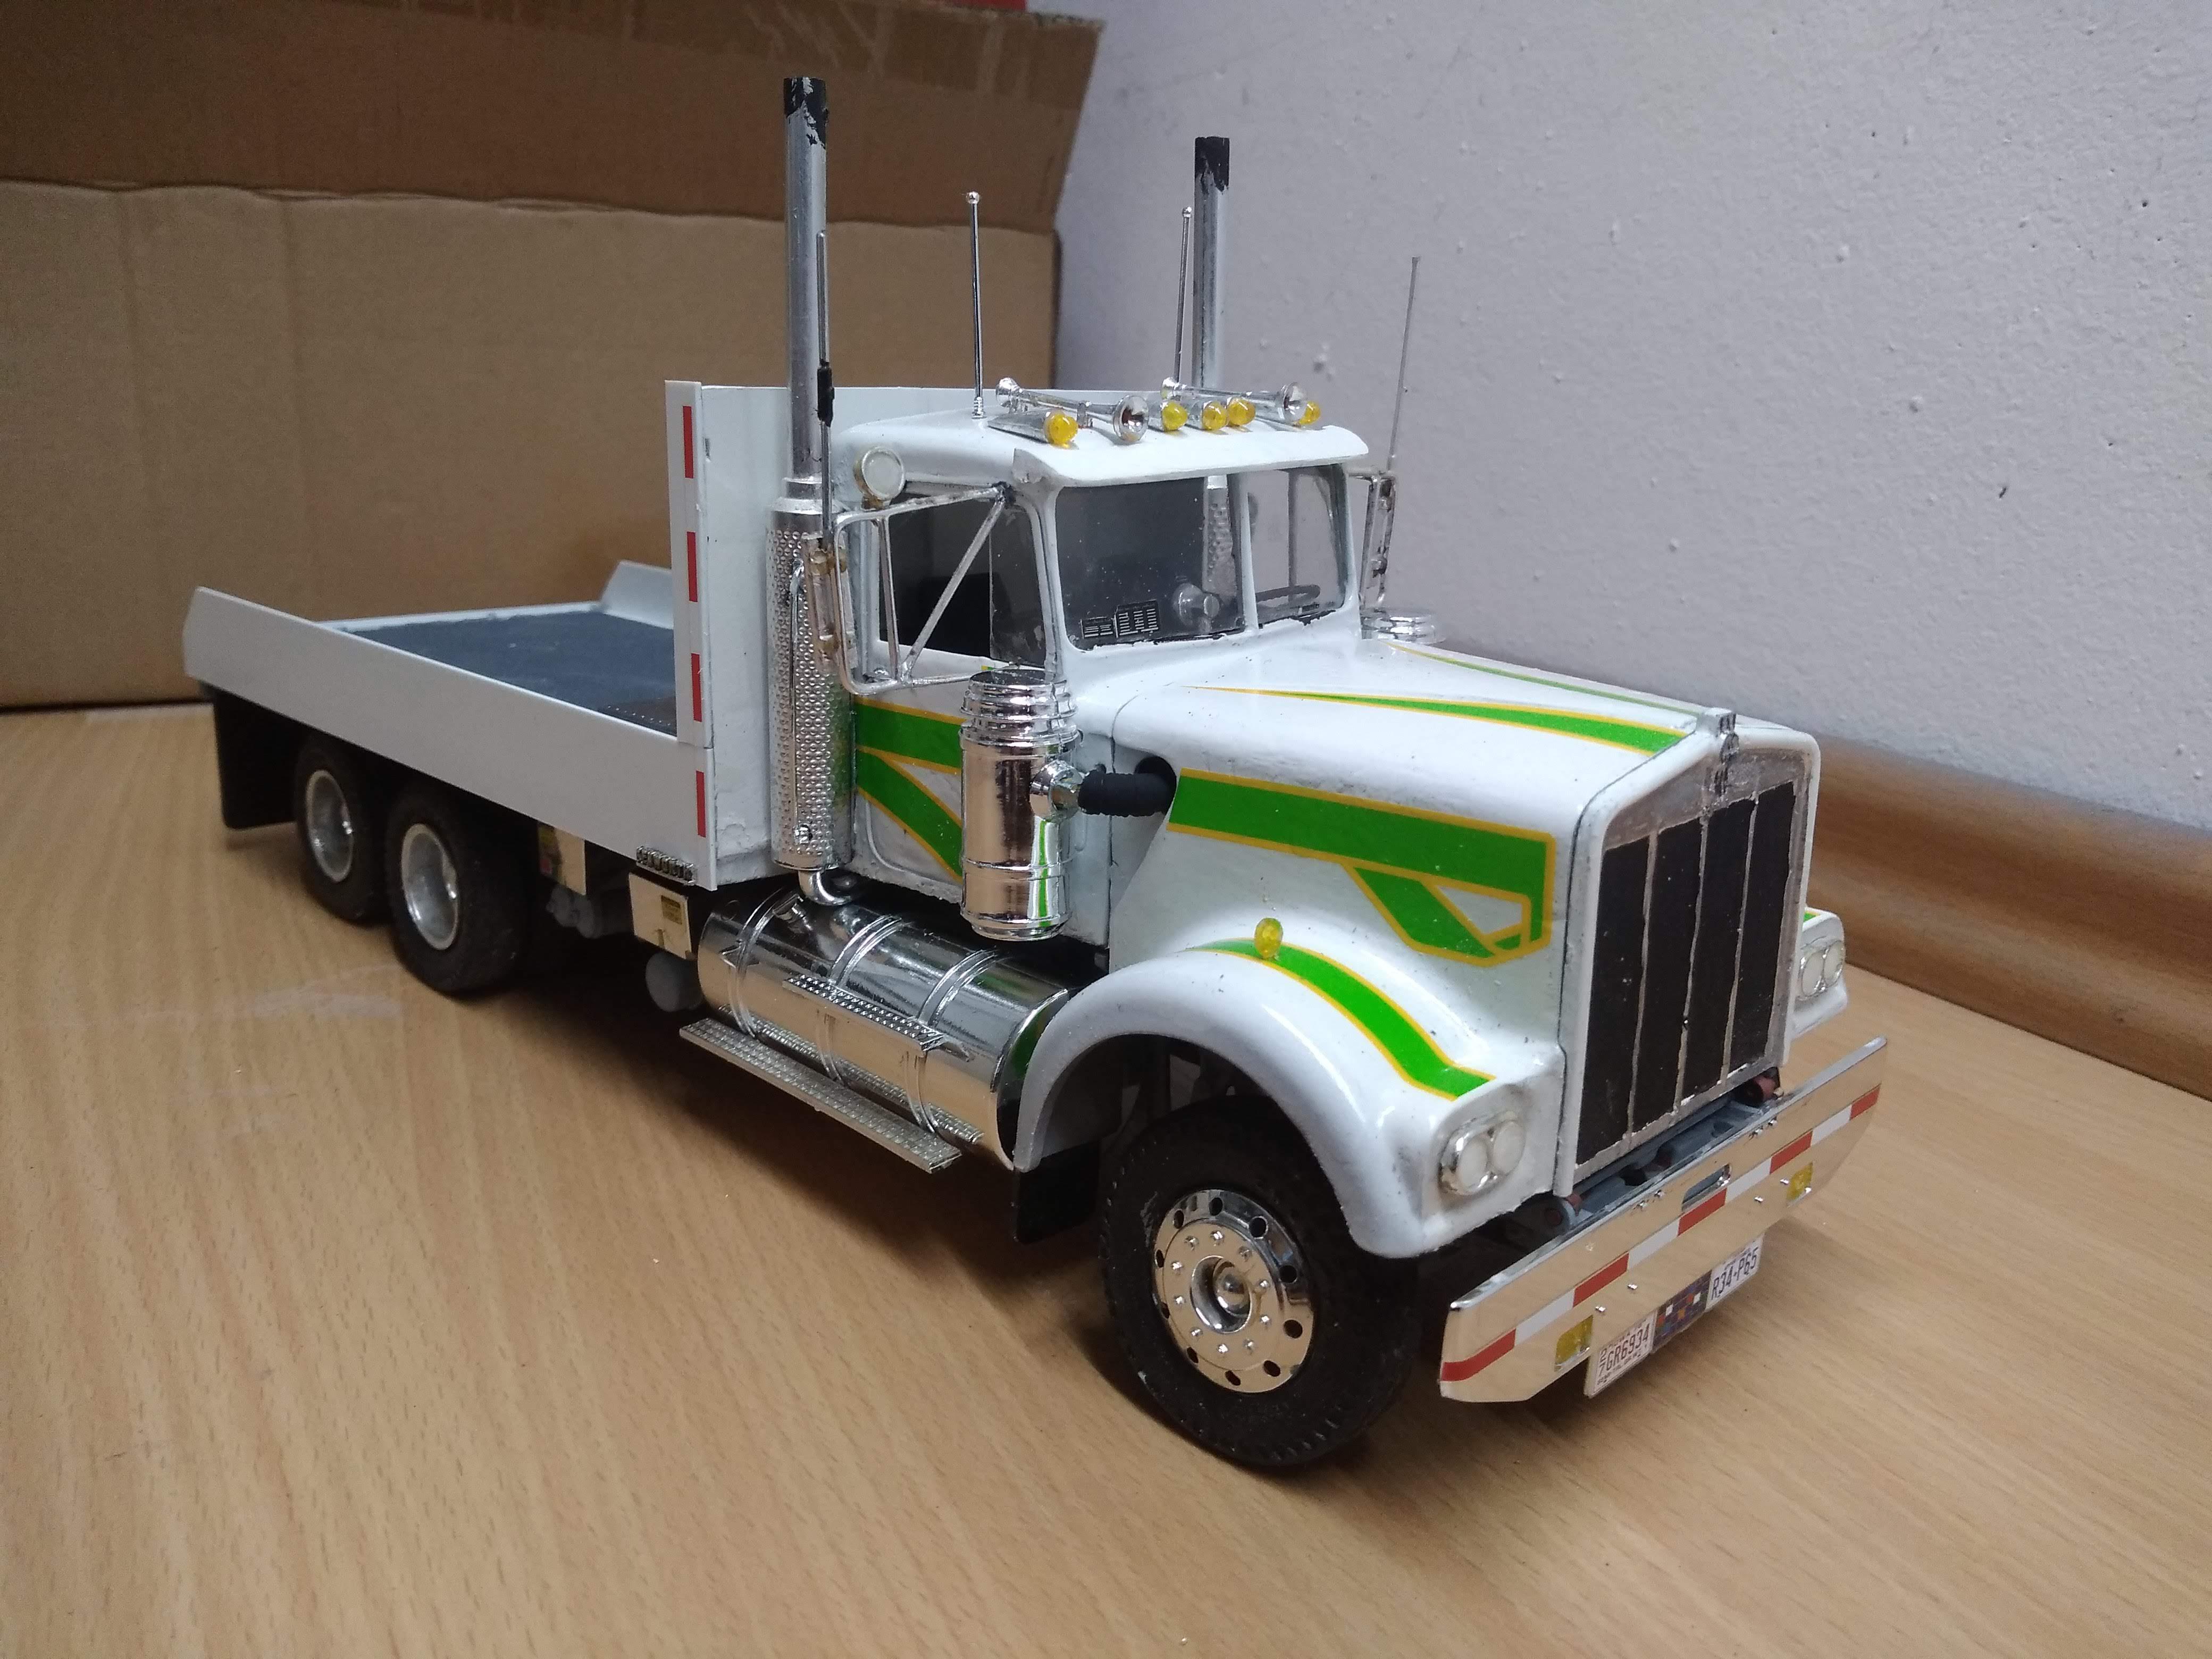
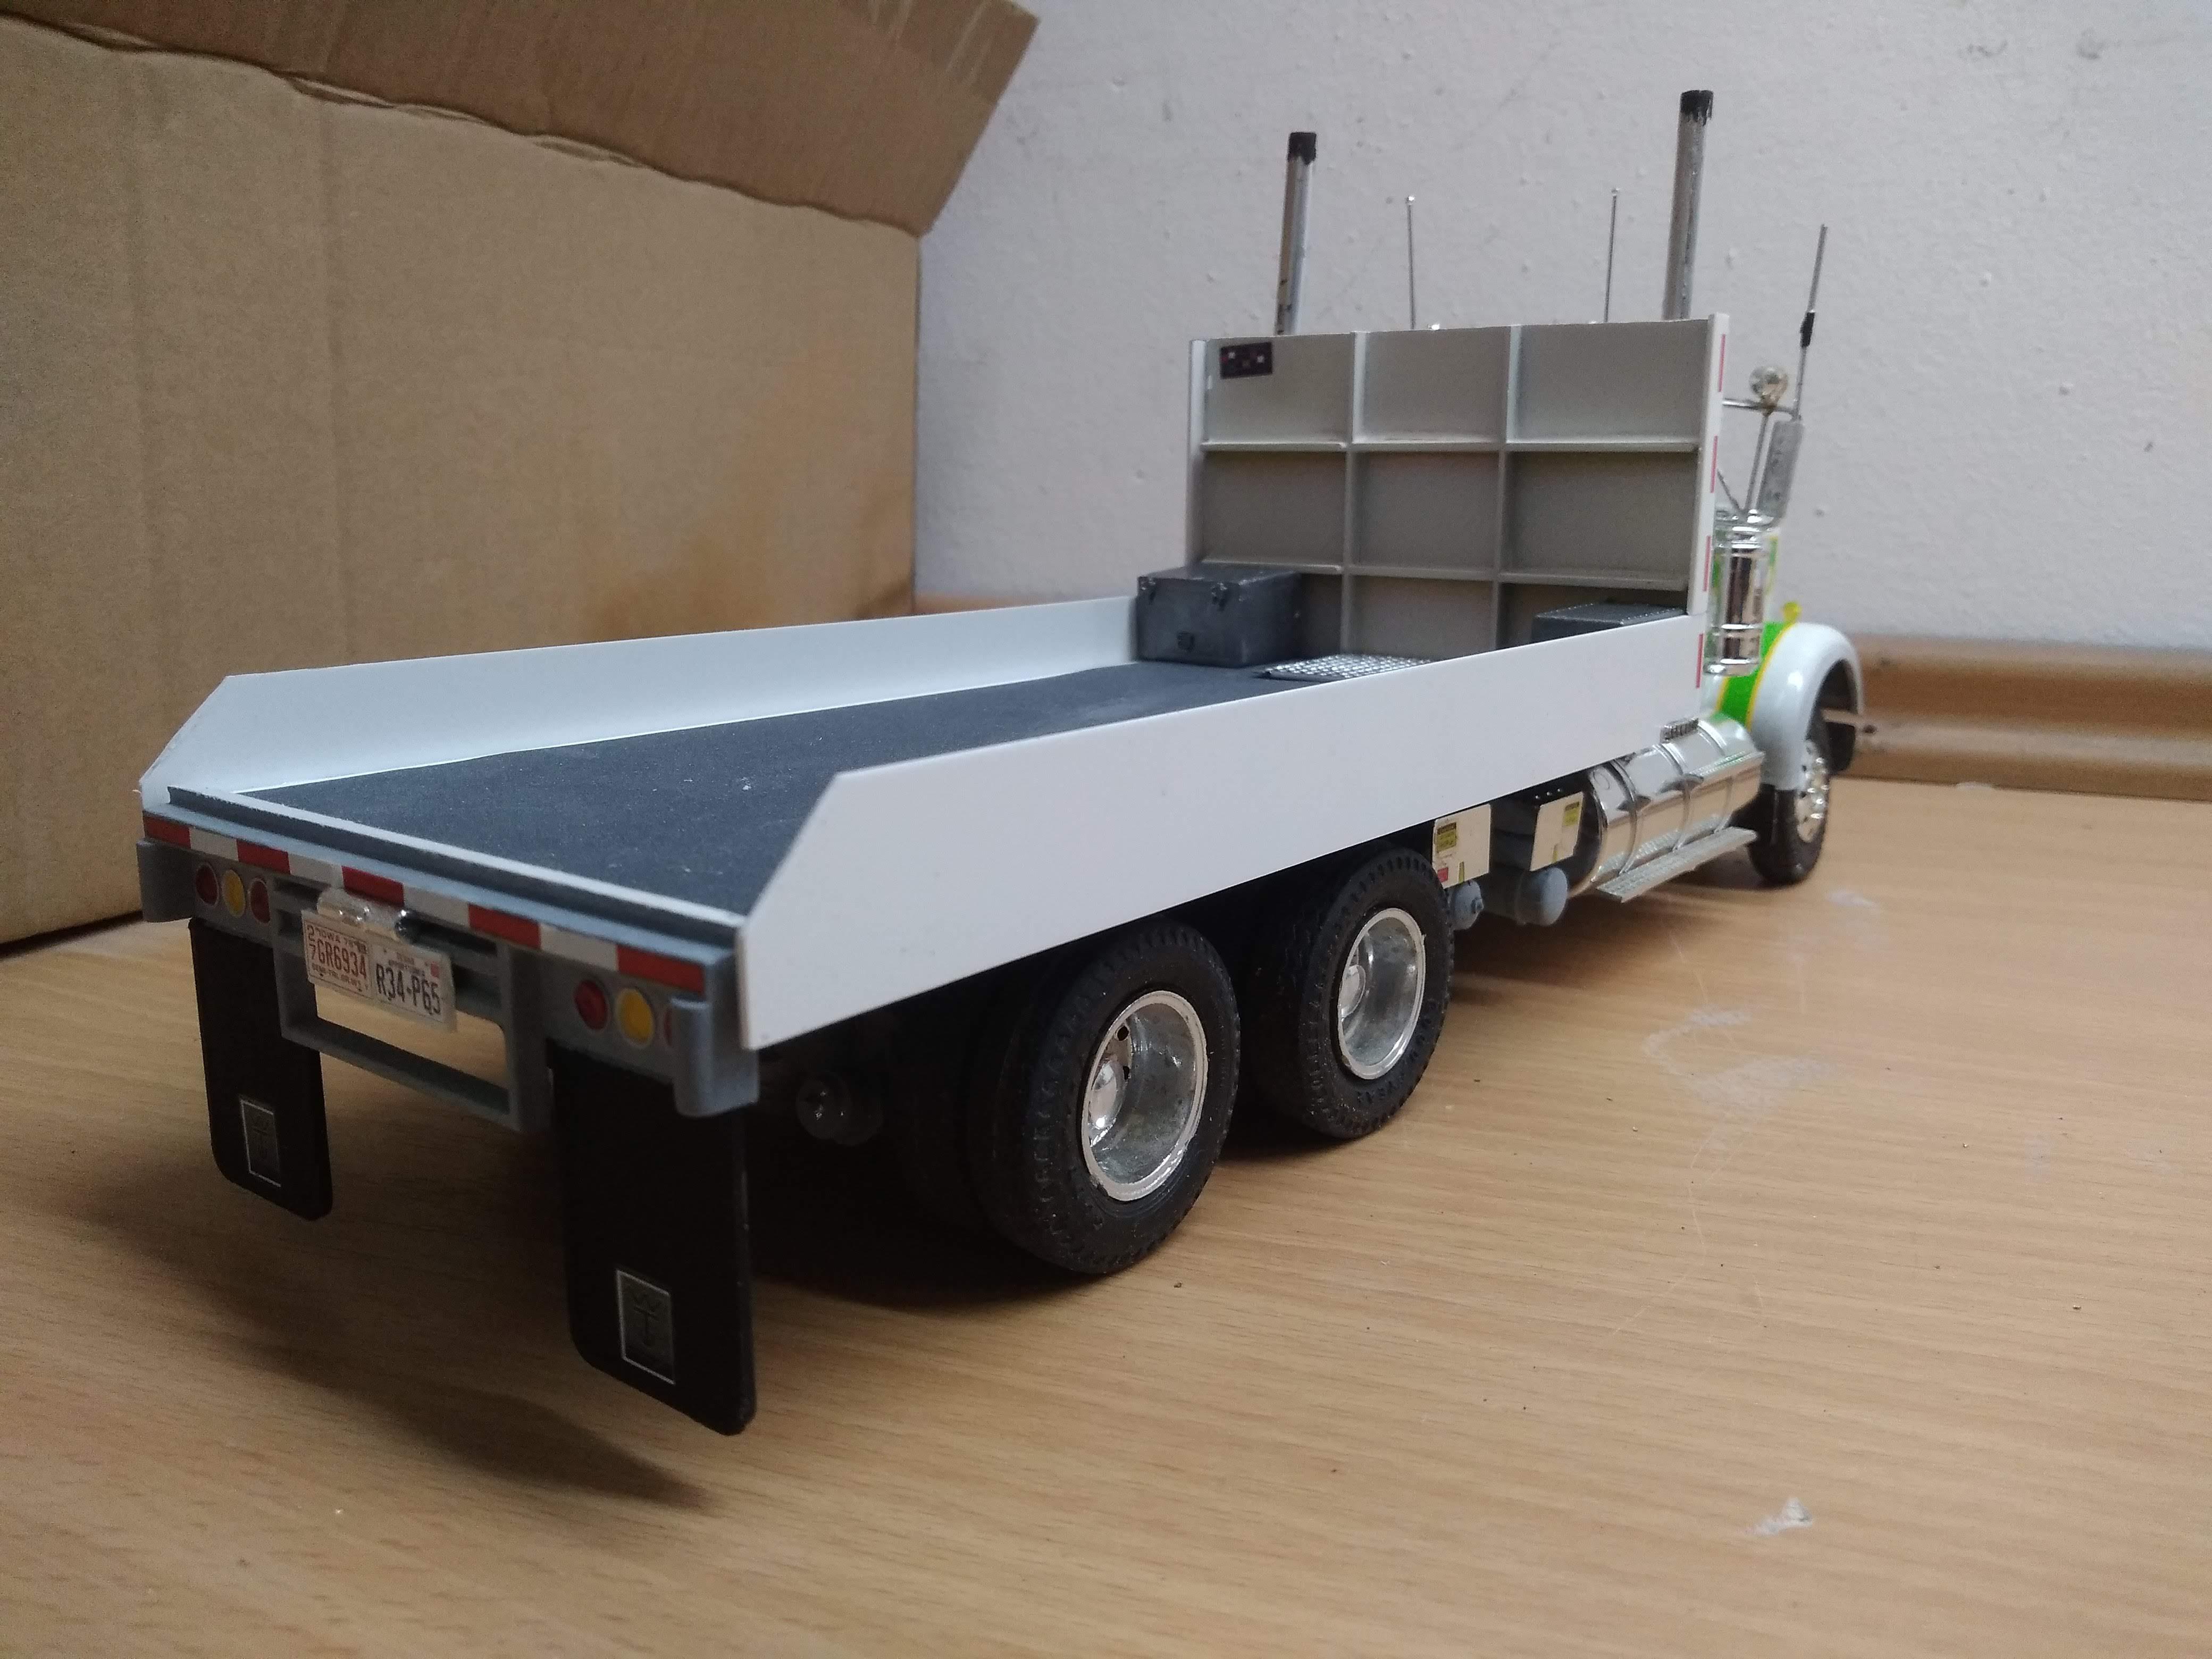
Hi everyone , I'd like to share one of my oldest truck kits, a Kenworth W 925 by amt. I built it at 14 so the quality of my work was heavily influenced by teenage impatience. I used only hand brushes for painting and didn't really know much about masking. Still it's a memory of the past. In 2022 I decided that I didn't like the truck in it's present make up so I partially took it apart and tried to strip off the paint without damaging the plastic. That had happened on a CJ7 kit. Made me quite sad! Anyway, this is how the KW looked before: I took off the sleeper and the fifth wheel. Then all the small parts like mirrors, pipes, tanks, ... Gave it a new paint job, new decals (from the Italeri White Western Star road train). Then I decided that I already had so many trailerless tractors so I made a scratch car platform! The chassis was and is everything but straight. This way you can't see it! ? Hope you like it!
-
Another "Convoy" Truck!
Jürgen M. replied to Jürgen M.'s topic in WIP: Model Trucks: Big Rigs and Heavy Equipment
Thanks! I began building Models at about 9! First only cars, then planes and ships and at 13 I got my first truck kit. It was the amt Peterbilt 359 1/43 kit with a wrecker and a tractor. They might not have been the best start into the world of truck kits because the parts we're quite small but I got them together and I was very proud at that time. Unfortunately we moved shortly afterwards and my parents didn't really care about my model kits so a lot of them didn't survive including the two Peterbilts. So my first "real" truck kit which survived till today was this Mack R685 that was transformed into "Rubber Duck" as soon as I had seen the movie!
-
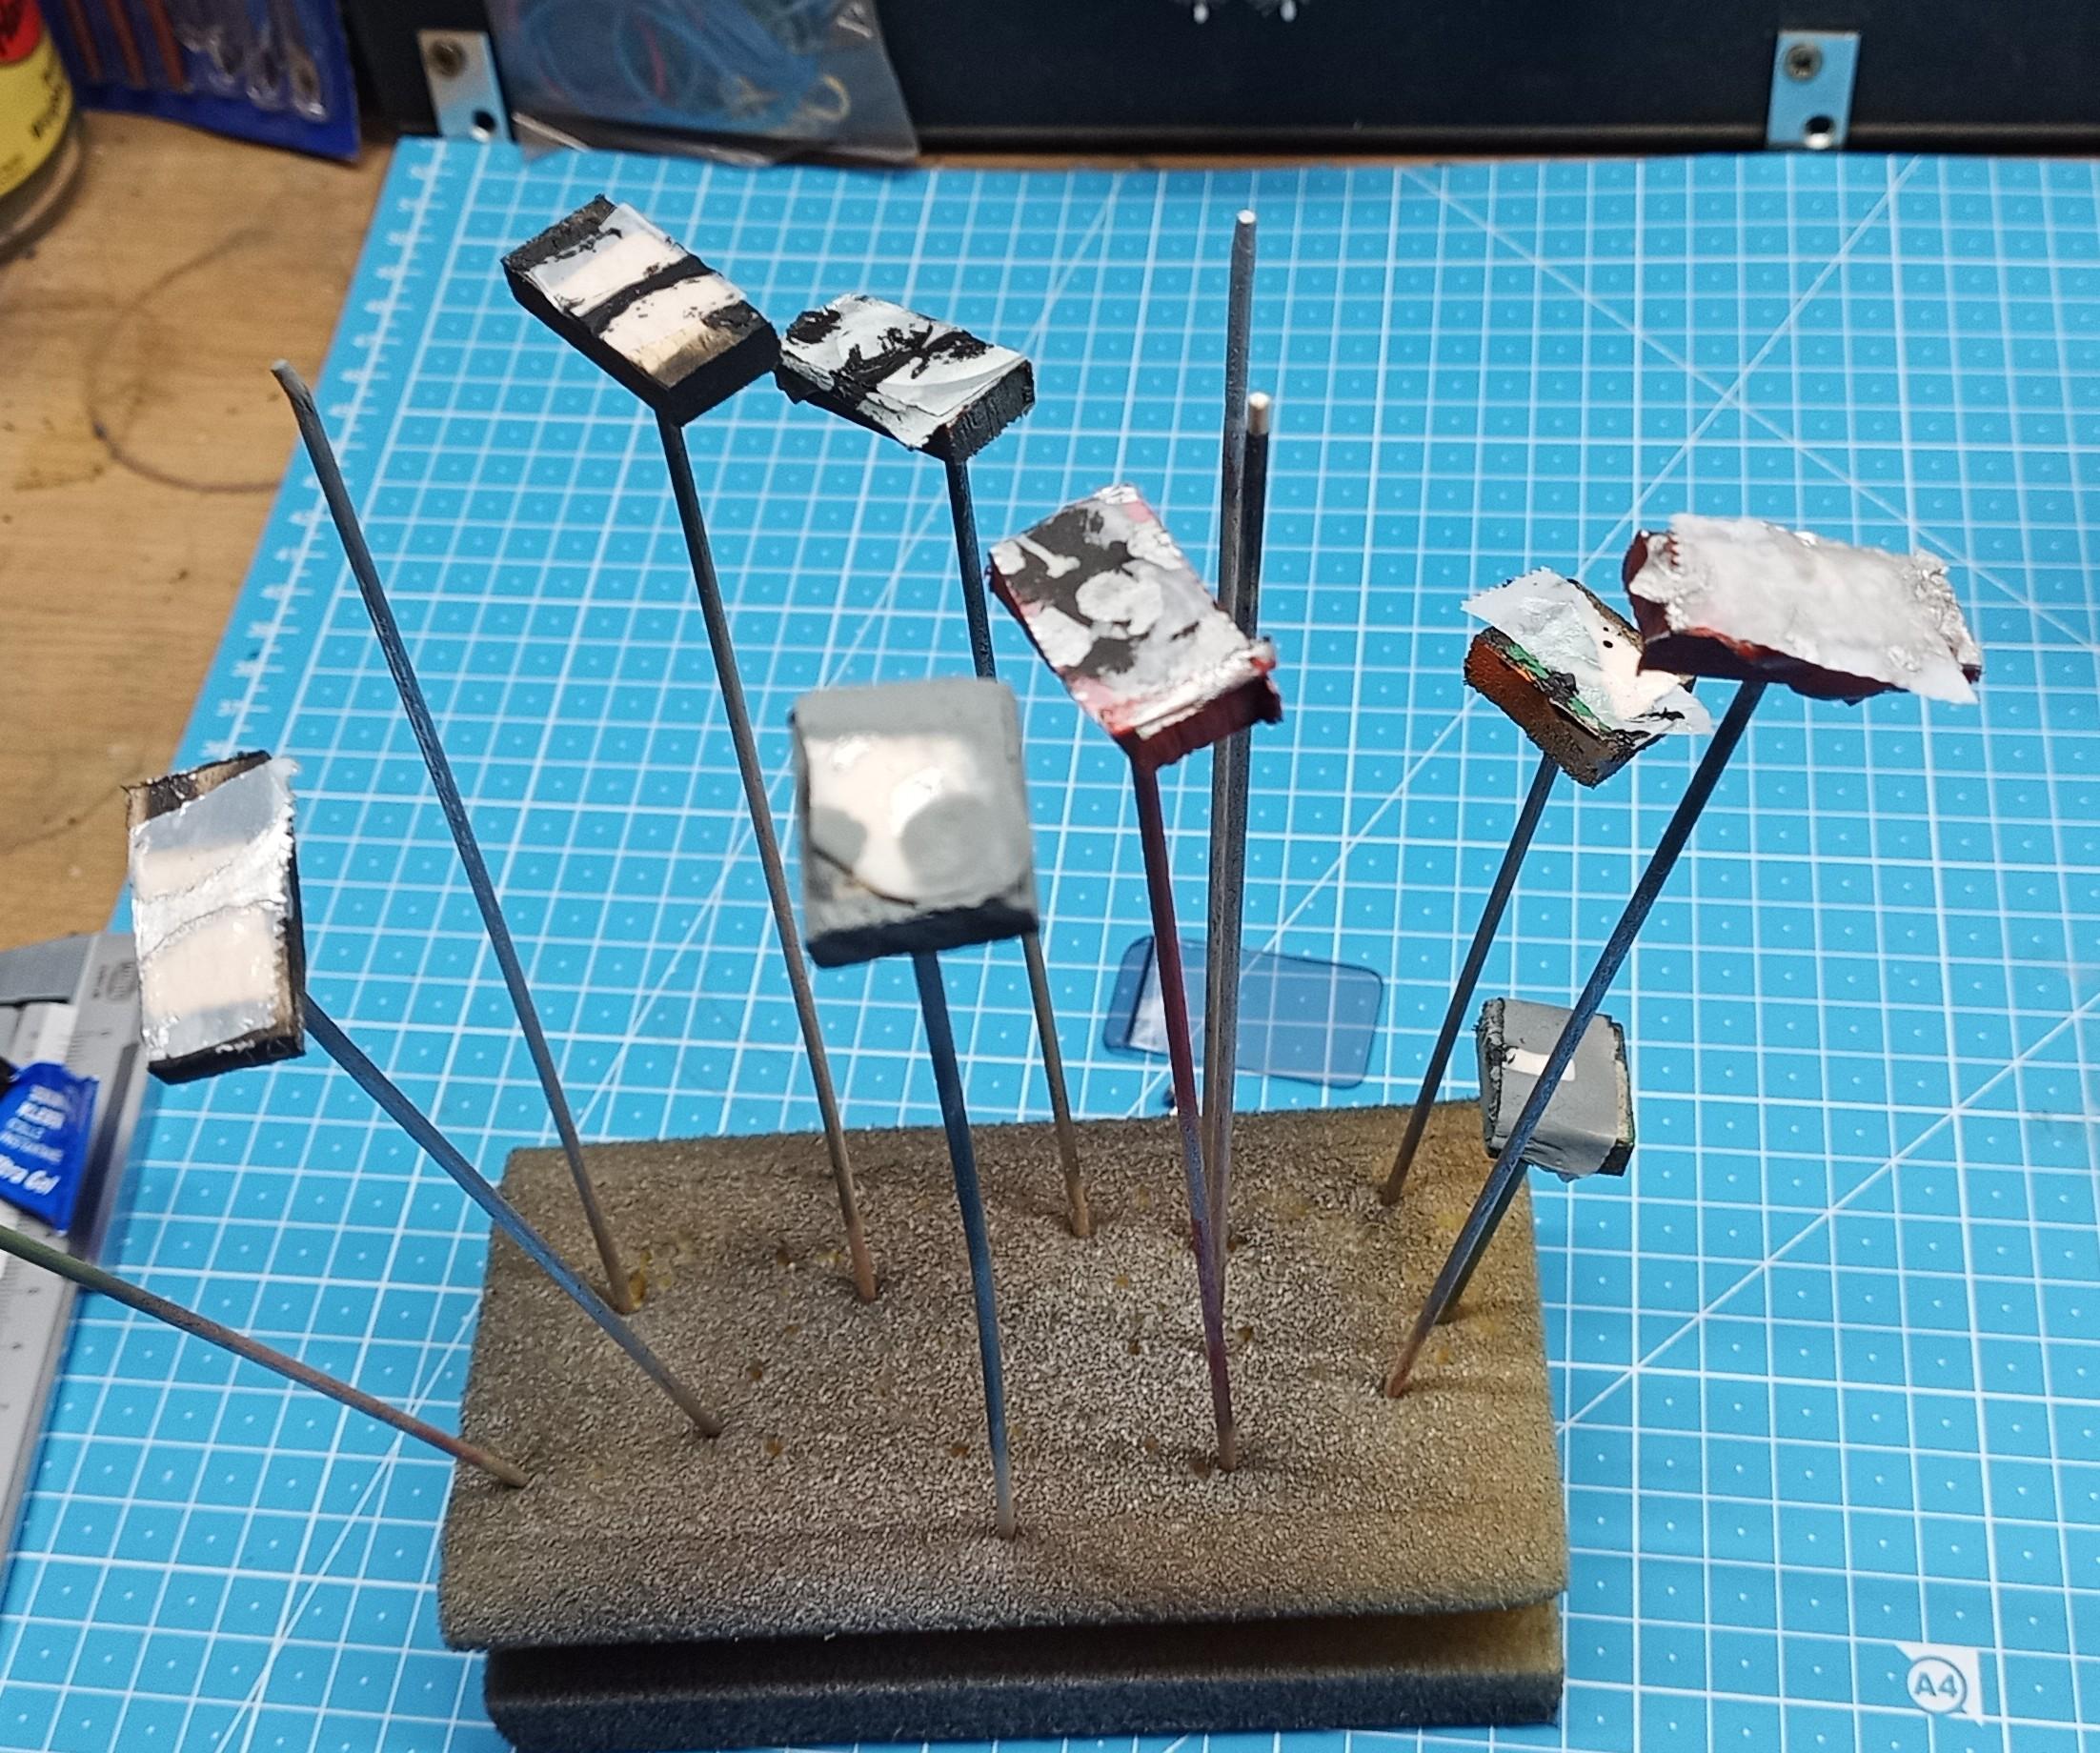
Nice idea by the way using those clamps to hold the parts while painting. I also use the wooden sticks but combined with flat wooden squares I cut in pieces from a long 12 x 5 x 100 mm profile! I then drill holes in one side to fit in the wooden sticks. Then I cut off pieces of double sided tape used for carpeting and stick them on. Looks like this: (used already) I'll have to think about using clamps for some parts though. Cool idea!
-
Another "Convoy" Truck!
Jürgen M. replied to Jürgen M.'s topic in WIP: Model Trucks: Big Rigs and Heavy Equipment
Thanks! That's really excellent! I don't know what to say! I'll do my best! ? -
Another "Convoy" Truck!
Jürgen M. replied to Jürgen M.'s topic in WIP: Model Trucks: Big Rigs and Heavy Equipment
I actually put that red on to make it look like rust. Not really realistic but the idea was there! The chassis isn't straight either but noone can see that! ?