Radretireddad
-
Posts
521 -
Joined
-
Last visited
Content Type
Profiles
Forums
Events
Gallery
Everything posted by Radretireddad
-
Yep! There were three Civic kits in the series and this is the only one that can’t be built stock. I’m glad I grabbed all the kits in the series when they were on the shelves because reissues aren’t likely anytime soon. Thanks Michael!
-
Thanks Chris!
-
I liken tuner wings on compact cars to thinking it’s fashionable to walk around wearing a pair of moose antlers. Thanks James!
-
Yeah, leaving the ridiculous wings off the trunk and painting the clear stock hood really kept things tidy. Thanks David.
-
Thanks so much Mike!
-
Thanks so much Larry!
-
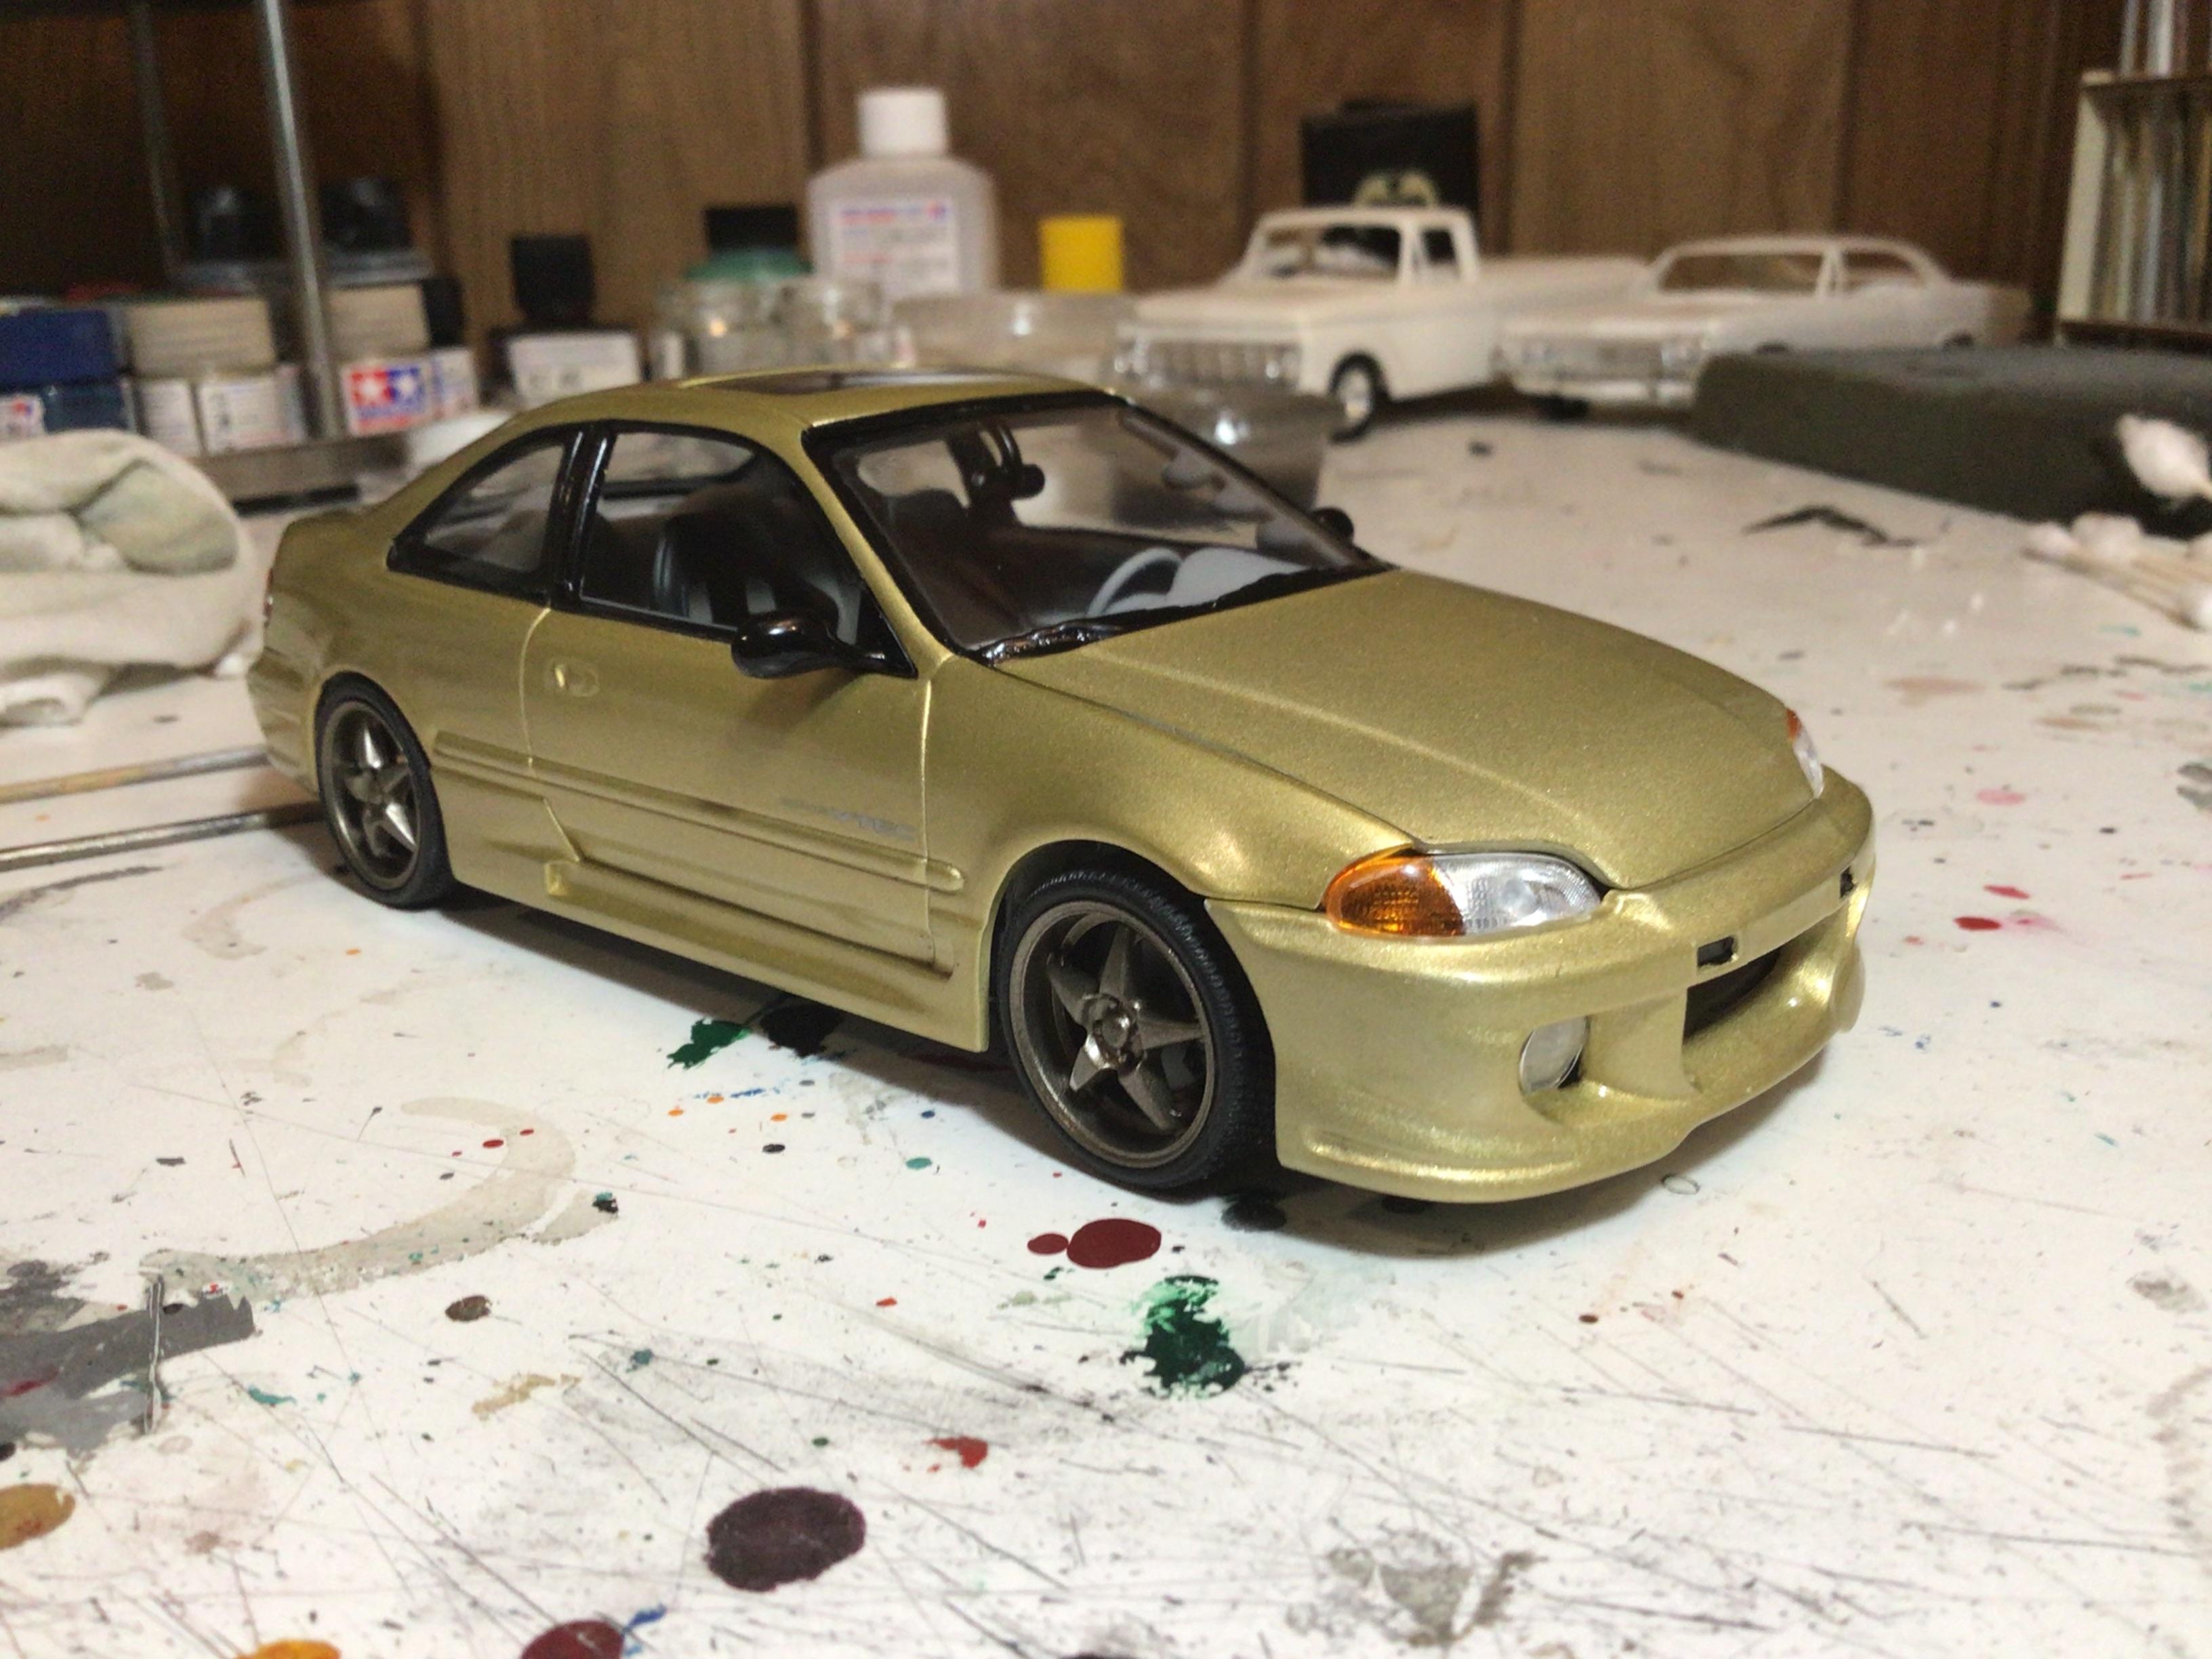
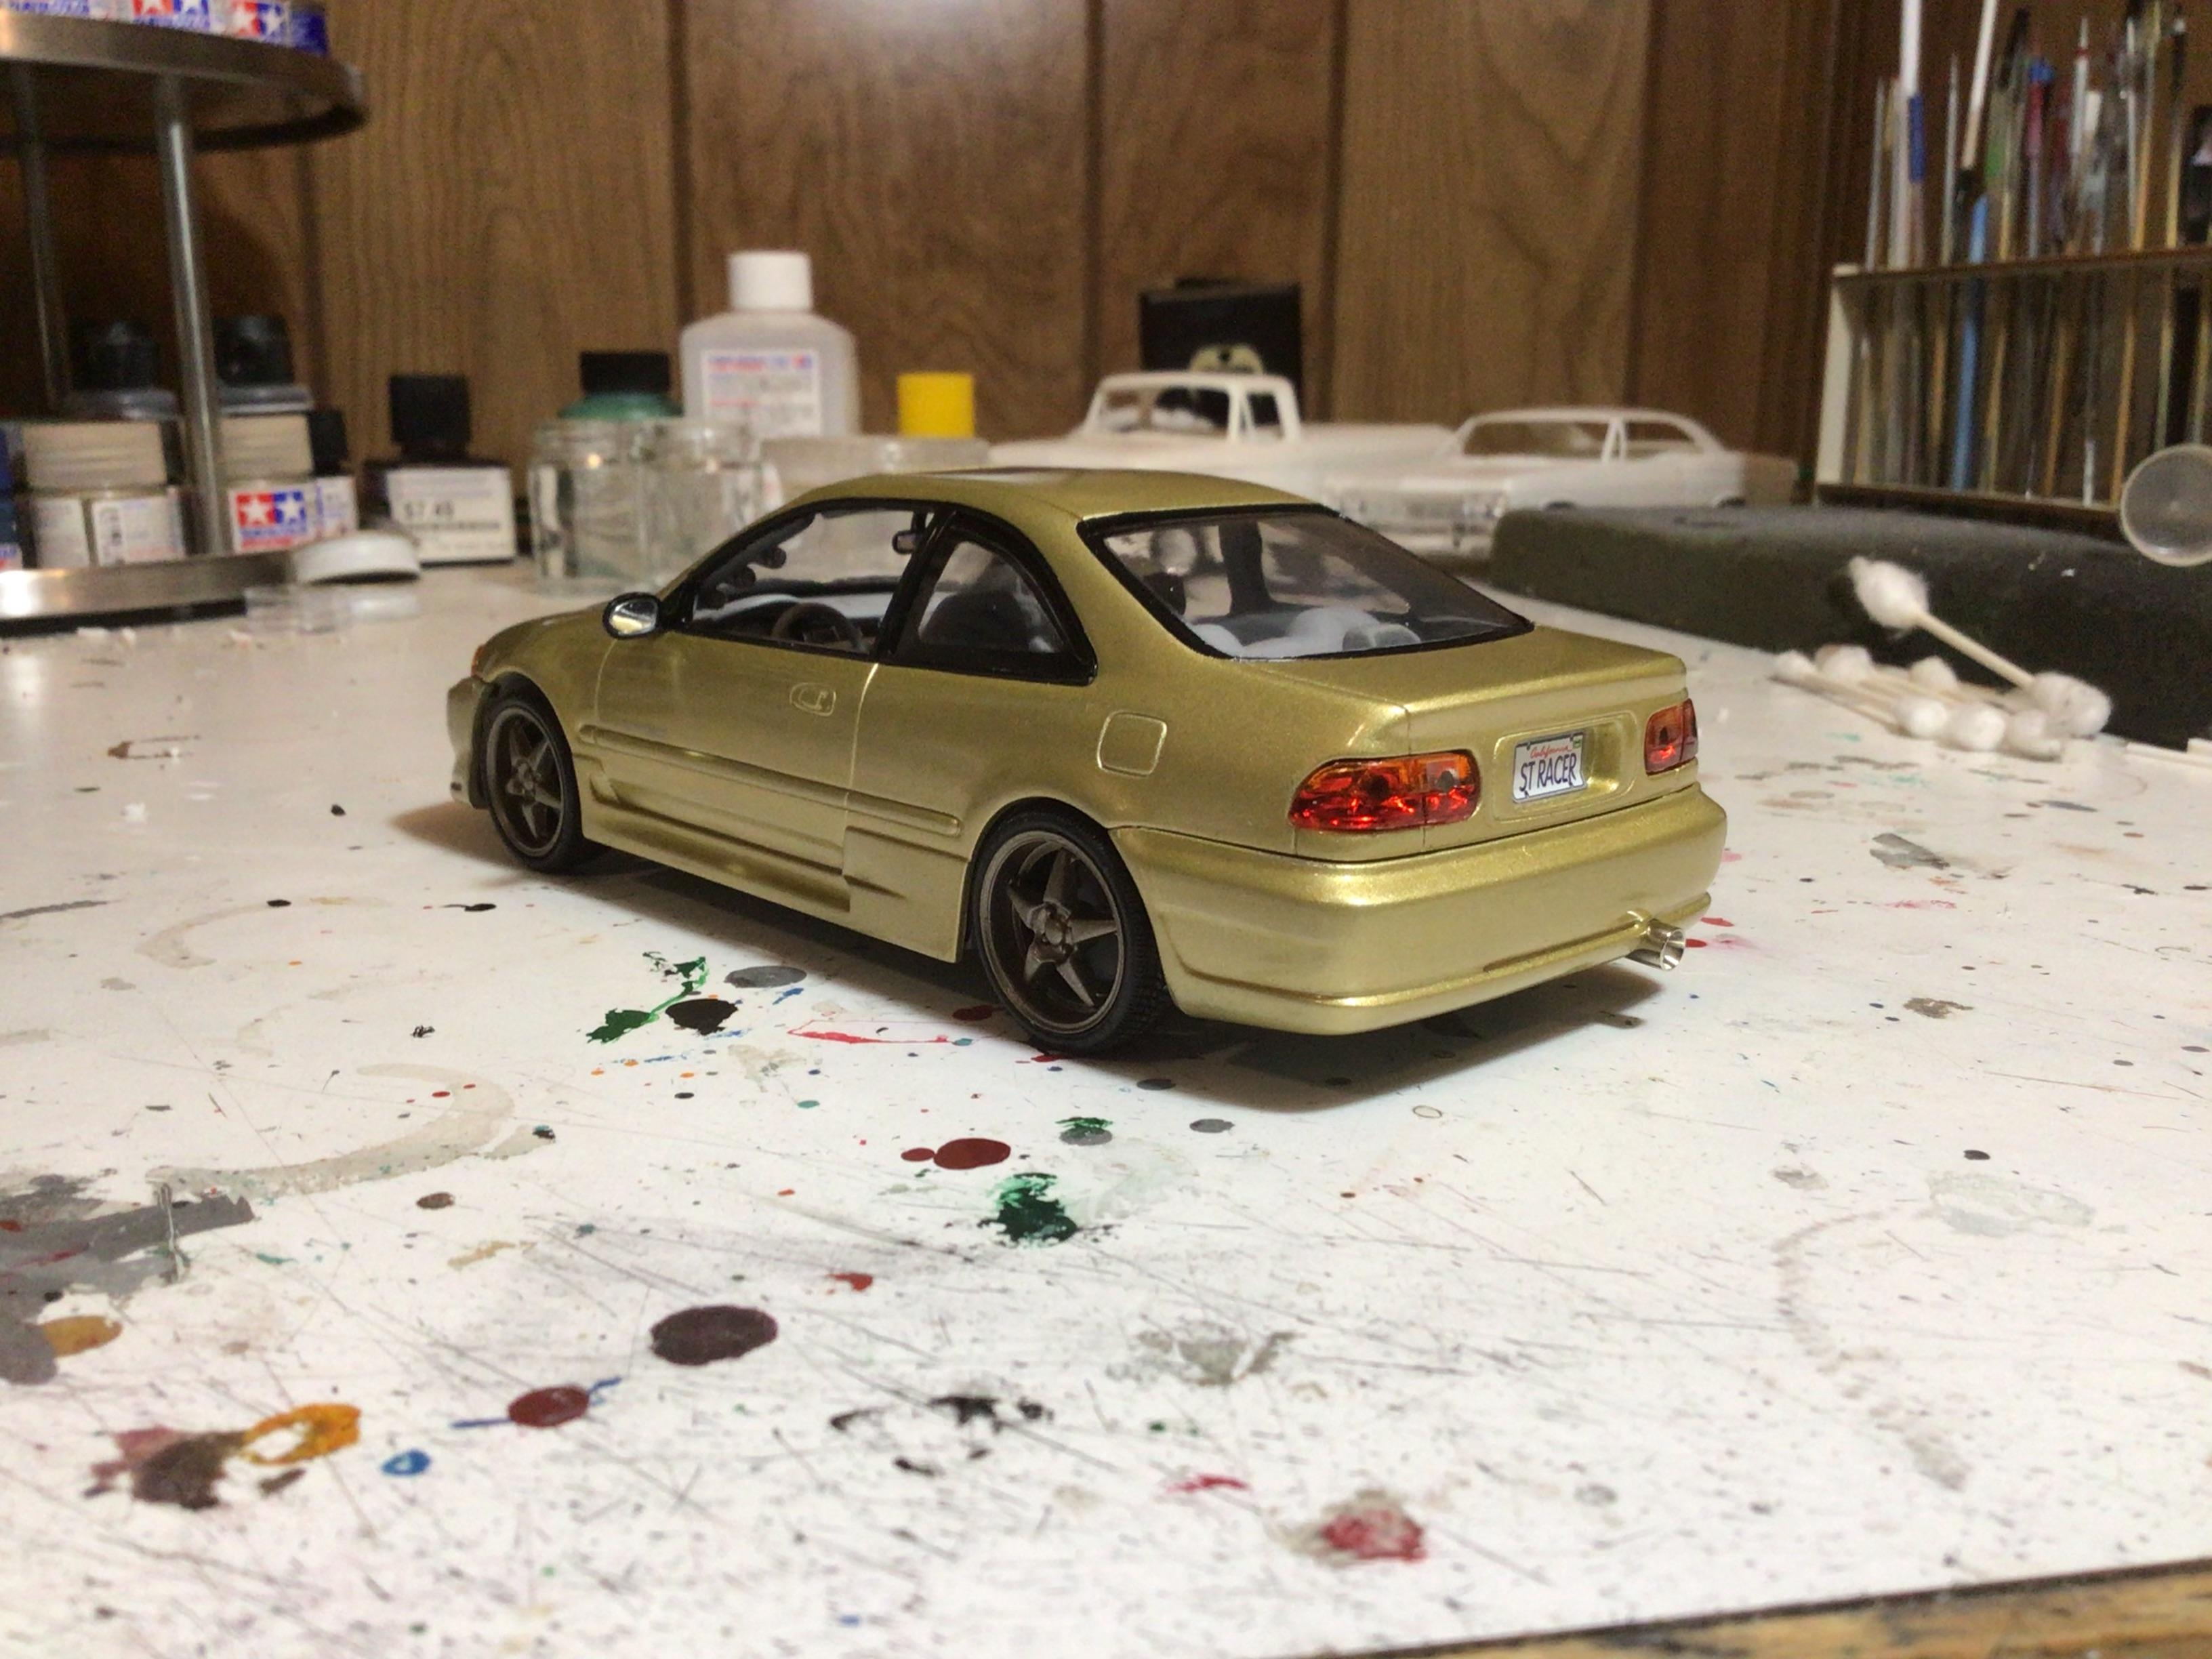
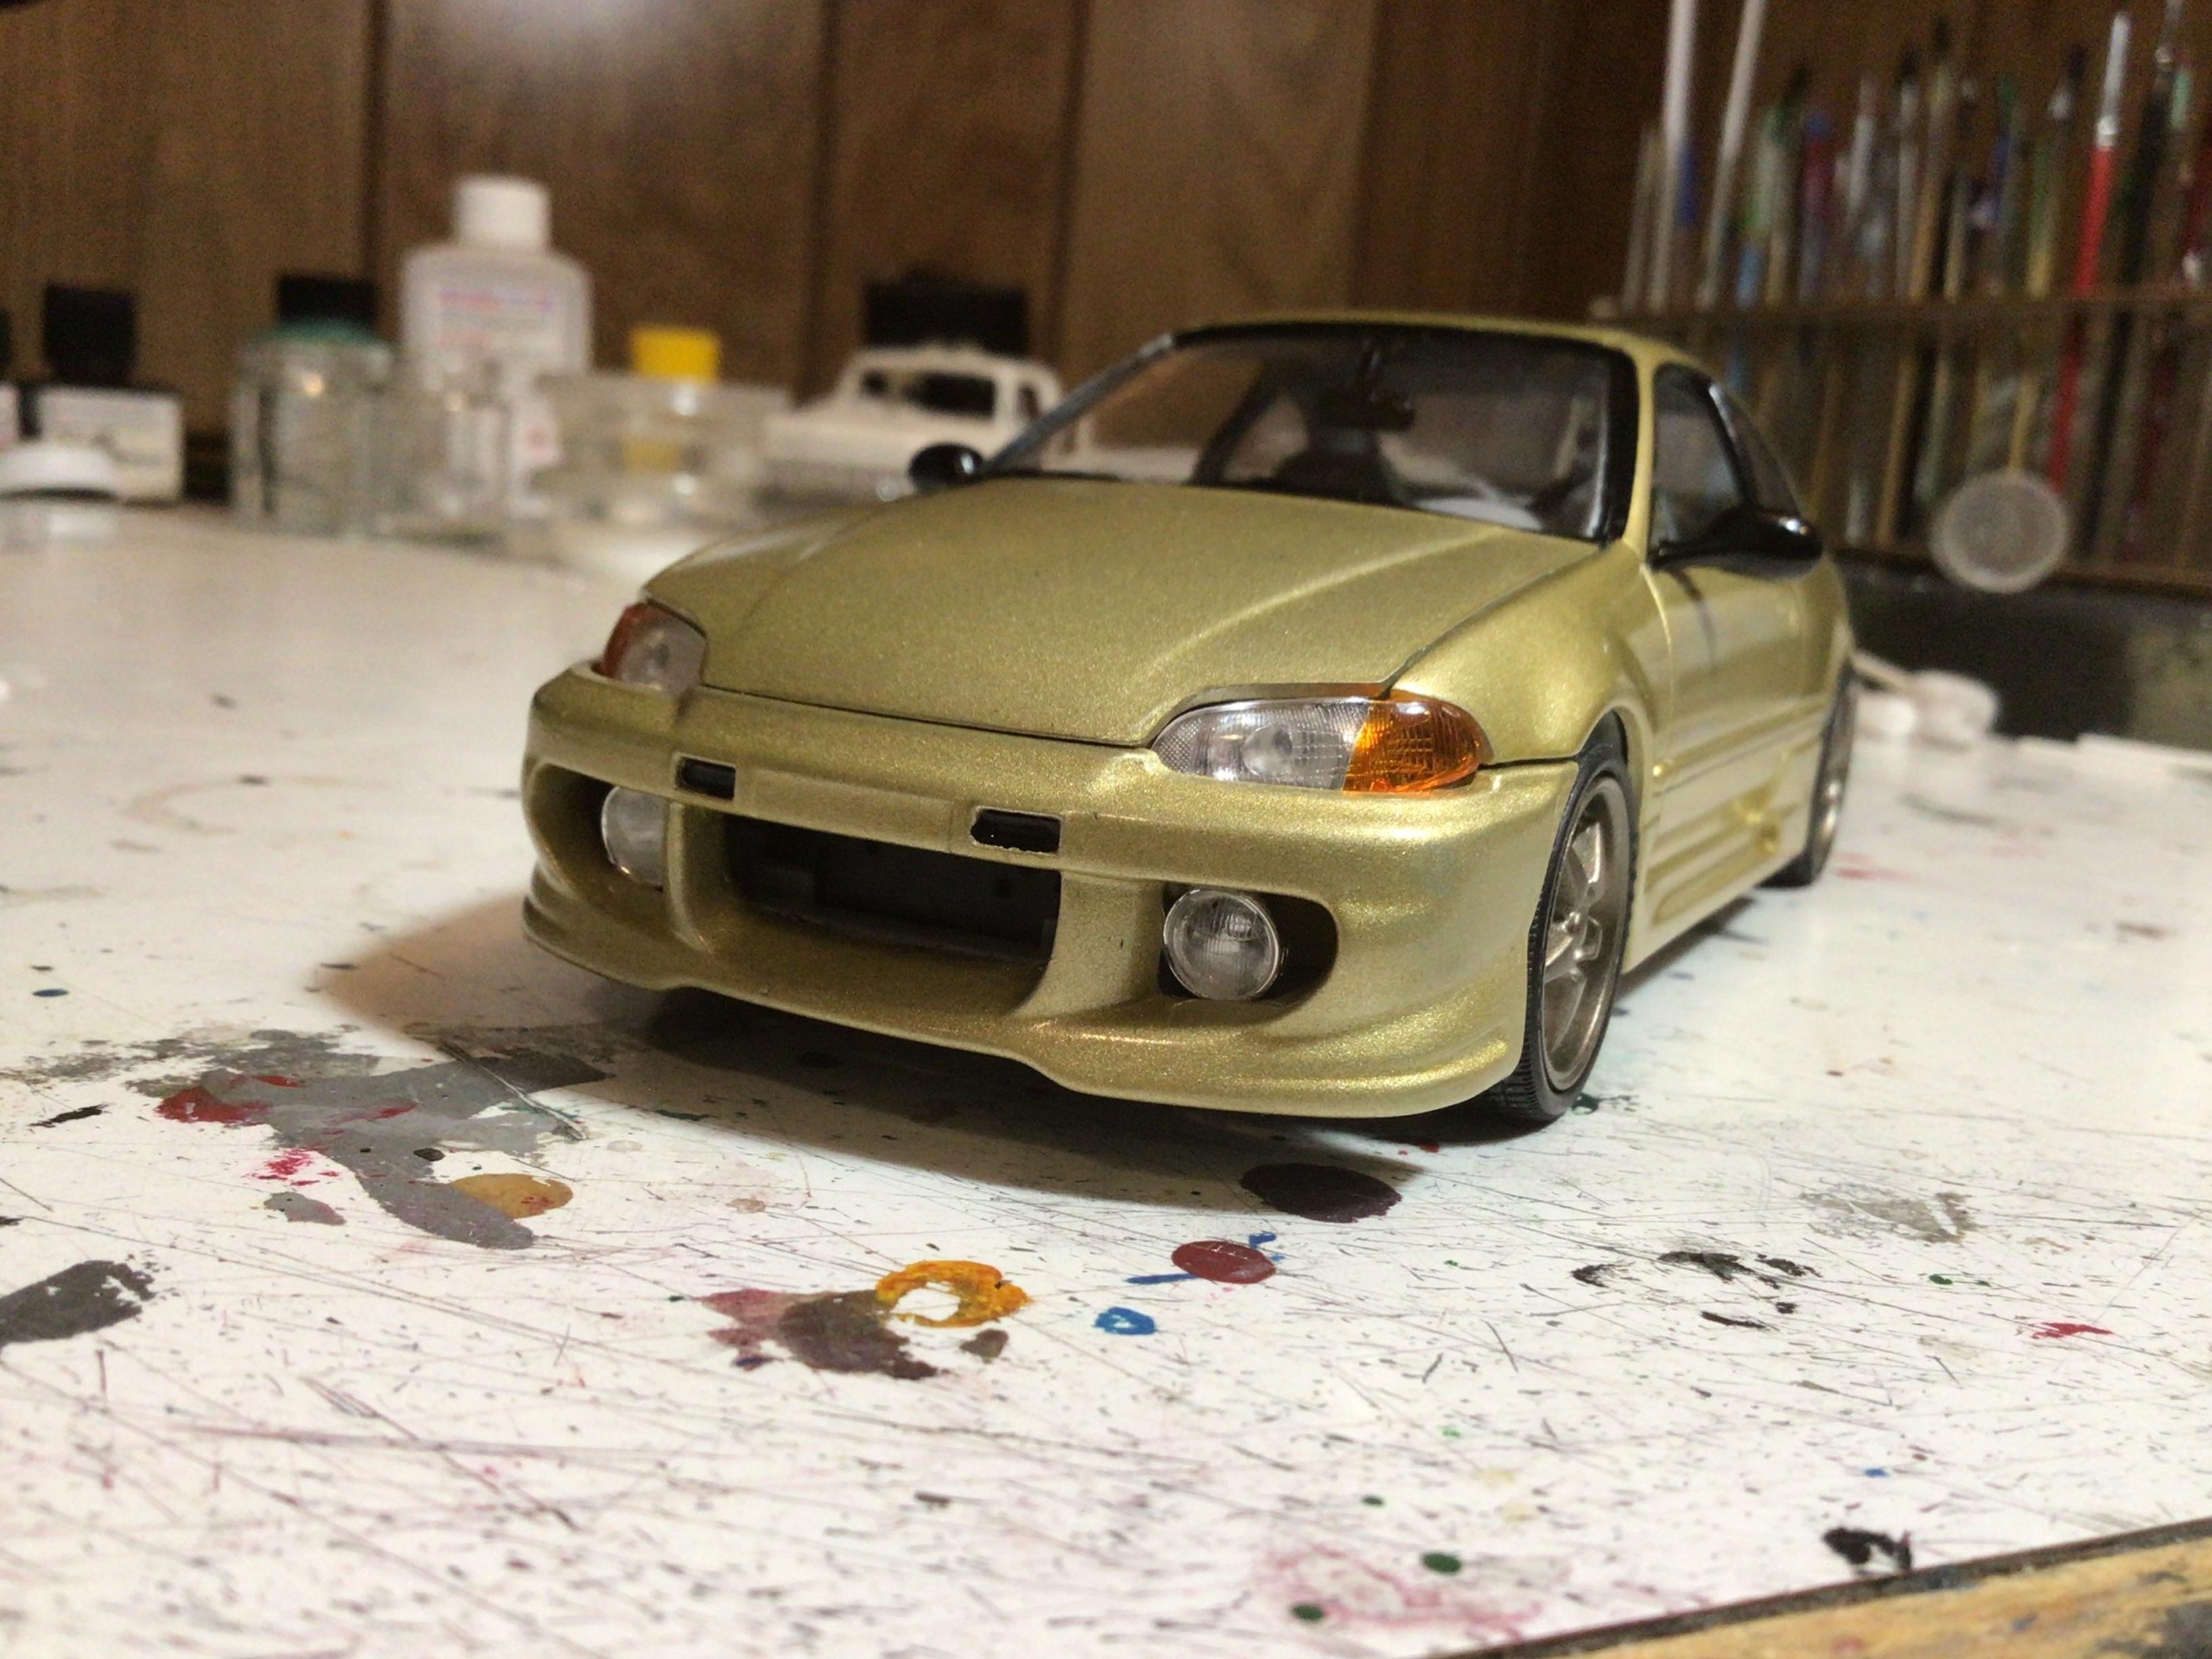
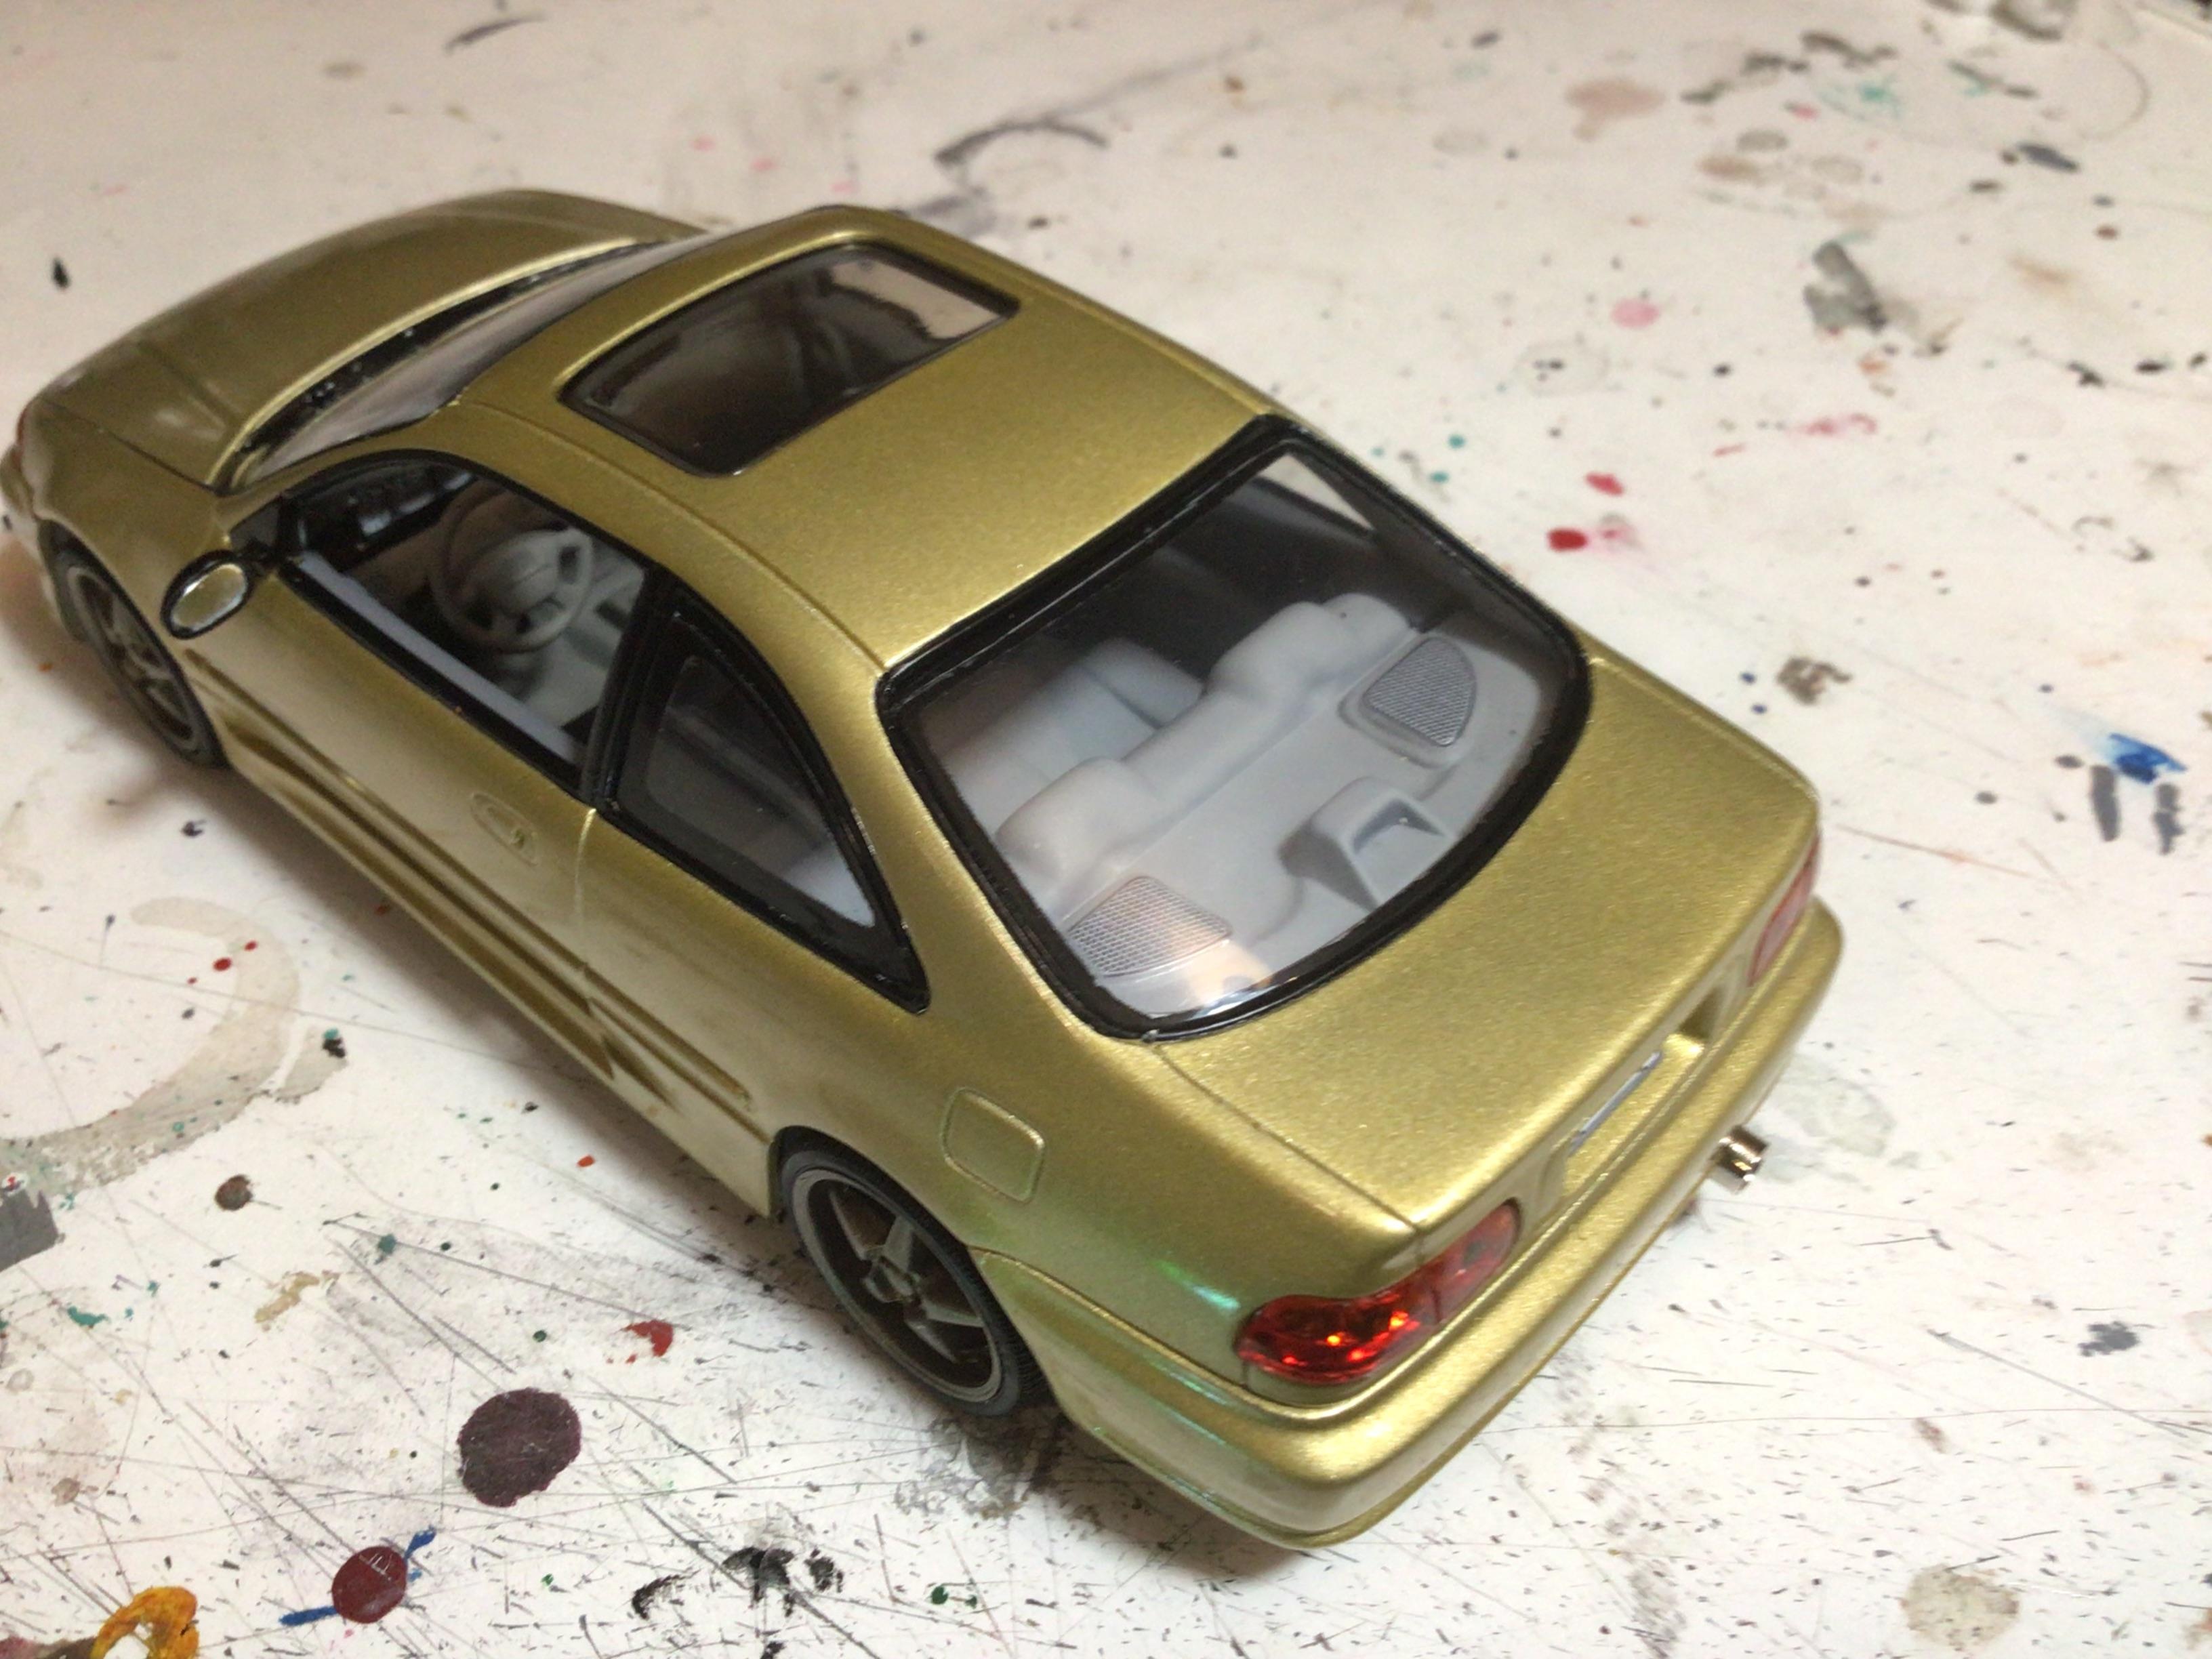
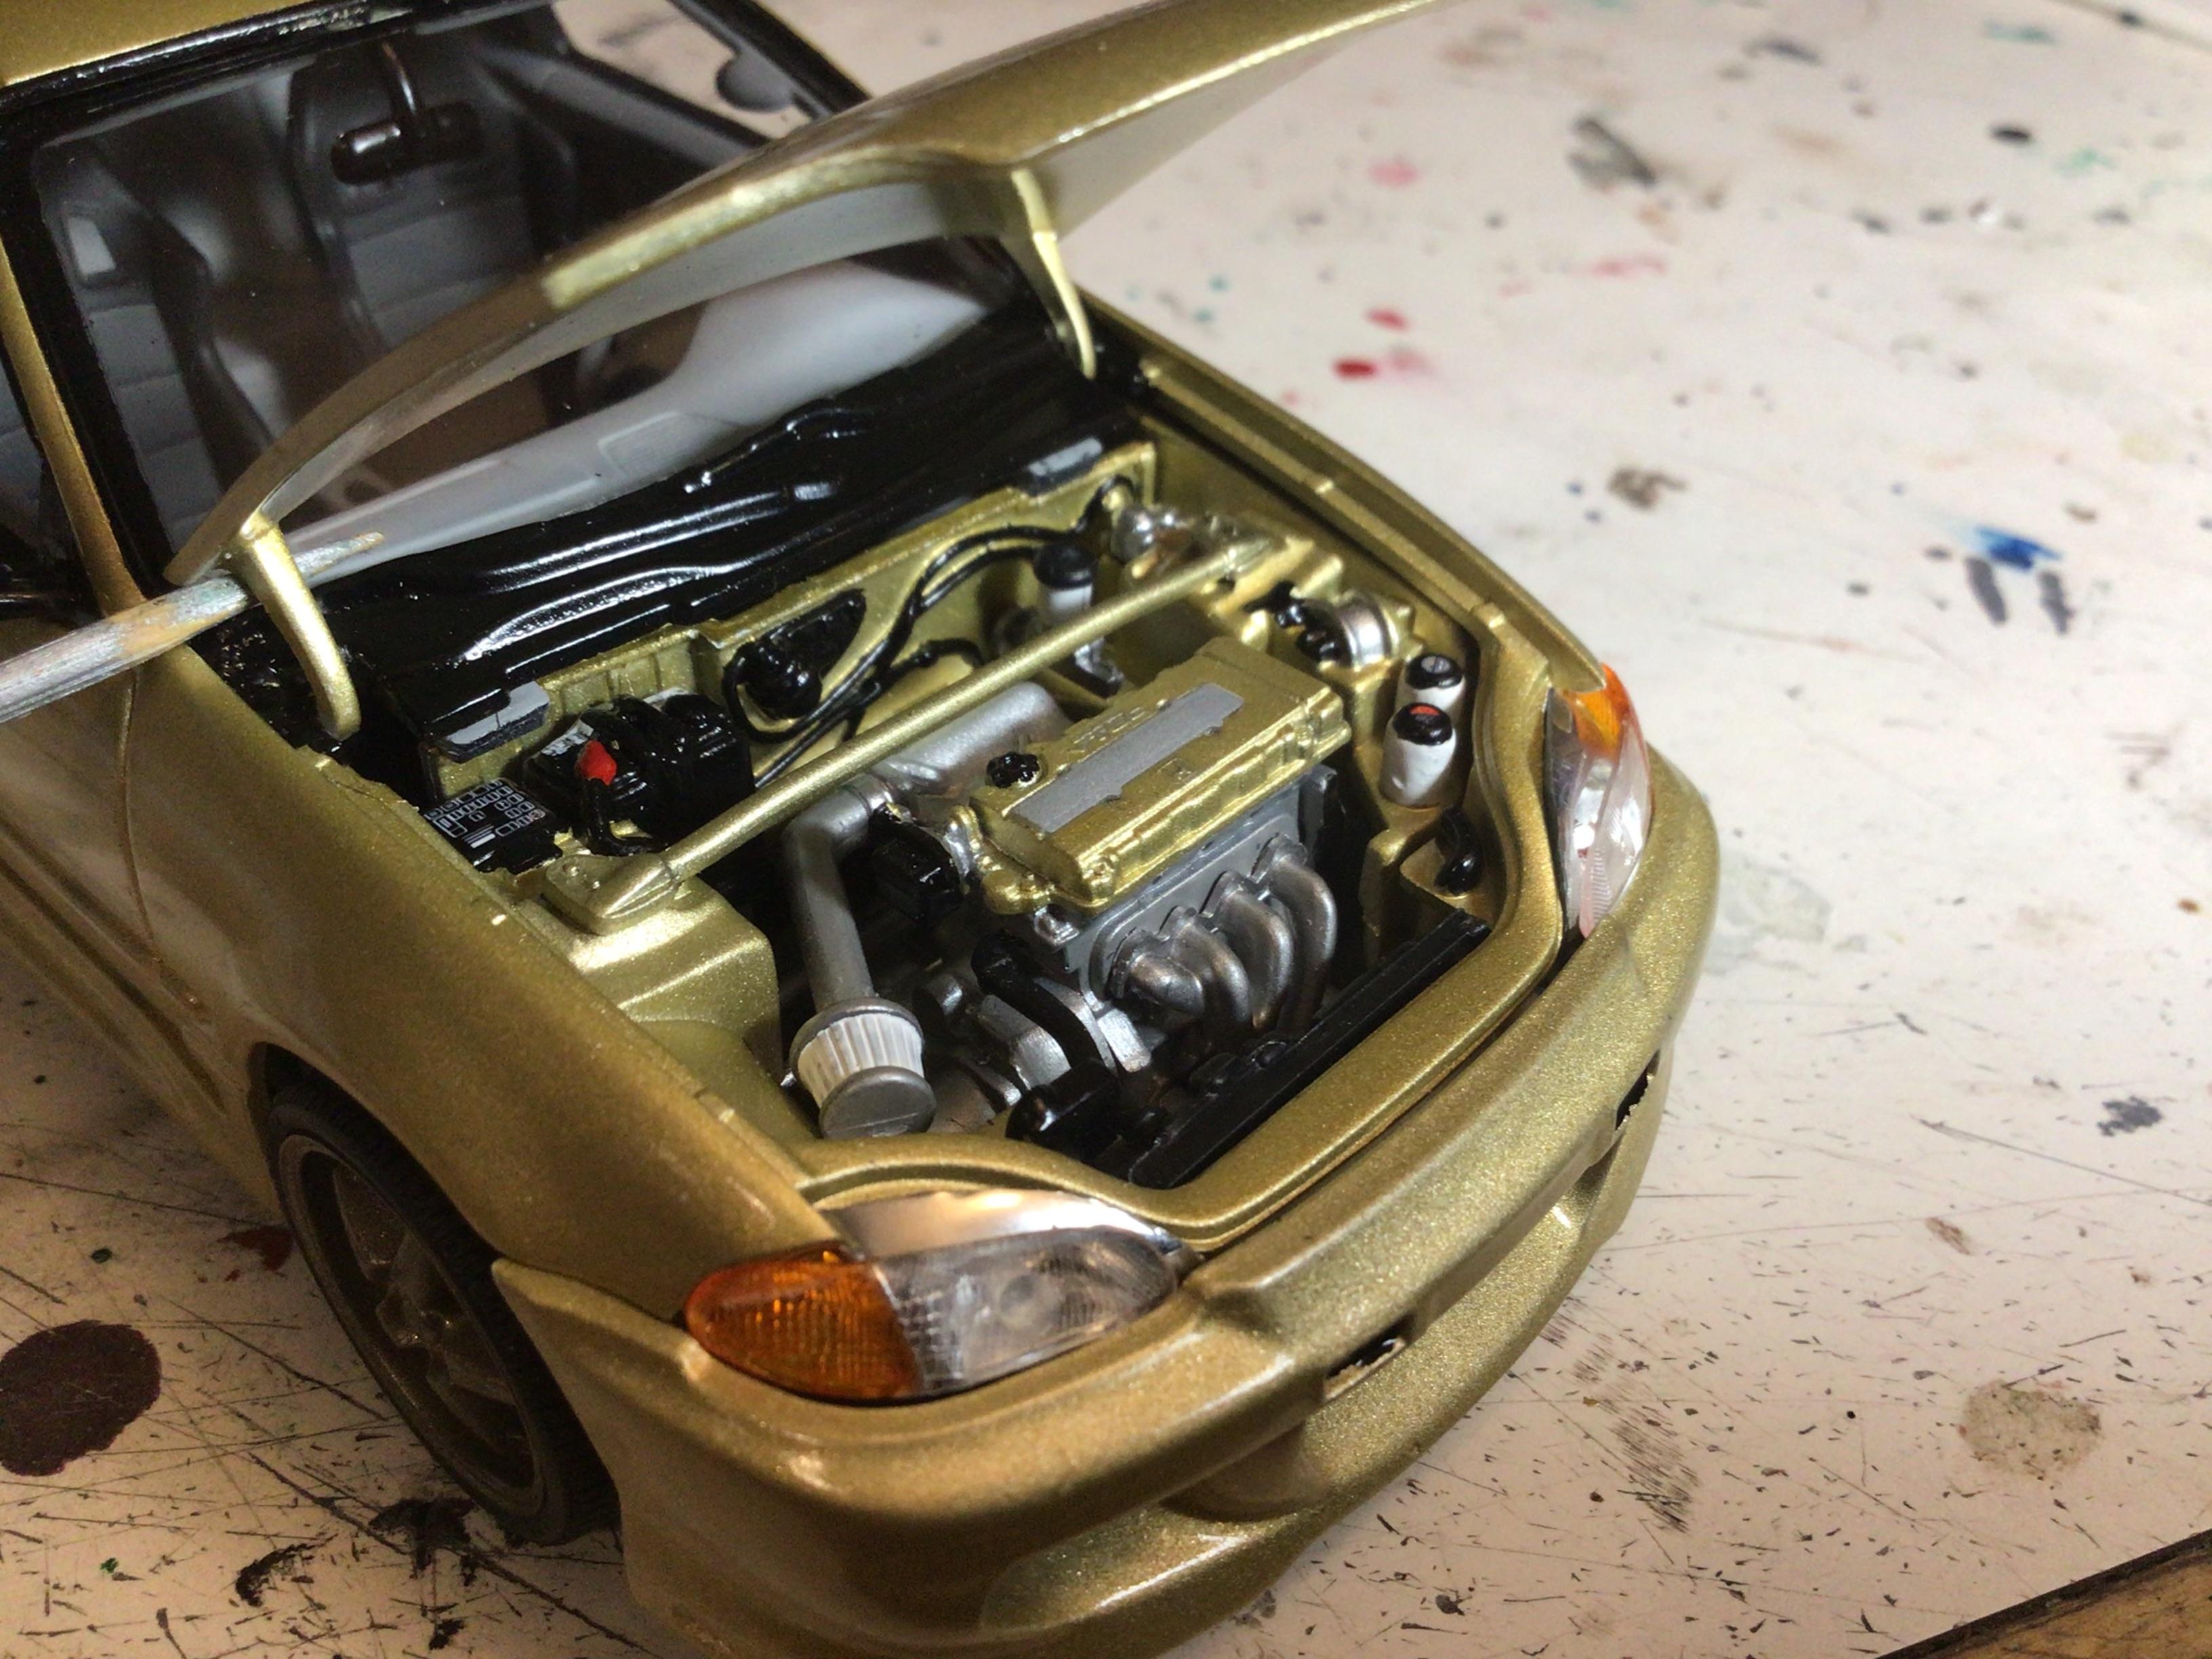
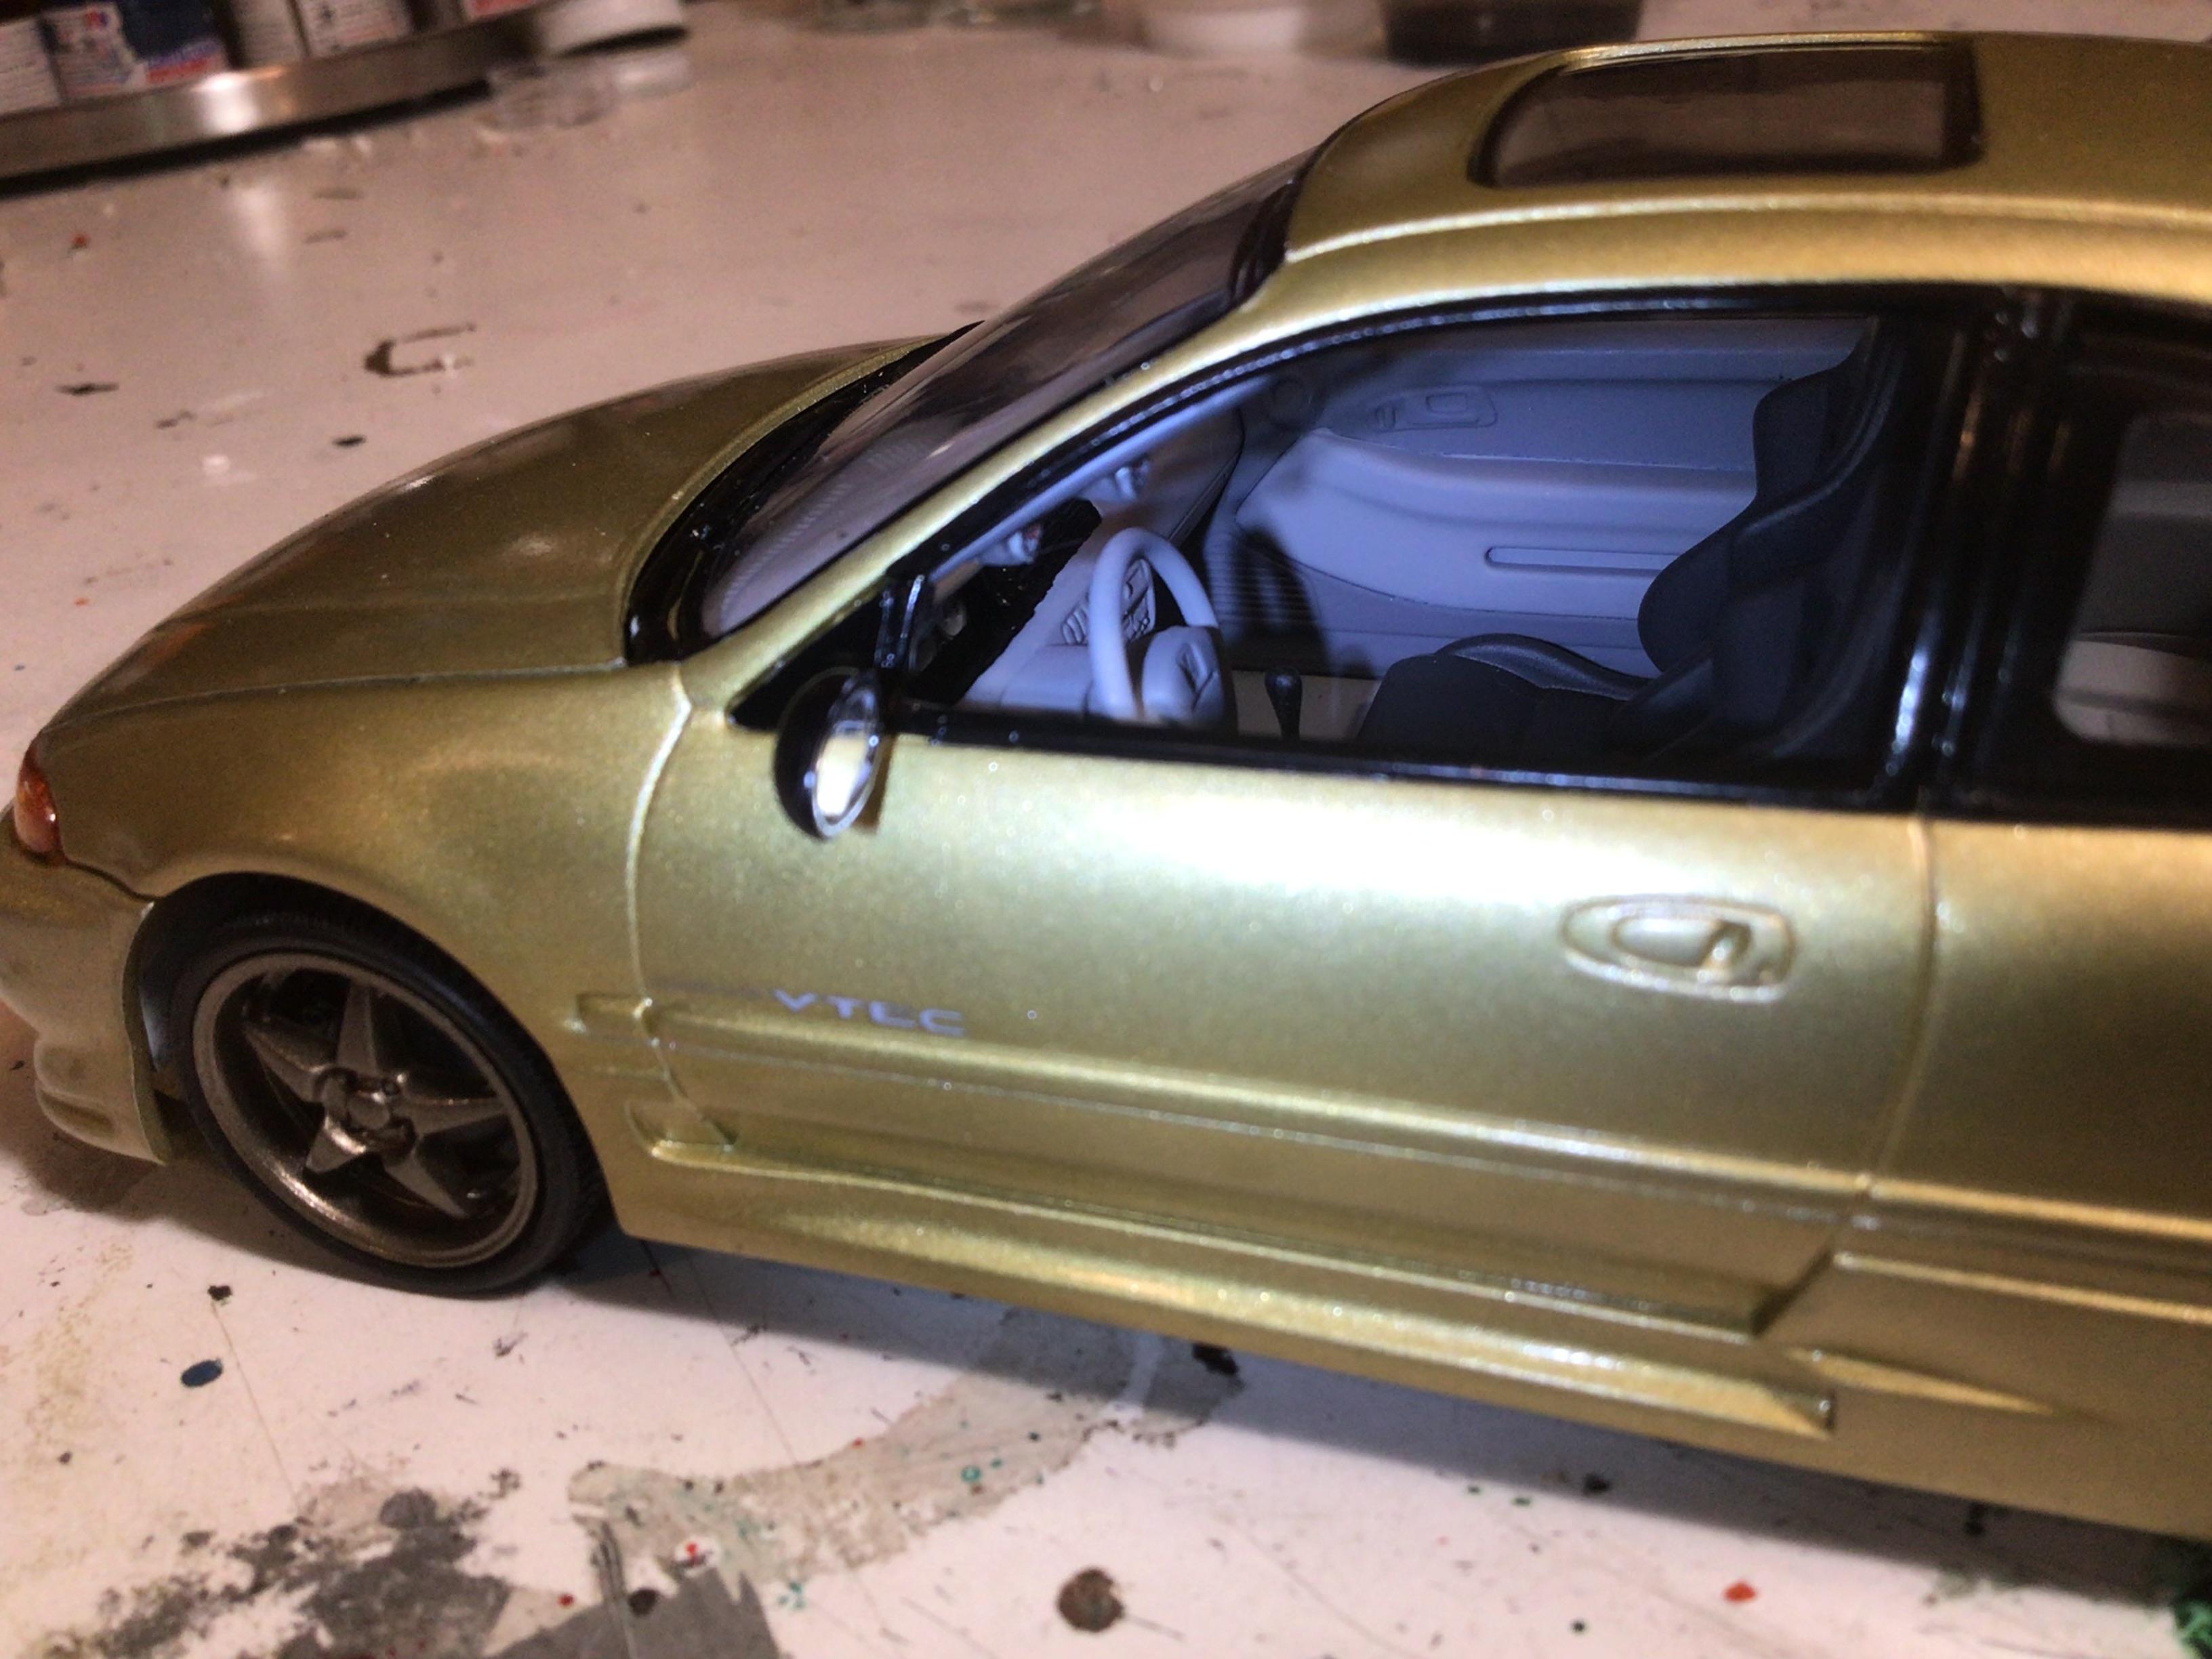
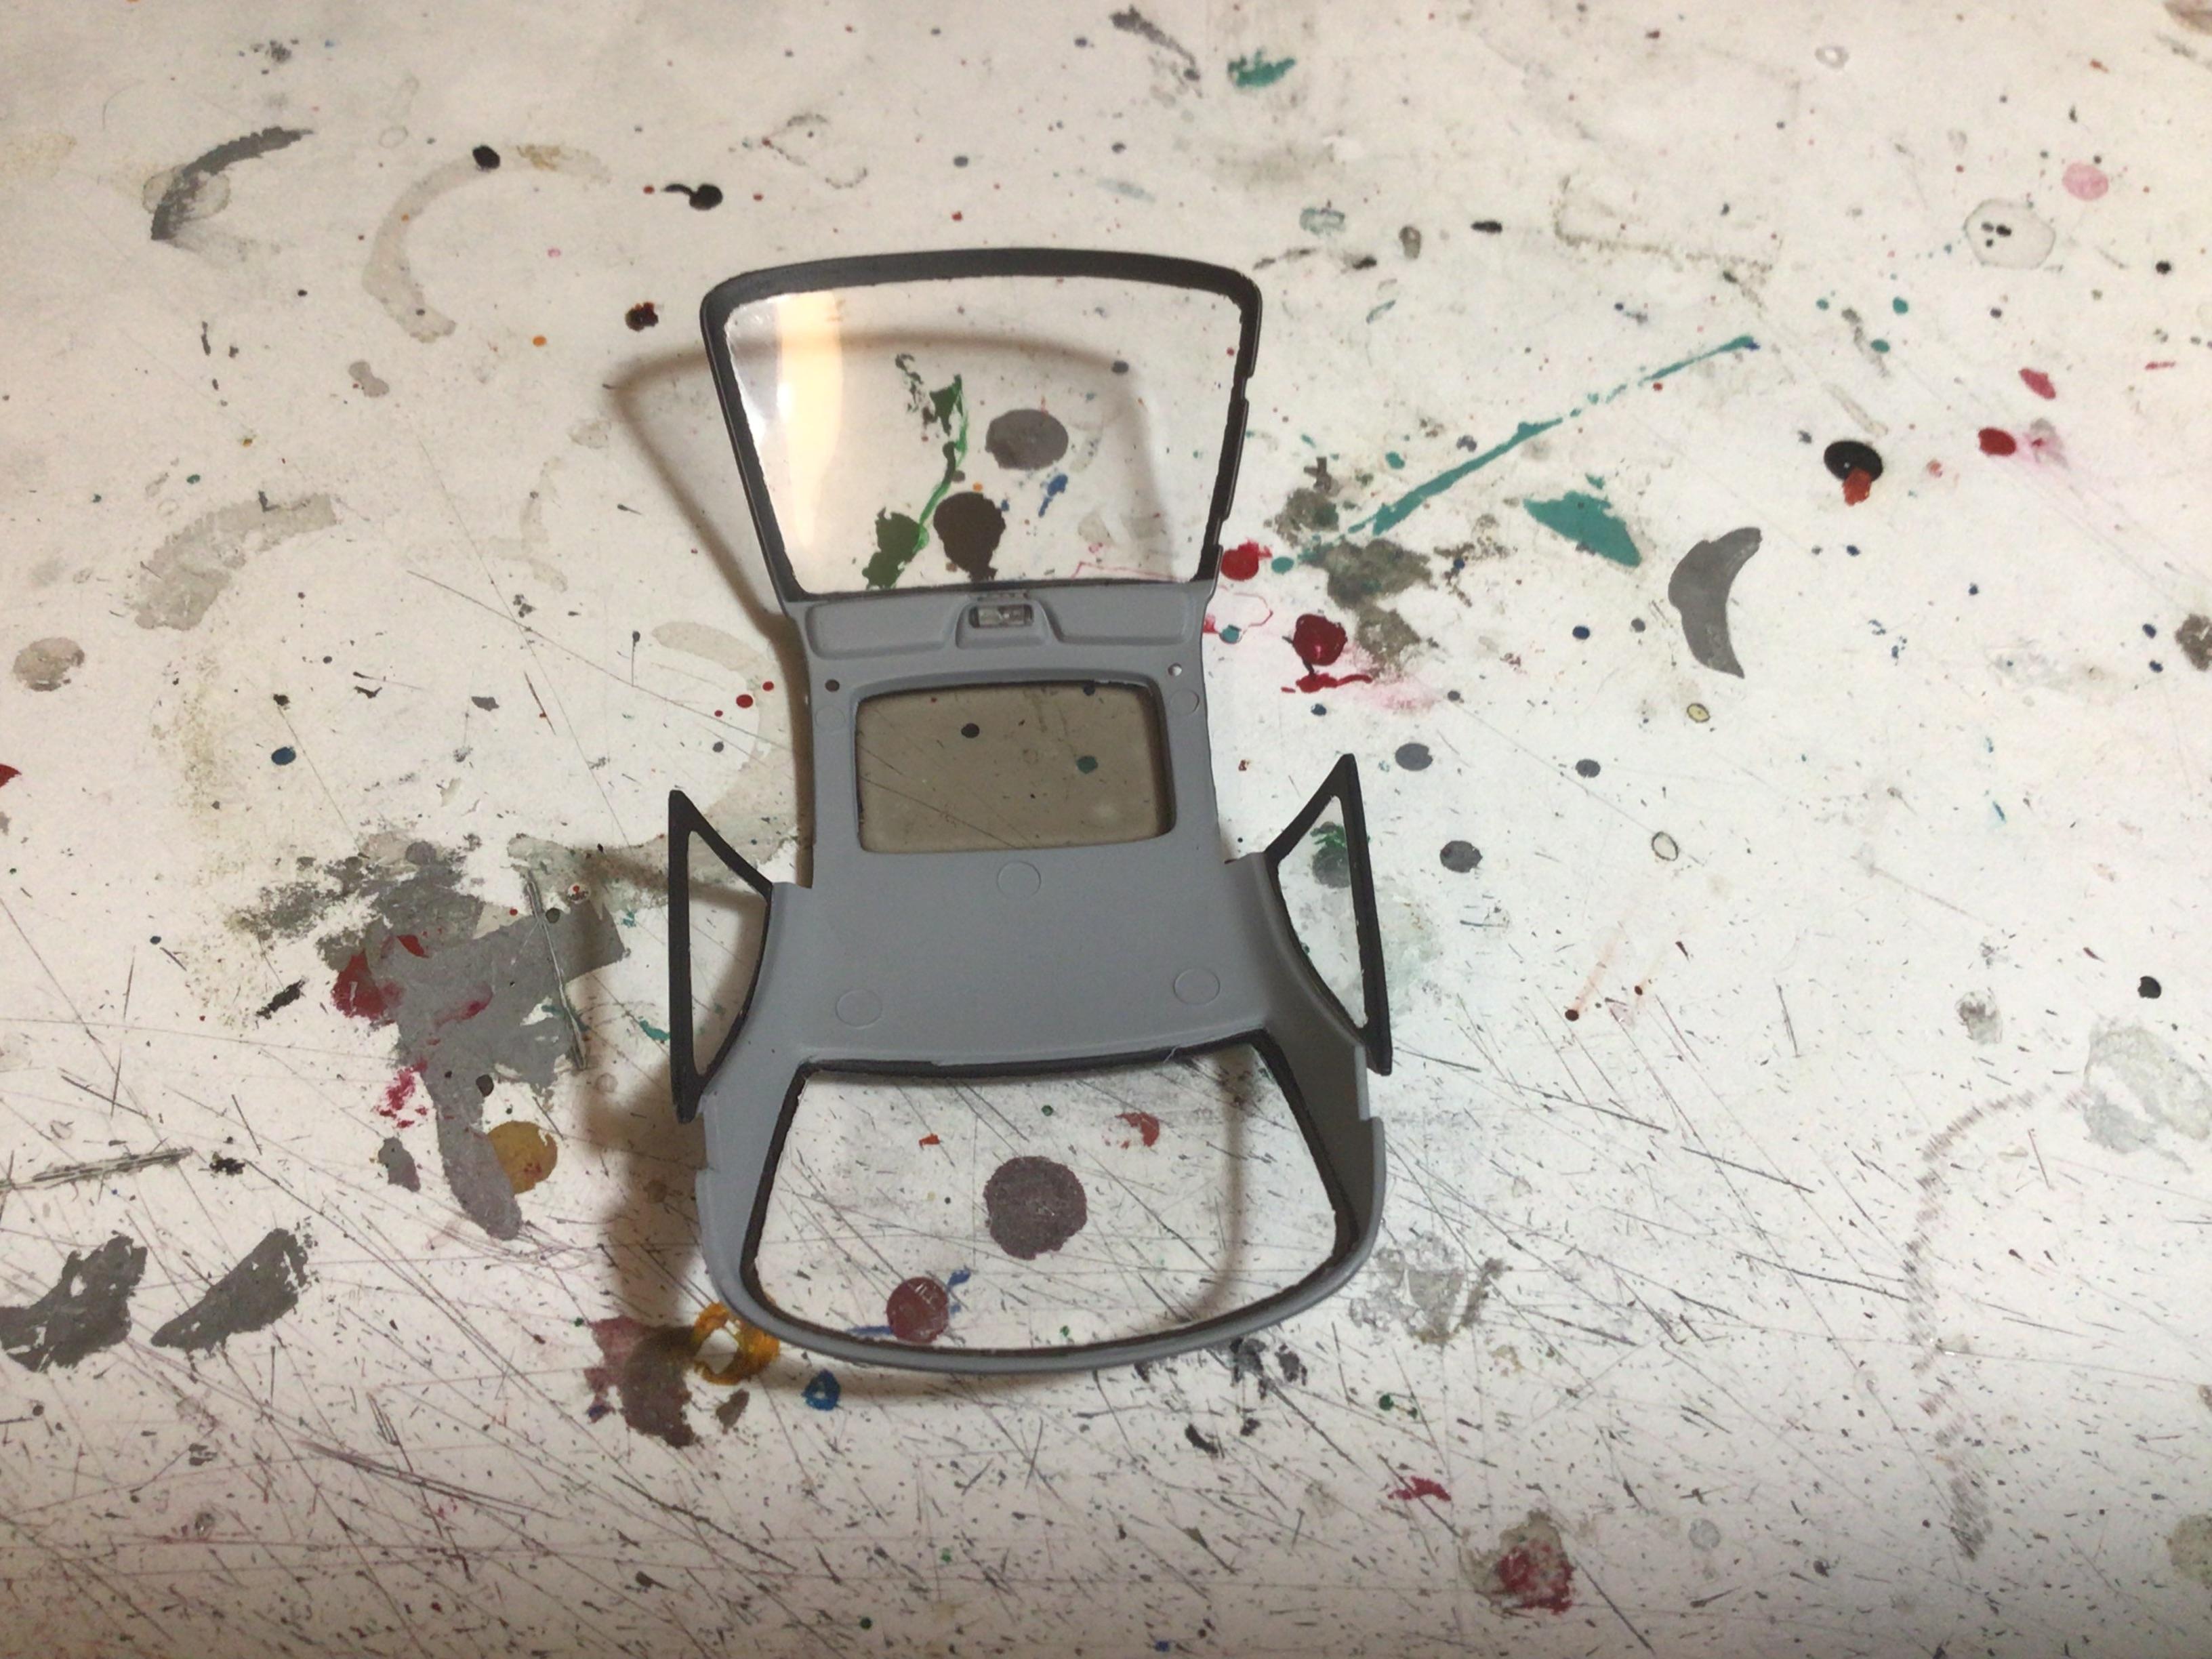
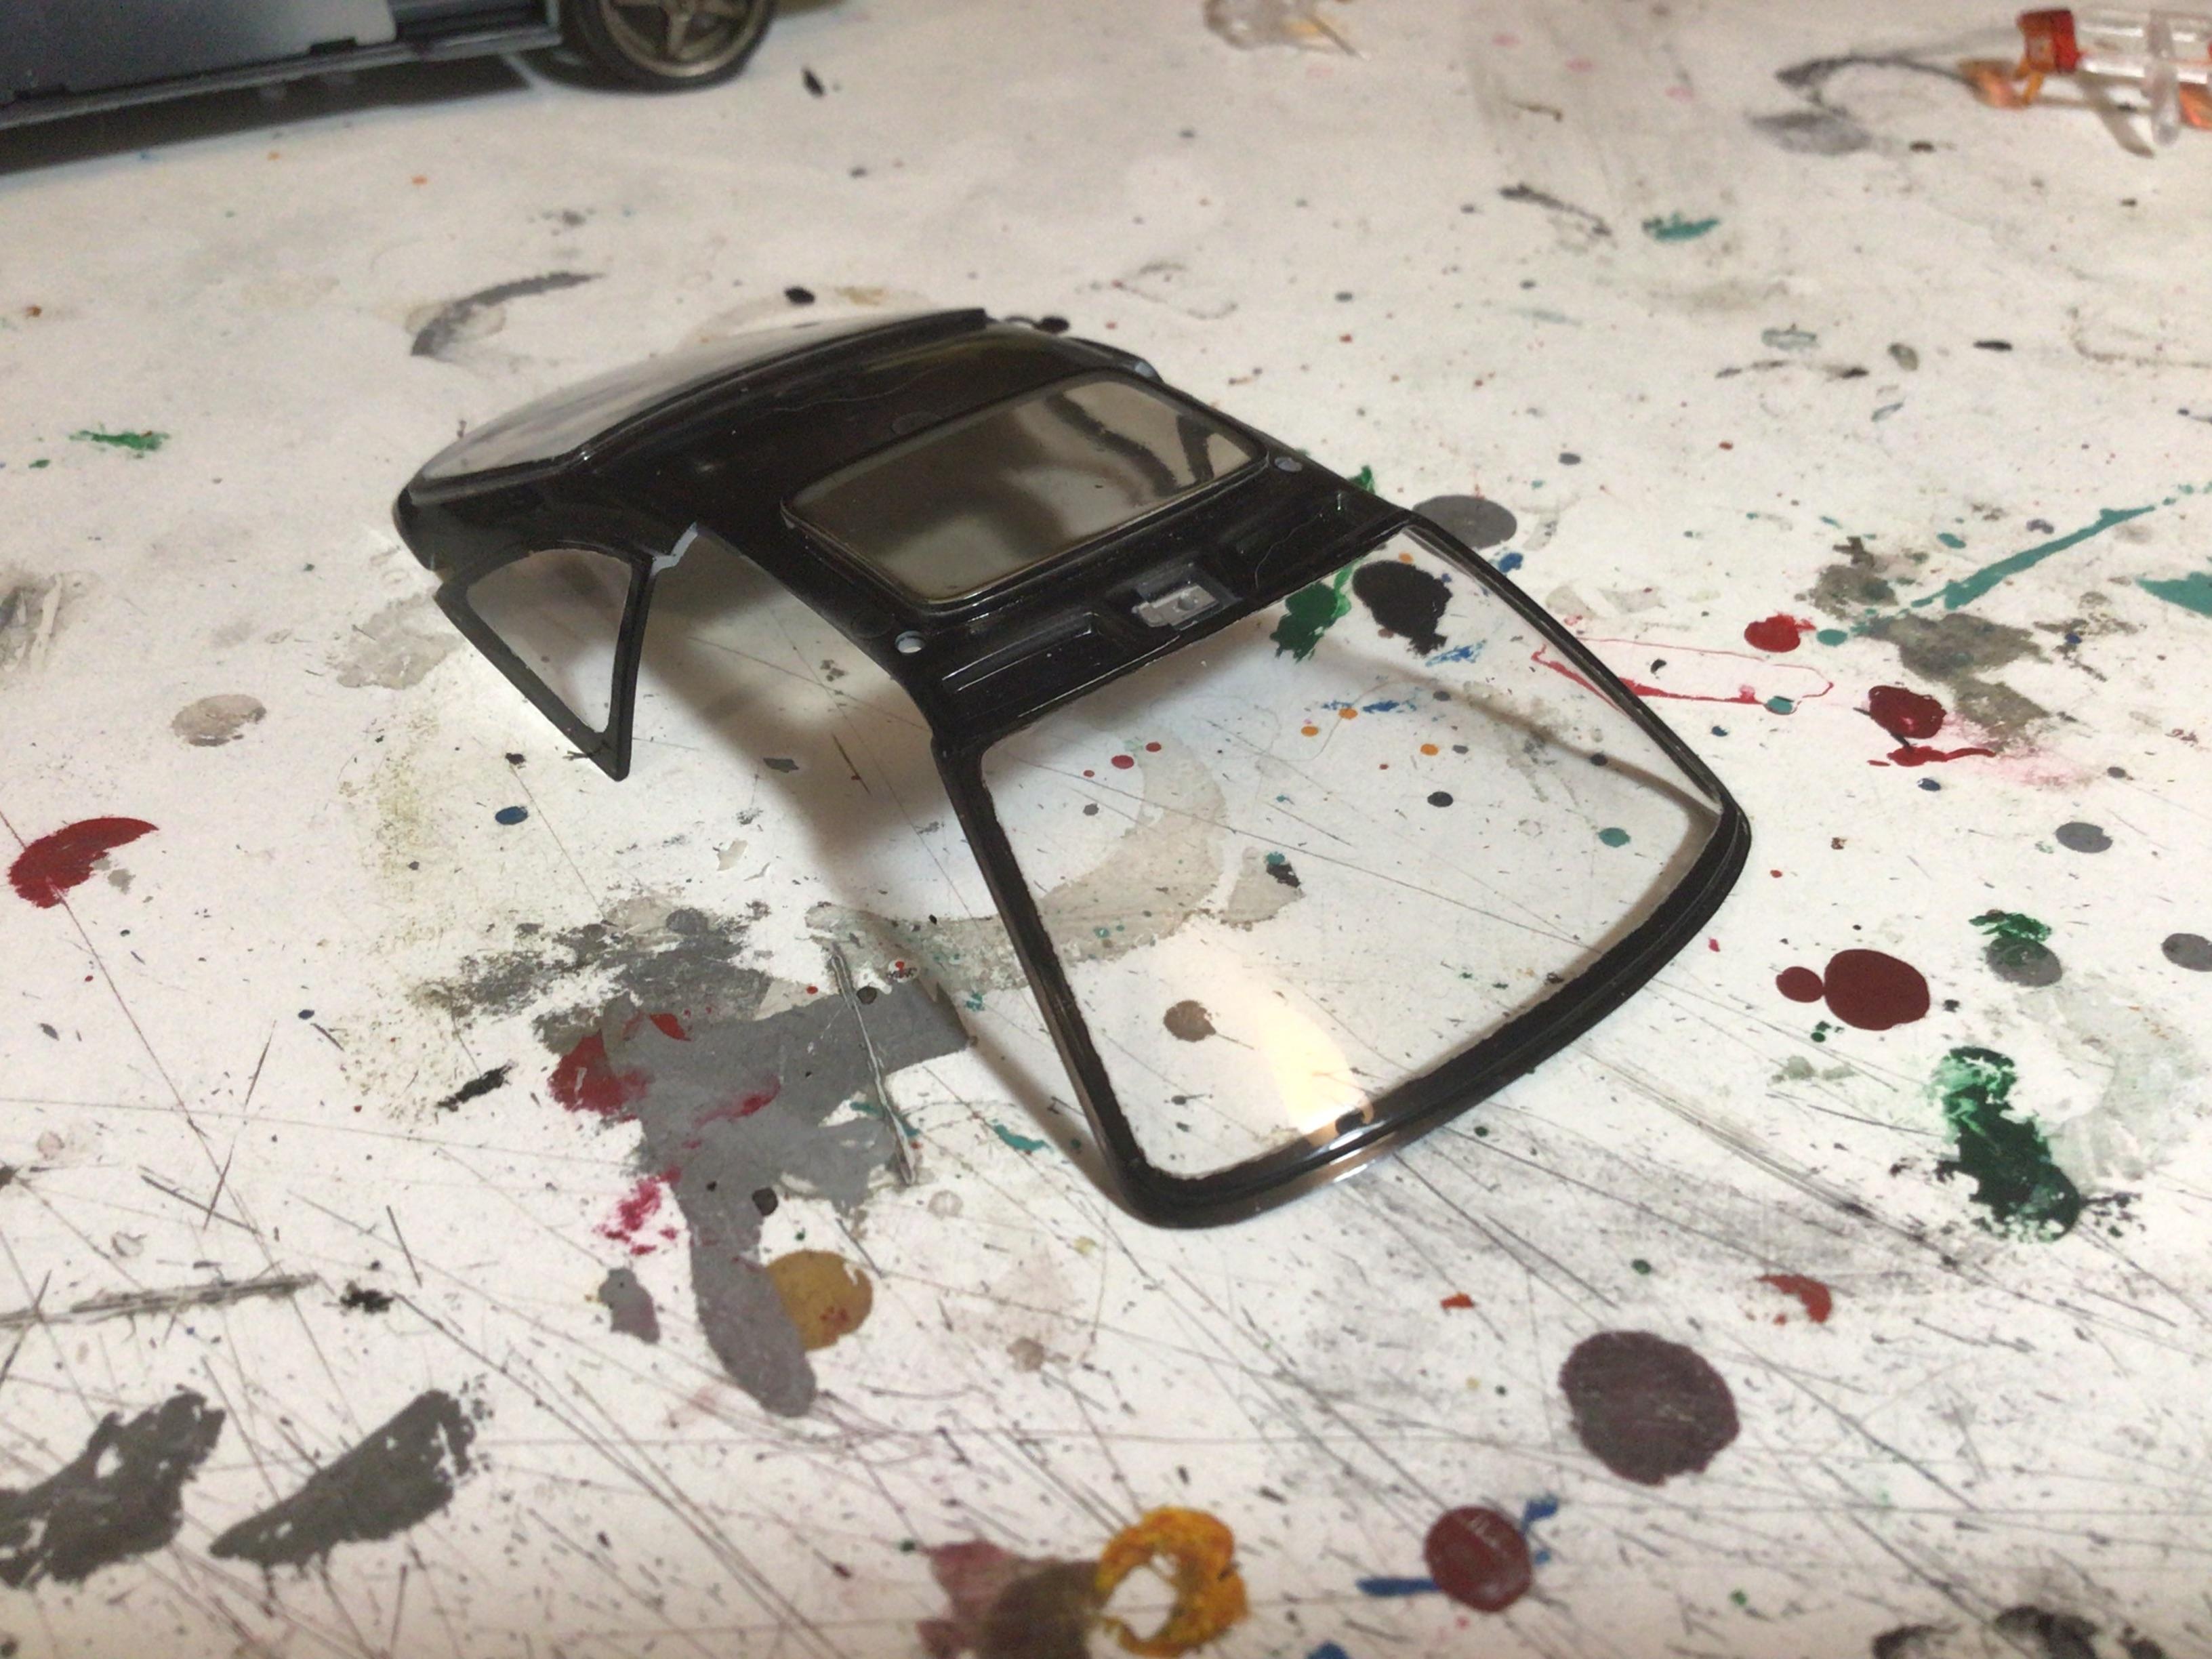
Hot off the bench is my Revell 1993 Honda Civic coupe from their tuner series. Except for filling in the holes in the trunk lid to go wingless, and cutting out the openings in the front bumper cover so I could add a pair of driving lights, it’s completely OTB. I’ve had a soft spot for this kit for a long time and since it can’t be built stock the challenge was keeping it as toned down as possible while maintaining some cool factor. Color is Tamiya Gold leaf on the body and a 70/30 mix of Tamiya gold leaf and metallic bronze on the wheels. The toughest part of the build was masking the one piece glass to paint it the three required colors. I used a combination of liquid mask and masking tape to paint the borders black, the headliner gray and the sunroof clear smoke. Thanks for looking.

- 17 replies
-
- 12
-

-
Eric from Moebius is really good about posting new kit announcements here. Until we get an official announcement from him with box art, I wouldn’t put much stock in anyone else’s projections.
-
No worries Steve. I’m glad you got through.
-
Atlantis rolls out ex Revell 57 Chevy Nomad.
Radretireddad replied to John M.'s topic in Car Kit News & Reviews
Fantastic job! A proper ‘57 Nomad is just one of a number of other body styles Revell could spin off their excellent tri-five series. I’d also love to a see panel delivery and a handyman version of any of the three years kitted. -
Moebius Wrecker Truck Announcement
Radretireddad replied to Erik Solie's topic in Truck Kit News & Reviews
Looking forward to seeing it! -
Moebius Wrecker Truck Announcement
Radretireddad replied to Erik Solie's topic in Truck Kit News & Reviews
Be sure to post pics! -
Precisely my point. The grouping of the parts on the sprues portends the other versions we’re all hoping for will be offered as well. Given that these trucks are gaining popularity and the poor state of previously tooled examples, I think Revell really did make a smart choice.
-
Note that the separate left and right side frame rails and interior panels along with the 4wd suspension and drivetrain pieces are also on separate dedicated sprues. The multi piece frame is also unique and suggests the possibility of different cross members being tooled for 2wd versions. The chrome sprue has unused center caps that look like the ones on the factory spoke style wheels of that era. The only other thing I note are the multi piece quarter windows on the pictures of the built kit but the unboxing reveals one piece quarter glass. Probably a preproduction change. Lots of clues. Who will be the first to build a camo military spec version or adapt the Moebius snow plow to the front of this thing?
-
From the looks of how the parts are arranged on the sprues, the possibilities for multiple pickup, 2wd and 4wd versions looks quite promising. GM square body trucks are coming in to demand as collectable classics right now, and the current crop of GM square body truck kits leaves plenty of room for fresh material just as the ‘71-‘73 Mustangs did before Revell released their two world class kits last year. If Revell has plans to kit multiple versions of this caliber from across the range of this generation, I’ll withdraw my criticism and join everyone in line to snap as many of them up as I can. My personal faves are those built from ‘73 to ‘80. Can’t wait to see what’s on deck next.
-
Very cool builds. I would love to see Revell kit this version.
-
Revell: Stranger Things; Billy´s Chevy Camaro
Radretireddad replied to Luc Janssens's topic in Car Kit News & Reviews
It’s not a deal breaker for me but it would have been nice to get the blower and BBS wheels in chrome. Nothing I can’t work around. -
It’s very clear from the recently posted test shots that the newly tooled Revell Blazer is a fantastic, state of the art, fully detailed kit that has had a sizable budget of time and resources devoted to it. I’m eager to add one to my stash and I look forward to seeing any other future versions that may also be in development. My only criticism of it is that the resources necessary to bring a kit of this caliber to the market weren’t devoted to a more exciting subject. The only reason, it seems, this subject got kitted is because of a TV series, yet it isn’t hard to think up plenty of other more interesting subjects that would not have needed any show biz connections to justify the same effort and could easily be branched off into other versions. For example, Revell appears to have spent the same level of resources on its two fabulous new Corvette and ‘71 Mustang kits but the only 2015 and up Mustangs we’re offered are a simple beginner’s snap together kit and Tamiya’s road race version. We also have only a single version of a fox body Mustang from a modern tool. IIRC The only Current gen Camaros, Challengers, and F-150 Raptors tooled are also beginners level snap together kits. Don’t get me wrong, I’m very happy we’ll all soon be getting the Blazer, but I wonder why we’re getting it instead of same level kits of subjects of equal or even broader appeal.
-
Atlantis rolls out ex Revell 57 Chevy Nomad.
Radretireddad replied to John M.'s topic in Car Kit News & Reviews
That car was only a decade old at the time and it was already considered a coveted classic. -
Atlantis rolls out ex Revell 57 Chevy Nomad.
Radretireddad replied to John M.'s topic in Car Kit News & Reviews
I think I’d rather spend the time grafting the roof tailgate and rear interior from the newer Revell ‘56 Nomad on to the Revell ‘57 sedan. -
Revell: Stranger Things; Billy´s Chevy Camaro
Radretireddad replied to Luc Janssens's topic in Car Kit News & Reviews
No chrome? -
Atlantis rolls out ex Revell 57 Chevy Nomad.
Radretireddad replied to John M.'s topic in Car Kit News & Reviews
I still have the ‘70’s release I started but never finished. It’s a crude kit but still buildable and IIRC the only other ‘57 Nomad ever tooled other than the old 1/24 scale Monogram kit from the 80’s. Which one is better is certainly debatable. A modern spinoff from Revell’s current Tri-five series is much needed. -
Moebius Wrecker Truck Announcement
Radretireddad replied to Erik Solie's topic in Truck Kit News & Reviews
Here’s to hoping the low sides version will be 2wd. -
Any word on a Revell 73 Mustang Mach 1?
Radretireddad replied to Dave Toups's topic in Car Kit News & Reviews
Yes, yes, yes! Must have this! -
Moebius Wrecker Truck Announcement
Radretireddad replied to Erik Solie's topic in Truck Kit News & Reviews
Yeah, I know, but using the wheels in this kit that I plan on buying anyway means I don’t have to pay for another set.