OldNYJim
-
Posts
251 -
Joined
-
Last visited
Content Type
Profiles
Forums
Events
Gallery
Everything posted by OldNYJim
-
 Beautiful car! Replica looks great too!
 -
Can we see the 1:1, out of curiosity?
-
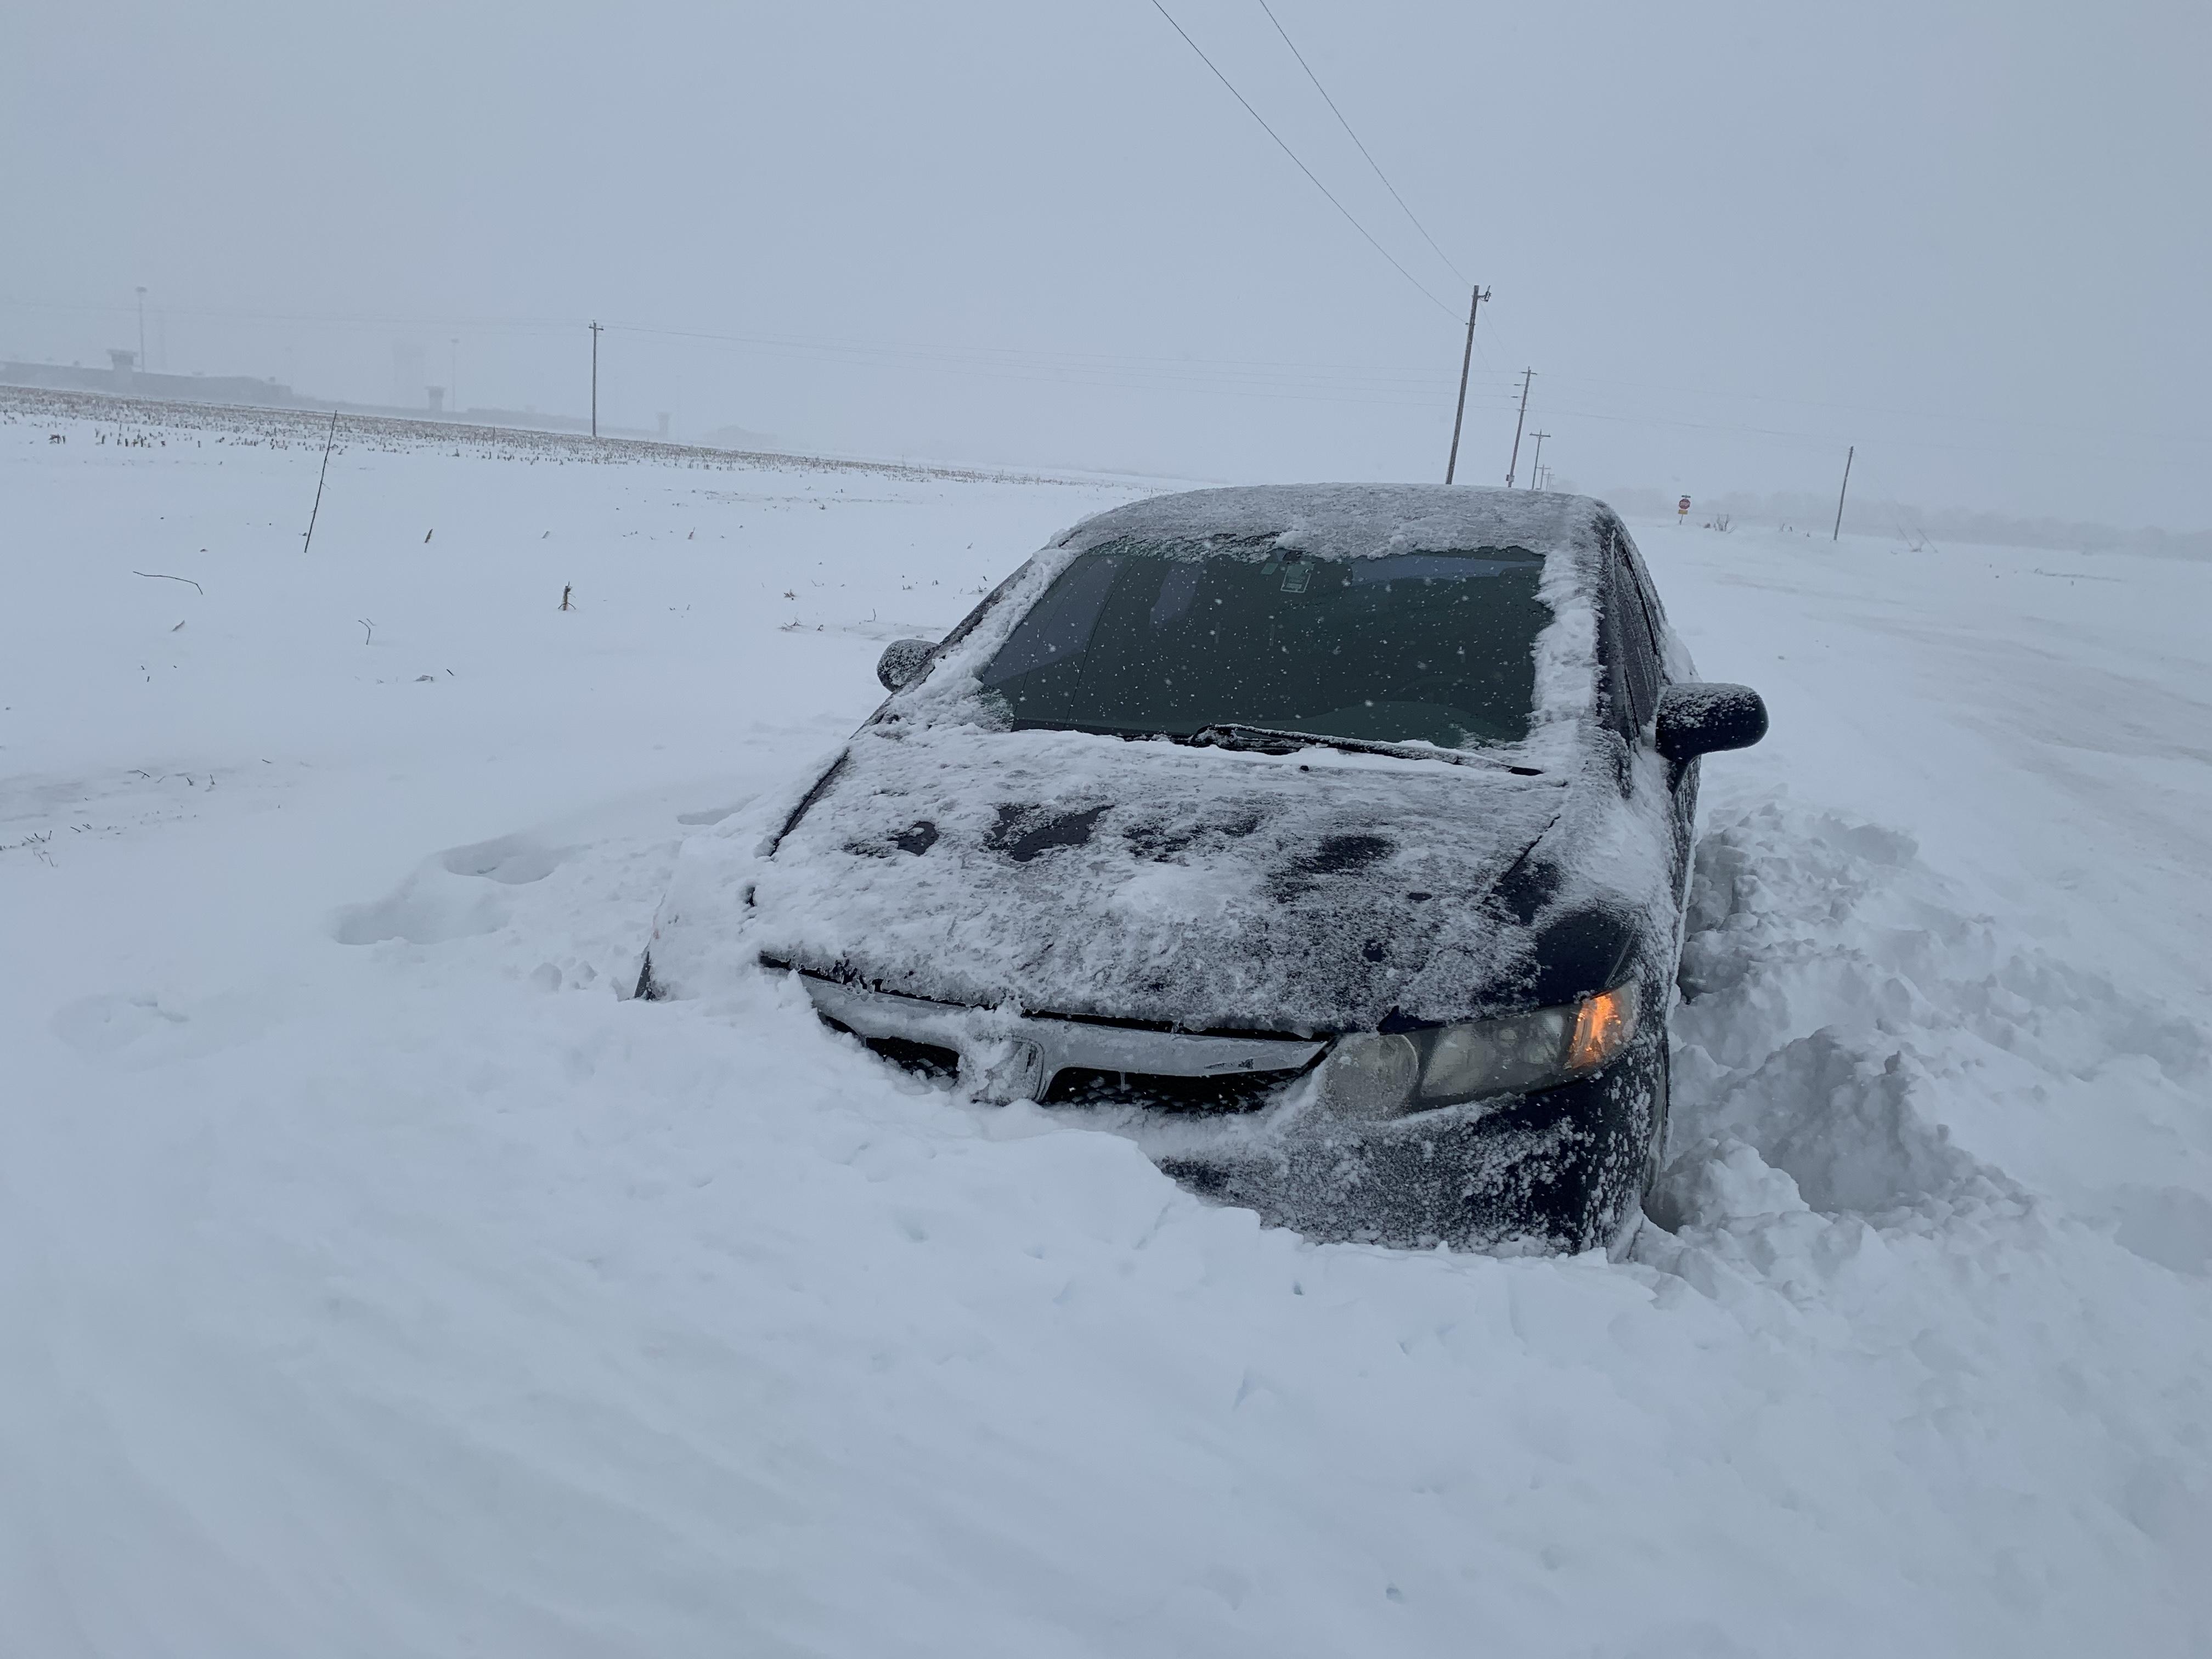
Good advice! Believe me, if I'd known how bad the roads get here in winter I NEVER would've got this little sedan. I knew they got a lot of snow, but I figured they wouldn't let 12" of it build up on a (normally busy) highway ? I do have all the stuff you listed in the trunk, figured I probably WOULD get stuck at some point...luckily in this case I was close to work and we've got a small fleet of Silverados and Rams and stuff useful for pulling dummies like me out of the snow...was only stuck for 5 or 10 minutes. That highway had police barriers up this morning and was closed - but I could see at least 5 or 6 cars stuck behind the barriers, and a small army of farmers with tractors dragging people out ?
-
Good tips - thank you! I hadn't even HEARD of the Siraya stuff - will add that to my list!
-
Drove a careful half-a-mile down the highway leaving work this afternoon - we’d had maybe 8 inches of snow today. It was tough going, but manageable…just took it nice and steady and was doing ok. Then, I guess, they just stopped plowing at a certain point. Made it half a mile before getting stuck… This New Yorker isn’t used to the Midwest yet…

-
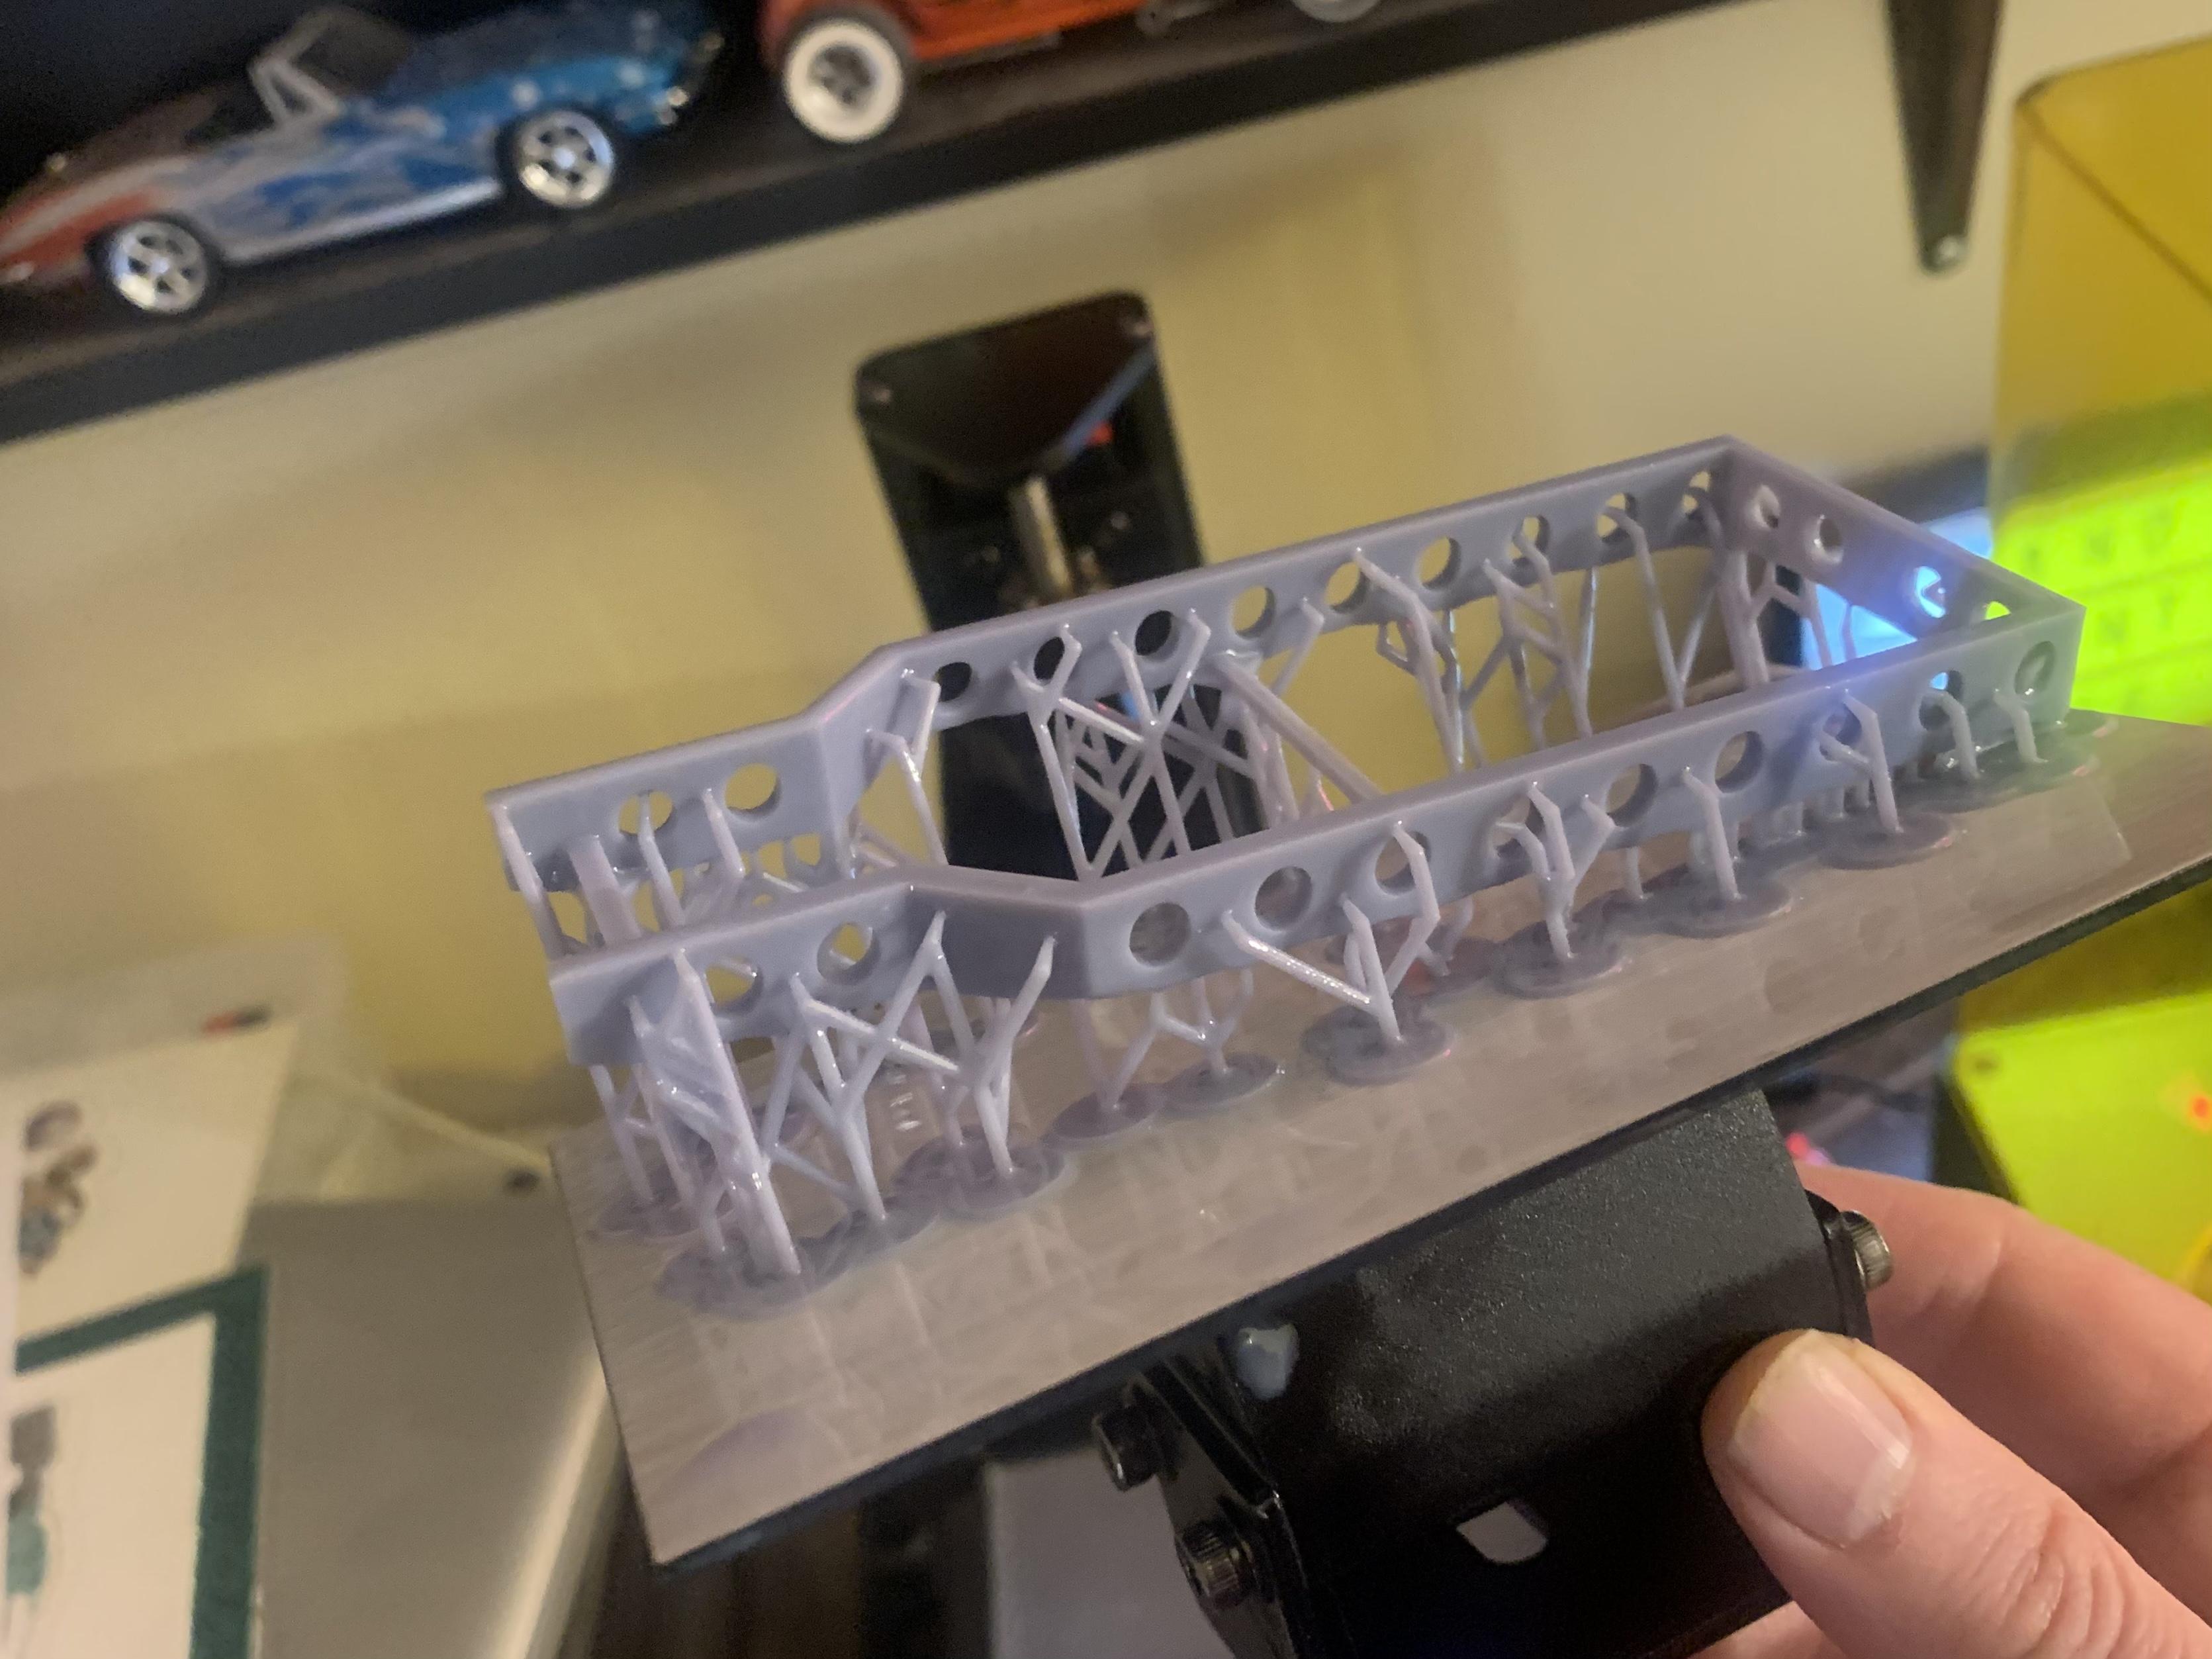
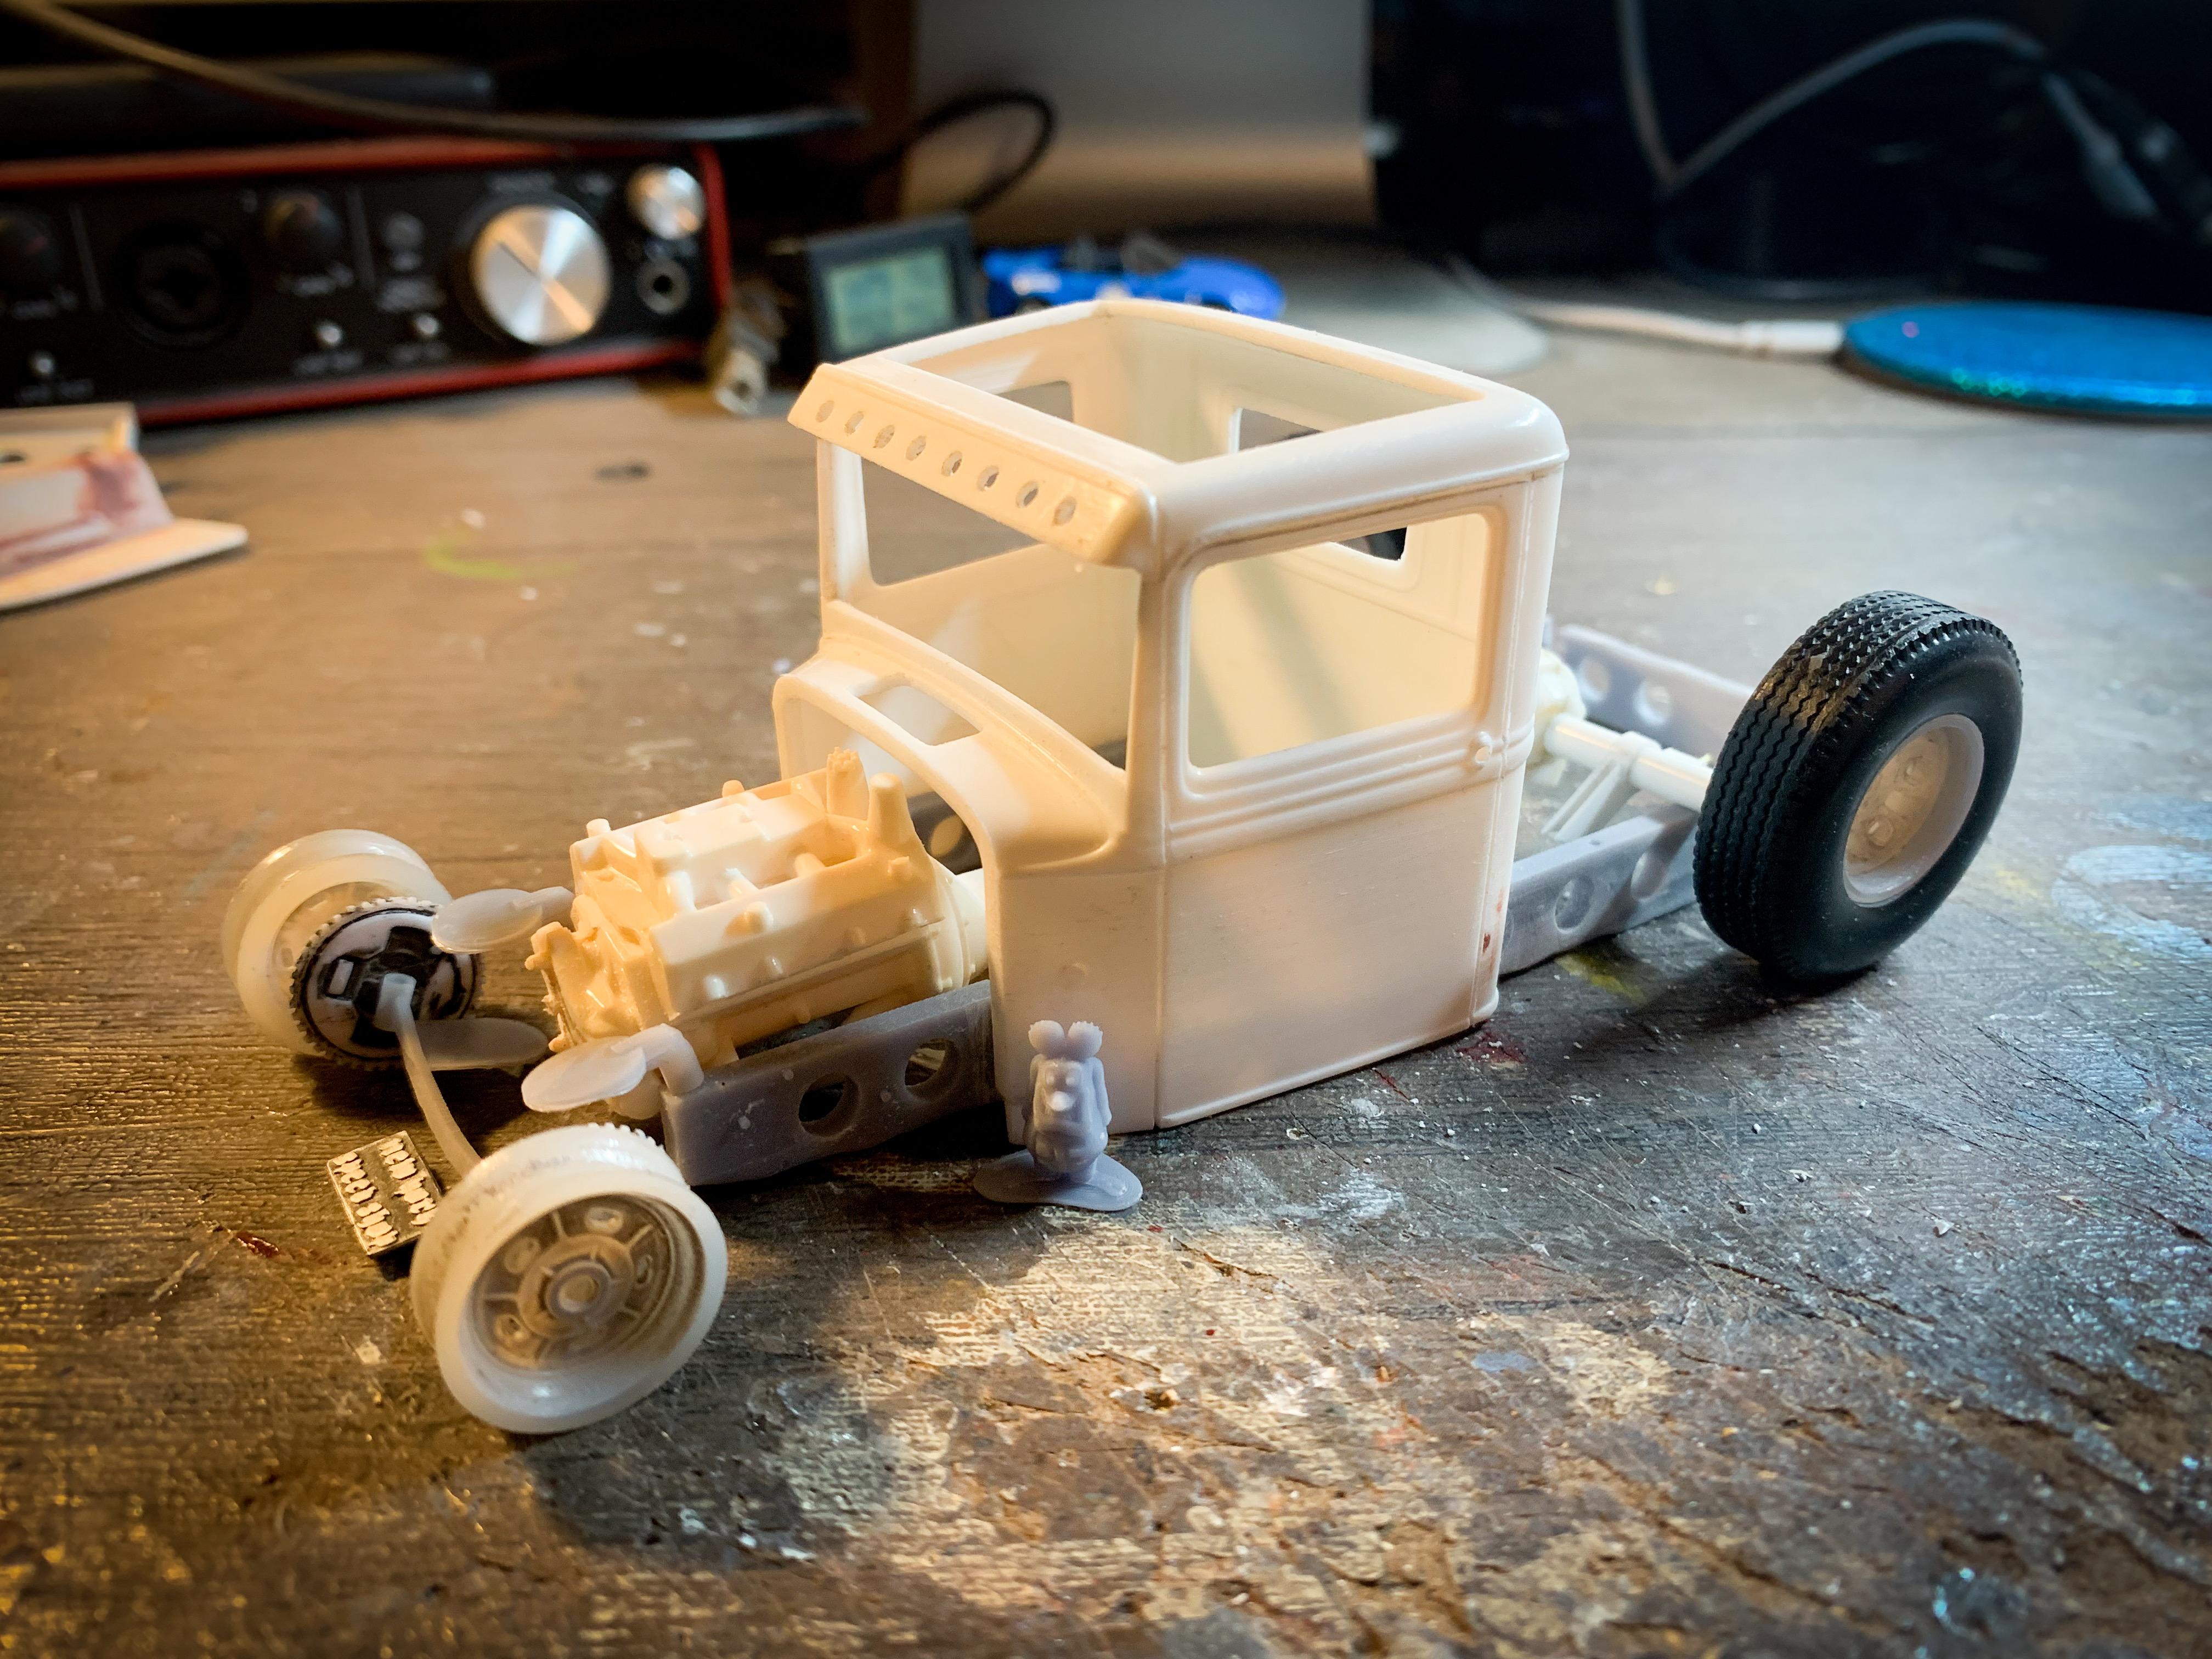
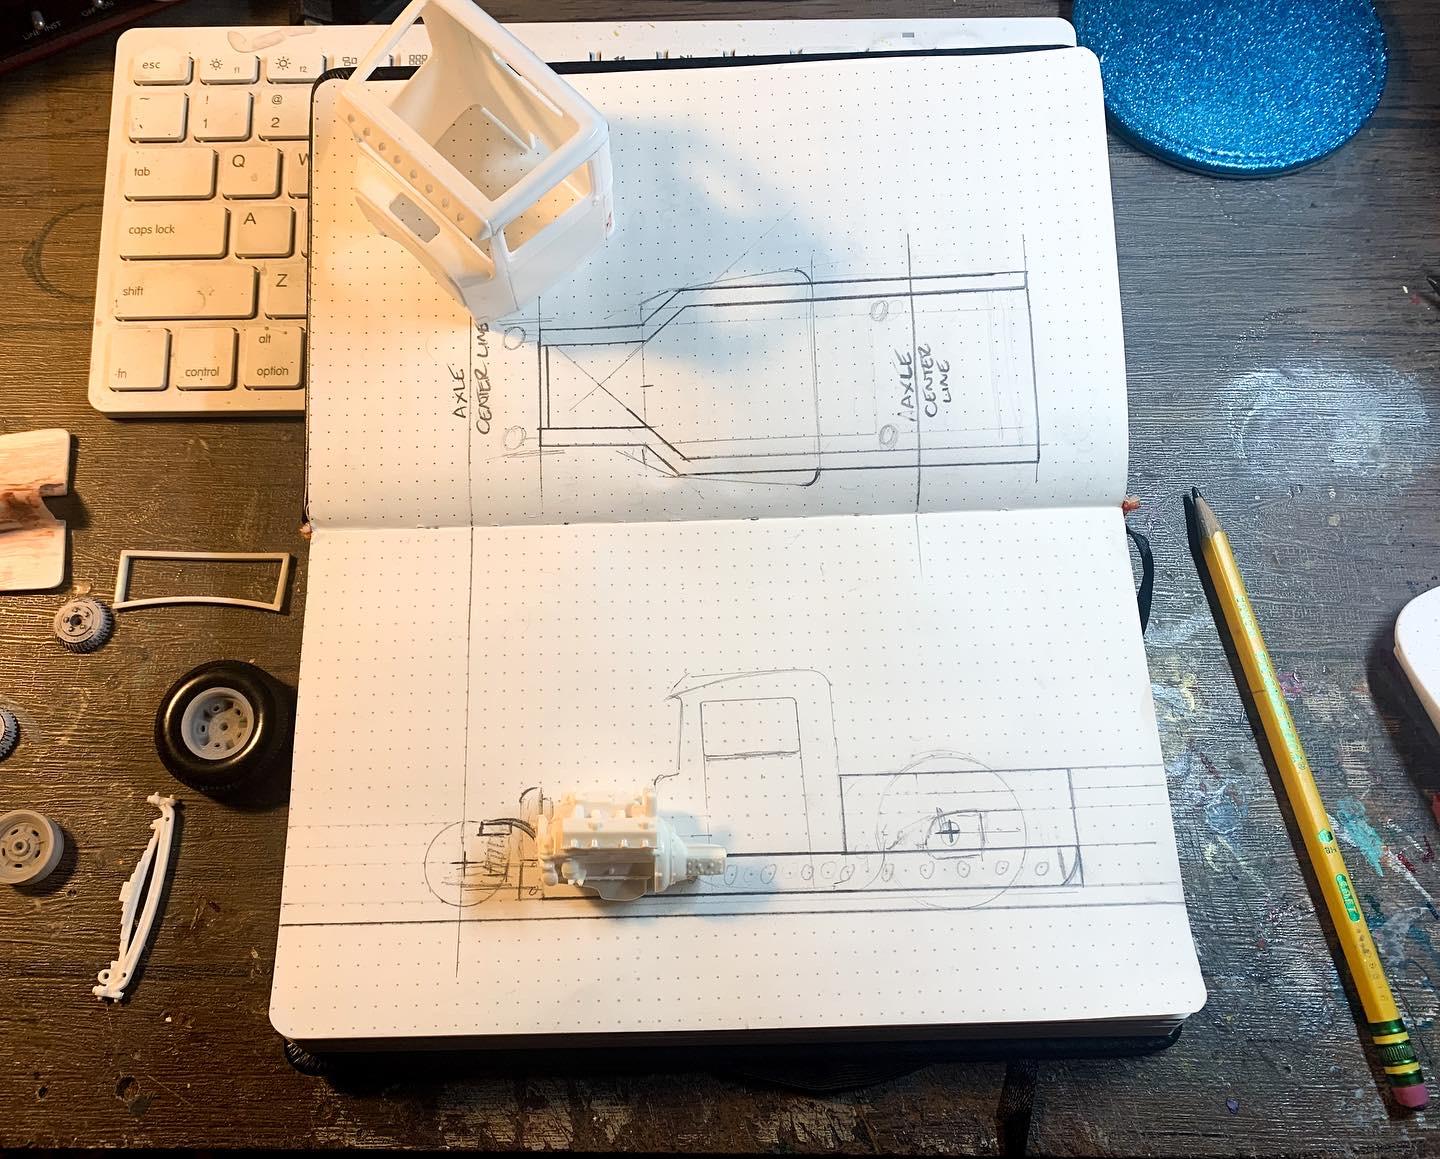
Printed my first frame! Haven’t nailed the settings yet (or the technique, or even actually the final design) but I’m having a blast playing with this stuff: No build thread yet, because I’m still learning a bunch of stuff before I really dig into it, but it’ll be a 34 Truck with a Roth Mysterion-inspired frame underneath. I actually started a version of this last year but I wasn’t happy with it… Oh, and my wife likes that Doctor Who show so I printed a tiny Tardis for her, seeing as she’s being pretty cool about me spending 8-10 hours playing with my new toy the last couple of days…
-
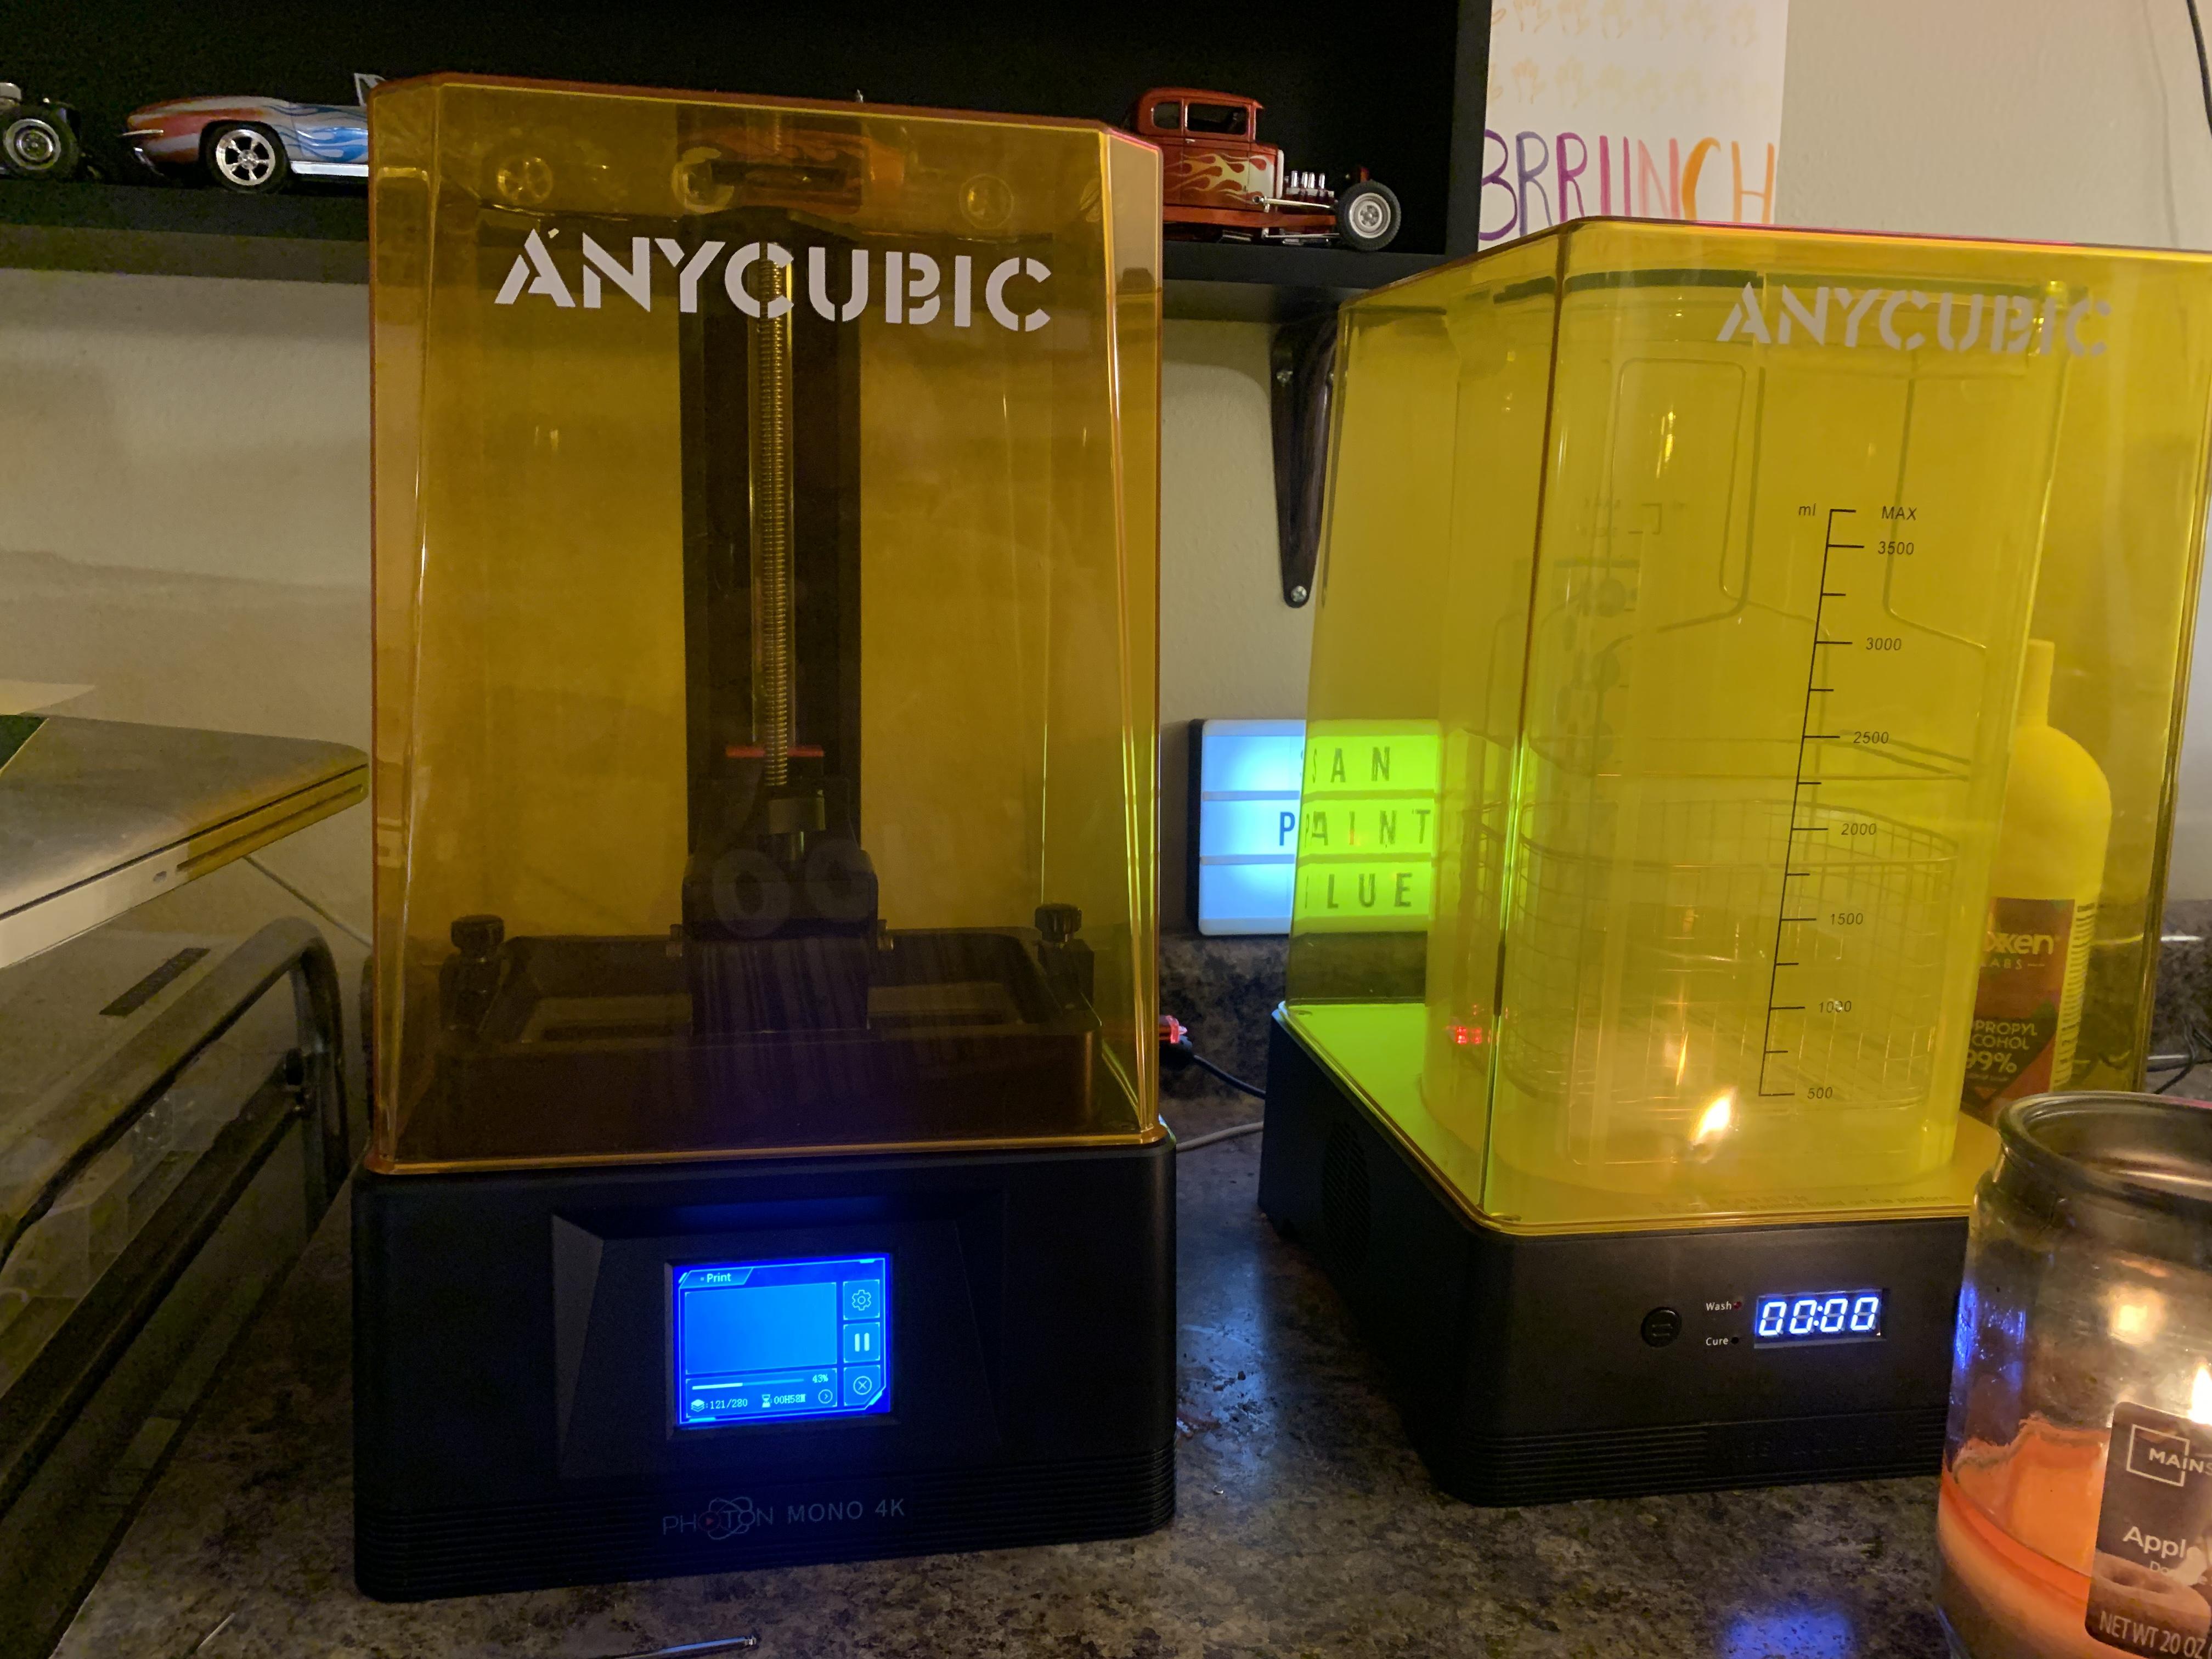
They probably do! I’m sure internally they’re pretty similar! Been using the Anycubic ‘basic’ gray resin for now - but a couple of people told me to try the water-based stuff…I should try that next. I really want to choose one and just stick with it for the sake of not having to play with the settings all the time, so I’ll likely give a few different kinds a try and then stick with whichever I get on best with. The gray stuff I’m messing with now seems to work pretty well…retains detail nicely on even tiny little stuff and I haven’t had any gloopy-mess failures YET (knock on wood) Which resin do you like?
-
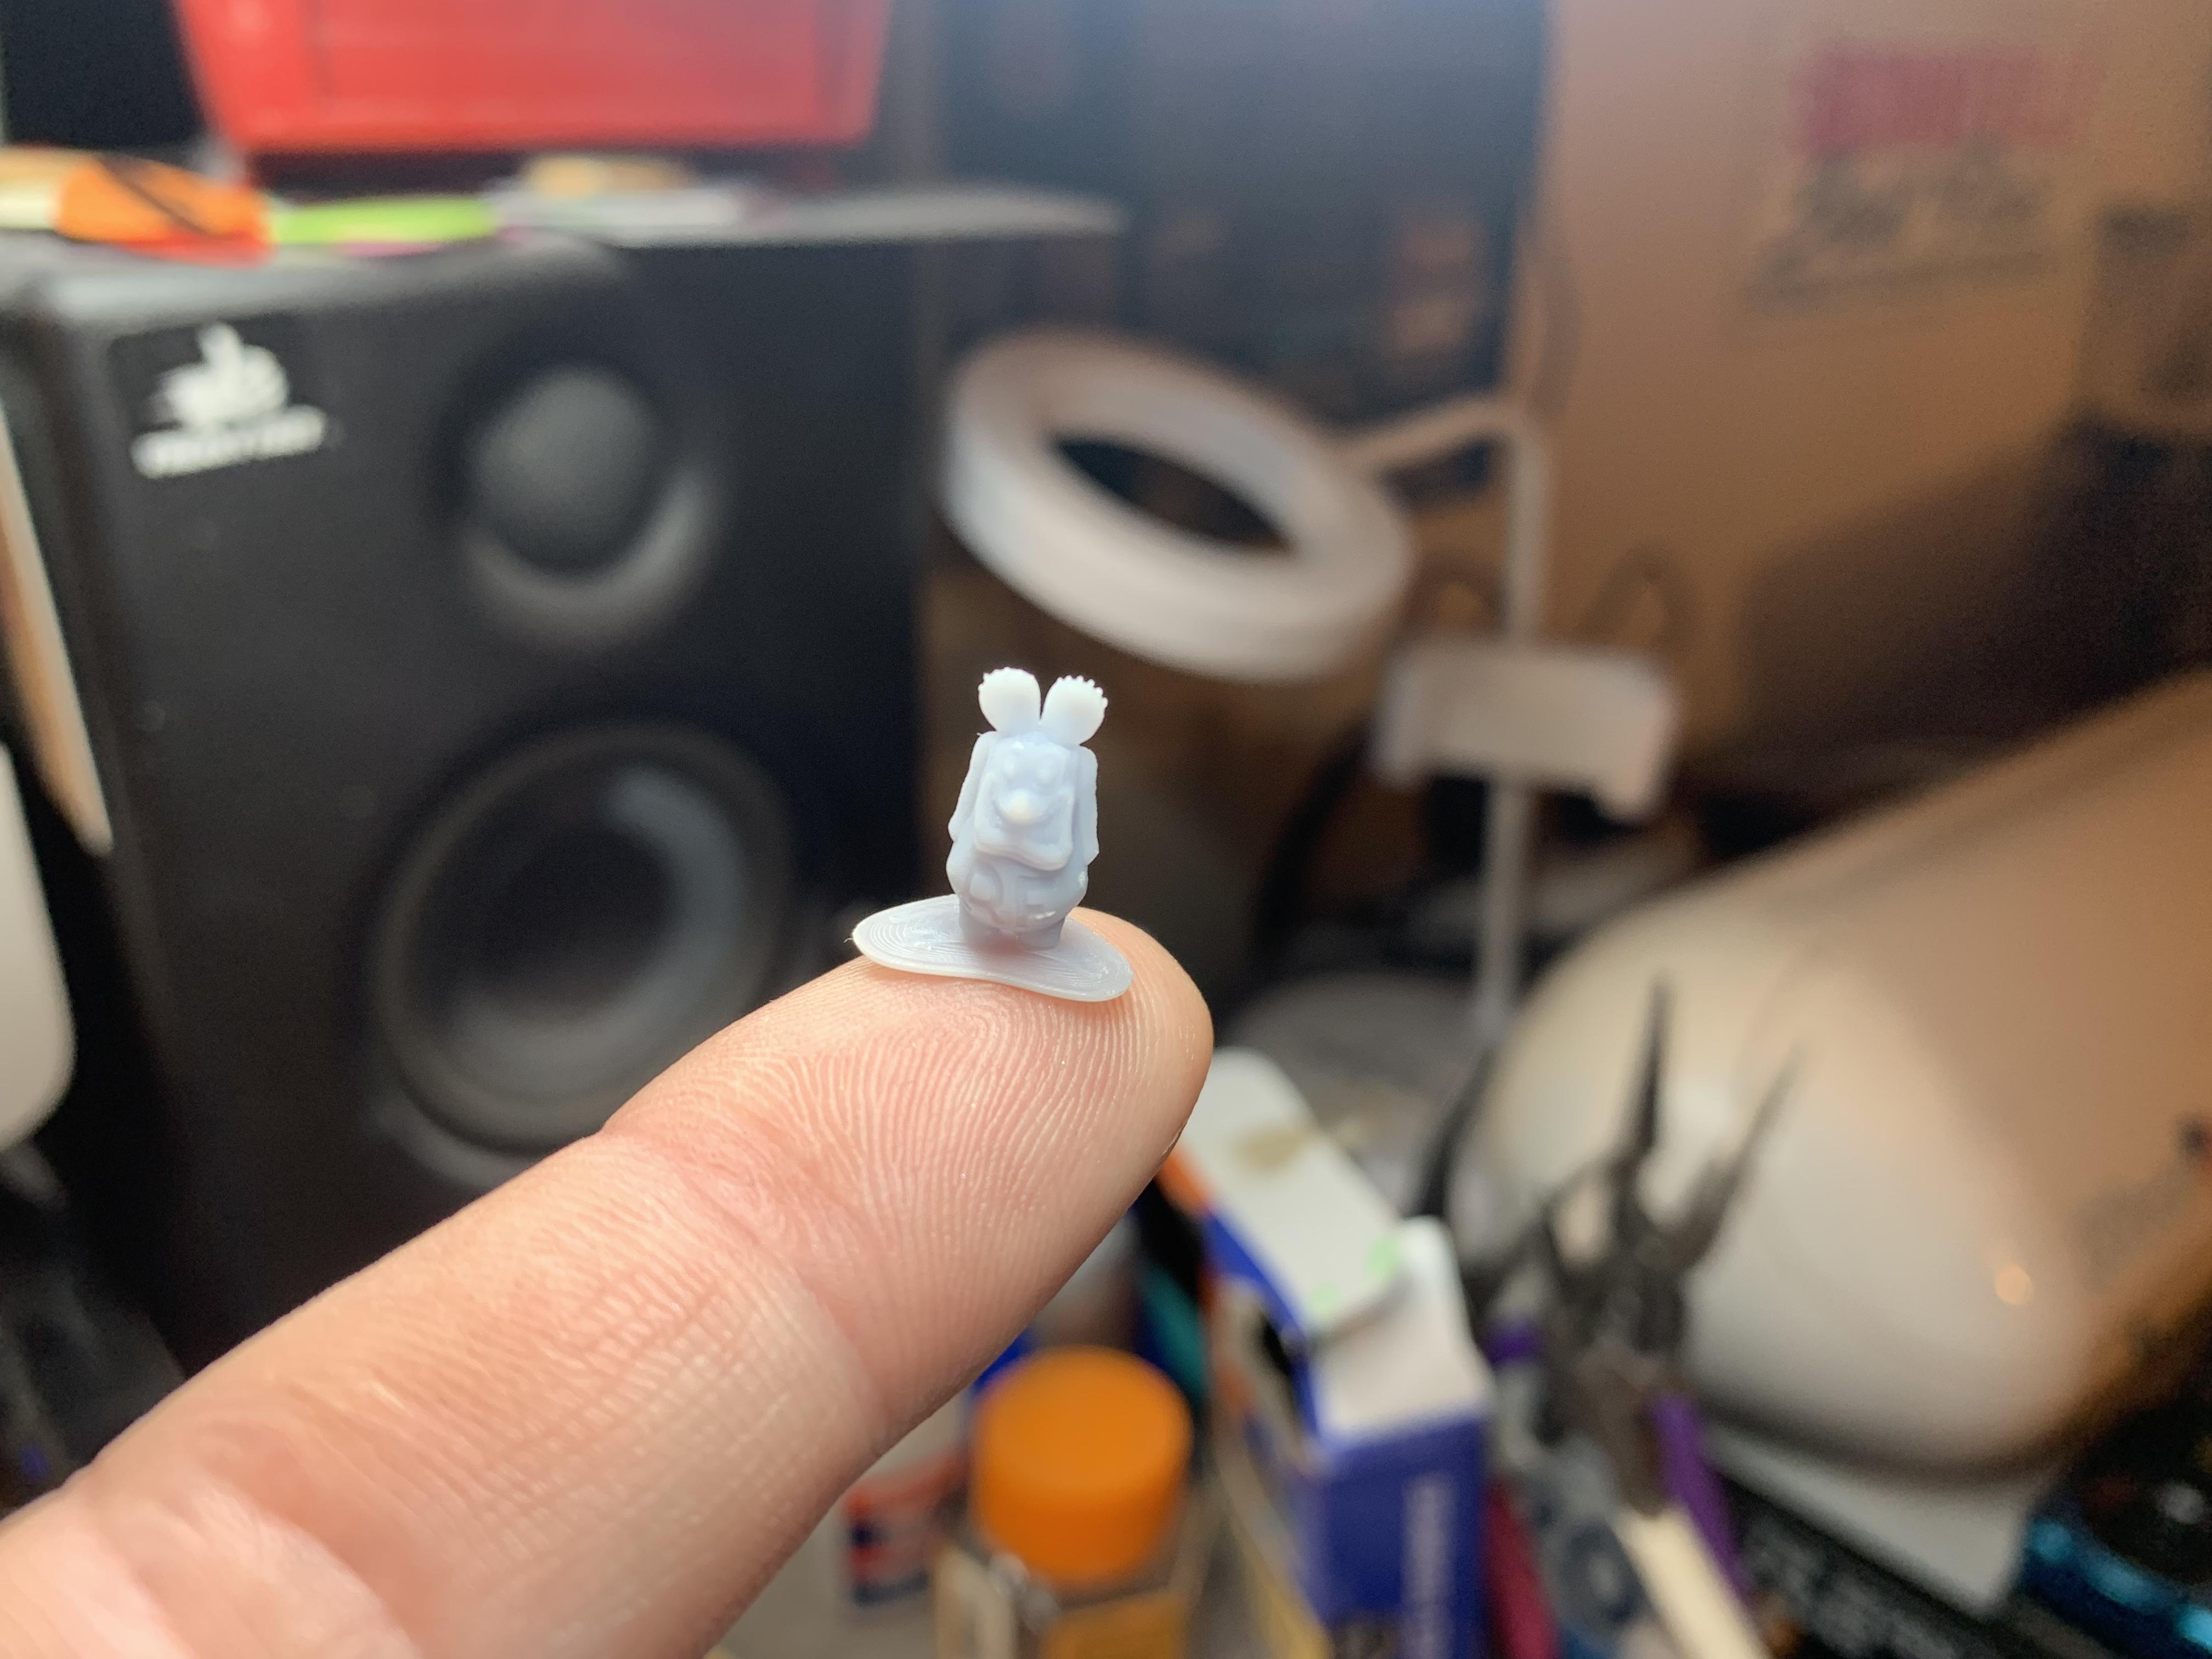
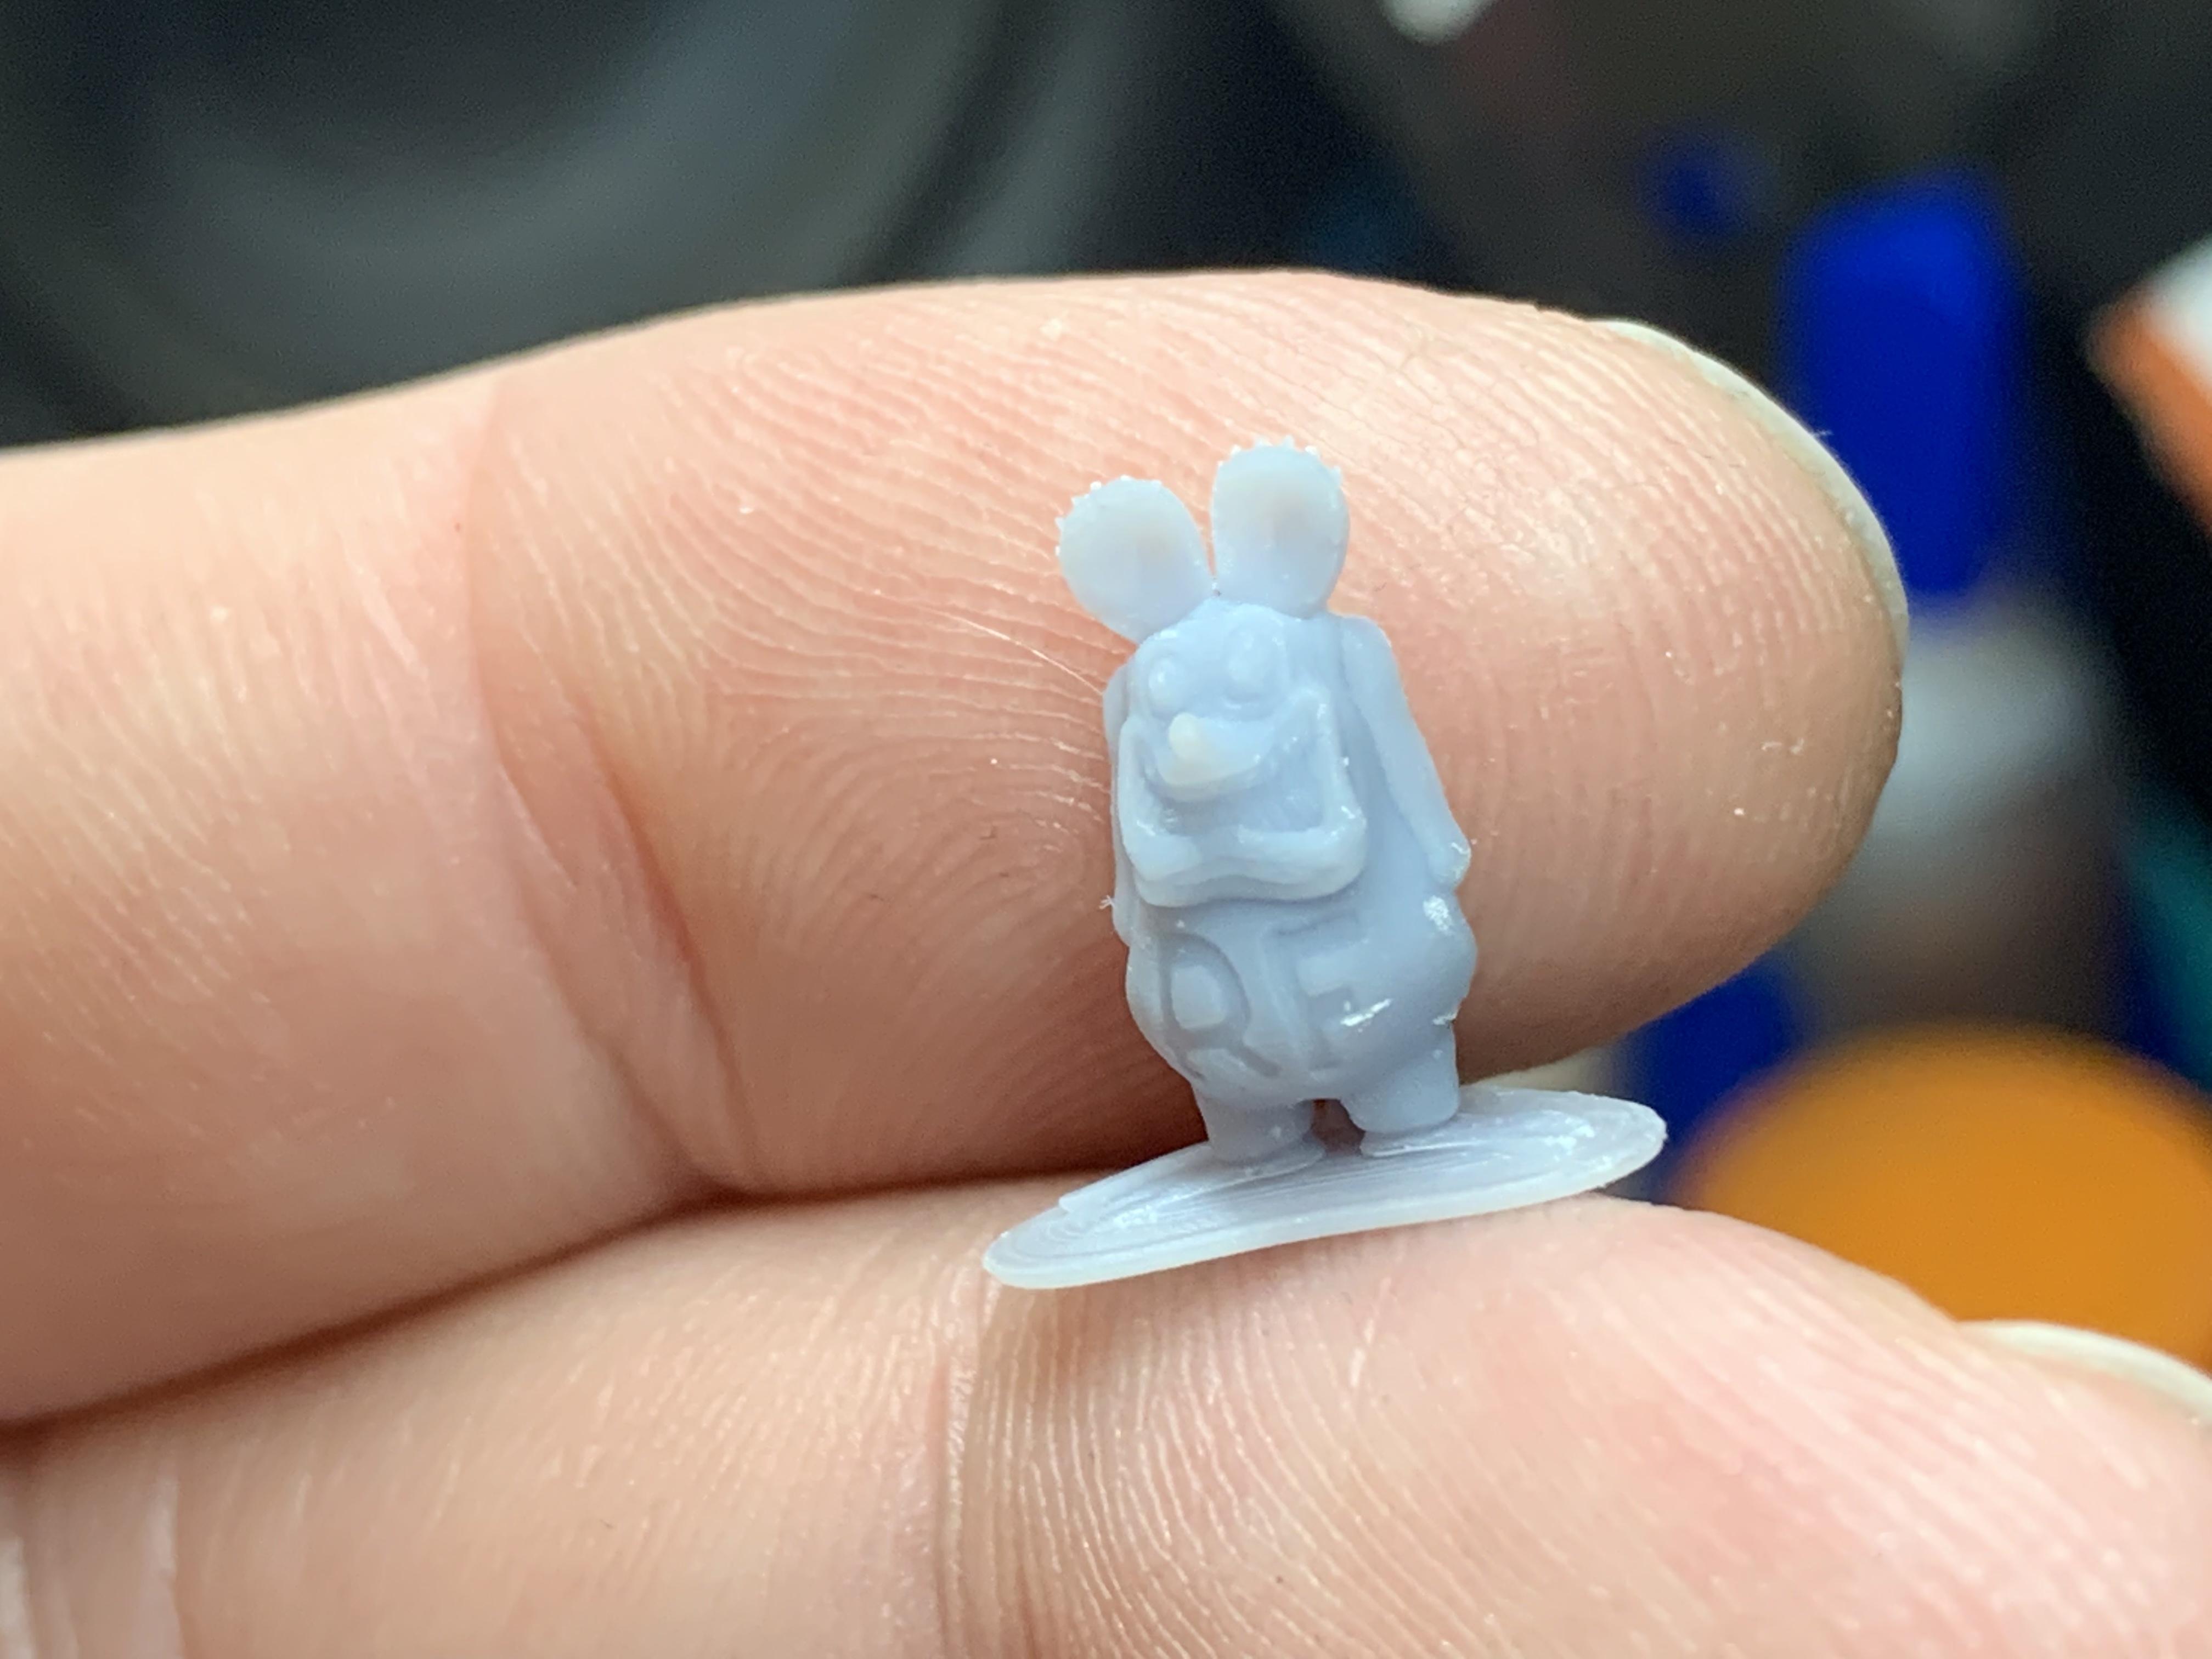
This arrived today - already printed a tiny Rat Fink!
-
I’ve had an idea for a frame for a 34 Ford truck in my head for a while…sketched it out this evening before dinner to see how it would translate. I’m doing technical drawings and renderings all day long, so it’s nice to work in pencil and paper now and then. And then, after dinner, I drew it on the computer ?
-
Phrozen Sonic Mini 4K 3D Printer
OldNYJim replied to MrObsessive's topic in Car Aftermarket / Resin / 3D Printed
I meant the Volvo suspension parts he mentioned...my bad, wasn't clear... -
1970 Winnebago D27 Chieftain
OldNYJim replied to Repstock's topic in WIP: Model Trucks: Pickups, Vans, SUVs, Light Commercial
Outstanding scratchbuilding - nice work! Love seeing projects like this! -
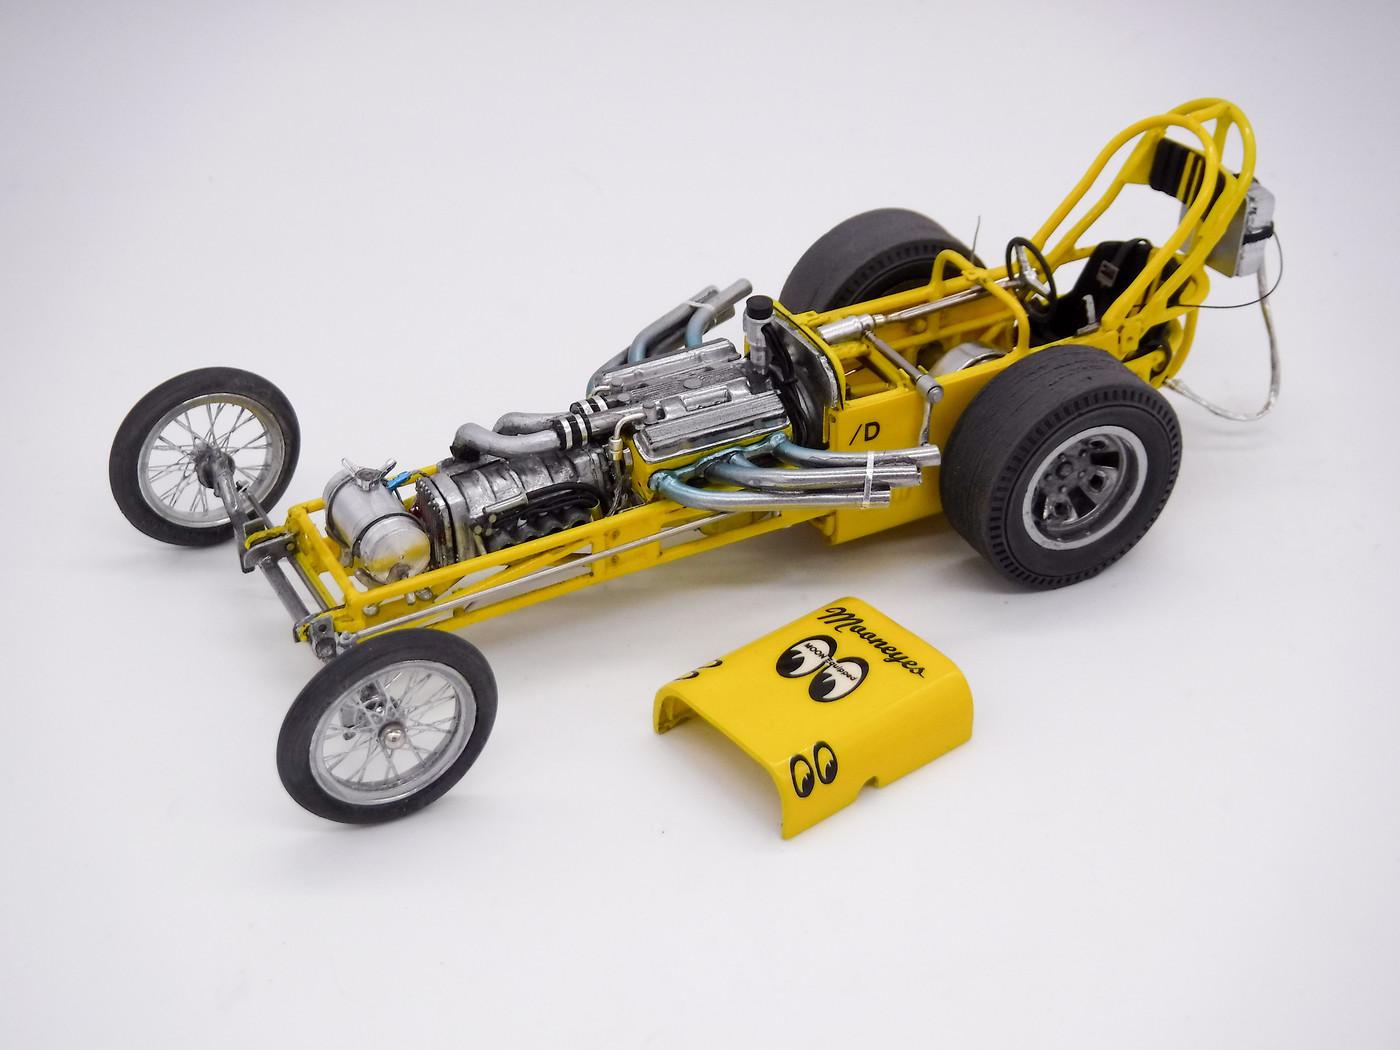
Wrapped this one up! Had a few little details to add and a little weathering left to do - this build will be part of a set with it riding on a replica of the Mooneyes ramp truck so that'll be a follow-up build later in the year...thanks for looking, everyone! FInished pics here:
-
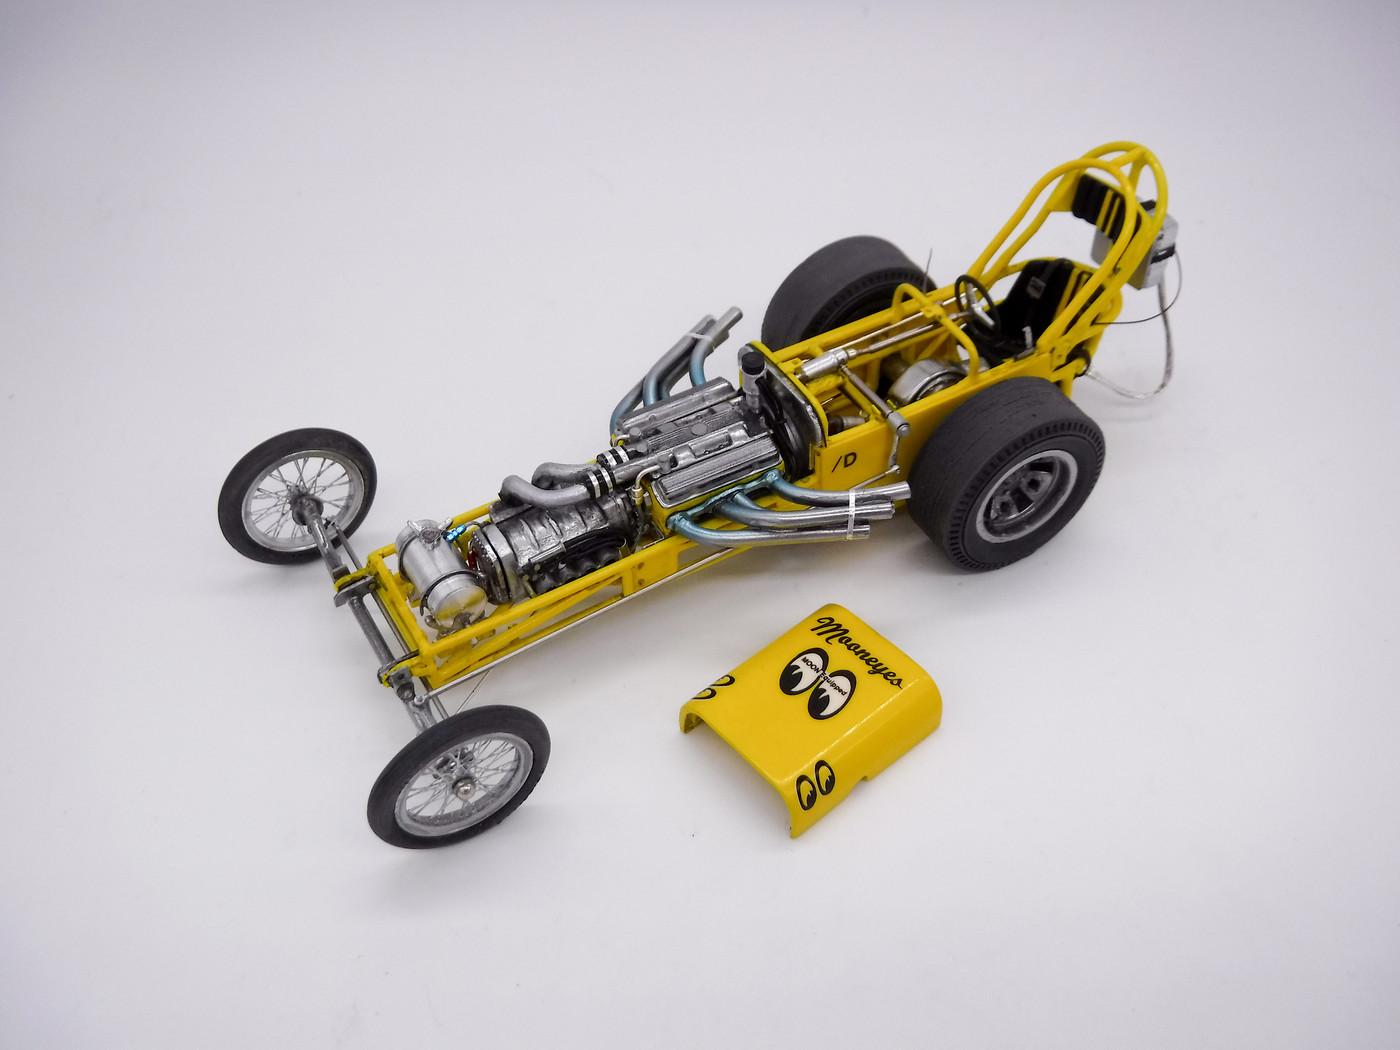
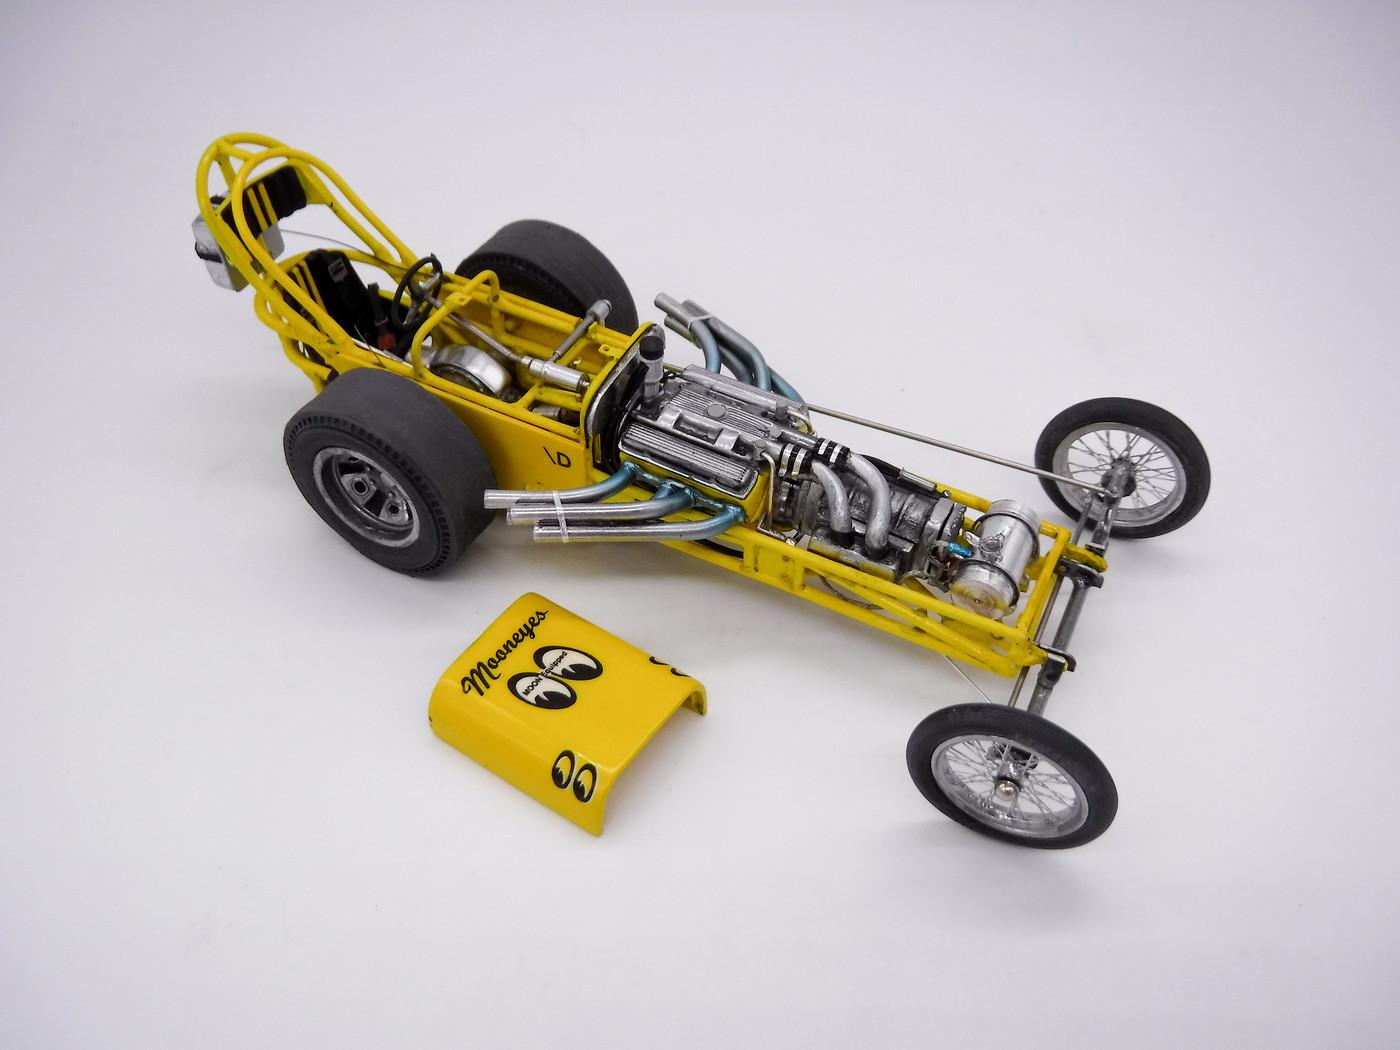
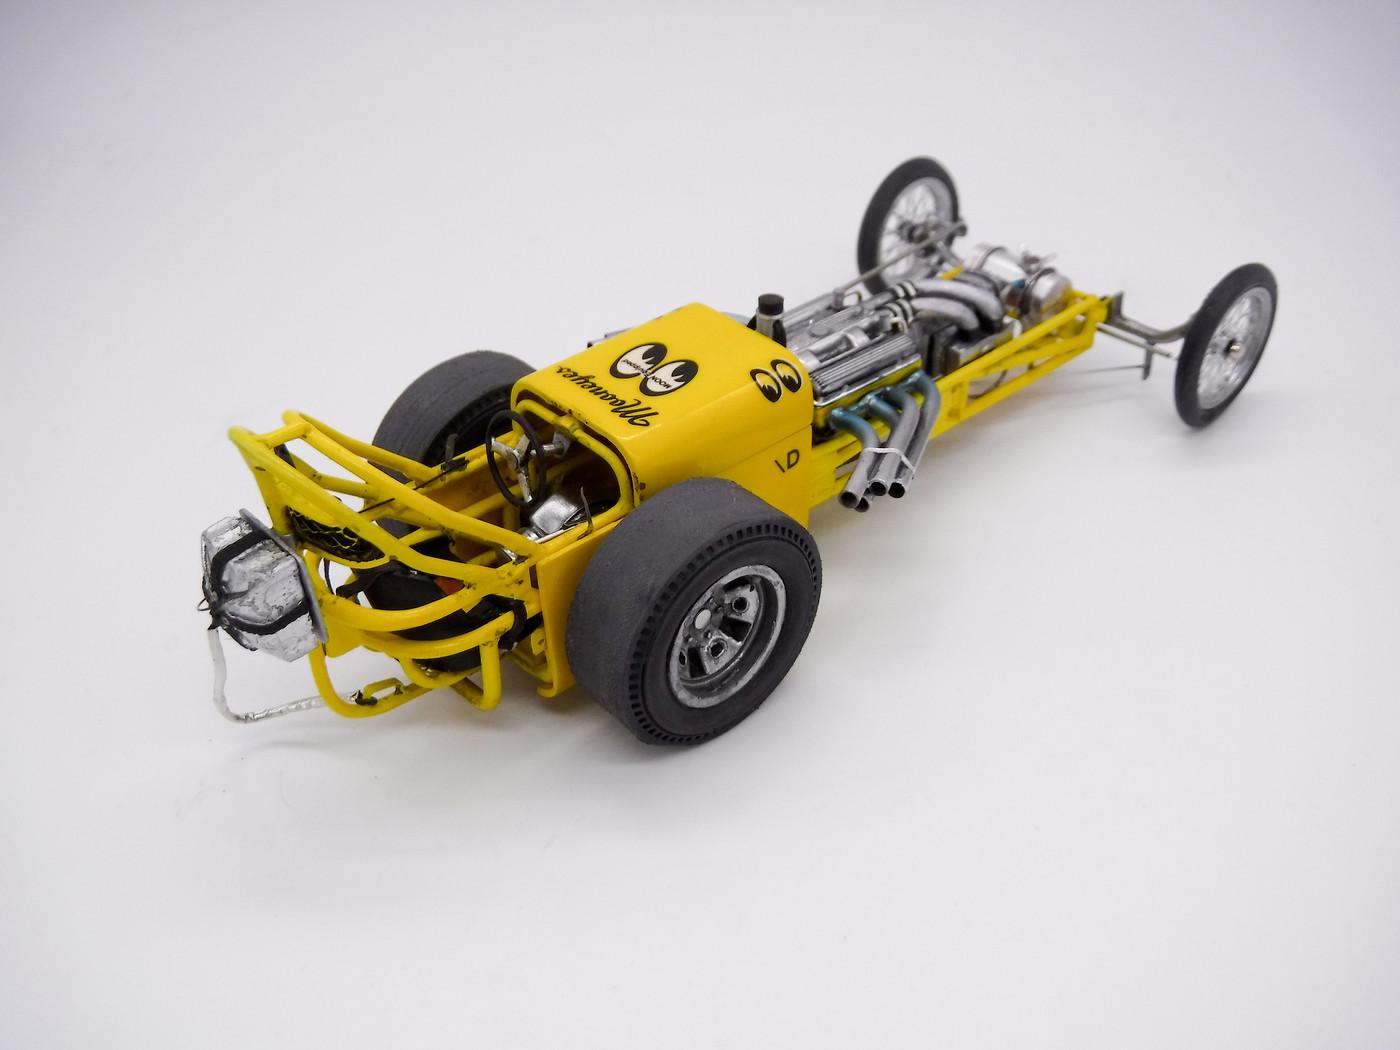
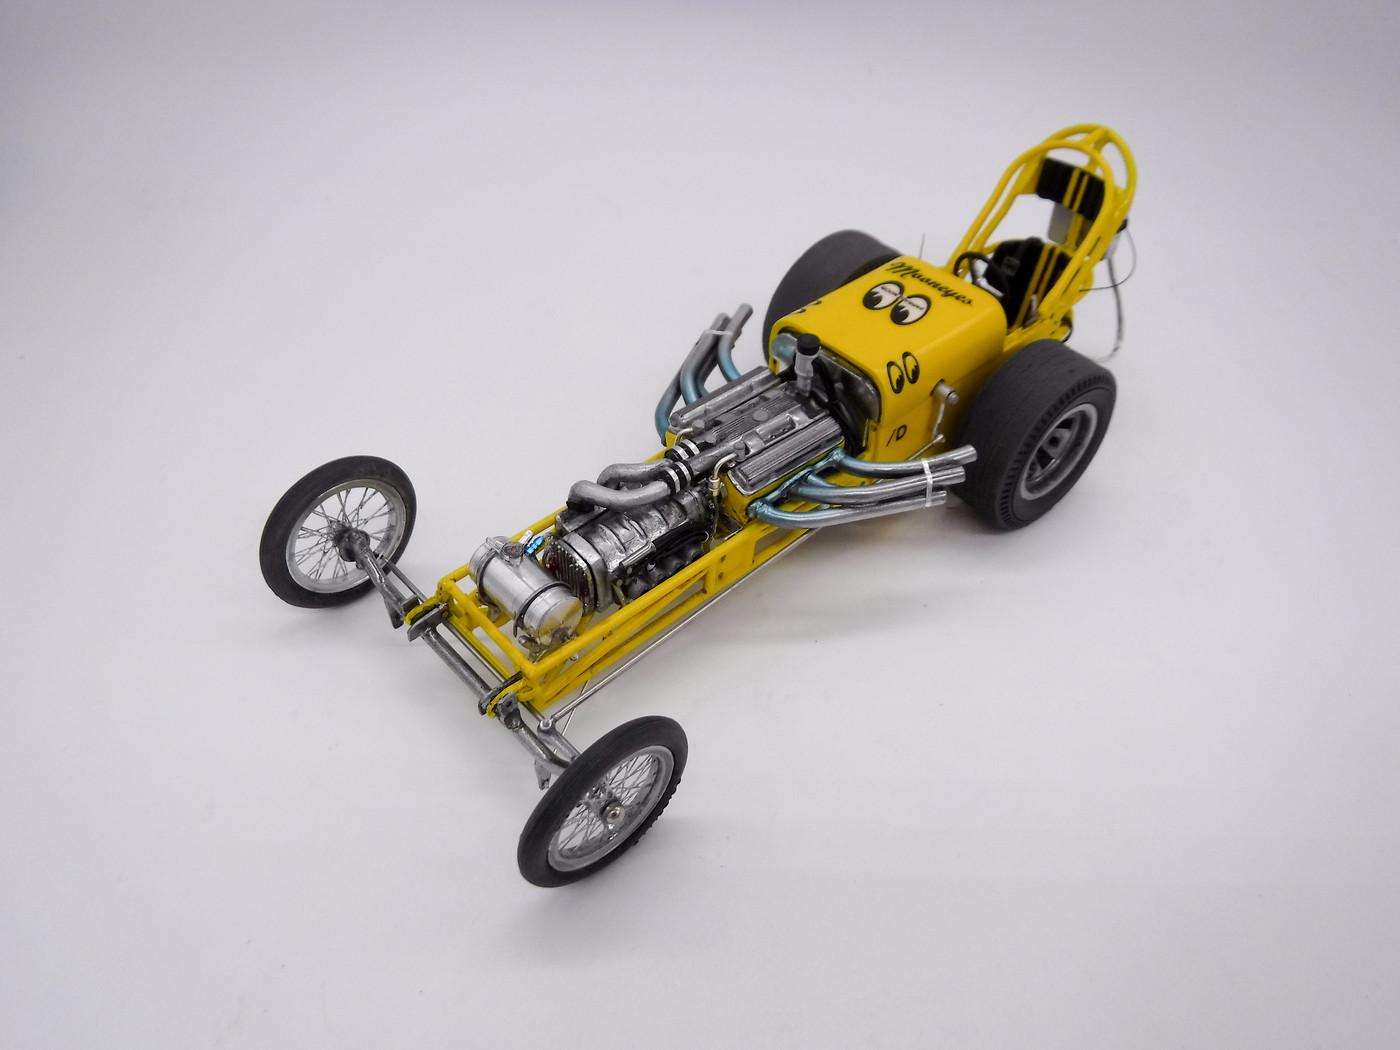
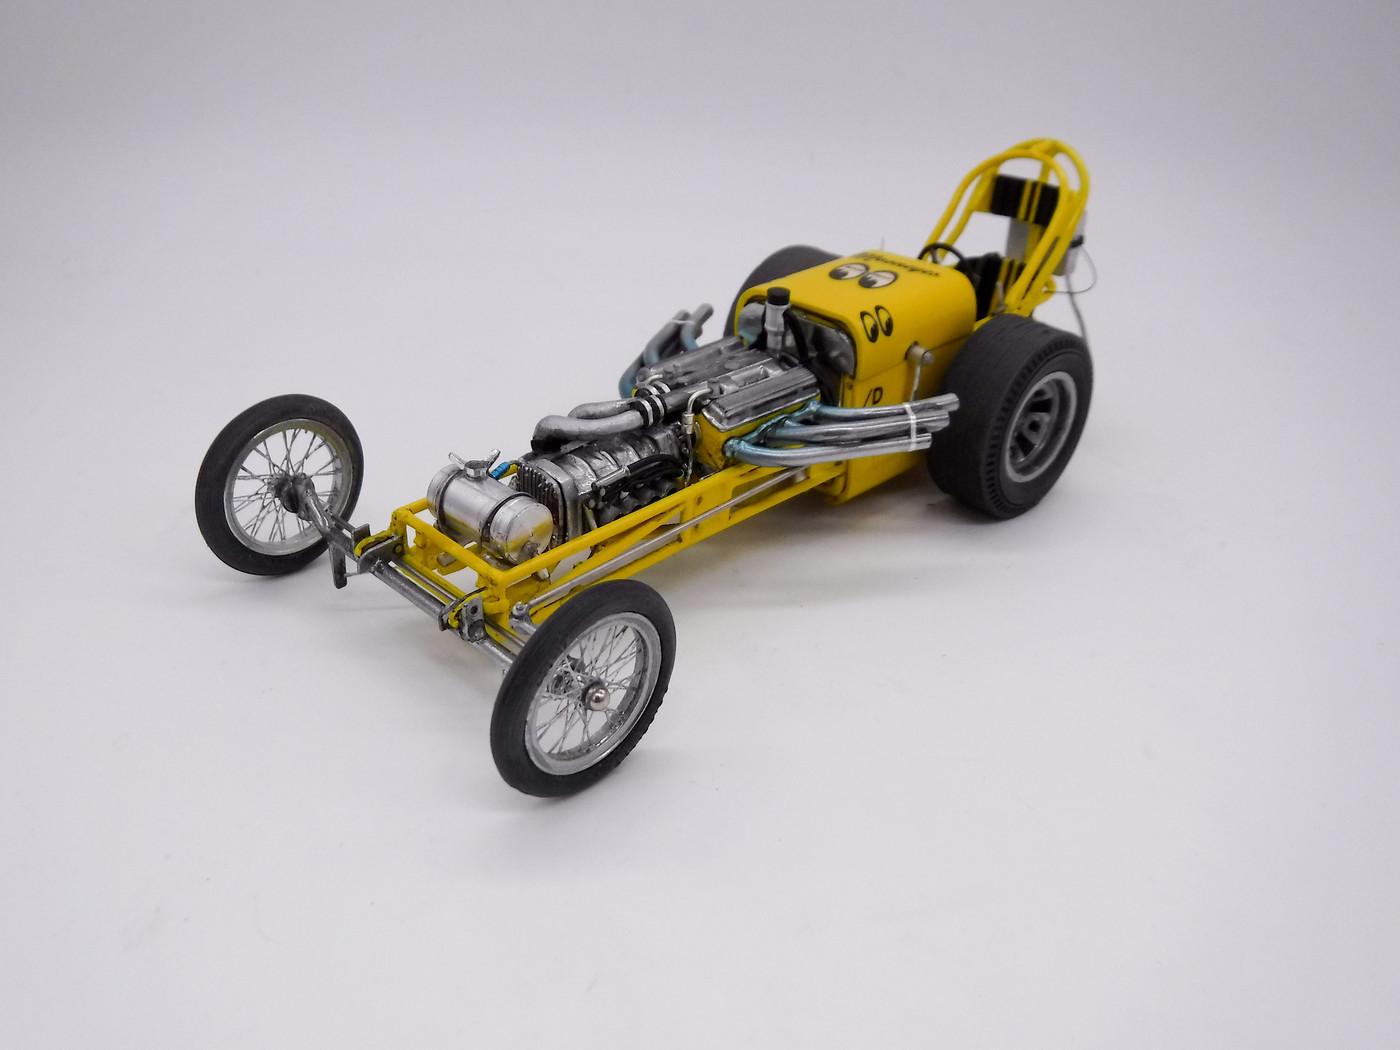
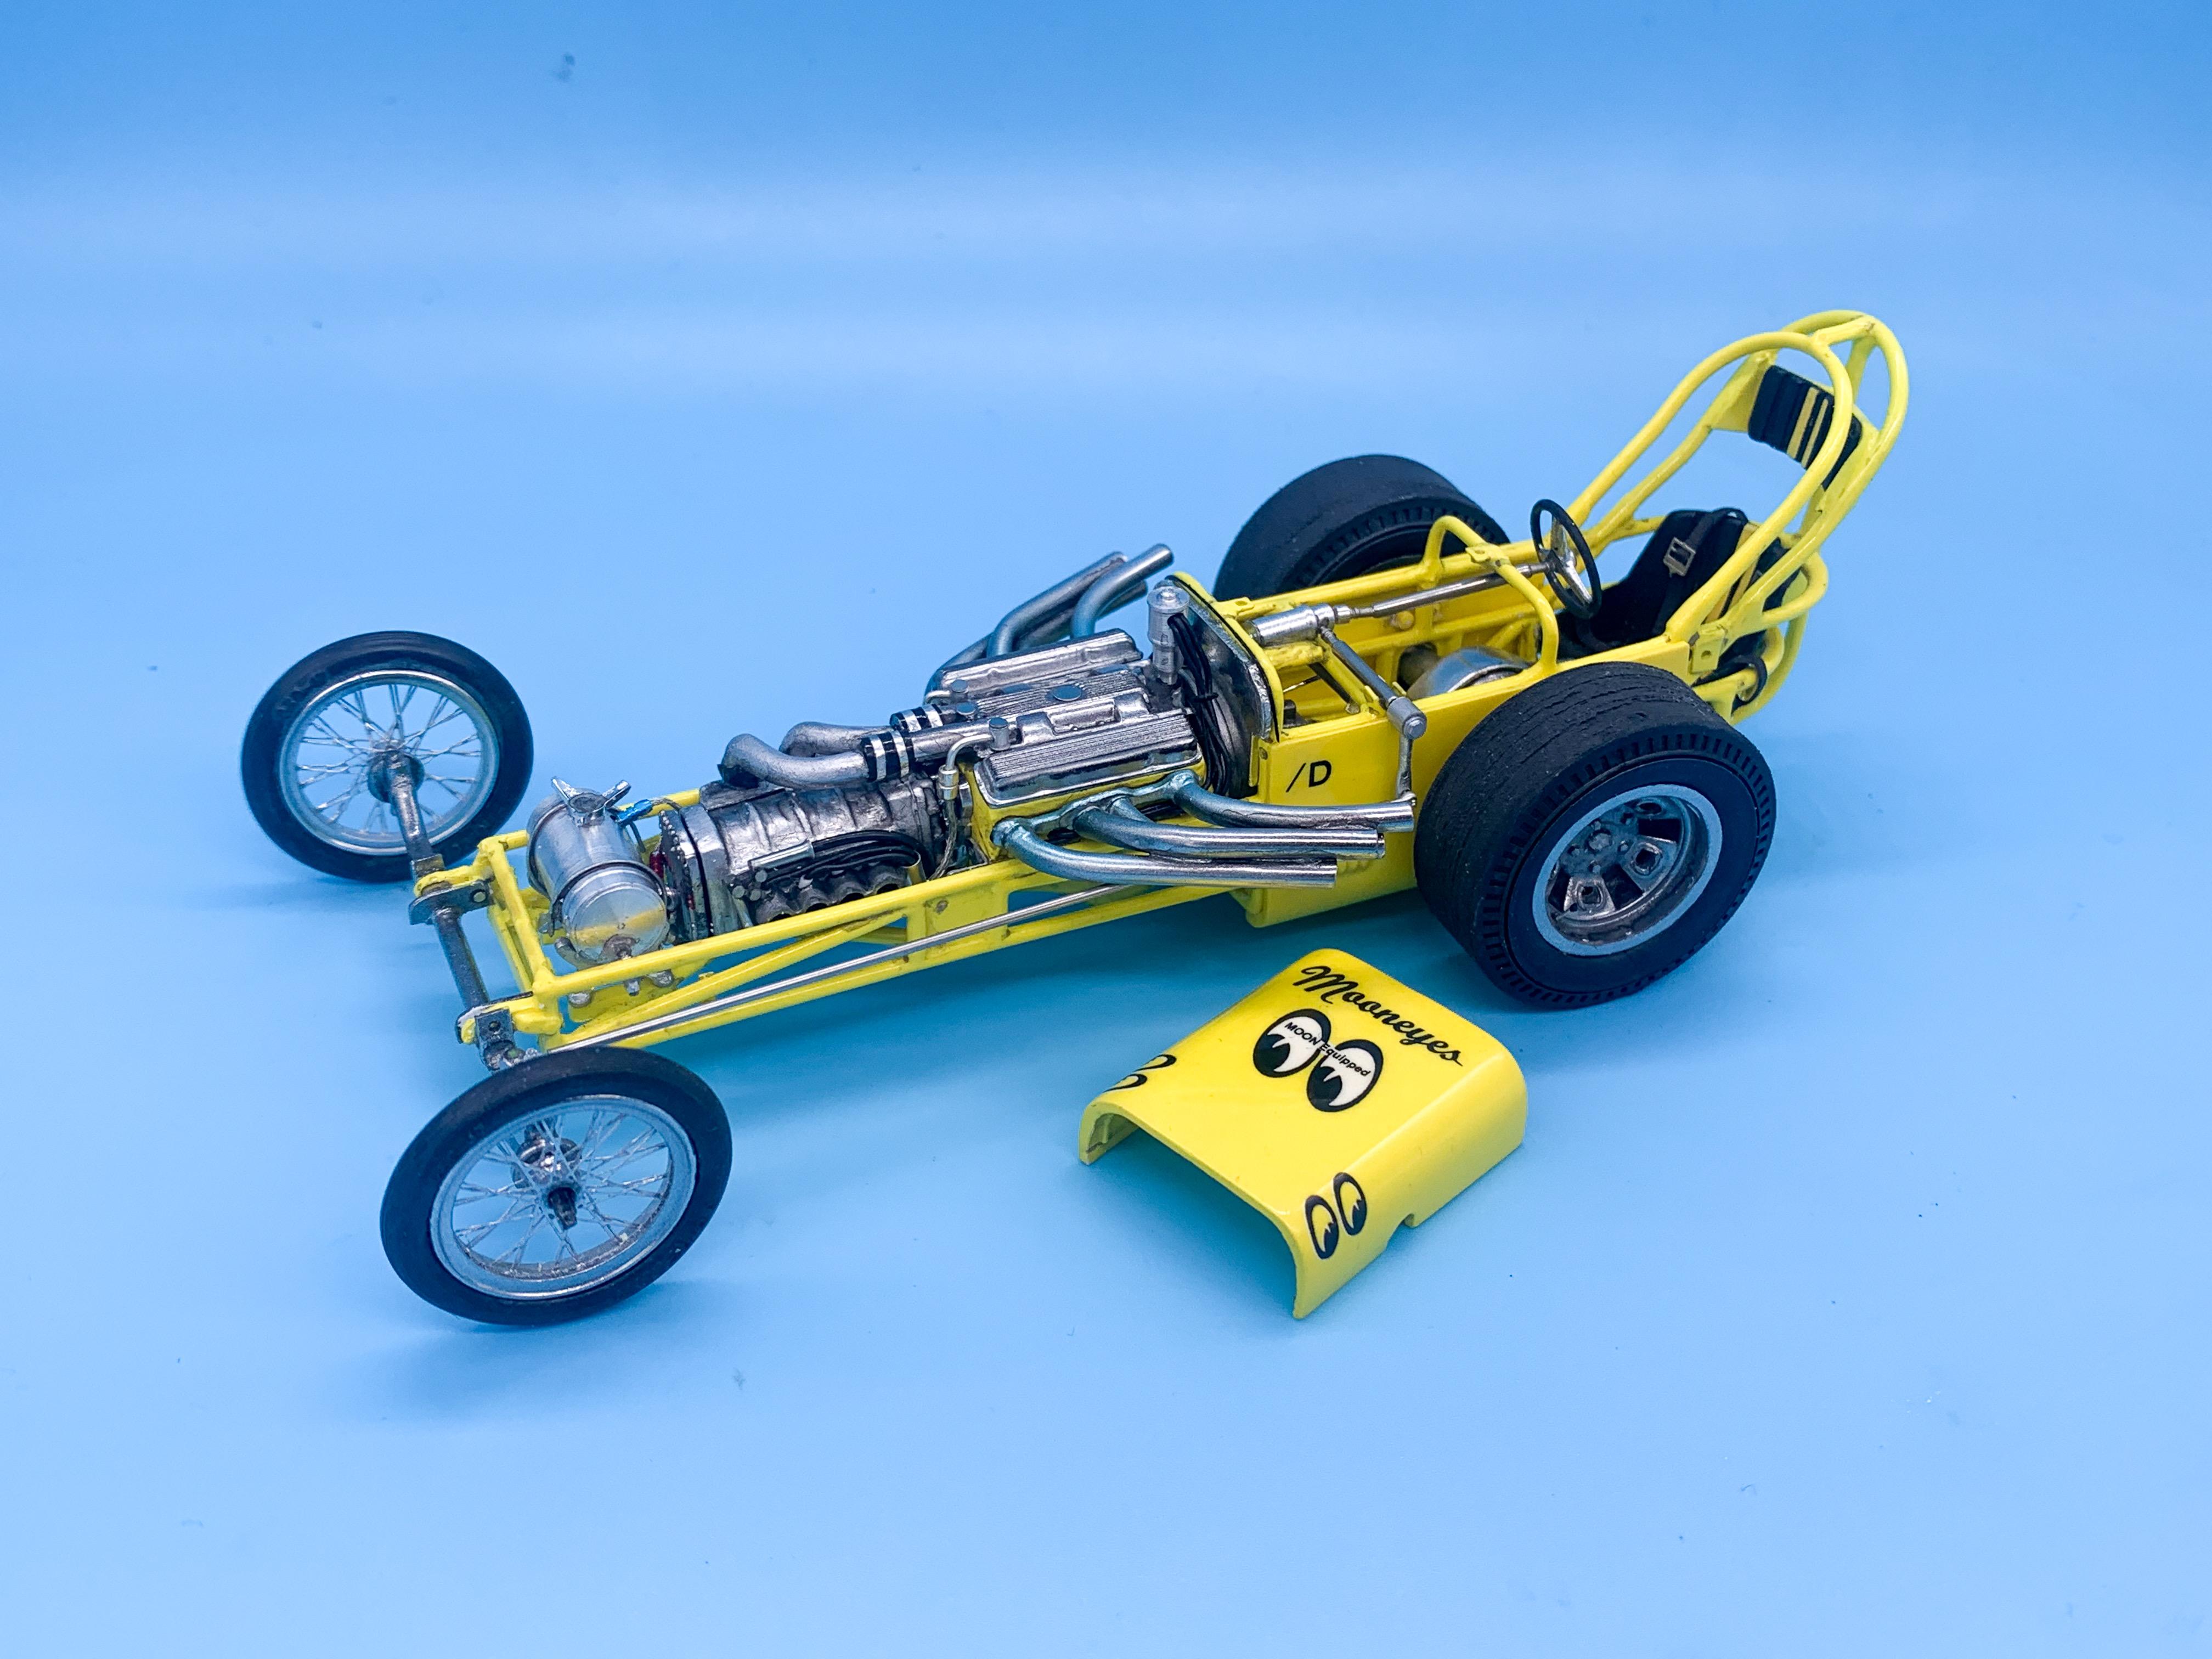
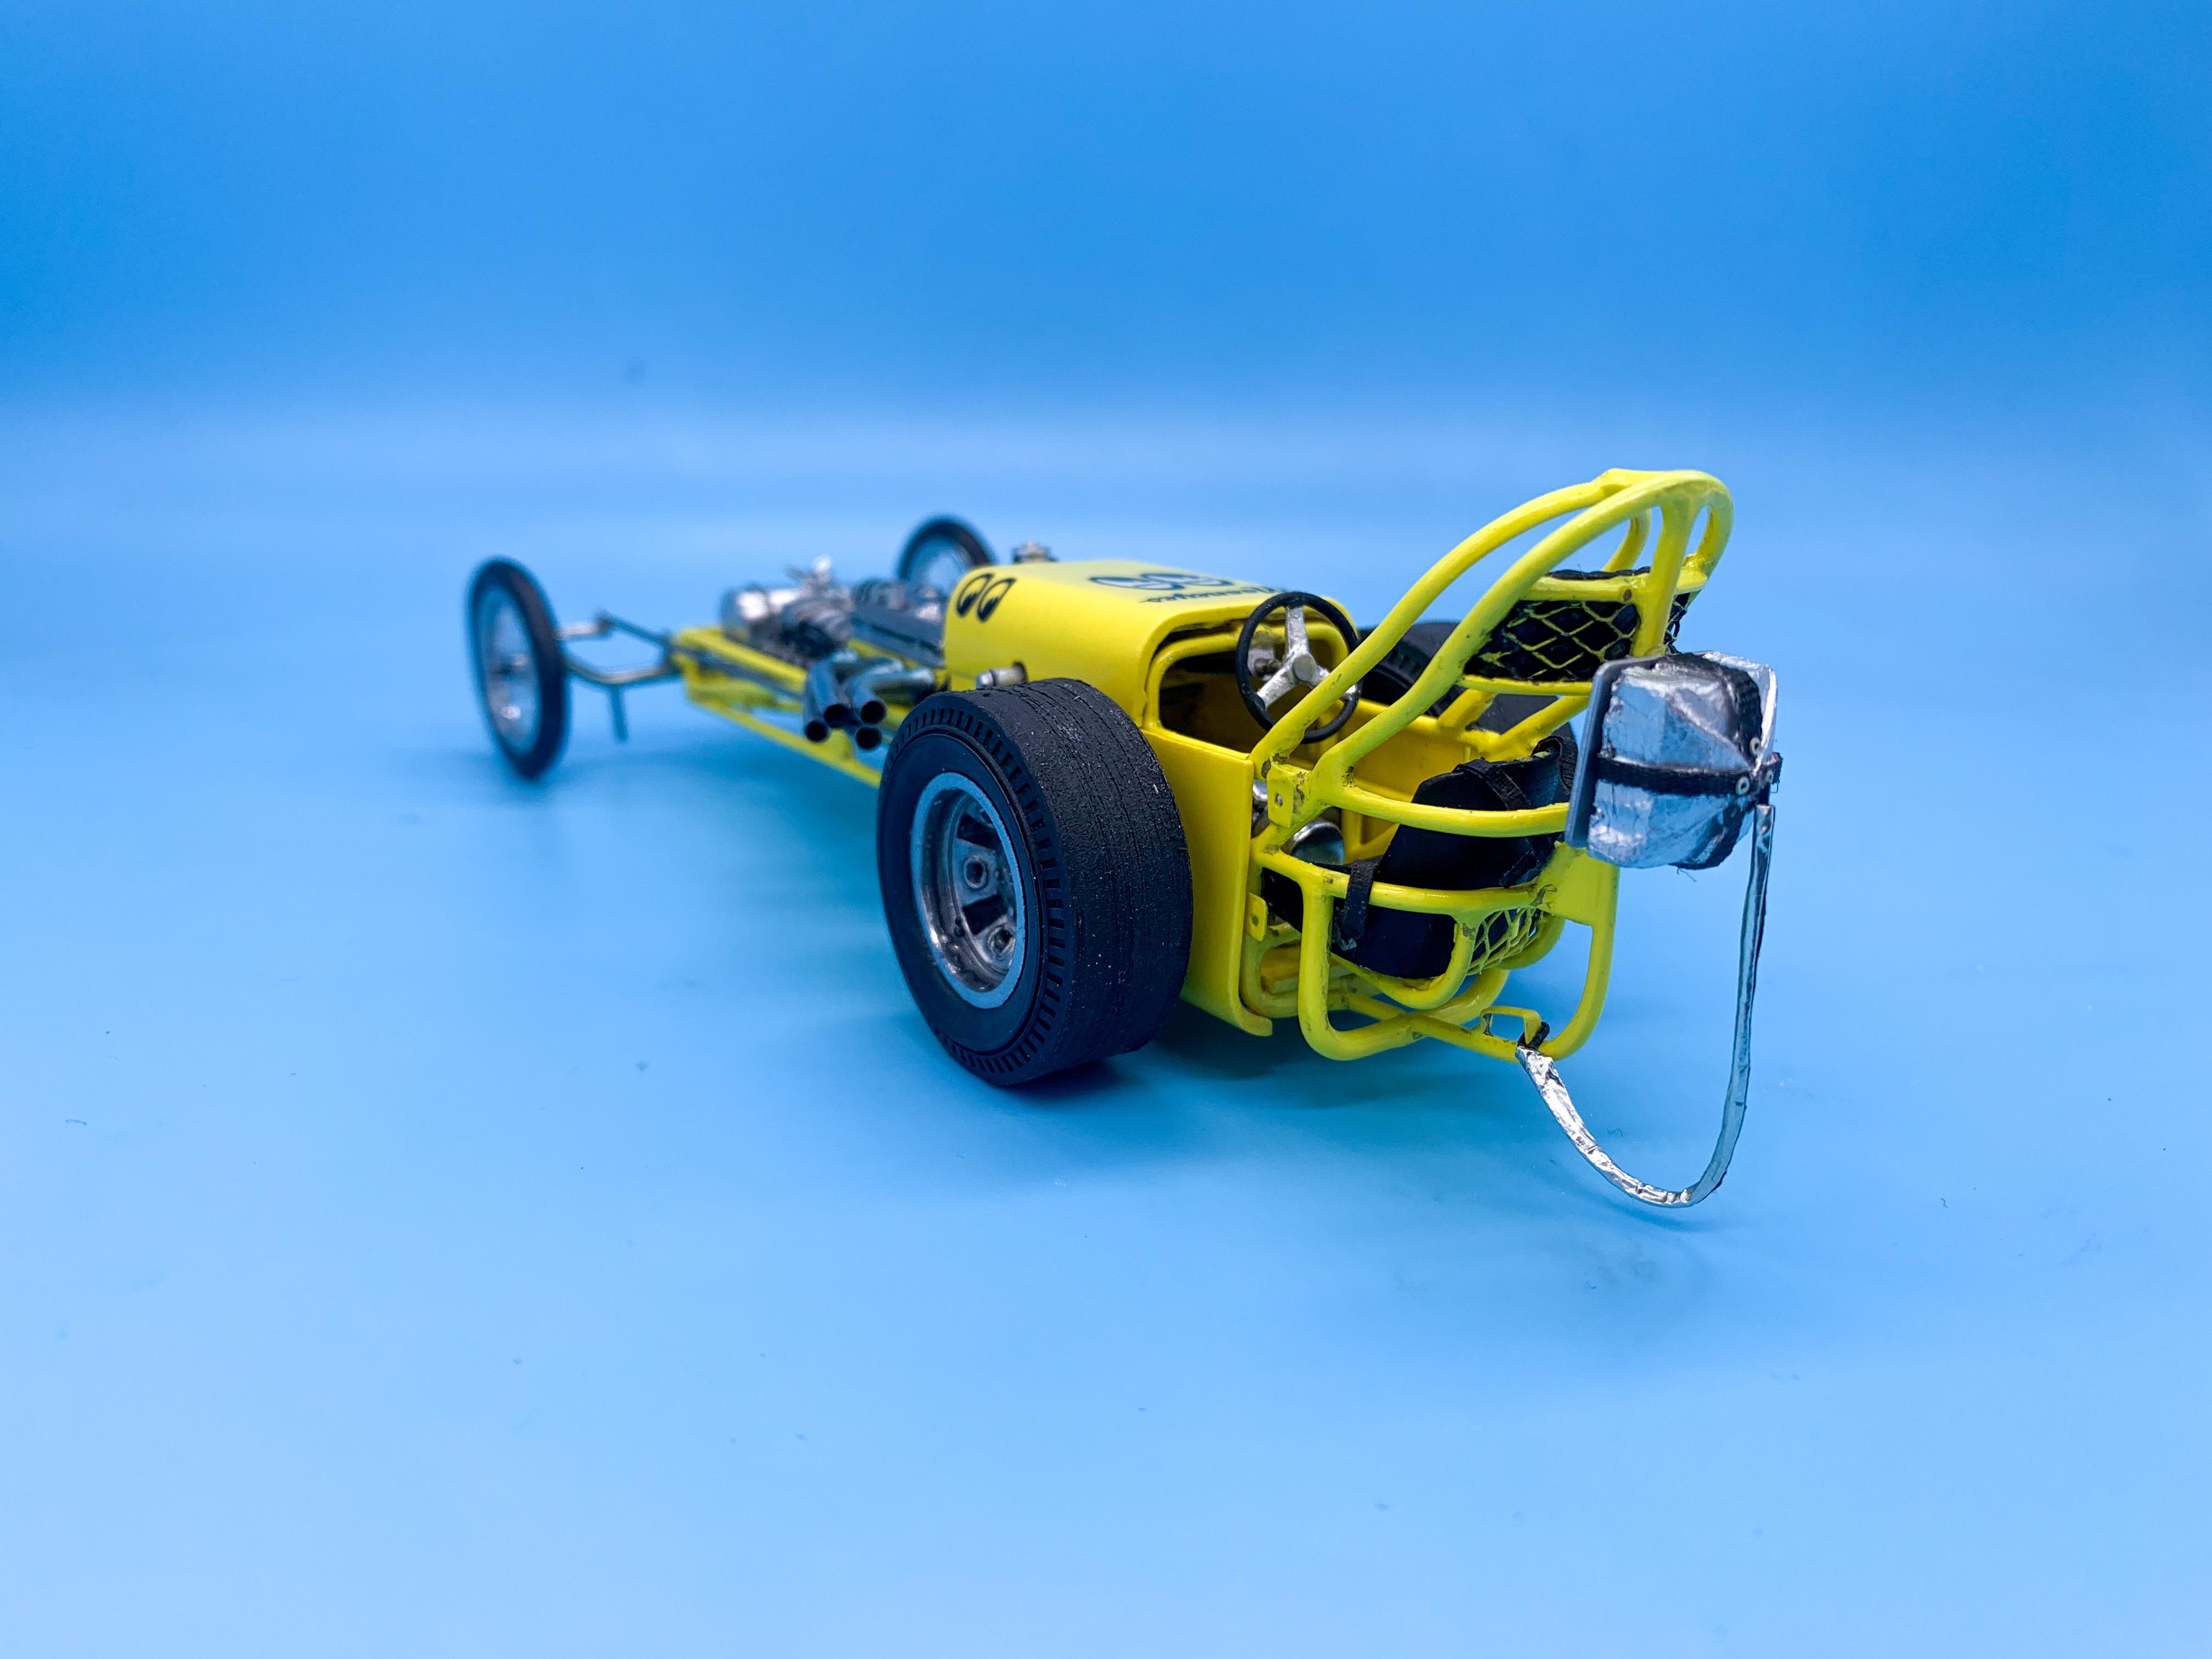
Few pics of my finished Atlantis Mooneyes dragster build. I was planning on close to a box-stock build, but the more I dug into it the more I ended up changing...really glad they brought these back though! What a GREAT kit! Painted with Createx paint, added some machined aluminum parts, RB Motion rod ends and Highlight Models Moon pedals and a resin parachute. Thanks for looking!
-
Phrozen Sonic Mini 4K 3D Printer
OldNYJim replied to MrObsessive's topic in Car Aftermarket / Resin / 3D Printed
Nice print! Does someone offer files for those parts that you’re printing or are you drawing them yourself? Excited to see your progress with that machine! -
Good tip, thank you sir! I get my wife’s car serviced at the Honda dealer right by there…I’ll take a look!
-
Huh, I never saw those 32 Sedans in the HL near me - got lucky at Christmas…Walmart had them so I got one there instead. I’d pick up a few of those for $18 a piece just for some of the parts!
-
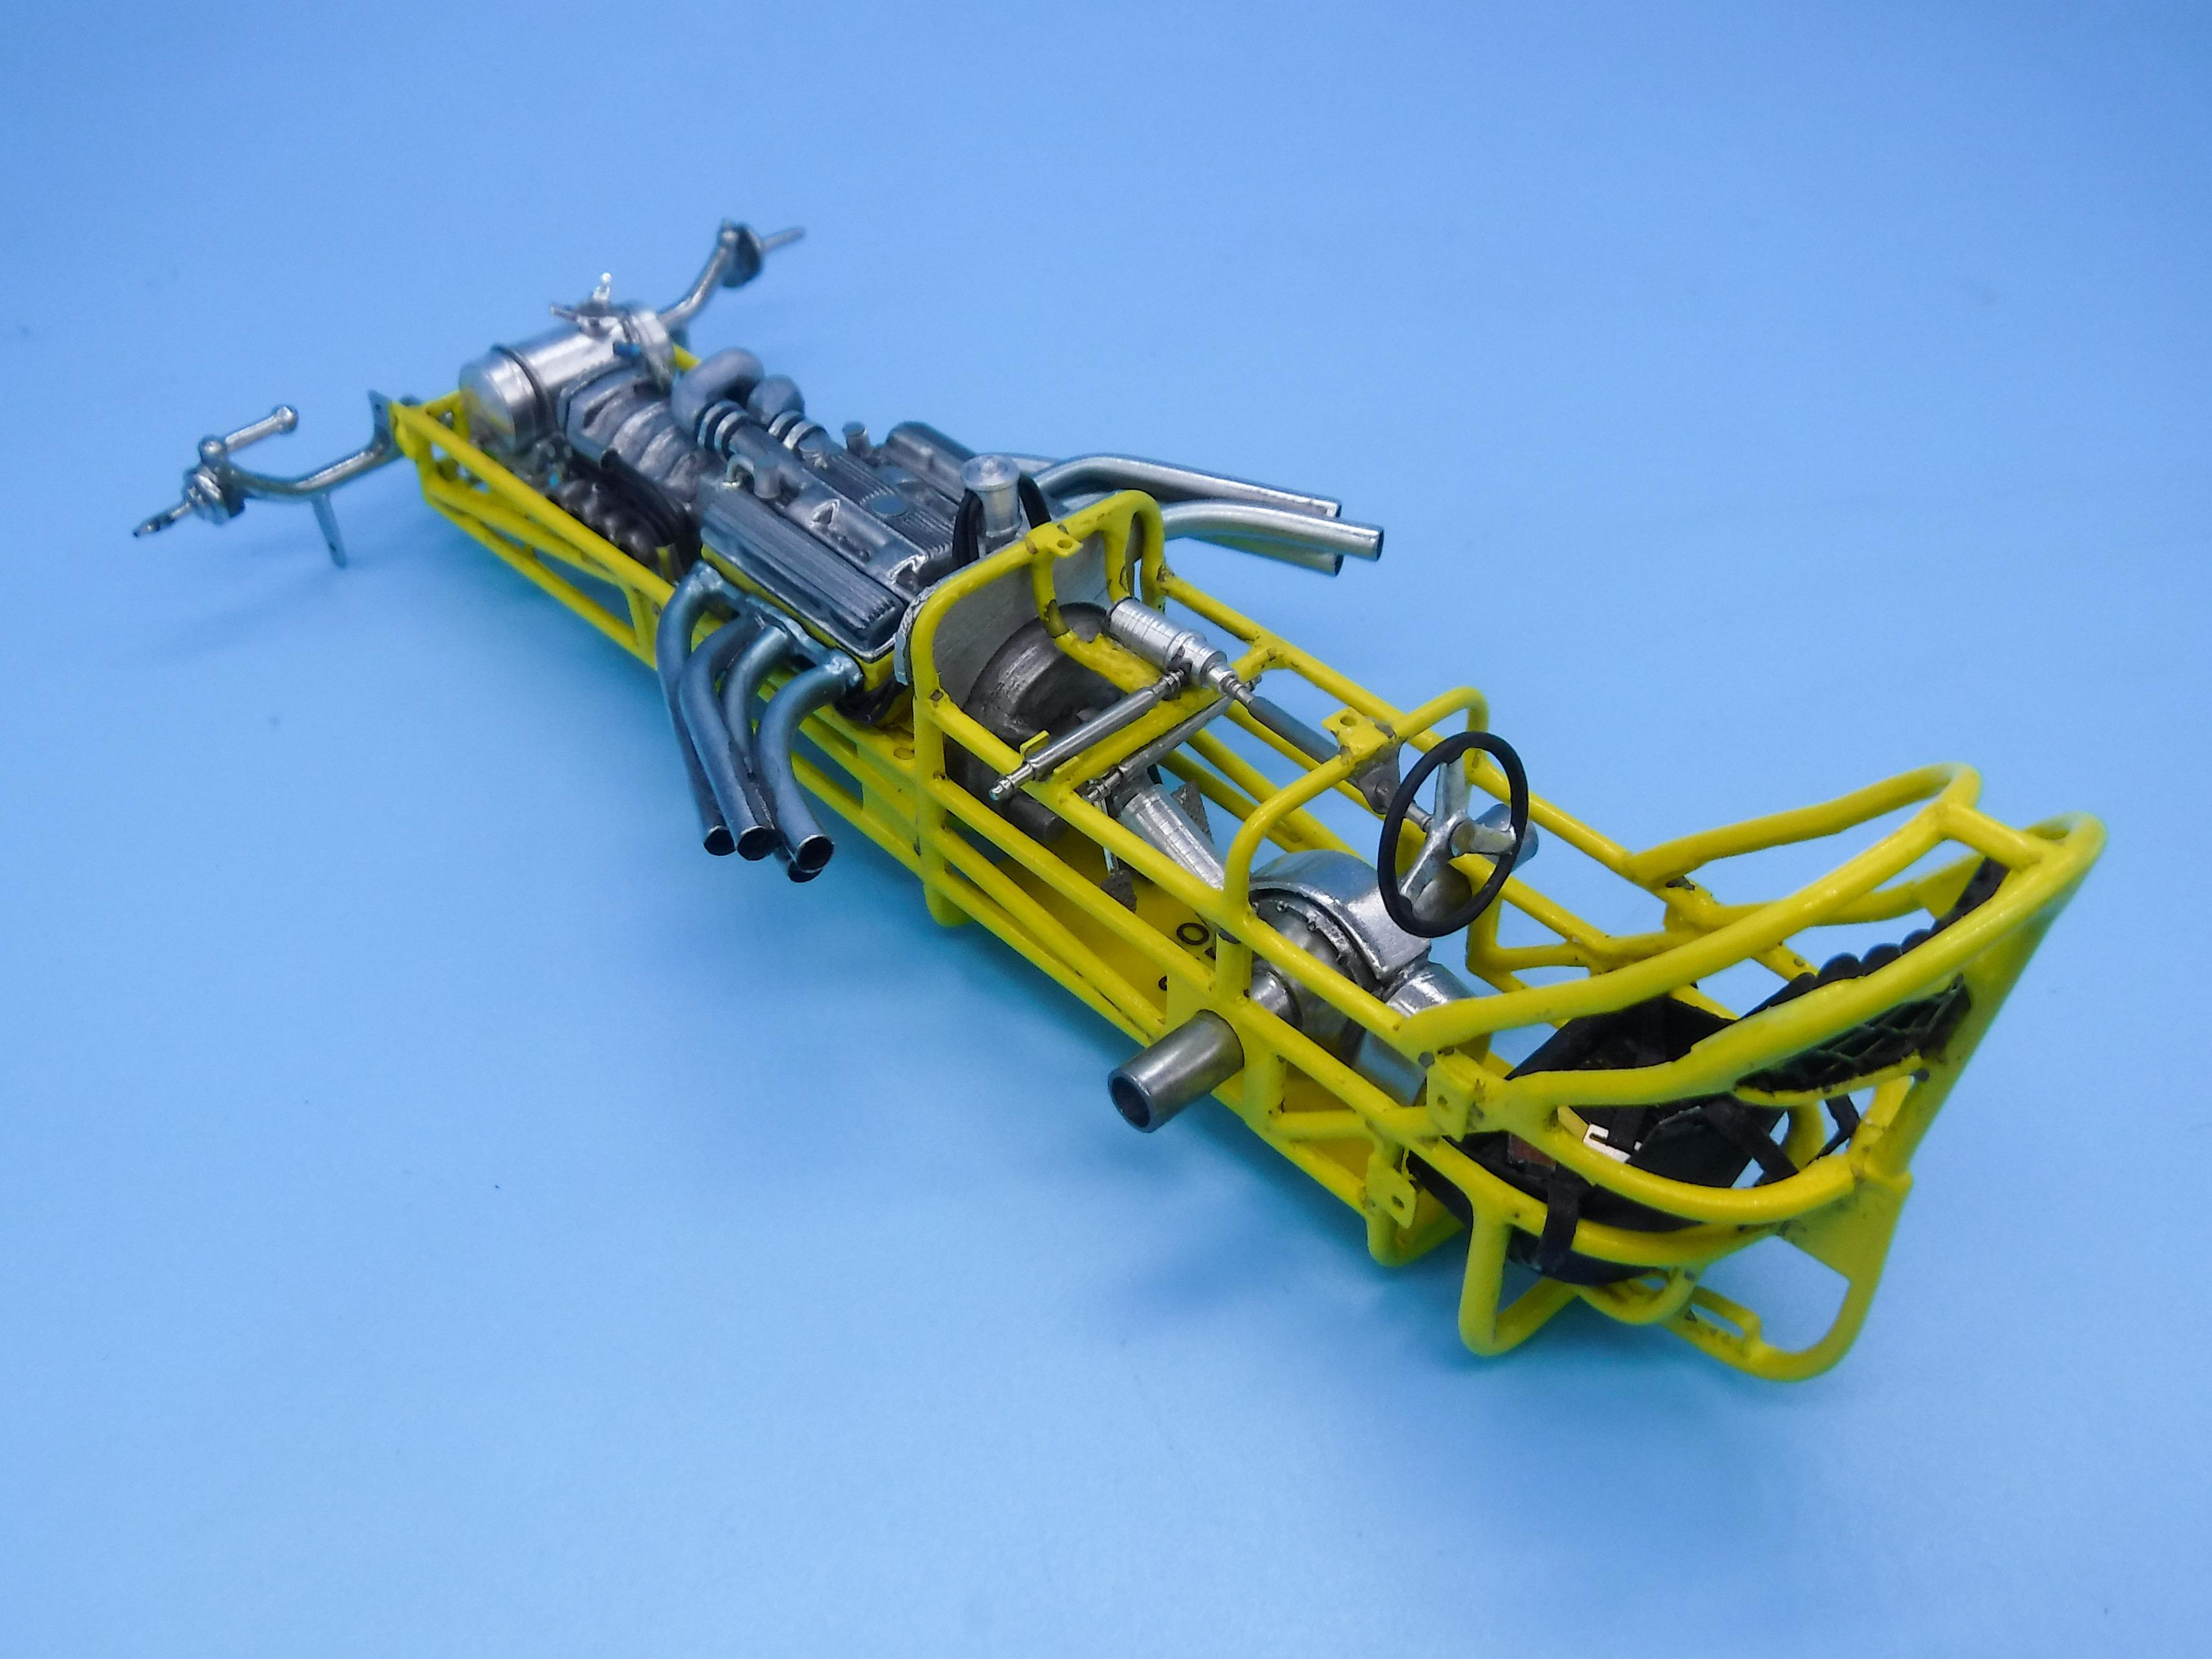
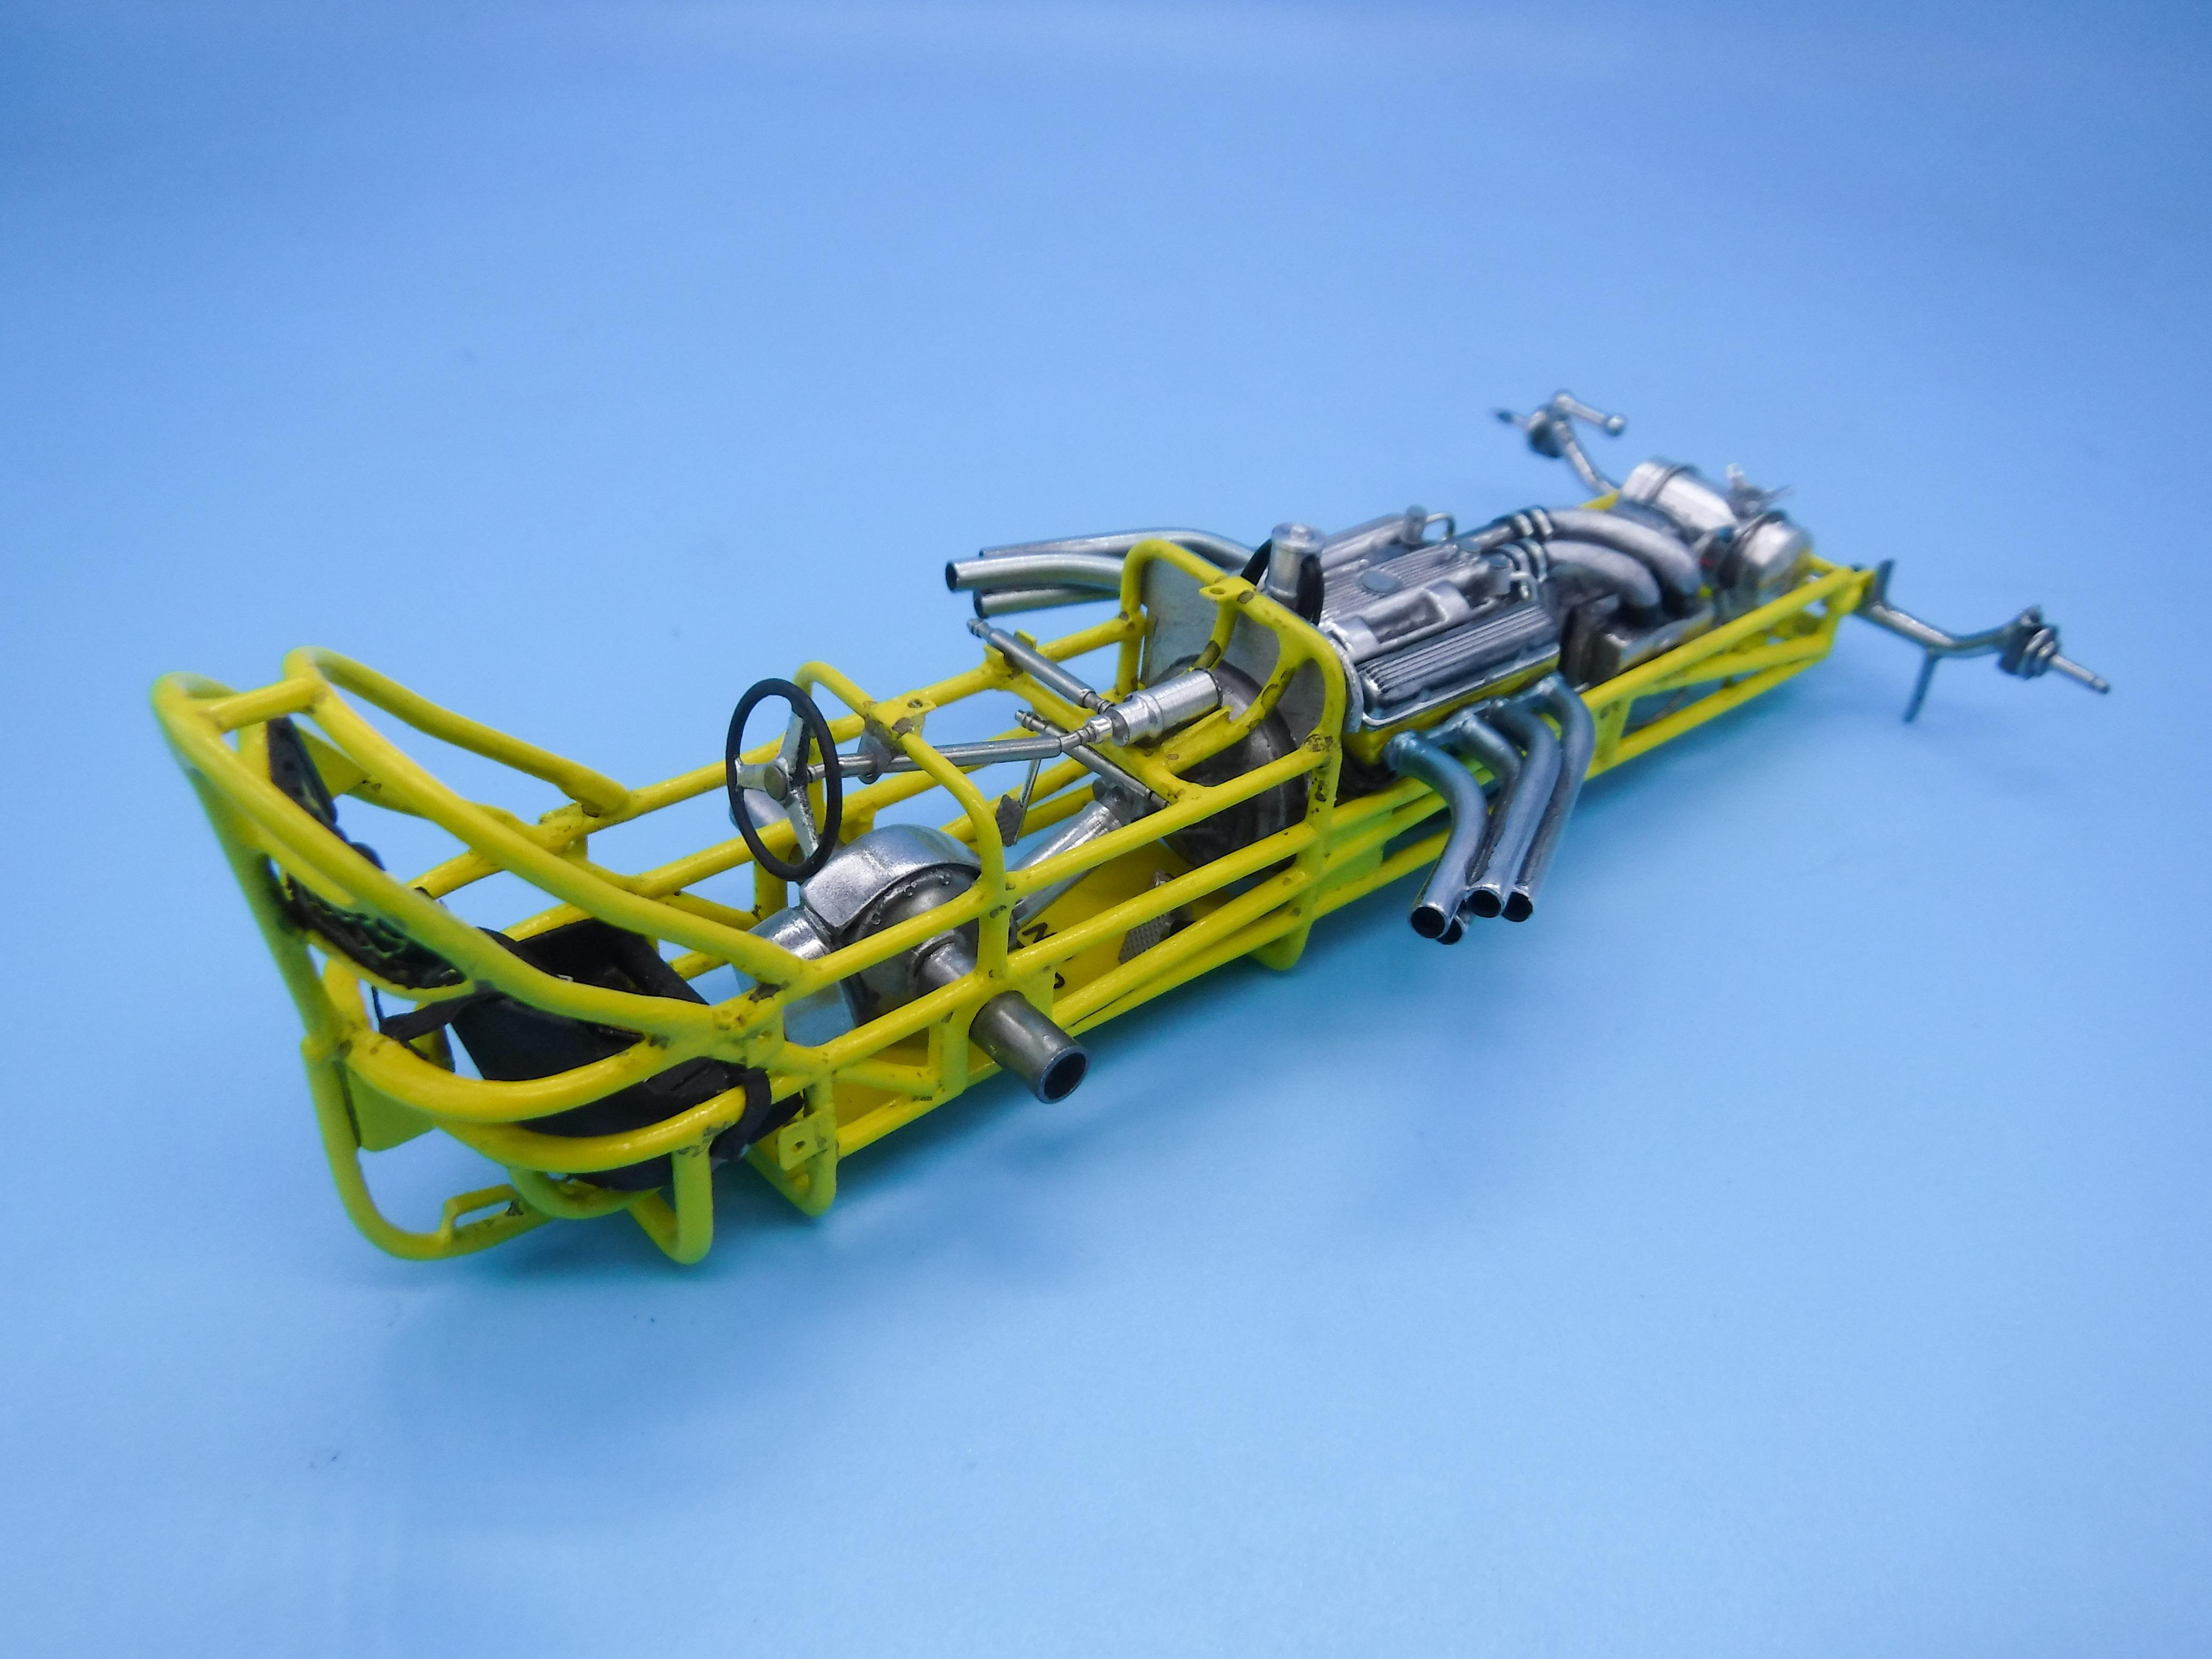
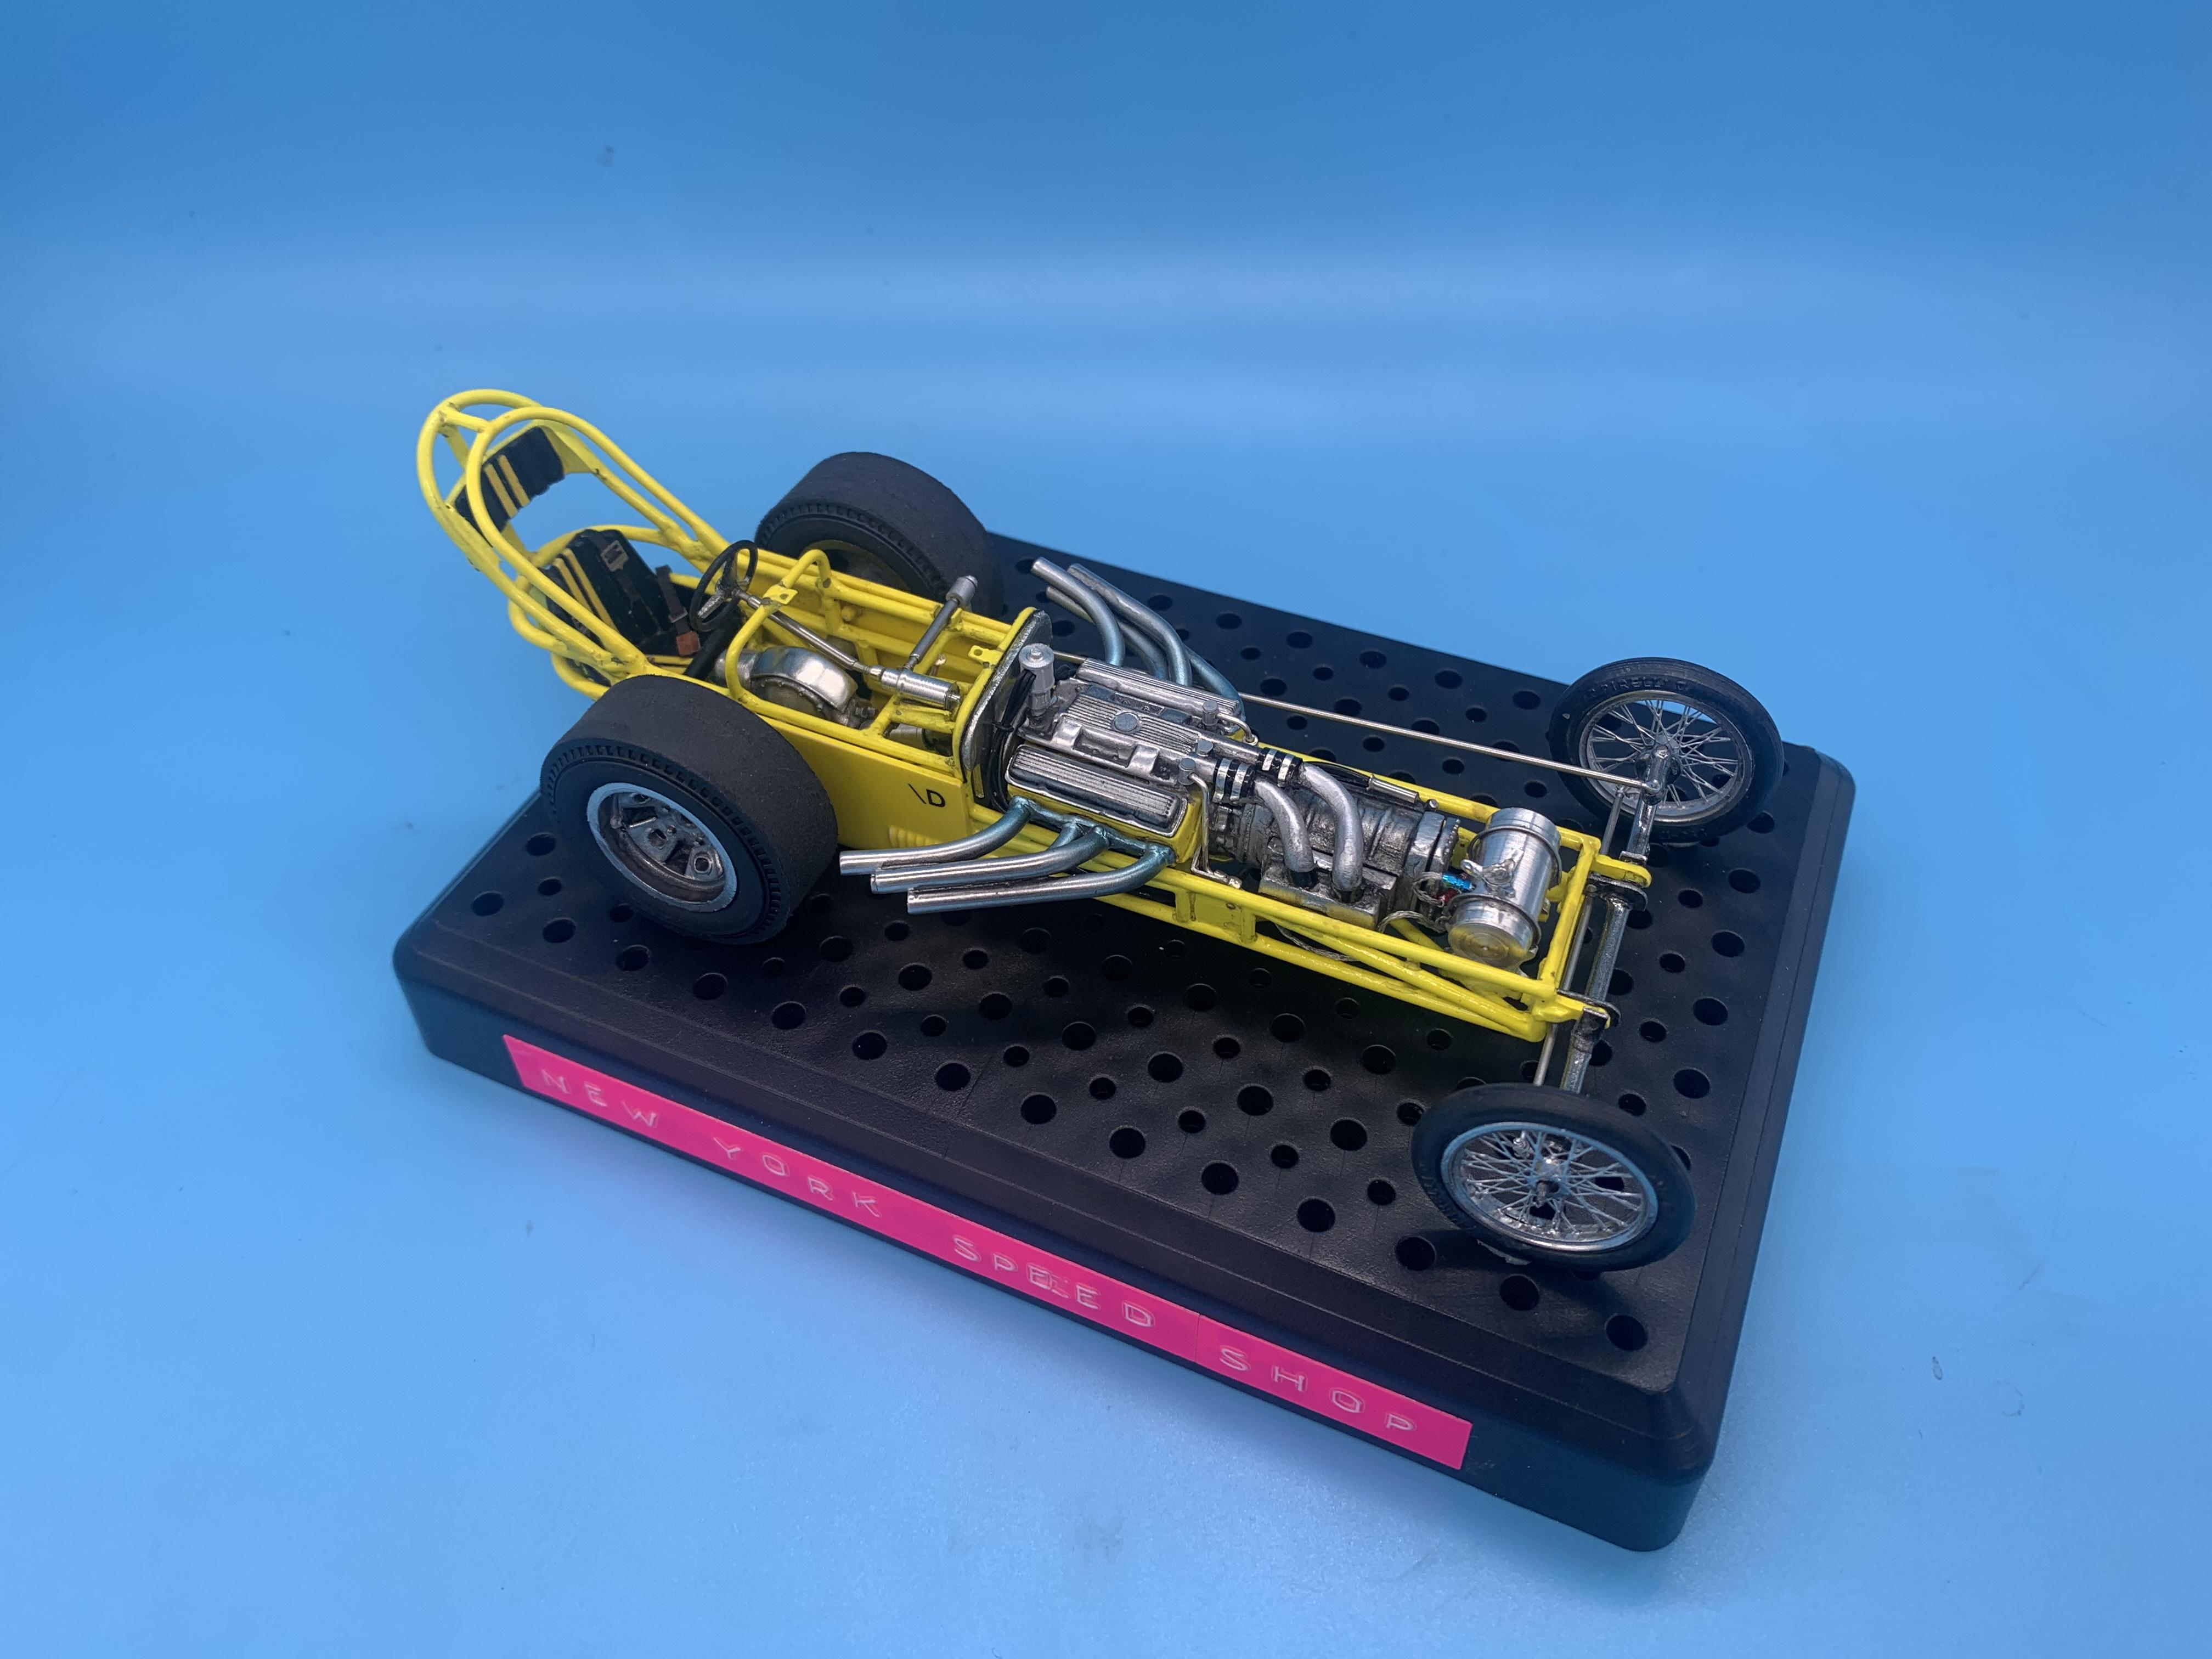
Thanks everyone! No kiddin’ ?. I’m sorry - I try and usually reply to any questions…if I missed one of yours before just bump it to the top again and I’ll reply! No disrespect intended, and I always appreciate all the nice comments you leave!! Re. those tank straps you asked about, I found reference pics of the car with three types of those straps - either wound compression spring type ones, metal ‘loops’ or what looked like some kind of rubber hose. I went with some bent wire for mine…the spring type were coolest and a guitar strings would KINDA look right to replicate those, but the wire ones were the easiest to replicate in scale, I decided… Tonight’s little bit of progress…getting the wheels on! Not a super exciting process, but these spindly little frames are really easily tweaked and warped so I was worried about everything still being aligned right even though I spent some time early in the build trying to ensure it would go together ok. I intentionally left a little play in the receivers for the rear axle so that i could tweak it a little if it needed it, and ditto the front wheels. Spent a couple of hours just casually playing with it tonight and using some slow-setting CA glue to install a wheel at a time and tweak it to try and make sure the ride height was right and all four wheels touched the ground ok… The camera lens makes the front look a little wonky, but they’re straight in real life, promise… Oh, and I got the ‘chute installed ready for more detailing tomorrow (needs the pull handle and cables and so on…) Got a bunch of little details still to add here but it’s getting closer! More soon!
-
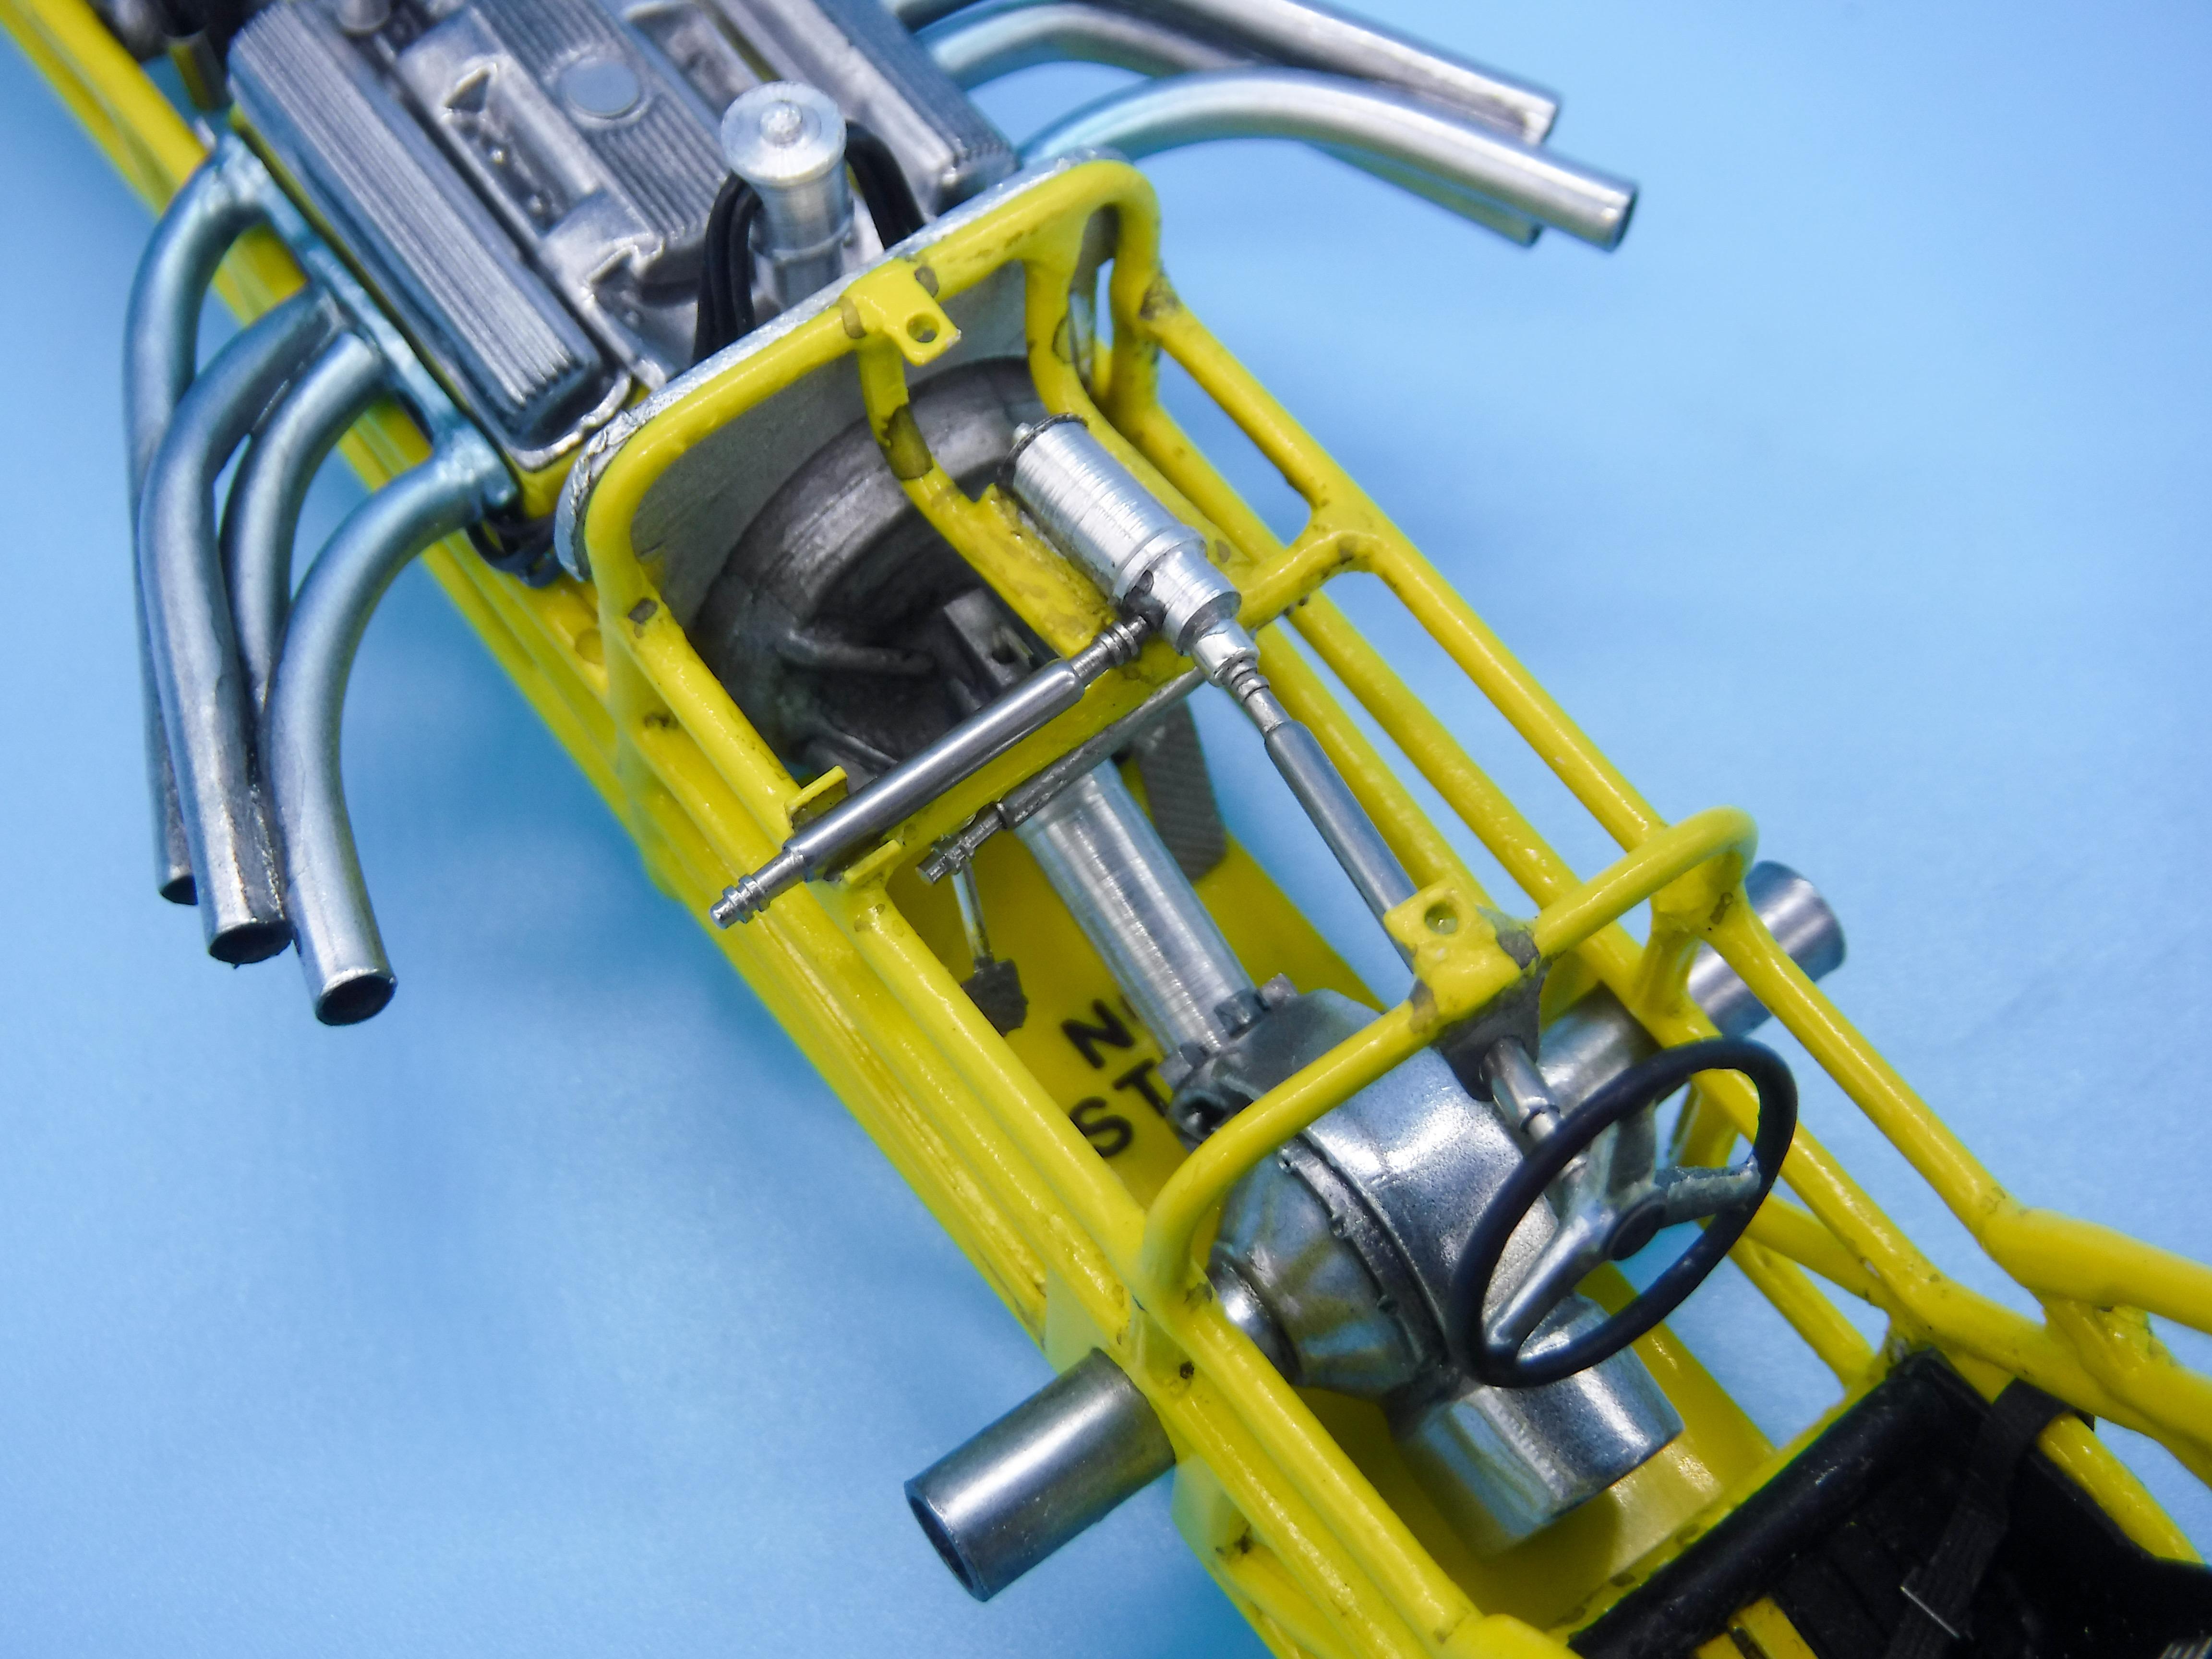
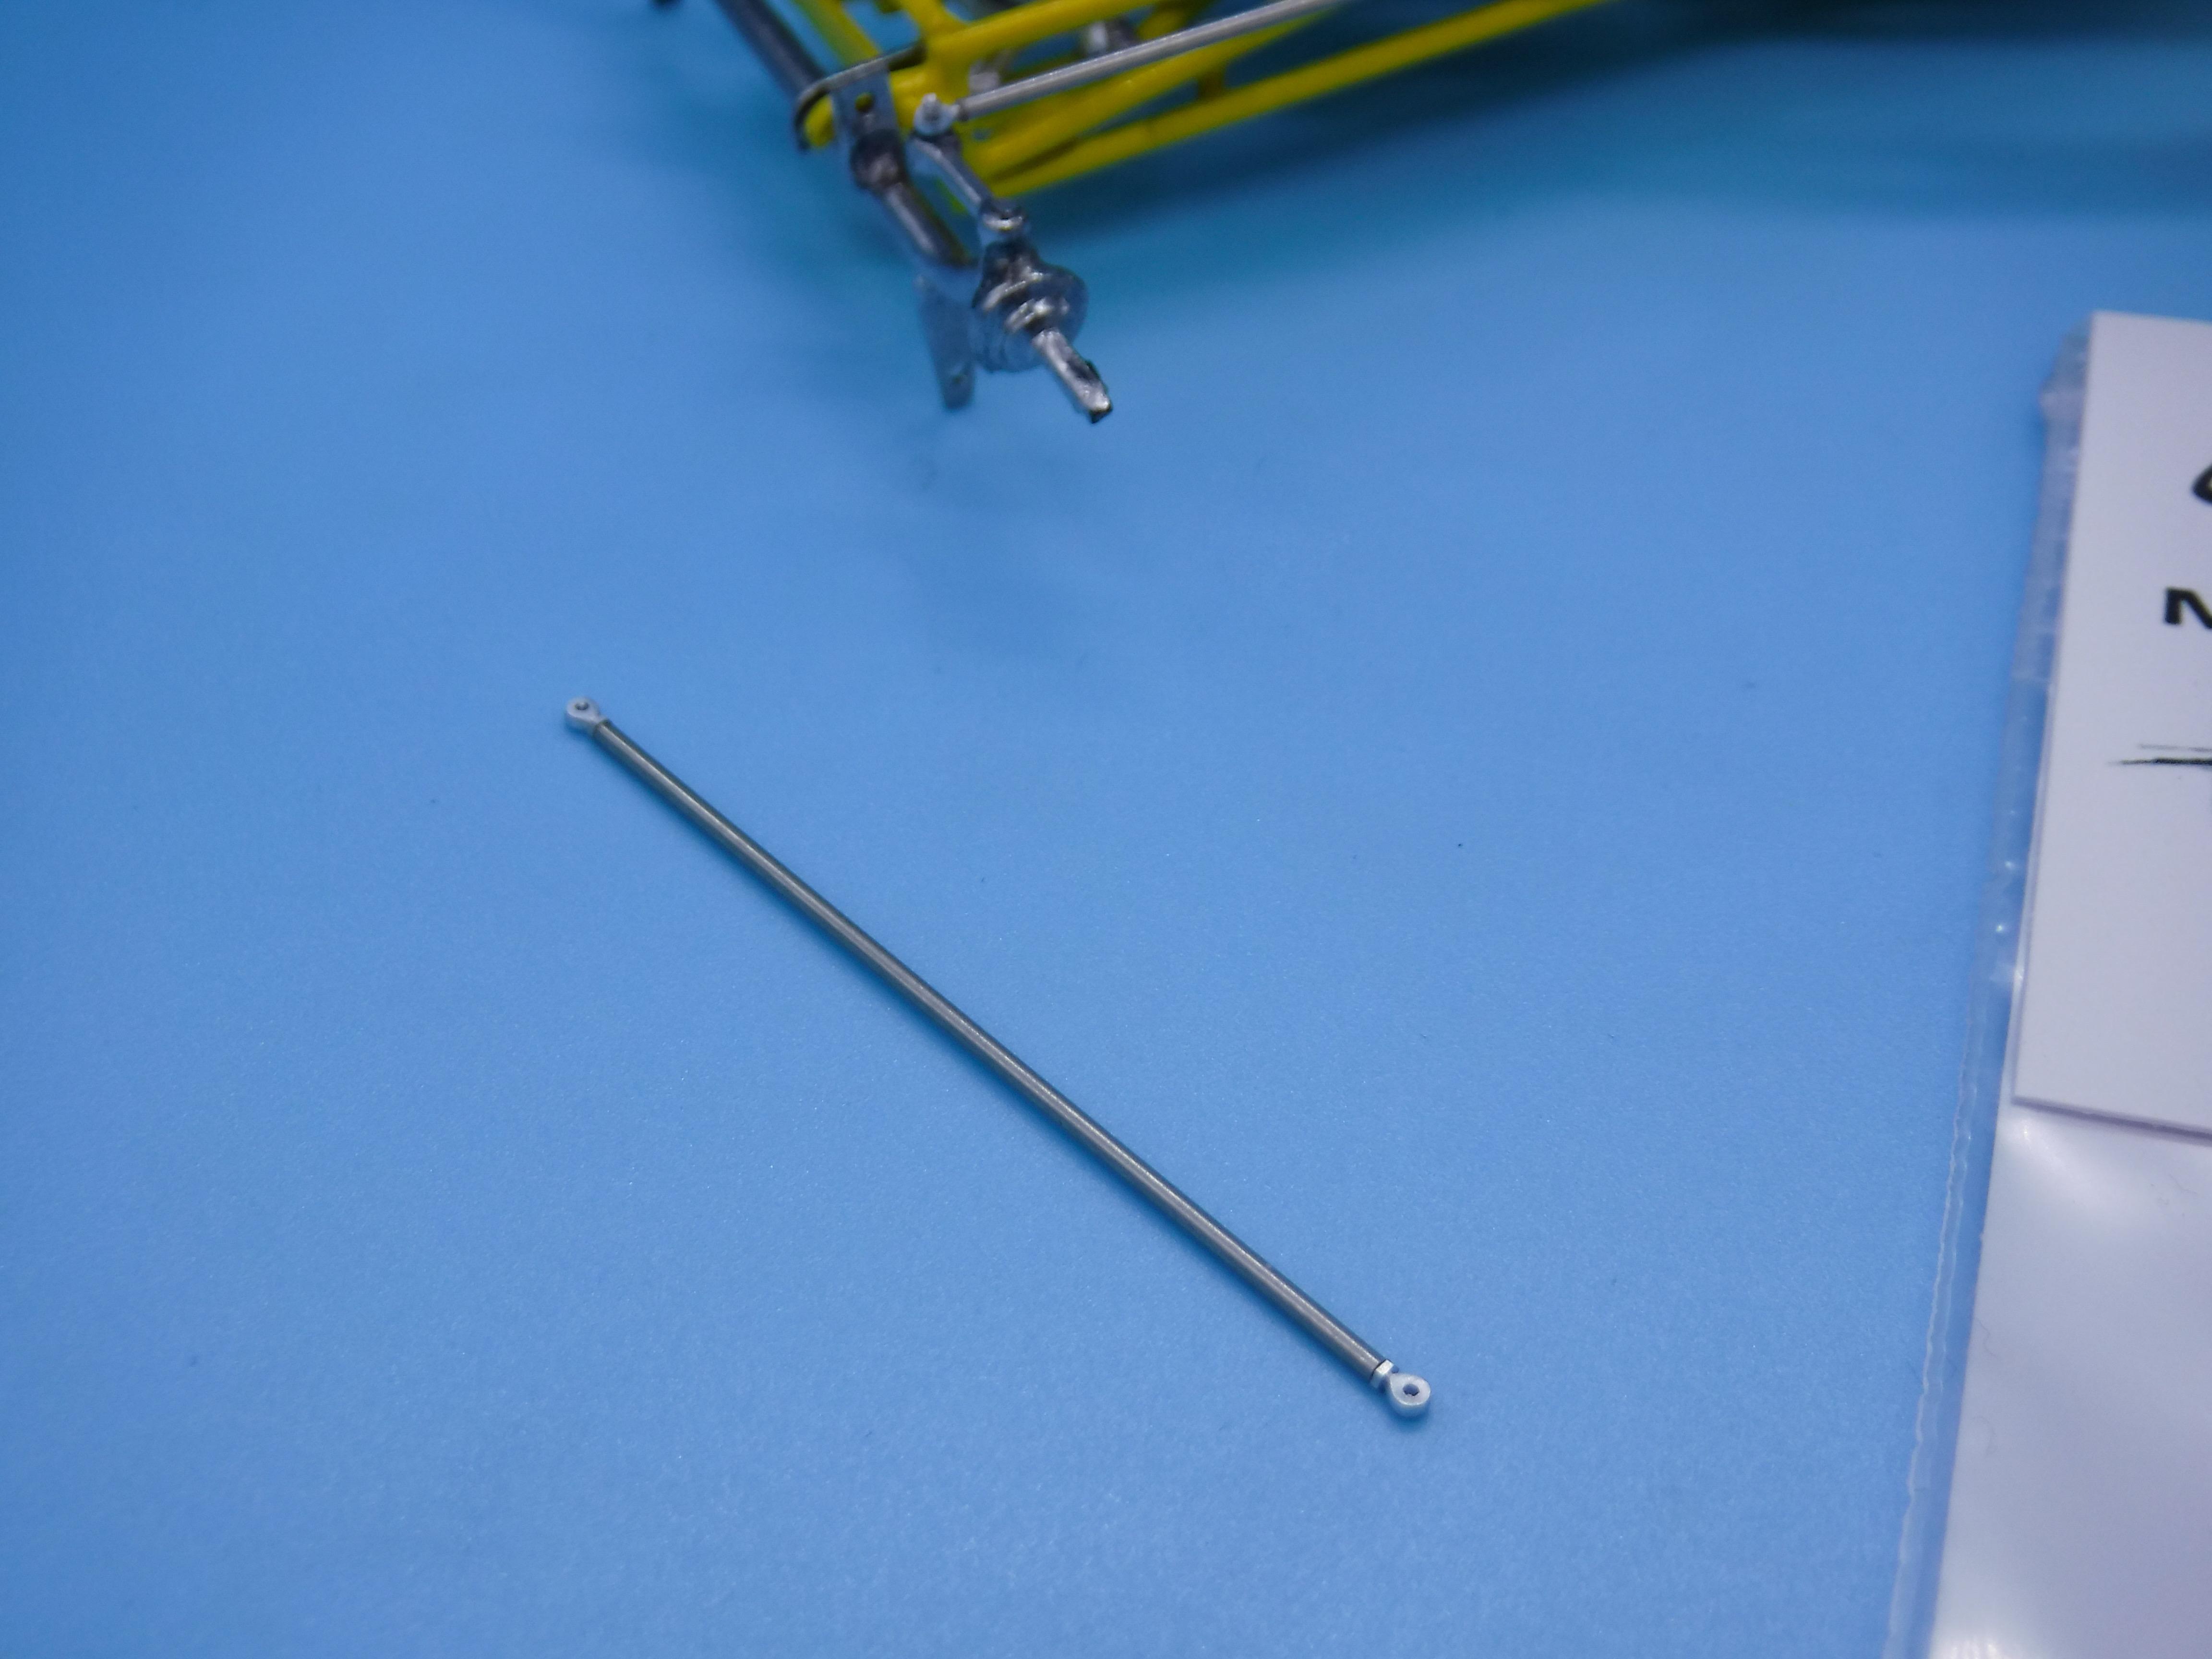
A little more on this little fella this past week… Got the ‘tins’ polished out and ready for installation… Made brackets and mounts for the pedals and got them mounted to the floor, which was the next part to install once the axle was in place: Not that you can see them particularly well, but you’d definitely notice if they WEREN’T there, so… Fun fact: a couple of pics I found showed some variation of the words ‘NO STEP’ on that floor panel, so I added that to mine too…but like the pedals it’s not super visible on the 1:1 OR the model. I know it’s there though… Next step was getting the steering linkages in - another fun fact, one early iteration of this car had the steering box offset despite there being a perfectly good bracket for the box welded to the frame. Why? Who knows, but I did the offset box and angled rod anyway… It’s starting to look like a thing! I ordered some of those nice RB Motion rod ends for this build, so I got linkages made and installed too: RB Motion makes such nice parts! Next job is making the rear hubs and disc brakes - but I did a quick mock-up for my own amusement: More soon!
-
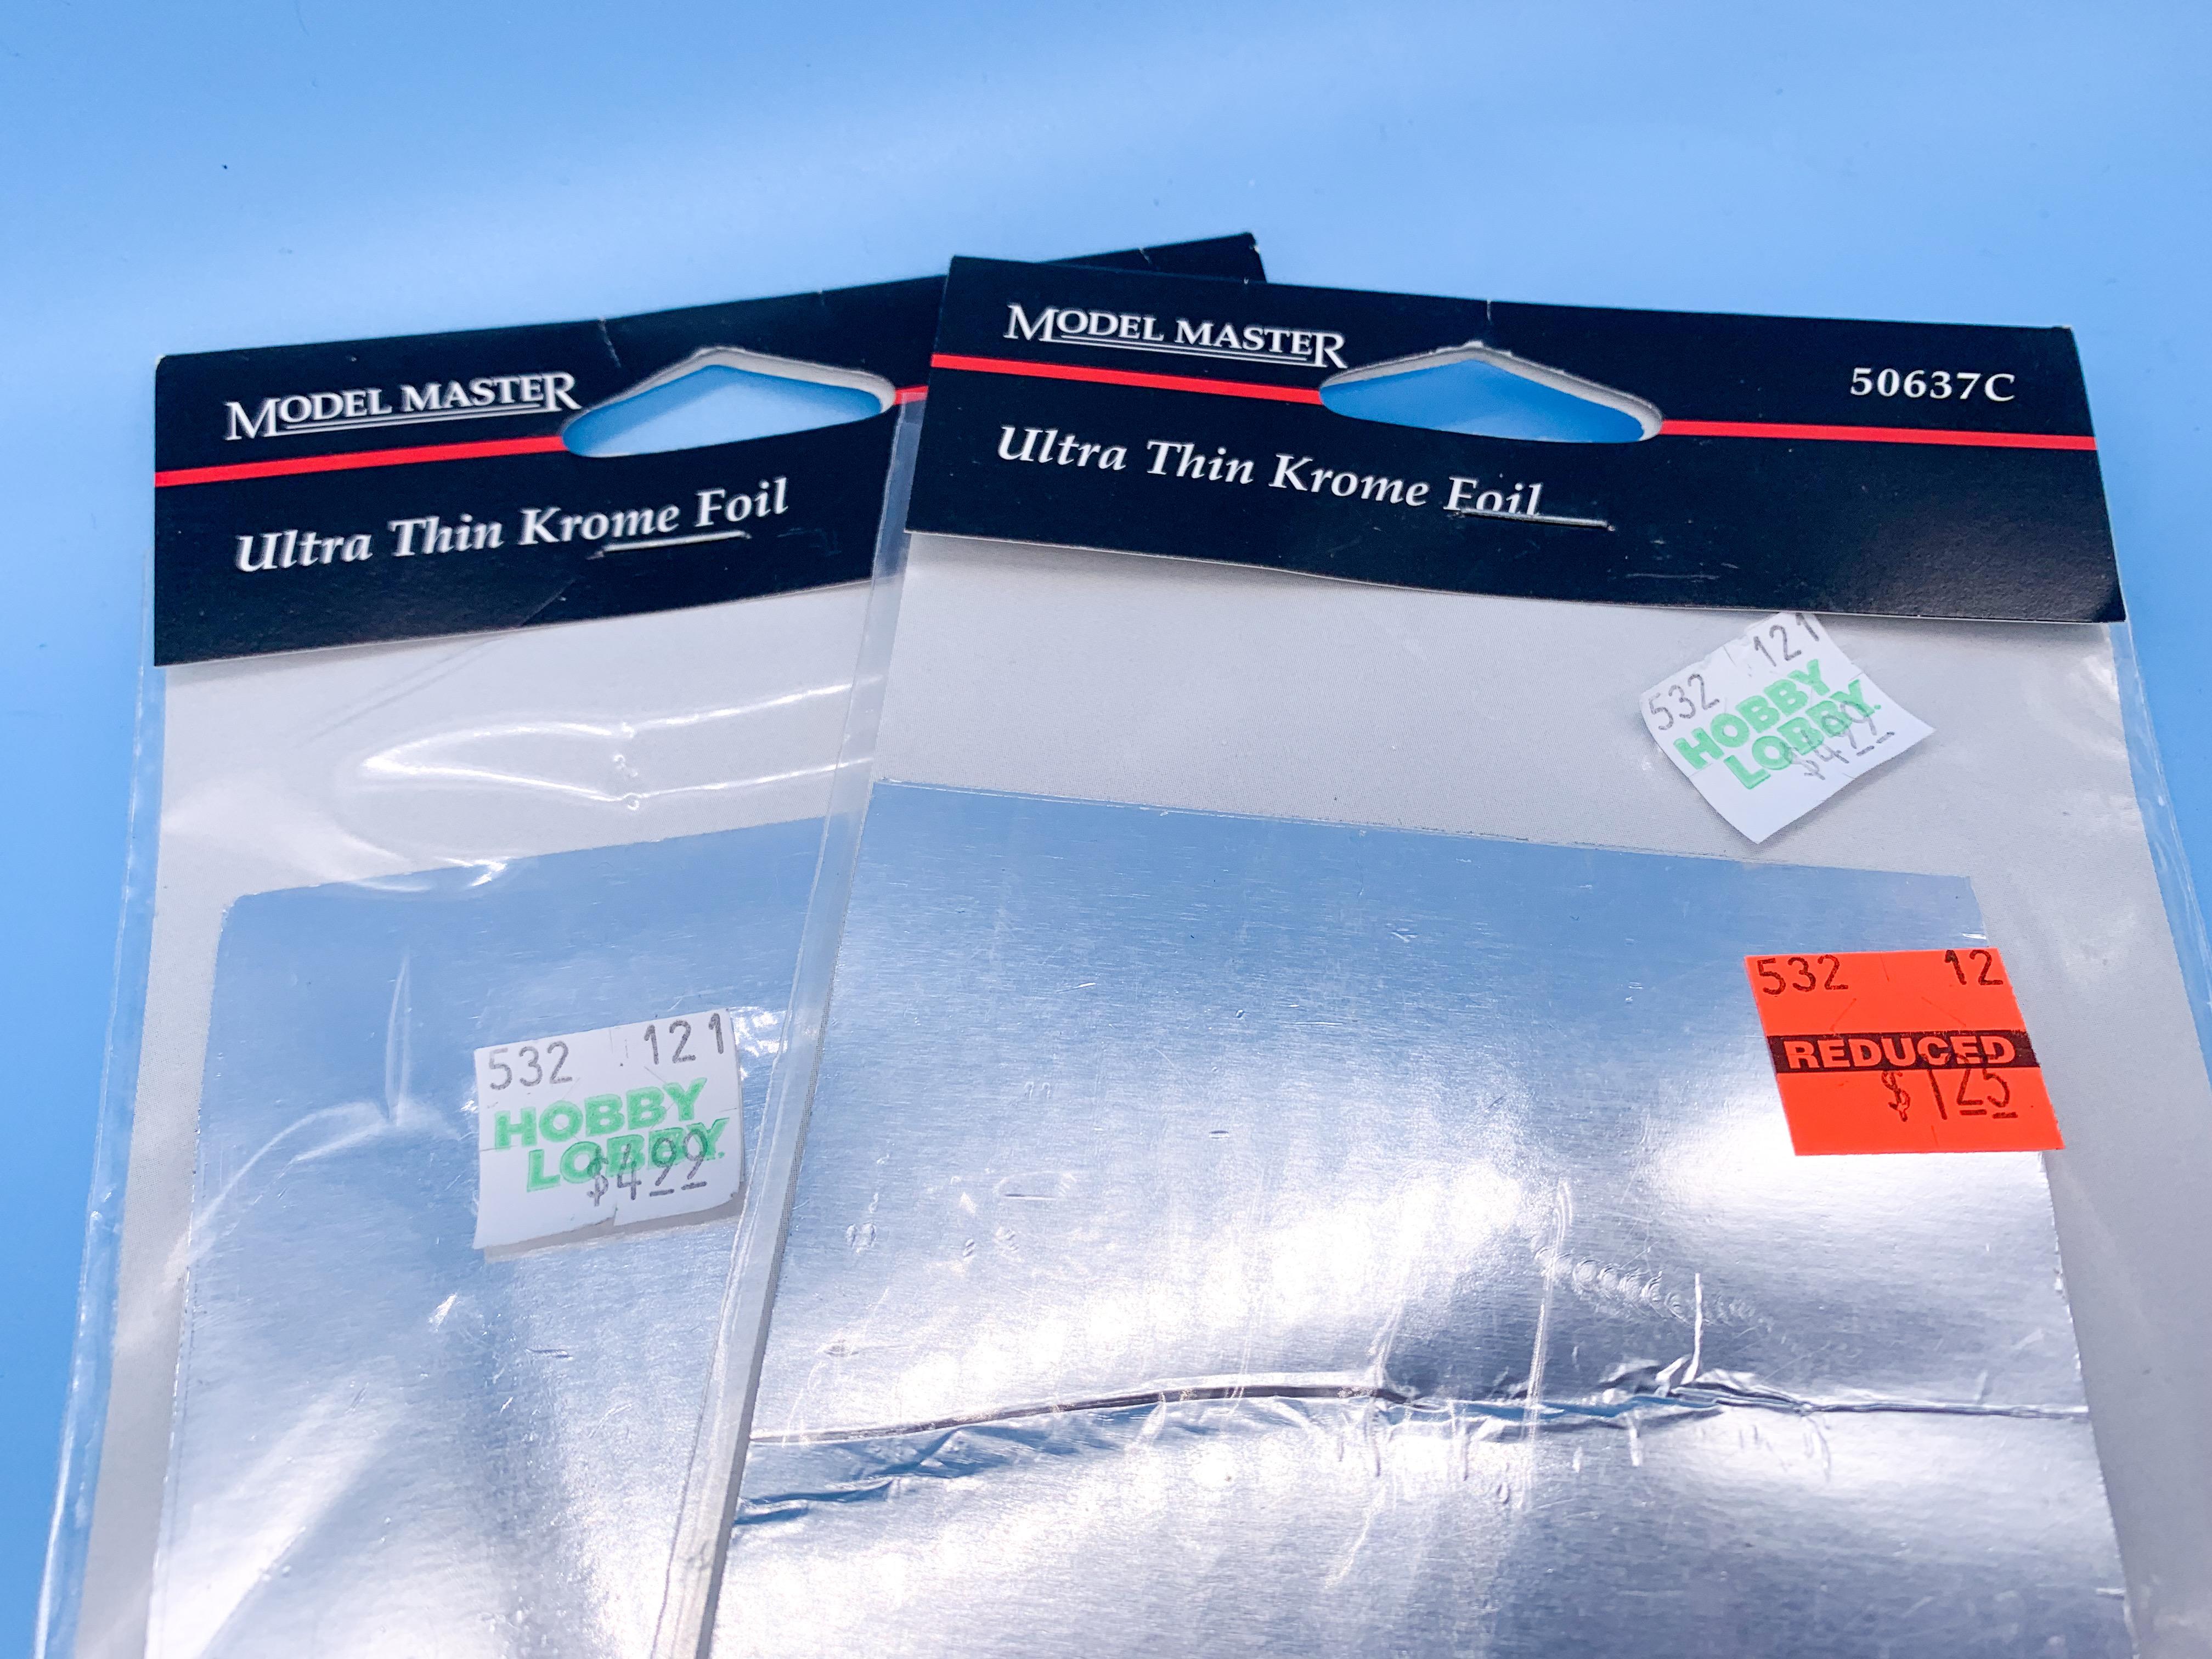
Tomorrow’s experiment…see if this YEARS old Model Master ‘Krome’ foil that I found today sticks better than my latest sheet of BMF…
-
Got a few bits today - hit Hobby Lobby to see if they had any new kits - they had that Hot Wheels Camaro but nothing much else that grabbed me - found some Model Master BMF-alike in the clearance aisle though! Got an order of RB Motion rod ends through too - I think the ones I picked up are a little too small but I didn’t study them closely yet… Oh, and picked up some Satin clear and some of HL’s polishing sponges to try
-
How many helmets have you acquired
OldNYJim replied to randx0's topic in Model Building Questions and Answers
If you didn’t see it already, you guys are gonna love this thread… -
How do you prep for a flame mask job?
OldNYJim replied to customline's topic in Model Building Questions and Answers
Sounds sensible to me! I’m no expert tho… ? -
How do you prep for a flame mask job?
OldNYJim replied to customline's topic in Model Building Questions and Answers
Haha, yeah, I have a stash of those 29s...built three so far but got probably a dozen on the shelf... I really like the Createx black sealer for black paintjobs (with a gloss over top) - its the thinnest, easiest to spray, best covering black I've ever used. Definitely recommended...but these tricks will work with about whatever paint you wanted to use -
I love nice craftsmanship like that! I almost like it MORE when people make that effort when its something you'll never see as soon as a coat of primer hits it...would be easy just to do a nice simple slice and CA glue it back together and sand it smooth - but it's WAY cooler to do it the harder way
-
How do you prep for a flame mask job?
OldNYJim replied to customline's topic in Model Building Questions and Answers
Parafilm would work, or regular old Tamiya tape or similar - or even Silly Putty if it's an awkward-to-mask spot! Key benefit to this 'backwards' technique is that it's MUCH easier to shoot a dark color over a light color that the other way round - so for something like your first example in the top post there you would only need a relatively light coat of the black over the orange color, cutting down on big edges and paint build up (and thus making it easier to remove the masking). Of course, it'll sometimes happen that the black would pull up instead when you're removing the mask...but it's WAY easier to touch in the black if you have a little flaw than it is to try and touch the color of the flames back in... Here's another similar build with the same process (but a slightly more complicated paintjob with some pearls and florescent and whatnot):