Chuck Most
-
Posts
12,886 -
Joined
-
Last visited
Content Type
Profiles
Forums
Events
Gallery
Everything posted by Chuck Most
-
Dodge Ram VTS Pickup
Chuck Most replied to mrmike's topic in Model Trucks: Pickups, Vans, SUVs, Light Commercial
I like it! And I feel your pain on the grille- I really wish that Revell had done the grille insert as a separate piece. Same goes for the Lightning, Magnum, and dozens of other kits from that period. -
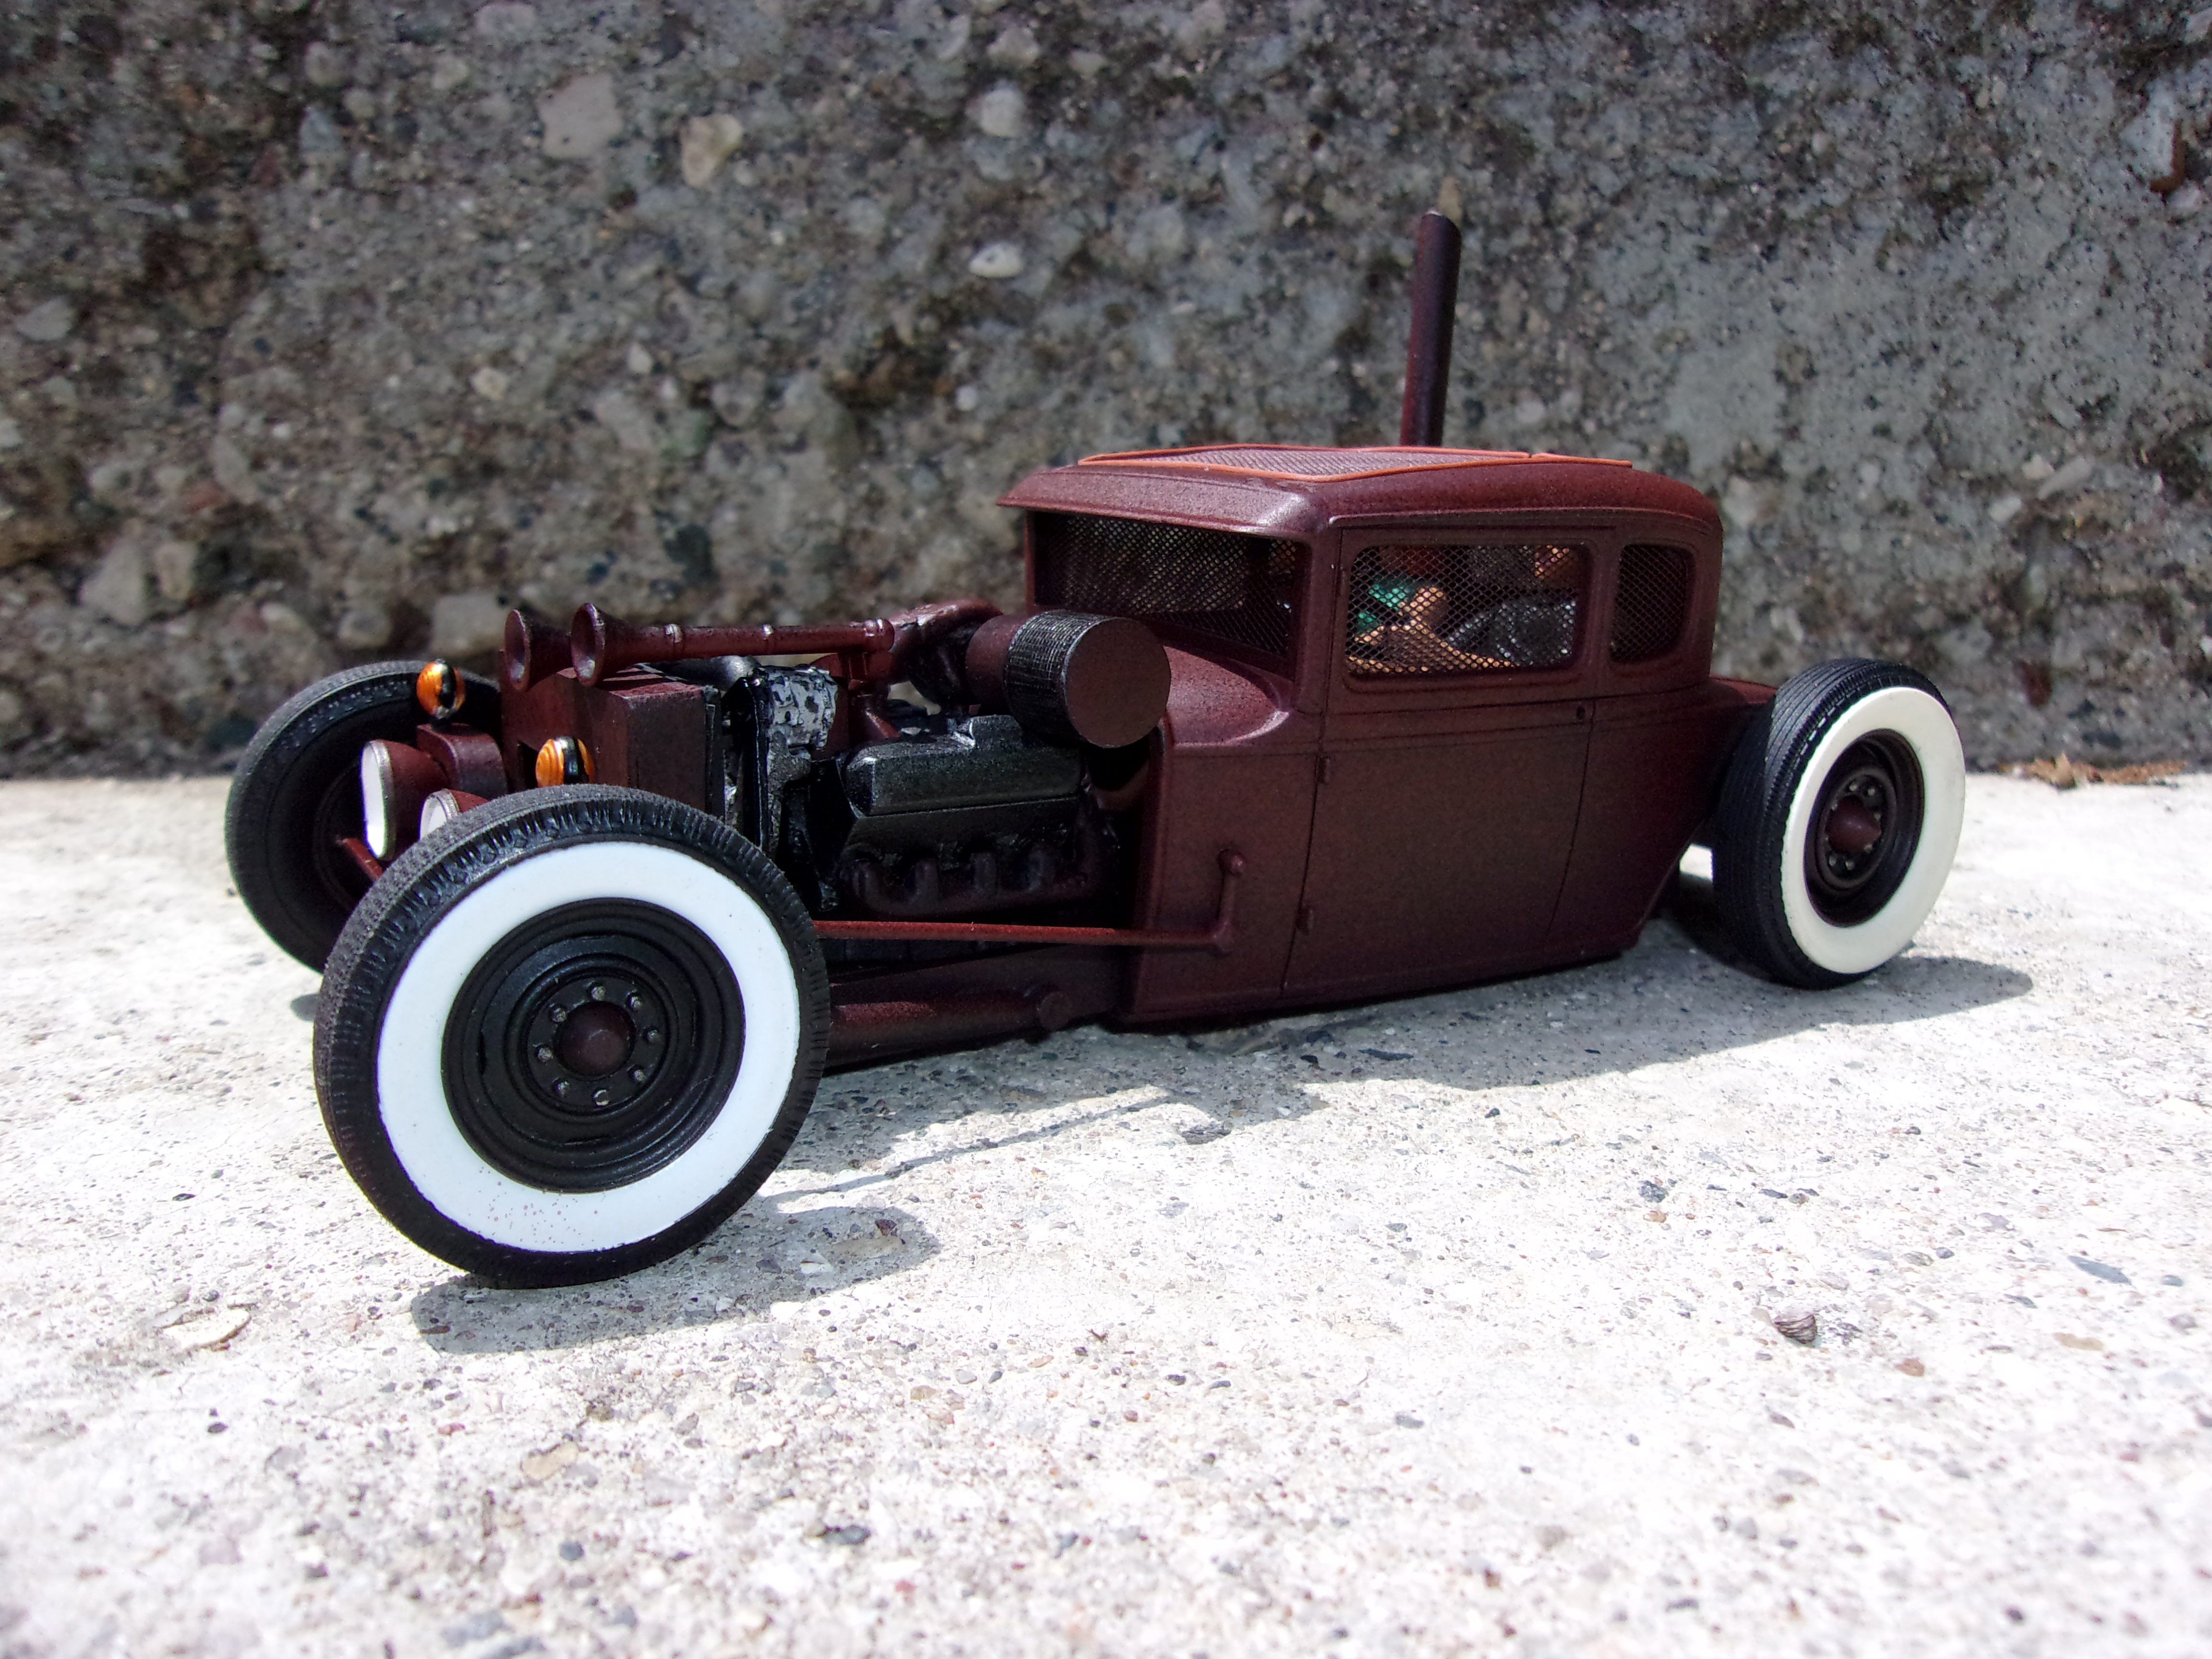
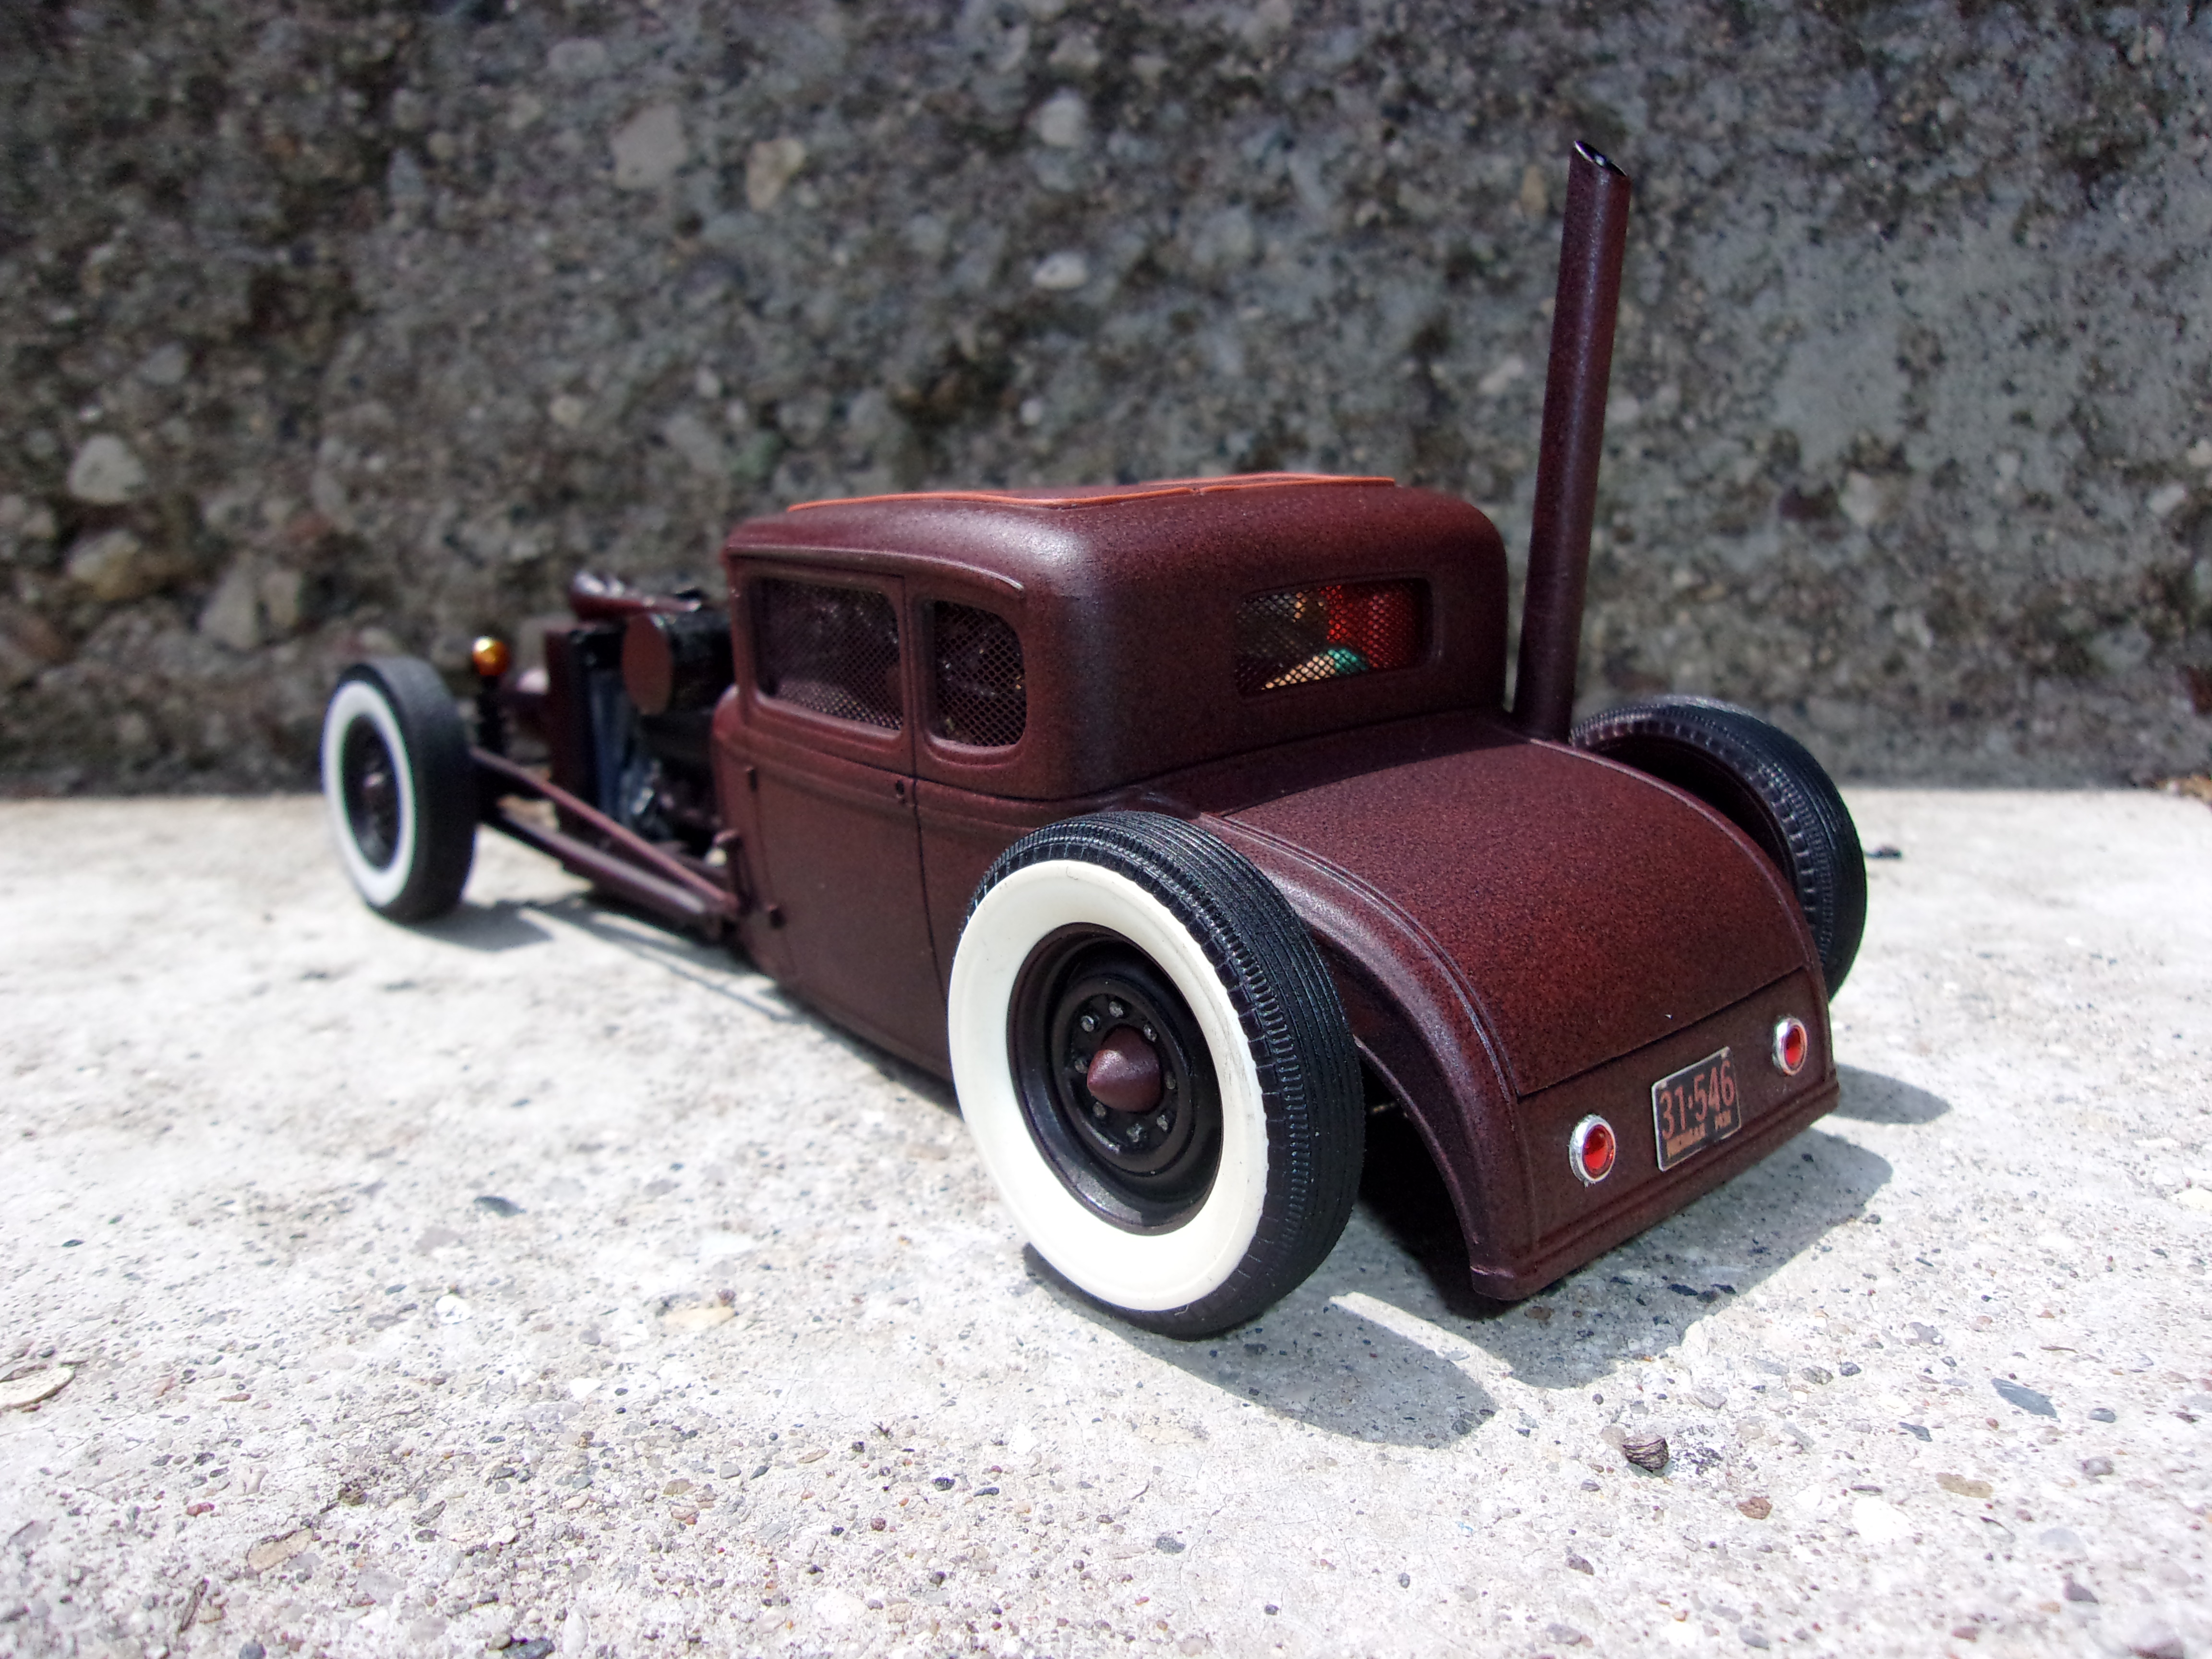
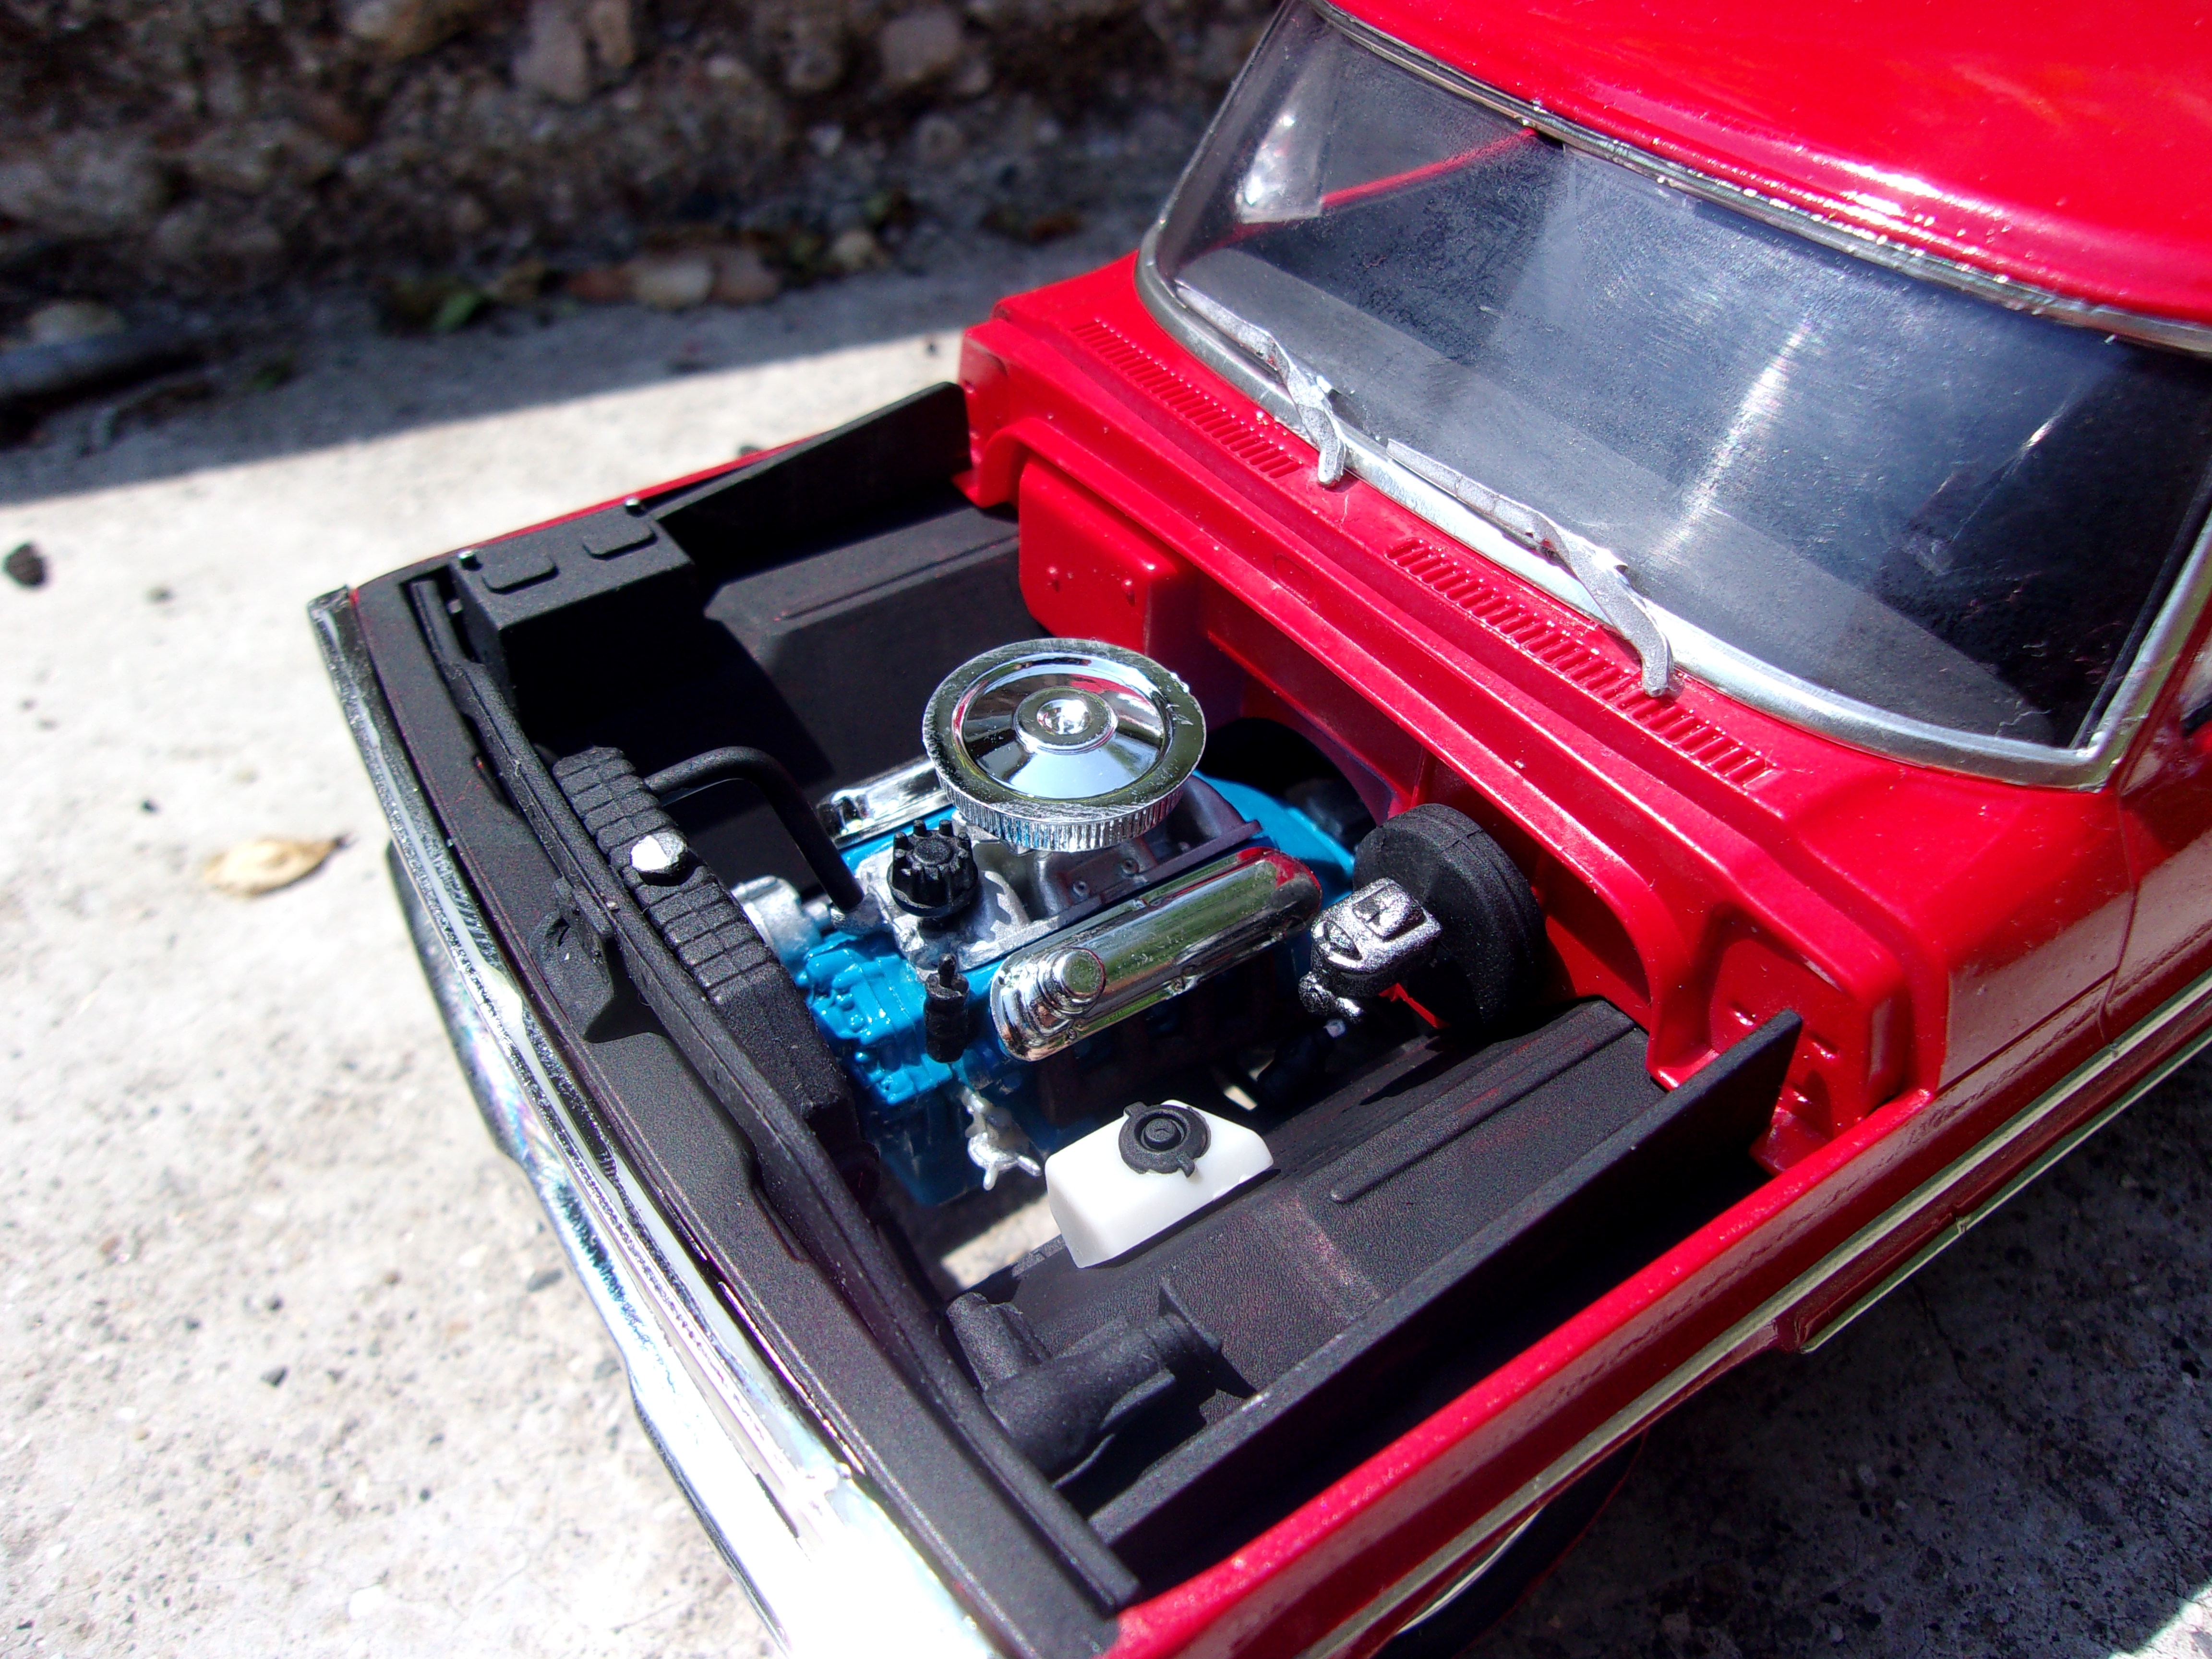
This is something I started way back when the kit first came out, and I finally got around to wrapping it up earlier today. The body and interior are from the Revell '30 Model A. The whole mess sits on a scratchbuilt chassis with Ford F-350 suspension components, and a 7.3 PowerStroke diesel from Trailer Trash Kustoms. The rear wheels were scratchbuilt, and I sent them off to Kris Morgan at Morgan Automotive Detail. He now sells them as 8-bolt Rat Rod wheels. They're in tires from a Monogram '41 Lincoln. Up front I used Scenes Unlimited wheels in tires from a Revell '48 Ford. The center caps are bullet tail light lenses. The big air cleaner came from an Airfix Stuka bomber. I also added some Fujimi figures to the interior.

-
Let's not forget...
-
Is this Hobby Design quality or recast?
Chuck Most replied to mphostetler2008's topic in Car Aftermarket / Resin / 3D Printed
I've never bought Hobby Design wheels, but I've bought a few sets of their turbochargers and other detail items, and I've never had any problems. -
Wild 2021 Dodge Viper
Chuck Most replied to Greg Myers's topic in General Automotive Talk (Trucks and Cars)
I keep hearing that, but I don't see any signs of life at Chrysler besides a relatively fresh mini van and the 300 series, which is already a decade and a half old under the skin, and uses some recycled Benz components that are even older. Same story with the Charger and Challenger at Dodge, but they still have the once-hot Grand Caravan, Durango, and the most forgettable crossover ever, the Journey. I'm still leaning toward the old legend of the Jeep curse. -
What did you see on the road today?
Chuck Most replied to Harry P.'s topic in General Automotive Talk (Trucks and Cars)
There already are! A few summers ago I walked right past a row of first-gen Camaros and Mustangs to check out a pristine '85 Plymouth Voyager. -
What did you see on the road today?
Chuck Most replied to Harry P.'s topic in General Automotive Talk (Trucks and Cars)
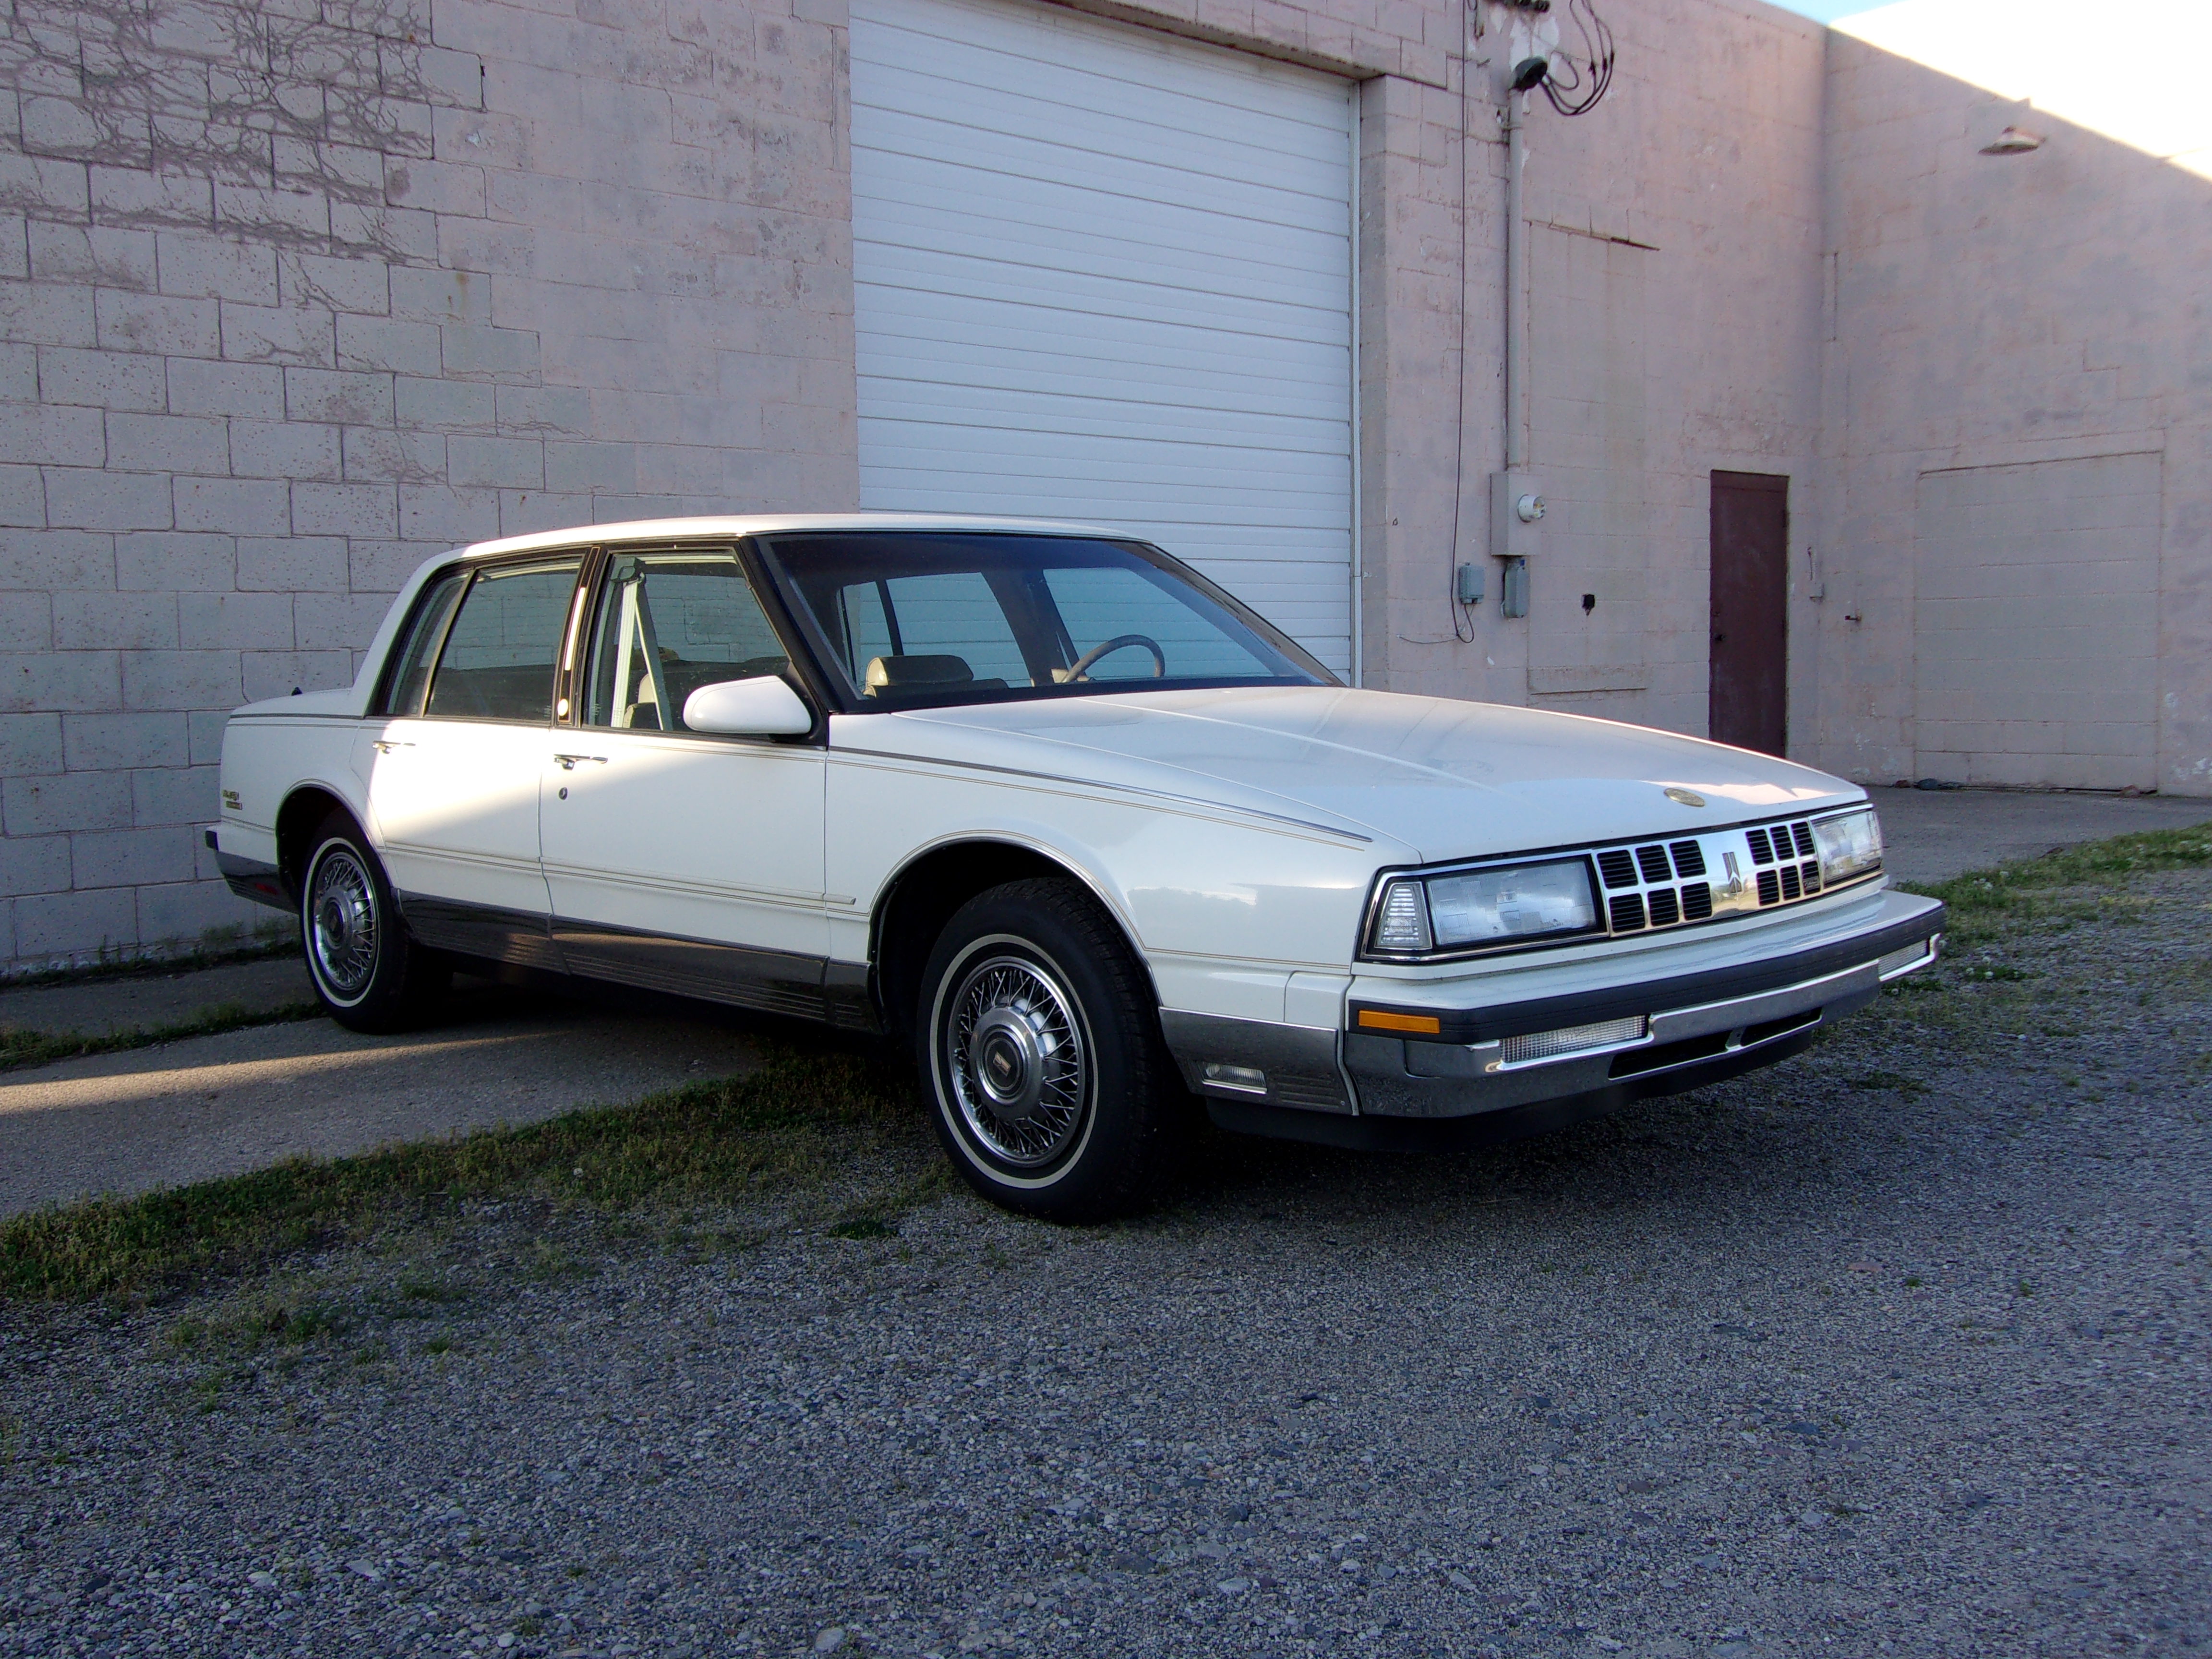
Construction detour on the way home from work took me past a self-storage place I forgot even existed. This clean old-lady-Olds was parked out front. I don't think I've seen one this well-preserved since junior high (mid '90's).
-
Ferrari 250 GTO sold for BIIIIIIG Bucks!
Chuck Most replied to SfanGoch's topic in General Automotive Talk (Trucks and Cars)
And I thought Hemi E-bodies going for seven figures was nuts... -
Nice! Still quite an amazing amount of potential in those old AMT kits.
-
Wild 2021 Dodge Viper
Chuck Most replied to Greg Myers's topic in General Automotive Talk (Trucks and Cars)
Question is... will there be anything left of the Chrysler group besides Jeep and Ram come 2021? PLACE YER BETS, GENTLEMEN... -
I'd be up for a few... a Continental Mk V, Ford LTD II, '78/9 Grand Prix/Cutlass Supreme/Regal... I could go on. Trouble is, none of them are muscle cars, and that seems to be what the majority of modelers want, so....
-
Johan prices $$$$
Chuck Most replied to NYLIBUD's topic in General Automotive Talk (Trucks and Cars)
Forgot about those- I have yet to run into one but I've heard of them. -
Johan prices $$$$
Chuck Most replied to NYLIBUD's topic in General Automotive Talk (Trucks and Cars)
The only exception seems to be the promos. They were molded from acetate and warp pretty badly, and who wants a bent '56 DeSoto? The late 80's/early '90's X-El versions were molded from polystyrene and don't warp, so it's one of very few instances where the reissues fetch more than the originals. Other than maybe the '59 Rambler wagon reissue, most of the "newest" JoHan stuff is pushing 25 or more years old, and by that time Johan wasn't pumping out thousands of kits at a time to begin with. Simple supply and demand. -
Certainly not what I was expecting! I like it.
-
They're Fujimi figures, but I needed to cut a few pieces off and adjust to get the poses I wanted. I had to cut off the right guy's head and swap on another one so it wouldn't look like he was trying to do a somersault. So it was like this weird horror movie going on at the workbench for a bit. Speaking of those guys, they're painted now. Going by the sign Foreign Objects has been around since 1978, I'm just going to arbitrarily say that Carl was in his mid-twenties when he started the business, which would put him in his mid 60's now, so I gave him grey hair, making him somewhat resemble an abnormally tall Leslie Nielsen. The guy on the right.... I'll call him Mike, because he sort of resembles my junior high biology teacher, got a goatee painted on, and some John Lennon sunglasses from a Detail Master photoetch sheet. I also gave him some "pinstripe" tats (taken from a Revell '50 Olds custom sheet) and painted his shirt to resemble a bowling shirt, because I guess bowling shirts are a thing now. The figures need a little touch up in places (check out the heel of Mike's right shoe, for one example) but considering I've never painted figures before... I'm reasonably pleased with how they came out.
-
It was an earthquake induced by spinning the diorama around After some thought, I figured (hahaha) the diorama could use a human element. So, here we have the shop owner... let's call him Carl Sullivan... leaning on the fender of the Mini, explaining what he did to swap the Honda 13B into the car to an interested... maybe the guy on the right is the Mini's owner? Or maybe he's just a curious onlooker who saw the car in the bay and wanted to ask some questions. I'll figure it all out later. It was odd- I was watching the classic Lucio Fulci horror movie "City Of The Living Dead" while I was cutting and shaping these scale humans, in a movie where horrible things happen to the characters. It made me think what an odd hobby this can be sometimes, and how good zombie movies used to be before that genre got played out.
-
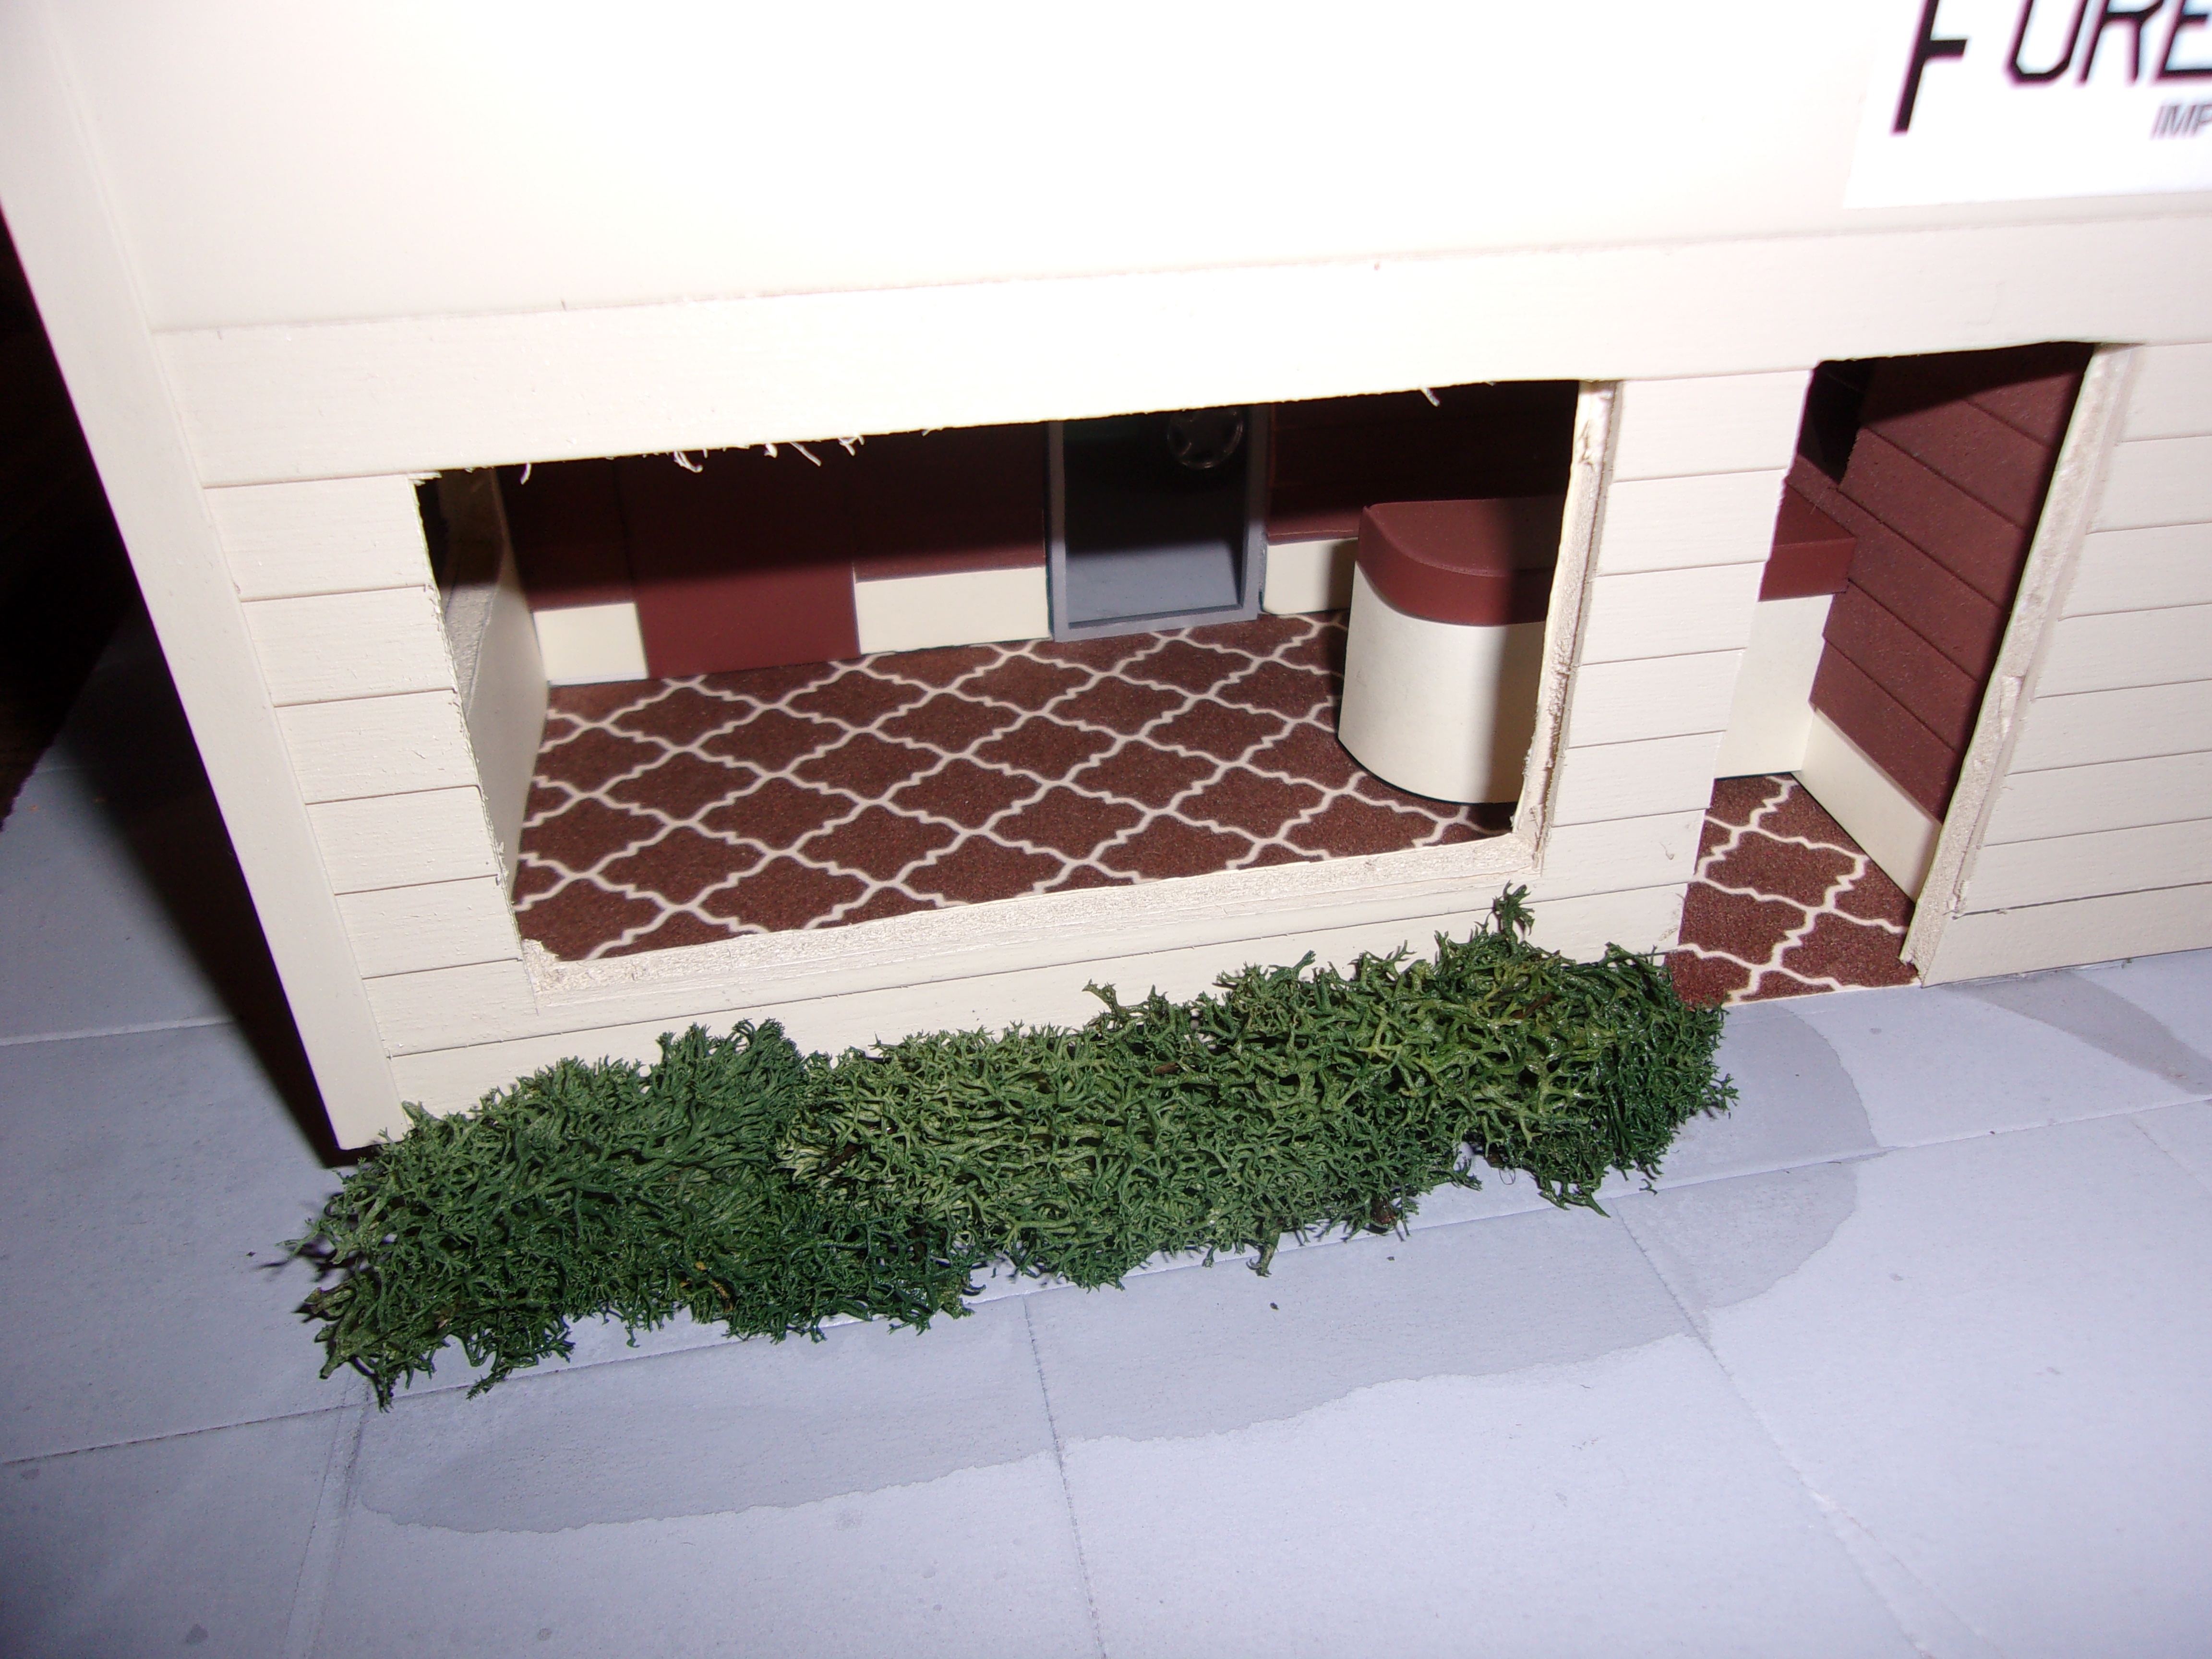
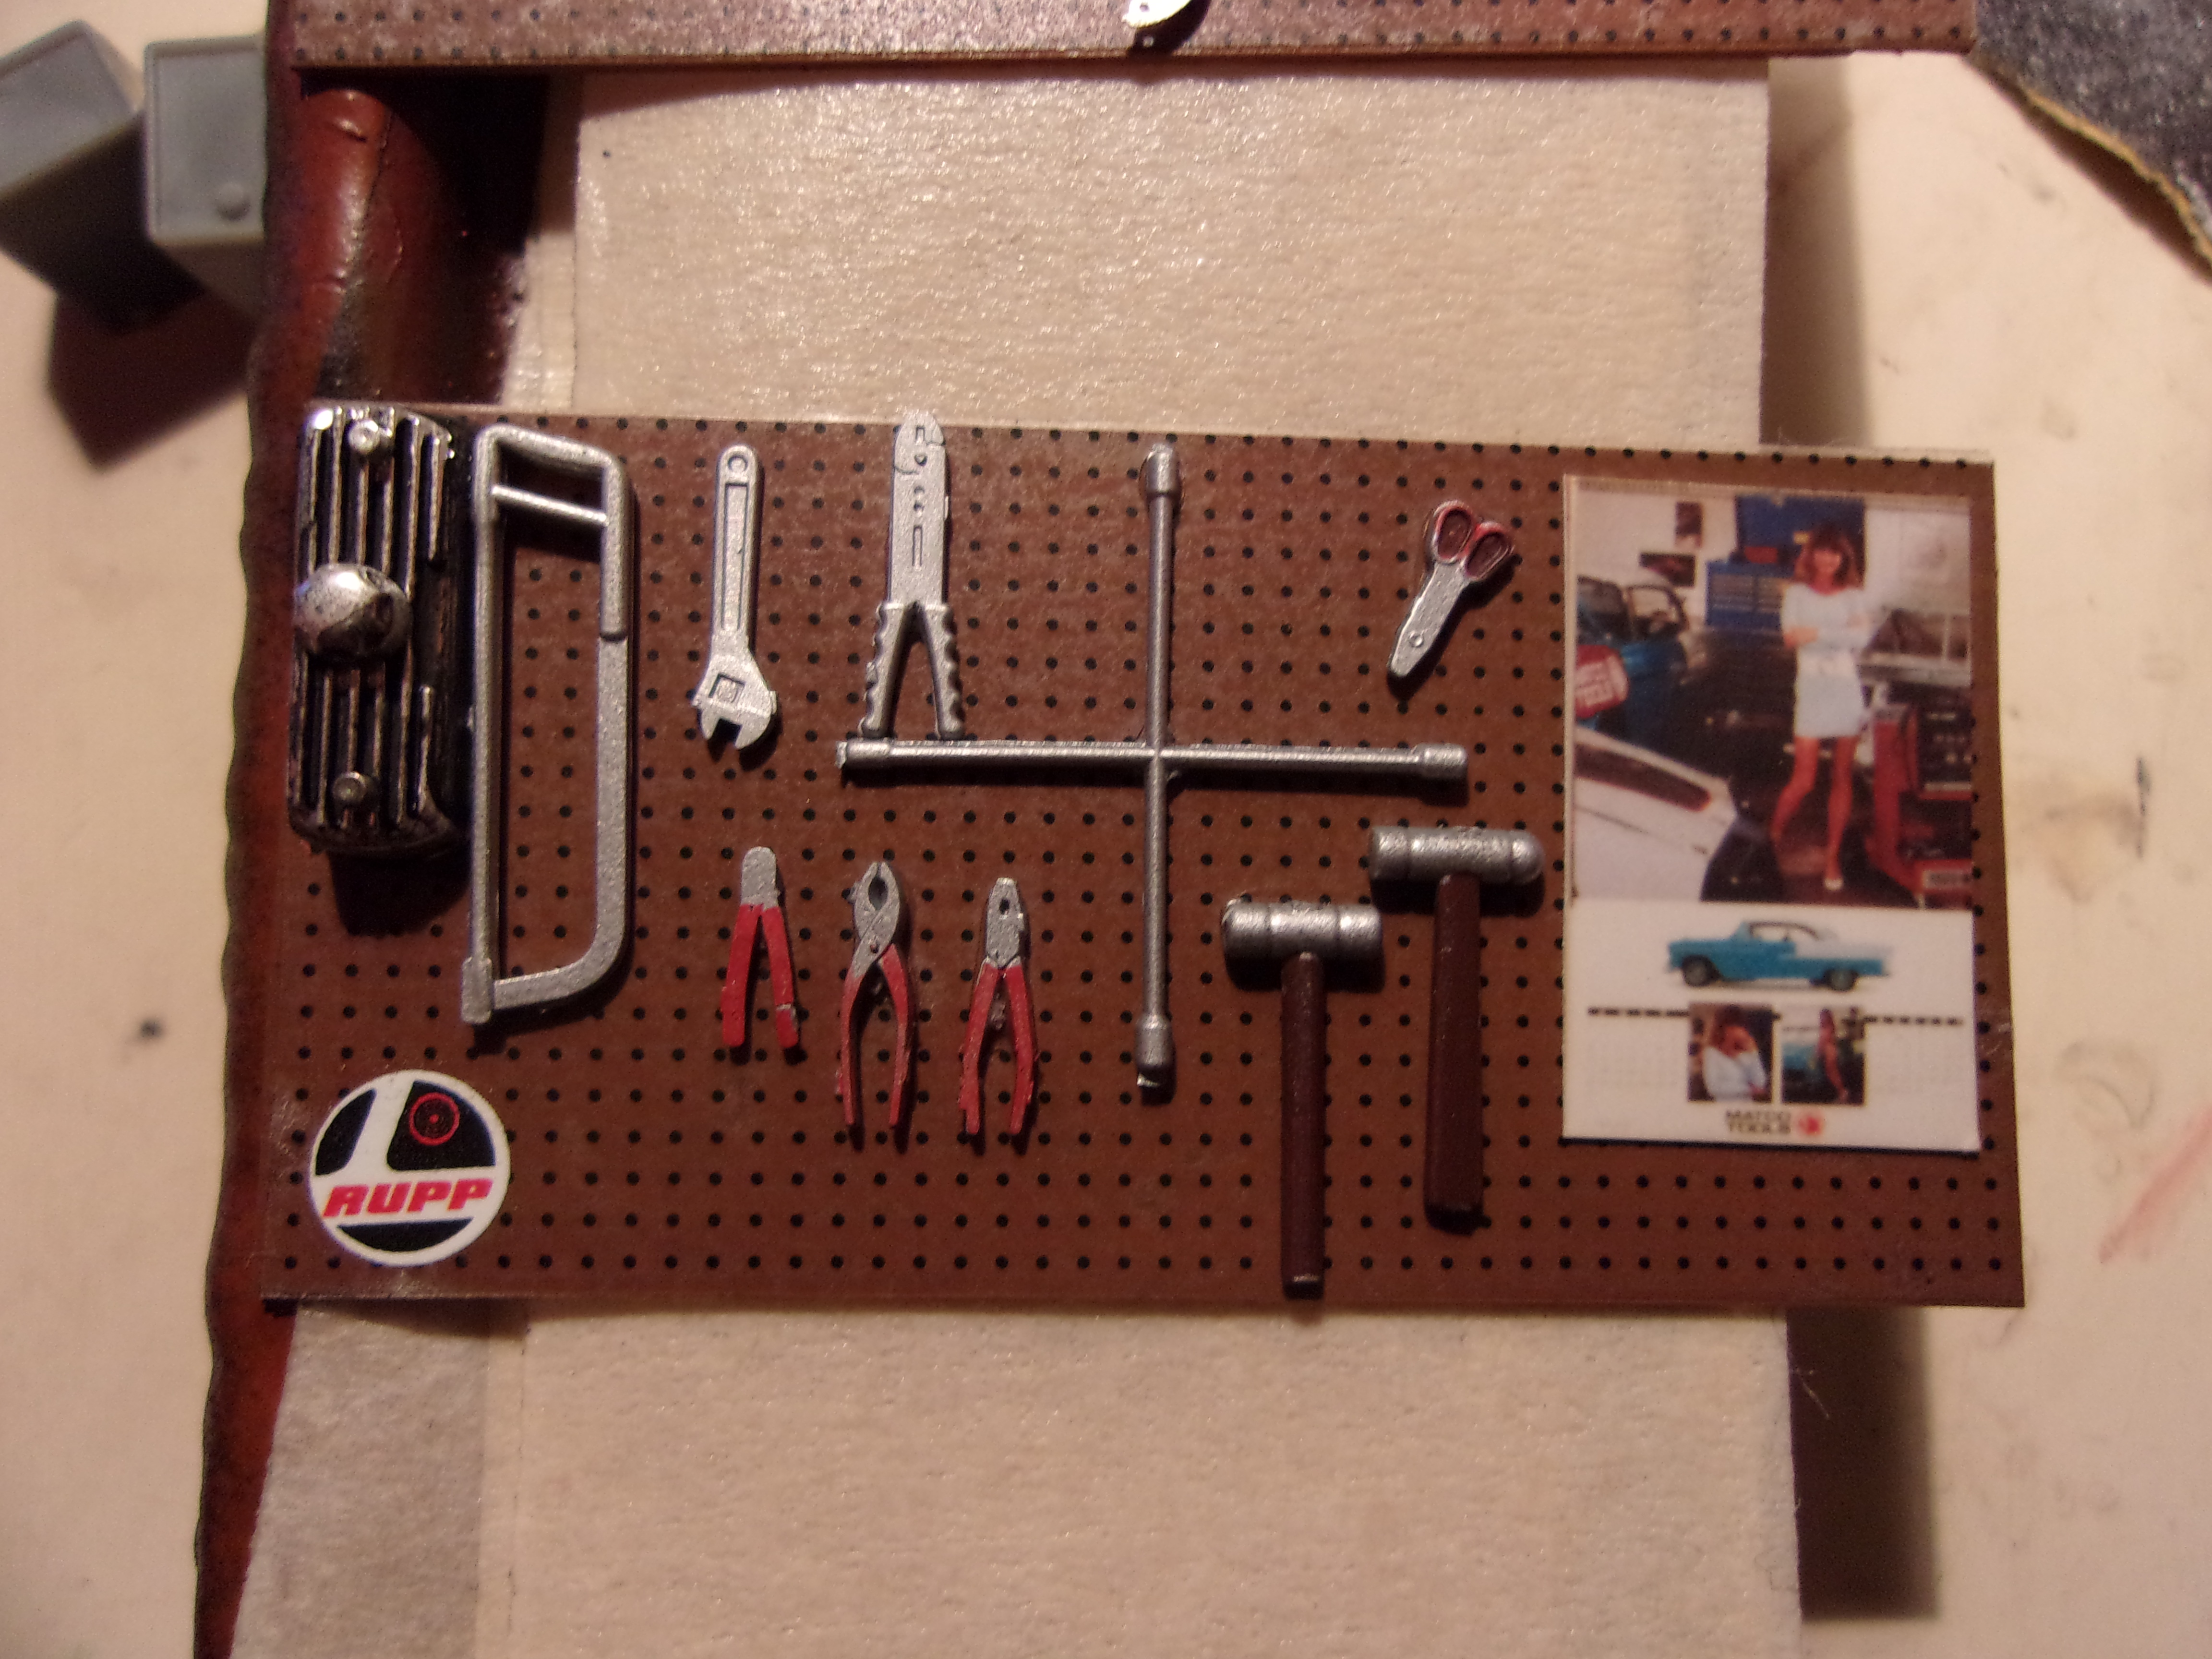
Now I'm at the stage where stuff is getting put up in it's permanent location. Along the bathroom wall I added two of the peg boards, along with the sign left over from the previous building's owner. There's also a resin refrigerator stuck in the corner... I have no idea who cast it, or when, but I've had it for years and finally had a use for it. I also stuck a Keep Out sign on it for kicks. A stack of used but still good tires are tucked into this corner, along with a safety cone I've also had lying around for years. The other peg board was positioned near the opening for the side bay, while one shelving unit and a toolbox were set along the wall. Down in the bottom of the photo are a couple of loose details for the front desk- a phone from the Fujimi tools set, and a tissue box from a Fujimi accessories set.
-
Last night, I got the building mounted to the base, and planted some shrubs under the lobby window. The lobby walls themselves were also installed, as was the restroom partition. The earquake only slightly jostled things around. The strangest part was that somehow the air compressor ended up on the restroom roof. I also stocked up a shelf with some photoreduced items and spare parts. The modified Honda radiator for the Mini is also plopped up there against an old Cragar box and some Subaru 360 hubcaps. I also found some old peg boards, and those were painted and some tools and other doodads were hung up on them.
-
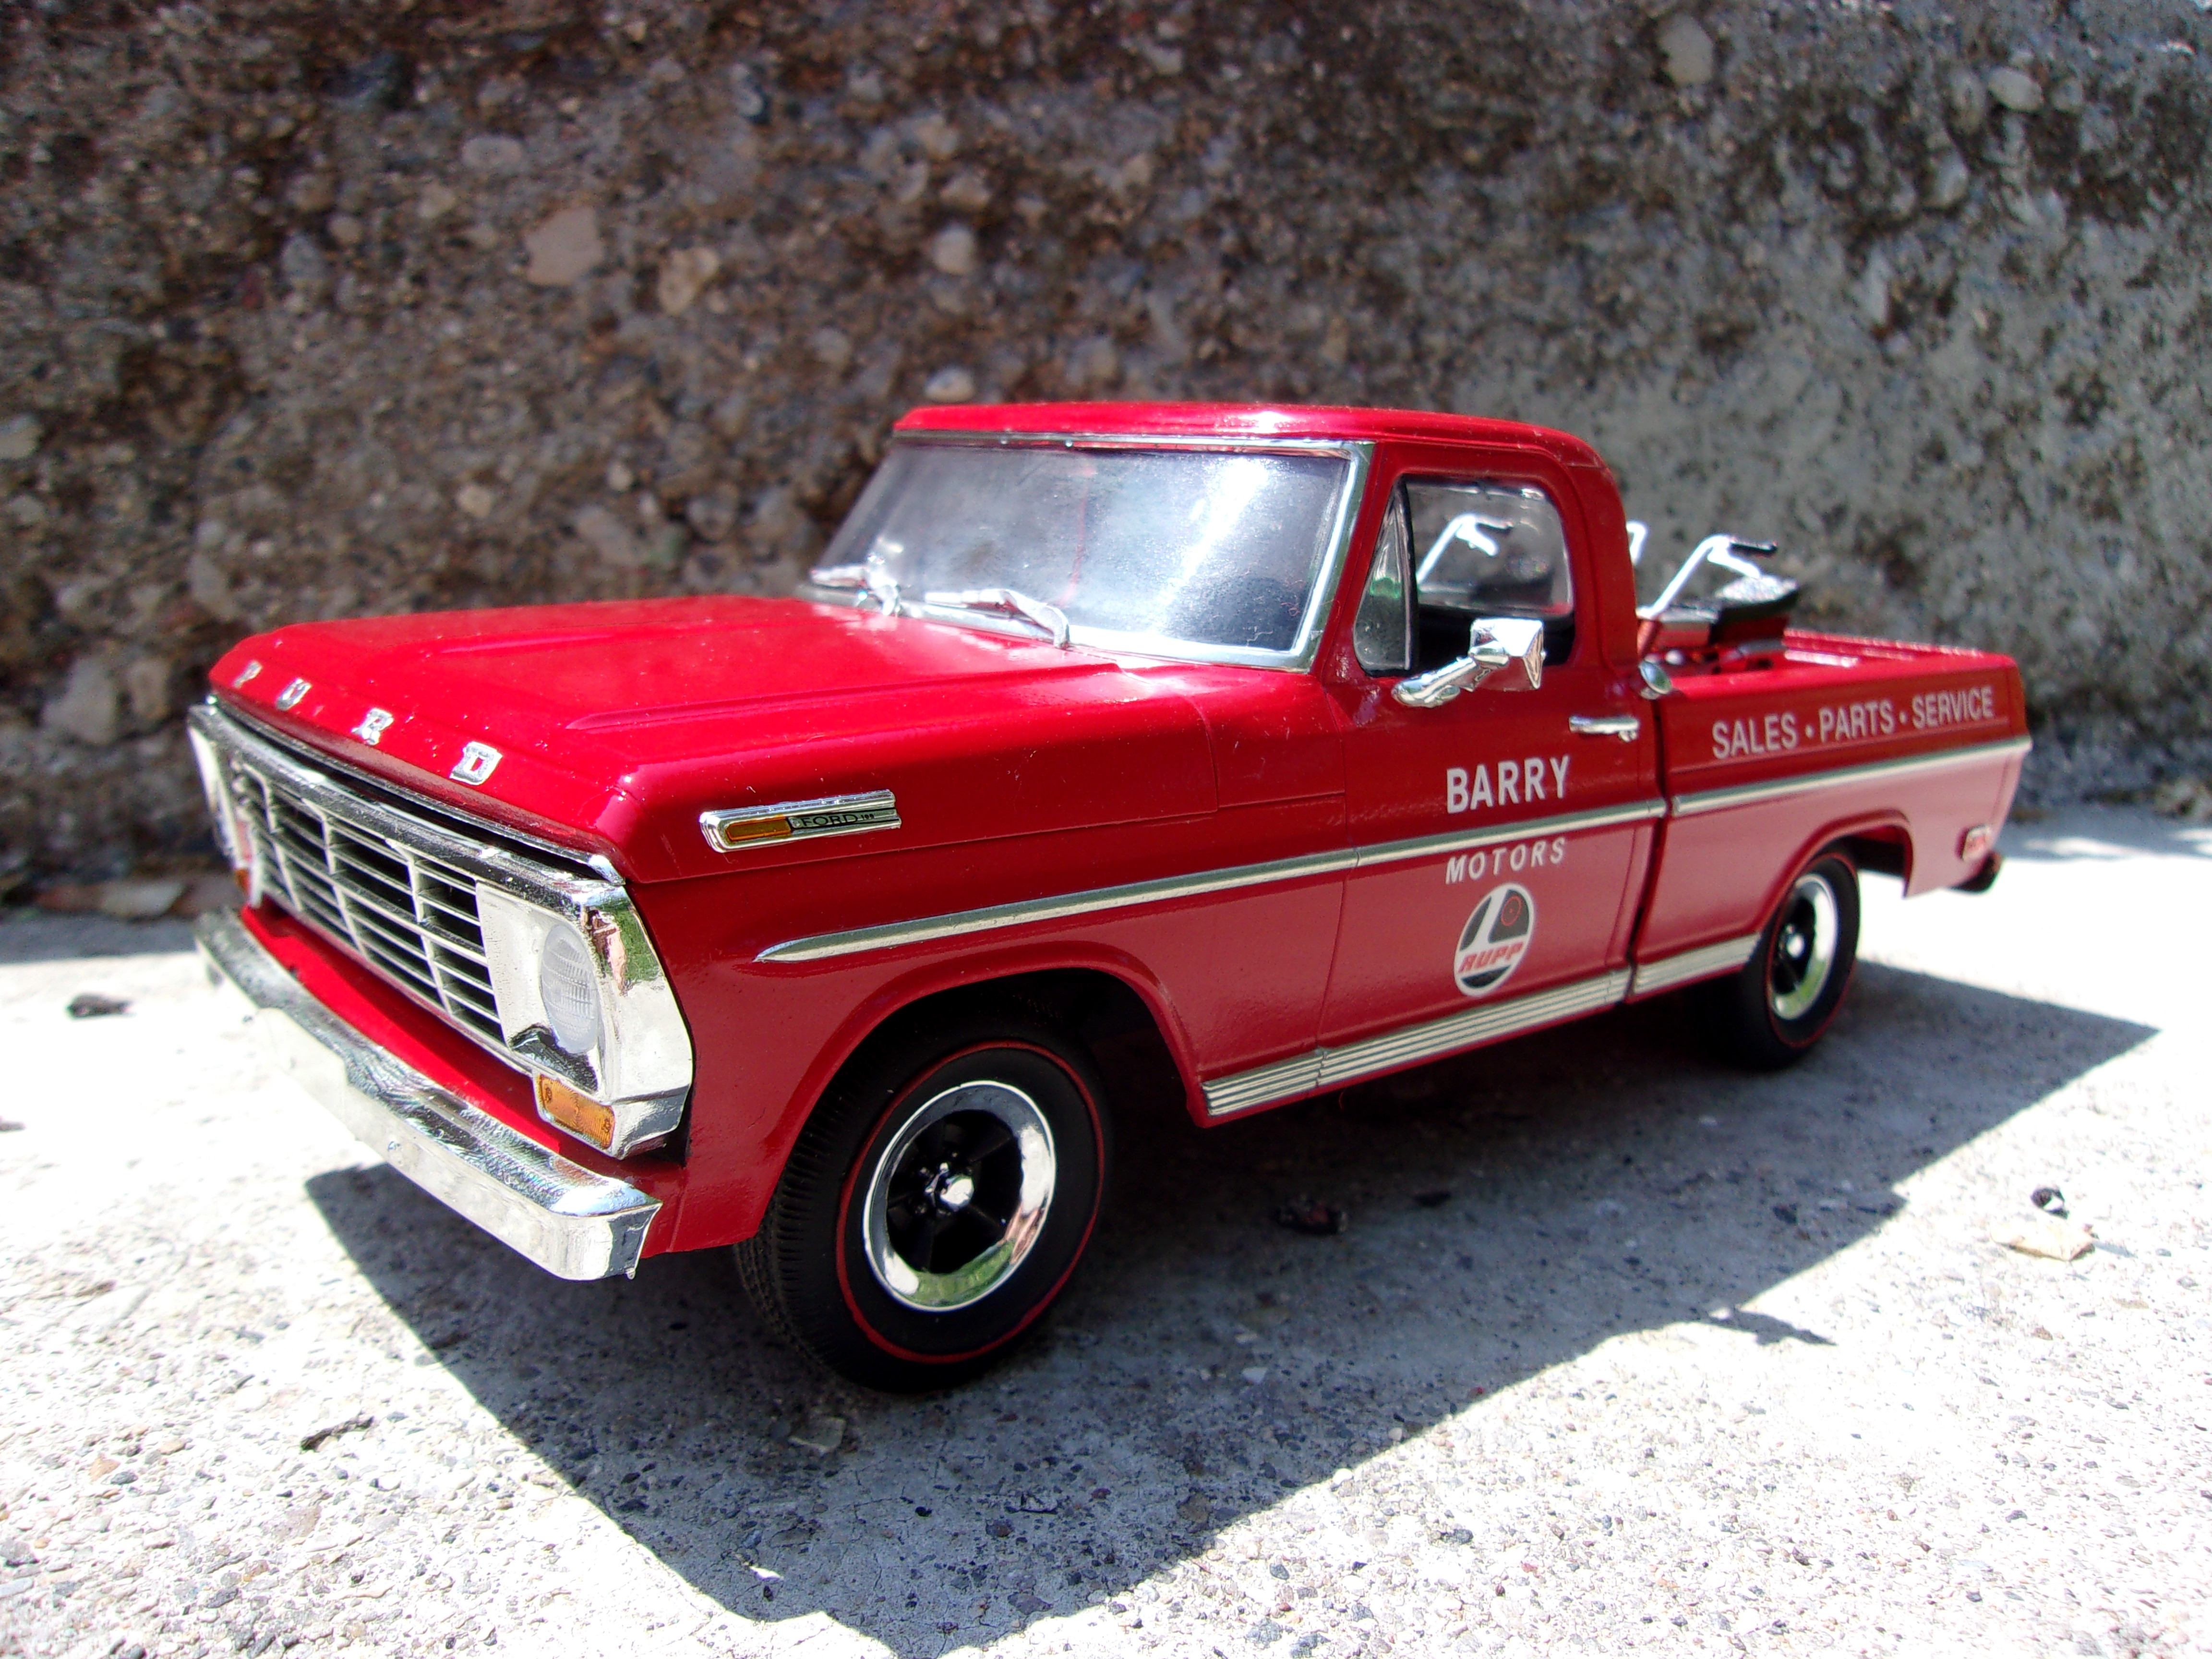
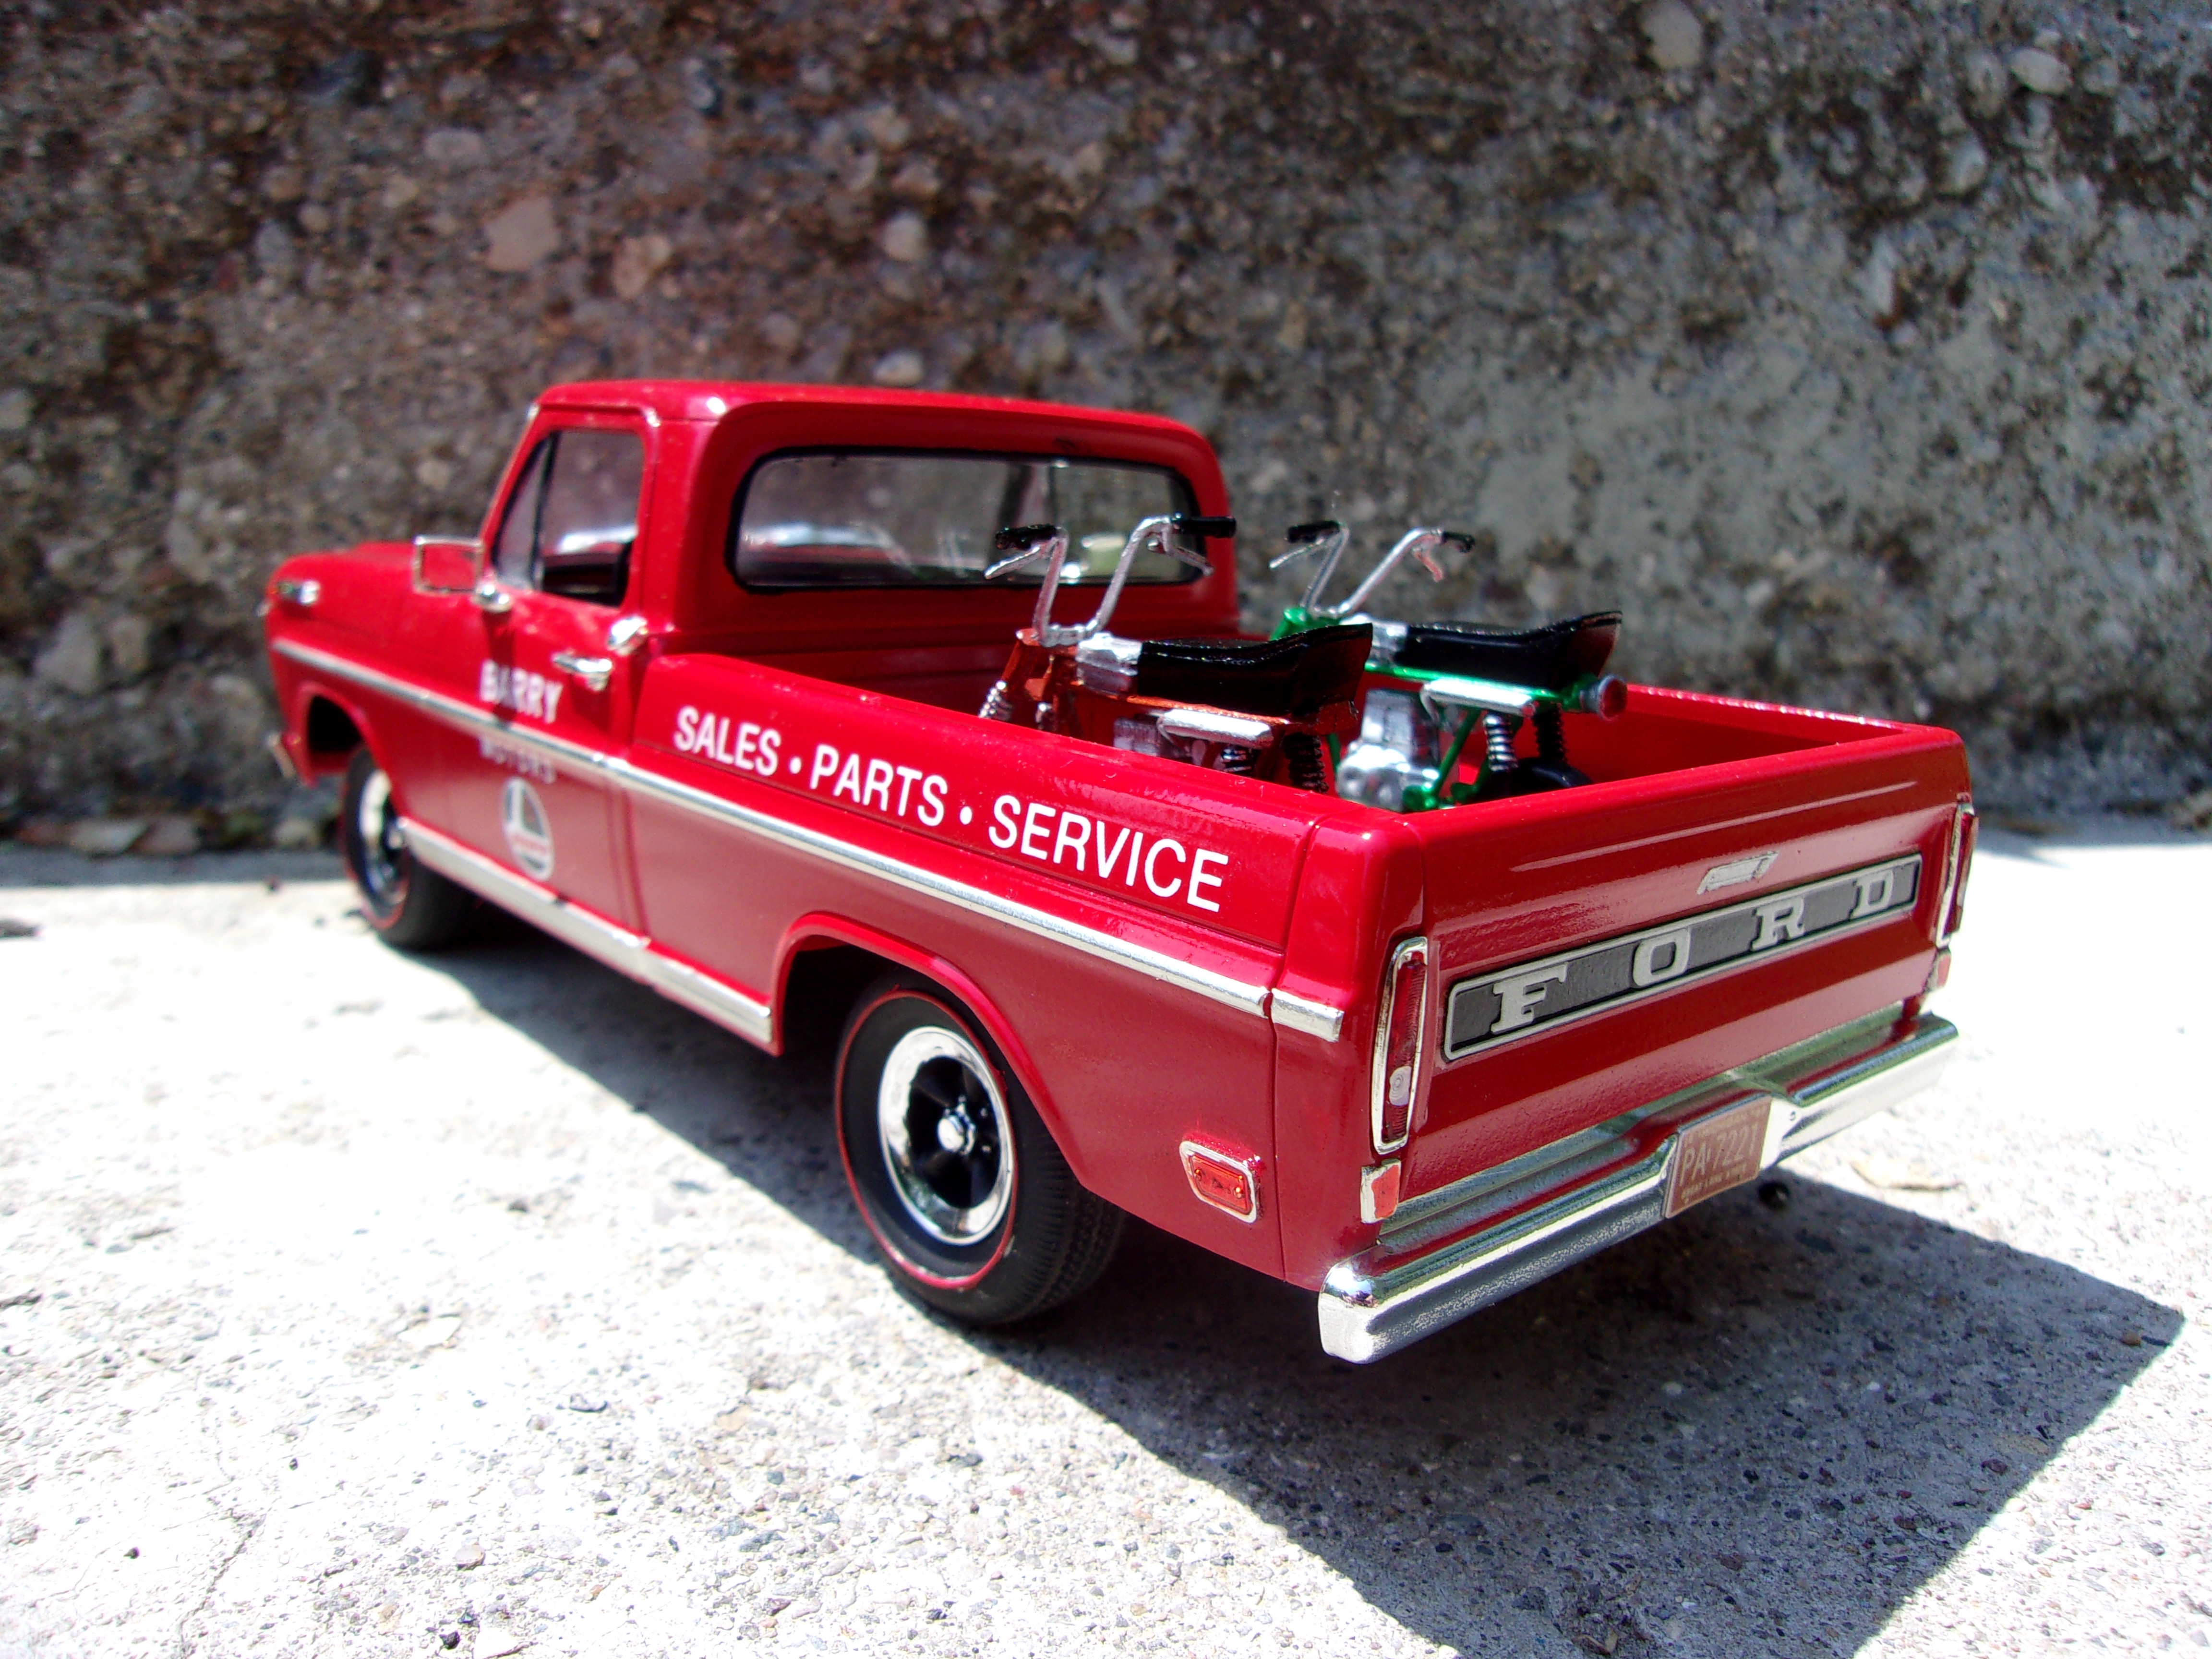
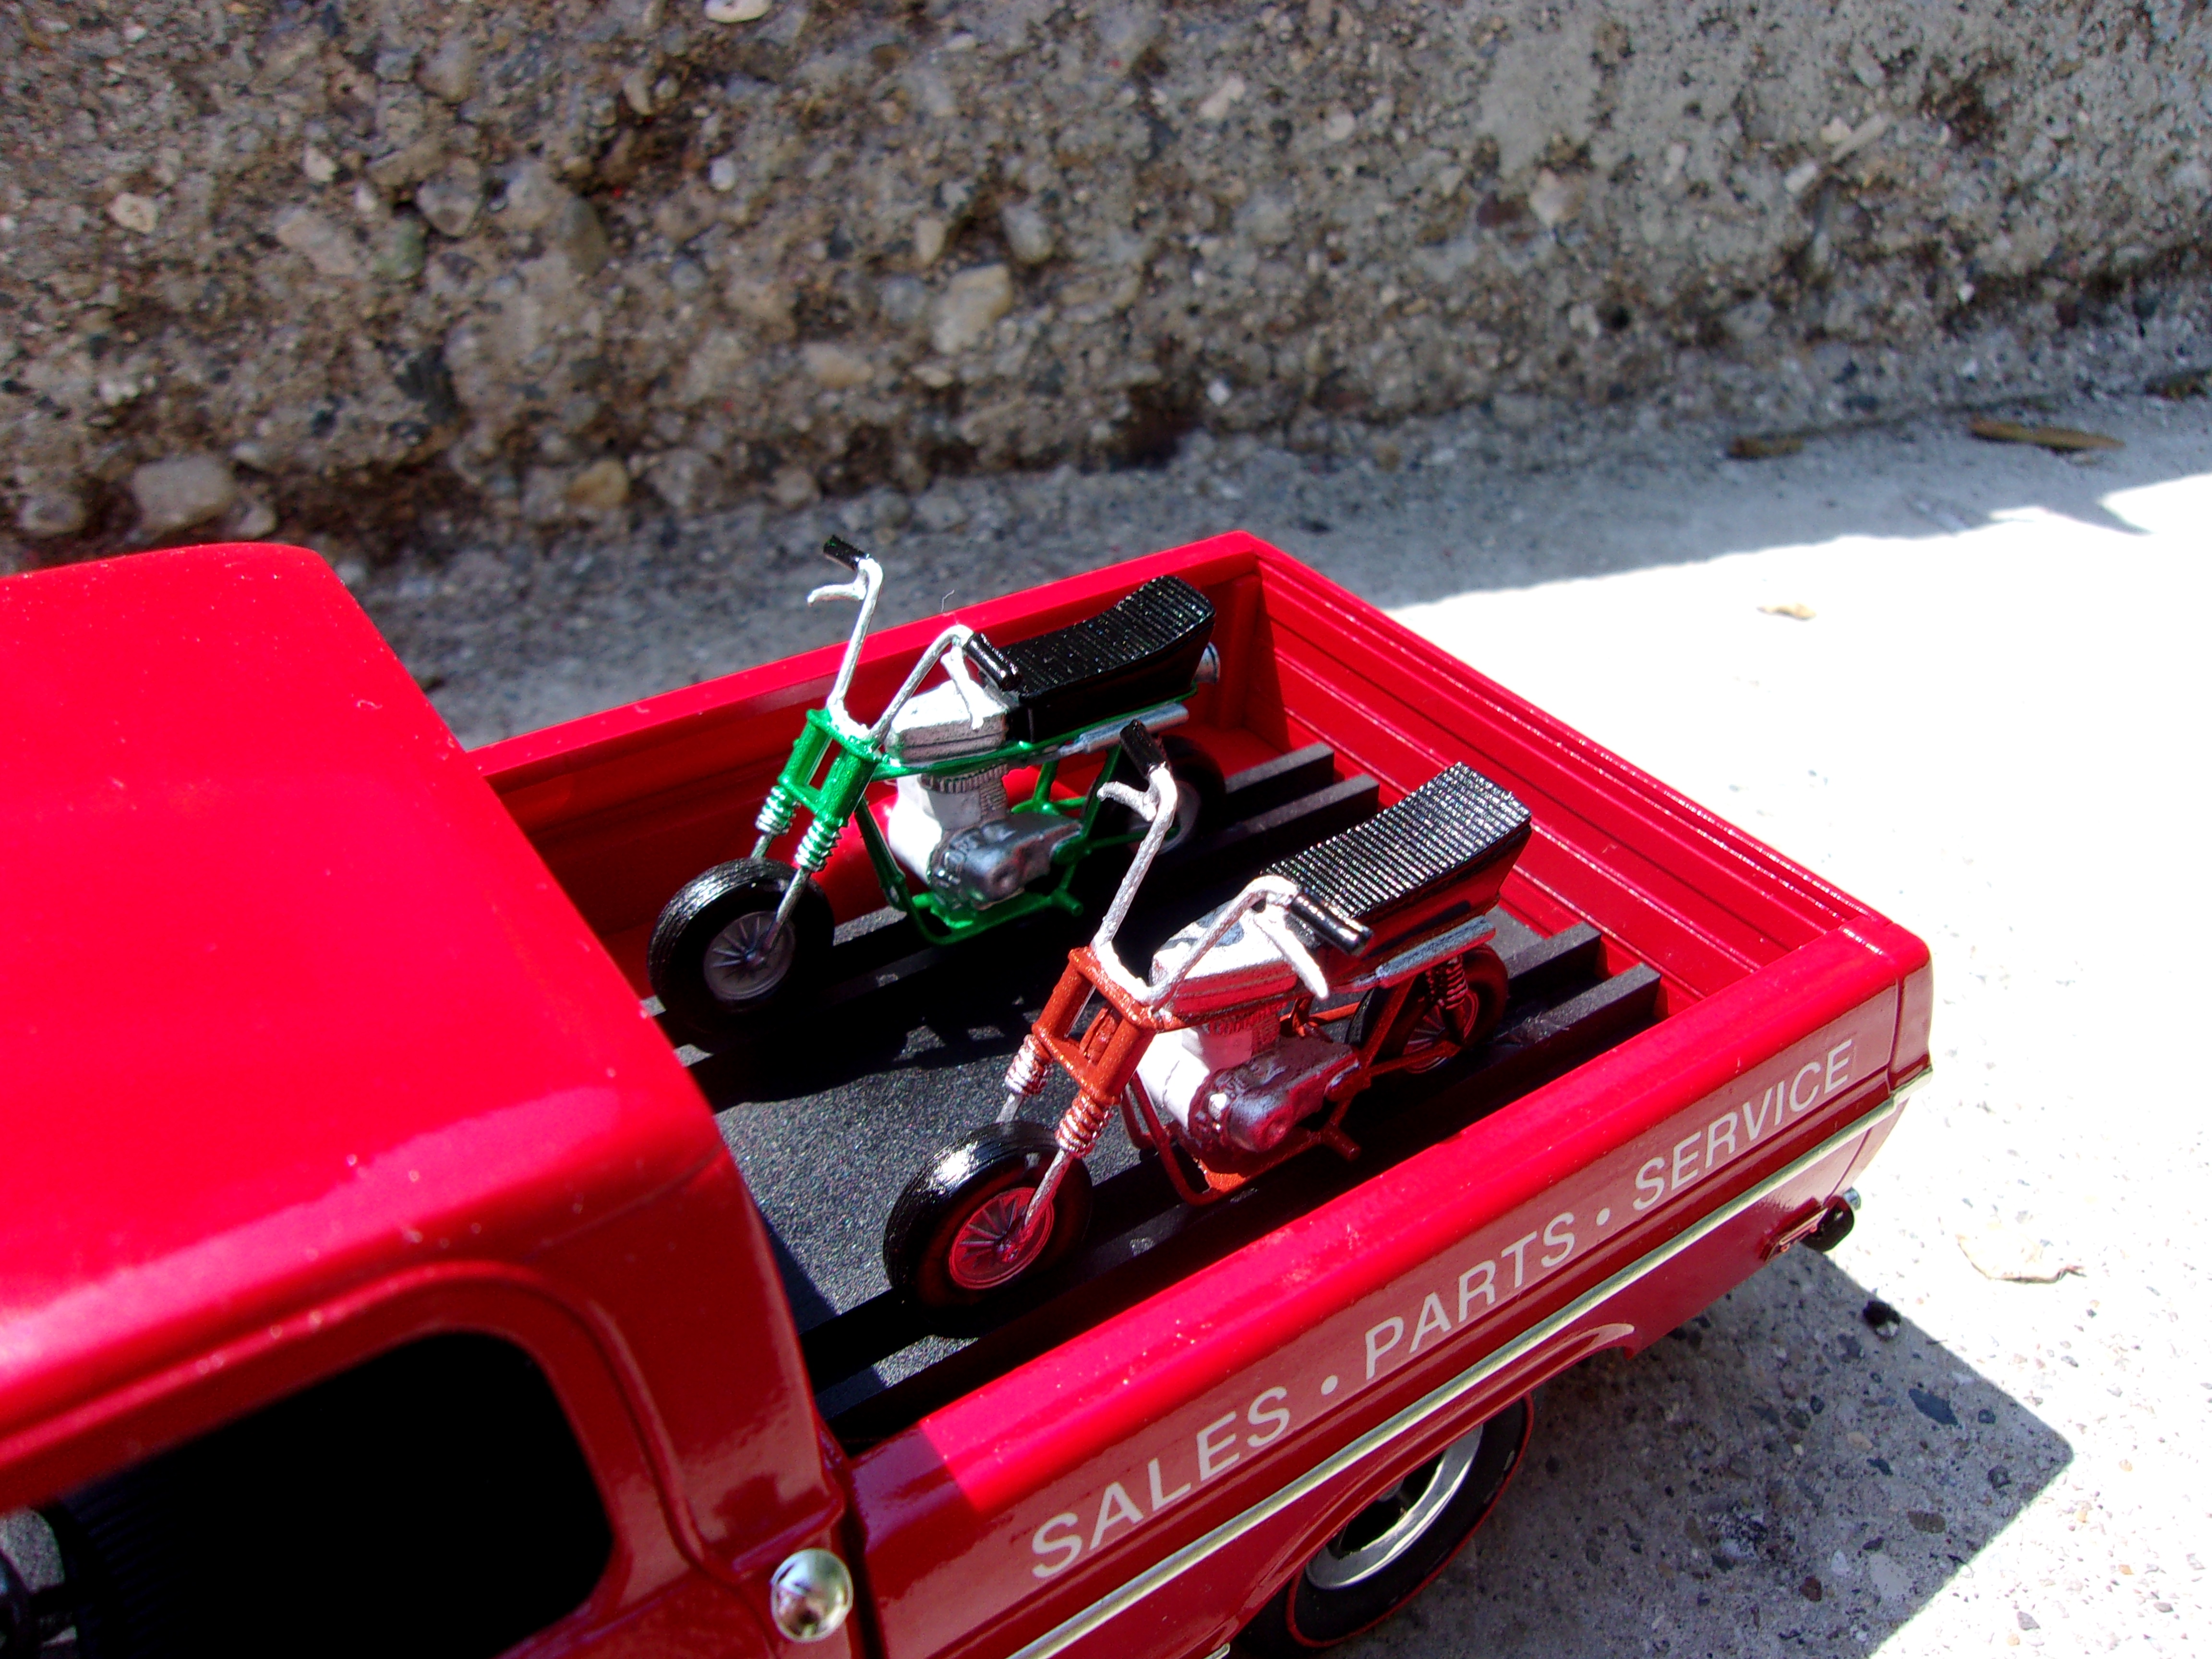
This started out as the '69 Custom. From there, I did a little mixing and matching with the different variants of the kit to come up with a mild custom (or mildly accessorized?) '69 pickup with a 302 V8. The 1969 Rupp bikes came from two MPC Force 440 kits, and they sit on a scratch build transport platform in the bed. The Rupp logos came from the 1:20 scale MPC snow dragster, while the other letters are either from the '69 kit or from a Microscale letter sheet. Paint is Massey-Ferguson red, I'd originally planned to paint the bikes to match, but went with orange and green instead just because I felt like it.
-
Ferguson TE20
Chuck Most replied to Tyler62990's topic in Model Trucks: Pickups, Vans, SUVs, Light Commercial
As a guy who owns a Ferguson 35, I love the kit, and I love your model on it. And believe it or not I've seen a few Fergusons that were painted red. In fact, I think I know where there's a real one that looks EXACTLY like your model. -
For all you guys who want a Vette wagon
Chuck Most replied to oldnslow's topic in General Automotive Talk (Trucks and Cars)
If the owner is a typical Corvette guy, when he goes to sell it on craigslist the ad will be chock full of "one of a kind" "rare" "now lowballers I know what I got." -
Some Olde things
Chuck Most replied to Greg Myers's topic in General Automotive Talk (Trucks and Cars)
If we're casually tossing out ugly designs we still love for some reason, allow me to treat you to the 1955 Mercury D-528 concept. I especially like the fact that I don't think they could possibly have picked a less flattering color for it if they'd tried. Going by the roof line I think somebody involved in the styling was having coffee with a guy from Nash's styling studio. On the other hand... squint and you can see a little '56 Continental MKII in the front end. Well, I can anyway. -
Made a little progress today. I added edge moldings (whatever you'd call them) to the corners of the building to cover up where the shingles meet. I did a little finish work to the foundation and then sprayed the entire mess in Rustoleum Almond gloss. Window frames have yet to be finished, they will be done in the accent color... probably more NATO brown. I also did more work on the lobby. Please excuse the misaligned carpet- it's not yet glued down and is just kind of laying there for the photo. The desk was finished and painted to match the decor, and a couple of pictures were hung on the wall- one of a Rover Mini and a Subaru 360. I'm trying to drop clues of the building's past into the project. Prior to being home to Foreign Objects, the building's previous owner ran a dealership out of the premises, selling Austins from 1960 to 1997, then switching to Subaru after the Mini stopped being imported to the US. Yes... the Mini in the picture is too new for that period, but it gets the point across. The "paintings" came from two sources. The Mini came from the end panel of a Heller 1:43 scale Mini kit, while the Subaru came from the flyer included in an Arii 1:32 scale Owner's Club kit. They were mounted to .020" plastic sheet with the spray adhesive, then superglued to the wall. I cut the bottom and right side off of the Subaru image to hide a stock number printed on it, then cut down the Mini image to the same size. A TV will be mounted to the corner of the wall for customers in the lobby to watch, but I may squeeze in a couple more "paintings" or photos to decorate the wall. The restroom door and the two-way door that leads out into the shop were made from plastic sheet and strip, and the male/female restroom icon was hand drawn. I'll cut some windows from thin styrene sheet at some point, and add some general signage.
-
There was a scratchbuilding school article in the magazine some time ago (it was written by either Scott Colmer or Alyn Loya) that showed how it was done. It looked very tedious but the article went into detail on making the tool to do it and demonstrating how to use it on foil. I'll have to see if I can see which particular issue it was in, unless somebody beats me to it.
-
What did you see on the road today?
Chuck Most replied to Harry P.'s topic in General Automotive Talk (Trucks and Cars)
Wasn't on the road, but in a Meijer parking lot. Which is only about 1/8 mile from the road, so...