trick my mixer
-
Posts
467 -
Joined
-
Last visited
Content Type
Profiles
Forums
Events
Gallery
Everything posted by trick my mixer
-
70's Swinging meat trailer
trick my mixer replied to KJ790's topic in Model Trucks: Big Rigs and Heavy Equipment
Looks pretty real to me...Really nice job -
Nice work..brings back old memories when trucks looked like trucks..Nice clean build.
-
53 foot smooth side trailer
trick my mixer replied to tbill's topic in WIP: Model Trucks: Big Rigs and Heavy Equipment
Nice looking trucks on display..!!!! -
Roger-4
-
Thankyou..Way Kool..love the red glitter steering wheels with the oxblood red diamond tuck upholstery..Long gone. Nice memories
-
Thank you for posting those super kool truck and car pictures. Would you happen to know where you were at when you took the picture of the old Carnation milk truck? Brings back memories of where I grew up at..Thank you again
-
Hi Kerry, That looks like an automatic going in there. Should be fine..Well keep an eye on this project..LOL
-
Revell Snap Peterbilt 359 Farm Truck
trick my mixer replied to vincen47's topic in Model Trucks: Big Rigs and Heavy Equipment
Looks really good. Looks well used and worked. Nice job on the bare metal foil...Overall ..Great!!! -
Mack Trident Logger
trick my mixer replied to carsntrucks4you's topic in Model Trucks: Big Rigs and Heavy Equipment
Did a very job nice on this build. Super detail on wiring and air lines..!!!! -
Nice matching combo...Looks great..!!!!!
-
SD White Freightliner
trick my mixer replied to Spruslayer's topic in WIP: Model Trucks: Big Rigs and Heavy Equipment
Nice looking..I like the look of the white wheels. -
Freightliner Conventional Aerodyne
trick my mixer replied to V8 Trucker's topic in Model Trucks: Big Rigs and Heavy Equipment
Nice job on this Freightshaker. Looks good... not too busy but very clean...!!!!! -
Greetings from Puget Sound
trick my mixer replied to Ensis Ferrae's topic in Welcome! Introduce Yourself
Welcome aboard Travis this is a nice site with alot of nice builds and tons of information....you will enjoy it..I`m in the north part of the Puget Sound..up by Arlington -
Trying BMF for the first time-questions
trick my mixer replied to Safire6's topic in Model Building Questions and Answers
Hi Steve, Welcome to the wonderful world of bare metal foiling. I feel that once you do it once you will find it isn't all that hard and I wish I could say it was easy the first time. It takes practice and you will only get better the more you do it. I always clear coat after I m done foiling and have never had any problems as of yet. The only 3 clear coats I have ever used were Tamiya, Dupilcolor and Testors Lacquer clear coat but they have never bothered the foil. The paint was also lacquer, just wanted to be sure to throw that in. As you I fold the excess inside but try to keep it to a minimum. Again no problem with paint not sticking. Just keep excess to a minimum ! As for the adhesive I use Testors cement made for clear plastic. This stuff is a a little more forgiving than regular cement.. I just finished using some ultra chrome foil and it did not seem any different than the other ones. The only complaints I have heard from a friend of mine was the black foil was extremely easy to rip/tear. No experiences with that, the thing I like about ultra chrome it is shinier. I guess it depends what application you are using it for.. I did not find one sticking better than the other. One word of advice is I suggest you buy the foil in person so you can inspect . I bought some on line from a reputable dealer and even though it was packaged nicely the sheets had some wrinkles in them. Not good. At least at store most places will open them up so you can look at it. The problem with wrinkles is if you cut a piece off the sheet and you make your cut thru the wrinkle when you go to peel your piece off and you get to the wrinkle it will break off there usually.. Another word of advice in case you are not aware. Do not scimp on the foil.. For the job it does it is well worth any waste. What I do when when I do a front or rear window trim I cut a square big enough piece to cover the whole window opening including the trim with some excess. Then you can cut out the center leaving enough to fold under. Might want to practice on something else at least once. The thing about doing it this way you avoid the chore of trying to mold the foil around the dreaded corners..ugh. As for the cutting blades I have never used scalpels. I always use the # 2 blade ( the small blade that is cut at 45 degree ). Once again do not scimp on whatever type blade you use. The sharper the better. Once I`m done foiling I put that blade away for other uses. Still very sharp but not sharp enough that it might tear the foil instead of cutting it.. Not sure where you can get the blades locally. I know Micro-Mark sells them. Just remember to be patient and take your time and practice. Hope this was of some help..Lucas . -
Thank you..I got the chain binders from Kit Form Services or as they are called KFS..Sometimes you can find thru Oiltruckie on ebay. He will list them occasionally
-
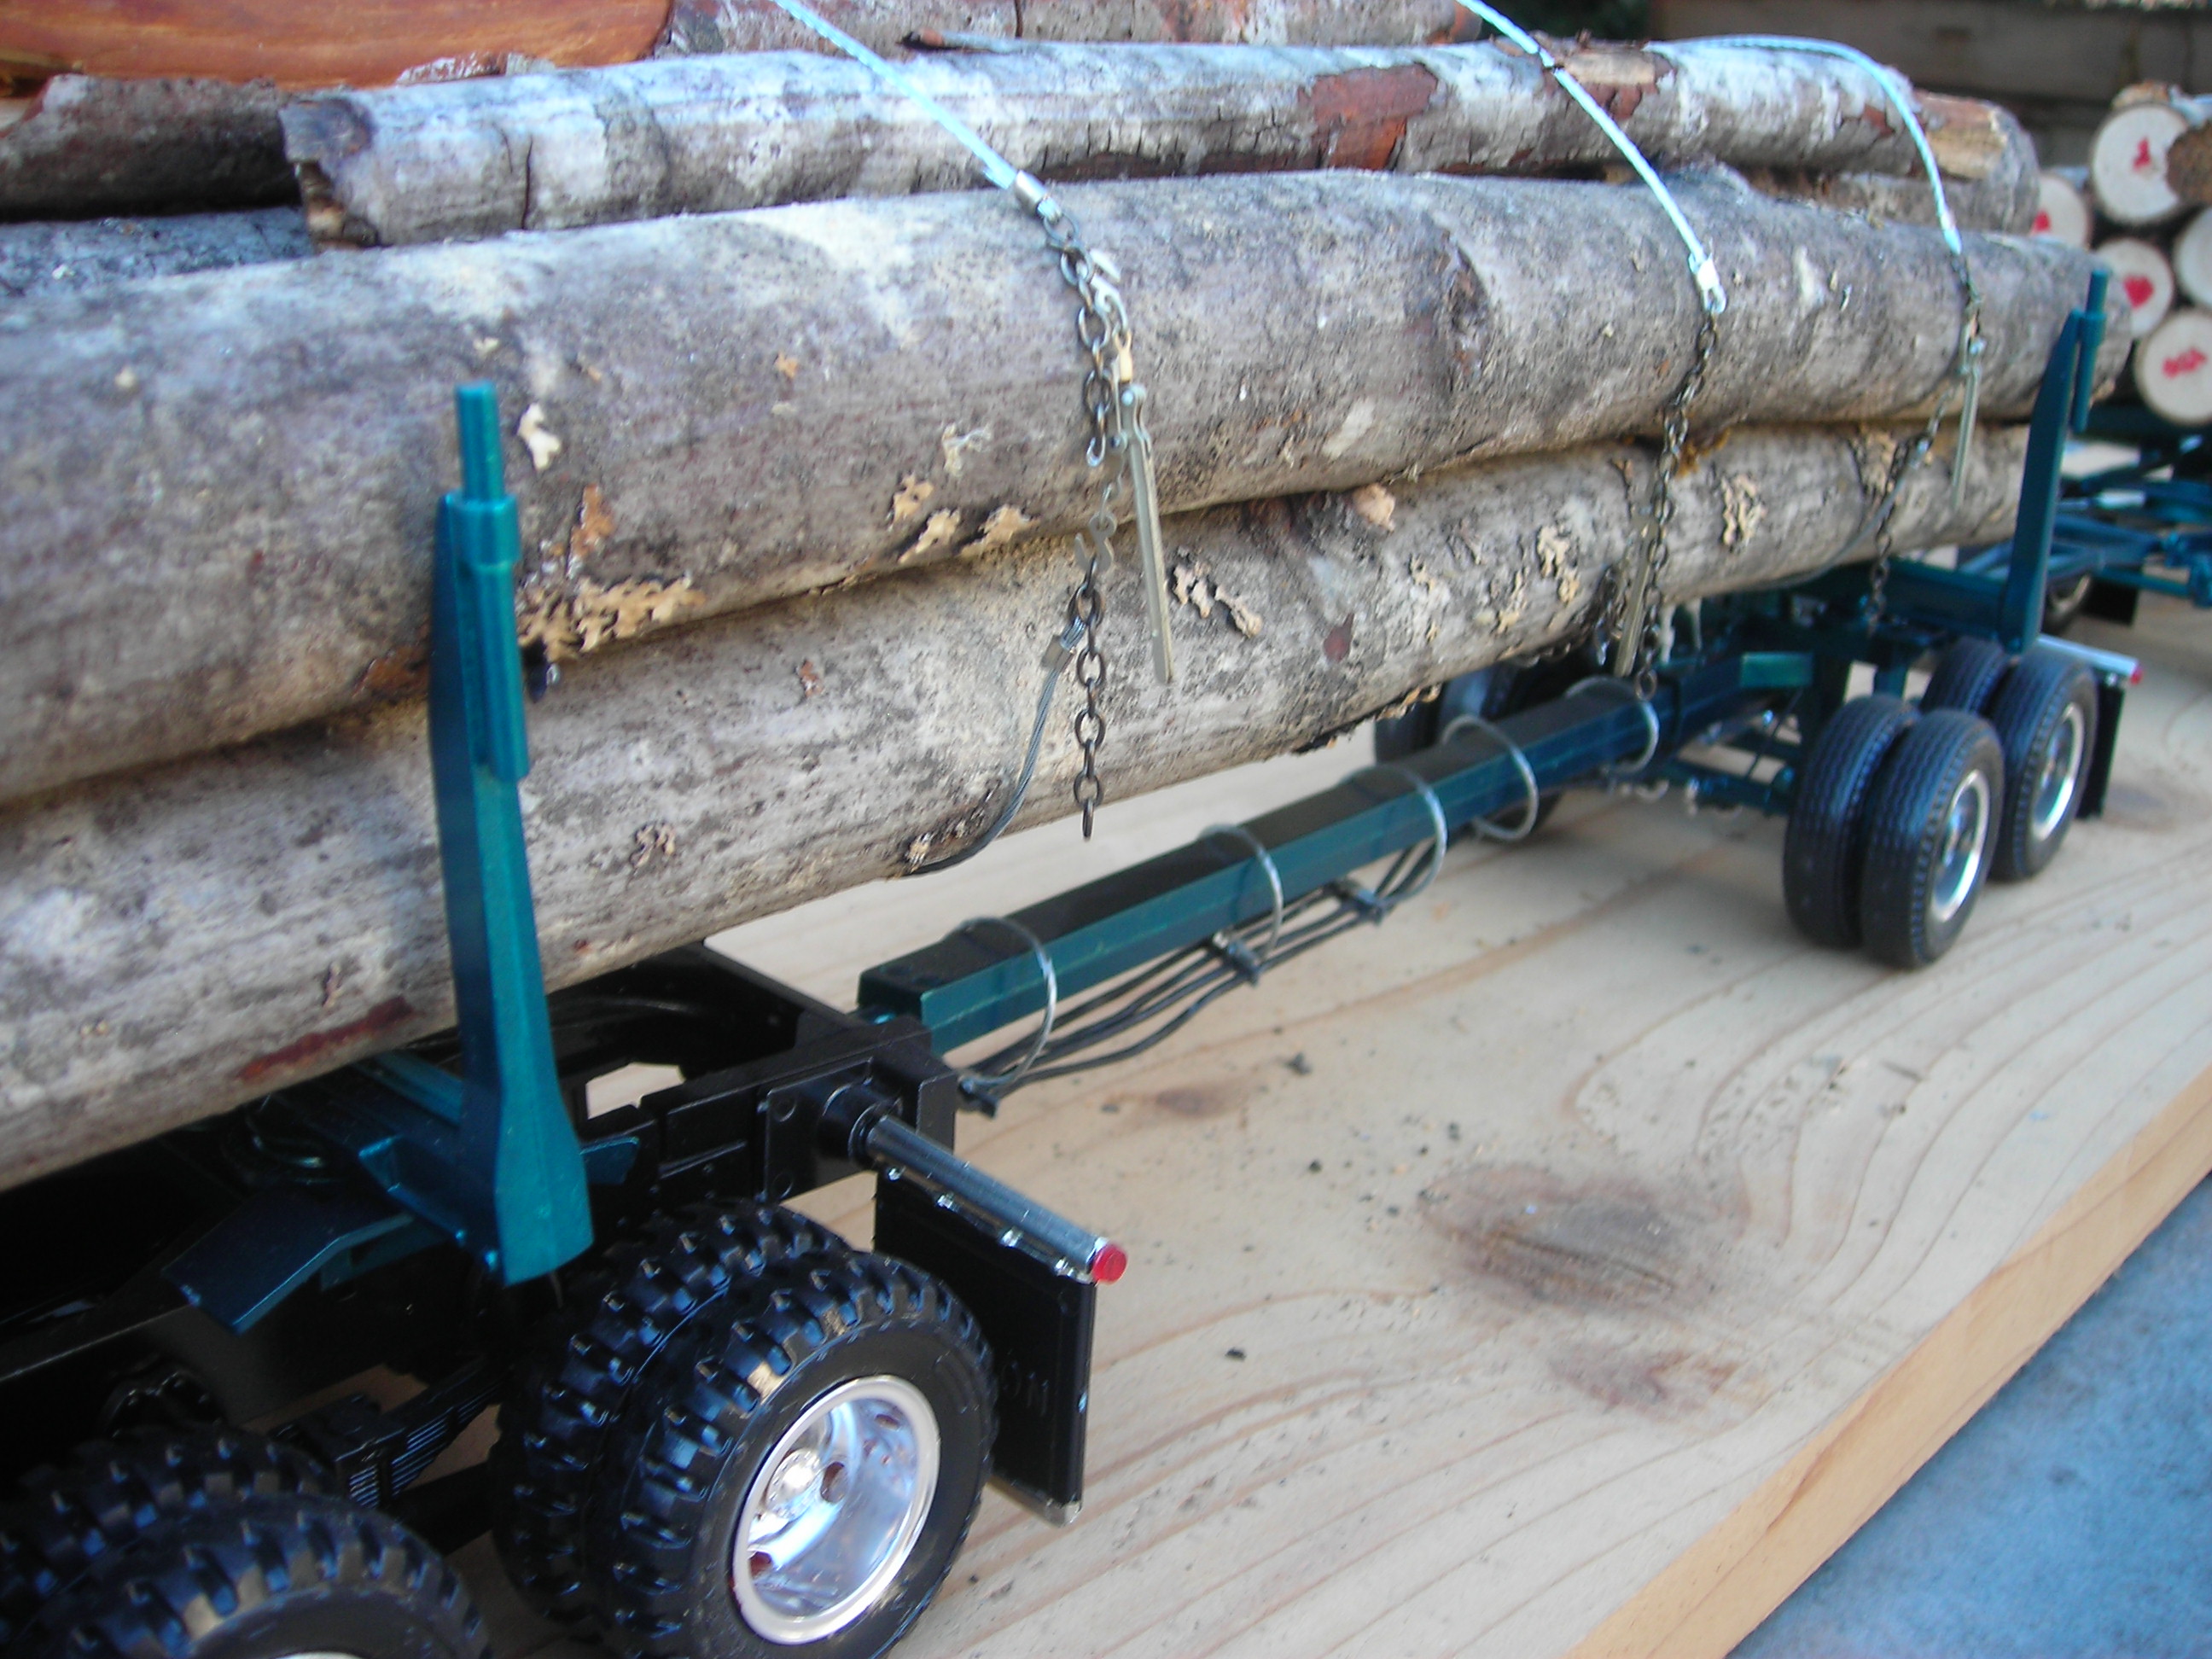
Here are some pictures of a Paystar 5000 International long logger with scratch built pup trailer. I built this about 12 years ago. This is the only kit I have found that comes with the log trailer and truck together. I decided I wanted it to be a long logger with a pup. Here in the Great Northwest these are called " Super Trains ". The truck itself is pretty stock. I did add my own built sun visor and also added cb aerials, I made the tool box that is behind the cab guard and put diamond plate with baremetal foil over it, the fuel tank straps are also baremetal foil. I used an alcoa wheel as the turntable for the pup trailer to turn. If you notice it also has working photo etched chain binders and scratch built wrappers. Those are the cables that you throw over the load to secure it.. I also added extension stakes to top of bunks for higher load option. As you can tell the windows are foggy from being outside. just minor detail like painting the bottom half of windshield washer fluid reservoir blue to make it look like a liquid line. Hope these come thru since first time for posting...

-
Ford Louisville Dual drive truck..
trick my mixer replied to ranma's topic in WIP: Model Trucks: Big Rigs and Heavy Equipment
Nice transformation...!!! Hard to believe same truck...Looks great -
Approx 1/25 rig size ?
trick my mixer replied to 57peppershaker's topic in General Automotive Talk (Trucks and Cars)
Hi Steve, i was just measuring one of my stock builds which is a Revell of Germany 359 Peterbilt and a AMT Fruehauf 40ft. trailer and it measures 31 inches long and about 7 inches high. Things can vary depending on kit or any modifications you make like taller stacks, you know the drill. Plus also give yourself some extra room for the ease of removing or replacing so as to make it easier for you to remove or replace. Hope this helps you some.... and by the sounds of your measurements you could probably do 3 shelves 9 inches or so apart. You definitely have plenty of width. If you do not put trailers in there you have all kinds of room. I would say you have easy enough room for three trucks and trailers...Lucas -
Welcome aboard...Great place to see awesome builds and tons of information...You will enjoy it I also build trucks and was a mixer driver myself...
-
Welcome Brenden...or I should say fellow truck modeler...That is all i build but do enjoy seeing all the builds that are posted on here..You will have a good time
-
Welcome aboard Carl..!!!! I vote for the Munsters Coach..You will have fun on here so just be patient and enjoy... Ask as many questions as you want...Have fun
-
KWhopper900
trick my mixer replied to Justin87's topic in WIP: Model Trucks: Big Rigs and Heavy Equipment
Hey, I really like those nut covers on the steer wheels....I have some on my steer also on my real work truck...Way cool..What did you use to make them? -
KWhopper900
trick my mixer replied to Justin87's topic in WIP: Model Trucks: Big Rigs and Heavy Equipment
Nice choice to build.. there are some down falls to this kit like the tires but overall you will enjoy it and it should be a fun project...Make sure you thank her brothers for their service to our country. Will be looking for pictures down the road.. Are you going to use those Mobius after market wheels and tires? Good choice.. have fun -
I`m liking it...Looks just like a Mack should look like...great detail
-
Welcome aboard Driver..LOL..I also only build truck models plus the fact I to drive a truck for a living...Hope to see some builds soon... take care