chepp
-
Posts
266 -
Joined
-
Last visited
Content Type
Profiles
Forums
Events
Gallery
Everything posted by chepp
-
Revell '57 Chevy Black Widow question
chepp replied to TonyK's topic in Model Building Questions and Answers
I'm adding to this older thread to mention that the current 14551 post sedan Bel Air still has some parts from the Black Widow such as 6-lug wheels, factory fuel injection, an extra sort-of-stock dual exhaust (parts 80 and 81 not shown on the instructions) and an extra simplified/braced firewall (part 85 not shown on the instructions). I'm modifying it to be a 210 street/strip machine. -
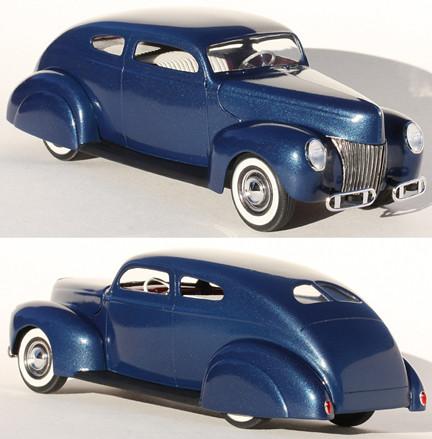
Here's my '39 chopped top sedan made from the AMT '39-'40 kit.

-
Thanks, all. Despite my thread title, I'll go with Chevrolet engine orange starting with Tamiya X-6 Orange and adding X-7 Red until it looks right. I only need a tiny amount to airbrush the block/heads (resin Muncie 4-speed will be aluminum). My LHS still has a nearly full rack of MM solvent-based bottle paint... the space for Chevrolet Engine Orange was empty. They don't have the Testors acrylic line anymore. I'm replicating my cousin's long-gone '57 Chevy 210 post sedan as it looked in 1965 soon after he'd made it into a street/strip car. There are no photos, just my memory as a 12-year-old and his (he's in his 80s now) so we're runnin' on fumes for some of the details. We'll presume that the original car had a six that was pulled and the engine builder started with a 327. So, the color will be orange (original engine color or repainted). Here's some backgrounda about the two colors. Ryan Miller post (snipped to show red and orange SBCs) from https://www.facebook.com/groups/138359353403/posts/10160772427643404/: "Chevrolet Engine Colors: The Complete Guide When it comes to Chevrolet engines, most enthusiasts immediately think of the iconic Chevy Orange, but Chevrolet has used a surprising variety of engine colors throughout its history. These colors reflected the specific engine type, application, and era, and sometimes were even used to distinguish early production models. Here’s the definitive breakdown: 5. Red (1955–1957) • 1955–1957: Early V8 engines, such as the 265 and early 283s, were painted red. This distinguished them from inline-6 engines and emphasized the new V8 technology. 9. Chevrolet Orange (1958–1976) • 1958–1976: The iconic Chevy Orange debuted with the 283 and became synonymous with Chevrolet’s small-block and big-block V8 engines. This bright color symbolized performance and reliability and was used across engines like the 327, 350, 396, and 454."
-
For example, what proportions of Tamiya X-6 Orange, X-7 Red, and/or X-8 Lemon Yellow acrylic would be good?
-
How do you decide what type of paint to use?
chepp replied to Bill Anderson's topic in Model Building Questions and Answers
Sorry for the delayed response. I mostly use Tamiya X prefix acrylic paint and these Badger paints: Stynlrez primer (black, white, gray) -- The brand means it's made for styrene, vinyl and resin surfaces. Model Flex, Minitaire I also have a stash of long-out-of-production model railroad water-solubles such as Polly Scale. I use the water-soluble term to describe what probably are acrylics (but don't always have that description on the label) that can be thinned with water. Other generic names are water base and water cleanup. However, for Tamiya I use their X-20A for thinning. For Badger and others I use this home-brew thinner formula: 6 oz. distilled water, 4 oz. universal acrylic thinner, 0.75 oz. retarder and 2 drops of Kodak Photo-Flo. However, when I use up my current brew I'll probably use Vallejo Airbrush Thinner 71.161. For airbrush cleaning, I use tap water followed with Badger Spray-Thru Airbrush Cleaner. -
How do you decide what type of paint to use?
chepp replied to Bill Anderson's topic in Model Building Questions and Answers
Back to the original question, for paint in bottles (brushing and airbrushing) I've almost exclusively only purchased water-soluble ones in the past five+ years while continuing to use spray can (solvent based) but buying fewer spray cans than before. I still have some solvent-based bottle paints that I mostly use for brush painting but sometimes for airbrushing. I'm "using them up" as I transition to water-soluble ones. My reasoning for going to water-soluble ones is that I'm concerned about health issues that might result from the fumes of the solvents. For airbrushing either kind I wear a NIOSH filter-mask to protect against both the fumes and micro-particles. I tend to avoid the cheap craft paints unless it's a special color, such as pearl yellow. Instead, I usually buy Tamiya or Badger brands. -
Both the photo on the cover of the box and on the instruction sheet show a post sedan but the kit is clearly a hardtop.
-
Thanks! I don't have a sub so I bought a single copy -- $11! It's an entire issue of weathering techniques. The price is kind of steep but it was worth it to see step-by-step examples with explanatory text. For example, I'd heard of chipping fluid but I had no idea about what it was until seeing this.
-
Thanks again for the kind comments. However, I mistakenly jacked up the rear too much. Since it's a curbside model, a quick cut to my snap-in rear axle holder brought it down to still have a California rake but one that is much more traditional.
-
Vintage Kustom Car footage!
chepp replied to Joe Handley's topic in General Automotive Talk (Trucks and Cars)
Thanks for finding and posting this. That radical kustom '58 Ford must have been something to see driving in traffic! After 12:40 the video shows a fellow with revolvers doing some quick-draw shooting at cans -- who was he? -
Thanks, all, for the kind words. As always, I'm open to constructive criticism, too. Here's my build thread on a different forum: https://trakinscale.proboards.com/thread/20012/1961-pontiac-ventura-kustom .
-
Thanks! Well, just a vague idea for the Riv as a sectioned topless speedster with a short windscreen and tonneau covering most of the interior. I'm building a series of 1/25 rods and customs that could have been built in 1:1 from the late '50s to the mid '60s. The operative word is "could" because although I'm using traditional era-correct parts and mods I have the benefit of hindsight to look like I was predicting the future such as the big beak on this '61.
-
Thanks! Actually, they are chrome but they do look clear from some angles. Here's a video that shows the car, and interior, rotating that shows it better:
-
Here's a curbside kustom I've just finished. It started as a Moebius 1961 Pontiac Ventura hardtop. Bbbbb-but, a '61 doesn't have that roof. You're right. It's from a '63 Riviera. Paint is Tamiya Clear Green over metallic silver and areas of pearl white with various colors of fogging.
- 40 replies
-
- 14
-

-
Here's a military modeler's DIY: https://d6combat.com/diy-washes-contrast-paint/ I haven't tried it but it appears to be OK. I use Kodak Photo Flo (prevents water spots on water-rinsed photo film) for making "wet water" on diorama scenery* -- it performs the same function as dish detergent except that it doesn't have degreasing, fragrance, etc. ingredients. *It keeps thin water/glue solutions from beading up, it is not used to simulate water.
-
Taillight Quiz #4 - Finished
chepp replied to carsntrucks4you's topic in Real or Model? / Auto ID Quiz
PM'd -
I've just discovered this thread and have some other projects in the works. Something just "called" to me about a week ago, though, and I ordered the chopped/filled body and stock firewall from Drag City Castings. All I'm sure of is that it won't be a modern street rod with air suspension, billet nor rubber-band tires...and it won't be a rat rod, either.
-
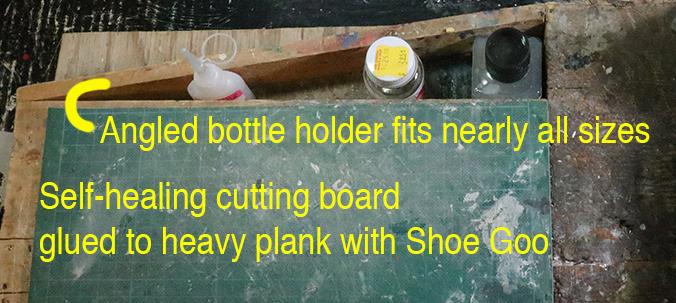
My middle name could be Butterfingers. So, I finally created this and it works fine because nearly any size of bottle fits.
-
Mine arrived yesterday via USPS in ZIP917XX near Los Angeles, CA. Looks good!
-
Could you re-post the photo links? Based on the comments this looks like something that I'd really like to see.
-
Cool! There are so many details to see in the photo link. I especially like "Big Daddy" stuffed into the Rotar. And who could't smile at seeing the overall diorama with a bubble top, of course. Thanks for building and showing this.
-
Bare metal foil small writing
chepp replied to Ctmodeler's topic in Model Building Questions and Answers
Thanks, all, for showing or describing the techniques and alternatives. -
A hobby collector website asked me to write about my experiences. Here are my four blog posts: Part 1 https://blog.hobbydb.com/2023/08/20/diecast-days-with-zee-toys-designer-charles-hepperle/ Part 2 https://blog.hobbydb.com/2023/08/27/diecast-zee-toys-designer-charles-hepperle/ Part 3 https://blog.hobbydb.com/2023/09/03/diecast-days-with-zee-toys-designer-charles-hepperle-part-iii-of-iv/ Part 4 https://blog.hobbydb.com/2023/09/10/diecast-days-with-zee-toys-designer-charles-hepperle-part-iv-of-iv/
- 1 reply
-
- 1
-