mrmike
-
Posts
5,324 -
Joined
-
Last visited
Content Type
Profiles
Forums
Events
Gallery
Everything posted by mrmike
-

Volkswagen T2 Bus
mrmike replied to mrmike's topic in WIP: Model Trucks: Pickups, Vans, SUVs, Light Commercial
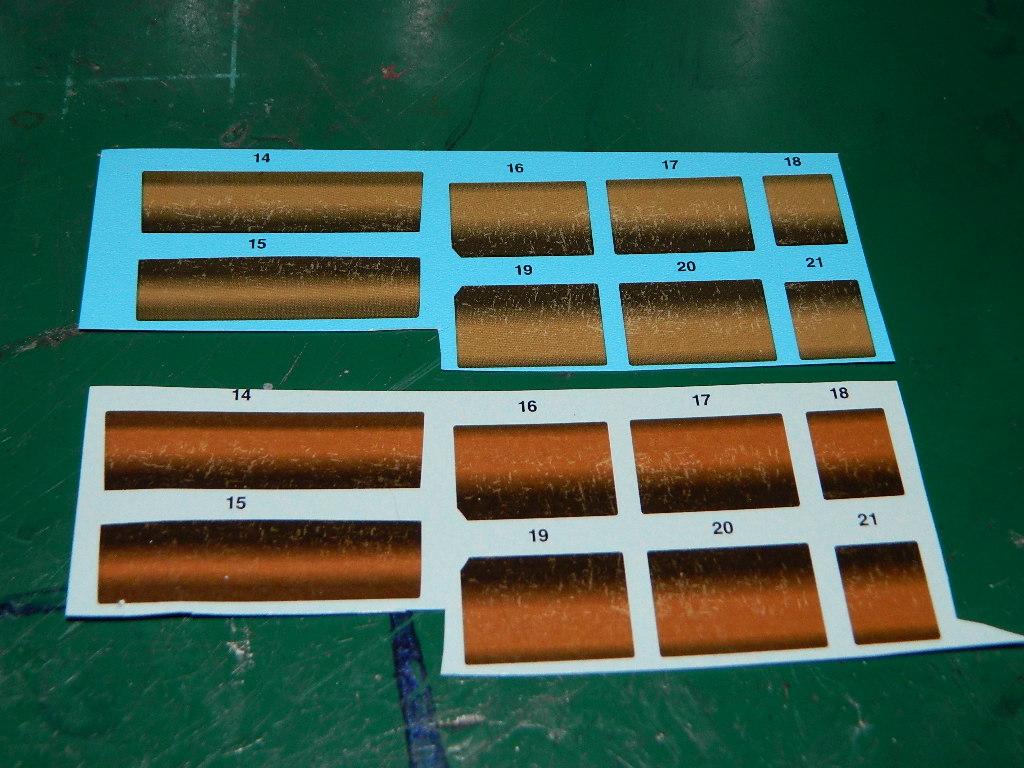
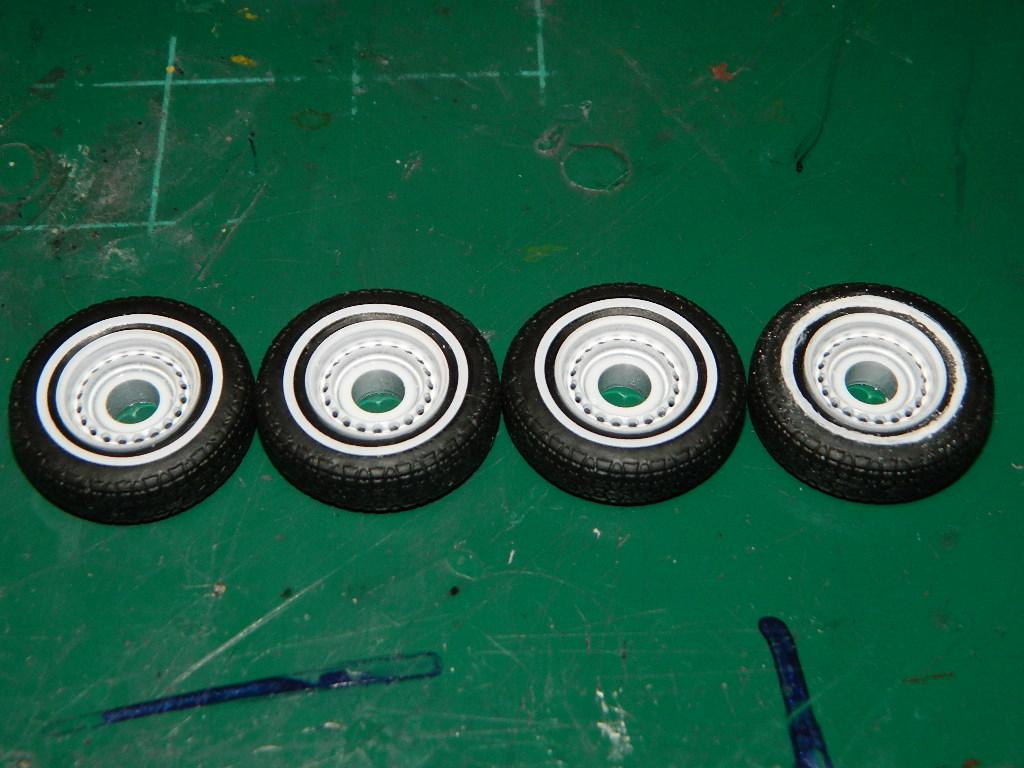
I got all the seats installed on the VW, but they do look somewhat plain. I dug into the parts box and I found these decals from two Revell '29 Model A Roadsters and I thought that they would look good on the seats. That was when I discovered the two different decal colorings. Time to rethink my process! I removed the decals from the tires since I found some new decals in my parts box. More Volkswagen to come...
-
Volkswagen T2 Bus
mrmike replied to mrmike's topic in WIP: Model Trucks: Pickups, Vans, SUVs, Light Commercial
The Camper version does not interest me like it would for others. -
Volkswagen T2 Bus
mrmike replied to mrmike's topic in WIP: Model Trucks: Pickups, Vans, SUVs, Light Commercial
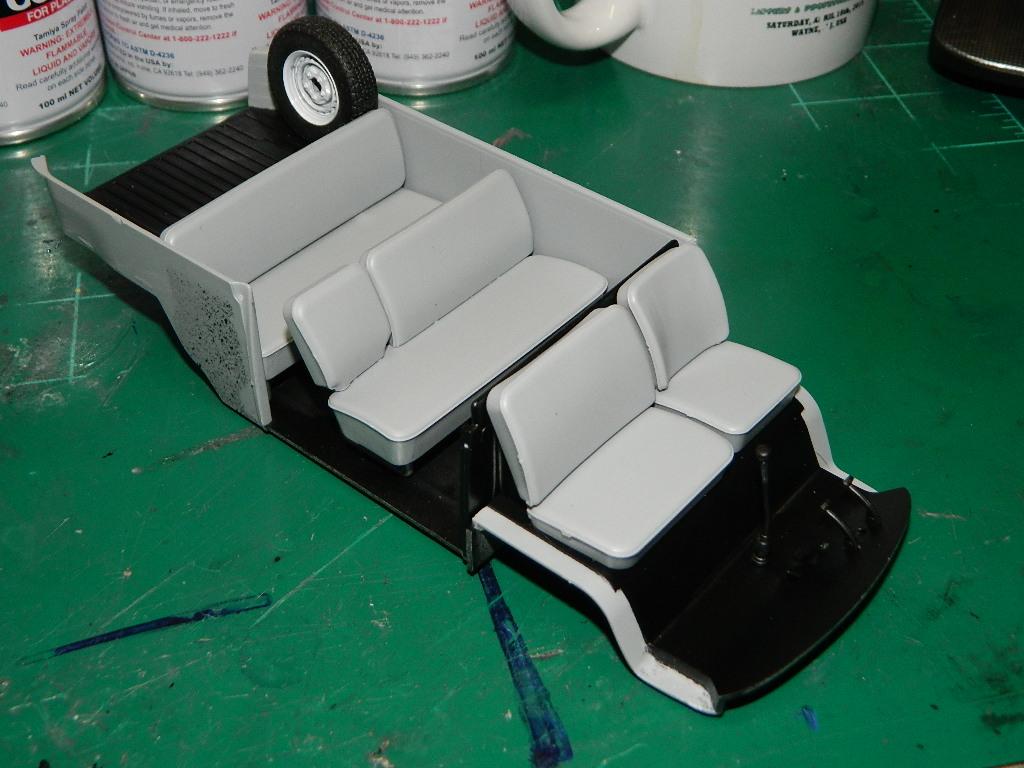
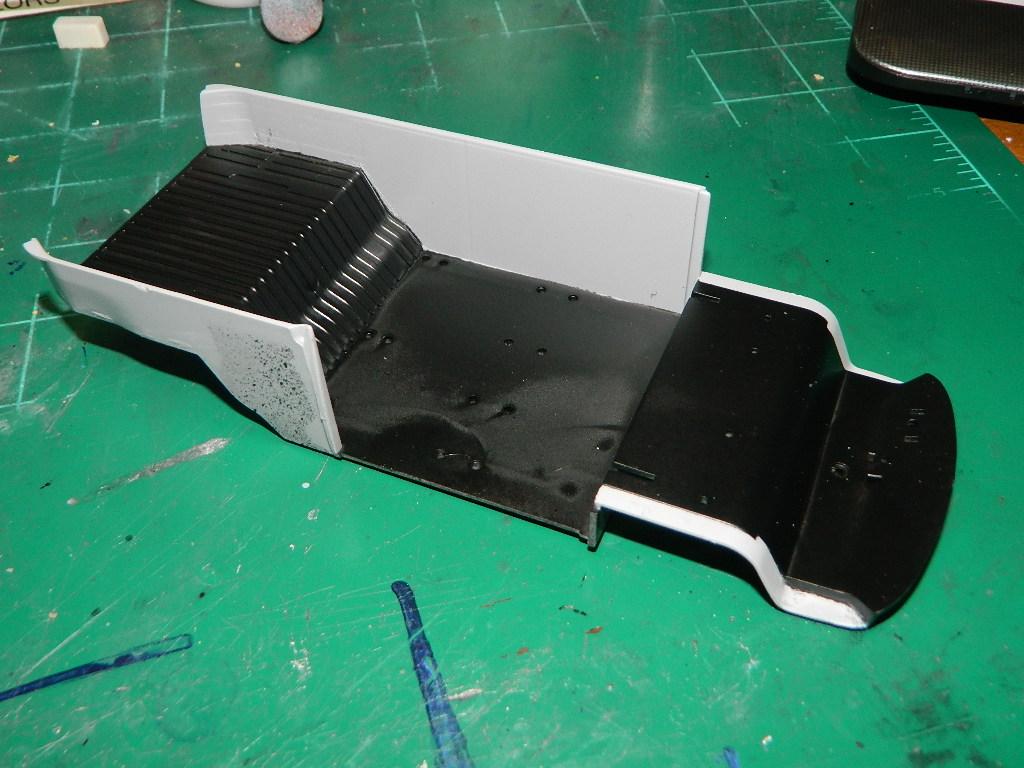
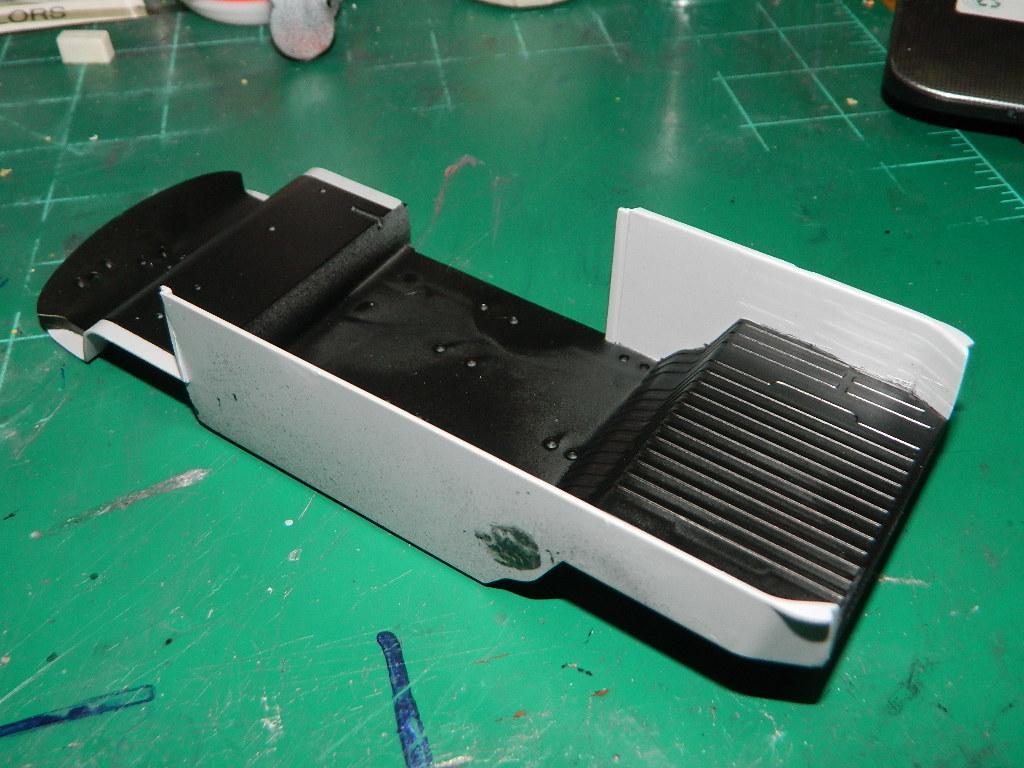
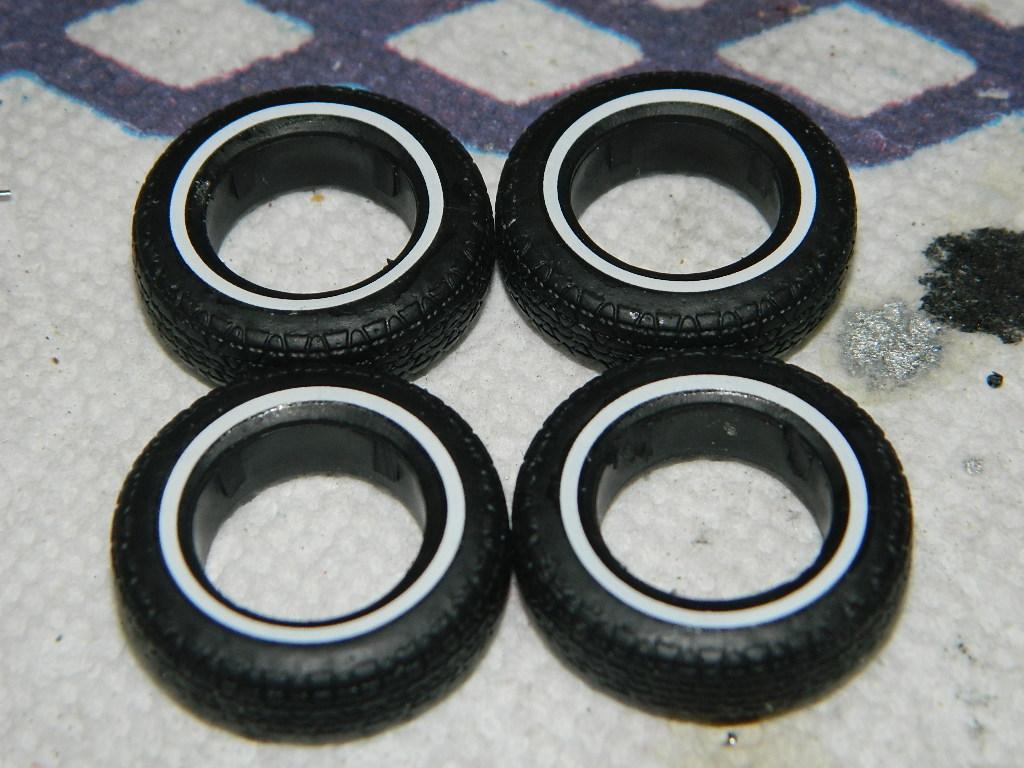
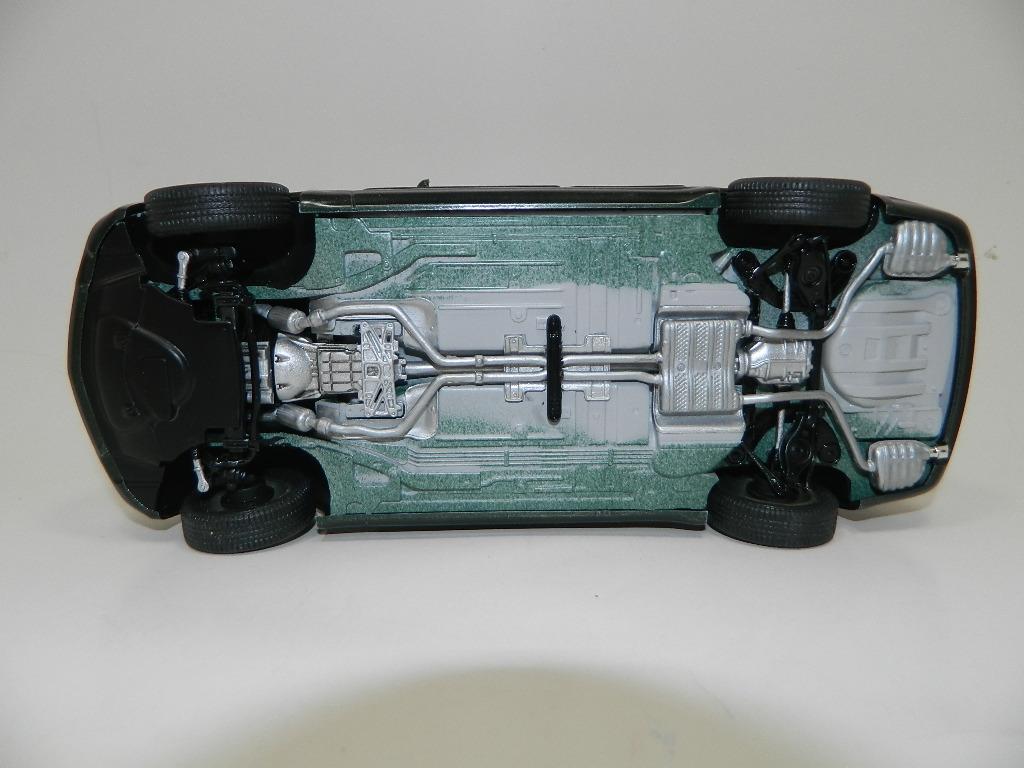
The interior is underway as we speak. All the seats are complete and I added the spare tire to the interior. The chassis is underway as well. I added a tool box to the drivers side of the engine compartment. The wheels and tires will need a coat of flat clear as one of the whitewall decals came off. I tried to replicate the whitewall with some flat white paint since my white Jelly Roll pen didn't want to work properly. More Volkswagen to come...
-
Thank you David!
-
Thank you Hector and Carl!
-
Volkswagen T2 Bus
mrmike replied to mrmike's topic in WIP: Model Trucks: Pickups, Vans, SUVs, Light Commercial
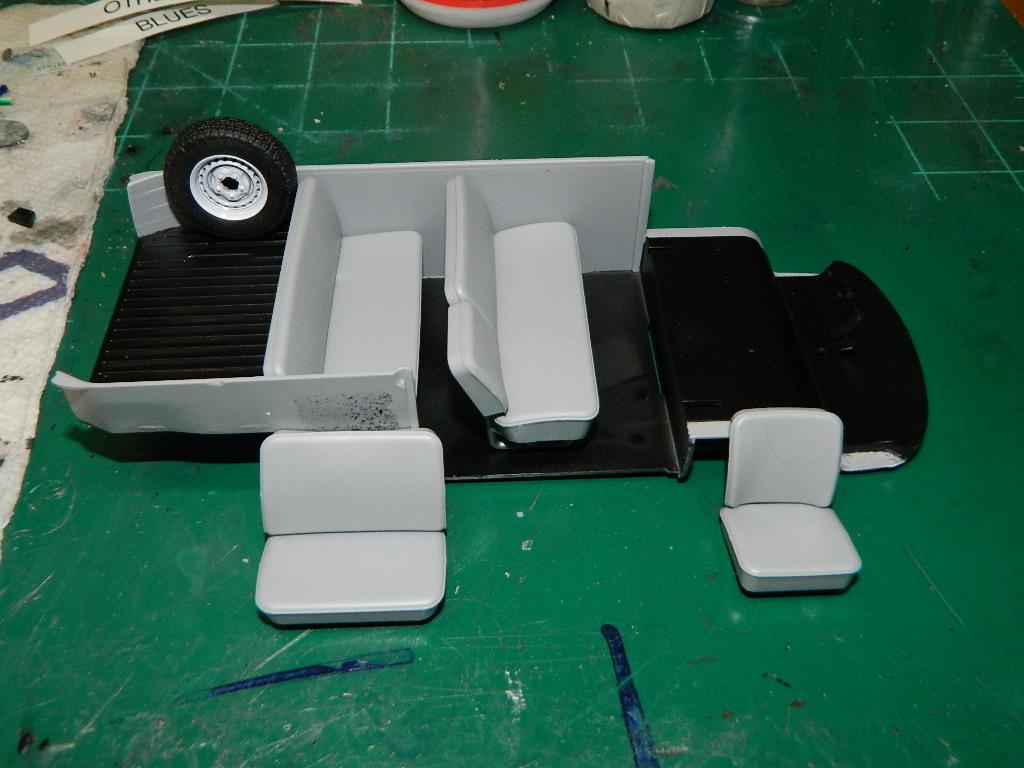
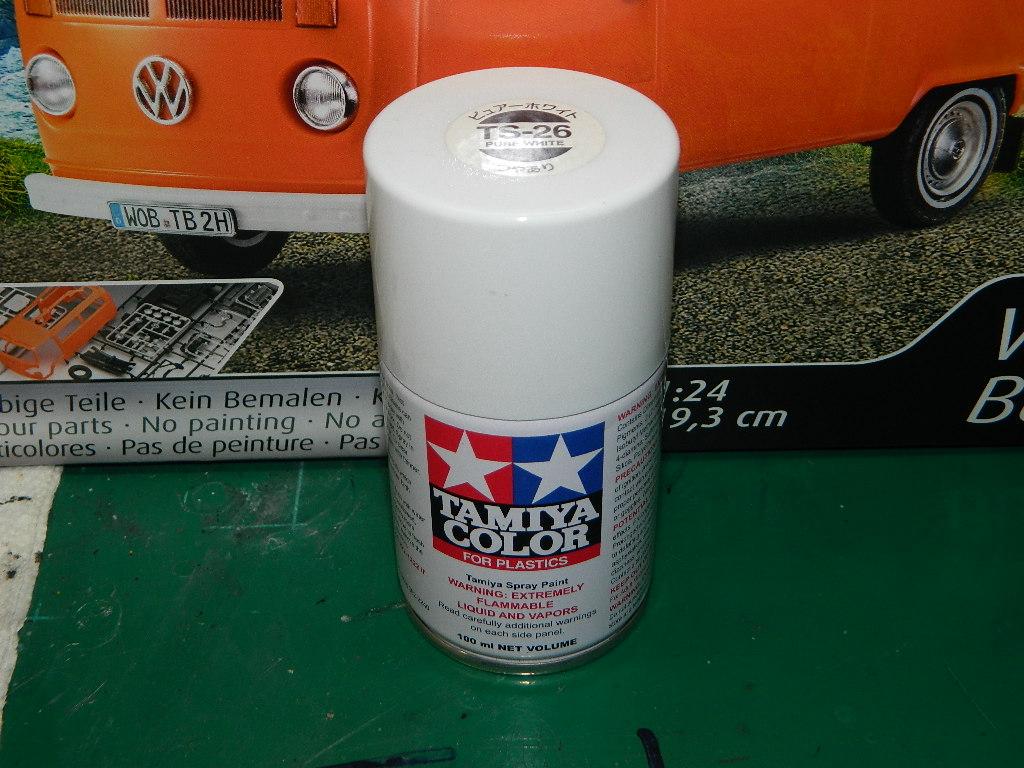
Some masking and the interior got a bit of Tamiya TS-29 Semi Gloss Black. I painted the wheels with Tamiya TS-26 Pure White. Now to add the tires. More Volkswagen to come...
-
Thank you James, David, Mario and Ron! The MPC Dodge Monaco had its roots in the TJ Hooker Police Car from the early 80s. There is more than just swapping the grille and rear bumper. The Plymouth Fury had a different interior compared to the Dodge Monaco. The Yodel Monaco/Fury kits shared everything, but the grille and bumpers to save money. It was primarily a motorized model.
-
Thank you Carl and David!
-
Volkswagen T2 Bus
mrmike replied to mrmike's topic in WIP: Model Trucks: Pickups, Vans, SUVs, Light Commercial
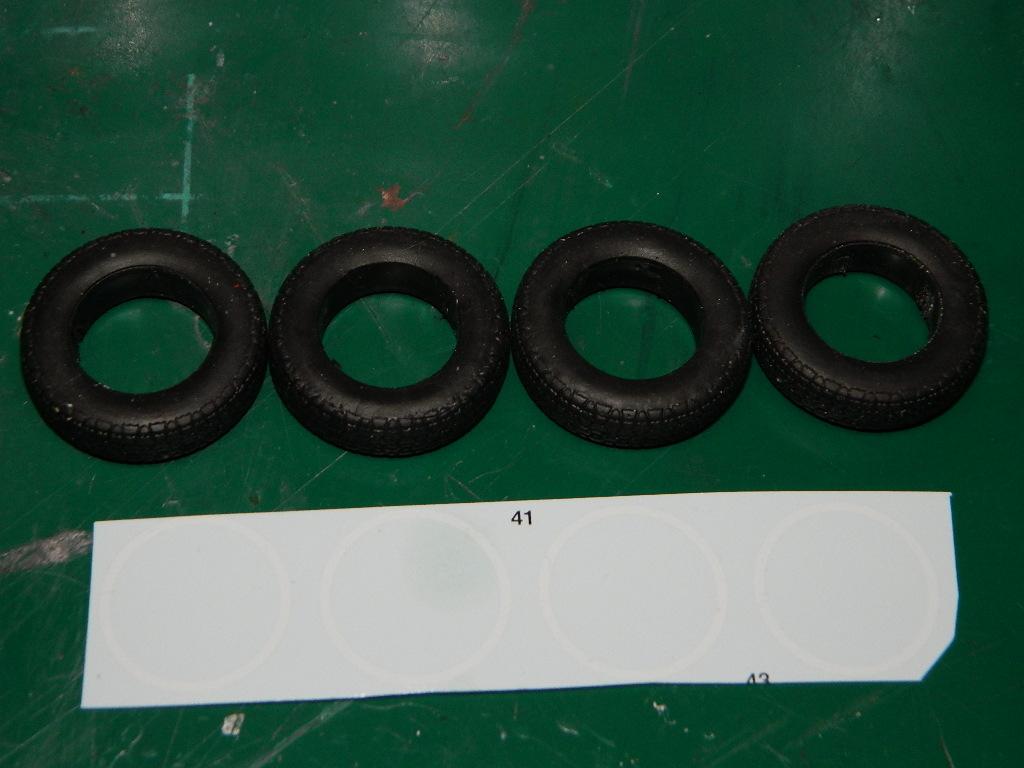
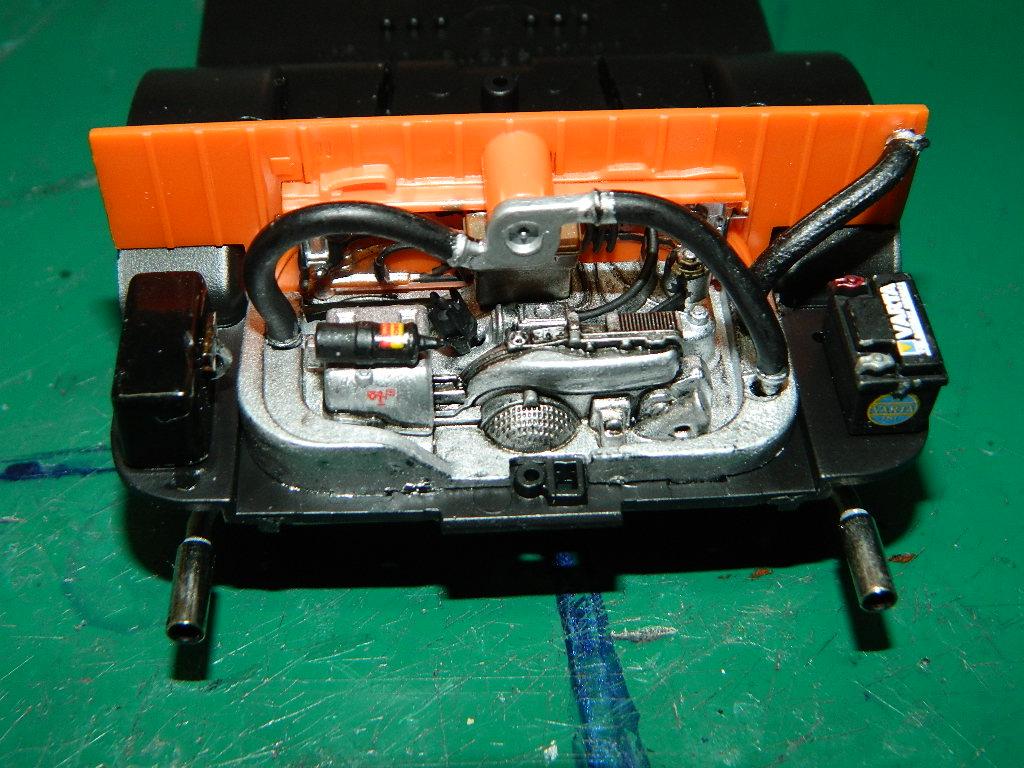
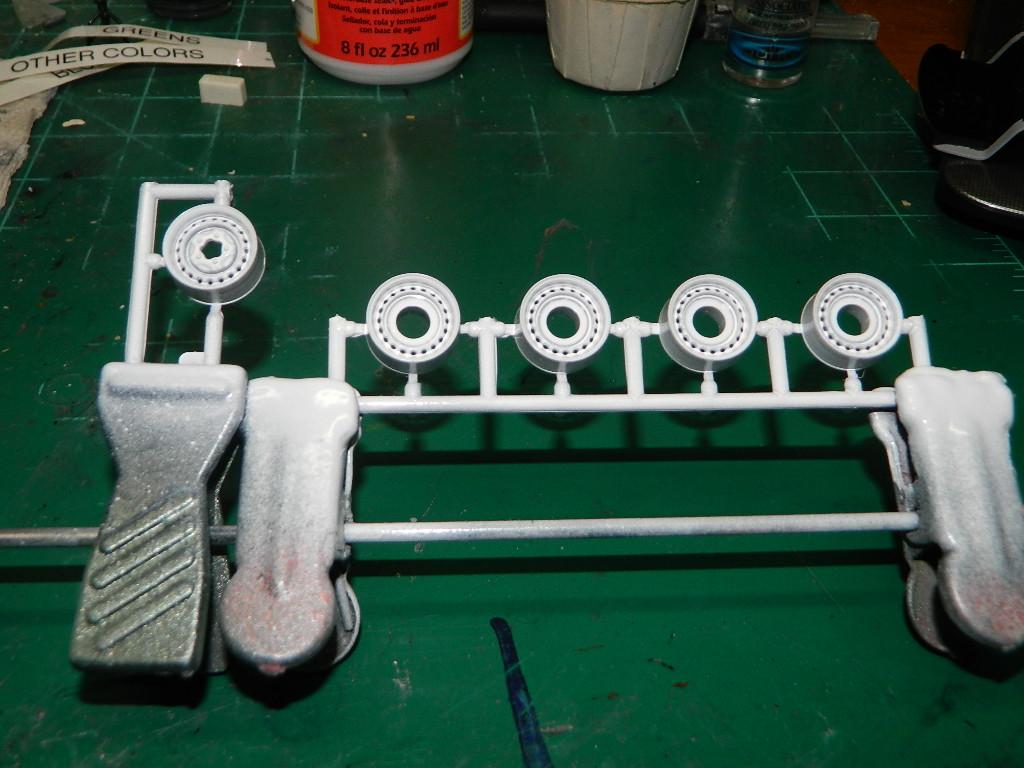
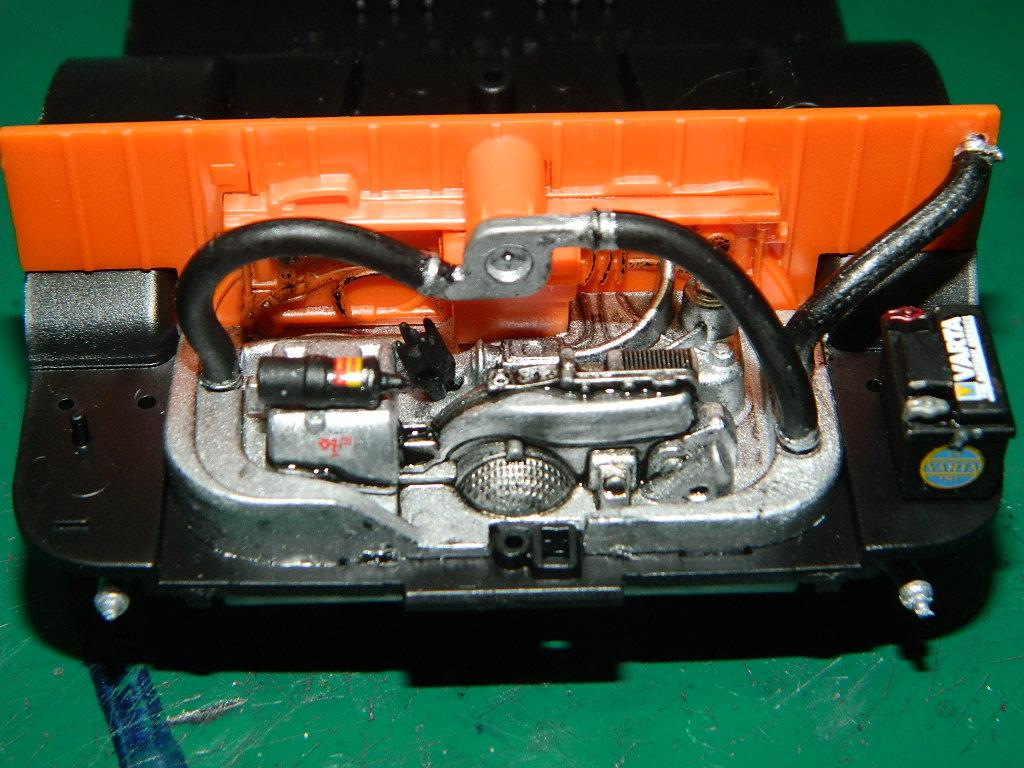
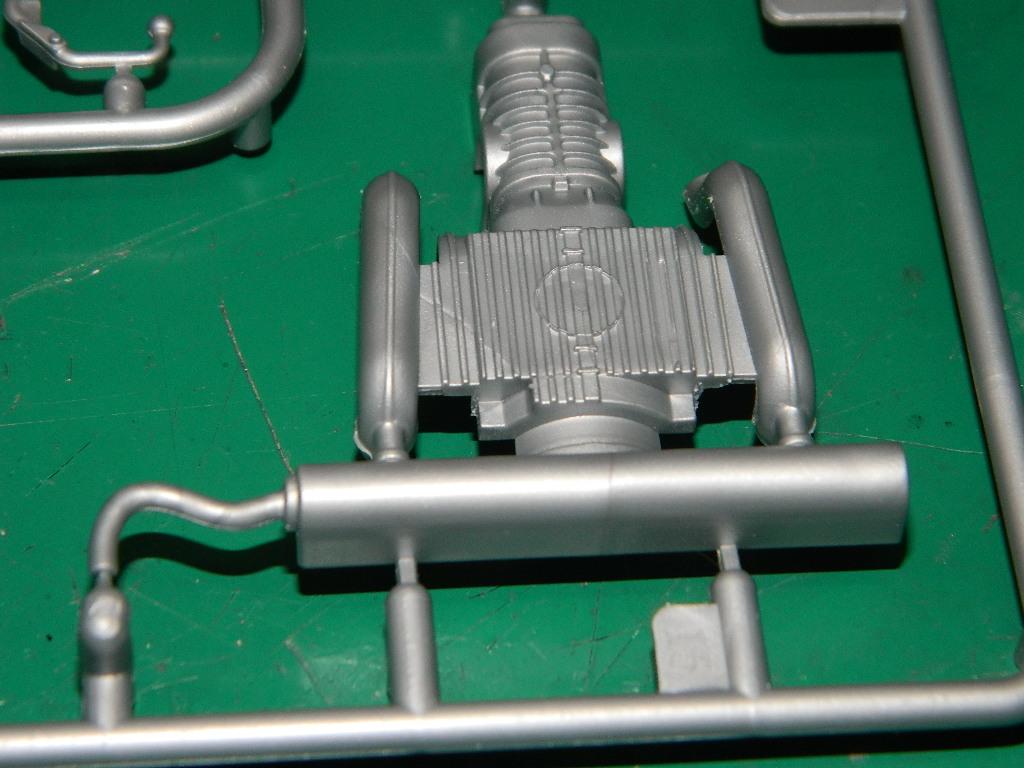
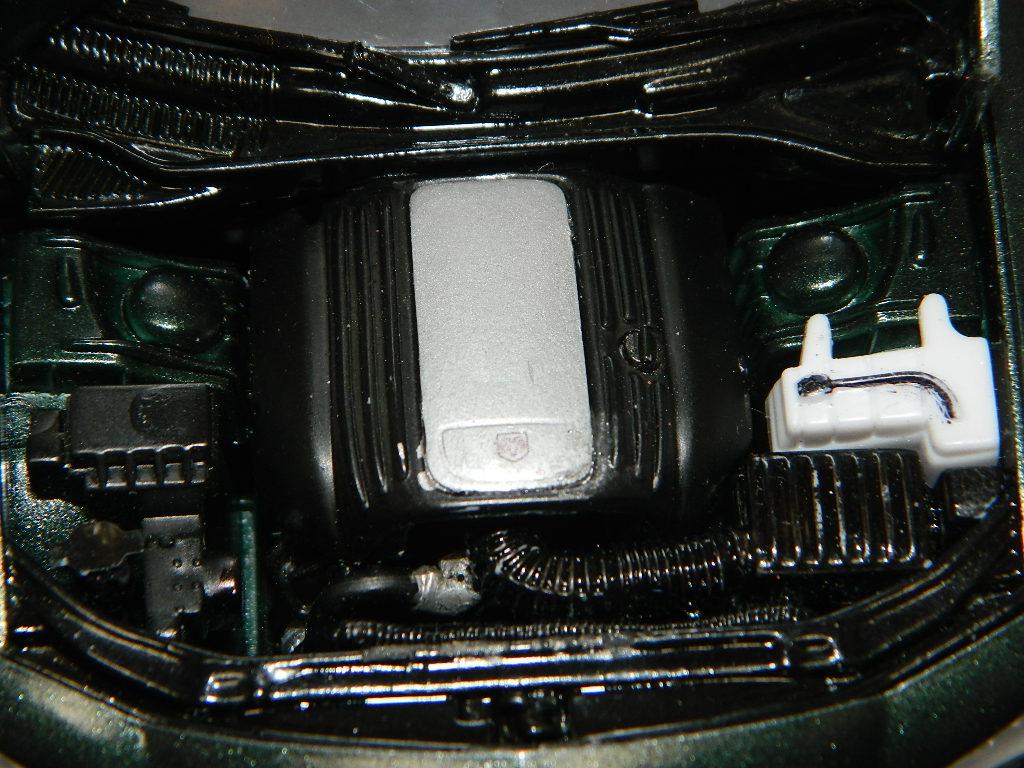
This VW T2 Bus is coming along smoothly! I added the whitewall decals and I tried to get them centered and round since there is nothing on the tire to line the decal up with. The engine has been painted, assembled, decaled and modified to a dual exhaust vehicle. The front and rear suspension have been painted and assembled. More VW T2 Bus to come...
-
Thank you Bill and Rusty! This was a fun build. and I finished it during a Club sponsered Build-A-Thon on Sunday. I foiled and polished and fitted a few remaining pieces during that time.
-
I have finished my Hunter's 1977 Dodge Monaco and it is posted in Under Glass. I would like to thank all those who have taken the time to view and to comment on my WIP.
-
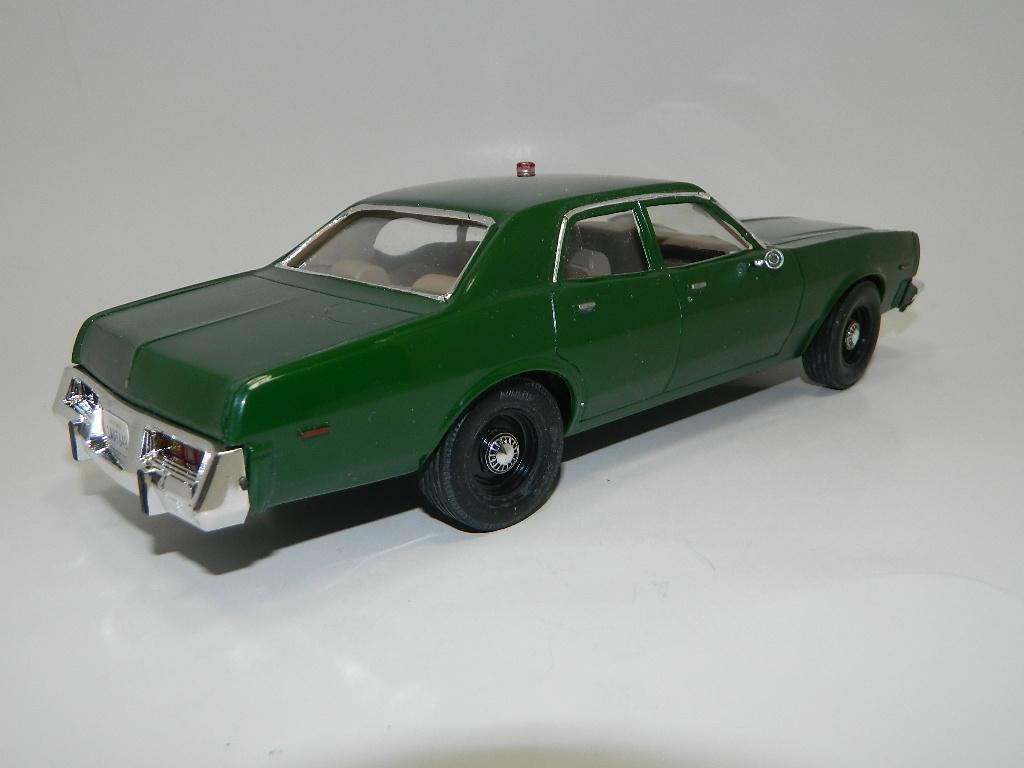
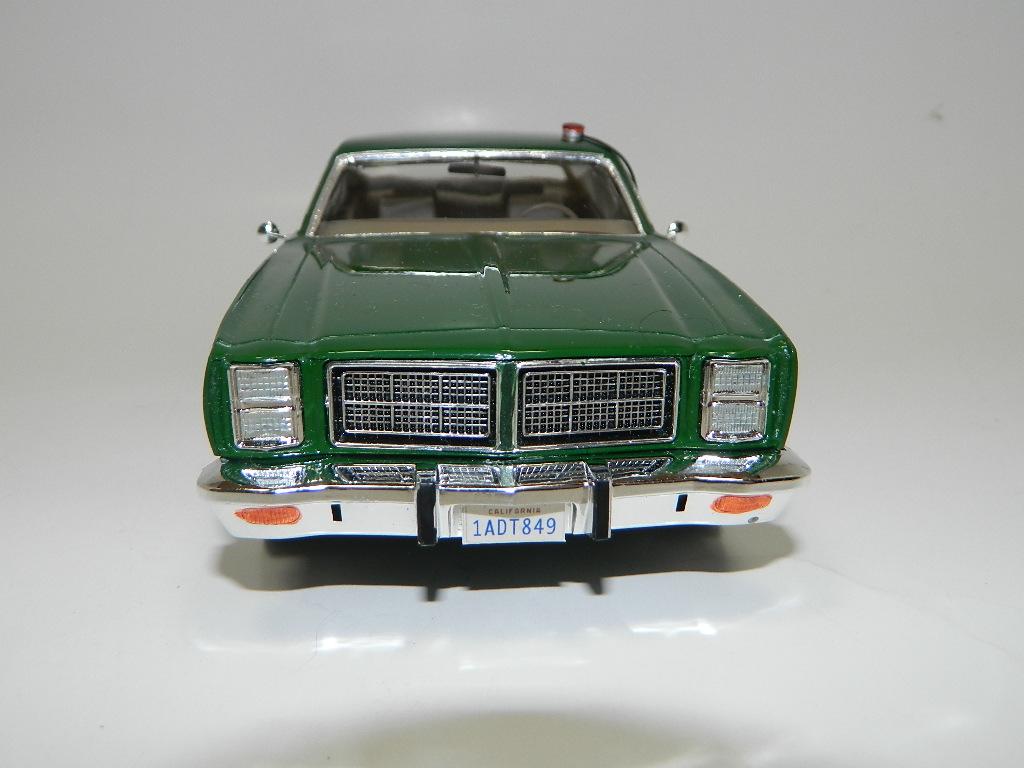
This is my Hunter's 1977 Dodge Monaco. It is painted with Tamiya TS-43 Racing Green with a Tamiya AS-15 Tan interior, a 2 way radio and an red emergency light. I would like to thank all those who have taken the time to view and to comment on my WIP.
-
Thank you Eric!
-
Volkswagen T2 Bus
mrmike replied to mrmike's topic in WIP: Model Trucks: Pickups, Vans, SUVs, Light Commercial
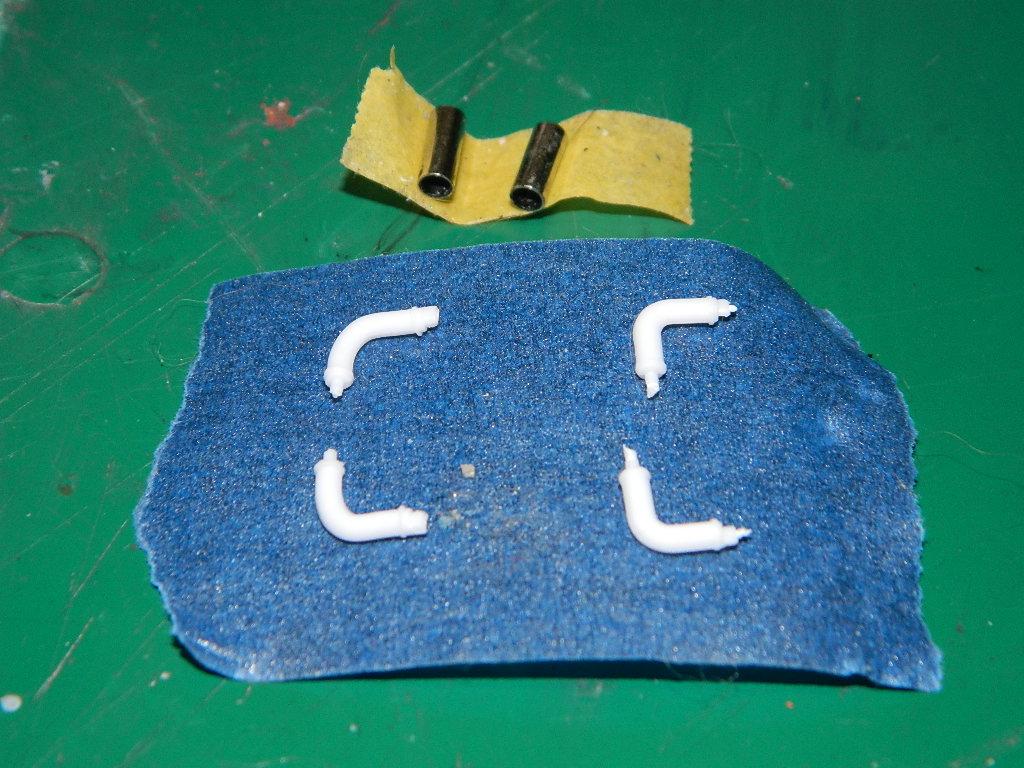
I saw a picture of a VW Bus with dual tailpipes and I just had to replicate them! I started thinking about the parts necessary and I found them in the Revell '29 Ford Model A Roadster kit. Out of the two kits I have, I found four (2 each) lower radiator hoses for exxhaust pipes and two metal exhaust tips from a 2006 Mustang GT that I did not use. More VW T2 Bus to come...
-
Thank you Tony, James and Larry!
-
Volkswagen T2 Bus
mrmike replied to mrmike's topic in WIP: Model Trucks: Pickups, Vans, SUVs, Light Commercial
Thanks Mike and Bob! I downloaded a bunch of pictures of my subject vehicle and look at them occasionally. I was looking at a VW T2 Bus that had dual tailpipes and I just had to have them! I looked at the parts in the box and I would be able to fit a set of pipes to the muffler for dual pipes! I love it when a plan comes together! -
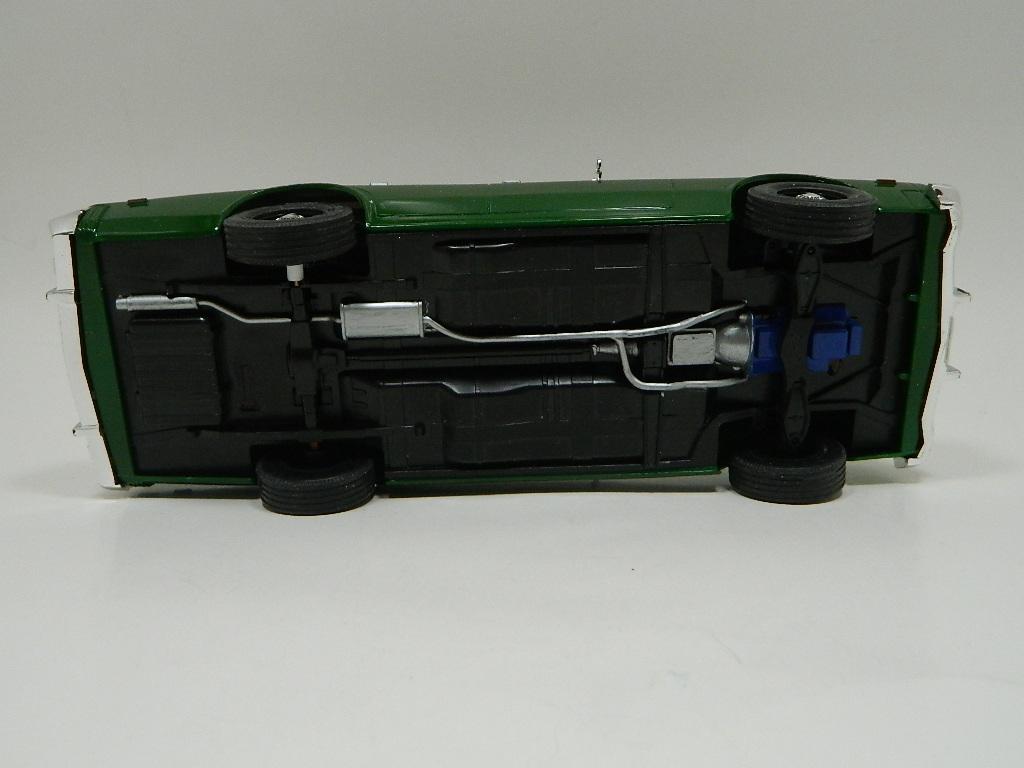
I kept looking at this model and wondering what I may have forgotten. I forgot to weather the chassis and I am no expert at that. The chassis was drybrushed with Tamiya XF-10 Flat Brown and the exhaust system was drybrushed with Tamiya X-23 Clear Blue and X-26 Clear Orange.
-
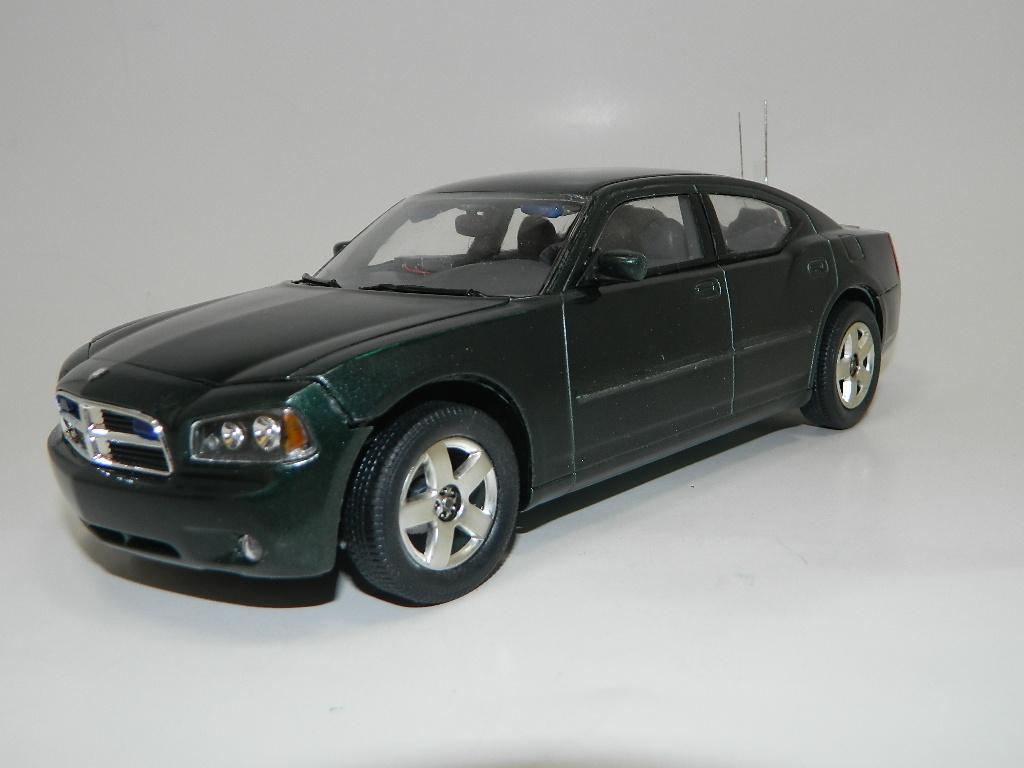
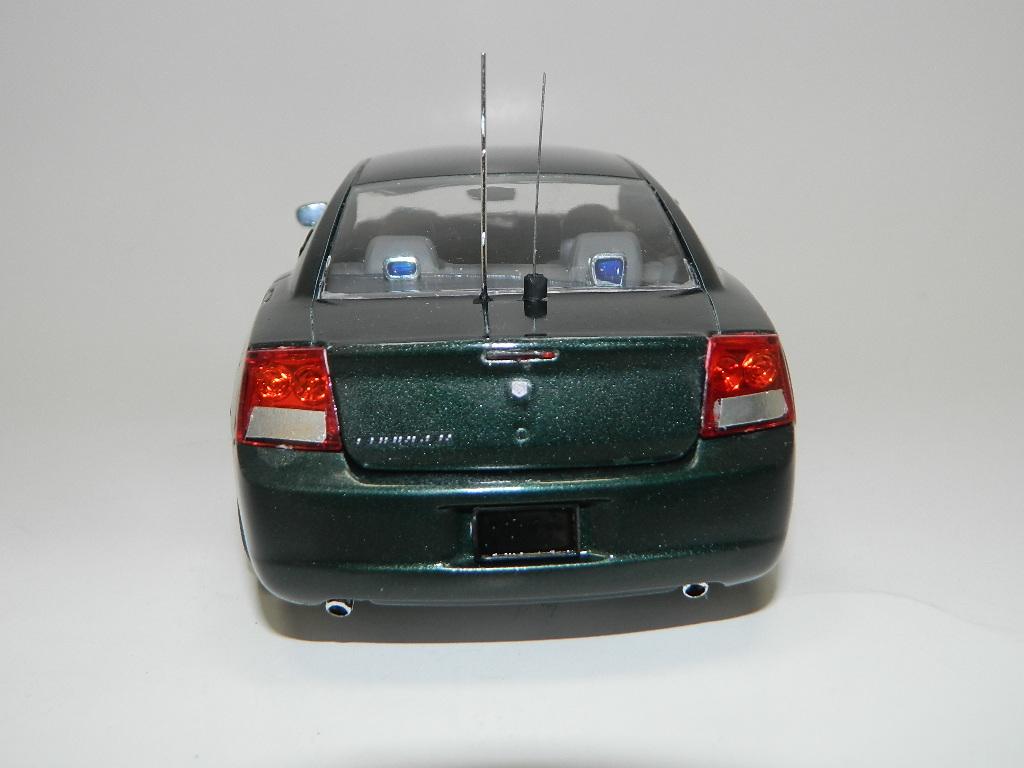
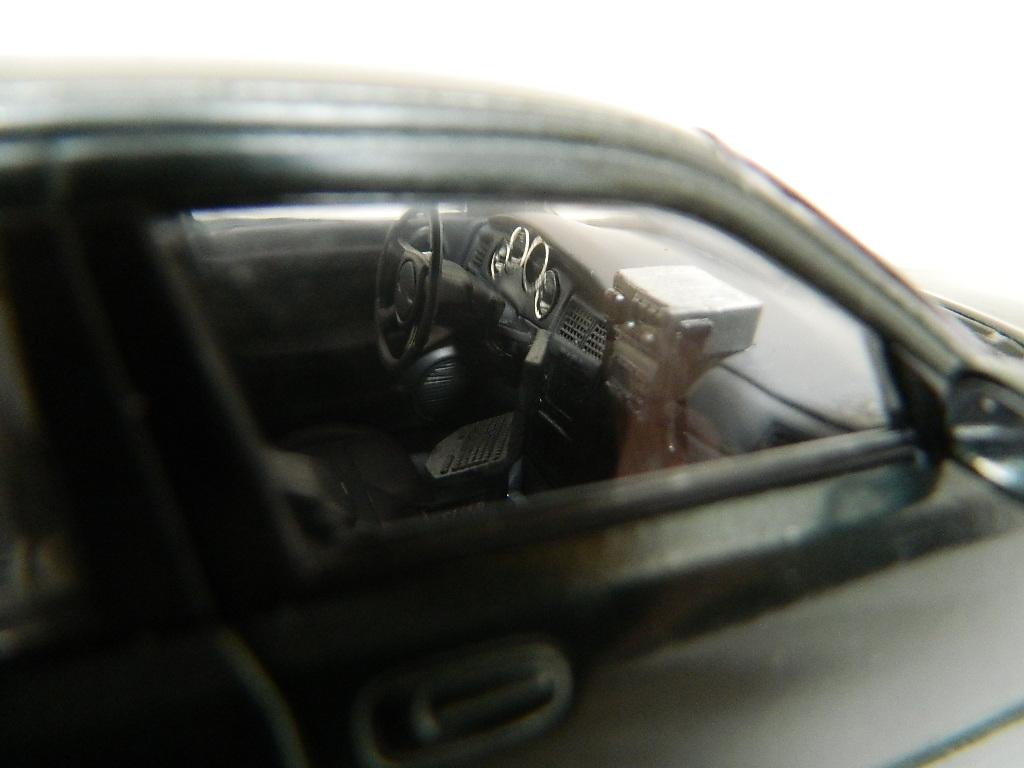
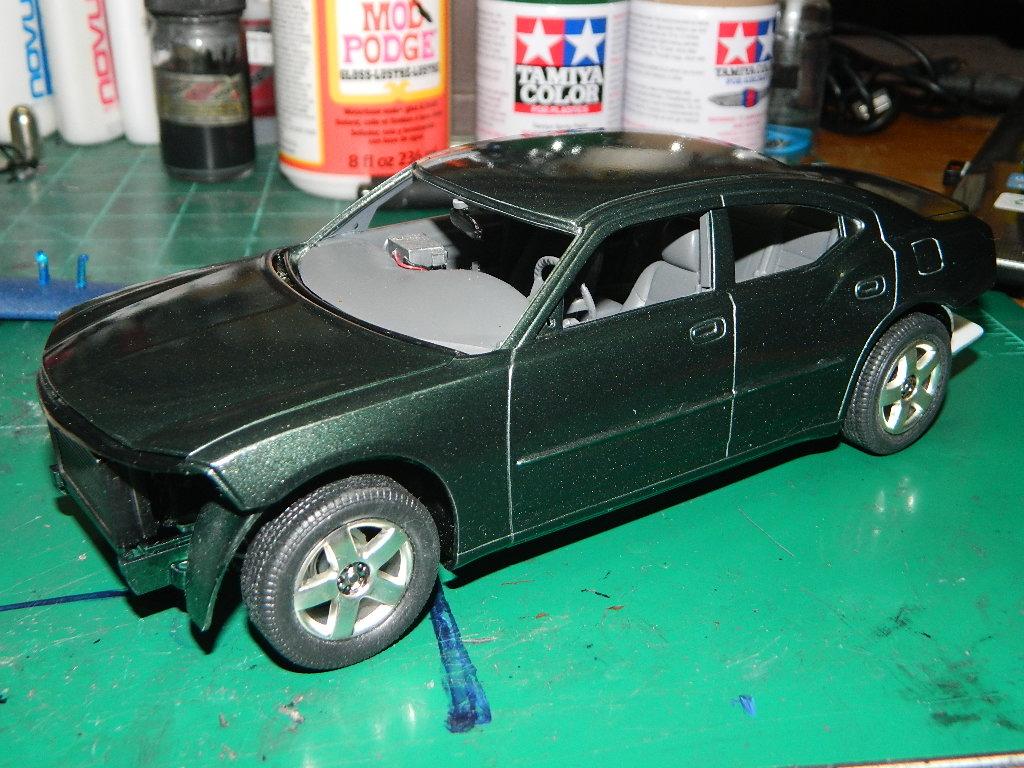
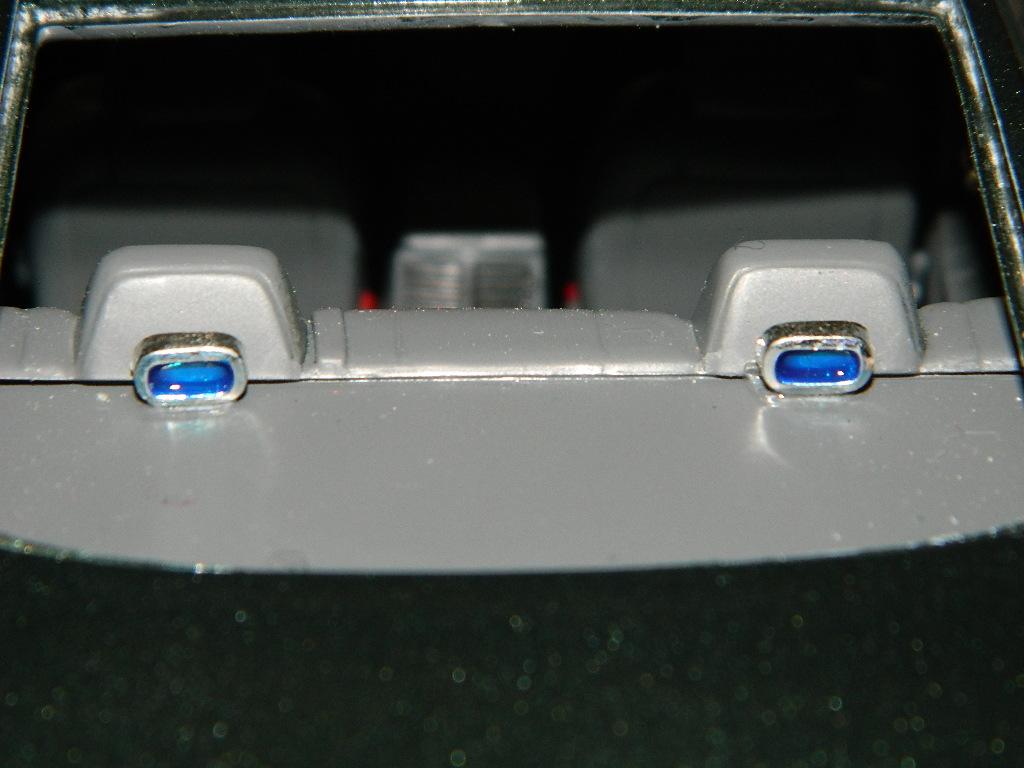
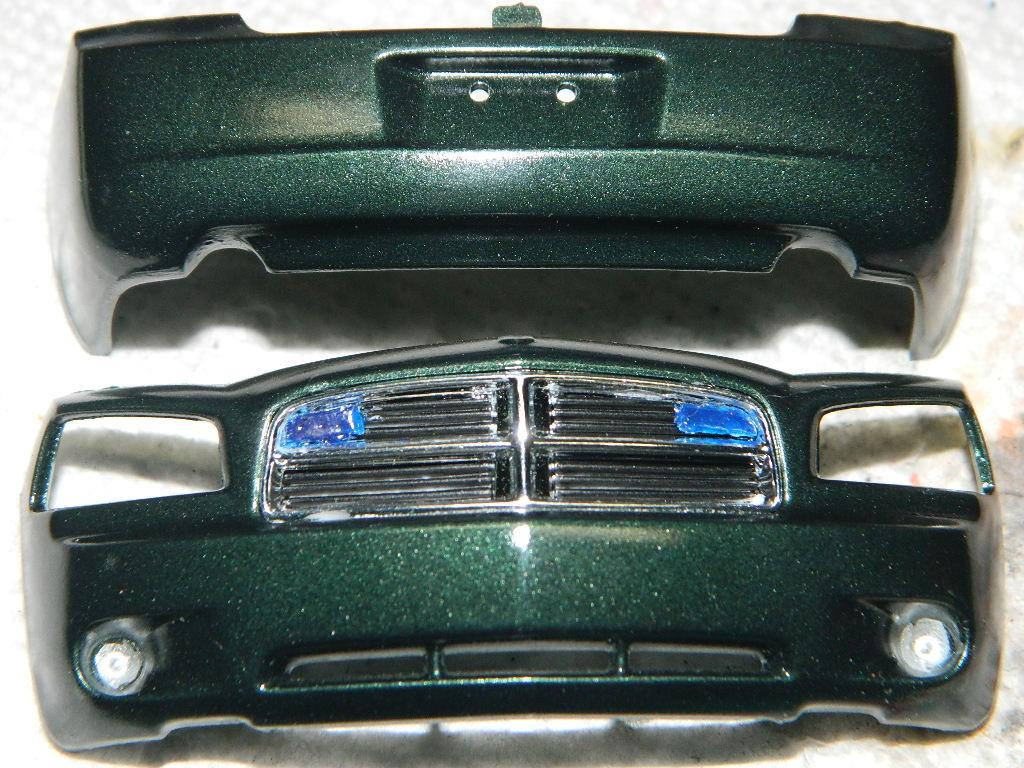
The Story Adam arrives home 20 minutes after leaving the crime scene and parks his car, back end in first, in the driveway. He walks into the house and he is greeted by his wife Natalie with a kiss and a hug. She pulls out a wrapped plate of food from the fridge, left over from dinner and places it in the microwave oven to heat up. His son, Thomas, is getting ready for bed and Adam says good night to him. Adam goes back downstairs to the kitchen and sits down at the table to eat and he is joined by Natalie and they talk about their respective days. His at Homicide and hers at the flower shop and at home. After eating dinner, he cleans up the kitchen and takes out the trash. He looks over the mail for bills and other correspondence and places them on his desk and he tosses the rest. He walks around the house making sure that the windows and doors are shut and locked and the lights have been turned off. He heads upstairs to bed where Natalie is reading a book and he then gets into his pajamas and crawls into bed. Tomorrow is another day. McNally Boston, PI will return… The Build I have finished my 2010 Dodge Charger R/T. My goal was to build this as a car taken from Patrol and given to the Detectives. It has mis-matched paint, mis-aligned body parts, a 2-way radio, a computer and dual trunk mounted antennas. The body hasn't been polished after the final coat of paint.
-
Volkswagen T2 Bus
mrmike replied to mrmike's topic in WIP: Model Trucks: Pickups, Vans, SUVs, Light Commercial
Thanks Mike! No mods on this one. Will be built box stock. If I build another, I may make some mods to it like lowering the suspension or maybe change the engine. -
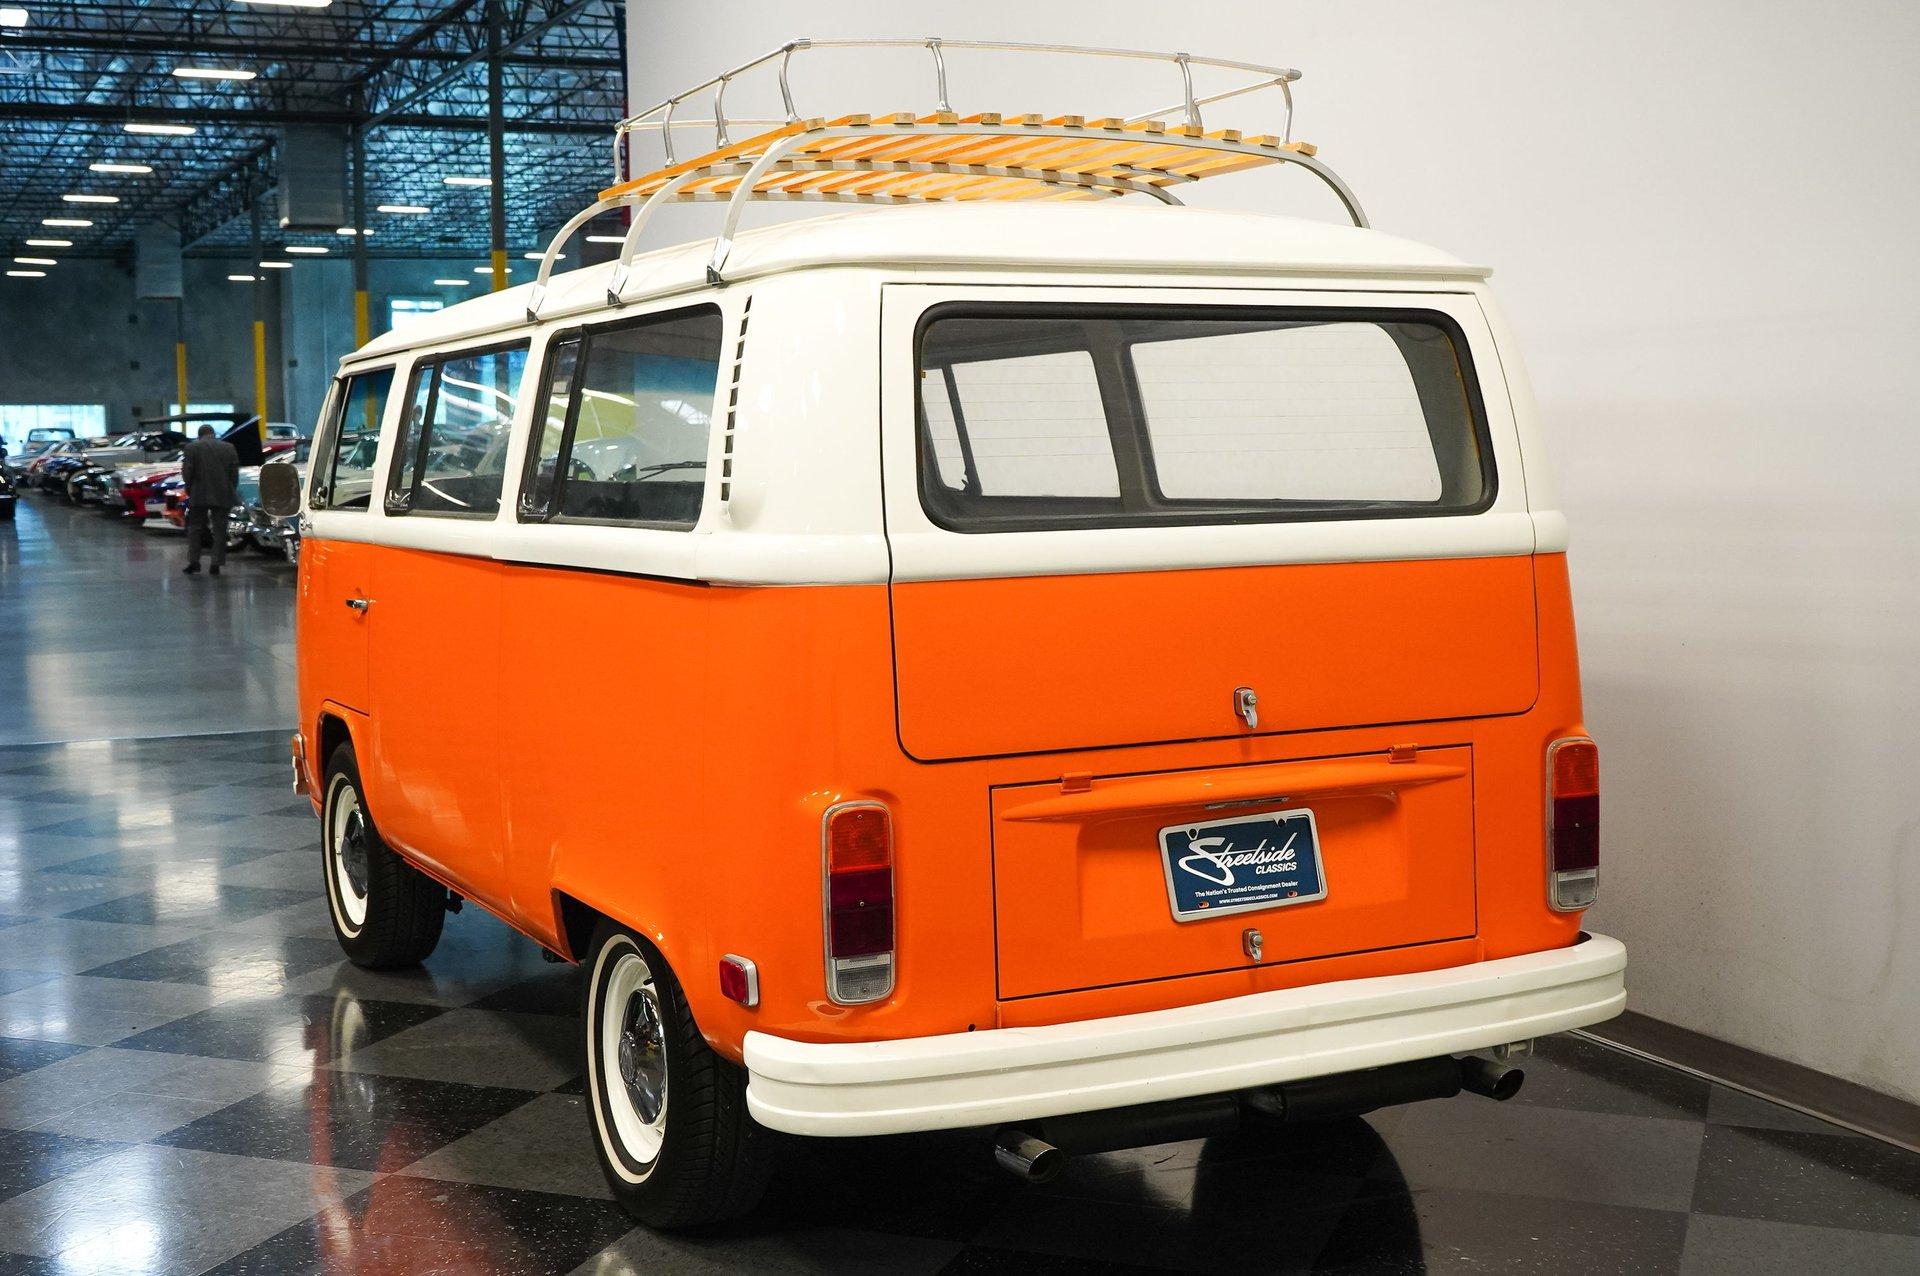
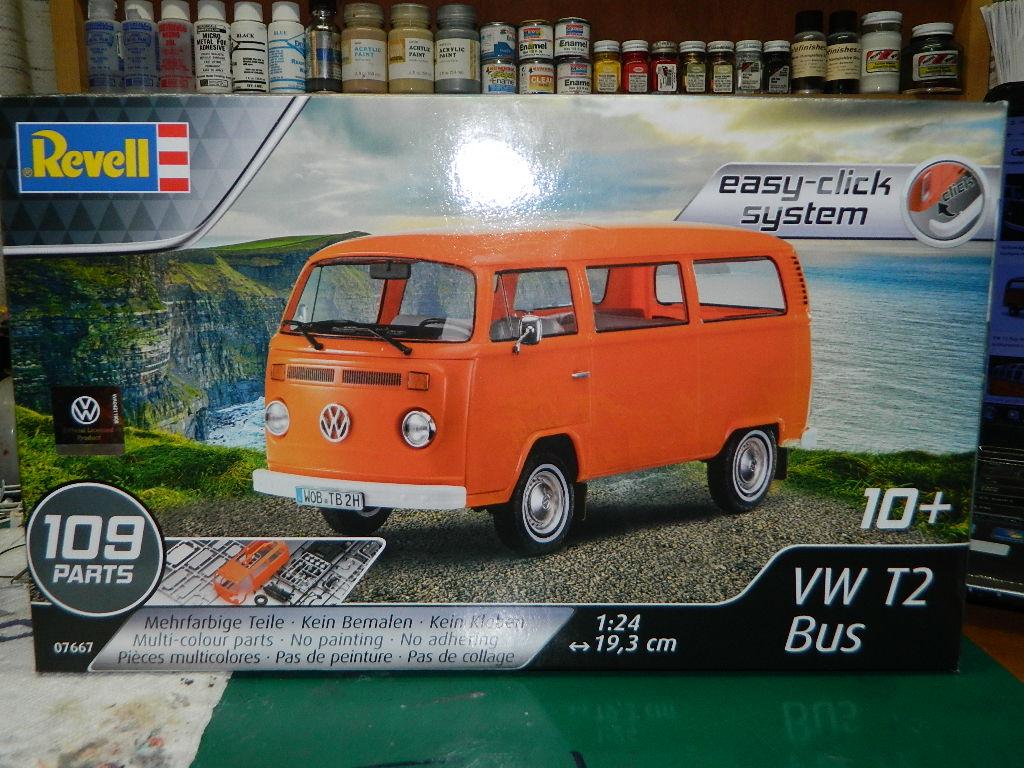
My new project is the Revell of Germany Volkswagen T2 Bus. This will have a two-tone Tamiya TS-26 Pure White paint over orange plastic scheme and Tamiya TS-13 Gloss Clearcoat. To be built box stock, maybe with a some ignition wiring and whitewall tires. This is an easy-click system model with 109 parts, so no glue is necessary. But, I may use some if needed. I was inspired by Tim Rhine, the Associate Treasurer of my Classic Plastic Model Club to get this kit and build it. I have already started masking the body for the two-tone paint scheme. More VW to come...
-
Thank you James! Those seats are from the Revell '30 Model A Coupe. They are not in the Revell '29 Model A Roadster
-
Thank you guys! This started out as a spare parts build and a member of my Model Club gave me the kit minus a few parts that he needed for a Club Build-Off. I used everything else and made this '29 Model A Roadster.
-
Thanks James! This was originally for a Christmas Build-Off elsewhere and we all ran out of time with unfinished projects. I'm trying to push this project along, but life keeps getting in the way!
-
The Story McNally had gotten the ‘Cuda running again and he spent a considerable amount of time during the afternoon trying to fine tune the engine by ear as best as he can. He parks the car in the garage and locks the garage doors. In the house, he starts his dinner by placing a TV dinner in the microwave and heating it. After he eats, he sits down in his easy chair and watches TV with a cold beer in his hand. While he is watching TV, the doorbell rings and he gets up to answer it. A large, well-dressed man is standing in the doorway. “Can I help you,” asks the Boston PI. The man says, “I’m Damian Rockler. Mr. Cannon would like a word with you.” “Sure,” replies the Boston PI. McNally walks out of the house and off the porch to a white Mercedes-Benz S-Class Limo parked at the curb. Mr. Rockler opens the door and McNally gets into the car. Inside the car is Alexander Cannon reading the Wall St. Journal and smoking a cigar. He puts the paper down and says, “McNally, Mr. Virden is no longer working for me. Mr. Rockler is my new assistant to call if you ever need anything from me.” “Ok, Mr. Cannon. Thank you for the update.” “Good night McNally.” “Good night sir.” McNally gets out of the Limo and Mr. Rockler gets into the car and the Limo drives away down the street. The Build The body and the chassis are now one. I have been adding emergency lights to the grille and on the rear package shelf behind the rear headrests. McNally will return...
-
My '29 Ford Model A Roadster Lowboy is complete and posted in Under Glass. I would like to thank everyone who has viewed and commented on my WIP.