
comp1839
-
Posts
2,003 -
Joined
-
Last visited
Content Type
Profiles
Forums
Events
Gallery
Everything posted by comp1839
-
1/16 Scale Army Vega Funny Car - Finished 10/14/2018
comp1839 replied to Mooneyzs's topic in WIP: Drag Racing Models
holy smokes, chris!!!!! your pump is incredible! remind me to give you reference shots more often. well done! i love your work area. all nice and organized and clean. i feel like a pig. thanks. hehe. -
Chip King's "Green Machine" Daytona Pro Mod
comp1839 replied to David Thibodeau's topic in WIP: Drag Racing Models
that is just the sweetness there, davey!!!!!!!! don't let this go to long before you finish it. i'm having a hard time standing up straight. hehe. -
WOW! those turbo's fit nicely in there joe. nice work. great engineering!!!!!!!
-
sounds like an incredible build don and rick. can't wait to see it progress. keep us informed on the details.
-
57 chevy pro mod w.i.p (updates 11/11/12)
comp1839 replied to tyrone's topic in WIP: Drag Racing Models
the straight on rear shot sends chills up my spine tyrone. i think you know why, hehe. the whole thing is coming together quite beautifully. just an outstanding effort!!!!!!! -
i have to agree with everyone........that is verrrrrrry nice.
-
whatever time and energy spent doing these headers was certainly worth it!! i know just how difficult this task was. you not only hand built each and every tube and the collectors but, you also chose the more diffucult path of doing the correct diameter tubing. no small feat by any means. looking at it has to bring a very large smile to your face, joe. excellent, excellent job!!!!!!!!!!!!!!!!!!!!
-
57 chevy pro mod w.i.p (updates 11/11/12)
comp1839 replied to tyrone's topic in WIP: Drag Racing Models
the fit on all of the parts is just aces tyrone. the chassis fits like a glove front to rear. excellent work. the 4 link and front are just nuts. super job. -
joe, you're welcome and those headers and collectors look great!!!!! did you go with 45's on the collectors? cause yours look WAY better than mine.
-
Chip King's "Green Machine" Daytona Pro Mod
comp1839 replied to David Thibodeau's topic in WIP: Drag Racing Models
i'm diggin' this big time davey!!! your builds are always super clean. wish i knew your secret. color choice really makes it pop. love the detailing so far!! this thing just has "attitude " written all over it. -
1/16th 69 Camaro ProMod 7/22/14 motor painted
comp1839 replied to Romell R's topic in WIP: Drag Racing Models
whether you guys know it or not. the cranks in these motors have hollow rod rournals and hollow mains. so the piece you modelled, romell, is actually quite accurate. -
1/16th 69 Camaro ProMod 7/22/14 motor painted
comp1839 replied to Romell R's topic in WIP: Drag Racing Models
lookin' awesome there romell. keep at it!!! -
they're right!.......size is everything! looks great joe. your efforts are paying off bg time!
-
the sweetness factor is exponential. engine detail is unreal.
-
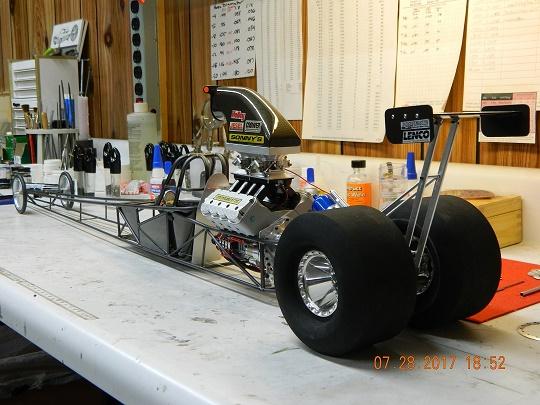
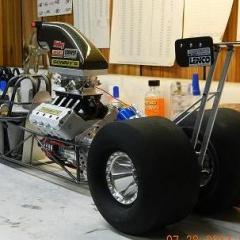
California Charger F.E.D. update
comp1839 replied to vintagedragfan's topic in WIP: Drag Racing Models
i beleive you just started something! that's totally cool!.......... "IncrediBill" .......i love it! absolutely meant with the utmost respect, bill. -
so much for the clay kemp weld conspiracy! clay what can anyone say but, WOW! again you set the standard by which others, will only copy. simlpy smokin' dude!
-
Is there a better way to bend plastic tubes?
comp1839 replied to Tony1200's topic in Tips, Tricks, and Tutorials
tubing is hollow, rod is solid. -
hey joe, this project always looks good to me. the motor plate is lookin' good. the intake plenum and the upper intake both look narrow to me. the runners are probably only 4-5 inches long. you should also be deciding on 1 or 2 injectors and if you use 2 injectors whether they (the injectors) will be mounted parallel or perpendicular to the runner center line. so scale your runner length and lower plenum accordingly. the upper looks narrow too. if your using 2 throttle bodies horizontally mounted (which i thought was your original plan). you might want to consider those into the total width before making your top.
-
California Charger F.E.D. update
comp1839 replied to vintagedragfan's topic in WIP: Drag Racing Models
looks incredible, bill! just incredible! -
2011 USAC NonWing Sprint Car
comp1839 replied to Old Sprinter's topic in WIP: Other Racing: Road Racing, Land Speed Racers
OMG!!! WOW!!! -
man, i might have to start 1/16,.... i'm tellin' ya. all of these cool parts would sure make my life easy. looks great scott!!!!!!
-
that's a great way for a "quickie" not important aligment jim. it's absolutely not the right way to align a rotary table to the spindle. not being negative here.
-
2011 USAC NonWing Sprint Car
comp1839 replied to Old Sprinter's topic in WIP: Other Racing: Road Racing, Land Speed Racers
just outstanding work, ken!!!!! these are just magnificent builds. super job,...please keep it up!!!!!!! -
1/16 Scale Army Vega Funny Car - Finished 10/14/2018
comp1839 replied to Mooneyzs's topic in WIP: Drag Racing Models
chris, something to think about. the hard injector lines are 3/16" diameter tubing in 1:1. that would be about .012" in 1:16 scale. here are some shots i took, of some injectors for you. perhaps they will help. i realize this particular motor has 2 injectors per cyl.. it is just to help visualize the size of the injector also, the last injector on each bank you have at a different (steeper ) angle. that would be something new to me. i'm not saying it's wrong. i'm saying that's something i don't think i've ever seen. hope this is helpful. -
1/16th 69 Camaro ProMod 7/22/14 motor painted
comp1839 replied to Romell R's topic in WIP: Drag Racing Models
rom, i'll help you out here. henry, the scoop is correct. that's how big they are when they are built. you must cut the scoop down to the level at which it needs to be as far as the builder is concerned. the scoop is not designed to fit the just camaro. please note the size of the "real" scoop before it is on the camaro and then look at the scoop after it is on the "finished" camaro. here is the real "unmodified" scoop. again please note the overall height of the scoop from the flange on the bottom to the top. it is quite tall! here is the scoop after it has been installed on the "finished" camaro. again note the "reduction" in overall height. that is because it's been "cut"! robert, yes the bodies are a rough texture. they are almost sandpaper like. that is the way they come. it is a result of the printing process in the w.s.f. material. there is a tutorial on the T.D.R. site explaining the procedure you should follow to prep the body for paint. are they a pain to sand? yes!! w.s.f. is a very tough material. you most likely will not sand it smooth. it will require a combination of sanding and a build up of filler primer to smoothout.