Luis Ayala
-
Posts
373 -
Joined
-
Last visited
Content Type
Profiles
Forums
Events
Gallery
Everything posted by Luis Ayala
-
Just a small update on the progress. At the beginning of the build I wanted to get it low with just a few minor adjustments to the suspension, using a small set of custom rims but after a few mock ups I decided to follow the advice of my good friend “Mad Slammer” and use the wheels and tires you see below. (Courtesy of Mad Slammer Parts Box) I have a few other options that can bring it low to the ground but the wheels are too small and don’t look right. I am really happy with the stance and the look so now I will move on to painting when the weather gets better. You can also see some assembly on the engine, getting it ready for a few plumbing & wiring details. Hope you like it and thanks for looking.

-
Hi Yuri, Amazing job sir, beautiful color, definitely a museum quality masterpiece!!!
-
1953 Chevrolet Bel Air. Something to do during the holliday.
Luis Ayala replied to Lovefordgalaxie's topic in Model Cars
Spectacular build sir!!! Thanks for sharing!!! -
Hi Mark, Bringing it back to life after 15 years is just fantastic!!! I am sure it will look spectacular when done!!
-
Beautiful work as always Bro !!! The paint looks miles deep...
-
Hi Steve, Absolutely stunning work sir!!!! Cant wait to see more progress!!!
-
2013 60th Anniversary Corvette 427 Convertible
Luis Ayala replied to ismaelg's topic in WIP: Model Cars
Hi Ismael !!!! Awesome work on the interiors my friend !!! The instrument cluster looks fantastic!!!! -
Alfa Romeo Tipo B P3 (1937)
Luis Ayala replied to BSteinIPMS's topic in WIP: Other Racing: Road Racing, Land Speed Racers
WOW !!! Amazing build Bob!!! Thanks for sharing. -
1965 Ford Falcon Ranchero (Trumpeter 1:25)
Luis Ayala replied to artecar24's topic in WIP: Model Cars
Cool !!! Gracias Angel !!! -
1965 Ford Falcon Ranchero (Trumpeter 1:25)
Luis Ayala replied to artecar24's topic in WIP: Model Cars
Fantistic Job Angel !!! The details on the engine, the dashboard and the roof liner look fantastic!!!! May I ask what material you used foe the floor mats? Excelente trabajo!!! Se ve espectacular!!! -
Thanks Bro!! I will call you if I need additional "accesories"... Cuidate Hermano !!!
-
Hi Jeff, The brake rotors came with a Fujimi wheel & tire set I bought a few years ago at a local hobby shop. I don’t remember the kit set part number but if I remember well those kits had the same brake pats tree. The one in the link below is not available but you can use it for reference. http://www.1999.co.jp/eng/10000938
-
Hi Skip !!! Thank you very much for your comments, I really appreciate your advice !!! I have done the best I can to make the kit look nice and I am really happy with the results. I was working on the engine wiring yesterday so hopefully I will add more progress later this week.
-
Hi James !!! Fantastic job so far sir !!! Can't wait to see the color !!!
-
Hi Jeff !!! Looks really cool !!!! Love those white wall tires, perfect match. Thanks for sharing.
-
Coney Island Cruiser - 5 Window T - Storm Jonas Weekend Build!
Luis Ayala replied to OldNYJim's topic in WIP: Model Cars
Hi James, Excellent job so far,rust looks great !!! Hope the weather gets better soon. Thanks for sharing!!! -
Thanks Paul!!! I really appreciate it. Since I am building a custom version, the color I picked is “Teal Envy” a $0.99 nail lacquer from “Kleancolor”. If you are looking for a factory look, up to 1941 it was dark green, but Dupli-Color DE1617 on spray can is an acceptable shade. Hope this helps!!!
-
Thanks Bill !!!!
-
Hi David!!! Great to hear that you will use the arm rest on your next big car build, this is what the hobby is all about to share ideas.
-
Thank you all for your comments !!! I will post more progress son!!!
-
Hi Ismael!!! I am glad you like the work so far!!! Did yoy mentioned "Blue"????
-
1959 Chevy Impala----Just a tease! 4/9/16
Luis Ayala replied to MrObsessive's topic in WIP: Model Cars
Hi Bill !!! It would be great to have you back here again buddy!!! I heard the news on the snow storm comming this weekend impacting Baltimore, Philadelphia and other larger cities, so hope all is well for you there. Family is good, I will email you some pics later. Things are tuff but we work it out a day at a time... I will keep in touch!!! Take care my Friend!!!! -
1940 Ford standard coupe with AMT parts
Luis Ayala replied to junkyardjeff's topic in WIP: Model Cars
Great Job so far Jeff!!! Thanks for sharing !!! -
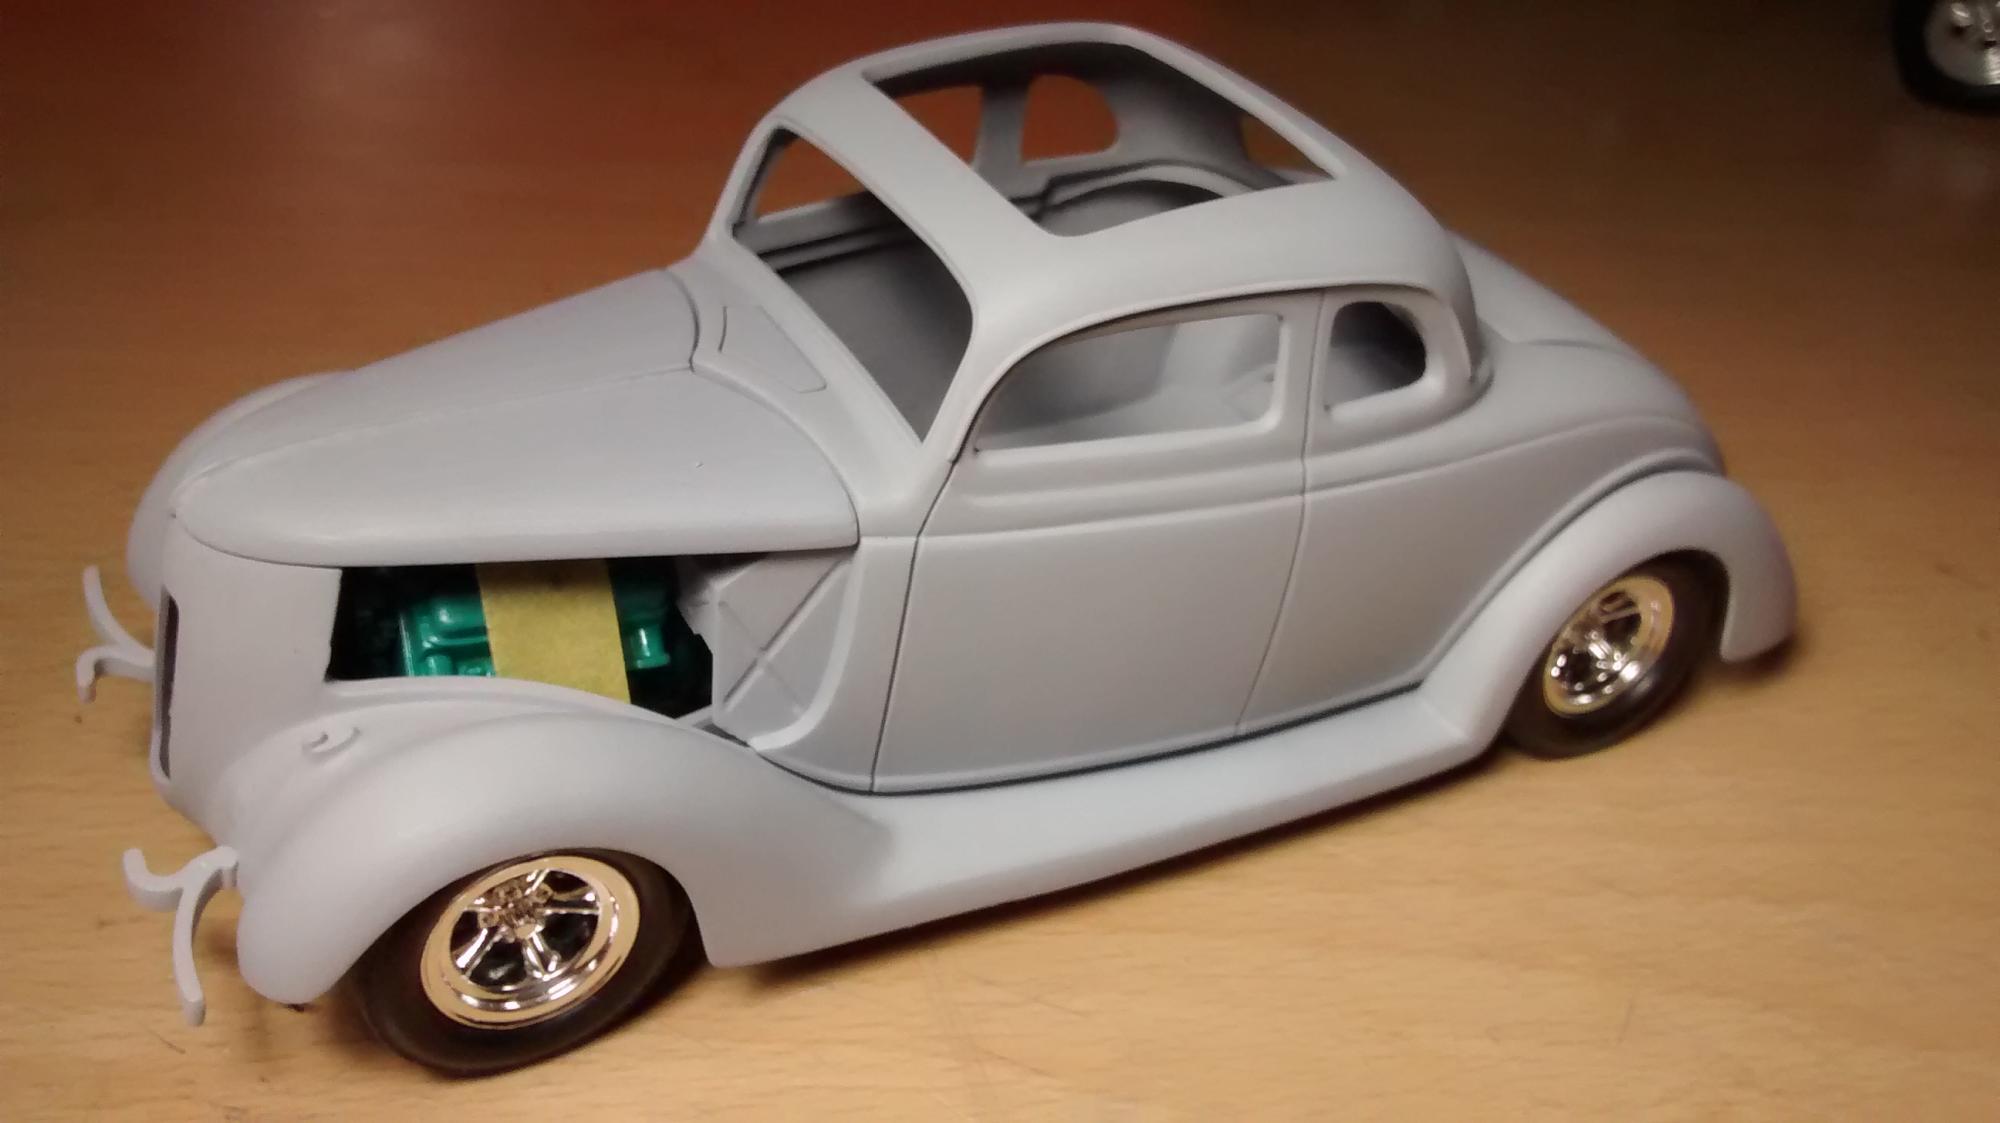
Hello Everyone and Happy New Year!!!! Long time after the last update so here’s a small one… Just finished getting primer over all parts: Now is time to install the brakes, still need some adjustments but pretty much close to the final position. A quick black wash to sharpen the rotor details, still need some additional cleanup but look much better…I will paint the Calipers later when the final assembly is closer. Since this paint is very thin, it will reveal any sanding scratches, so I took some time to double check, fix them, applied a few more primer coats to the body and sand it down to 800 grit. After all these years I just got infected again with the “started too many projects syndrome” so that’s one of the reasons it took me so long to post again. I will post my new projects as soon as I get this one painted. Hope you like it and thanks for looking!!!
-
2013 60th Anniversary Corvette 427 Convertible
Luis Ayala replied to ismaelg's topic in WIP: Model Cars
Hi Ismael, Ahhh... beautiful paint job my friend, great to see color after all that hard work... Thanks for sharing !!!