Luis Ayala
-
Posts
373 -
Joined
-
Last visited
Content Type
Profiles
Forums
Events
Gallery
Everything posted by Luis Ayala
-
Hi Ismael !!! Great work buddy!!! Excellent job on those exhaust tail pipes. I wonder ...mmm... a corvette...blue paint... sounds familiar... don't you think...
-
1959 Chevy Impala----Just a tease! 4/9/16
Luis Ayala replied to MrObsessive's topic in WIP: Model Cars
Hi Bill !!!! Like always your work is just amazing!!! Thanks for sharing and Happy New year!!! -
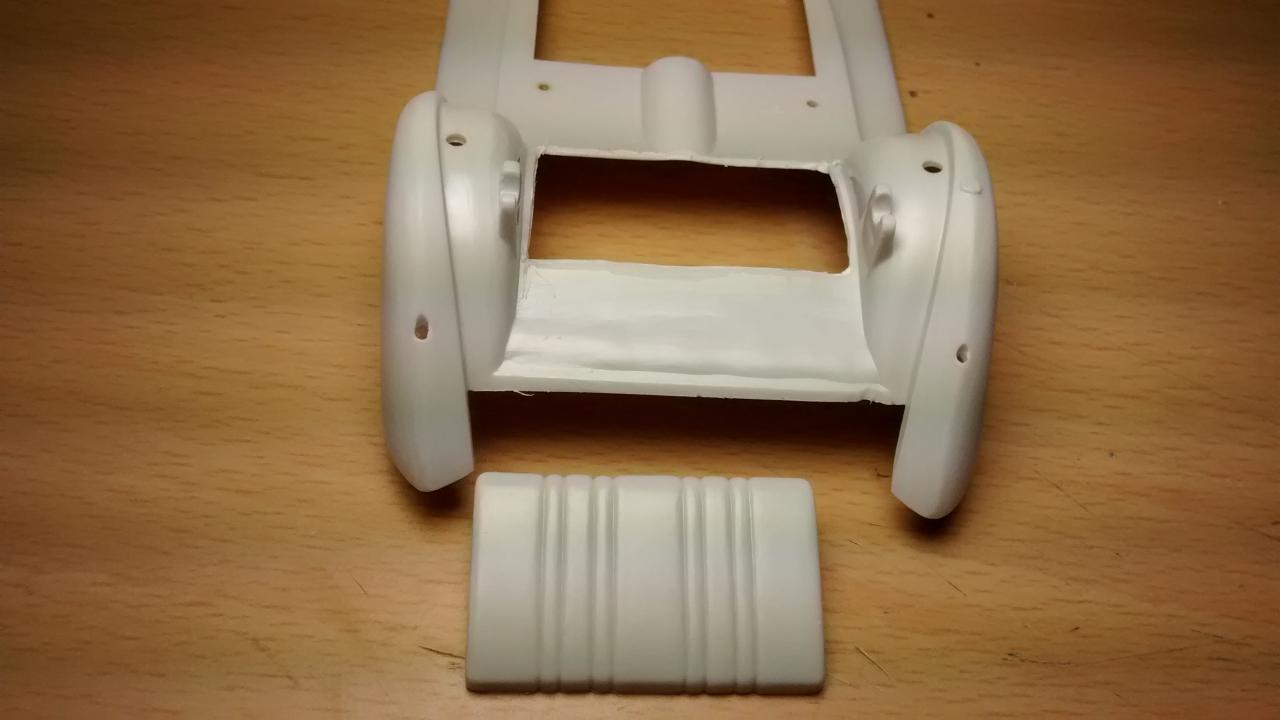
Time for a small update!!! The console is almost finish, I made the holes for the refreshments and added an additional piece of styrene to make it look also like an arm rest. I just need to fix some minor details and it will be ready for primer. I added some extra styrene to the under body to cover the exposed tail under the rumble seat and make it look more realistic. Below you can see the difference on the before and after pics. I am working on the interior panels for the doors and rumble seat so soon I will post more progress. Hope you like it and thanks for looking!!! Hi Skip!!! Thank you for your comments, I am glad that you like the work so far!!! For the Stance, the look I am looking is closer to what you see in the mock up pics. When the right rims are in it will sit just a little bit higher. For the interiors I am still working on the upholstery panels so hopefully I will post more progress soon.

-
Thank you all for your comments!!! I will finish the interior details and post more progress soon!!
-
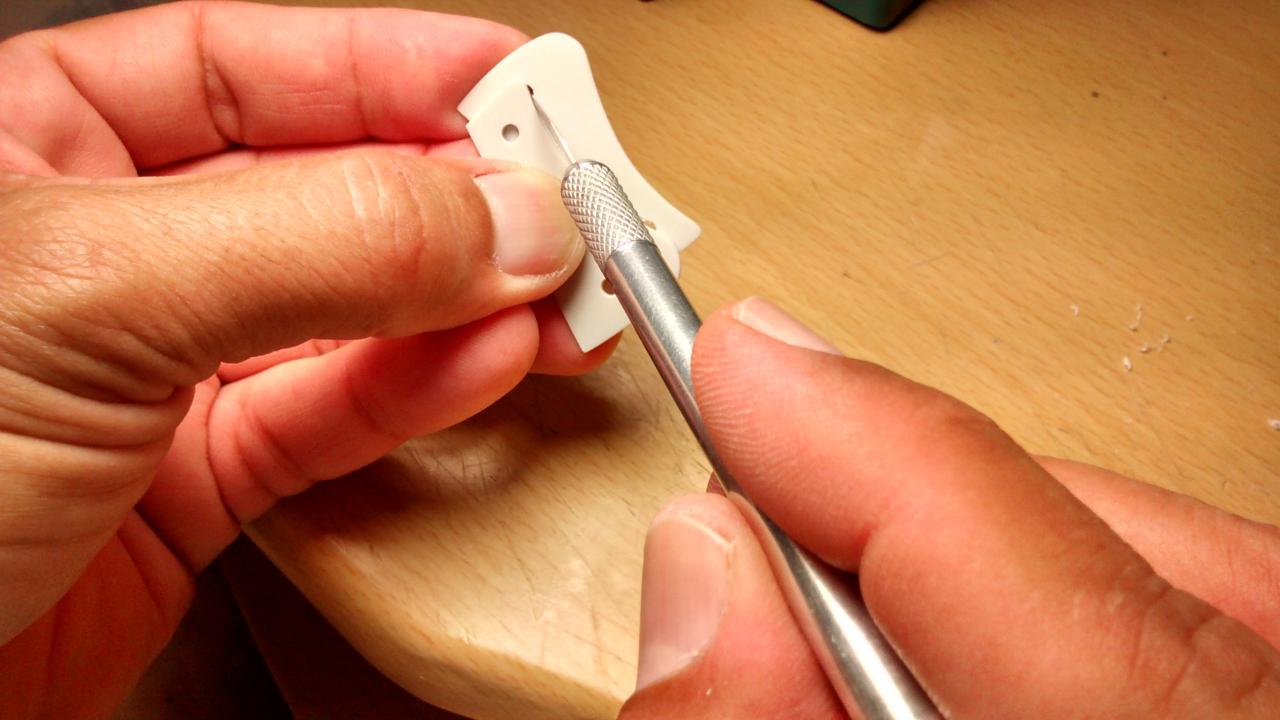
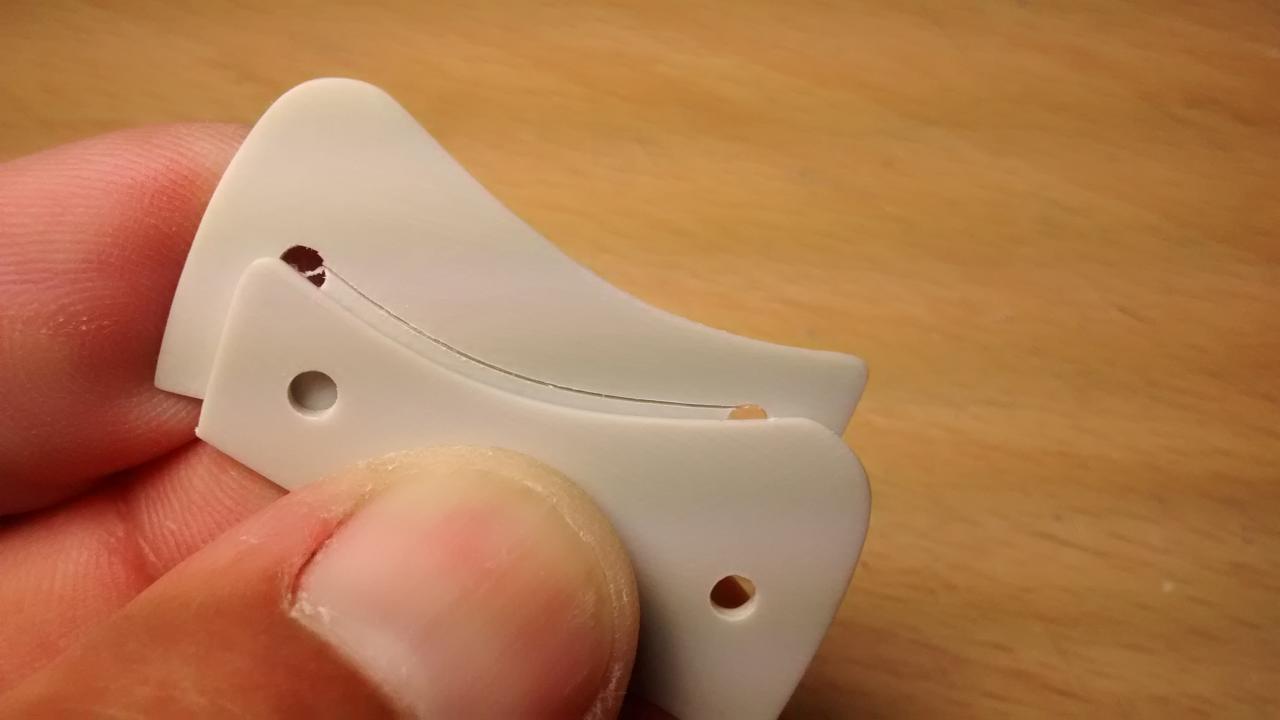
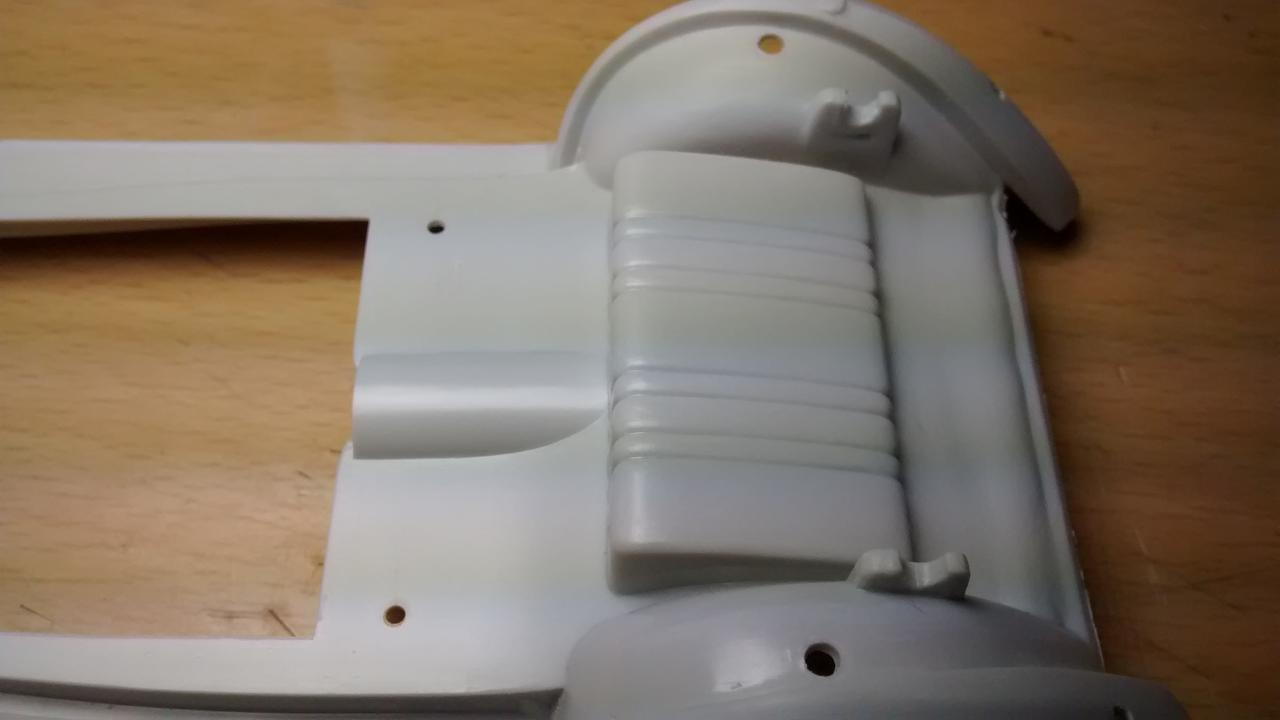
I was ready to paint the body but we had a rainy weekend so I continued the work on the interiors. I was really disappointed with the molded interior details so I decided to cut off the sides of the interior tub and make some flat panels where I can put some nice details later on. One of the sides was thicker than the other as you can see below. Also the dashboard was not sitting correctly so with the new panels I can get it to fit correctly on its place. I was wondering what to do to make some custom details to the interior and I came up with the idea of building a folding console in the middle of the seat, so below you will see a few pics of the process and the almost finished piece. First Part of the Process: Almost Finished Piece: I still have to make some minor adjustments and make the holes for the “refreshments”, but I am really happy with the results. The tub also needs some sanding and filling but so far the fit is so much better especially for the side windows. Hope you like it and thanks for looking!!!!
-
Just a small update to show you the stance I am looking for. The rear axle and the front suspension have been modified. Still some minor adjustments and everything will be ready for primer. I am using these rims just for testing the high of the tires and the center alignment. Hope you like it and thanks for looking!!!
-
Nice work TJ!!! One of my favorite 1:1 cars.
-
1965 Ford Falcon Ranchero (Trumpeter 1:25)
Luis Ayala replied to artecar24's topic in WIP: Model Cars
Hi Angel!!! Awesome work so far!!! Love the engine detail and the front suspension. Thanks for sharing!!! -
Hi Scott!!! Fantastic work so far, I will be watching this one closely. Thanks for sharing!!!
-
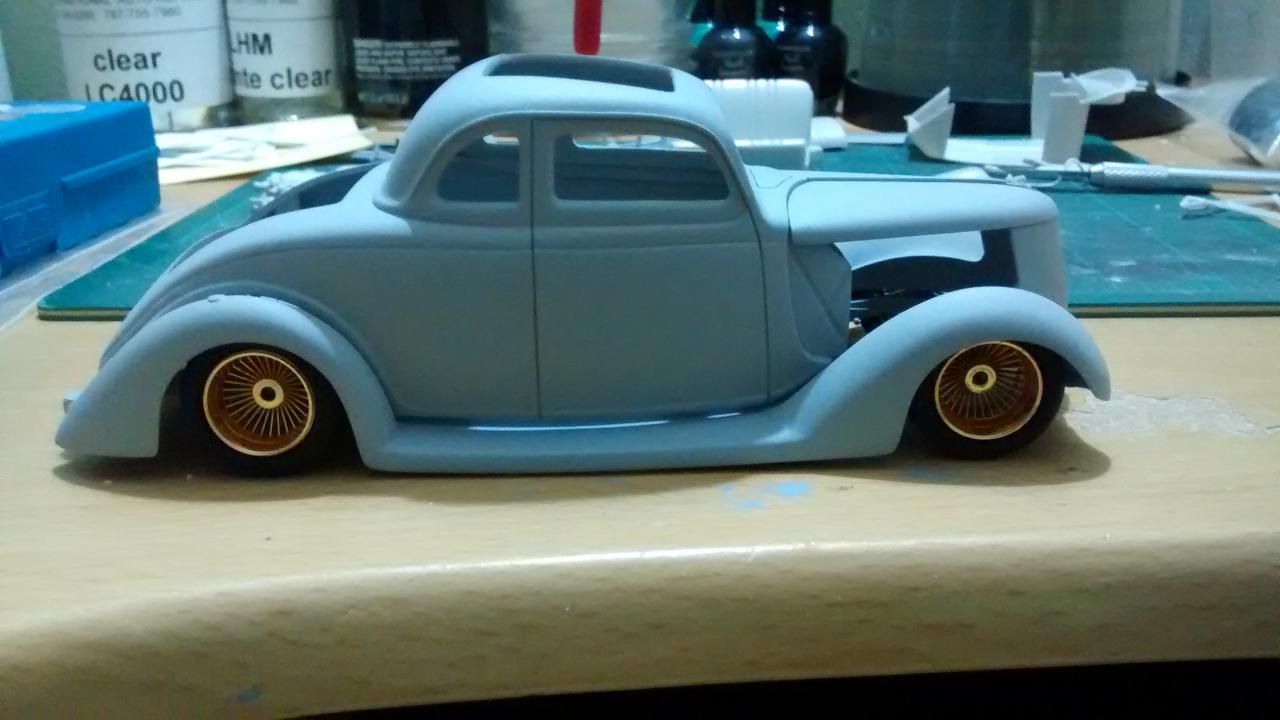
Thank you all for your comments, I am glad you like the progress of the build!!!! I am having a lot of fun after all these years off the bench. It will definately sit close to the gound so as soon as I have the right rims and tires I wil post some mock up pics.
-
Hi Michael!!! Yes, I wil be painting the body with nail polish next weekend. Hahaha!!!! my wife and daughter ask me the same thing the first time they found me digging in their stash of nail colors... Now they always ask if I have spare colors...
-
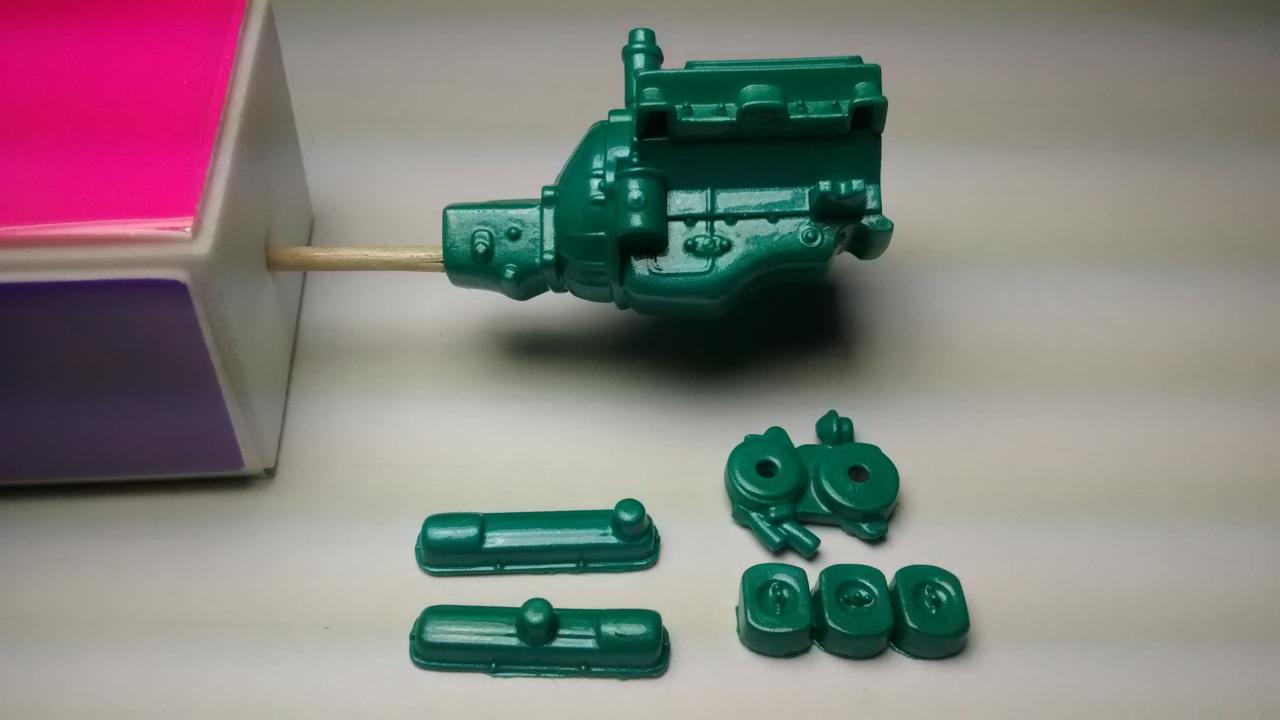
I have been very busy at work but finally had some spare time during the long weekend to start painting the engine parts. I wanted to try a different color out of my comfort zone so I went to the $0.99 store to pick up some nice nail lacquer color. These paints are really good for airbrushing, you can thin them 1:1 put many coats over the parts and they won’t build up and cover the parts details or drip easily. They dry fast, the pearl is just the size to fit the scale, there are many nice colors to choose and the best part is that you can get a 0.5 ounce jar, mix it and make 1 ounce of ready to airbrush paint for just $0.99 cents. One thing though,I preffer to use Bondo automotive lacquer primer, it has been the best so far for me and I always test new paint products on some spare parts from the kit first to make sure they blend, don't bleed or hurt the plastic. Long time ago I had a disaster with a Tamiya kit and since then I don't take any chances... The color I picked was “Teal Envy” from “Kleancolor”. You can use any hardware store lacquer thinner to mix it, I used Harris brand to mix it 1:1 and for a top coat I used Harris Acrylic Enamel Clear. The paint scheme for the build will be a two tone Teal/Silver. I used Harris clear cote on the engine because I just wanted to protect the paint finish and bring it to a nice shine. In the past I have used urethane clear for the engines and it looks like a mirror, but for me it is just too much shine. I will use some “Zymol” wax later just to make it crisp a bit more. Below are some pics in different shades and you will notice that he color changes a bit depending on the amount of light as a result of the fine silver pearls on it. I am really happy with the results so hope you like it and thanks for looking!!! Hey I almost forgot!!! One more thing… keep more than a jar handy just in case your daughter or wife spot it over your workbench…
-
WOW !!! Awesome work Shane. The paint looks beautiful, excelent job on the BMF and the wheels fit just perfect. Thanks for sharing !!!
-
2013 60th Anniversary Corvette 427 Convertible
Luis Ayala replied to ismaelg's topic in WIP: Model Cars
Great work as usual buddy!!! Good to see you are back on the bench too!!! -
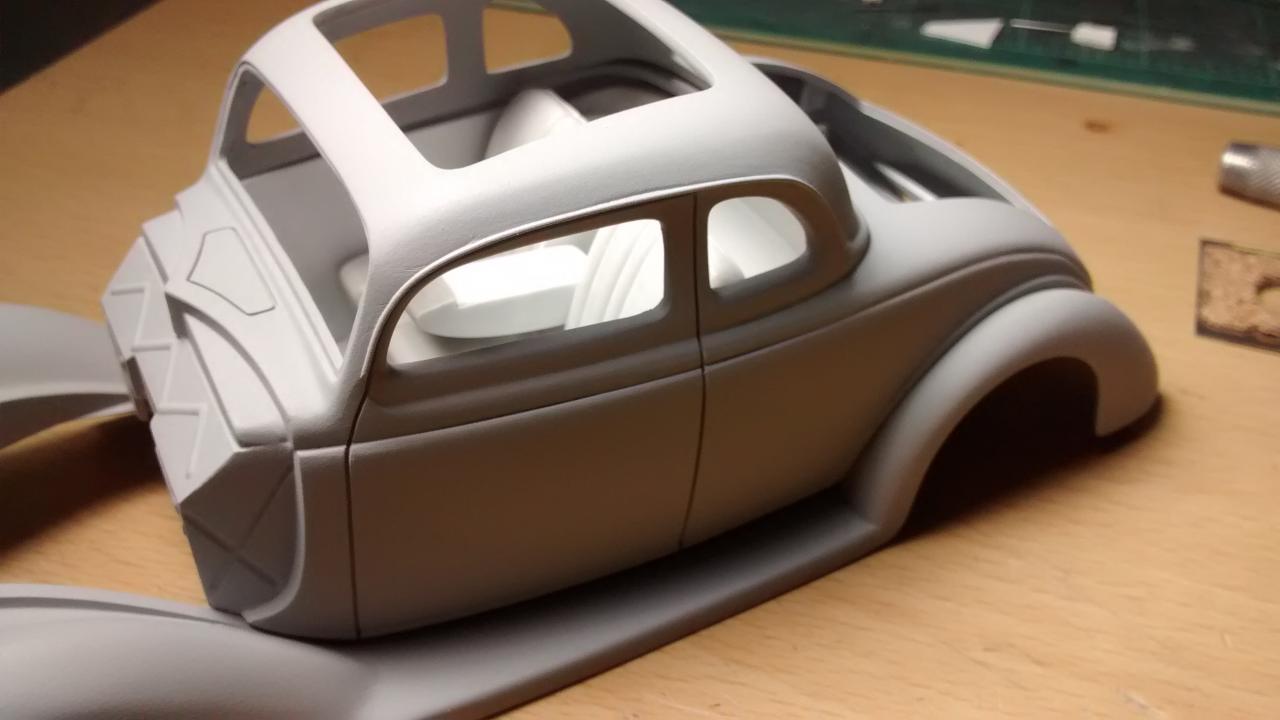
Thank you all for your comments!!! I really appreciate you like the work I have done so far. It was a long time off the bench so I am working on a slow pace and having a lot of fun. The top trim of the front windshield was not molded correctly and since I didn’t wanted to cut off everything to scratch build, I decided that the best way to go was to try to carefully carve it out and finish the body work. It took time and was not perfect but after some sanding and scraping I am really happy with the results. I managed to get some primer on the body today so below are a few pics to keep you updated. To get the custom look I wanted I decided to shave the running boards and remove the molded rubber inserts to paint them on one solid color. Soon I will post more progress on the suspension, rear axle, engine and interiors. Hope you like it and thanks for looking!!
-
Beautiful Build Michael, the paint looks great !!!! Thanks for sharing !!
-
As I promised, another small update… First coat of primer under the lower body to check for unfinished spots. It just need some small fixes and it is ready for paint. It took a while but I am very happy with the results so far. The Custom Grill will be painted body color so I removed the chrome and shot some primer on it to mock it in place. The engine valve covers and the front cover received the same treatment. The engine is primed and ready for paint. I decided to go with the three carb option to have some room for a custom cover inside the engine bay. I started working on the front suspension and rear axle so as soon as I have the correct rims set up I will post more progress. Hope you like it and thanks for looking!!!!
-
Thank you all for your comments !!!! I will post more progress soon !!!
-
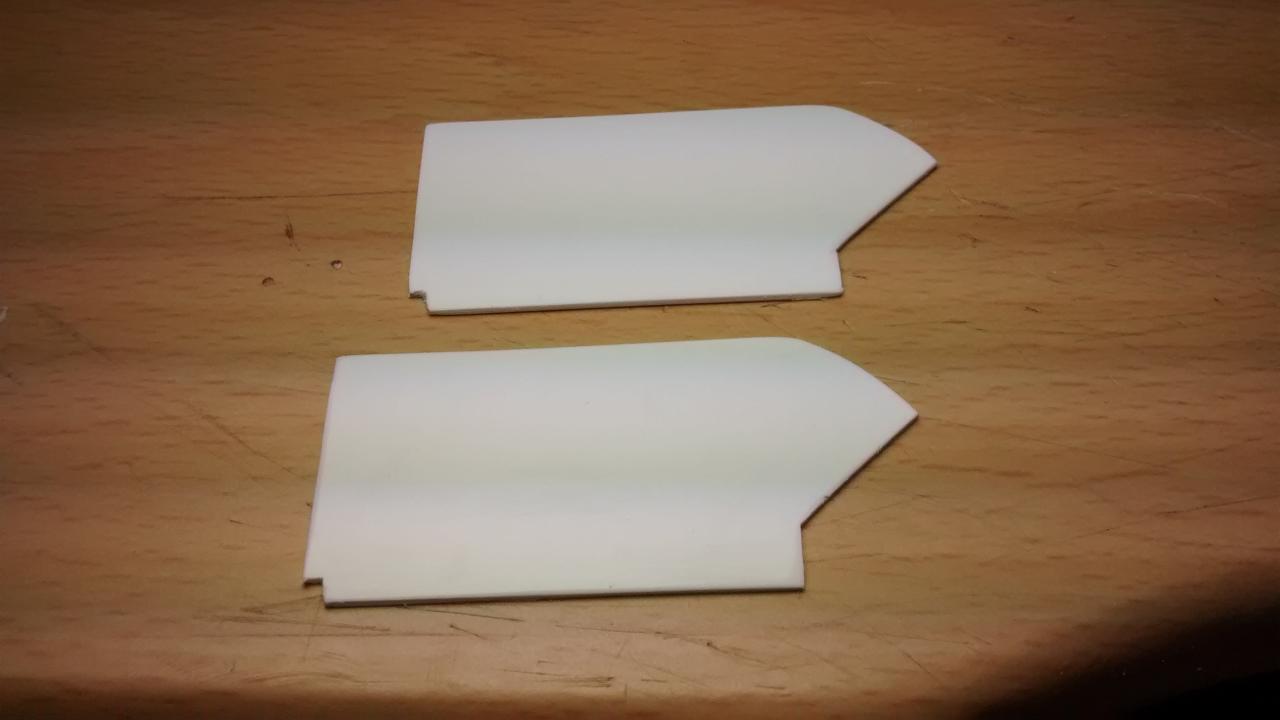
Another small update… I am almost done with the body work, so hopefully it will get a coat of primer tomorrow to highlight the areas that still need some sanding and filing. Since I am looking for a custom look, I decided to modify the optional flat hood curtains that came with kit. I didn’t wanted to cut off a straight line so I drilled a couple of offset holes to make some curved lines and used the curtains as a guide. After drilling the holes I carefully cut off the curved strips using the back of the Exacto blade on both sides. I will probably add some mesh later but so far I am very happy with the results. Hope you like it and thanks for looking!!
-
Hi Tim, I have built this kit a couple of times and the first one I did it just like the instructions say but it was very difficult to close the kit and there was a gap between the interior and the rear tray. In my experience it will fit cleaner and it is easier to close the build if you glue it to the interrior assembly. I have always glued all the glass in place and then start test fitting the interiors till they snug nicely in place before the final assembly. Hope this helps.
-
Great Job on the paint !!!! Also one of my favorite kits!! Thanks for sharing.
-
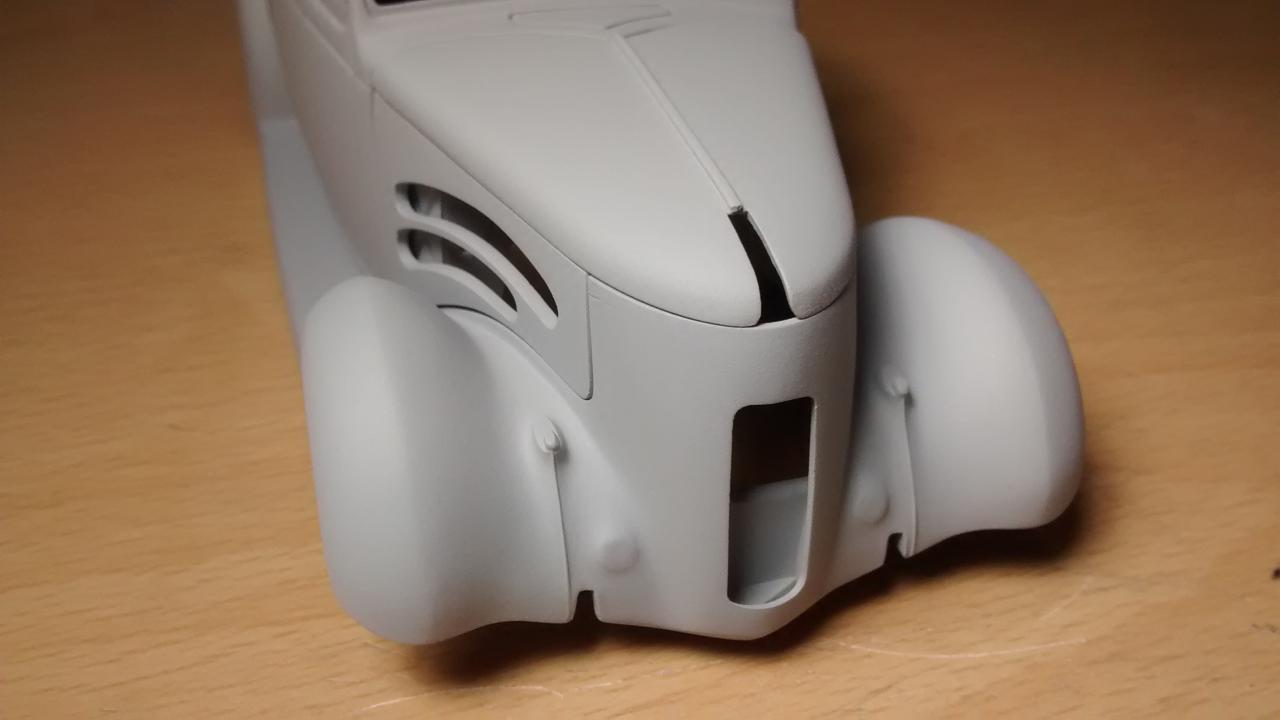
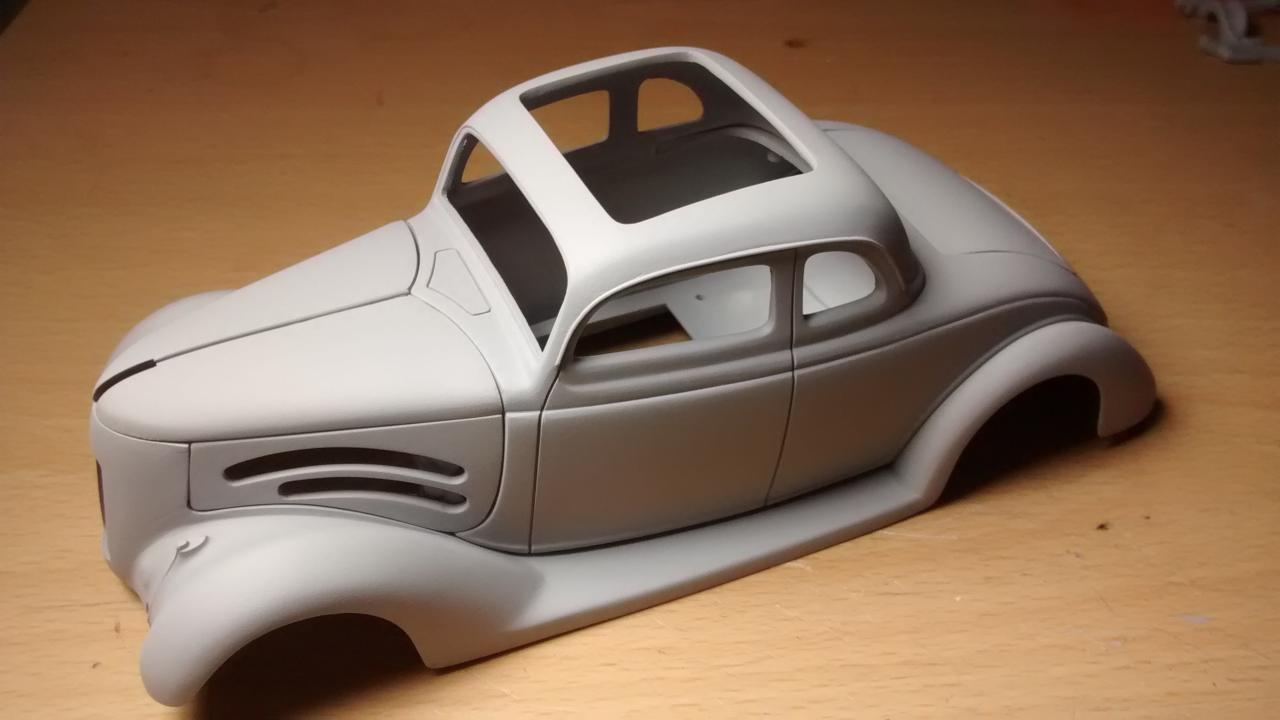
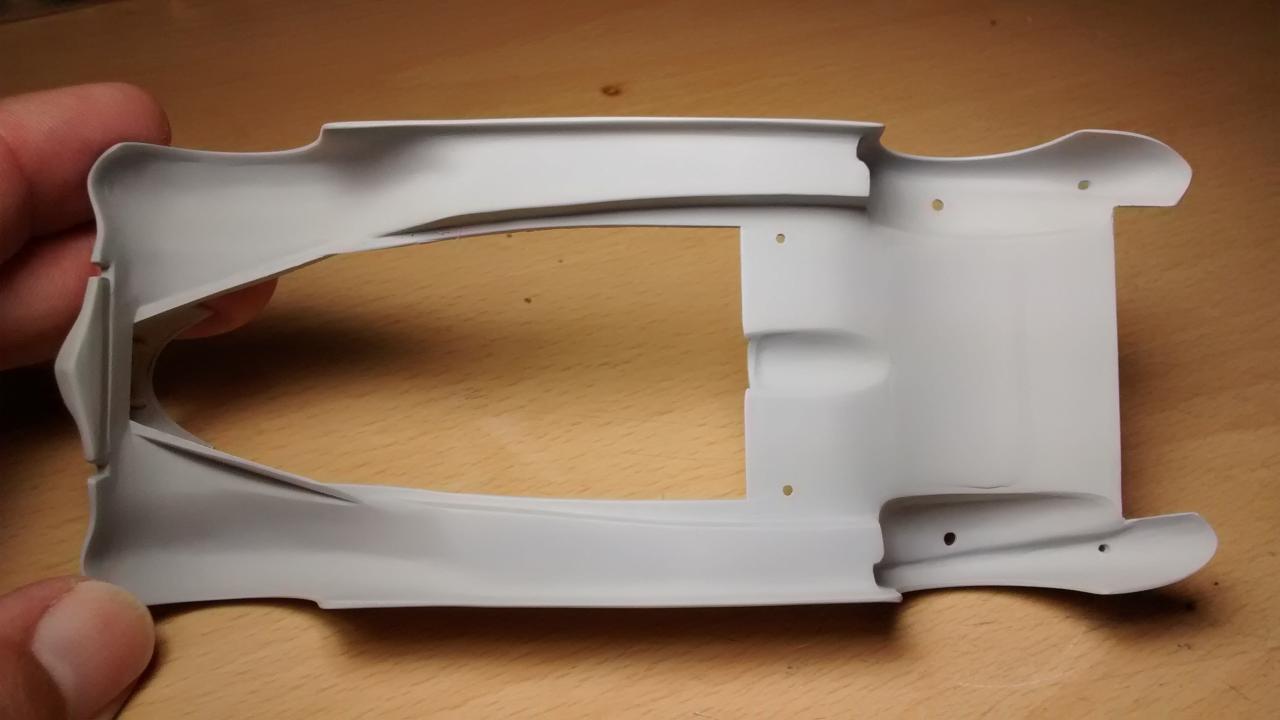
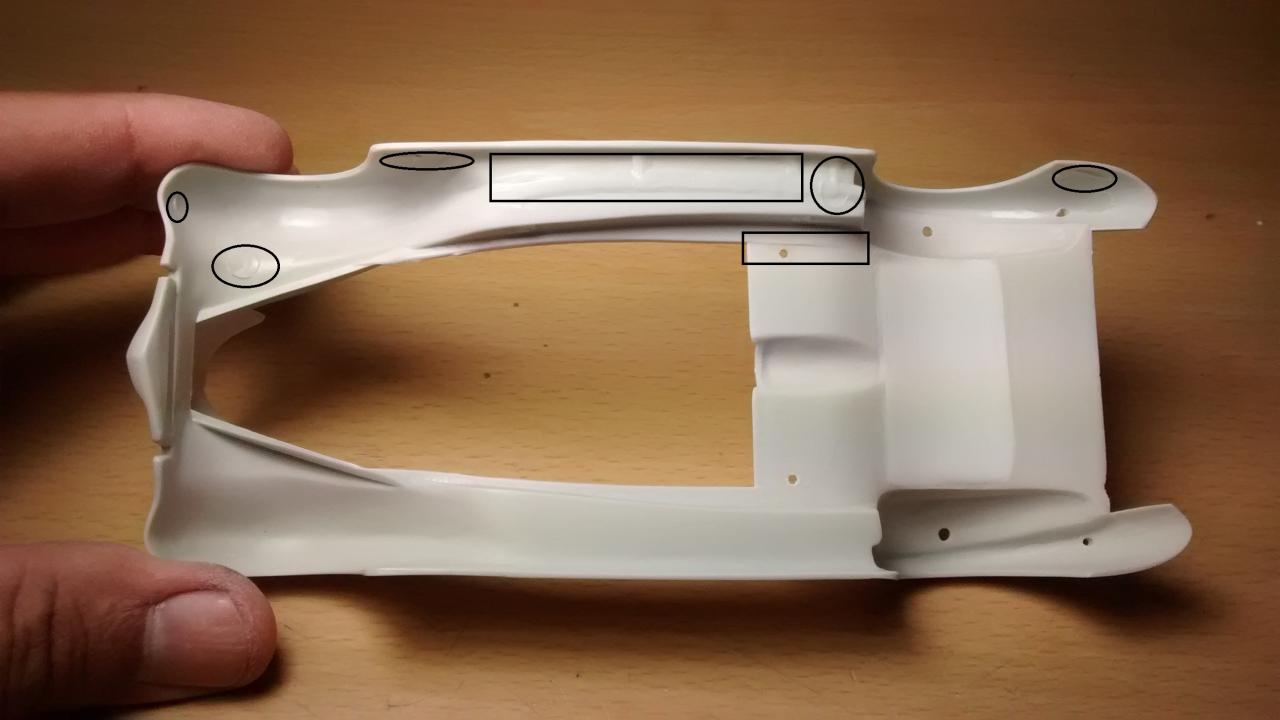
Thank you all for your comments!!! Bill, thanks for the advice I really appreciate it!!! Time for a small update This old AMT kit needs a ton of work under the running boards and fenders, specially because I want to make a custom car with a nice paint job underneath. I am not adding too many PE parts so I will work out all those details and wrap it up with a two tone paint job. First I removed the rumble seat to detail it later and sealed the floor to make it look more realistic. Then I started to remove all the excess plastic, pin marks, etc., to get a smooth surface. Below you will see the results on one side and on the other I just highlighted the spots that needed to be fixed. I will finish up all the body work and hopefully get it ready for primer next week. This is just a small update but didnt wanted to let it sit for long without making some progress. Hope you like it and thanks for looking!!!
-
Hi Michael, The kit has two engine options, the flathead with stock carb and a second V8 for the custom version with a tree or six carb intake option. I like the six Carb option but I agree with you, three seems right. I plan to make some custom work to the engine bay so I will test fit to see how much room I have left for the plumbing and then start from there.
-
Hi Steve, Your skills are amazing, outstanding job!!!
-
1935 LaSalle convertible coupe - 3d printed at home Aug. 30
Luis Ayala replied to my66s55's topic in WIP: Model Cars
Hi Dough, You are setting the bar really high, but at the same time paving the road ahead for us by sharing your project. The time you have spent is beggining to pay off and for the rendering of the 3D image you just post I can not wait to see the finished product. Thanks for sharing,