oldcarfan
-
Posts
2,828 -
Joined
-
Last visited
Content Type
Profiles
Forums
Events
Gallery
Everything posted by oldcarfan
-
29 Ford Model A p/u with California street choper 1/25 scale
oldcarfan replied to Jack L's topic in Car Kit News & Reviews
This is the one I was thinking about that had the stock parts that might work on the pickup. Pretty sure I still have one of these in storage somewhere. -
Today I went out to my shop, turned on the lights, sat down and looked around for a few minutes before sighing and going back into the house. I really need to get motivated. Maybe after New Years?
-
Nice find! Should be a fun build. Sure would be nice it Tamiya would do a reissue of their 90s kits. Some good stuff in there>
- 39,060 replies
-
- 1
-

-
- johan
- glue bombs
- (and 1 more)
-
Sorry to revive an old thread, but I came across two of this kit and I'm kind of excited. One is still in the box and the other was started. Looks like the body was painted in a dark purple and a few pieces were removed from the sprues. Don't know what I'll do with them yet, maybe a future Cannonball entry or a towpig for a racing 911?
-
Home made decals. Advice needed !
oldcarfan replied to Bugatti Fan's topic in Model Building Questions and Answers
Also, I've done artwork on Word documents and printed them on a commercial Xerox printer and they work pretty well, though again you have to layer for best results. Laser ink isn't as transparent as ink jet, so layering two seems to be sufficient. Just a caution, I was warned very strongly that you must use laser paper only on laser printers. Apparently someone tried to use ink jet paper and it wrecked something expensive in the printer. -
Bronco II Kit - does such a thing exist?
oldcarfan replied to Jonathan's topic in Model Building Questions and Answers
As a youngster in the 90s I bought a lot kits at Toys R Us on clearance. AMT was doing a lot of kits with promo versions on the side which they then also sold as snap kits and I got a lot of both. I used to have the Dodge Stealth as a promo at one time and I still have the regular kit version to be built someday. I'd love to see them return to offering some simplified kits as well as the regular ones as I'm practically ancient now and not so interested in doing full detail. -
29 Ford Model A p/u with California street choper 1/25 scale
oldcarfan replied to Jack L's topic in Car Kit News & Reviews
I think the Revell 29 pickup and their Woody wagon started out with the same frame so they probably should interchange. The old Monogram Model A car's parts probably would interchange with the Monogram hotrod pickup I'm guessing. -
The ones I looked at even had a couple of LED lights and a battery pack so for the price I might get another.
-
Not sure this belongs here, and it might have already been covered, but I just discovered these at Hobby Lobby. Some of them might look good in a street scene. I bought one to use in a man cave photo backdrop for my models but have only glanced at it so far. The smaller parts are kind of clunky, but overall for the price, they seem to be pretty good. They look similar to the Rolife ones. If they go on 40% off sale they might be an even better good deal.

-
29 Ford Model A p/u with California street choper 1/25 scale
oldcarfan replied to Jack L's topic in Car Kit News & Reviews
I wonder if the parts for the stock Monogram Model A that was rereleased a while back interchange with this kit? You could maybe do a stock truck and a hot rod convertible. -
I've read all the tips and tricks for photographing models. I take reasonable pictures with my phone, but obviously, the best answer is to get a good digital camera, but that's not really happening right now. In lieu of that, what if any tips help get good results from an iPhone or other brand? I currently have an iPhone 11 and i haven't found any good apps to help. I'm in the process of building couple of different backdrops, but are there any cheap lighting hacks or other ideas?
-
29 Ford Model A p/u with California street choper 1/25 scale
oldcarfan replied to Jack L's topic in Car Kit News & Reviews
No biggie. If you want the stock look, you can pirate the stock wheels and tires off an AMT 29 Ford of any type and they look good on the Revel truck. -
Home made decals. Advice needed !
oldcarfan replied to Bugatti Fan's topic in Model Building Questions and Answers
The previous posters have given good advice. The only thing I would add is to make sure the paper you get says its for ink jet printing. I bought some laser printer paper by accident and it didn't work, the ink just pooled up on the page. Speaking of ink, it isn't very opaque, so be sure and print several of each piece of artwork so you can layer it if need be. Also I print a "proof" page on regular paper to check sizes and make sure everything is lined up and not misspelled, I learned that the hard way. -
29 Ford Model A p/u with California street choper 1/25 scale
oldcarfan replied to Jack L's topic in Car Kit News & Reviews
As far as I know, the Monogram 29 kit was never offered in a stock version unless it was at the very first issue. -
Bronco II Kit - does such a thing exist?
oldcarfan replied to Jonathan's topic in Model Building Questions and Answers
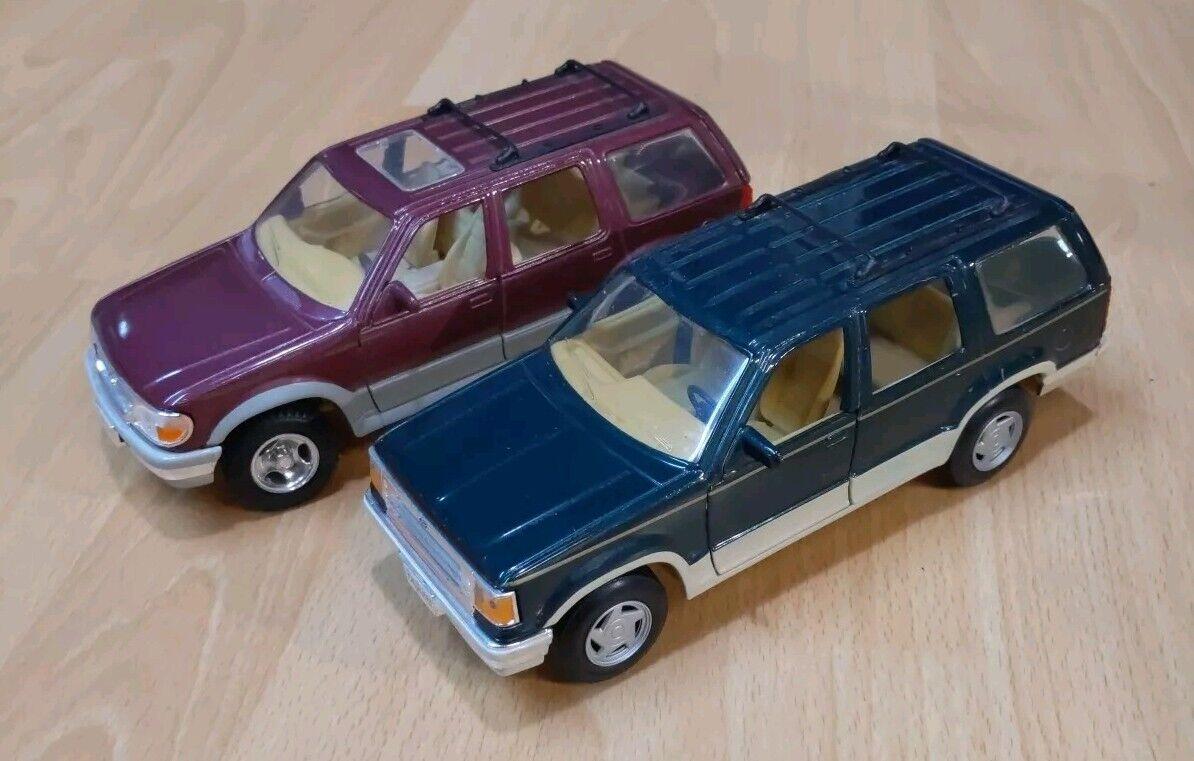
Since the link I posted went away, here's a picture of what I was thinking as a start. The teal one is a vintage Maisto release of an early 90s Explorer which might work. I had one at one time which I converted to a crude version of a Jurassic Park Explorer. Wish I still had it. The other one is the later release.
-
29 Ford Model A p/u with California street choper 1/25 scale
oldcarfan replied to Jack L's topic in Car Kit News & Reviews
I feel you! I'd love to see some new kits. I suppose the manufacturers' budgets just aren't there? I'm to the point where if they redo an old kit with new/restored parts, I'll buy one just to support their efforts. -
29 Ford Model A p/u with California street choper 1/25 scale
oldcarfan replied to Jack L's topic in Car Kit News & Reviews
Correct me if I'm wrong as it's been a while. If I remember, it's missing the stock wheels/tires and the stock interior, there may be other things. Same with the 40 Ford, except I think it also needs a non-louvered hood. -
Resin Wheels for the Round2 2021/23 Bronco kit
oldcarfan replied to stavanzer's topic in Model Building Questions and Answers
I haven't seen those particular wheels from any manufacturer. The Mustang wheels could be similar with a little work. Speaking of that Bronco Sport, I'd buy a few of them if a manufacturer decides to do one. Same goes for the Maverick Truck. -
29 Ford Model A p/u with California street choper 1/25 scale
oldcarfan replied to Jack L's topic in Car Kit News & Reviews
While I'd love to see a 32 pickup, especially if they did a 2n1 version, but I'd be happy just to see all the stock parts restored to the 29. Same goes for the Monogram 40 Ford truck, it would be nice to see all the stock parts there, too. Maybe even do a 39 version too. -
At least they're getting more. Our store got a display last year and it sold out quickly. A few weeks later I asked the department manager when they'd be getting more and she said, "I don't like that sh*t and I ain't gonna see it on my shelf." I guess she was right because the only 'boy toys' they have is a small assortment of Jada diecasts and the Hot Wheels.
- 39,060 replies
-
- 2
-
-
- johan
- glue bombs
- (and 1 more)
-
What would YOU like to see as a model
oldcarfan replied to JeroenM3's topic in General Automotive Talk (Trucks and Cars)
I really want to see some modern SUVs and crossovers. Everything from the Bronco Sport all the way up to the premium brands. Volkswagen, Audi, Porsche, and Lamborghini make some pretty nice vehicles among others. Even Ferrari and Aston Martin are getting in on the game. This is my take on the Welly 1/24th Porsche Cayenne. As well I'd buy a bunch of late model pickup trucks, if they made them. Fords, Chevys, Dodges, and the Toyotas and Nissans, yes, please.
-
2024 Cannonball Run "Resto-mod" Official Finished Builds
oldcarfan replied to White Rabbit's topic in Community Builds
I love it! I'm only one lottery win from having a 1:1 version in my shop. -
What did you see on the road today?
oldcarfan replied to Harry P.'s topic in General Automotive Talk (Trucks and Cars)
Interesting! A co-worker had a similar thing going on with his Chevy HHR. He even added spinner hubcaps and fake antennas. I asked him if he got all that stuff from Pep Boys and he said ot since he discovered Amazon and eBay! He got two rolls of chrome pinstripe tape at a clearance and used both rolls to outline his doors and fenders. -
It's nice to see you do this. I understand his reaction to resin. One of my coworkers developed a similar reaction and had to step away from his side business. All I can say is for everyone to use please use at least breathing protection when dealing with resin, especially the dust from sanding. When I sand parts, I feel like I have a cold for a couple of days.
-
I'd imagine the 64 Corvair might be a good one to retool as they've done the Chevy II wagon and are redoing the Barracuda and the 60 Chevy wagon. Maybe they could surprise us and do a coupe and a wagon version. Do they have the same wheelbase?