Rockford
-
Posts
1,943 -
Joined
-
Last visited
Content Type
Profiles
Forums
Events
Gallery
Everything posted by Rockford
-

Dodge LN 1000 day cab
Rockford replied to Mopar - D's topic in Model Trucks: Big Rigs and Heavy Equipment
Wonderful job, great looking combo. Could I do one in 1/32 I wonder ? -
Scratchbuilt flatbed
Rockford replied to Rockford's topic in WIP: Model Trucks: Big Rigs and Heavy Equipment
I've got a few things to do before paint but I'm torn between black, which seems to be the modern colour, and a brick red, not quite red oxide but not a bright red. -
Trailways bus
Rockford replied to yellowsportwagon's topic in WIP: Model Trucks: Big Rigs and Heavy Equipment
Project creep at its finest but what a great job you're doing with it. I've never seen one of those before. -
Scratchbuilt flatbed
Rockford replied to Rockford's topic in WIP: Model Trucks: Big Rigs and Heavy Equipment
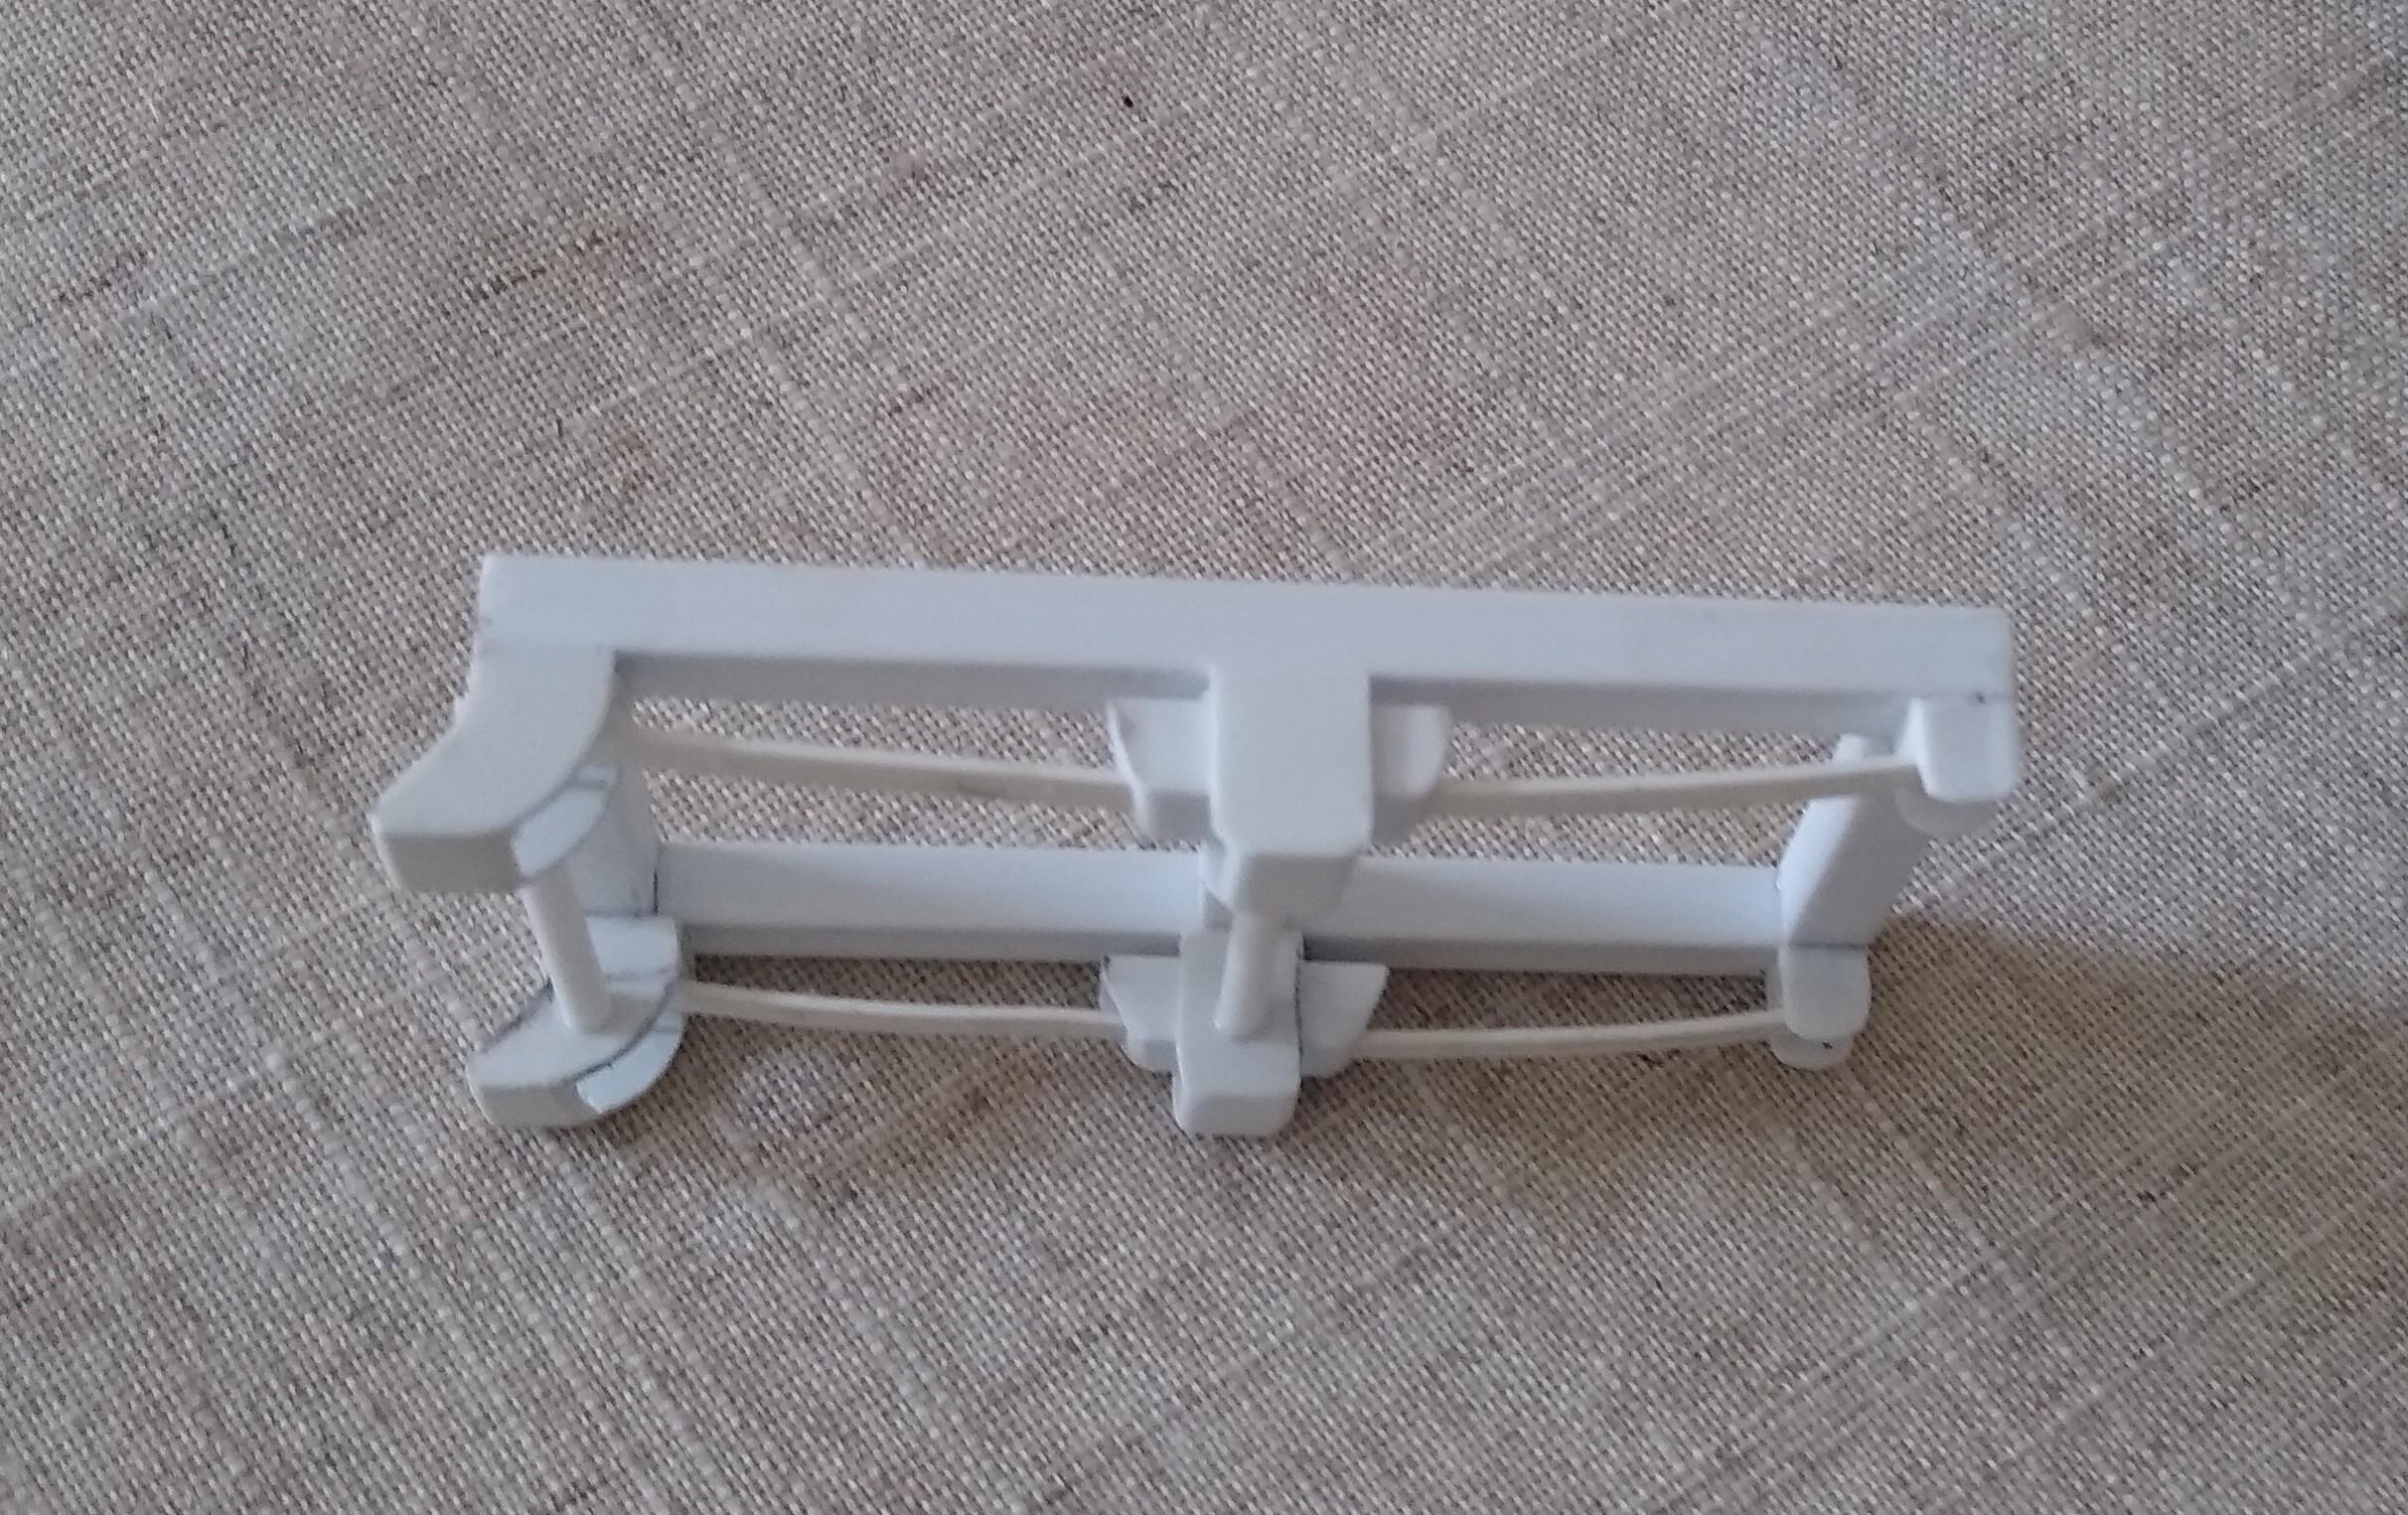
Had a second bite of the cherry this week. I desperately wanted to get the headboard sorted as soon as. I scoured the interwebs for examples of headboard setups. I used 2.5mm square rod as a frame for the stock card. I made a basic flat headboard then added some 45 degree wings with the end pieces of the frame acting as a final location for the side rail. I also cut 1mm slices of round tube to form the rear light bezels. I'm still over the moon with the way this build has gone.
-
Scratchbuilt flatbed
Rockford replied to Rockford's topic in WIP: Model Trucks: Big Rigs and Heavy Equipment
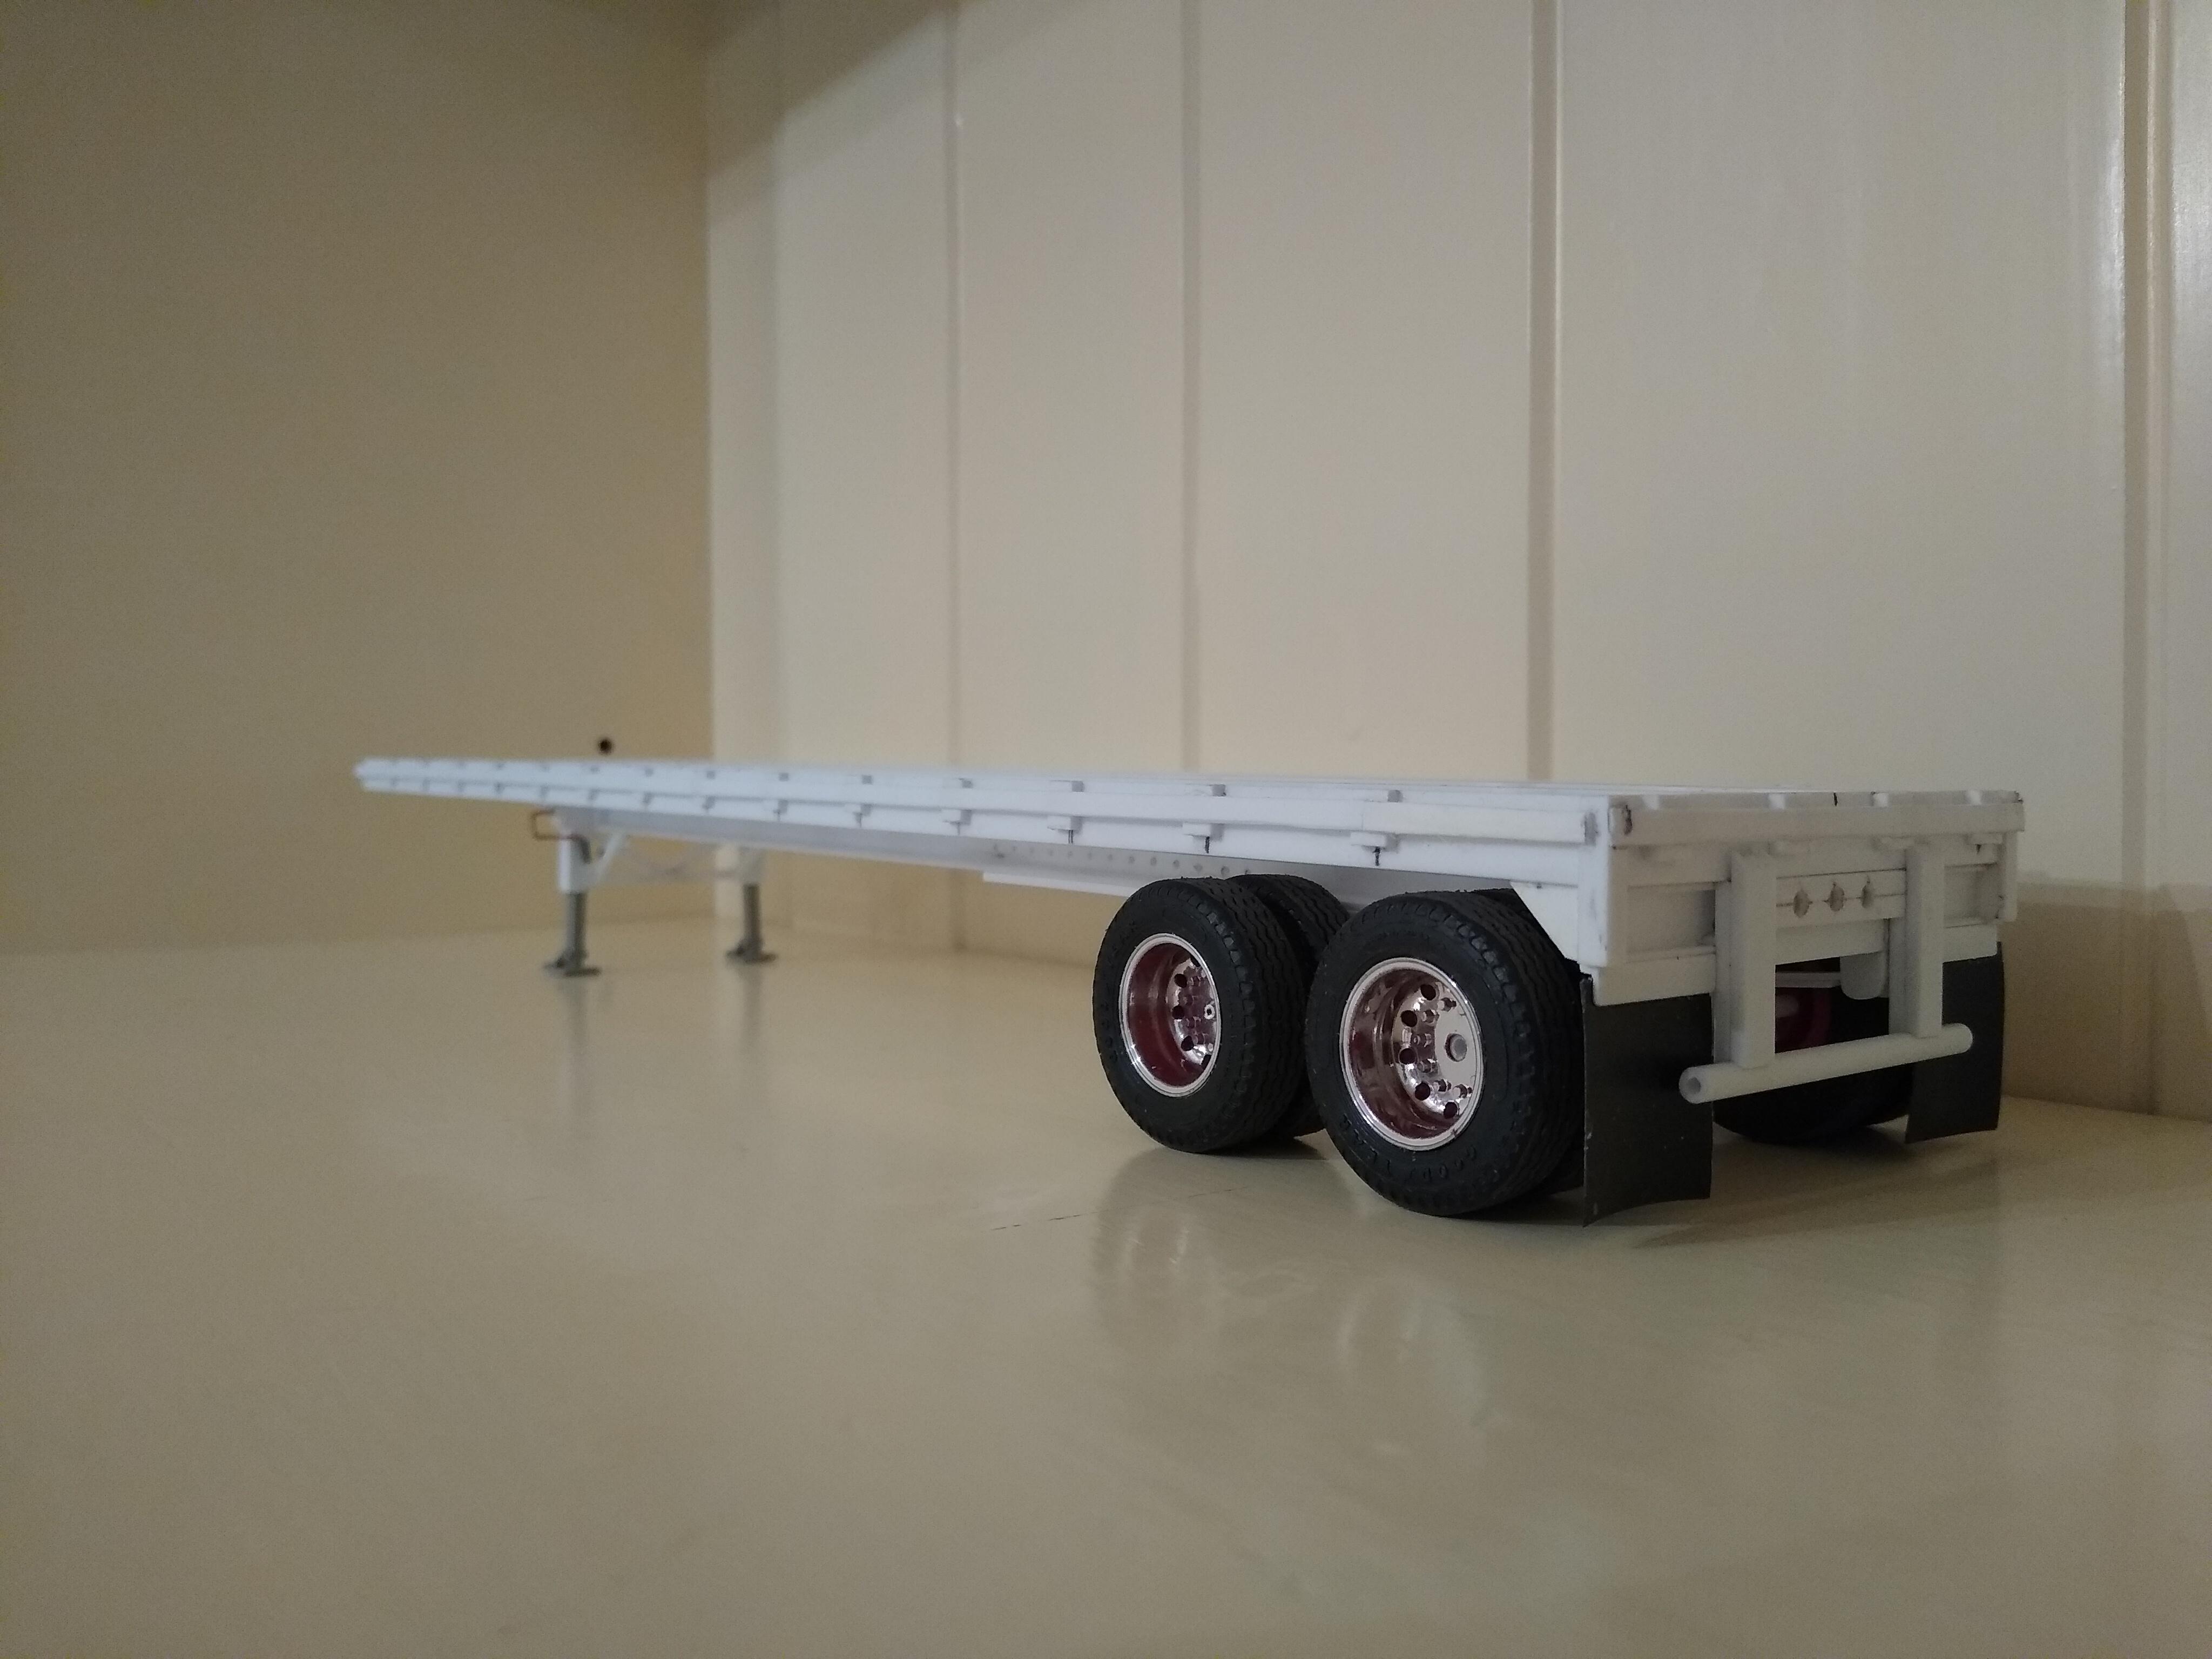
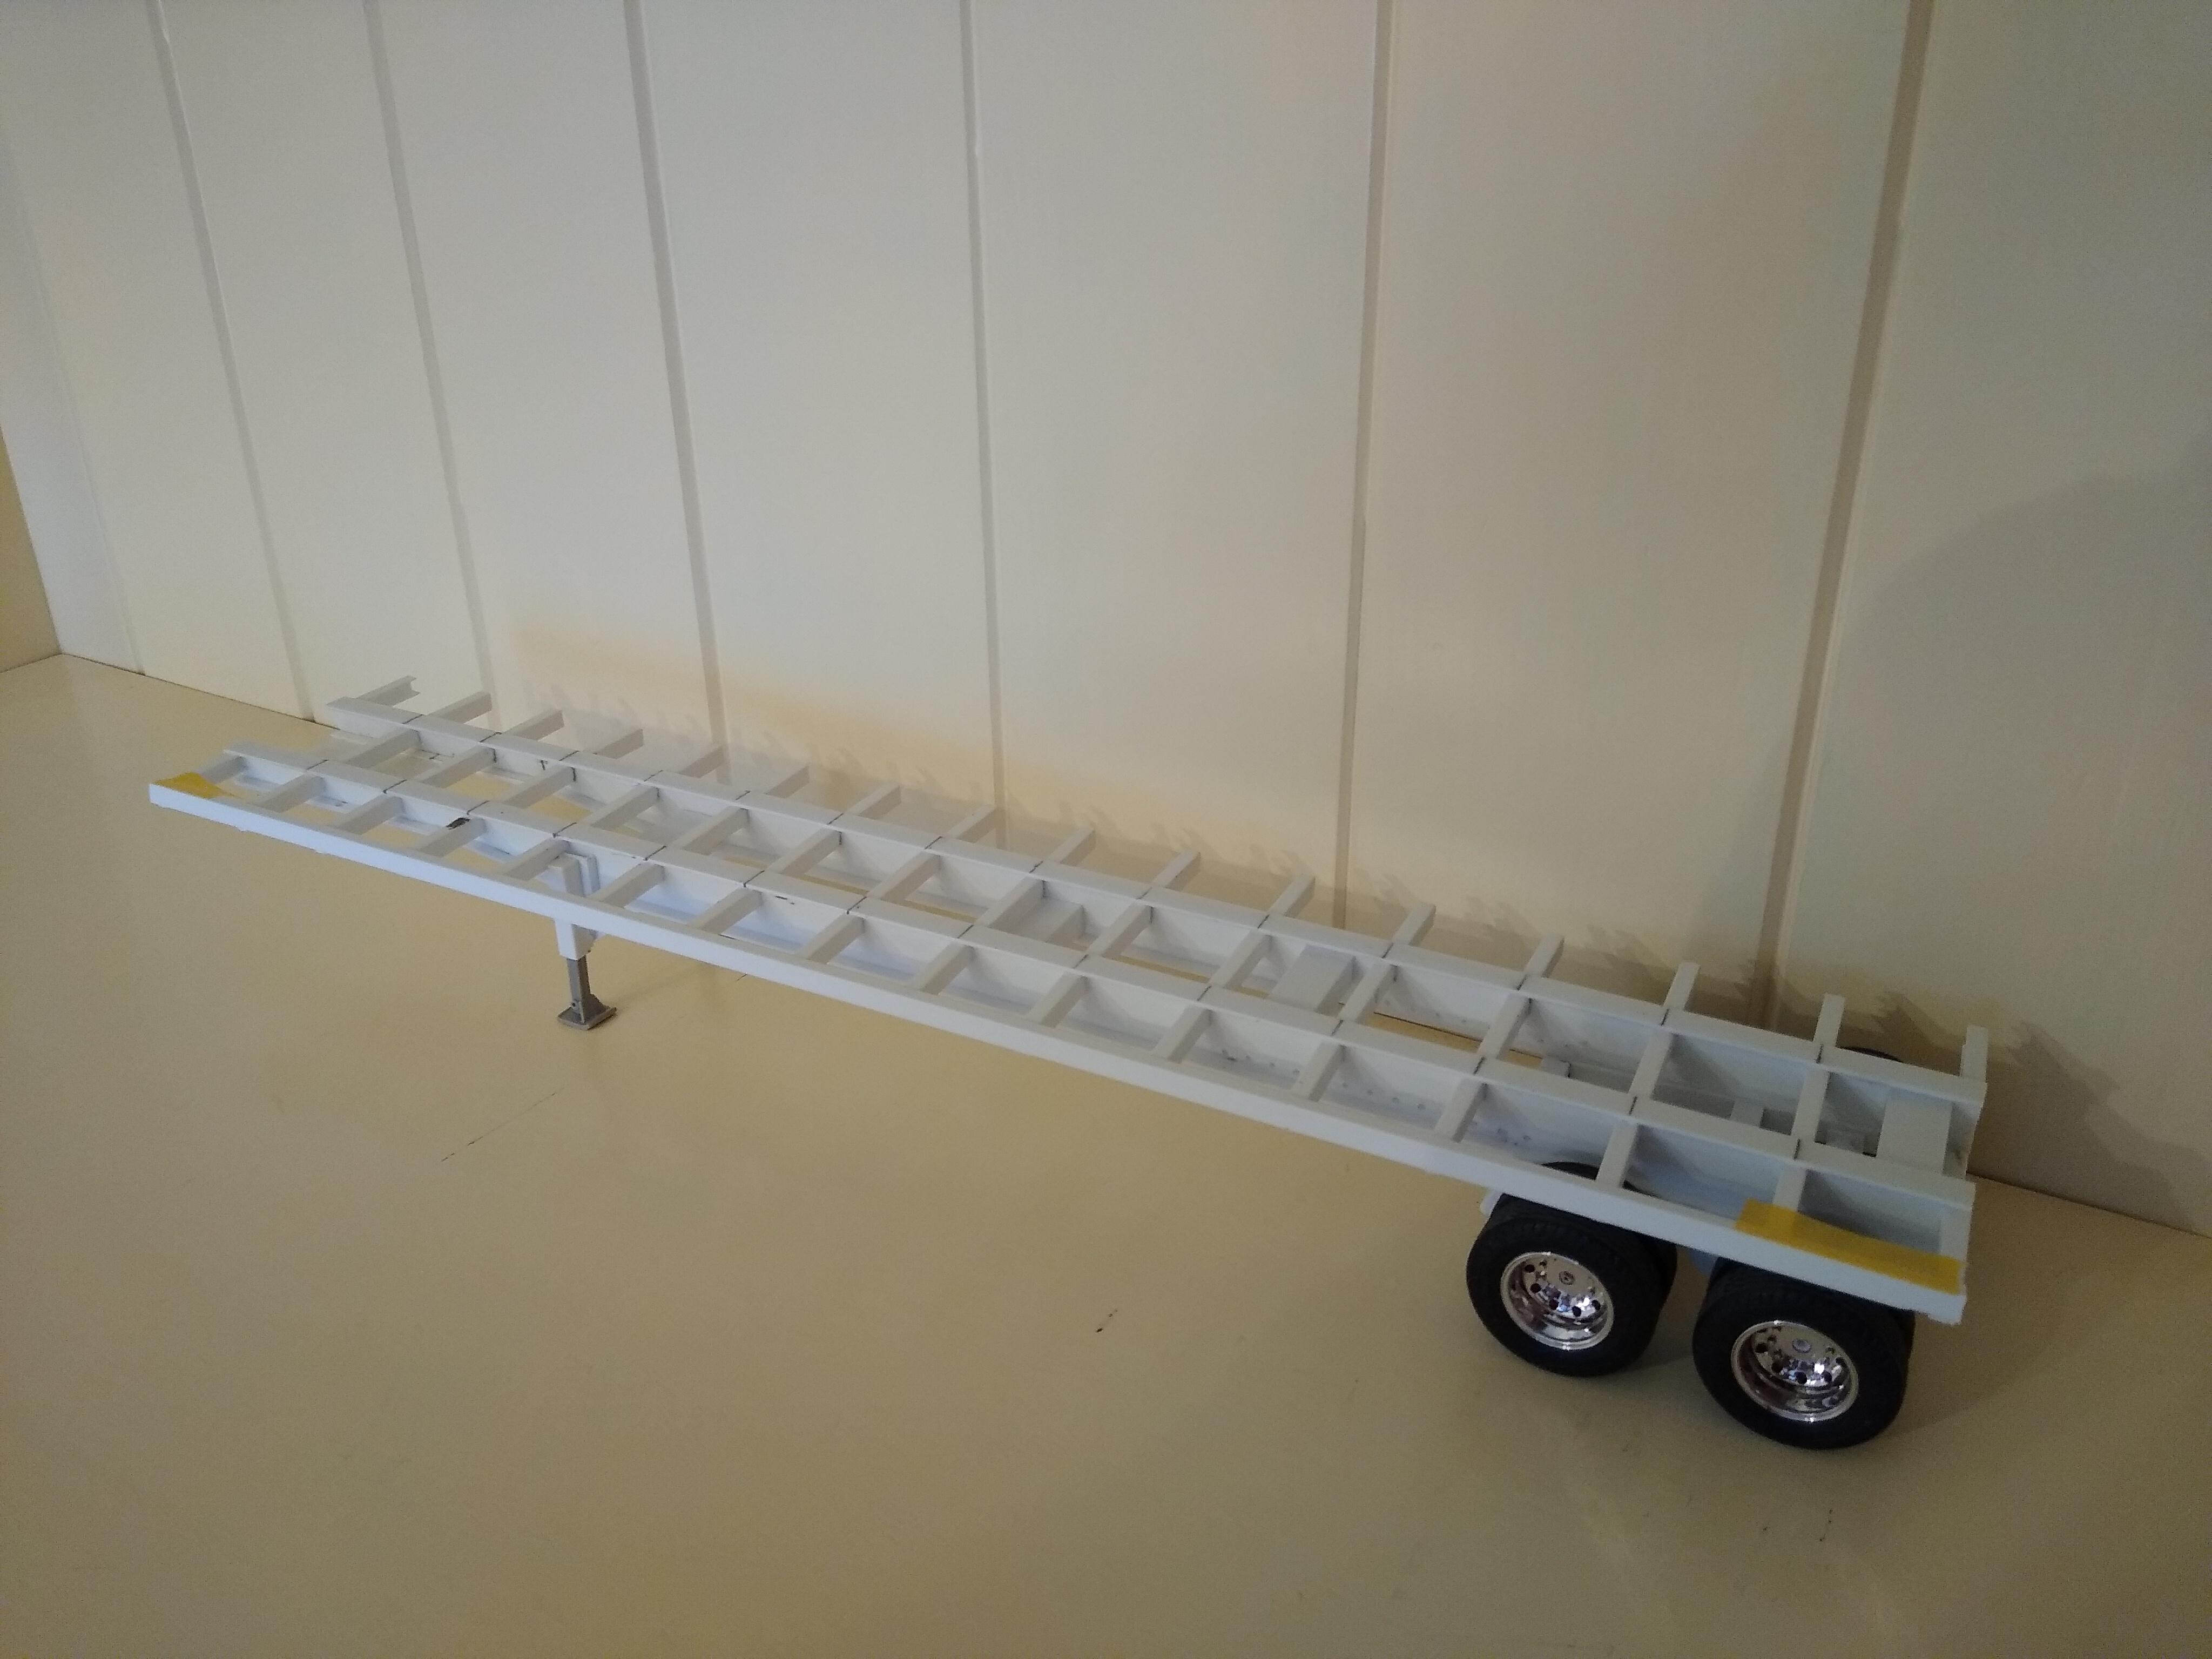
Gave attention to the rear end today. Fitted a rear section of the bed perimeter and added stake pockets and tie rail. Fitted corner pieces to the bed, as well as rear light fittings and mudflap brackets. Added electricians tape mudflaps, Mansfield bar and brackets. Fabbed a central panel with the three clearance lights. I honestly can't believe that I've built something that looks so correct! It sits just right, it's all square and straight! Probably one of the best purchases recently has been an aluminium mitre box so I can cut square sections and 45 degree angles accurately, it's really helped today. Next time it's the front end. I need to build a headboard and front crossmember.
-
Dodge LS1000 Day cab
Rockford replied to Mopar - D's topic in WIP: Model Trucks: Big Rigs and Heavy Equipment
That's a proper truck that. Looks great with the Freightliner chassis. Does the Detroit fit under ok? -
Scratchbuilt flatbed
Rockford replied to Rockford's topic in WIP: Model Trucks: Big Rigs and Heavy Equipment
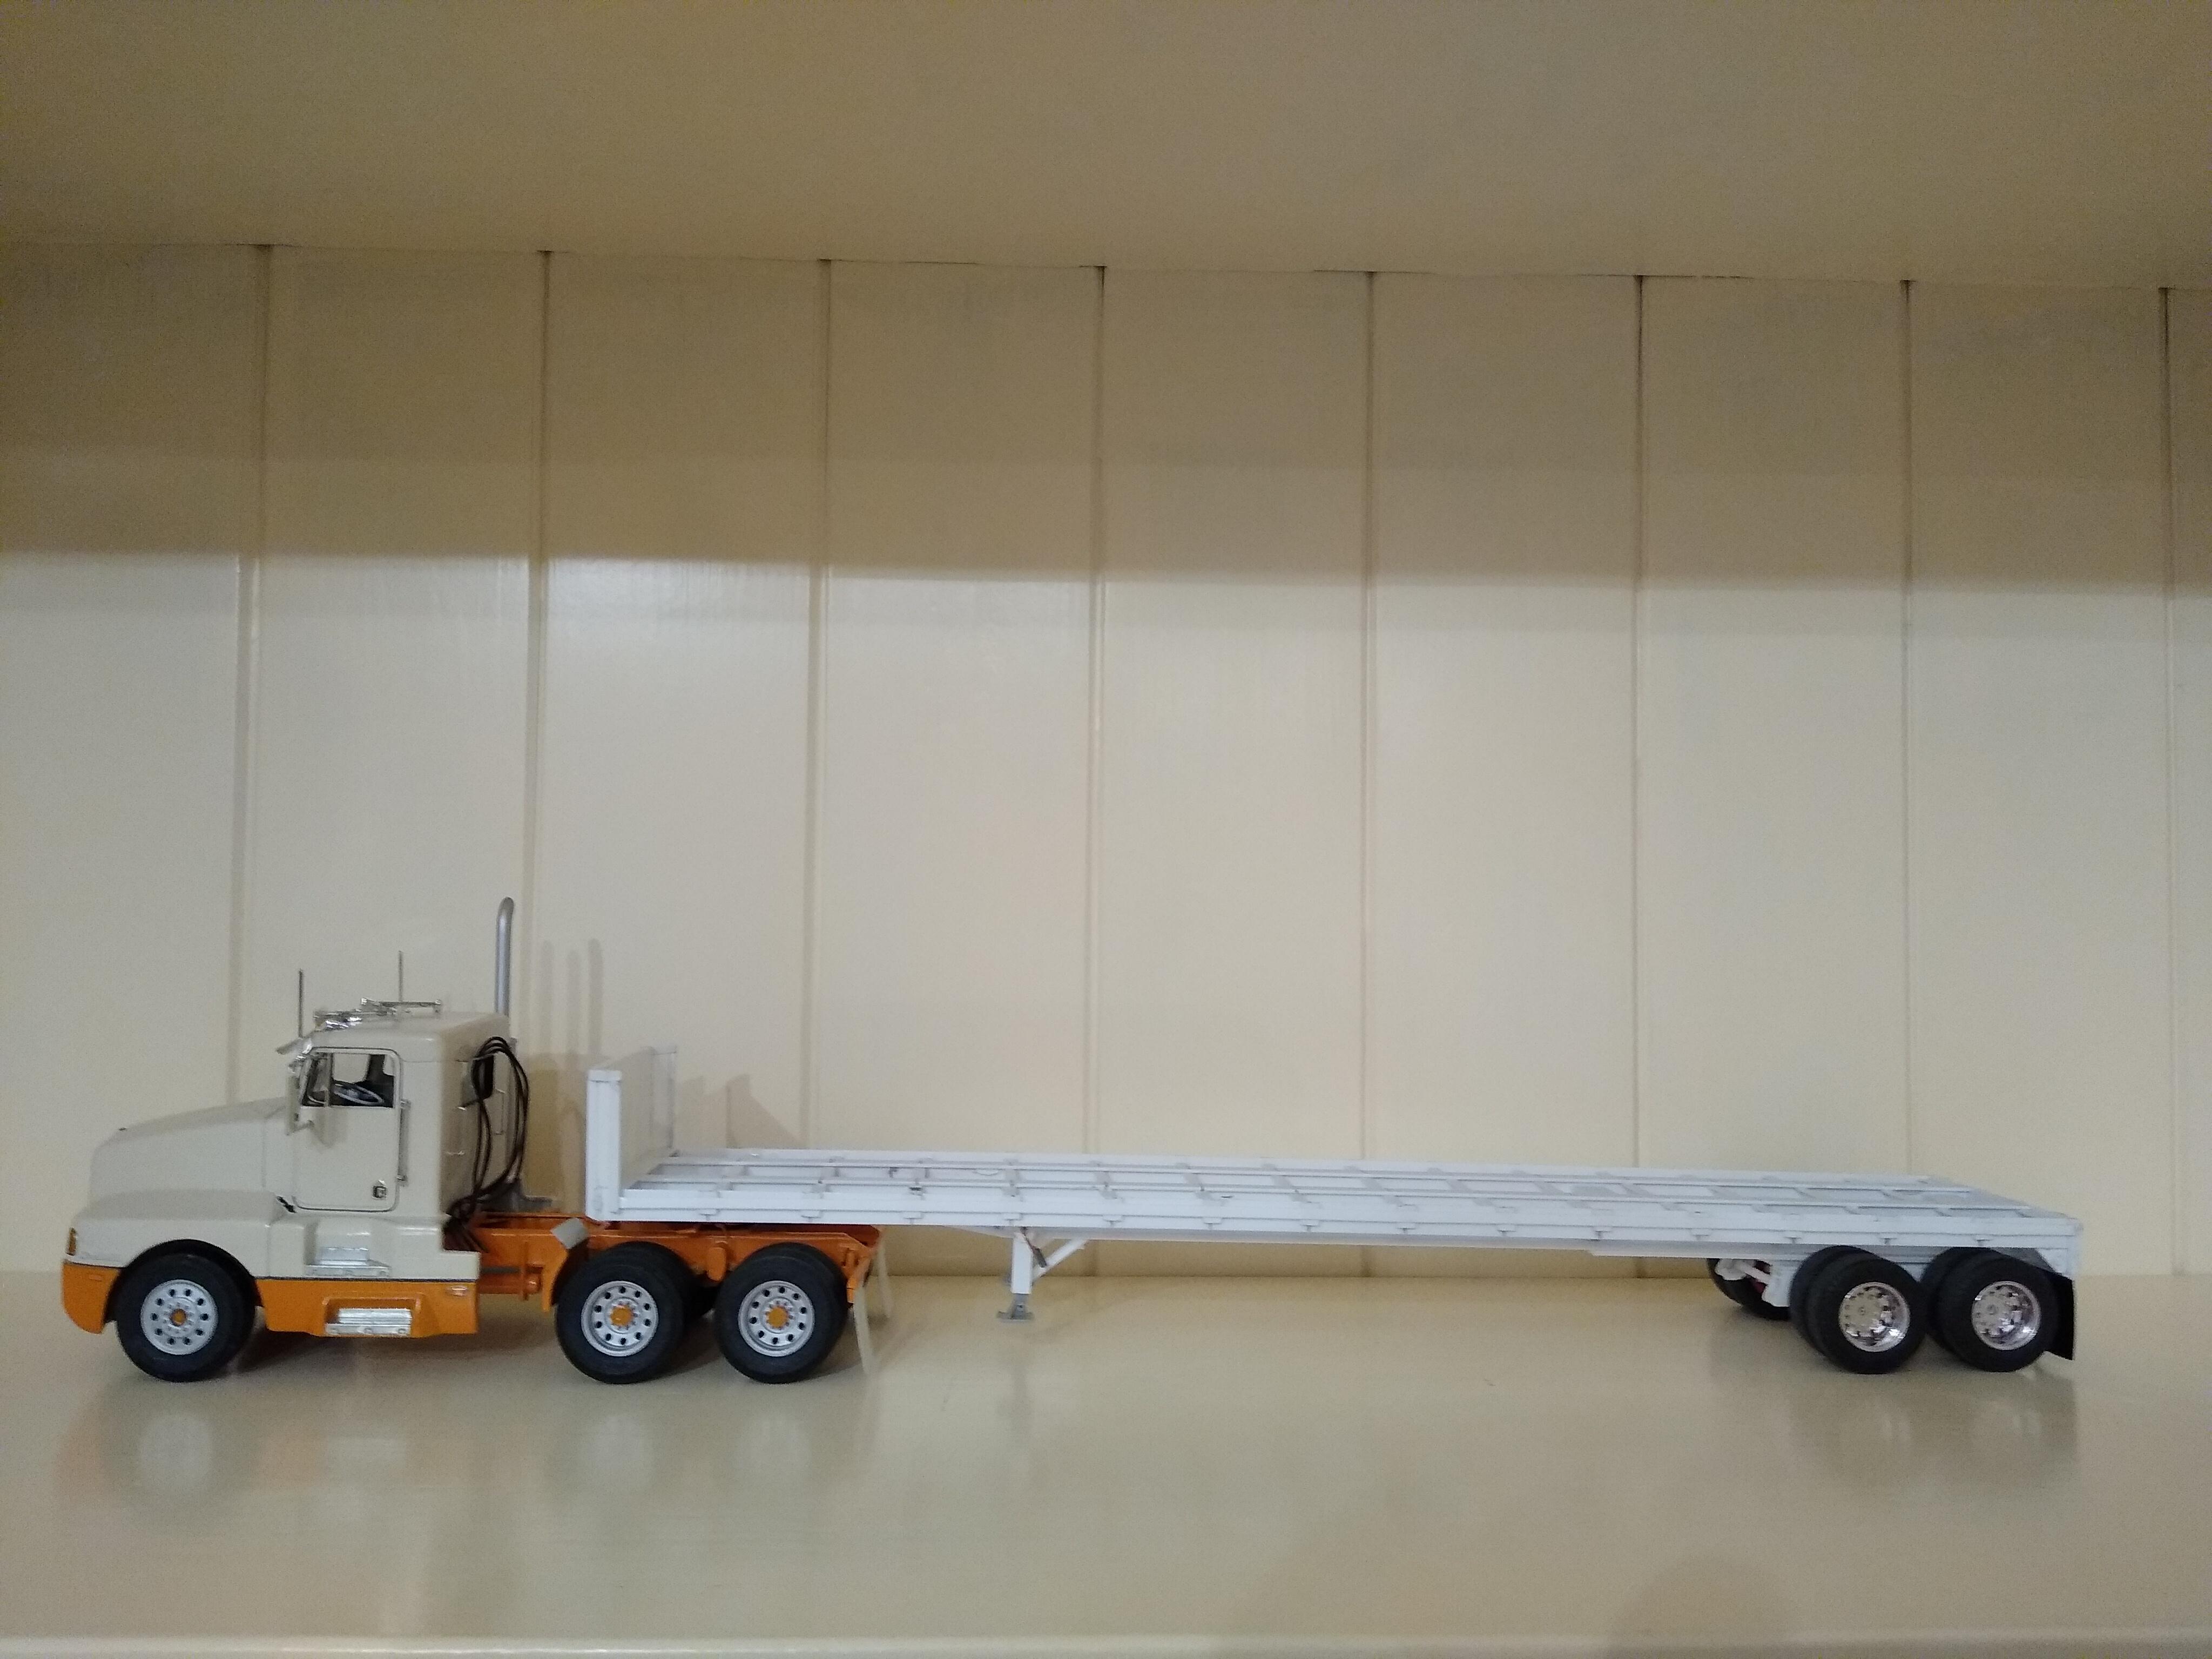
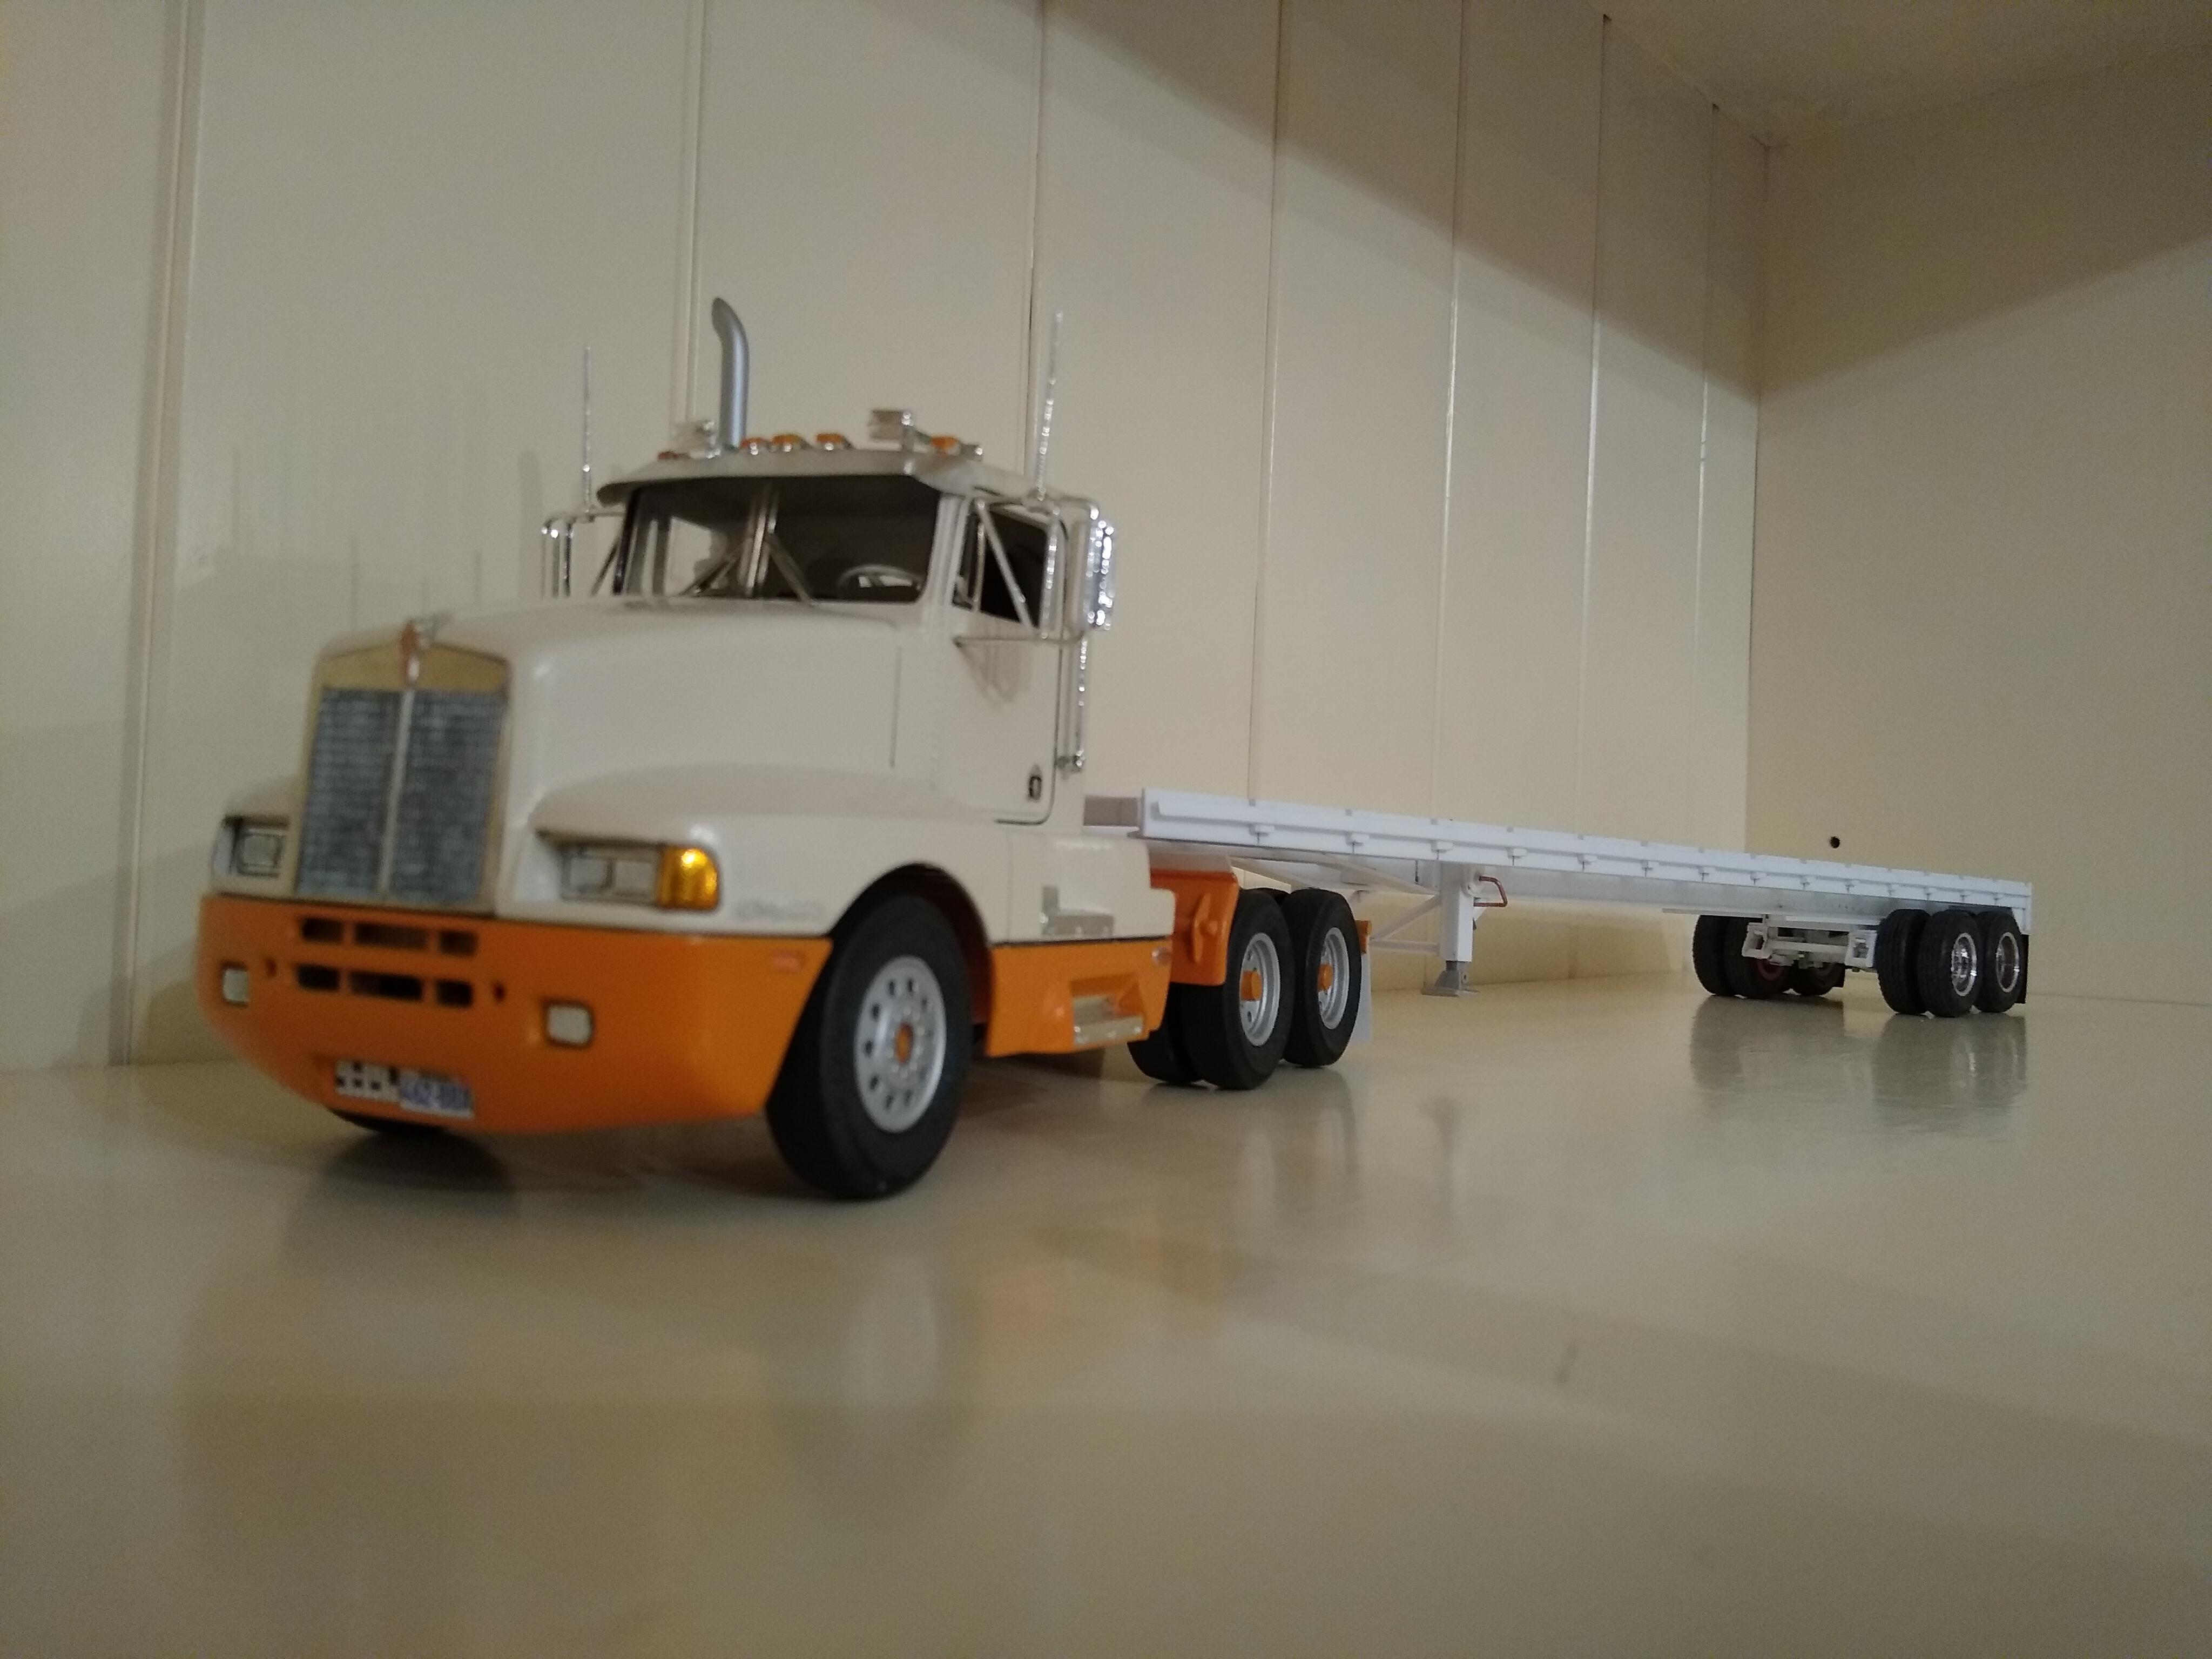
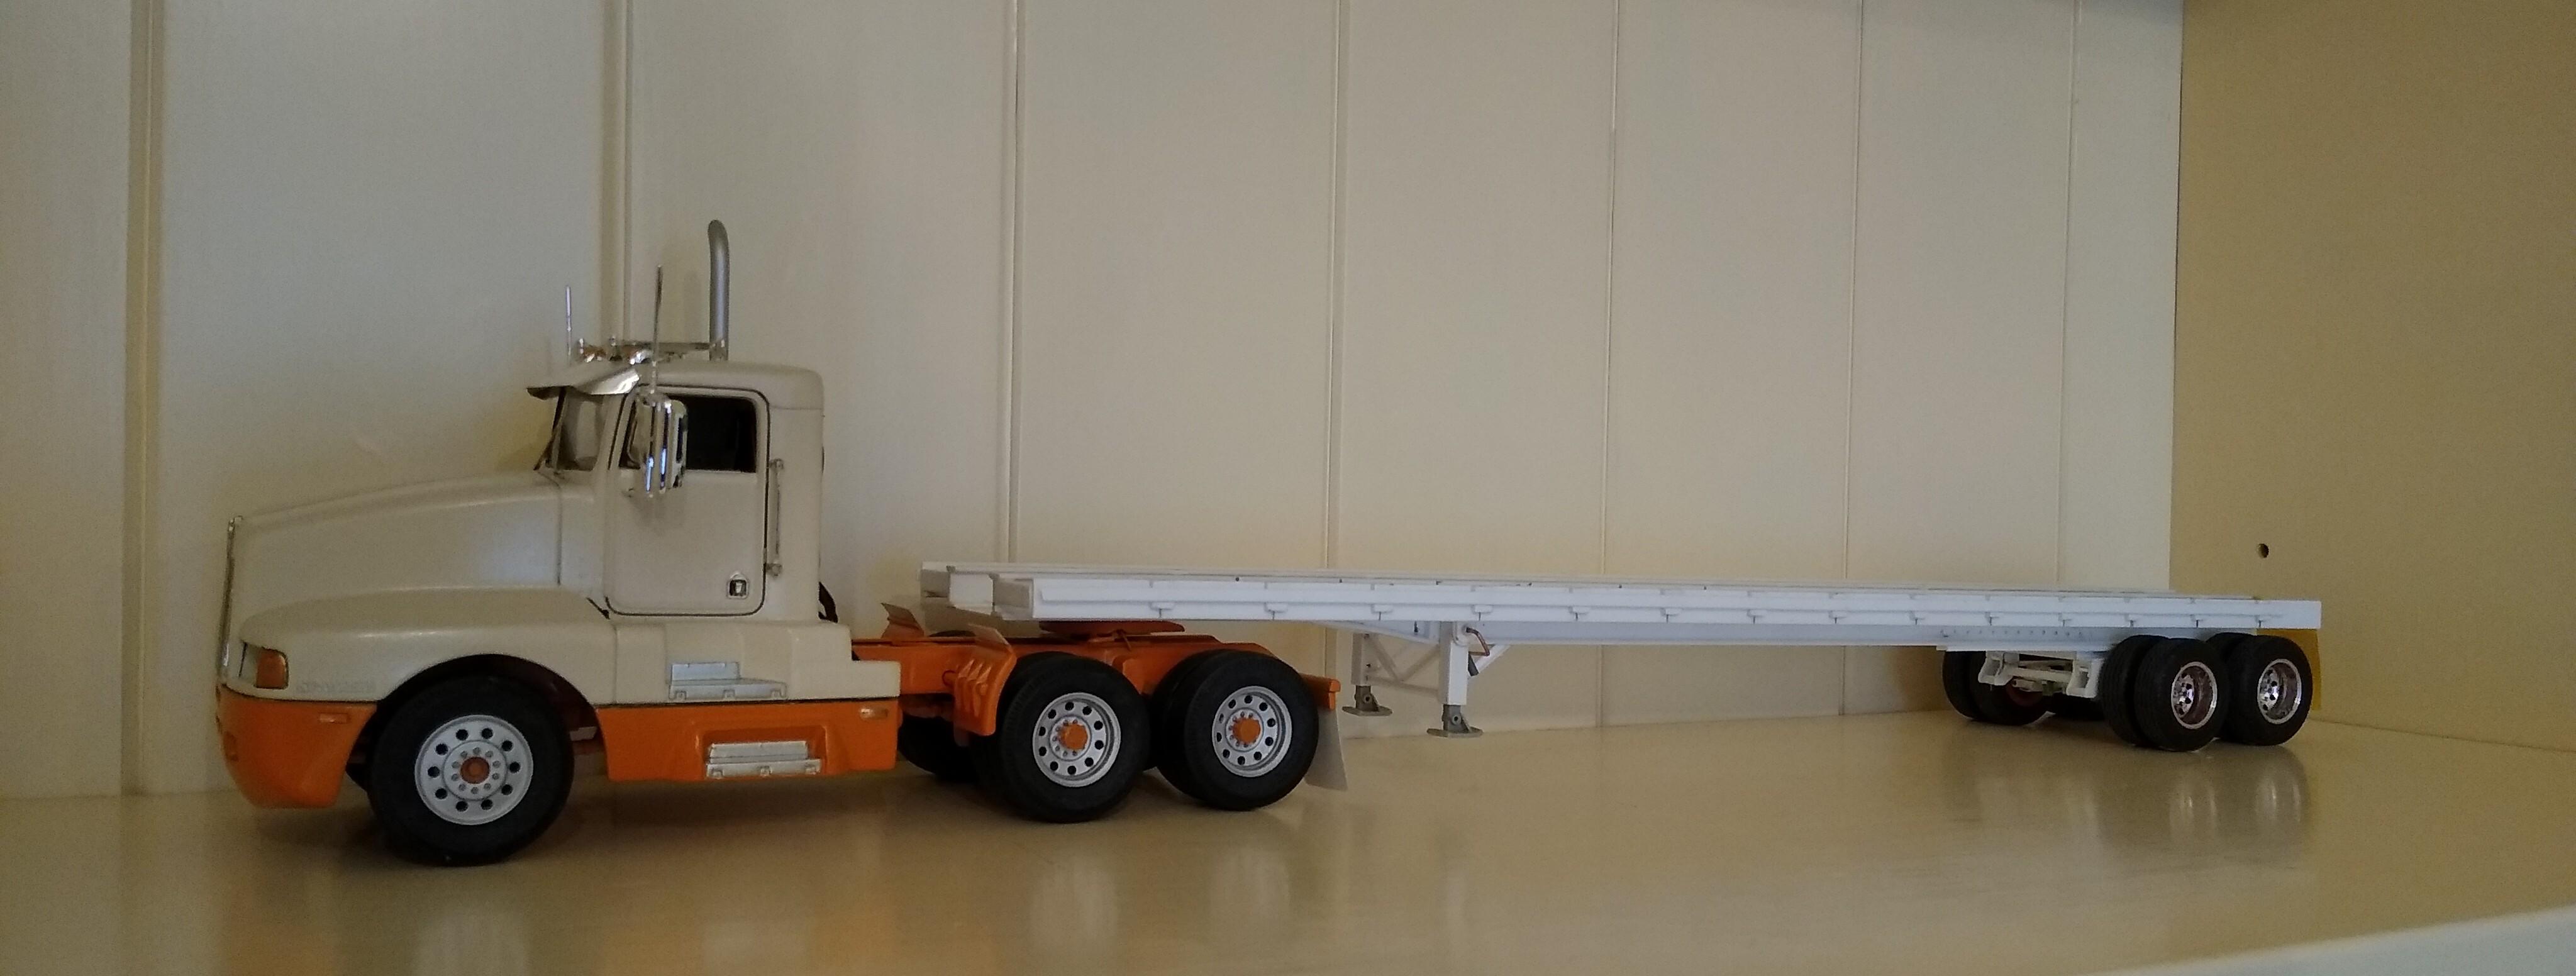
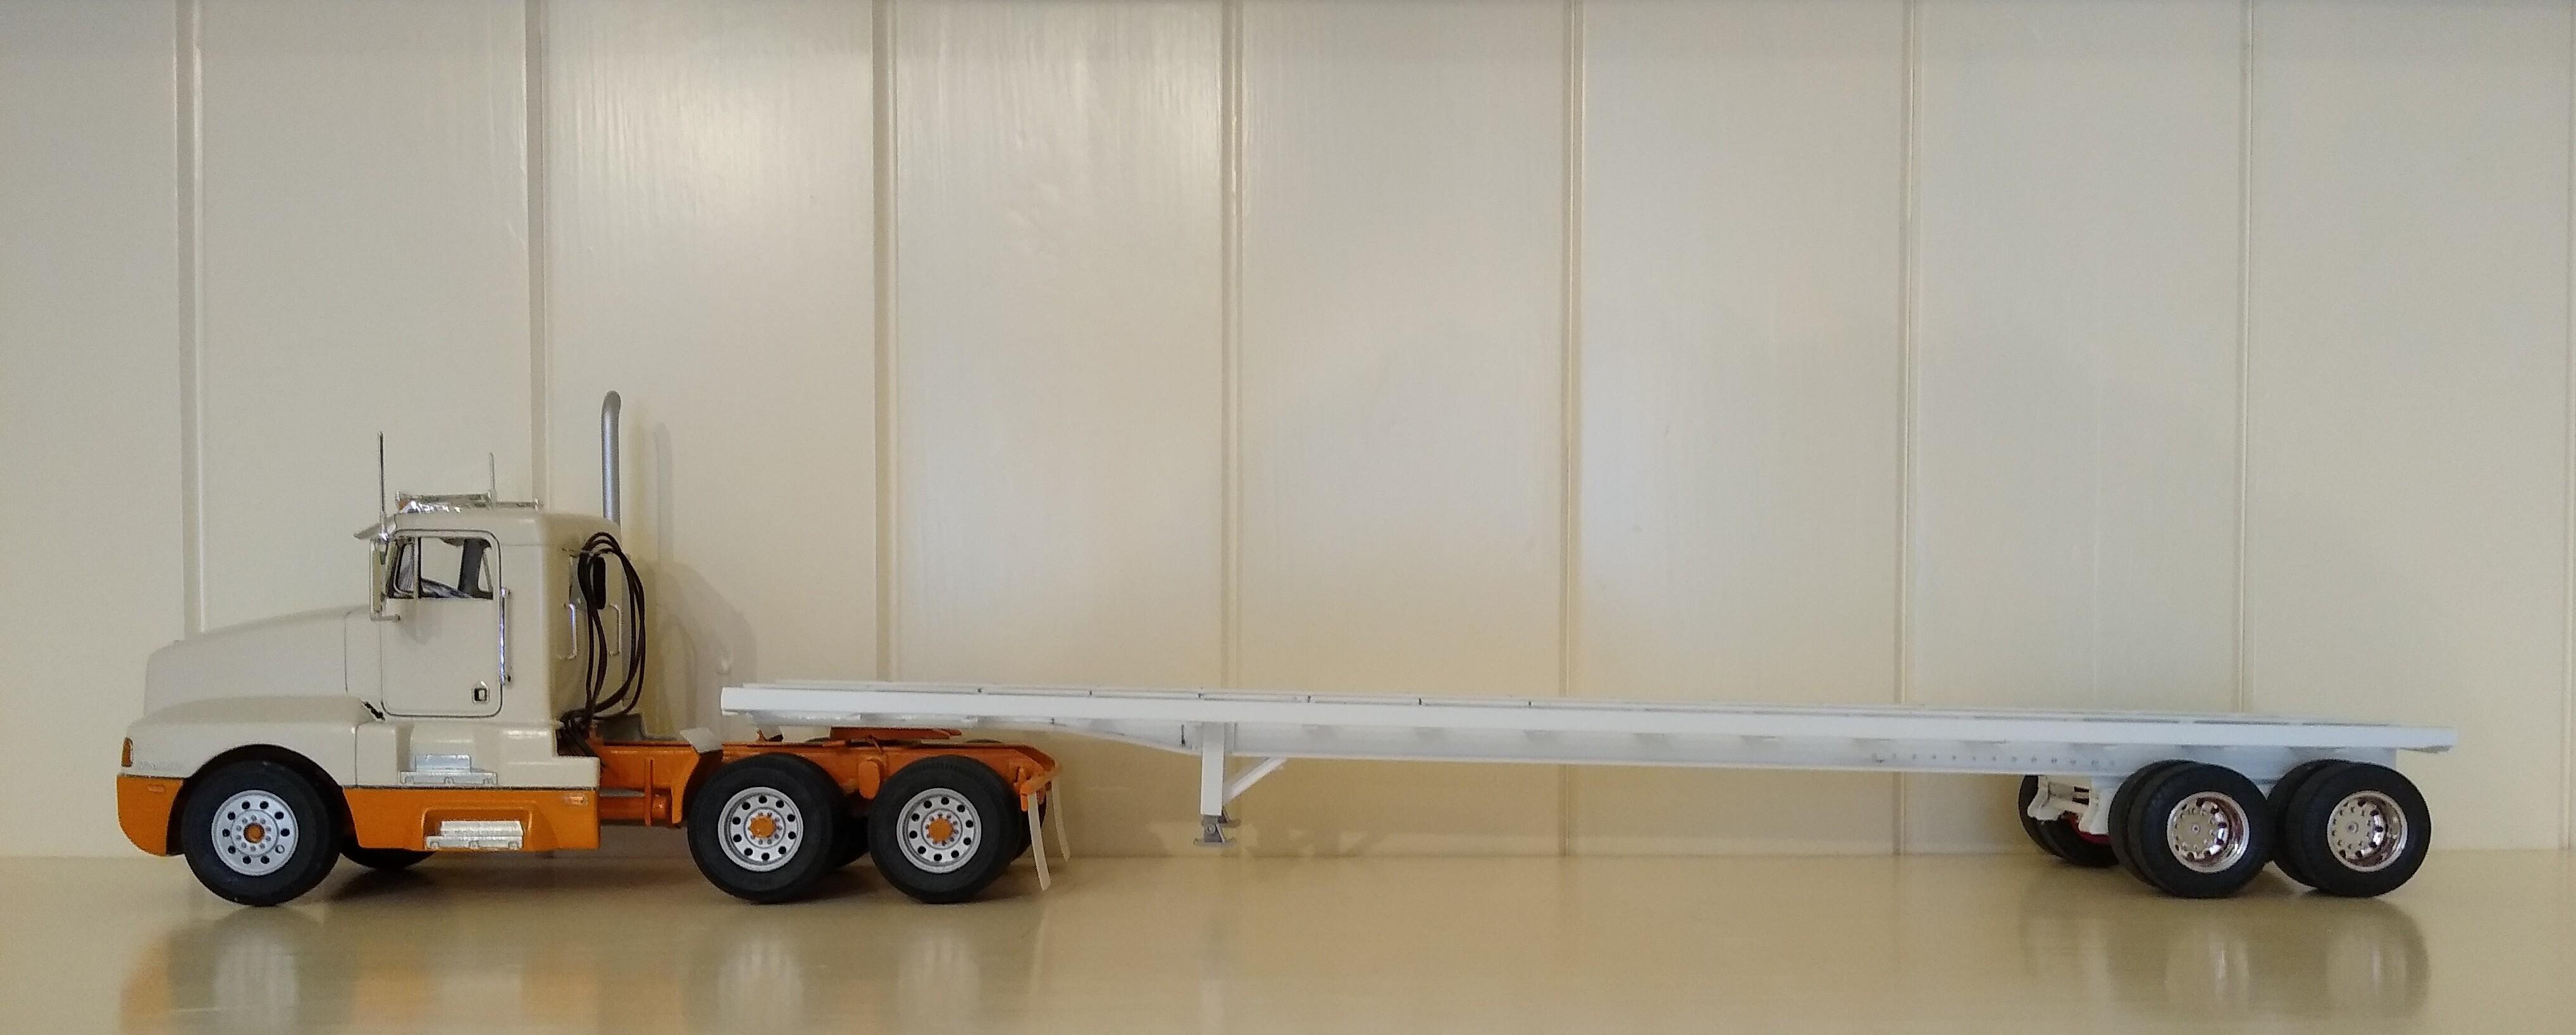
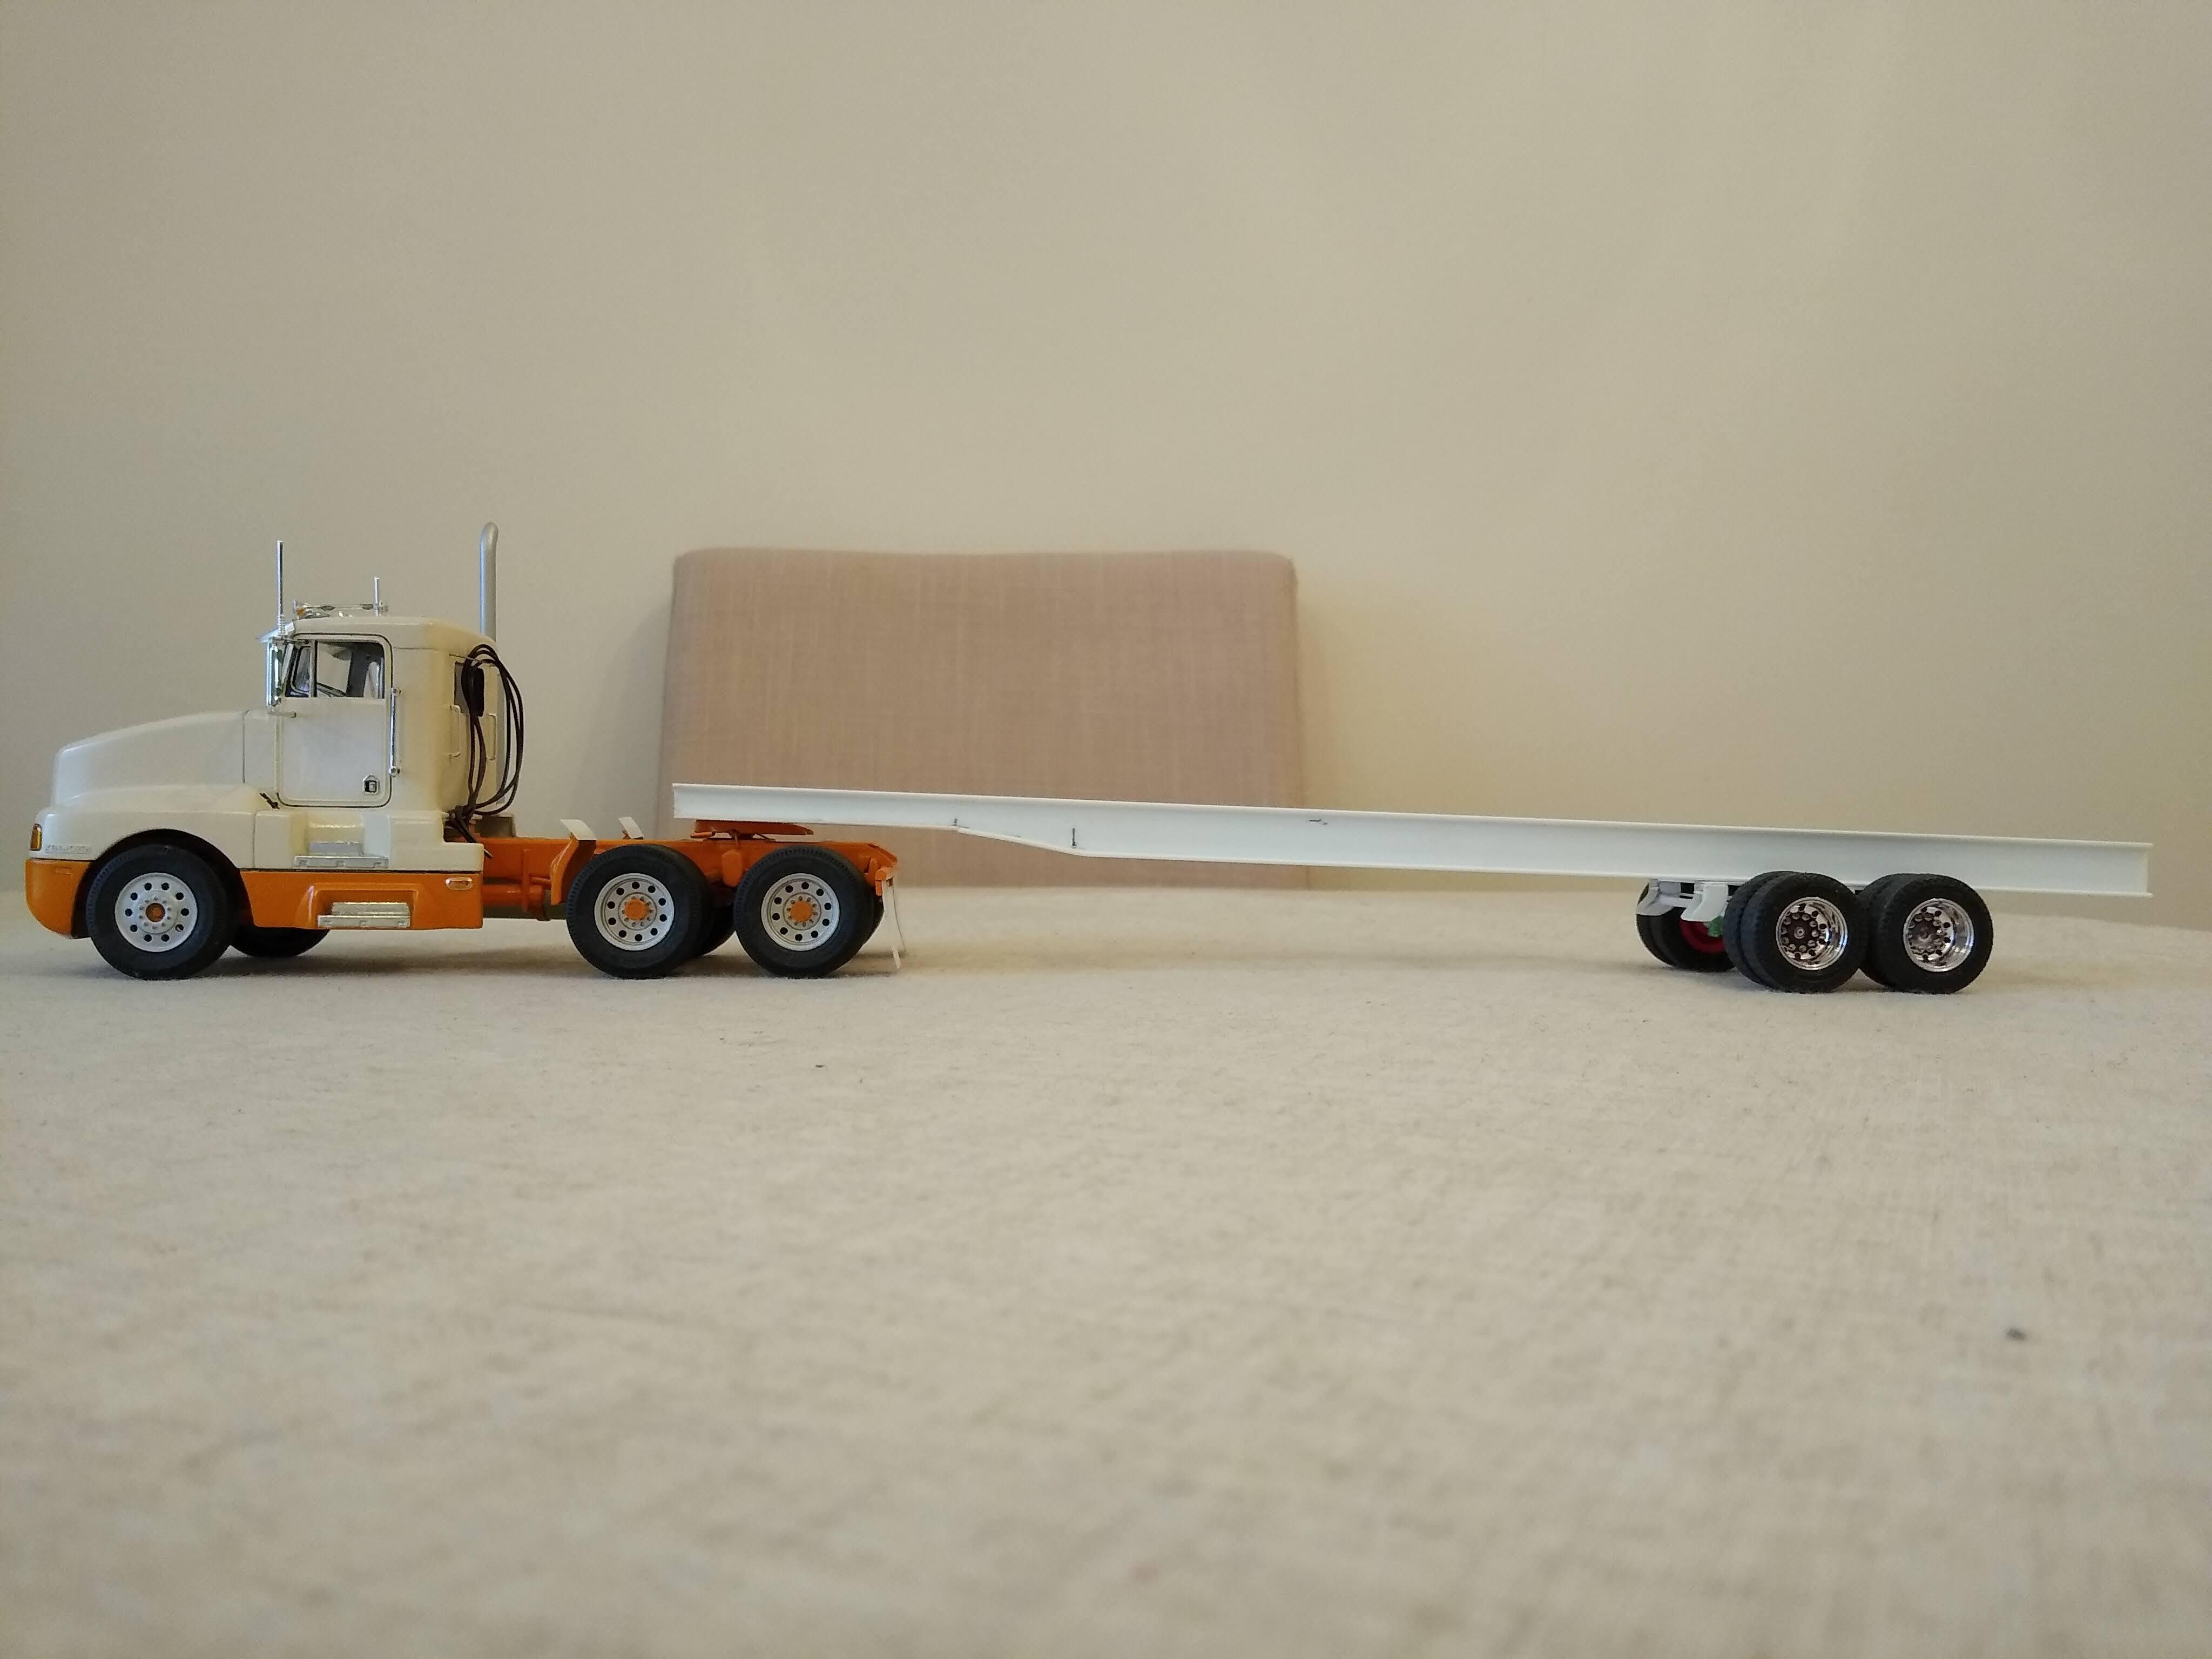
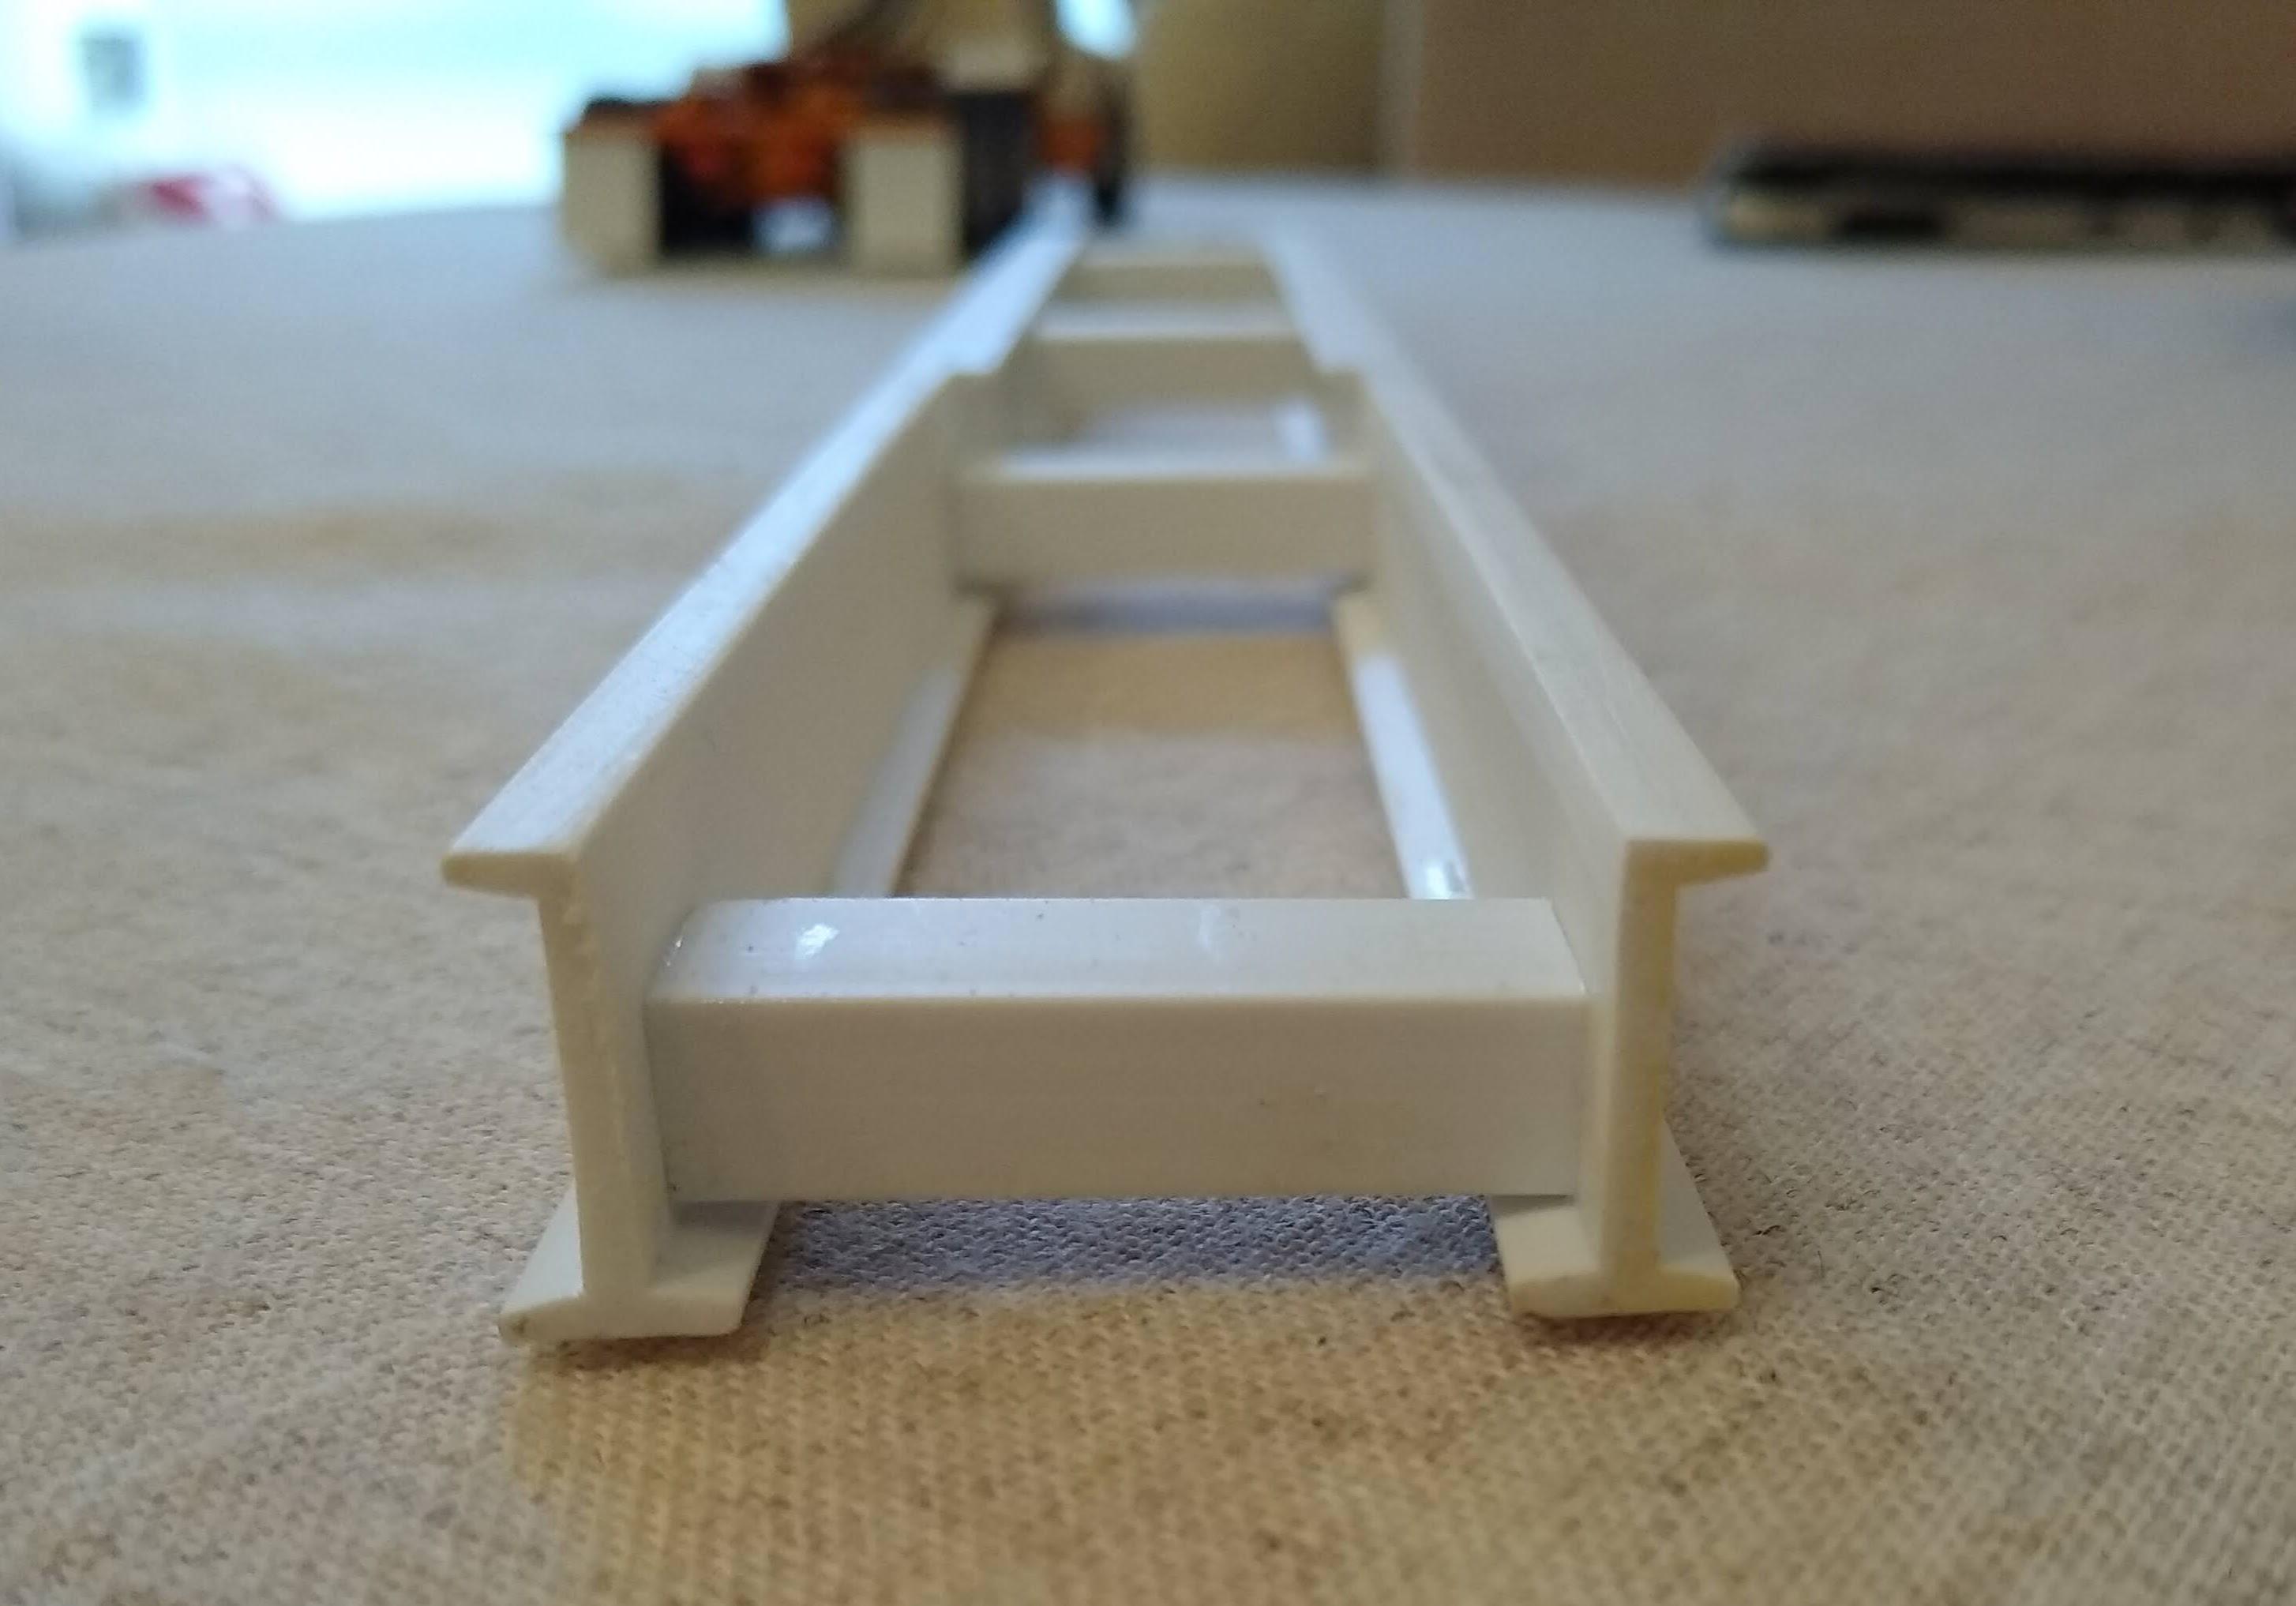
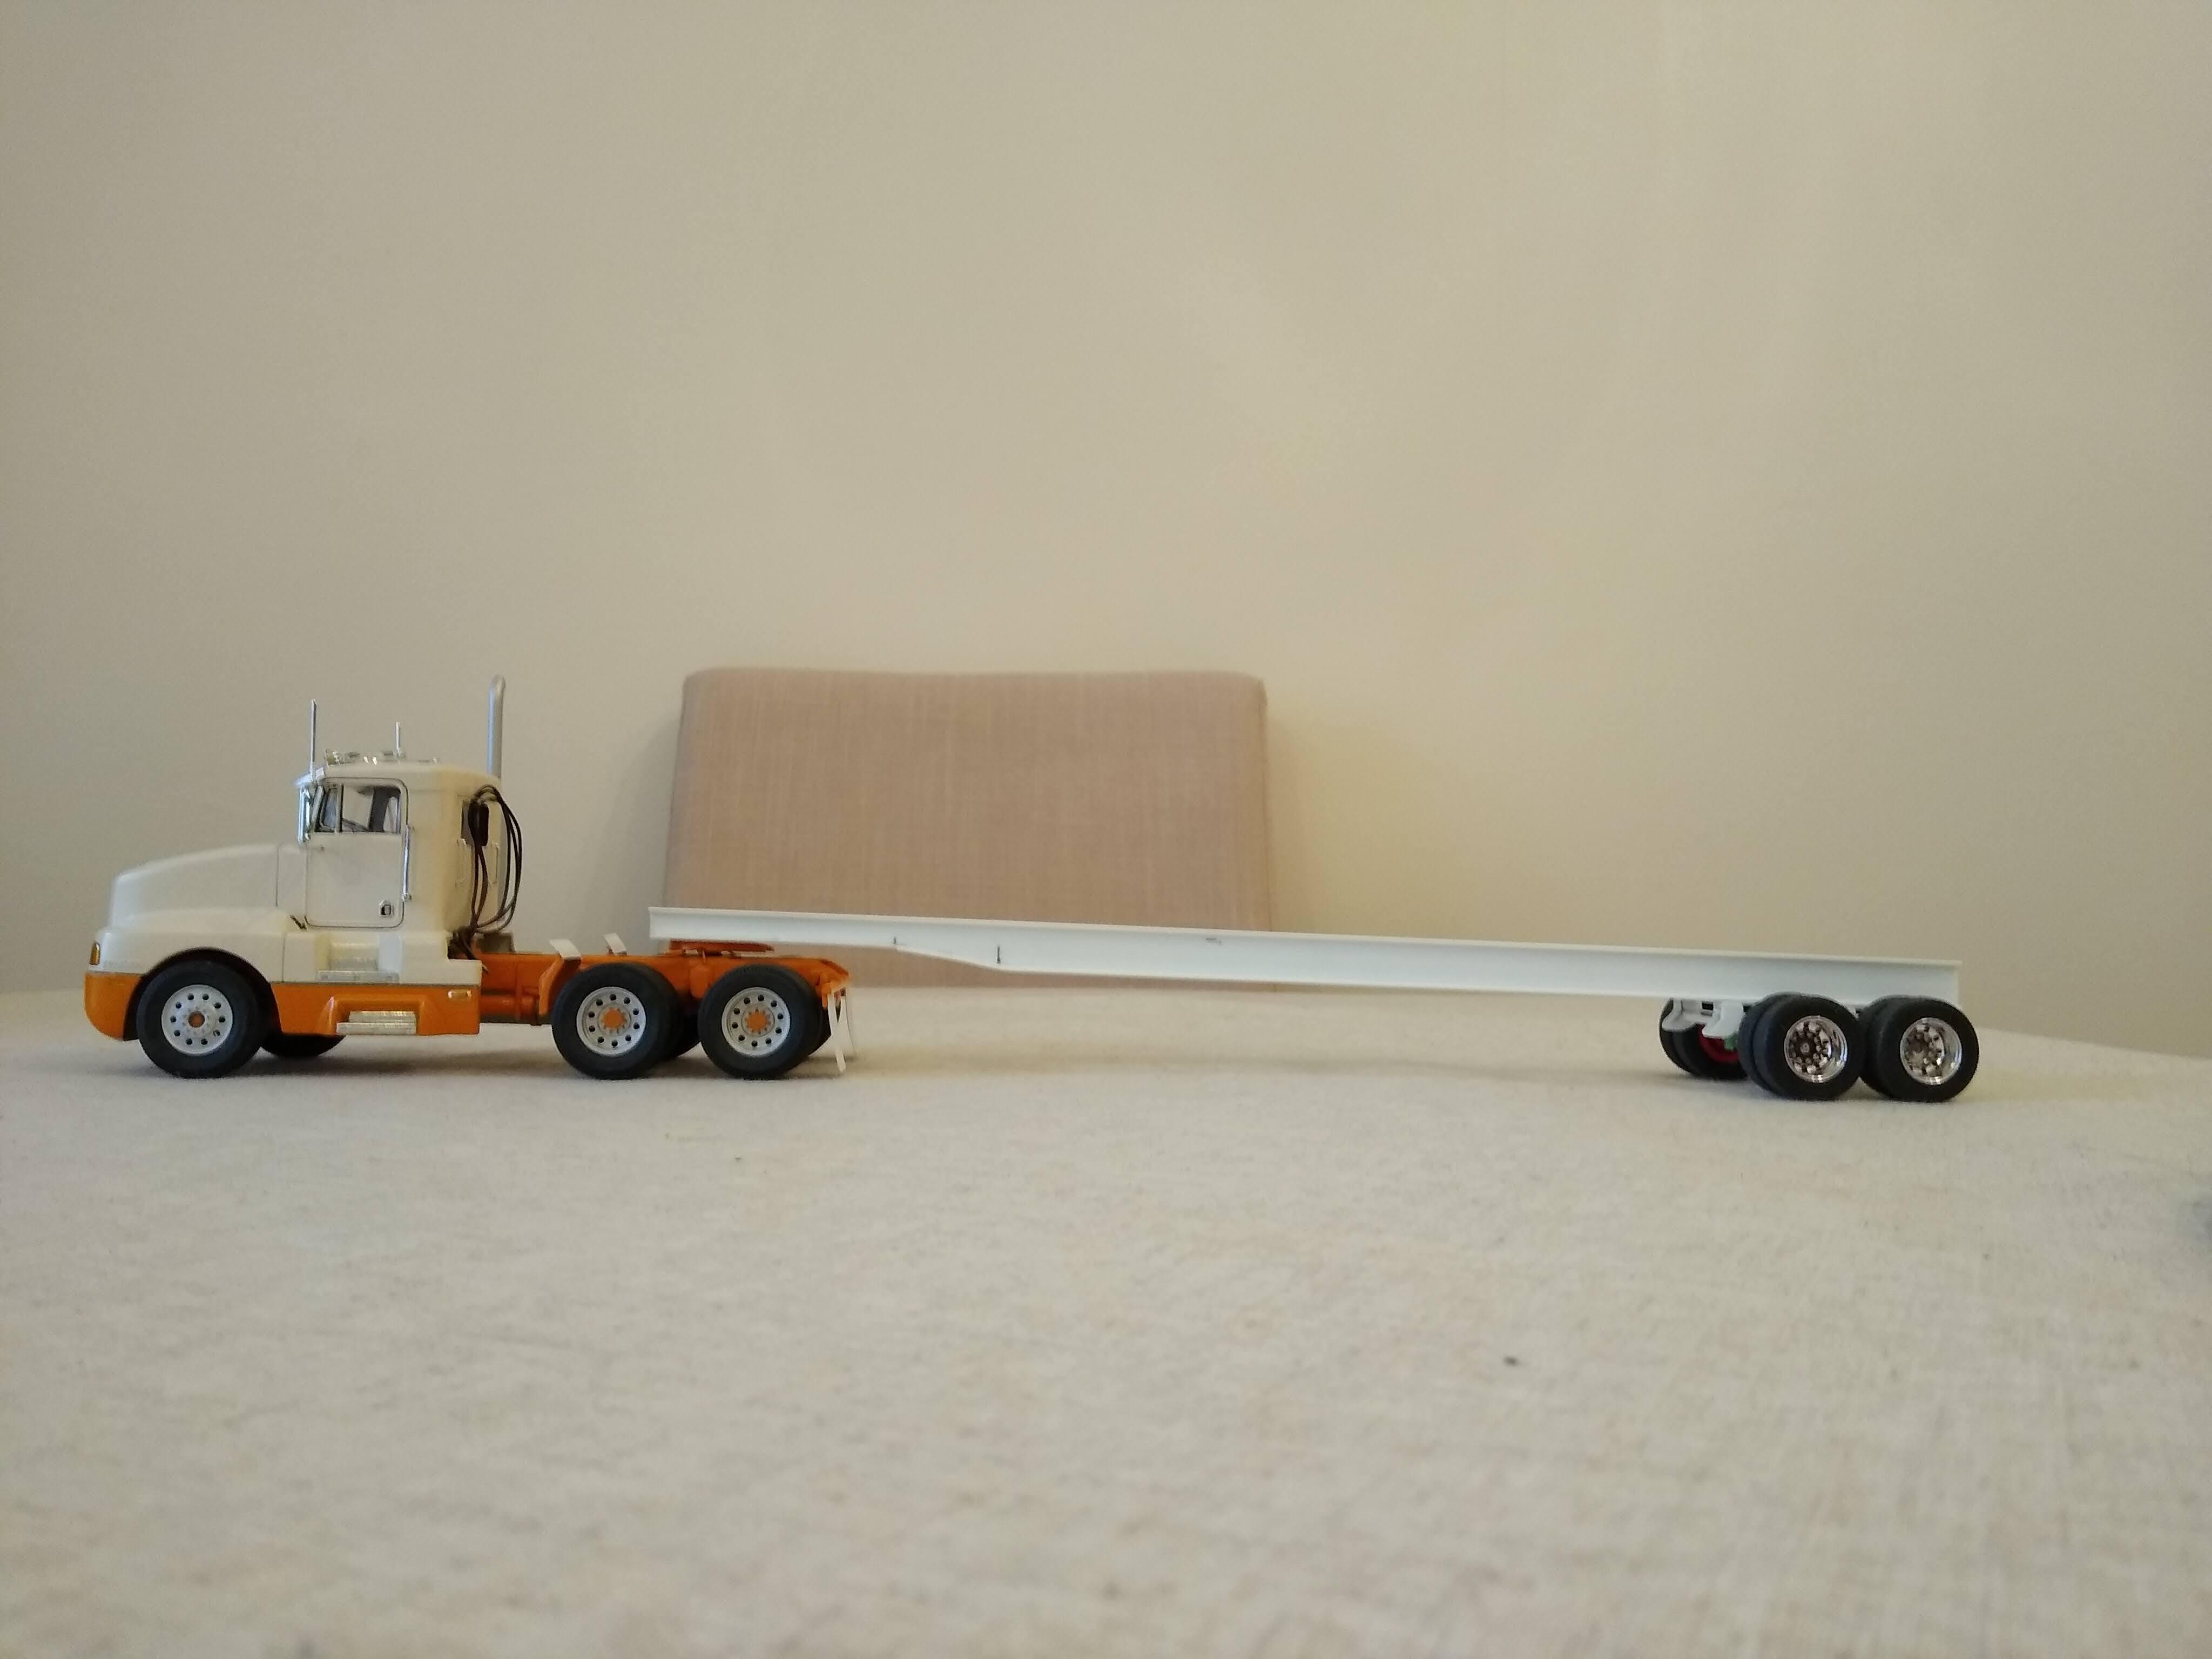
Although I had reservations about adding the stake pockets and tie rail at this scale an American flat just doesn't look American without them. So, I opted for a deeper side rail to accommodate it all. Then I cut 28 little sections for the pockets and a rail and painstakingly located it all using templates made from coffee stirrers. However, as I had planned my width on having plain rails I had to take 3.2mm off each end of every crossmember. That was scary but I managed it. I also had to raise the ride height because of the deeper rails, I just added a strip under the main rail. Overall stance is just right in my opinion. I'm thinking of using coffee stirrers for the bed.
-
Pete 359 at last
Rockford replied to Rockford's topic in WIP: Model Trucks: Big Rigs and Heavy Equipment
Thanks Brian, sorry for not responding but I didn't notice you'd commented. It's really just a stopgap so I can bear to look at it on the shelf until I can get to it properly. I've got so many projects on the go now and I'm so slow at my work nowadays. -
Scratchbuilt flatbed
Rockford replied to Rockford's topic in WIP: Model Trucks: Big Rigs and Heavy Equipment
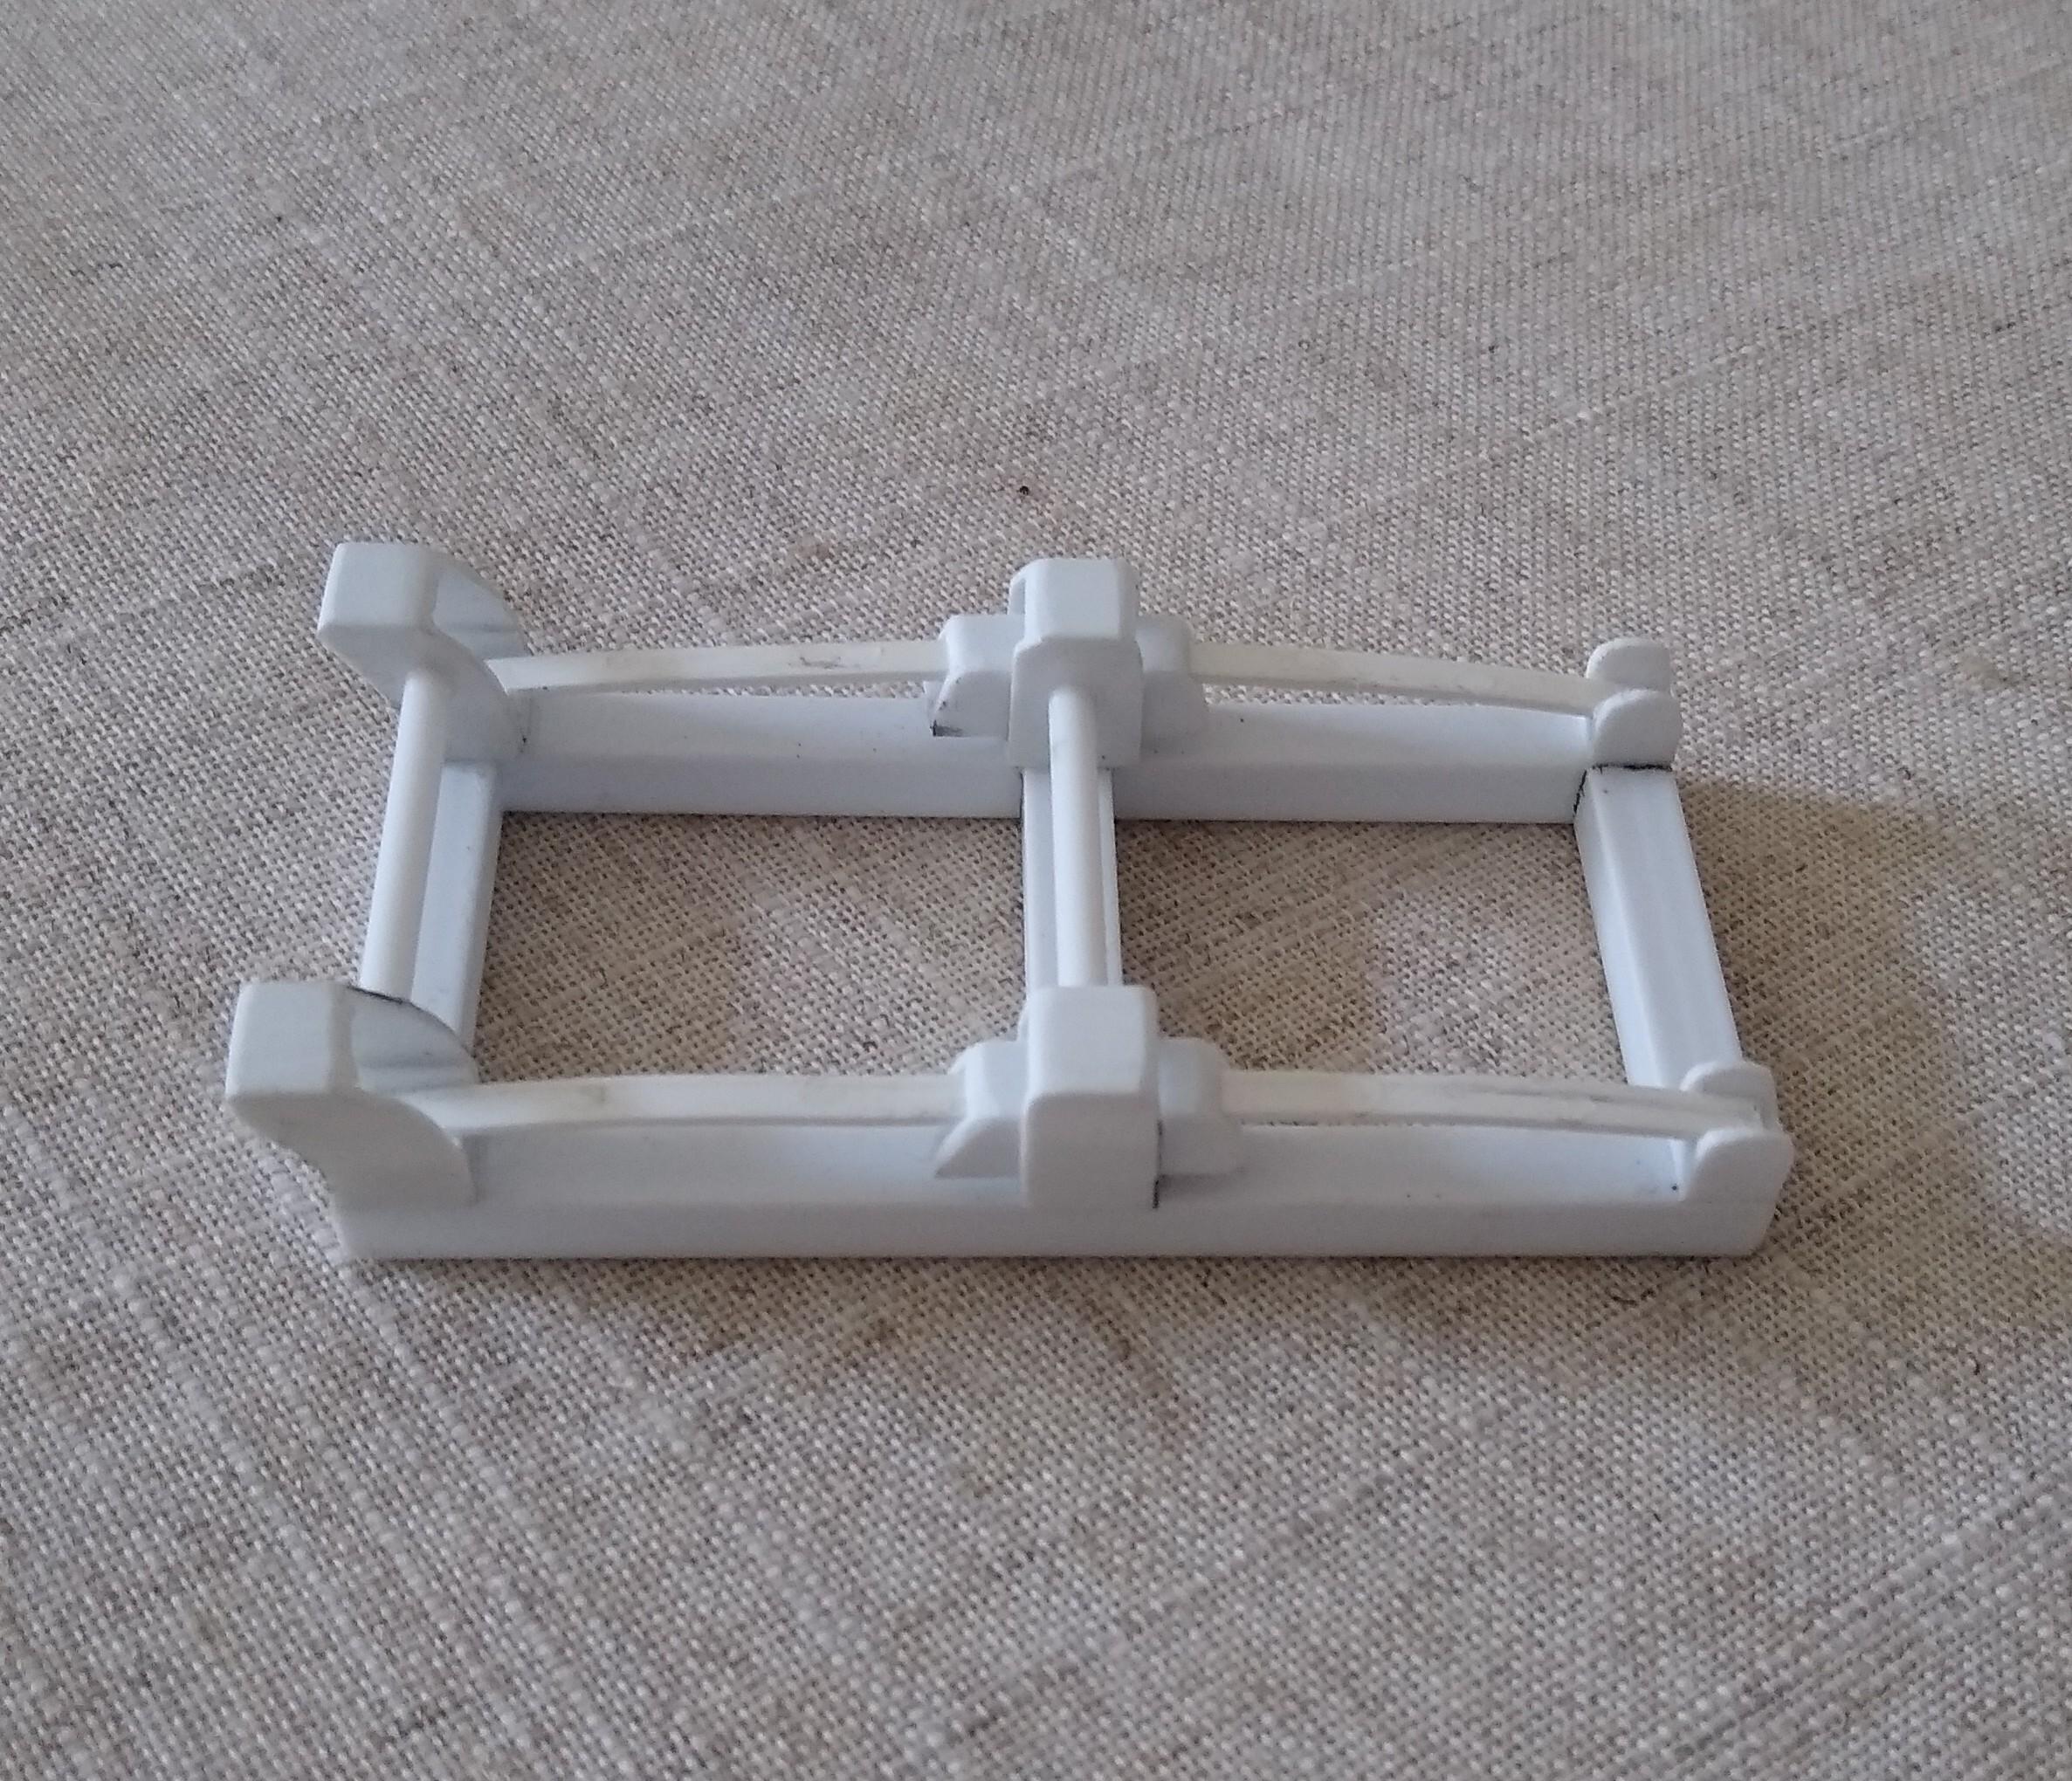
Colours ? I was thinking red with white wheels, though most steel framed flats appear to be black. Black would hide a multitude of sins but I think red looks great on flatbeds. Definitely not silver because it's not an aluminium unit. Had quick look tonight, made a gearbox for the landing gear out of three layers of card stock, so I could get the seam down the middle. Then fashioned a winding handle out of copper wire adding a little piece of the wire insulation back on at the end for the handle, or should that be handle-handle? Not bad.
-
Scratchbuilt flatbed
Rockford replied to Rockford's topic in WIP: Model Trucks: Big Rigs and Heavy Equipment
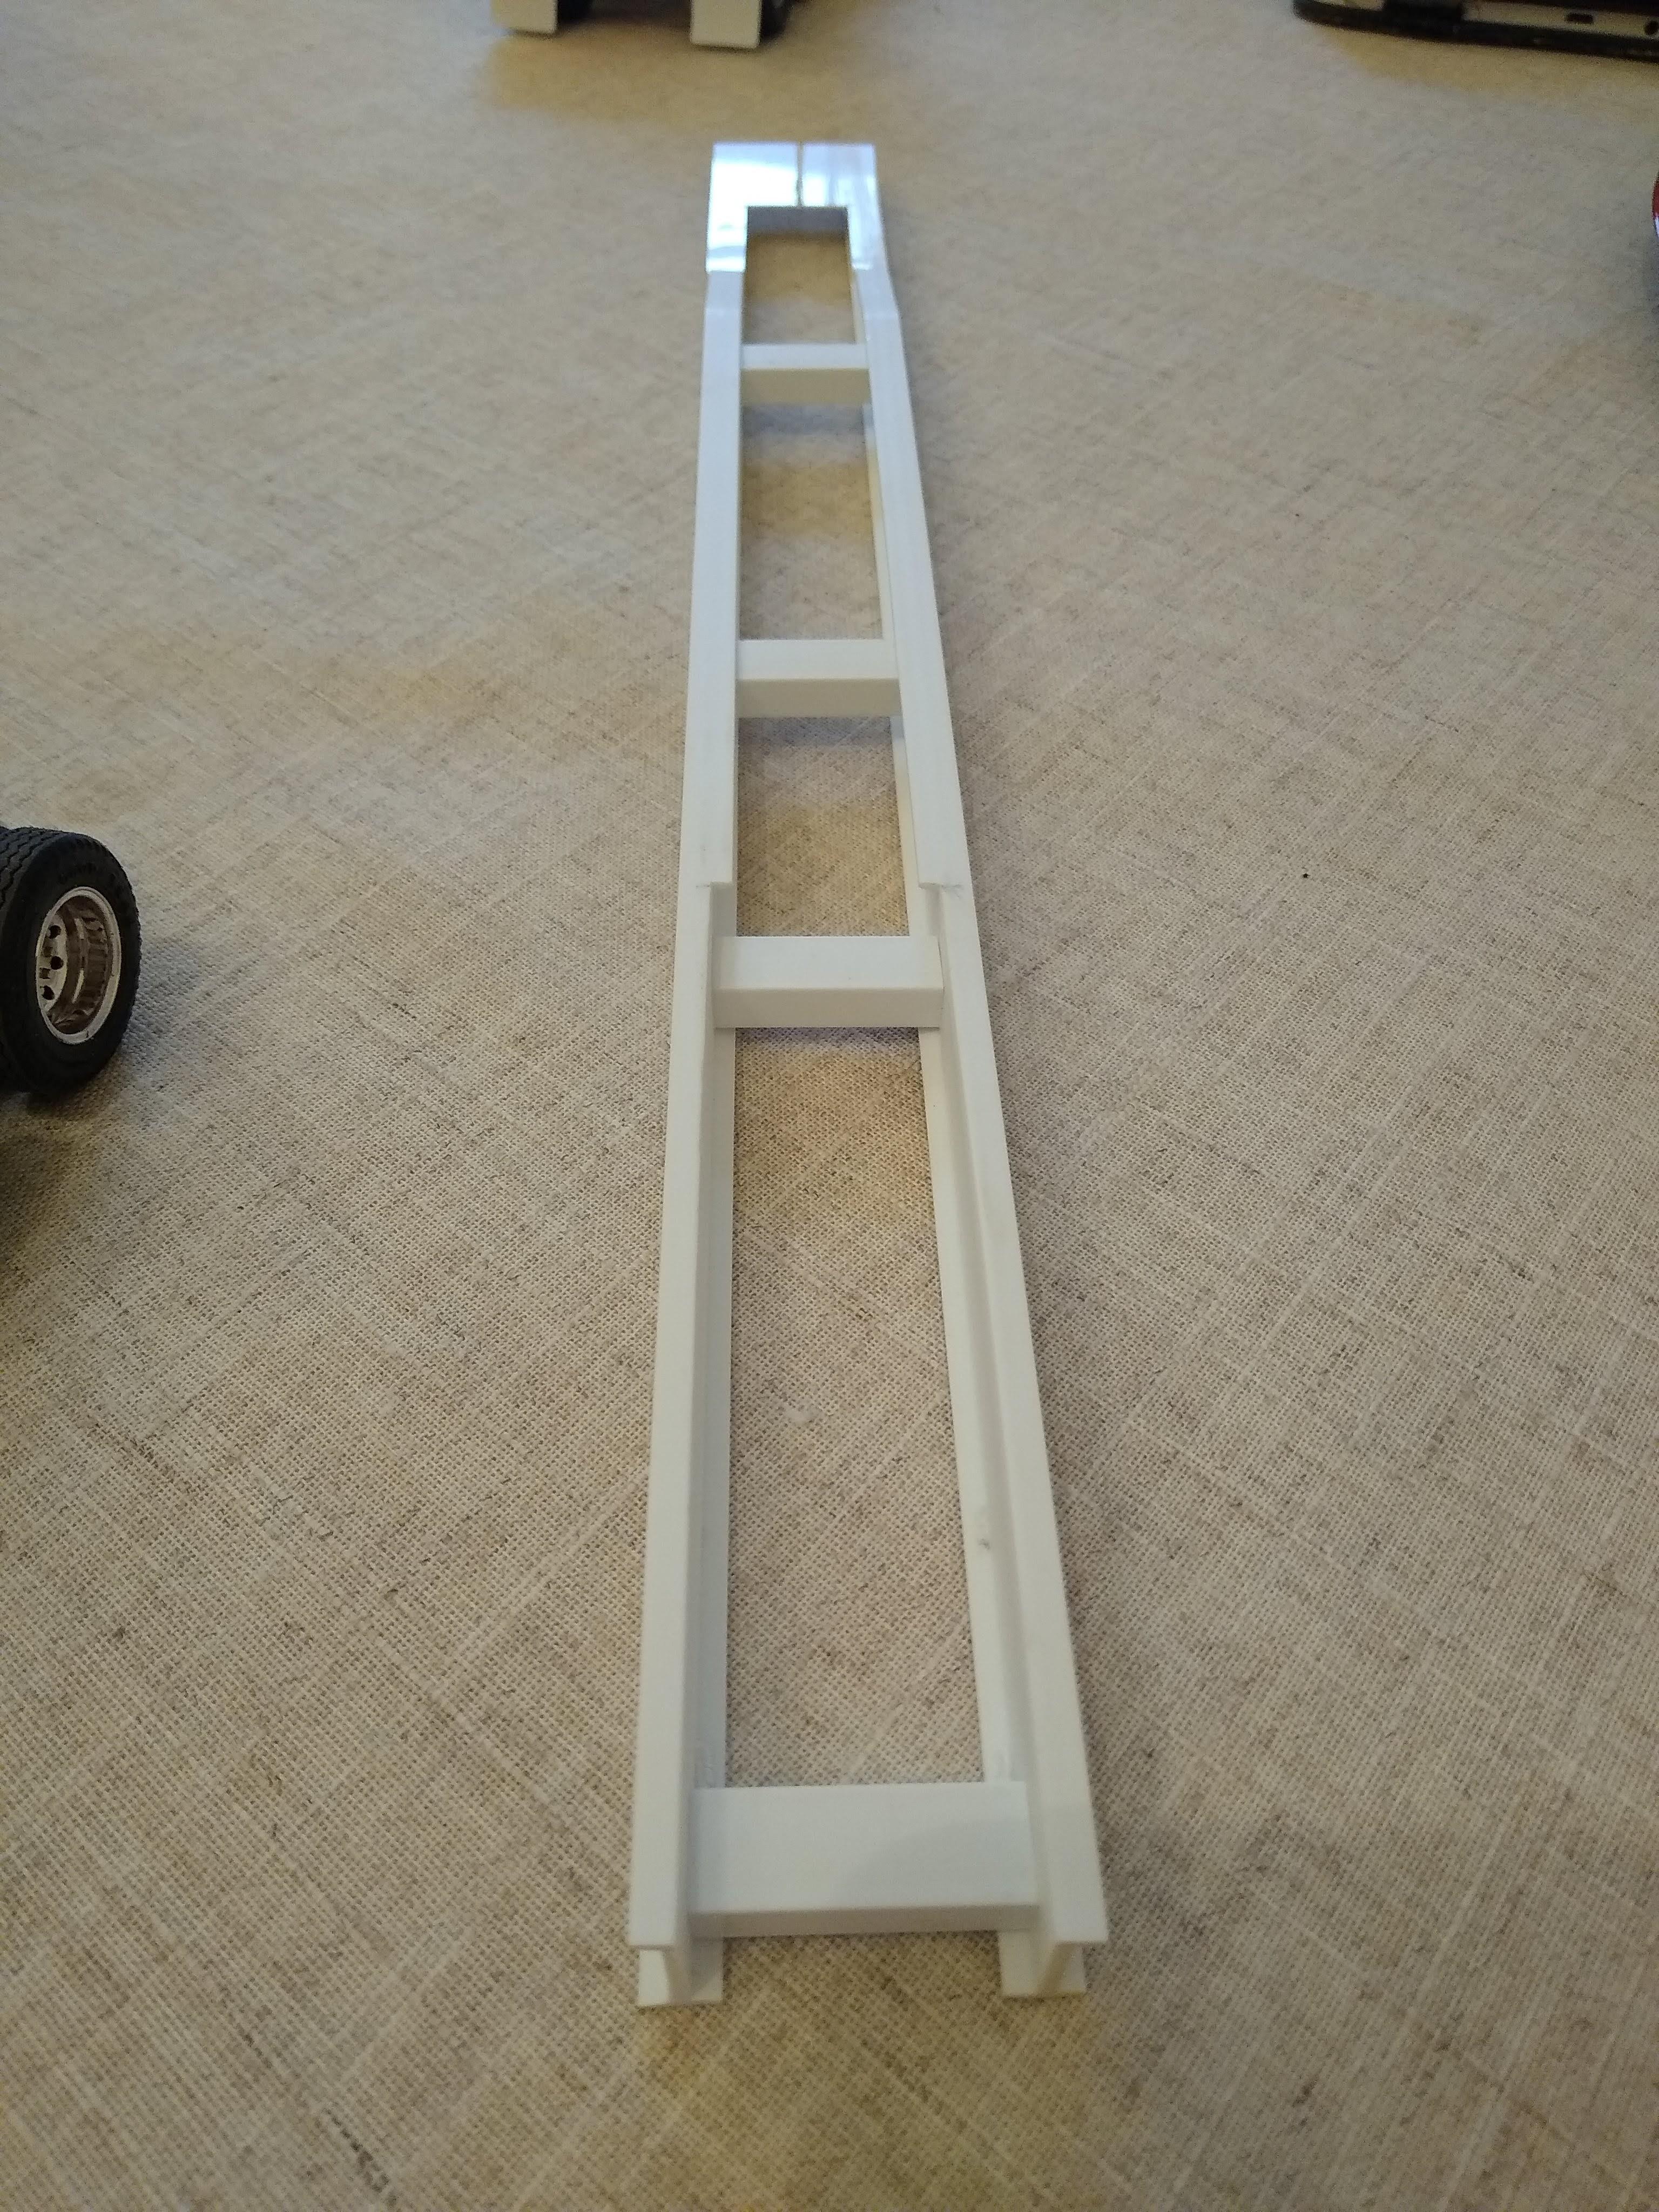
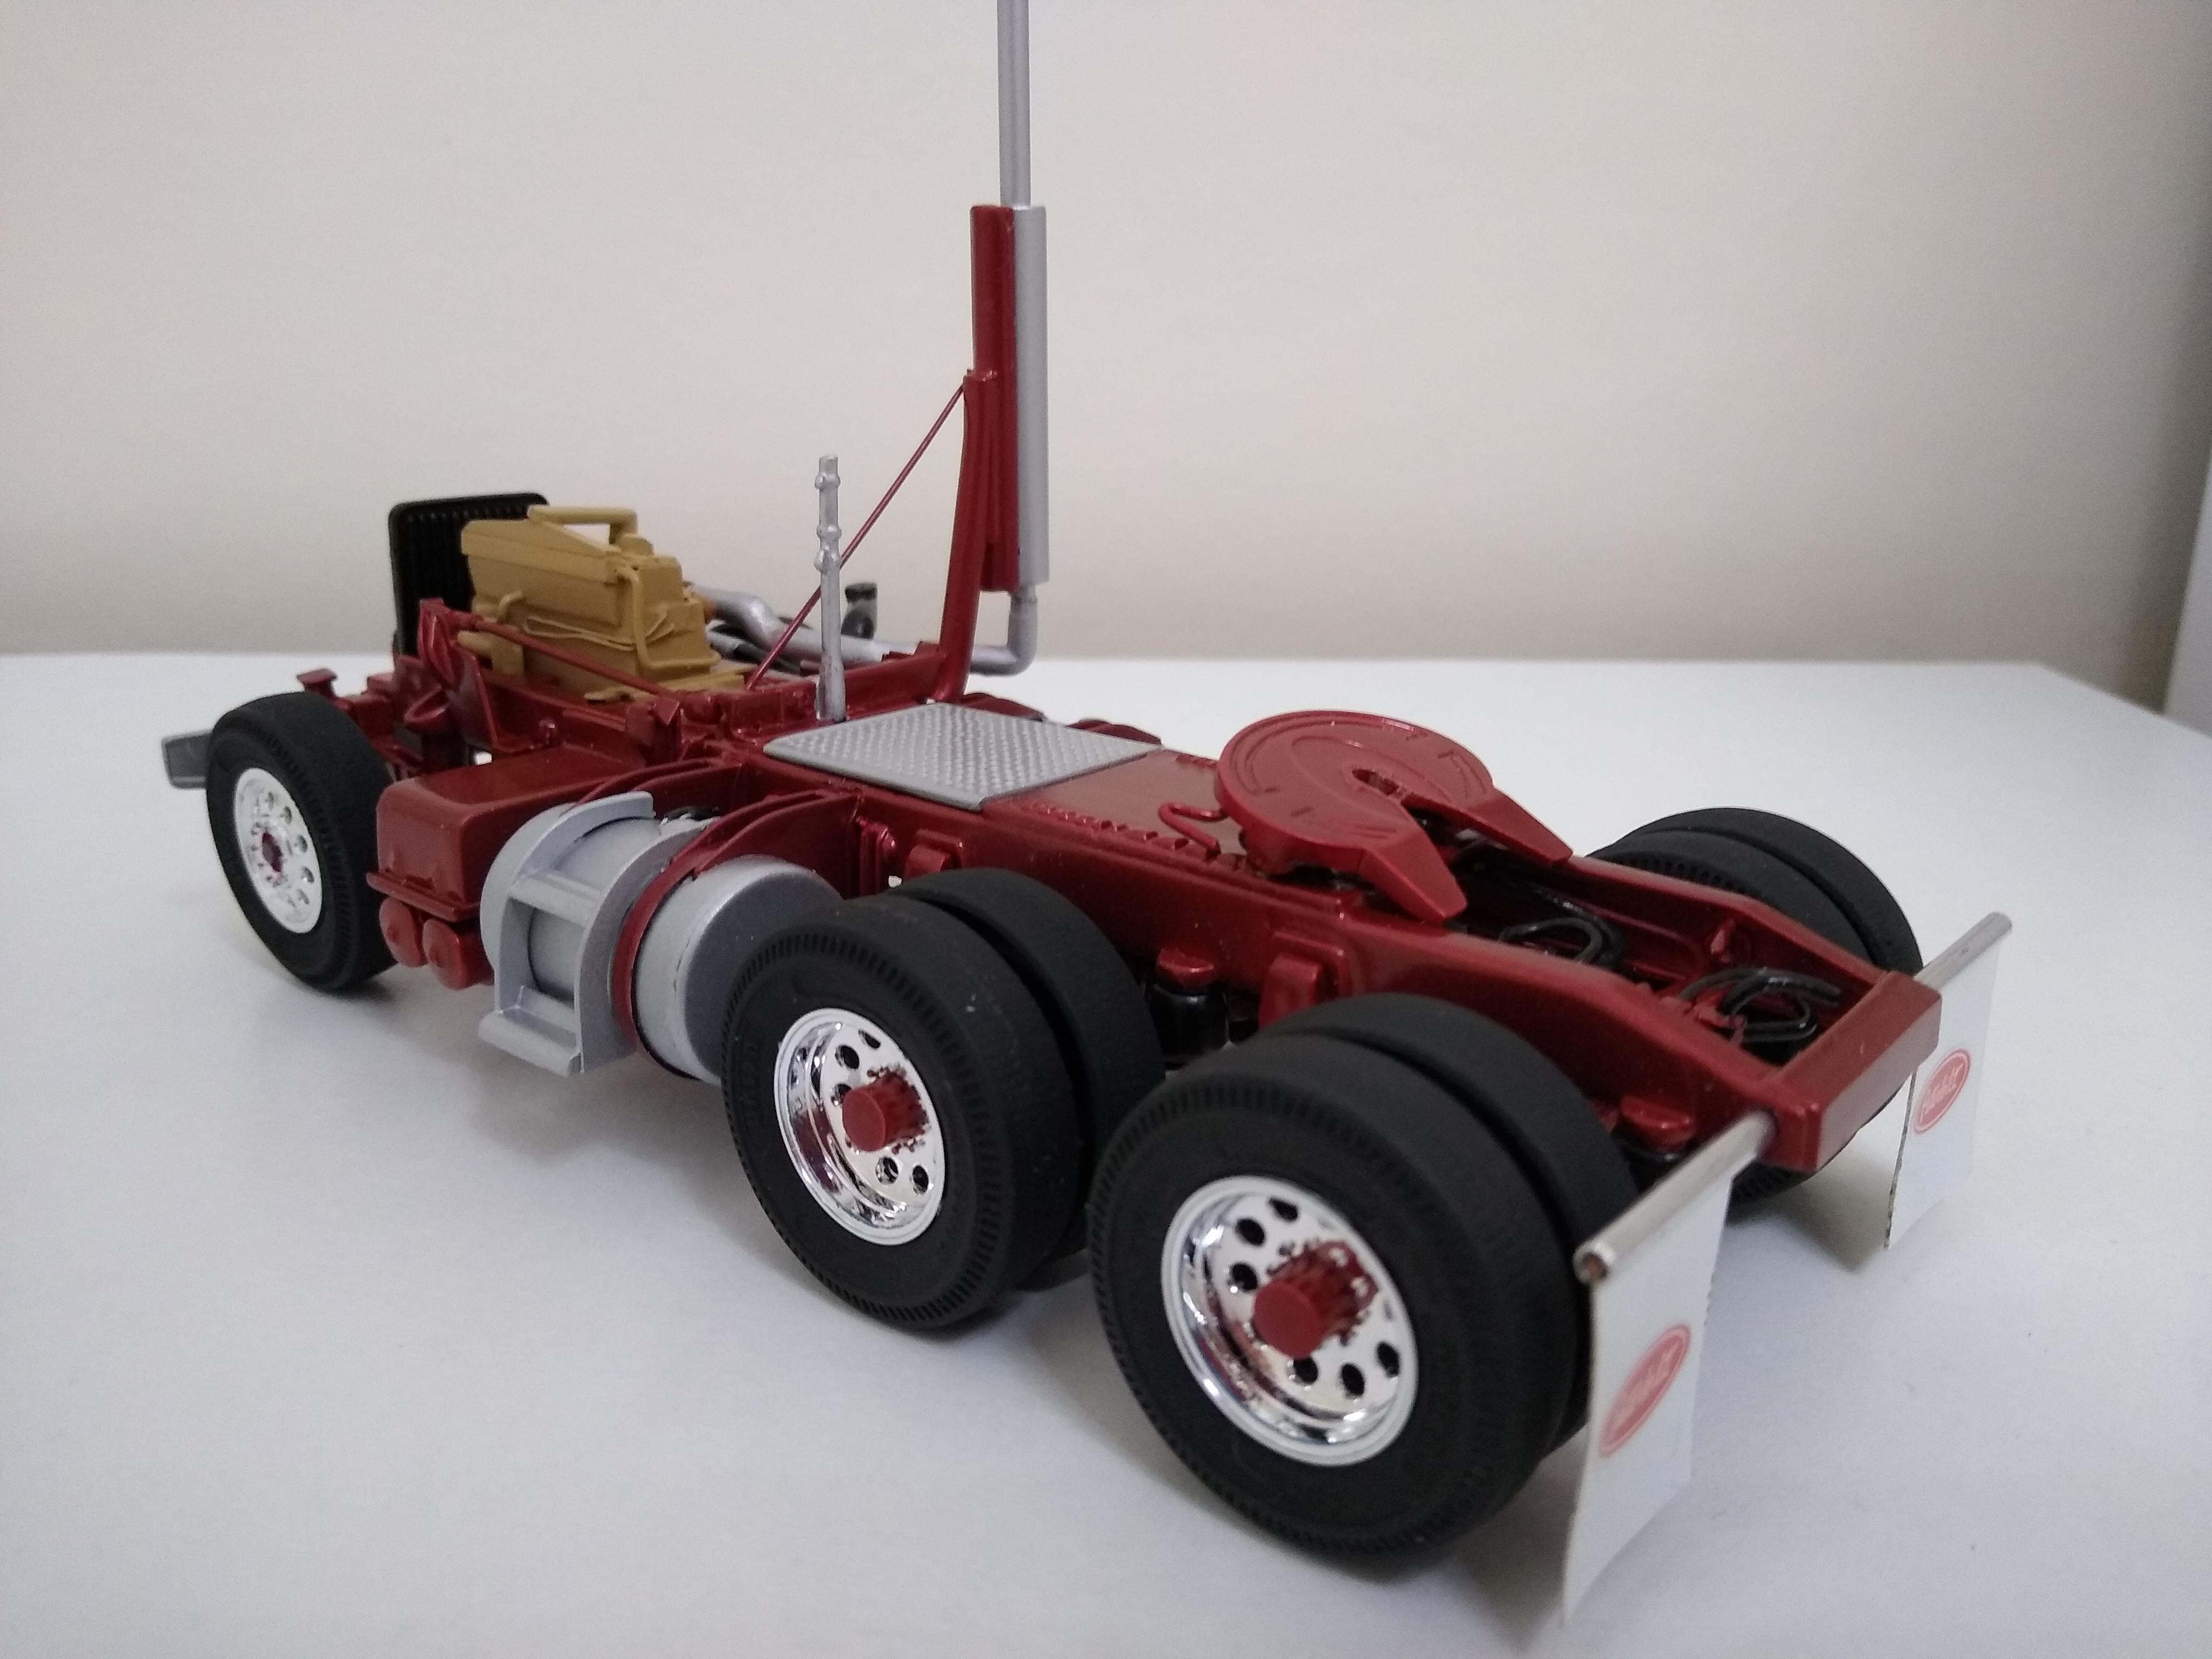
Added all the crossmembers for the deck. Had to do each one in three pieces, on the real thing they punch holes through the main members but that was not happening. Bit of preparation setting up some wooden jigs meant that I could get my cuts pretty much the same, just a little fettling required with a file. Taped a side rail on to see what it looks like. I'm quite pleased! Landing gear works well. I'm pleased to say it actually looks like a trailer! The small AMT tyres look better too with the proper spacing between the axles. I have to admit, I did back Kermit the KW up to it and picked it up. I remembered that feeling as the fifth wheel flattens out as it slides under the hitch plate. You're never too old... Got to do the ends now. I'm going to build a headboard for it. Will try and mimic a Trailmobile rear end setup too. I've thought about the stake rails on the outside but if I did them accurately they'd be so fragile they'd break, so I might think of doing them in a solid rail and see if I can fool the eye.
-
Scratchbuilt flatbed
Rockford replied to Rockford's topic in WIP: Model Trucks: Big Rigs and Heavy Equipment
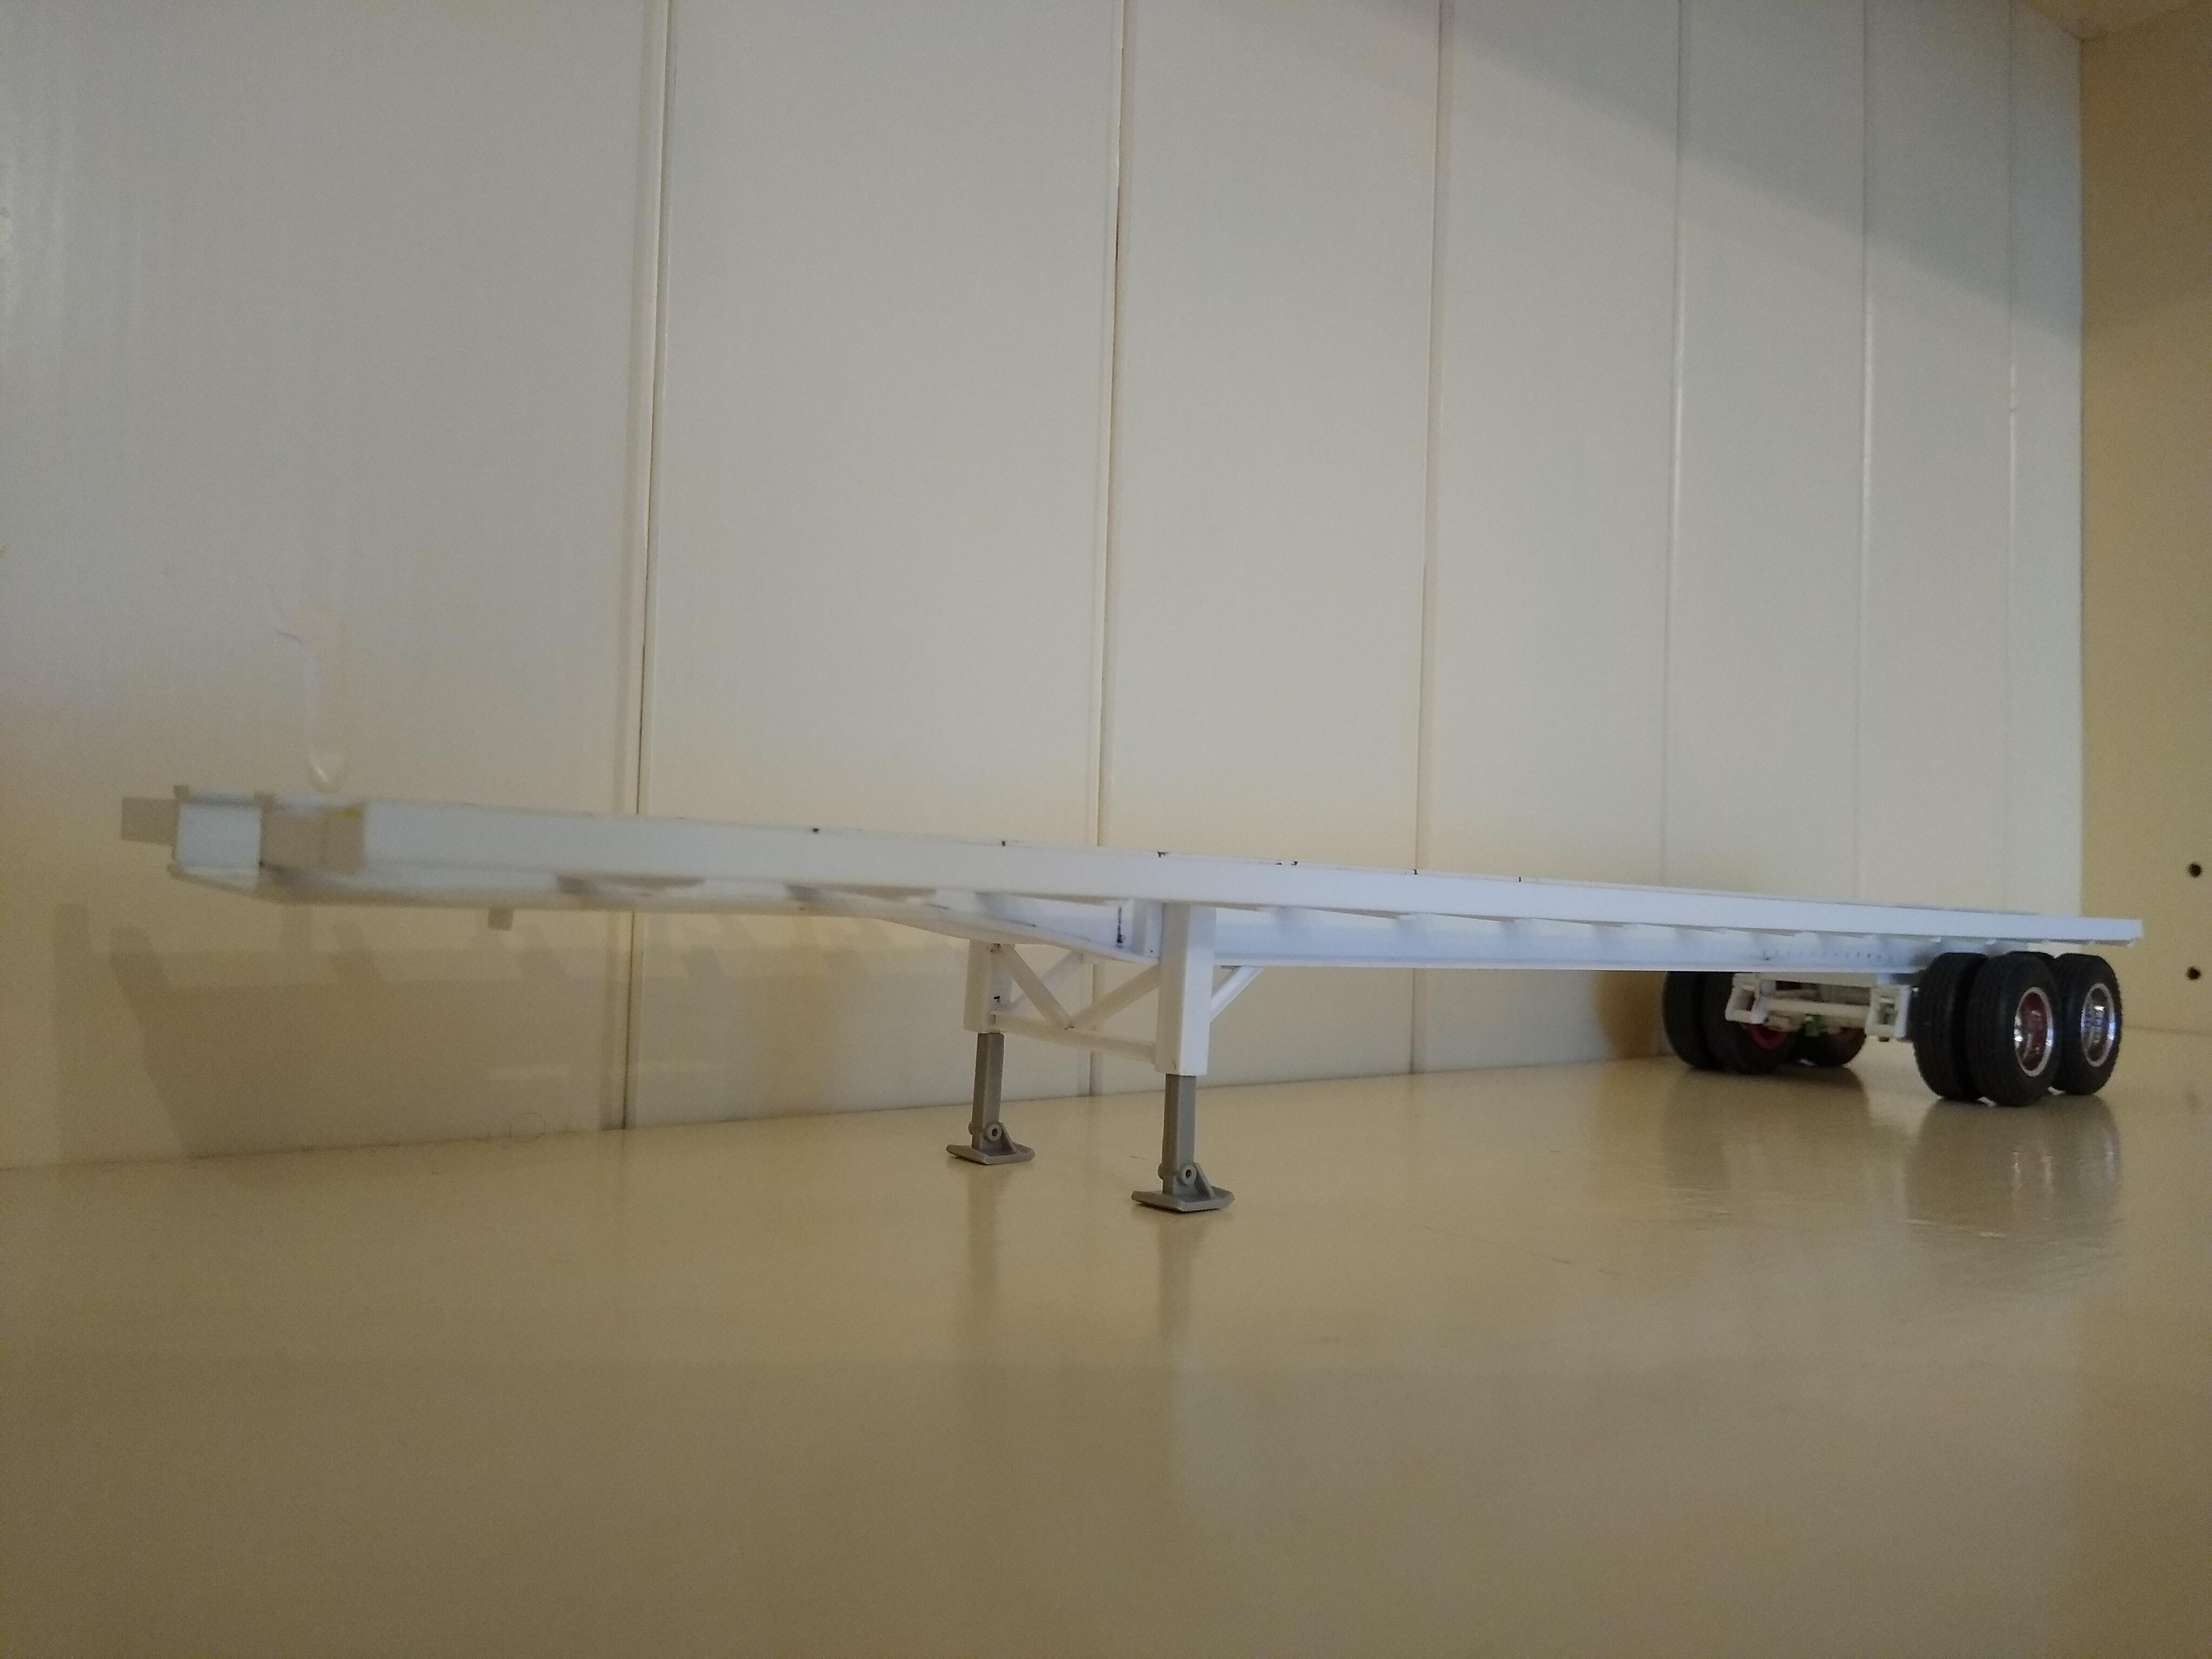
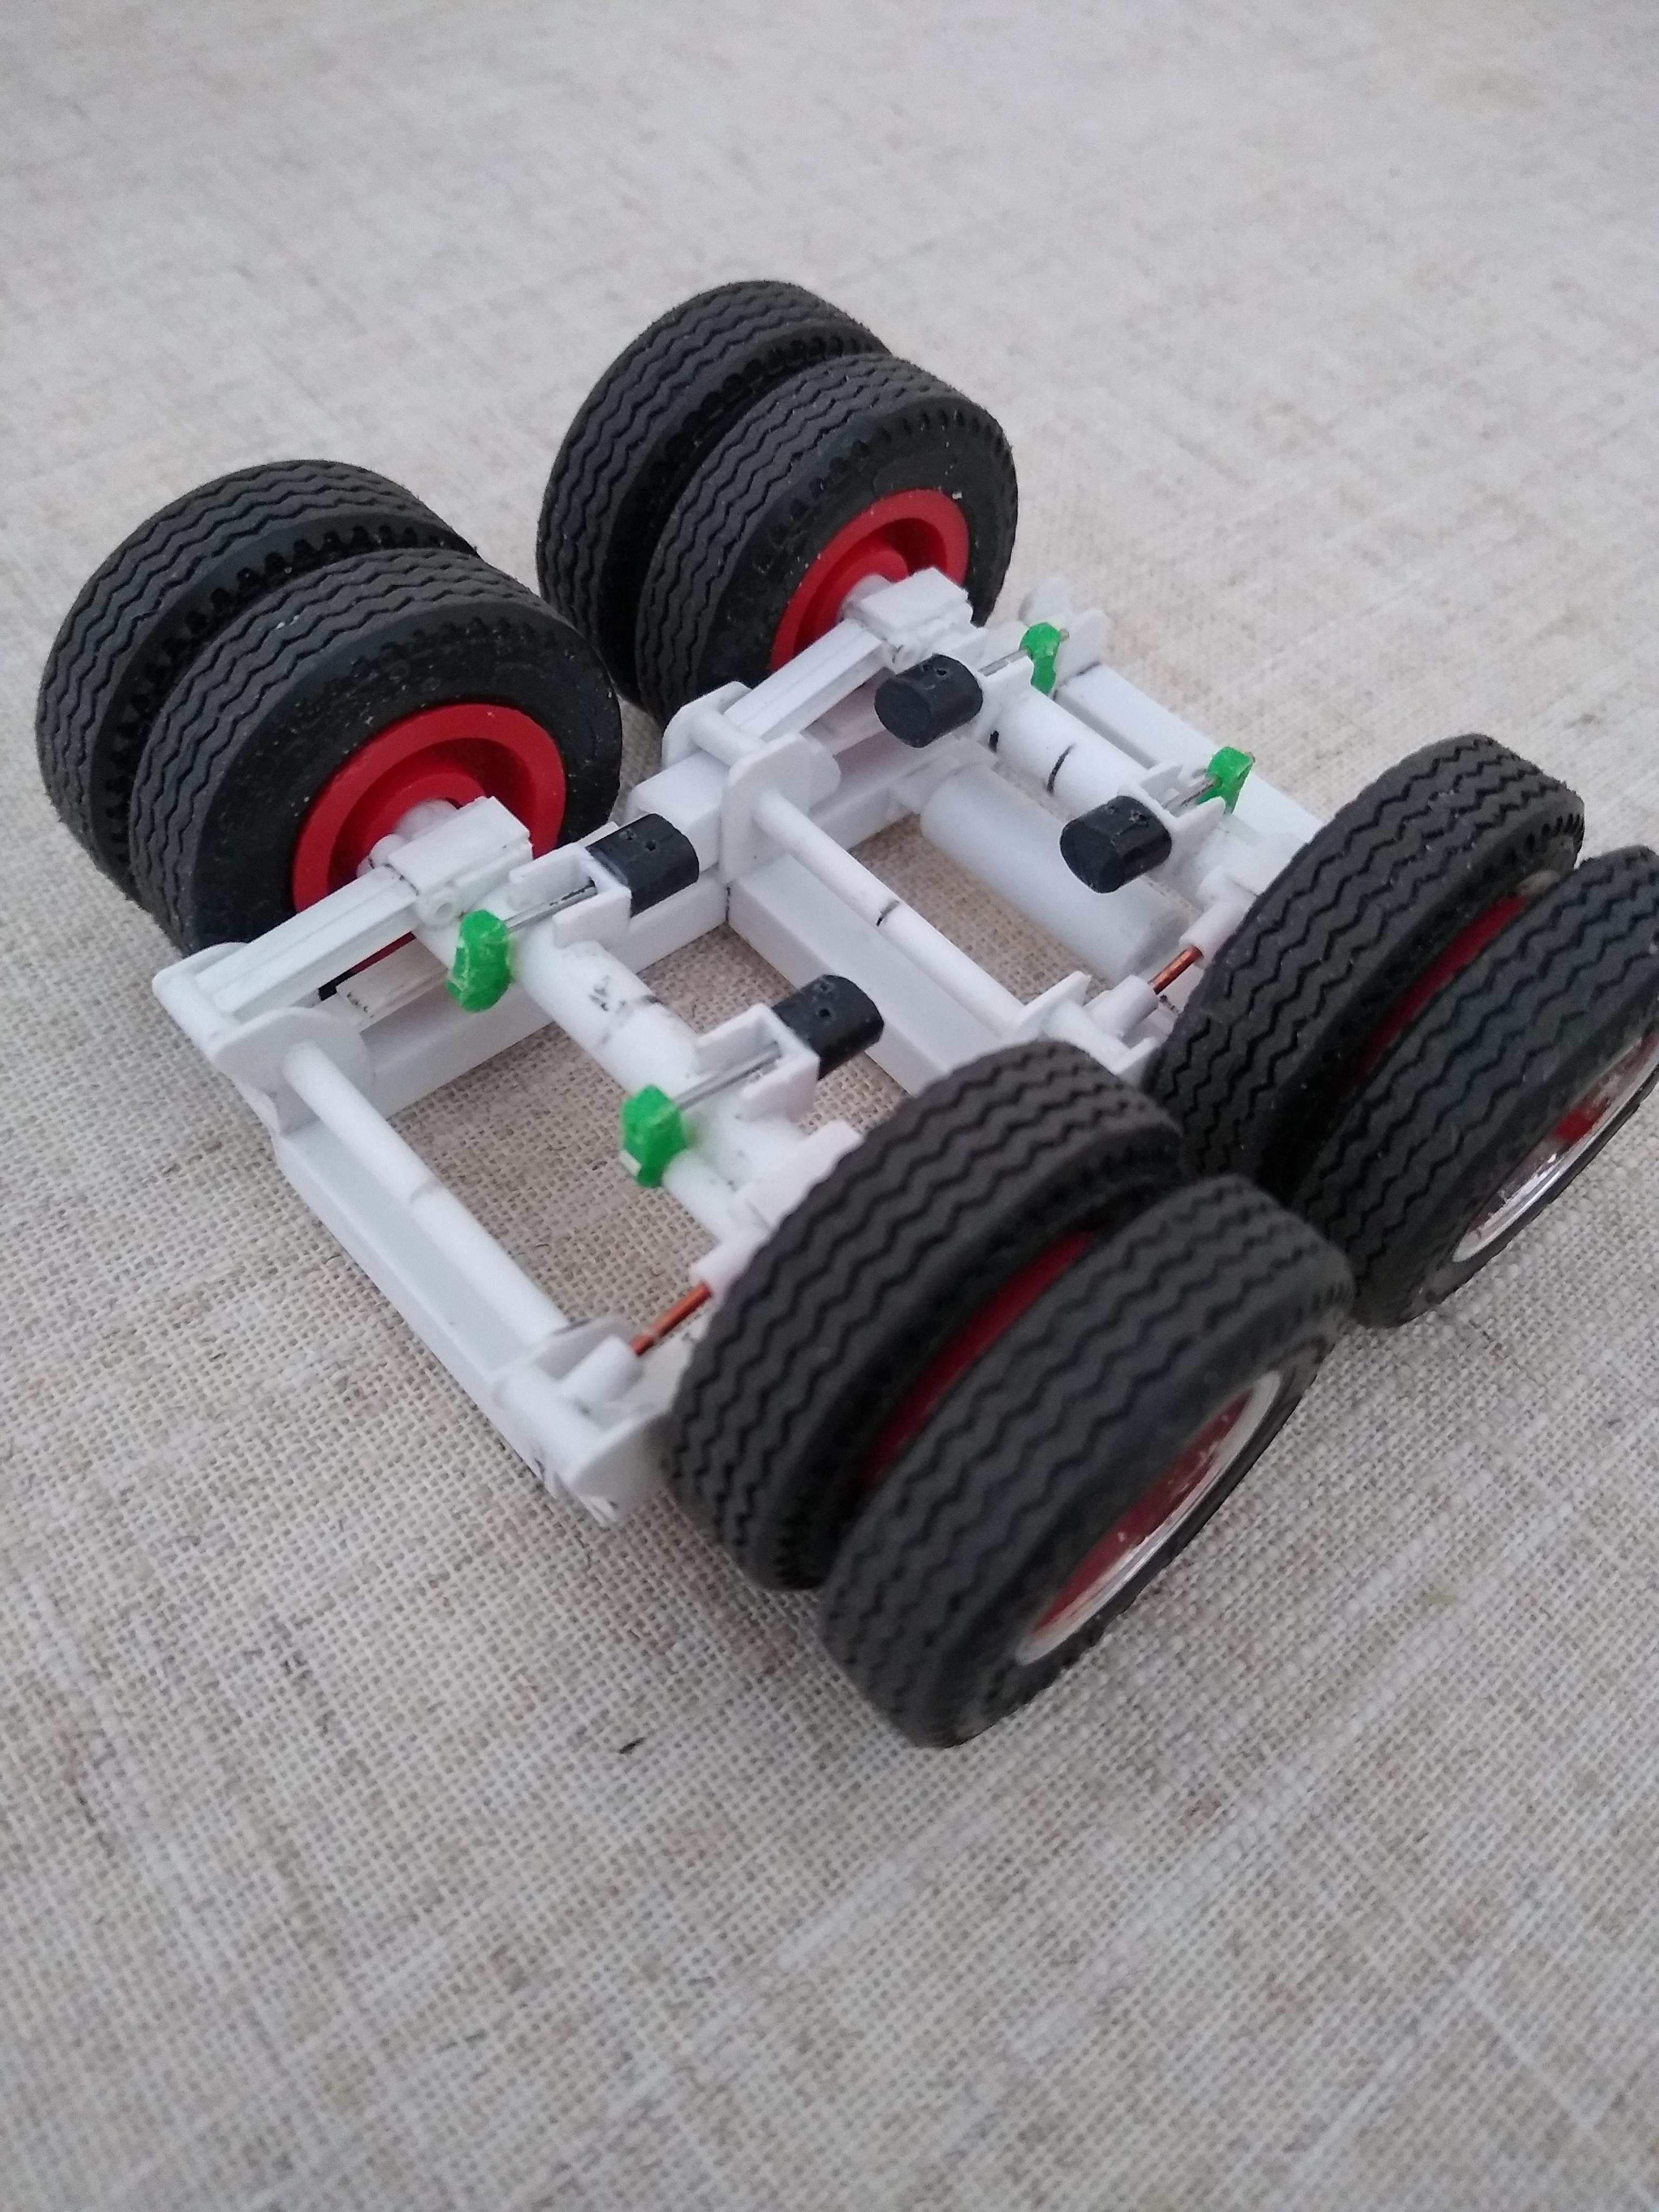
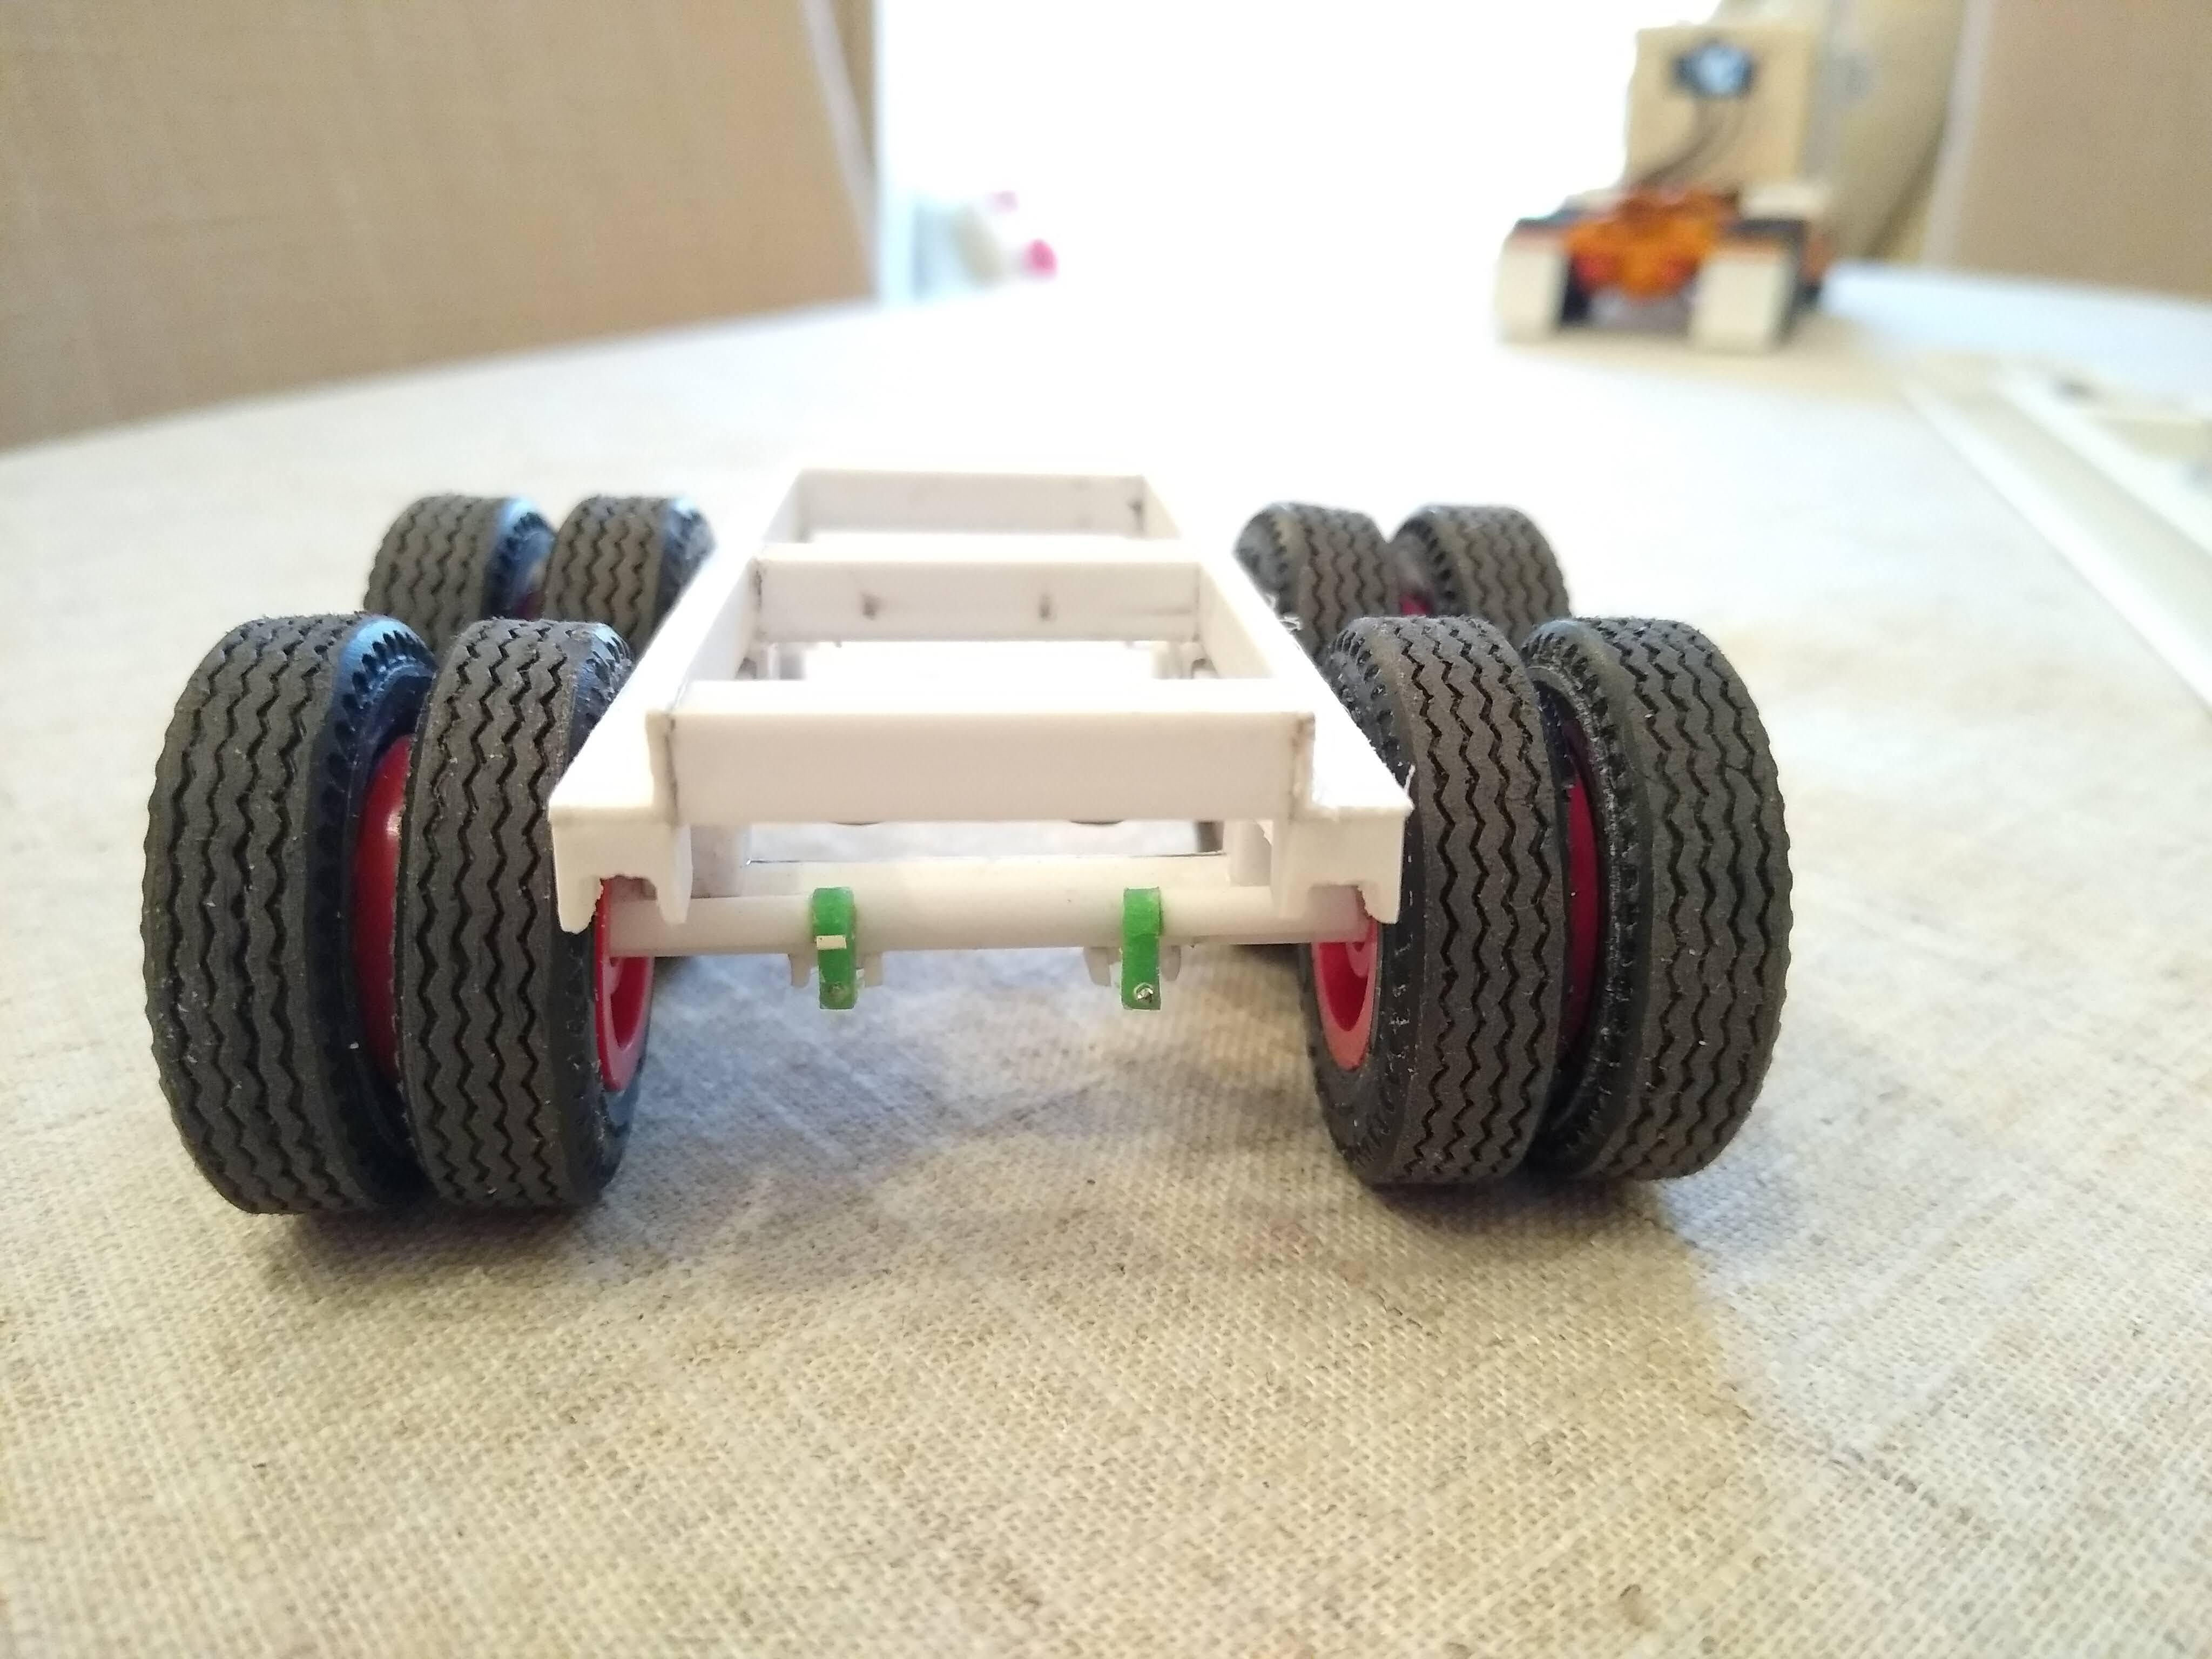
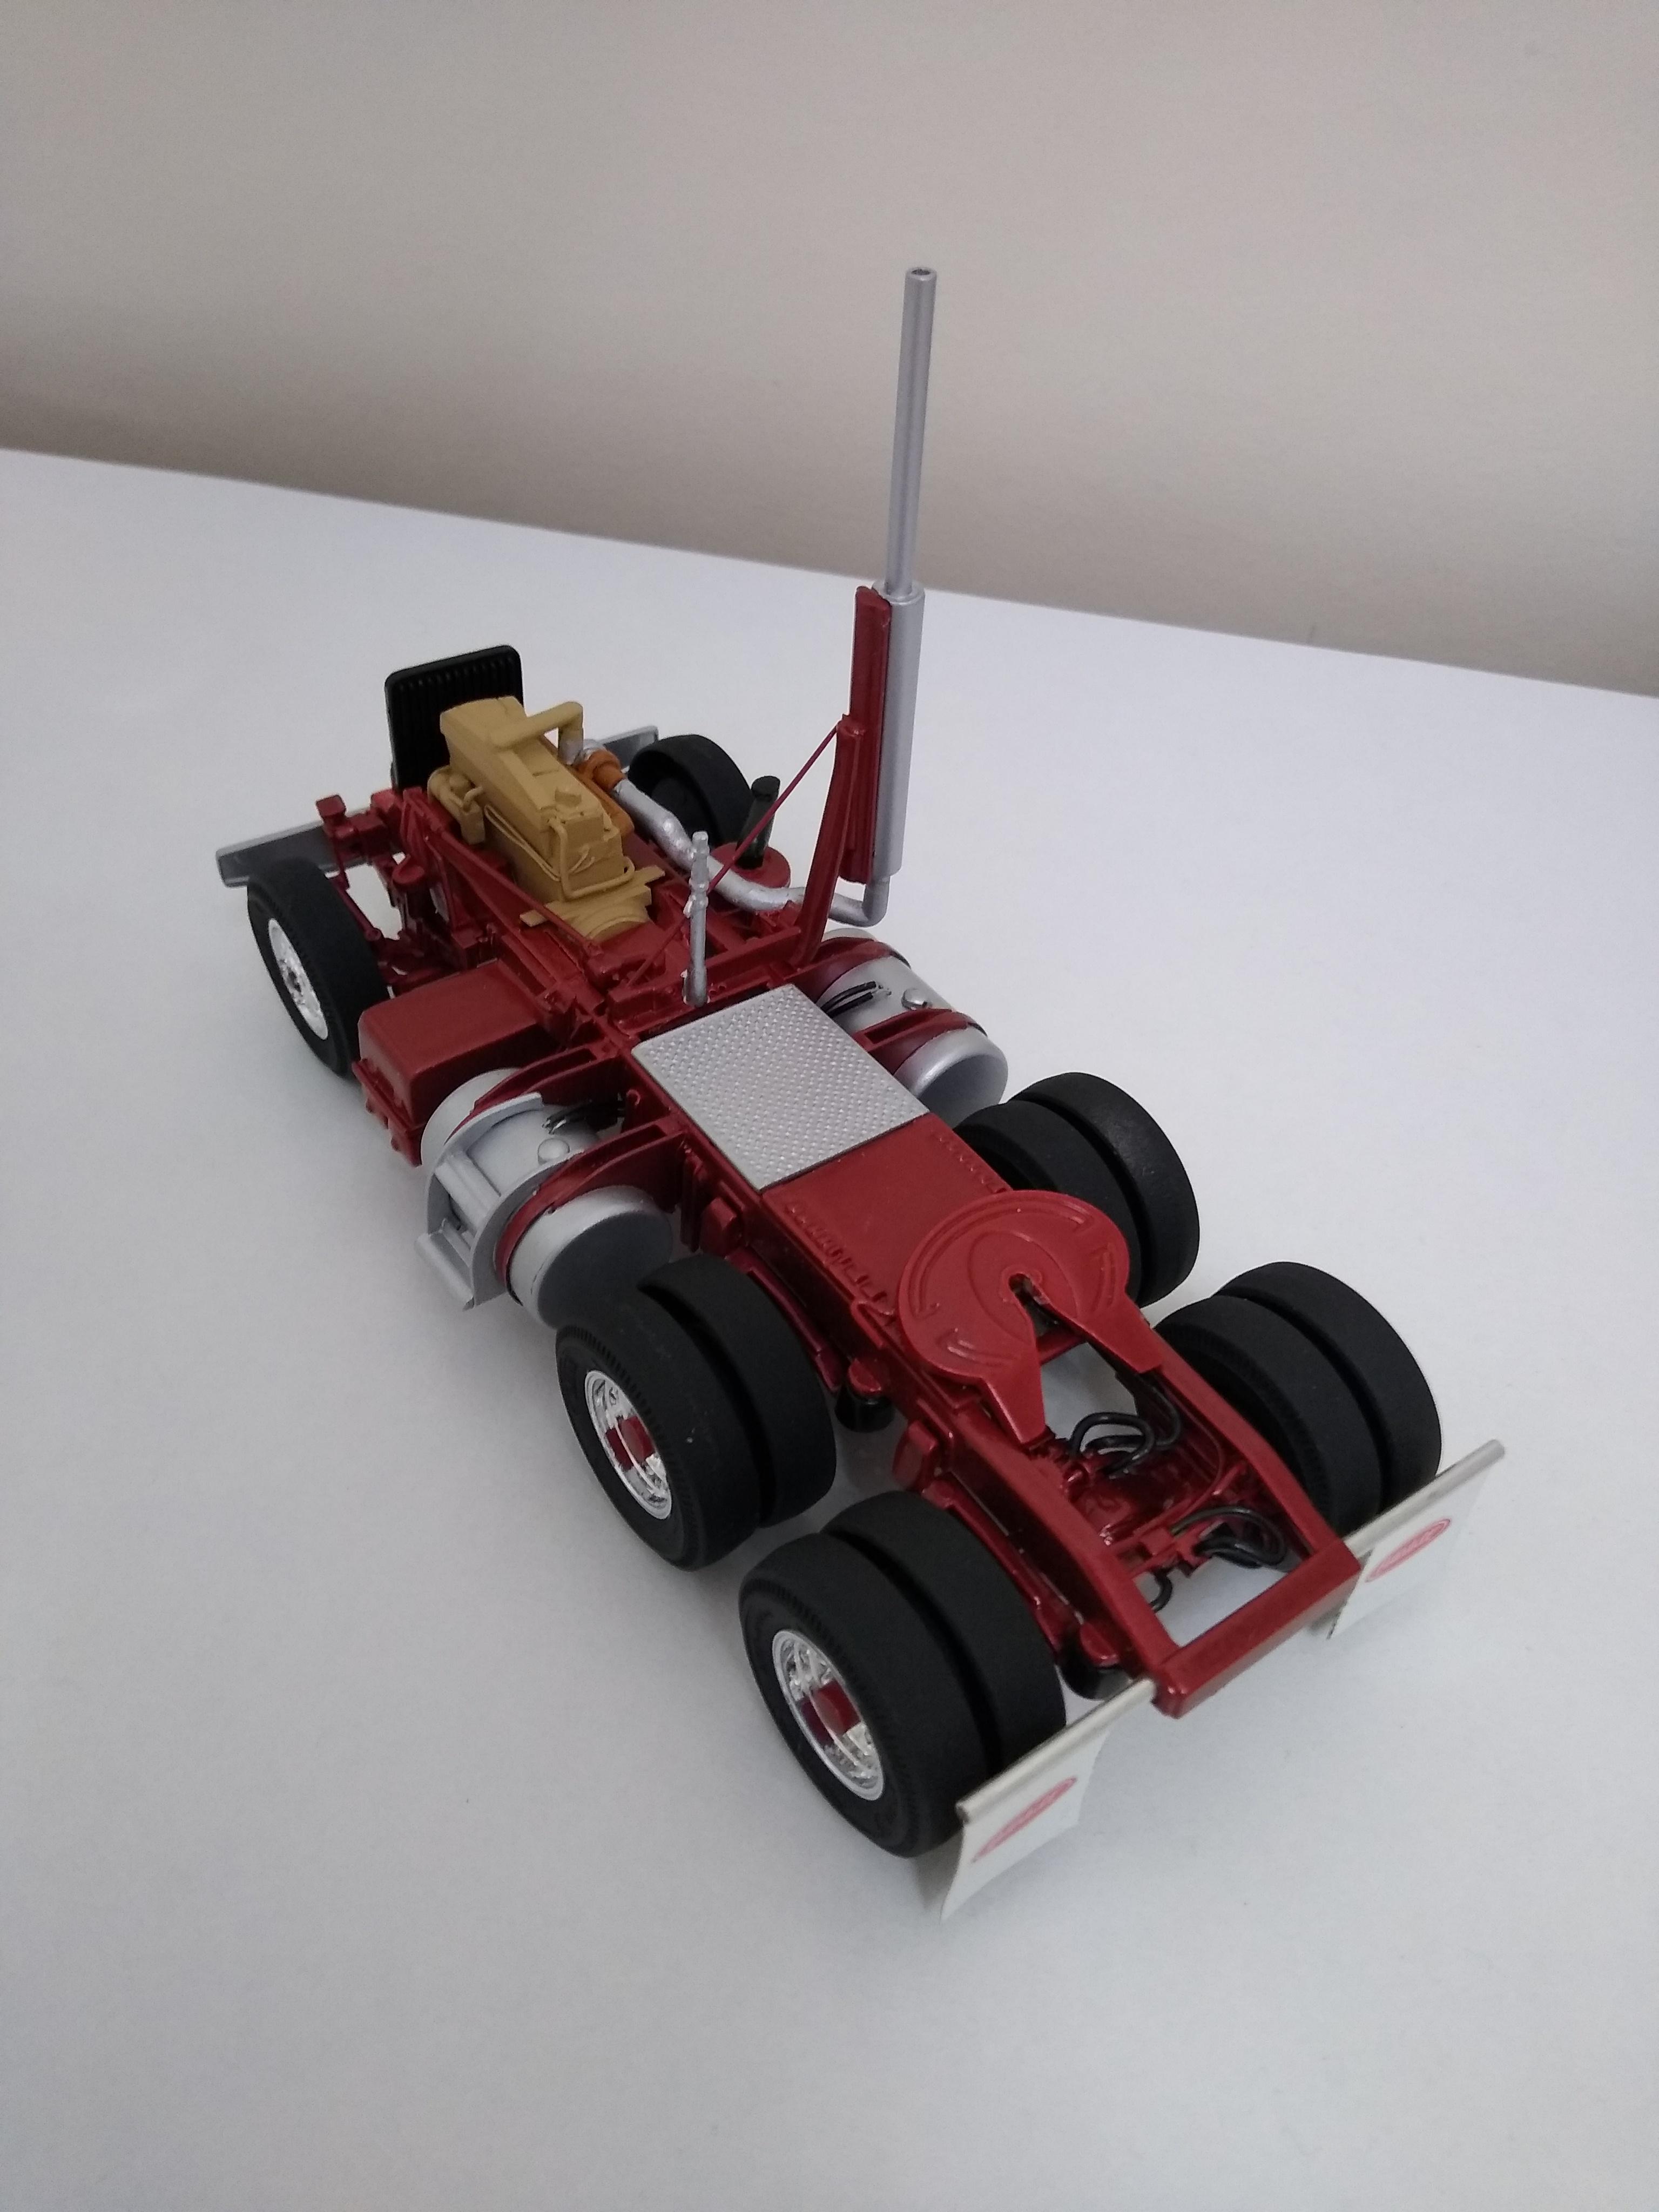
Finished building the tandems, added the air tank and track rods, on the track rods there's an adjustable one and a fixed one on each axle. To me it looks an utter shambles but it's the best my fat hands and middle aged eyesight can do. I can't seem to cut or file anything straight! Fitted the axles which was a bit scary because I wanted to rectify something that taints the Trailmobile van trailer for me. Because the wheels and tyres are smaller than scale, they look too far apart at the scale axle spacing so I wanted to bring them closer together. The AMT spacing is 8mm at the tyre tread; I settled on just under 6mm for the right look. Seems to have worked when you put them side by side. Fabbed landing gear using the 'extended' legs from the Monogram Fruehauf van. By using hollow square tube I can make them operate too. Still to do the reduction gearbox and winding handle.
-
Scratchbuilt flatbed
Rockford replied to Rockford's topic in WIP: Model Trucks: Big Rigs and Heavy Equipment
Thanks for the kind comments gents, but as usual with me it's one step forwards two steps back. The ride height was far too high so I took a few measurements and found I could drop the subframe between the main rails, as I've seen on some trailers. I cut the siderails of the subframe into L shape rather than a box section, then I cut out the inner flange of the main rails so the tandems can sit inside. Drops the suspension by 4mm but makes a big difference! I was terrified I'd ruin it but all went perfectly! I canstill slide the tandems, but I won't because I love the "bridge law" stance.
-
Scratchbuilt flatbed
Rockford replied to Rockford's topic in WIP: Model Trucks: Big Rigs and Heavy Equipment
Thanks mate, your bottom-dump trailer inspired me to jump in -
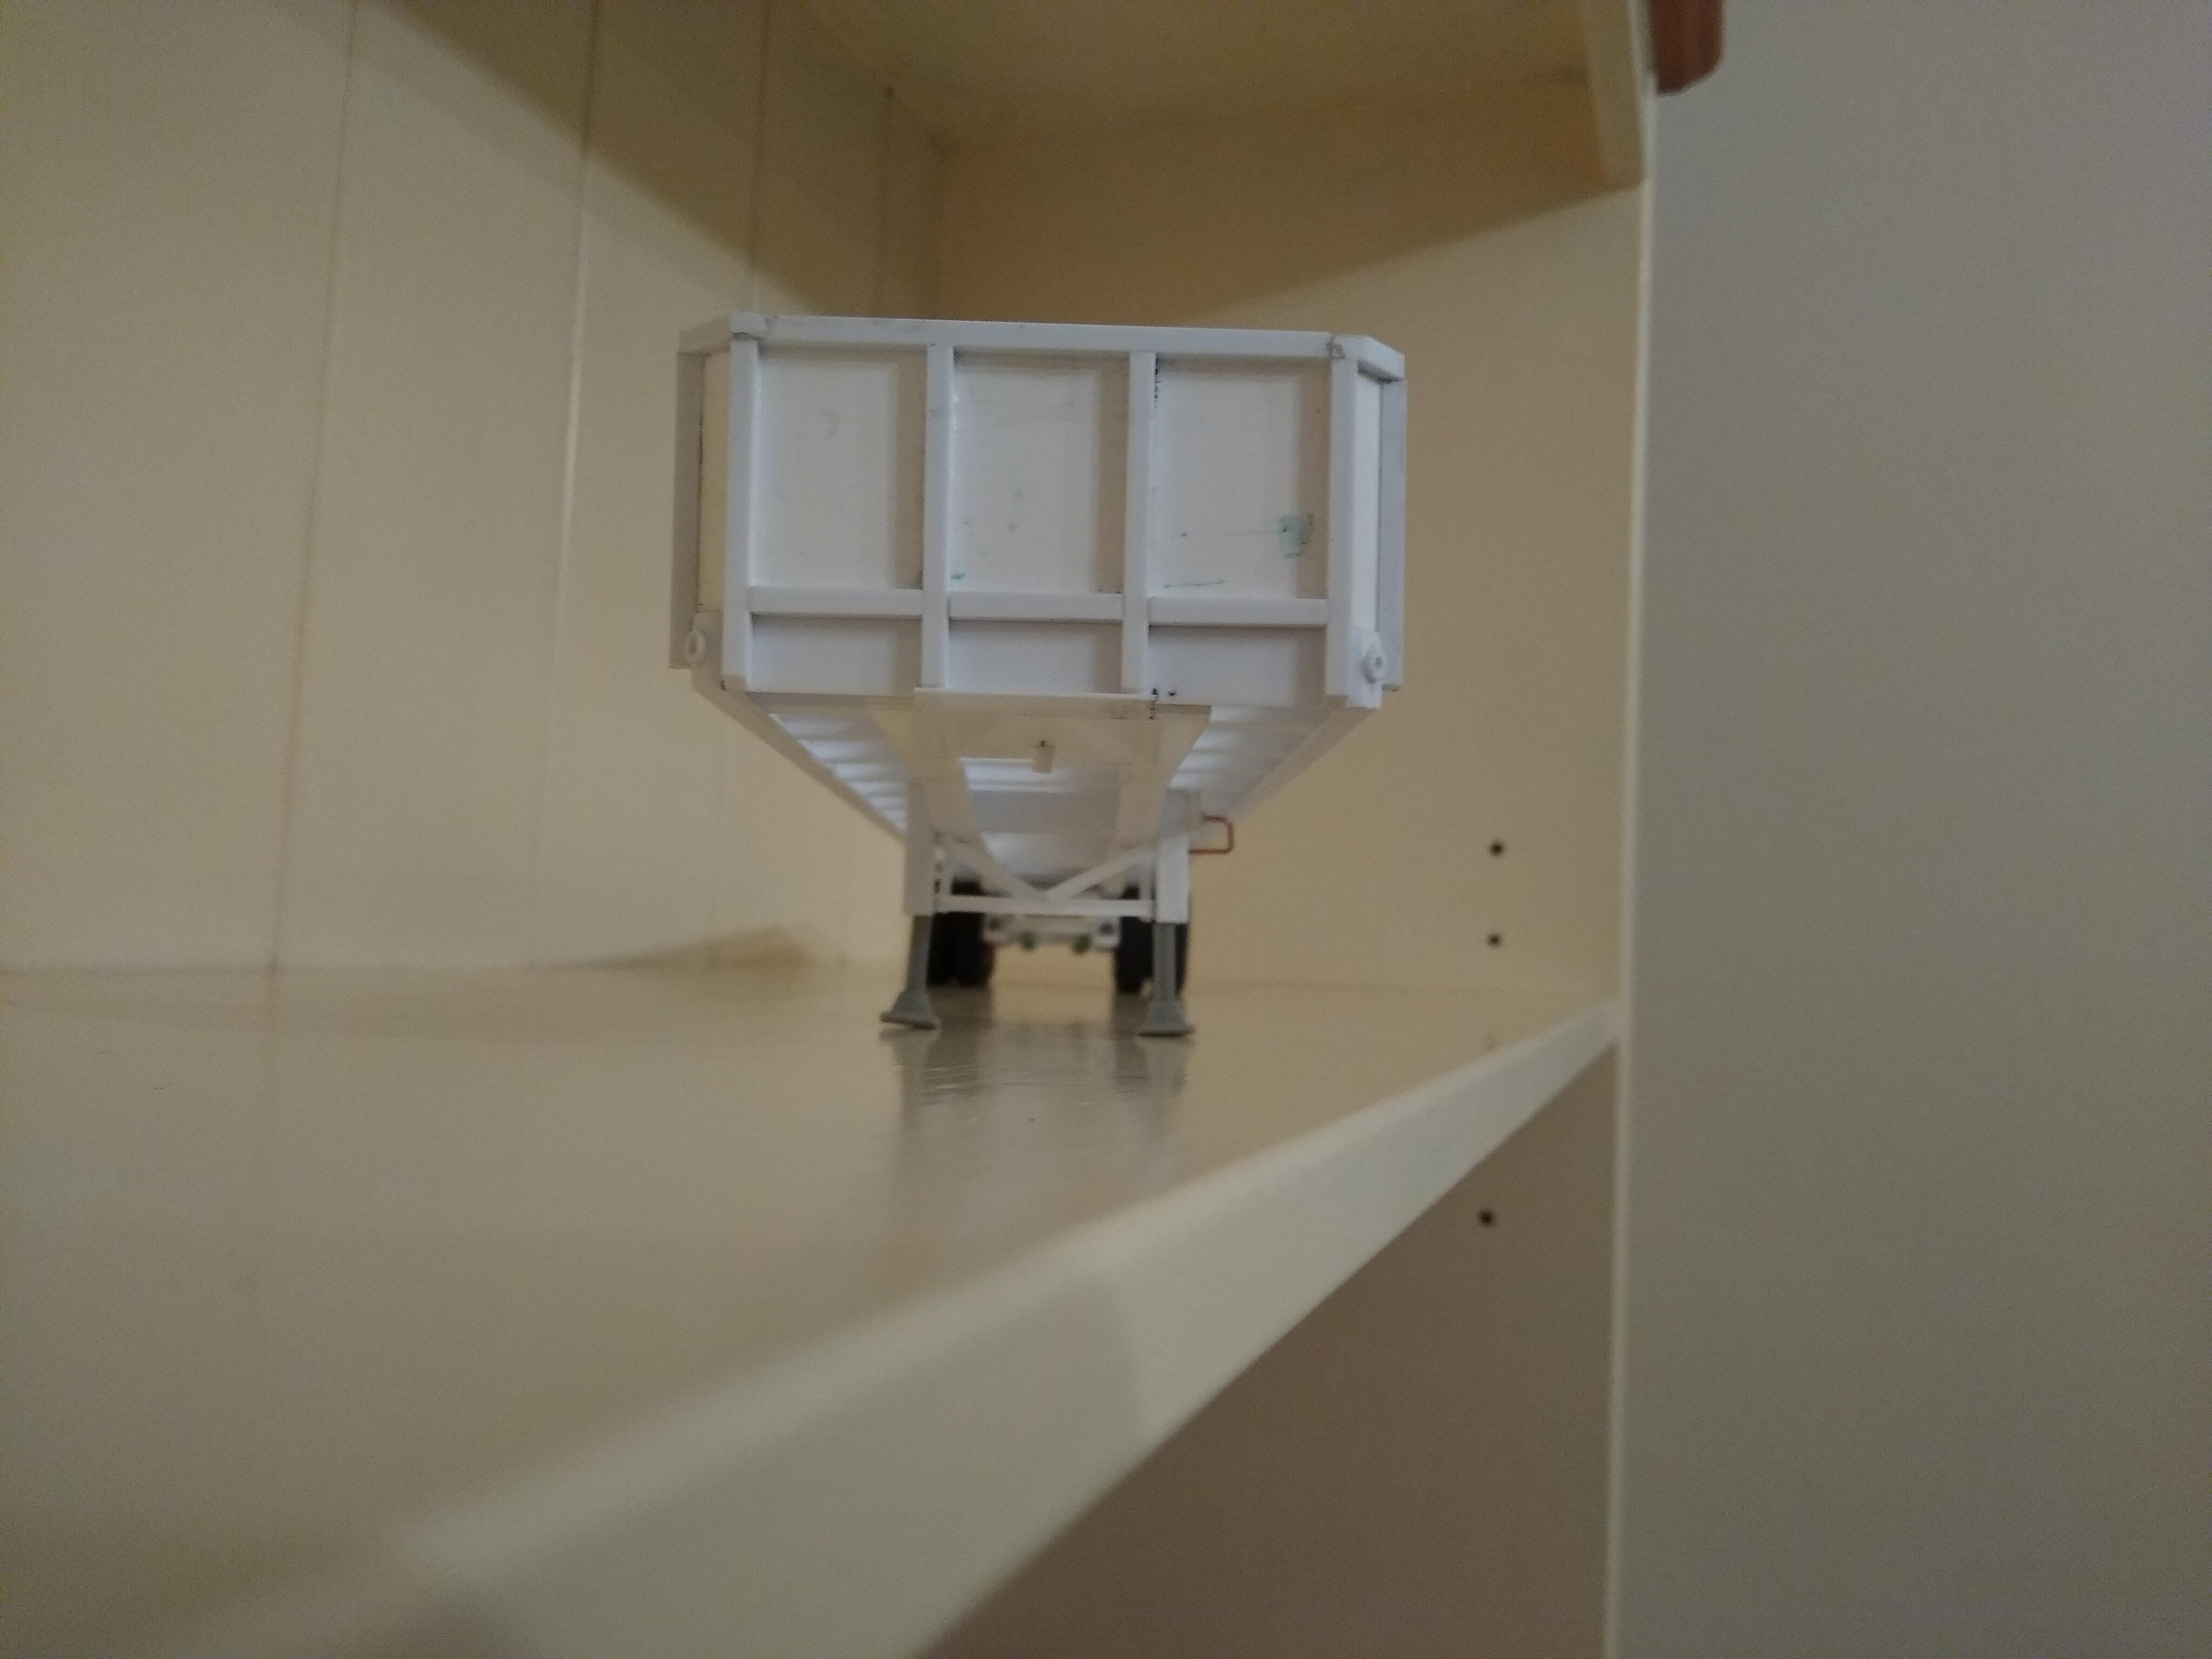
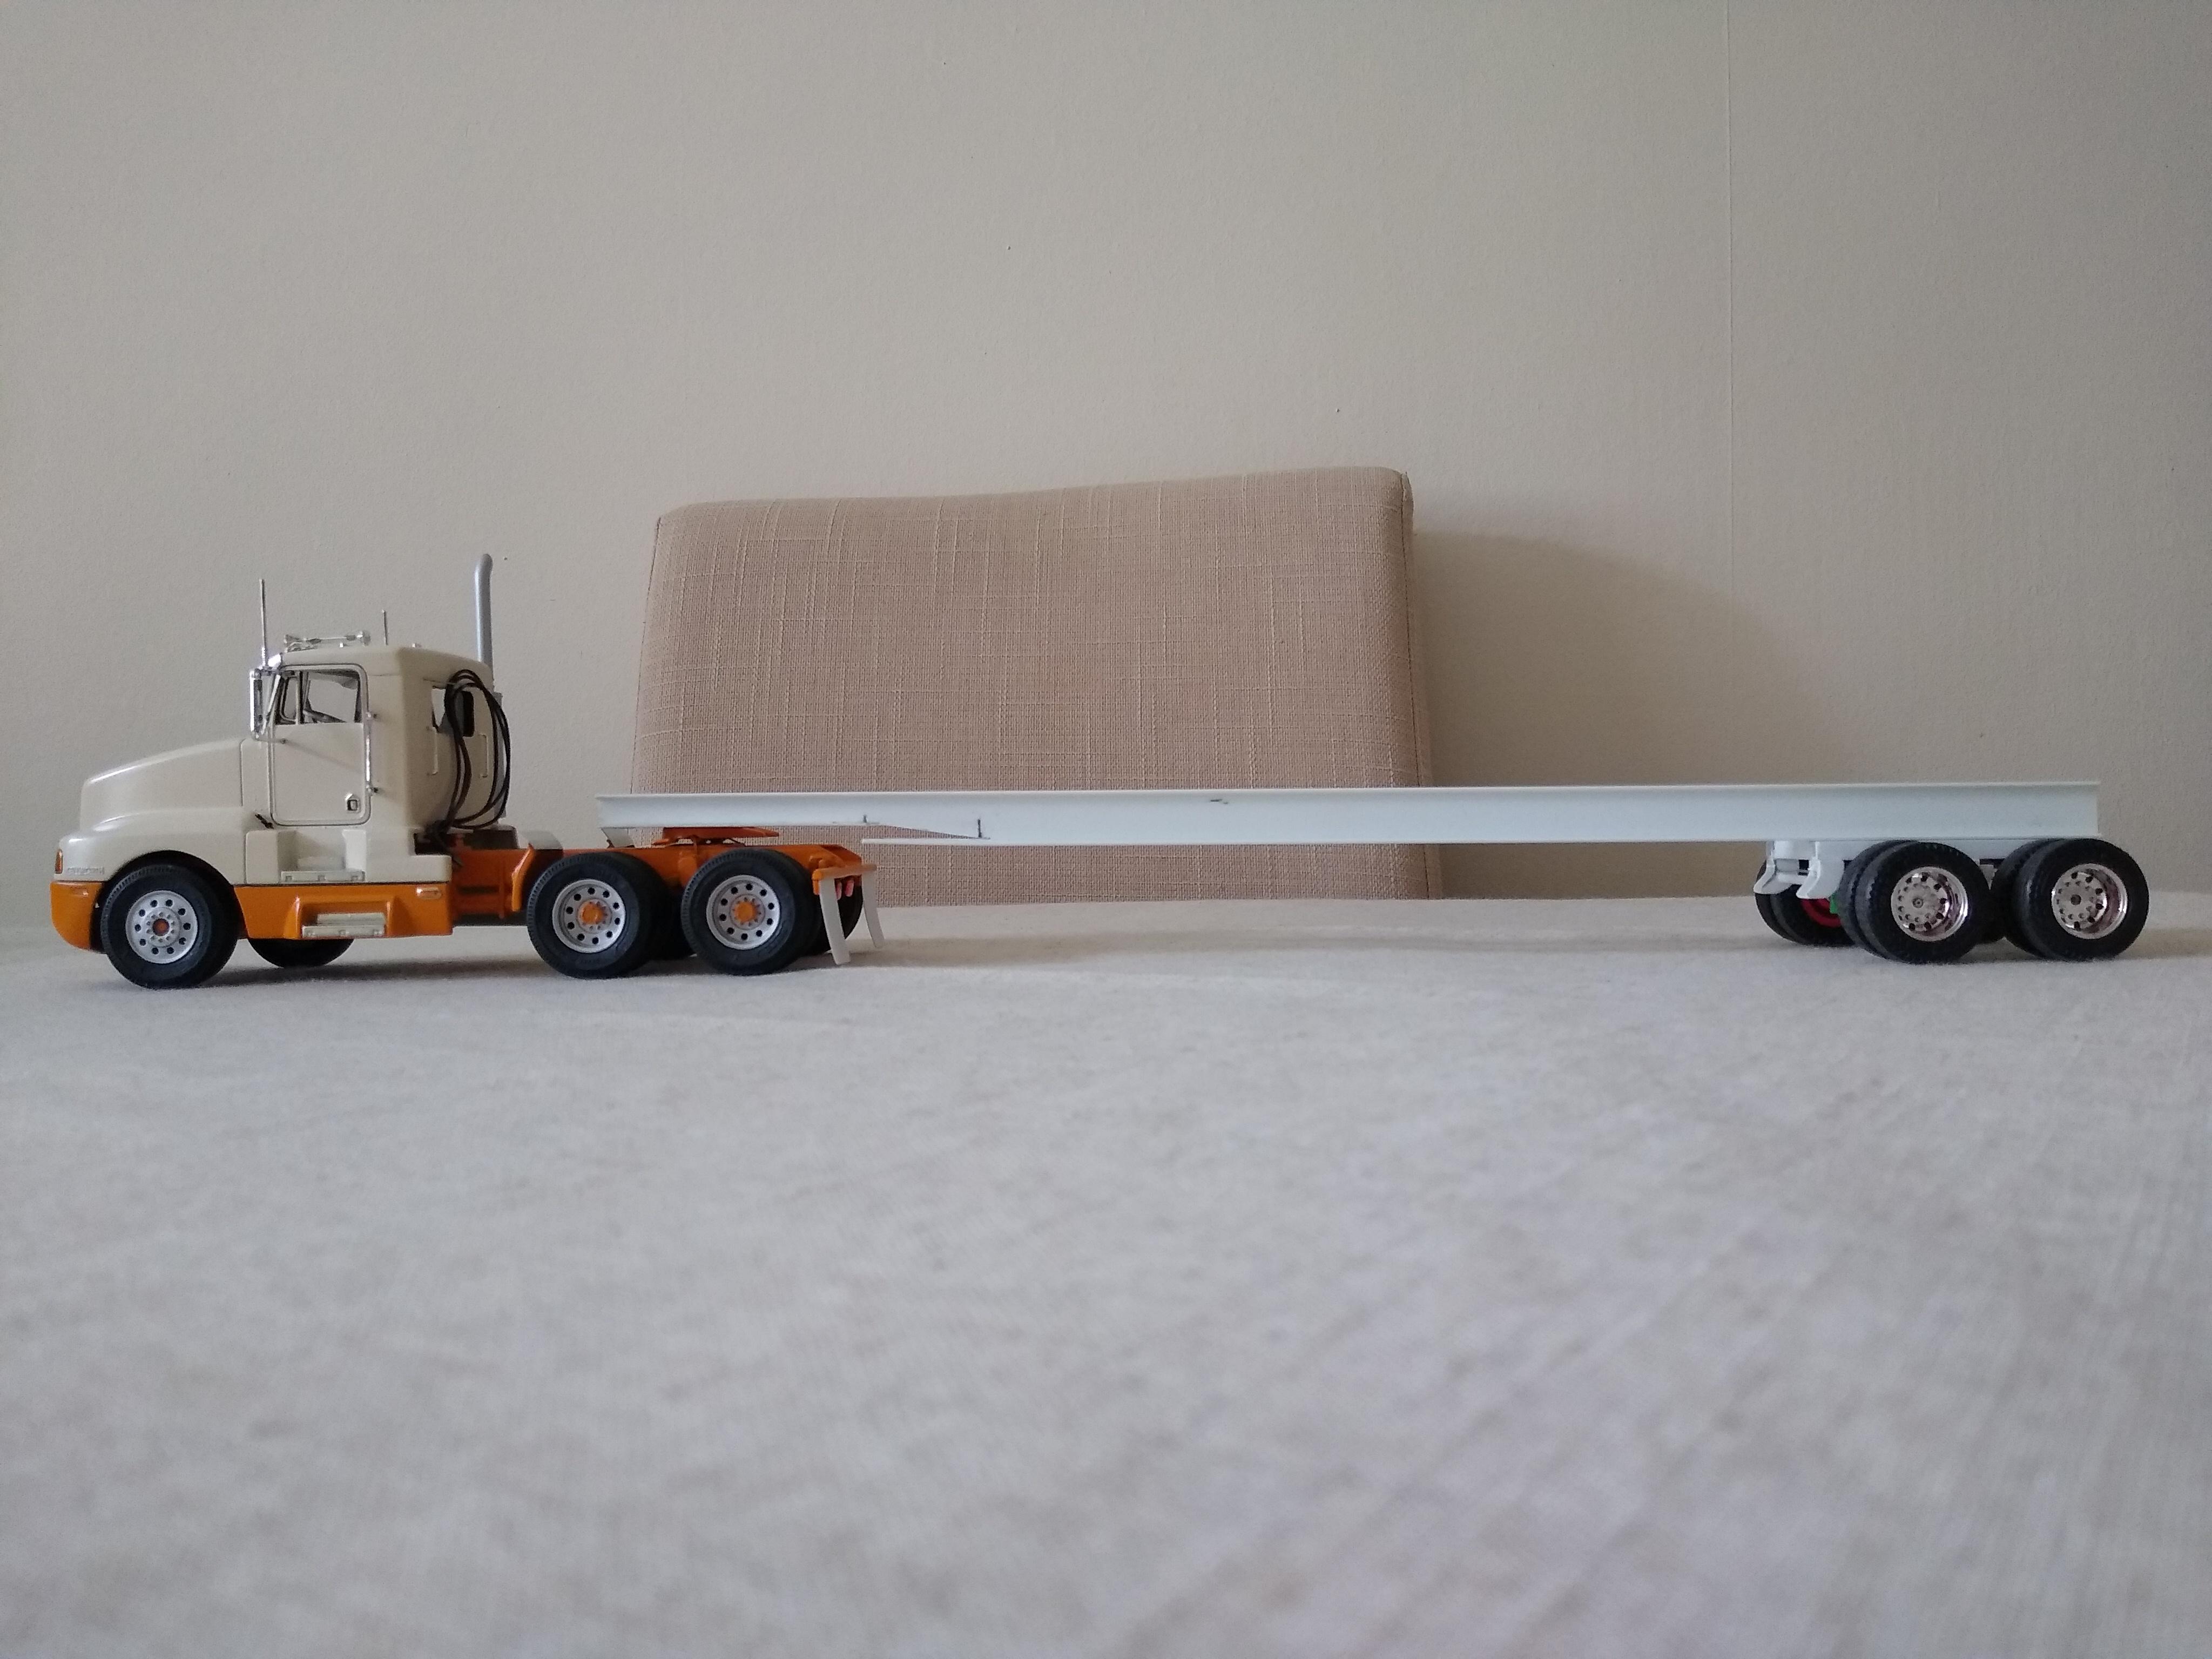
I've wanted a flatbed for my 1/32 fleet for a long time but the only trailers available are vans, reefers and the tanker. I suppose I could look for a diecast I could modify but I couldn't see anything suitable so, after seeing the work done on here I decided to build my own. I really shouldn't, I've got four jobs on the go already. I bought various channels and profiles along with two 14mm I-beams for the main structure. I built a subframe for the steel suspension fashioned after a Trailmobile unit. I fabbed balance beams and spring mounts. Built two axles with brake chambers and slack adjusters. I'll use AMT wheels and tyres from a scrap K100 Aerodyne. I still have to build the track arms that locate the axles. I was going to taper the frame at either end but decided to go for just the neck at the front with the full depth running the rest of the length because I hope to be able to have the suspension sliding. A very rough mock up looks ok.
-
Peterbilt 352
Rockford replied to Rockford's topic in WIP: Model Trucks: Big Rigs and Heavy Equipment
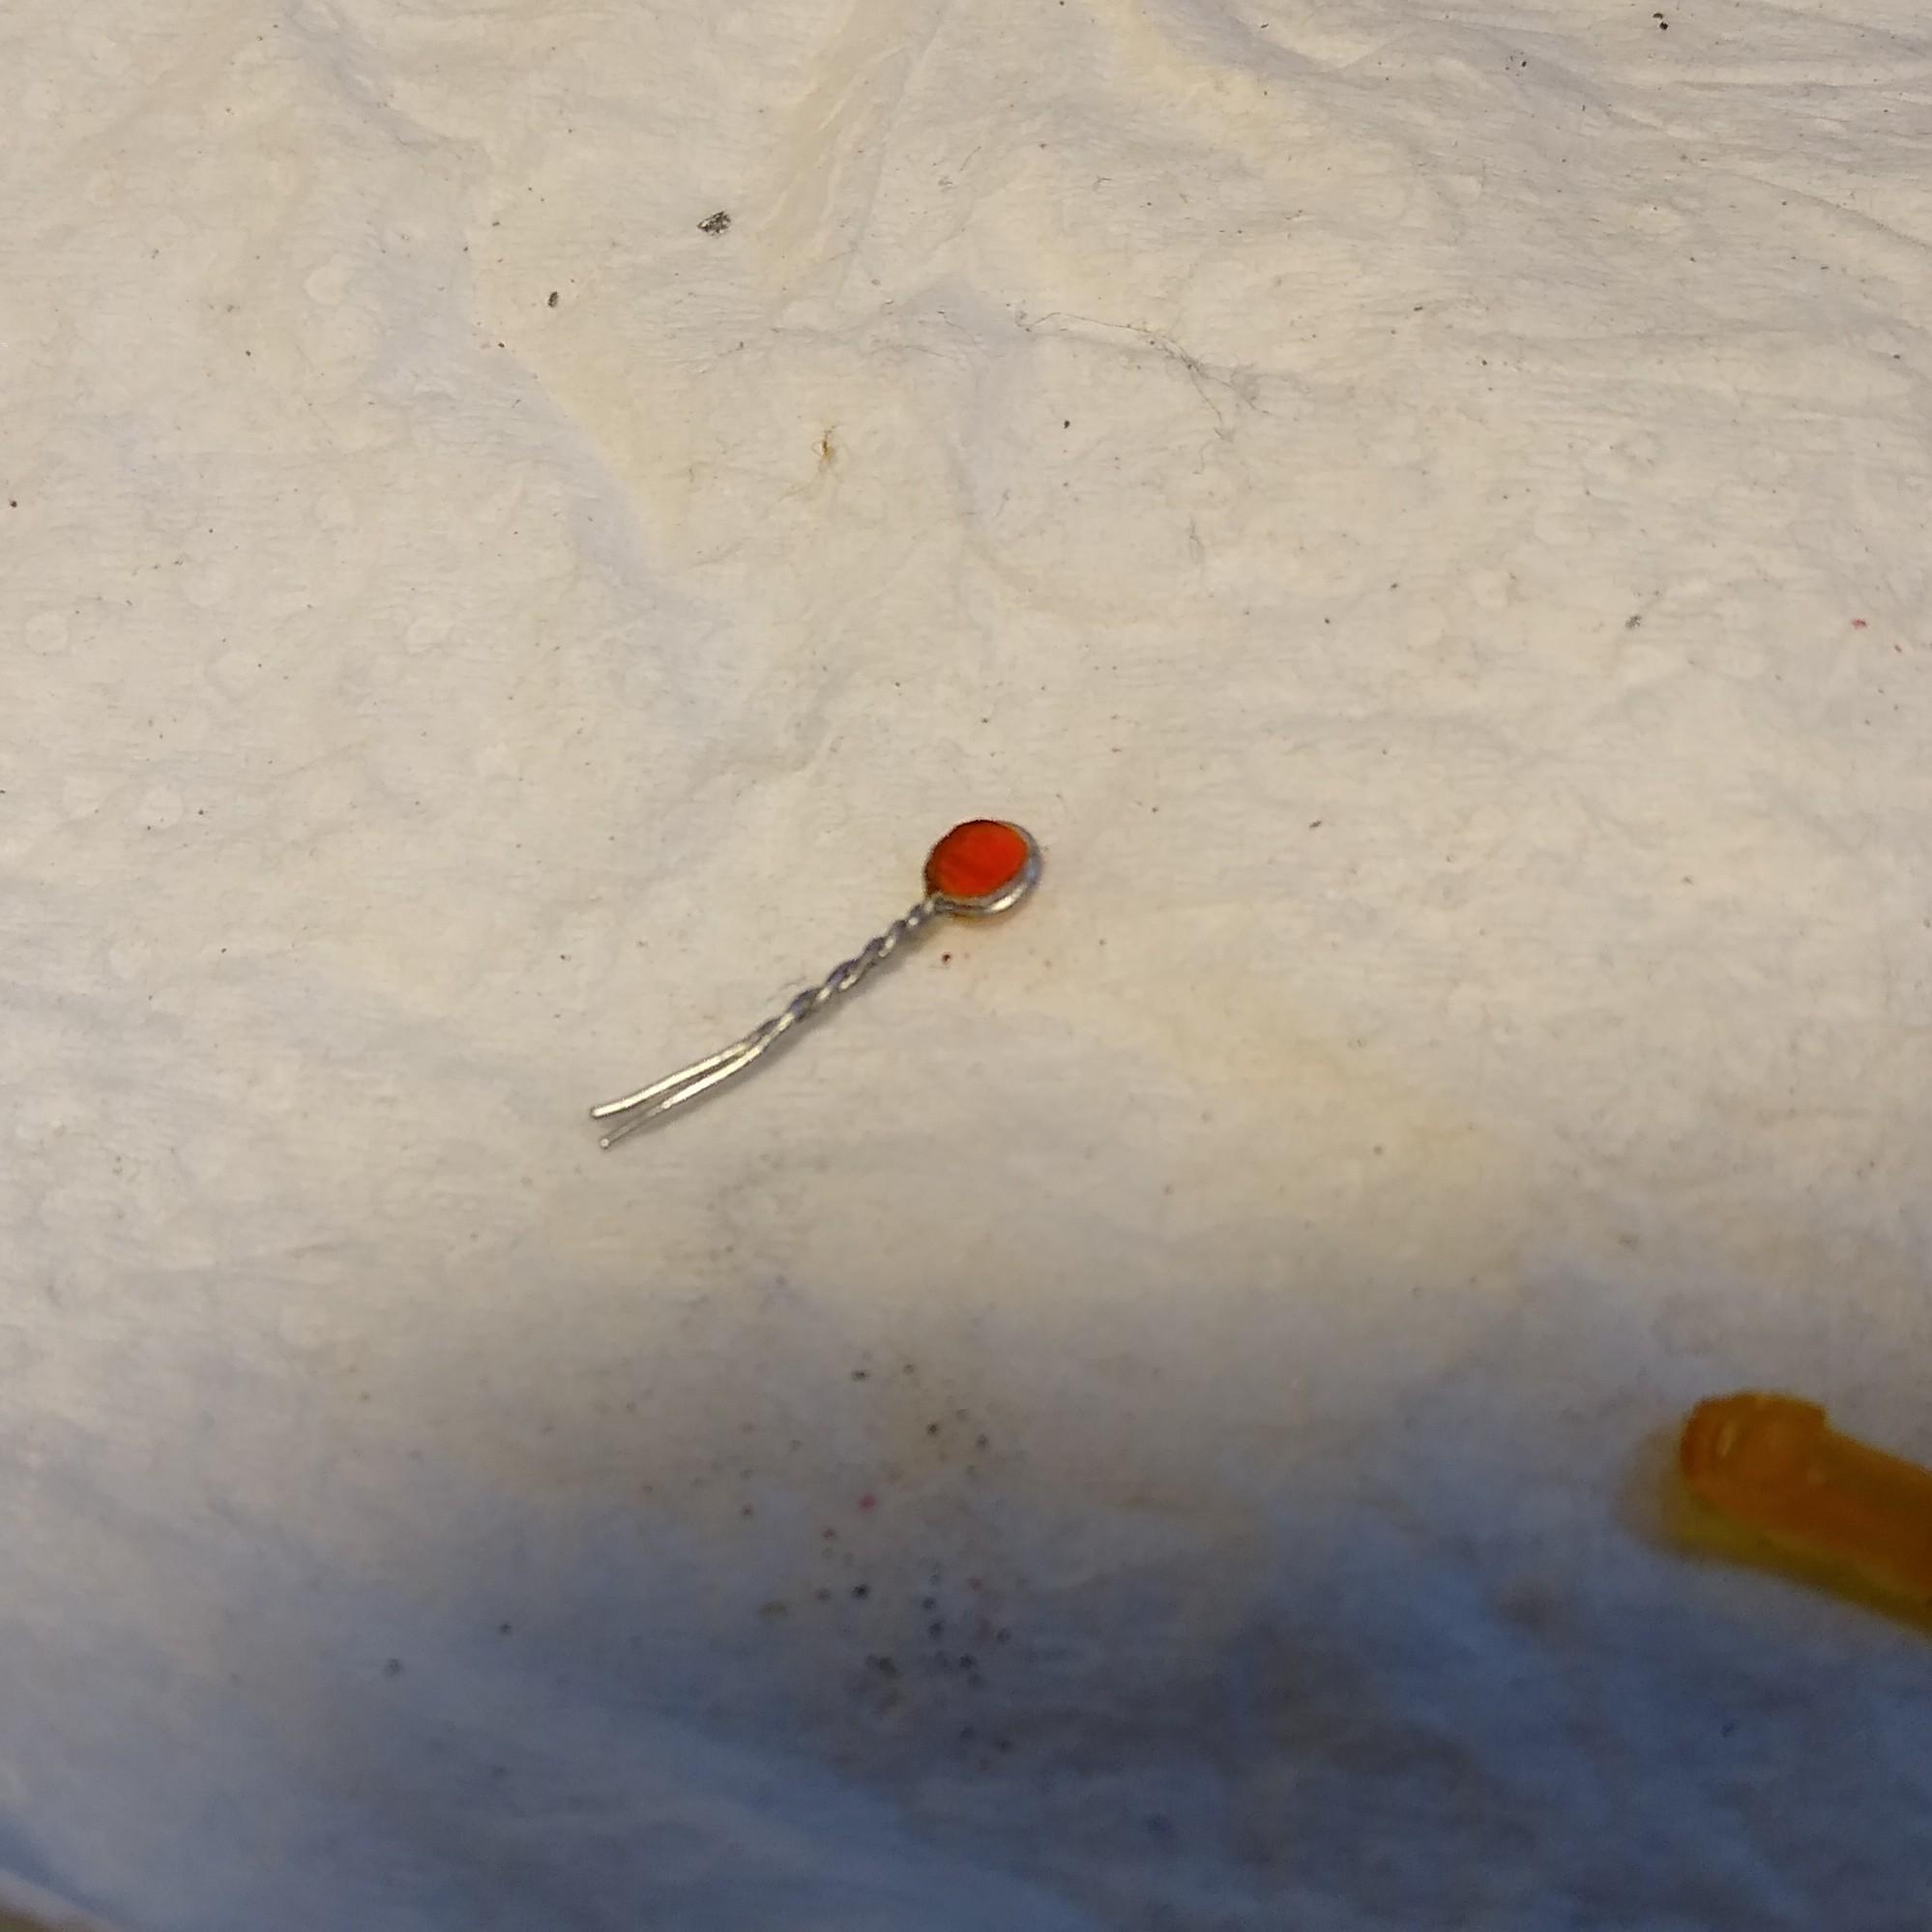
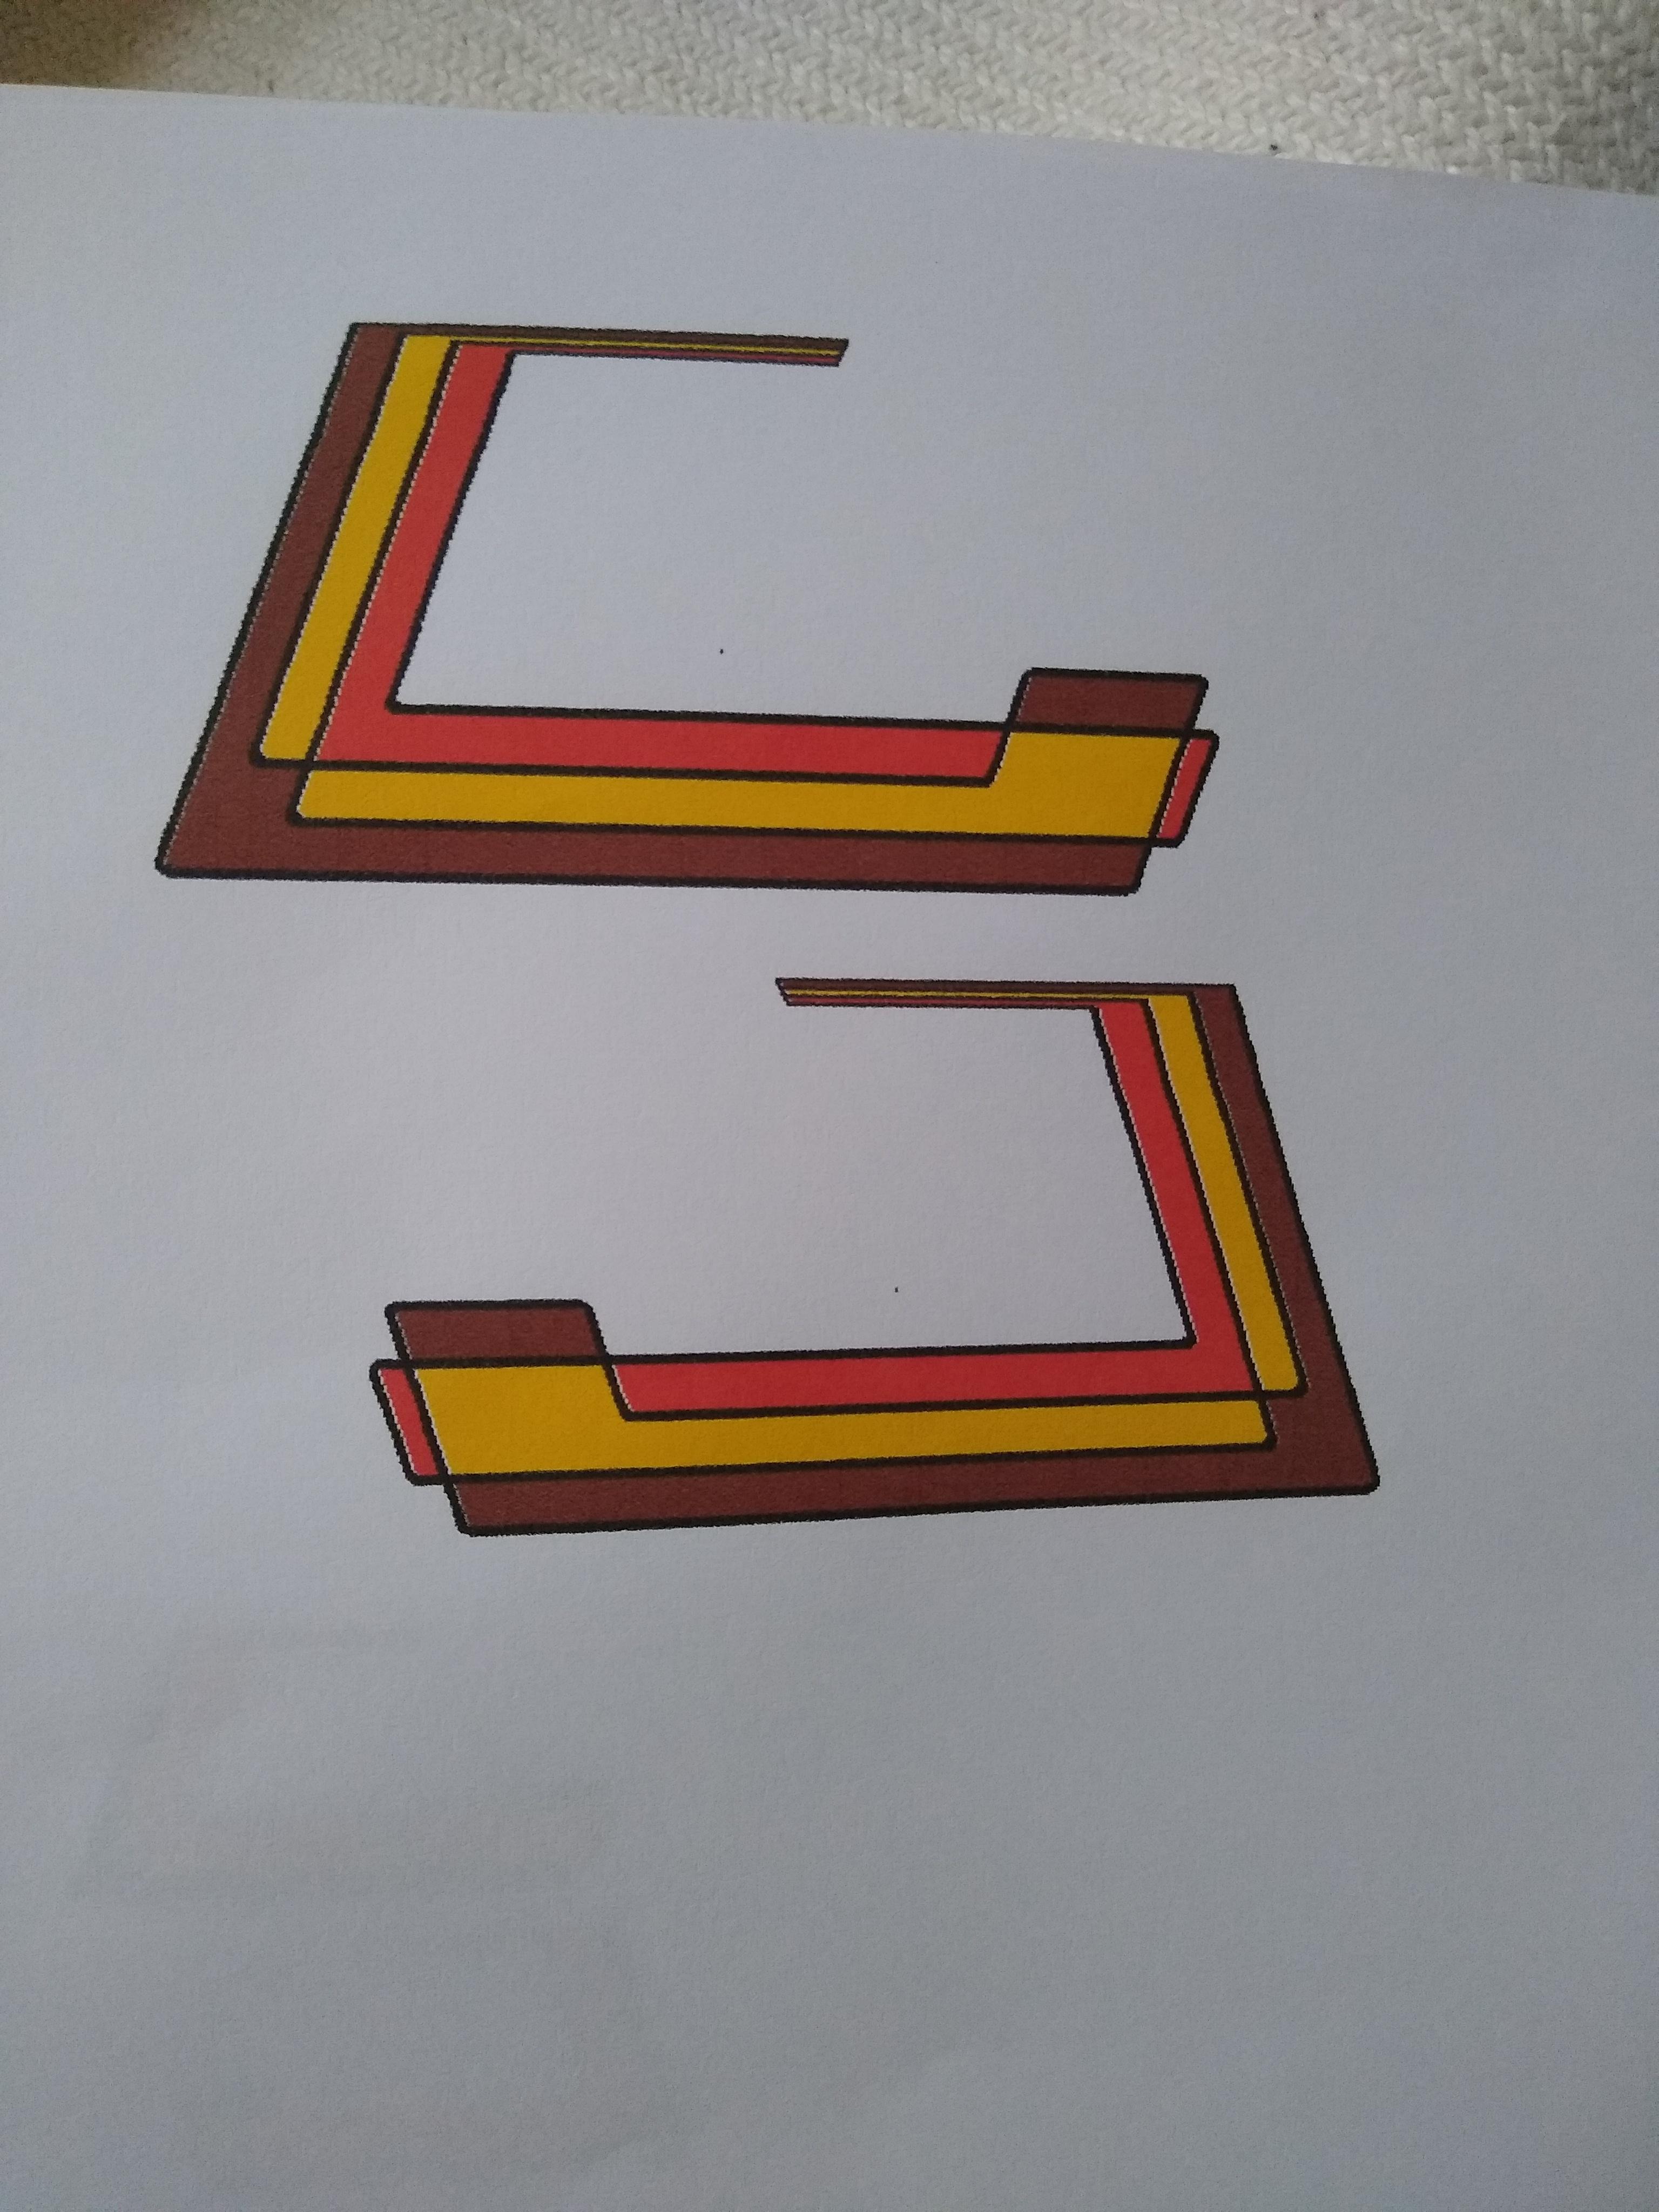
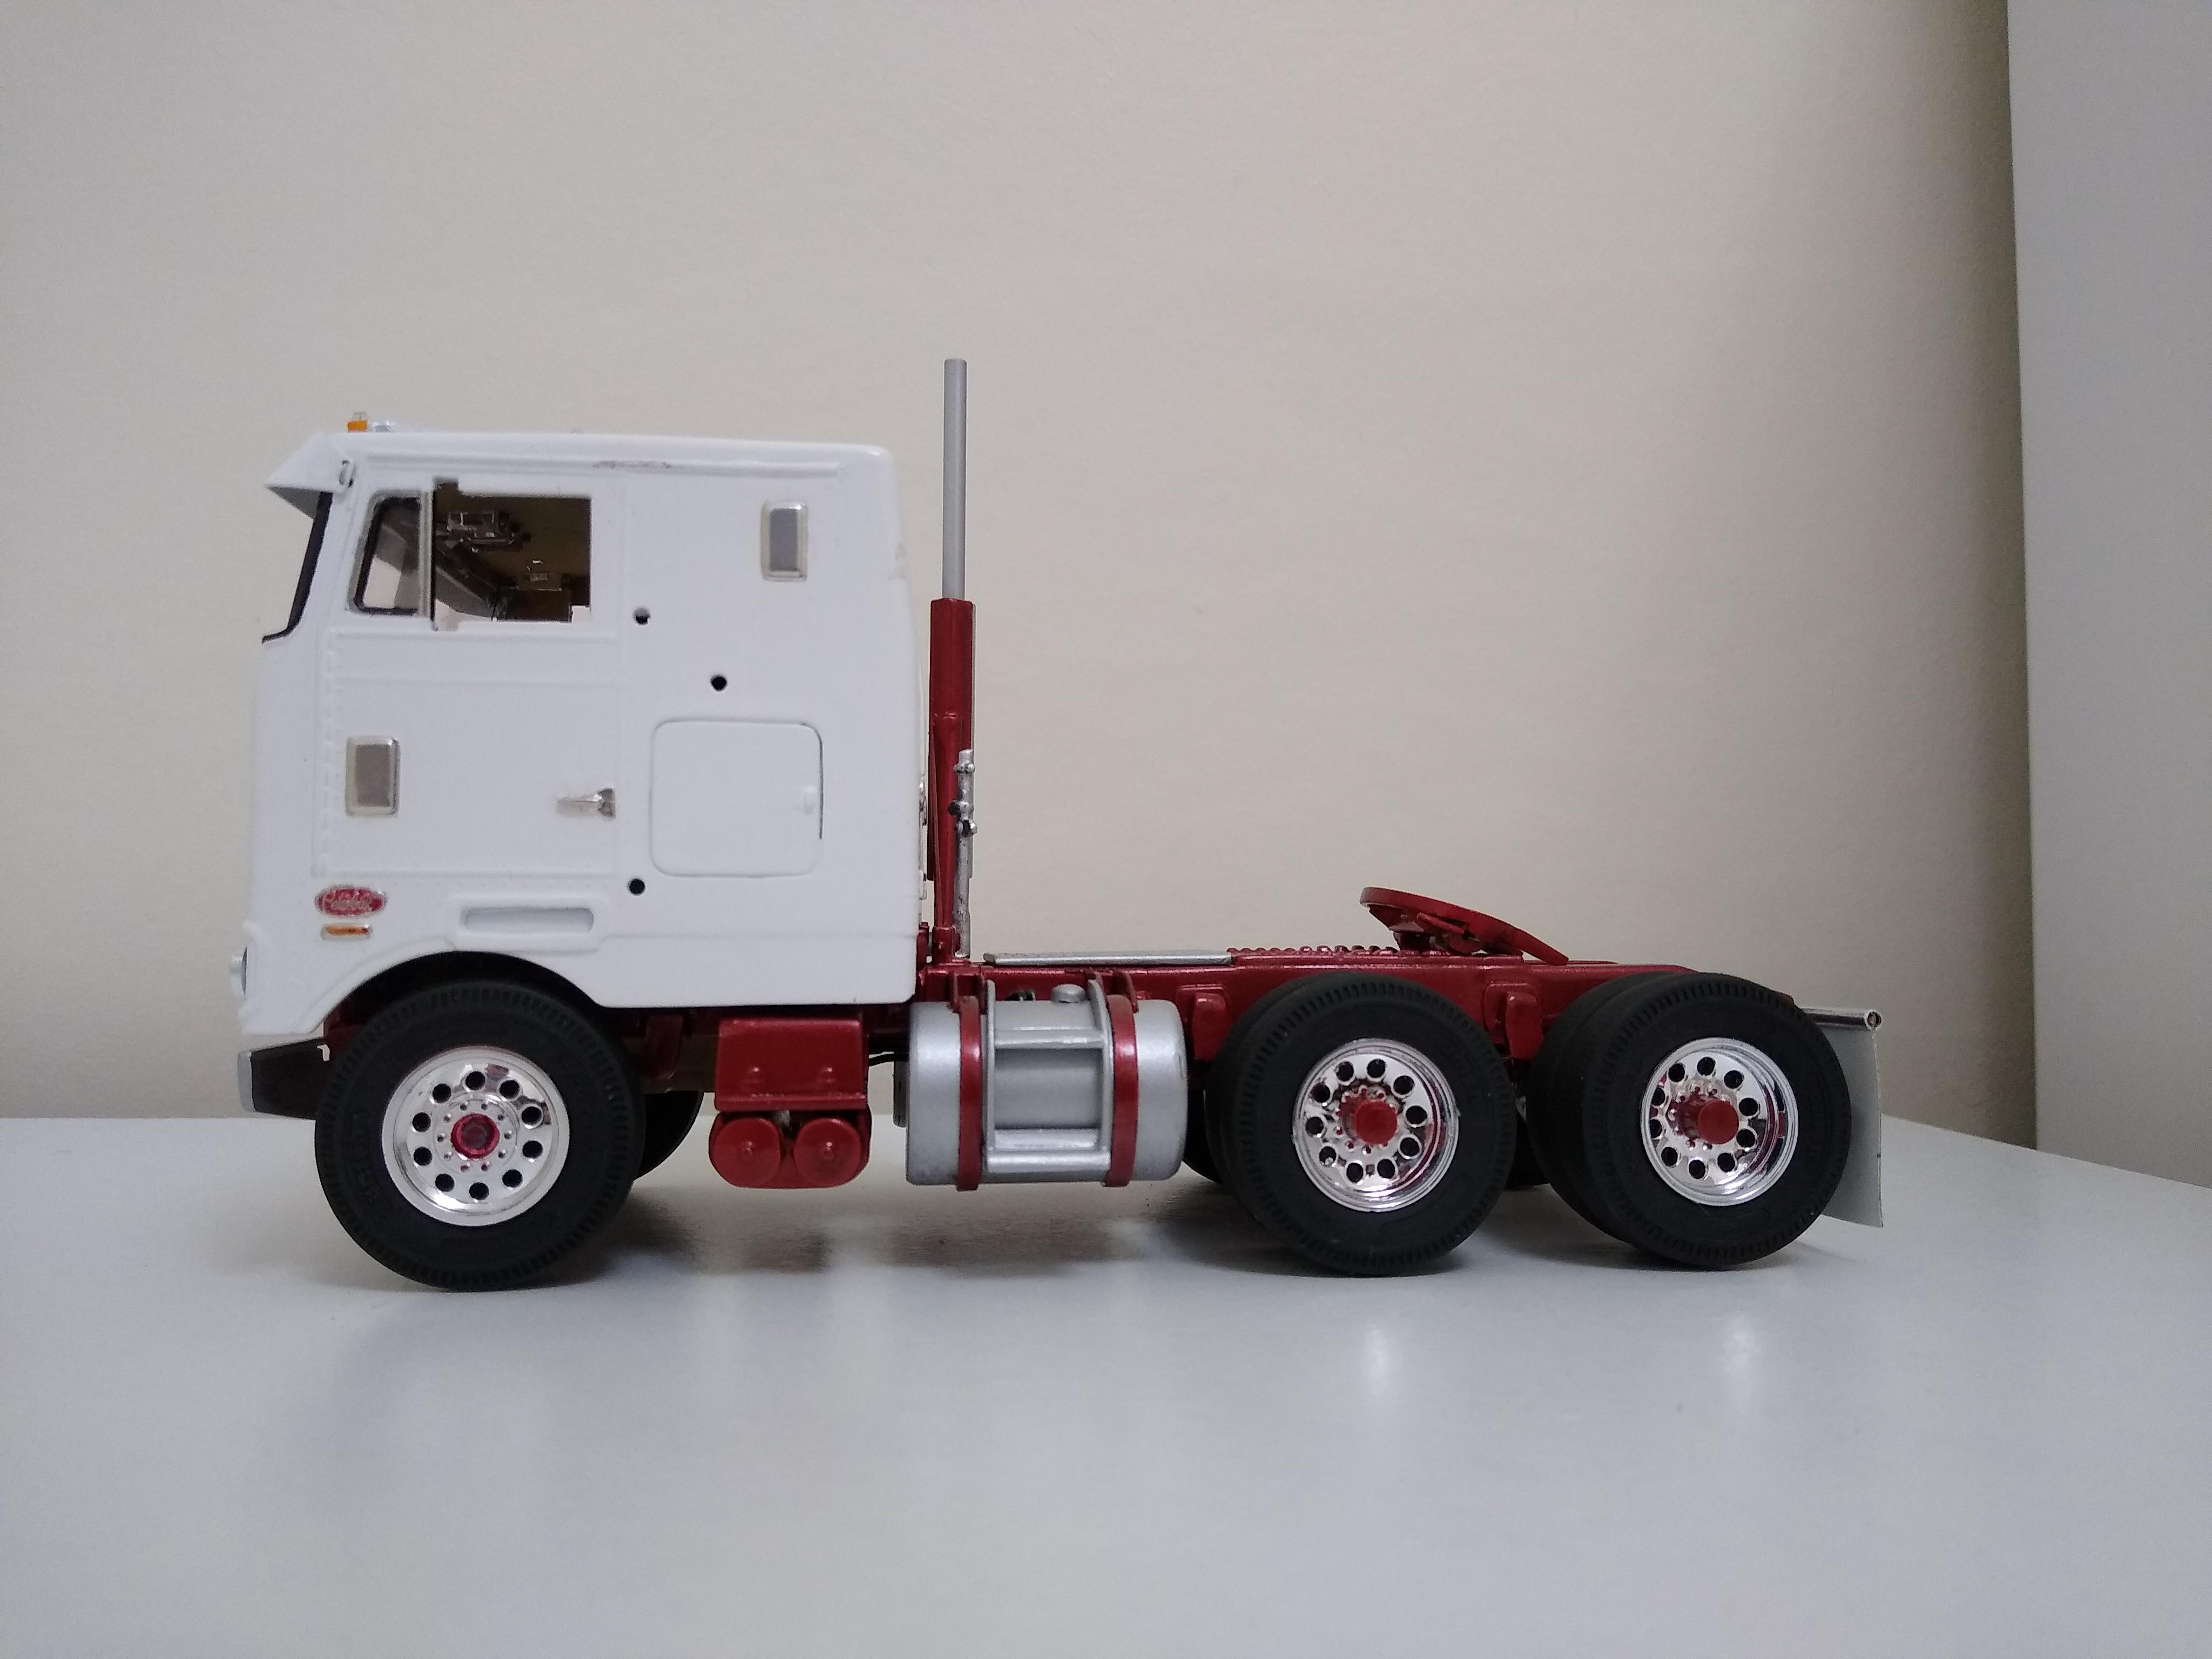
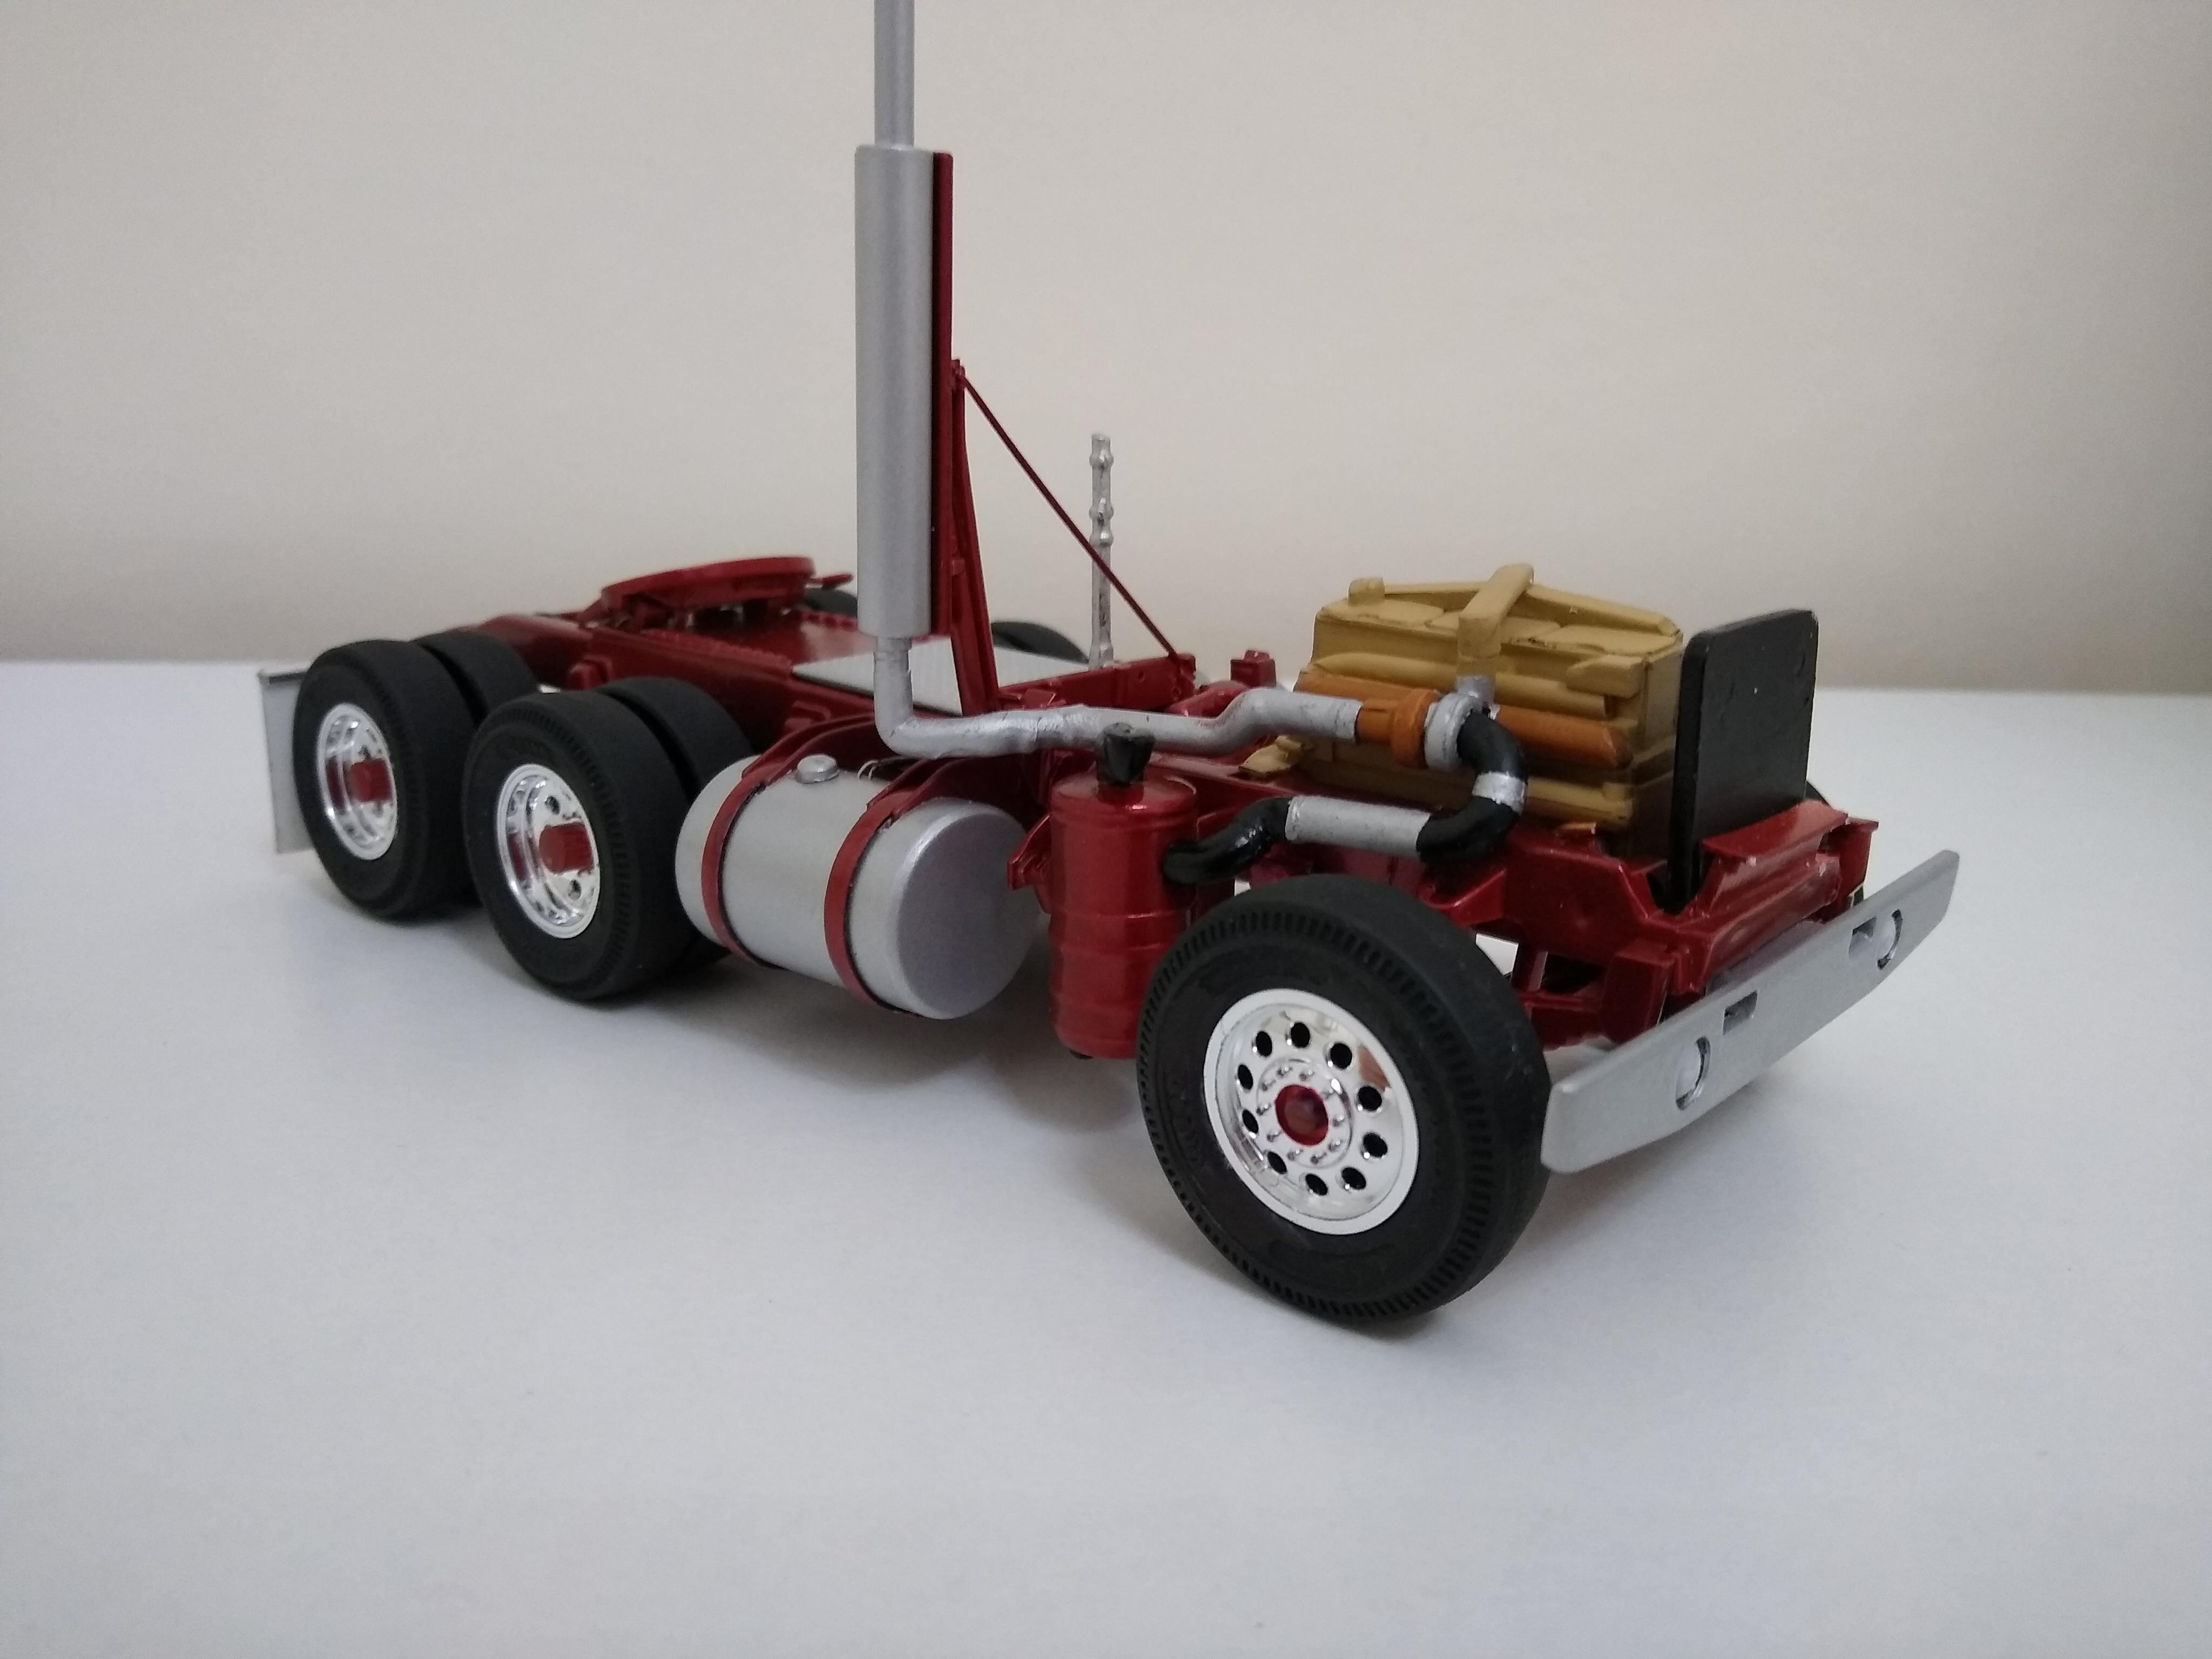
Fitted the rear shocks today, took me an hour and only I can see them!!! Why do we do it? Also fitted my air hoses around the pogo stick, front licence plates from the kit on a board under the front bumper. One thing I have wanted to do is add the round flashers on the front of the cab. I am very aware that at 1/32 scale they'd be so fragile someone would only have to cough and they'd fall off. So, I had to be resourceful. I snipped off a piece of amber sprue from an AMT 1/25 kit and filed an annular groove in it. Then, I put a piece of wire in the groove and wound it tight forming a pigtail. I cut and filed the sprue until it was a thin disc bound by the wire. A little Tamiya clear orange to deepen the colour, drilled a hole in the cab and wound the pigtail into the hole. I now have more realistic, translucent and tough lamps. Much better than the ones the kit tacks onto the mirror brackets. I'm very pleased. I'm now trying to draw up my Winslow stripes on Inkscape which was recommended to me by Peteski, thanks mate. In typical make style I faffed around with it for four days fruitlessly before deciding to read the manual and knocking out a simple pattern in half an hour! Long away from a set of cab stripes but it's very interesting.
-
Project Terminator
Rockford replied to Saltie Olds's topic in WIP: Model Trucks: Big Rigs and Heavy Equipment
Looks great mate. The AMT tank trailer has a terrible reputation for warpage of both the frame and the tank. How have you found it? I've got one in my stash, I should get round to it in about ten years. -
W900 Hauler / Dodge 4x4: Part #1
Rockford replied to Saltie Olds's topic in WIP: Model Trucks: Big Rigs and Heavy Equipment
Who needs a house with a truck like that? Looking great. -
W900 Hauler / Dodge 4x4: Part #1
Rockford replied to Saltie Olds's topic in WIP: Model Trucks: Big Rigs and Heavy Equipment
The little lumps on the roof are covers over the air vents for the sleeper. -
Thanks for that Peteski, I'm away for a week now so will have a look at both of those when I get home. I knew someone would have something to offer.
-
I've just been playing around with the "Winslow" stripes for my Pete 352 cabover. I've just been using old Microsoft Paint, not 3D, just the original Paint. The results are ok but they're a bit pixelated due to the nature of the program. Does anyone know of any "drawing" programs I could download on Windows 10 that would give a sharper image with better colour choices? I want to do basic stripes but anything with a curve or a slant ends up being stepped with Paint.
-
That's quite an achievement, it looks so convincing, you'd never imagine it was scratch built.
-
Just such a spotless build, flawless paint!
-
Peterbilt 352
Rockford replied to Rockford's topic in WIP: Model Trucks: Big Rigs and Heavy Equipment
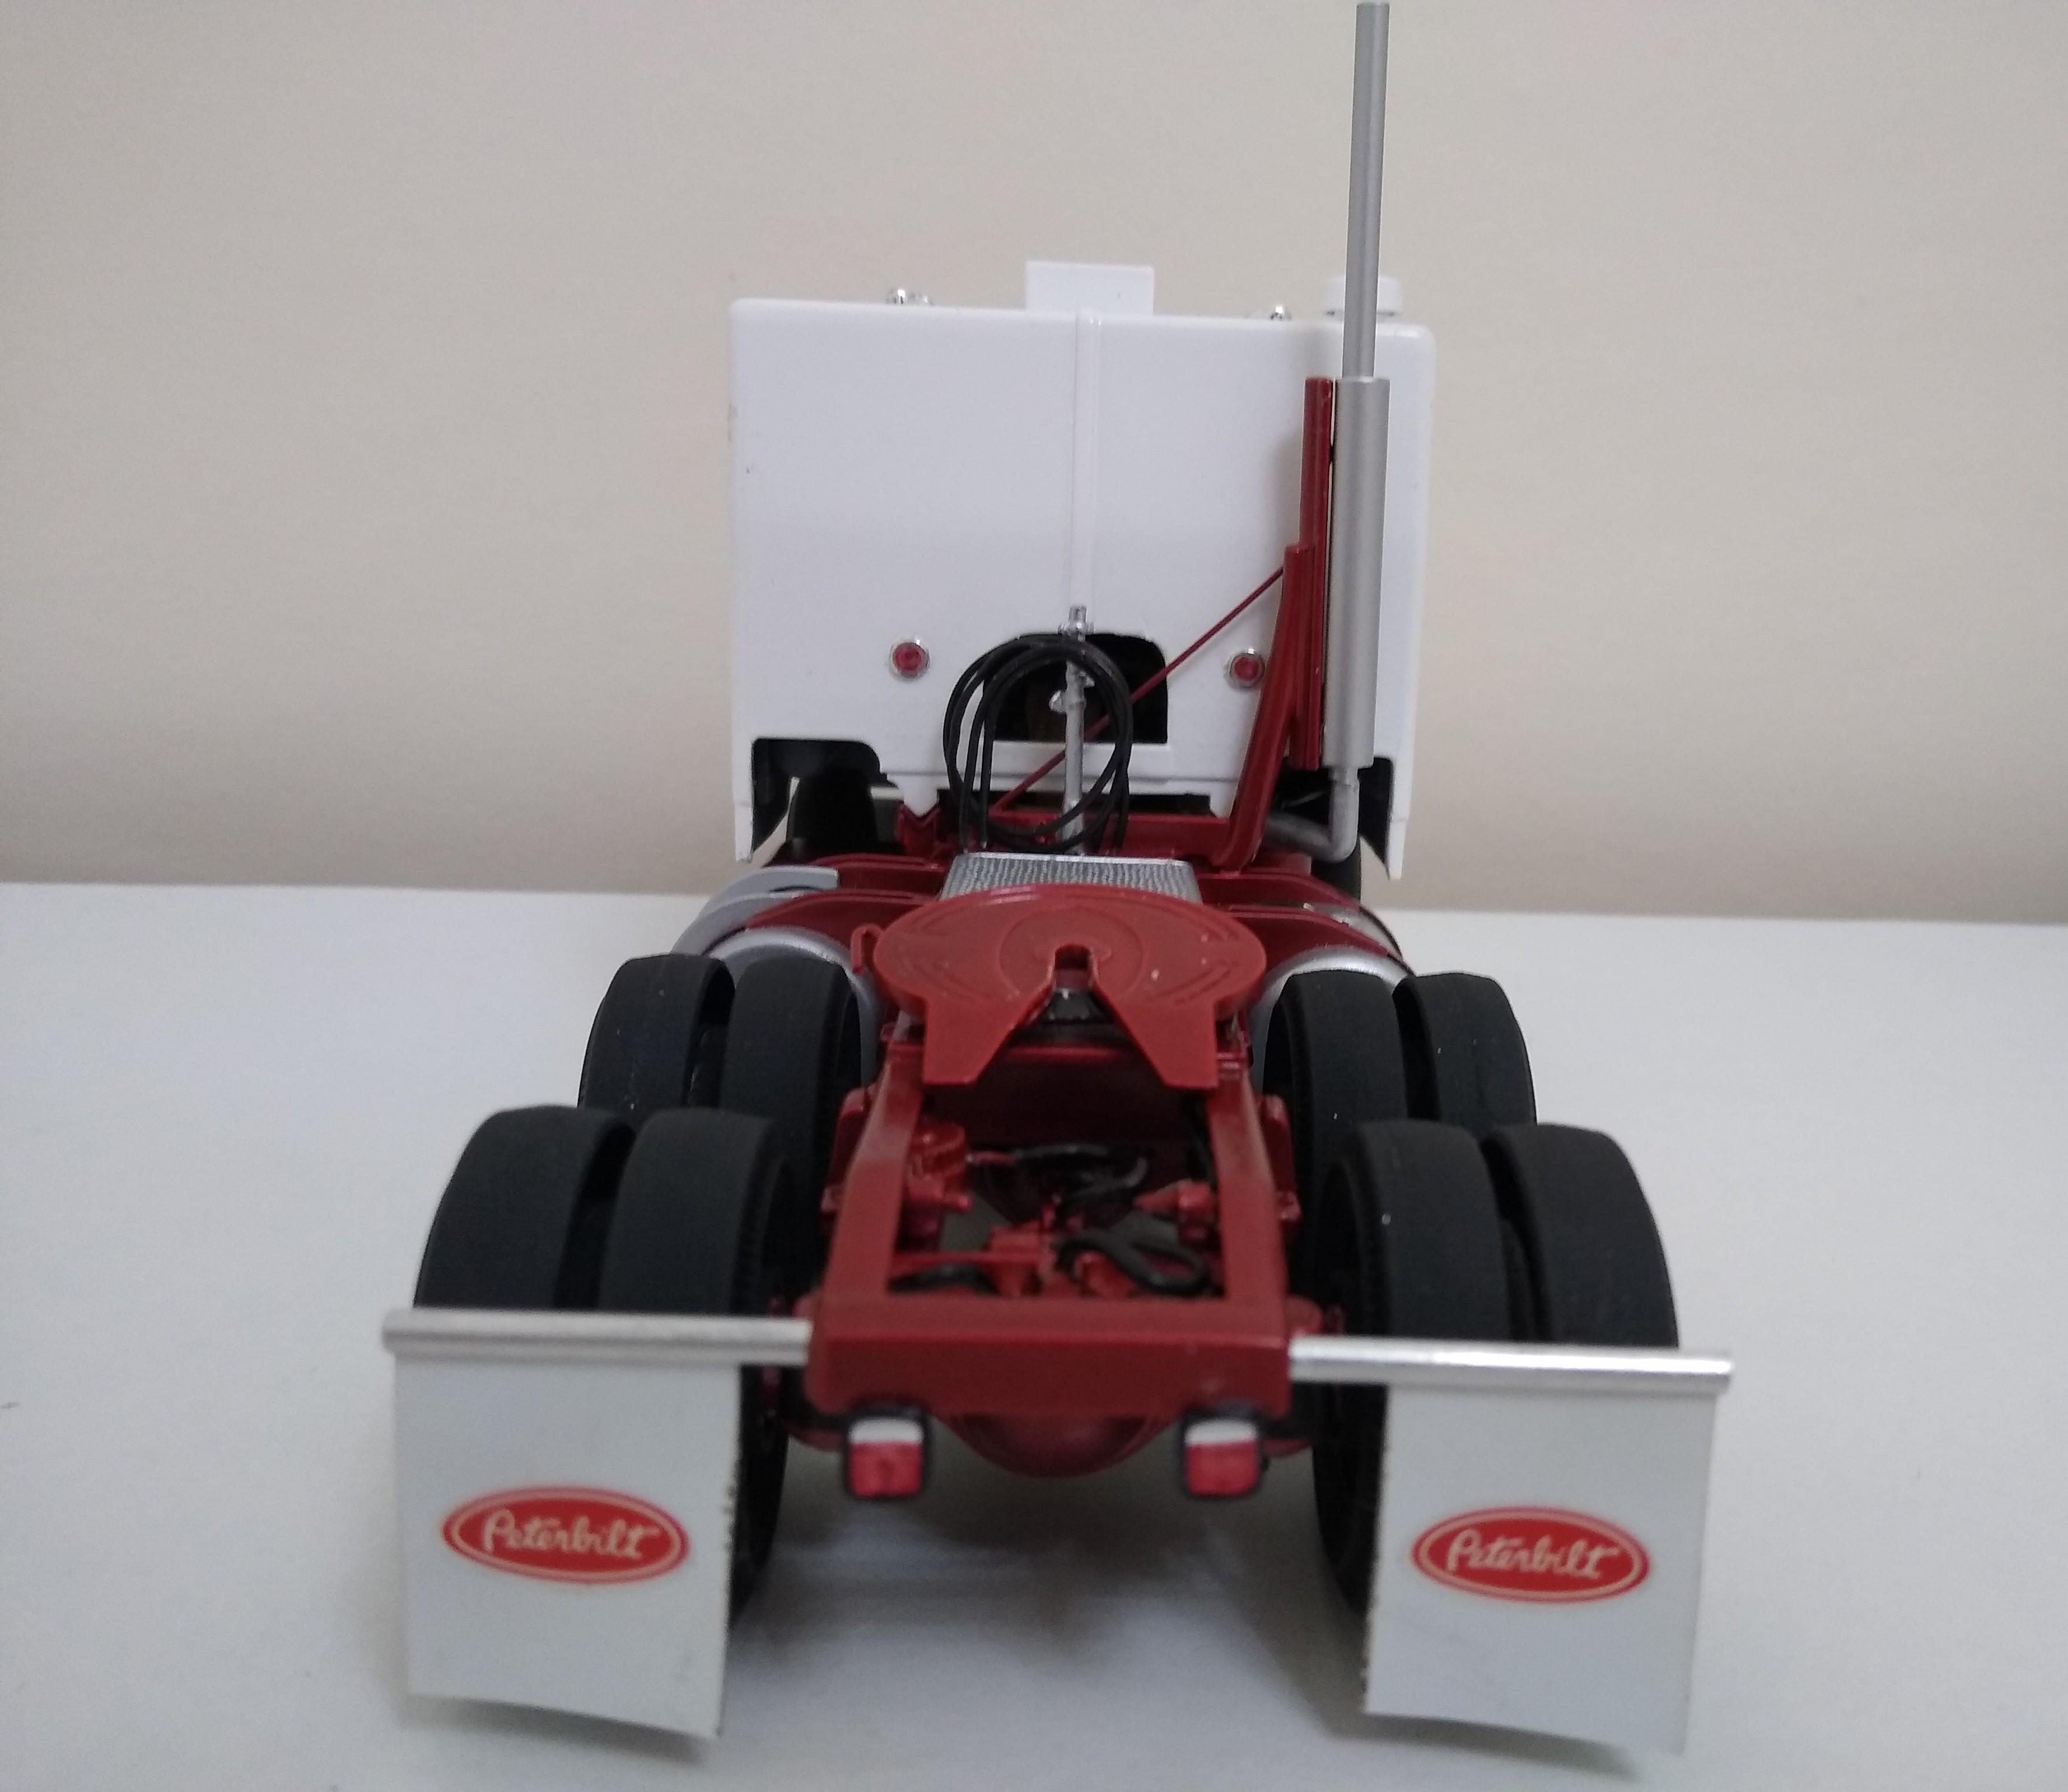
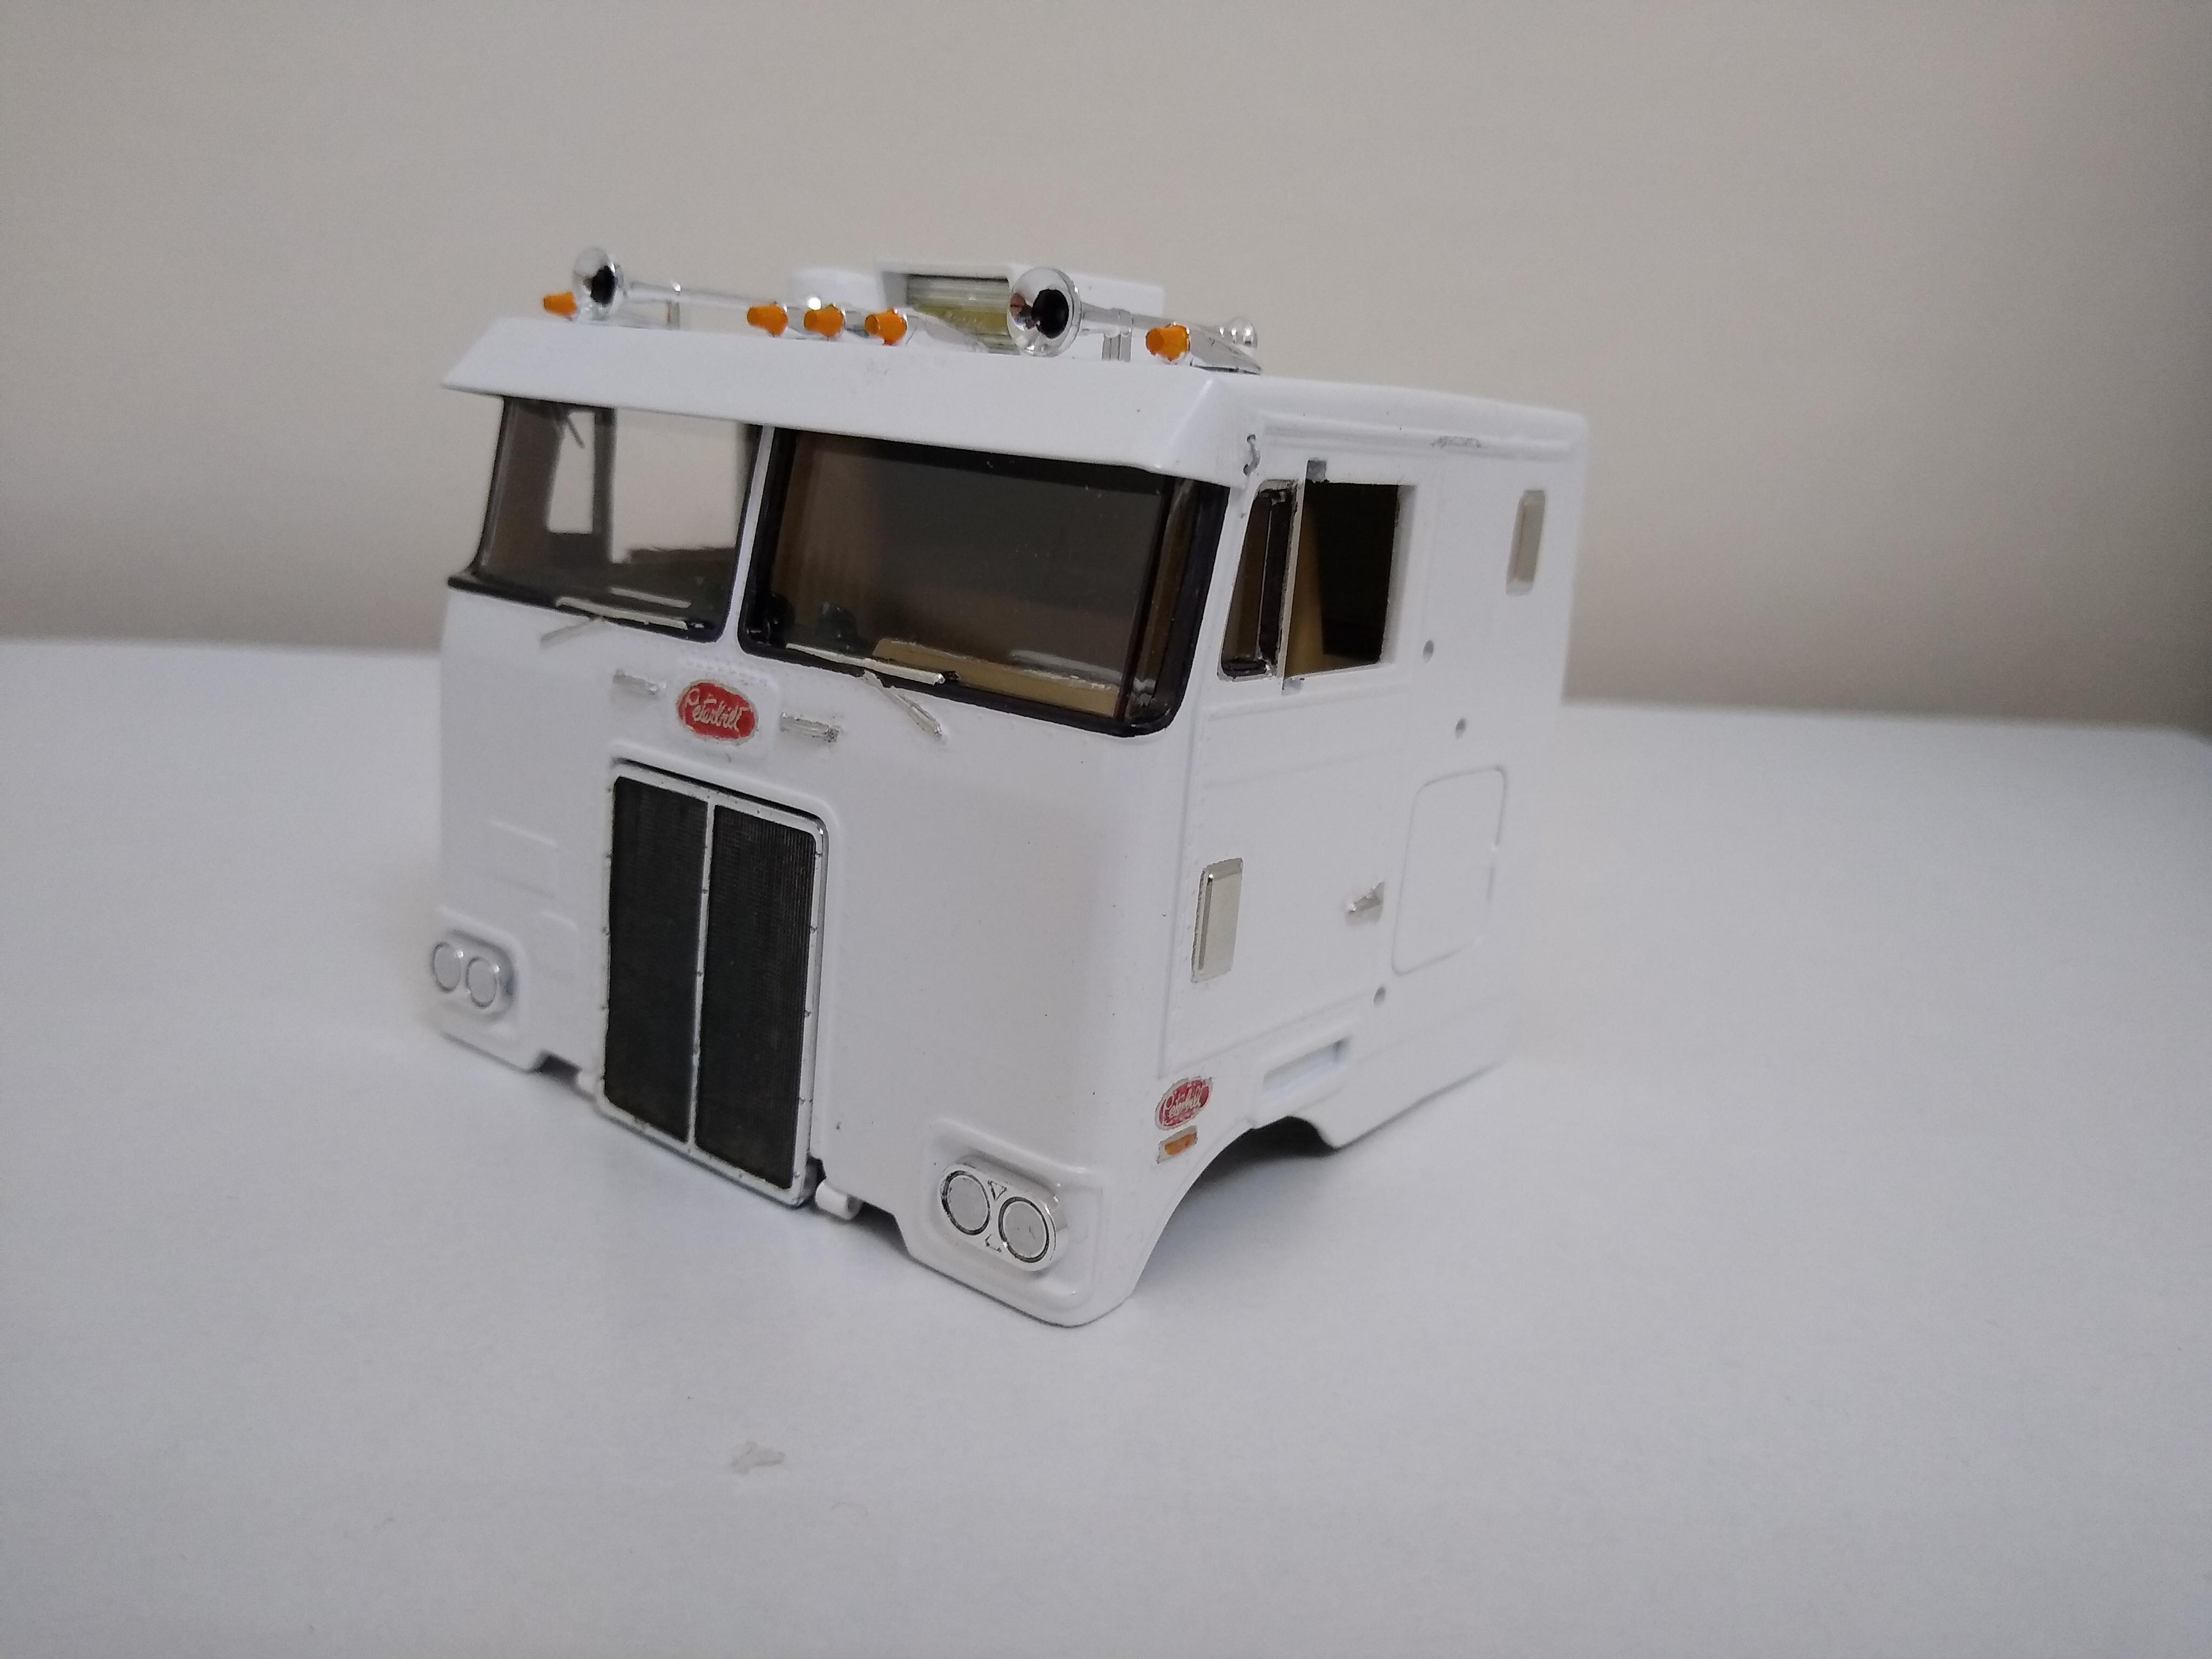
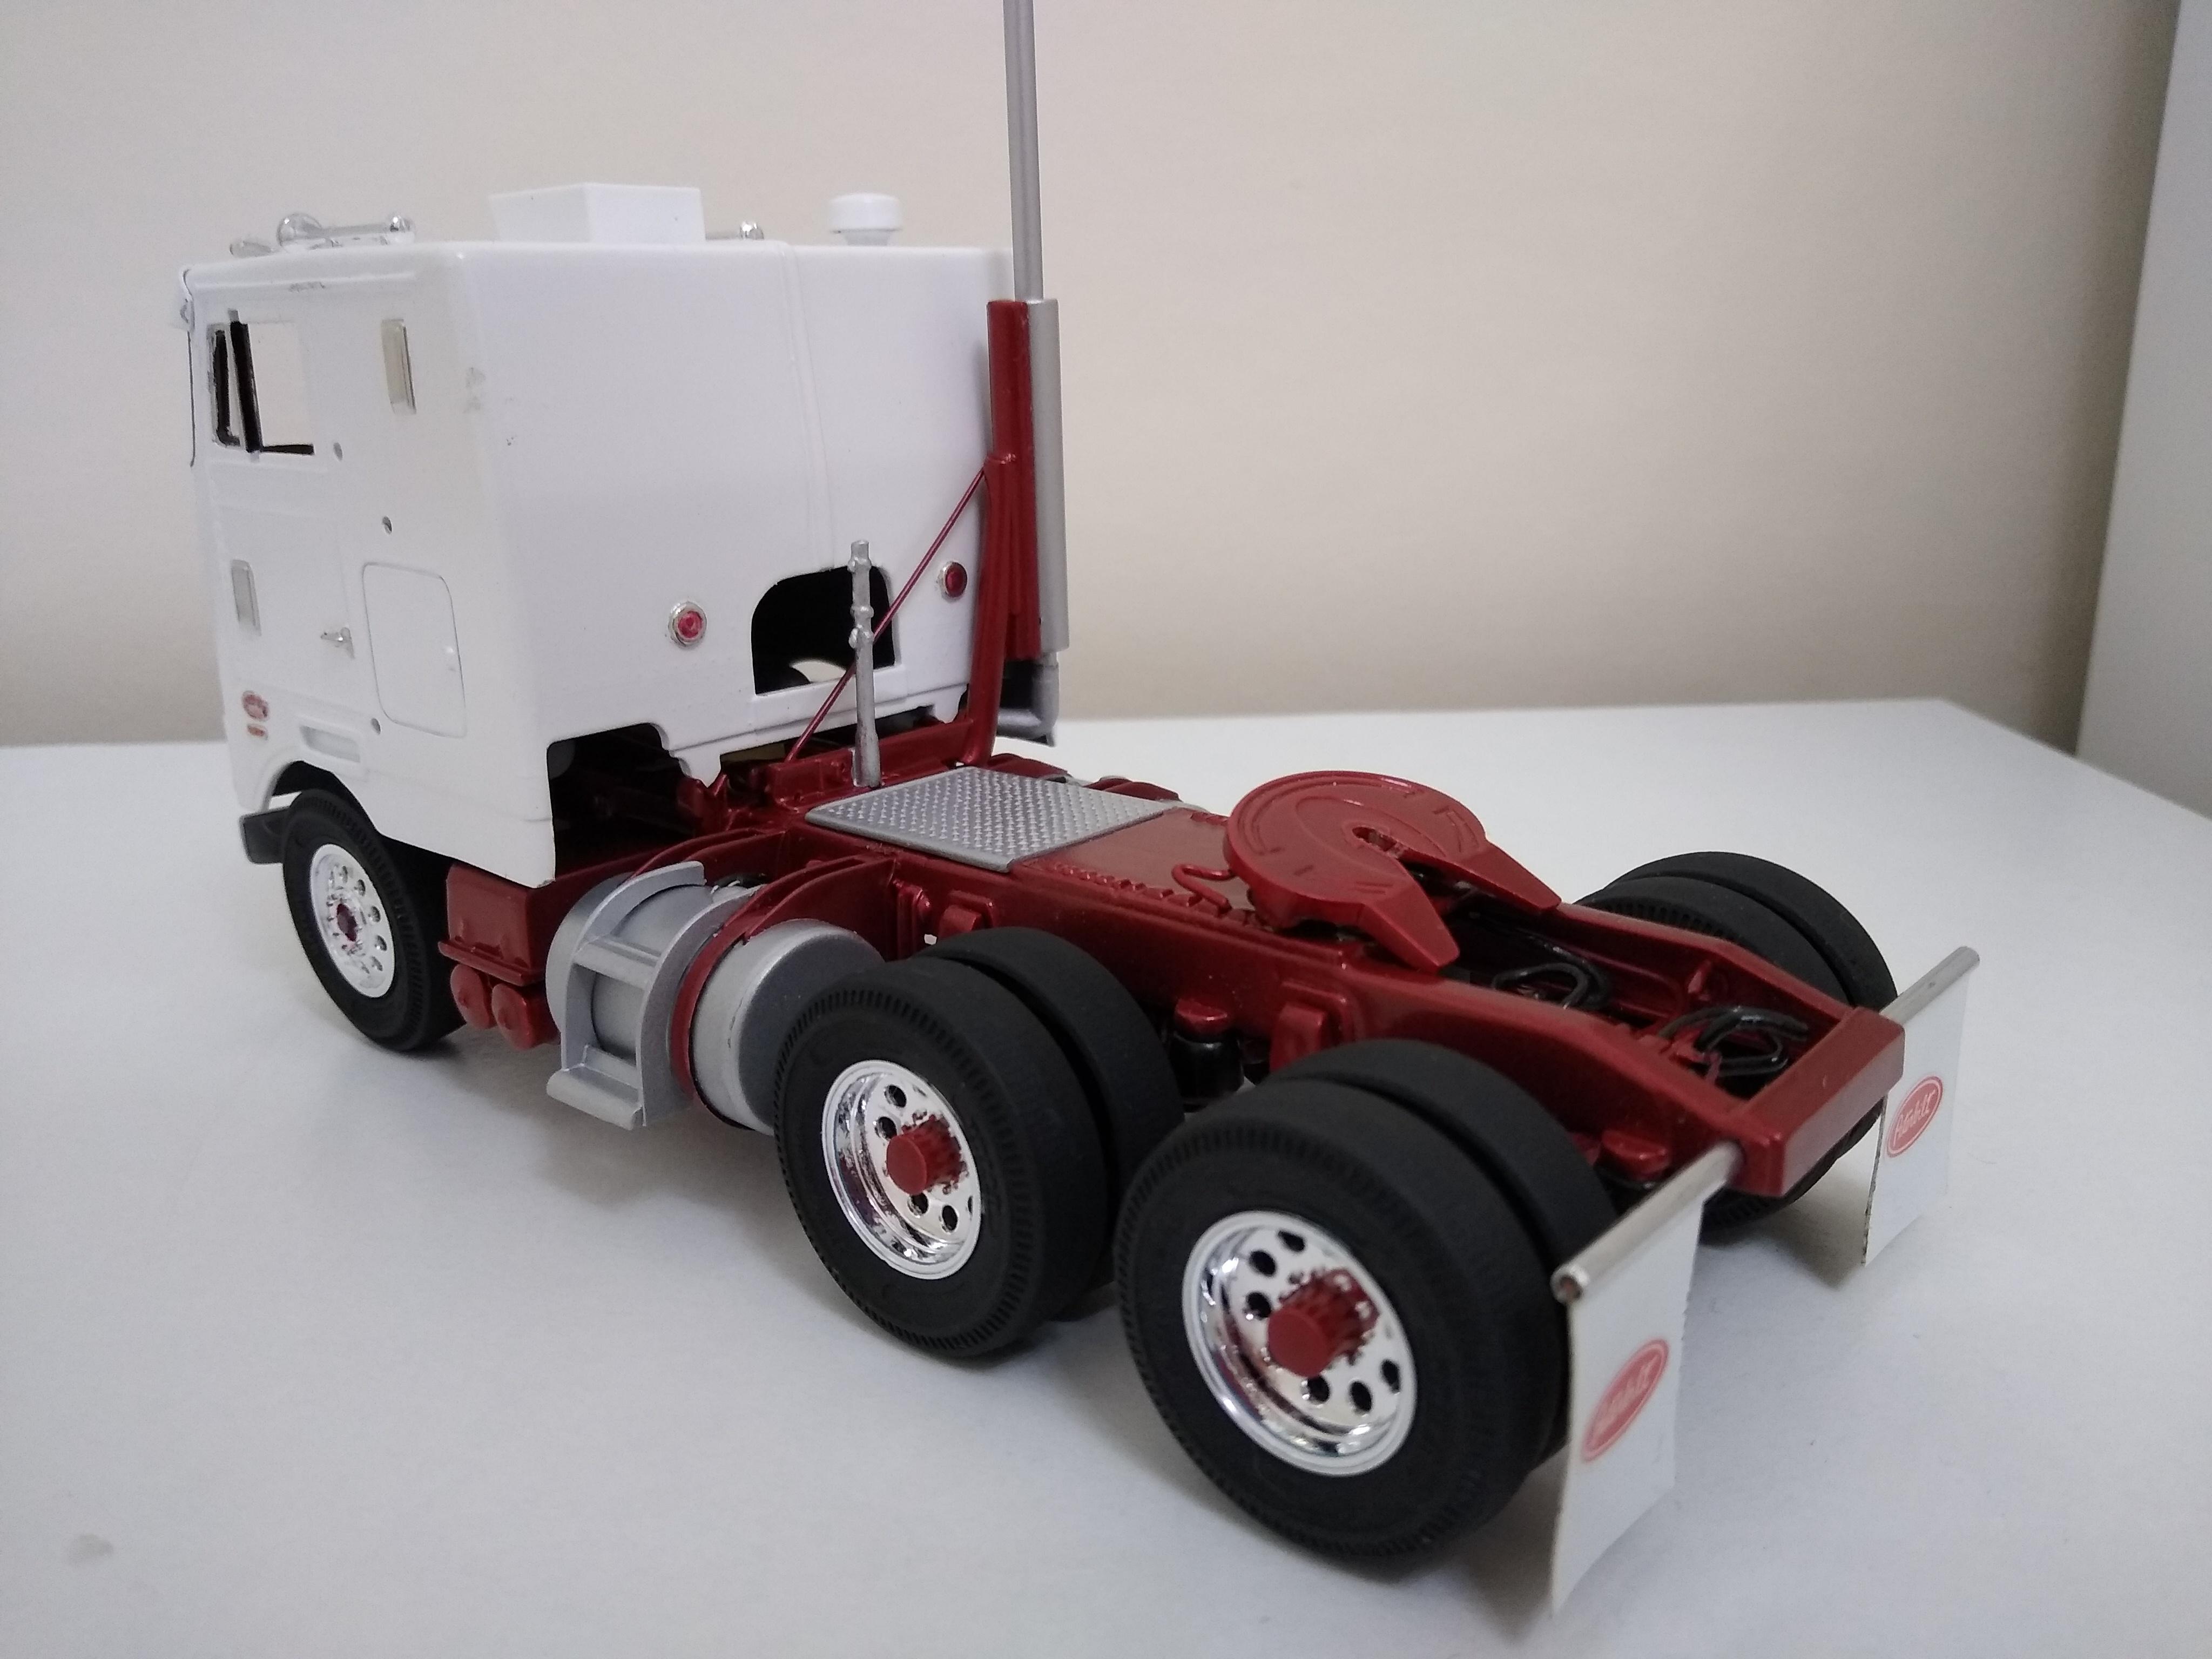
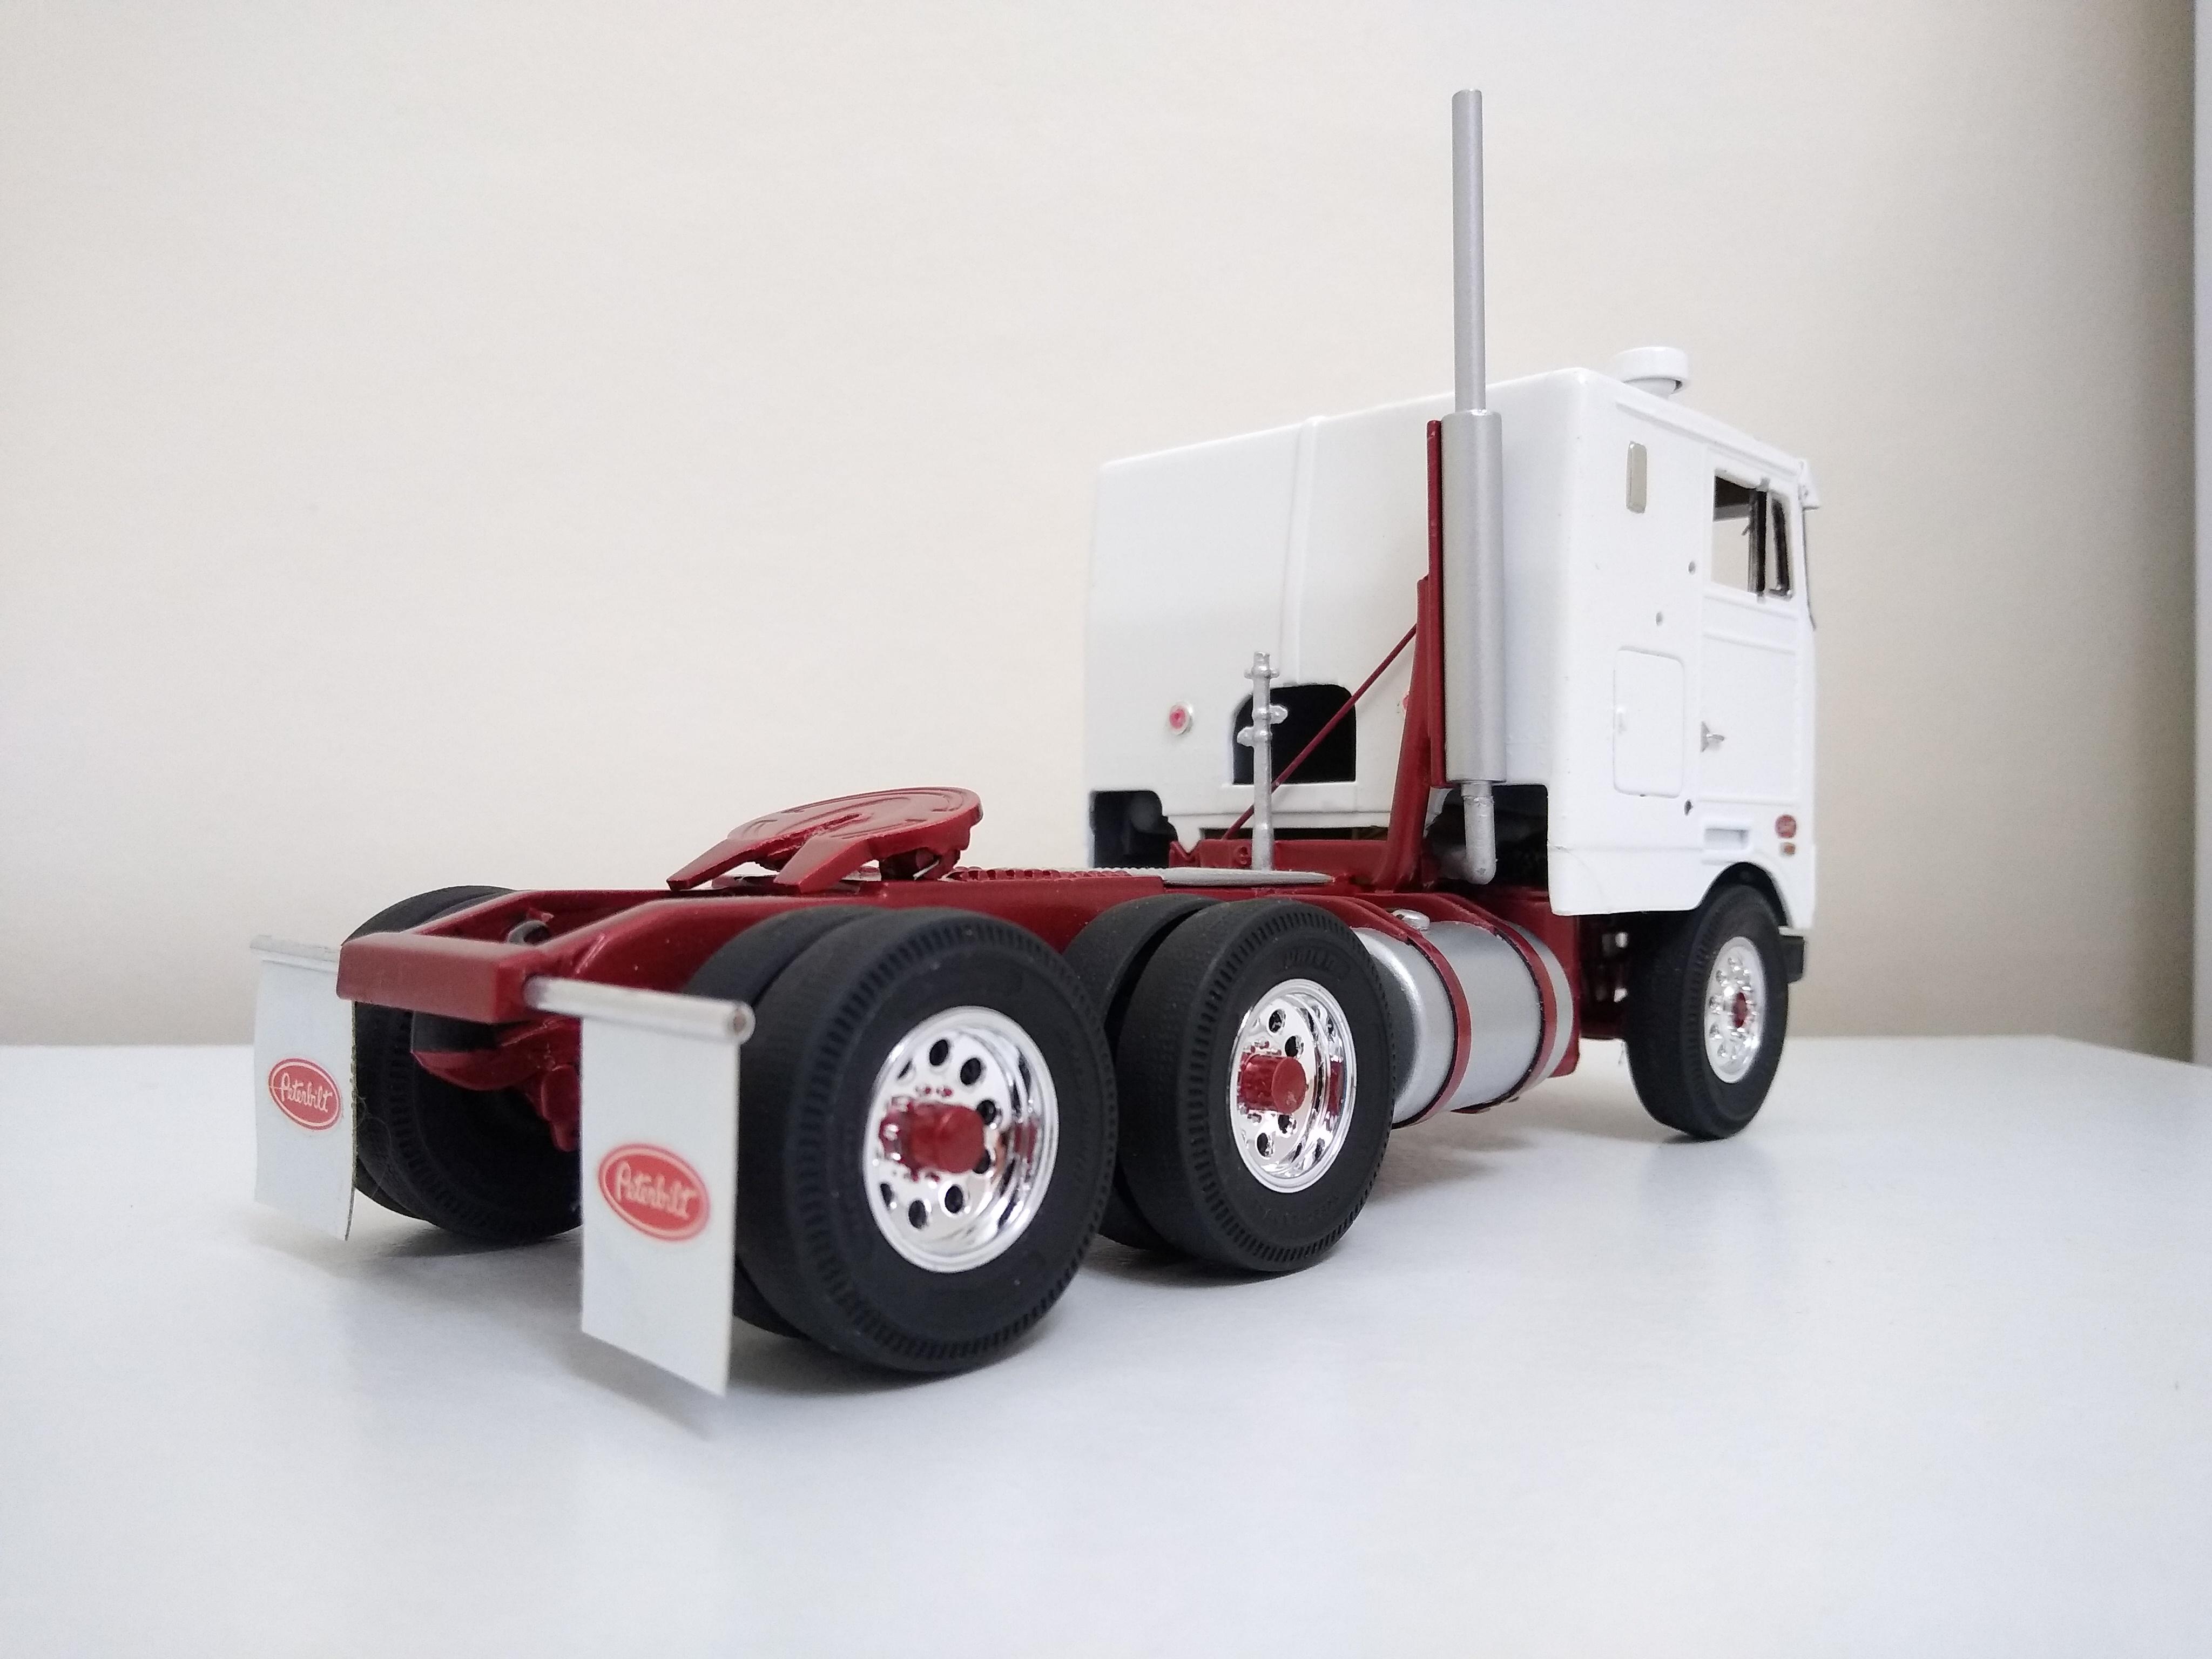
Another scary day today, trying to put the thing back together without damaging the paint. Fuel tanks needed a bit of massaging to get the brackets to slide in now that they were covered in paint. Managed that without ruining them, used an Emery board sliced in half. Slipped the tank straps over and slotted them in, look great! Added the step on the driver's side. Dressed the cab with BMF etc... and it really pops. Home made bumper looks good. Still got a few things to do, the rear shocks fell to pieces as I tried to install them and I still need to fit my Winslow stripes, airlines, rear lights etc...
-
Peterbilt 352
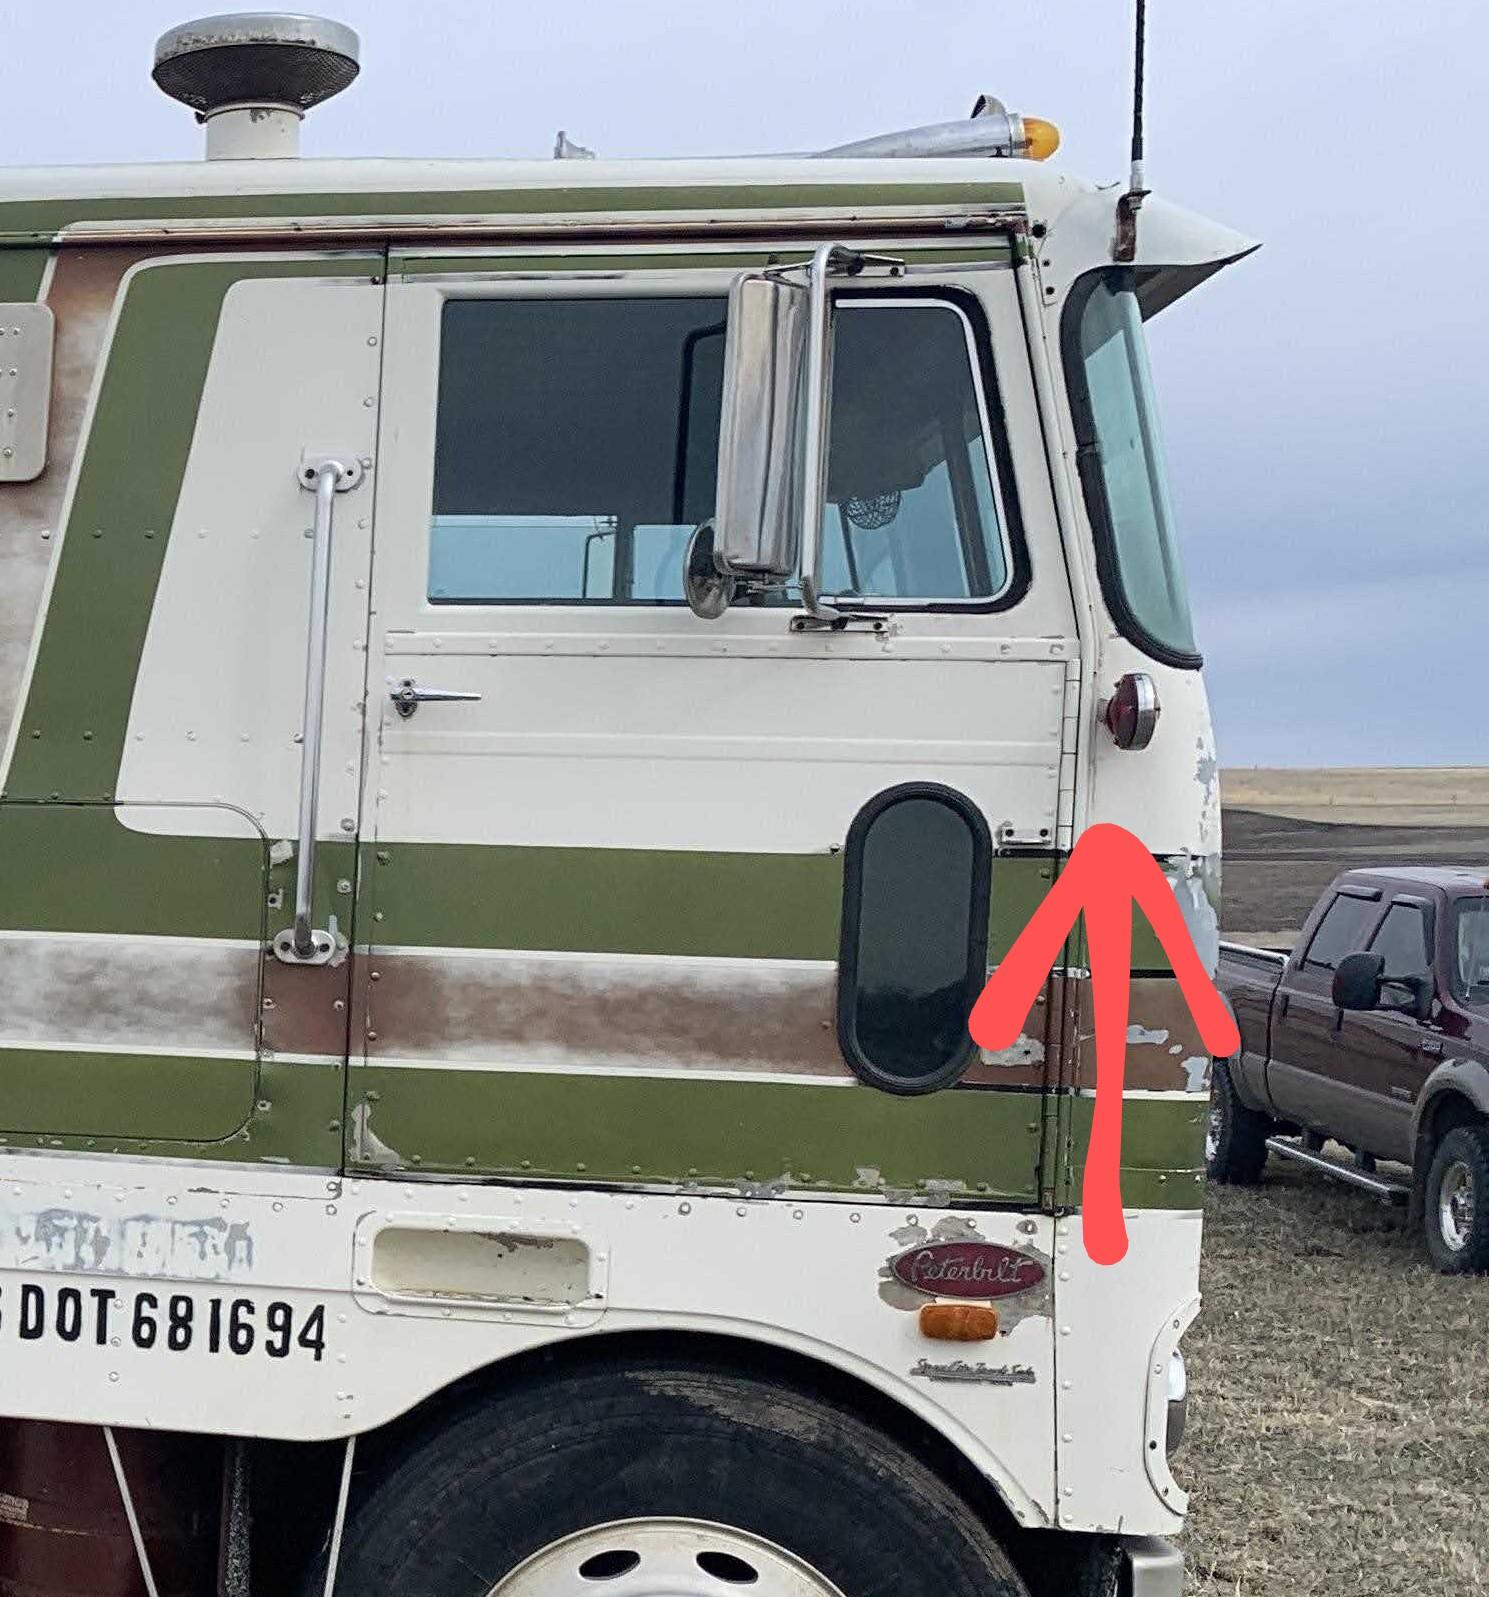
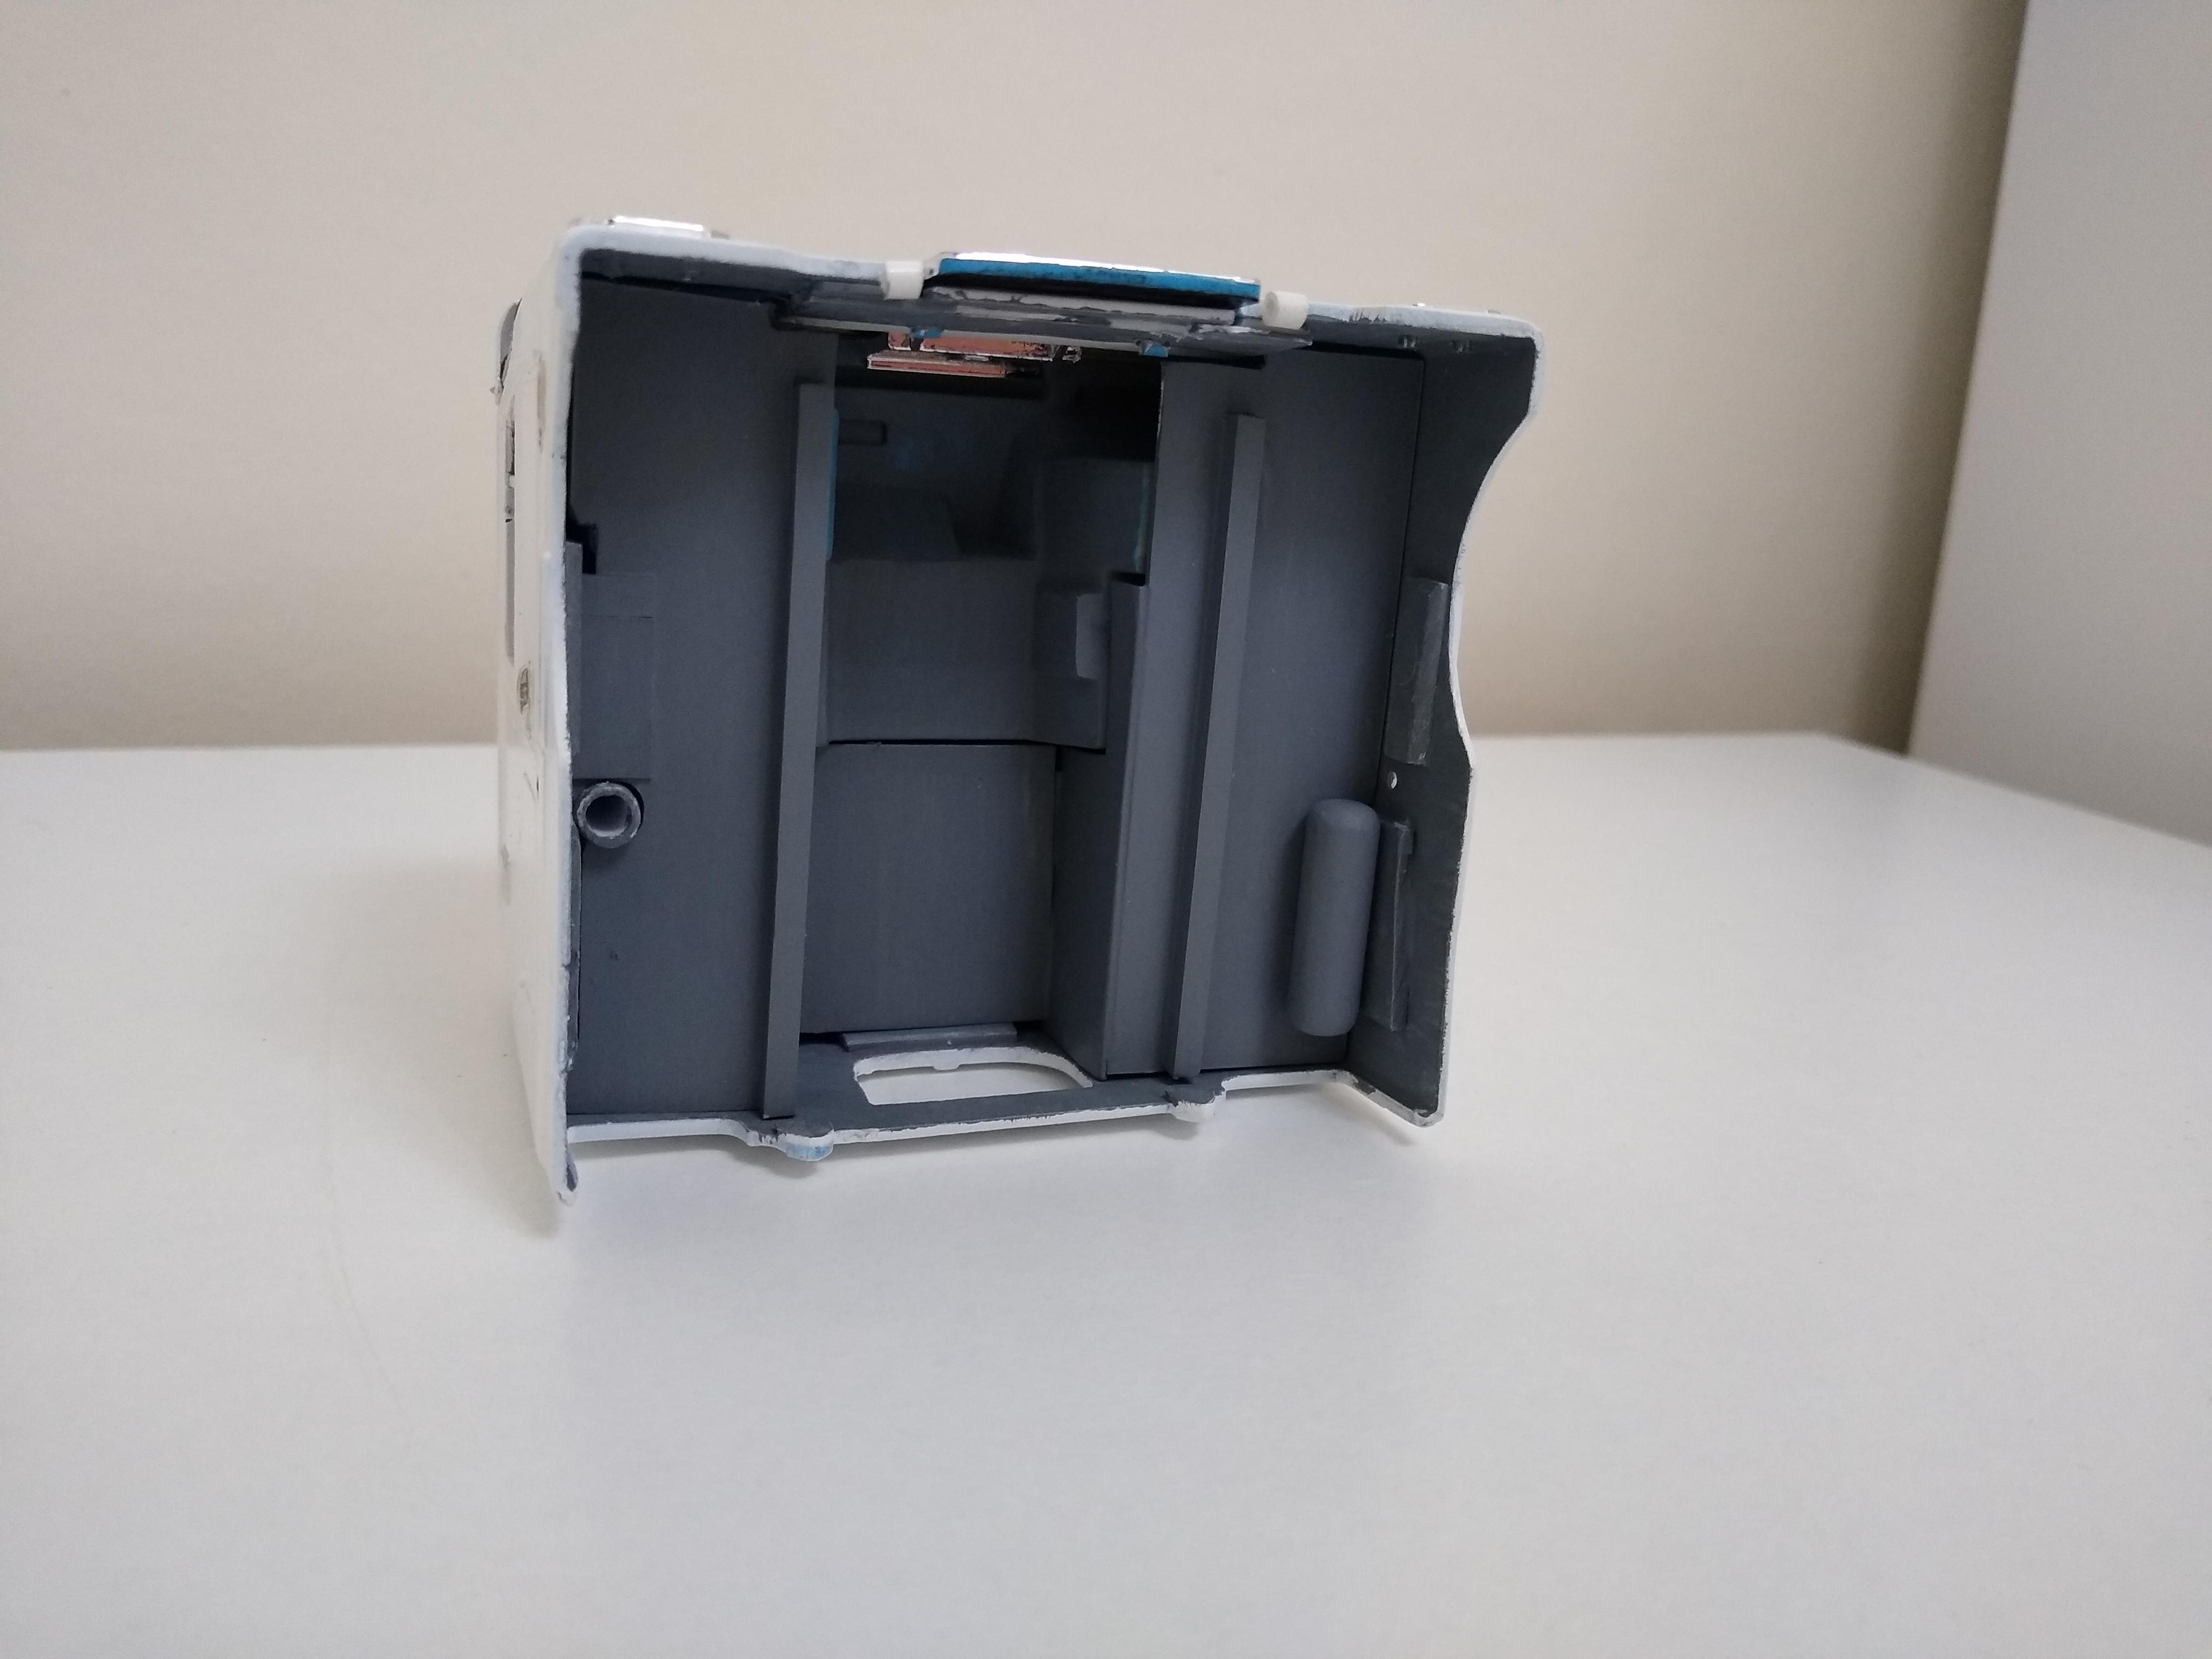
Rockford replied to Rockford's topic in WIP: Model Trucks: Big Rigs and Heavy Equipment
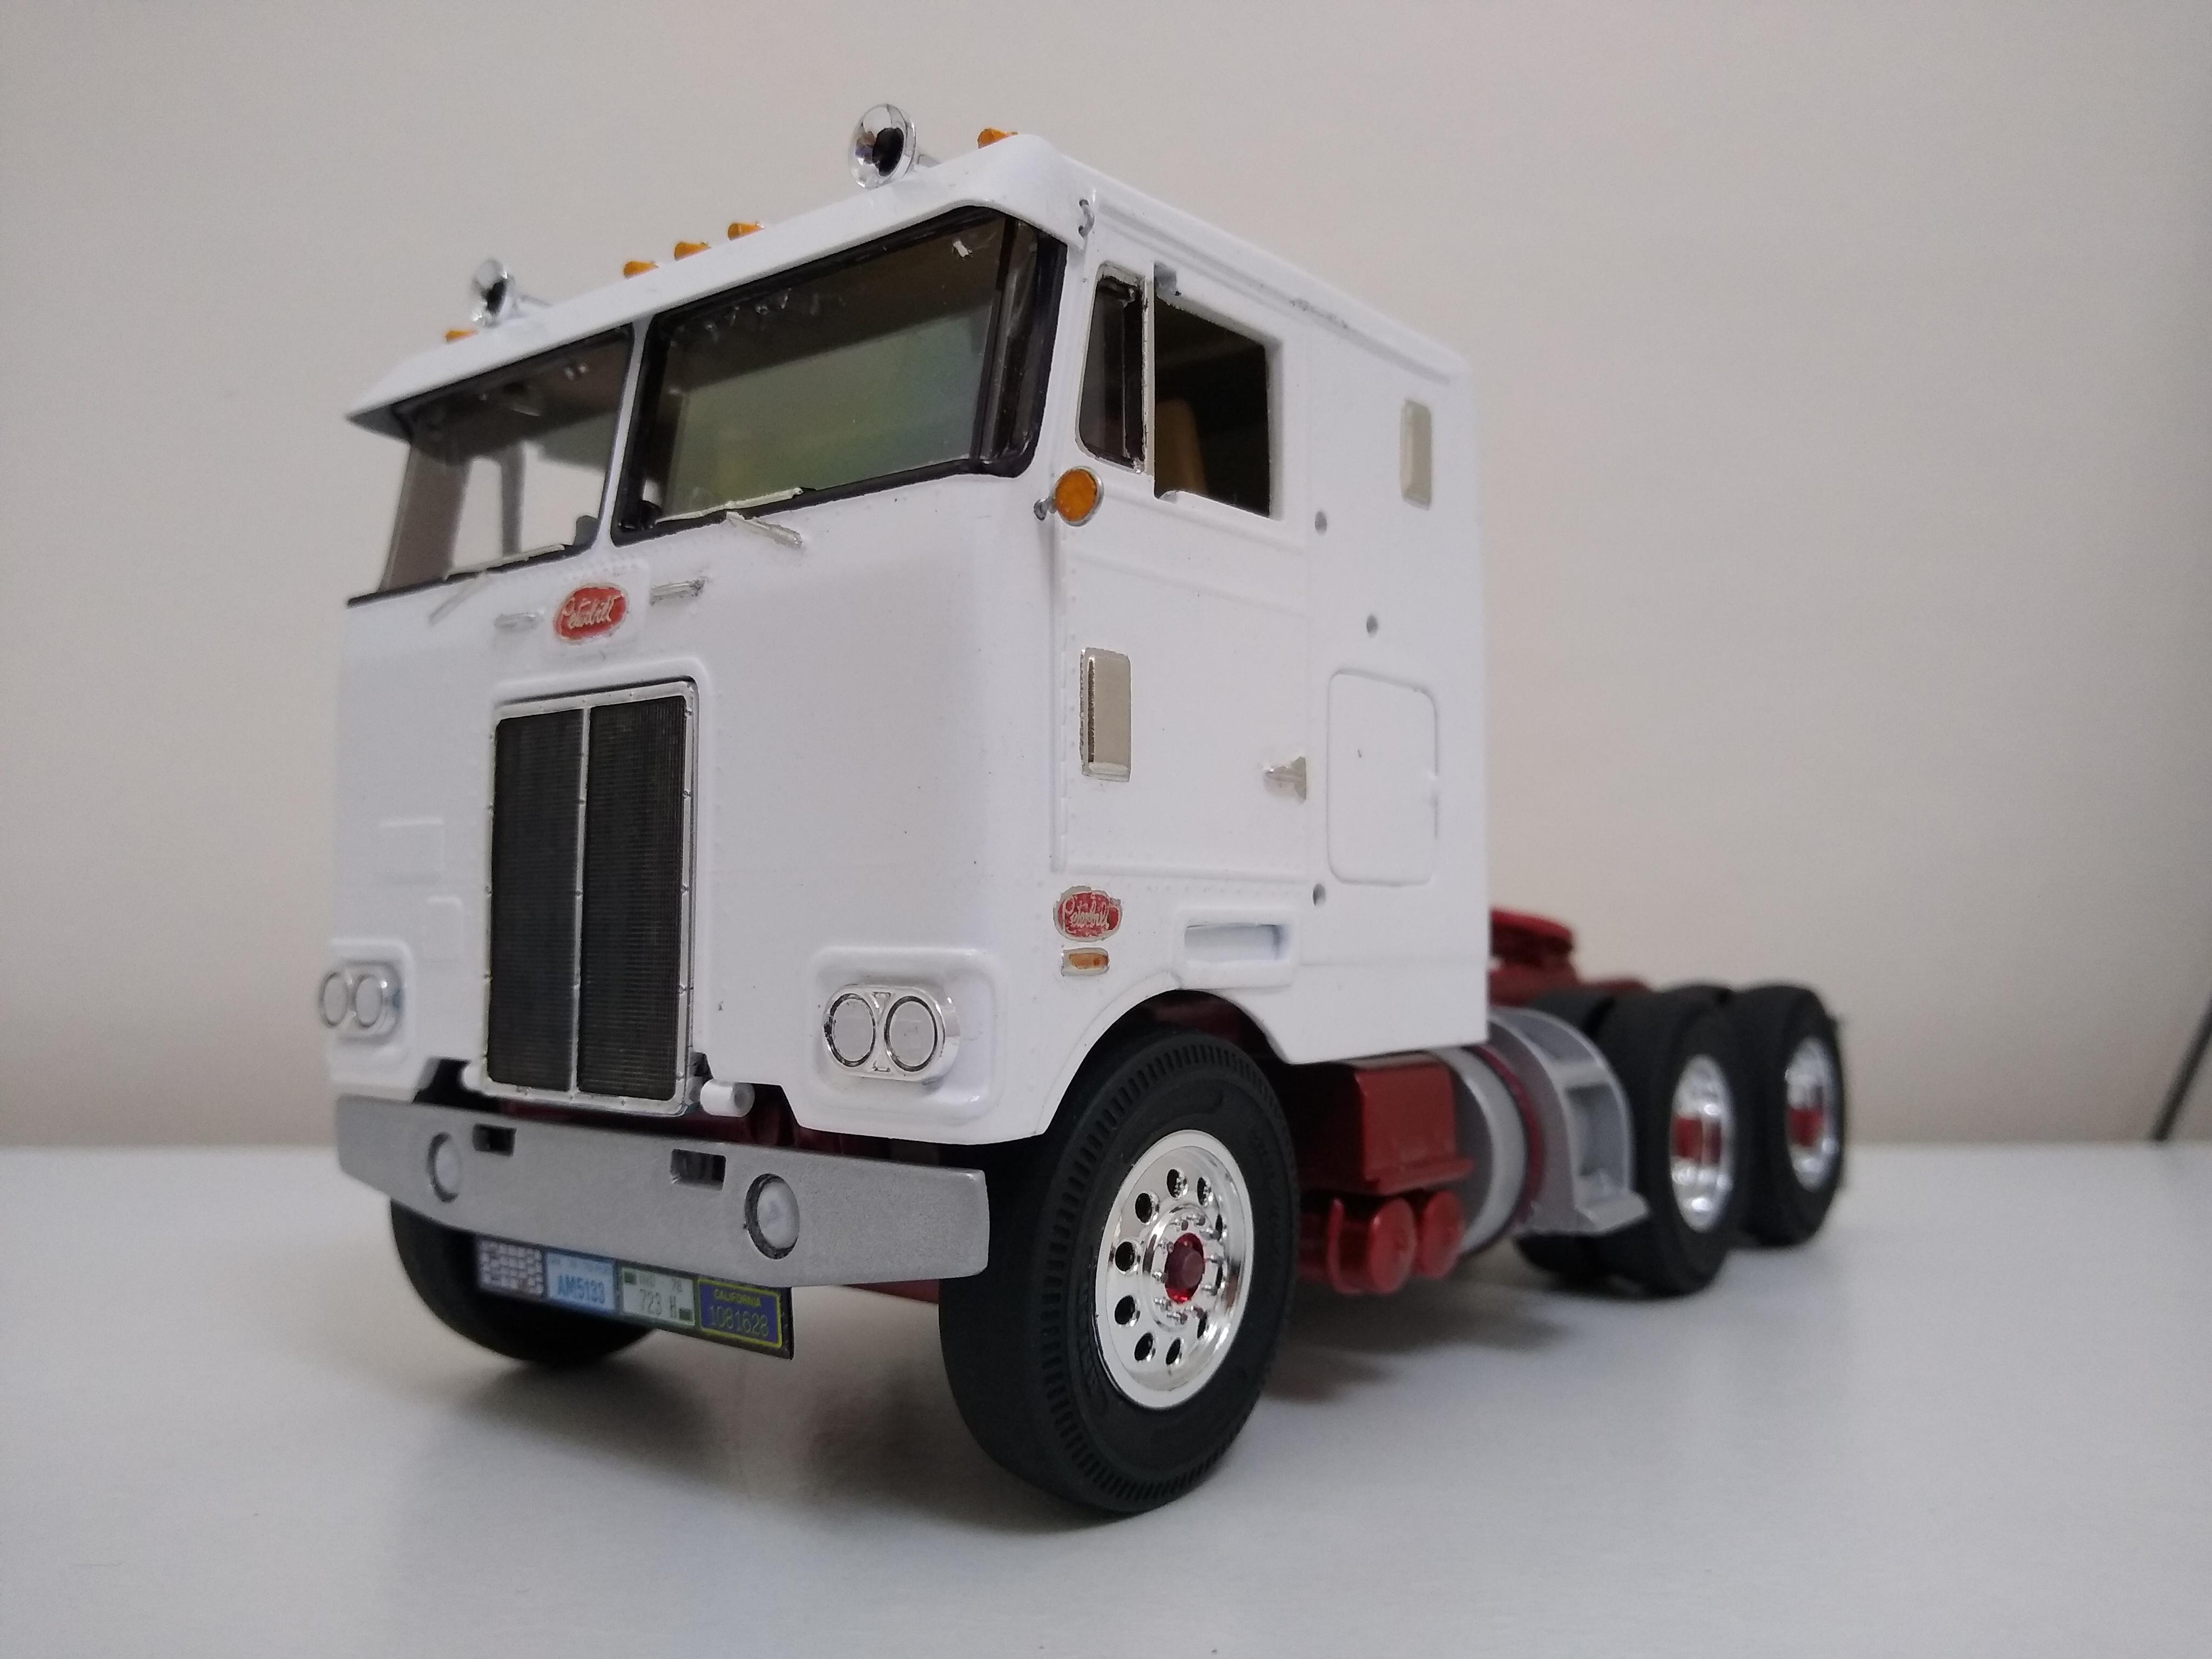
I can't believe what's happened to the cab of the 352 since I painted it. The paint was hard enough to handle the cab with no issues. I stood it on a shelf and next to it was some of that non-slip matting you can get. This was just touching the cab it seems. When I picked it back up today there were little pieces of the mat embedded in the paint! I rubbed it off with a cloth but it's left a sort of "burn" in the places where it touched the cab( ringed in the photo). I'll see if I can polish them out in a few days. I'm so annoyed. First of all I drop it and now this! Spent the afternoon doing little bits, painting the inside of the cab and the doghouse, washing the grille, colouring the wheel studs etc... Couldn't resist a quick mock-up, even though I said I wouldn't.