crowe-t
-
Posts
1,965 -
Joined
-
Last visited
Content Type
Profiles
Forums
Events
Gallery
Everything posted by crowe-t
-
Great job on the roll cage.
-
I got inspired and I stretched the nose/wheelbase. It actually solved the problem I had trying to get the rack and pinion to fit. I had originally moved the engine forward and the rack and pinion didn't fit. Now that the nose is stretched I was able to move the engine back to almost it's original location. I also attached the Turbo 400 to the engine.

-
Nice job so far.
-
I can't wait to see the chassis.
-

1965 Oldsmobile 442(from an AMT '64 Olds 442) - FINISHED
crowe-t replied to crowe-t's topic in WIP: Model Cars
Thanks Gregory! The '64 kit is a rough kit to begin with. It's an older one and the chassis and interior leave a lot to be desired. Everything is molded into the chassis so the only option that made sense was to use the chassis from the '67 442 kit. -
That's one of the problems with this kit. Revell should have used a different chassis that is more realistic. I'm sure they wanted to make as much money on the Rick Dobbertin J2000 kit by re-using the chassis in this kit. I'm trying to make this look a bit more like a real Pro Street car and use as much of the kit as possible.
-
1965 Oldsmobile 442(from an AMT '64 Olds 442) - FINISHED
crowe-t replied to crowe-t's topic in WIP: Model Cars
Thanks JC and Steve for the nice words! -
What's the 'Comically small gap between the rear arches!'?
-
Thanks guys!
-
What do you guys think, ground effects or no ground effects? The part I taped on for the picture is from an MPC Beretta GT kit but it's too long. It's even too long for the MPC body which has the same wheelbase as the Revell body. I started scratch building an Enderle bug catcher injector scoop.
-
Thanks Ron!
-
1965 Oldsmobile 442(from an AMT '64 Olds 442) - FINISHED
crowe-t replied to crowe-t's topic in WIP: Model Cars
Today I started working on making the exhaust system. I still have to make the mufflers and add details. I'll add some pins made from 1 mm brass rod to attach it to the floor.
-
Attaching a wing to a drag car?
crowe-t replied to crowe-t's topic in Model Building Questions and Answers
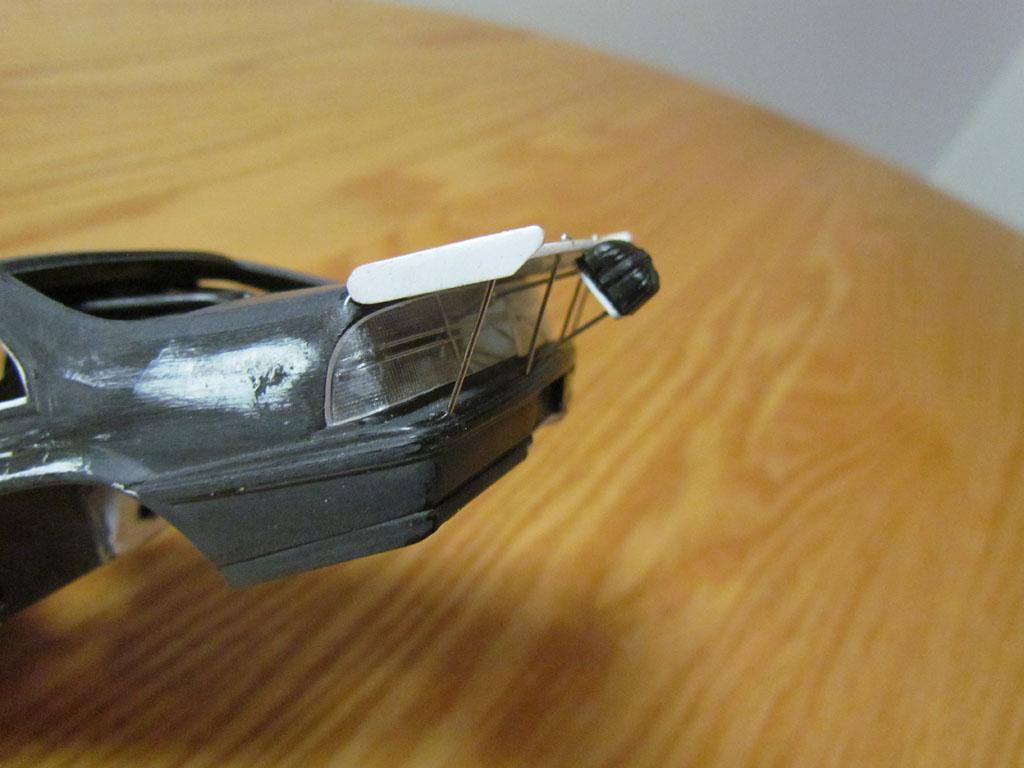
Thanks for the suggestions. I just put this together the other night and do plan on refining it and adding details where the pins go into the bumper. I also have to remove the pin heads so they don't show on top of the wing. -
Thanks guys! The paint came today. It's a red orange pearl and should look quite a bit like the 1:1 Beretta pictures I posted above.
-
Attaching a wing to a drag car?
crowe-t replied to crowe-t's topic in Model Building Questions and Answers
I installed three 1 mm brass rods into the wing to attach it to the rear deck and used straight pins for the four supports that go into the bumper.
-
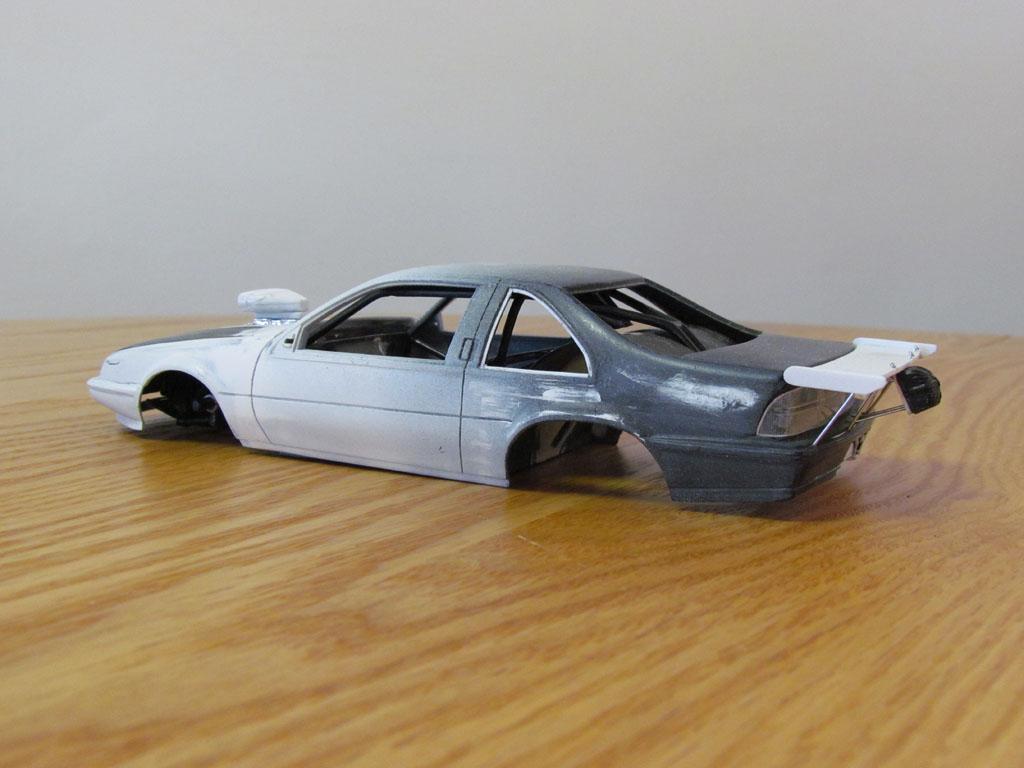
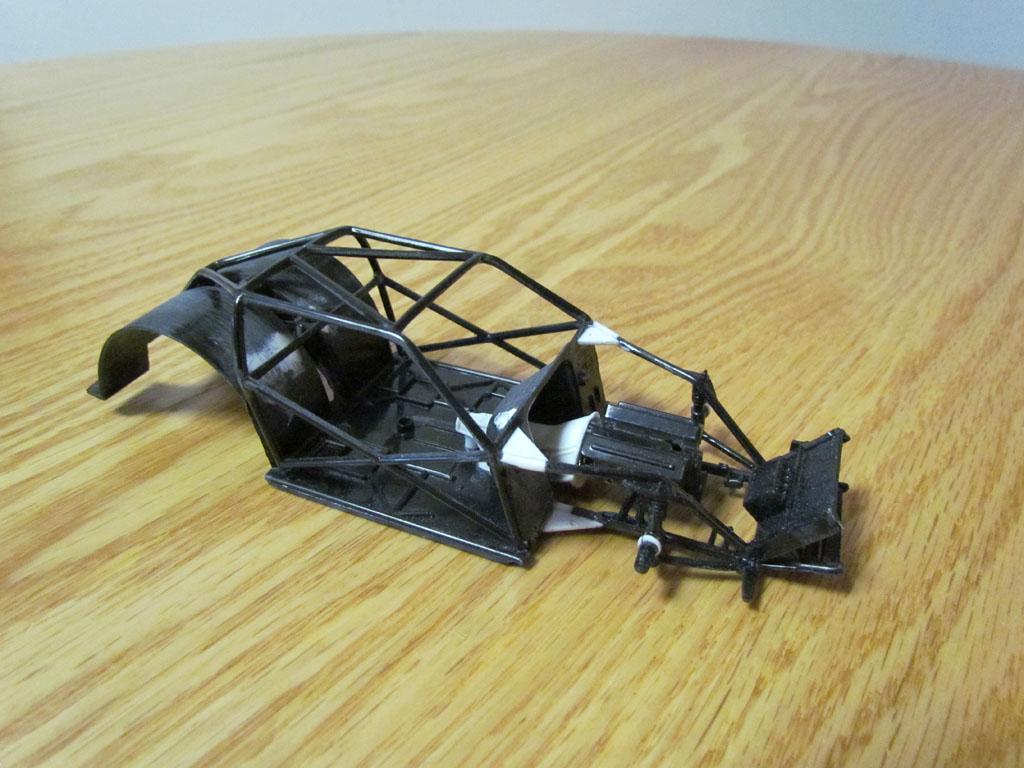
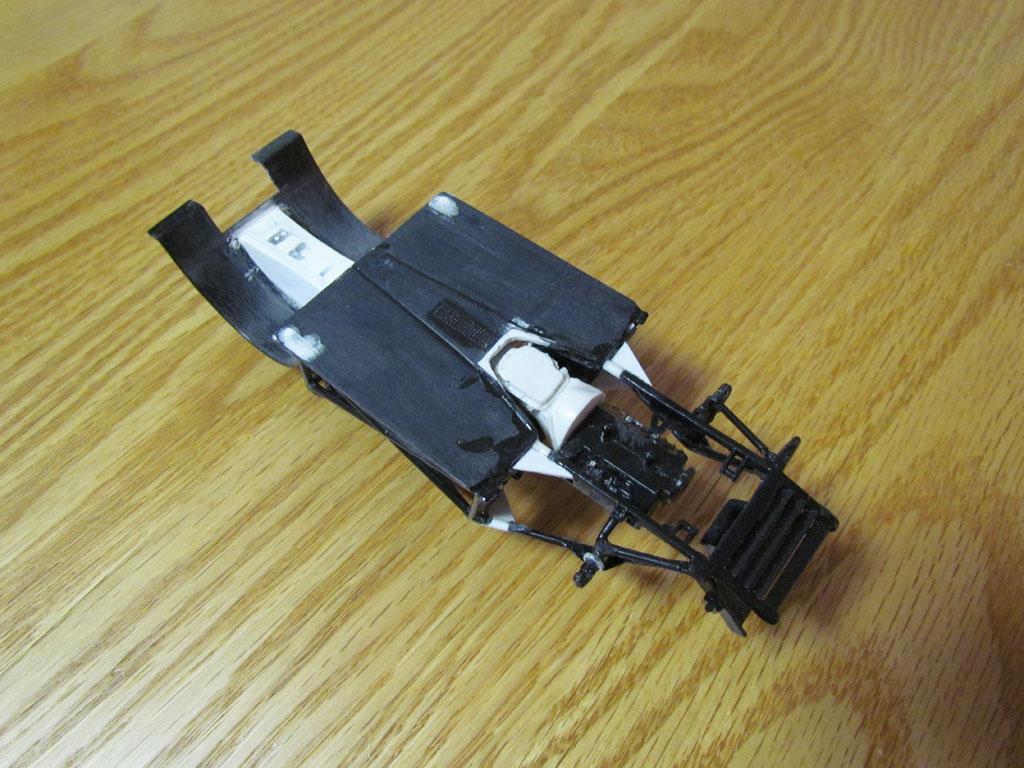
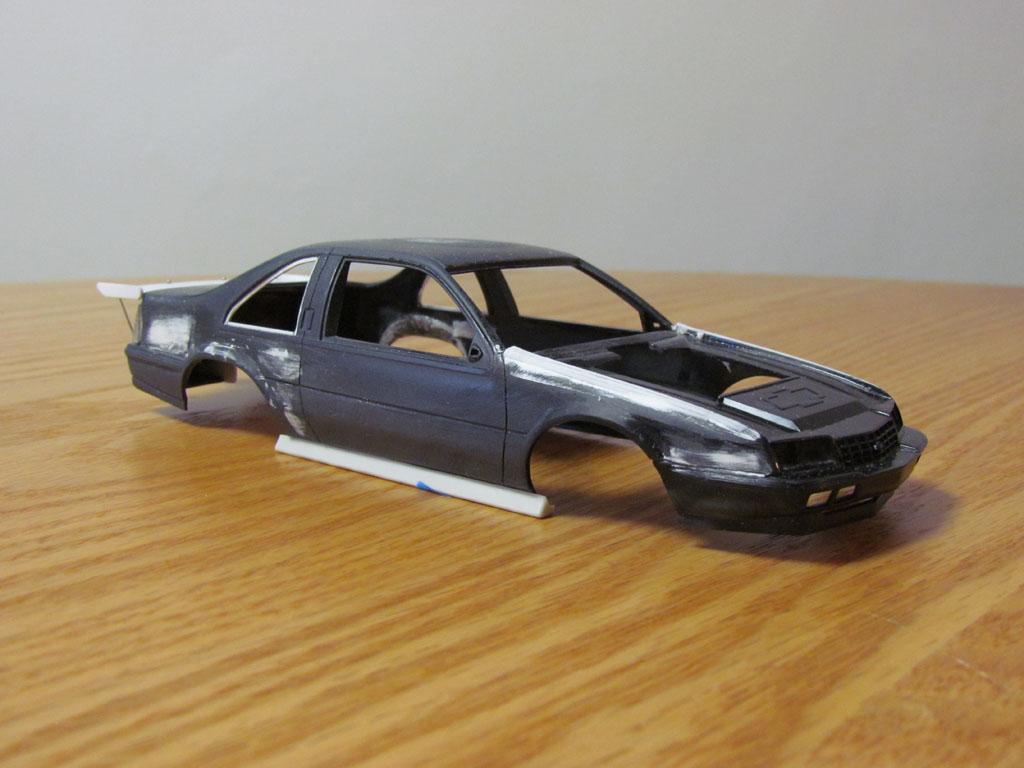
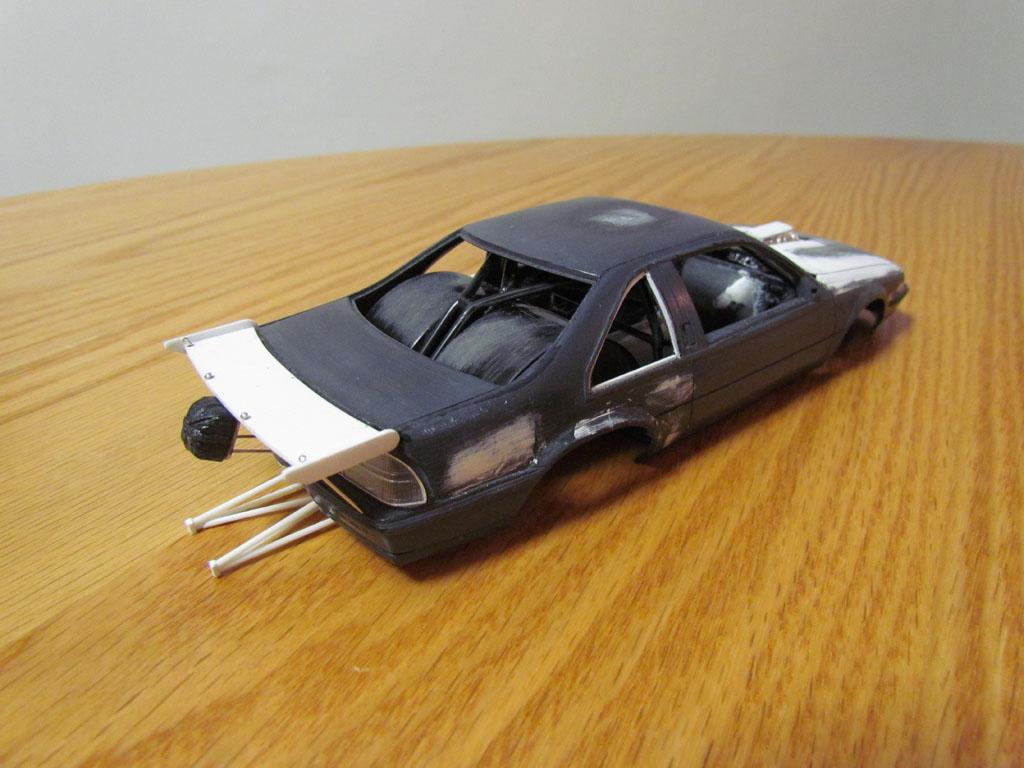
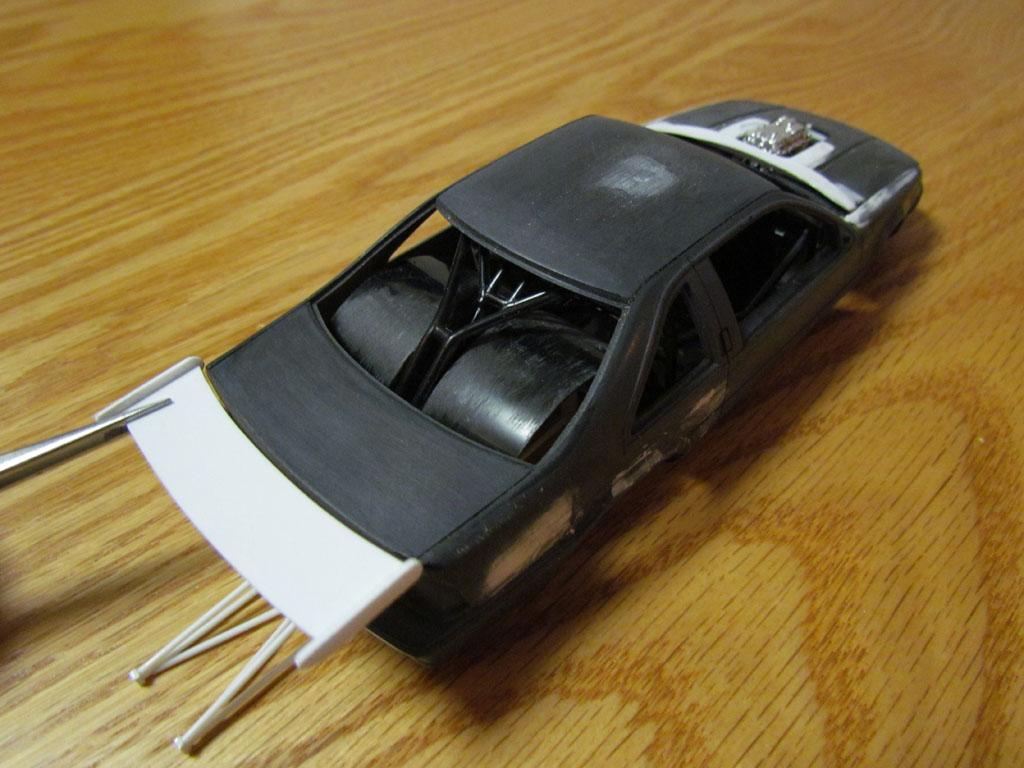
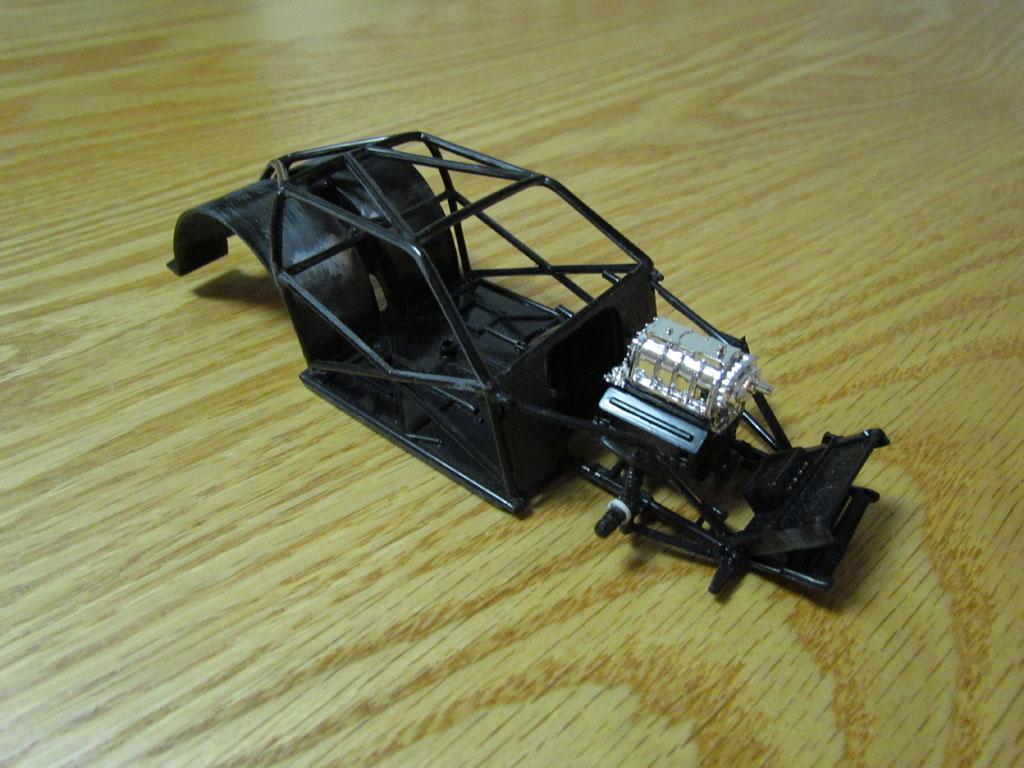
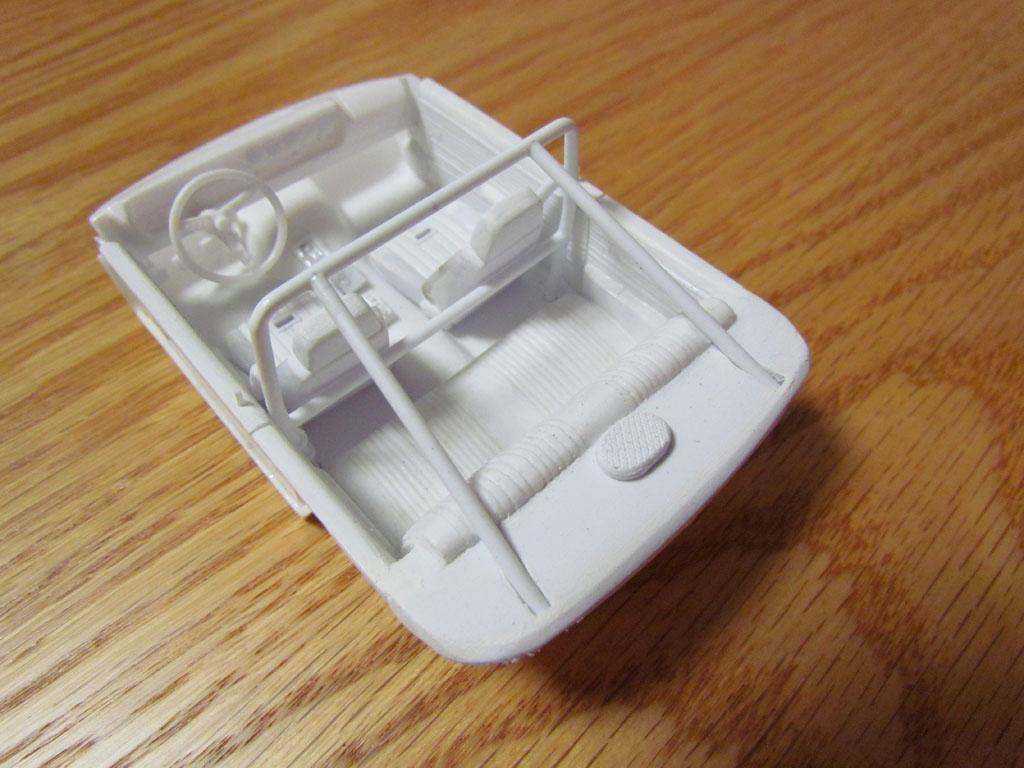
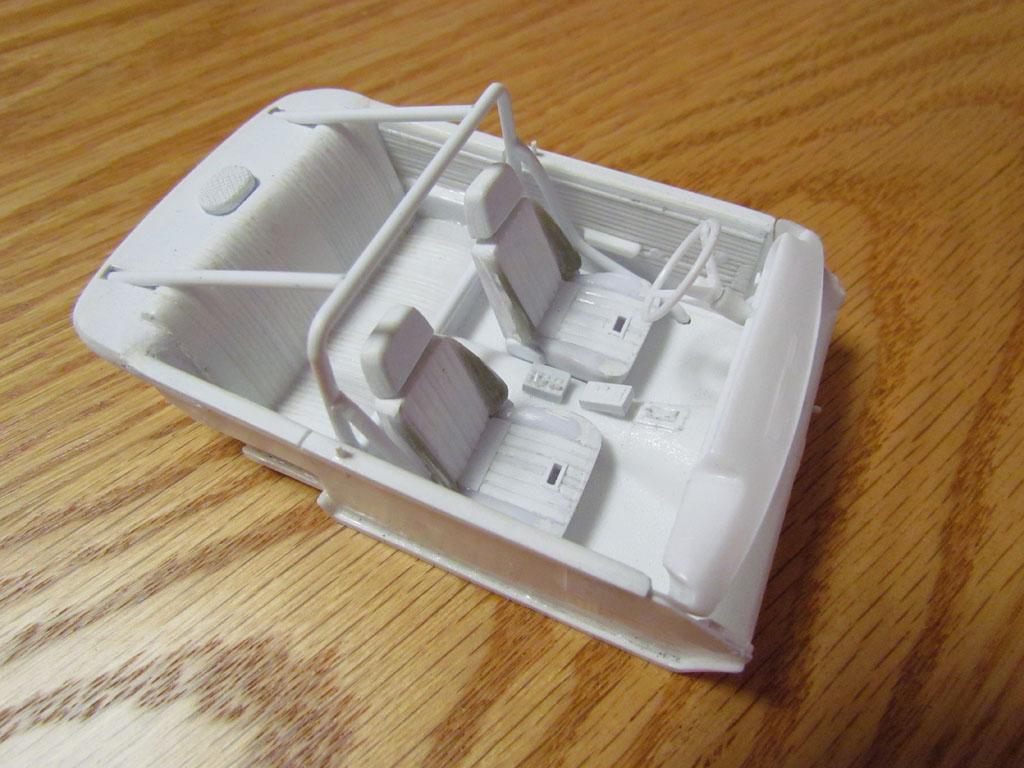
I installed three 1 mm brass rods into the wing to attach it to the rear deck and used straight pins for the four supports that go into the bumper. I used the kit's parachute which I made a bracket for and also used straight pins. The fenders and hood are raised up slightly towards the windshield and the rear quarter windows are opened up which I feel looks more accurate to a real Beretta. This kit doesn't have a Beretta dash board. The dash board in the kit is basically a flat top piece which has a large gauge panel that goes underneath. I'm not using the gauge panel so I started building a Beretta dash board. It's rough but I'll clean it up and add some details. I had to file down some of the inside of the transmission tunnel to fit the Turbo 400 so I added some .75 mm styrene sheet to the sides. I think it actually looks better now that it's wider. I attached the front of the chassis rails in the engine compartment and added some supports. I'll be painting the chassis rails and roll cage the body color. After these are painted I can glue the roll cage in. The interior will have dark gray door panels, seats and dash board and possibly red carpeting on the floor. I'm not sure if I'll spray the transmission tunnel and rear wheel tubs in polished aluminum or use carbon fiber decals. What do you all think? I cut out the front of the belly pan to accommodate the Turbo 400's pan. It's larger than the Lenco but I made it fit. I started making a tunnel in the rear of the underbody for the wheelie bars. Thanks for looking in and comments are welcome.
-
This car has NY plates so it must be the one you saw. I did some more work today and will post pictures in a day or so. It's not a replica of the car I posted but inspired by it.
-
Attaching a wing to a drag car?
crowe-t replied to crowe-t's topic in Model Building Questions and Answers
What type of pins did you use? Straight pins, brass rod...? -
This turned out great!
-
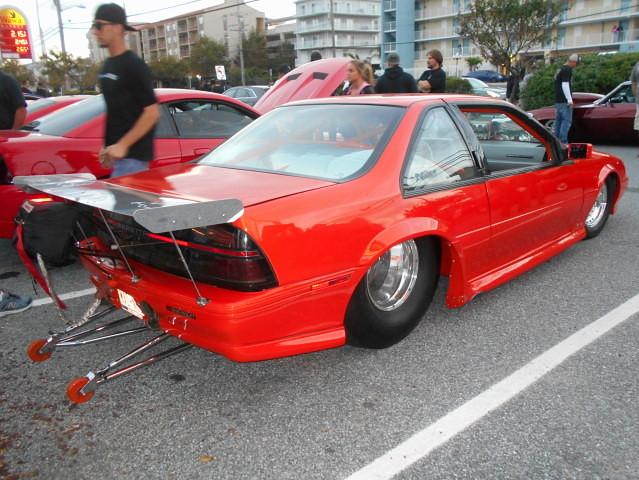
I made a wing to go on a 1/4 mile drag car body. I don't want to just glue it on the trunk lid. I think it would be better to install it with some pins into the trunk lid and then some straight pins as the supports to the rear bumper like in the picture of the red car. Has anyone done it like this?
-
Thanks guys! I'm trying to have fun with this build. I have a set of Centerline Convo Pro wheels I think I'll use for this. I modified a set of wheel backs from an AMT 1966 Nova kit to work with the wheels.
-
Hey thanks guys! I'm trying to take some of the Rick Dobbertin out of it. lol I found pictures of this Pro Street Beretta that's a really nice color. I also found this same Beretta in a video on Youtube. At first I thought it was red but it's actually a red-orange metallic/pearl color. In a night time shot on the video it clearly looks orange. The Beretta is shown at :45 seconds in and then again at 1:59. Here's a link to the video. https://www.youtube.com/watch?v=OEh-ddnSx8w I'm going to paint it McLaren Mira Orange Pearl which looks the same.
-
Excellent start! Keep it going. Vega's made great drag cars. What tube chassis are you using?
-
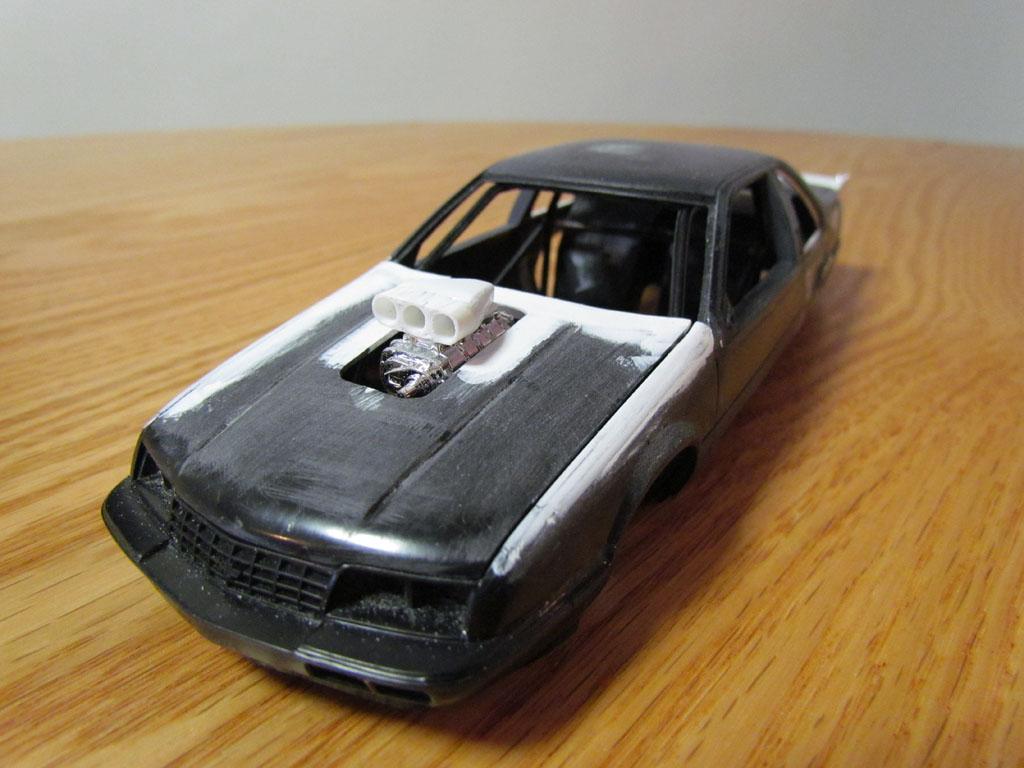
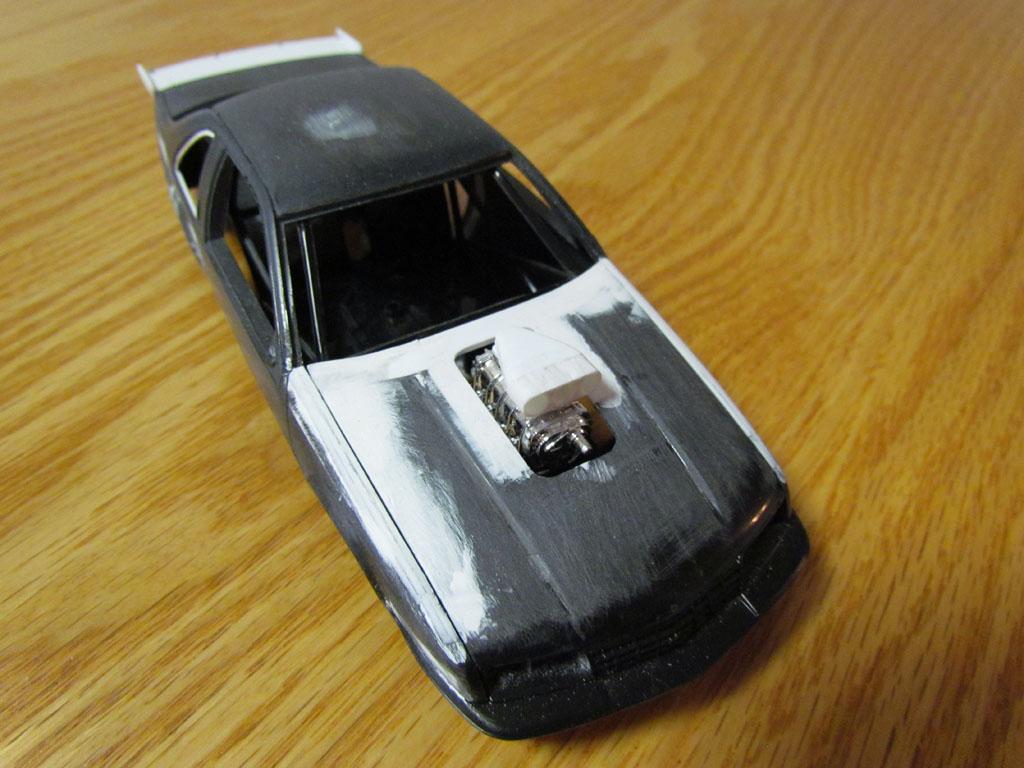
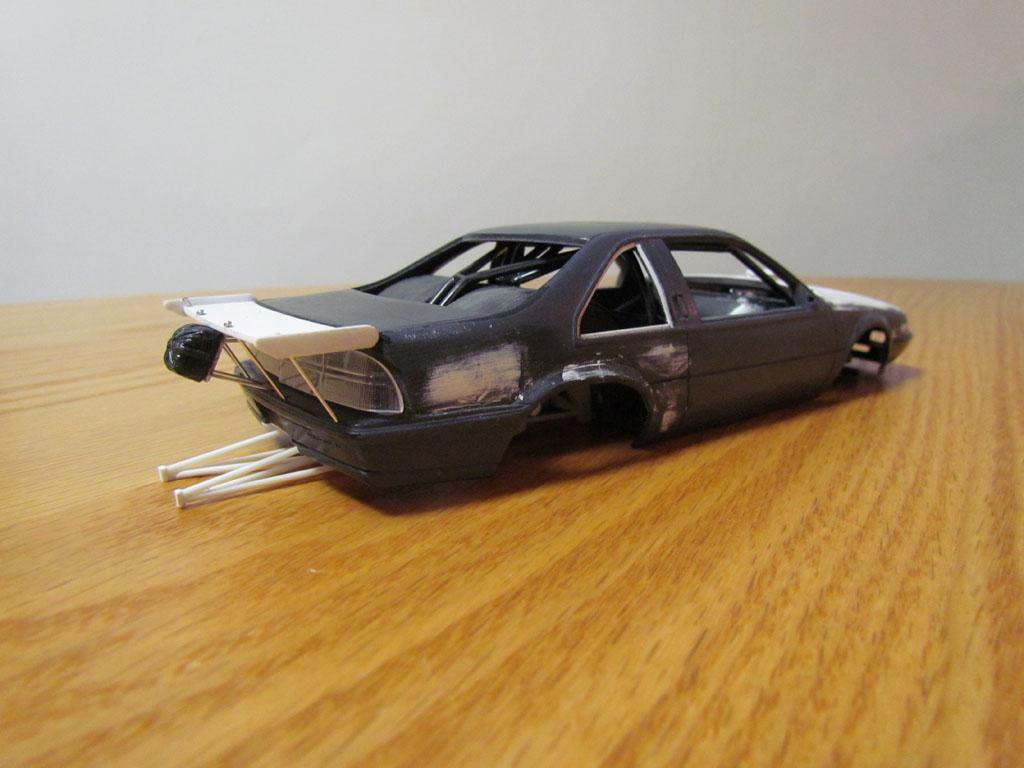
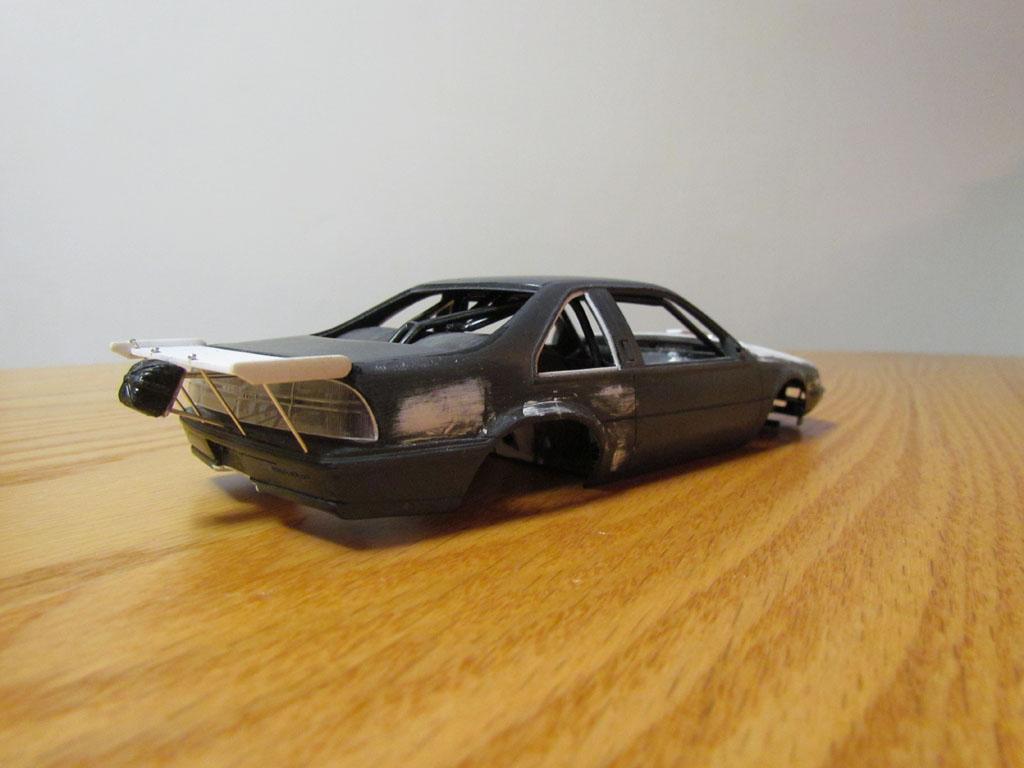
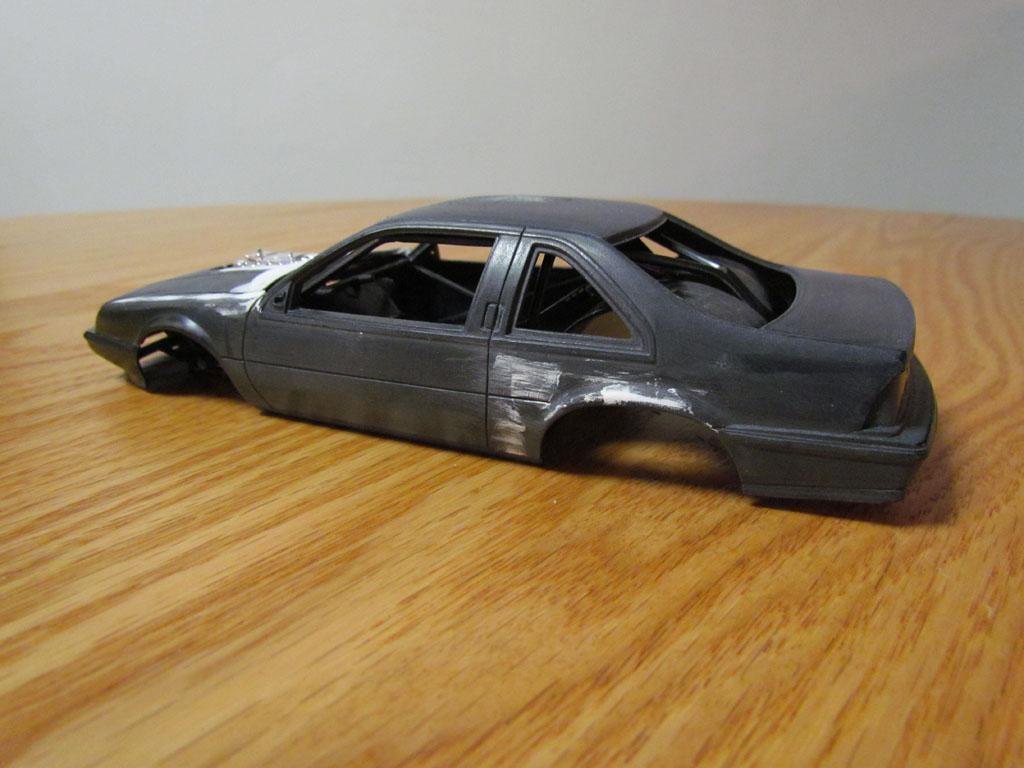
I needed to paint a body to test some new clear. I have a few Revell Beretta Pro Street kits so I decided to build one. It was supposed to be an out of box build but I got a little carried away. lol The Revell Beretta body is basically a stock Beretta. I enlarged the rear wheel openings 5 mm so it would look like a Pro Street car and I extended the hood and fenders back towards the windshield and removed the hood scoop. The blower is from a 68 Corvette kit. The rear end was goofy since there is no suspension so I took a spare 9 inch rear's housing and scratch build a 4 link and wheelie bars. The wheelie bars are more of a Pro Mod design but due to the small diameter styrene rods(1.2 mm) the cage design gives it strength. I also didn't have any 1.6 mm styrene rods so I made due. I thought it needed a rear wing so I made one from some sheet styrene. I'm holding it in place in the picture with a pair of tweezers. This kit has a Lenco which isn't too realistic for a Pro Street car so I ordered a resin Turbo 400 for it. This is about all the modifications I'm doing on this one except I might make the rear quarter windows a bit larger. The quarter window frames on this kit are too wide and make the windows too small. Here's some progress pictures.
-
1965 Oldsmobile 442(from an AMT '64 Olds 442) - FINISHED
crowe-t replied to crowe-t's topic in WIP: Model Cars
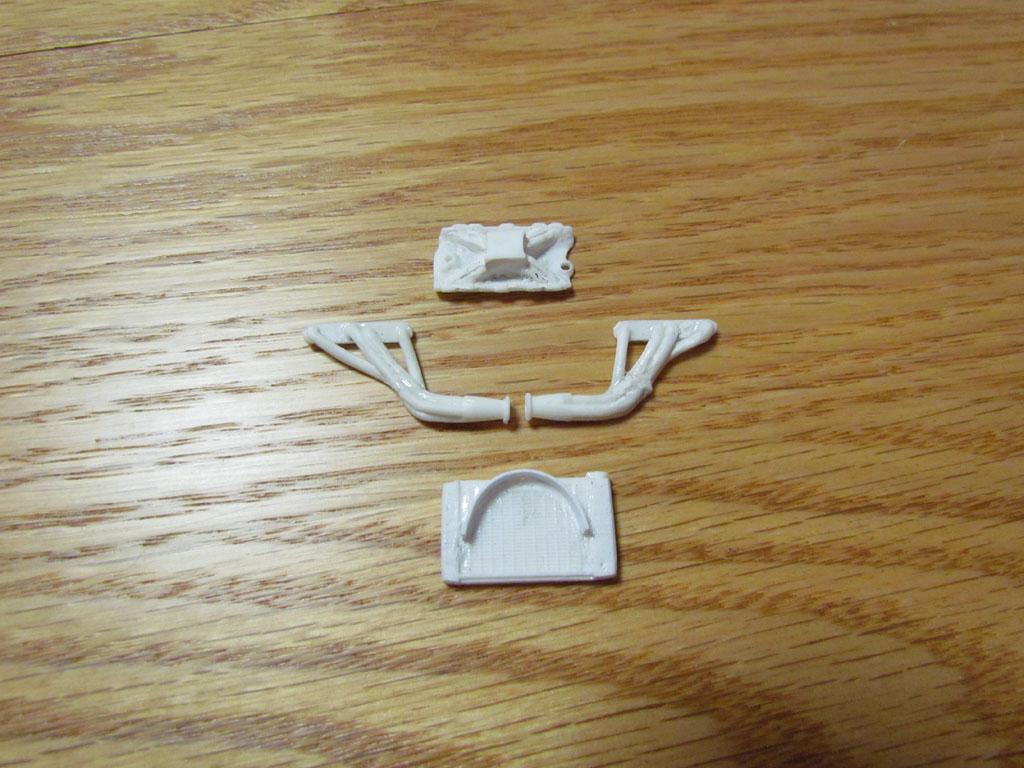
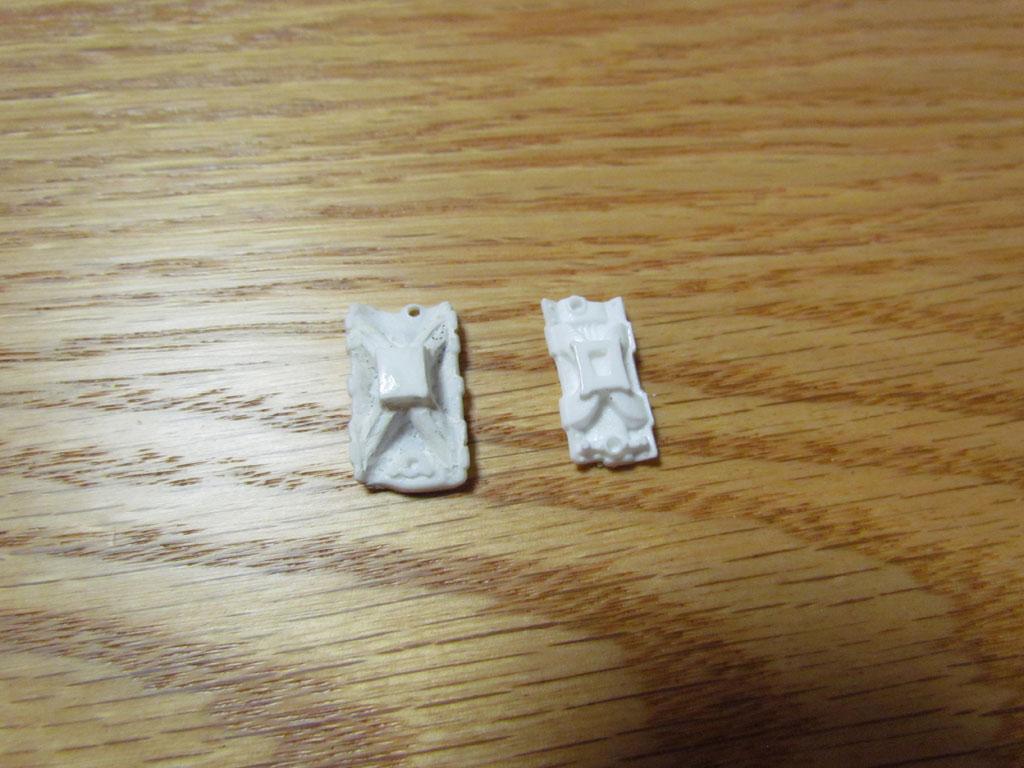
Here's a small update. I scratch built the rear speaker that goes on the package tray and made the cutouts in the front seat bottoms for the harness belts. I started modifying a set of Small Block Chevy headers to fit the Olds 455. I picked up a couple of resin Small Block Chevy intake manifolds from Ron Coon Resins and used one to modify the stock 455 manifold. I filed down the top of the stock manifold and glued on the center section of the resin part. The picture is making it look rougher than it is. Thanks for looking in and all comments are welcome.