crowe-t
-
Posts
1,965 -
Joined
-
Last visited
Content Type
Profiles
Forums
Events
Gallery
Everything posted by crowe-t
-

Best glue for photo etch parts
crowe-t replied to br67's topic in Model Building Questions and Answers
Can a PVA glue such as Micro Krystal Clear or Testors Clear Parts cement be used to attach photo etch emblems to a painted/polished body or is clear enamel or acrylic paint better? -
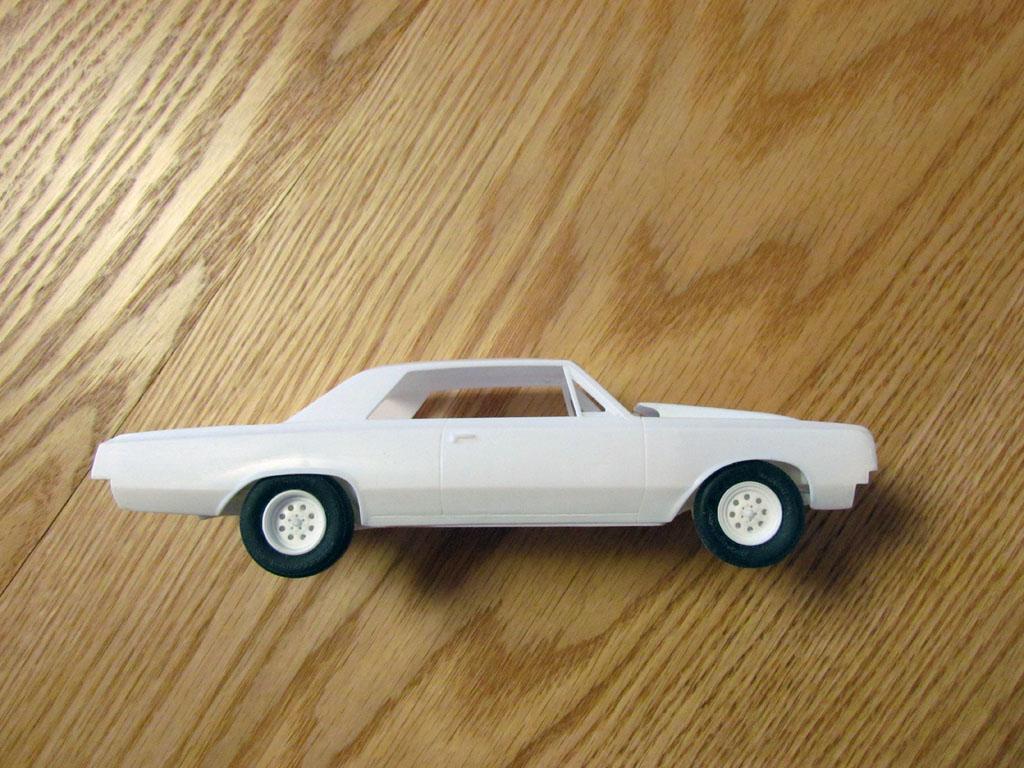
1965 Oldsmobile 442(from an AMT '64 Olds 442) - FINISHED
crowe-t replied to crowe-t's topic in WIP: Model Cars
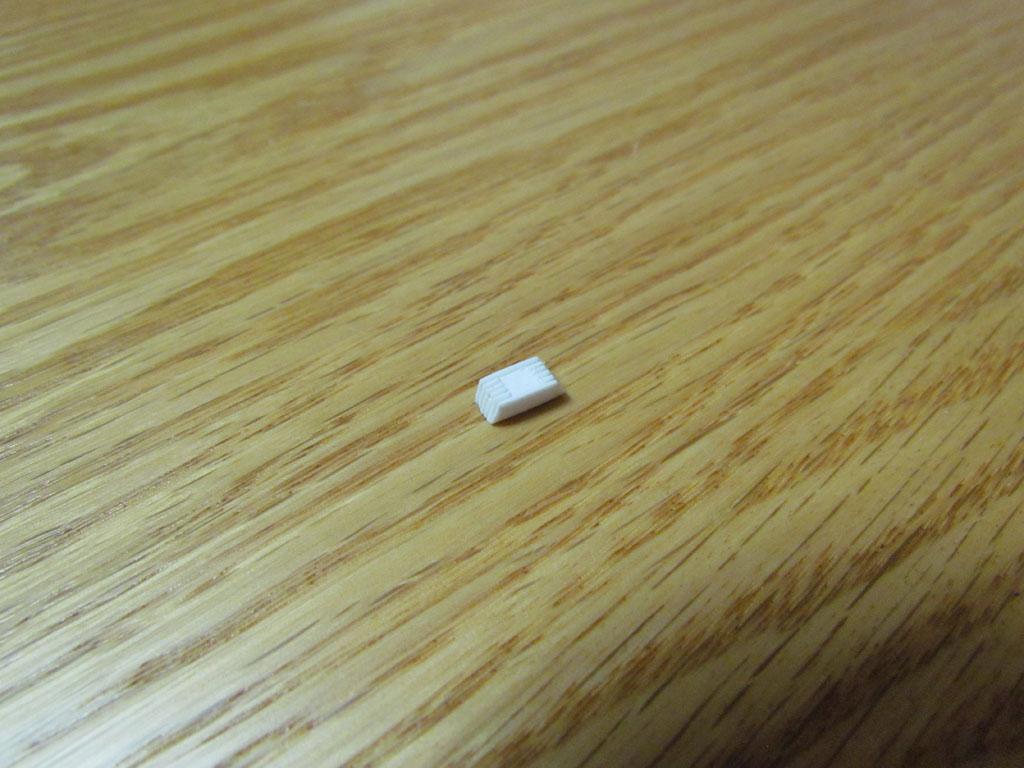
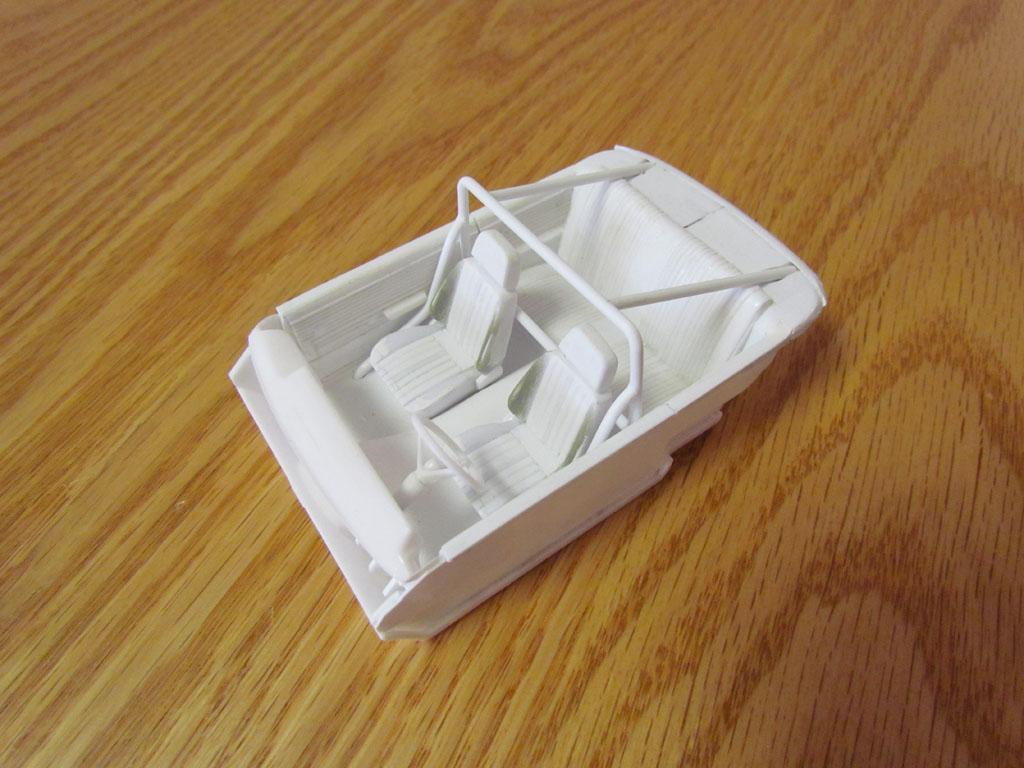
Here's a fire extinguisher and MSB box I made. I put the fire extinguisher mounts on the roll bar.
-
1965 Oldsmobile 442(from an AMT '64 Olds 442) - FINISHED
crowe-t replied to crowe-t's topic in WIP: Model Cars
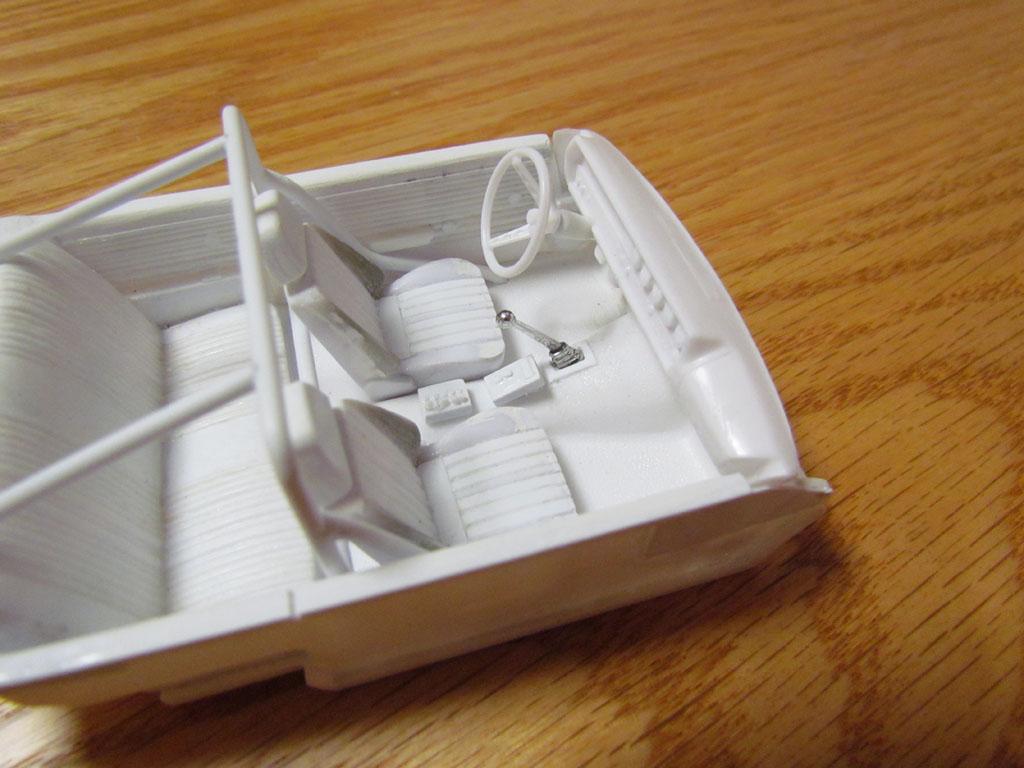
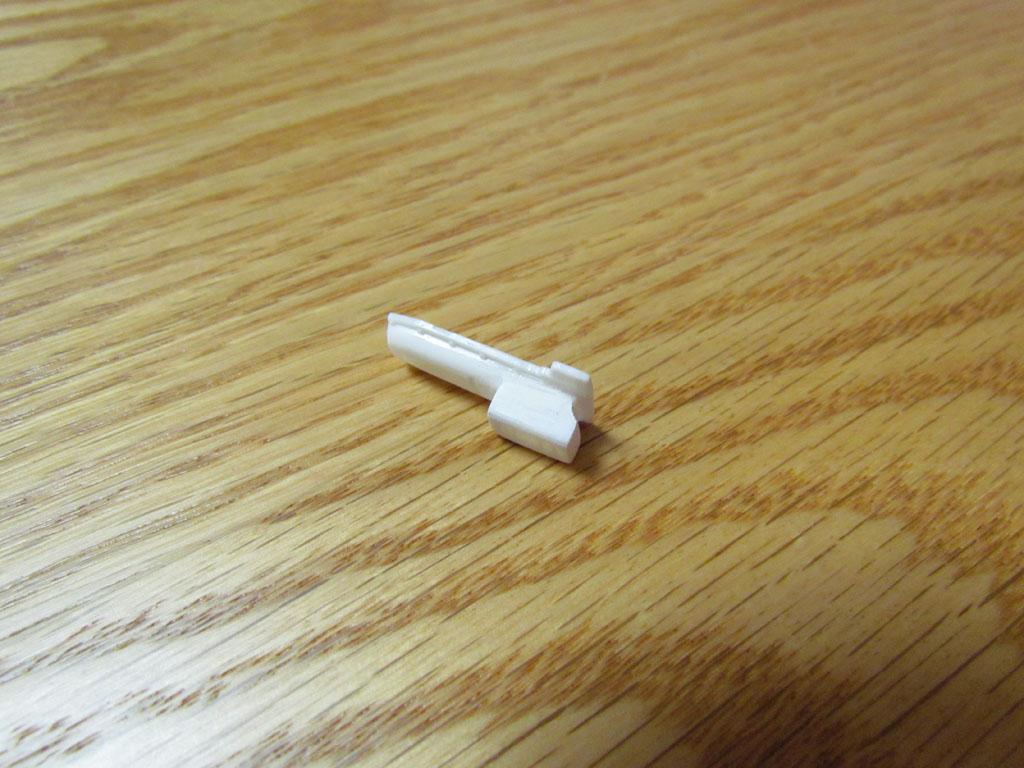
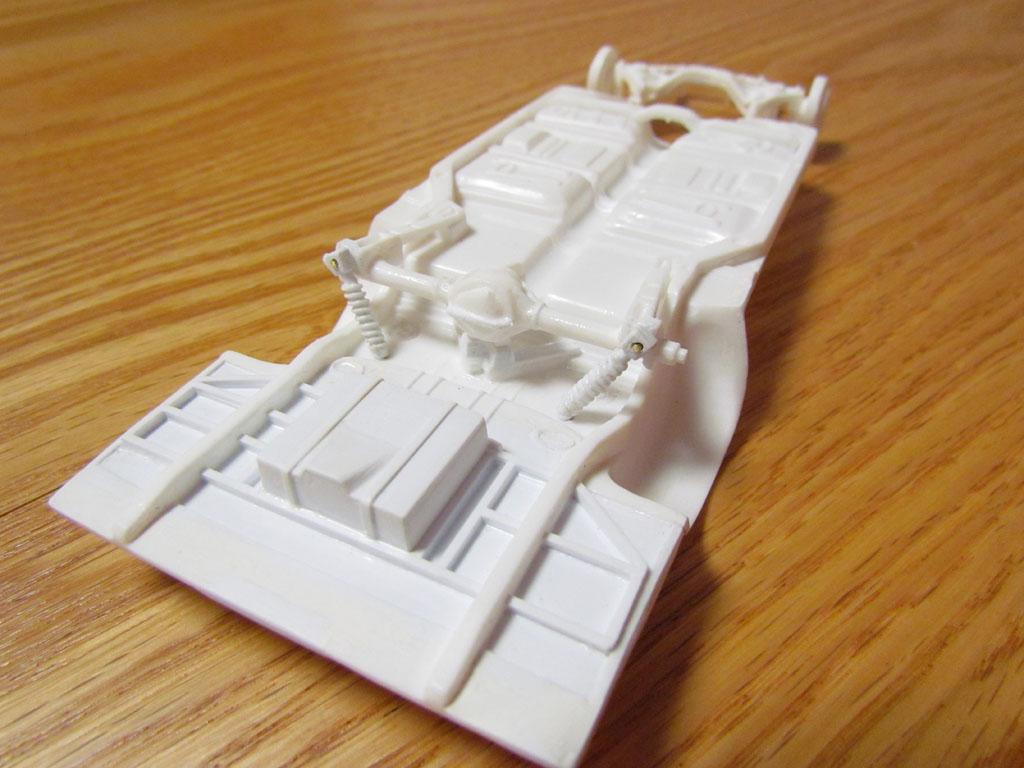
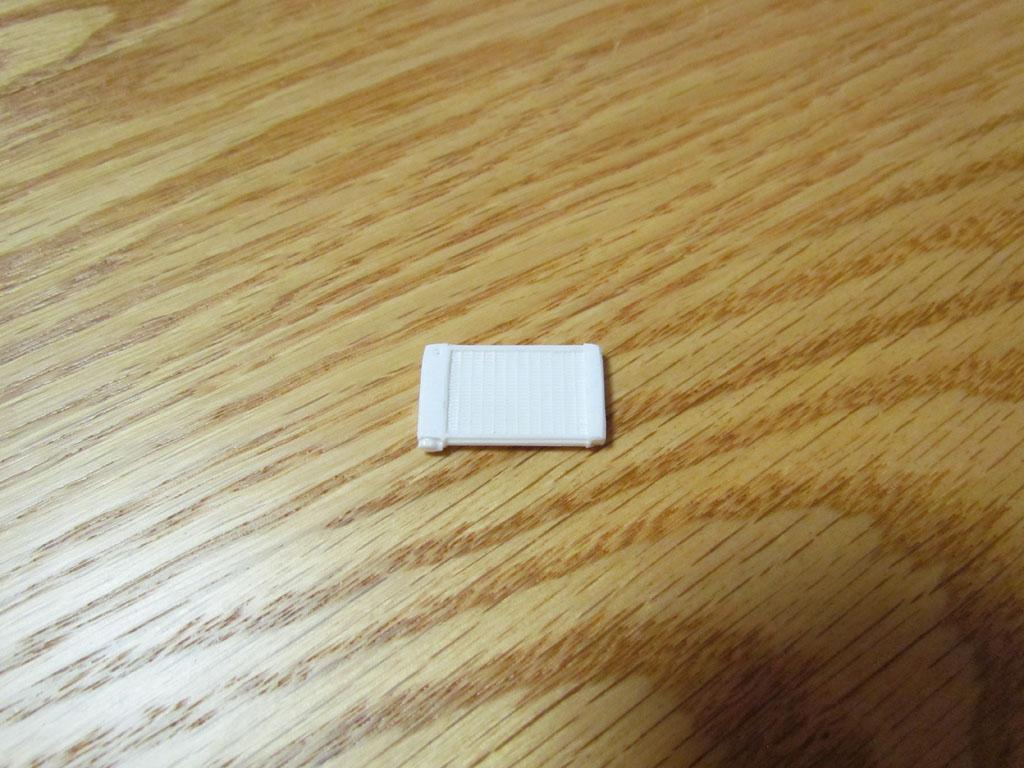
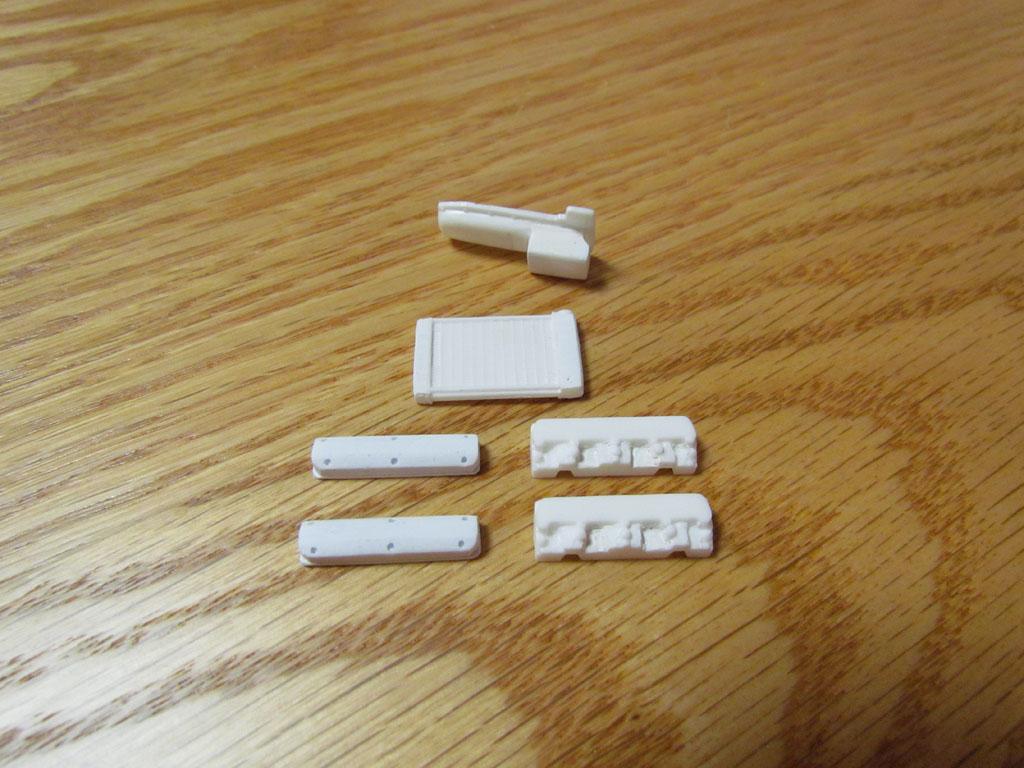
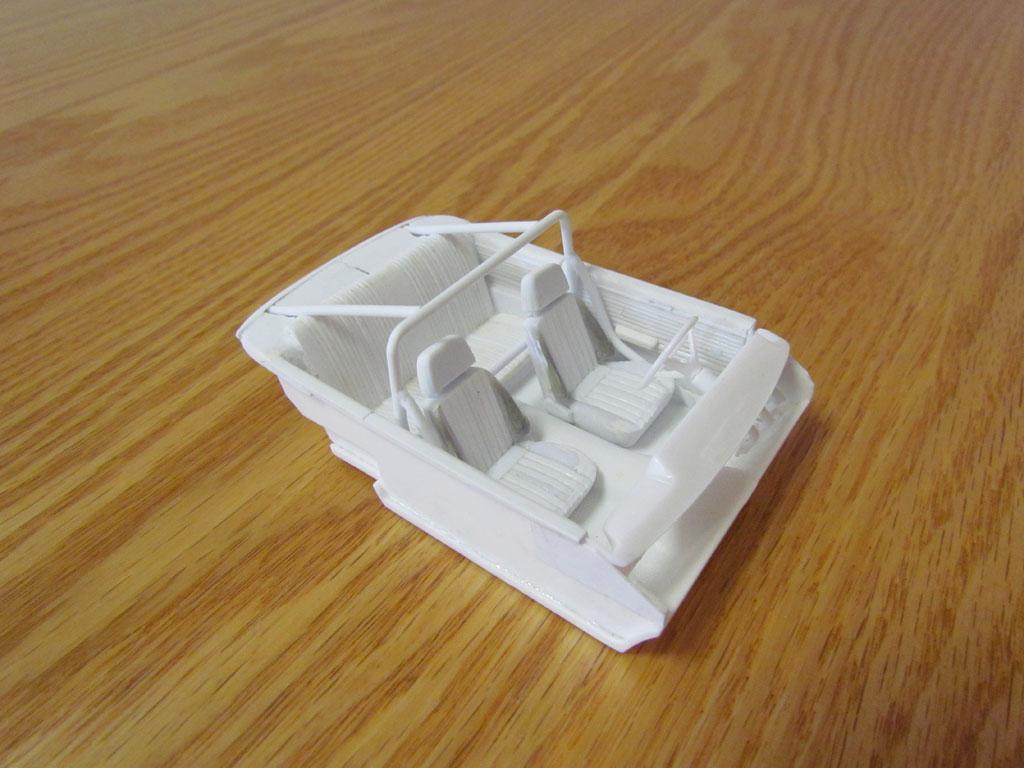
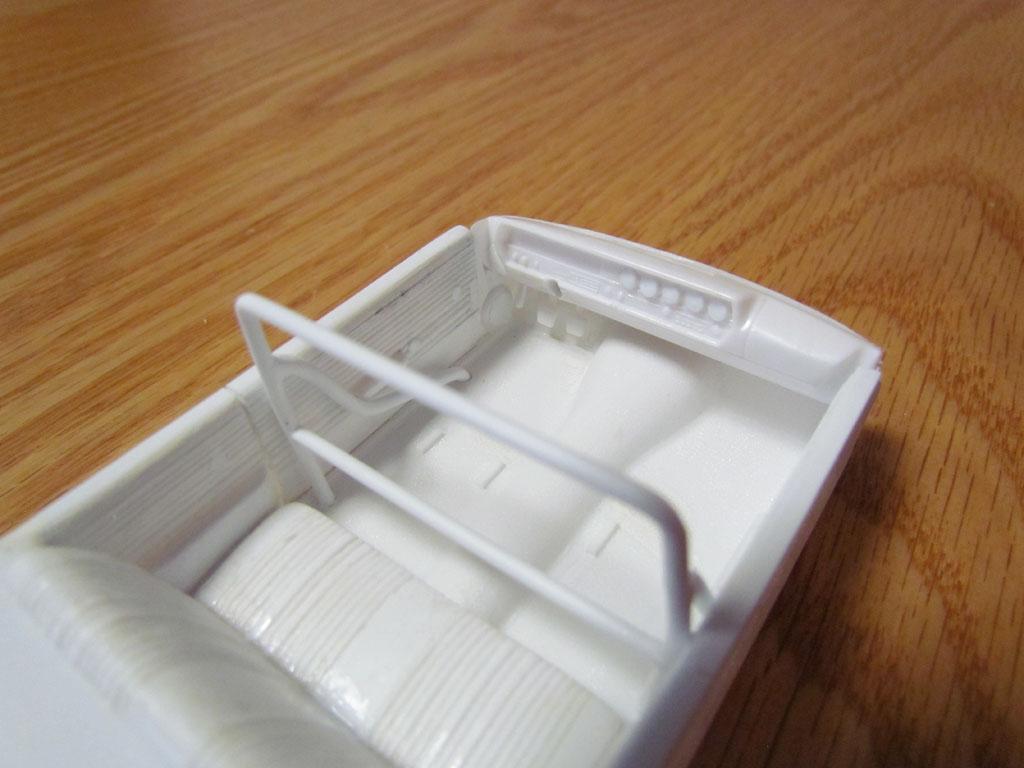
Here's some more work I did today. I added the raised details and bolts to the rear end cover. The details look better in person. They are very small and hard to photograph. I made the 2 boxes between the seats and put the 'chrome' base of the shifter boot on the floor. The shifter is temporarily glued in for the picture. The picture without the dash shows the gas pedal. I added the emergency brake release lever under the dash.
-
1965 Oldsmobile 442(from an AMT '64 Olds 442) - FINISHED
crowe-t replied to crowe-t's topic in WIP: Model Cars
Thanks Rusty! -
1965 Oldsmobile 442(from an AMT '64 Olds 442) - FINISHED
crowe-t replied to crowe-t's topic in WIP: Model Cars
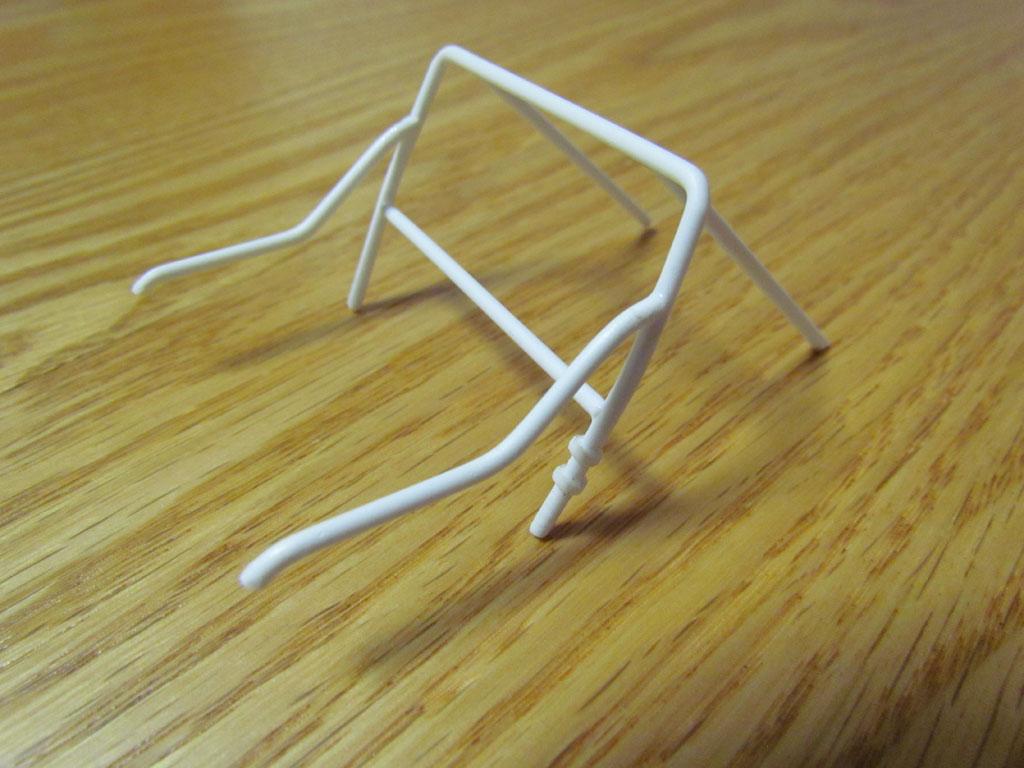
Here's some work I did on the heads to make them look like Edelbrock heads. I started scratch building the valve covers and modified the sump on the oil pan to make it resemble a Milodon pan. I have to scribe the lines in the sump but since a good portion of the front of the pan is hidden under the cross member I won't have to re-shape that area. I scratch built the rear coil overs. I installed 1mm round brass rods on the rear end and the tops of the shocks to make installation easier after it's all painted. I also started adding the details to the rear end cover. I added some styrene to smooth out the side tanks on the stock radiator. I'll add some small bolts in the holes of the valve covers. Thanks for looking in.
-
Food Dehydrators & Paint Dryers
crowe-t replied to JayVee's topic in Model Building Questions and Answers
Lacquer actually never fully cures. After about 1 - 3 months it's more stable and hardens. The 1K acrylic urethane takes more time but when it fully hardens it's like a rock. I'll run the dehydrator again and see what happens. -
Food Dehydrators & Paint Dryers
crowe-t replied to JayVee's topic in Model Building Questions and Answers
The clear lacquer is Gunze Mr Super Clear. I've been using it for a few years. I usually wait 1 - 3 months to polish it since lacquer continually reduces down over time. The urethane is from KBS Coatings and one from Duplicolor. I had sprayed the Dulpicolor 1K urethane on a body about 6 months ago and it's rock hard. I sprayed the Duplicolor on another part a few weeks ago and was hoping the dehydrator would cure it faster. I'm most surprised that the lacquer is still a bit soft after the 10 hours in the dehydrator. -
Food Dehydrators & Paint Dryers
crowe-t replied to JayVee's topic in Model Building Questions and Answers
I bought an Ivation 6 tray food dehydrator. I put some parts in with 1K urethane clear and also parts with clear lacquer for 10 hours at 113 degrees. Nothing cured. Some of the parts were painted a few weeks ago and the clear was still not fully cured. The dehydrator did nothing. I thought it was going to make a difference. I'm just going to return it. -
1965 Oldsmobile 442(from an AMT '64 Olds 442) - FINISHED
crowe-t replied to crowe-t's topic in WIP: Model Cars
Here's more progress on the roll bar. I had to extend the package tray but that will all be cleaned up. A few more details and the interior will be done.
-
1965 Oldsmobile 442(from an AMT '64 Olds 442) - FINISHED
crowe-t replied to crowe-t's topic in WIP: Model Cars
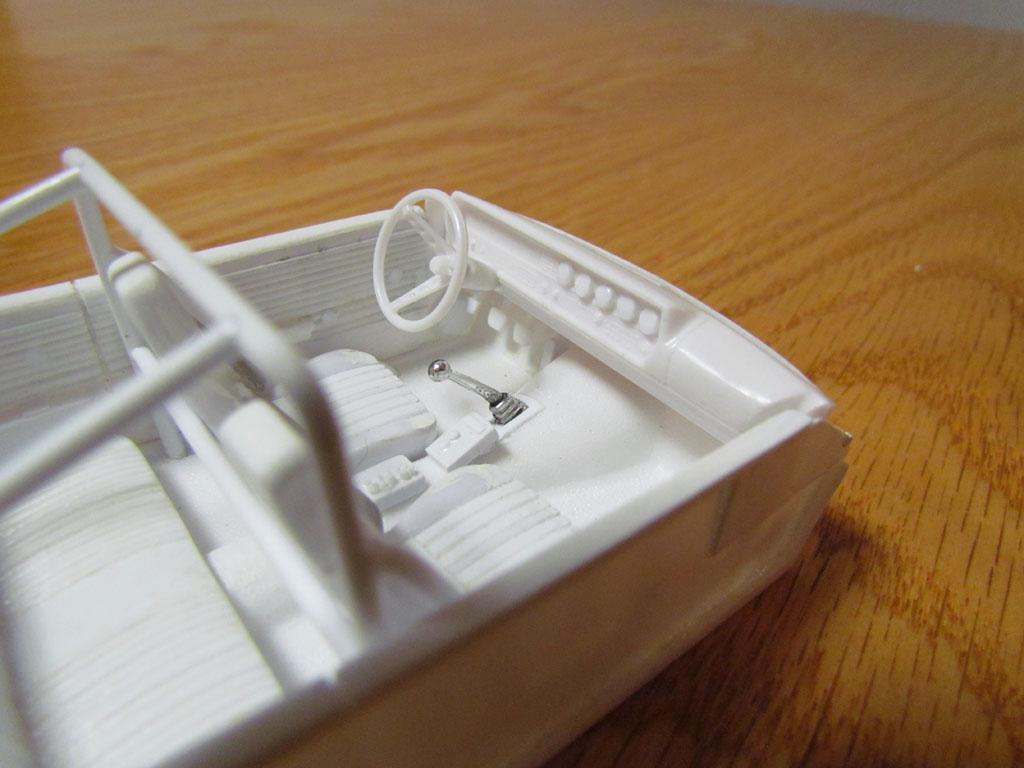
Here's a small update. I started building the roll bar. I'm using 2 mm rods. I also started adding the pedals and the gauges on the dash board.
-
Food Dehydrators & Paint Dryers
crowe-t replied to JayVee's topic in Model Building Questions and Answers
Has anyone used this dehydrator from Ivation? Someone on Facebook recommended it. https://www.amazon.com/Ivation-Digital-Electric-Dehydrator-Vegetables/dp/B017KSBYHC/ref=dp_prsubs_3?pd_rd_i=B017KSBYHC&psc=1 I was also looking at the Micro Make Dr Drybooth from Micro Mark but it's $169 and seems to be basically a food dehydrator. -
Chrome Plating Resin Parts?
crowe-t replied to crowe-t's topic in Car Aftermarket / Resin / 3D Printed
Here's their response: "We have a minimum charge for small parts processed separately of $35.00ea or $65.00 for a 6x8in rack/tree." I'm going to get the Alsa Corp Easy Chrome kit. I can chrome many parts with it. I only have 2 bumpers to chrome now and it'll cost $70. That's crazy. -
Alclad II ALC-118 Gold Titanium – Problem
crowe-t replied to 69NovaYenko's topic in Model Building Questions and Answers
Can you post a picture of your results? -
Chrome Plating Resin Parts?
crowe-t replied to crowe-t's topic in Car Aftermarket / Resin / 3D Printed
I just sent them an e-mail asking it they chrome plate resin parts. I'll post what they say. -
1965 Oldsmobile 442(from an AMT '64 Olds 442) - FINISHED
crowe-t replied to crowe-t's topic in WIP: Model Cars
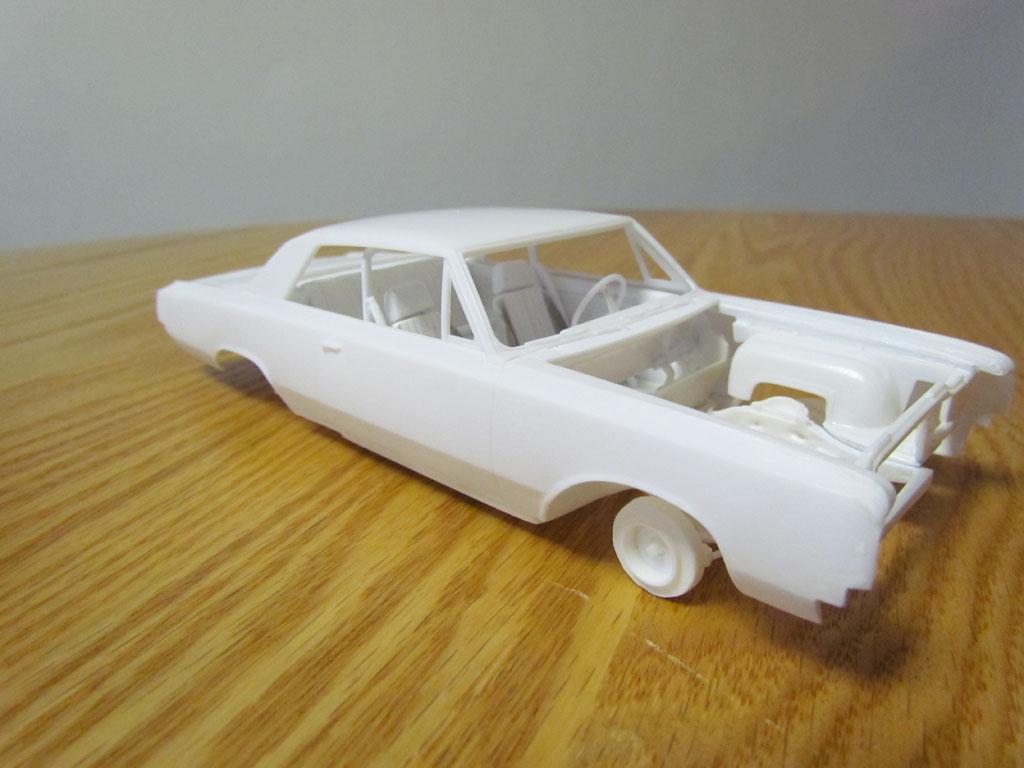
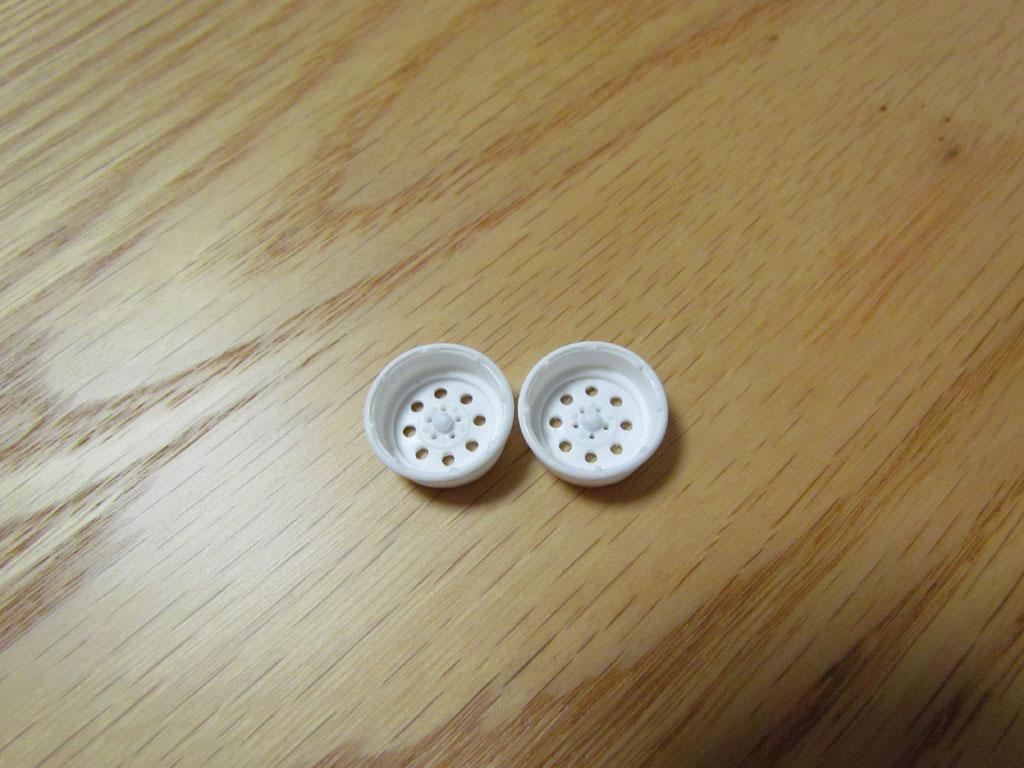
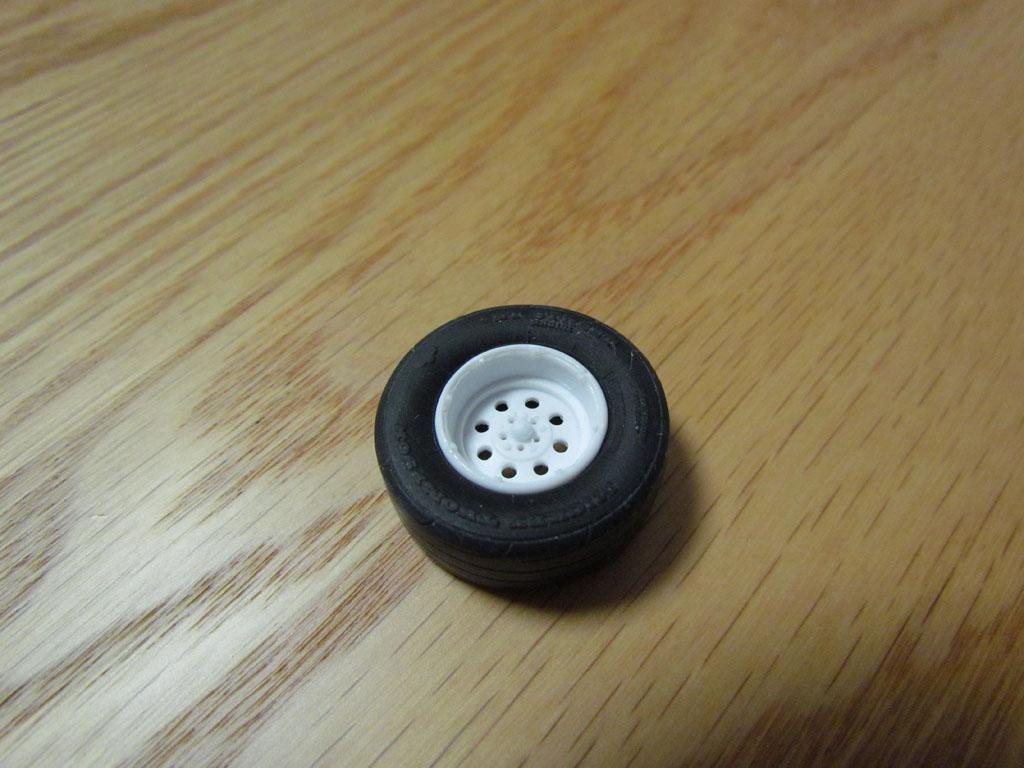
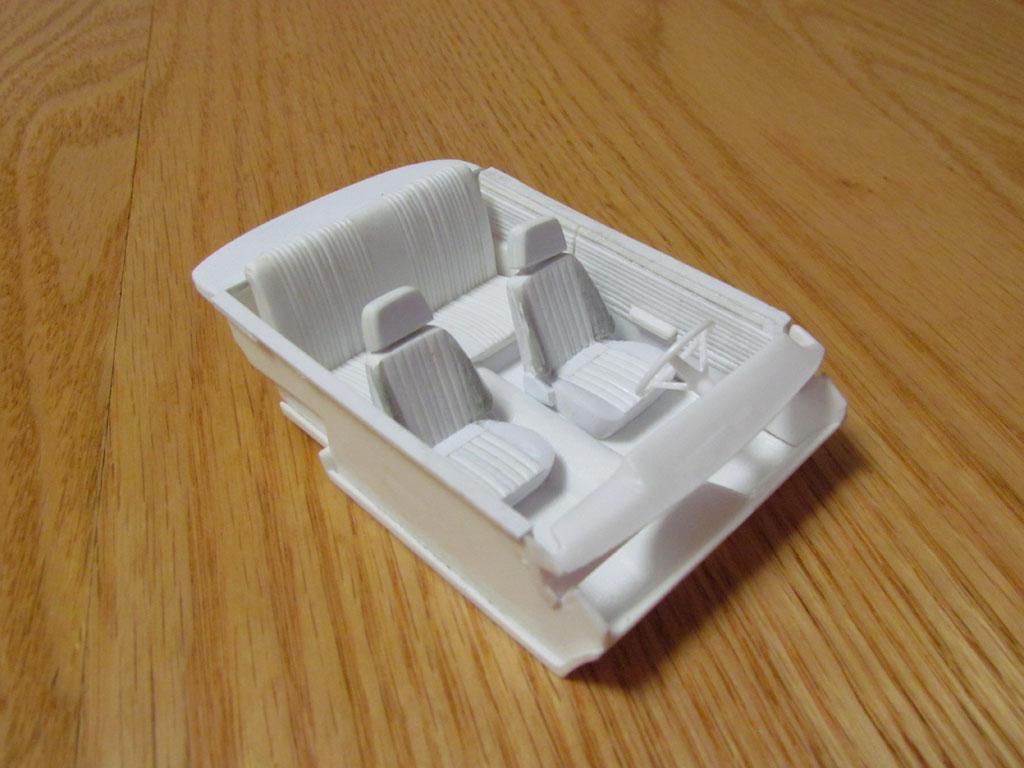
I added the screws around the perimeter of the rear wheels that hold the tires in place. The interior is now glued together. The rear seat gave me problems. The back of the seat initially sat too straight up and down. I had to pull the seat out and file the back and bottom to angle it. It now sits the way it should. The steering wheel was slightly too far to the right by about a mm so I filled in the hole on the dash board and drilled a new hole. I also slightly widened the rear arm rests and added speakers to the front kick panels.
-
1965 Oldsmobile 442(from an AMT '64 Olds 442) - FINISHED
crowe-t replied to crowe-t's topic in WIP: Model Cars
Hey thanks! -
1965 Oldsmobile 442(from an AMT '64 Olds 442) - FINISHED
crowe-t replied to crowe-t's topic in WIP: Model Cars
Thanks Stephen! -
1965 Oldsmobile 442(from an AMT '64 Olds 442) - FINISHED
crowe-t replied to crowe-t's topic in WIP: Model Cars
I did some work on the interior's door panels. I used 1 mm and 1.5 mm Evergreen half round rods for the pleats. I also scratch built a steering column. I started making a new package tray. The stance is just about right. My friend sent me measurements. He measured from the rims to the fender/quarter panel wheel openings. I just have to move the rear end slightly forward.
-
Thanks! I appreciate the picture.
-
I got the material from Pro Tech so I now know it looks realistic seeing it in your car. What glue do you use to attach the material to the photo etch harness hardware?
-
Food Dehydrators & Paint Dryers
crowe-t replied to JayVee's topic in Model Building Questions and Answers
Have you used it yet? -
This is awesome! What material did you use for the 5 point harness' belts?
-
Food Dehydrators & Paint Dryers
crowe-t replied to JayVee's topic in Model Building Questions and Answers
Thanks Dusty! I'm looking for something a bit more affordable. I found these on Amazon. With the exception of one they have a temperature control. Is it important to have an adjustable temperature control? Is there any other feature(s) I need to look for? https://www.amazon.com/Chefman-Food-Dehydrator-Transparent-Temperature/dp/B08RHF6WH1/ref=sr_1_17_sspa?crid=3KPGEKX8BOBY&keywords=food+dehydrator&qid=1639261728&sprefix=food+d%2Caps%2C164&sr=8-17-spons&psc=1&spLa=ZW5jcnlwdGVkUXVhbGlmaWVyPUEyRFVTN1ZLVTdFRFEwJmVuY3J5cHRlZElkPUEwNTk4NDU4MllMR05EVDRDQ1JIMyZlbmNyeXB0ZWRBZElkPUEwNTM5NzI4MUdTN01BMEs1WkMwRiZ3aWRnZXROYW1lPXNwX210ZiZhY3Rpb249Y2xpY2tSZWRpcmVjdCZkb05vdExvZ0NsaWNrPXRydWU= https://www.amazon.com/Elite-Gourmet-Dehydrator-BPA-Free-Stackable/dp/B08BSQZ2LS/ref=sr_1_4?crid=3KPGEKX8BOBY&keywords=food+dehydrator&qid=1639261728&sprefix=food+d%2Caps%2C164&sr=8-4 https://www.amazon.com/Dehydrator-Professional-Circulations-NutriChef-PKFD12/dp/B00VHLXAQC/ref=sr_1_20?crid=3KPGEKX8BOBY&keywords=food%2Bdehydrator&qid=1639261969&sprefix=food%2Bd%2Caps%2C164&sr=8-20&th=1 https://www.amazon.com/Rosewill-Countertop-Dehydrator-Adjustable-RHFD-15001/dp/B018UR4XJI/ref=sr_1_30?crid=3KPGEKX8BOBY&keywords=food%2Bdehydrator&qid=1639261969&sprefix=food%2Bd%2Caps%2C164&sr=8-30&th=1 -
Food Dehydrators & Paint Dryers
crowe-t replied to JayVee's topic in Model Building Questions and Answers
I've been testing some new clear. It's 1K acrylic urethane clear from Duplicolor and KBS Coatings. They both claim about 48 hours for total cure and will dry rock hard. However I found that not to be the case. The Duplicolor does get rock hard after a couple of months. So far the KBS Coatings clear isn't rock hard yet after a few weeks. Will a dehydrator help to cure 1K acrylic urethane? Neither of these use a hardener so they cure by evaporation. The room I have the bodies in is a bit cold so maybe that's slowing the cure time. Can anyone recommend a decent dehydrator that doesn't cost too much? -
Thanks Gerry. I ordered the window cranks from The Model Car Garage. I'll make the small handles from styrene rod but I'm still not sure what to do with some of the parts.