mr moto
-
Posts
1,344 -
Joined
-
Last visited
Content Type
Profiles
Forums
Events
Gallery
Everything posted by mr moto
-
Wow! Those do look real! That's great work.
-
 Has anyone been in contact with BMF lately? I placed an order for BMF chrome at the end of October and shortly after that their website started showing "out of stock" . I recently noticed that the site shows "In Stock" again so I've been trying to contact them to get the status on my order. None of my attempts by e-mail or phone has gotten any kind of response. Phone calls haven't gone through at all. What's your experience?
 -
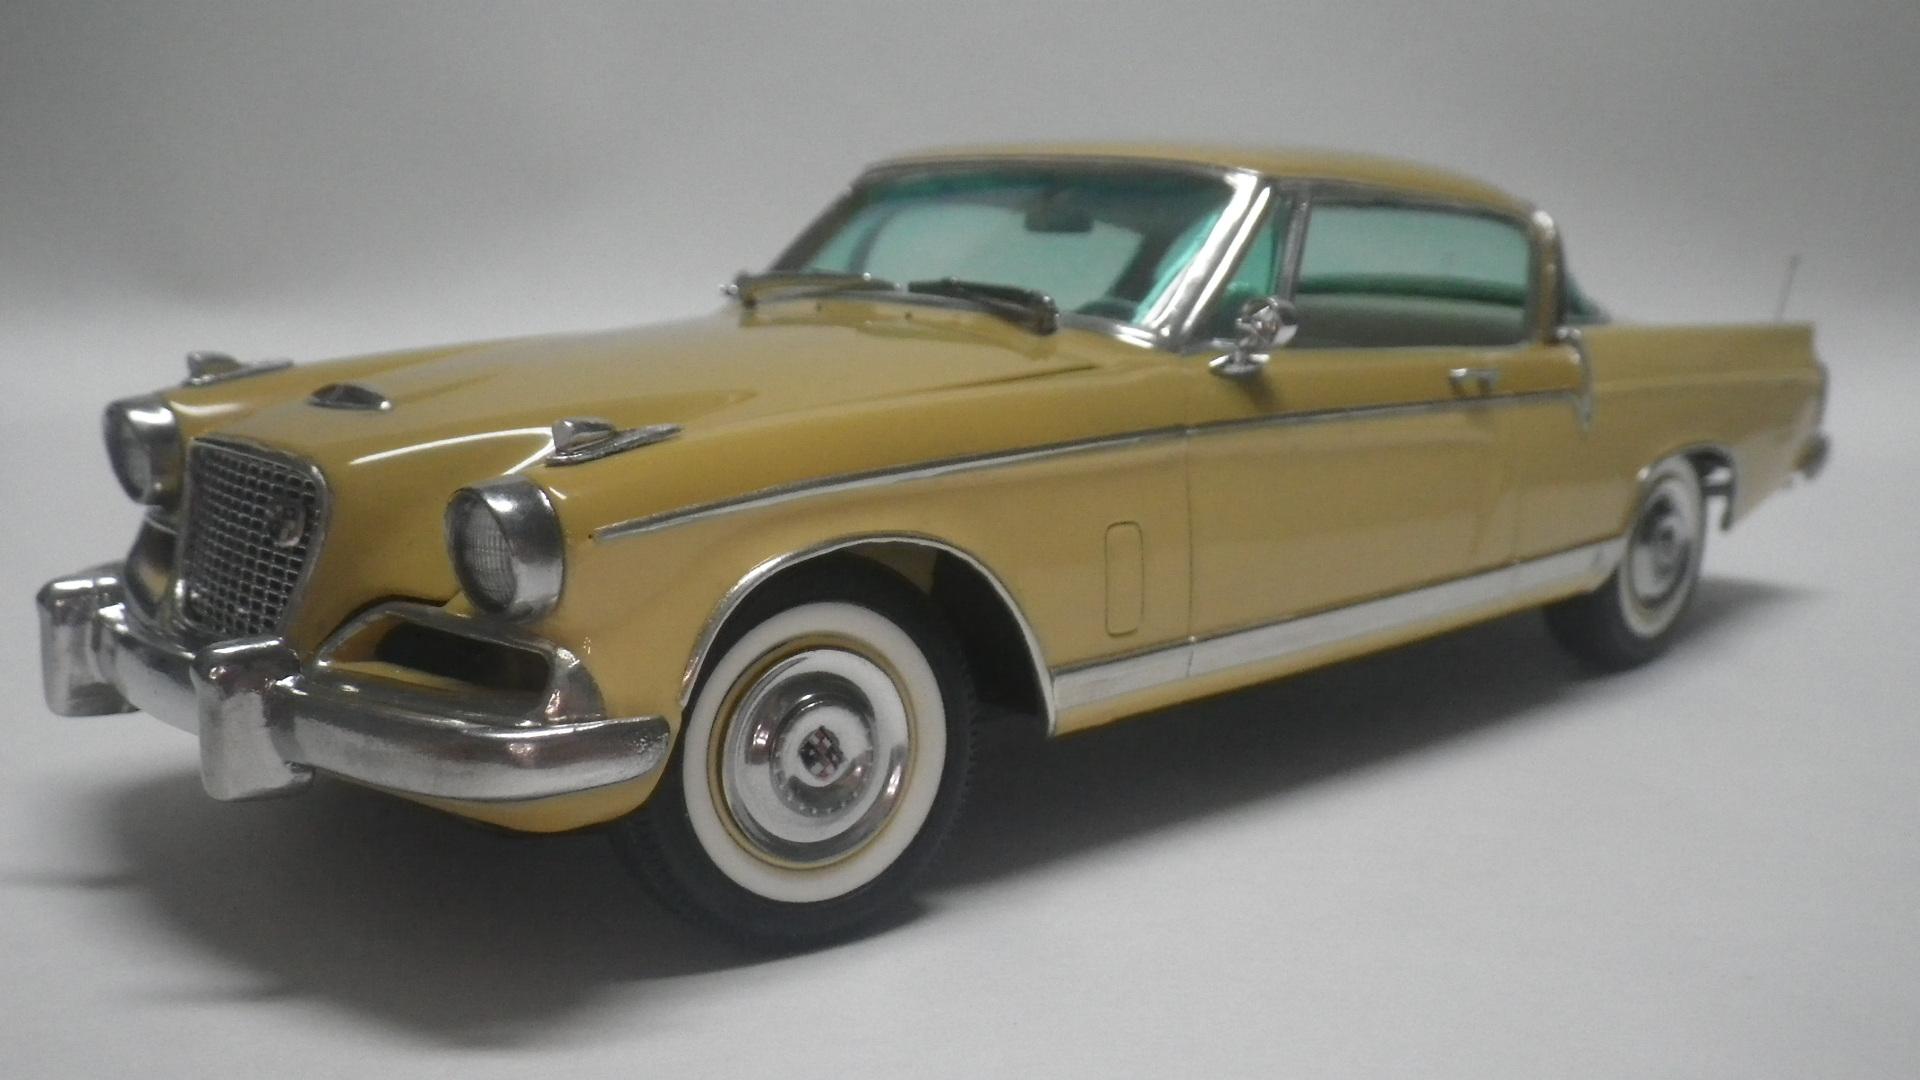
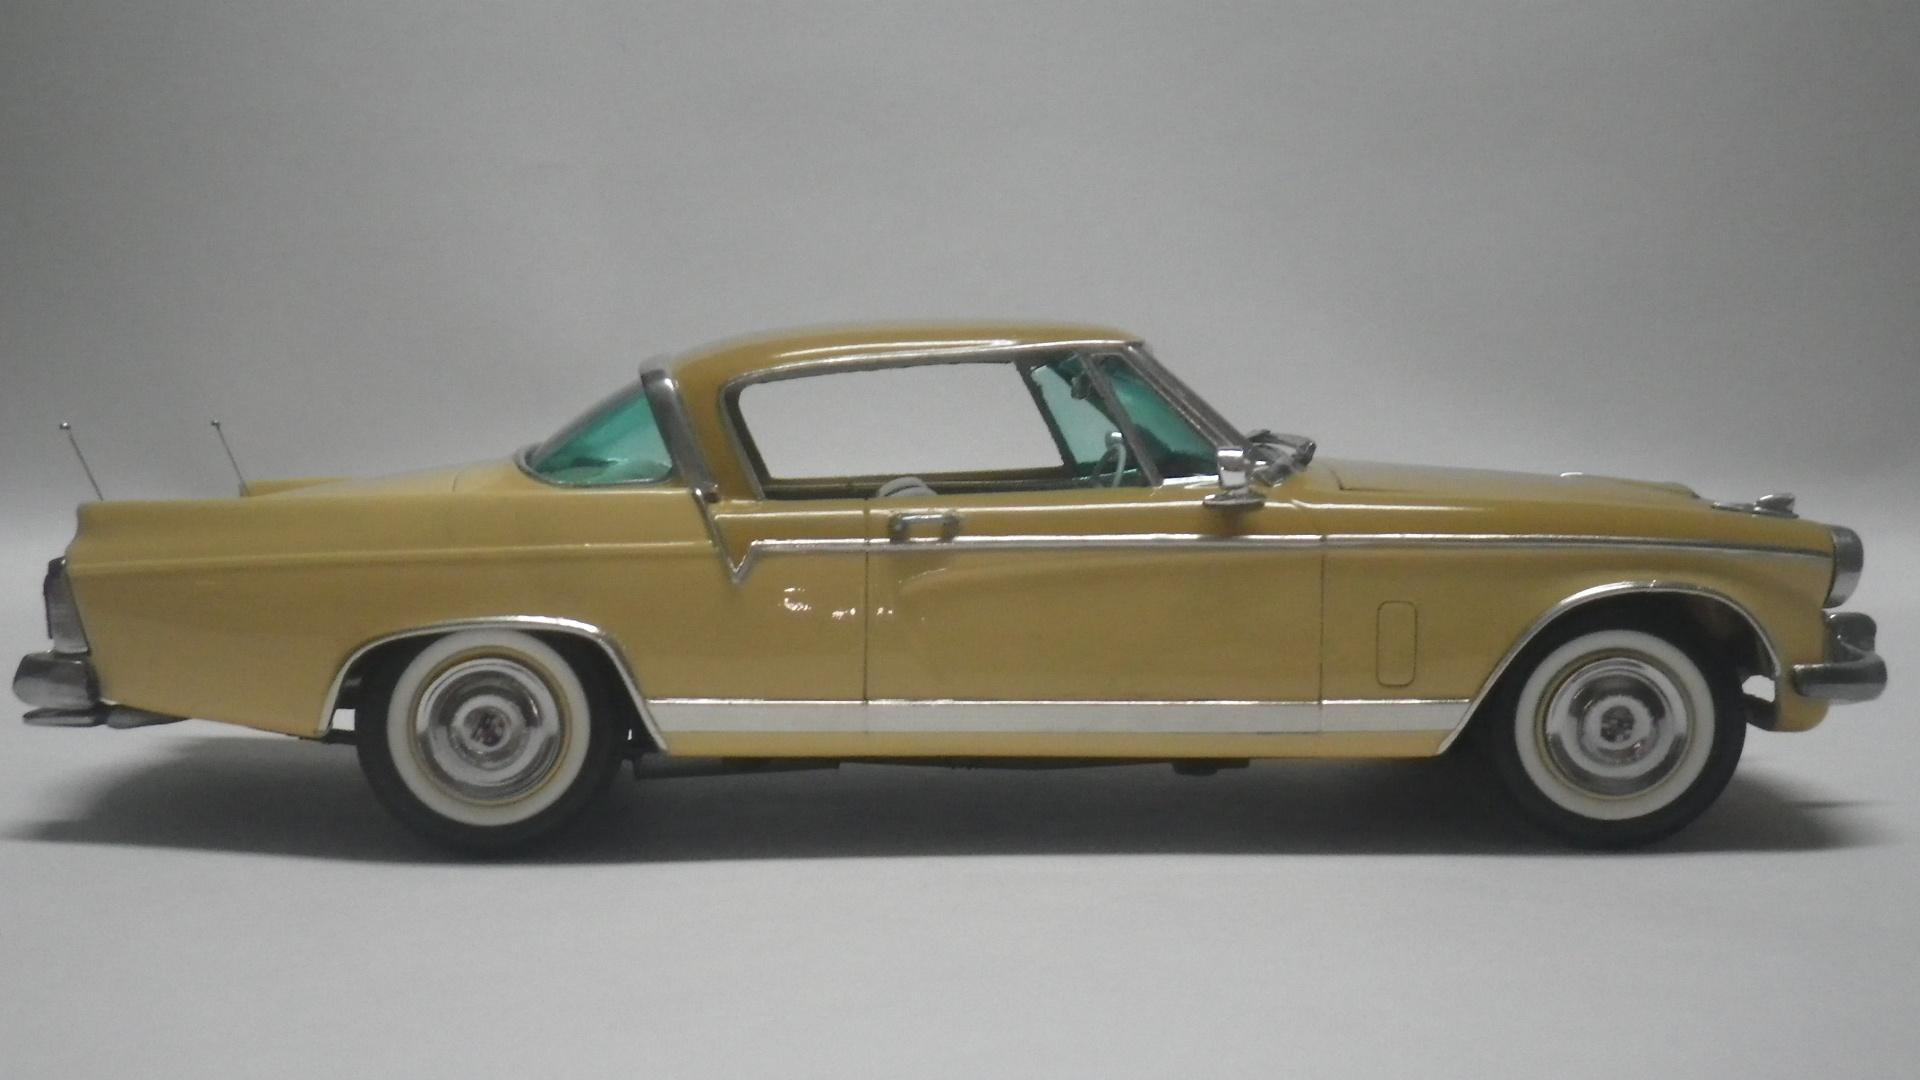
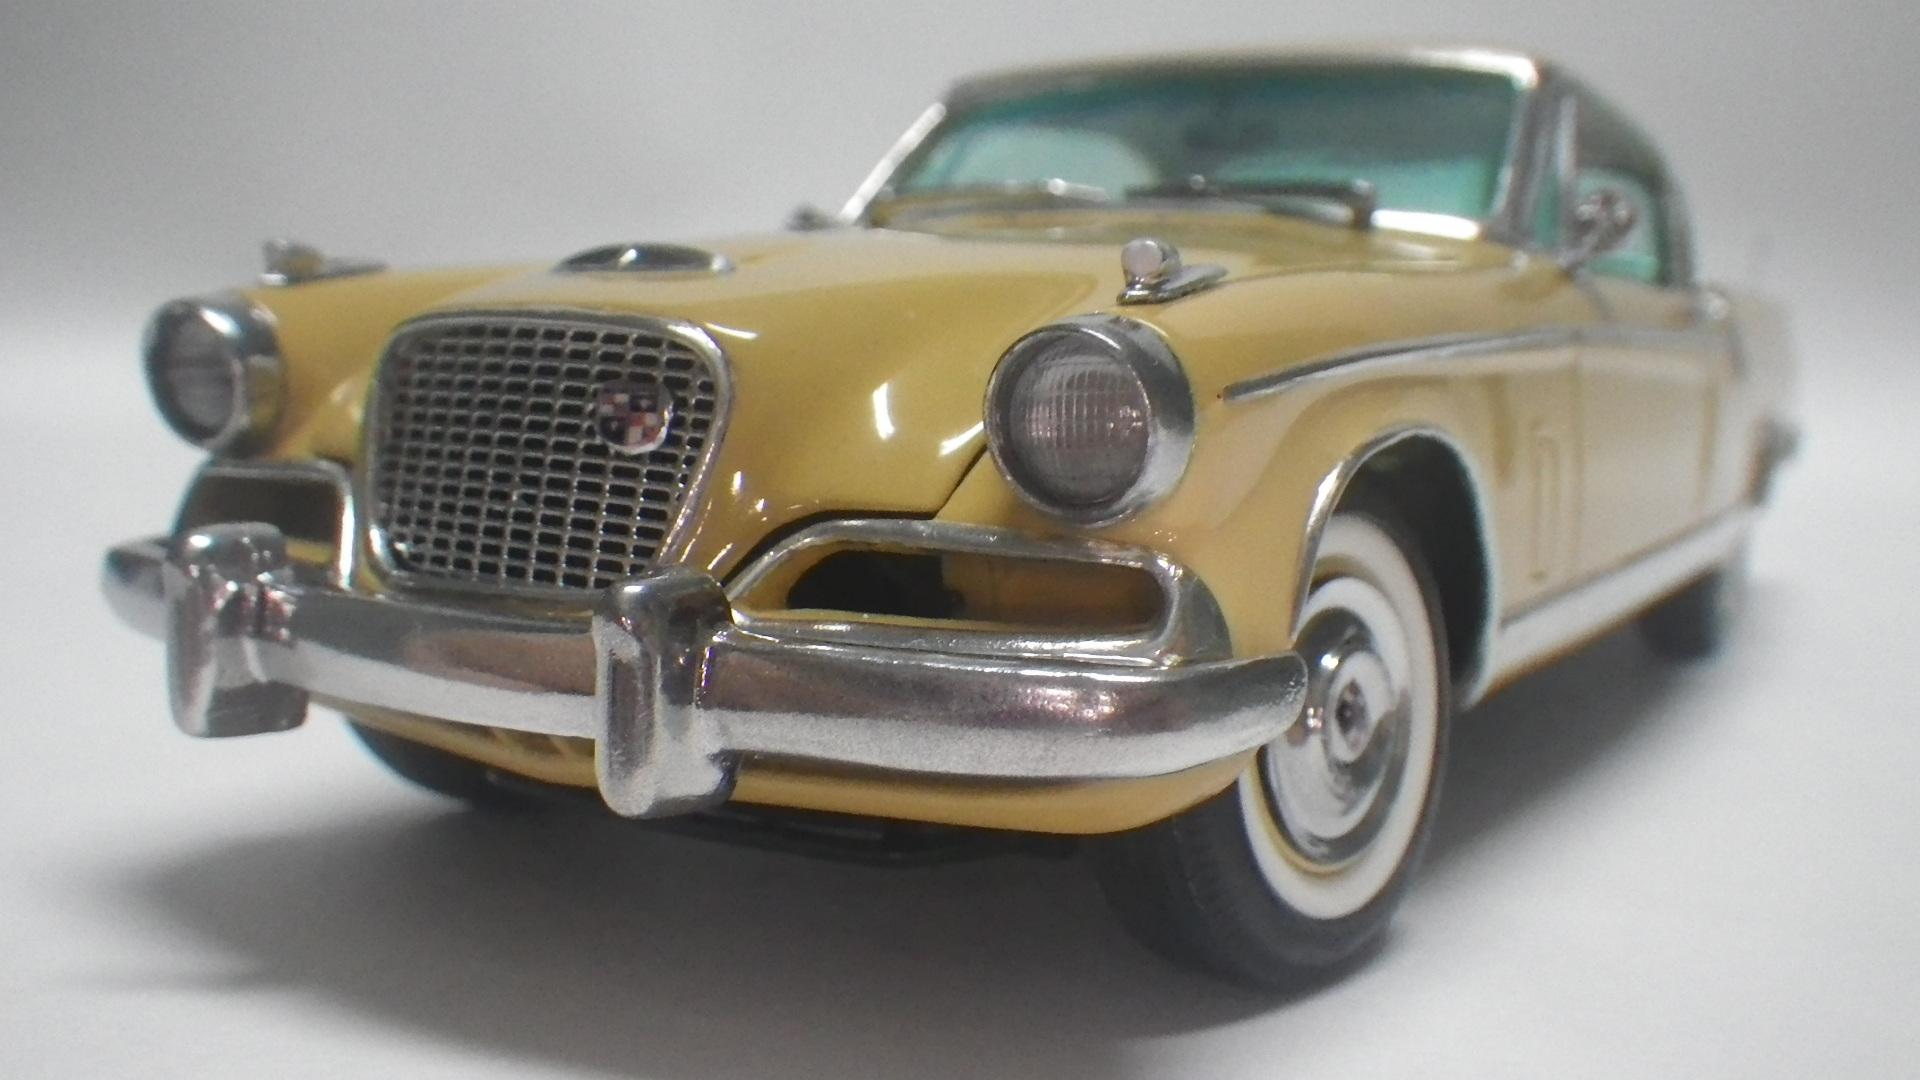
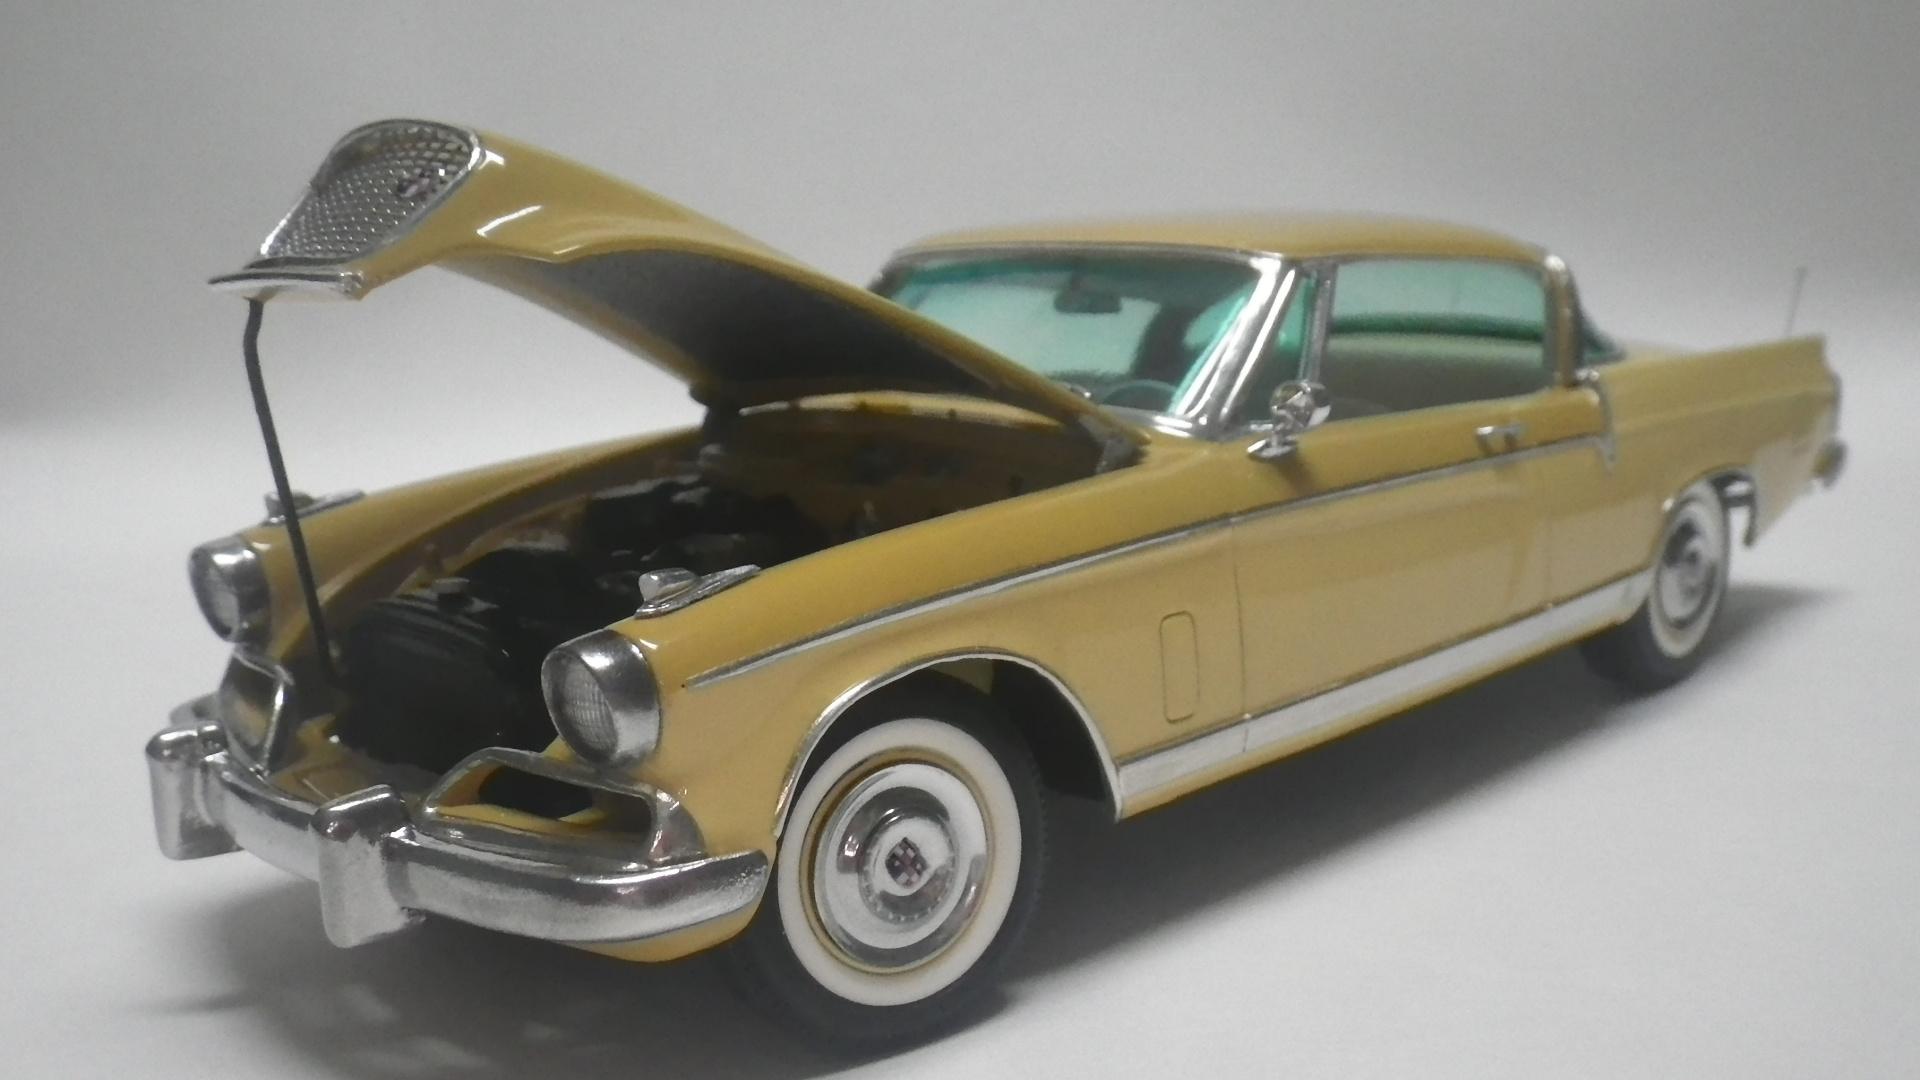
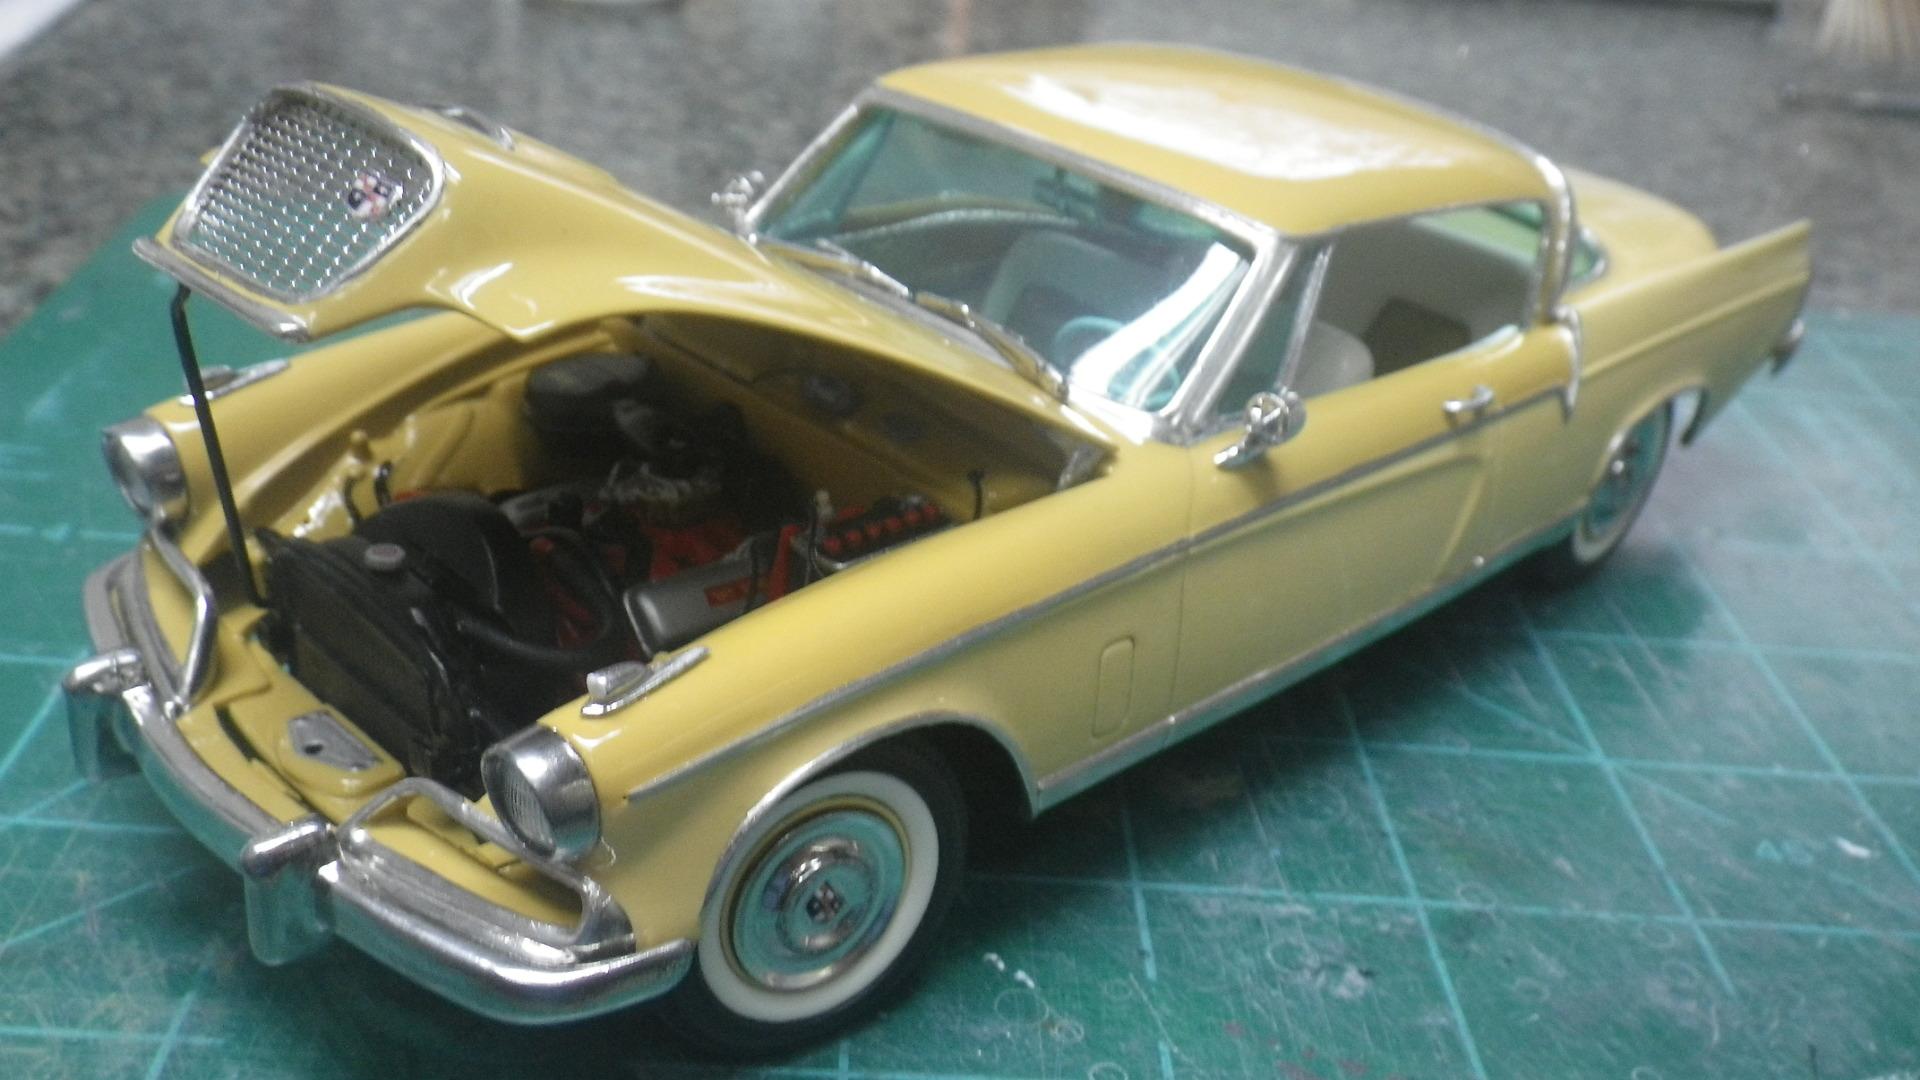
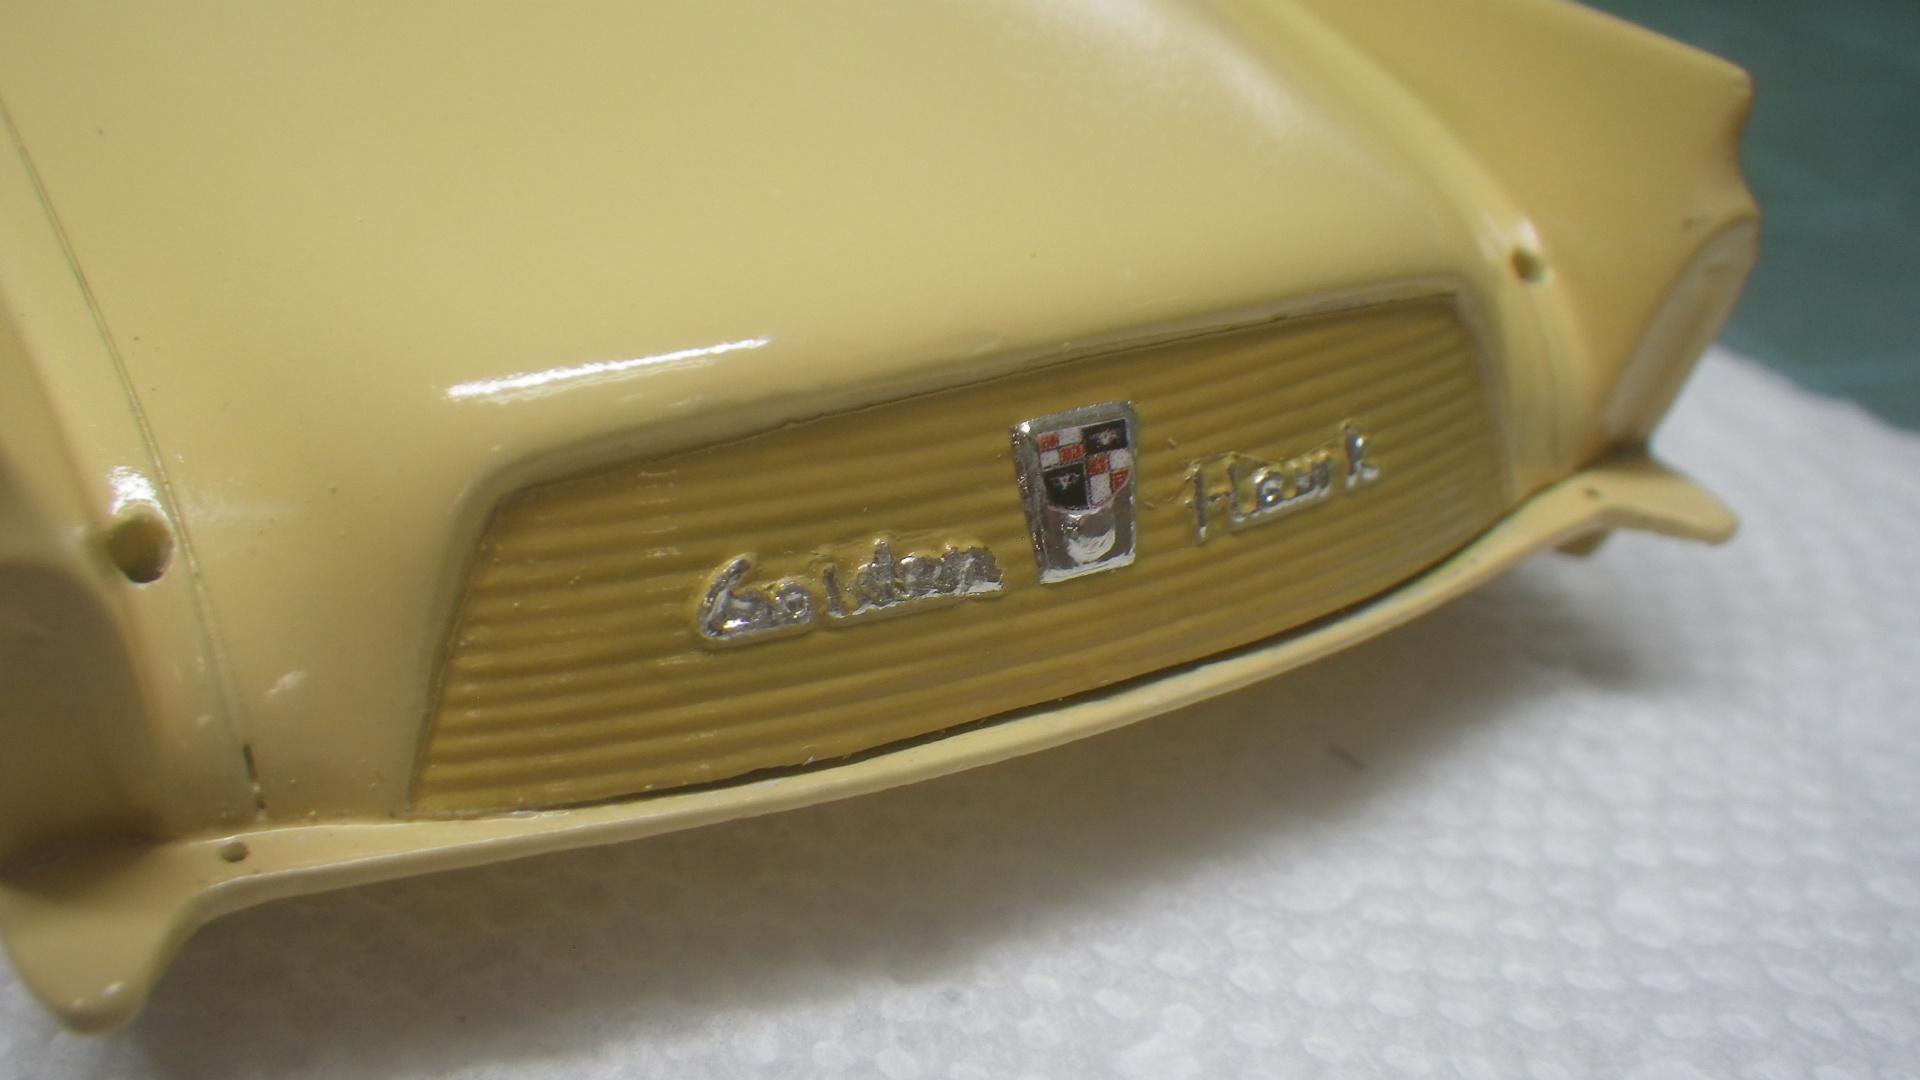
1956 Studebaker Golden Hawk (56J): Sunglow over Yellowstone
mr moto replied to mr moto's topic in Model Cars
It's some of each plus a dollop of scratch building. The body is from R&R Resin but I re-mastered the hood and front bumper/grill assembly and did other needed mods also. You can check out the link to the workbench thread in one of the previous threads and get more details. -
I don't know about availability in a kit but the vee angle is 65 deg. Good luck!
-
1956 Studebaker Golden Hawk (56J): Sunglow over Yellowstone
mr moto replied to mr moto's topic in Model Cars
We may be outnumbered but I have some ammo socked away for future use!
-
1956 Studebaker Golden Hawk (56J): Sunglow over Yellowstone
mr moto replied to mr moto's topic in Model Cars
Thank you for the suggestion! I'll add that link. And thank you to everyone for the nice words about my work. http://www.modelcarsmag.com/forums/topic/165044-1956-studebaker-golden-hawk-56j/ -
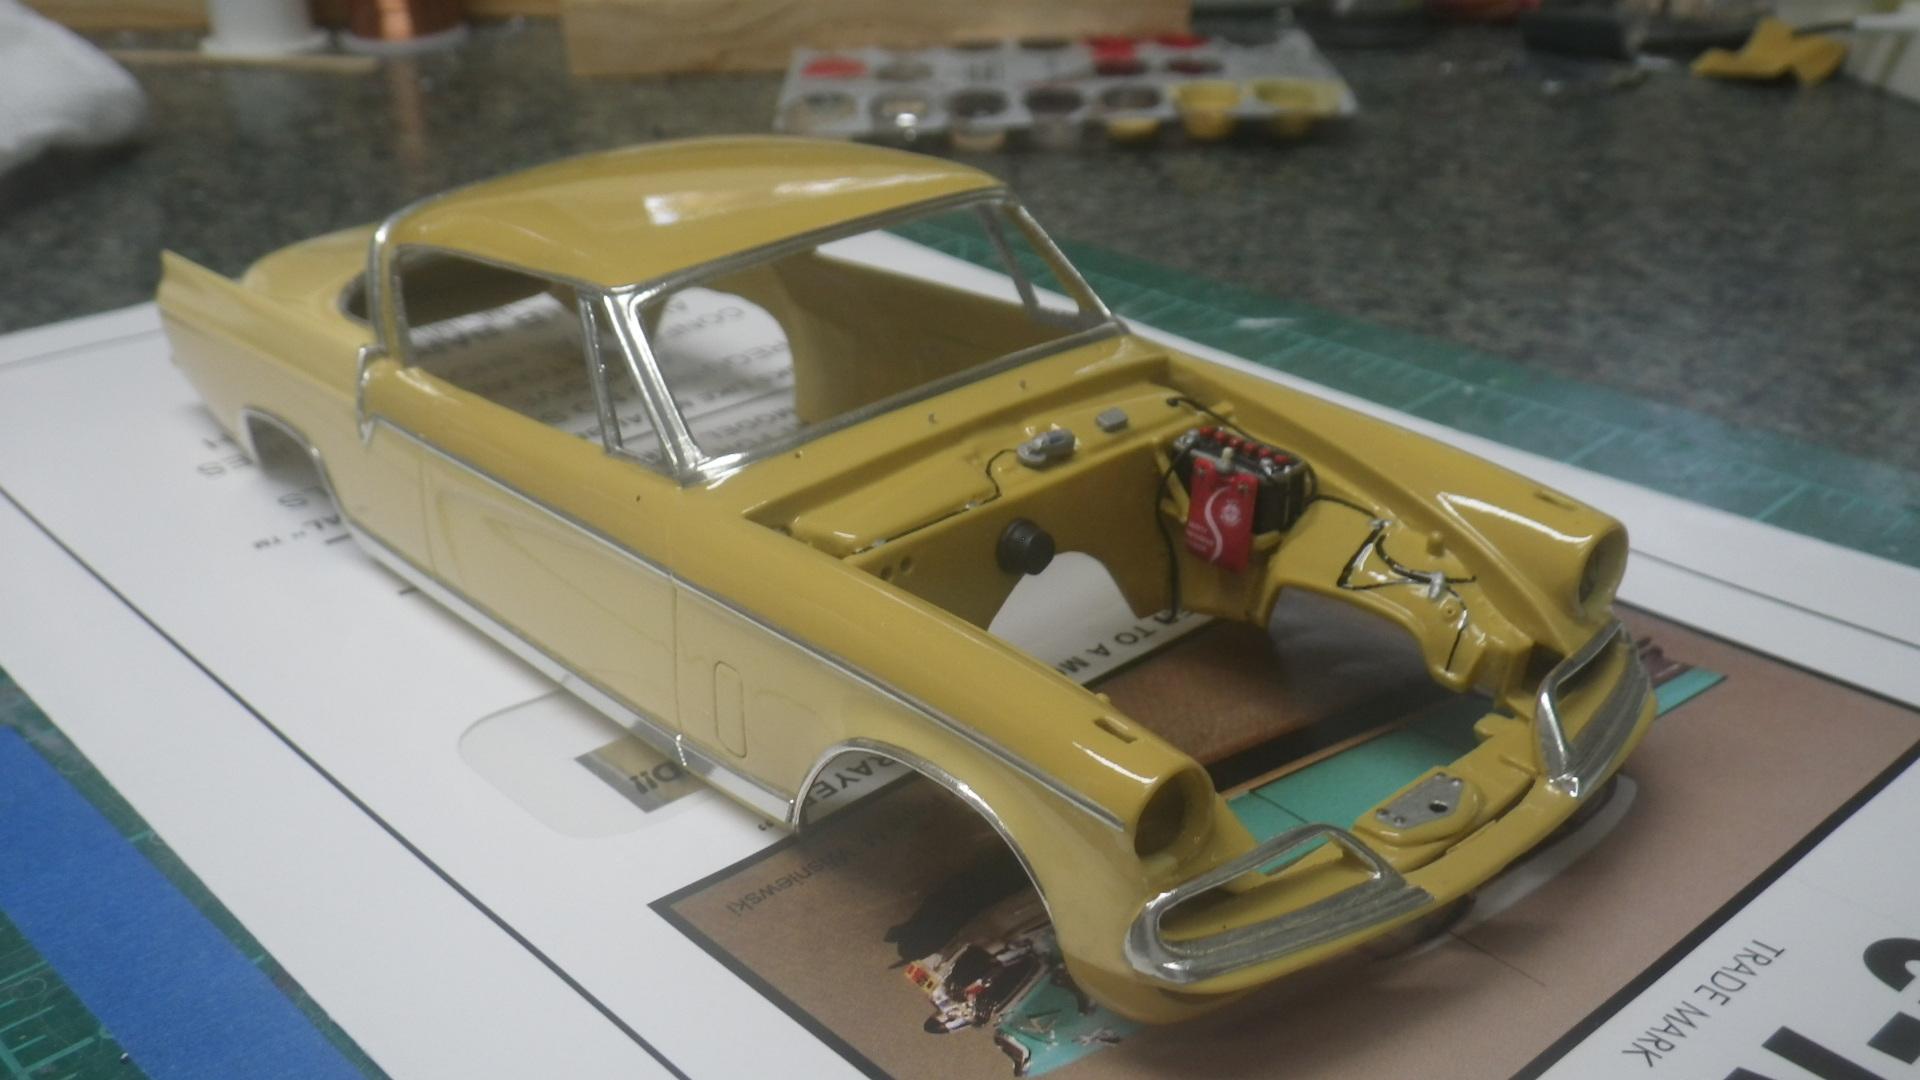
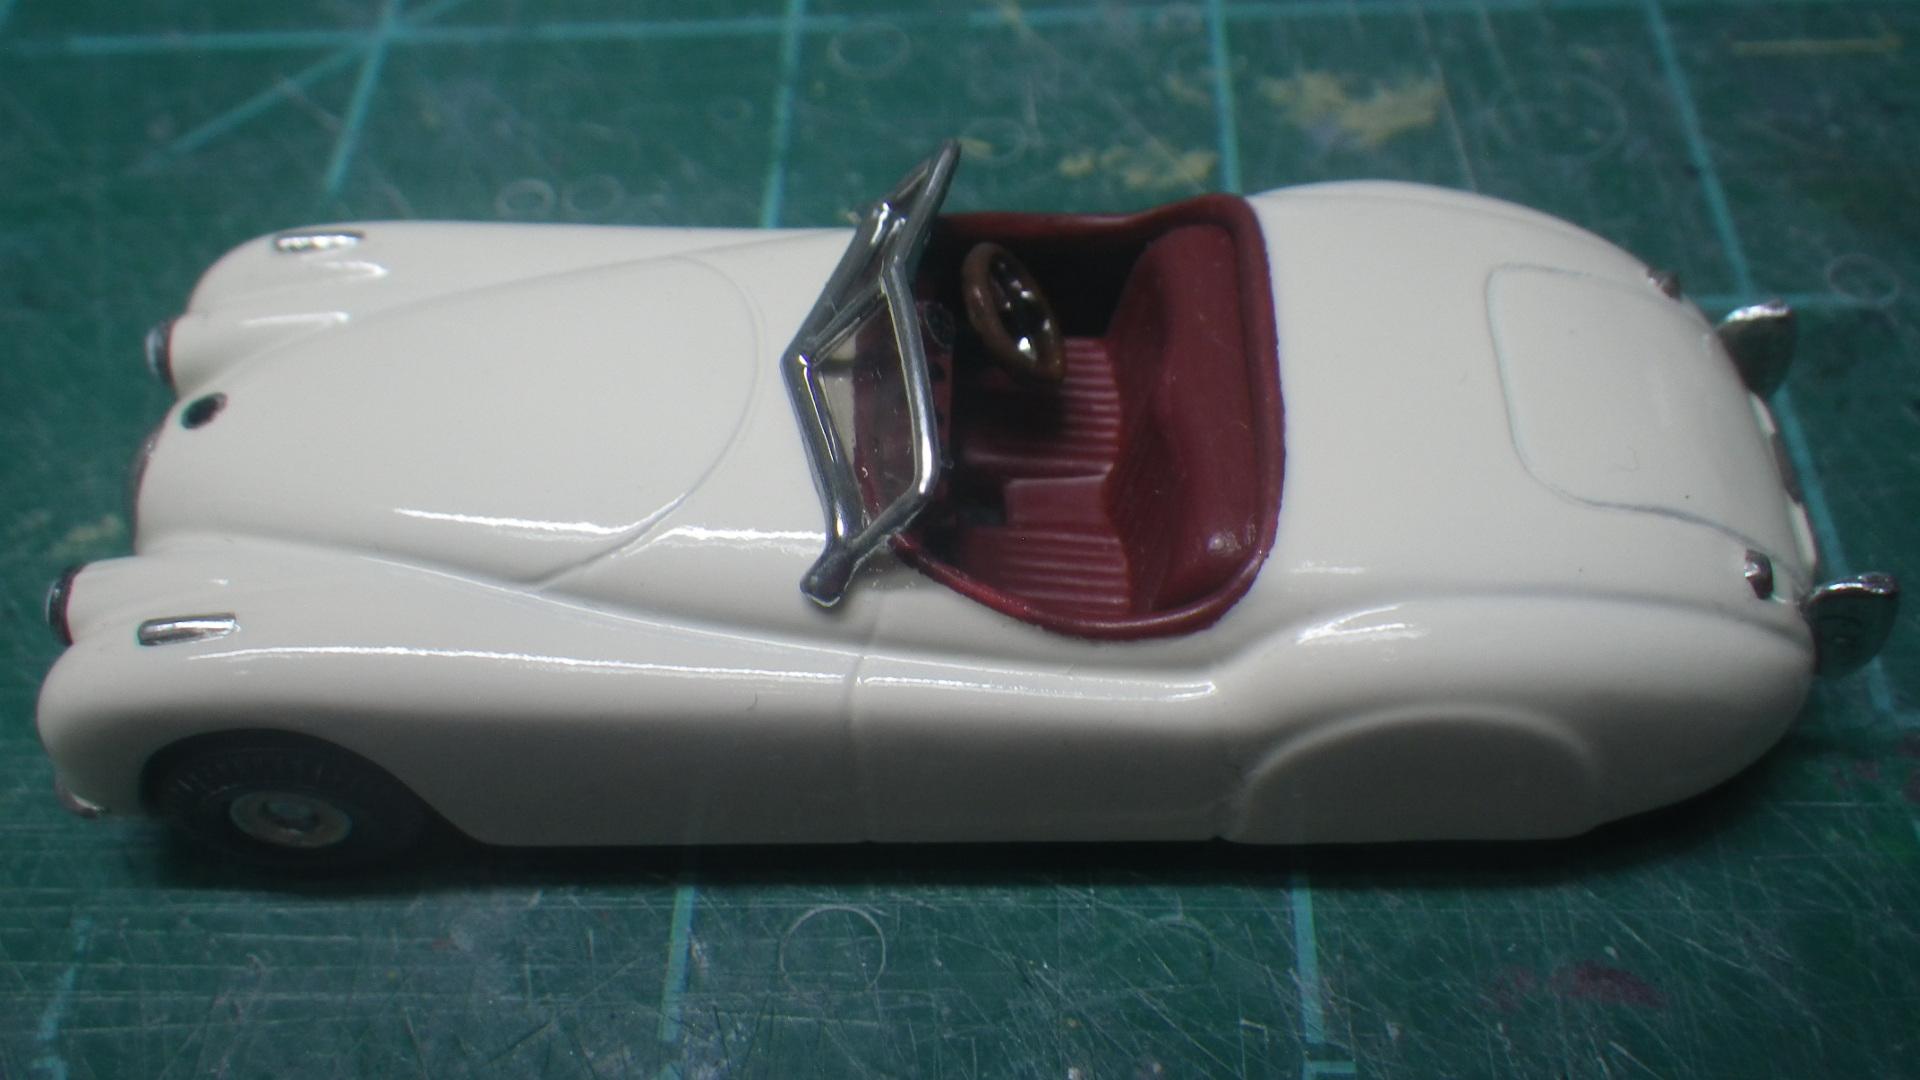
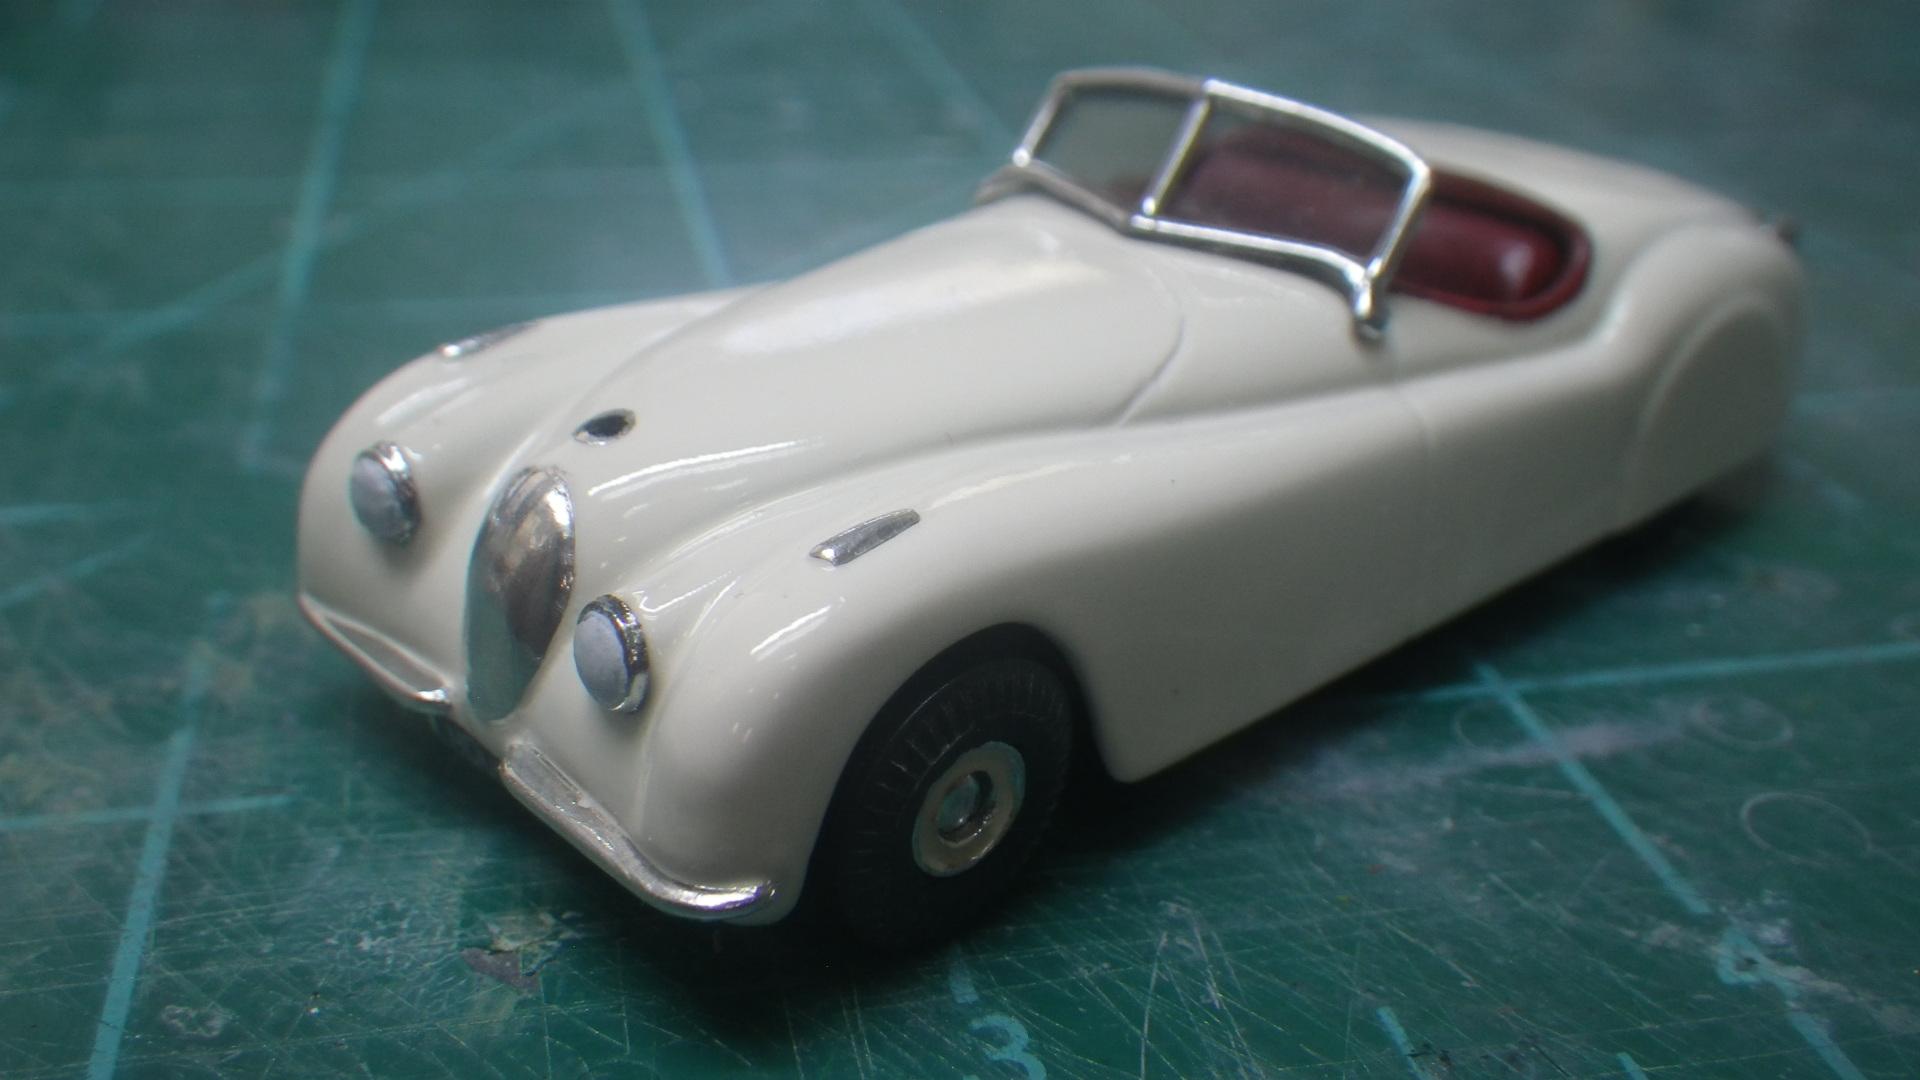
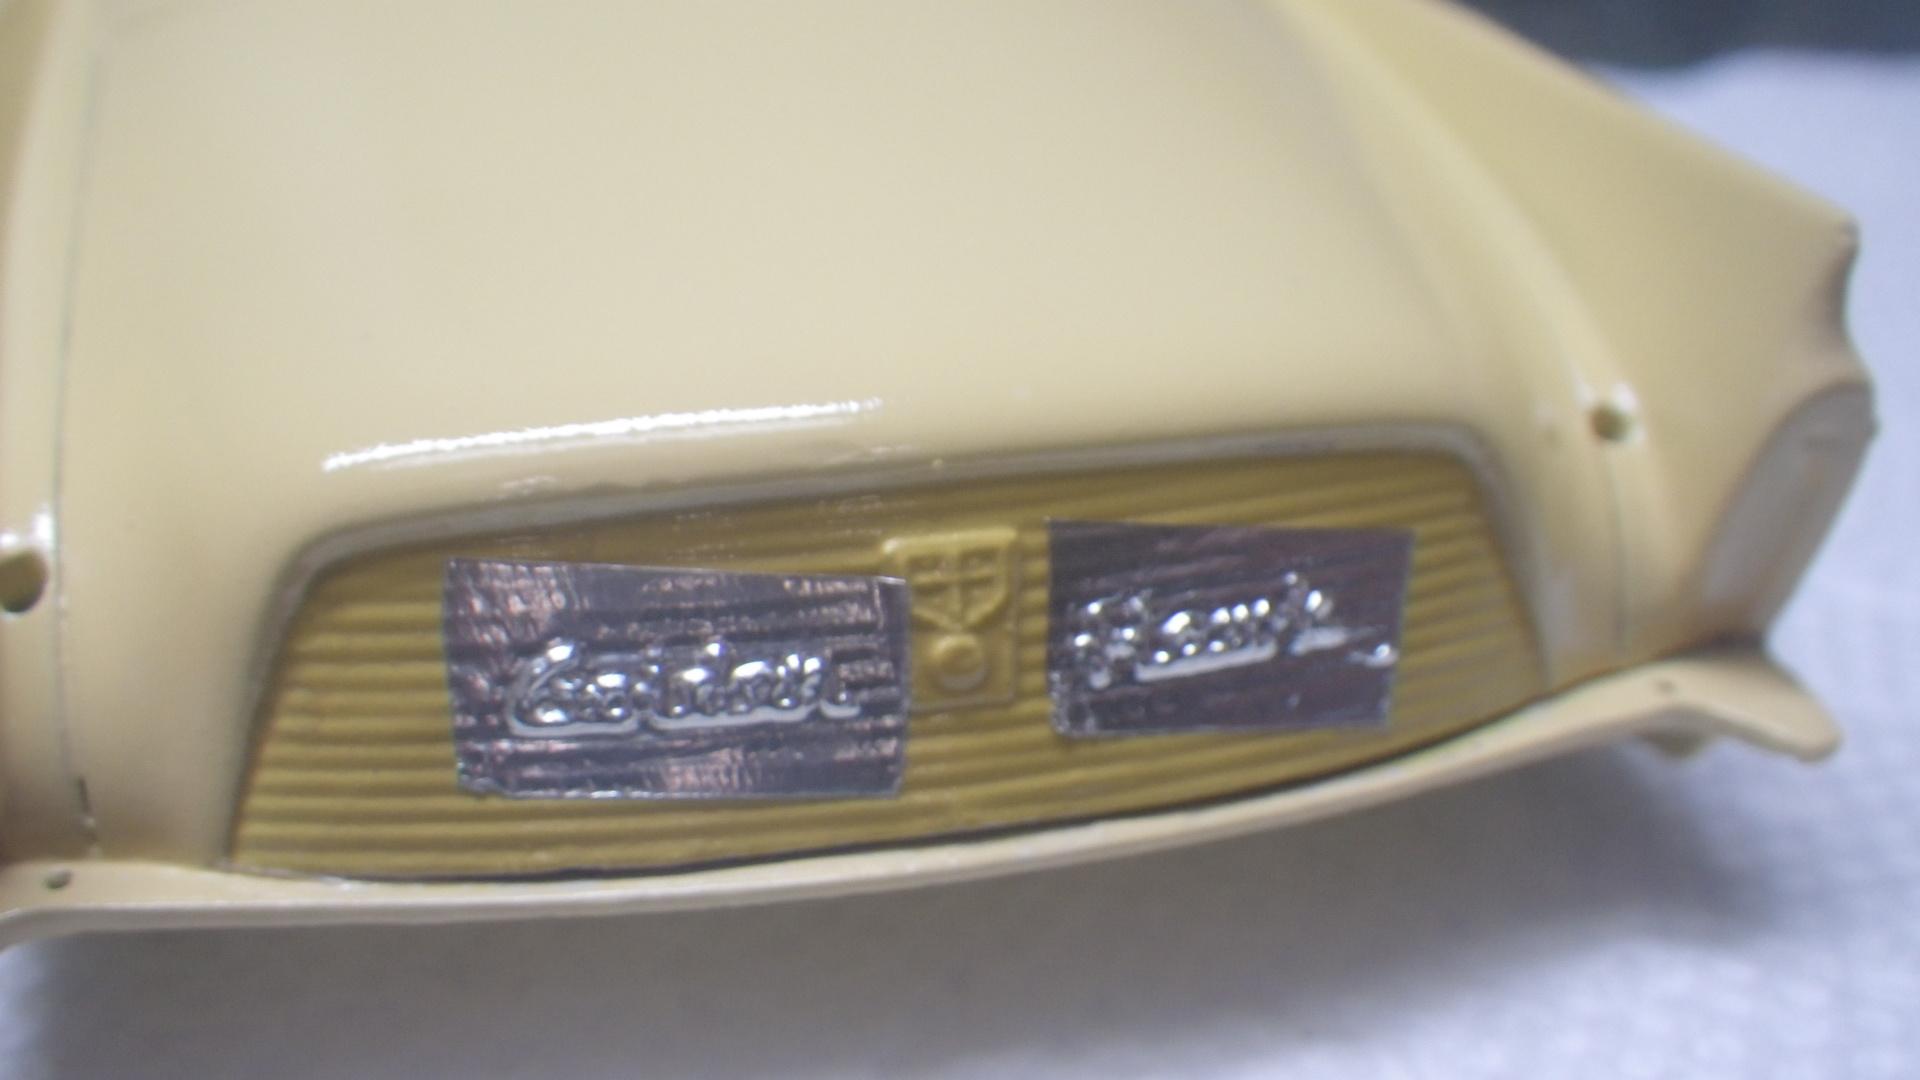
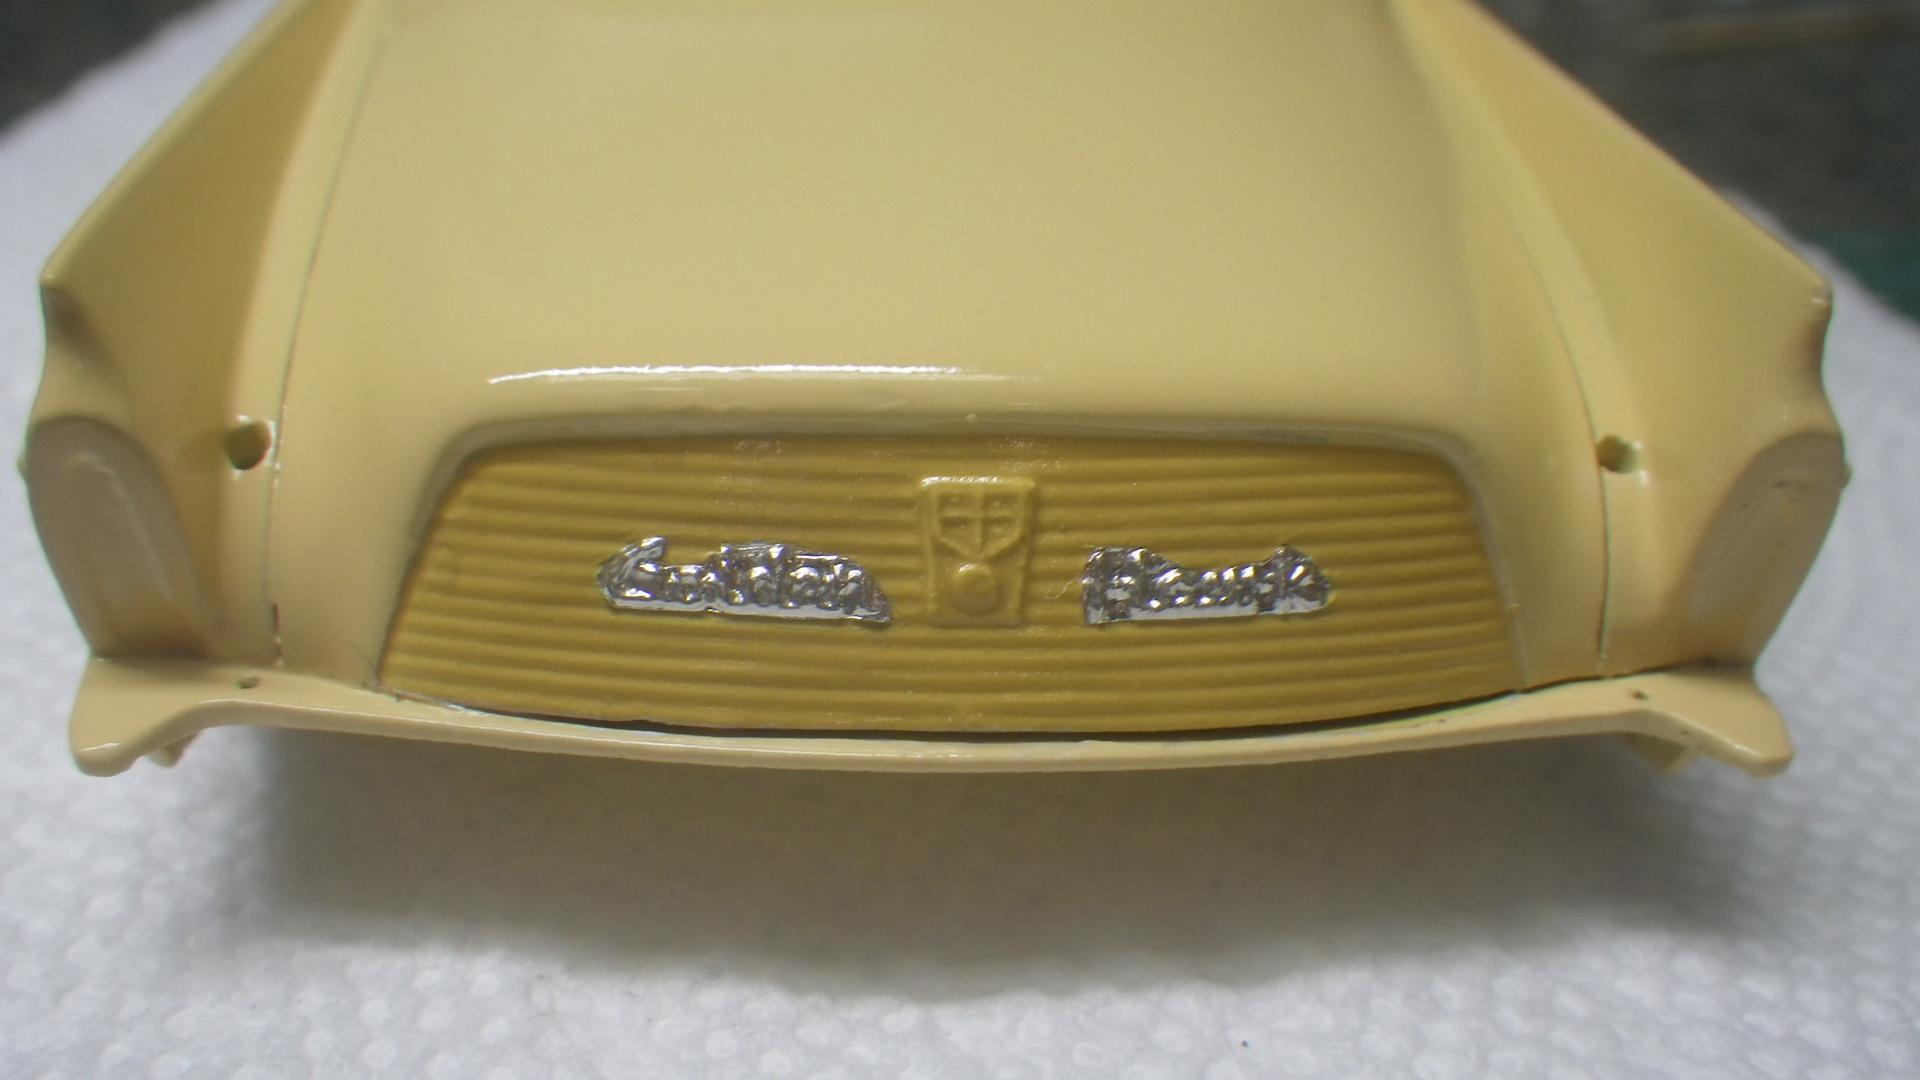
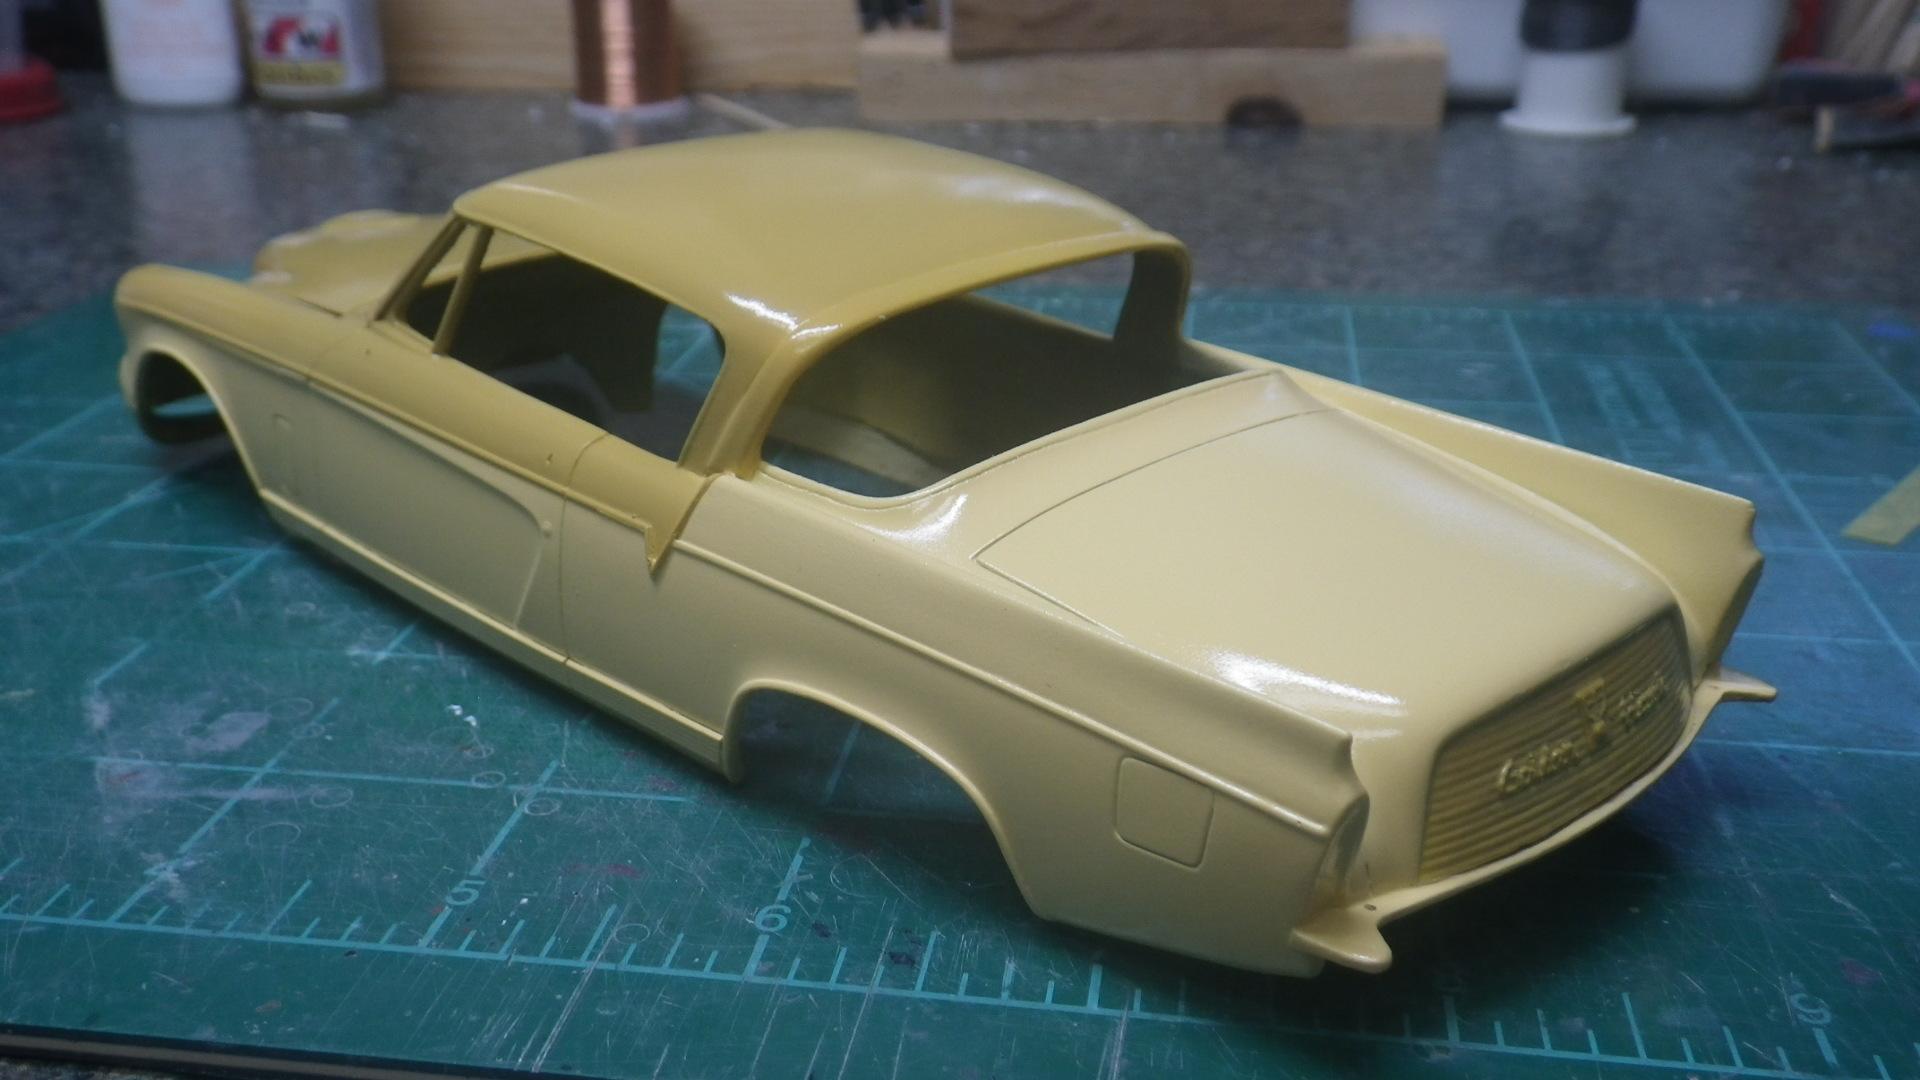
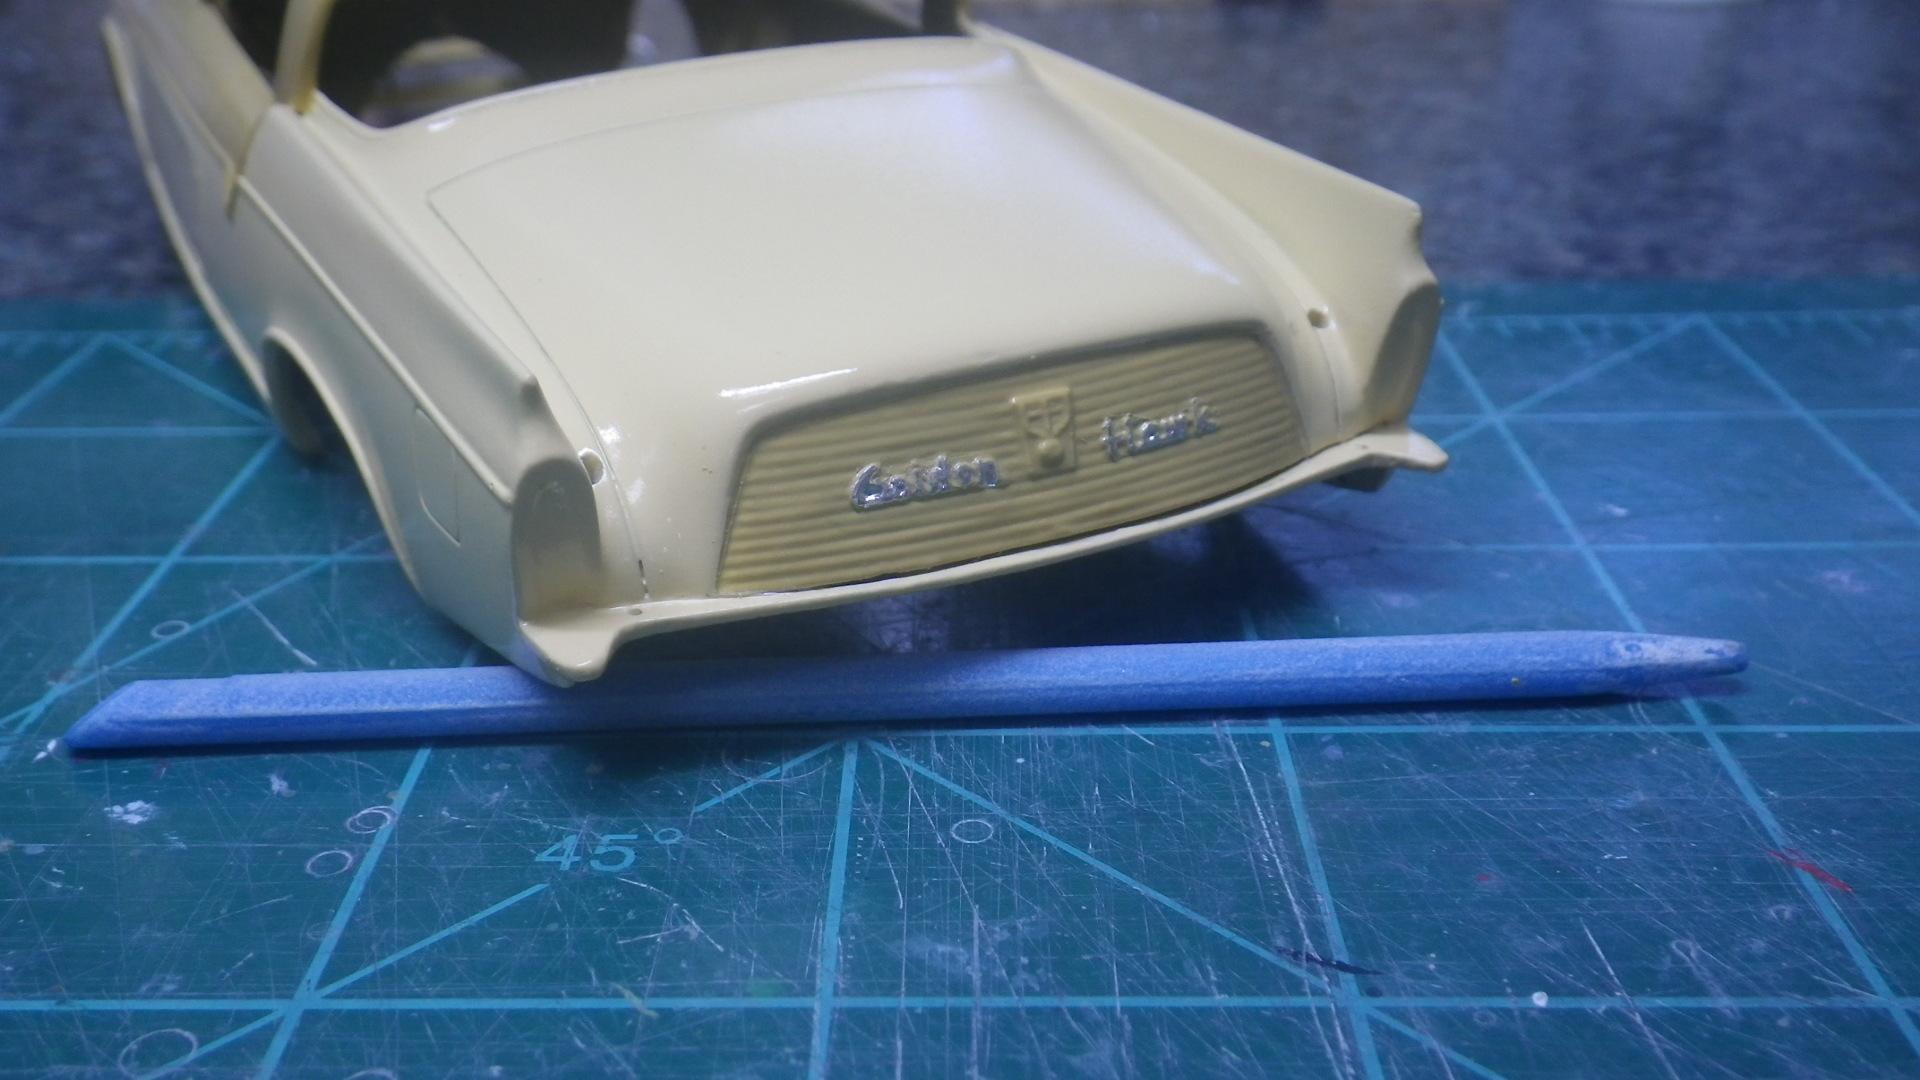
What to say? This one's a sort of holy grail (really, any Studebaker Hawk is) and it took me 10 years (not continuous!) and it's been a struggle most of the way but it all feels good now! It's decked out in the most mid 50's color scheme possible and certainly the most poetically named. Sunglow and Yellowstone. These low contrast, subtle two-tones made a big splash in the mid 50's but have disappeared ever since. The car itself was one of the first to use what became the classic muscle car formula of "stick a big engine in a car that was intended for a smaller engine". It has a 352 inch "Sky Power" that was intended for use in Packards. In a 1956 comparison test, Speed Age magazine declared it the fastest American "sports car". It was up against Corvette, Thunderbird and Chrysler 300B. Anyway, here it is and I hope you like. Photos came out kind of fuzzy. I'll have to work on that in the future. See hi-tech photo booth below.
-
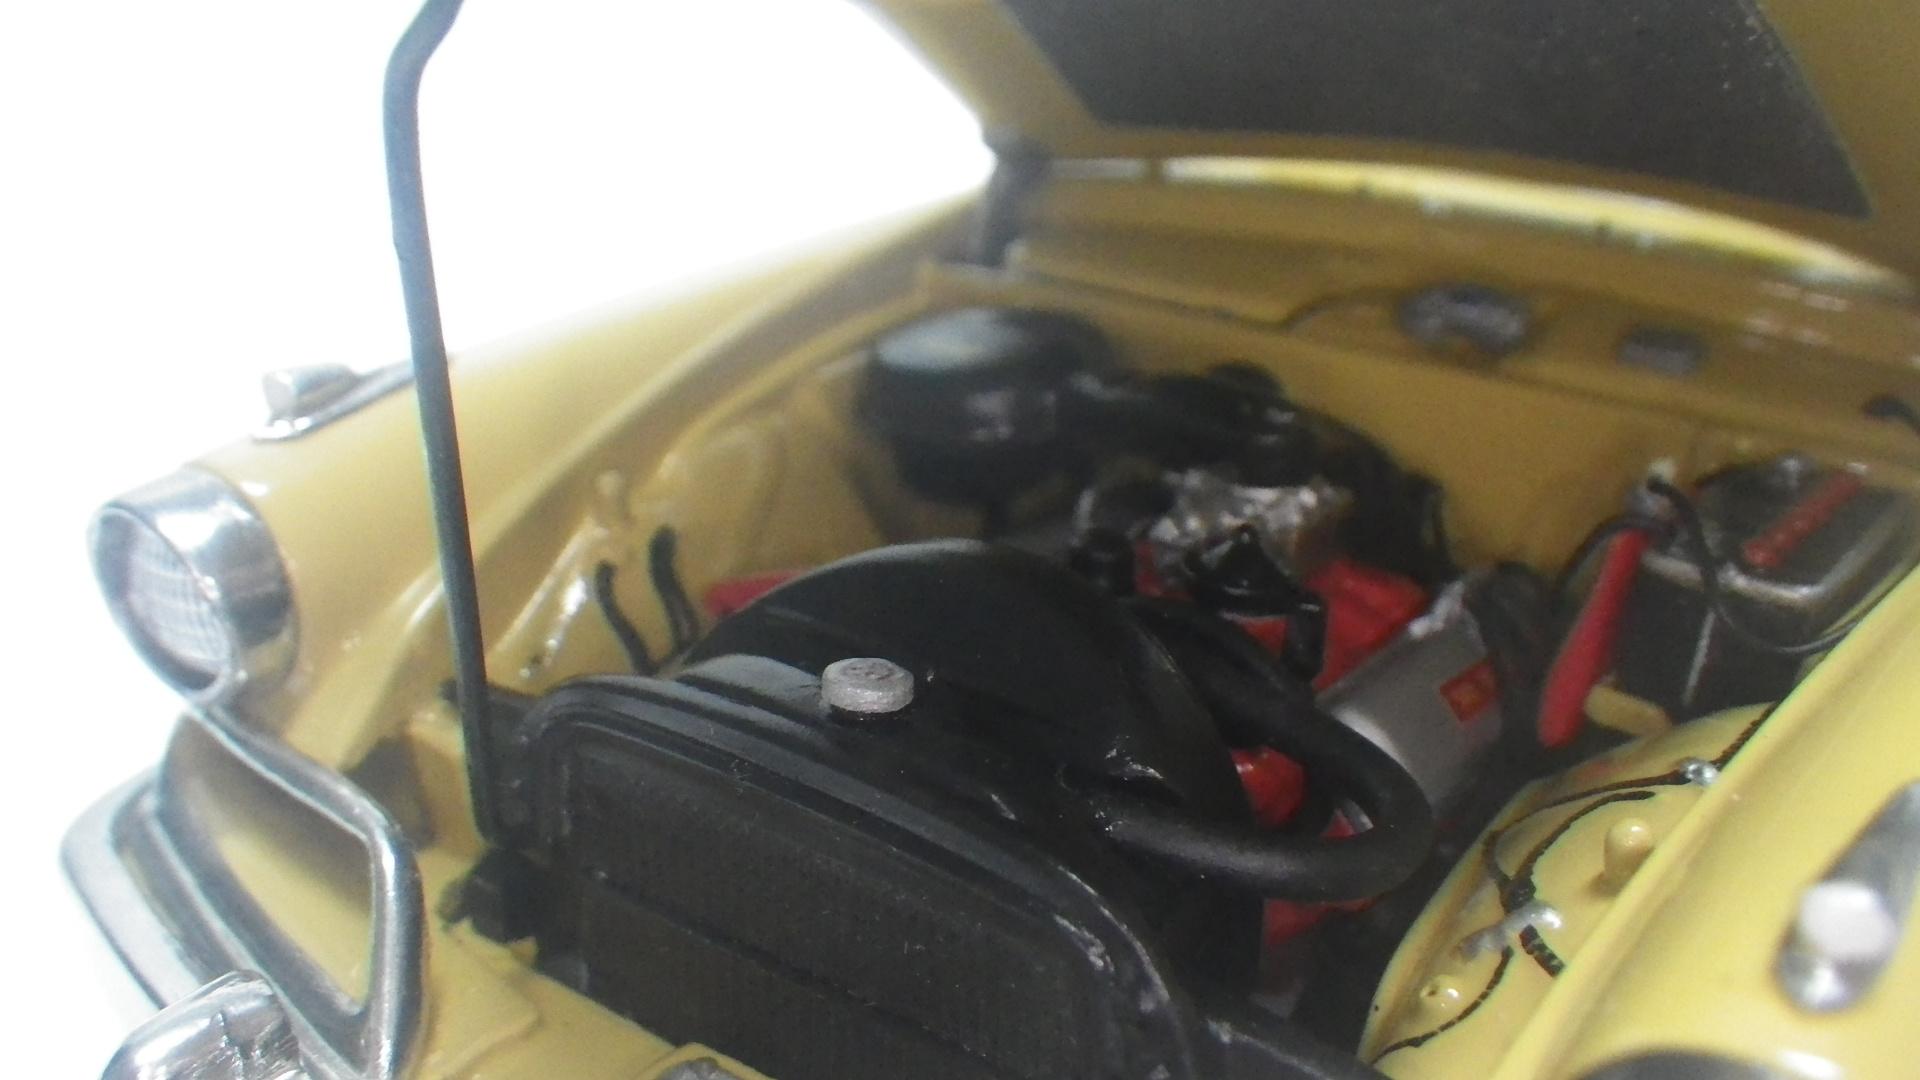
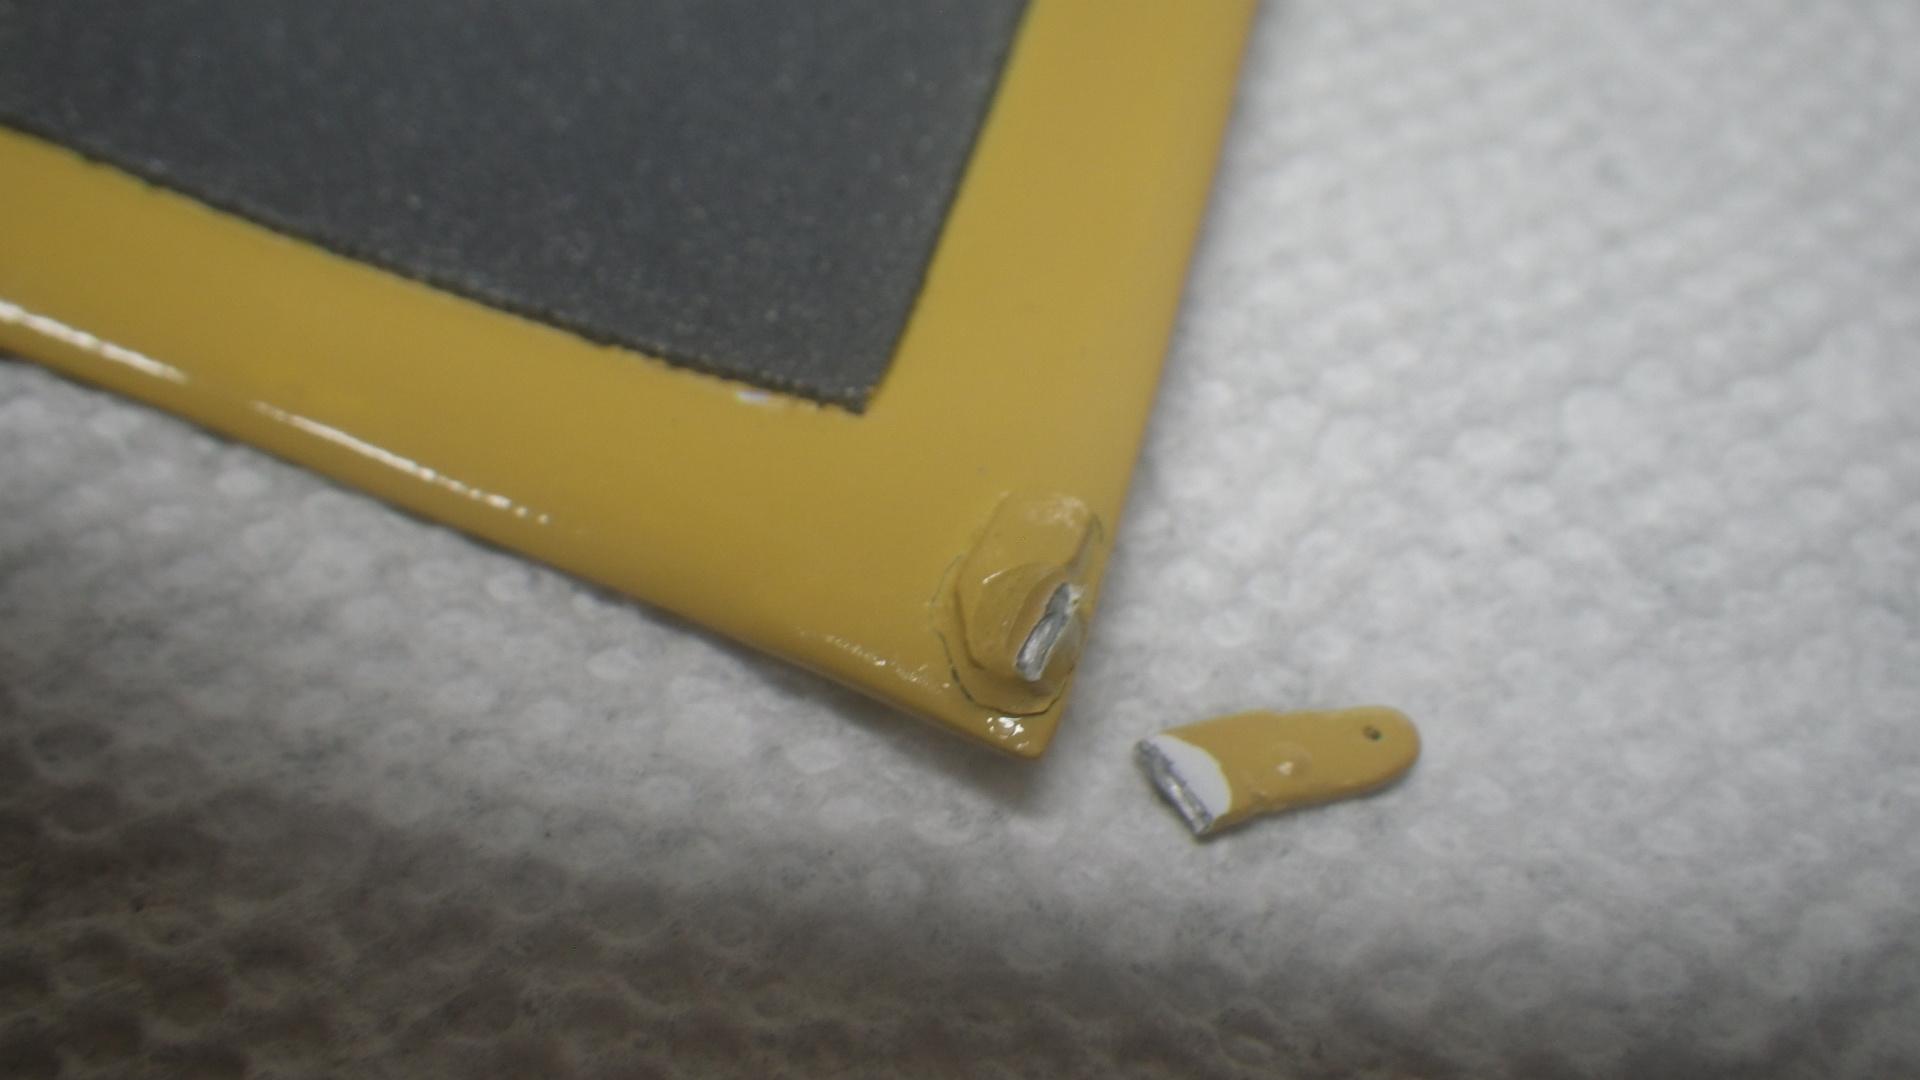
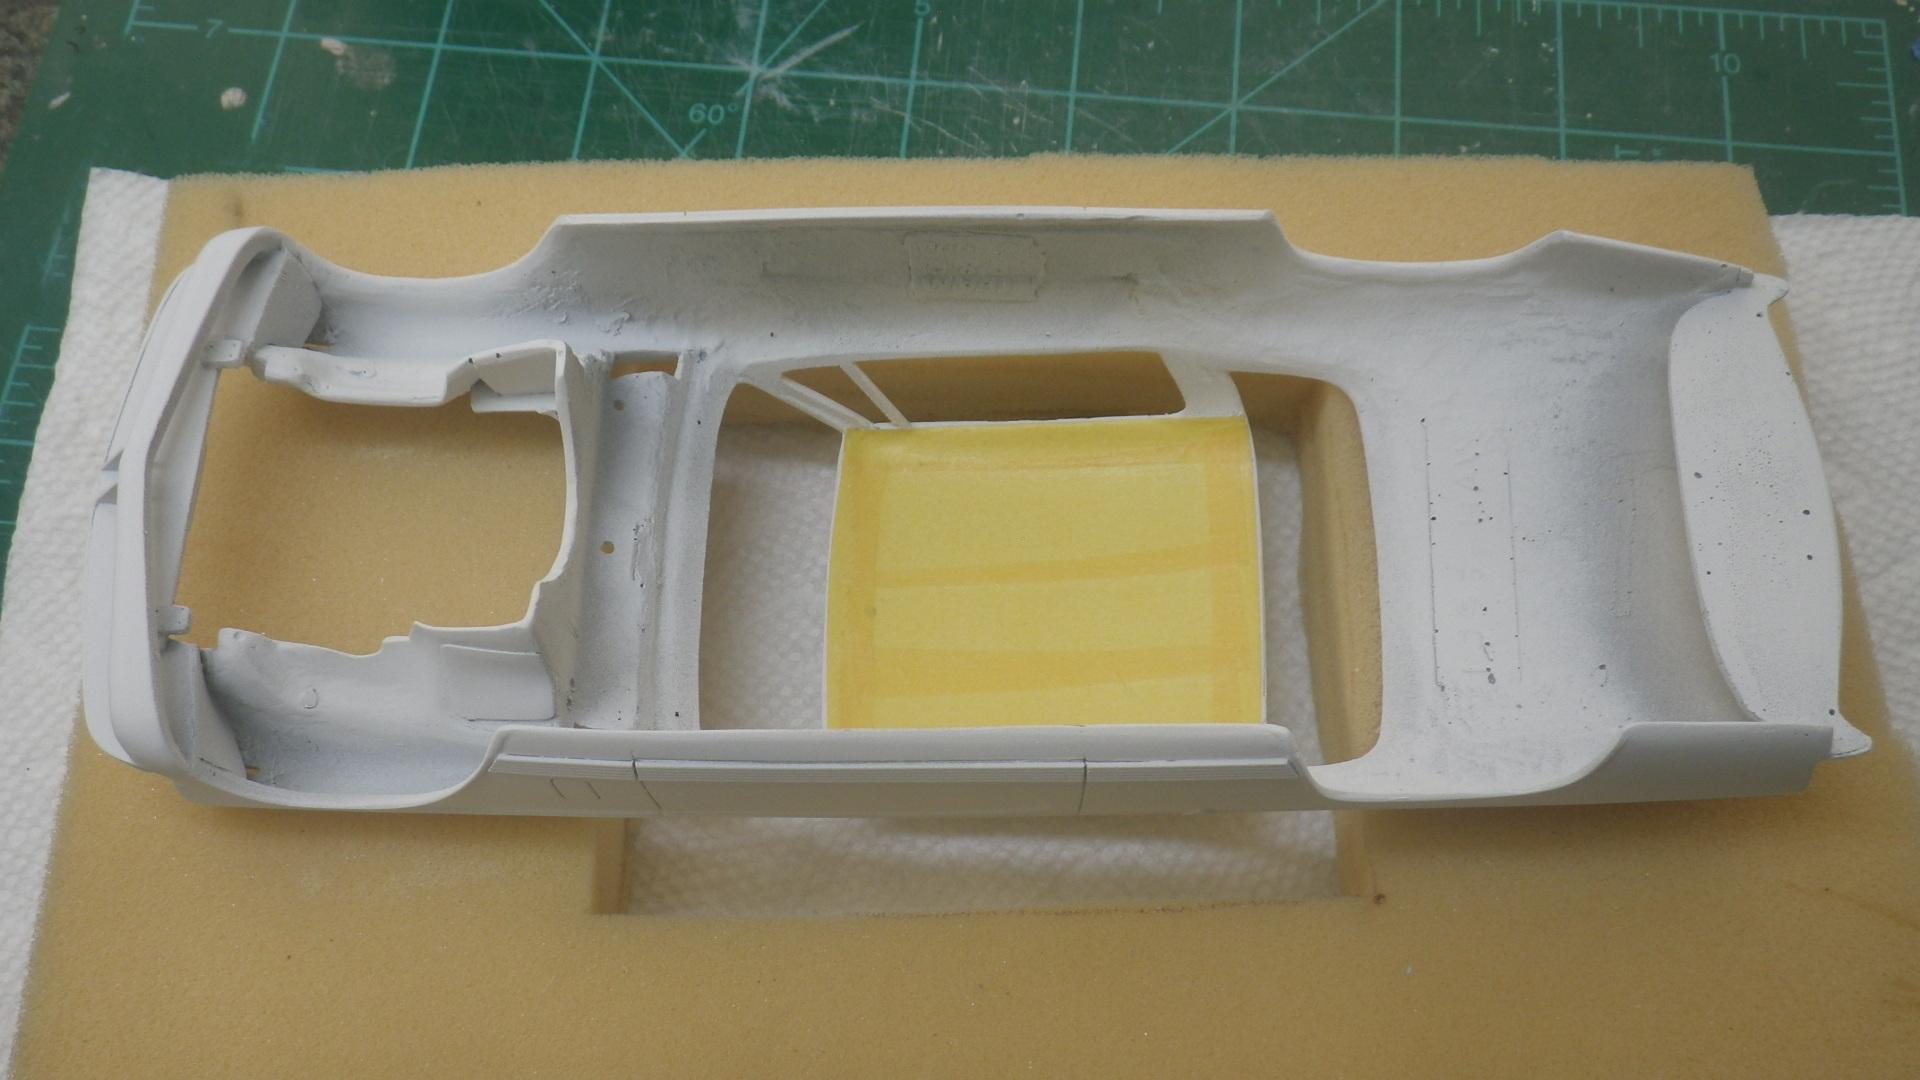
Today's Adventure: Final Assembly or "Don't Worry, It'll Buff Right Out!" As usual for me, final assembly became an adventure in damage control. I really need to figure out damage prevention! But in the end, things have turned out pretty well. Progress has been slow with not a lot of time at the bench and I haven't really been pausing to take pictures very much while working but here are a few "highlights". I added a very minor detail but one that I thought was necessary - windshield washer nozzles. Since I went through the trouble of adding the reservoir (just a bag in those days) for the optional washer I had better include the nozzles! These are just some very small styrene rod inserted from below into pre-drilled holes. Push them up to the right height, glue and trim from below. Here's another one that I liked doing. The hood support rod can be raised and lowered like the real thing and even has a little bracket to rest in when it's down. I tinted the windows with a mix of decanted Testors transparent blue and green. The recipe is 4 parts green, 1 part blue and 5 parts thinner. Since I was using decanted paint, it was already thin spray without that extra thinner but it helps with preventing too dark a tint. I always mask off the outside of the "glass" a light colored tape so I can tell how dark the tint has gotten - don't use the blue tape or you can't tell. The lower one in the picture is before tint and the upper one is after. Foiling was complicated by the current unavailability of good bare metal foil. I have some new foil ordered but there's no telling when they'll be shipping again or how the foil will be. I ended up piecing the job together from the remnants of old sheets. It worked but not the finest job ever. I never have been able to get a good foil job on the narrow pieces at the back of the vents so I just brush paint them with a little Molotov. Now it was time to attach the hood but not before I managed to do this. I pieced it back together with a reinforcement and then attached it to the body by installing some tiny pins (Hobby Lobby sewing dept.) as retainers. You can see in this photo just how rough a resin body I started out with. In hindsight, I should have gotten the inside just as smooth as the outside at the beginning of things. Here's a couple of pictures of assembly and finishing bloopers. These don't even show half of the story but it'd hard to stop and shoot photos in the middle of stressful damage discoveries. The Molotov smears on the paint did buff out just fine.! The rear view mirror needed a very fine wire pin installed to hold it together but so far, so good. Like I said these are just a few among many but things have worked out a pretty good conclusion. I'll be posting in Under Glass later when I get a little more time. Thanks for looking and even more thanks for all the appreciation!!
-
Great build. The color looks terrific and I'm pretty sure that if you flash the cash Ferrari will paint your car any color you like.
-
What a crazy idea!! I love it! And your work is superb. Totally cool. Totally great.
-
Thank you everyone. I swear it was easy! Glencoe offers a number of these mini-kits and I'll probably buy some more - after I build the Ferrari. They're great fun!
-
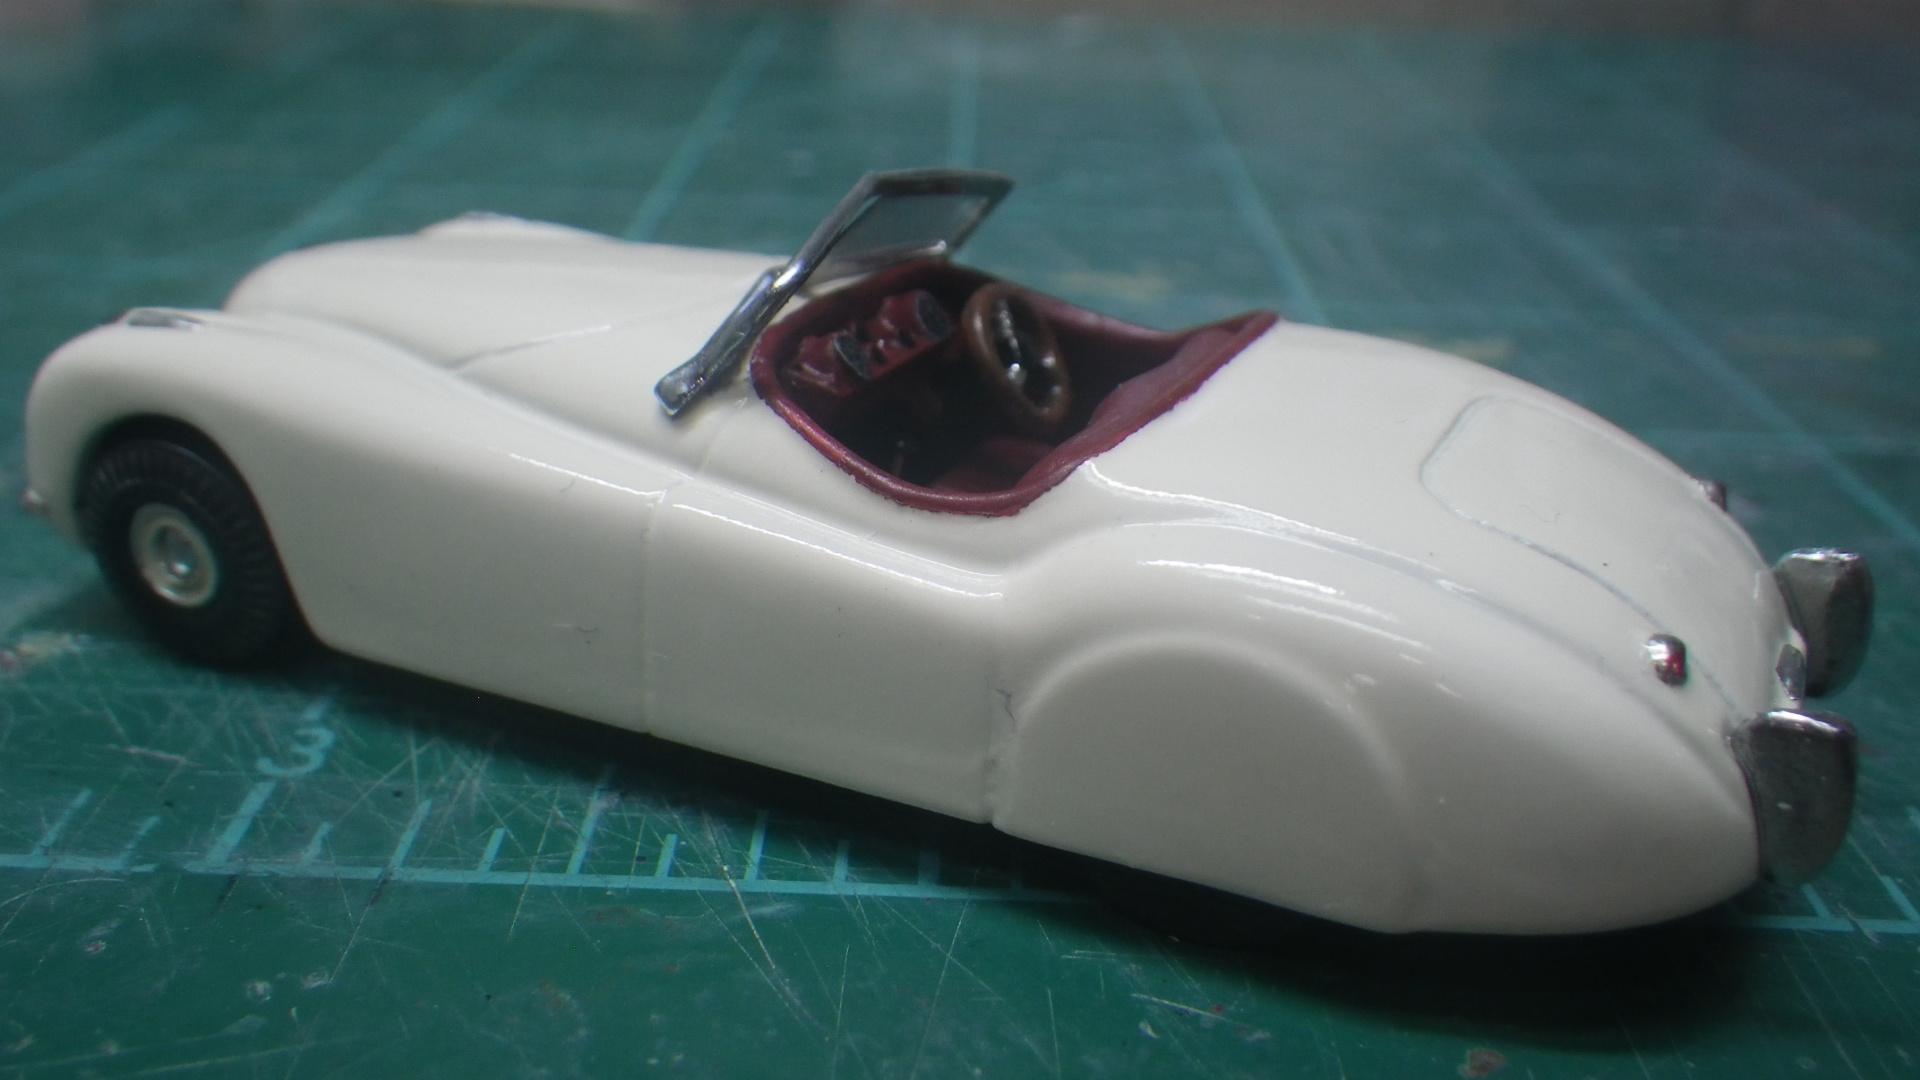
A quick fun little project to recharge my batteries. A Glencoe re-issue of an old ITC kit from about 1955. They don't get much older! The small size wasn't much of a problem because of the low parts count and minimal detail. I lowered the stance and replaced the wheels and tires with some from old Aurora Model Motoring cars. BTW, the Glencoe box art shows an XK-150 but I think ITC originally showed what was in the box. Thanks for looking!
-
Question regarding Grex TG3 airbrush
mr moto replied to karbuildr's topic in Model Building Questions and Answers
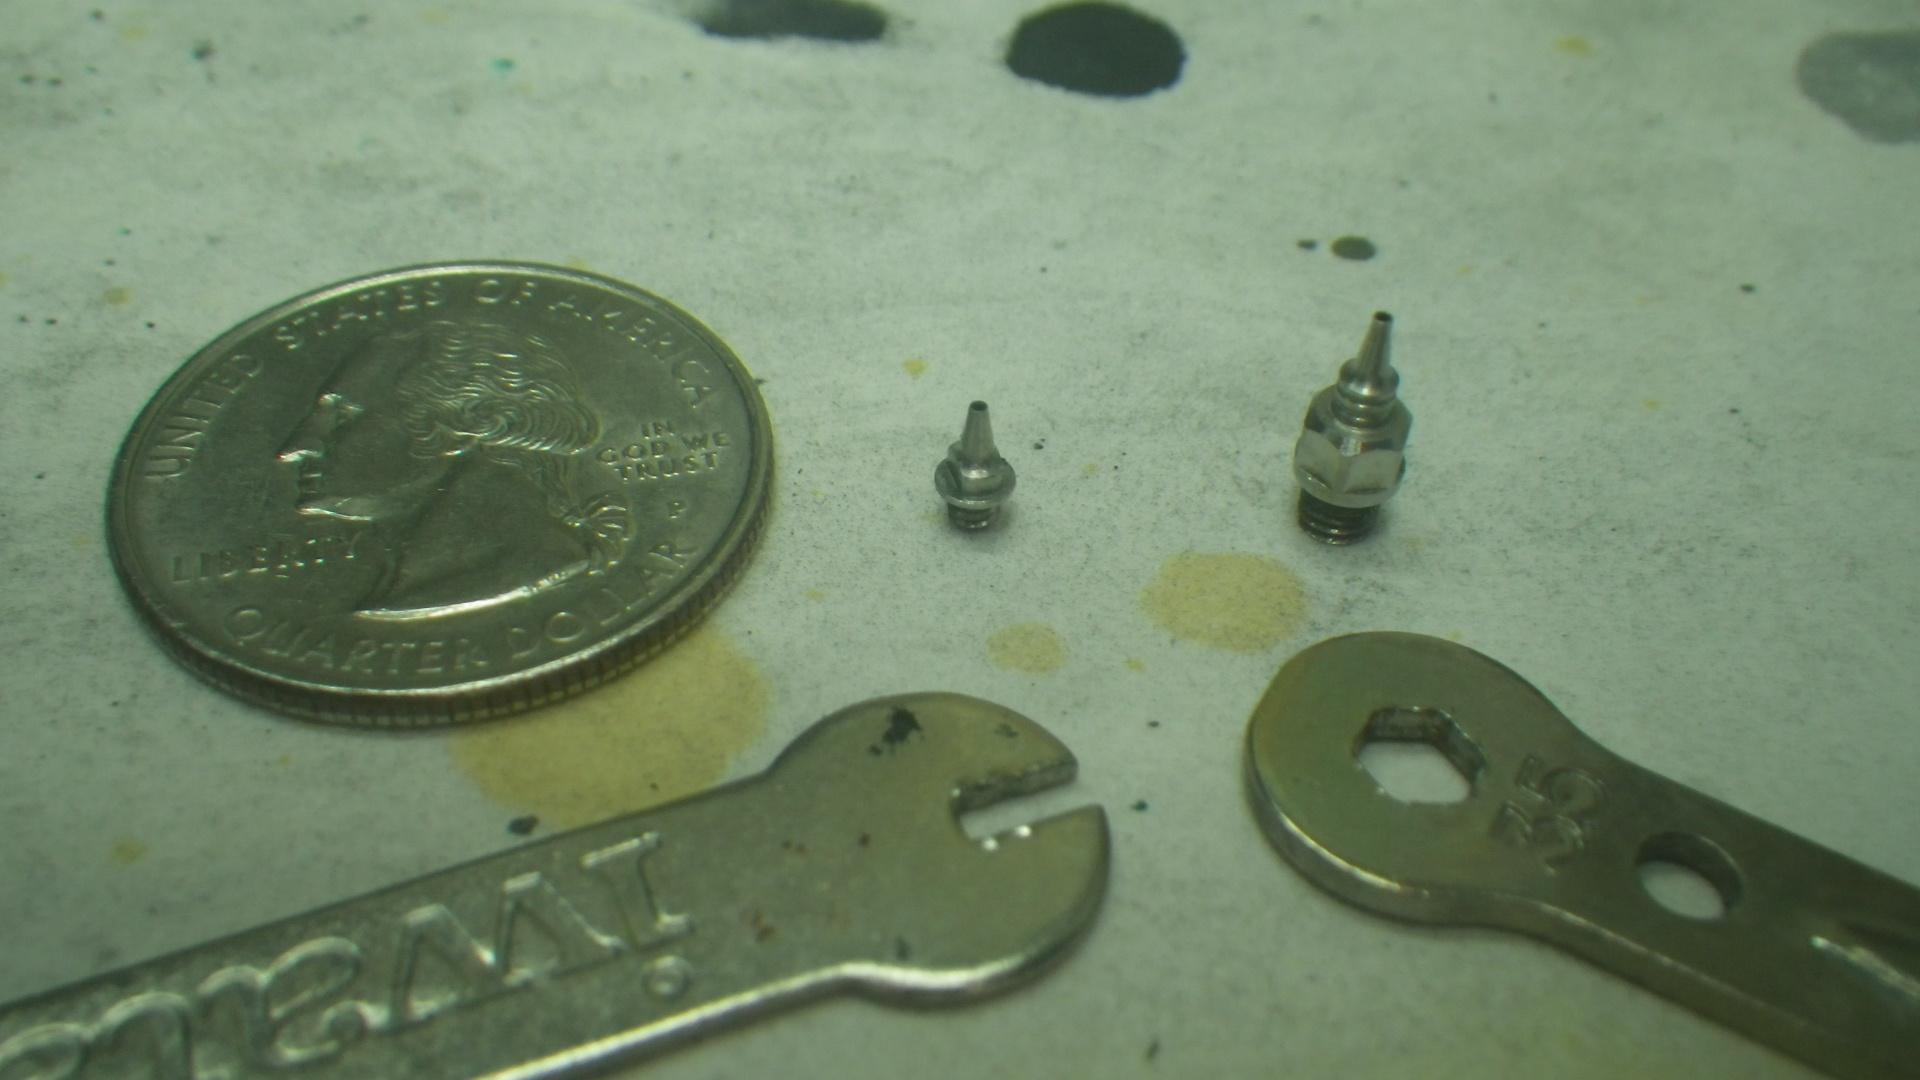
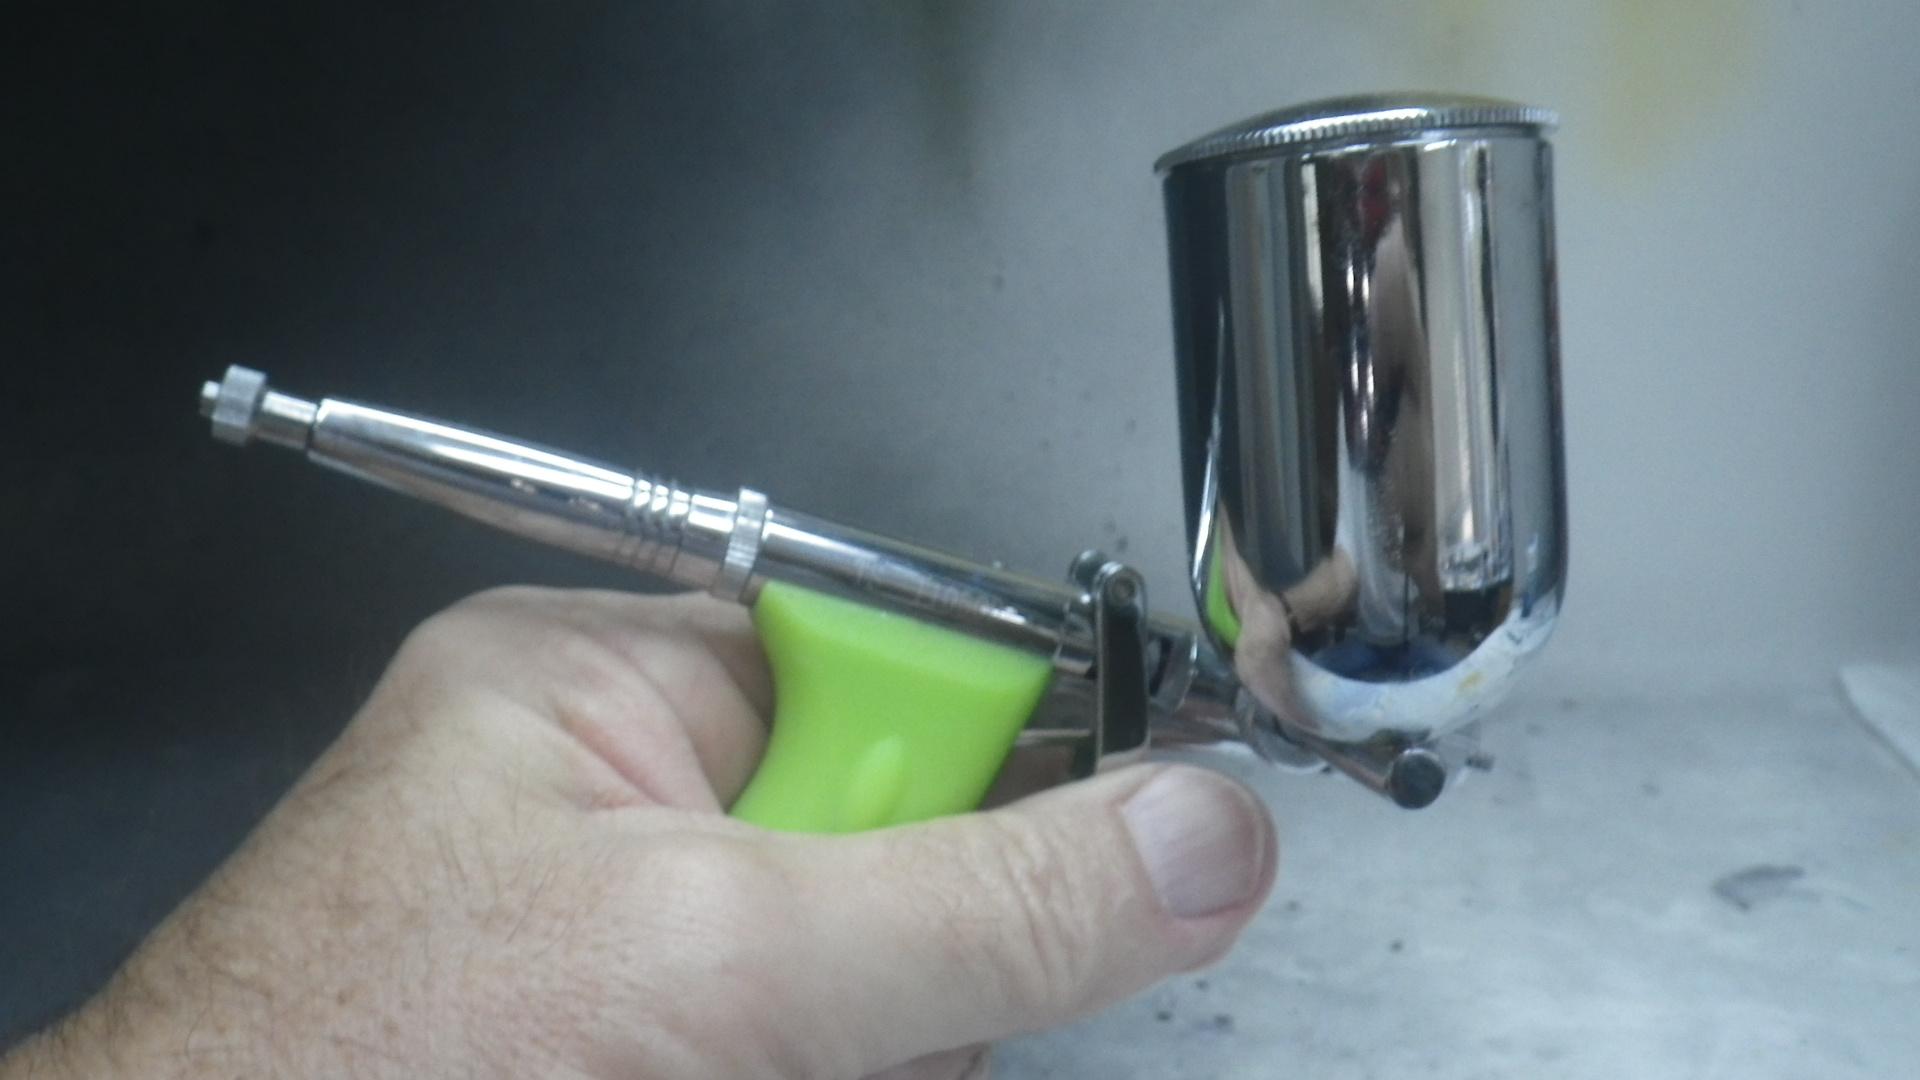
A good opportunity came up the other day take these photos to illustrate my comment about the difference between Grex and Iwata nozzles. The one on the left is Iwata and the one on the right is the Grex. You can see that there's a great difference in size even though the opening sizes are the same. I find the Iwata can be hard to handle and hard to find if it's dropped. Also, very large paint cups are available for the Grex. Here's the one that I use when painting car bodies: As you can see, my Grex is a side-feed but similar size cups are available for top-feed and if I was was doing it over again I'd get the top-feed brush. They're just a little bit simpler and easier to clean. When I bought mine the large cups hadn't come out yet. As far as thinning the paint, I don't find that it has any special requirements that are different from any other airbrush. For instance, if I've decanted some paint from a rattle can I don't thin it any further than how it came out of the can. Lacquer is what I typically spray. I don't know if enamels might be different. Hope this helps out!
-
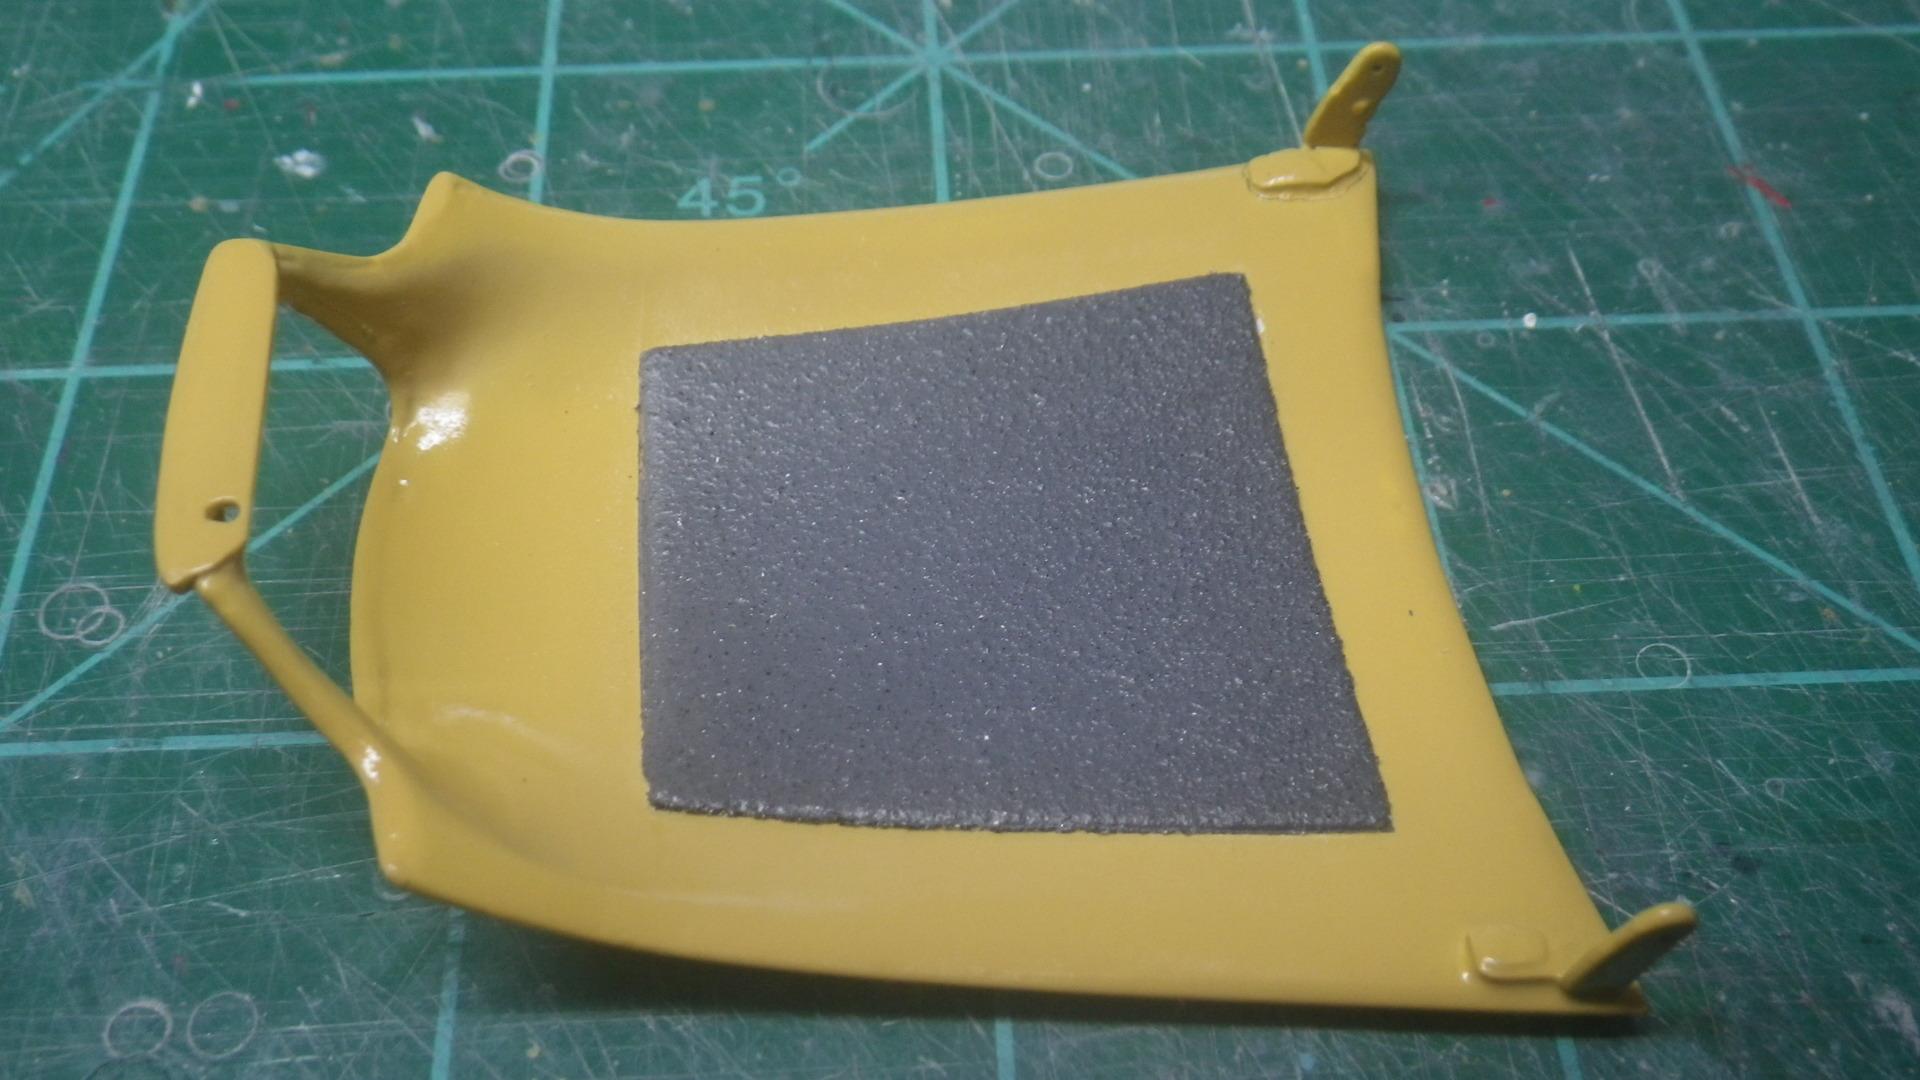
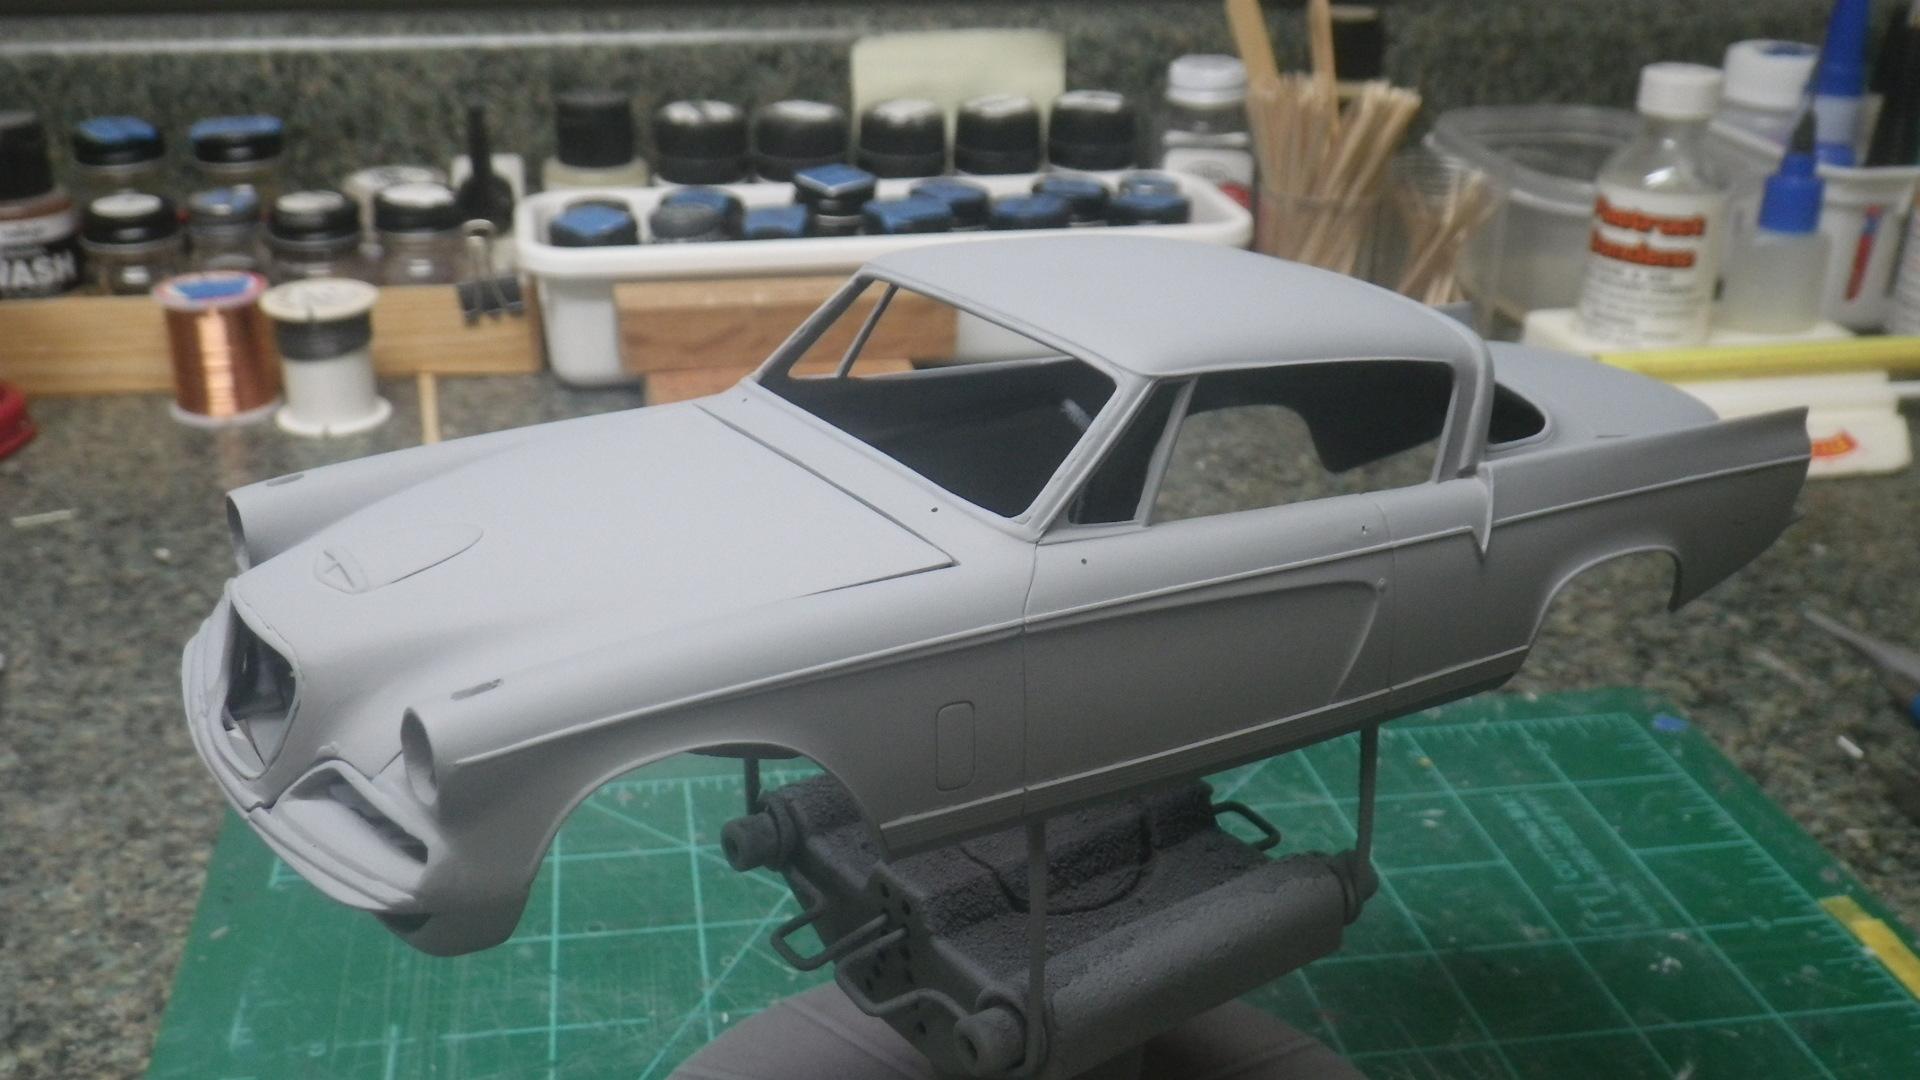
Progress has been kinda slow. Haven't been spending too much time at the bench lately. Gave the hood one more test fit before giving it the final touches and found that it warped a little after painting. I've had this problem with relatively thin resin parts before. In fact, that's why I made this hood with a molded in sound deadening pad - because a previous one had warped and maybe the extra thickness would prevent that. So I decided to bend it a bit using hot water. This is my sophisticated hi-tech heating rig: To save time the water was heated almost to a boil on the stove and then I used the cup warmer to keep it hot while I worked. The end result was much better but I'm not totally satisfied and might try doing it again. Have to weigh the risk against the reward and decide. Putting the correct curve into a complex curved part like that is not as easy as it looks. The sound pad was painted with Duplicolor trunk paint which has some texture and a a sort of slightly speckled appearance. It gives a pretty realistic look. I made a grill insert out of some Model Car Garage photo etch mesh, added an emblem that was foil cast using the one on the rear deck panel as the original, Alcladded the whole works, and then put another Studebaker crest decal on it. BTW, when you're painting photo etch or really any metal parts it's best to start with Duplicolor self etching primer. It really increases the adhesion and durability. Here's the hood after that plus a foil trim added. Yay!! Finally another finished part. Part of the reason for slow progress lately is that I'm waiting for some new foil to come in. The foil I have on hand is causing some issues so I ordered some new direct from BMF. Here's the "glamor shot" so I can admire my work for a few minutes. It's getting there! Here are the exhaust tips I'll be using. They're reshaped from the ones that come in the Round2 '59 Imperial kit. They're not actually correct for a 56J but are similar to the ones that Studebaker offered in 1957. I like these better and they were easier to make and the Authenticity Guide says that dealers installed a lot of these on '56 cars. Anyway, it was time to gather up all the "small" parts, which are really almost everything remaining, for a painting session. Most of them got an Alclad treatment. A few were painted flat or semi-gloss black. My favorite semi-gloss is Duplicolor flat black primer followed by Tamiya semi-gloss clear - all rattle cans. I'll stop here but I hope to be back soon with it almost finished - maybe all the way? See you soon!
-
Excellent work but isn't that actually the 1955 300 instead of a 1956 300B? The color definitely looks great on that car.
-
I like what you're doing very much. That's a huge improvement over what came in the kit. This will be interesting!
-
Question regarding Grex TG3 airbrush
mr moto replied to karbuildr's topic in Model Building Questions and Answers
I have a Grex and an Iwata. Both are excellent airbrushes. The small parts of the Grex, especially the nozzle, are much more substantial and easier to handle. The trigger action is a great feature. -
If you opened an AMT, Revell, or Tamiya box and saw a Ferrari, Mustang, or Bugatti with a body that looked like that you would demand your money back.
-
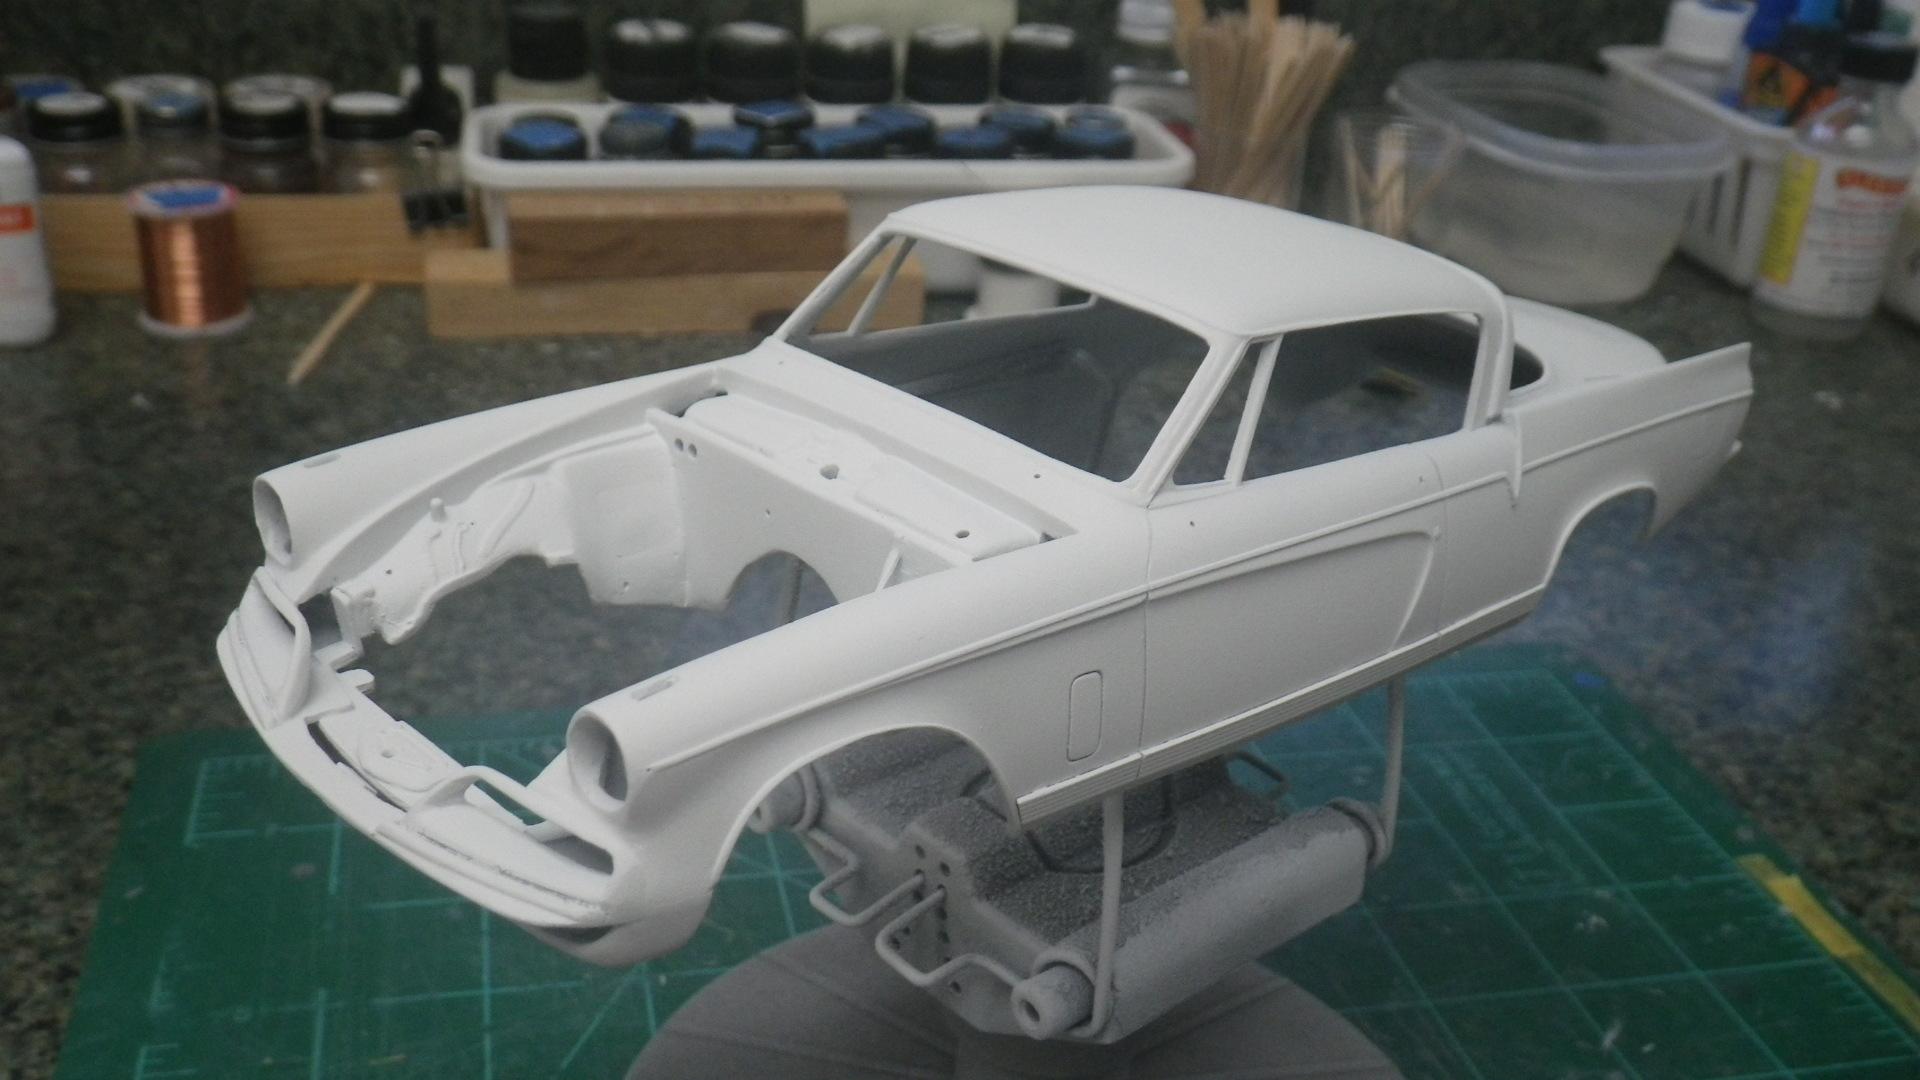
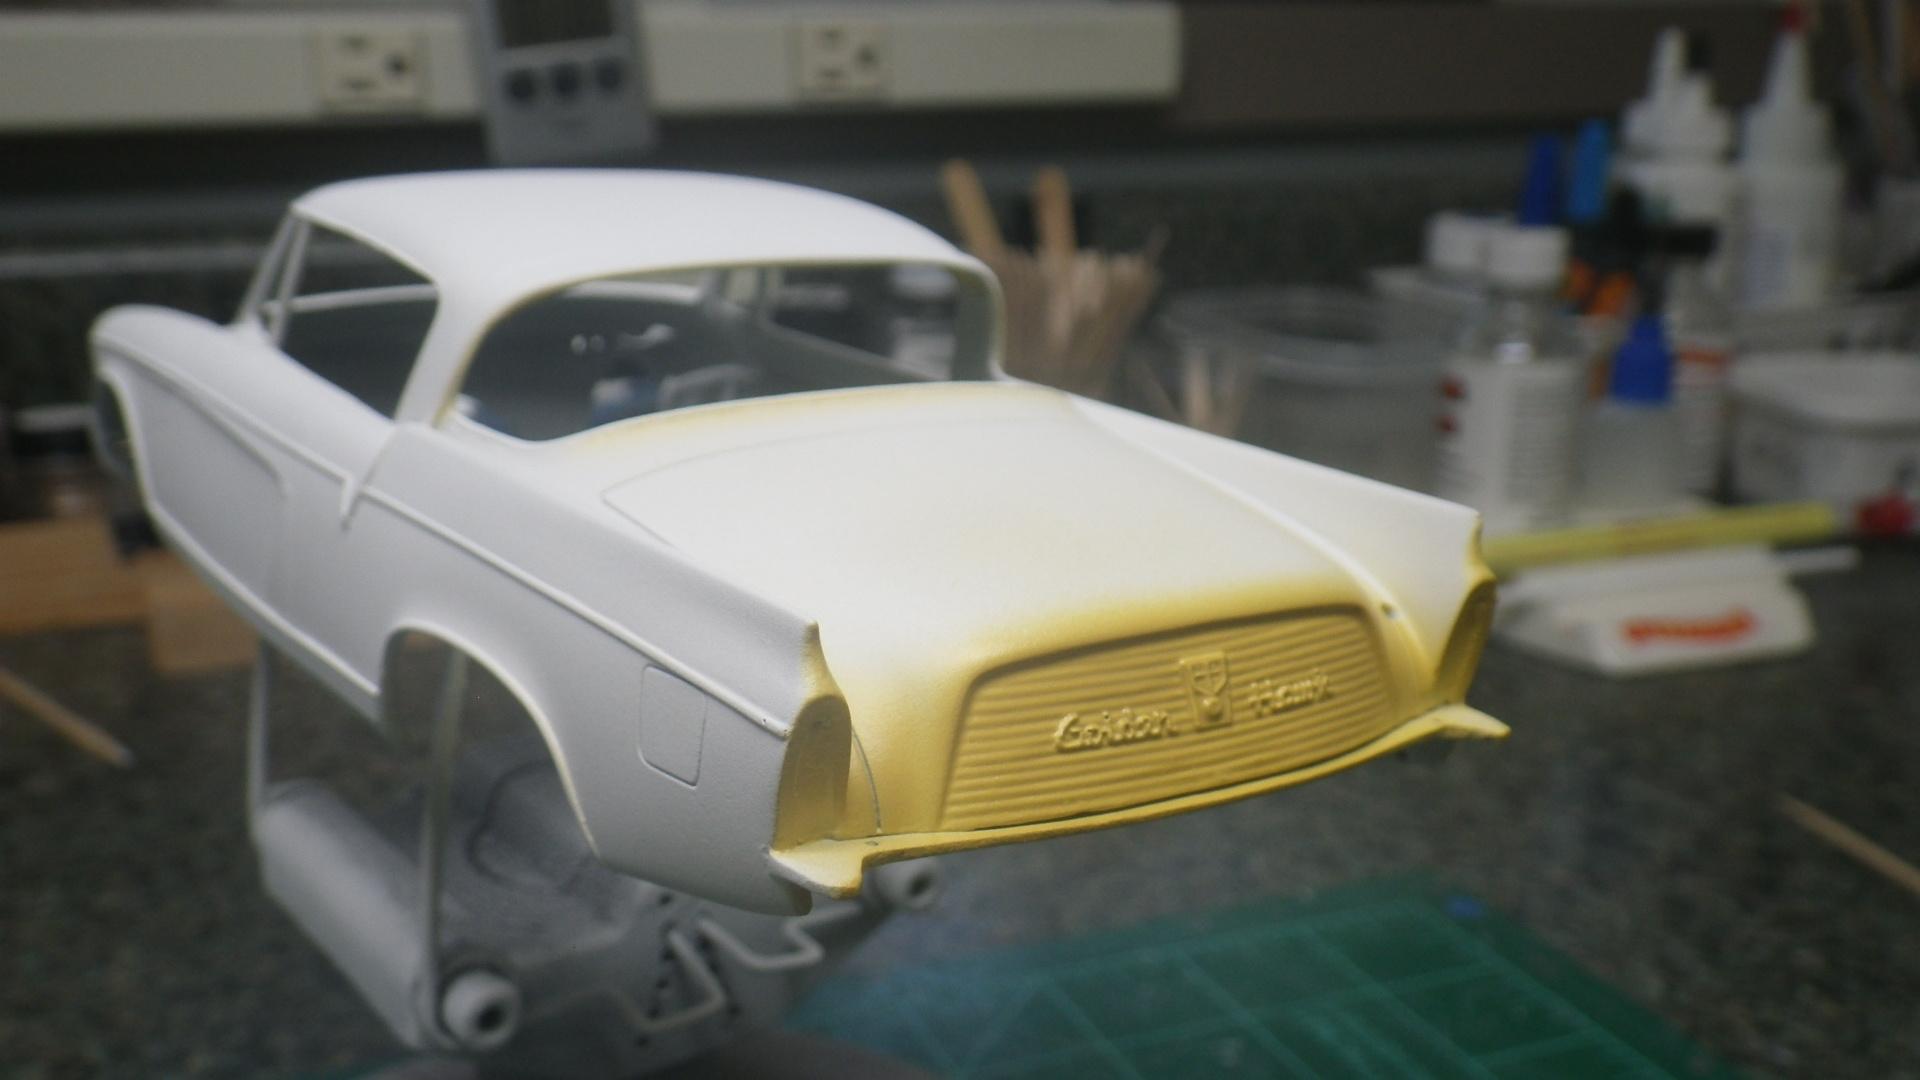
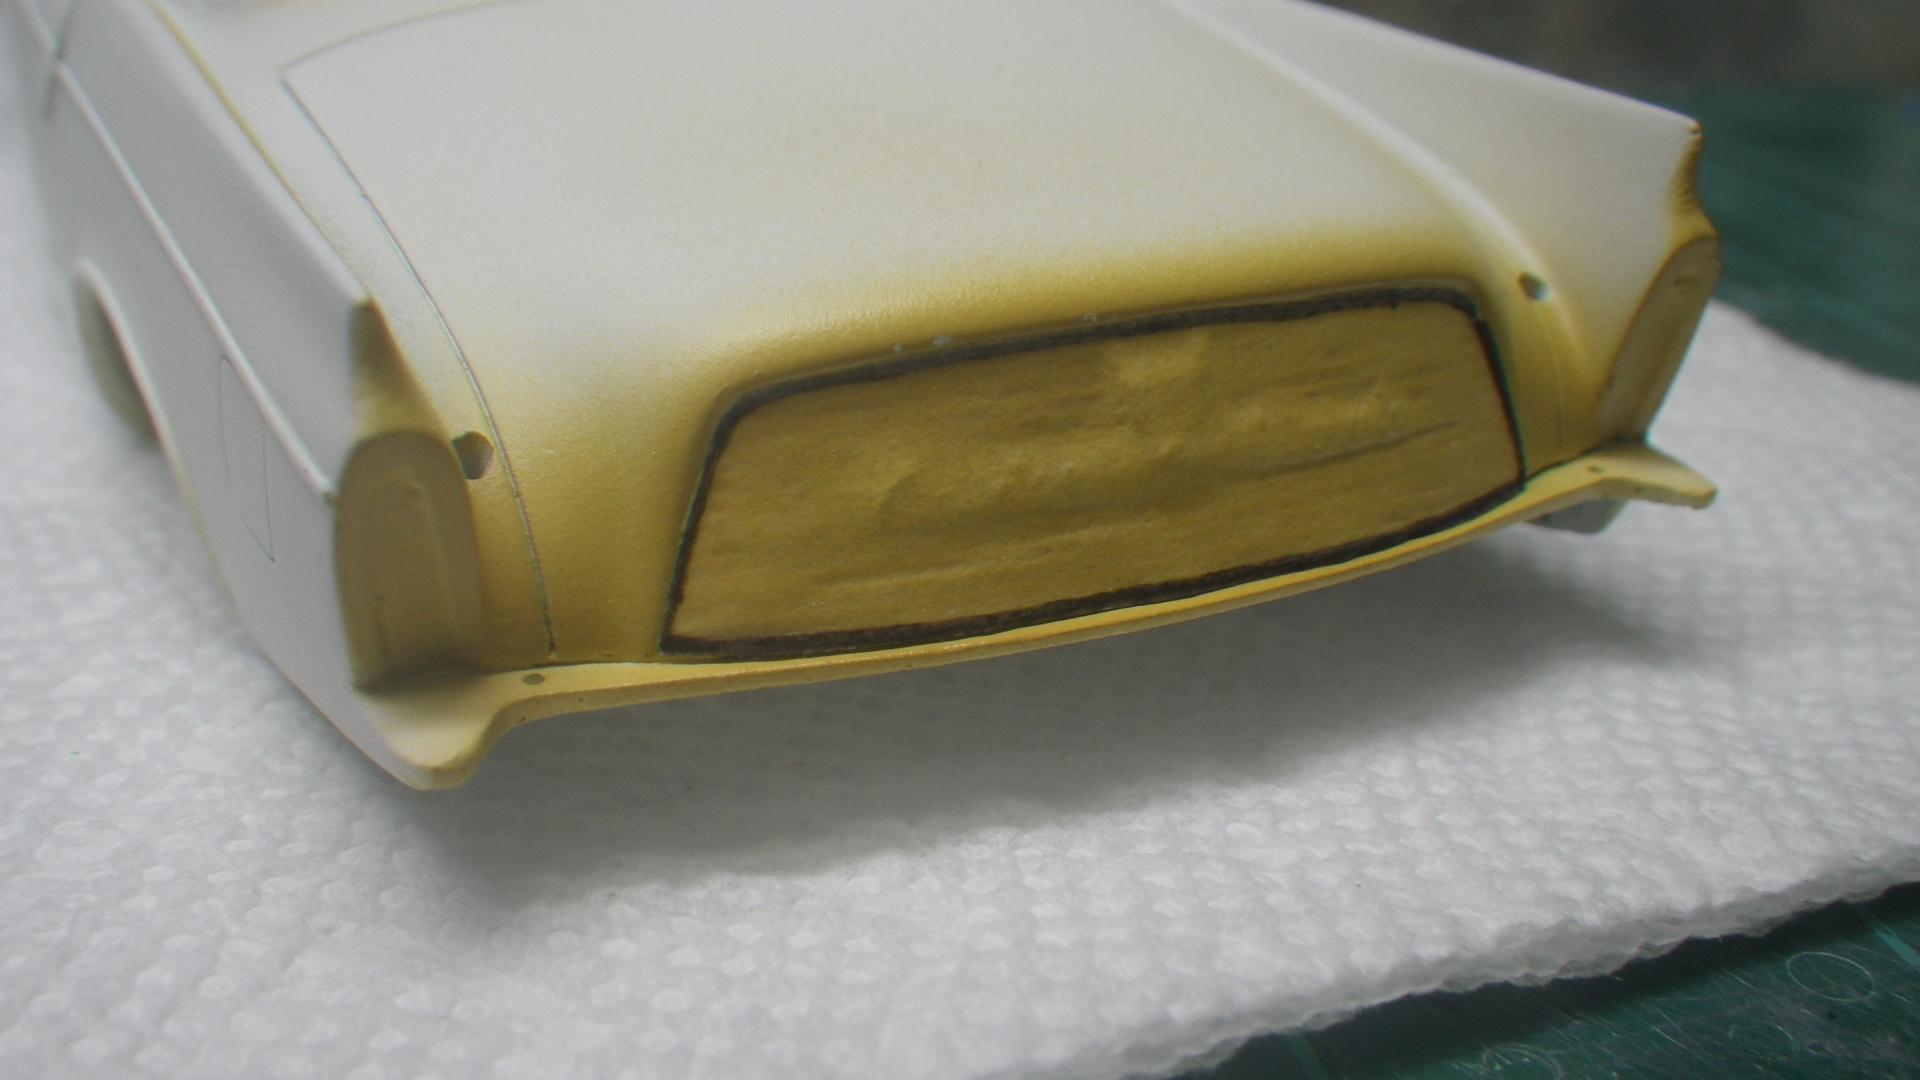
Made a little more progress over the last few days and it's starting to look like a project that can reach a conclusion after 10 years! Got it up on its wheels and it already needs a front end alignment. Actually, the tie rods haven't been installed yet and they won't be until the body is on the chassis and the engine is installed. I'll need the extra access room when connecting the exhaust to the engine. The body is next up. Step one is to respray in white primer. I always use gray primer first because it seems to be the best at exposing flaws but the white primer will help give some pop to the light color paint job. The ceiling is masked off so there will be more light reflected into the interior by the flat white. Same reason that ceilings are usually white in houses. I started into the two-toning by spraying some Sunglow Gold on the rear panel, masking it with a pre-cut pattern that I made ahead of time, and then overspraying with Yellowstone. At this point, I realized that I had forgotten to pre-foil the Golden Hawk script on the rear panel so I had to retrace my steps a bit and do that. So that's a rough trim that was painted over again with Sunglow and then the high points of the script were rubbed clean. All the Yellowstone was masked up like a mummy, the body sprayed with Sunglow, and then unmasked to give this result. I used one of these blue abrasive sticks to reveal the script. Those sticks seldom get used by me but in this case it seemed to have just the right reach to rub the script without bothering all the other textures in the area. Don't know why the picture turned out so strangely colored but that is the same car with the same paint! So I'm about to start cleanup and prep for the clear coat but it seemed like a good idea to also foil the emblem on the rear panel before clear coating. It has a decal on it and decals don't always adhere to foil as well as I'd like. A few coats of clear lacquer should take care of that problem. And that's where it stands right now. This evening, I might be able to spray that clear.
-
I built that kit last year but I really don't remember what I did for a distributor. I'll check on that and see if I came up with a really clever solution (doubt it, though). In the meantime, good luck with it and I'll be following.
-
1/16 brass rod works for me.
-
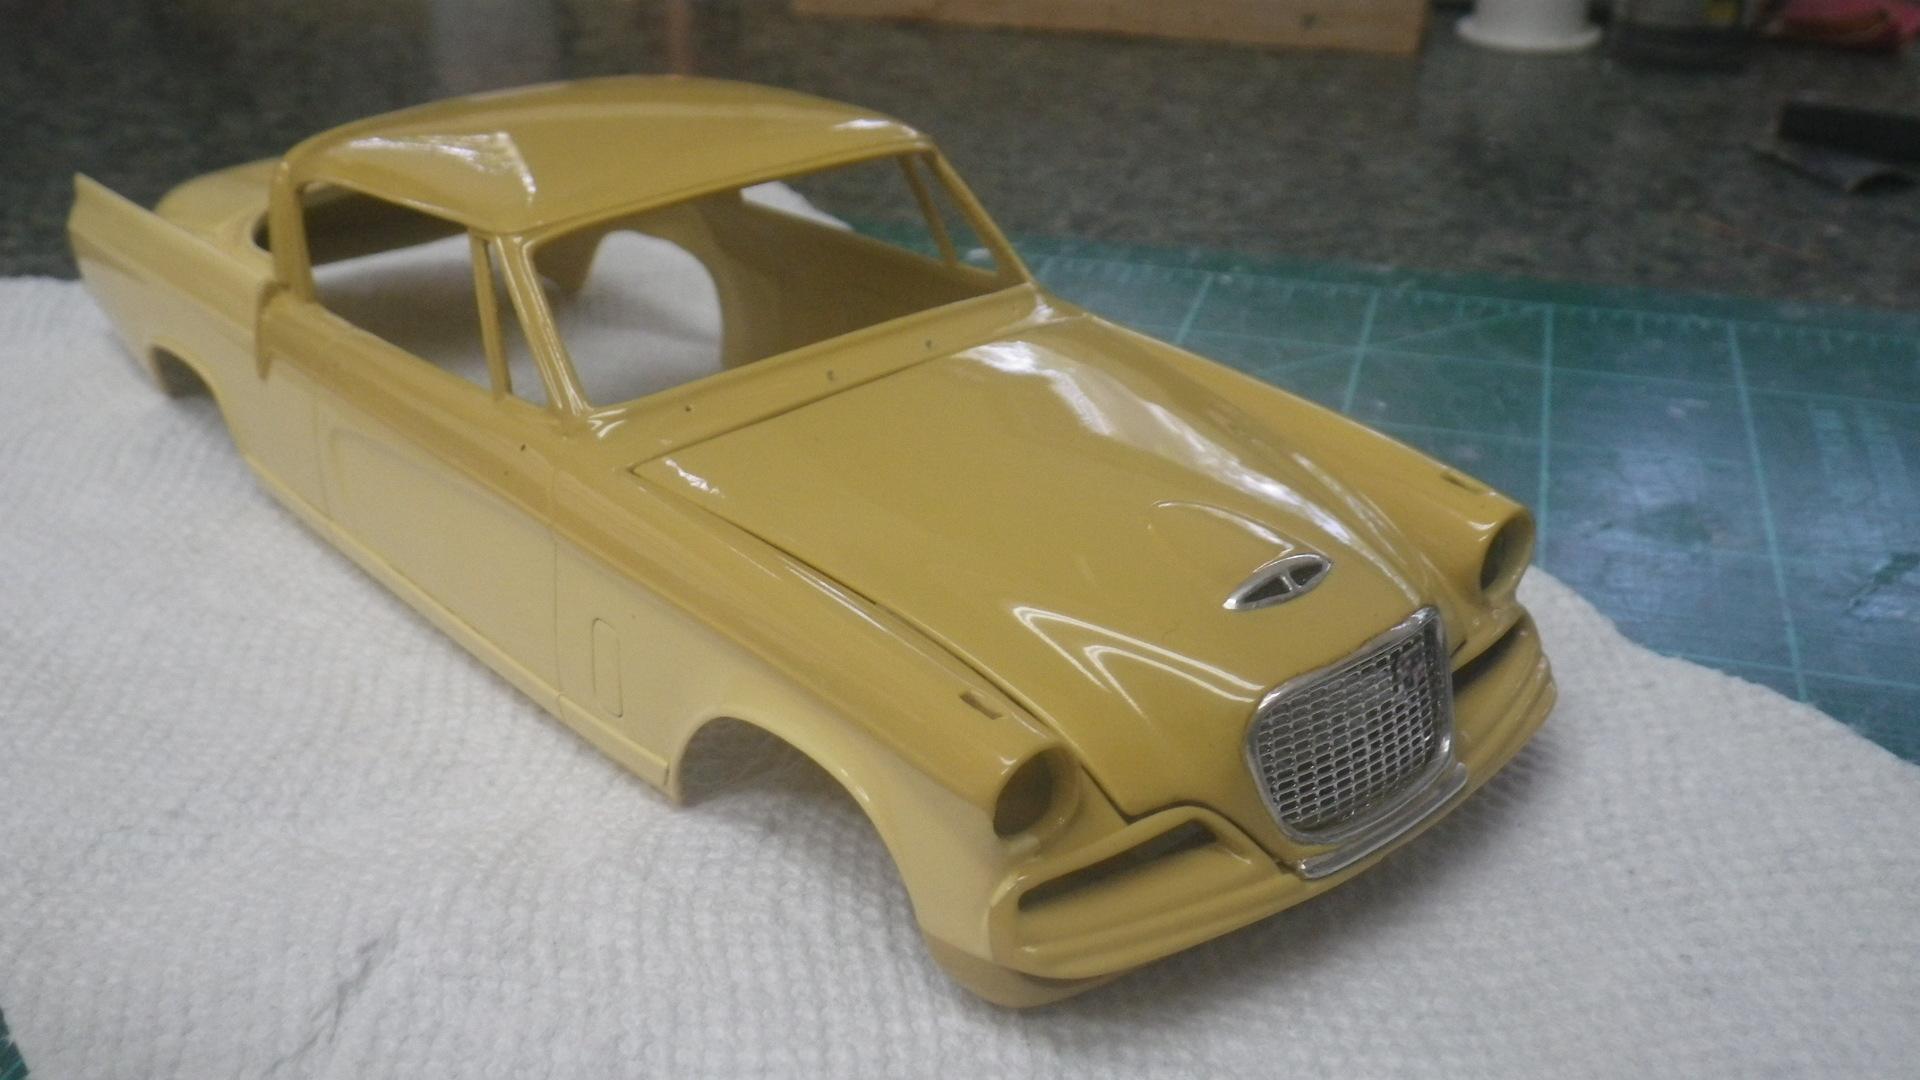
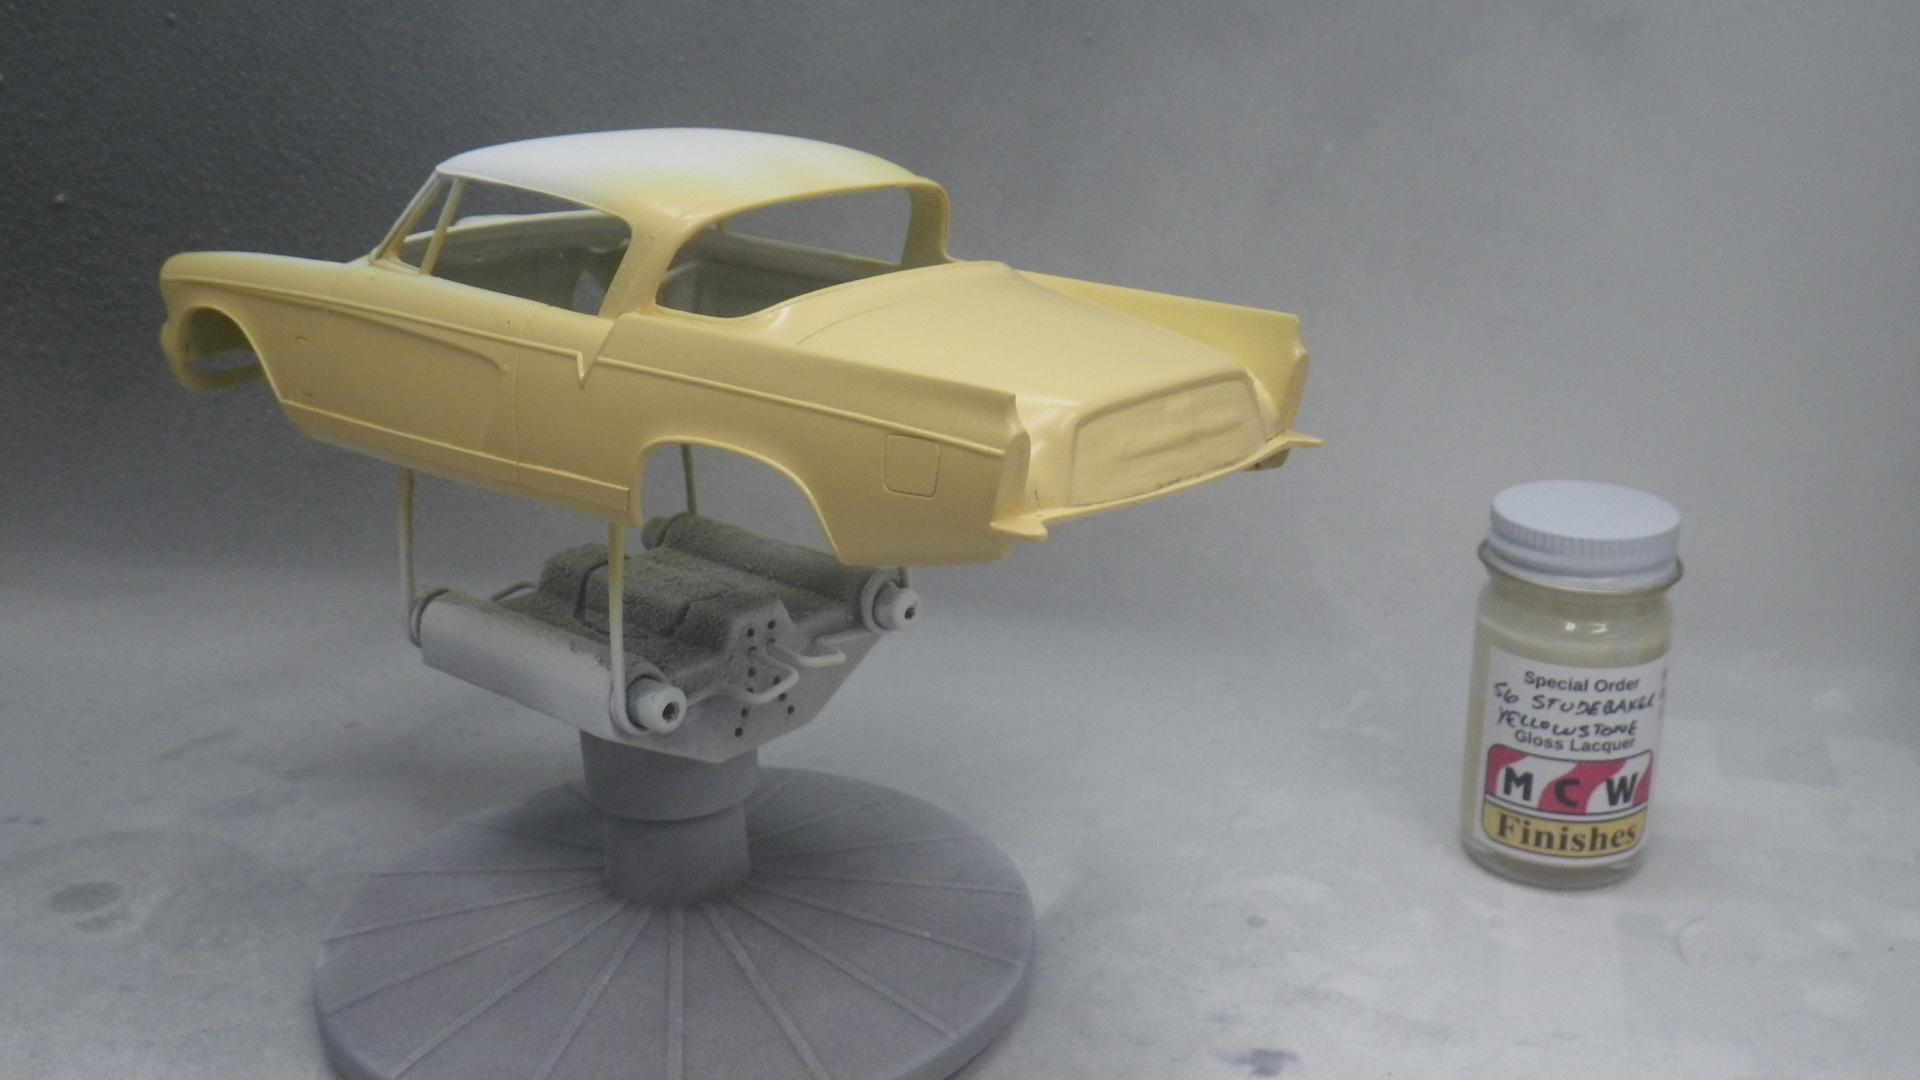
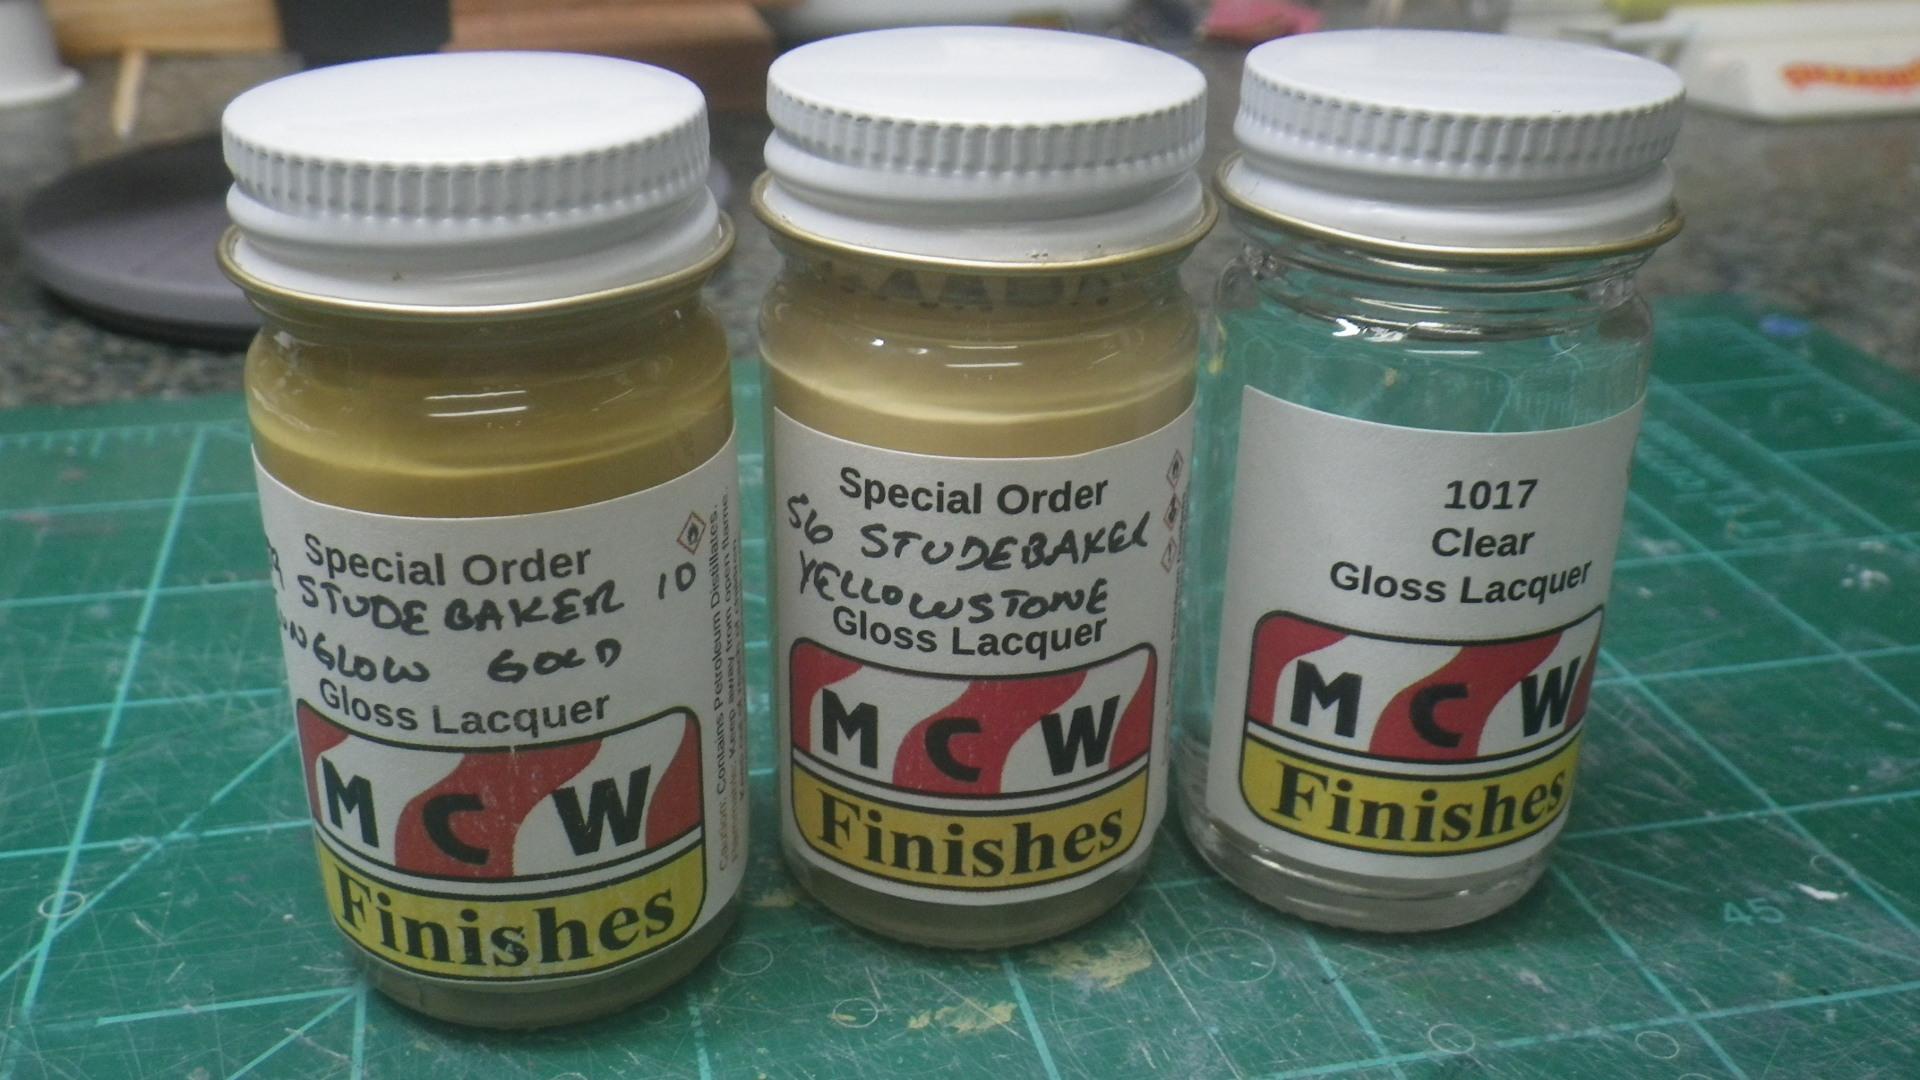
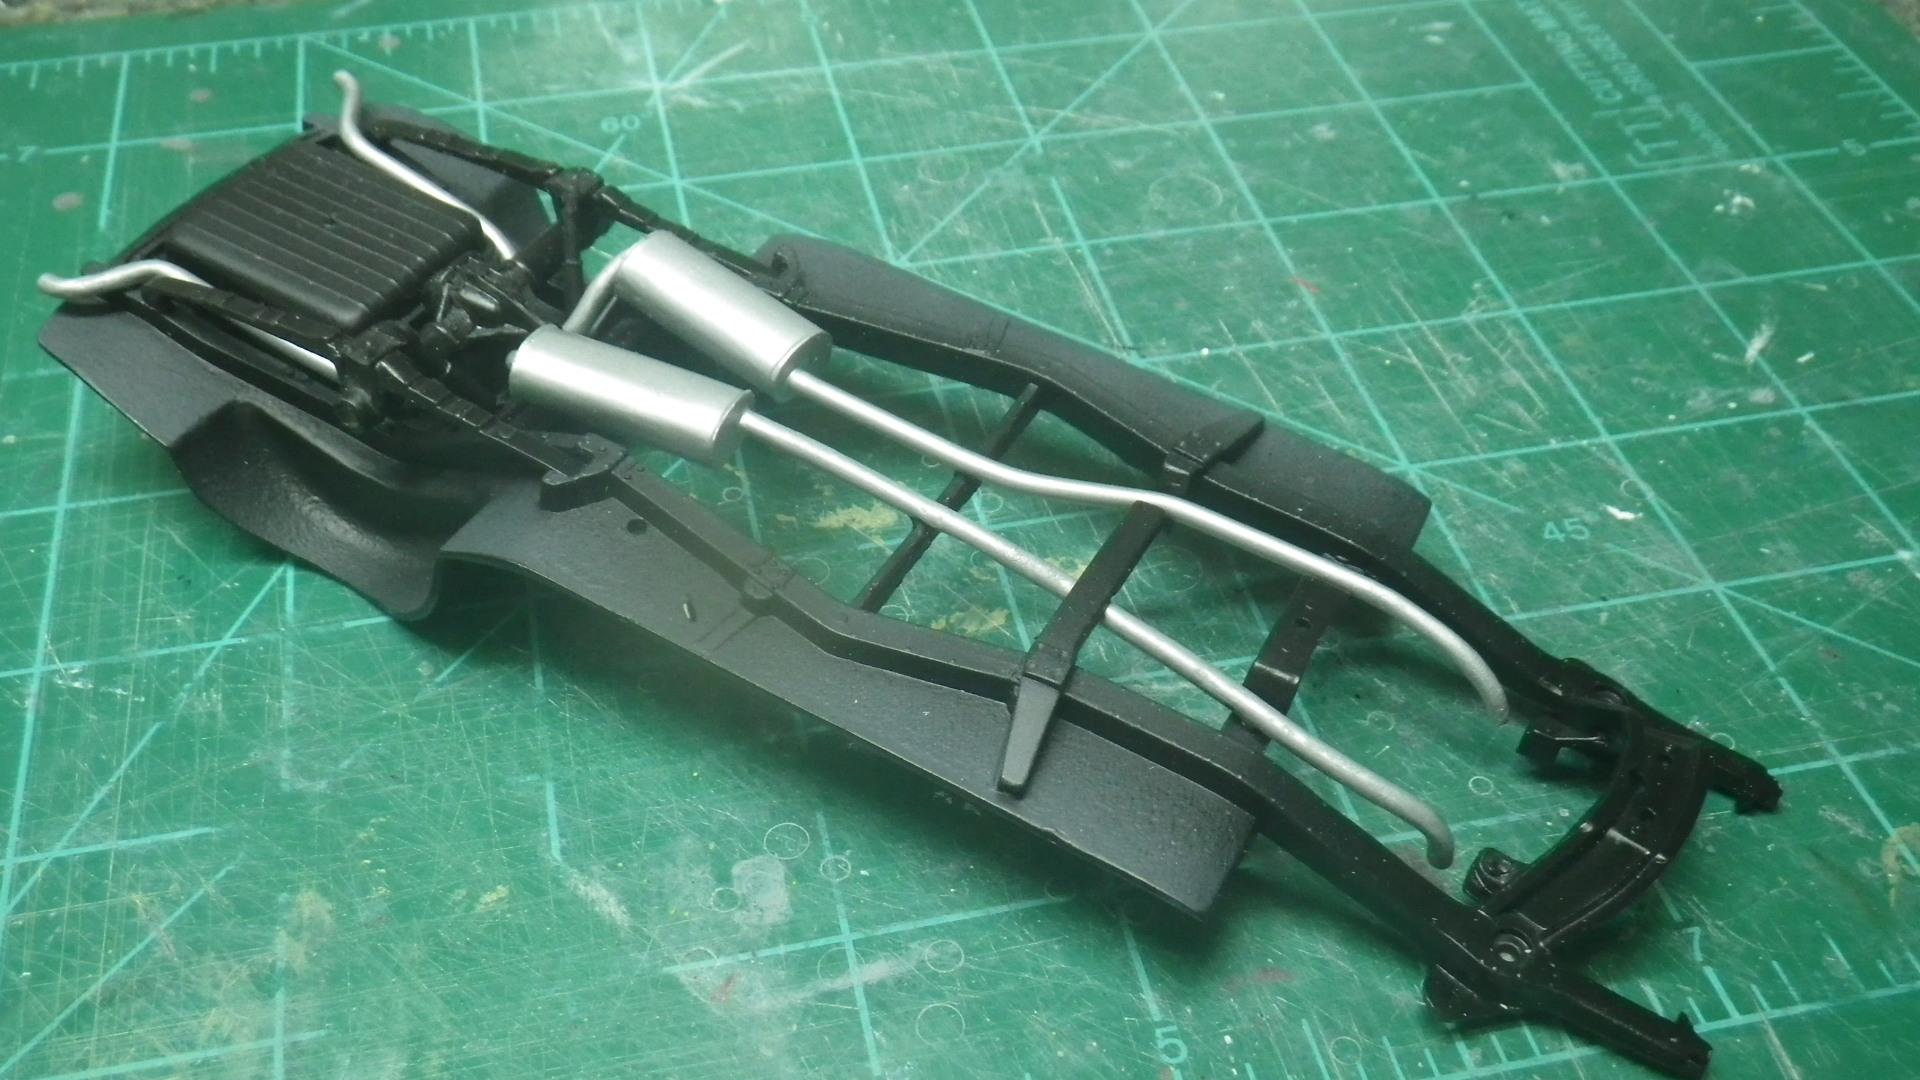
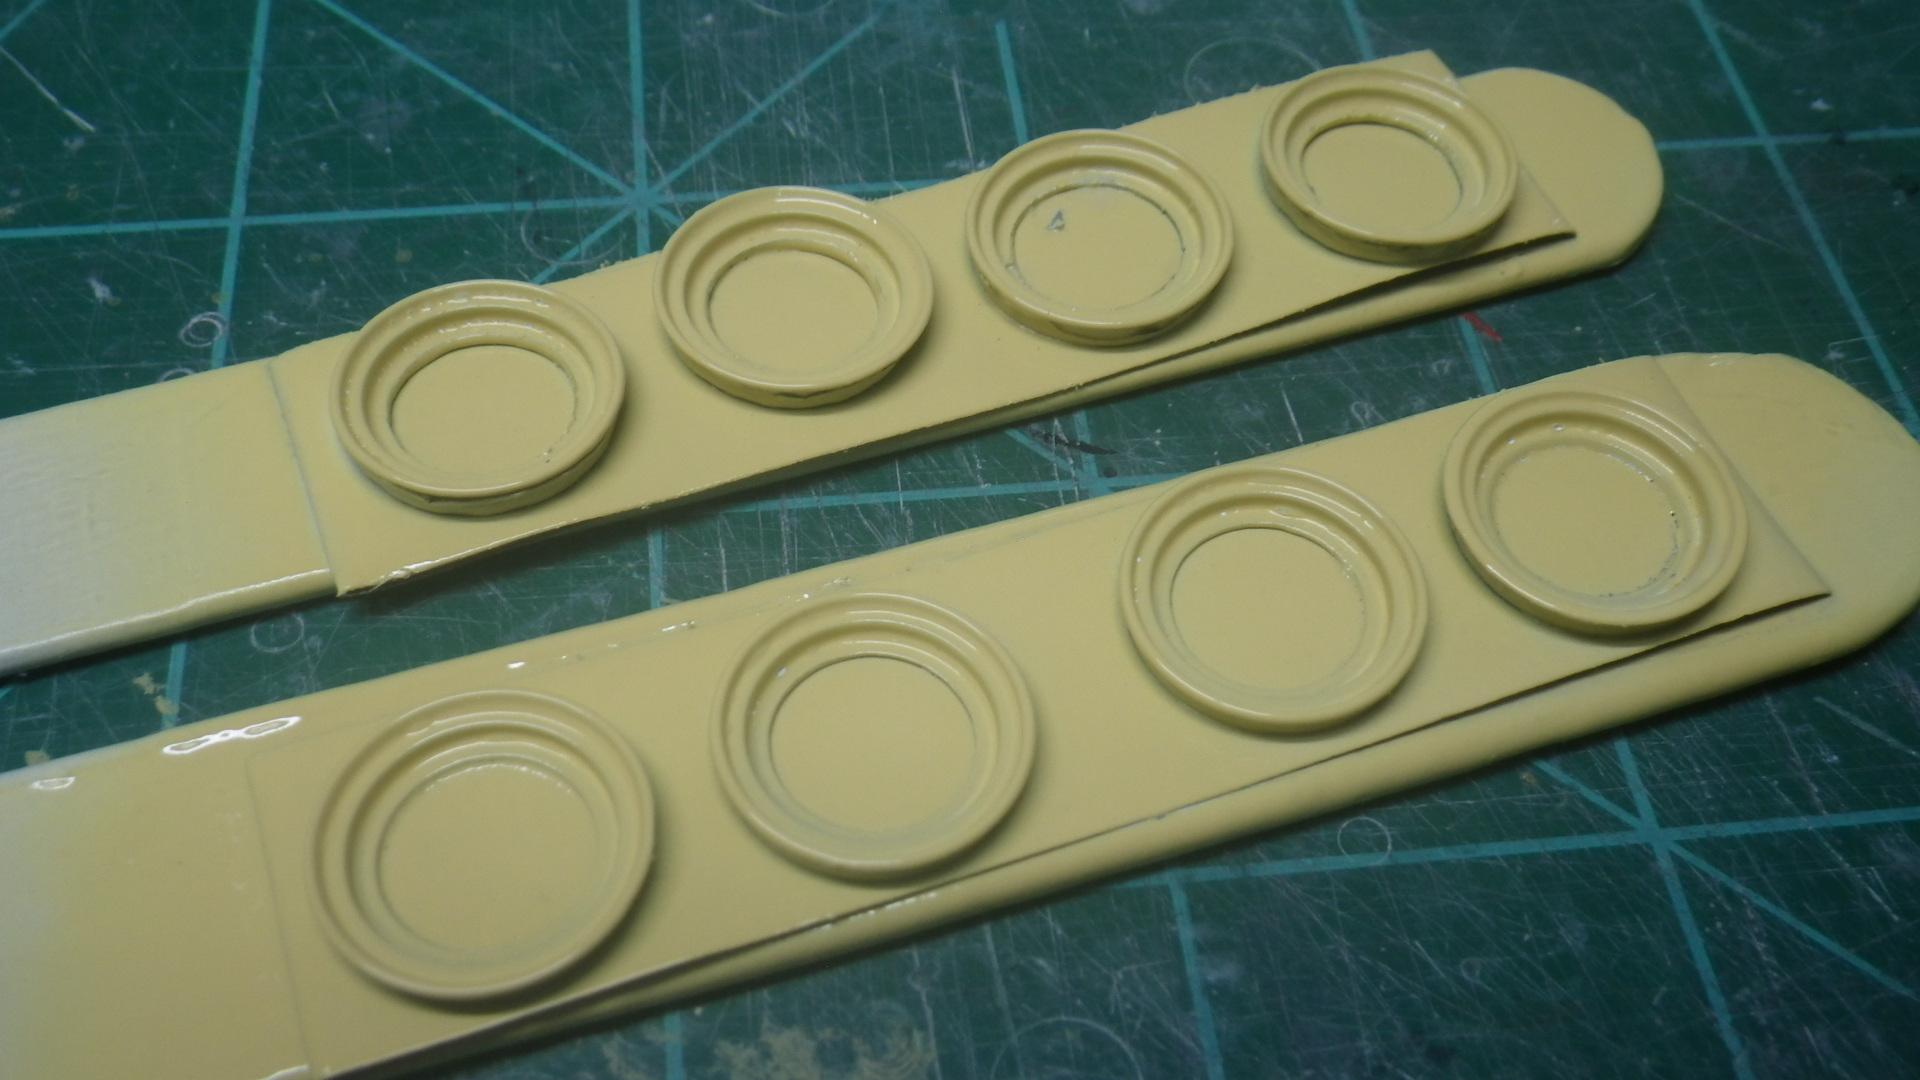
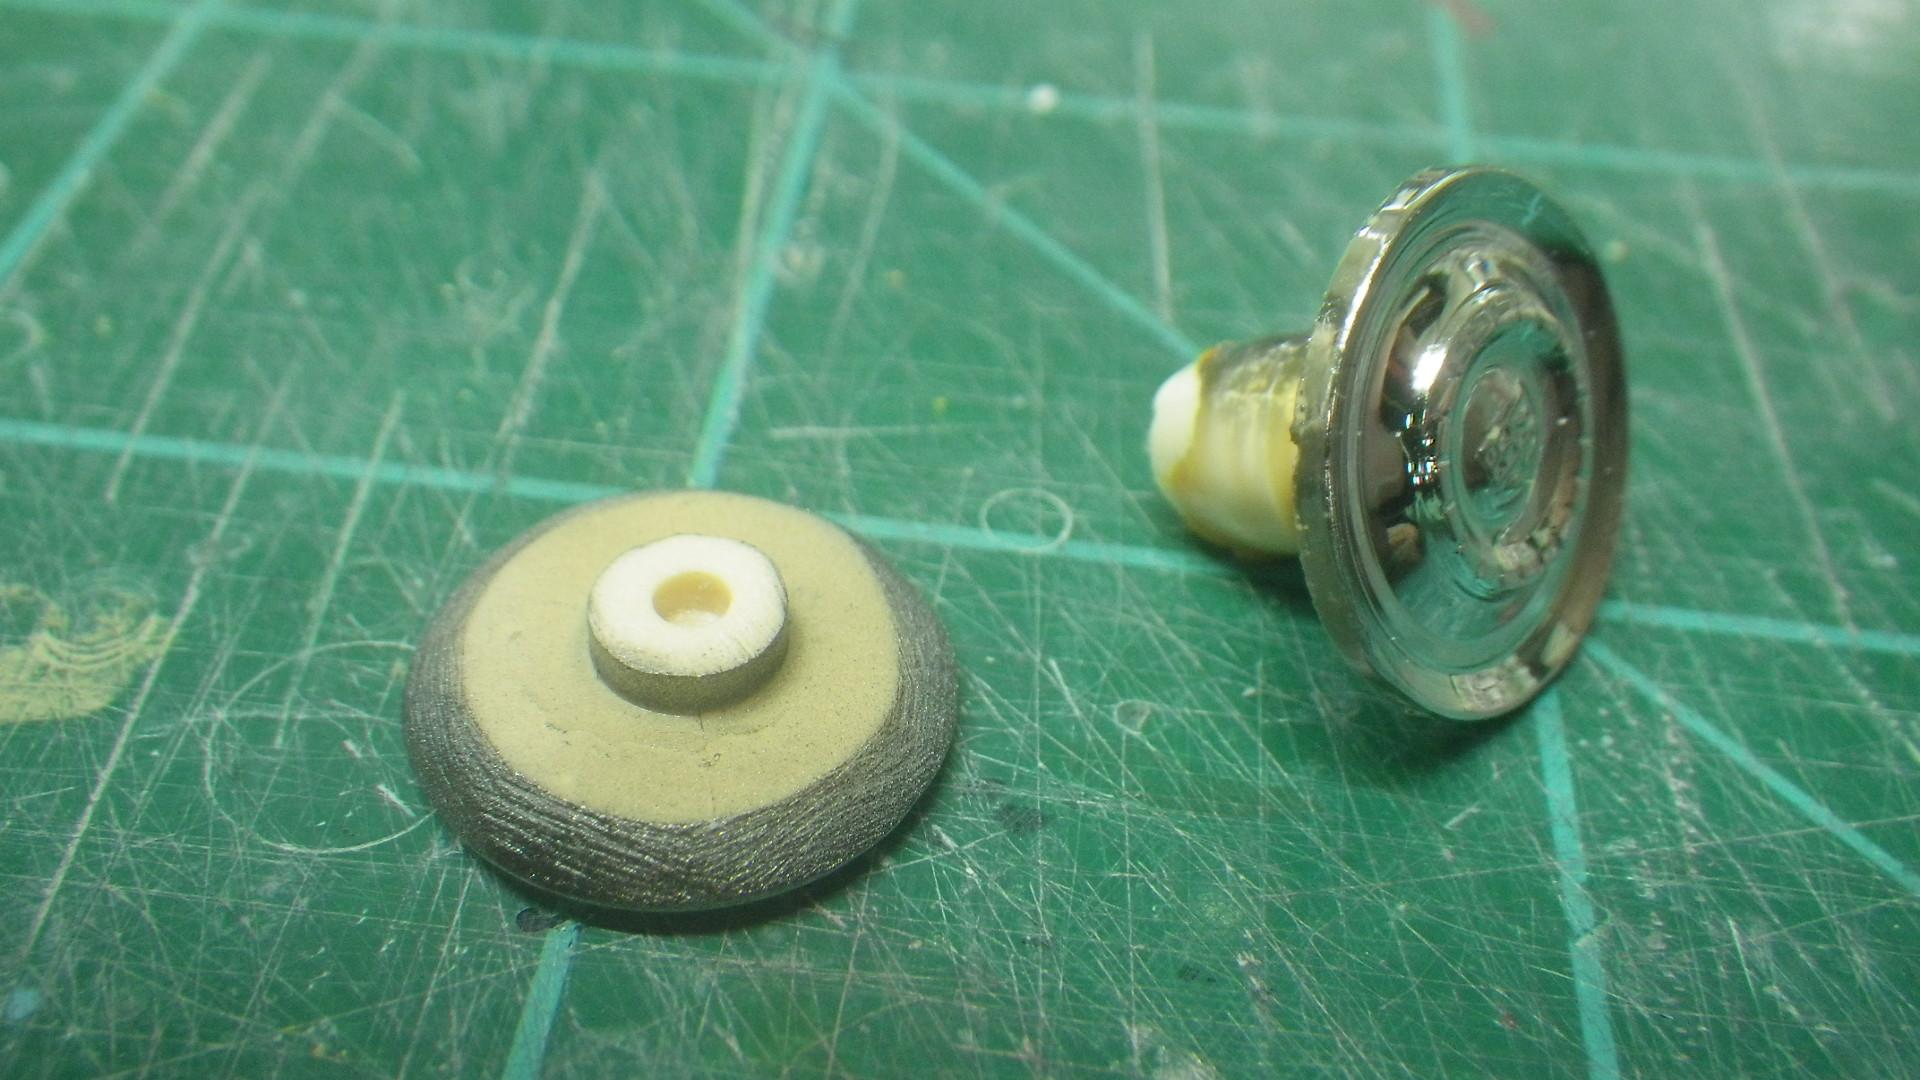
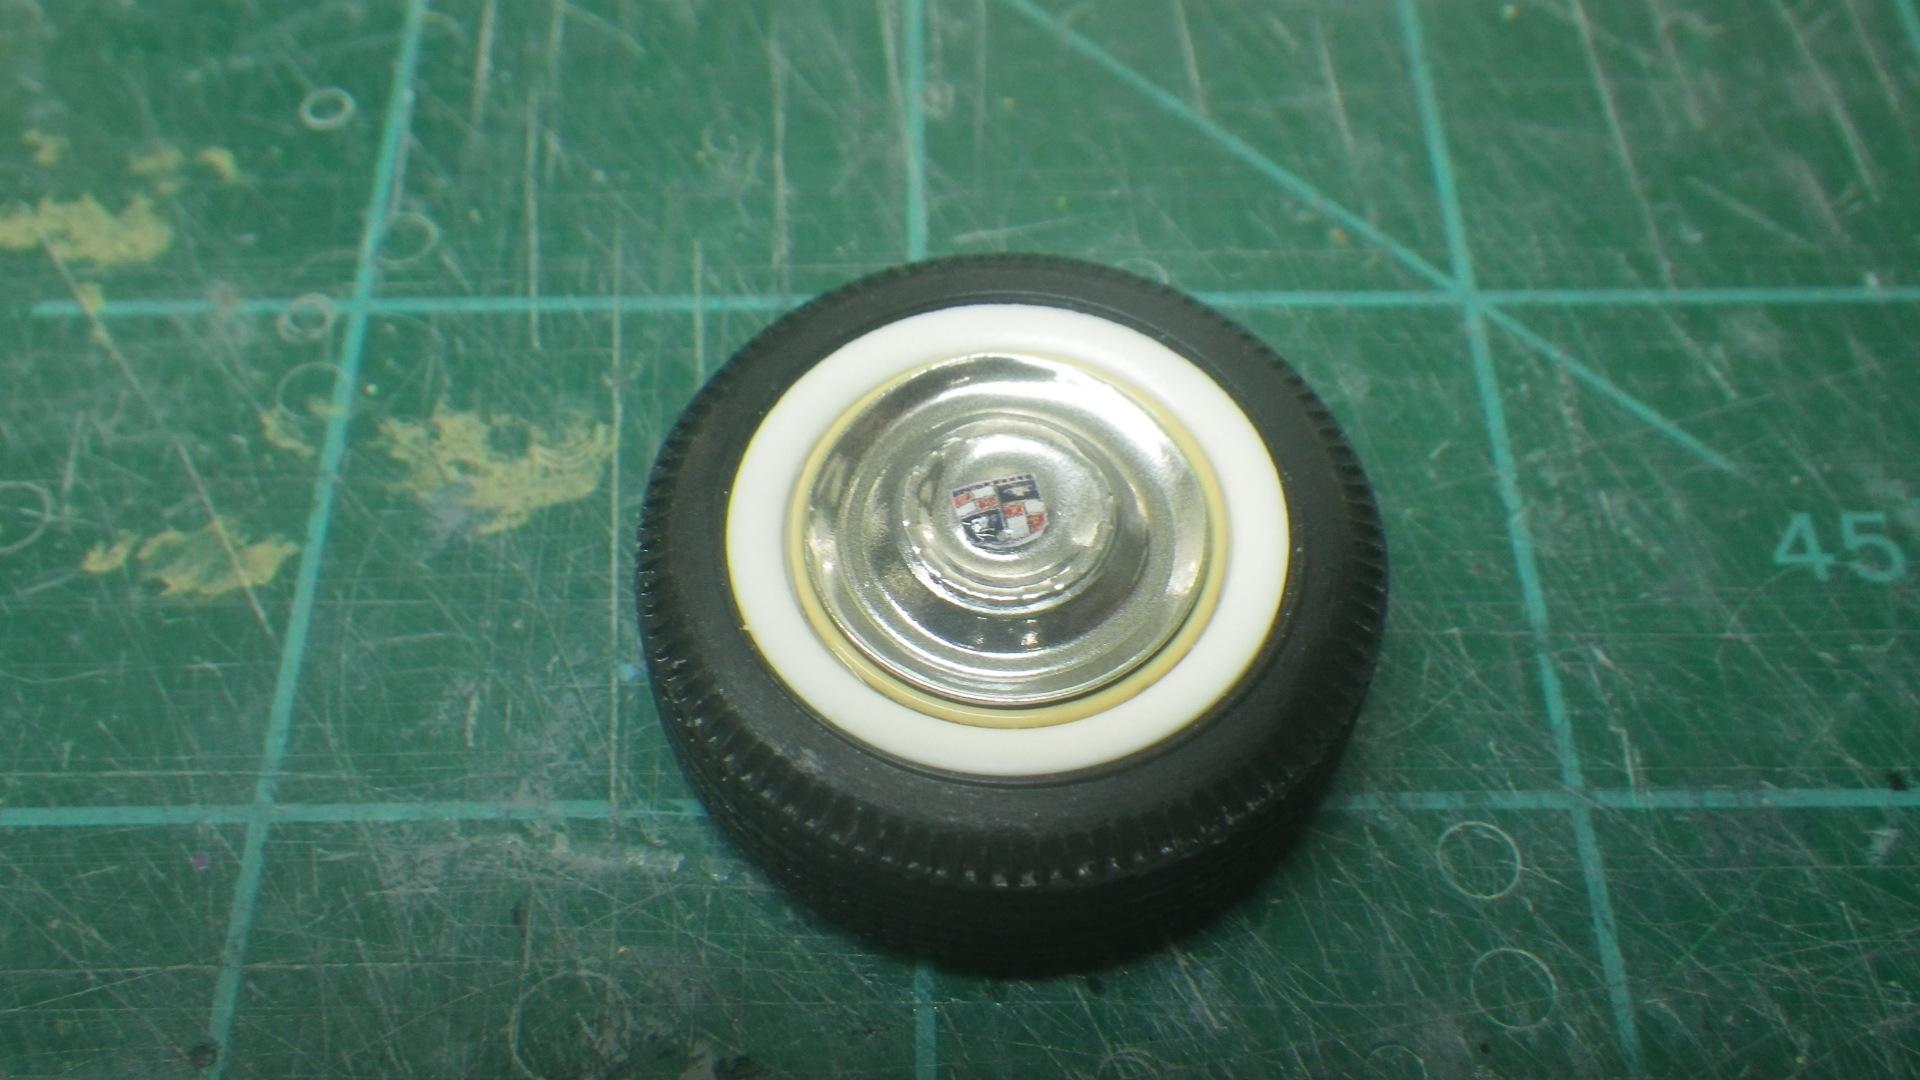
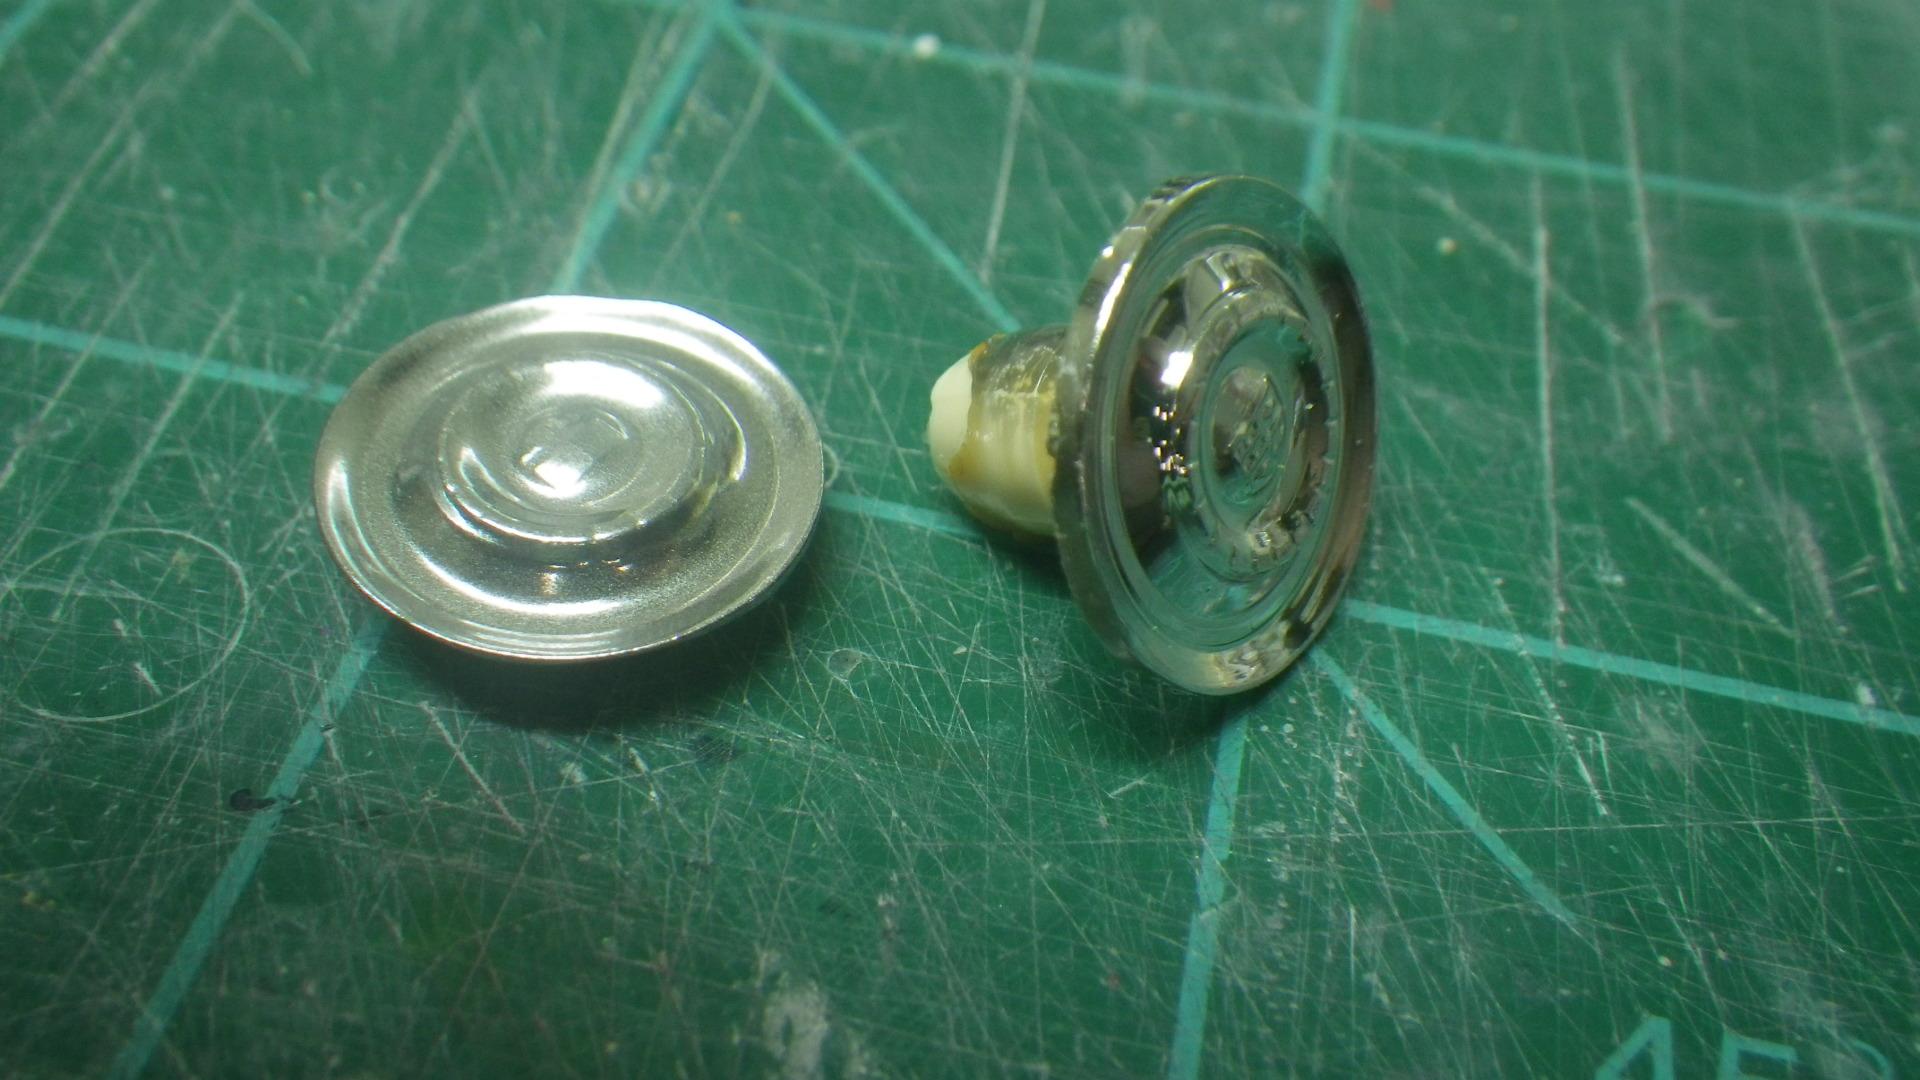
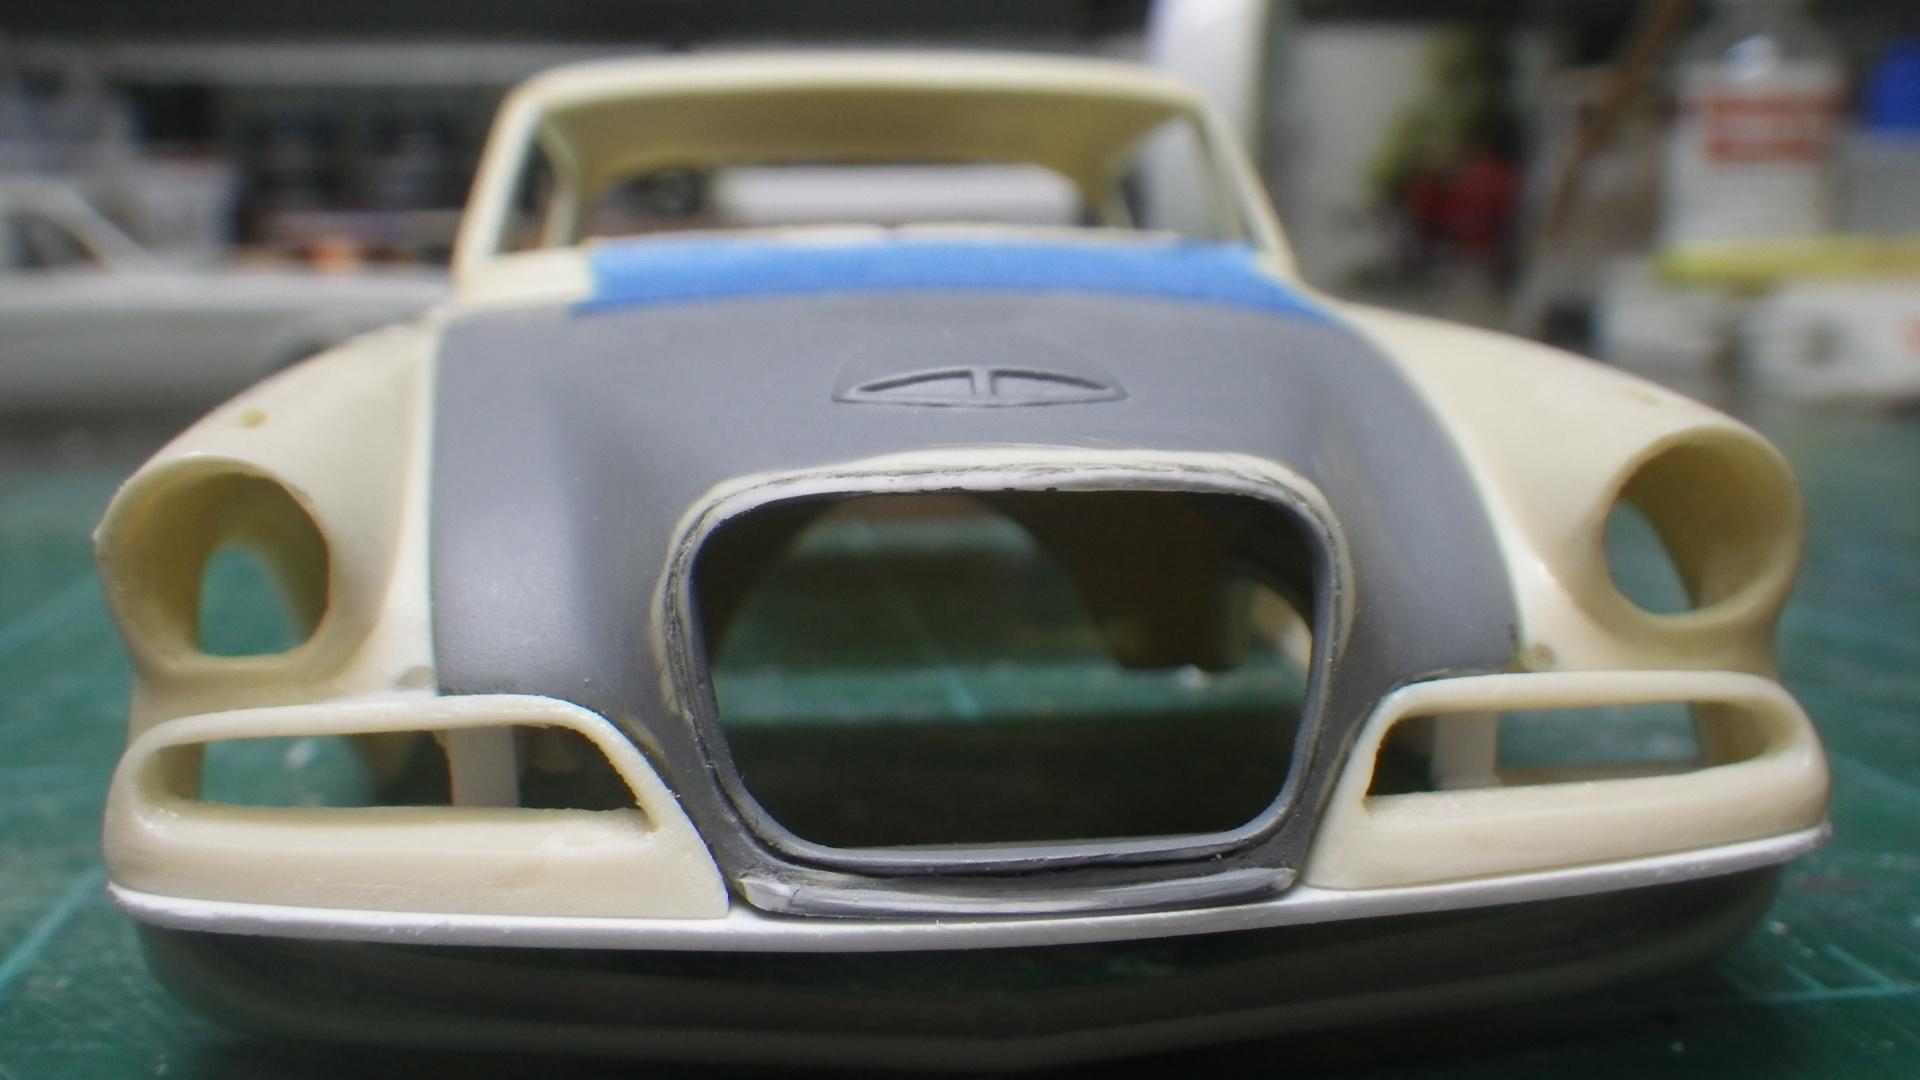
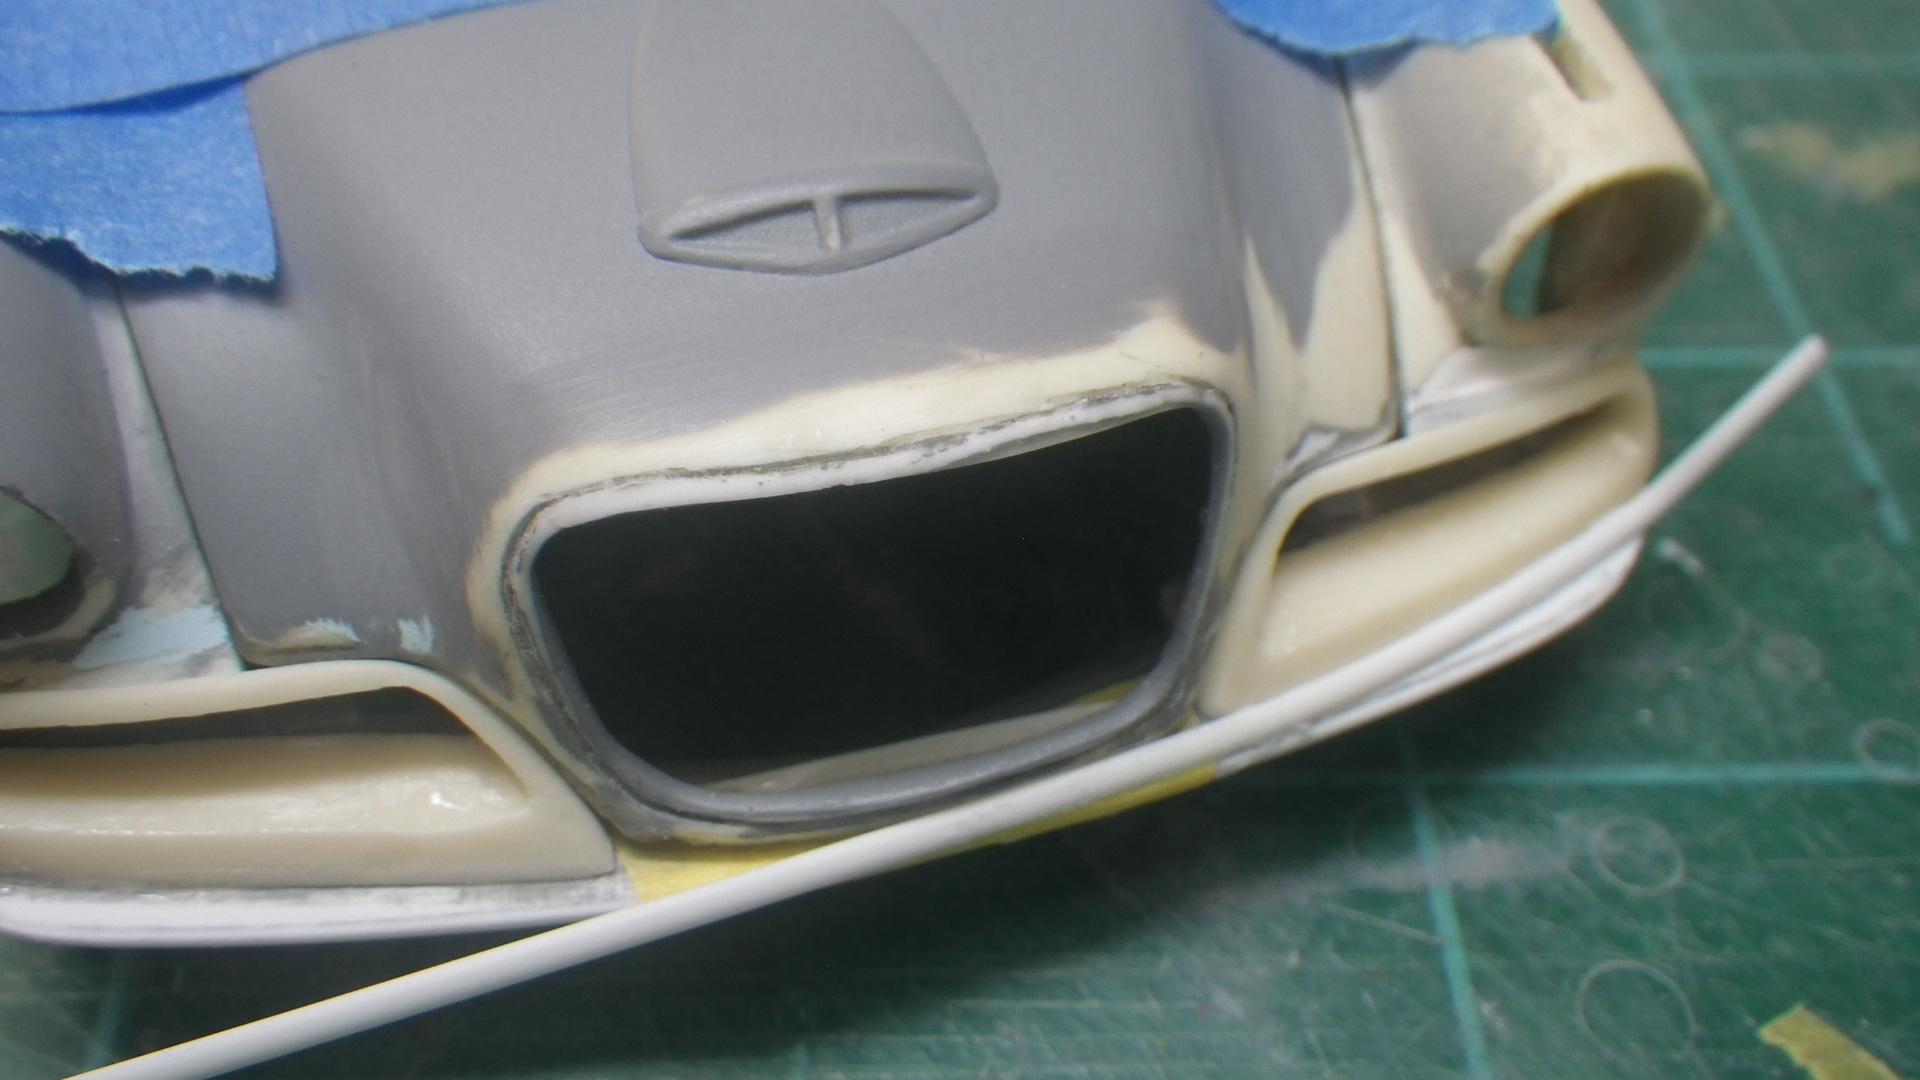
As promised, I'm back with another update. At this point, the build is starting to look like something that you could call a model car - it's about time! After completing the front end plastic surgery the body was finally ready for primer and after a good post-primer looking over I was amazed that it didn't reveal any major problems. There was just one little easy-to-fix flaw on a corner of the hood and It was looking like this: And then - just in the nick of time - this showed up in the mailbox. MCW is great for providing hard-to-find factory colors (like the ones that Studebakers came in). I've never used their clear before but if it's as good as their other paints it'll be great. The paint scheme I've chosen wasn't on of the most popular but It's one of the most mid-1950's-ish paint jobs I can imagine. Those bright, splashy, multi-color paint schemes were almost exclusive to the mid 50's. This one has the rather poetic name of "Sunglow over Yellowstone." I saw a photo of a 56J painted this way on the net and knew it had to be. In the meantime, the chassis was coming along to the point of having the exhaust and rear axle installed. The chassis is just basic kit assembly from here on. The wheel halves have been painted Yellowstone as the factory would have done: Notice that these are 8 wheel halves but they're all inside wheel halves. Four of them are styrene from the donor kit and four are resin. I needed to do that because the only correct wheel covers available were Modelhaus repops of some ancient AMT promo wheels and they were just a little too small diameter to mount in the tires (Modelhaus #428 medium wide whites). The solution was to use inside wheel halves on the outside too and taper the edges of the wheels to nestle down in them. The promo wheels also had a long neck that had to be cut down. Here's a comparison of before and after: It's all for the good, though. Doing it that way allows the painted edge of the wheels to show just as they do in 1:1. So I'm pretty pleased with it. That's all the progress so far. I'll be back when there's more to show!
-
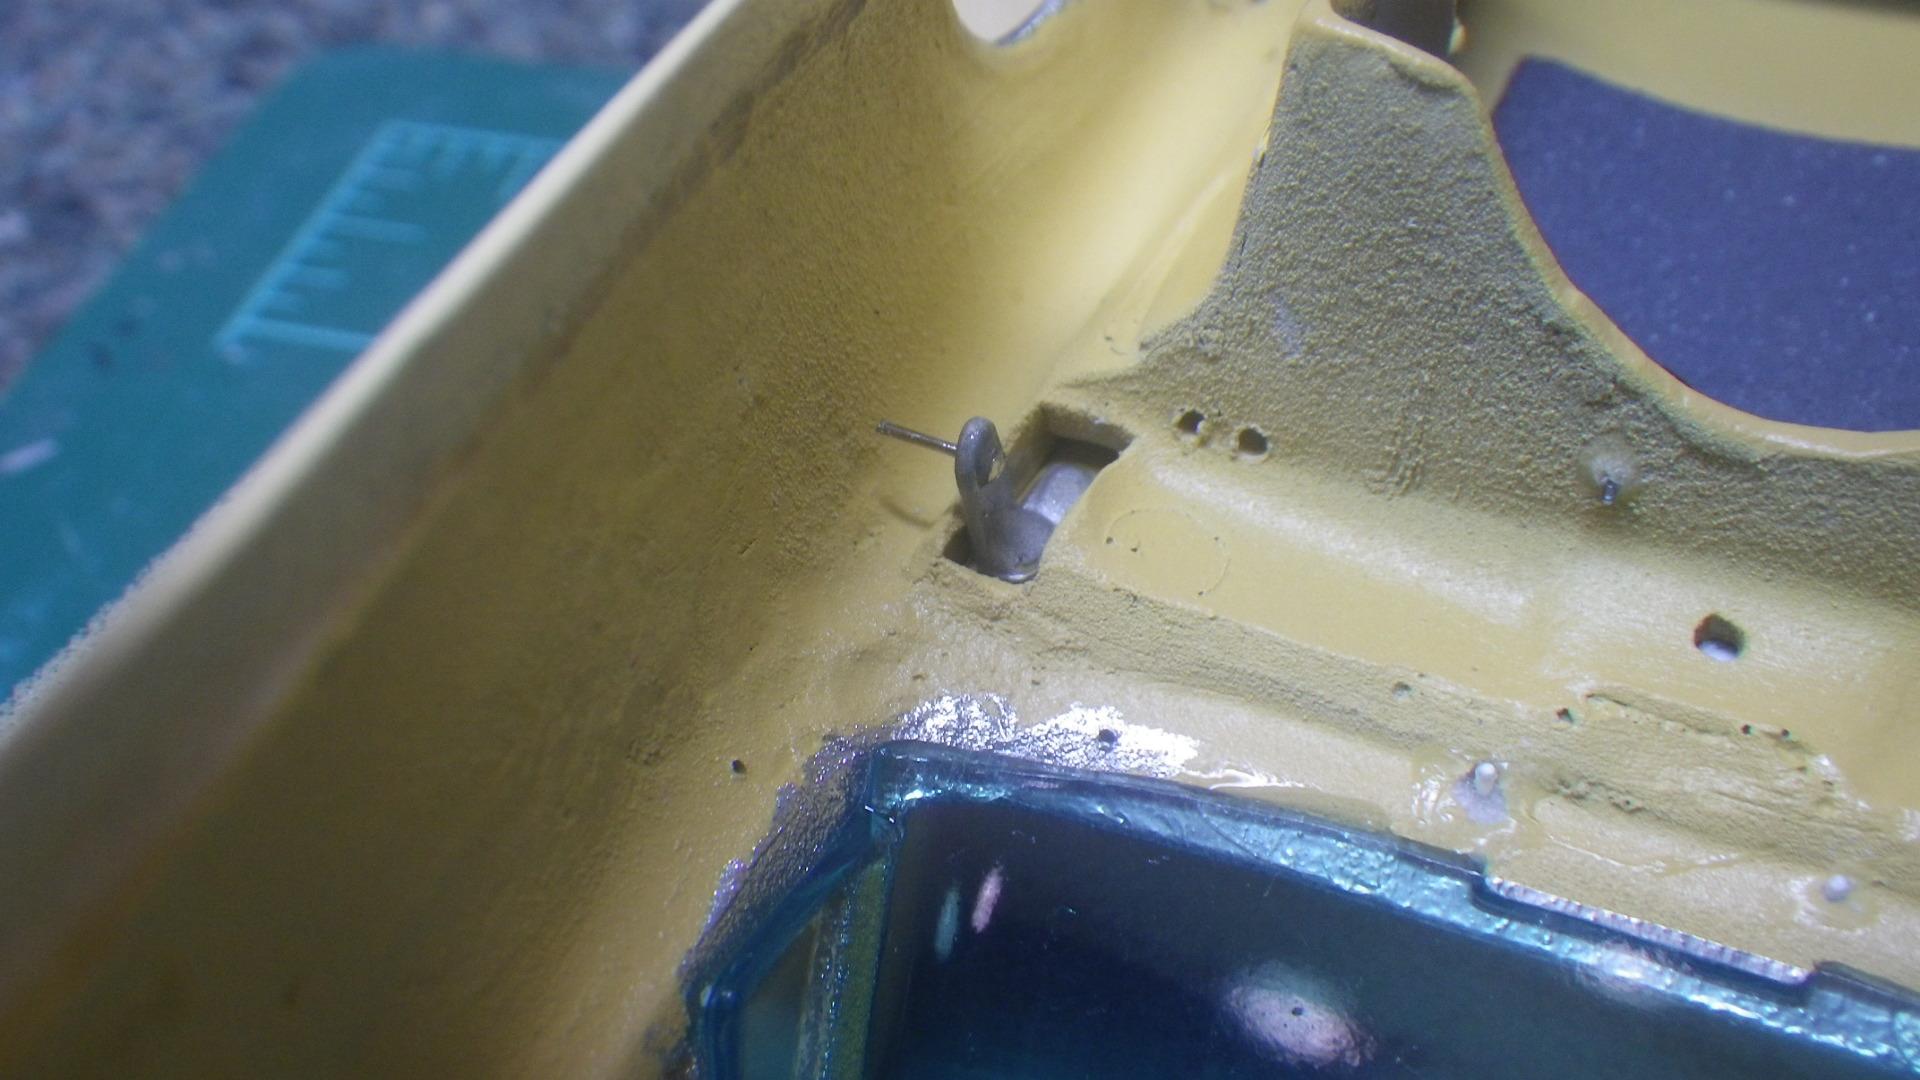
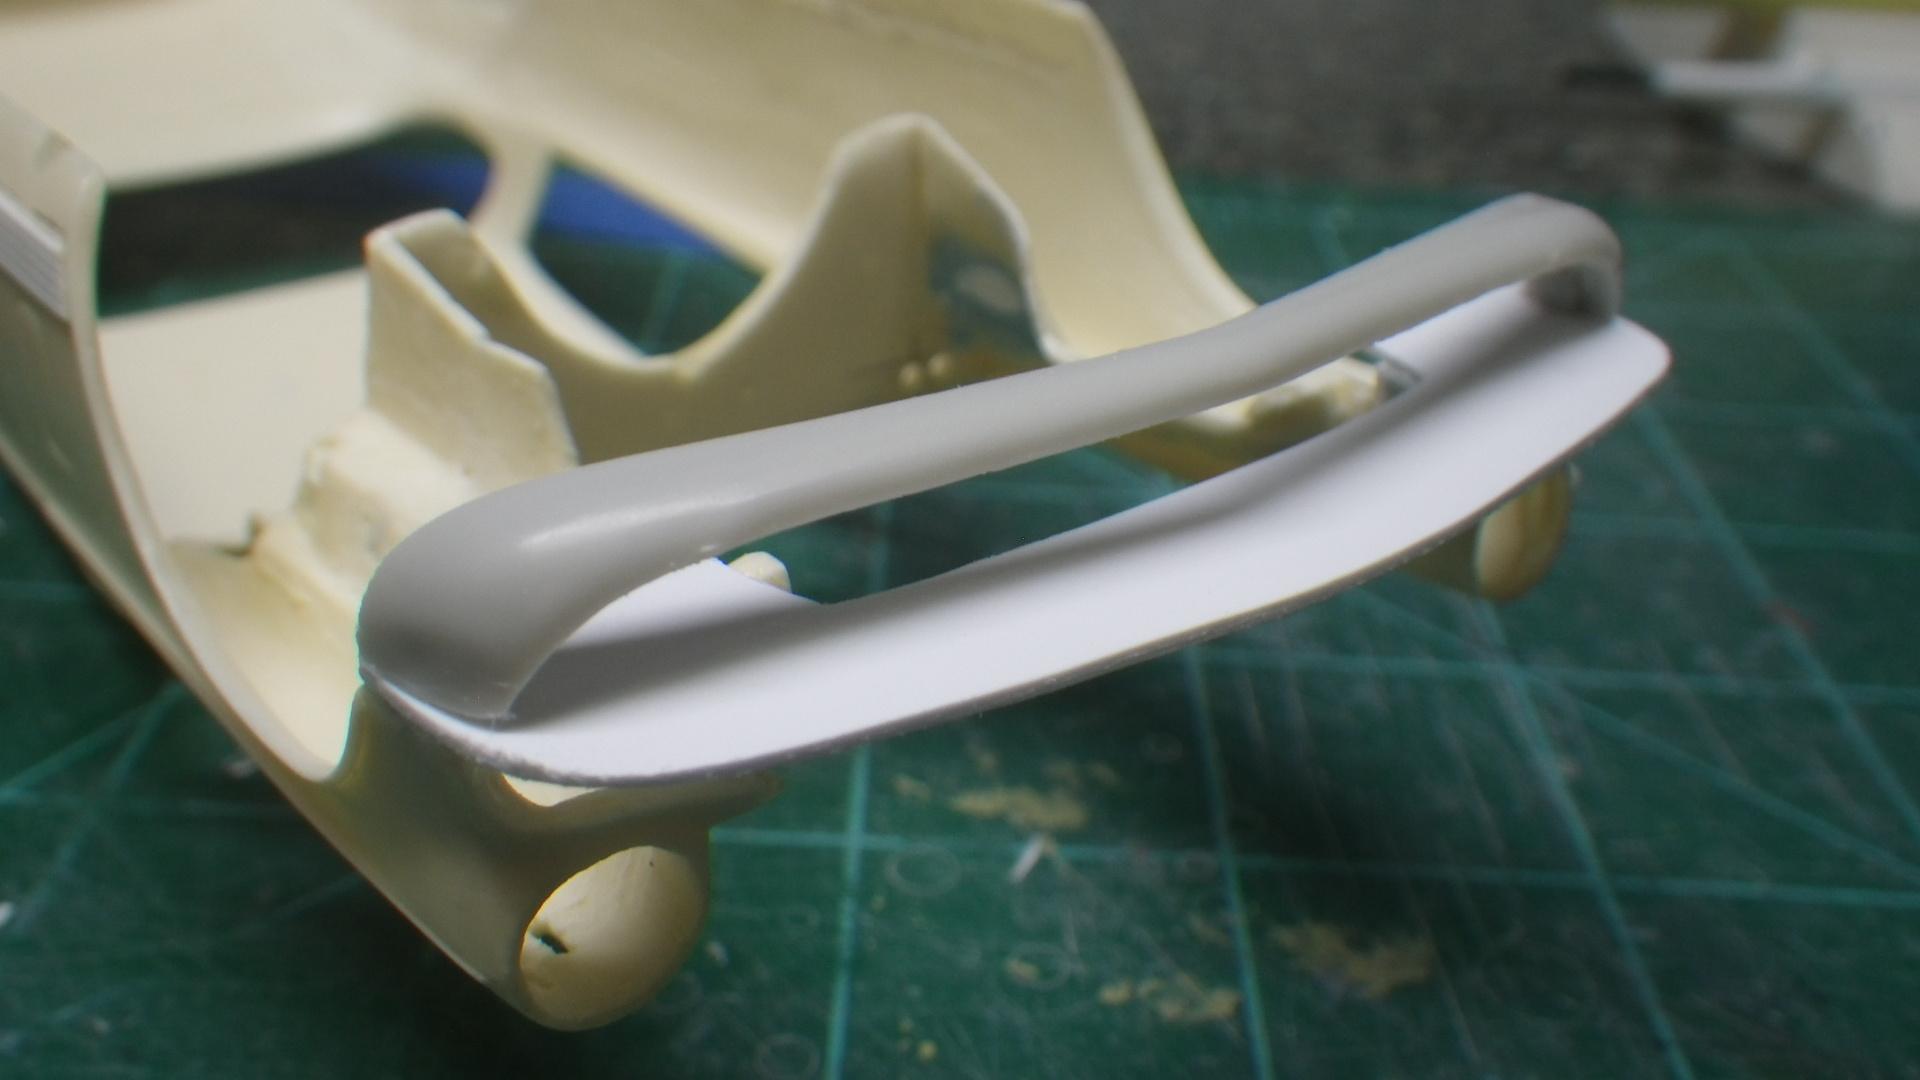
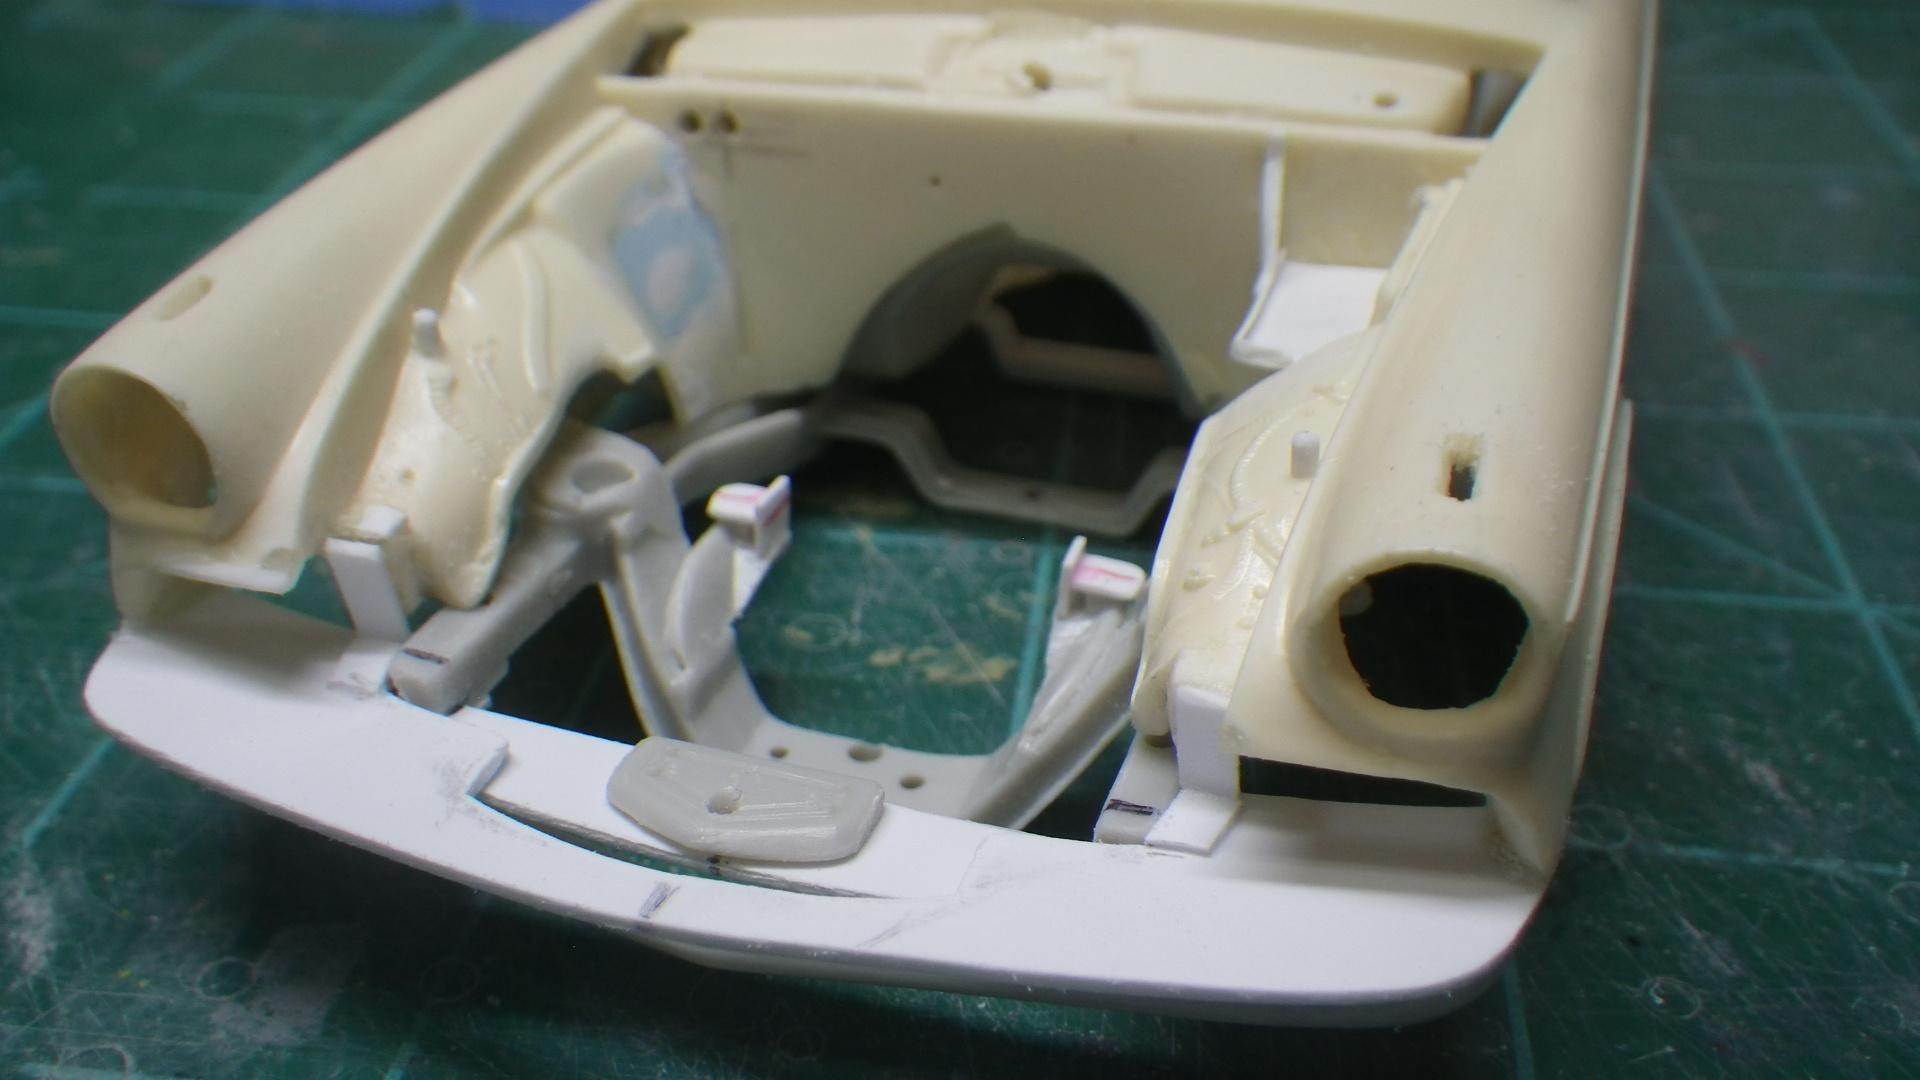
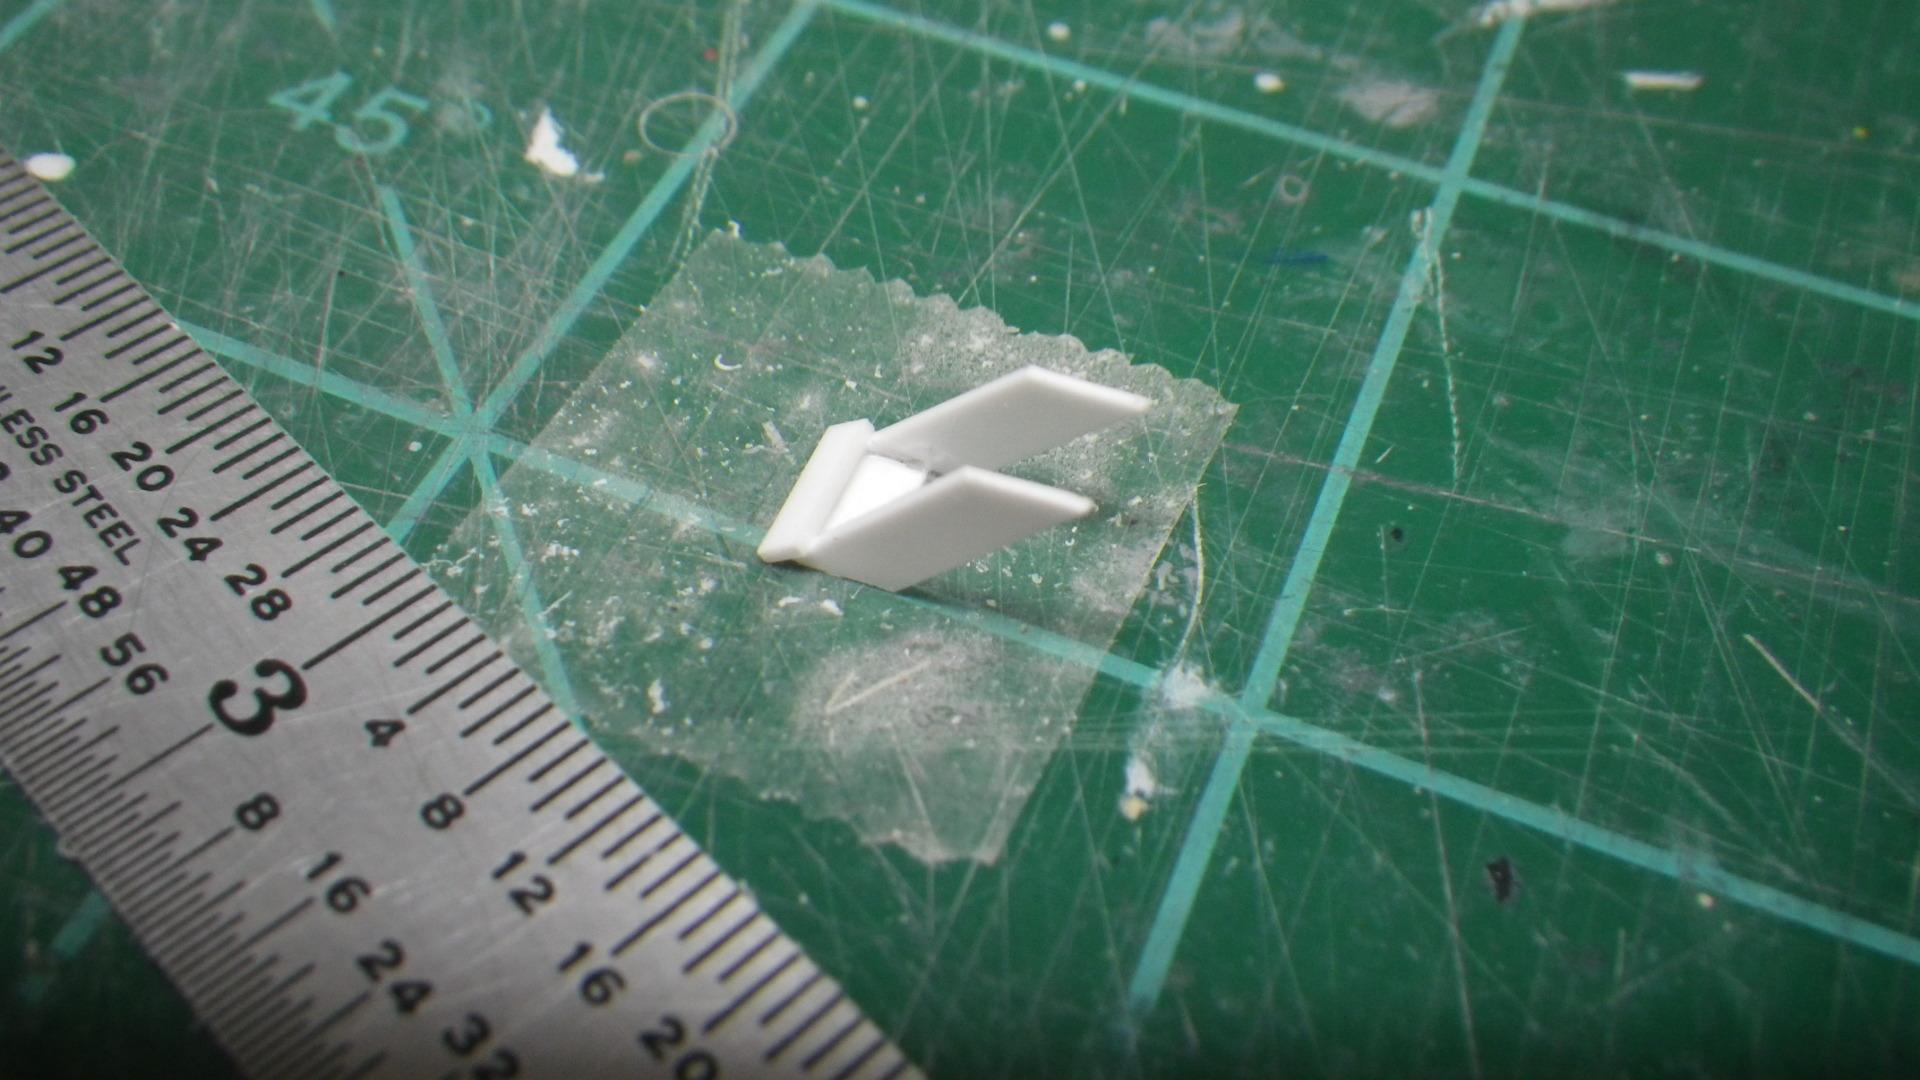
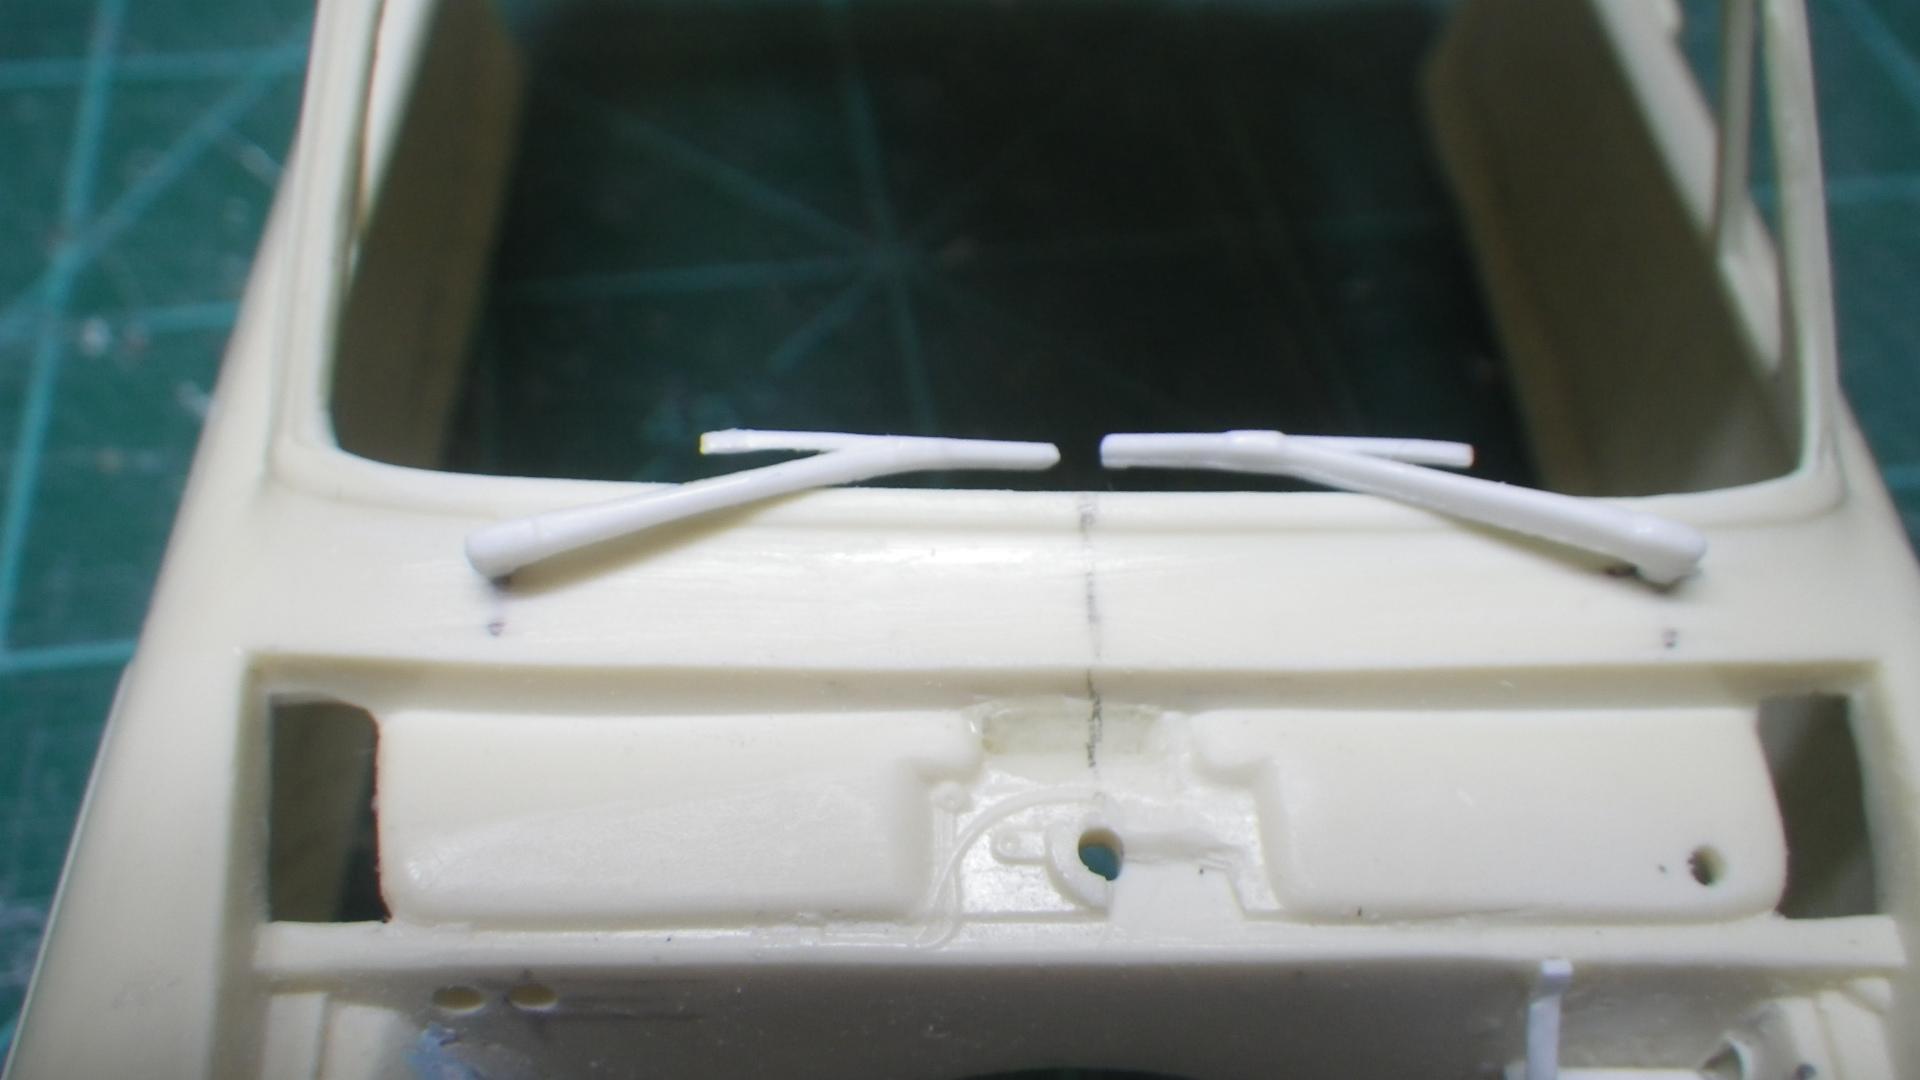
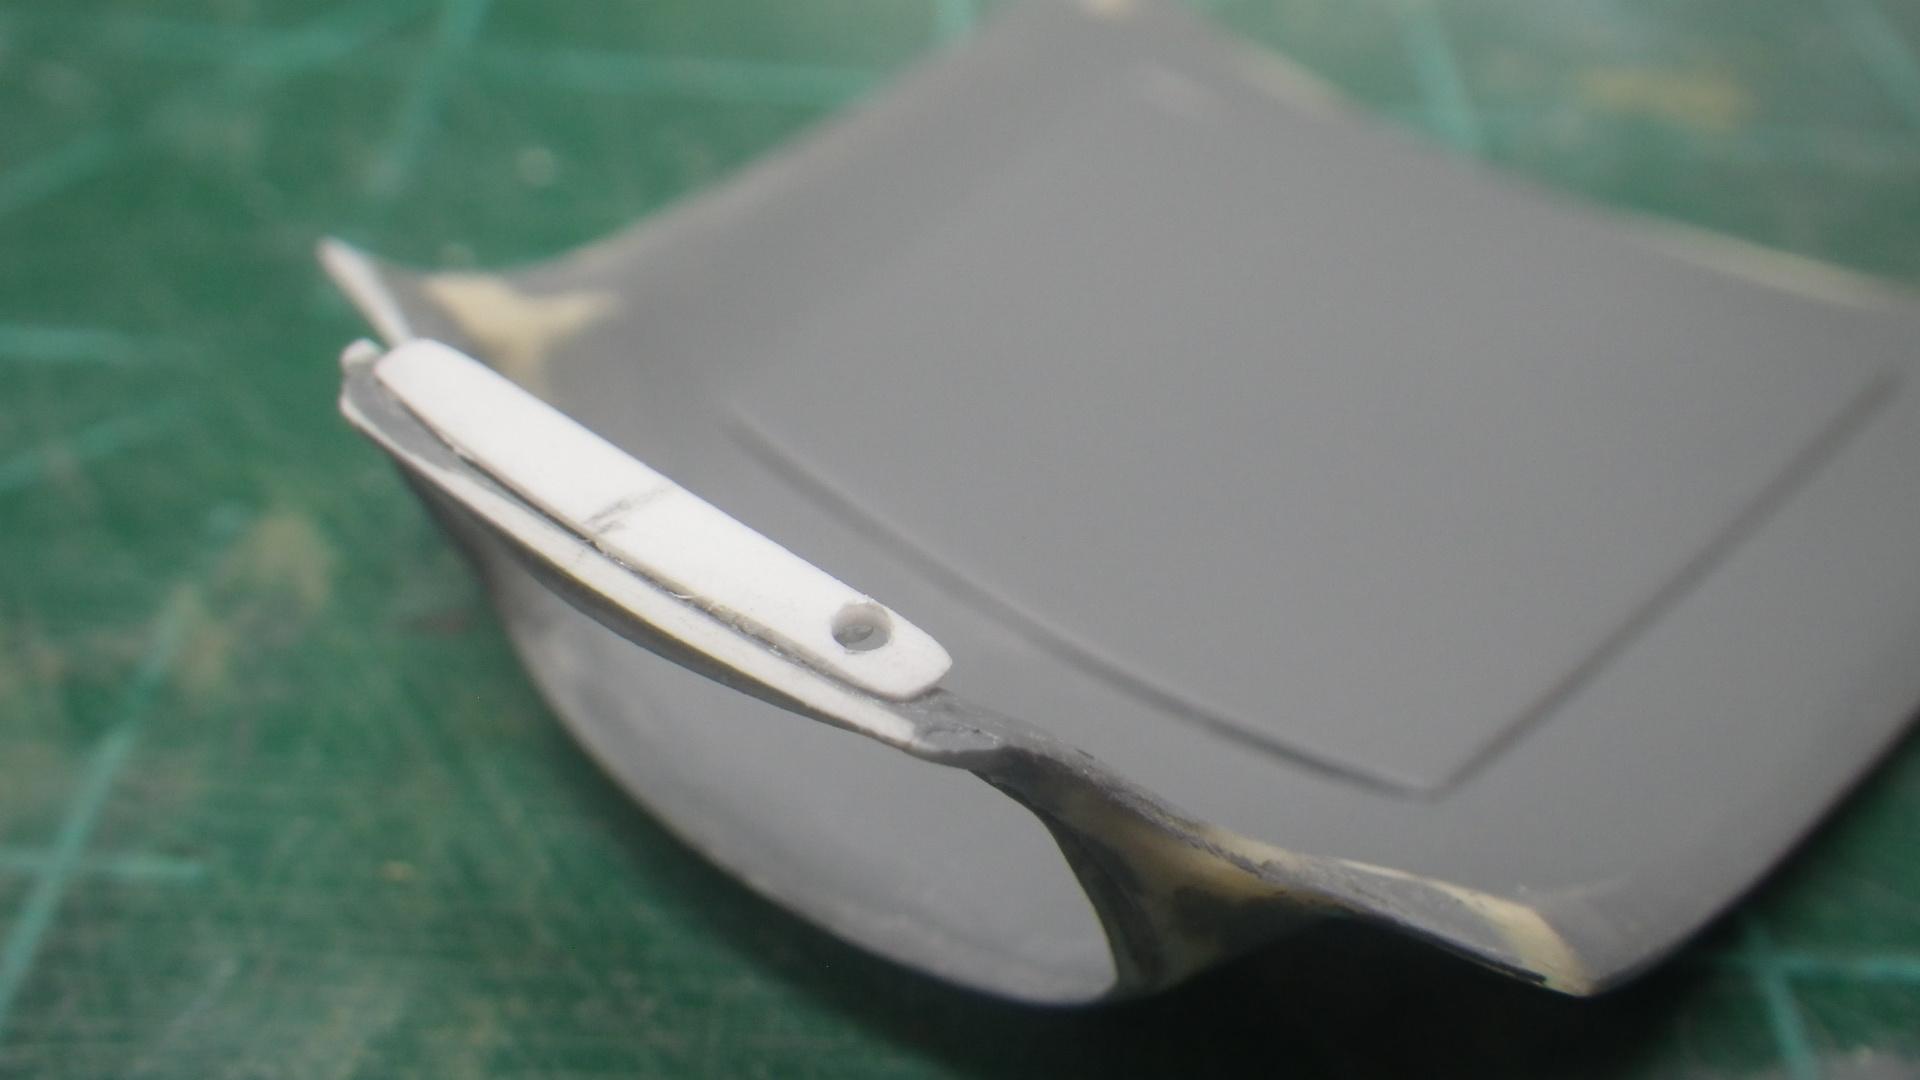
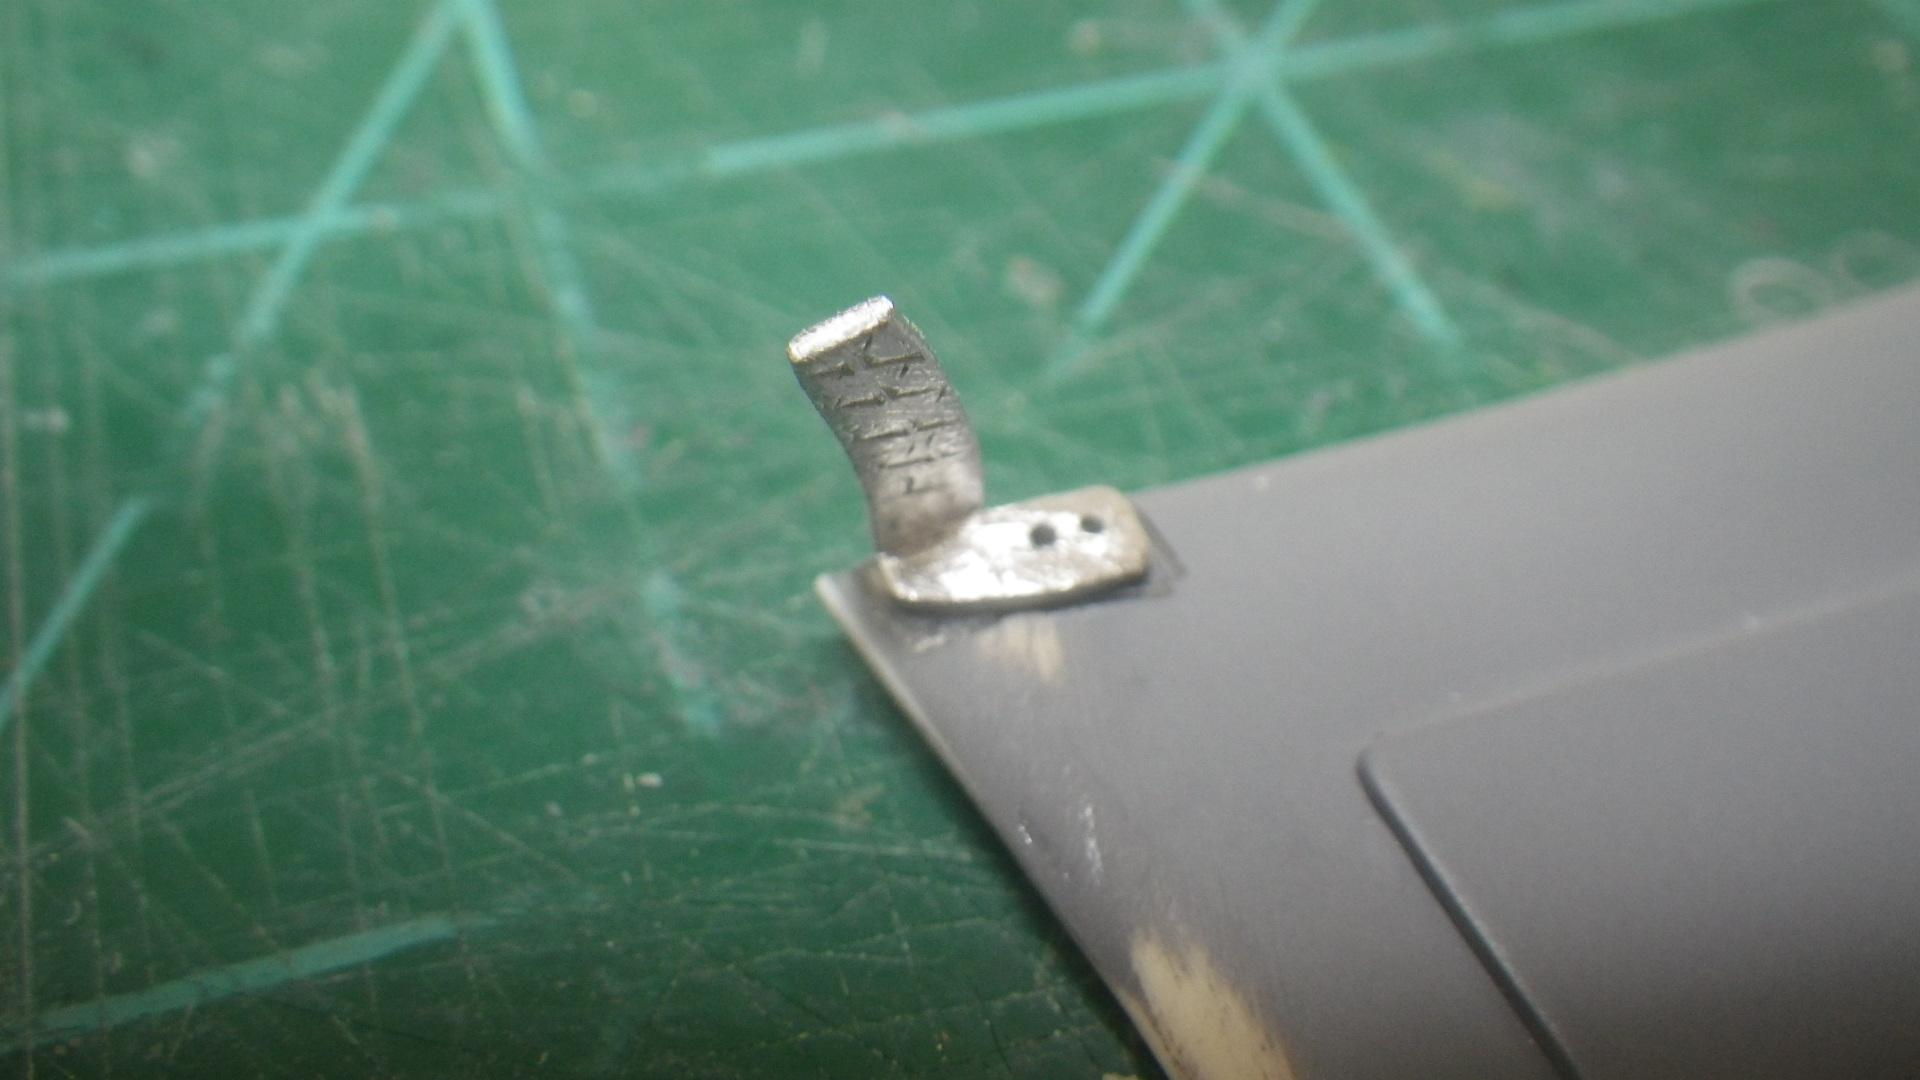
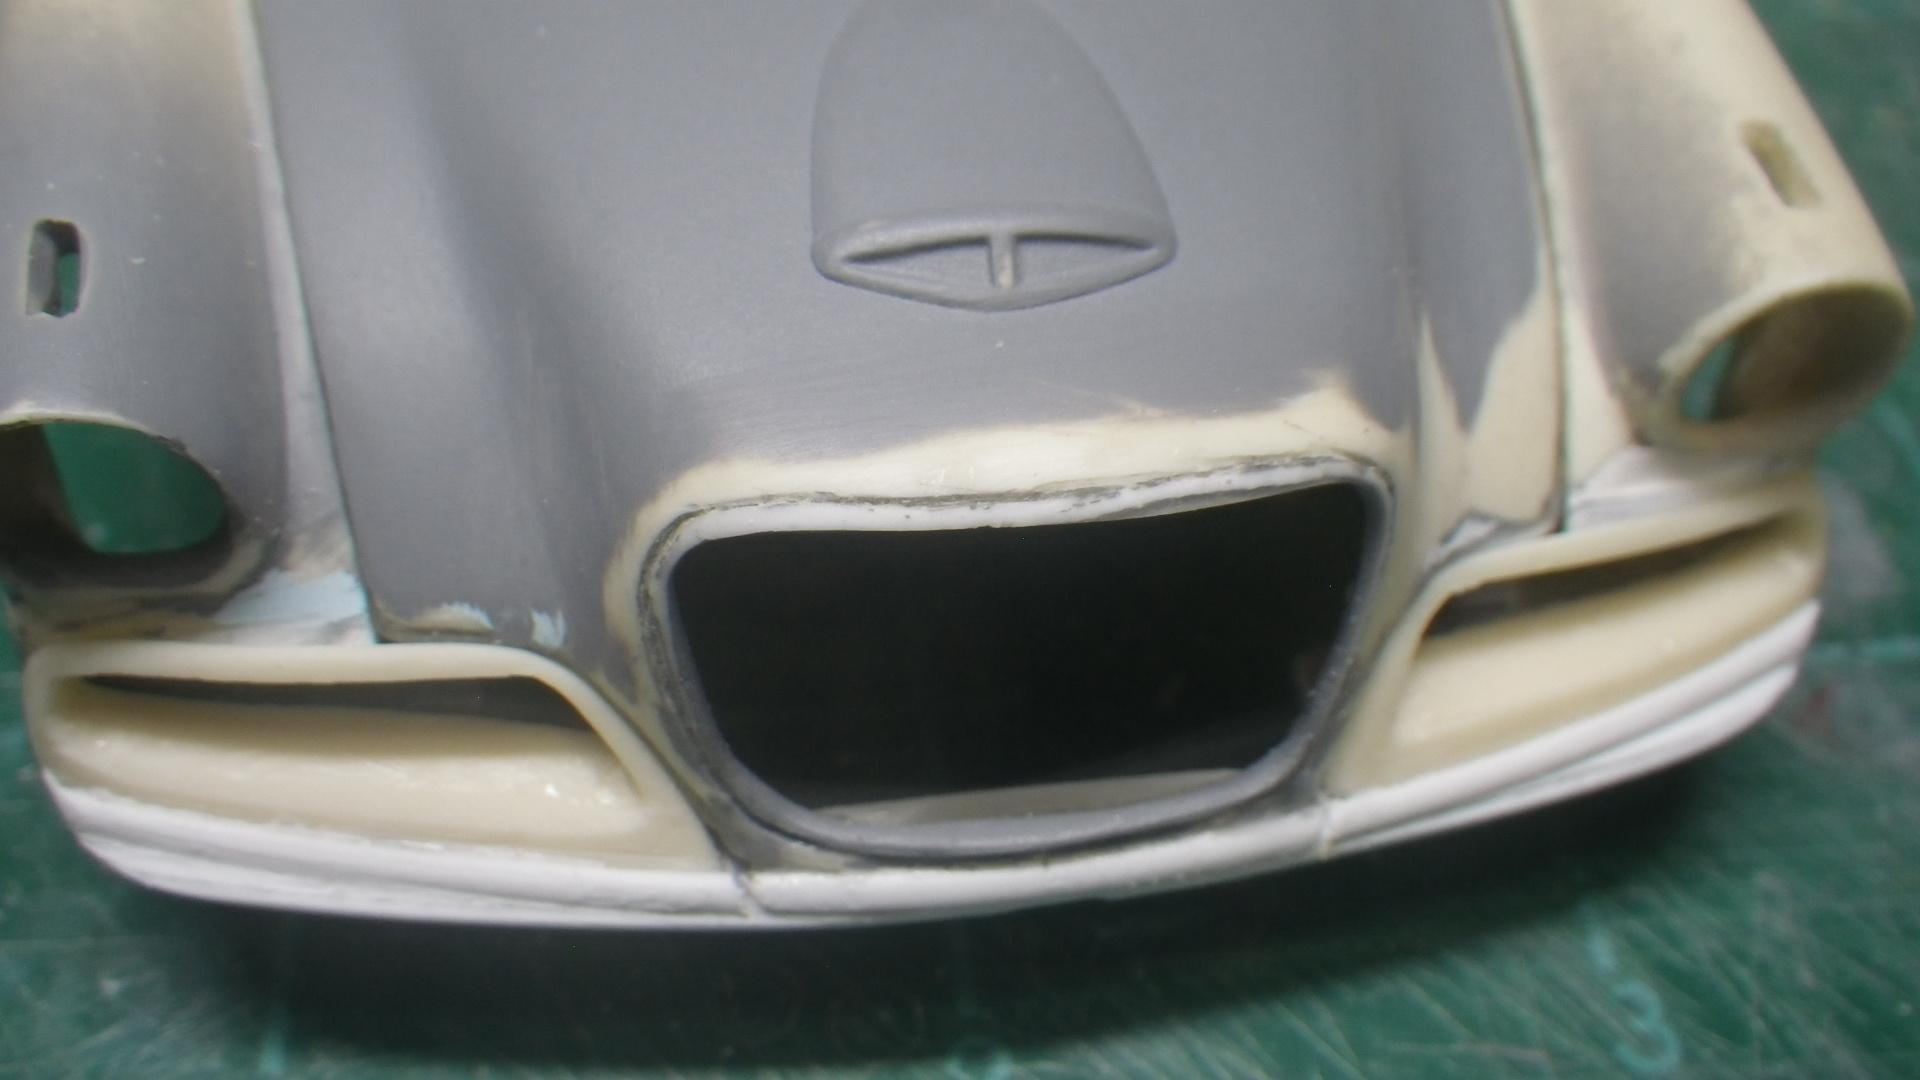
Finally getting around to a new update! Continuing work on the front end rebuild: Added the lower pan from the '53 Stude kit. And then the resin side grill openings. I don't know what to call this piece but it holds the strike plate for the hood latch that i removed from the '53 donor kit. Later I decided to remove it from the chassis and attach it to the apron I made earlier to simplify painting color separation in the future. This little bit is a reinforcement that ties together the apron and the lower pan. Quarter round Evergreen was bent in place to create what will become the chrome trim piece across the front end. It was glued in place all the way across and then cut open so the hood can be raised. The hood rests on this little plate when closed. The hole in the corner will accept the support rod to hold the hood open. I made these very simple hinges for the hood. That downward leg will have a small hole in it to accept a pin (installed after the hood is on the body) that keeps the hood attached to the body. This type of hinge doesn't swing smoothly like some more sophisticated styles but it allows the model to be displayed with hood open or closed and it doesn't take up much room. The area between the dashboard and the firewall is very cramped on this car. The separate wipers are a big upgrade from what was molded into the resin body. These aren't the ones I'll actually be using - found some that are better proportioned. That's it for right now but I have some more stuff to post later today or tomorrow.
-
I'm thinking that mini '32 is actually an Austin Bantam. Yes, no?
-
Your '64 was one elegant looking ride!