mrm
-
Posts
2,845 -
Joined
-
Last visited
Content Type
Profiles
Forums
Events
Gallery
Everything posted by mrm
-
Hi Tim. Thanks for the kind words. I think you are giving me too much credit however. The wide body and all the other aero parts which I have not shown yet, were all part of a transkit which was designed by BlackBoxStl. I am not sure where exactly are they based in, but all their stuff is available on Cults and a lot of people print their designs. Half the stuff in Iceman Collection is their design. This particular print, used on this body in fact was purchased from Iceman Collections together with few other parts and actually played a huge role in the decision to get a 3D printer. His stuff can be hit or miss and when you mess up a part on a transkit like this one, which you paid $40 for, you start thinking "can I do better" and "what if I could reprint just this one part instead of having to purchase another $40 set for just one fender". To answer your question, I have a little over a month into this project and this is not a very accurate assessment, which brings us to the second question about my printer. I have a love-hate relationship with it, ever since I got it (for Father's Day this year). What I mean is that I absolutely love what it does and I still have hard time wrapping my head around what it is capable of. The hate part comes from the time it sucks away from everything else. Once you get out your first set of wheels, you immediately want to try something different and print more wheels and another body kit and a figure and to make a keychain for your wife and this thing and that.....and next thing you know, you have gone through 2kg of resin, have a shoe box of parts that you realistically did not need, didn't sleep more than 3 hours per night for two weeks and not only didn't do any work on the models on your bench, but started six new projects that you shouldn't have. LOL. It's one of those I love to hate it, but hate to love it ordeals, very much because of how good it is. I bought the printer myself, because I didn't think it was fair to let my wife spend that much money on a Father's Day present. But she followed up with buying me a wash station and a UV curing station from the same manufacturer to match the printer. Which made prints easier and faster in terms of getting parts ready. Which in turn made things worst, when it goes to the addiction factor. I literally had to step away and promise that I am not playing with my new toys until my other chores are done and I finished at least two of the models I have started. As far as this Mustang goes, it turned out to be the outlet for quite few ideas and desires I had rolling around in my head. I always wanted to build a Ferrari powered hot rod. Actually I have, but not quite like that. Now that the cat is out of the bag, you know what to expect next on here. A thoroughbred 4.3l 500hp V8 from Italian descent under that hood.
-

Who doesn't love a mock-up? Let's see yours!
mrm replied to Belairconvertable's topic in WIP: Model Cars
Oh, boy! This kit brings memories! You just brought me back to 1984. LOL -
20 started projects?!... That's probably just the '32 Fords I have in different stages. LOL. I have this one model which has a body somewhat based on parts of an Aluma Coupe, which would be best described as something that could have come out of Marcel's Custom Metal on a Coddington or Foose commission that could be passed as '33/'34 Ford. It was started in New Jersey together with the aforementioned Speed Wagon some 25 years ago. Numerous body mods, three different scratch built frames and two interiors later it is still not finished. And it is not the only one. Actually, thinking about it, I should have somewhere a Dan Fink Speed wagon with the roof taken off, taped together with masking tape as a highboy. Maybe I should dig it up. See what you have done now?!?! LOL
-
Aaaaaand..... we got paint! Now comes a lot and lot of tedious carbon fiber decaling...
-
It does a little, but once you put the hood on and look at whole car, that goes away. Thanks Spike. I’m having fun with this one. Thank you Steve. I’m glad you enjoy it. Thank you. I needed a little change of pace from my usual builds. I hipe it turns out like I envision it. Still plenty of opportunities ti Ef it up. Lol
-
And just to add... I have done countless carbon fiber decal jobs on all sorts of parts in every possible shape or form. Nothing comes even close to be as aggravating as trying to do deep wheel barrel covered in carbon! Nothing! I'm loosing my mind ???
-
It's a '30-sumthin' truck thingy...
mrm replied to mrm's topic in WIP: Model Trucks: Pickups, Vans, SUVs, Light Commercial
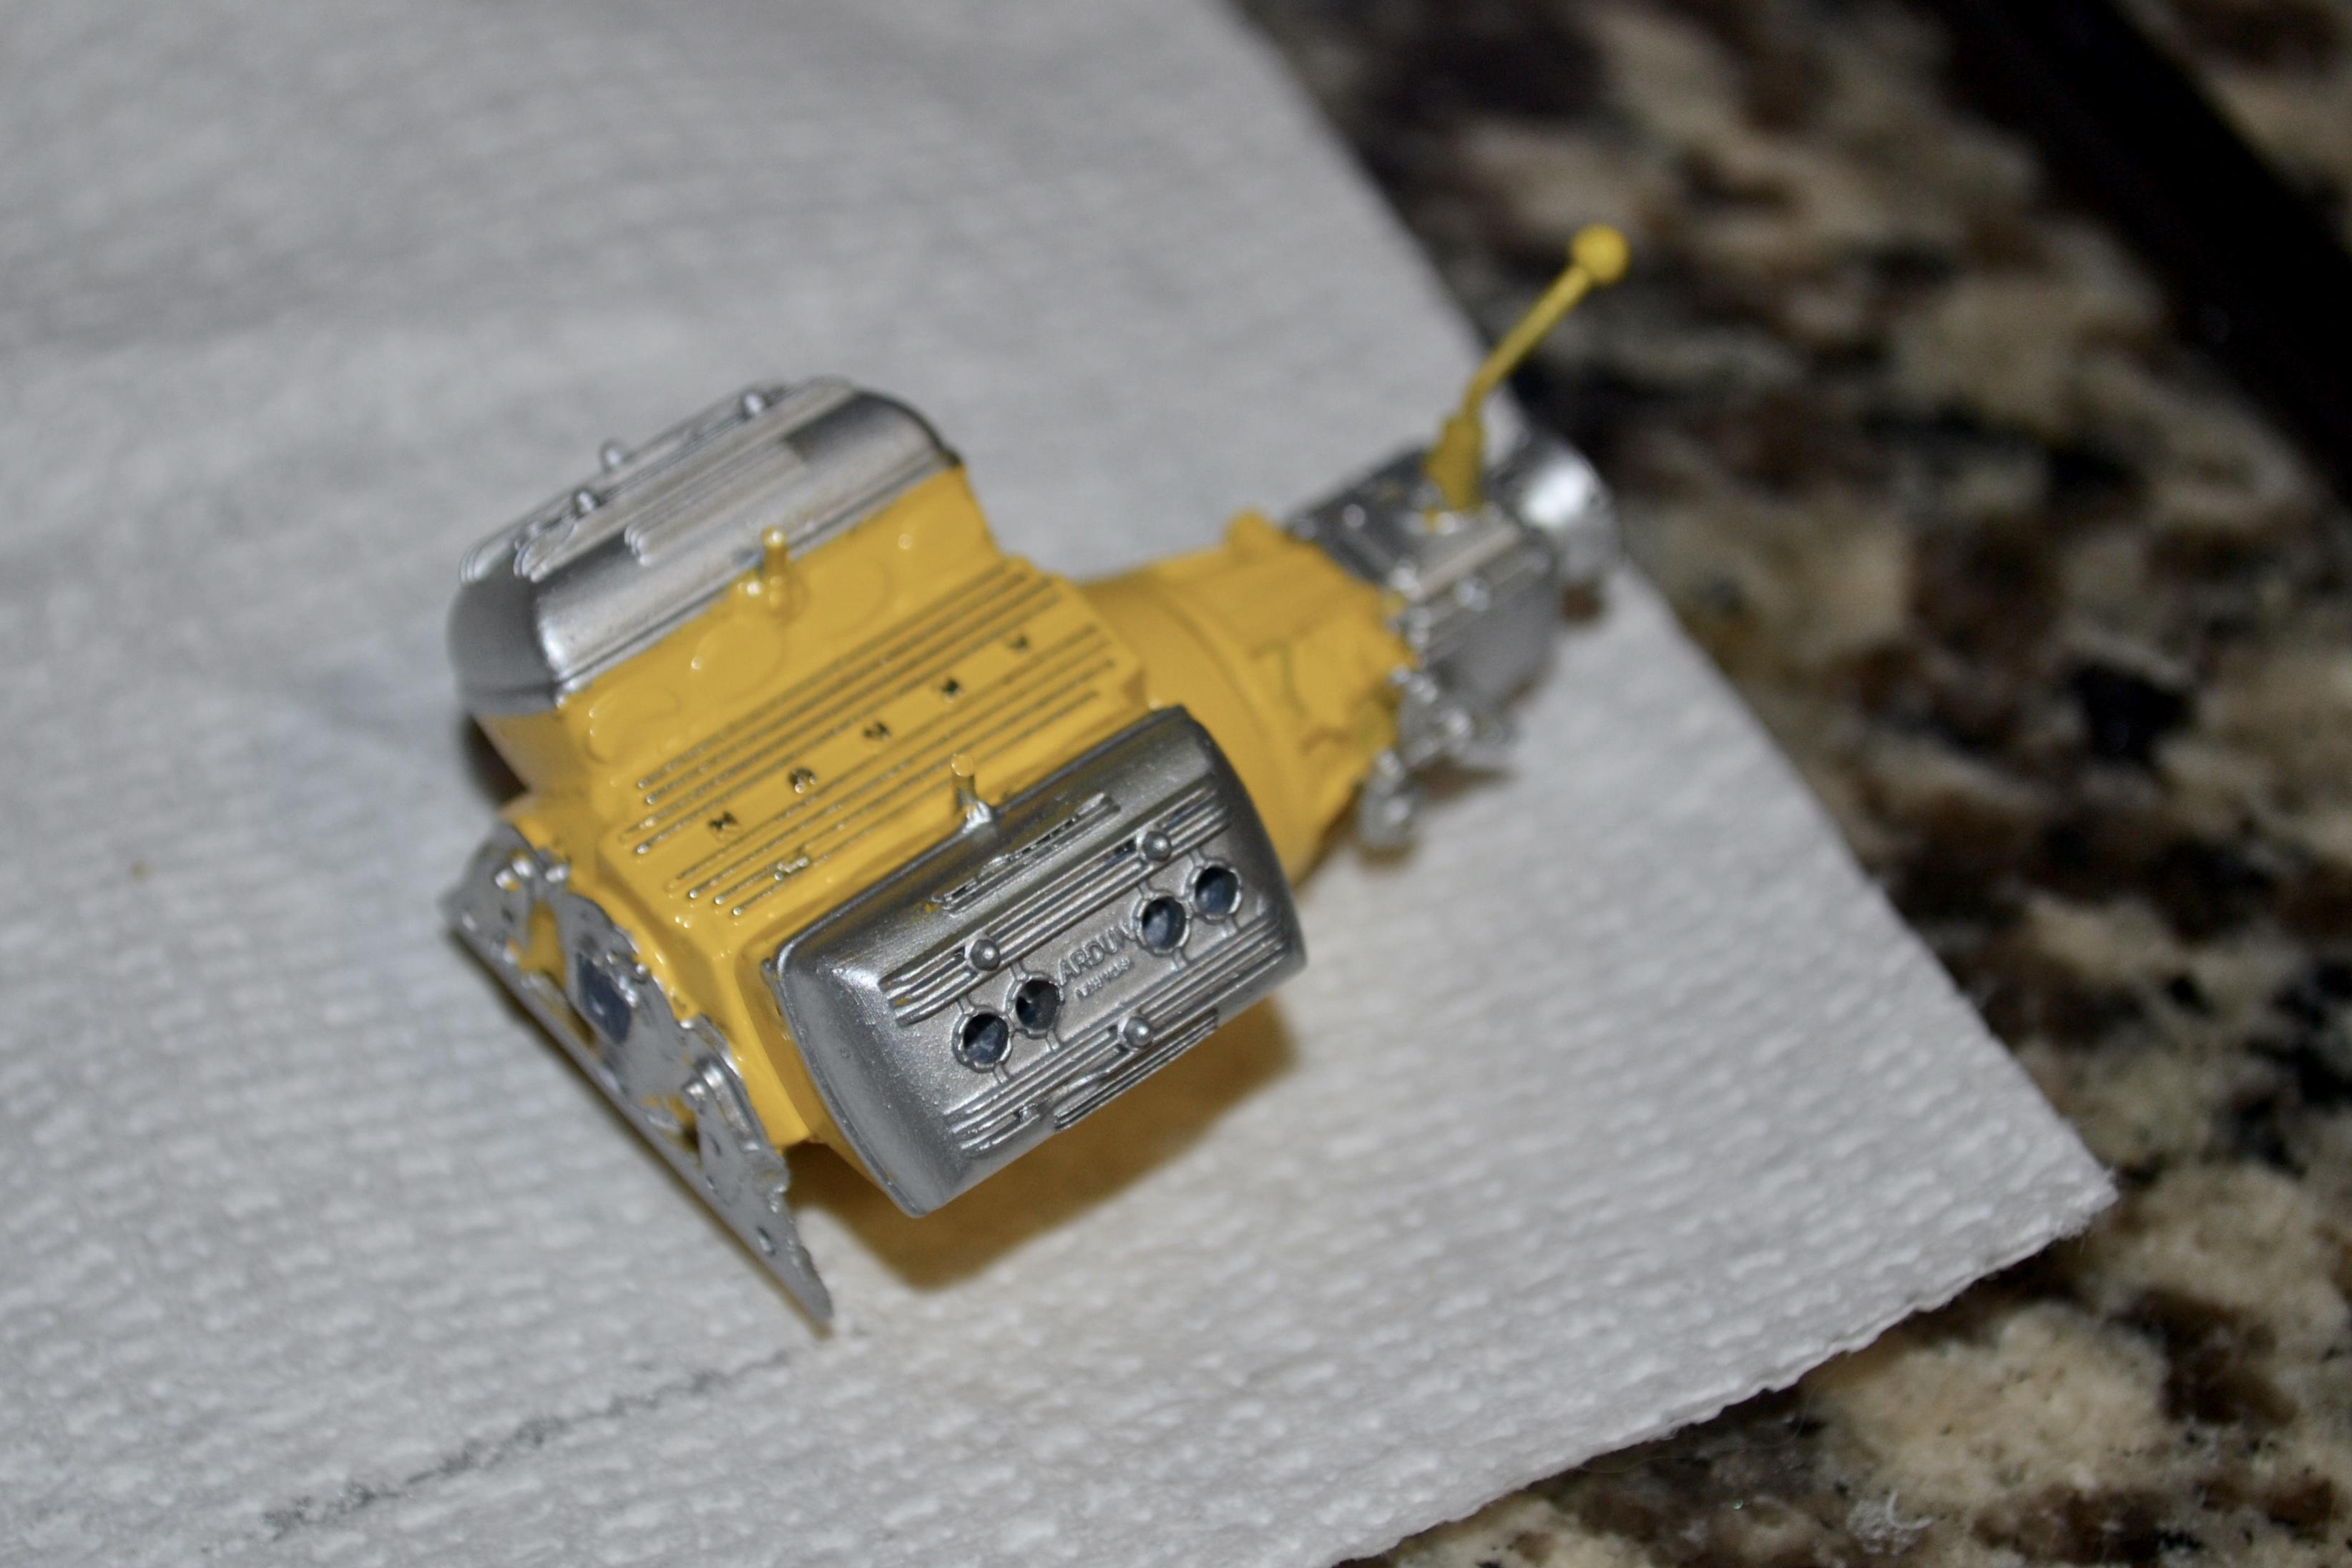
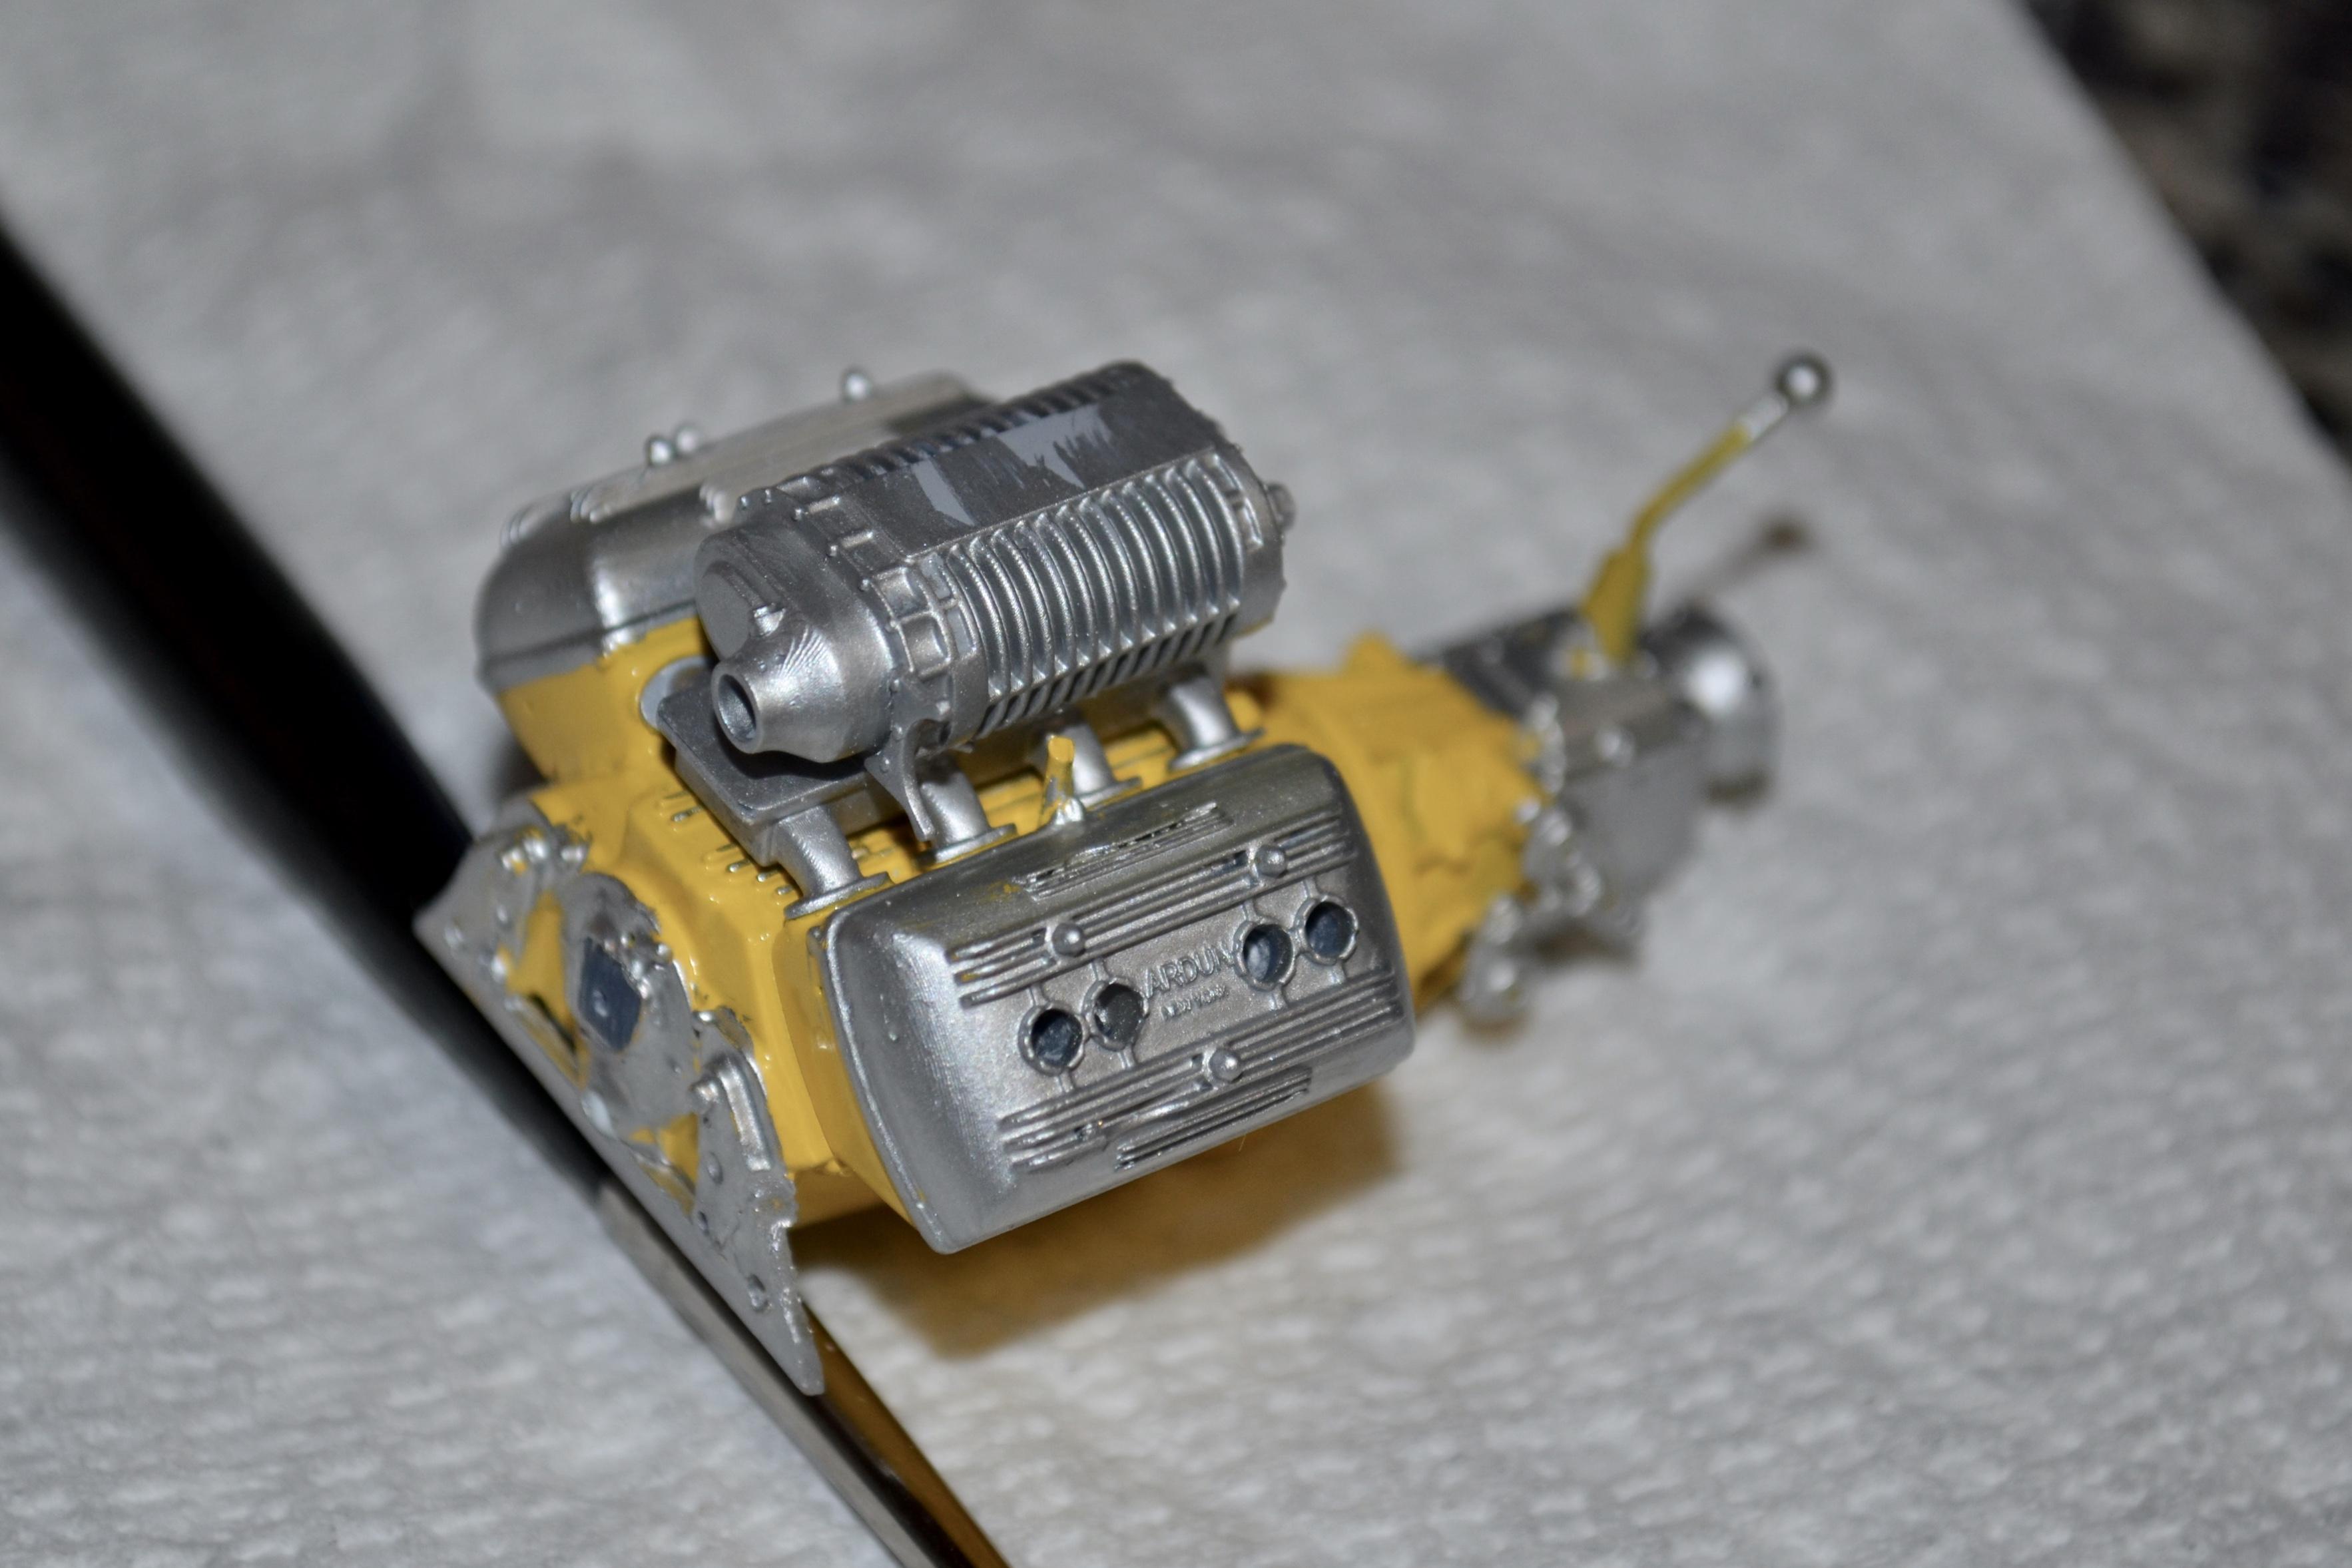
And finally some paint... The front and rear suspensions were painted Tamiya Gunmetal, with quick change receiving some Aluminum metalizer to match the motor. Eventually the driveshaft would be painted aluminum too. The interior panels received their "leather" inserts, which I wanted to look like floating in the panels, so I made them slightly smaller. Still not decided how I feel about them. A nice bomber style bench seat will actually hide most of the panel details. The wheels were painted with all Tamiya colors with a technique I kinda created myself and have been using on variety of parts in my builds. They were sprayed grey primer first, followed by flat black, straight from the rattle can. When dry (just an hour or so) I sprayed Tamiya Gold straight from the can again immediately followed by Titanium silver from the can. Those two colors were done in several mist coats alternating one over the other. This way the colors kind of mix by eating into each other right on the part. And right before they were cured I sprayed Tamiya clear matt, which again soaked into the previous layers. The center wingnuts were painted with Mollotow marker. The front tires are almost certainly from the Rat Roaster, while the rears are from the parts box, but if I had to take a guess, they may have come from the Black Widow T-bucket. I have a couple of well heeled neighbors that are into showing off their rides as a d1(k measuring contest. One of them is all about his signature white, which would include a Ferrari California, A couple Lambos Huracan and Urus and the latest a Tesla truck - the only all white one I have ever seen (even the wheels are white). The other is all about his signature grey, including and AMG GT, a McLaren 720, a Brabus G-wagon and a couple of Porsches. I always liked the subtlety (if there could be such thing with these cars) of the plain grey colors. So I decided that I am going to paint my truck in similar light grey as his Porsche GT3RS. I have to say that I repainted my cab about four times with British, Japanese and US air force colors, followed by an RC color I forgot the name of and still wasn't happy. So Clear coated primer grey it would be, as it is the closest to what I wanted. Mind you, this is the Tamiya FINE grey primer, which is slightly lighter and different shade of grey than their regular grey primer. The grille and the bed are still in just primer, while the cab needed some gloss in order to apply the modified Slixx decals. After that, the same Tamiya yellow used on the engine was blended from the firewall into the decals. And that's it for now. Thanks for looking and stay tuned... -
Here is some of the work I've done on the interior. The whole area in the back received a new shelf under the rear window and the rear seat space was filled in making a nice little package tray, like something you would find in a Grand Touring Ferrari. Actually it is almost identical to what's behind the seats of a Ferrari 550 Maranello for example. I have added more detail to the edges of all panels, which is missing in the pictures. Next, that old outdated dash had to be addressed and I first glued it to the center console. Then I covered all the old instrumentation in the center with sheet styrene and molded the console into the dash with more styrene. This left me with a blank center console. I had bought an Aoshima kit of the 50th anniversary Lamborghini Aventador, which I have not even started. But when I was going over its parts I noticed that Aoshima added a new sprue tree with the 50th anniversary seats, doors and roof, which have different upholstery pattern but are otherwise the same as the stock Aventador and on the same tree was also an extra center console. They left all the regular parts in there too, since they share real estate with some other pieces. So I end up with an extra set of seats and doors and center console. So I cut it up. The insert with all the modern controls had to be trimmed and after some sanding, just nestled up nicely in the Mustang's dash - nav screen and all. Next the molded in door handles were completely cut out and the surface behind them sanded smooth. Then almost as a joke I piled up bunch of loose left over styrene rod pieces and ends that were littering my desk to create actual door handles, which I wanted to kinda flow into the dash, like on most Ferraris from the '70s/'80s/'90s... This was the rough result after some serious sanding and sculpting. Here it is after some primer for guidence, before a round of putty. And how everything flows together, looking rather factory. This will be ever more apparent, when everything gets painted as seen with this masking tape. Thanks for looking and stay tuned...
-
Thank you. In contrast, I always liked the look of the '71. It has a hood for miles and a low roofline that looks chopped from the factory.
-
Pretty cool build. In the late '90s/early 2000s I used to work for Kerbeck (FC Kerbeck car dealership empire). They were (and probably still are) the biggest Corvette Dealership in the world. That's where I worked - the Cadillac, Corvette, Lamborghini and Rolls Royce showroom in Atlantic City, NJ. At the Corvette showroom is where the three Kerbeck brothers had their main offices and also where they kept most of their personal car collection. This very same original Camaro pace car (not a clone or reproduction) was on the showroom floor not 15 feet from my desk. Next to it was the very very first Corvette ever made. I mean the the prototype with the very first serial number. George - the oldest brother, who basically ran the show was a diehard GM guy. With all his millions (if not billions) of dollars, you would never see him behind the wheel of anything other than a Cadillac, Corvette or a Harley. I honestly have no idea if their collection is still on display in AC or even if the dealership is still there, as even 25 years ago the casinos were offering them all sorts of stupid piles of money for their property.
-
Can't go wrong with that Hemi. I just always thought that Hemis look better with something beefier for induction on top of them. It's such a large engine that a single row of Strombergs kinda gets lost on top of it. The forum's own Maplelleaf Motorparts makes a killer six carb intake for that motor.
-
I get the difference in height because of the channel job, but you don't have to section the grille. just the radiator and the back side of the grille shell, which would allow you to sit it lower without moving it forward. Here I filled mine because I am going to use a see through photo etched one, but if you are using the kit's grille you don't even have to do that.
-
I missed this one the first time around, but I am definitely following now. A lot to be learned in this thread and definitely some ideas/techniques that will be used in the future. Thank you for that. Here is the crazy thing. I love street rods and I absolutely love woodies. I have bought woody kits countless times, but somehow in the last 30 years building street rod kits, I managed to only ever build two of them. One was a '30 Ford woody which I build while working part time in a hobby shop in Chicago, back in 1996. I painted it some kind of lighter green metallic and at the time it was one of my best models. When my relationship with the shop's owner fell apart and we decided to part ways, thanks mainly to his unbelievably bratty son, he refused to give it to me and kept it on display at the store. I was furious, but mostly hurt by his petty attitude. The other was a Dan Fink Speed Wagon converted to a pick up with the drivetrain and chassis from the Phantom Vicky, built in New Jersey in 2001 which ended up on the cover of Scale Model Contest Annual 2003. I still have it. So over 20 years since I have even attempted a woody, while I've bought plenty of them during this time. Ironically enough, the last woody I bought was last year and it is the latest reissue of the very model you are showing on here. I definitely simply can not fit another build on my bench right now (I wonder how many times we have all said this in vain) but your thread is definitely making me want to go dig out the box in my garage and start mocking parts up. Must resist... I'm with the force and the force is with me...I'm with the force and the force is with me... LOL
-
I'll join the others on the figures. I think you did a fantastic job on them. They look very period correct and compliment the car perfectly.
-
LOL. Sure we can. And thank you. I printed them for the C3500 extended cab dually I'm working on. But the rear is too narrow for it. The files came with two different backs - tall and short. So I had to resize them in all directions to make them work. I cut out the kit's rear seat as two separate pieces - bottom and back. Then I measured them and resized the 3D parts to those specs. Then I resized the front seats to match the width of the inserts, hoping they would fit in the Deuce's narrow interior. They barely fit, but it will work. It will just limit the room to play with the door cards, which I'm going to custom make. I'm planning to make three different long roofs and I don't want them to all have the same interior.
-
I love your color combo. The red interior looks super nice on that light gunmetal. I just don't understand why did the grille have to move so far forward?
-
Brabham BT45
mrm replied to Chris Smith's topic in WIP: Other Racing: Road Racing, Land Speed Racers
Great stuff from the golden era of F1, when real men raced real cars. -
Wild Hoss Bronco
mrm replied to iamsuperdan's topic in WIP: Model Trucks: Pickups, Vans, SUVs, Light Commercial
I did make the plunge and that's exactly the trap I fell into. For the last month I've been printing bunch of stuff that I don't even know if I'm gonna use or trying to figure things out by reprinting parts with different settings and I have spent very little time actually building something. After all, there are only so many hours in a day... I recognized the seats and the accessories, but what files did you use for that Ford motor? It seems like a very, very well designed parts. -
Post your truck mockups.
mrm replied to Mike C.'s topic in WIP: Model Trucks: Pickups, Vans, SUVs, Light Commercial
I have the extended cab 3500 version in the works. I haven't started a thread about it, but maybe I should. -
Pretty cool. I am a big fan of unconventional powertrains in hot rods. I was just reading an old magazine (from 2012) about a '54 Buick by Troy Trepanier that is powered by a supercharged AMG V8. I'm also working on the reissued AMT Dually right now.
-
Who doesn't love a mock-up? Let's see yours!
mrm replied to Belairconvertable's topic in WIP: Model Cars
Now, for me personally, this is the quintessential Deuce coupe! Love the wheel/tire/stance combo. -
I think the fenders look a lot better bobbed. It can be very tricky tho, as I have cut off too much in the past. Yours look just right and I thing they abslutely needed it considering the channel job.
-
It's a '30-sumthin' truck thingy...
mrm replied to mrm's topic in WIP: Model Trucks: Pickups, Vans, SUVs, Light Commercial
The engine getting closer to be ready. The block was painted Tamiya yellow, while everything else is Model Master Aluminum non-buffing metalizer.
-
Thank you. This build just gets my creative juices flowing and I keep adding new ideas to it. At this point I have a general idea what I want it to look like but not a clear plan or vision what it would end up like.
-
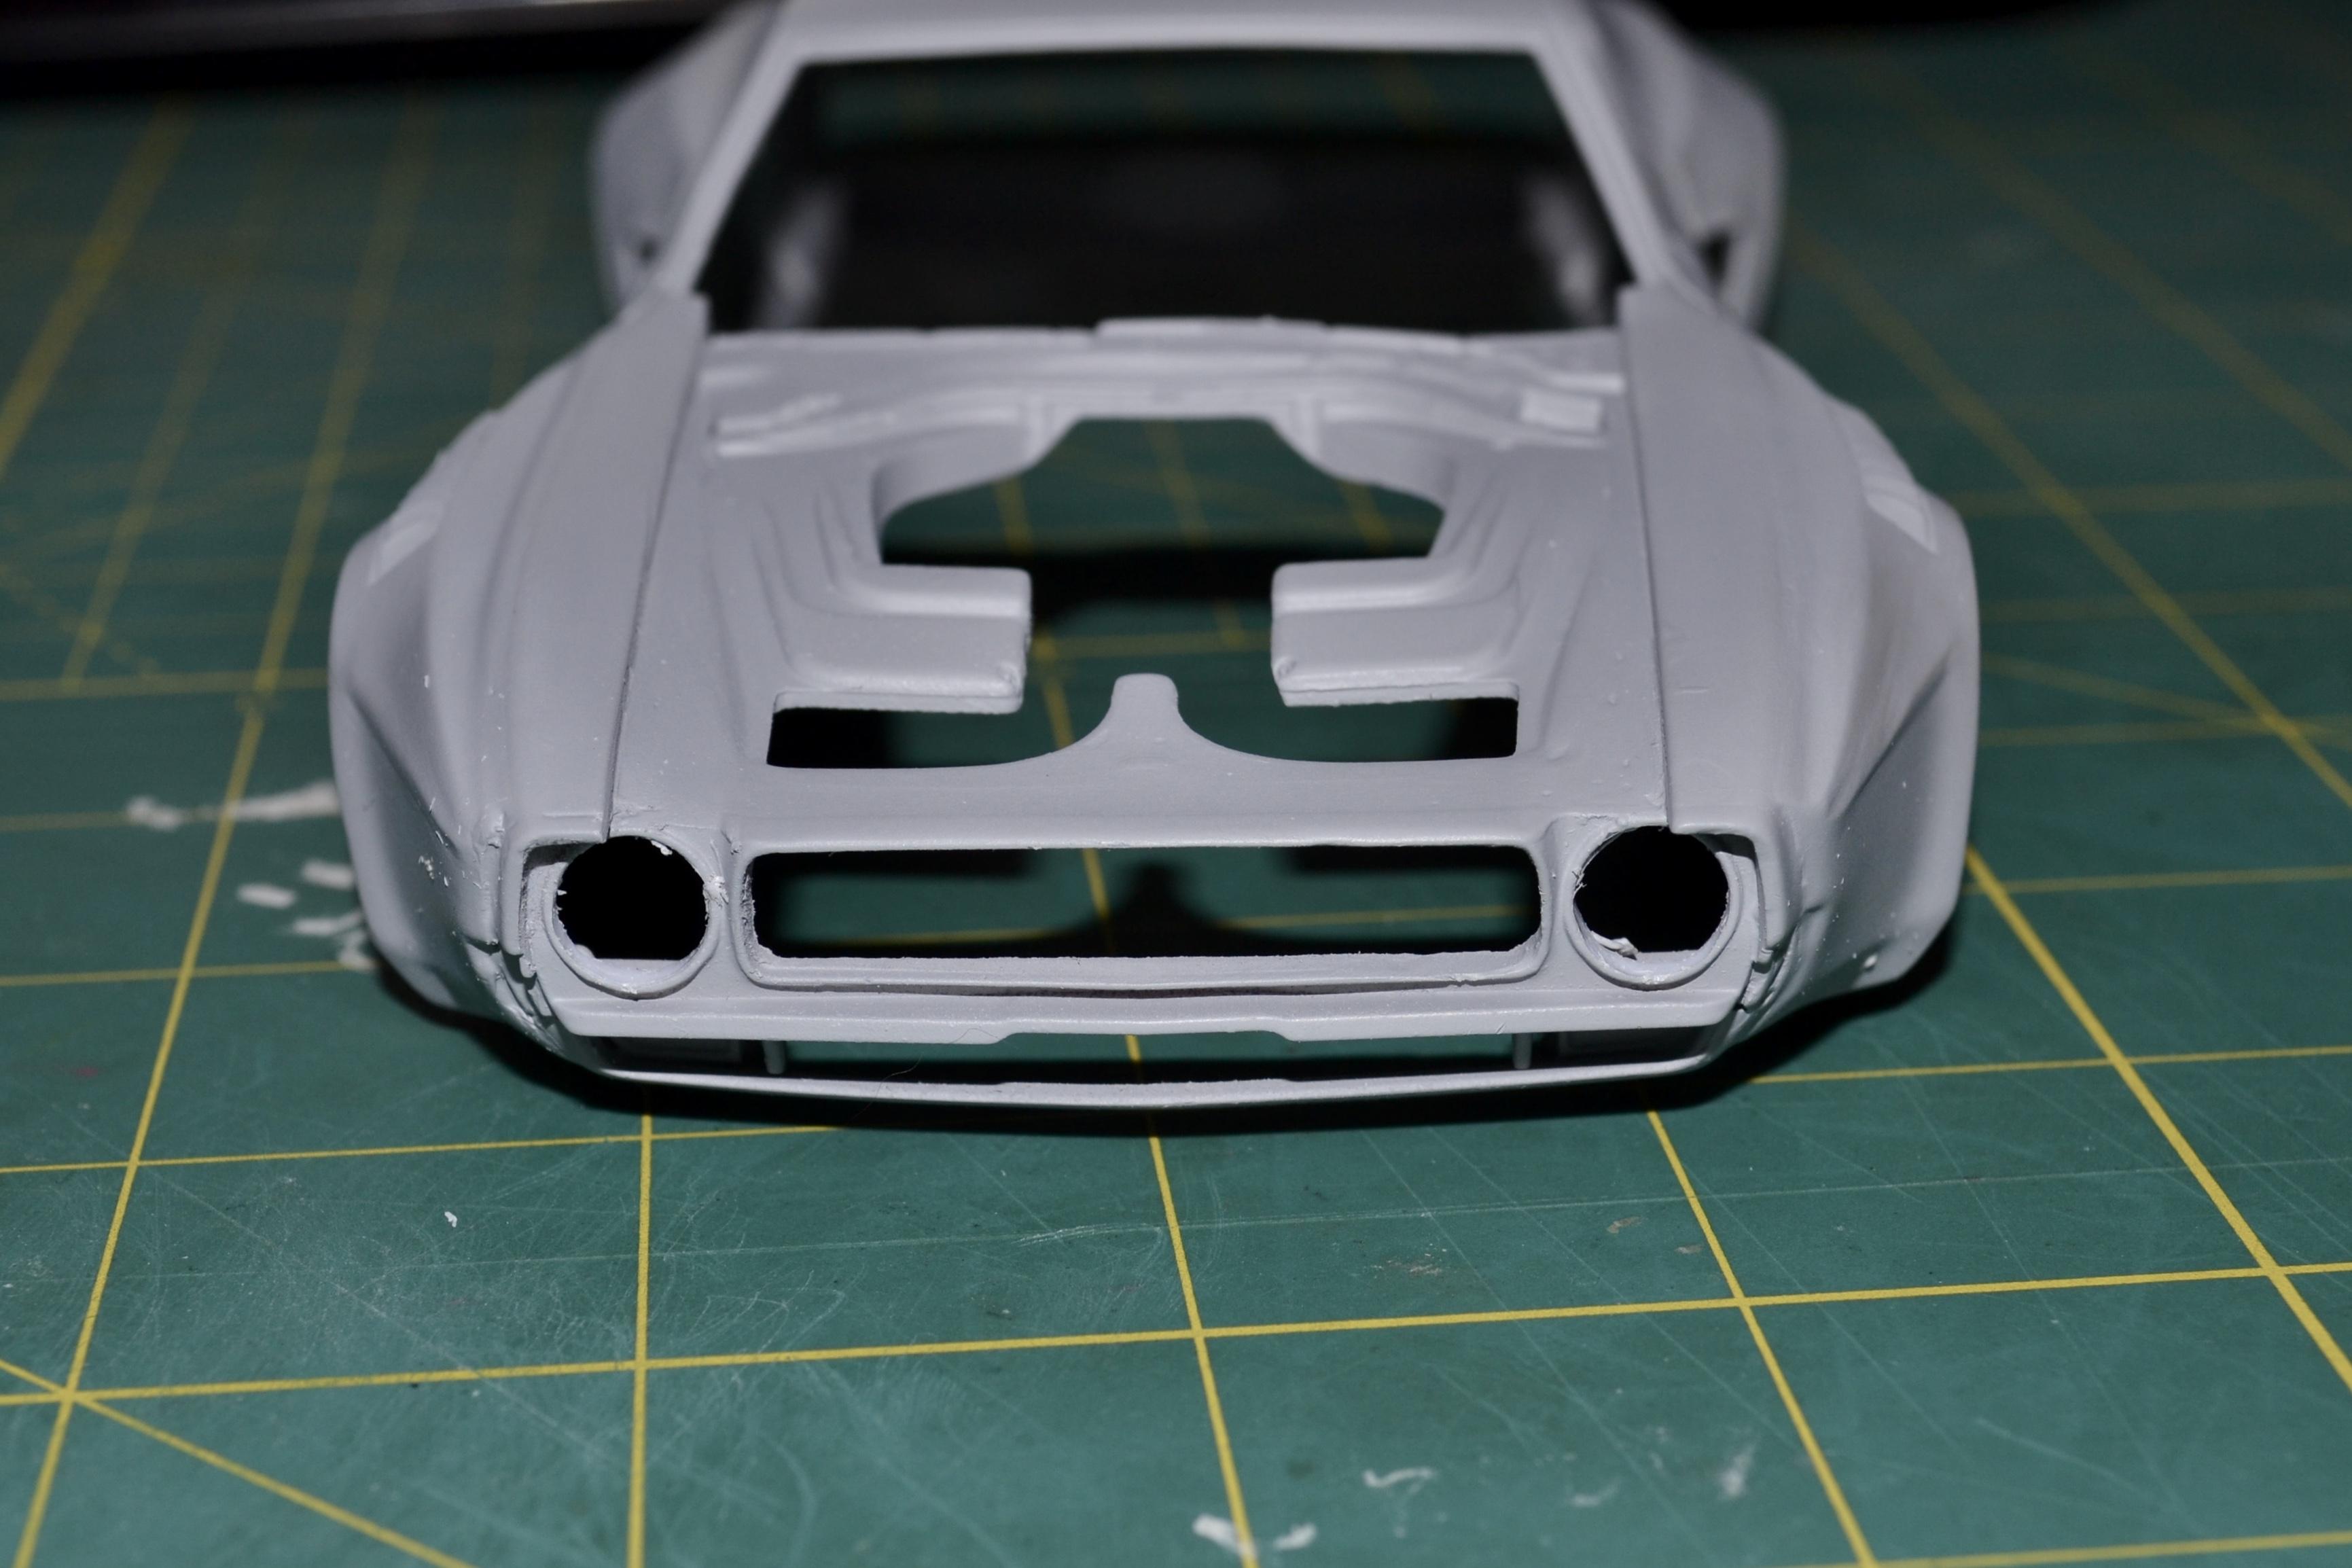
I was not happy with the look of the lights. They are very nice if you are building a stock version of the car, but for my build I needed something more in tune with today's trends. So I drilled them out and made myself some nice custom HID projector lights. I only feel a little bit of guilt, as the more I change, the cooler the car looks, but it gets less and less recognizable as the Mustang it started as.