Ace-Garageguy
-
Posts
38,181 -
Joined
-
Last visited
Content Type
Profiles
Forums
Events
Gallery
Everything posted by Ace-Garageguy
-
Yeah...I've used a boatload on various countersinking applications. Smallest I have here are about .040" for the small diameter. Dang handy tools to have around, but I still think real cobalt micro drills, started with a small punched dimple, is the way to go. You're right. You just do NOT use a punch to make a hole in metal. It's not the way it's done. A center-punch is used to make a very small divot that makes a drill bit to stay on center as it starts, rather than skittering across the workpiece. It's very often wise to lightly dress the punched area flat, with a file, to remove the upset edge after punching too, as a drill bit can sometimes catch on the edge, and walk out of the hole...making a nice snail-trail all across your pretty work...and it happens much faster than you can catch it. BUT IT IS ESSENTIAL to have the correct material for what you're drilling into, with the bit correctly sharpened. I've seen guys who should know better waste time trying to drill stainless with HSS. Yeah, you might eventually WEAR a hole in it, but that's not the right way.
-
 The original images are all on my own drives as well. The problem I'd face by changing photo-hosting services is the inordinate amount of time it would take to go into every post and change all the links for all the photos I have all over the web. I won't do it. If Pbucket goes entirely down, I guess the world will just have to do without the hundreds of illustrated threads and articles I've created over the years. I really don't care one way or the other at this point. It was fun while it lasted. I've had a lifetime's bellyfull of compensating for the incompetence of others. I'm done.
 -
Kinda like these? All the micro bits I referenced above come in this configuration. (And starting with a center-punched dimple is the only way to fly. Again, using a drill-press, or a drilling rig setup for a Dremel, is a good way to avoid breaking these things. Drill into a piece of soft wood under your work, too.) Also, cobalt bits prefer low speeds.
-
I just noticed that though the links are working here, they're broken on the "other" board.
-
Those are pretty cool, especially the Merc. Real period pieces. Love the junk in the trunk and the flocked interior too.
-
Yup, that's pretty much the same thing as the "filling glaze" or "machine glaze" I use. Liquid Ebony was the original, back in the dim recesses of time. NLA.
-
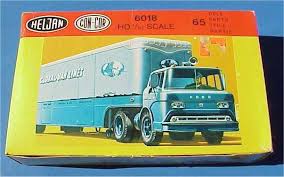
Decent price on a Testors repop of the Fujimi Porsche 356 B/C (kit builds either variant). The C brakes, hubs and 2-liter 4-cam engine will go into a 356 A coupe outlaw. The C bolt pattern allows 911-style Fuchs wheels. The B running gear and the 1500cc 4-cam engine from the A will go under a Flintstone 550 Spyder. And finally got a virgin, unmolested 1/87 (HO scale) Revell Ford C tractor and van...
-
Agreed 100% (except: though I never tried "bowling alley wax", I DID try Dog Wax, but that's another story for a different day). A well-polished paint job really doesn't need anything else, but a coat of "filling glaze" or "machine glaze" can remove the absolute last of any polishing swirls or light "haze". Modelers often make the mistake of thinking "wax" will substitute for a dead-smooth (color-sanded) and highly polished surface (both of which take time and effort). It won't.
-
These two were built by the same guy, long gone, sold off by his family. He sure had an eye for stance.
-
The body shell on this '32 is all I got. The rest is, again, mocked up with period parts.
-
This one came in painted, but missing almost everything but the body and fenders. Mocked up here with period parts, the plan is to leave the paint pretty much as-was.
-
What Did You Get Today? (Not Model Related)
Ace-Garageguy replied to LOBBS's topic in The Off-Topic Lounge
I don't know. The heads and pan were off and the pistons were out. Definitely a 4-bolt, and my calibrated fingernail in the bores says there's less than a .010" ridge, so I'm pretty sure she'll clean up at .020" over...if she crack-tests OK. If I get REAL lucky, one of the cranks will be a decent 307, the last big thing I need to build a junkyard-special big-journal 327. Already have a nice pair of double-hump heads. -
Well, this is nutty............
Ace-Garageguy replied to Joe Handley's topic in General Automotive Talk (Trucks and Cars)
Way too much power is just enough. -
What Did You Get Today? (Not Model Related)
Ace-Garageguy replied to LOBBS's topic in The Off-Topic Lounge
Scored a pickup load of smallblock Chebby engine parts...blocks, heads, cranks, etc. Some of it low-performance scrap iron (though there's probably enough stuff to build a decent 305 to replace the one with the cracked block in the GMC), but some decent 350 stuff mixed in, including one 4-bolt main block that should clean up with a .020" bore. One complete TH-350 (unknown condition) too. Same guy had a pair of 351C small-port heads, just what I needed to finish up the junkyard-parts scrounge for a 351 Clevor Ford build. Can't beat the price: $0.00. -
Yes, great photos. Thanx.
-
Cobalt bits are available in small sizes. They're not cheap, and it's advisable to have a drill press. https://www.amazon.com/Dormer-Cobalt-Miniature-Uncoated-Conventional/dp/B007E4OUCE Or tungsten carbide. https://www.amazon.com/dp/B00PGLTJPK/ref=sspa_dk_detail_3?psc=1&pd_rd_i=B00PGLTJPK&pf_rd_m=ATVPDKIKX0DER&pf_rd_p=f52e26da-1287-4616-824b-efc564ff75a4&pf_rd_r=MSH0RXJFB2NRWHRFYMX2&pd_rd_wg=efKxI&pf_rd_s=desktop-dp-sims&pf_rd_t=40701&pd_rd_w=ckIOP&pf_rd_i=desktop-dp-sims&pd_rd_r=bc6c1ecf-c9c6-11e8-bf7f-6b3ae7c9f0a5 Another option is diamond-dust coated tips on HSS. Though intended primarily for glass and ceramics, they will cut through stainless... https://www.amazon.com/Diamond-Tipped-Micro-Drill-0-30mm-1-6mm/dp/B008J4DRMM EDIT: A real problem with these is that you never really know what you'll get from the offshore stuff. Some of it is pretty decent, and some of the "cobalt" or "tungsten carbide" bits are no harder than HSS. Maybe some folks who have bought specific brands or part numbers can weigh in here. NOTE: All of these are available in a wide range of diameters. I only posted a very small representative sampling.
-
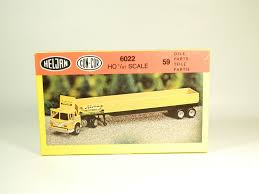
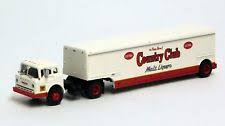
Yup, Heljan Con-Cor acquired and re-released many of Revell's HO-scale building kits, including the really nice engine-house, Superior Bakery-newspaper plant series. They also did some runs of the trucks... ...and the tractor has been released with more modern trailers too... EDIT: Athearn has done several C-series Ford trucks, and as it's pretty common for HO manufacturers to swap tooling and/or offer each other's products in different packaging, I wouldn't be at all surprised to find the Athearn pieces were based on the ancient Revell tooling too.

-
Model Car Kit Collection
Ace-Garageguy replied to Ahajmano's topic in General Automotive Talk (Trucks and Cars)
Yeah, like other guys have said, I don't see you at the "problem" stage yet. When you wake up under a bridge, clutching a kit to your chest after being evicted from your apartment because all your money goes to storage space for kits...and more kits, THEN you have a problem. -
What I was actually thinking is that, in my experience experimenting with the stuff, usually NOT ALL of the baking soda gets equally saturated with CA, because it starts to "kick" immediately, and forms a crust. It's my GUESS that the less-saturated baking soda may be the source of the long-term problems reported by Mr. Snake. NOTE: Another good polyester filler that comes in MODELER FRIENDLY packaging is the Bondo Brand "Professional" catalyzed glazing putty. The much larger body-shop packages usually go bad long before the typical modeler uses them up. These small tubes, available at most general auto parts stores, come with a small tube of the correct catalyst, too. There IS a learning curve to mixing and using it to best advantage, so don't experiment on a model you care about.
-
I tried the old-style brush-in-cap Wite-Out a long time ago, and my experience was that it didn't flow enough to suit me, leaving raggedy brush marks. Since then, I've been using acrylic artist's white, or acrylic gesso, with the tire chucked up in a slow-speed drill...and a good brush, almost a pinstriping brush, that will carry enough paint to get a complete coat in one revolution without stopping. For even better results that rival factory pad-printed tires, I use a light colored spray interior dye, and masks cut from frisket film with a compass knife. And in my own experience, I've found that a white gel-pen, allowed to dry thoroughly, makes an acceptable base for blue-line stripes (sorry...I don't recall the manufacturer of the gel-pen that works best; oil-paint markers usually never dry on vinyl tires). EDIT: I'd be really interested to know if the correction pens work well for narrow whitewalls and tire lettering.
-
Got another cheap sealed reissue Attempt 1, mainly for the Dragmaster chassis. Lots cheaper than the vintage parts-pack version, plus a whole lotta other vintage stuff in the kit, like a 3-71 blower. Also snagged a partially assembled and display-model converted Strombecker 1/24 Maser. Included in the box was a nice set of PE wire wheel centers too.
-
Your first line: "Joining and gap filling diecast metal"... "Joining" in this context means "bonding" or "adhering" or "attaching one thing to another thing". Filling means filling. Bonding two parts together, and filling large gaps are best done with a filled or toughened epoxy, as discussed above....JB Weld or something similar, or cotton-flock/epoxy, etc. (I use high-strength aircraft stuff, but it's expensive...over $200/gallon with the hardener). Filling the areas AFTER joining, or smaller things like door lines, etc. is best done with a catalyzed polyester putty like the Evercoat product Pete mentions, as also discussed above.
-
Without studying the problem and the chemistry, my first GUESS would be that unreacted baking soda absorbs atmospheric moisture over time, leading to eventual swelling and failure. Like I said, that's an off the cuff GUESS. Now that we've addressed several of the issues here, my recommendation for BONDING die-cast parts together, or for FILLING LARGE GAPS, would be a relatively high-strength epoxy, thickened with cotton flock. (Finish fill with polyester putty) Cotton-fiber-filled epoxy material is used for structural bonding in aircraft, and is as permanent an adhesive as there is. By "relatively high strength", I mean an epoxy that takes AT LEAST a couple of hours to cure. Generally, the LONGER AN EPOXY TAKES TO CURE, THE STRONGER IT IS. The stuff I use, leftovers from aircraft work (but past its legal use-by date) has to be mixed on a gram-scale, takes several hours to gel, overnight to set up to handle, and an additional 24-hour post cure at elevated temperature to reach maximum strength. It's beyond overkill for most model applications, but it allows me to produce extremely thin parts that are far stronger than styrene. On something like a chopped top, I'd further reinforce the bonded joints with fine fiberglass cloth on the backsides, as I do on styrene models. There's nothing so maddening as being in the middle of the last phase of polishing paint, and having a crack appear in an insufficiently strong joint. That's why I tend towards overkill.