-
Posts
2,248 -
Joined
-
Last visited
Content Type
Profiles
Forums
Events
Gallery
Everything posted by Miatatom
-
Nice job! I love the color and quality of finish. The gaps for the trunk and rear fenders are a little wide. I'd scuff the mold line off the slicks too. Trademarks on the bottom of the chassis could be removed. Rear taillights? I've got this model in my stash and will get to it someday. I've heard it's sub par on fitment of some of the parts. If mine turns out as nice as yours, I'll be happy. I'm working on several cars and in a few instances, taking a shortcut was necessary for my sanity. I'm finding that the near perfection I see in some builds may be above my abilities. Experience will fix that hopefully.
-
Welcome! I visited your beautiful city while in the US Navy, way back in 1963. I'm sure it's changed a lot but I really enjoyed it.
-

Start-up stuff...
Miatatom replied to Doug Bowen's topic in General Automotive Talk (Trucks and Cars)
Doug, I'm 69 so I speak from experience. You need light, more light and then even more light. -
Nice work! Love the orange, GO VOLS!!
-

Mercedes W154 M163 - Grand Prix Champion 1939 1/20
Miatatom replied to Plastheniker's topic in Model Cars
Another beautifully completed model. Jurgen, you amaze me! -
Wax comes last.
-
Nice job!
-
This is a really good way to make your own. I haven't tried it yet but may give it a shot just to see if I can. http://automodeler.kitmaker.net/modules.php?op=modload&name=features&file=view&artid=1240
-
Looks great! I want to build a couple of 60 Ford Starliners. Love the lines.
-

Paint Booths & Safe Ventilation?
Miatatom replied to Synister's topic in Tips, Tricks, and Tutorials
You might consider a bilge blower. That's what I use. Do a search here for "glove box style spray booth". -
I'm heading out early in the morning to pick up cans. Should have enough to cover that in no time!
-
FREE SHIPPING!!!!!!! I'm all over that!
-

1941 Chevrolet Pickup
Miatatom replied to mooneysober's topic in Model Trucks: Pickups, Vans, SUVs, Light Commercial
Nice! I hope my first one looks that good. Almost there on one of them. -

Benny Parsons .........
Miatatom replied to Old Coyote's topic in WIP: Stock Cars (NASCAR, Super Stock, Late Model, etc.)
Excellent work! I miss Benny. -

Small mixing containers?
Miatatom replied to Beach Bum's topic in Model Building Questions and Answers
I do what Dale does. I'm starting to use decanted paint exclusively. Here's how I store the stuff: http://www.modelcarsmag.com/forums/index.php?showtopic=76428 As for mixing paint, when I have to, I always use these. They're called plastic pipettes and you can buy a hundred of them, shipping included for around $5 on eBay. -
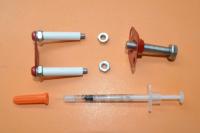
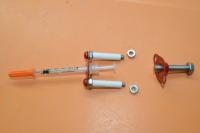
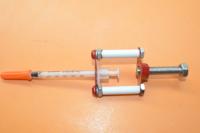
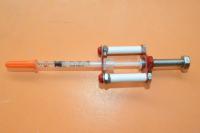
The job goes easier when you've got the right tool. Some of you might not need something like this but when your hands aren't as steady as they used to be, it makes some accurately applying glue much easier. I read a suggestion here that using insulin syringes was a good way to apply small amounts of glue. I tried that and while it does work well, sometimes the plunger would stick a little and then I'd wind up with more glue than I needed. I gave it a little thought and here's what I came up with. I took a couple of old dzus fasteners and flattened them out. You don't have to use them but I had some already. You can pick them up at a race shop. Guys that race go through them, especially if they race dirt. A small washer was epoxied to one fastener to hold the syringe since the opening in a dzus fastener is too large. A nut was epoxied to the other fastener which serves to hold a fine thread bolt. A couple of small screws and some plastic tubing made the parts that hold it all together. Disassembled. The syringe in placed in the holder. The syringe is ready to be filled. The syringe is loaded and ready. Just hold the device with one hand and screw the bolt in with the other. Took a little time to decide how to make it and put it together but I've already used to once and it works great. Naturally you can't used glue that's too thick in it.
-
Excellent job! I love the color and the stance is perfect.
-
Nice work! Love the color! What is it?
-
Nice work! If the 70 Datsun was a 510, I'd take it any day over the Plymouth. Well, actually I'd take the Plymouth and sell it to buy a 510.


