DRIPTROIT 71 Posted August 21, 2018 Posted August 21, 2018 I've already dove into another project. This one is meant to be a fun little experiment project. I intend for it to look like an old barn find. It began life as the old "Orange Blossom Special" AMT kit, with some donor parts from the Revell 41 Chevrolet. IMG_1380 by Brian Smith, on Flickr IMG_1382 by Brian Smith, on Flickr IMG_1383 by Brian Smith, on Flickr
CRUSADER2 Posted August 21, 2018 Posted August 21, 2018 This is going to be another good one, really interesting, i'm going to follow your build closely for tips, aspecially the weathering, good luck with it.
Jim B Posted August 22, 2018 Posted August 22, 2018 This should be interesting. Where are the wheels & tires from?
DRIPTROIT 71 Posted August 22, 2018 Author Posted August 22, 2018 Thanks guys! I plan for this to be a simple fun build. I hope it stays that way. 5 minutes ago, Jim B said: This should be interesting. Where are the wheels & tires from? Thanks Jim! The wheels came from Ebay. I'm not sure who cast them.
DRIPTROIT 71 Posted August 22, 2018 Author Posted August 22, 2018 Thanks!! I have the interior bucket done. I modified the AMT kit bucket and seat back to stock as it was all diamond pleated and diamond plate. This barn find is going to need some work. There's a box on the seat with the air cleaner, carb, distrbutor and wires, and starter. There's also a few tools too. There is a brand new valve cover gasket though. Since all of the spark plus are out and there's a can of Marvel Mystery oil in the box I assume that the engine is stuck. Maybe that's why the For Sale sign is in the box. A gauge and the speedometer have been robbed too, at least the cable is still there. IMG_1384 by Brian Smith, on Flickr IMG_1385 by Brian Smith, on Flickr IMG_1386 by Brian Smith, on Flickr IMG_1387 by Brian Smith, on Flickr IMG_1389 by Brian Smith, on Flickr IMG_1390 by Brian Smith, on Flickr
Warren D Posted August 22, 2018 Posted August 22, 2018 Interesting ideas, doubt I'd ever thought of all that.
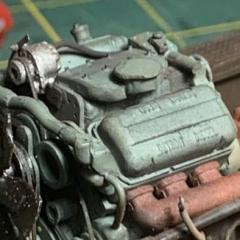
DRIPTROIT 71 Posted August 24, 2018 Author Posted August 24, 2018 Thanks Warren! A little more progress to show. IMG_1414 by Brian Smith, on Flickr IMG_1411 by Brian Smith, on Flickr IMG_1413 by Brian Smith, on Flickr IMG_1410 by Brian Smith, on Flickr IMG_1409 by Brian Smith, on Flickr IMG_1408 by Brian Smith, on Flickr IMG_1407 by Brian Smith, on Flickr
Rat Roaster Posted August 24, 2018 Posted August 24, 2018 LOVE the heater core nipples sticking out of the firewall. Very creative!
Warren D Posted August 24, 2018 Posted August 24, 2018 Maybe some "rotted" rubber hoses or parts of hoses hanging off the ends?
plastic trucker Posted August 24, 2018 Posted August 24, 2018 Looking good. I like the idea of the missing carb.
Chariots of Fire Posted August 24, 2018 Posted August 24, 2018 I'm glad to see you kept the chrome free of rust. Just the way it ought to be! Nice job.
DRIPTROIT 71 Posted August 27, 2018 Author Posted August 27, 2018 Thanks for the comments guys!! I'm calling this one done! I'll post some pictures under glass tonight.
landman Posted August 27, 2018 Posted August 27, 2018 25 minutes ago, DRIPTROIT 71 said: Thanks for the comments guys!! I'm calling this one done! I'll post some pictures under glass tonight. Brian, what technique did you use for the rust?
DRIPTROIT 71 Posted August 28, 2018 Author Posted August 28, 2018 3 hours ago, landman said: Brian, what technique did you use for the rust? I had heard of the "salt technique" from looking at builds from Chuck Most and a few others. I've never seen or read a tutorial on it, I just took a guess on the technique. I sprayed red oxide lacquer primer first and let it dry. I then applied salt to the areas that I wanted rust using moisture to make it stick. I then sprayed it with flat black lacquer for color. I then fogged it with both red oxide and flat black. After it dried I removed the salt with a tooth brush. Some of the more stuck crystals had to be scraped off. I added chalk in some places for more final effect. This whole build was an experiment. It may not be the best technique, but I'm pretty happy with the results.
Sixties Sam Posted August 28, 2018 Posted August 28, 2018 Very nice build! The box of junk on the seat is a nice touch. Great work! Sam
Pete68 Posted August 30, 2018 Posted August 30, 2018 Brian put a 4 banger in it with a organ pipe behind the cab LOL ?
DRIPTROIT 71 Posted September 4, 2018 Author Posted September 4, 2018 On 8/30/2018 at 2:24 PM, Pete68 said: Brian put a 4 banger in it with a organ pipe behind the cab LOL ? Lee, you read my mind. Take a peak at the power plant for my next project. IMG_1648 by Brian Smith, on Flickr IMG_1649 by Brian Smith, on Flickr Stat tuned for more!
Pete68 Posted September 6, 2018 Posted September 6, 2018 Very nice! That is awesome Brian could it be a late 30s Jimmy COE???
PettyKW43 Posted September 6, 2018 Posted September 6, 2018 I have never built anything that is weathered but after reading your technique I think it’s time to give it a try! Thanks for sharing. Is the 4 banger Detroit resin or did you scratch it?
Recommended Posts
Create an account or sign in to comment
You need to be a member in order to leave a comment
Create an account
Sign up for a new account in our community. It's easy!
Register a new accountSign in
Already have an account? Sign in here.
Sign In Now