dragcarz Posted August 22, 2022 Author Posted August 22, 2022 I have some days off and I’m trying to get as much done as I can! I made arm rests for the door panels, smoothed the dash of its gages, and painted the seats. I set the ride height and attached the rear axle assembly. I primed and painted the engine flat black as my reference photos showed, and I primed the intake.
Bainford Posted August 23, 2022 Posted August 23, 2022 This project continues to impress. The Hornet is really looking the part. Nice work.
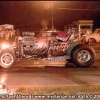
Ace-Garageguy Posted August 23, 2022 Posted August 23, 2022 Great project, coming together very nicely.
dragcarz Posted August 24, 2022 Author Posted August 24, 2022 Thanks everyone! It makes the extra effort to post the builds worth it.
dragcarz Posted November 10, 2022 Author Posted November 10, 2022 Little progress, still waiting on the Slixx decals to be printed….. 1 1
Codi Posted November 17, 2022 Posted November 17, 2022 She looks GREAT sitting in white Roger. Can't wait to to see the rest of it.........it does look "oh so right". cheers, tim
dragcarz Posted November 20, 2022 Author Posted November 20, 2022 A great big shout out to everyone at Slixx Decals, I pestered poor Becky, and she was so gracious to me! The decals are beautiful, went on effortlessly and look awesome! I’ve got my motivation back! 3
AmericanMuscleFan Posted November 21, 2022 Posted November 21, 2022 This is so cool Roger, I really like it, the Slixx decals are really nice, their quality is first class as is your build!?
Bainford Posted November 21, 2022 Posted November 21, 2022 That looks fantastic! The decals were well worth the wait.
dragcarz Posted November 26, 2022 Author Posted November 26, 2022 I finally came across a color photo of the engine and engine bay, everything looks flat black, so I make take some liberty for detail sake. I lowered, and reshaped the shock towers, I still need to fabricate the shock mounts. I glued the interior tub to the chassis and filled the gaps and seams on the firewall. The engine was mounted with simple L shaped metal brackets on the real car, so I tried to duplicate the same though mine are a bit out of scale. I may try and sand them smaller. I’m really pushing to complete this as it’s now hit the two year mark. It sure doesn’t seem like it has been that long. I still need to make the valve cover spacers, come up with a master cylinder
Straightliner59 Posted November 26, 2022 Posted November 26, 2022 This is coming along, very nicely, Roger! I've been watching to get a promo, of one of these. I can't see the motor mounts in the photo, but, yours don't look really out of scale.
dragcarz Posted November 27, 2022 Author Posted November 27, 2022 I made valve cover spacers, and another test fit. Engine compartment looking cleaner. I just need some painting weather now. 2
Scott8950 Posted November 27, 2022 Posted November 27, 2022 The engine compartment looks great. Can't wait to see this finished .
dragcarz Posted November 28, 2022 Author Posted November 28, 2022 11 hours ago, Scott8950 said: The engine compartment looks great. Can't wait to see this finished . Thanks Scott, neither can I
1972coronet Posted November 28, 2022 Posted November 28, 2022 I posted the link to Shirley's 'book page of your fantastic build of her Hornet P/S, @dragcarz
dragcarz Posted November 29, 2022 Author Posted November 29, 2022 16 hours ago, 1972coronet said: I posted the link to Shirley's 'book page of your fantastic build of her Hornet P/S, @dragcarz Thanks John,I appreciate that. I purchased “AMC Motorsports” book suggested by another follower and I was disappointed as there were no new photos that I didn’t already have and then the written information on the Hornet was completely wrong as it had it listed as a tube chassis car, and that wasn’t legal in 71. I’m so far into this build that I’ll probably just continue with what I have. I already have too much time and money invested in this project to spend another $30.00 on a book. Had this book came out a year ago I would have been all in. 1
dragcarz Posted December 21, 2022 Author Posted December 21, 2022 (edited) Small update. I really started pushing this build as I haven’t finished a build this year. Huge mistake, I sanded through the paint on the hood, now have to repaint it. I sprayed the chassis but it is too cold in Indiana for painting. It looks ok but could have been better, I opted to brush paint the interior and I’m not happy with the results but after the windows are installed you won’t be able to see it. The roll bar and braces are installed and painted. I thinned the motor mounts more to my liking and created the by-pass hose from the water pump to the intake. I added the master cylinder to the firewall as well as the pinch weld to add some visual interest. I applied Molotow chrome paint with a brush to the outer rims of the wheels and it was too bright for my liking, so there in the Purple Pond and we’re starting over there. I’ve been struggling with lots of dirt and debris, black specks, in my paint and I think the culprit may be rust from my 45 year old compressor. I’m wondering if it’s rust from inside the tank….. I have an in-line filter on both my hose and on my air brush hose as well. Anyone got any ideas? Edited December 21, 2022 by dragcarz Wrong photo 2
dragcarz Posted February 4, 2023 Author Posted February 4, 2023 IM NEEDING HELP….I normally try and clear over the graphics, so as usual I applied the roof decal and door lettering and cleared the body. It looked great but as it cured pits began to develop over the decals. I let it set a couple days and decided to try and polish it out. It did polish out and I was relieved thinking the problem was solved. A week later the problem returned. Here’s where I’m stuck , do I just finish it as is, or purple pond and repaint? I can’t decide, so your thoughts would be greatly appreciated
Scott8950 Posted February 5, 2023 Posted February 5, 2023 If it's going to be a shelf model I'd leave it as it is because it really doesn't look bad but if it's going to shows then I'd repaint it.
M W Elky Posted February 5, 2023 Posted February 5, 2023 4 hours ago, dragcarz said: IM NEEDING HELP….I normally try and clear over the graphics, so as usual I applied the roof decal and door lettering and cleared the body. It looked great but as it cured pits began to develop over the decals. I let it set a couple days and decided to try and polish it out. It did polish out and I was relieved thinking the problem was solved. A week later the problem returned. Here’s where I’m stuck , do I just finish it as is, or purple pond and repaint? I can’t decide, so your thoughts would be greatly appreciated I have had a similar problem with the slixx decals that I used on my landy’s dodge dart. Against my better judgment I tried to lightly sand and polish it out. Then respray it with another coat of clear lacquer, but the results were that it only looked slightly better. I realized it would never be right unless I stripped it and started over. The only problem was that the decal sheet was out of production. Being that it wasn’t leaving my shelf l decided to leave it alone. I now put all my decals on after the clear coat which eliminates this possibility. Your hornet ? looks fantastic by the way. You can be very proud of it. These old race cars often had many small flaws in them when you see them close up and in person. So I guess if I were you I’d leave it alone. although while the decal sheet is still in production now would be the time to fix it . On a different note how did you convince slixx to make decals for a body that’s kinda hard to come by ?
dragcarz Posted February 5, 2023 Author Posted February 5, 2023 7 hours ago, M W Elky said: I have had a similar problem with the slixx decals that I used on my landy’s dodge dart. Against my better judgment I tried to lightly sand and polish it out. Then respray it with another coat of clear lacquer, but the results were that it only looked slightly better. I realized it would never be right unless I stripped it and started over. The only problem was that the decal sheet was out of production. Being that it wasn’t leaving my shelf l decided to leave it alone. I now put all my decals on after the clear coat which eliminates this possibility. Your hornet ? looks fantastic by the way. You can be very proud of it. These old race cars often had many small flaws in them when you see them close up and in person. So I guess if I were you I’d leave it alone. although while the decal sheet is still in production now would be the time to fix it . On a different note how did you convince slixx to make decals for a body that’s kinda hard to come by ? Hey Michael thanks for the input. I tried some new things with this build, and in all honesty this is the first issue like this I’ve had. I don’t think it was the Slixx decals, I normally don’t use setting solutions on decals, but I did on this one. I also used Splash 2K clear. I also painted it in my impatience in 50 degree weather. It was pure chance that Slixx came out with this decal as my first thought was to adapt the Dart decals to the build.
Recommended Posts
Create an account or sign in to comment
You need to be a member in order to leave a comment
Create an account
Sign up for a new account in our community. It's easy!
Register a new accountSign in
Already have an account? Sign in here.
Sign In Now