Claude Thibodeau Posted January 16, 2021 Posted January 16, 2021 Hi Mike! Great work. Your rear wheel, to avoid getting the nose too high upon launch, reminds us how tricky those cars were to pilot back then. Memories... CT
Mike Williams Posted January 16, 2021 Author Posted January 16, 2021 @Brad, much appreciated friend, nice of you to stop by here. I agree, the car is looking mean and nasty, the plan was to go with a shorter wheelbase (150" was the real deal in 1965), with lots of motor tilt and moved back, this is the LOOK, my opinion. The tires are a bit too wide, not much to choose out there. If they were solid then I'd slice them, but Revell FC tires are so flimsy anyway....a problem. I've already seen the front axle mounted with wheels, the look is right and it kills me. Looking forward with this one! @Francis. Agreed, about posting a previous photo, my sympathies exactly. Occasionally I have to take a peek at what the finished car might appear to represent, with all the units mounted. Mercy! This car in my opinion will be nasty, I just love the dimensions! Thank you sincerely for your support. @Marcos. Very kind of you to drop in and comment. Your work and modeling is exceptional as I've seen your topics. Also, as a FB group buddy, our paths will surely cross again soon. Thank you sincerely. @CT, first of all your support and commenting is greatly appreciated! As I understand, this sized chassis was the last of its kind. The motor was moved more forward for better weight distribution, and the chassis lengthened to compliment the changes. Still, I wanted to build one of the older and aggressive cars, as I think even the styrene kits don't quite reach the way they looked. Shorter wheelbase, motor back to the slicks and tilted down low! I like. Mike..
Glen Powers Posted January 17, 2021 Posted January 17, 2021 Mike once again the only thing that comes to mind is outstanding craftsmanship! Glen
Mike Williams Posted January 18, 2021 Author Posted January 18, 2021 Thank you Glen, I'm enjoying letting this one come together. Mike..
Mike Williams Posted January 22, 2021 Author Posted January 22, 2021 UPDATE: Today the first laced front wheel was soldered up. One down, one to go for the shorter car. These are laced 40 spoke wheels, using silver coated copper wire (0.25mm) and brass rims from brass sheet in 0.5mm and inner rims with 1mm brass sheet. Unfortunately at a decisive time a clamp slipped somewhat and bent 2 wires at the outer rim. I'll try and sever and reattach with CA. I won't abandon the wheel for this slight mistake. Here you can see the goof at about 2 o'clock; Here the 2 inner rims where the spokes are soldered on, the outer rim and the tire used; The other laced wheel up next. A gap here and there will be filled with the CA, Zap-a-Gap, then painted chrome. Mike..
AmericanMuscleFan Posted January 24, 2021 Posted January 24, 2021 Impressive work as usual Mike! Your laced wheels are a work of art and few people (including me...) are able to venture into this kind of work! Question: What kind or brand of chrome paint do you use on brass? Do you need to add some primer or base color for the chrome paint? Francis
Big John Posted January 24, 2021 Posted January 24, 2021 Hi Mike, Beautiful work, very clean and detailed. A couple of questions (it is hard to find multi word searches) and a tip or two.... What do you use to cut your brass tubing? Ive tried a fine razor saw but that is pretty crude and a tubing cutter is only good on larger sizes. And how do you make such smooth bends? Do you add a filler that you can melt out or leave in? Now tips... I've learned that the key to really nice soldering is Clean Clean Clean the joints. Also that the solder will only go where there there is flux. The last I use to advantage when soldering wire screen to a metal frame. Thanks again for your WIP.
Mike Williams Posted January 24, 2021 Author Posted January 24, 2021 @Francis, many thanks and your interest is greatly appreciated. This lacing process is an ongoing attempt as there have been areas and mistakes that need attention. This is the reason for not fabricating another 2 wheels for the longer car yet. Trouble being after each rim is laced and soldered, the alignment of both together has proved to be faulty. The single rims fit wonderfully into the outer rim without wire, like a piston in a cylinder. When 40 wires are soldered on, the 2 halves don't connect or align in a decent manner. They just don't slide in but need trimming to let both rims fit inside the outer rim. This is why there is such a void from inner to outer rim. The voids will be filled before painting.....just this is an area that bothers me at this point. This has to be better. I've decided to use Alclad 2 for the future. PROBLEM: I can't find any Alclad2 Black Base Coat in the EU....that is without paying exorbitant prices for postage. $25 shipping for a paint that costs $7 is a scheme that I won't follow. @Ian, hey guy! Great to see you here, and again, many thanks for your approval. I'll check out your ongoing projects and topics, surely a view worth following. Gotta laugh again....."Winkelmesser" lol. Mike..
Mike Williams Posted January 25, 2021 Author Posted January 25, 2021 @Big John...many thanks for your interest, appreciated. 1. Slicing brass tube. The thicker tubes and rods for a 1:25 to 1:16 build will be around 1.4mm to 2.5mm diameter, these to be cut with a skinny cutting disc (0.3mm) mounted on a micro-motor handpiece with about 18k RPM's. Thicker, then 25k is better. Use only the cross hatched fiber thin discs, they should last till there's nothing left.....a great investment. A smaller Dremel-type handpiece is meant. Smaller tubes are thinner walled, so rolling them on a flat surface with an sharp Ex-Acto type flat blade works great. I cut these though with said slim discs, been doing this stuff for decades. 2 quality, super thin disc lasts me for a complete brass build, so the cost is justified. Last week I received 20 discs for $25 to the door. Considering...that's cheap. 2. Smooth bends. Luckily I was able to find a 1mm-walled copper tube that has the right measurements. To let the brass fit easily, I cut strips from brass sheet (using the above mentioned discs at high speed) after measuring the diameter needed, the length was determined. The thin strips were cut wider than needed, as the tendency to twist while bending is imminent. 1.25mm was needed for the single rim, so slices were cut at about double size. The rim strips were then annealed, holding over a propane Bunsen burner till they gently glowed. Now pliable enough to bend manually over the said copper tube. TIP: when the rounding process is close, clamp securely the lowest point of the ring, this will allow for lesser wandering and the rim will slowly bend into the thick copper tube. Clamps on the sides also encouraged. This takes time! Piece by piece, you'll see that the ends have to be trimmed a bit to make a perfect circle and meet correctly. To solder the ends, better is to make a mechanical retention available, like the slits shown in the photos. Every added surface for solder only strengthens the overall ring. 3. Filler. Yes, I use a styrene filler for the voids. Ethyl acetate is the chemical that makes our kit models and for glue. Place leftover sprues from a kit in the liquid, in the morning you have a wonderful paint-on styrene filler and glue too! Great for filling gaps with our kit models, and also great for filling metal gaps. The stuff will dry in a couple of hours, then you have styrene. Paint it. A small tin or glass jar will suffice for the concoction. 4. Yes. Clean joints are important! Flux will clean off with hot water. It's just a resin and will brush off. Mike..
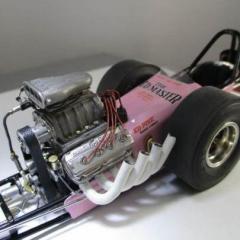
Mike Williams Posted January 25, 2021 Author Posted January 25, 2021 The wire wheels are done, I've started filling the gaps from inner to outer rims. All chassis assemblies are finished, getting slowly ready for paint preparation. Next up is the motor, paint and buildup. Mike..
Big John Posted January 25, 2021 Posted January 25, 2021 (edited) Thanks for the tips Mike, Annealing definitely helps the workability or the metal. I was more interested in how to bend the round tube. I've not been satisfied with using the spring sleeve bending tools and not sure if anyone makes a mandrel bender for tubing 3/16 on down. Thanks again for you info. Edited January 25, 2021 by Big John
AmericanMuscleFan Posted January 26, 2021 Posted January 26, 2021 Masterful technique for a masterful result! The photos speak for themselves, there is not much to add except to thank you for sharing your technique in such detail. I dare to hope that a place like this forum will make it possible to perpetuate this art which tends to slowly disappear to the detriment of the already done... Thanks for wowing us Mike! ?
OldNYJim Posted January 26, 2021 Posted January 26, 2021 On 1/24/2021 at 5:42 PM, Mike Williams said: I've decided to use Alclad 2 for the future. PROBLEM: I can't find any Alclad2 Black Base Coat in the EU....that is without paying exorbitant prices for postage. $25 shipping for a paint that costs $7 is a scheme that I won't follow. I've used regular black gloss enamel paint a bunch of times with Alclad Chrome - you don't need to use their base coat if you're having difficulty finding it. About any black (or dark blue) enamel will work just fine - you just need to make sure it's as smooth and glossy as possible before shooting the Alclad Great progress so far - what an inspirational build!
Mike Williams Posted January 26, 2021 Author Posted January 26, 2021 (edited) @Big John...OK. Since I'm with the motor now, here a few photos of bending tubes. @Marcos, many thanks for your support. I've seen you on a FB group, great things you're showing! @Francis, many thanks again, your praise is appreciated. Meantime, the rim voids have been filled, I do believe they will come out very smooth and realistic looking. I'm quite satisfied with the result, just the method needs revision. I'm working on this. @Jim King, thanks for the heads up! I got caught up in watching tube videos, even hoping other glossy blacks will work. Many thanks. Bending tubes for zoomies; Here the usual method I prefer for bending tubes. Aluminum tube in 4mm was stuffed with annealed 3mm brass tube, the tubes will not collapse. The tool I prefer for most all of the bends needed. Then bent slowly and steadily until a "J" is visible. Mark it, and chop off the excess. Make the object longer as this will help leverage. Smaller tubes are done the same way. I've had success with the method, good enough for me. Next, holes will be drilled into the head exhaust ports for studs, these will fit into the zoomie pipes so the pipes will align better, plus the pipes will be much easier to cement. The method makes for a good bond. Mike.. Edited January 26, 2021 by Mike Williams
gasser59 Posted January 26, 2021 Posted January 26, 2021 Nicely done Mike. I especially like the bending tool. Where did you find that?
Big John Posted January 26, 2021 Posted January 26, 2021 49 minutes ago, gasser59 said: Nicely done Mike. I especially like the bending tool. Where did you find that? Ditto... That's one slick bit of kit!
Mike Williams Posted January 26, 2021 Author Posted January 26, 2021 @Brad & John....Hobby Linc, back in 2015.
Tortuga Kustomz Posted January 27, 2021 Posted January 27, 2021 Very cool work, i did the same thing to my Wynn's Jammer, and came out awesome, but i need to get an smaller curve bender, for 1:25 scale because it was kind of hard to bend them
AmericanMuscleFan Posted January 27, 2021 Posted January 27, 2021 22 hours ago, Mike Williams said: Bending tubes for zoomies; Here the usual method I prefer for bending tubes. Aluminum tube in 4mm was stuffed with annealed 3mm brass tube, the tubes will not collapse. The tool I prefer for most all of the bends needed. Then bent slowly and steadily until a "J" is visible. Mark it, and chop off the excess. Another fantastic tip Mike! Your curves are simply perfect and I will follow your advice with all the considerations they deserve when I need to proceed with this kind of operation. Nice bending tool by the way! Francis
Big John Posted January 27, 2021 Posted January 27, 2021 Thanks Mike. They do have one for 1/8" but seeing what you have has the old brain storm rumbling. It shouldn't be too hard to turn up some spindles and make one in various sizes. Look forward to seeing the old slingshot progress.
butter Posted January 27, 2021 Posted January 27, 2021 On 1/25/2021 at 3:02 PM, Mike Williams said: The wire wheels are done, I've started filling the gaps from inner to outer rims. All chassis assemblies are finished, getting slowly ready for paint preparation. Next up is the motor, paint and buildup. Mike.. I hand laced some wheels for a model A I built years ago. I drilled out all the holes in each rim, string the wires as you did and just twisted the excess wire together outside the rim and inside the tires I hogged out to make room. none of the wires were attached to the rim with glue or solder. They all straightened out as I applied tension during the twisting process. Attached is a pic of the model with the wheels I am talking about. (Sorry, I work in 1/25th scale.) By the way. Your craftmanship is absolutely amazing!!! Always looking forward to your next installments.
foghorn62 Posted January 29, 2021 Posted January 29, 2021 The wheels are beautiful Mike! So much better than the plastic ones. I’m really anxious to see how they come out after they are chrome painted. I really wish I could find a way to have my small parts chrome plated, without sending them across country and waiting for them to come back. The gaps are a bit of a surprise. The process that you came up with certainly didn’t sound like that would happen. Since you are painting the wheels, you can fill the gaps and they will look fine. I don’t usually do bicycle wheels, so I am able to turn outer and inner rims with a little flange inside for the wire rim to sit, where you wouldn’t see the gaps if they are there. I can’t imagine doing that on such a skinny wheel though. Especially in the 1/25 scale that I usually work in.
Mike Williams Posted January 29, 2021 Author Posted January 29, 2021 Hi Tim! Hold on about the chrome paint, I've ordered some new metalizer paints and am anxiously waiting. In a few days I can show the good or the bad. The gaps were a surprise for me as well, was not counting on much of a difference between the 2 inner rims for each wheel. Herein lies the demon. Getting each rim with 20 spokes soldered on to match another rim with the same. I've thought about an application that lets me slice 20 notches into each rim, then the wires will all but disappear and be flush with the rim edges. Drill holes? No way. New plan is in the workings as there is another FED to do right next to this one, both being ready to go forward. Tedious, a learning process for sure. I like the results and the process is good, just some method adjustments necessary. More later. Mike..
Recommended Posts
Create an account or sign in to comment
You need to be a member in order to leave a comment
Create an account
Sign up for a new account in our community. It's easy!
Register a new accountSign in
Already have an account? Sign in here.
Sign In Now