TarheelRick Posted May 10 Posted May 10 Just scanned through this build and it is totally awesome. I can just see the looks on faces when you pull this one into the local grocery store. Definitely not your normal grocery getter. 1 1
Mattilacken Posted May 10 Author Posted May 10 5 hours ago, David G. said: That looks like a great first attempt Anton! With practice and patience you'll ger even better. David G. Thanks. I think I pushed to hard so I cut the paint… don’t know what to do.. might just take a small brush with black paint and give it a once over.
David G. Posted May 10 Posted May 10 3 hours ago, Mattilacken said: Thanks. I think I pushed to hard so I cut the paint… don’t know what to do.. might just take a small brush with black paint and give it a once over. You'll learn to read the blade. With practice, you can learn to feel the resistance of cutting just the foil. A little touch up paint might work well. Thin it down a little and do some practice strokes somewhere where they won't be seen or on a practice body. David G.
Mattilacken Posted May 10 Author Posted May 10 1 hour ago, David G. said: You'll learn to read the blade. With practice, you can learn to feel the resistance of cutting just the foil. A little touch up paint might work well. Thin it down a little and do some practice strokes somewhere where they won't be seen or on a practice body. David G. Thanks for the encouragement! Will try! did some progress at least, got most of the interior done. Cage is glued as well as seats and belts. I also started gluing the window and noticed I had made a mistake when cutting of the side window and cut them to close to the quarter windows. So I need to do some magic there.. but that’s for tomorrow. I did also remove the tint on Al side windows and even cut the side windows if as mentioned since they had a hideous thickness to them that caused an optic diversion. So I will replace them with clear plastic sheet. I let pictures speak. 5 1
David G. Posted May 11 Posted May 11 That interior is awesome! Now that you have the paint all polished up, it makes a world of difference. Just remember, it's a hobby and the point is to have fun and get better as you go along. As I say: "Each kit I build is really only practice for the next one!" =D- 1
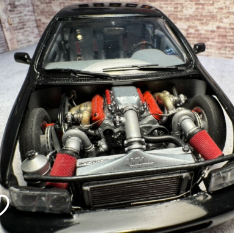
TarheelRick Posted May 11 Posted May 11 That is pure wickedness. Stance is just right for that big beast. 1
Speedpro Posted May 11 Posted May 11 22 hours ago, Mattilacken said: Thanks. I think I pushed to hard so I cut the paint… don’t know what to do.. might just take a small brush with black paint and give it a once over. Your build is really coming along nicely. I see nothing but good things here! May i suggest trying a toothpic instead of a brush for touch up of a deep gouge in your paint. Brush holds alot of paint hence bigger chance of failure. 1
Mattilacken Posted May 12 Author Posted May 12 On 5/11/2025 at 2:53 AM, David G. said: That interior is awesome! Now that you have the paint all polished up, it makes a world of difference. Just remember, it's a hobby and the point is to have fun and get better as you go along. As I say: "Each kit I build is really only practice for the next one!" =D- Thanks David! That is so true, and that it’s more or less the reason why this one stalled I guess. It was no fun when with the tint and it became a hurdle. Well I have a plan for sorting the side windows now. Just need to get bench time to get it done. But tonight is 1:1 jeep time, need to Finnish my conversion to steel springs with the parts coming in today so I can have the car back. On 5/11/2025 at 3:13 AM, Phildaupho said: Great concept and execution!! Well done. Thanks man! 13 hours ago, TarheelRick said: That is pure wickedness. Stance is just right for that big beast. Thank you, I went to great lengths to get it that low with those huge tires and it really came out as I wanted it to! 12 hours ago, BK9300 said: Very cool, Anton - looks super aggressive! thank you sir! 12 hours ago, Speedpro said: Your build is really coming along nicely. I see nothing but good things here! May i suggest trying a toothpic instead of a brush for touch up of a deep gouge in your paint. Brush holds alot of paint hence bigger chance of failure. Thank you! Will try that tip!
Mattilacken Posted May 12 Author Posted May 12 2 hours ago, Zippi said: Looking pretty sharp so far Anton. The stance looks just right. Thanks Bob!
Mattilacken Posted May 18 Author Posted May 18 (edited) Did a bit of work.. not much to show but the ECU. Edited May 19 by Mattilacken
Mattilacken Posted May 19 Author Posted May 19 Made a set of inner fenders for the front wheels. And I took some final pictures of the interior since I believe I am done underneath but I have not glued the chassis to body yet. 6
David G. Posted May 20 Posted May 20 I really enjoy seeing all this come together. Thanks for taking the time to share it with us Anton. David G. 1
Mattilacken Posted May 23 Author Posted May 23 On 5/20/2025 at 2:09 PM, David G. said: I really enjoy seeing all this come together. Thanks for taking the time to share it with us Anton. David G. Thanks David, and thank you for taking your time to respond it’s much appreciated! I have not done that much last days due to other things but did this tow bar for trailer and caravan. The inspiration for this build have had the world record on 402 meters with a caravan behind. So of course this need to have it! 3 1
Mattilacken Posted May 23 Author Posted May 23 I put some paint on the parts, glued the wheelie bars and dry fitted the pull bar. 3 1
David G. Posted May 24 Posted May 24 What a great vehicle to replicate, too cool! "When you need to go on holiday... fast!" I never knew there was such a class, let alone a record. Do you also plan to build the trailer and towing mirrors? The towbar looks great BTW. David G.
Mattilacken Posted May 25 Author Posted May 25 22 hours ago, David G. said: What a great vehicle to replicate, too cool! "When you need to go on holiday... fast!" I never knew there was such a class, let alone a record. Do you also plan to build the trailer and towing mirrors? The towbar looks great BTW. David G. It’s a Swedish icon, and as I mentioned I started this build in 2003 or something like that with the intention of making a tru replica, but that does not work for me 😂 The driver is also a legend and used to work at the biggest carmag over here (a bit like friburger in a sense). i don’t think there is a class for it but it would be cool if there was! 😁 but EV’s would probably destroy such a class. The idea of the trailer have crossed my mind, even gotten some basic files to start with in the computer. I don’t know about the wing mirrors.. would ruin the look/stance I belive. thanks for checking in!
Mattilacken Posted May 26 Author Posted May 26 Made some progress, not really on the impala but I managed to put couple of coats of putty on the Mb that got its paint stripped. the Impala got some attitude added in the boot and I covered a BLAH_BLAH_BLAH_BLAHup with a suiting sticker. Tire Slayer.. I also added a California plate.. not that it should’t have anything else than a Swedish plate. I did also replace the dash decal with a bigger one, same text. 🙂 and don’t worry I have not glued the body to the interior yet due to I am not sure I am done with body of works yet. o and I did mend the broken chrome work. 2
David G. Posted May 27 Posted May 27 Clever work Anton, using the bumper stickers to cover the errors. I do that kind of stuff all the time. Like this custom '62 Buick I built back in 2013. I made this "award plaque" to cover up a glue spot on the dashboard. Cheers! David G. 3
Mattilacken Posted May 27 Author Posted May 27 8 hours ago, David G. said: Clever work Anton, using the bumper stickers to cover the errors. I do that kind of stuff all the time. Like this custom '62 Buick I built back in 2013. I made this "award plaque" to cover up a glue spot on the dashboard. Cheers! David G. Great minds think alike 😁could never have guessed you had a damage underneath that plaque! i suddenly remembered that I had forgotten to install the go fast pedal and the slow pedal… so I lifted the boddy and had a pita to install the hanging pedals behind the dash. I kept the brake fluid canisters and linkage and the individual brake cylinders and even the brake scale from my 3d print.. even though it will never, ever be seen again! A mishap also knocked the battery out of place so I got an opportunity to improve on the ground wire which is now secured with a stud and nut. Also made a fire extinguisher system, not done but it start to looks crowded as I want it to! 2
BK9300 Posted May 28 Posted May 28 Getting close for its final cleanup, Anton - so much excellent detail! Well done. 1
Mattilacken Posted May 28 Author Posted May 28 I decided to af some nuts and bolts to the chassis In visible spots. I made these and printed them in various sizes. i did also make a new cross bar for the swaybar, the arms connecting to the a arms are stock, when the bar was there I used insulation from a cable to make a rubber busshing and a strip of metal as brackets and finished it of with studs and nuts. I did also make some work with the exhaust. Swedish law dictates that the exhaust are not allowed to exit underneath a space where you have occupants. Which leaves me with side exits on the exhaust, but that’s not really legal either. So I routed it all the way back. And due to clearance issues I ran 3mm pipes which led me to put electric cutouts to let all the exhaust pressure out on full boost. Actually read about a similar 1:1 build that did just that. I put magnets under the mufflers to secure it wile fabricating, but will do some visual hangers as well. I will tuck the exhaust so it won’t be to visible behind the bumper to retain that discrete look. 3
Recommended Posts
Create an account or sign in to comment
You need to be a member in order to leave a comment
Create an account
Sign up for a new account in our community. It's easy!
Register a new accountSign in
Already have an account? Sign in here.
Sign In Now