mr68gts Posted May 25, 2023 Share Posted May 25, 2023 So I started this project back in January of the Radici and Wise car. Using Tom West's excellent photos I've been recreating this in scale. Starting with an Atlantis Green Elephant as a base kit. The wheels and tires are a collaborative effort between Jeff Farris and I. Engine was sourced from Texas 3d in 16th scale. What started with modifying the kit chassis turned into a whole new 3d printed chassis. Using the Aurora chassis kit, much of its dimensions got me where I needed to be. The green chassis in the back ground is a Logghe stage IV with coil over front. 1 Quote Link to comment Share on other sites More sharing options...
mr68gts Posted May 25, 2023 Author Share Posted May 25, 2023 The rear end is wrong in both kits for what I needed so it also got put in cad and printed. New head light buckets to correct the ones in the kit. (The kit body is a different body than what was ran in this car ) Brakes from the Aurora chassis kit are a match so they will be used on the rear end housing. Basic mock ups of the chassis. 1 Quote Link to comment Share on other sites More sharing options...
mr68gts Posted May 25, 2023 Author Share Posted May 25, 2023 Mocked up either the body, you can see how far our of whack the body is on the new chassis. 9 inch pumpkin supplied fromm good friend in NZ, he also supplied me with the barrel valve. Initially thought to have a 2 spd lenco, I soon realized that it wasn't a 2 spd but an overdrive unit. Back to the cad box I go...lol Working couplers for the rear end housing. This car ran a right side steer so it took a special mount to flip the box. Amd the chassis in paint with all the photo etch tab work done thanks to Futurattraction parts! 2 Quote Link to comment Share on other sites More sharing options...
mr68gts Posted May 26, 2023 Author Share Posted May 26, 2023 New steering box was in order to replace the kit blob. The highly modified body. It cut into 14 pieces and glued back together! I have a rotory engraver so I put it to use. This will be on display with the model when it's taken to shows or where ever. 2 Quote Link to comment Share on other sites More sharing options...
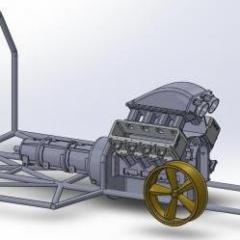
mr68gts Posted May 26, 2023 Author Share Posted May 26, 2023 I had to cut up the Texas 3d engine some as it had parts that didn't represent the one I'm building. All new front cover and drive parts are done ready to go. This also required a supercharger manifold as the engine one came carburated at the time. 2 Quote Link to comment Share on other sites More sharing options...
mr68gts Posted May 26, 2023 Author Share Posted May 26, 2023 Chris sobak provided me with a supercharger but it turned out I needed yet a different style case so a new one was put in cad and printed. The magneto in the kit was wrong so a new one made from a print I found was in order. I've discussed with Cirello what cap his dad used on these mags and will still have to model one up once I order the correct cap. I had to cut apart the Texas 3d hemi heads from the valve covers and cast them in resin for personal use. This way I don't have to mask either the head or valve cover to paint the pieces. Last part if the body mods is putting a lip around the hole in the body for the supercharger. There's still much to do but the body is close to paint. The inside will be getting cover in China silk. This does 2 things. 1) it strengthens all the joints, 2) it makes it look like fiberglass from the inside! I still need to cad a seat and print it for the chassis, soldier up a rear tree that attaches to the chassis. This supports and locates the rear of the body and provides a pivot point. I also need print the front axle that is already been done up on the computer. All said and done, the only parts from the kit are the body, oil pan, and bell housing! This concludes this for now and is up to date as of today. Paul 5 Quote Link to comment Share on other sites More sharing options...
Straightliner59 Posted May 26, 2023 Share Posted May 26, 2023 Rock and roll, Paul! This is awesome! You definitely have enough research photos. Tom was always generous and helpful. I miss that guy. 1 Quote Link to comment Share on other sites More sharing options...
Ian McLaren Posted May 26, 2023 Share Posted May 26, 2023 (edited) WOW Paul this is going to be awesome. Having a few Green Elephant kits sitting in the closet I'm really paying attention to how you are approaching the body on this one. Jeff built me a set of Halibrands for a previous project using those centers so I have seen your handy work in person, fantastic quality. I will definitely be following along on this one. Edited May 27, 2023 by Ian McLaren Quote Link to comment Share on other sites More sharing options...
Muncie Posted May 26, 2023 Share Posted May 26, 2023 Oh My!, this is so cool. Like your work on the body. I always liked the looks of the Revell Vega body, but it looked a little off. Your changes make a difference. Quote Link to comment Share on other sites More sharing options...
Daddyfink Posted May 26, 2023 Share Posted May 26, 2023 1 Quote Link to comment Share on other sites More sharing options...
Steamboat Posted May 26, 2023 Share Posted May 26, 2023 Amazing work! Your CAD work and 3d printing blows me away! 1 Quote Link to comment Share on other sites More sharing options...
John B. Posted May 27, 2023 Share Posted May 27, 2023 WOW!!!! I really admire the level of realism you are putting in this project - great work! Quote Link to comment Share on other sites More sharing options...
dragcarz Posted May 30, 2023 Share Posted May 30, 2023 Just amazing! Looks beautiful so far. Quote Link to comment Share on other sites More sharing options...
Limeyglue Posted May 30, 2023 Share Posted May 30, 2023 Fantastic build so far Quote Link to comment Share on other sites More sharing options...
mr68gts Posted June 11, 2023 Author Share Posted June 11, 2023 Thankyou everyone for the comments. I've still been plugging away at this thing. Most of the time has been spent on the body work. It's getting close to being able to be painted. I did crack one of the glue joints in handling the body so I repaired that and moved on. A couple minor details added that were missed. Also I've since added the support for the windshield around the blower hole and made the firewall in .023 thick aluminum and cut the new windshield. (body was narrowed so the kit part was of no use lol) Paul 1 Quote Link to comment Share on other sites More sharing options...
dragcarz Posted August 18, 2023 Share Posted August 18, 2023 Any more progress on this one? Quote Link to comment Share on other sites More sharing options...
mr68gts Posted September 16, 2023 Author Share Posted September 16, 2023 On 8/17/2023 at 5:51 PM, dragcarz said: Any more progress on this one? Some. The body is ready for paint, just need to make it to the paint shop and get some. I do need to change the color of the chassis as it's too blue from all the research I've found online. For now it's been sitting in the display cabinet on wheels though awaiting me to get un busy enough to paint the body. Paul Quote Link to comment Share on other sites More sharing options...
Force Posted September 17, 2023 Share Posted September 17, 2023 On 5/26/2023 at 2:08 AM, mr68gts said: I had to cut up the Texas 3d engine some as it had parts that didn't represent the one I'm building. All new front cover and drive parts are done ready to go. This also required a supercharger manifold as the engine one came carburated at the time. Very nice work man. I reacted to one thing tho'...the coupler. On all dragrace cars I have seen the female end (the cup end) is mounted on the axle pinion shaft and the male end (the splined end) is on the transmission shaft Quote Link to comment Share on other sites More sharing options...
mr68gts Posted September 17, 2023 Author Share Posted September 17, 2023 4 hours ago, Force said: Very nice work man. I reacted to one thing tho'...the coupler. On all dragrace cars I have seen the female end (the cup end) is mounted on the axle pinion shaft and the male end (the splined end) is on the transmission shaft They can be either male or female. We ran a male on the Lenco altered we ran in comp Elim when I worked there. Quote Link to comment Share on other sites More sharing options...
Force Posted September 18, 2023 Share Posted September 18, 2023 (edited) On 9/17/2023 at 6:19 AM, mr68gts said: They can be either male or female. We ran a male on the Lenco altered we ran in comp Elim when I worked there. I should probably work either way but I have not seen any with the female coupler on the drive shaft, most have that end on the pinion shaft on the axle like on the Super Comp dragster I'm working on...so it seems like it's most common. Edited September 18, 2023 by Force Quote Link to comment Share on other sites More sharing options...
mr68gts Posted September 18, 2023 Author Share Posted September 18, 2023 2 hours ago, Force said: I should probably work either way but I have not seen any with the female coupler on the drive shaft, most have that end on the pinion shaft on the axle like on the Super Comp dragster I'm working on...so it seems like it's most common. Quote Link to comment Share on other sites More sharing options...
Force Posted September 18, 2023 Share Posted September 18, 2023 6 minutes ago, mr68gts said: Yes I found that myself. Quote Link to comment Share on other sites More sharing options...
Recommended Posts
Join the conversation
You can post now and register later. If you have an account, sign in now to post with your account.
Note: Your post will require moderator approval before it will be visible.