TheBEAUMONTGURU Posted June 3, 2024 Posted June 3, 2024 I already built a replica of my 1965 beaumont station wagon in another thread. Now this time im going to use some of my scratch-build and resin cast 1967 parts to build a one-off 1967 Beaumont Custom station wagon. I have a clear vision of how i want it to be equiped so there is going to be a ton of scratch building and kit bashing from various kits. Im using the revell 1966 chevelle wagon as a basis. as well as the front end off the 1967 chevelle SS hardtop kit. a parts bin Small block 283 is going in place of the Biglblocks. Here is how i made the grills for both the 65 and 67 beaumonts, first building and modifiying the 1967 chevelle grill using evergreen strips, then resin casting the final product. 2
TheBEAUMONTGURU Posted June 3, 2024 Author Posted June 3, 2024 here i am making the unique taillights for beaumonts. although the station wagon does not use them, i made a set anyway just to have. i moulded them out of clay just like in a gm design studio in the 1960's, then resin cast them. Here is also some of the work cutting the bodies apart and grafting the 67 front end onto the wagon body. the other body is my test of the taillights for a future 2dr HT project 3
TheBEAUMONTGURU Posted June 3, 2024 Author Posted June 3, 2024 I did this same chassis pan modification on my 65 wagon project. i used the 67 chevelle pan because its the only one with a correct frame(the Z-16 kit uses a convertible frame). i modified the back end to depict the wagon floor and gas tank Left is the convertible/Z-16 frame, middle is stock 67 chevelle, right is modded 67 chevelle into wagon form. 3
TheBEAUMONTGURU Posted June 3, 2024 Author Posted June 3, 2024 (edited) The interior on a 67 chevelle is far different from a 66 chevelle, luckily the 67 chevelle and 67 baumont share interior patterns, so i used the 67 2dr ht chevelle seats and modified the rear bench to use in the front, it required buying 2 67 chevelle kits to get 2 rear seats. The 66 door panels were all sanded smooth and then evergreen strips were made for every single pleat and pattern for both front and rear door panels, you can also see i scratch built all the armrest and made up a column-shift automatic. Im making it a Power window car, so i scratch built some tiny power window switches too You will also note that the Bigblock hood has now been filled in with a chunk of plastic and the center rib made out of evergreen strip, this was a hard project to get the flat hood!!!! lots of primer and sanding!! Edited June 3, 2024 by TheBEAUMONTGURU added more text 5
TheBEAUMONTGURU Posted June 3, 2024 Author Posted June 3, 2024 Im painting the body 1967 GM Provincial White. the interior is now done with NPD medium blue vinyl dye for teh real cars. Here i have now painted my grill with molitow and started some of the blackwash highlights, its looks better in person. THe rear of the body has been altered around the taillights and the 1967 taillights are ready to install. All the tailgate trim and the lower side mouldings are made from evergreen strip The dash cluster is from the revell 66 GTO kit, then detail painted to match the 67 beaumont colors, the guages are made in photoshop and printed with my decal paper and color lazer printer. Carpet is a mixture of flocking to get the right dark blue color 5
TheBEAUMONTGURU Posted June 3, 2024 Author Posted June 3, 2024 Im making a very complicated wheel and tire package to get just the right look. Im starting with some parts bin black tires that look close to a 7.75-14 bias ply. I got some stick on vinyl white stripes that i am very happy with. The wheels are 14" from fireball. The hubcaps i turned out of aluminum on a metal lathe then resin cast copies and painted them with molitow. i then made up a decal set for all the little black dots and the center beaumont logo. i also added tire valve stems 5
TheBEAUMONTGURU Posted June 3, 2024 Author Posted June 3, 2024 here we see a small modification to the 1966 chevelle rear bumper, in order to make it a 1967 i had to drill out some rectangular backup lights. it worked but wasnt an easy thing to get right. You will also note my starting or a roofrack. using metal HVAC foil tape for the stainless roof ribs. Taillights are stock kit part from the 1967 chevelle SS kit, that are fit into my newly shaped housings in the body 3
NOBLNG Posted June 3, 2024 Posted June 3, 2024 Your dedication to these Beaumonts is outstanding Dave! I love all the scratch built details using good old fashioned techniques.??? 1 1
TNT Posted June 3, 2024 Posted June 3, 2024 Seen one for sale on line the other day. I knew canada got basically the same cars as the US but just a name change. Never knew it was a Beaumont till the other day. Looks like a great build.
Bainford Posted June 3, 2024 Posted June 3, 2024 Another cool Beaumont project. Nice work on the bespoke details. 1
espo Posted June 3, 2024 Posted June 3, 2024 I followed your previous Beaumont build, so I'm looking forward to this one. The grill you made looks like as good as a Revelle part.
TheBEAUMONTGURU Posted June 4, 2024 Author Posted June 4, 2024 I made the rest of the roof rack. i used round evergreen stock and carved out some mounts. then hit it will the revell spray chrome. 4
TheBEAUMONTGURU Posted June 4, 2024 Author Posted June 4, 2024 Got most of the paint on the chassis. to keep it stock appearing as GM of canada would have done it, i sprayed a green etch primer on the whole thing, then applied a mist of body color white, followed by a black frame and then a sloppy layer of undercoat in the wheel wells
Steve H Posted June 4, 2024 Posted June 4, 2024 Very nice work and awesome attention to detail Dave! The door cards look fantastic, as does the roof rack. I might have to crack open the piggy bank and buy some Revell chrome, looks quite effective. Definitely some excellent reference here for when I replicate my 1:1 67 Beaumont. The photo that shows the back of your 2door HT got my heart pounding. Cheers, Steve
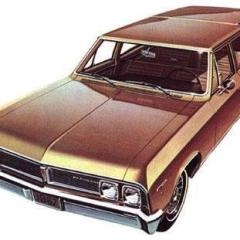
Kenmojr Posted June 4, 2024 Posted June 4, 2024 Beaumonts are cool. Here is a 1967 Beaumont Super Deluxe I took a photo of at the Atlantic Nationals, Moncton, New Brunswick - July 2014. This car is stunning. 1
Kenmojr Posted June 4, 2024 Posted June 4, 2024 And at the 2016 Atlantic Nationals, Moncton, New Brunswick 2
TheBEAUMONTGURU Posted June 8, 2024 Author Posted June 8, 2024 A bit more work, the engine is from the 64 impala kit with a proper aluminum powerglide. i found a nicer looking intake and made the oil filler tube out of round stock. the valve covers i think are from an old mpc truck kit out of the parts bin and the carb i belive is from the revell 65 truck kit., lots of bits and pieces to make it the most acurate. i scratch built most of the power streering, and it will also get a power brake booster. Trying to get as much plumbing and wiring as i can. It sure helps to have real Beaumont to use as reference. The single exhaust system is mostly scratch built, using bits and pieces from the stock chevelle BBC kits. 5
David G. Posted June 8, 2024 Posted June 8, 2024 That's a fabulous looking wagon! I love all the kitbashed details you're adding. David G.
espo Posted June 8, 2024 Posted June 8, 2024 Great attention to all the fine detailing to look like a 1:1 car.
TheBEAUMONTGURU Posted June 10, 2024 Author Posted June 10, 2024 I keep forgetting to take pictures. So here is the finished interior after installing the body. Added some seatbelt details, and my steering column is now for a powerglide column shift automatic. I still have to put in some rear door glass too. 2
TheBEAUMONTGURU Posted June 10, 2024 Author Posted June 10, 2024 Got the engine bay detailing all finished. made the aircleaner assembly on a metal lathe then added a snorkle. lots of scratch built stuff like the fan spacer and linkages. i built a radiator spacer too(the kits never have them and this car being a 283 does not use a fan shroud, only a spacer) i made all the decals in photoshop, they are the correct ones for a canadian built chevelle or beaumont. and a metal foil cowl tag. and some free hand assembly line chalk marks on the firewall too. It has added power steering and power brakes from the parts bins. I made the oil filler tube and cap from round stock. 2
Bills72sj Posted June 11, 2024 Posted June 11, 2024 Amazing detail work. I love the kit bashing. Is it typical to have the firewall body color?
TheBEAUMONTGURU Posted June 11, 2024 Author Posted June 11, 2024 3 minutes ago, Bills72sj said: Amazing detail work. I love the kit bashing. Is it typical to have the firewall body color? Thanks Bill, yes all canadian cars had body color firewalls in the years 1964-67. also body color trunks(no spatter paint on canadian cars) 1
Recommended Posts
Create an account or sign in to comment
You need to be a member in order to leave a comment
Create an account
Sign up for a new account in our community. It's easy!
Register a new accountSign in
Already have an account? Sign in here.
Sign In Now