Eshaver Posted November 23, 2011 Posted November 23, 2011 Why the two hoods and when will we see a STOCK HEIGHT ROOF ? Ed Shaver
Matt T. Posted December 21, 2011 Posted December 21, 2011 Hi John, Sorry I'm late to this discussion, but I just got this kit and I really like it. However, your post made me look at the proportions more and I wonder if it's not that the cowl/windshield are too high, but rather the side window sills are too low? See the body reveal molding at the top of the door - doesn't that look a little narrow when compared to a 1:1 '48, or even Revell's 'vert or Woody kits? If so, a little sheet plastic laminated to the window bottoms may improve proportions, while making the chop look a little more aggressive. That said, I agree with SamDiego that the chop is more of a hot rod chop than a classic lead sled/taildragger chop. I like this kit! OK, I swear, I really was getting pumped up about this kit, looking at scans of the box art, and (heaven help me) something about this photo of the model looked off to me. Look how high the cowl is versus the window sill on the door... So, trolling Rik Hoving's Custom Car Archive, I couldn't find one single photo where the cowl and bottom of the windshield looked as high in relation to the side window sill as it does on the model. I really want to love this kit, but now I don't know...
Speedster Posted March 4, 2012 Posted March 4, 2012 I just got mine Thursady night. So far I love it! Not wild about the frame cross member X, but I will deal with it. I believe the it is based on a Foose car. (Dad not son), I will keep checking. I know for a fact I will be getting at least one more if not two. Would love to change the chop some.
MikeMc Posted March 7, 2012 Posted March 7, 2012 I just like this kit. I don't care about measurements...this is a custom...not a cake!....I went with the side pontoons, skirts and jammed some big heads on that ole flattie.
Roncla Posted March 8, 2012 Posted March 8, 2012 I just like this kit. I don't care about measurements...this is a custom...not a cake!....I went with the side pontoons, skirts and jammed some big heads on that ole flattie. That is a custom alright. I like the way its heading
Draggon Posted March 8, 2012 Posted March 8, 2012 I think Matt's correct. Looking at Mikes model, the side windows are at least a couple scale inches lower than the bottom of the windshield. Looking at this example, you can see that the side windows appear to line up perfectly with the windshield. Also ck out the stocker....the side windows appear to be a slight bit narrower at the front. Perhaps the Revell chop isnt that far off. That being said, I dig what youre doing to this one MIke!
MikeMc Posted March 12, 2012 Posted March 12, 2012 Looking at both of these you can see the lip at the rear of the cowl on the model, which I do not see on the 1:1
Gregg Posted March 17, 2012 Posted March 17, 2012 Finally got around to putting the pinstripping tape around the belt line. I went with chrome, don't know why. Looks okay, I guess Tried to put some clear down today, finally had some clear weather (pun intended...)
SteveG Posted March 17, 2012 Posted March 17, 2012 Finally got around to putting the pinstripping tape around the belt line. I went with chrome, don't know why. Looks okay, I guess Tried to put some clear down today, finally had some clear weather (pun intended...) Looks like custom stainless trim similar to a 38 Ford ..... I like it !!!
sjordan2 Posted March 17, 2012 Posted March 17, 2012 Speaking of chrome pinstriping tape, what brand is it and where did you get it? Will it lay down in curves and arcs without crinkling?
tim boyd Posted March 17, 2012 Posted March 17, 2012 Finally got around to putting the pinstripping tape around the belt line. I went with chrome, don't know why. Looks okay, I guess Tried to put some clear down today, finally had some clear weather (pun intended...) Looks sharp Gregg.....TIM
Gregg Posted March 17, 2012 Posted March 17, 2012 I posted here (I thunk) before, and it will be in the MCM What's New. It's from Model Expo. It went all the around the body, even the hood, no wrinkle, crinkle, or dinkle. I cleared over it to lock it down though. It is super dooper sticky. Keep them in their baggies, they pick up dust easy.
Chuck Most Posted March 17, 2012 Posted March 17, 2012 You guys are going to convince me to buy a few of these yet, aren't you?
Gregg Posted March 17, 2012 Posted March 17, 2012 More this morning. Probably use the stock Cadi hub caps, Bob Dudek headlight buckets.
jcbigpaw Posted March 18, 2012 Posted March 18, 2012 Nice work on this build. These are my favorite car whether stock or custom. I am looking forward to picking up one of these kits to do this local car which I am in love with!
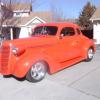
tim boyd Posted March 19, 2012 Posted March 19, 2012 (edited) OK guys...here's mine. Built straight from the box....fadeaways added....'46 Cad grille....tailights that are in the bumper guards....photographed without hub covers and no rear skirts, without hub AND rear skirt, and with wheel covers and no fender skirts. I had a ball putting together this kit. If anyone is interested in how I built this kit or in seeing some tips to improve your build....there's an On-Line How-To posted at this link....http://public.fotki....d-on-line-ho-1/ Thanks for looking....TIM Edited March 19, 2012 by tim boyd
MikeMc Posted March 21, 2012 Posted March 21, 2012 Looking at what I posted I agree with your thinking....but after seeing Tim's build pics I am stumped..I do not think it is so much what was done but how its seen...Using this pic by Tim Boyd see how the "slab was rounded"... I still think the 1:1 will dislike this kit, but I love it and this look!!
Rob Hall Posted March 21, 2012 Posted March 21, 2012 Well, it is a custom, so I wouldn't expect it to resemble a stock 1:1....it does seem to build as an interesting custom, though.
Chuck Most Posted March 21, 2012 Posted March 21, 2012 I'm on the fence about the chop... but I do like what I see with regards to the rest of the kit. If nothing else, the custom parts included in this version of the kit would look killer on the older drop-top kit, or even the Woody wagon.
maltsr Posted March 23, 2012 Posted March 23, 2012 I'm on the fence about the chop... but I do like what I see with regards to the rest of the kit. If nothing else, the custom parts included in this version of the kit would look killer on the older drop-top kit, or even the Woody wagon. Just posted mine in the WIP section
Gluhead Posted March 23, 2012 Posted March 23, 2012 You guys are going to convince me to buy a few of these yet, aren't you? Same for me, Chuck. I don't have it yet but it looks like there's a bit too much "curl" to the back end of the cowl where it meets up with the windshield; actually a pretty common design flaw with model cars but it stands out more on some subjects. The 1:1 is not an easy chop to get right...there are tons more that are equally "off a bit" in one way or another than there are stellar examples, so I don't think I will be too critical of how they did it. Of course, if it really bugs ya just do that Carson Top kitbash above. Looks great. One thing that stands out for me with the fadeaways is that there is a minor bump in the road as it transitions from front fender to fadeaway. It's not very noticeable from some angles but it'll bug me enough that I'll have to put a little extra work into that area to get some serious flow.
Chuck Most Posted March 27, 2012 Posted March 27, 2012 Nice one, Paul! Now... anybody up for figuring out a way to make the fadeaway fenders from the coupe kit work on the Woody?
Chuck Most Posted July 3, 2012 Posted July 3, 2012 The thing I don't understand is: Half the cost of a kit is the complex mold to make a one-piece body! All the other pieces are molded in a two part mold and are quite a bit easier to make than is the mold for the one-piece body. So, if Revell is going to make another kit with a stock body in the future (Provided Ken's suggestion is correct)... why spend the huge amounts of money for another body mold? Think I might know why- and this is just my theory, I have no hard data with which to back it up. Feel free to poke as many holes in this idea as you see fit... While the '48 Convert has all of the stock trim, panel lines, etc, intact, the coupe has all of those things shaved and filled. So, suppose Revell did tool up one body with two top options. Then you'd have a stock-height coupe with all the trim shaved, and all of the panel cut lines (as well as the cowl vent) filled in... and therefore not capable of being built stock (or at least with a stock-appearing body). Yes, you could graft the stock top onto the convertible body and have yourself a stock coupe, trim and all, then people would gripe about the need to purchase two kits to build one stock '48 coupe. So, even with with a theoretical pair of tops in this kit, there'd stil be quite a few people unhappy with it for one reason or another. Or, what if Revell had released the kit with both tops and a mostly stock body? "Totaly stock body with an optional chop? Some 'custom' this is", they'd say...
Recommended Posts
Create an account or sign in to comment
You need to be a member in order to leave a comment
Create an account
Sign up for a new account in our community. It's easy!
Register a new accountSign in
Already have an account? Sign in here.
Sign In Now