Spottedlaurel
-
Posts
1,975 -
Joined
-
Last visited
Everything posted by Spottedlaurel
-
2024 Cannonball Run Restomods Build Thread
Spottedlaurel replied to White Rabbit's topic in Community Builds
This was where I was when I started earlier today: With exhaust and some other bits elsewhere. Lots of little bits done since , should be good for final assembly tomorrow.....
-
2024 Cannonball Run Restomods Build Thread
Spottedlaurel replied to White Rabbit's topic in Community Builds
Hoping to get mine finished, even if it's going to mean a busy couple of days on it this weekend..... -
1974 Chevy Malibu (Nascar converted to Stock)
Spottedlaurel replied to Cosmo_Song's topic in Model Cars
Stunning! The super-clean finished look gives no clue as to how much work you did to create this, amazing. -
2024 Cannonball Run Restomods Build Thread
Spottedlaurel replied to White Rabbit's topic in Community Builds
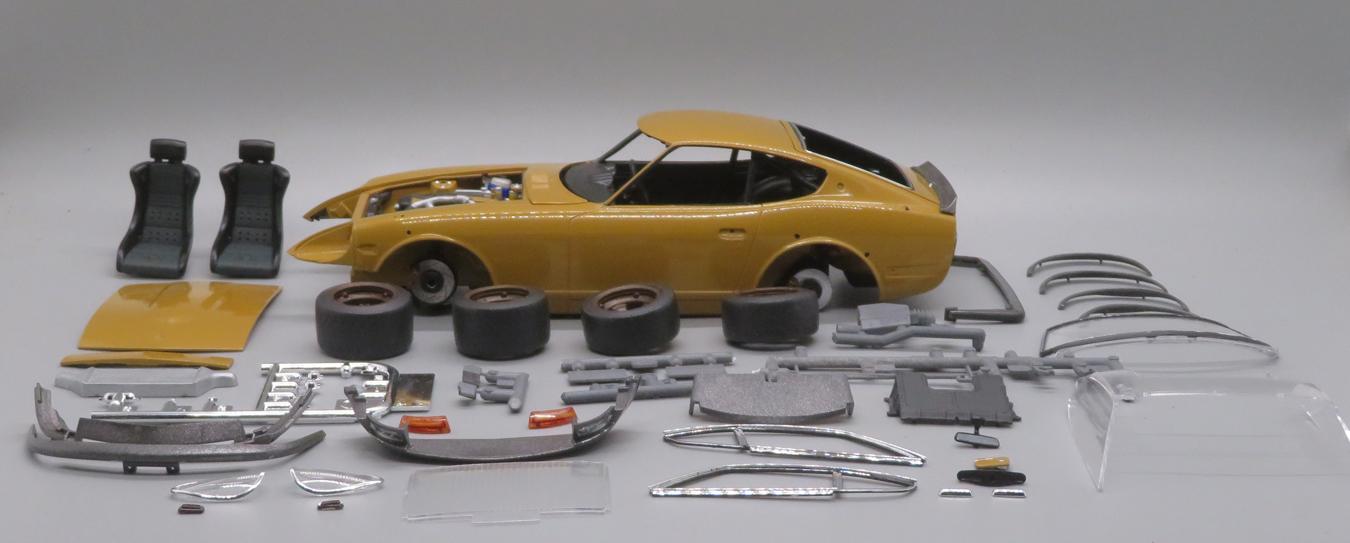
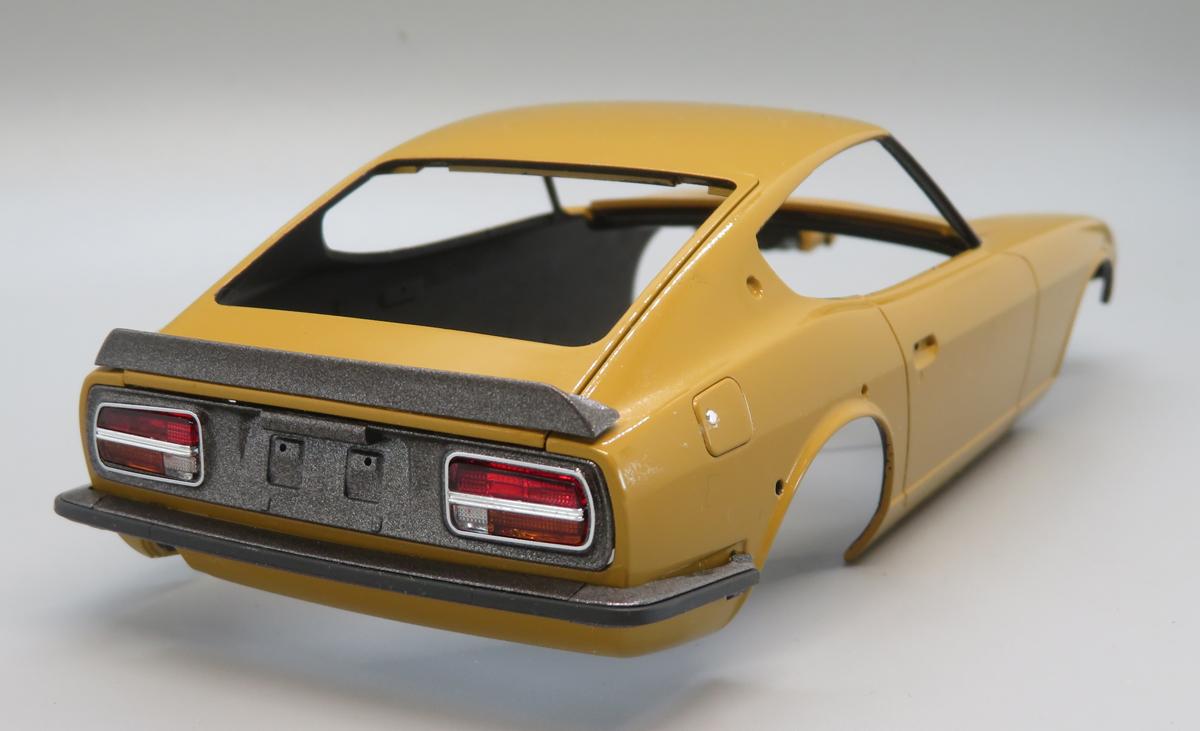
Well done to those of you who already have their CBR entries on the start line! I think I should make it with mine. With more of a quiet Sunday at home to come today, then fingers crossed a free weekend on the 23rd-24th, I'm hoping that gives me enough time..... Finally got the RB26 to 240ZG engine mounts sorted. It sits a bit differently in a Skyline GT-R so I had to concoct this arrangement with a couple of pieces of angle styrene. This is how it sits. Quite a bit of room on the LH side, but that's where the turbos etc sit so I need to keep plenty of space there. Wheels are not fully fitted at this point, I just wanted to see roughly how it sits. Dashboard is installed. On the interior I still have to fix the seats, paint the steering wheel just robbed from a Skyline GT-R race car, re-do the rear loadbay carpet and hopefully find time to make up a basic cage and seatbelt installation. Ex-Honda NSX rear brake dics now fitted. Aftermarket wheels are rather neat, with a separate casting for the male fitment required to suit a typical Tamiya kit. This has 4 studs protruding through the wheel, making for easy detailing (just need to clean up a bit of the wheel paint here). Ignore the tyres, they will either be replaced or given a little more attention. Can't wait to properly unite the floorpan and bodyshell. Have also been making progress on the latter, with the headlights fitted and some of the detailing done on the windcsreen scuttle panel. A few things of note at the back end, just to demonstrate the level of detail in this kit. The tailgate is separate to the bodyshell, and the spoiler and lock are both individual pieces. The fuel filler flap is also separate, again with its own lock that pushes through from behind. The rear bumper has six separate parts (it's not properly fitted here). The panel around the rear lights is another piece, then the lenses are split either side of the central chrome trim as below: That gives a really crispline between the indicator and reverse light. FInally there's a metal transfer to go around the light to replicate the chrome trim surround.
-
What’s your favorite clear red paint?
Spottedlaurel replied to Monty's topic in Model Building Questions and Answers
Like @stitchdup I use Humbrol too, both red and orange. Mine is in little plastic pots I must have had for around 30 years now. Got loads left and it still works really well. I hadn't really thought about the shade suiting older cars, as mentioned by Les, but it certainly looks right on the 1990s and earlier builds I do. It usually requires 2-3 coats and I find it does tend to run into the corners, so needs applying thinly and brushing out. Mostly I'm painting it on the back of clear parts, but for moulded-in markers and indicators then I lay a piece of BMF down and go over that. I did a quick refresh of an old built-up kit recently which had solid orange painted indicators. Out of laziness I just quickly applied the orange clear over the top of the original paint and even then it gave a more realistic look. For yellow I use Tamiya X-24 and then Revell #752 enamel for blue, although this came out a little darker than I expected recently and perhaps needs thinning a little. -
Very nicely done, looks really good. This is a nicely detailed older kit with some delicate parts. I built one a few years ago and was surpised about the detail compared to some other Fujimi kits of the time, but I think it started life with Nitto.
-
2024 Cannonball Run Restomods Build Thread
Spottedlaurel replied to White Rabbit's topic in Community Builds
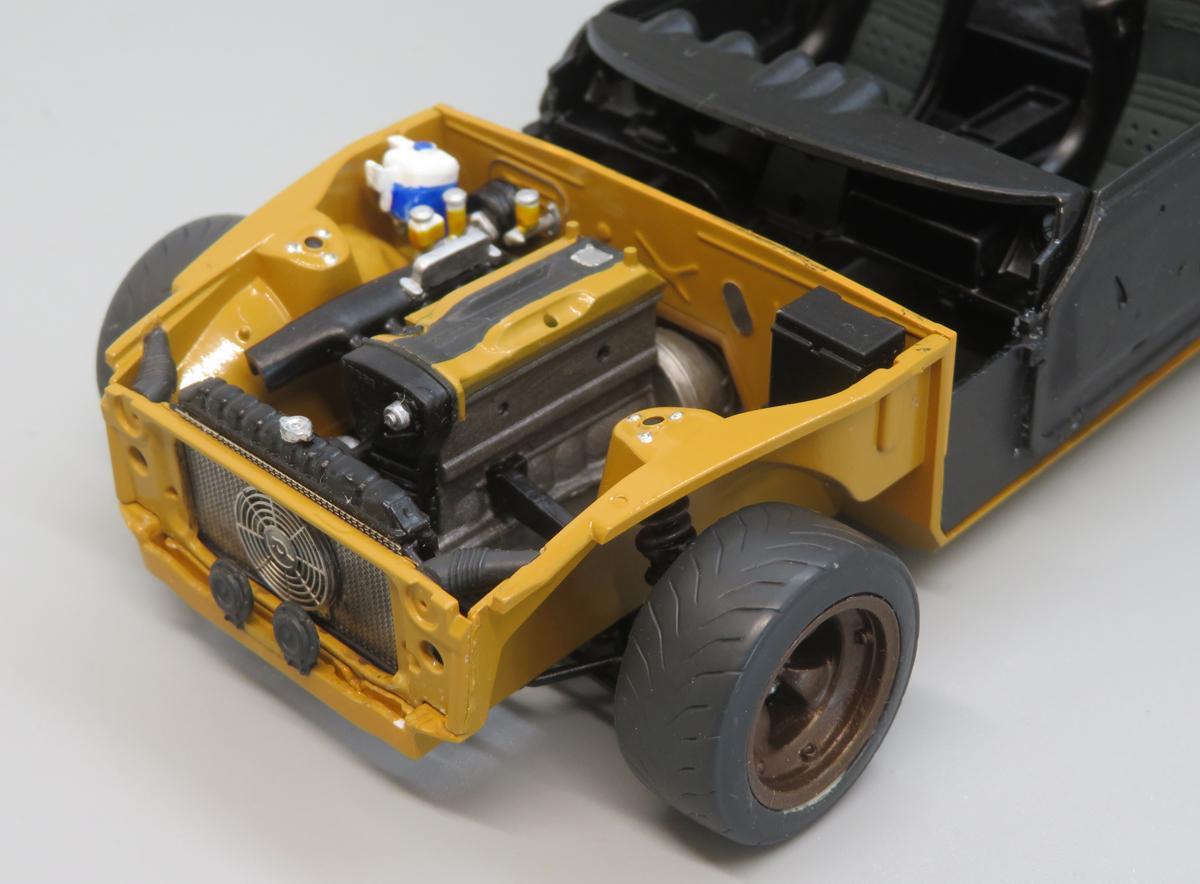
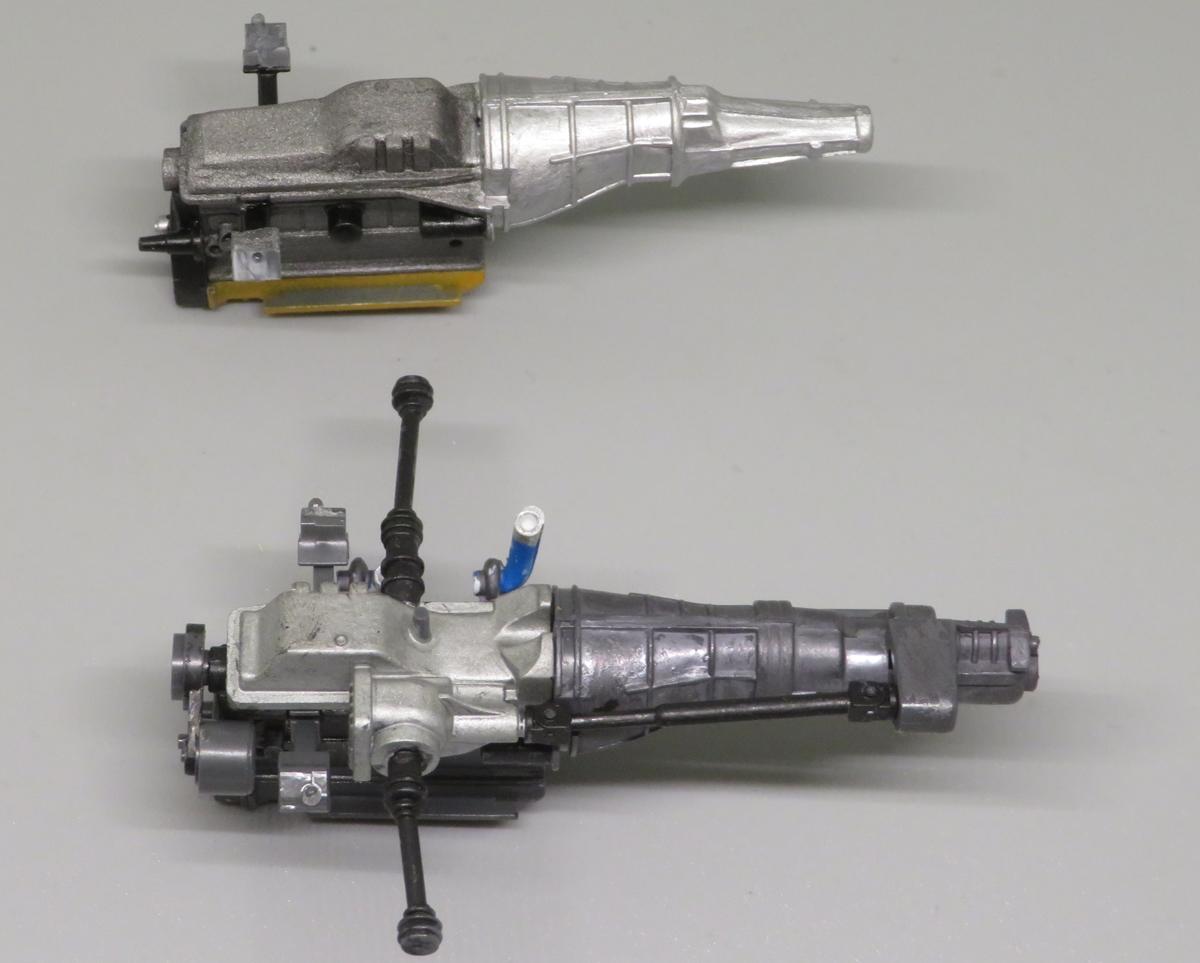
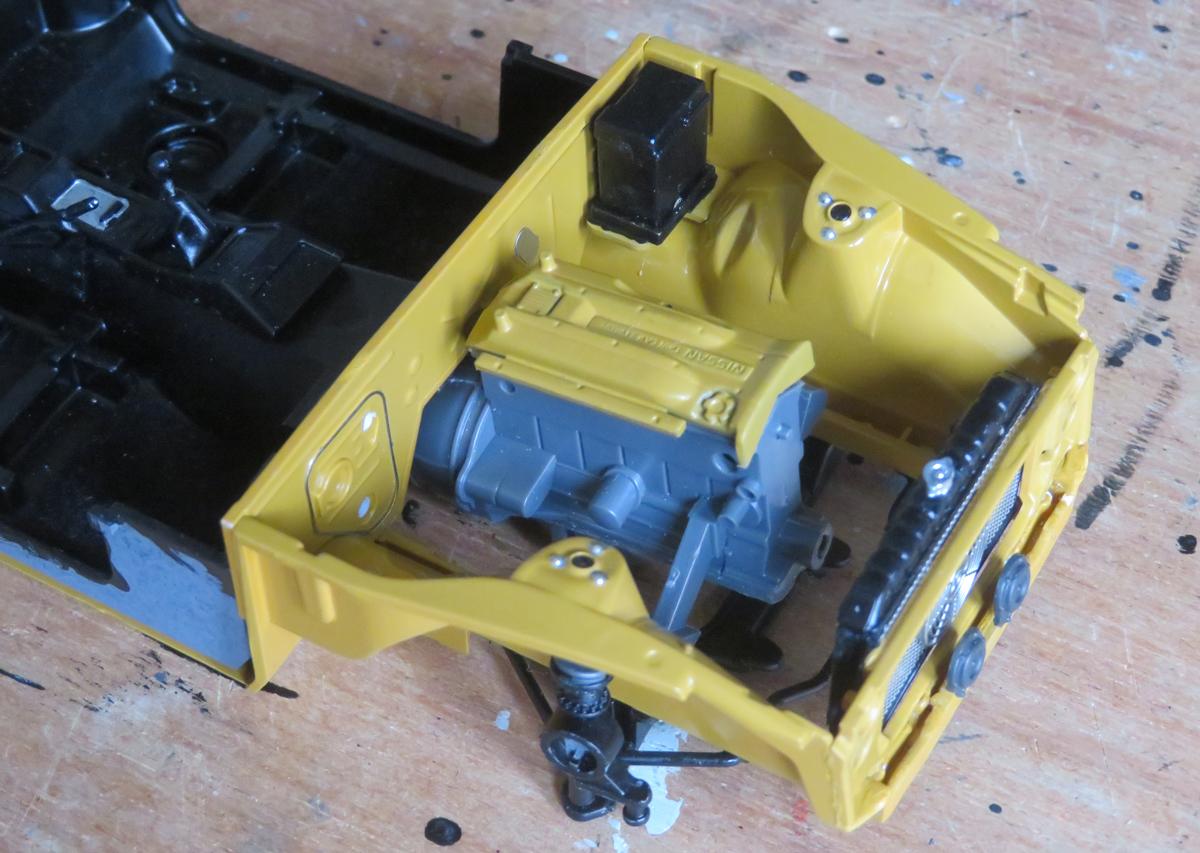
Had a quieter day than expected so being mindful of the forthcoming CBR deadline I managed to get quite a bit done: Today's main tasks were polishing the bodywork and getting the engine ready for installation, plus picking off a few odds and ends. Brakes were fitted onto the struts, the disc faces and radiator given a wash, and the undertray painted and mocked-up here to see how it fits. All good so far. Cam cover was painted body colour a few weeks ago and then detailed and fitted today. Sump reversal and conversion was finished with styrene sheet and filler. Need to attach some angle to the engine mounts so it sits correctly on the ZG's chassis rails, but I seem to have got the length right and it joins up to the standard length propshaft. Comparison with an original RB26 complete with its 4wd equipment shows how much I had to change and remove. I avoided clearcoat over the solid 1:1 automotive paint to maintain the period look. Polishing was done Micromesh (3600 down to 12000) then Zero fine polishing compound and finally Autoglym resin polish. The latter will probably need doing again after I've handled it over the remainder of the build, but I wanted to see how it looked. First time of trial-fitting the floorpan complete with most of the engine bay installed under the freshly-polished bodyshell - it fits! Before today I was mildly concerned as to whether I would get to the startline in time, but now I think I should be OK....
-
Had a weekend away and managed to visit a couple of physical LHSs, one I knew about beforehand but the other was a pleasant surprise find. Great to get the 240Z. I may end up robbing/swapping some of the hi-po bits off it for my current CBR group build entry, which is the 240ZG kit Tamiya brought out a while back. Paints and materials always come in handy, the Plastruct angle is also needed for something on that CBR project.
- 38,251 replies
-
- 6
-

-
- johan
- glue bombs
- (and 1 more)
-
Most of the guys doing Youtube videos of UK racing do a bit of a pit walk beforehand,so that should give some ideas on what to use. Would love to see your paintwork skills applied to something in the style of how some of them prepare their cars. The paintjobs they do for big meetings like the world final is amazing. Here in the UK (and Belgium/Holland) the favoured choices in the Unlmited class are big saloons and estates like Mercedes E-Class, Ford Scorpio and Granada Mk1/2, Jaguar XJ and various larger Volvos and Japanese saloons and coupes. Nowadays a lot of the racers fit a Ford 4-cyl engine, which rev's nicely and is very compact in a large engine bay so the car can take a lot of damage and still run, but it doesn't sound like the V6s or straight sixes from the days when they had to run the original engine. Of things I can think of in kit form that I've seen raced there is the Italeri Volvo 740, Hasegawa Jaguar XJ-S, Tamiya Jaguar Mk2, various large Mercedes saloons and coupes from Tamiya and Italeri, Toyota Supra Mk3 from Tamiya or Hasegawa (a surprisingly effective and strong banger - look out for a guy called Tye Williams (639), who can race and wreck them with great skill), and quite a range of big Japanese saloons like Lexus IS200 and LS400, Nissan Cedric, Toyota Mark II etc. A big race meeting will also attract random American stuff, have a look at some of the things that were raced at the King's Lynn Stadium Halloween Carnival last weekend..... Some of those kits aren't cheap, but it could give a new lease of life to a gluebomb or incomplete/damaged kit.
-
2024 Cannonball Run Restomods Build Thread
Spottedlaurel replied to White Rabbit's topic in Community Builds
Good luck with it Carl! Managed to spend a reasonable bit of time on my Fairlady 240ZG on Sunday - no one big thing finished, but made useful progress on a few smaller elements: Radiator built-up with PE mesh and electric fan from the HD detail-up set. May give it a light wash, will see how visible it is once it's tucked away behind panels. Fitted it to the radiator panel which was in turn glued into place, plus horns. At this stage I thought I'd better check the RB26 engine fits - it does, hopefully with enough room around it for the intake/turbo/exhaust set-up. Cam cover has been painted body colour. Front brakes were assembled, complete with drilled and slotted PE disc faces from the detail-up set. Again they will probably get a bit of wash. The outer caliper face was separate to the disc, which gave a crisp look when I placed it over the PE, and the disc was separate to the backing plate. Some more of the engine bay components installed. Possibly the first kit I've built that includes the steering column! Rear brakes upgraded to discs, which were leftover from last year's Honda Accord/NSX build. I've given the resin/3D tyres that came with the wheels a first coat of Revell #9 enamel, as they're slightly lower profile than the other rubber set which I was hoping to use but may not fit under the arches. May have something else that would work, I need to see how the wheels fit once the brakes are mounted. Carpets need to be redone with more care (and less glue!), but I like the texture of them.
-
Bought assembled and brush-painted: Had anticipated it being a glue-bomb needing to be stripped and rebuilt, but it isn't too bad and might respond well to a bit of Snake-Fu tidying and detailing.
- 38,251 replies
-
- 3
-
-
- johan
- glue bombs
- (and 1 more)
-
Great to see this given your customary care and attention, looks just right! The WIP is very useful too, I have several kits which I would like to turn ino banger racers - our equivalent of the demo derby cars - but I know it's not going to be as easy as just applying some lairy paint and assembling it without the glass and interior....
-
Often with Harris engines as I recall?
-
That was the one that came to my mind. It was a rough example but I loved the look of the one I owned back in 1991-92: One of the best-looking cars of the time (or ever), in my opinion. An early Manta B would be nice too, with the chrome bumpers. I know Belkits do a rally version of the later Manta, but I'd love to see the mid-late 1970s model as a kit.
-
2024 Cannonball Run Restomods Build Thread
Spottedlaurel replied to White Rabbit's topic in Community Builds
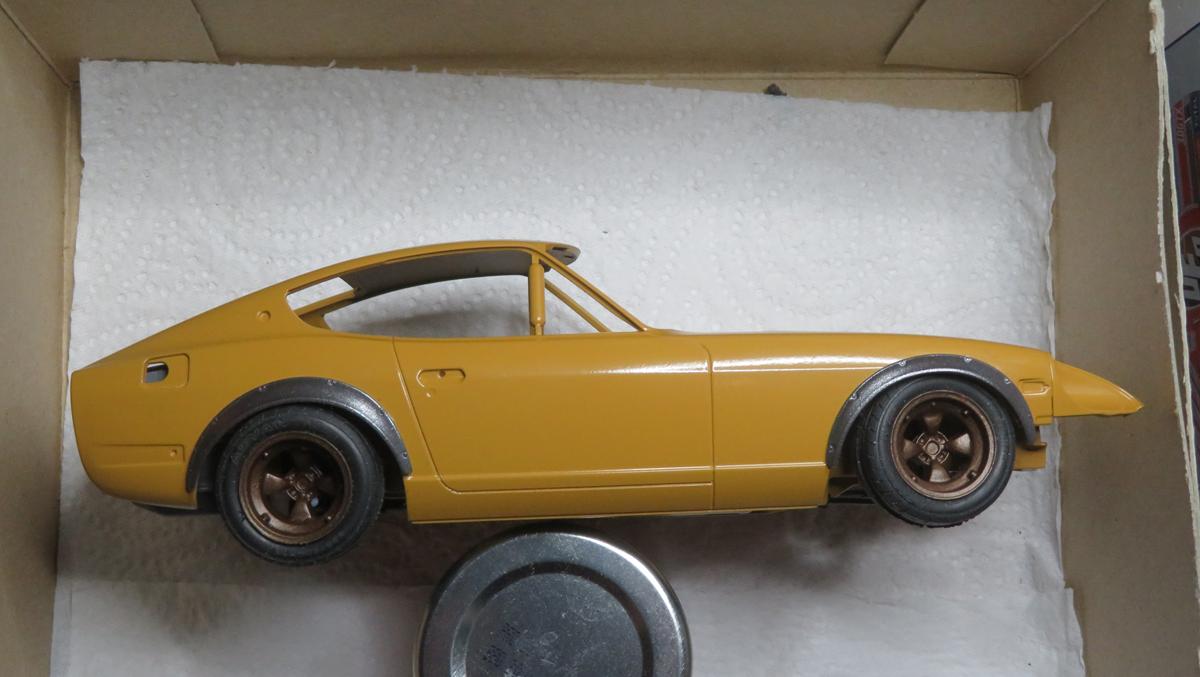
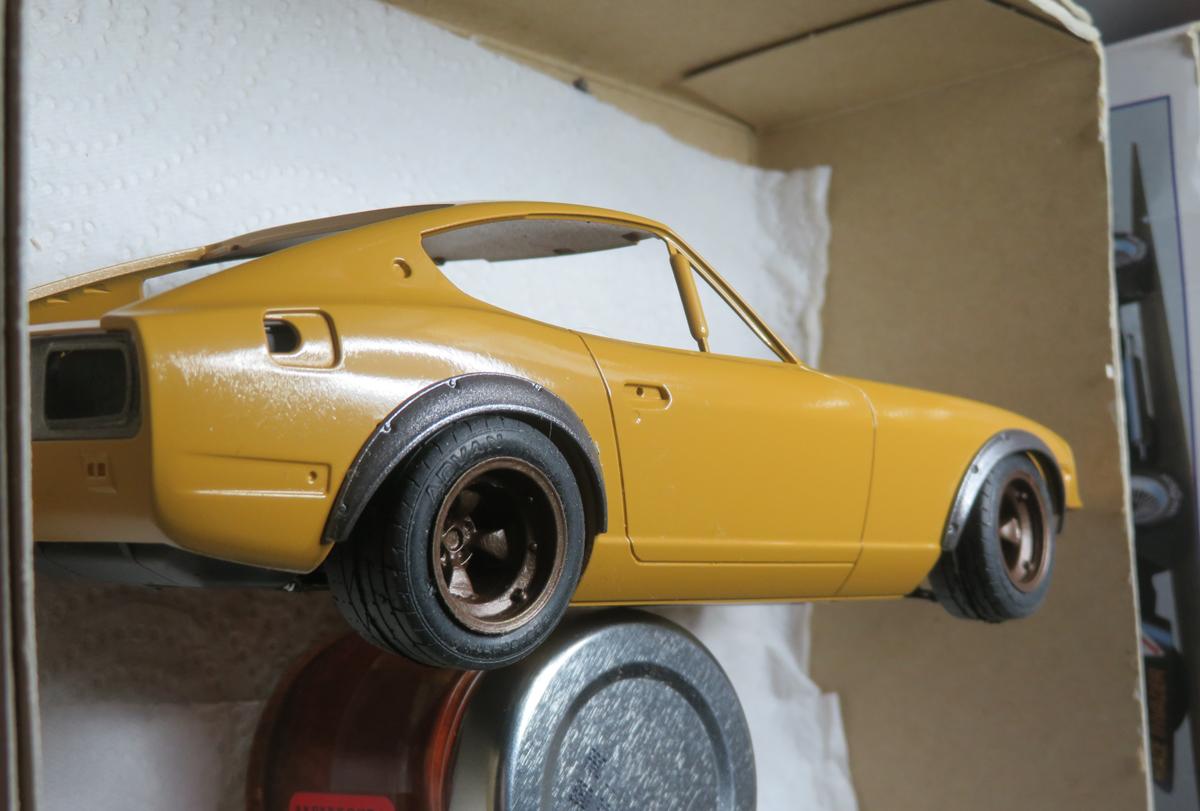
A little bit more progress, hoping to domore this weekend.... AK "Burnt Tin" has given the desired bronze colour to the wheels (just mocked-up in position here). Suspension is mostly fitted and I'm working on the engine bay. Still a lot to do, but that's the nature of a well-detailed kit.....
-
Looks mean! I like it, nice work.
-
2024 Cannonball Run Restomods Build Thread
Spottedlaurel replied to White Rabbit's topic in Community Builds
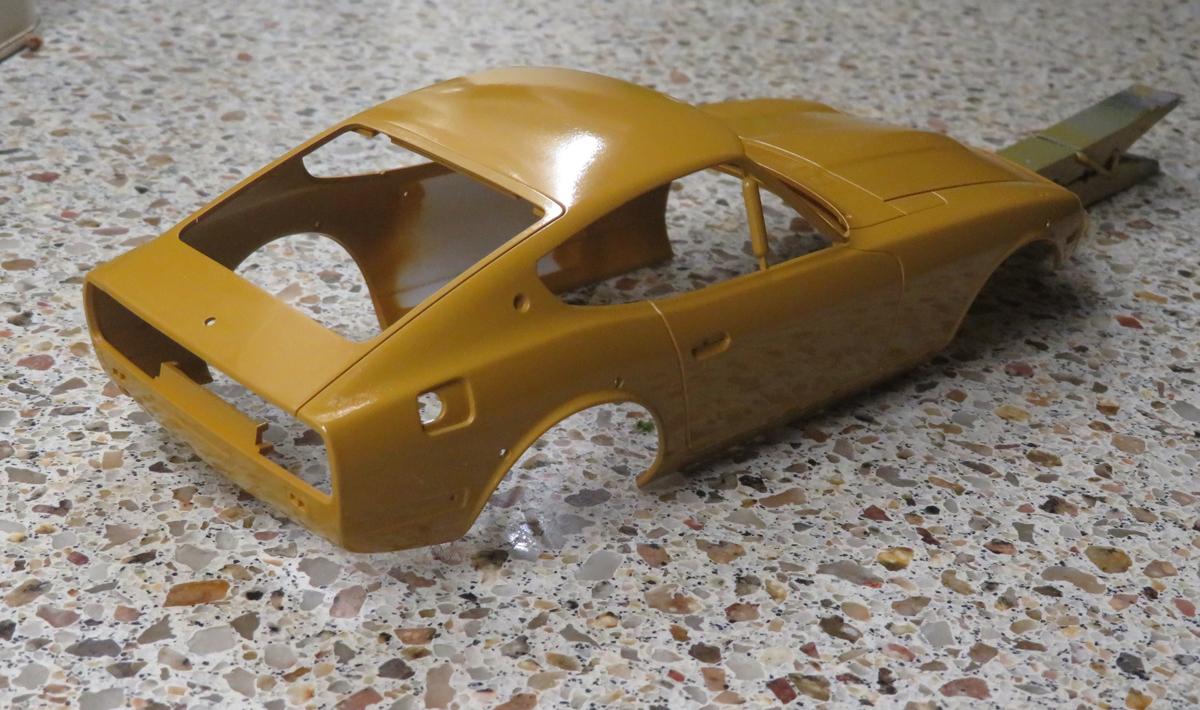
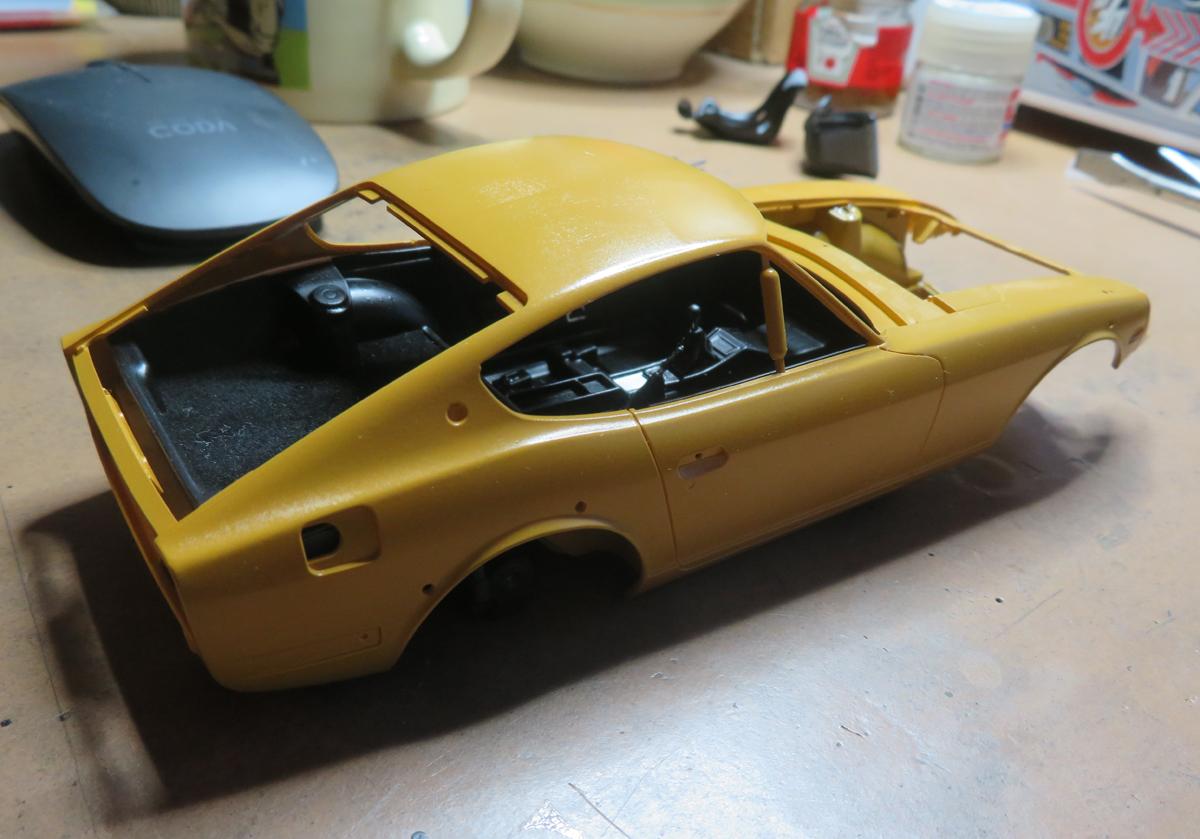
I've had a bit of a break from mine with holiday etc over the summer, but I got back into it this weekend. A little bit more assembly work and I gave the main bodyshell parts a wet-sanding with 600 grit then a few more coats: The separate panels might need a final wet coat, but the main bodyshell seems to be OK and should polish up well. I want to avoid using clear and keep the solid, period paint looking suitably 'thin'.
-
A few things over the last couple of months..... I don't have plans to build either of them as emergency service vehicles. Both are particular cars I don't have in scale form, so it was good to get them in whatever guise. Sadly this one has a rather squashed roof, but I knew that when I bought it. Appropriately it got delivered on a day when I was using my 1:1 LS400. Selection of sale items from an online seller.
- 38,251 replies
-
- 3
-
-
- johan
- glue bombs
- (and 1 more)
-
Brilliant news, thank you Hasegawa! Be interesting to see what other versions they come up with, maybe the pre-facelift, round headlight model? I had a 5-door version in the '00s, with the 1.2-litre and 5-speed 'box it was such a sweet thing to drive. This generation of Starlet became the short oval racer of choice in various classes of stock car and hot rod racing here in the UK and Ireland back in the 1980s and '90s. Tempting to build one or two in that style and maybe the aftermarket will provide the necessary arches etc?
-
Tamiya 1/24 Nissan 240Z (street custom?)
Spottedlaurel replied to Bennyg's topic in Car Kit News & Reviews
No, pretty much one way only to build it OOB. The Hasegawa non-ZG front end appears to fit nicely, so that is still there as an option (especially if the preference is to build it without a chin spoiler). -
Nice one Luke!
-
Tamiya 1/24 Nissan 240Z (street custom?)
Spottedlaurel replied to Bennyg's topic in Car Kit News & Reviews
Great to see it released, think it's still on pre-order here in the UK. I would be interested to see the contents, wondering how it differs from the ZG and what options there are. Is there just the front end with the spoiler, or have they included a standard valance too? -
Excellent news! It's an enjoyable build that looks good when completed.
-
2024 Cannonball Run Restomods Build Thread
Spottedlaurel replied to White Rabbit's topic in Community Builds
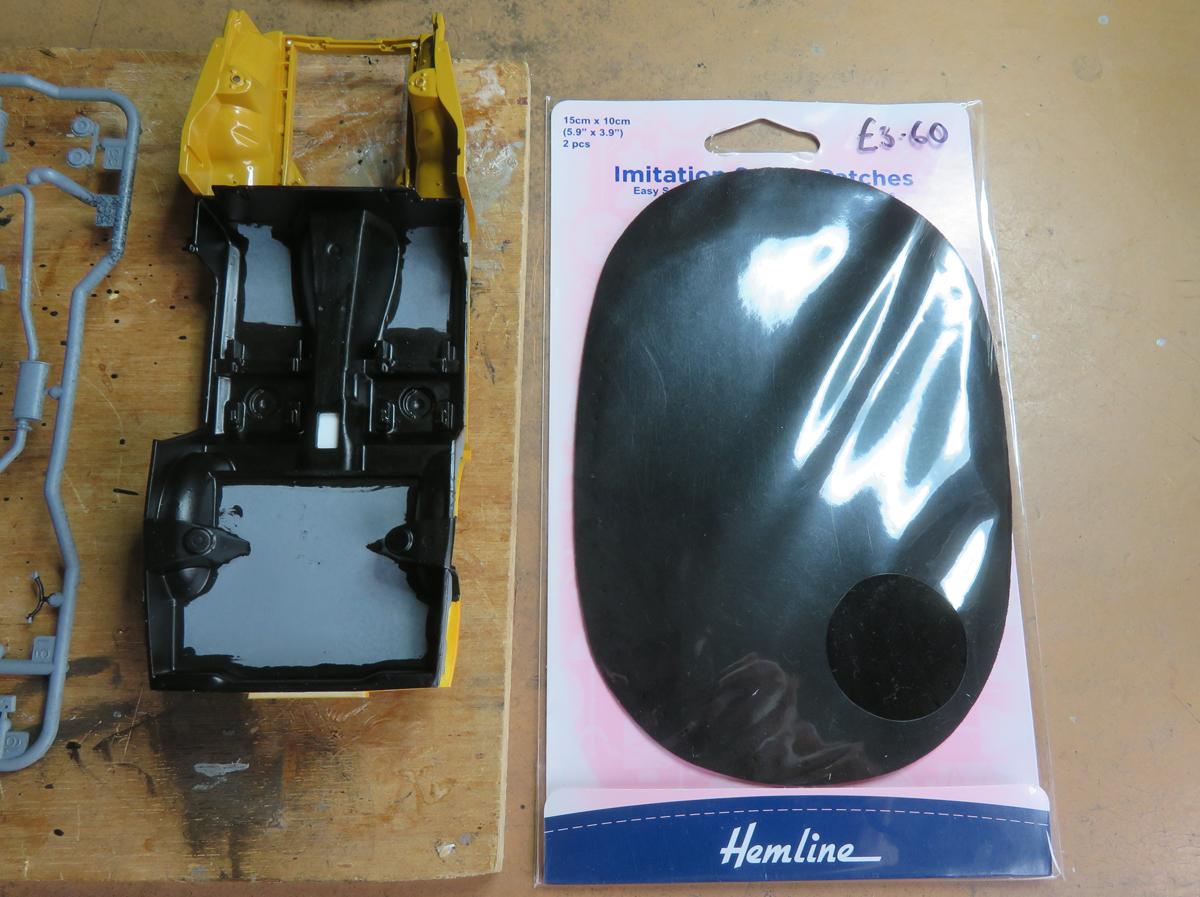
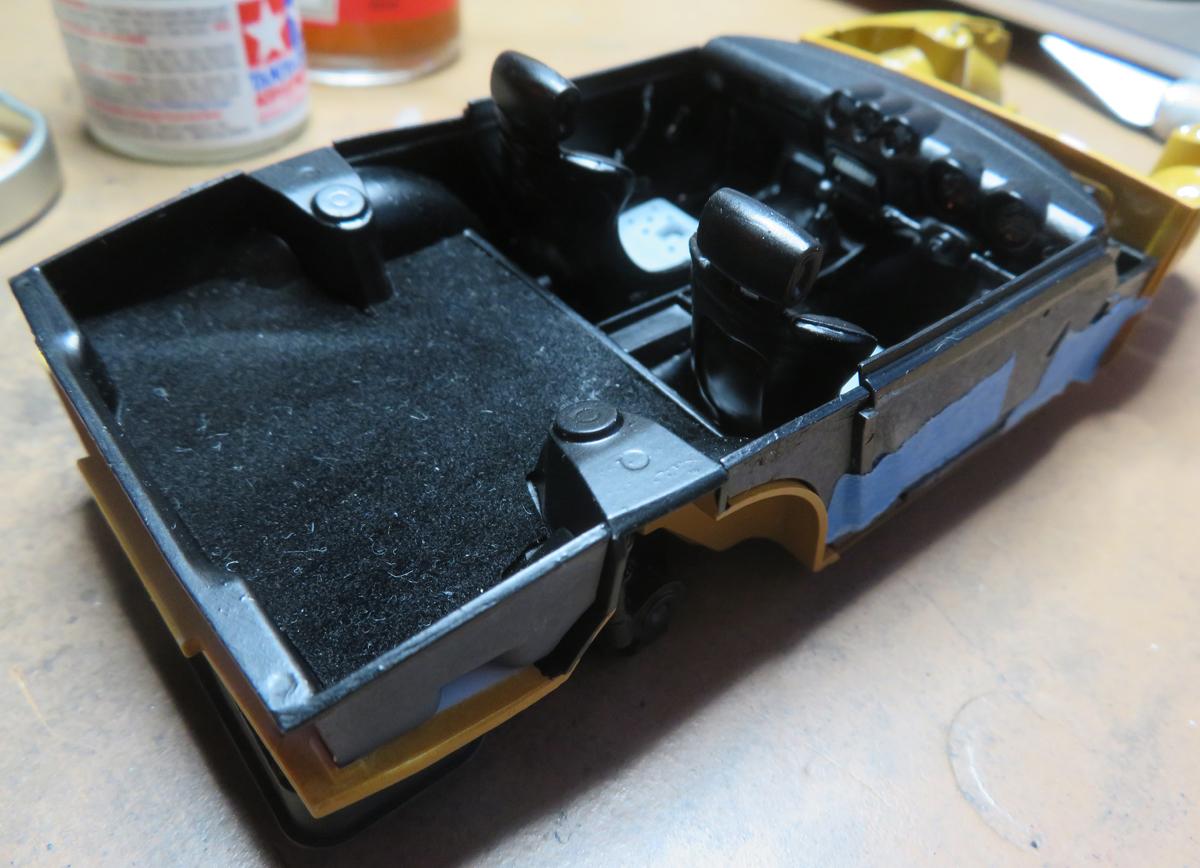
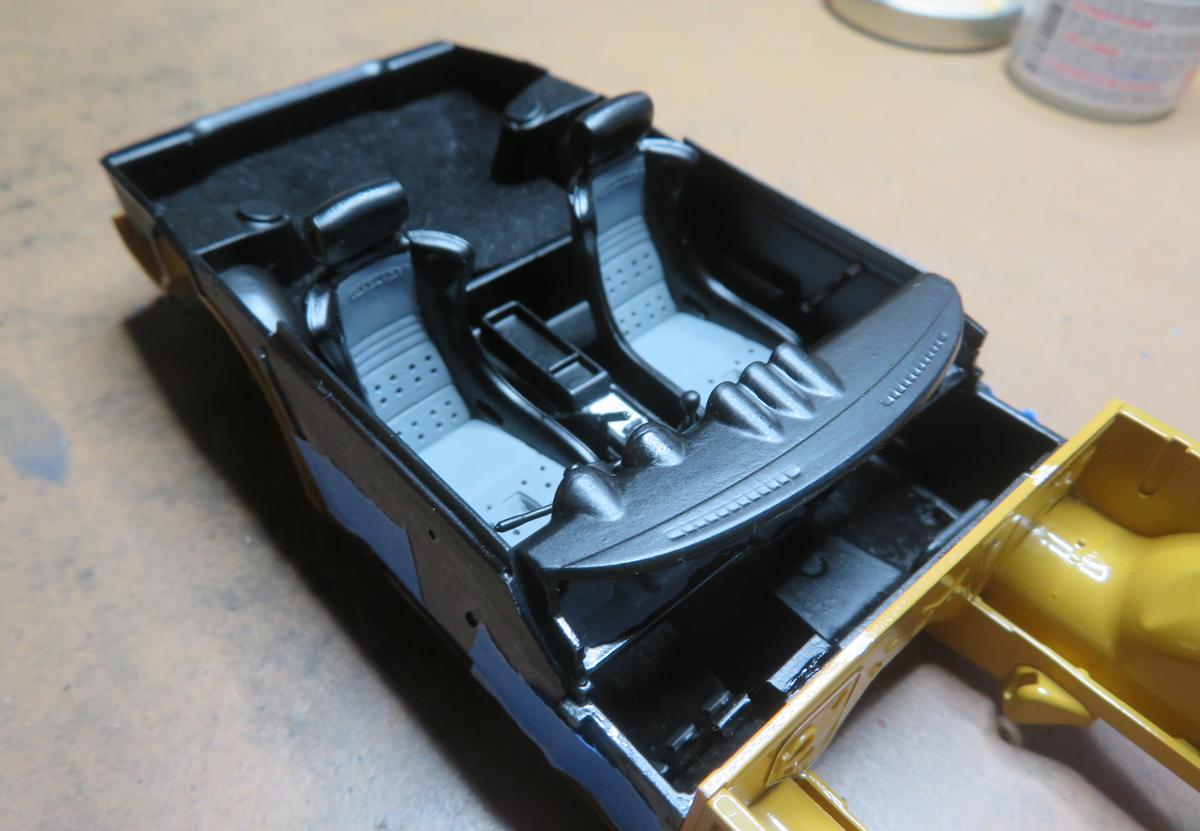
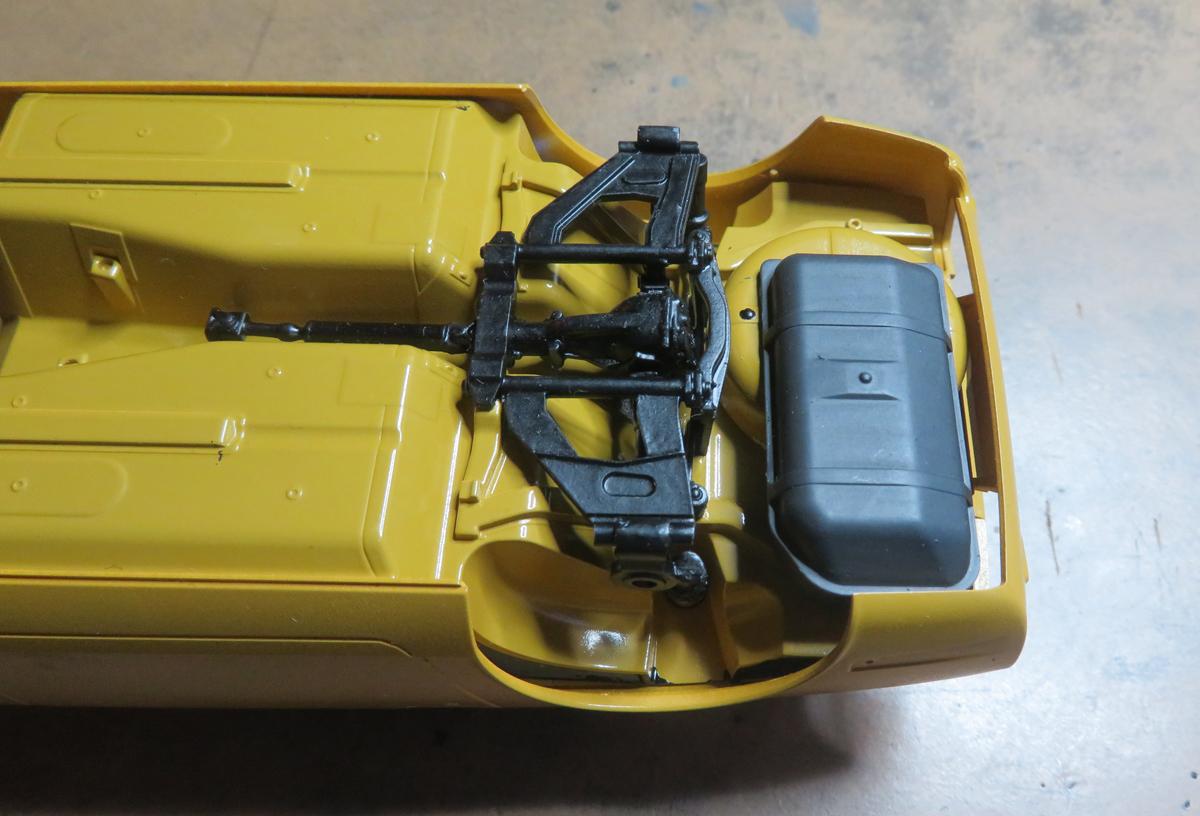
I stalled for a little bit with my CBR build, I ran out of my preferred Revell SM302 for mid-sheen black and the Humbrol alternative didn't work out very well. And there's a lot of it needed for the suspension and interior.... I found these aftermarket seats which I thought suited the retromod look nicely. Thought I'd try something different for the carpeted areas, imitation suede elbow patches! Spent a morning playing around with very small pieces from the Hobby Design detail set, very few of which will end up beng seen! Might repaint the seat centres a darker shade of grey. I'm happy with the carpet effect, certainly looks like the slightly shiny, nylon-esque material I remember from various 1:1 Japanese cars that I've had. Just need to be careful fitting it, any stray glue shows up and I need to redo it on the loadbay. Rear suspension etc now in place, with the Hobby Design lowering parts to make life simpler instead of me cutting and whittling away at it. For some reason I glued the fuel tank in the wrong place, so I had a worrying minute or two trying to get the body fitted before I realised my mistake.... Body still in its guide coat, hope to progress that if we get any kind of summer here in the UK.
-
Cutting plastic mesh
Spottedlaurel replied to Kit Basher's topic in Model Building Questions and Answers
Scissors? And cut the pieces oversize and trim them as necessary?