
Casey429
-
Posts
441 -
Joined
-
Last visited
Recent Profile Visitors


Casey429's Achievements
MCM Avid Poster (5/6)
-
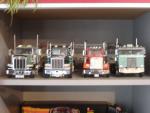
 All, With little time to spare, my 2022 BRBO entry is done. The rather short WIP thread can be found here. A quick recap: Stretched frame 25 scale inches, used an AMT Peterbilt sleeper slightly modified and home made crawl through boot. Larger driver's side fuel tank made from two stock Diamond Reo tank components with strip styrene straps. Stirrup-step on rear deckplate is made from a piece of aluminum rod. Aluminum tube for exhaust stack and styrene rod for the radio and CB antennae. Bits of wiring and hoses added for trailer connections, luberfiner, air conditioner and engine. Roof A/C unit from little window AMT Peterbilt. Aluminum wheels from AMT White Freightliner with Revell Michelin steer tires, AMT Goodyears on front drive axle, and AMT Uniroyals on rear drive axle. Color is Tamiya grey primer, clear coated. Stripe decal from kit. Lettering, permit numbers, and others from various other big rig kits. Weathered with a selection of washes, powders, paints and black RTV silicone for fifth wheel grease. Other than the askew driver's side fender that I didn't catch until after the hood was on, I couldn't be happier. I don't know how the fender got the way it did, but it didn't show up during test fitting so I wonder if I tweaked it polishing the paint. I tried my best to capture a '70s small fleet/owner operator look that's definitely been on a few runs, but a date with the truck wash would have it gleaming again.
 -
The Diamond Reo is off the bench and ready for BRBO 2022 Voting.
-
I thought I had posted more about this project, but it's been so long since I updated that well, I plumb forgot. I didn't get a whole lot done over the summer, but with the weather turning quickly here in PA over the last two weeks, I've managed to, in CB terms, "Put the Hammer Down!" on the 'ol DR. This picture, taken April 11, shows the basic look I was going for. I did the stretch I outlined above, swapped a Peterbilt sleeper for the Mercury, and that's about where it sat for about 6 months. I was hung up on what to do for fuel tanks. I tried making new ones out of PVC as I've read online, but couldn't find quite the right diameter to match up with the kit endcaps. I also didn't have a pair of matching tanks that I felt like using. This left me one choice. Slice and dice a set from a second Diamond Reo kit. Good thing I stocked up when they had them at Ollie's... I ended up splicing two tanks together to create a longer driver's side one. I left the passenger as it was to not interfere with the exhaust pipe. I shaved the straps off of both and redid them with strip styrene. While I was at it...I just went ahead and about assembled the whole thing... Paint is Tamiya grey primer topped with Tamiya clear. My original plan was going to be white or red with these same yellow decal stripes. But once I had all the body work and block sanding done, I liked it way too much. So I shot some clear on it, and laid down some decals. Stripes are from the DR, door signs from the recent issue of the MPC Mack DM800, permit stickers from various big rig kits from my stash and/or left over from previous builds. They actually cover a paint boo-boo on the driver's side lower cab skirt. I like to hide easter eggs in my builds and this is no exception. Truck number 16 for Tennessee being the 16th state admitted to the union. What can I say? I'm a history nerd too. I plan to shoot some more clear over the decals after another go around or two with the MicroSol to get them settled down a little more. With the color and the door signs, I have inadvertently created a very Confederate flavored tractor. I wanted to create the look of a working truck that isn't abused. It's got some miles on it now, but it's part of a small fleet or leased to one by an owner operator. Not quite as fancy as an equivalent Peterbilt or Kenworth, but nothing that's shameful to be seen in. I can't recall if I read it somewhere, or if this is something I just came up with, but the theme here is "Working Dirt". It's showing the signs of logging some serious highway miles, but it's nothing that a day spent with the steam jenny, some wax and some Nev-R-Dull couldn't fix! Any truck I've run across in life had dirt on it, even when it was freshly washed. The only time they're spotless is when they're new on a dealer lot. To pull of my "working dirt" motif, nothing other than the paint and most of the frame is shiny and clean. Inside the frame wears a coat of road grime and grease. The dirt is heavier under the hood and cab where it's harder to wash, especially if you're just cruising through the Blue Beacon. The fifth wheel is filthy, which I accomplished using some black RTV silicone from my garage, Tamiya panel line wash, and a couple shades and brands of black paint. There are grease "stripes" inside the frame at the u-joints. I've greased enough real ones to know how they fling it everywhere. There's also some grease daubs at where I know fittings to be. Forward rear spring mount on the Hendrickson suspension, both ends of the front leaf springs, steering gear, etc. You also might have already noticed that there are mismatched tires a plenty. Something else I picked up from growing up around trucks is that unless you buy tires in bulk, or are super particular, it's pretty rare to have all 10 tires match on a tractor. Steer tires are Revell (I think?) Michelins. Front drive axle is Goodyears from an AMT Transtar 4300. Rears are the kit Uniroyals. All have the tread sanded and dirtied. Front drives have more tread than the rears, which means they're newer. Rear drives also tend to scrub on tandems so they typically wear faster, at least in my experience. I even did the brake drums differently, even though they can't really be seen. Front drive has new drums in a raw cast steel grey/silver and the rear drives are rusty. Aluminum wheels are from the AMT White Freightliner dual drive. Fronts are reasonably clean but the rears could use a polish. I'm not a fan of how thick these kit mudlfaps always are, and ordinarily I'd replace them with some .020 or so plastic sheet. I wanted the raised Diamond Reo logos so I did what I could. I block sanded them as thin as I dared, and the sanding scratches on the back add to the aged rubber look. I scratched the Tamiya Rubber Black off of the DR logo with my Xacto and gave them a light dry brushing of grey to look like old rubber. I like the result. The cab, hood, and sleeper are not yet mounted. There's still a ton of little things to do before they're ready to go on, and I want to wait until they're mounted to get the sleeper stripes installed and aligned properly. I'll do that, then re-clear the sleeper and mount it last. The Cummins and Spicer trans were treated to various washes and dry brushing to age them a bit. Again, I don't want this to look clapped out, but it's probably got a few hundred thousand on the clock and it's ready for a few hundred thousand more. There's a few oil stains, spilled fuel, a little rust and general dirt but nothing worth carrying on about. I built new tank steps for both tanks with Plastruct checker plate attached to the sides from the kit steps and a strip of square styrene on the front to give them some depth. That's it for now. I think I'll be done with this comfortably before the Dec 31 deadline. There was a time I wasn't sure, but this load of progress is what I've gotten done over the last 2-3 weeks from that photo from April. The best part about building a dirty truck is if you have a paint or glue booger somewhere you don't want it, hide it with dirt. I really like how this is turning out, so as long as I don't FUBAR it on the home stretch, I think I'm going to be a happy builder!
-
Late to the party here, but hopefully not too late. Would a turbocharger set up for the Detroit 8V71s be of any interest to get modeled and printed? I want to add one to the engine in a Transtar, and that means either raiding an AMT KW Aerodyne (any of its variants) for one off of its 8V92. I'd hate to do that and then that leaves me with an engine that's almost unusable. I tried scratch building one using a spare Cummins turbo but the way they sit on top of the DD blower means they have a kind of unique plenum to feed it. I can handle building the exhaust plumbing and adapting some manifolds, but the turbocharger has proven difficult. There's a few different configurations for stationary, marine, industrial and truck engines, this is what I'm referring too.
-
As promised, here is my 2022 BRBO build thread. I started with a fresh sealed AMT Diamond Reo reissue. I actually started on this a couple of days ago and between house chores and a couple other things, here's what I was able to get done. I got the engine and trans assembled and lightly detailed. Oil pressure and return lines for the turbo, fuel lines from filters to PT pump, and feed and return from PT pump to head. Fuel filter housing is also drilled for future fuel line from chassis. I don't want to go overboard on this, but I am going to do some light chassis plumbing and wiring. I got the rails stretched too. I used the front section of a set of partial DR rails I got from Tbill (back in 2014!). I went back and looked at my PMs to make sure I gave credit where credit is due. He'd used a piece of them to stretch a frame, and I was going to do the same, but the truck I was stretching had a different contour to the rail, so I never used them. I trued them up, and they ended up being cut right behind the factory DR rear cab mount location. I took the rails from the fresh kit and cut them 1 inch ahead of the location the front sections were cut, giving me a 1 inch stretch. I can't remember what the stock DR wheelbase is, but it's now 25 scale inches longer. I want to run a sleeper, and the DR is too short, in my opinion, to pull it off out of the box. Great for a daycab tractor though. I started assembling things like the rear axle housings that will need seams addressed. I came up with my frame stretch amount by staring at this for a while. This is a survivor of my dad's. It's been rebuilt a few times, and with the number of spare DR kits I've accumulated, I need to replace what's missing and give it a proper redo. That's all I have for now. Plan is to use an AMT Peterbilt sleeper since I'm not a fan of the quilted aluminum Mercury found in the DR and the other White Motor Co kits from AMT. I know it's period correct, but I think they're kind of ugly. The Peterbilt sleeper is a Restrite unit to the best of my knowledge, and I've seen pictures of them on Diamond Reos. Plan is for a period correct owner-operator or small fleet look. Might be some dirt and grime in the nooks and crannies but it'll have a clean overall appearance and a few fancy doo-dads. Haven't picked out a color yet, but I want to use one of the sets of included stripe decals. Thanks for checking in!
-
OFFICIAL 2021 BRBO POLL fixed issue
Casey429 replied to gotnitro?'s topic in Model Trucks: Big Rigs and Heavy Equipment
Just wanted to take a minute and congratulate Dan on his win, well deserved. Also a big thanks to everyone else who participated and shared their work with us. Great Job everyone! -
BRBO2022 - Official Topic.
Casey429 replied to wayne00's topic in WIP: Model Trucks: Big Rigs and Heavy Equipment
Roger, count me in. I had a blast with 2021's rendition and now that I can finally say things have settled down a bit in my life, I'm in again. I'll be building an AMT Diamond Reo. Plan as of now is a sleeper tractor with a bit of a frame stretch. -
Mack Truck question
Casey429 replied to Oldmopars's topic in WIP: Model Trucks: Big Rigs and Heavy Equipment
I'd like to just toss out some quick info I've been meaning to share about Mack model designations, but I haven't had a chance to login here and reply since I got a new laptop. To clarify, there is no Mack "D" model, they are all "DM" Supposedly it stands for "Dump-Mixer" as they're the primary vocations that these were aimed at. They could be had as tractors too, in addition to being commonly seen as garbage trucks, roll-offs, and every other vocational truck out there. Mack did offer a lighter duty version with the offset cab called the "U" model. Typically they were tractors and lighter specs all around where the DM was almost exclusively heavy spec. The option of fiberglass or steel hoods were just that, options. The DM600 could be had with either, but the DM800 was exclusively steel. The same thing applies to the R series. Fiberglass/steel on R400 and R600 series, R700 was exclusively fiberglass, and the RD800 is steel. The addition of the D into the R model designation simply designates it as a heavy duty R model. Here's a handy (but by no means complete) guide to how the Mack model nomenclature works: Chassis numbers (GVW Rating): 4xx - 6xx - 7xx - 8xx - Note: the xx is the place holder for the engine code. Examples R607 END673 R609 END711 R611 ENDT673C R612 ETAZ673 (300+) R615 END864 V8 R626 6v92 Detroit R685 ENDT675 (237 Maxidyne) R686 ENDT676 (300 Maxidyne) R688 E6350 R719 ENDT864 V6 R795 ENDT865 V8 R797 ENDT866 V8 R747 290 Cummins R763 335 Cummins R767 350 Cummins T - Tractor S - Six wheel chassis L - Light weight components RS7xxLS as our example: R = R model S = an S after the R indicates it has a steel frame. This was a western Hayward thing i believe. 7 = has to do with the chassis GW rating. 800/900 series were extra and super heavy duty chassis. XX = these two numbers are engine codes. L = Hayward models had this letter to denote the cab used light weight components like aluminum doors. S = six wheel tandem chassis. so essentially it is a 6x4 chassis. Another example RW613: The W stands for Western and together with the R means a superliner or RW. 13 is a Cummins NTC engine. If there is an SX after the number code like R600SX it means you have a heavy duty tandem X - Extreme duty So, to use an example of one in plastic, the AMT R685ST translates to an R600 series, with the 237hp Maxidyne engine, in 6 wheel tractor chassis. The AMT(Ex MPC) DM-800 actually depicts a DM-895SX with it's ENDT-865 V8 turbo diesel and 55,000 lb rear axles. the DM-600 I believe uses the same rear suspension (I've never built one) which makes it a DM-607SX, as I believe it has a ENDT-673. Another interesting note is the engine designators. EN simply means engine. The D was added when Mack began to produce diesels to distinguish them from their gasoline counterparts. T means its turbocharged. The last 3 digits are the model designator. Once Mack phased out everything that wasn't a turbo diesel, the engine models I believe simpy became the "E" series. -
When I built my "out of the box" F4270 I struggled with painting it a metallic blue or the solid blue I ultimately ended up going with. I couldn't decide if the highlights on the box art meant it was metallic, or just shiny. This almost makes me second guess my decision. It's looking really good, will stay tuned.
-
Made a quick deal with Rodent for some parts, couldn't have gone smoother.
-
Ford C800 Gar-Wood Load Packer. It's Happening!
Casey429 replied to chuckyr's topic in Truck Kit News & Reviews
I completely agree Tim. I remember seeing these things everywhere in my youth, but it's a shame how they've more or less disappeared from daily life. Granted, the newest ones are the same age as me and they weren't ever meant to be more than working class yeomen so I'm sure many of them were used up and thrown away. I'm also sure there's a lot of them still earning their keep, with even more enjoying a well deserved retirement in fields, tree rows, and garages alike. -
Ford C800 Gar-Wood Load Packer. It's Happening!
Casey429 replied to chuckyr's topic in Truck Kit News & Reviews
I'm a big fan of the Ford C series, and this will be making its way into my collection. I ended up finding some of the aforementioned videos of some of these old mules still out working, pretty neat stuff. The Ford/Caterpillar V8 out of the LN trucks is a natural swap, and maybe someone out there would have the skills to master and cast a Detroit 8.2 "Fuel Pincher" too. -
Meng F350 super duty
Casey429 replied to Madd Trucker's topic in Model Building Questions and Answers
Better late than never I suppose. Mine is actually an F-250 and also has the 6 3/4' box, but in scale one is a moot point and the other is remedied with some well placed cuts. The only changes from this picture are it's now fitted with the black headlamp housings from the Harley-Davidson model, and it also has the fatter lower air dam from a later '08 truck. Which also leads into something I forgot to mention in my other detailed post. The narrow air dam was only found on "Job 1" '08 Super Duty 4x4 pickups. Starting with "Job 2" they were fitted with an air dam that's roughly 6" tall as opposed to the 2" air dam in the kit. 2 wheel drives kept the small air dam. So to be completely picky, the kit depicts a Job 1 2008 F-350 XLT. Job 1s were built from approximately January of 2007 to July of 2007, Job 2 from July of '07 thru the early part of '08, and Job 3 was the remainder of 2008. The Job numbers started over for 2009, and do every year thereafter. The trucks are divided by "Job", each of which had running changes and changes in availability of options, hence the designation. -
Meng F350 super duty
Casey429 replied to Madd Trucker's topic in Model Building Questions and Answers
The kit depicts a 2008-2010 F350 in the XLT trim level. With a bit of painting/stripping some of the chrome, you could feign an XL, Lariat, King Ranch, or Harley-Davidson trim. Model Car Garage makes a photoetch set for it to make the badging possibile. Engine is the 6.4 liter Power Stroke Diesel V8 coupled to a 5R110 automatic transmission, and as others mentioned the exhaust is all wrong. It's a gas engine style and lacks the Diesel Particulate Filter system introduced with the 2008 MY emissions standards. The 6.4 Power Stroke was the last of the Navistar International built engine, before Ford switched to the in-house designed and built 6.7 liter "Scorpion" version of the Power Stroke V8. Both sets of wheels in the kit are inaccurate. The ones on the box art are a badly rendered set of the 2011-2016 18" optional wheel found on XLTs, while the 7 spoke design is also an 18" wheel, but it represents a 2013-2016 Platinum trim wheel, which was only available as a 20" wheel. I've got the real thing parked out in the driveway, although mine features the ZF 6 speed manual transmission. But other than the wheels, I have to say the body, interior and chassis are very faithful to the real thing. -
BRBO 2021: Ertl International F-4270
Casey429 replied to Casey429's topic in Model Trucks: Big Rigs and Heavy Equipment
Thank you all for stopping in to take a look. I appreciate the kind words! Bill, I thought about this, but it would go against my MO of straight from the box. Maybe at a later date, but for now this is all she wrote.

