Force
-
Posts
4,561 -
Joined
-
Last visited
Content Type
Profiles
Forums
Events
Gallery
Everything posted by Force
-
Same here, #222 and #223 has not reached my mailbox here in Sweden as of May 11th, I have not sent any requests for replacements yet tho' as I have been patiently waiting for them to come. I know there were problems with the #222 everywhere in the World but since I got #221 I thought the #223 would show up...but nothing so far.
-

"The 777" Tasca Ford '63 lightweight Galaxie
Force replied to customline's topic in WIP: Drag Racing Models
The 60 Starliner Custom or 2 'n 1 kit has everything you need to do a period correct 427 with dual 4 bbl and long cast iron headers. -
Peterbilt 359 'needle nose' conversion
Force replied to robdebie's topic in Model Building Questions and Answers
The truck has a hood ornament on top of the grille in the middle and it's small, but it also has a mirror on top of the grille to the right of the ornament pointed at the smoke stack so the driver could see the color of the exhaust and if it was too black he had to lift off or change to a lower gear and keep the rpm up to not damage the engine. -
Nice build so far...and the correct year.
-
Peterbilt 359 'needle nose' conversion
Force replied to robdebie's topic in Model Building Questions and Answers
I also plan to build the primary truck when I build mine and I'm gathering parts as we speak, I have everything covered except for the engine and front wheels. I bought the resin cab kit from AITM and I also got a narrow nose hood kit from Dave made to fit the small window Unlilite cab AMT 359, I just took it out and measured it and the grille is 36 mm on that one, so it's slightly wider than the grille on the cab kit and close to your 3D design. Go with what you think looks best. If you want to be sure and get it right ask the Peterbilt guru Tim Ahlborn, he would know, he is a member here on the forum but I have not seen him post here for a long time, I see him post on Spotlight Hobbies board from time to time, but he has a facebook group called MTDG Model Truck Discussion Group and he posts frequently there. This is the closest I could find of an early hood ornament but I think some I have seen looks slightly different. But good pictures are hard to find....I've tried., most of the ornaments I find pictures of are the later air plane style. I don't know how I will tackle the engine issue either, maybe modify a kit engine to look like a 1673 or something like that, as you say, nothing is available. There are two different designations for the same engine tho', 1693 for the truck engine and D333 for the heavy machine version, but they are the same on the outside, what can differ is if they have aftercooler or not, I have found lots of pictures on the web of these engines wich I saved to my files. I forgot to mention the suspension on the truck, it was a Page & Page 60/40 suspension and you can find one at Czech Truck Model (CTM) wich recently added a couple of suspensions to their line of resin truck parts. I'm sure more will come in the future, I have provided lots of pictures of old truck suspensions to them. https://www.czechtruckmodel.com/resin-suspension-sets/297-ctm-24269-page-and-page-suspension-set.html The axles are wrong for the movie truck as both are top loaders, but the suspension is right, the movie truck appearently had one top loader drive axle when it left the factory but it was also changed to a front loader axle, most likely when they changed the rest of the drive line but they kept the tag axle and the suspension. When it comes to suspension on the trailer I found out from reliable sources that it would have had Kenworth style torsion bar suspension like this. These wheels look great, I have looked for some myself as I need them for my Duel project...and the engine wich is the only major parts missing. The closest I could find was Moluminum's Tyrone Malone Truck Mate wheels wich really didn't look right and there are hub caps on them. I also got some wheels from Strato Models wich were very nice, but they are too small as they are 20 inch wheels, I believe the movie truck had 22 inch wheels. The fronts are like this but in different colors, black on the drivers side and white on the passenger side, the rear wheels are miss matched, drivers side drive axle has a 5 hole Alcoa aluminum wheel and the tag axle a 5 hole steel wheel, the passenger side has 5 hole steel wheel on the drive axle and 5 hole Alcoa on the tag axle, the tank trailer has 6 hole steel wheels on the front axle and 5 hole steel wheels on the rear, same on both sides. Well here is my research for you, it gets more complicated than you think if you want to get it right and I have spent many hours researching for this truck wich is part of the fun.
-
Peterbilt 359 'needle nose' conversion
Force replied to robdebie's topic in Model Building Questions and Answers
I just measured the AITM resin kit grille, I don't have any precise measure of the real thing. I have a couple of magazine articles that states to remove 6 mm or 1/4 inch from the center of the 359 grille and that could be right...I haven't checked if it matches up with the resin grille. The main primary 281 truck in the movie wich was destroyed at the end indeed had rivets at the rear edge of the grille, but there were two trucks used in this movie, a mid 60's 351 was used for the extended scenes filmed in 1973-74, and that truck did not have any rivets on the rear edge of the grille. I have not noticed any ribbed "thingie" on top of the grille other than the ornament and mirror, I have not seen any good pictures of the top of the grille on the primary truck and I have collected all photos I could find on it. From reliable sources I have found out that the Primary truck was a former Union Oil truck and it was a 1957, not a 1955 as stated on many places, Union Oil only bought two tag axle 281's in the 1954 to 1961 period, this was just the tractor, not the trailer wich was much earlier (late 40's) and wasn't originally on the truck. The engine originally was a NH-6B Cummins but was changed to a Cat 1673B sometime under it's life, mid 60's, and the yellow horisontal air cleaner is indeed a from a Cat 1673, the trans was a RTO-913 Fuller. This could be the movie truck or it's sister when they were new in 1957.
-
Peterbilt 359 'needle nose' conversion
Force replied to robdebie's topic in Model Building Questions and Answers
The width of the grille on my 1959 Peterbilt 281/351 cab kit from AITM is 32 mm wide and 45 mm high, it's 1:25th scale. Not all of the needle nose Petes has rivets on the rear edge of the grille, but the Duel truck do. The 281/351 also has butterfly hood and if it's a one piece tilt hood it's a 258/388. -
It's pretty close to Mopar FC7 "In Violet"/"Plum Crazy" High Impact color from the early 70's
-
Fujimi's Ford GT40, 68 le mans winner
Force replied to eran_k's topic in WIP: Other Racing: Road Racing, Land Speed Racers
Nice. Did you know the same chassis won Le Mans both 1968 and 1969? Chassis 1075, as No 9 1968 and No 6 1969. -
AMT Kenworth W925 Coke
Force replied to iamsuperdan's topic in Model Trucks: Big Rigs and Heavy Equipment
Yes, they didn't change the chassis designation when they changed suspension. Both the W925 and K123 kits got the same Hendrickson RTE 3 hanger walking beam suspension about the same time, so when the W925 originally came out the designation was correct but the K123 was wrong as both had torsion bars, now it's the other way around since both has walking beam, the W925 is wrong and the K123 is correct. -
Trumpeter Ford GT40 with my twists
Force replied to kensar's topic in WIP: Other Racing: Road Racing, Land Speed Racers
I don't know why the Asian model companies do the discs grooved, I have seen several examples of that, the discs/rotors can be ventilated, slotted, drilled or nothing, but they have flat and smooth surface with no grooves what so ever. -
Anyone Ever Built The Cannonball Countach Kit?
Force replied to oldcarfan's topic in Model Building Questions and Answers
For the Cannon Ball Run Countach there are only two alternatives as I see it, Fujimi Enthusiast Model EM series wich are full detail but they have curbside versions also and I believe they are RS series, or the Aoshima kit. The Fujimi kits are demanding to build as the body with flares and everything are separate pieces but with patience it will be a nice model. The Aoshima kit is a bit simpler than the Fujimi EM series kits but easier to build, and it looks good (I have one of each). So if you going to build an accurate model of the Cannonball Run Countach wich was a 5000 Quattrovalvole (QV) you need to go with either of these two and add the front wing. -
I don't know for sure because I'm no Peterbilt expert like Tim Ahlborn, but it could be that it wasn't a window there at all and you could open up and close for ventilation. I can't access his website any more where he had a spotters guide to the different peterbilt models, I know I have seen something there about this sliding panel on the old Peterbilt cabs.
-
It's probably one of Dave's own left over after he passed a couple of years ago but they don't have any production as far as I know. Dave Natale was into Mack trucks and built many of them...and of course casted them.
-
The AMT kit is a newer style cab than the Duel truck cab, the Duel truck was a 50's cab as the 281/351 came 1954 and the Duel truck was a 1957 after what I have found out during my research, the AMT small window Unilite cab California Hauler kit is a 60's cab, the 359 came 1967 and the kit is from 1969. About the rear window, yes it's a sliding panel.
-
AITM is on facebook and run by Dave's family, but they don't have much for sale other than leftover parts and I don't think Dave's son casts anything, it doesn't seem so...so I can't really say they are up and running. Keystone still has their facebook page but they for sure are out of business.
-
American Industrial Truck Models is no more since Dave Natale passed away, Doug Wagner at Keystone Aluminum Model Miniatures had AITM stuff a while but there was a glitch somewhere and he closed up shop and some of the AITM stuff got back to Dave's family.
-
No rivets, or huck bolts as they are refered to.
-
Another "Convoy" Truck!
Force replied to Jürgen M.'s topic in WIP: Model Trucks: Big Rigs and Heavy Equipment
Years and years of modelbuilding and research on upcoming and planned models. I like to get my models as accurate as possible. Another thing, I've been around and been tinkering with cars and trucks all my life and I have an adjucation in cars and body and also have a class 1 license to operate both trucks and busses, and wheel loaders and excavators...so I have learned how these things work. -
Another "Convoy" Truck!
Force replied to Jürgen M.'s topic in WIP: Model Trucks: Big Rigs and Heavy Equipment
No problem. The engine in the AMT Peterbilt 359 1100 series cab truck is a NTC 350. -
Another "Convoy" Truck!
Force replied to Jürgen M.'s topic in WIP: Model Trucks: Big Rigs and Heavy Equipment
Don't mention it, if I can help I will. Most of the engines with turbos back in the day only had one, the twin turbo setup on inline six engines is a more recent thing, both Caterpillar and Cummins had twin turbos on some of them and Cat still do on some engines, but Cat stopped doing engines for on highway trucks back in 2010 so after that you couldn get a Cat engine in your truck. V8 and V12 is another thing, they could have one or two turbos...or none at all. That looks convincing enough so go for it. The engine in the AMT Kenworth W925 and K123 is a NTA wich is not that common, the most common Cummins is the NTC version wich came in different horsepower ratings, but you can of course use the NTA if you want to, both are 855 cui engines and the visual difference is mostly in the oil cooler area. I don't know what engine was in the Bruhn K100 and you can't see it so use whatever engine you like, engines available back then was Cummins and Cat 4 stroke, and Detroit Diesel 2 stroke, all in various configurations. -
Trumpeter Ford GT40 with my twists
Force replied to kensar's topic in WIP: Other Racing: Road Racing, Land Speed Racers
You are welcome. -
Trumpeter Ford GT40 with my twists
Force replied to kensar's topic in WIP: Other Racing: Road Racing, Land Speed Racers
Here is the oil system. The scavenge pump wich suck the oil from the pan is at the front, the forward outlet goes to the oil tank and the rear is where the oil from the tank gets back to the engine through the standard oil pump, the filter housing is not used and replaced with an adaptor for remote filter and oil cooler. Here is the adaptor for the remote oil filter and oil cooler and back into the oil gallery in the engine, one out one in, the brass piece is the oil pressure sensor for the oil lamp and the outlet for the oil pressure gauge.
-
Trumpeter Ford GT40 with my twists
Force replied to kensar's topic in WIP: Other Racing: Road Racing, Land Speed Racers
Here is a couple of öpictures of the cooling system.
-
Another "Convoy" Truck!
Force replied to Jürgen M.'s topic in WIP: Model Trucks: Big Rigs and Heavy Equipment
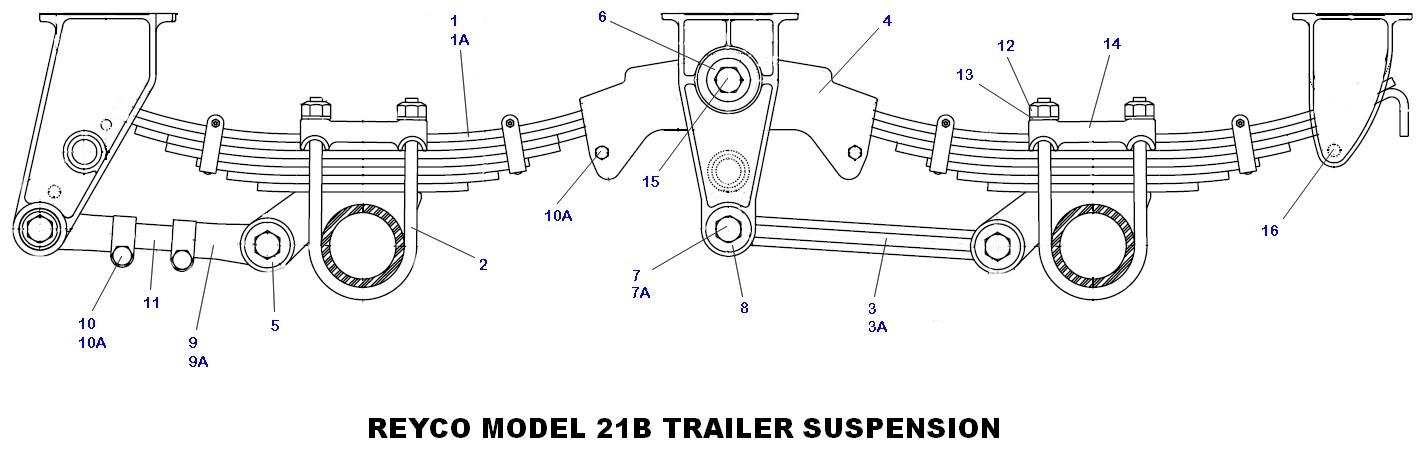
U bolts, yes that's a good idea. You forgot part number 3 right in the middle of the breakdown picture wich the springs are attached to, it's called leaf spring equalizer and it's kind of a hinge in the middle hanger and are crucial for this suspension to work properly and smoothly. Leaf springs can't be solidly mounted, the arch of the spring gets flatter when loaded so they grow in length and has to be able to slide in the mounting points, and this equalizer wich is a pivot point between the front and rear spring are on every 4 spring suspension I have seen. Here is another picture so you can see how it looks, the equalizer has number 4 in this picture, this is a trailer suspension and it's similar to the truck suspension, but the U bolts holding the axles are the other way around. Otherwise it looks convincing enough.
.jpg.07b7cab7507028b8f1bc0441433311fc.jpg)
.jpg.e9718ba875e8634fbd9062bf3ec66f9d.jpg)