Sledsel Posted May 26, 2021 Share Posted May 26, 2021 As for headers, maybe someone has the headers from the Johan 64 Dodge you could trade for. I would have sworn they were the ones on TarheelRick's post above. Also, the Flipnose '57 Vette has a set that may work. Quote Link to comment Share on other sites More sharing options...
magicmustang Posted May 26, 2021 Share Posted May 26, 2021 (edited) Headers, they sure look similar to the fender well exit one's in the MPC '57 Chevy Flip nose gasser kit. Edited May 26, 2021 by magicmustang 1 Quote Link to comment Share on other sites More sharing options...
dragcarz Posted May 26, 2021 Author Share Posted May 26, 2021 1 hour ago, magicmustang said: Headers, they sure look similar to the fender well exit one's in the MPC '57 Chevy Flip nose gasser kit. I tried those they would not fit either. Quote Link to comment Share on other sites More sharing options...
NYLIBUD Posted May 29, 2021 Share Posted May 29, 2021 Very cool Quote Link to comment Share on other sites More sharing options...
Straightliner59 Posted June 2, 2021 Share Posted June 2, 2021 I would make headers from solid core solder. Quote Link to comment Share on other sites More sharing options...
dragcarz Posted June 8, 2021 Author Share Posted June 8, 2021 Ok, so I’ve been stuck on the headers, for way too long, I’ve tried all the suggestions listed above, tried making my own a couple of times with solder, and I’m done, I’m moving on. I used the kit headers and I’m calling it close enough. I’m calling the chassis done, I added a helmet to the interior. I scratch built the master cylinder. Getting closer to my first complete build this year. 1 Quote Link to comment Share on other sites More sharing options...
dragcarz Posted June 15, 2021 Author Share Posted June 15, 2021 Small update doing some final assembly, age the turquoise to the body side molding 1 Quote Link to comment Share on other sites More sharing options...
Tortuga Kustomz Posted June 15, 2021 Share Posted June 15, 2021 nice Quote Link to comment Share on other sites More sharing options...
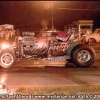
dragcarz Posted July 3, 2021 Author Share Posted July 3, 2021 My first finished project this year. It took so much longer than I thought it would. The headers gave me fits, the kits left header refuses to stayed glued to the motor, and the rear bumper falls off if you just look at it. I ran outside and photographed it while everything was hanging on still. As is becoming my trademark no fuel lines , though I have carburetor linkage and spark plug wires. I haven’t built this kit in over 50 years, and I found a couple of issues I had to work around but nothing major. I seemed to have lost a little of my skills since COVID. But I’m still getting better. Hope you like it! 2 Quote Link to comment Share on other sites More sharing options...
Zippi Posted July 16, 2021 Share Posted July 16, 2021 Your 55 Nomad turned out pretty slick Roger. Maybe I missed it but I didn't see this one in "Under Glass" Quote Link to comment Share on other sites More sharing options...
espo Posted July 18, 2021 Share Posted July 18, 2021 I've been following your build and really like how it has turned out. Just a thought if you aren't now doing this, you mention the problems with the headers and even the rear bumper. Try "pinning" the mounts for the headers and any other part that doesn't want to hold together. I will use cut up staples. Drill a small hole in the parts to be joined the size of the pin. Glue the pin in one part and then glue the other part to it. The pin gives the joint more contact area for the glue an will reinforce the mounting. Quote Link to comment Share on other sites More sharing options...
AC Norton Posted July 18, 2021 Share Posted July 18, 2021 LOST SOME OF YOUR SKILLS, HUH.....THATS A GOOD ONE, ROGER, THIS BUILD IS A TOUGH PROJECT RIGHT OFF THE HOP WITH , AS YOU FOUND OUT, TONS OF MAJOR WORK TO MOVE IT ALONG....TO SEE A NICE EXAMPLE BUILT IS THE TREAT OF MY SUNDAY, AS I HAVE ALWAYS LIKED THIS CAR ALONG WITH MOST M/P CARS OF THE ERA....ACTUALLY SAW THIS CAR AT DRAGWAY PARK, CAYUGA, OUR LOCAL STRIP A COUPLE OF TIMES...YOU CAN HEAR THAT SBC BUZZ TO INSANE RPM JUST BEFORE PAUL BLEVINS DROPS THE HAMMER.....LOVE IT....LOST YOUR SKILLS....THROW SOME OF THOSE LOST SKILLS MY WAY, I HAVEN'T GLUED 2 PARTS TOGETHER IN 5 YEARS......CONGRATS, ITS A KILLER.....BEST, ACE...😅 Quote Link to comment Share on other sites More sharing options...
dragcarz Posted July 18, 2021 Author Share Posted July 18, 2021 5 hours ago, espo said: I've been following your build and really like how it has turned out. Just a thought if you aren't now doing this, you mention the problems with the headers and even the rear bumper. Try "pinning" the mounts for the headers and any other part that doesn't want to hold together. I will use cut up staples. Drill a small hole in the parts to be joined the size of the pin. Glue the pin in one part and then glue the other part to it. The pin gives the joint more contact area for the glue an will reinforce the mounting. Quote Link to comment Share on other sites More sharing options...
dragcarz Posted July 18, 2021 Author Share Posted July 18, 2021 Thank for the tip and I wish I had now. I had tried scratch building the headers and l had holes in the cylinder heads, but after the motor was glued in it was too late to pin them, you learn something on every build. Quote Link to comment Share on other sites More sharing options...
dragcarz Posted July 18, 2021 Author Share Posted July 18, 2021 5 hours ago, AC Norton said: LOST SOME OF YOUR SKILLS, HUH.....THATS A GOOD ONE, ROGER, THIS BUILD IS A TOUGH PROJECT RIGHT OFF THE HOP WITH , AS YOU FOUND OUT, TONS OF MAJOR WORK TO MOVE IT ALONG....TO SEE A NICE EXAMPLE BUILT IS THE TREAT OF MY SUNDAY, AS I HAVE ALWAYS LIKED THIS CAR ALONG WITH MOST M/P CARS OF THE ERA....ACTUALLY SAW THIS CAR AT DRAGWAY PARK, CAYUGA, OUR LOCAL STRIP A COUPLE OF TIMES...YOU CAN HEAR THAT SBC BUZZ TO INSANE RPM JUST BEFORE PAUL BLEVINS DROPS THE HAMMER.....LOVE IT....LOST YOUR SKILLS....THROW SOME OF THOSE LOST SKILLS MY WAY, I HAVEN'T GLUED 2 PARTS TOGETHER IN 5 YEARS......CONGRATS, ITS A KILLER.....BEST, ACE...😅 Thanks Ace, my chrome trim isn’t as sharp as it could be some of my paint details are shaky. I really appreciate those old Modified cars myself, I miss how drag racing used to be. Quote Link to comment Share on other sites More sharing options...
AC Norton Posted July 18, 2021 Share Posted July 18, 2021 ALL OF US FROM THAT ERA DO.... YOU WILL NEVER SEE DRAG RACING LIKE IT AGAIN, IT WAS A GOLDEN TIME AND WE WERE LUCKY TO BE PART OF IT....THANKS FOR THE EMAIL, AND TAKE CARE OF YOURSELF, IT HAS BEEN A TERRIBLE 16 MONTHS FOR SO MANY PEOPLE.....TALK SOON, ACE... Quote Link to comment Share on other sites More sharing options...
chris chabre Posted July 19, 2021 Share Posted July 19, 2021 Wish I saw this sooner, I know the guy who owns it! I may have been able to get some questions answered. Quote Link to comment Share on other sites More sharing options...
hemiman_1999 Posted August 21, 2021 Share Posted August 21, 2021 Hi this is a fantastic build I am pretty sure you are using my decals on this I also have the Scotto & Blivens 65 Corvette. Oh I am the owner of SMP Decals. Anyway what I wanted to ask you is if I can use these pics in the Models Gallery section on my website I will need your full name as you want it to appear and only if these are my decals which I think they are. Also any other models you may have with my decals... the show case can hold as many pics as I want. So Let me know also here is a link to my website If you want to go look around that is SMPDECALS.com Quote Link to comment Share on other sites More sharing options...
Recommended Posts
Join the conversation
You can post now and register later. If you have an account, sign in now to post with your account.
Note: Your post will require moderator approval before it will be visible.