ModelcarJR
-
Posts
1,648 -
Joined
-
Last visited
Content Type
Profiles
Forums
Events
Gallery
Everything posted by ModelcarJR
-
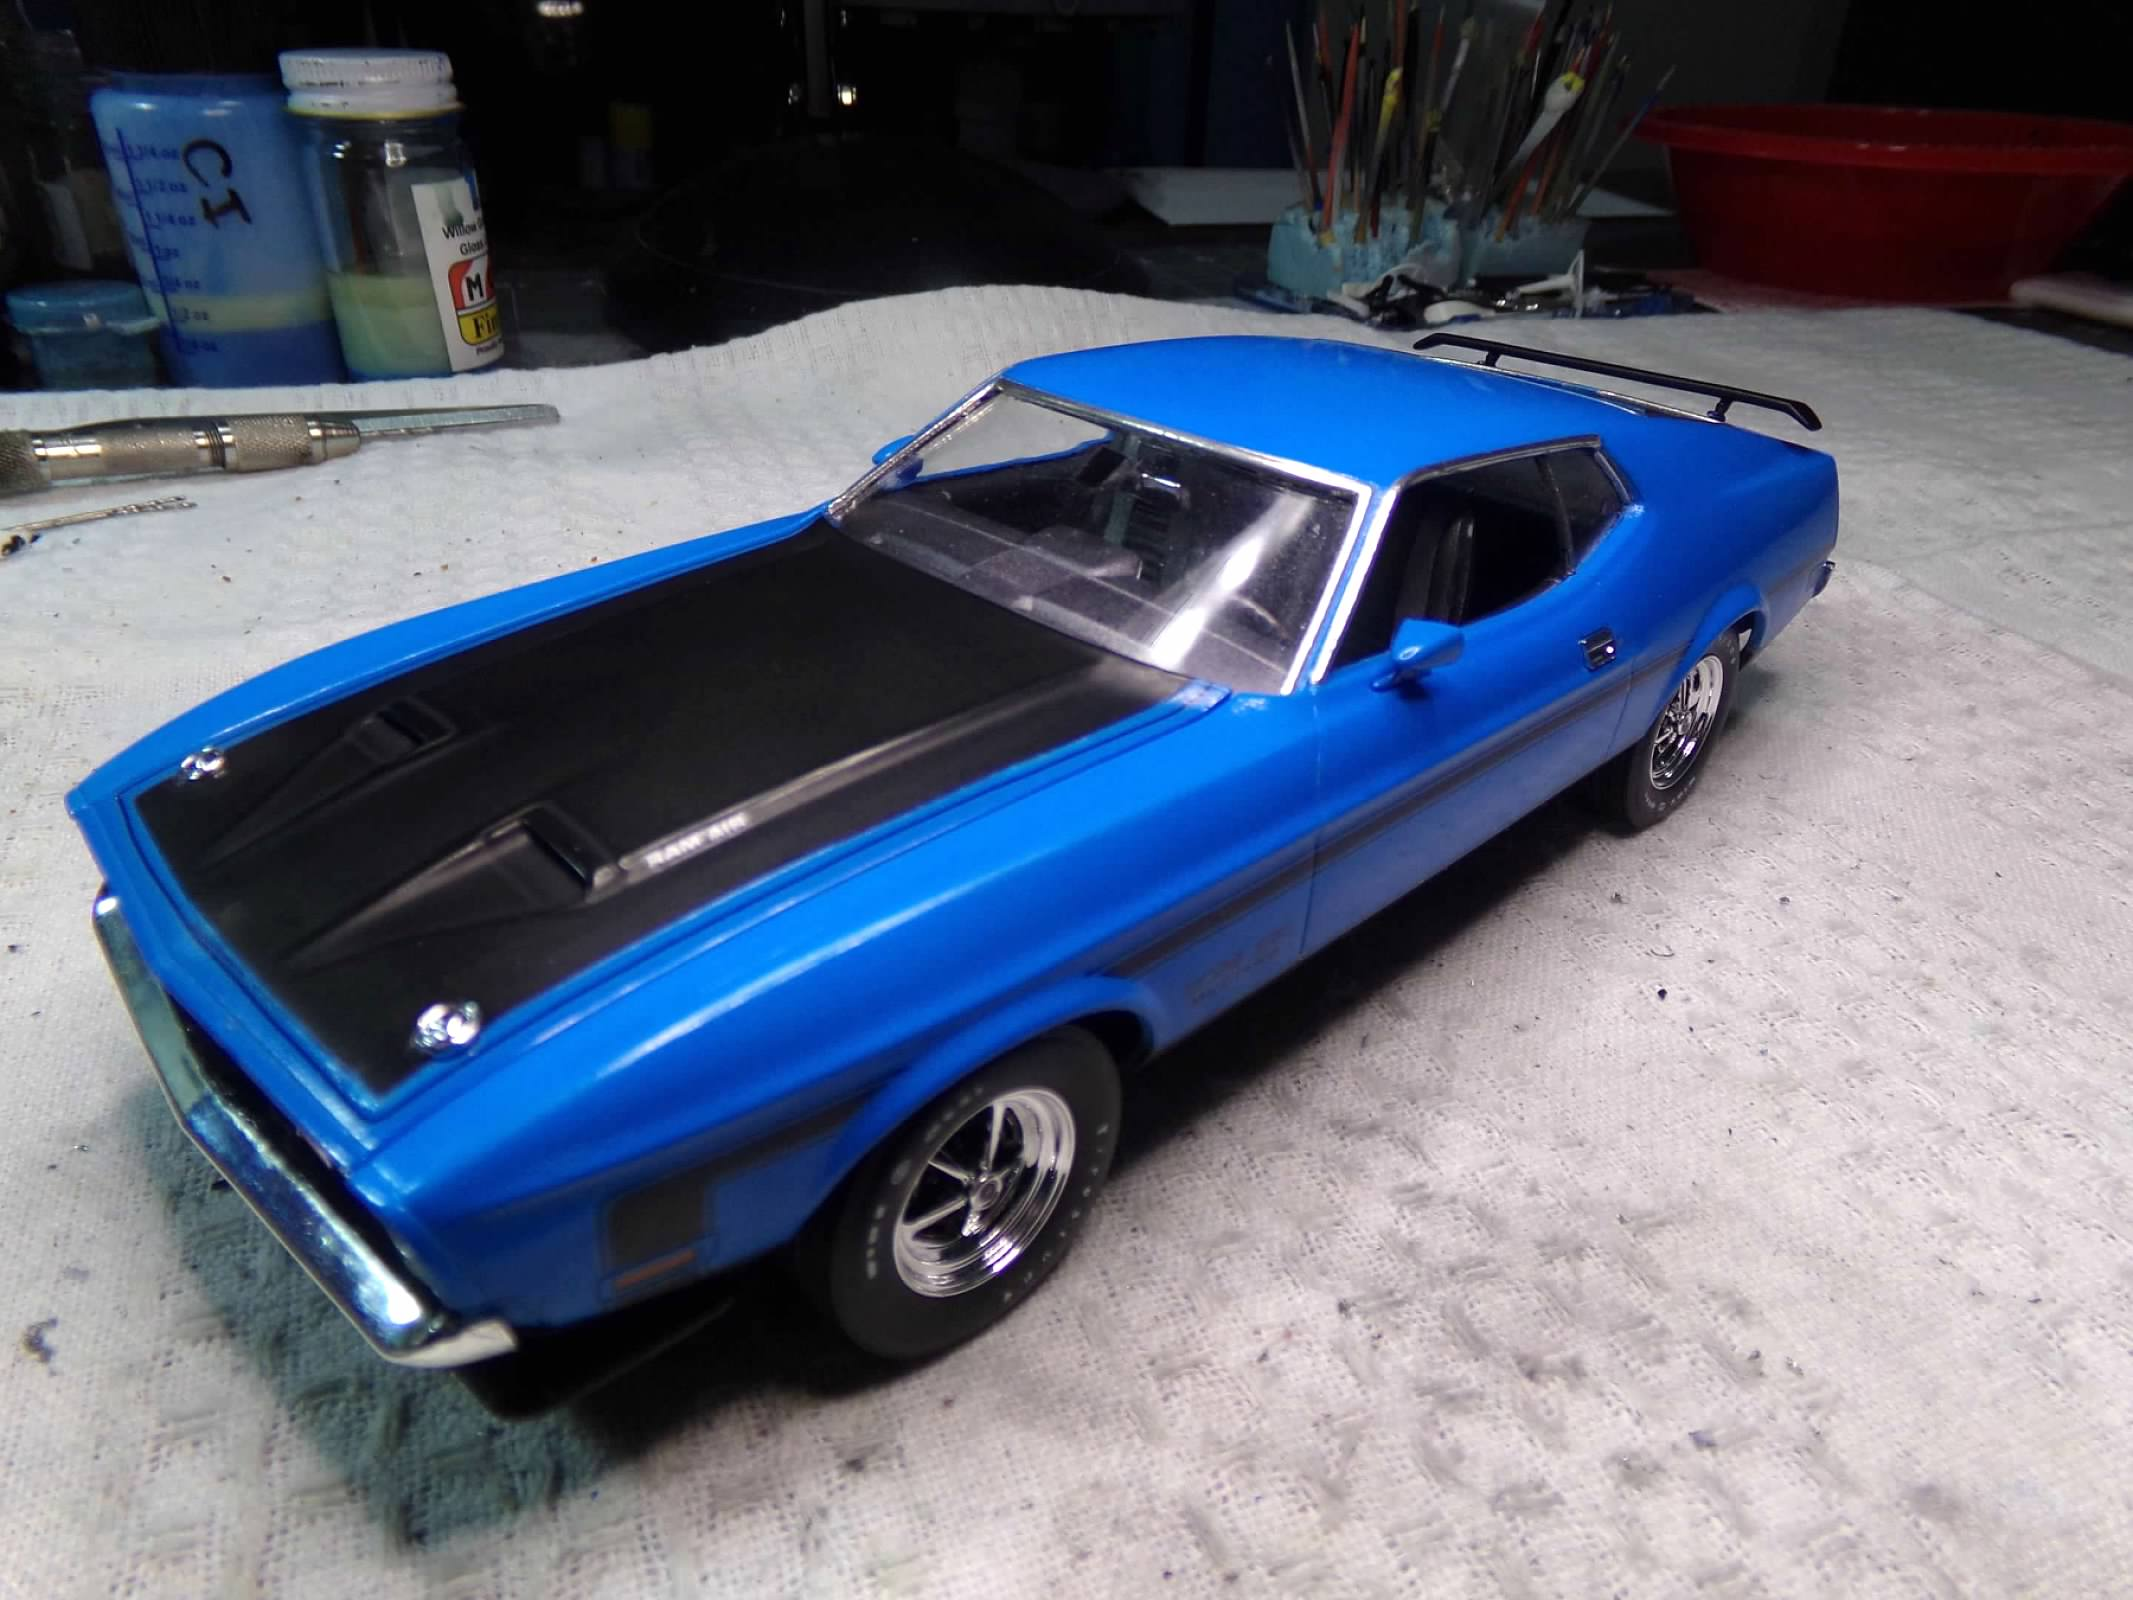
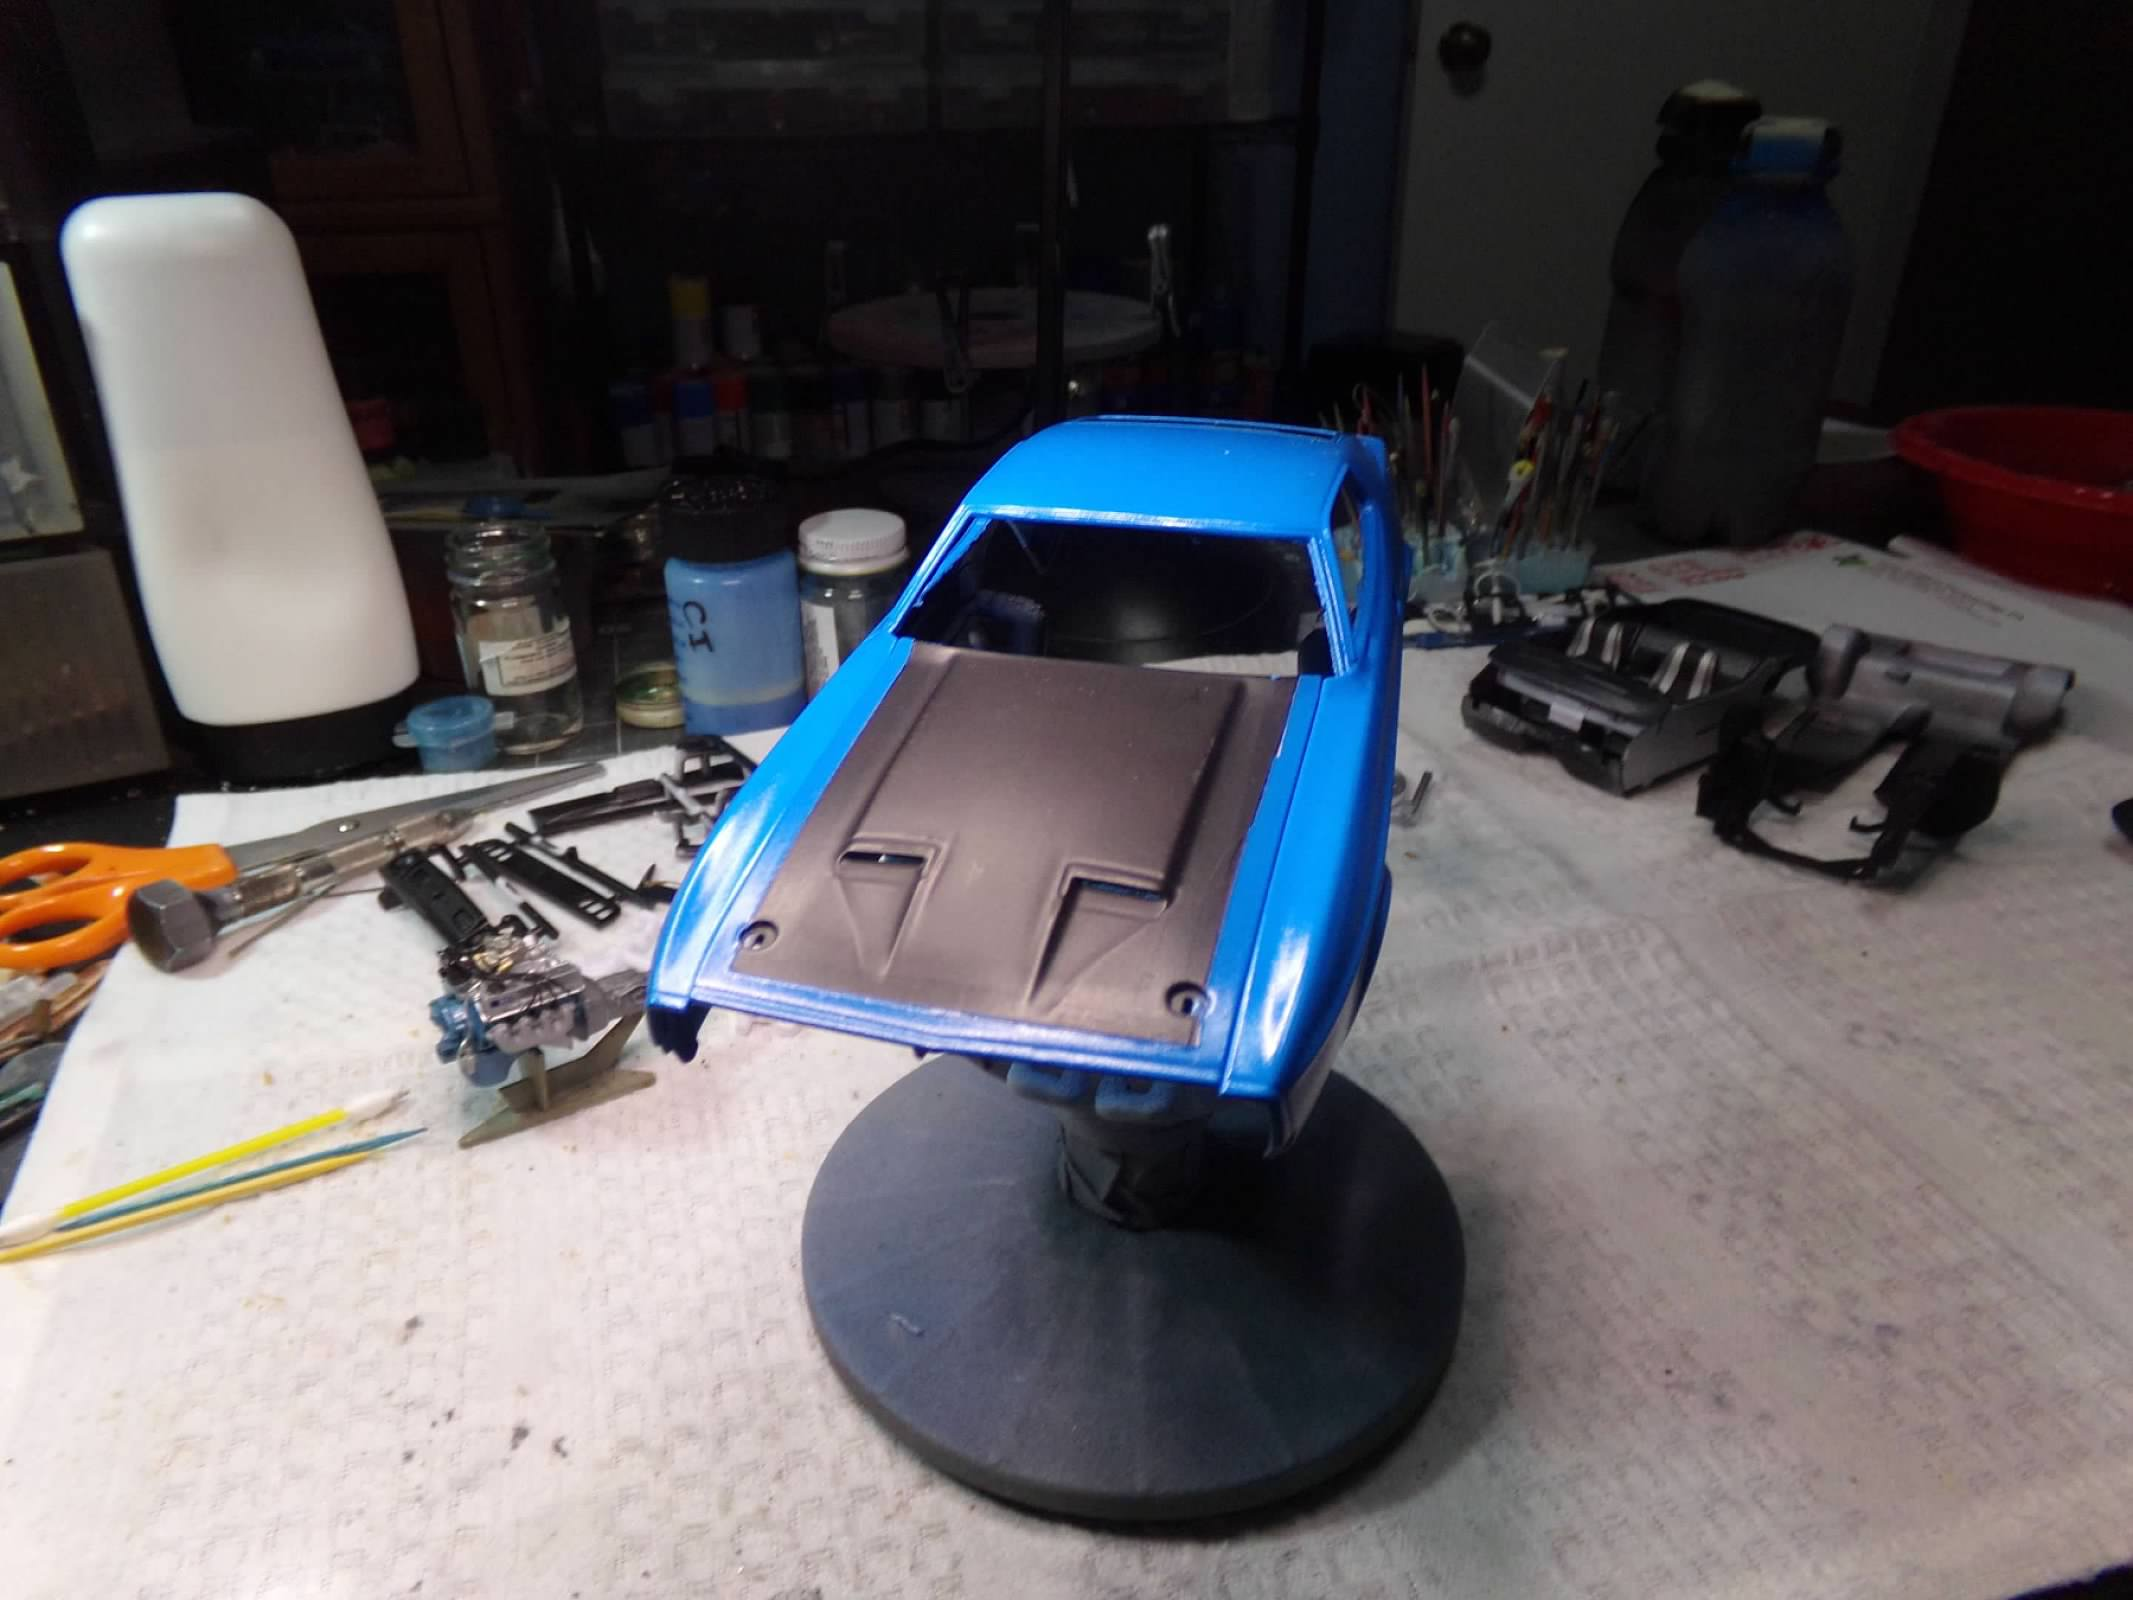
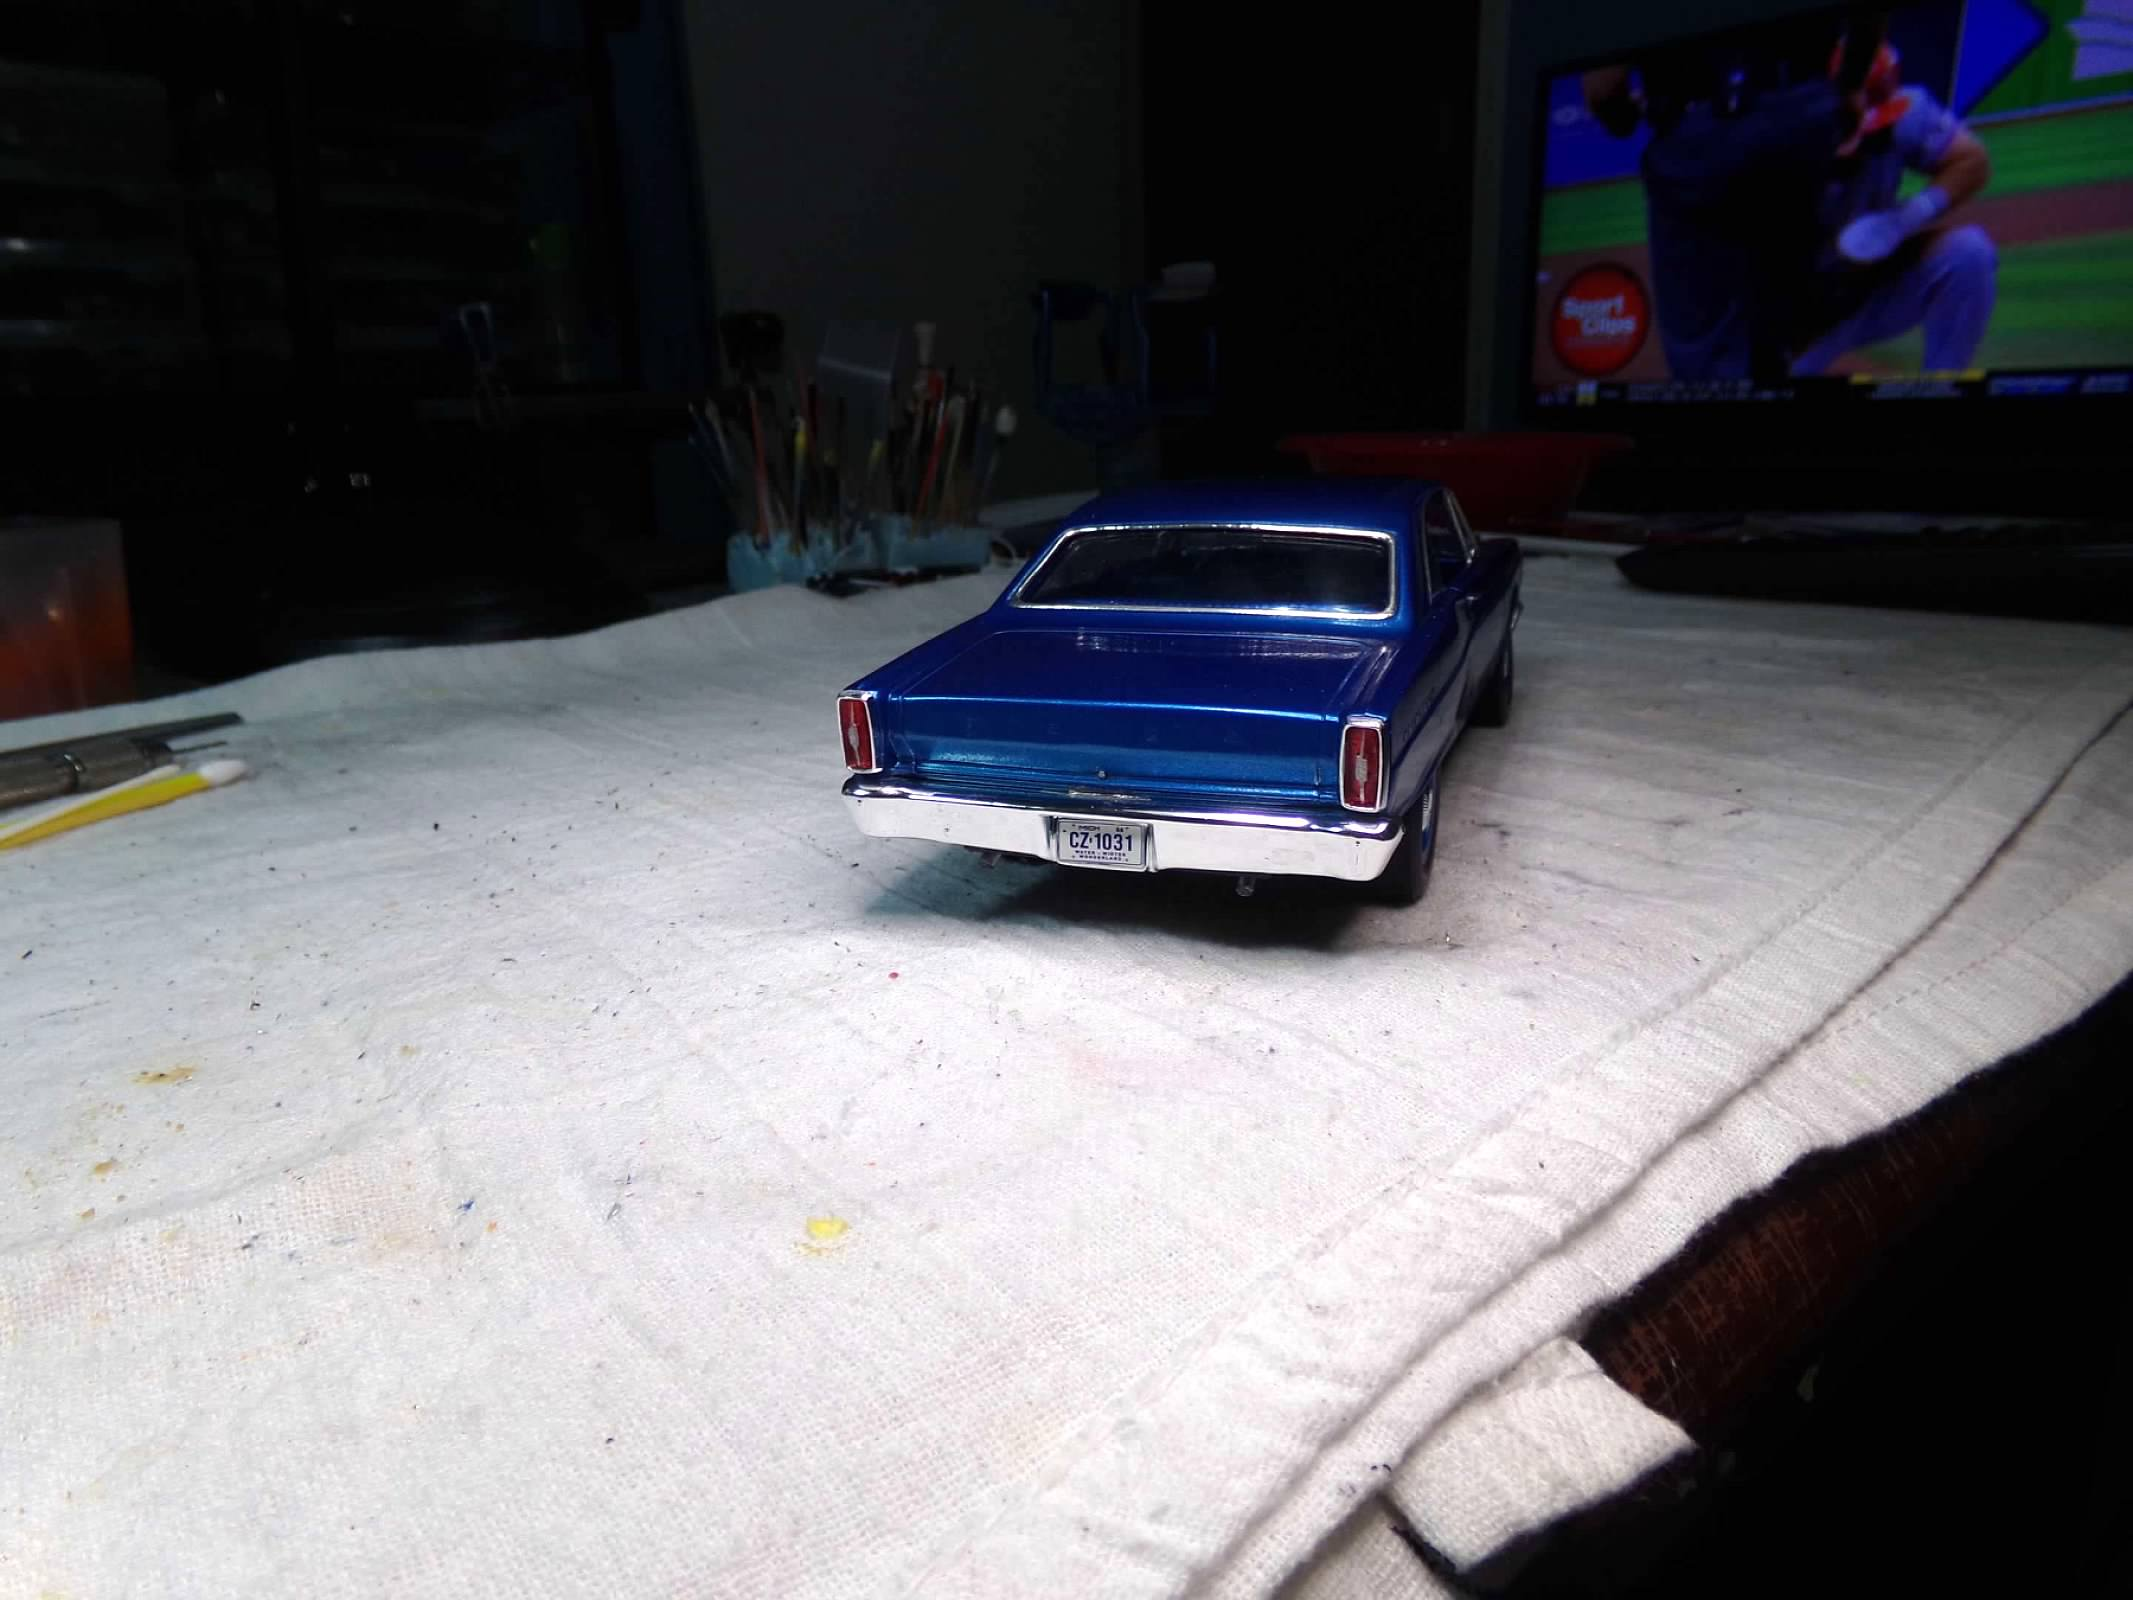
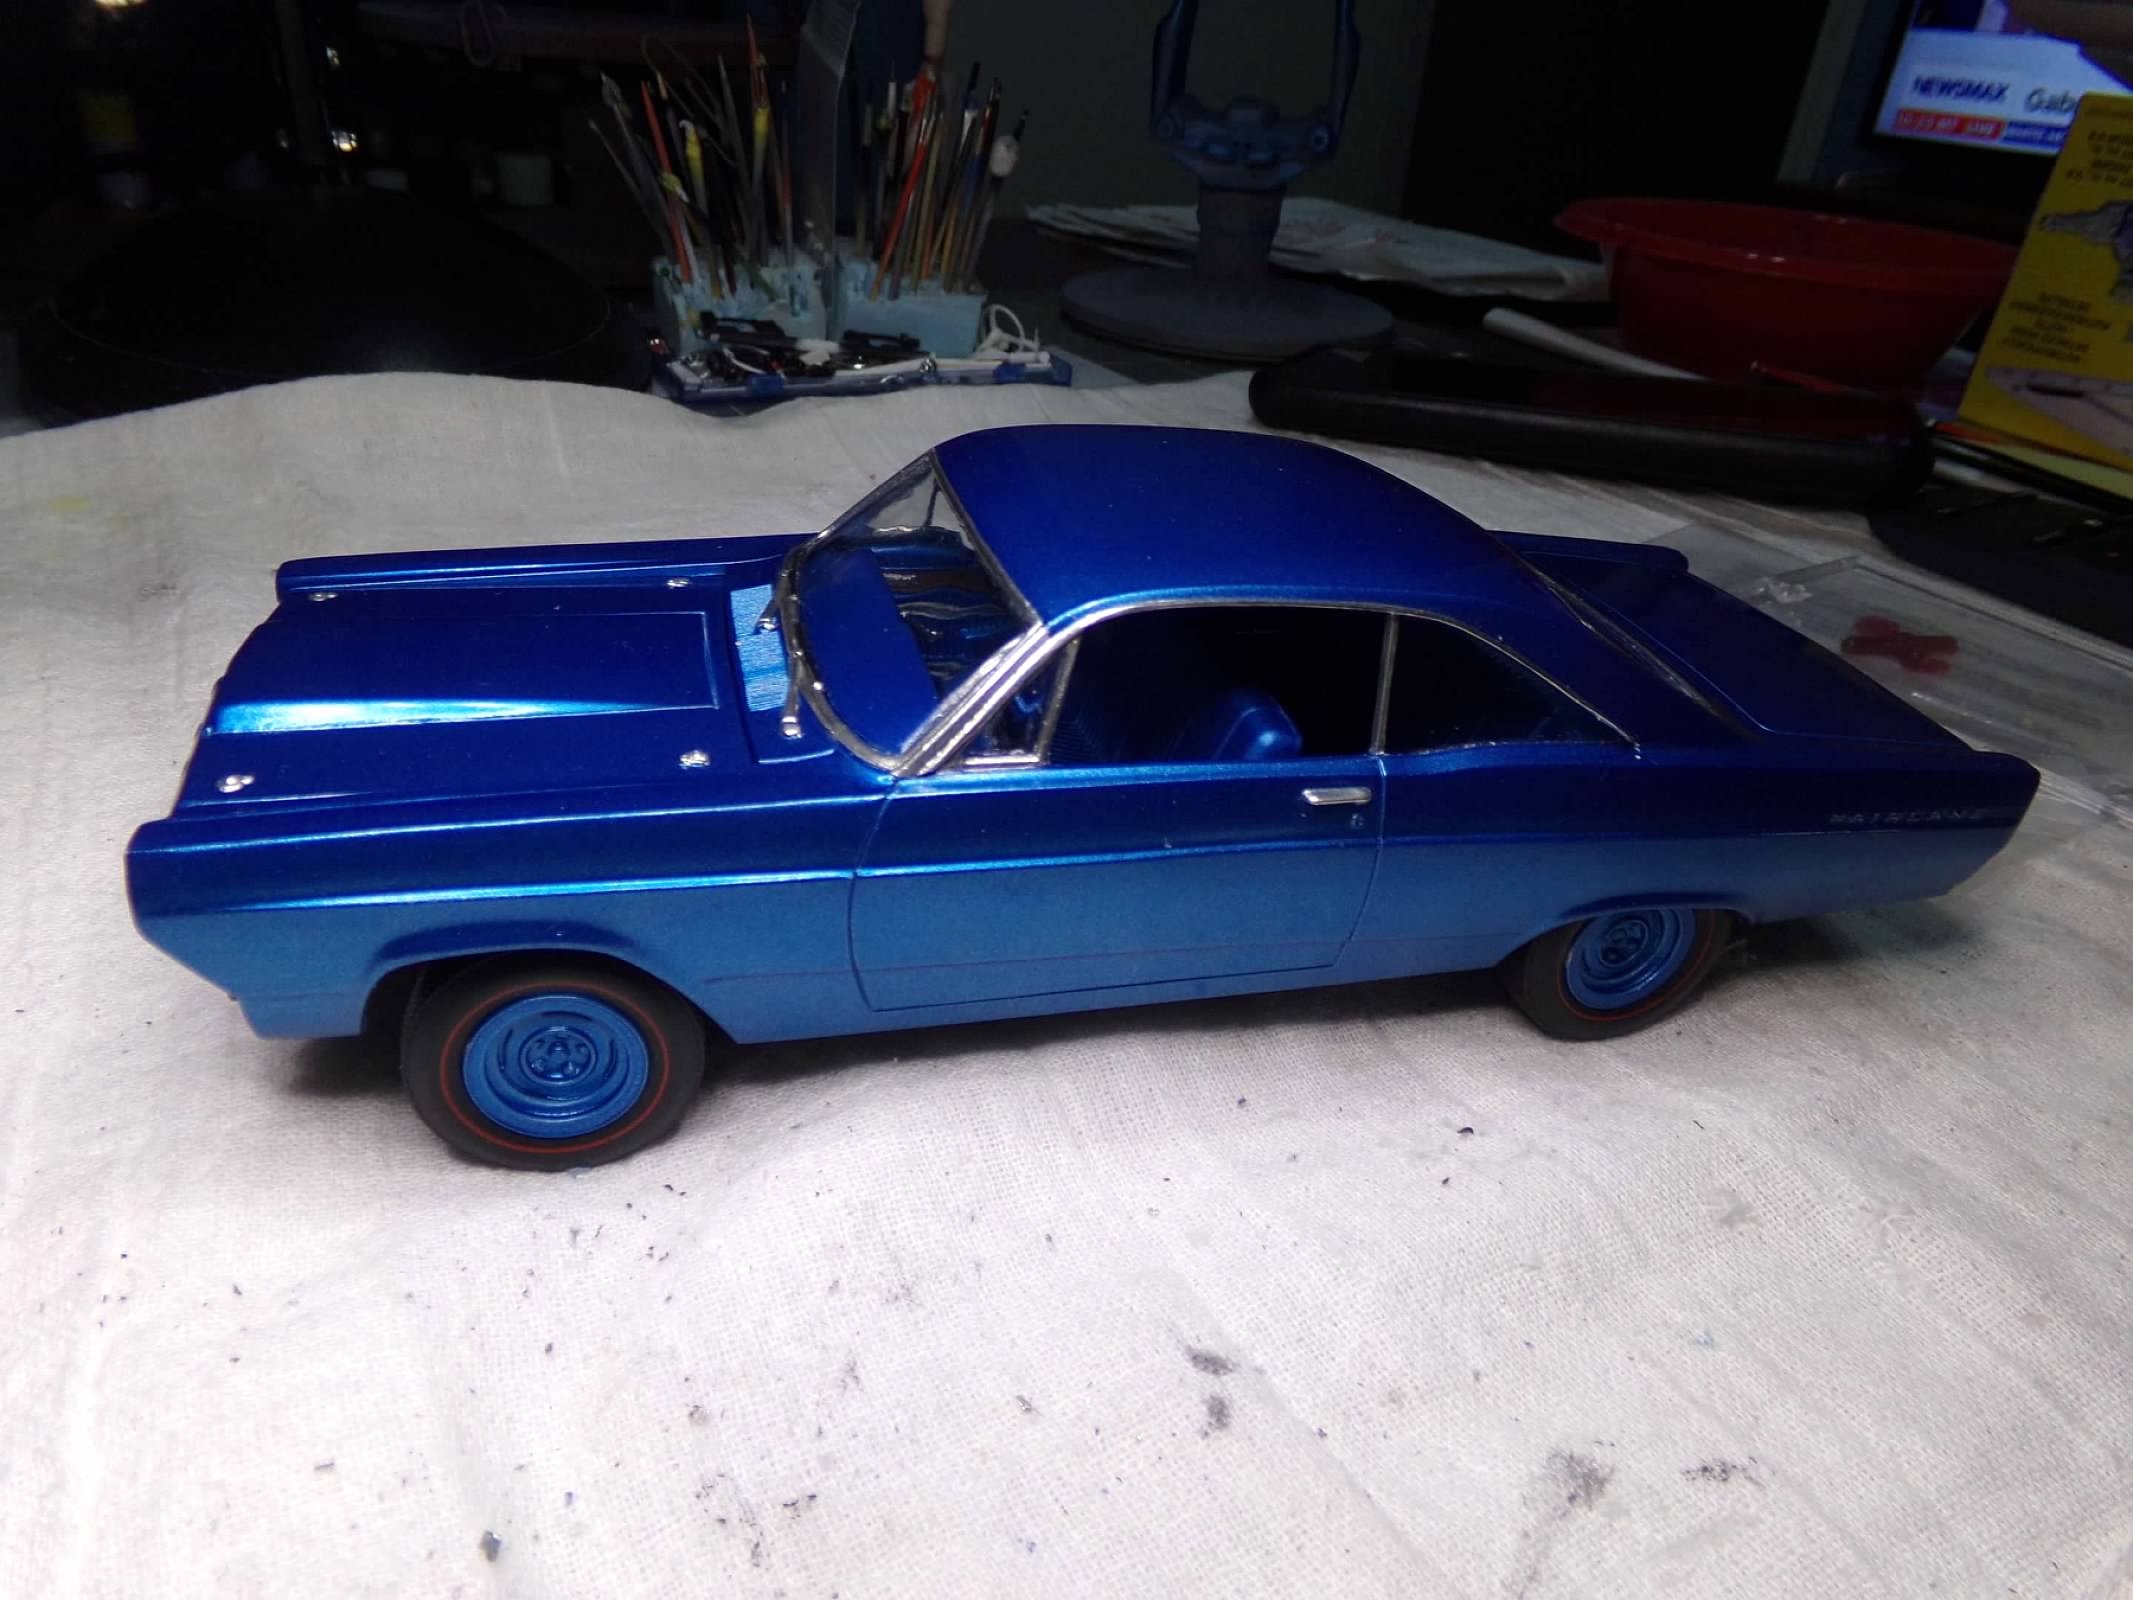
Thanks, Rick! I appreciate your comment! This one is done! the only problem I had was with the rear taillight panel and the rear roll pan. Somehow I managed to knock out the taillight panel with the body on but nothing done in front so it was relatively easy to pull the body off and reattach the rear taillight panel. Then the next time I tried to get the roll pan on, I knocked out the rear taillight panel again with the front complete. So I had to remove the front grill, chin spoiler and bumper to repair the taillight panel. Then, the third time, I knocked out the rear window and had to undo everything again. Finally, I got smart and attached everything in back first and then I completed the front! I had to cut off the top of the roll pan license plate surround in order to get the roll pan to marry up to the bottom of the taillight panel. then everything was flush and the bumper covers the top of the roll pan anyway. I applied most of the decals but of most importance was the pinstripe on the hood and the body sides. All are there and I cut them off the larger decal and applied them so that I didn't have to try to blend a decal with black paint. The main black area is paint. Only the pinstripe is a decal. I think they worked out well with a straight edge and a sharp No 11 bladed knife. Final photos in the "Under Glass" section. Thanks for looking and I hope everyone has a happy Memorial day weekend! ?

-
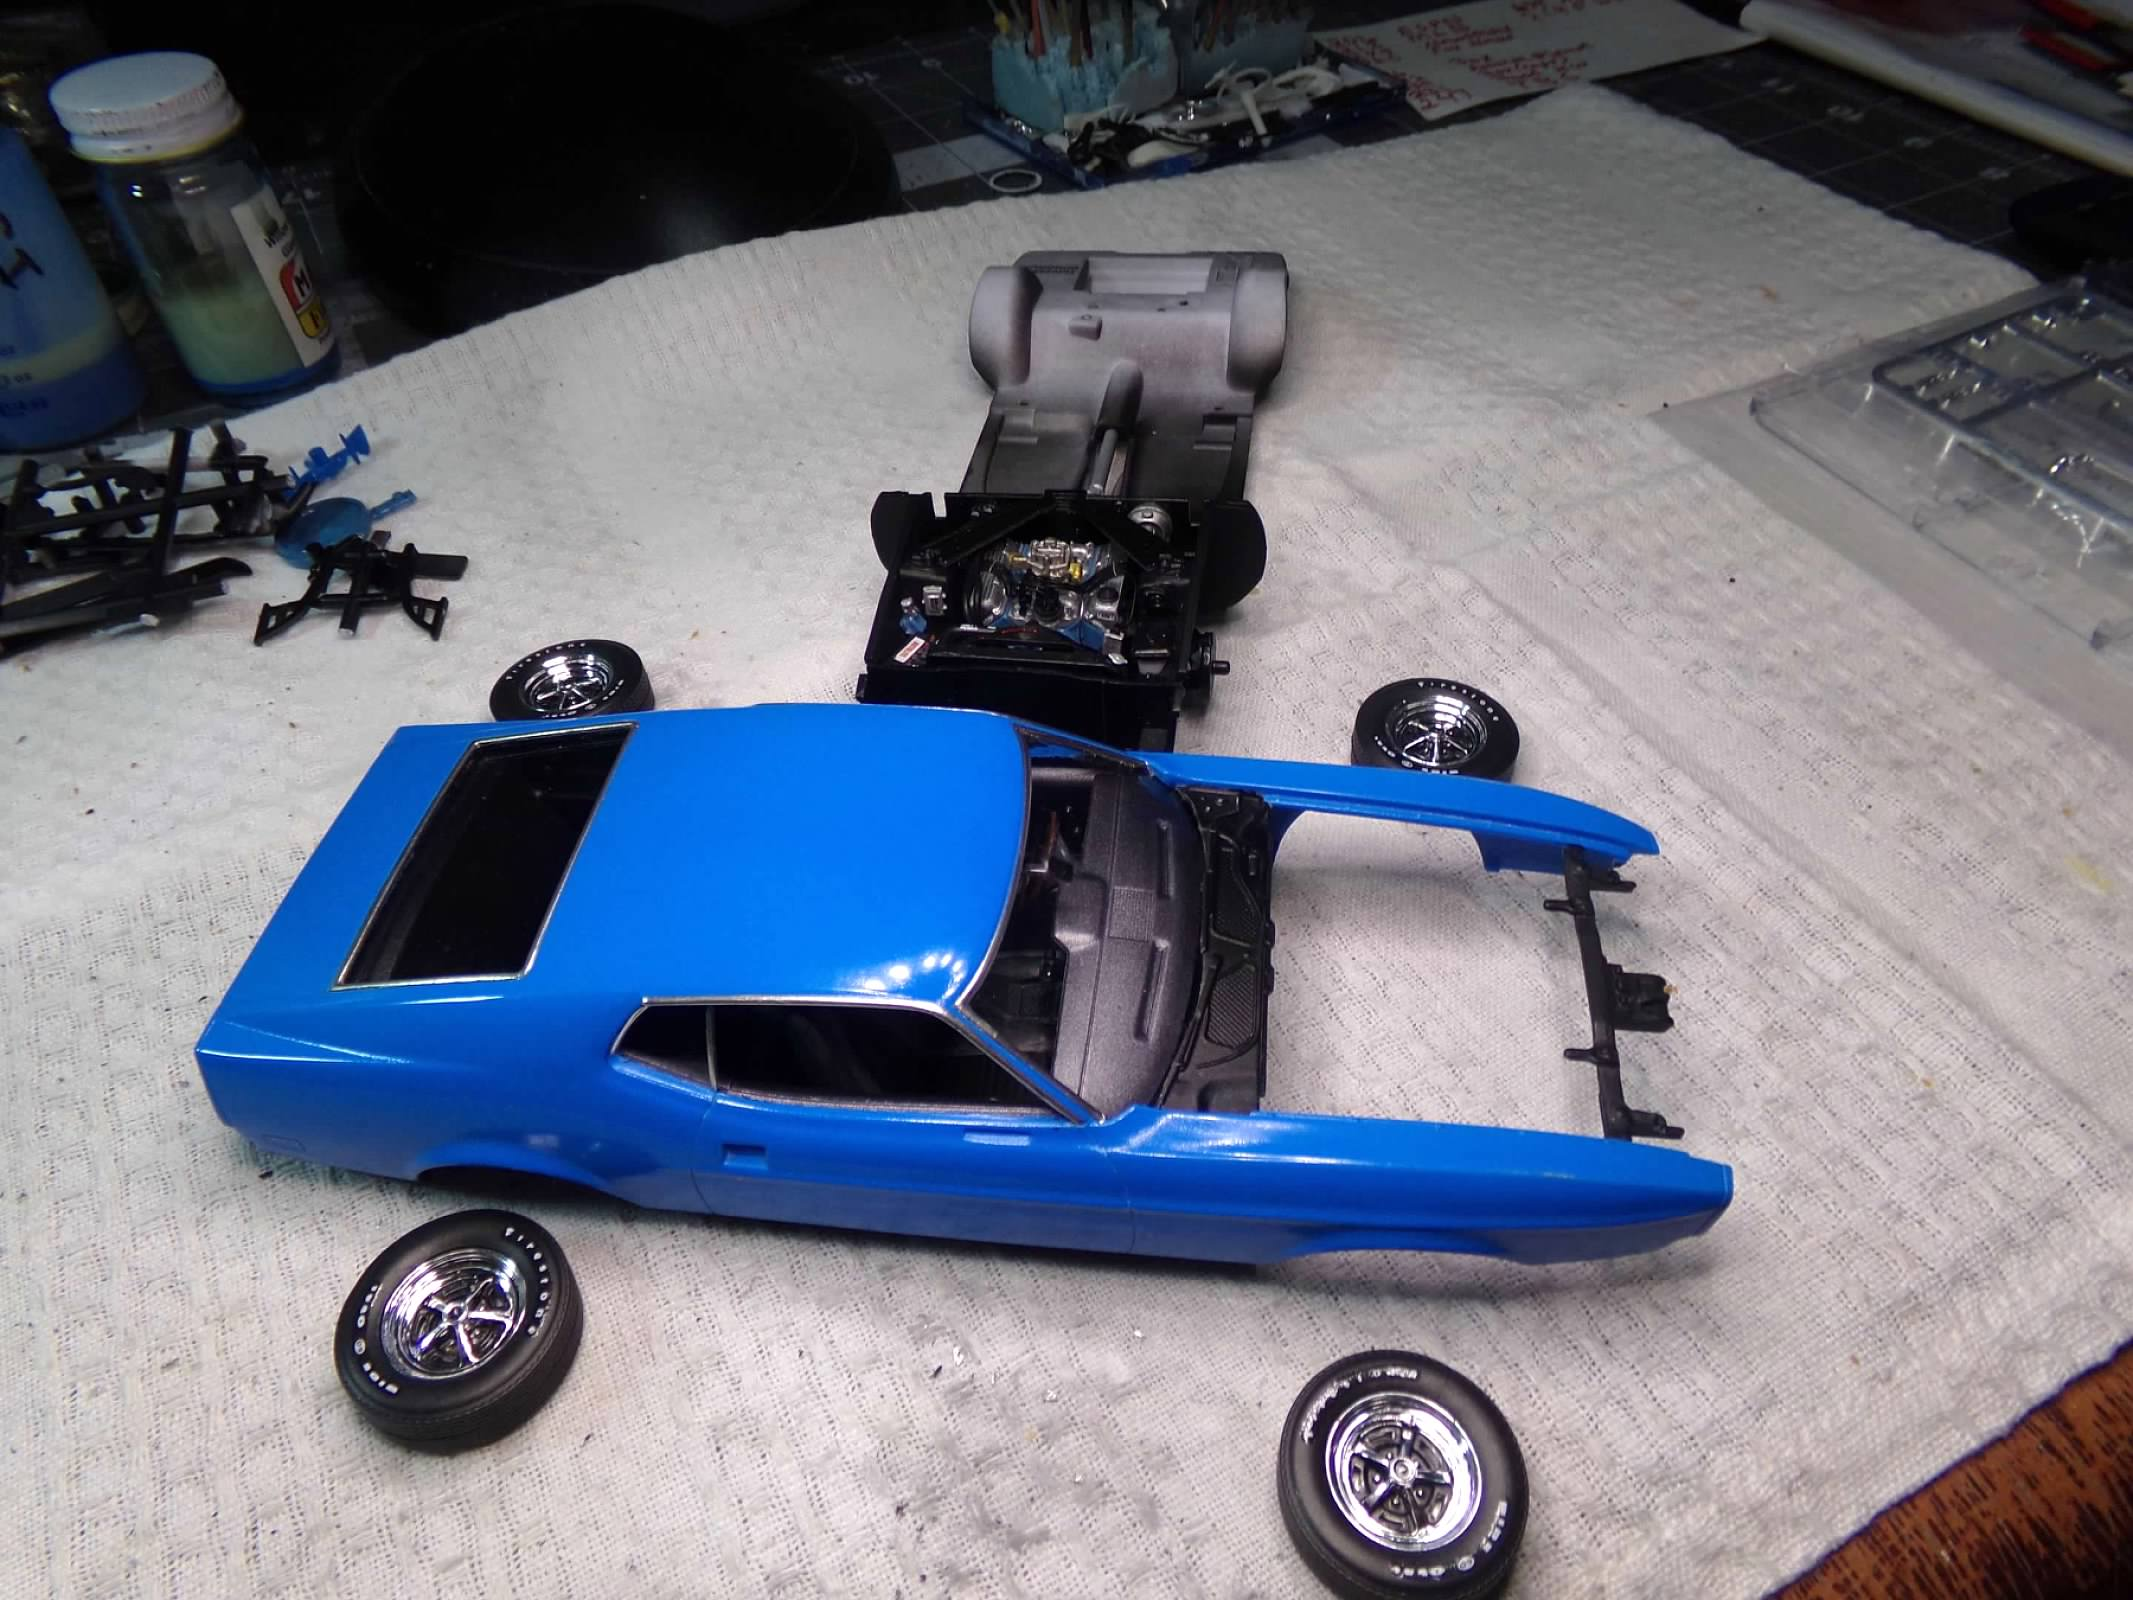
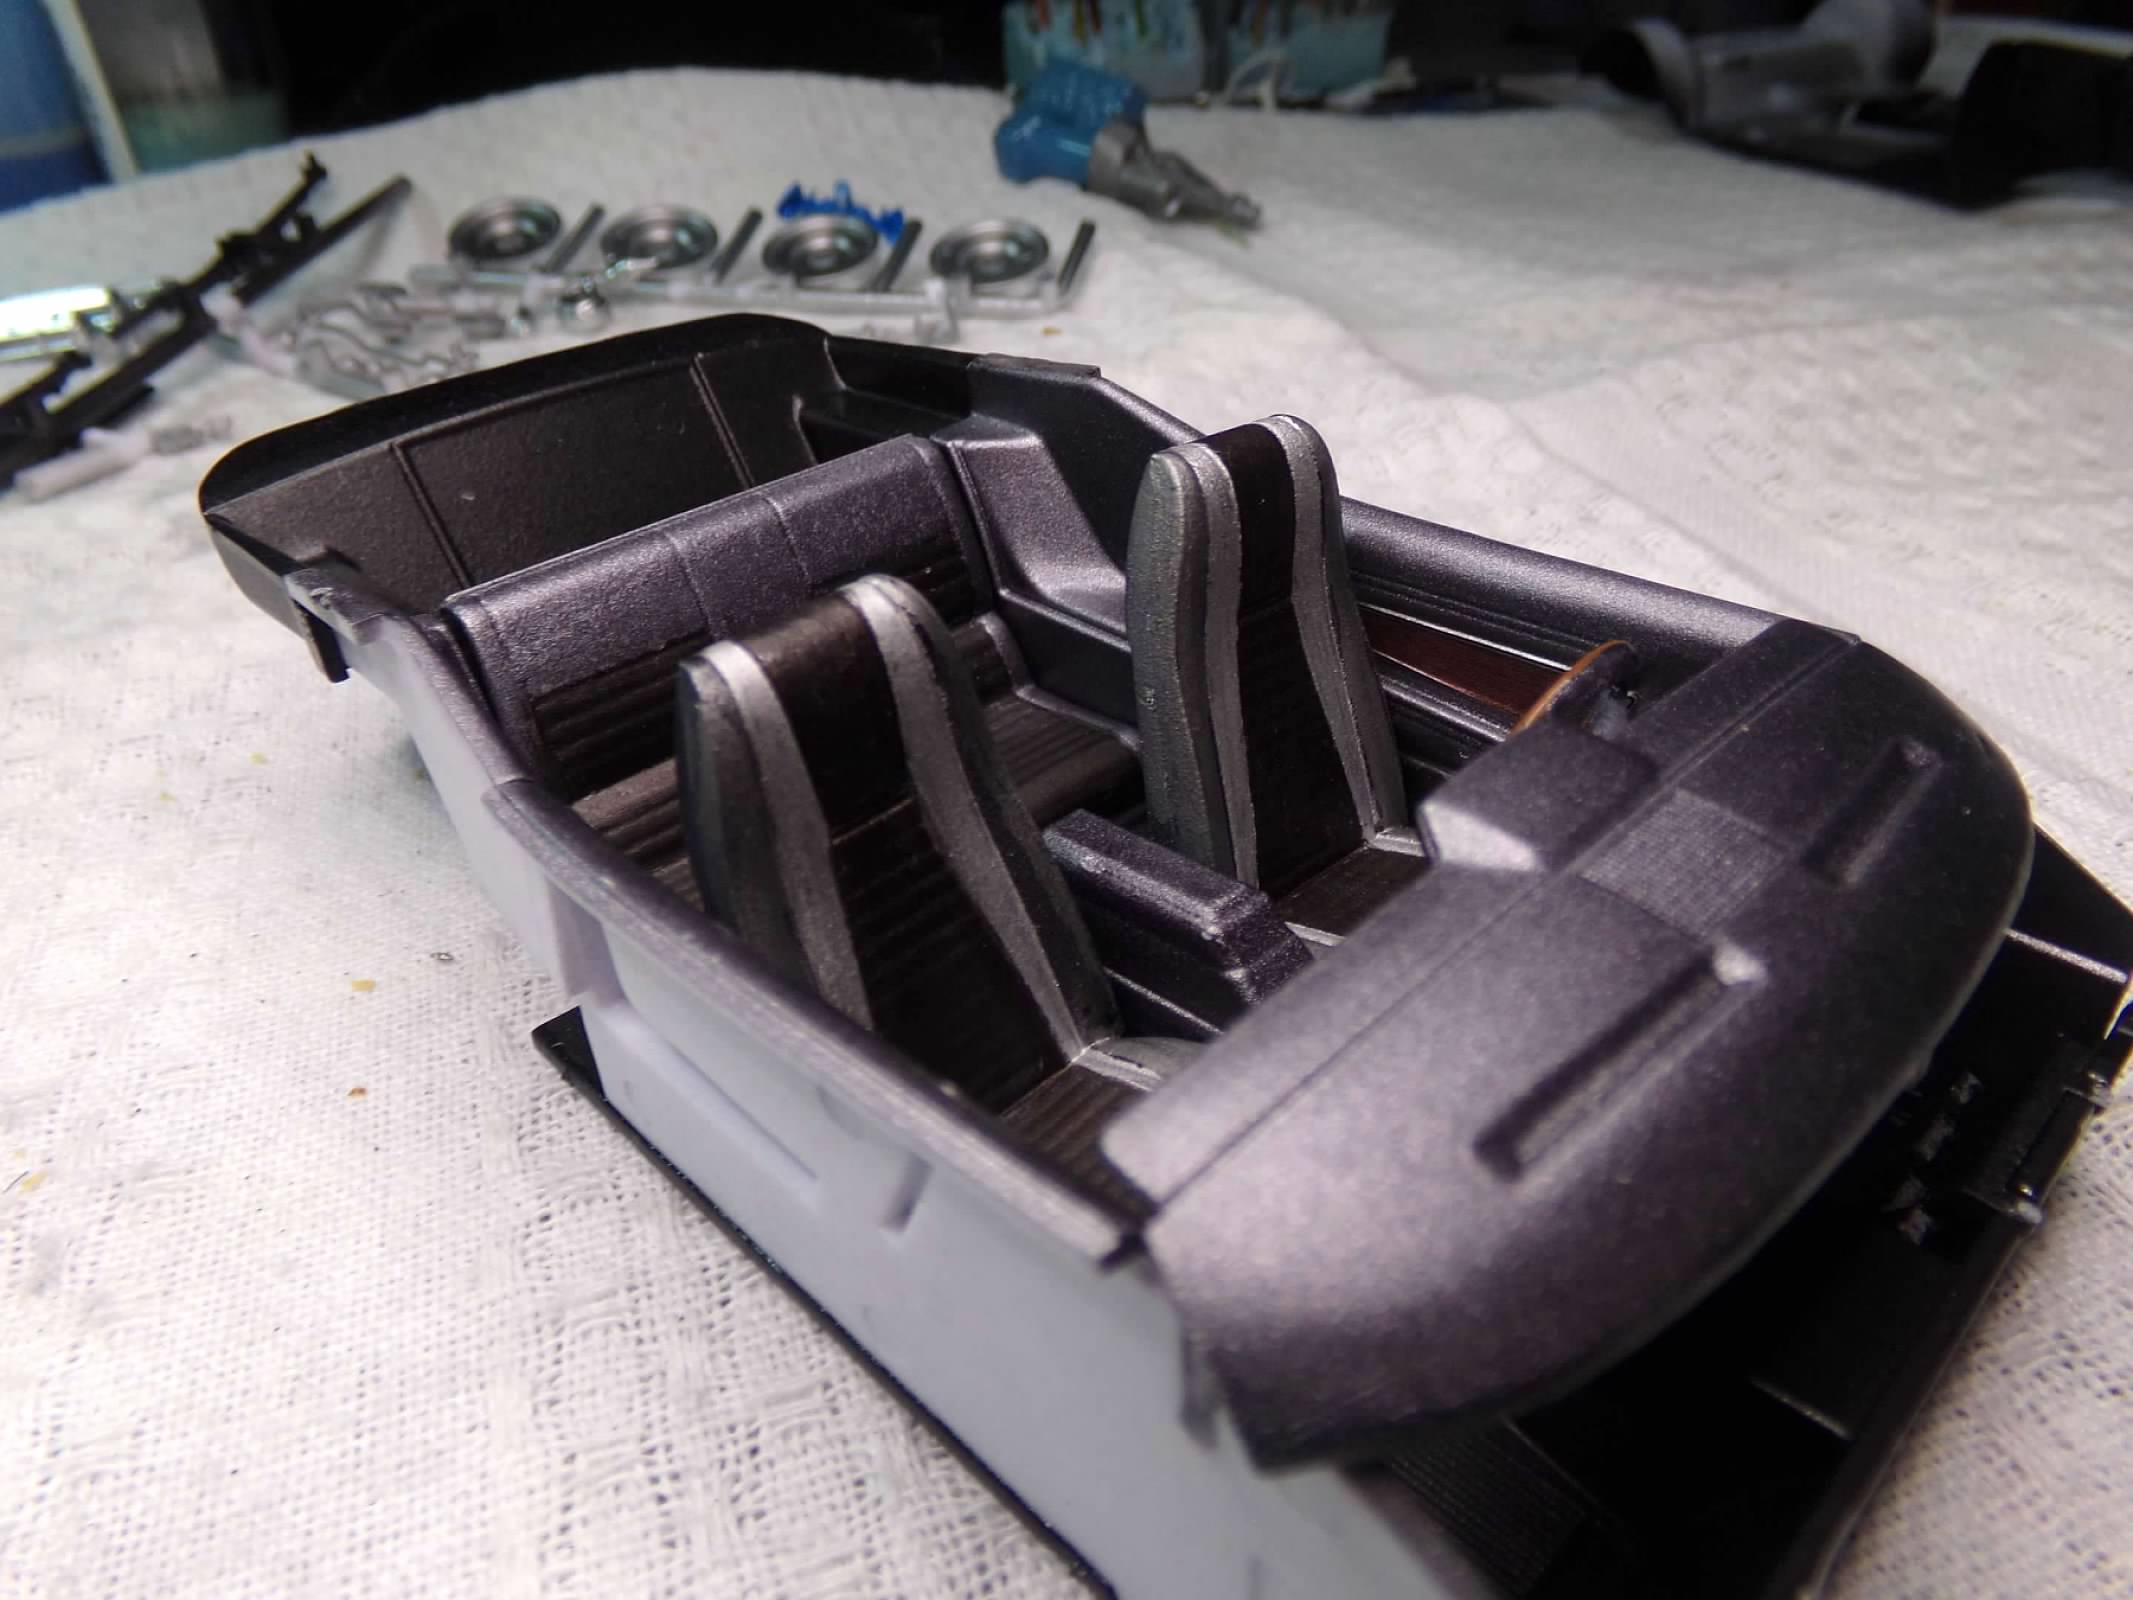
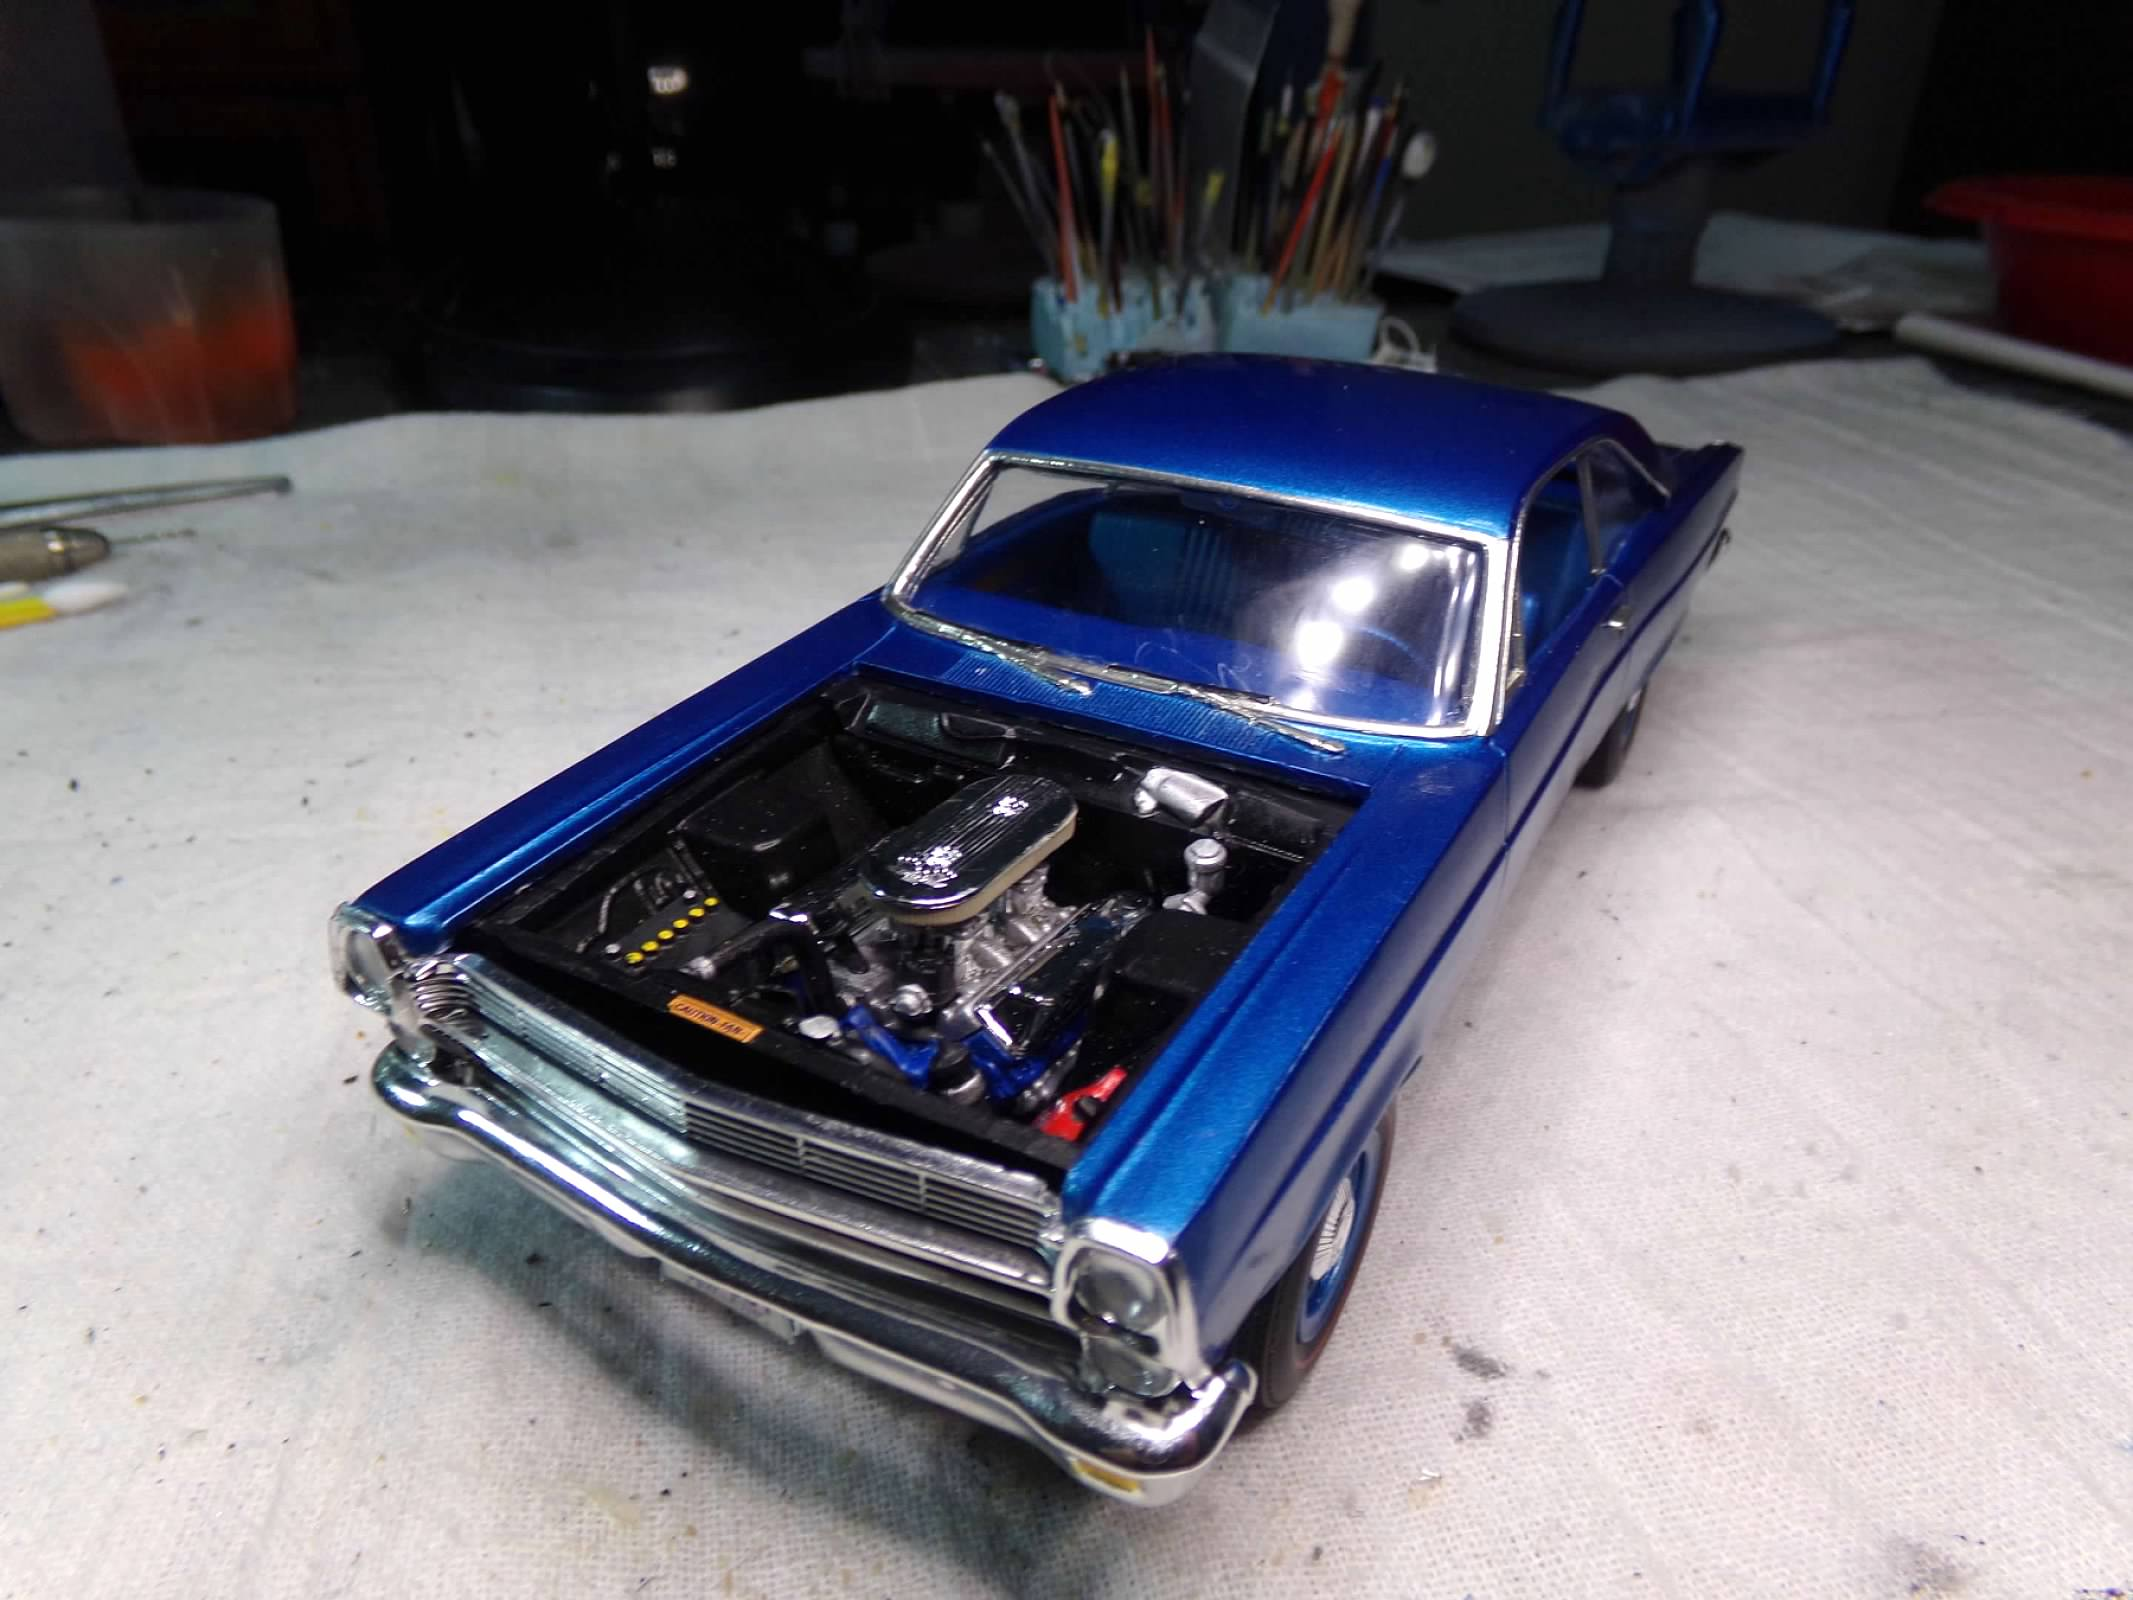
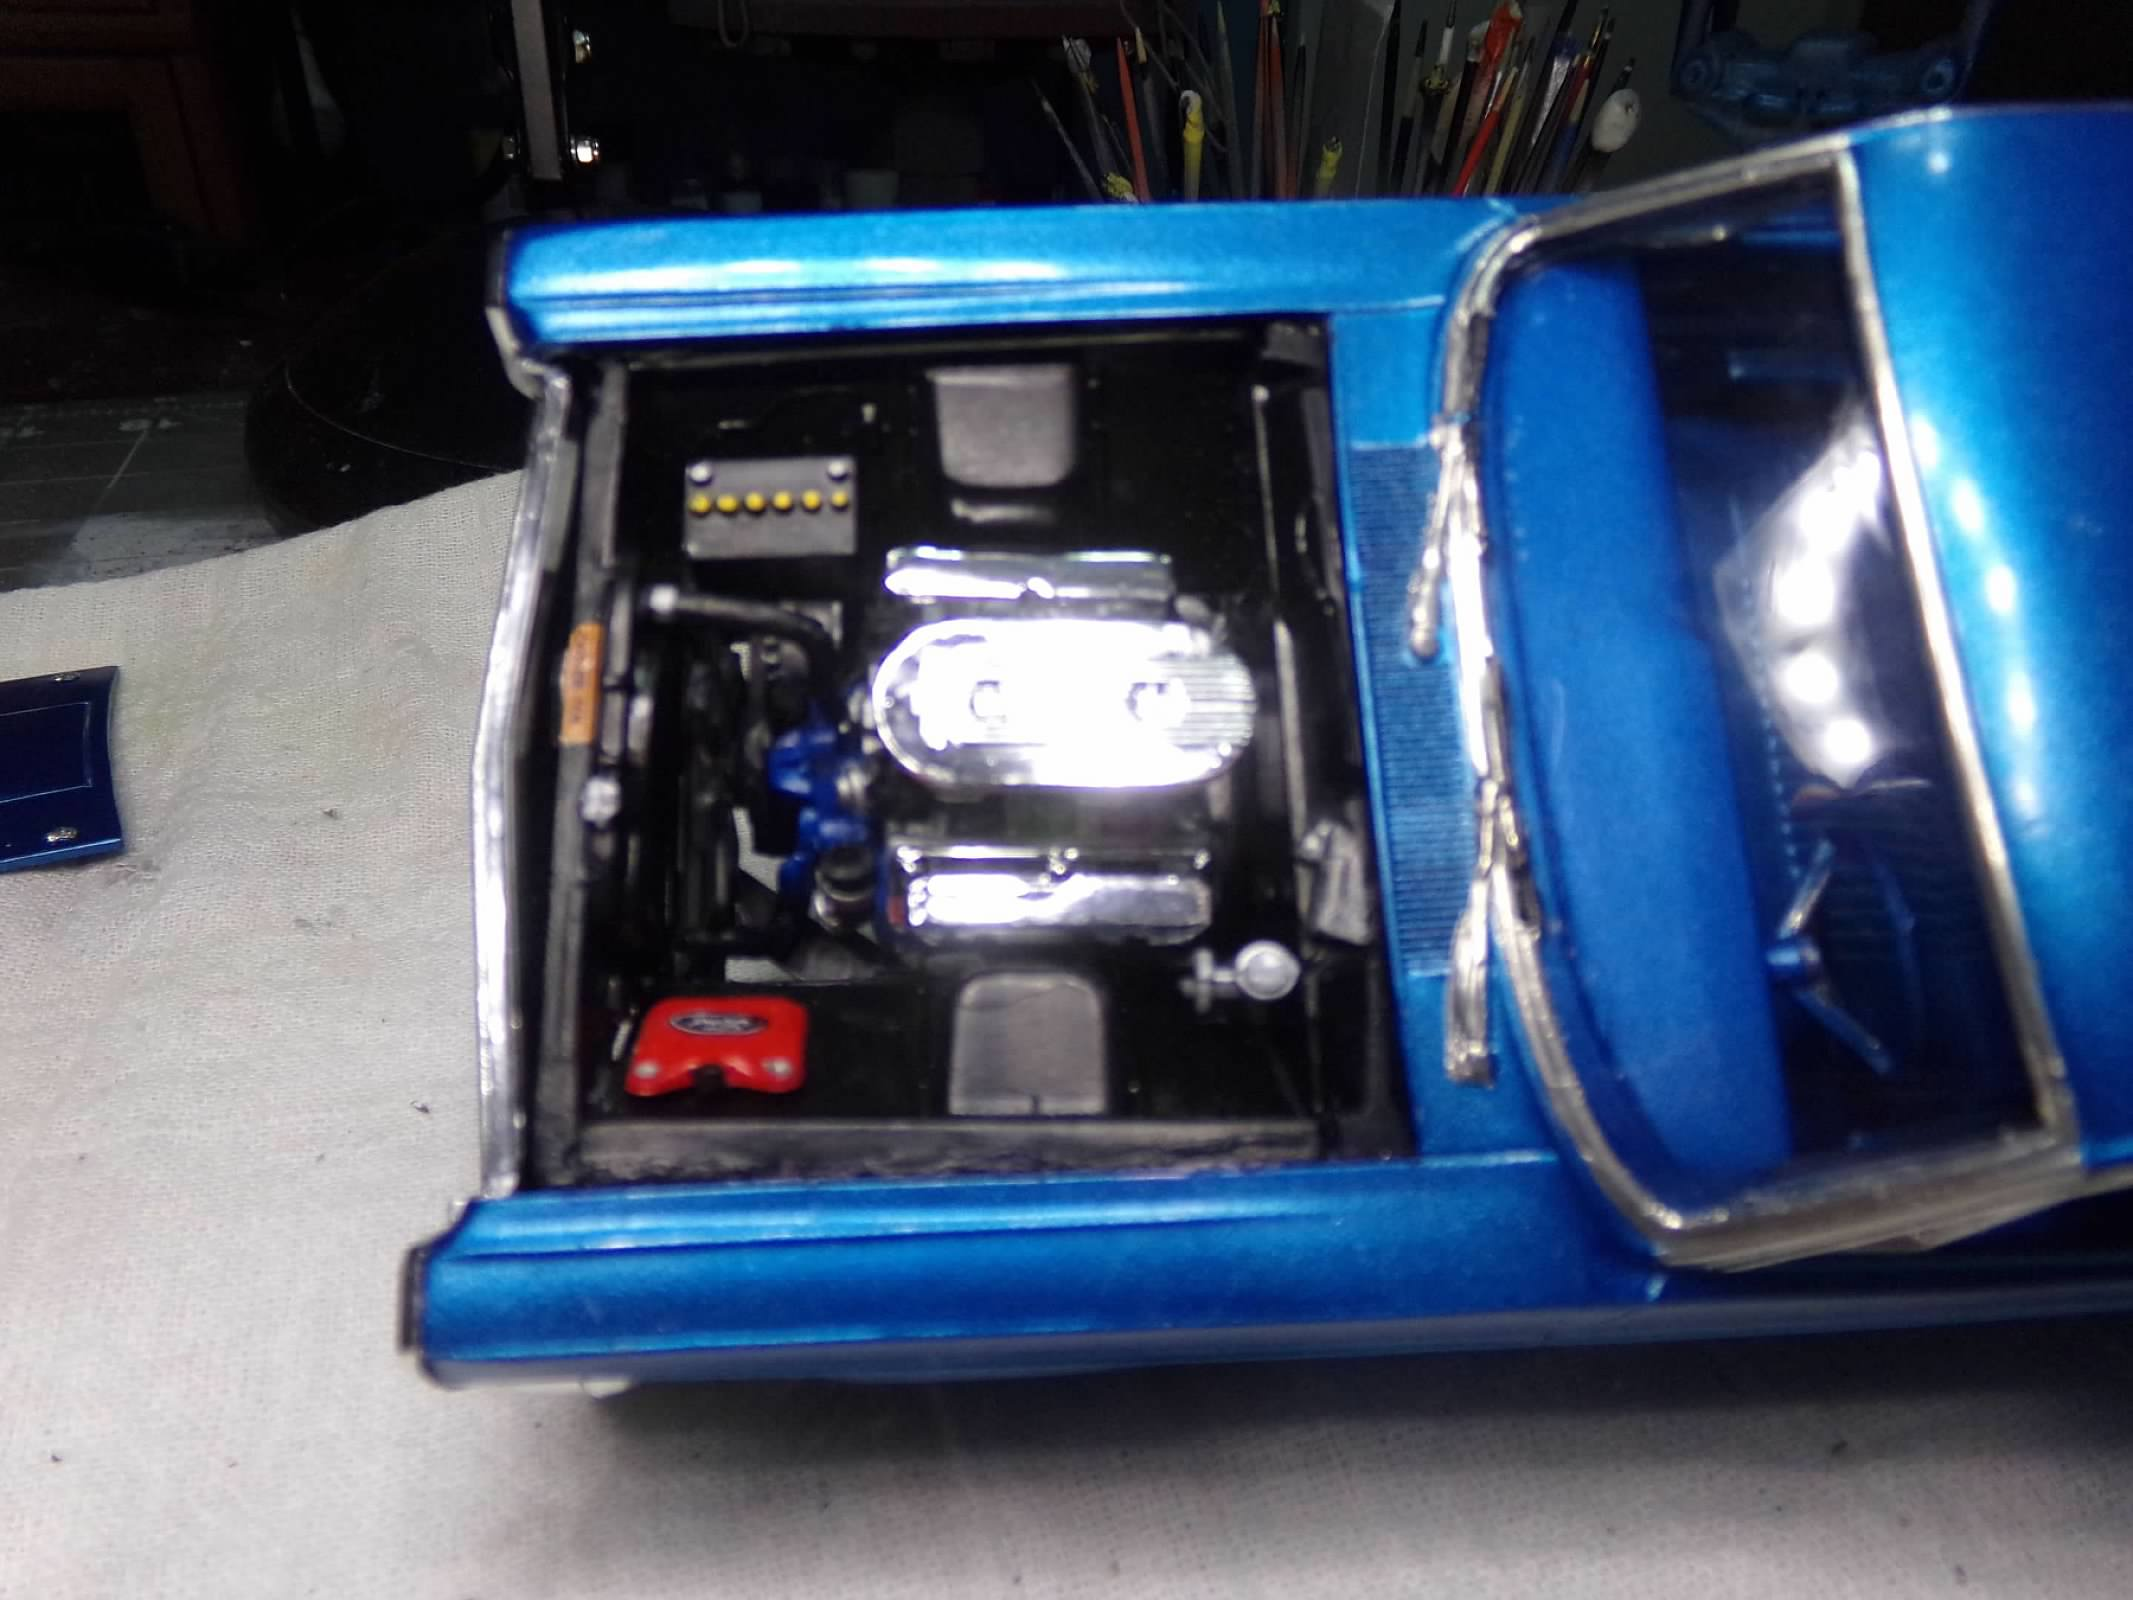
Thanks, Carl and Jeremy! I appreciate your comments! Carl, the paint is Tamiya Light Blue which is not really a light blue but looks more like Grabber Blue to me. Its been a couple of day since I have posted anything but I have been making good progress on the build. The body is foiled, windows and interior are in. I finished the wheels and tires and the tire decals are included in the kit. The engine and chassis are complete and the engine has been detailed with plug wires, a fuel line and heater hoses. Its very tight and I hope I can still get the air cleaner installed properly with the heat riser tube. I must say a word about the chassis. It is very simple but tight assembly and everything fits beautifully. The approach to the rear shocks and stabilizer bar attachment to the rear axle is very simple but much better than historically kits have been. The steering linkage is a solid connection and the tailpipes fit the exhaust manifolds and run the length if the chassis with positive pin placements. Very nicely done, Revell! Now its time to get this one on all fours and finish! Thanks for looking! ?
-
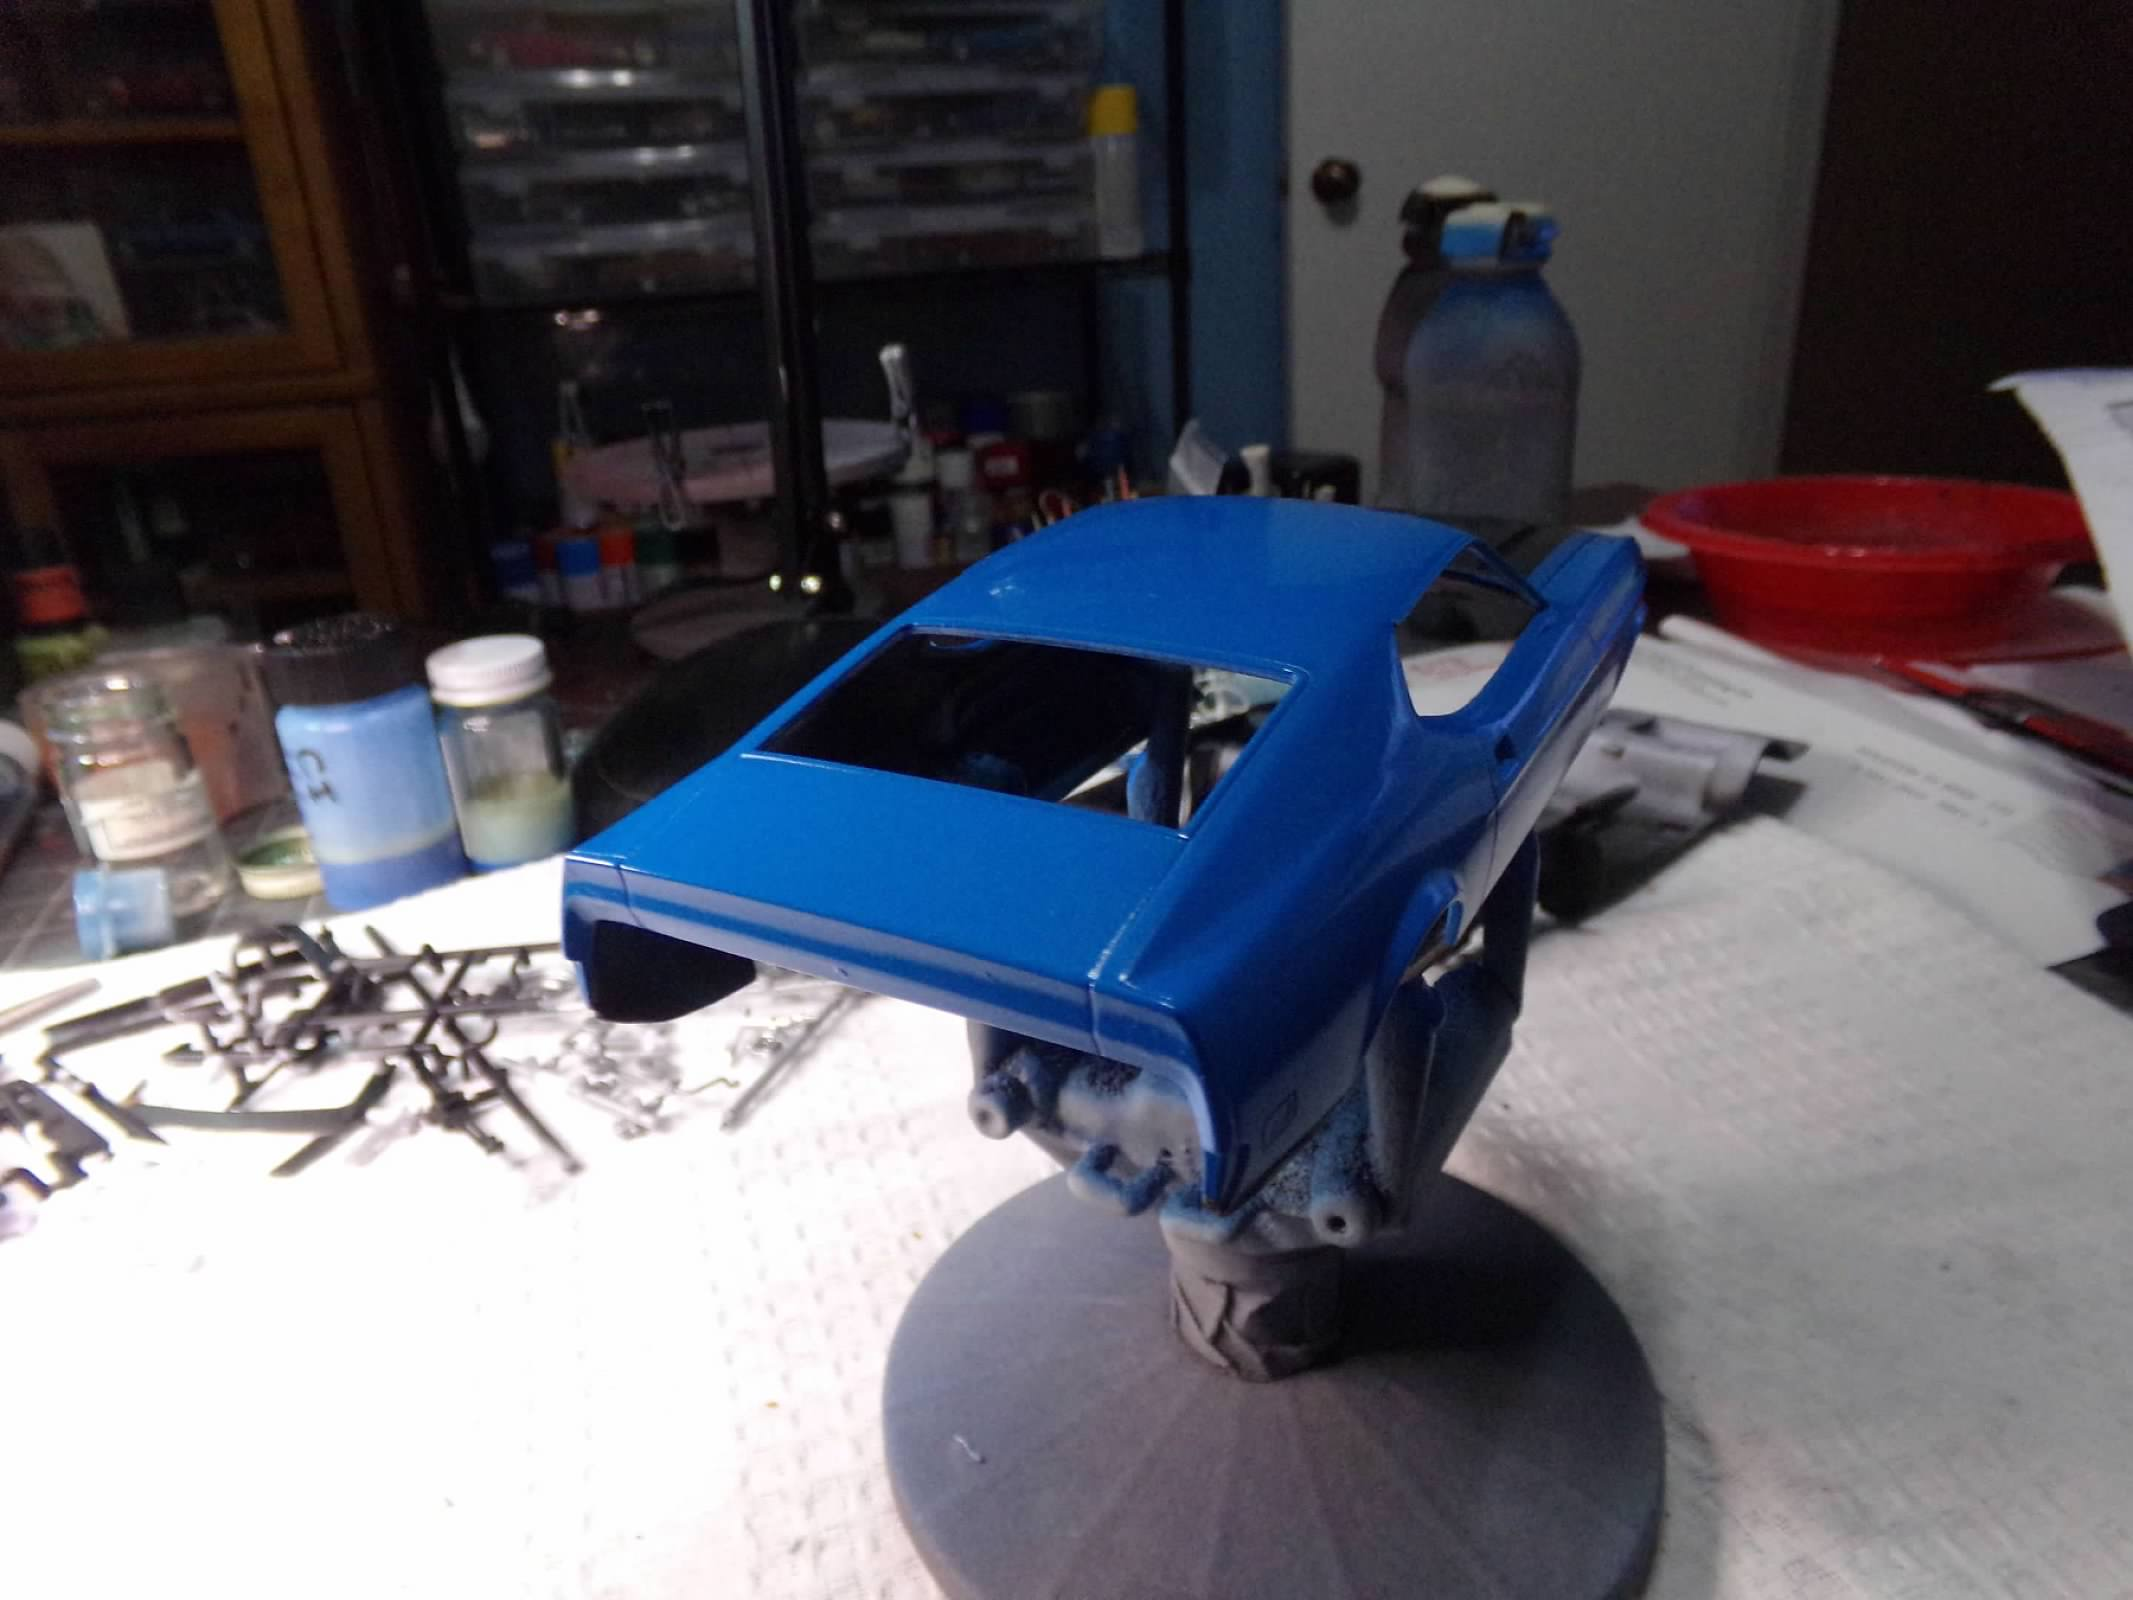
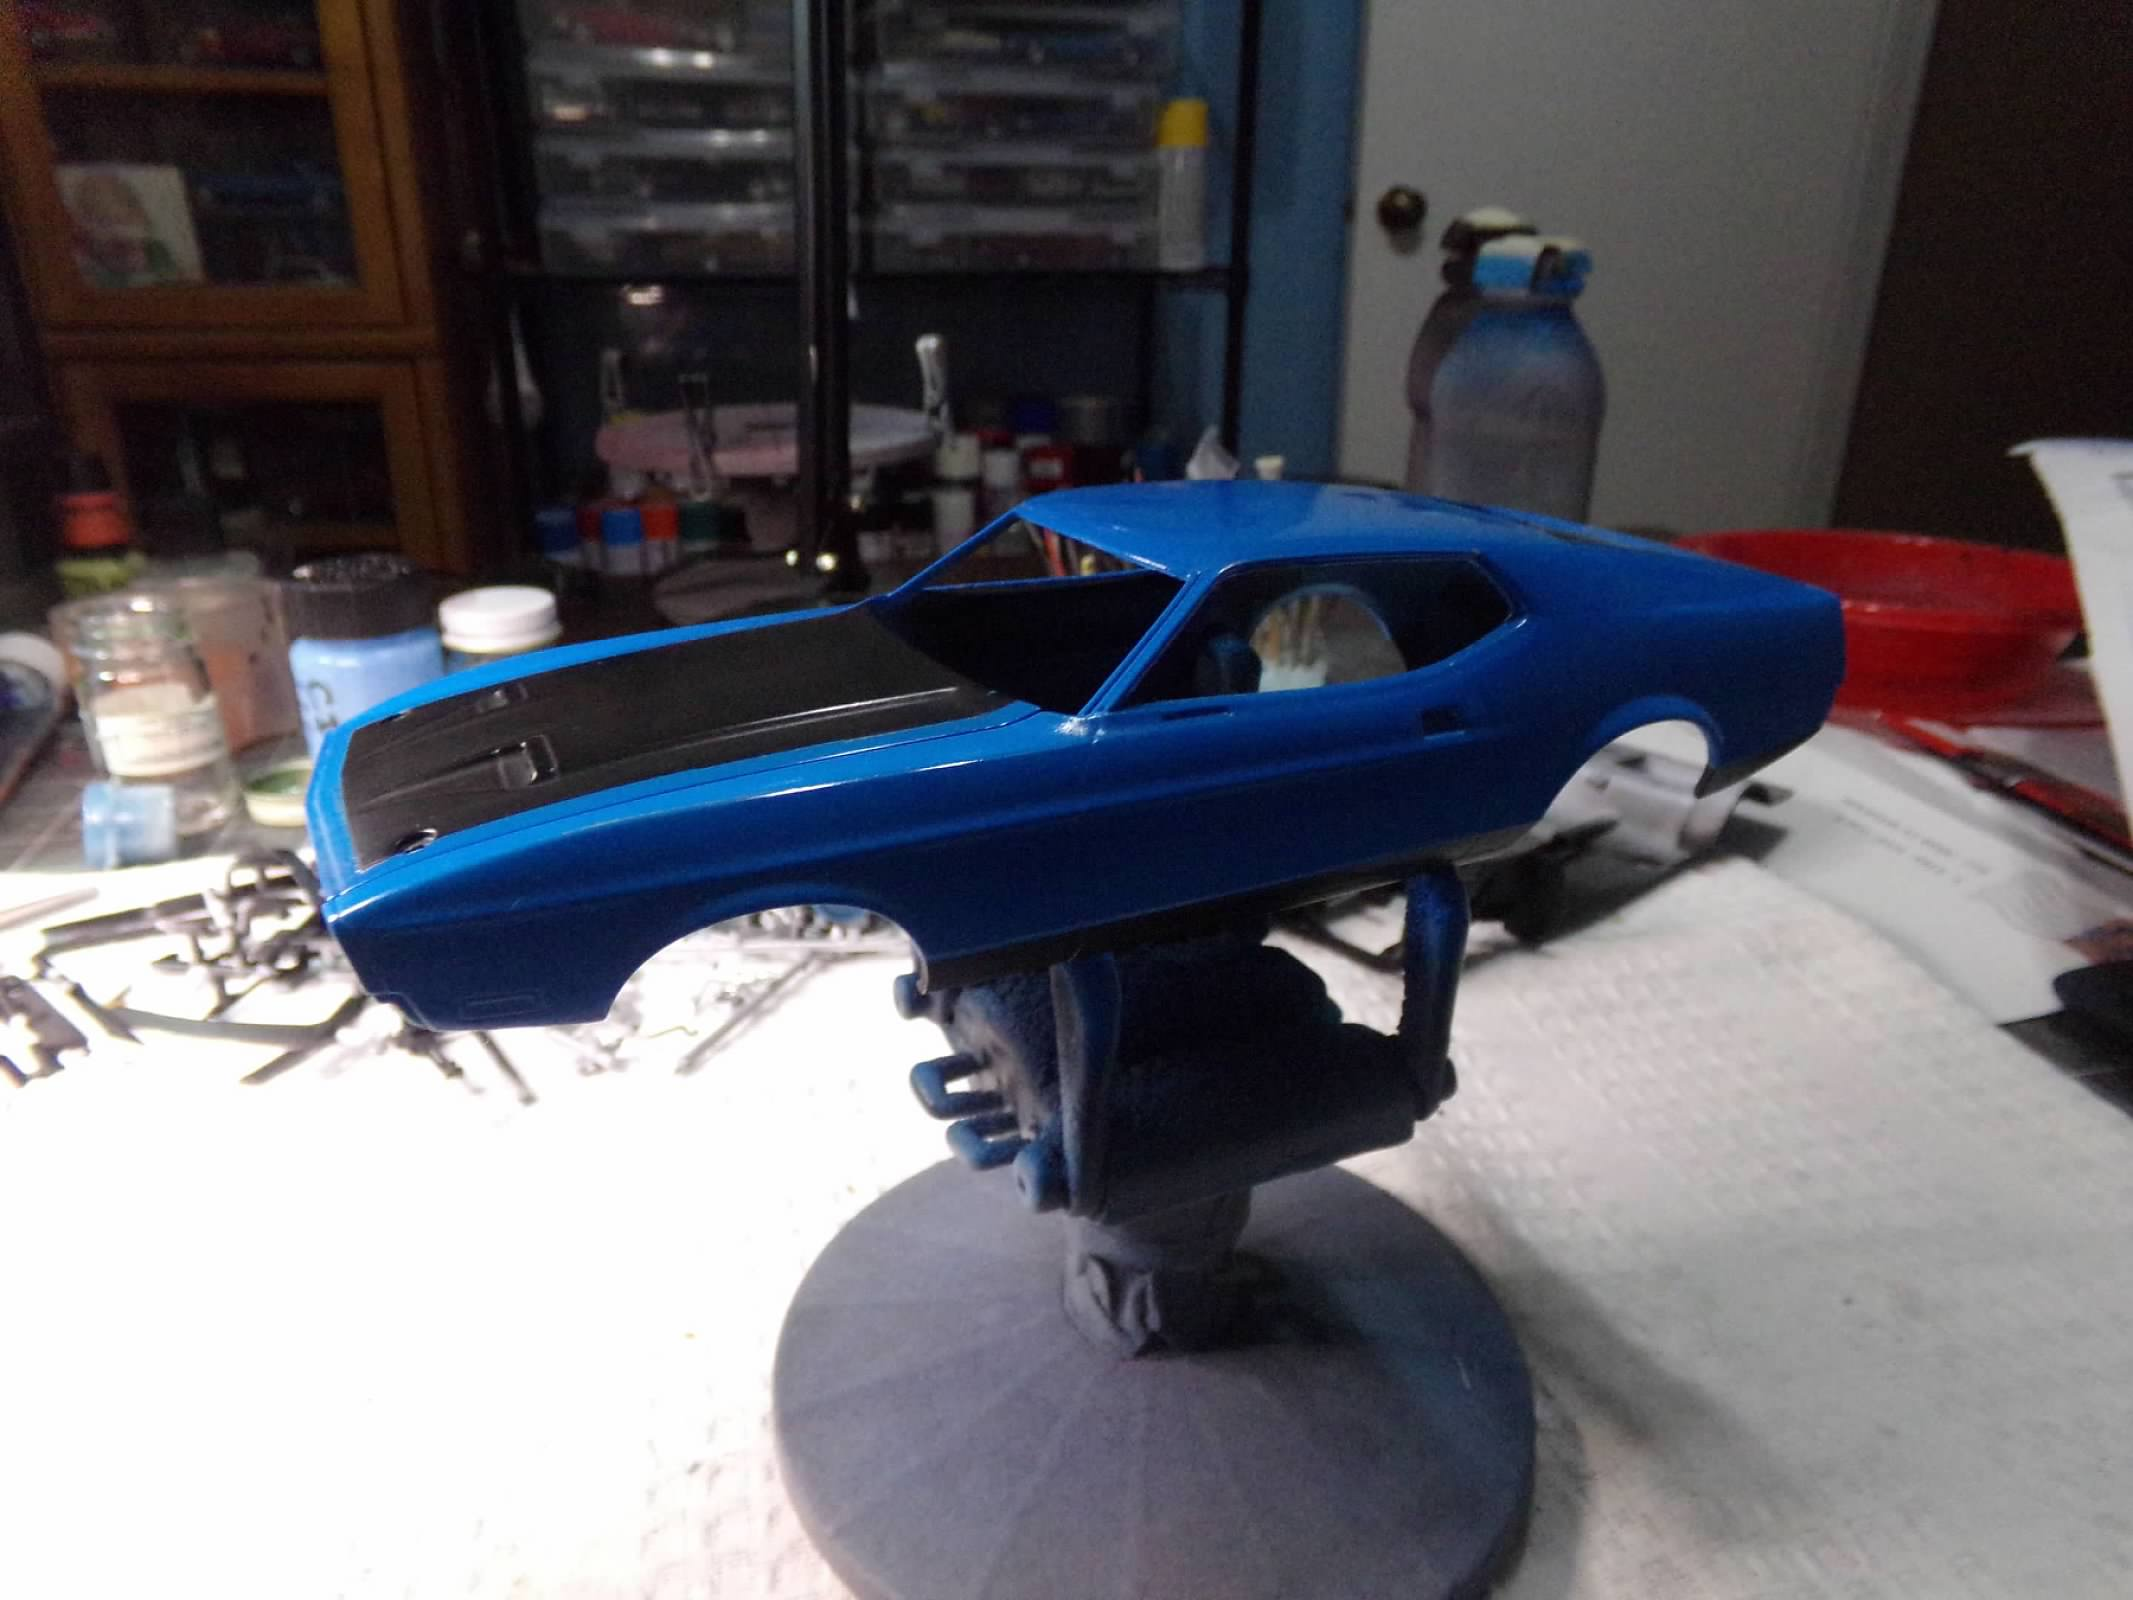
I rubbed out the body today. The first photo shows the paint in my mag light but the other photos are out of the light to show the color a little better. its really darker than light blue and I think matches Grabber Blue pretty well. I am going to try the add the pin stripes by themselves cutting them away from the larger decals. If I am not successful, it will still be OK because in this scale the pinstripes will be hard to see anyway. Thanks for looking! ?
-
I repainted the body today. I got started about noon, when the humidity was about 60%, and painted the black primer on the sides, interior, cowl area. After a couple of hours i taped it off and painted the blue (I'm going to call it Grabber Blue although it is Tamiya Light Blue). The weather was perfect about 3 PM with about 40% humidity. Two coats of paint and 1 wet coat of Krylon clear lacquer. I'll polish it out tomorrow. I'm also working on the engine. I have the flying valve covers installed to go with the flying alternator and power steering, I think. LOL! Thanks for looking! ?
-
I finished the interior. The decals went on well although you can't see them much in the photos. I thinned down the turn signal lever with my knife and it looks OK to me. Some have said its too big but at least it is there. I didn't apply the Hurst decals on the shifter as you can't see them anyway, A nice exercise in black, gray and silver. Thanks for looking! ?
-
Thanks, Lenny for your comment! I forgot to post a reply with my last post. I wasn't impressed with the two people I talked with about the touch-up paint. I don't think they knew what it was or how to mix it to thin it down. And I don't know much about urethane paint either as I have tried to stay away from it due to its harmful effects. I don't use a mask since I paint outdoors. Thanks again for looking! ?
-
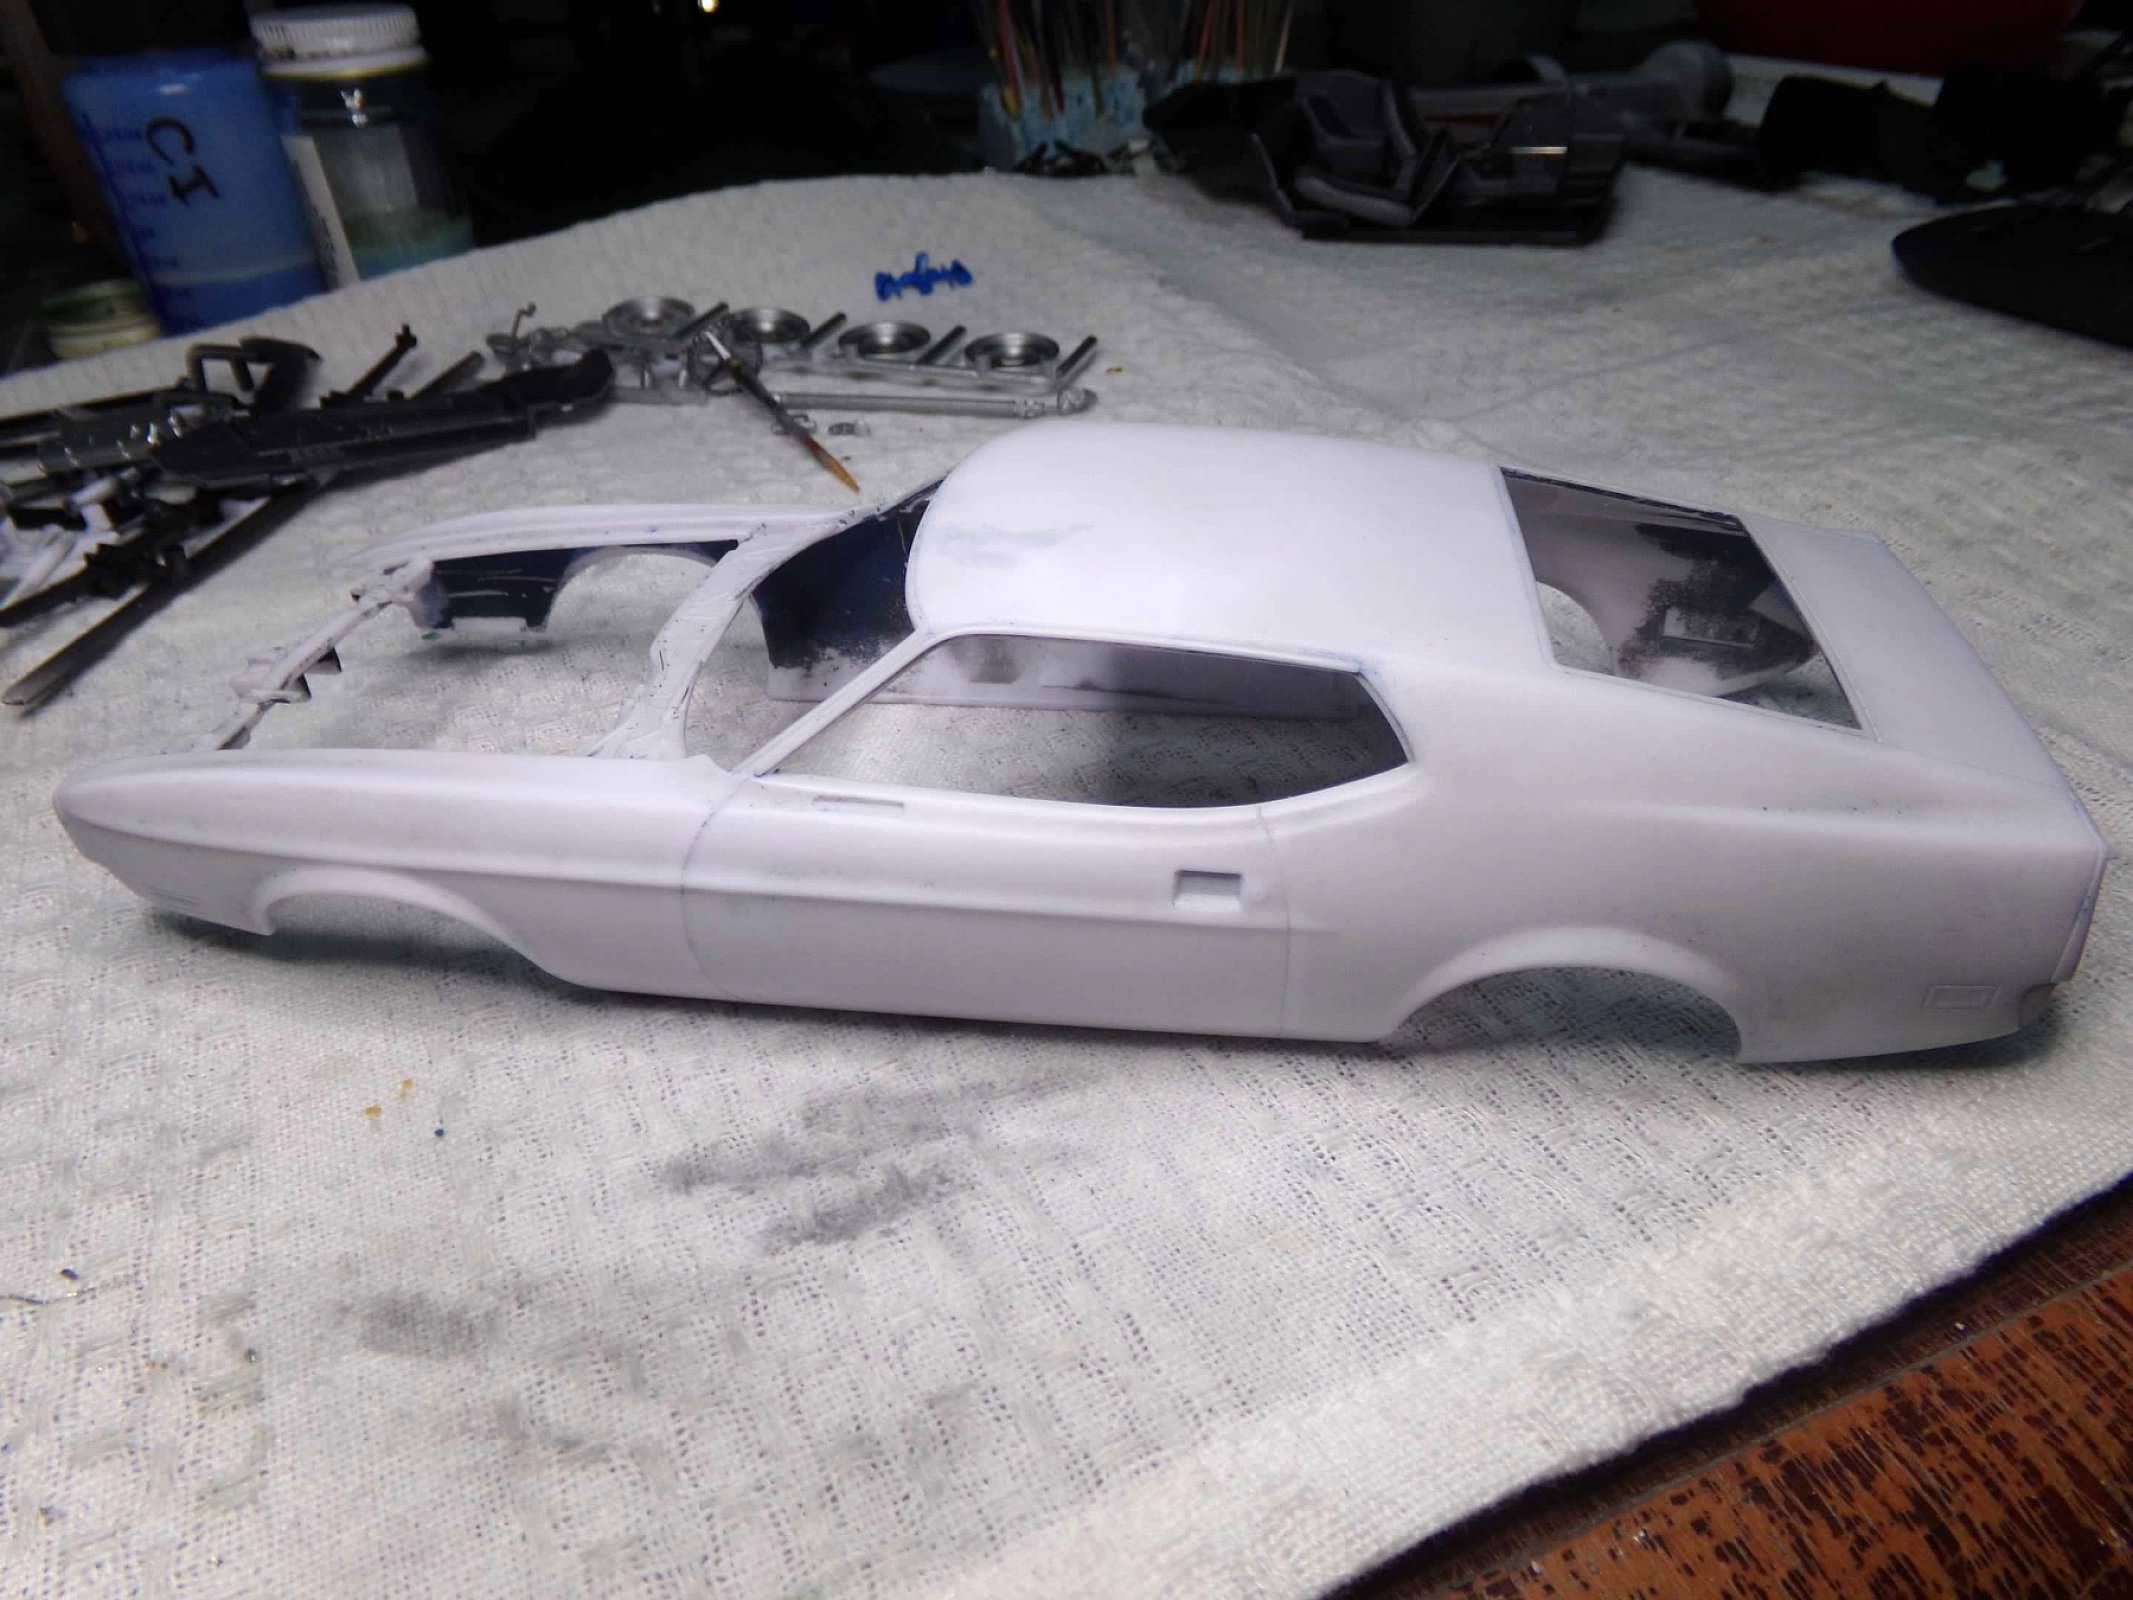
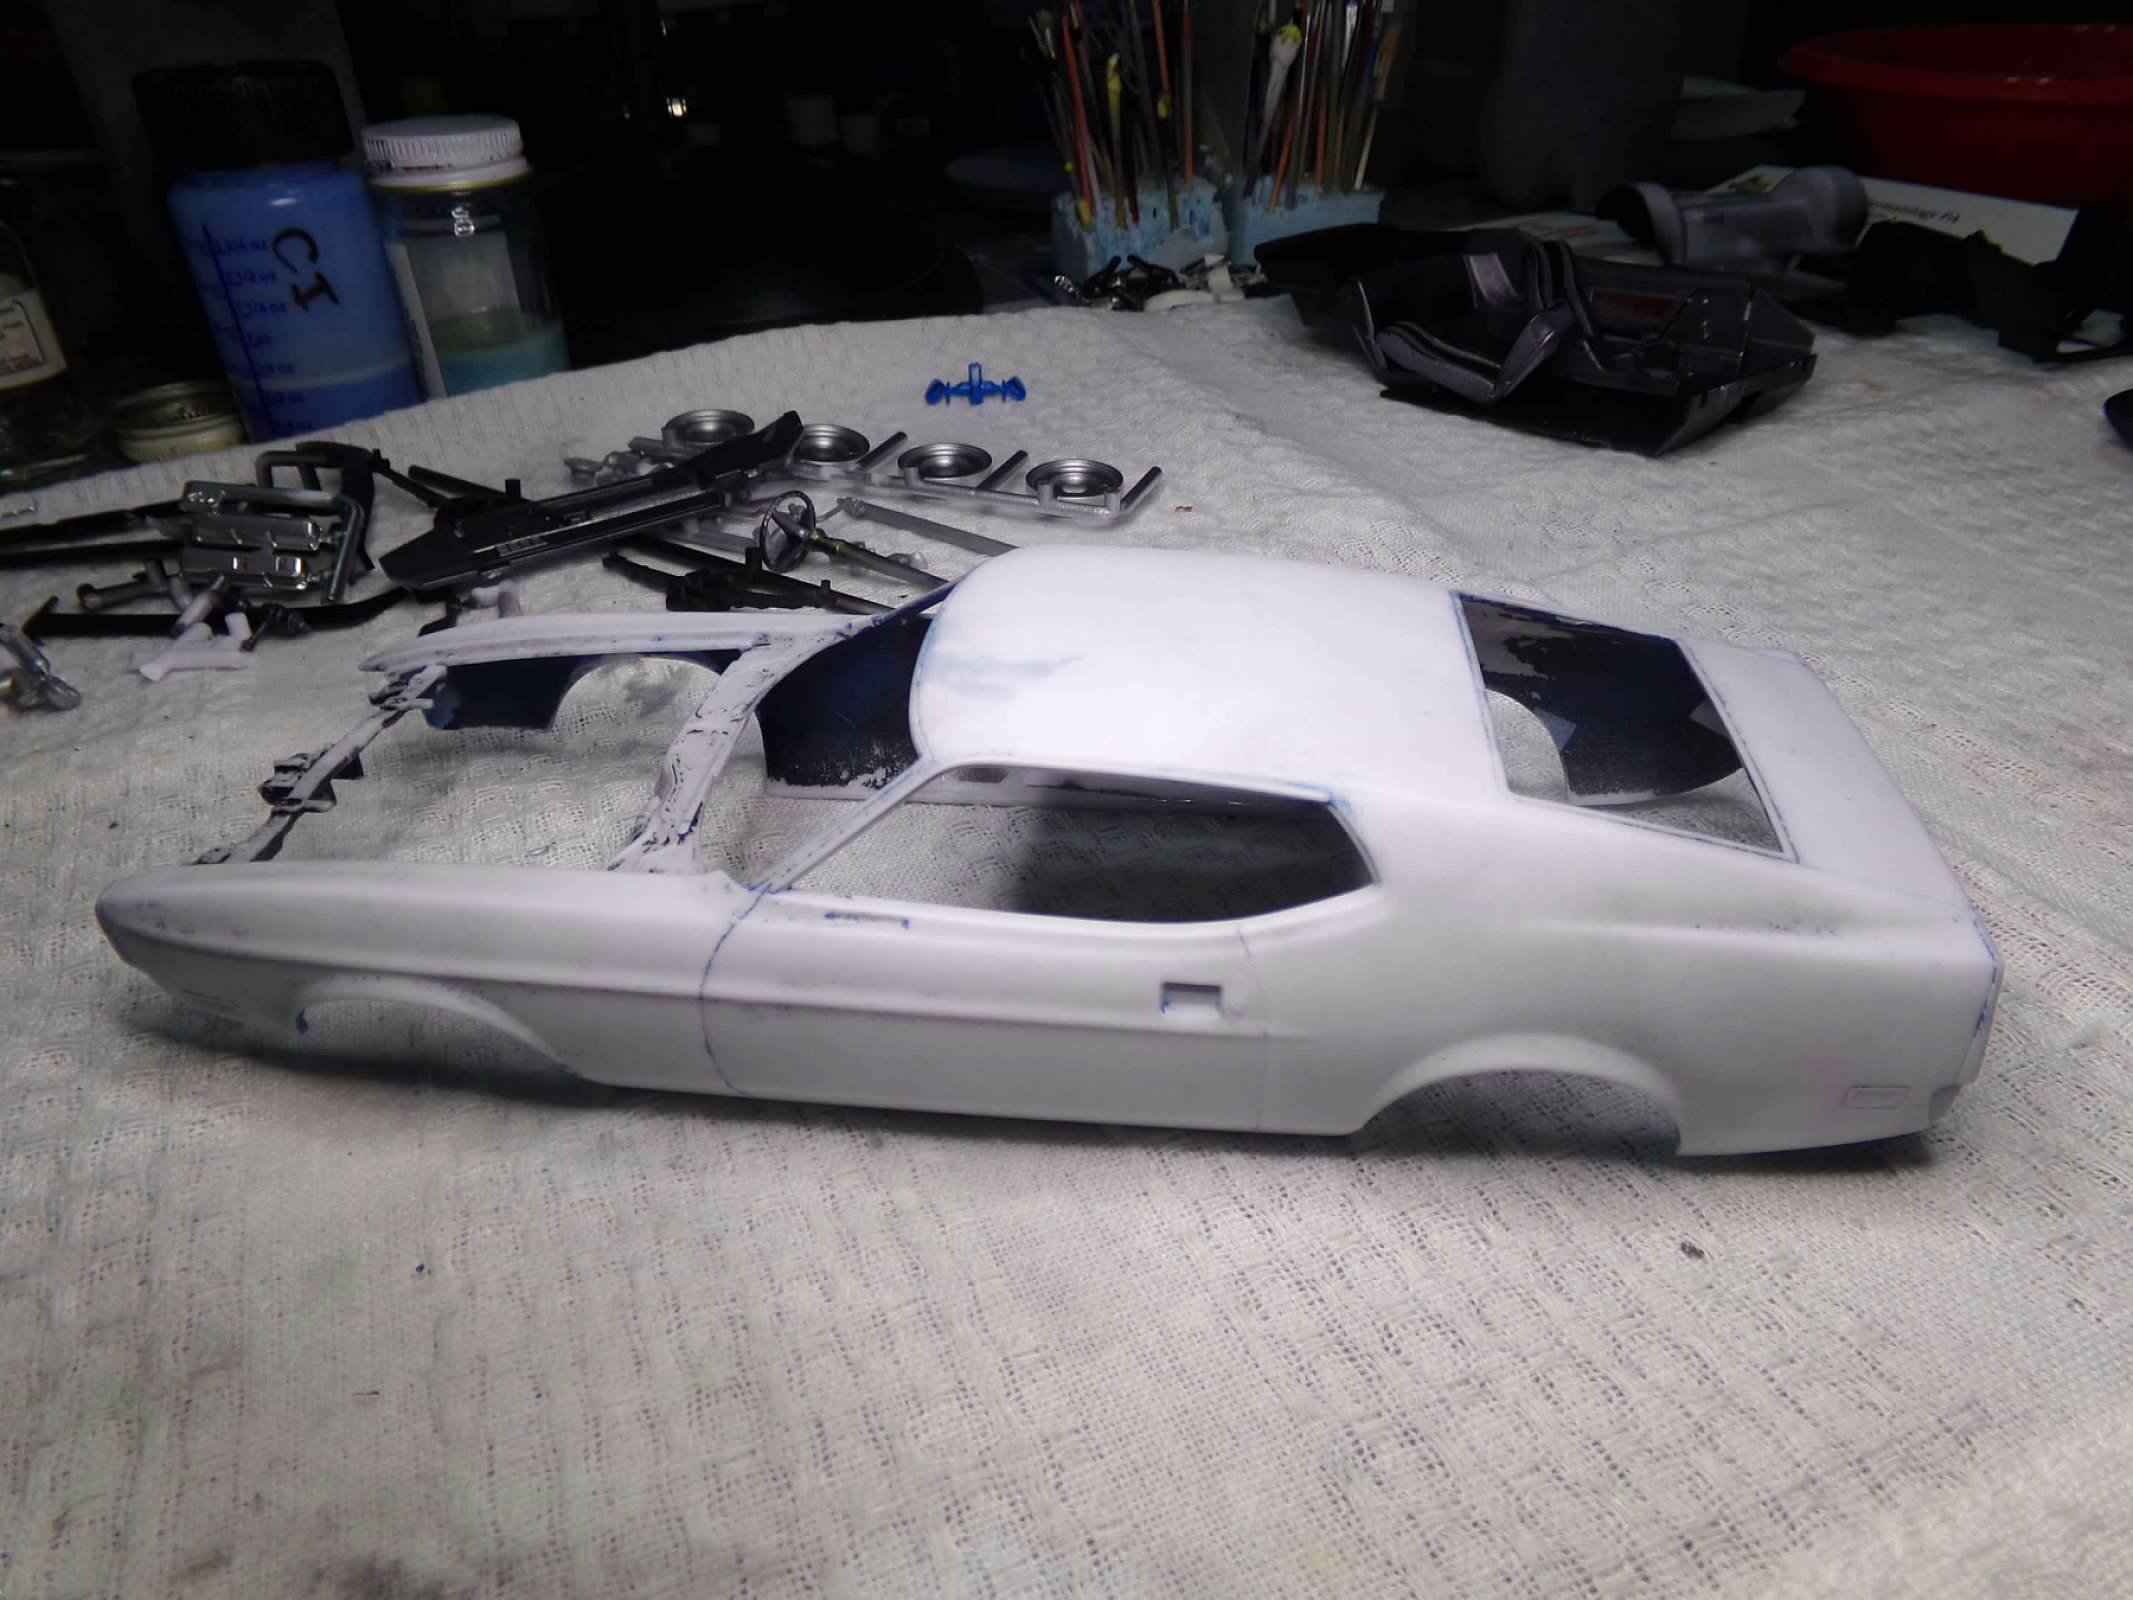
Working on the interior and completed the seats and one door panel. The base colors are black on the floor and back and dullcoted gunmetal for a gray interior. Highlighted with silver and burnt iron (shaken, not stirred). I have an old bottle of Model Master metalizer that I used because its thin and dries quickly and makes a good black for the interior with a brush. Its a shame that its not made anymore. I also finished removing the paint from the body. Three times through the oven cleaner, each time scrubbing what I could get off and then back in the oven cleaner. About 12 hours for each application and its finally almost ready to repaint. Two more steps in the process. Sand out with 400 grit sandpaper, a toothpick and the backside of a No 11 blade. Then wash it thoroughly. Then do it again. Now I am ready to repaint, but unfortunately, its been raining today and should rain again tomorrow. I may have to wait a couple days. Here are the pics. Thanks for looking! ?
-
Making slow progress on this on and had a setback. First I repainted the hood with black primer and got a nice sheen with a polishing cloth. I don't have any Ford engine blue and Krylon used to make a Global Blue that was very close but I am out of it and Krylon doesn't make it anymore. So I mixed up my own with some Testors light blue and dark blue and painted it with a brush. Looks OK to me so I'll let it dry a couple of days before handling it. Testors enamel is always sticky it seems. Then I ran into problems. I had ordered some touch-up paint from e-bay and it came today. 1 oz. of paint for $8. It wasn't thinned so I called the number on the package to find out if I could thin it using lacquer. They told me it was a formula that included a clear in the paint and they couldn't guarantee a good result by thinning it. It was not recommended for the 1oz. paints and was only intended to be used for scratches on 1/1 cars applied with a brush in the bottle. So I tried it anyway. The hood edges looked fine and the mirrors painted fine as well using my airbrush. So I painted the body and started noticing popcorn popping up. Paint became very rough and dry looking. I had already finished all the black as well, but into the oven cleaner it went. I have a can of Tamiya Light Blue which I probably should have used in the first place as it looks like Grabber Blue to me. Its only slightly lighter and I don't think I could pick it out the grabber blue from the Tamiya Light blue in a line up. I took it and re-painted the edges of the hood and the mirrors right over the touch-up paint I had already airbrushed on. It looks good to me and hours later it is still looking good. So once the body is out of the oven cleaner, it will get the Tamiya Light Blue. Thanks for looking! ?
-
Thanks, Lenny! I appreciate your suggestion! After reading your suggestion, I went on a search to see what color I should use. I found a website that talked about rebuilding 1:1 71 Boss Mustangs. It was almost unanimous that they all used SEM Hot Rod Black. So I looked at that color and it is a flat but shiny finish. So I have repainted the hood with Black Primer. Its not as flat as flat black and I think I can shine it up a bit as you suggested to get a slight sheen. Thanks for your help! ?
-
I have made a little progress on this build although the weather is awful right now. Humidity barely below 60 percent late in the afternoon and I don't like to paint above 50%. But I taped off the hood and painted it. I used a template from a copy of the hood decal. I taped it on the hood and outlined it. Then I remembered that the 3mm Tamiya tape I have is the approximate width needed. So I removed the template softened the pencil line and put the Tamiya tape on. It followed the template lines approximately so I am happy with it. Painted with Krylon Semi-Gloss black because as I viewed the instructions it called for Black Silk Matte which is Semi-Gloss to me. Also looking at several photos on the internet the hood doesn't look like a flat or matte finish to me. So I will have to rub it out but I wait and do that when the blue is on. An ounce of paint is on its way. I also sanded out the interior top with my oscillating sander and it looks good to me. One other correction I made to the body was to cut in a panel line from the bottom of the front of the door through the rocker. If you have a crinkled front fender, normally you wouldn't cut through the rocker to get it off. If its a rear fender - tough luck- lots of repair work! Another hint on the contest entries: The predominant exteriors are, 3 MCW, 2 Tamiya, 2 Dupli-Color, and 1 Krylon.
-
I am starting this one that I picked up over the weekend at the Houston IPMS show. I am not a big Mustang guy but I thought I would build this one because it is a new tool from Revell and I have heard a lot of good things about the kit. A couple of things struck me as I perused the instructions. First, i think the rear rocker or valance should be black and not body color (white according to these build instructions). Secondly, I don't know a lot but I do know that you can't extend a color with a decal. In this case, the hood is partially painted black and THEN a decal is suppose to extend the color and include a pinstripe around the edges. I don't think it will work because there will be a seam and and it is very hard to match paint exactly to a decal so that it looks seamless. So I am going to do this backward and paint the black first, tape it off and paint the body color around the edges, in this case Grabber Blue, and then add only the pinstripe from the decal. Hope this works. Second, I would like opinions about removing the circle thingys (pin injector marks) on the interior roof. There are six on this roof and I normally ignore them because you would have to have a pen light and a magnifying glass to see them once everything is built. What would you do? Finally, I would like to share my good fortune at the Houston IPMS show. I took 8 places 1 gold, 4 silver and 3 bronze. Can you guess which one won the gold? So there are about 3 things that everyone can opine on! Thanks for looking!
-
Thanks, Monty, Stephen, Larry and Ken! I appreciate your comments! Over the weekend, i picked up a Bobby Unser Olsonite Eagle at a model contest. It will be my next Indy Car build. I'll have to get some decals from IndyCals again but its on the build list. Thanks for looking and commenting! ?
-
Thanks, Jim and Garry! I appreciate your comments!
-
Thanks, Stephen! I appreciate your comment! I agree! This one is done! See the rest of the completed photos in the "Under Glass" section. Thanks for looking! ?
-
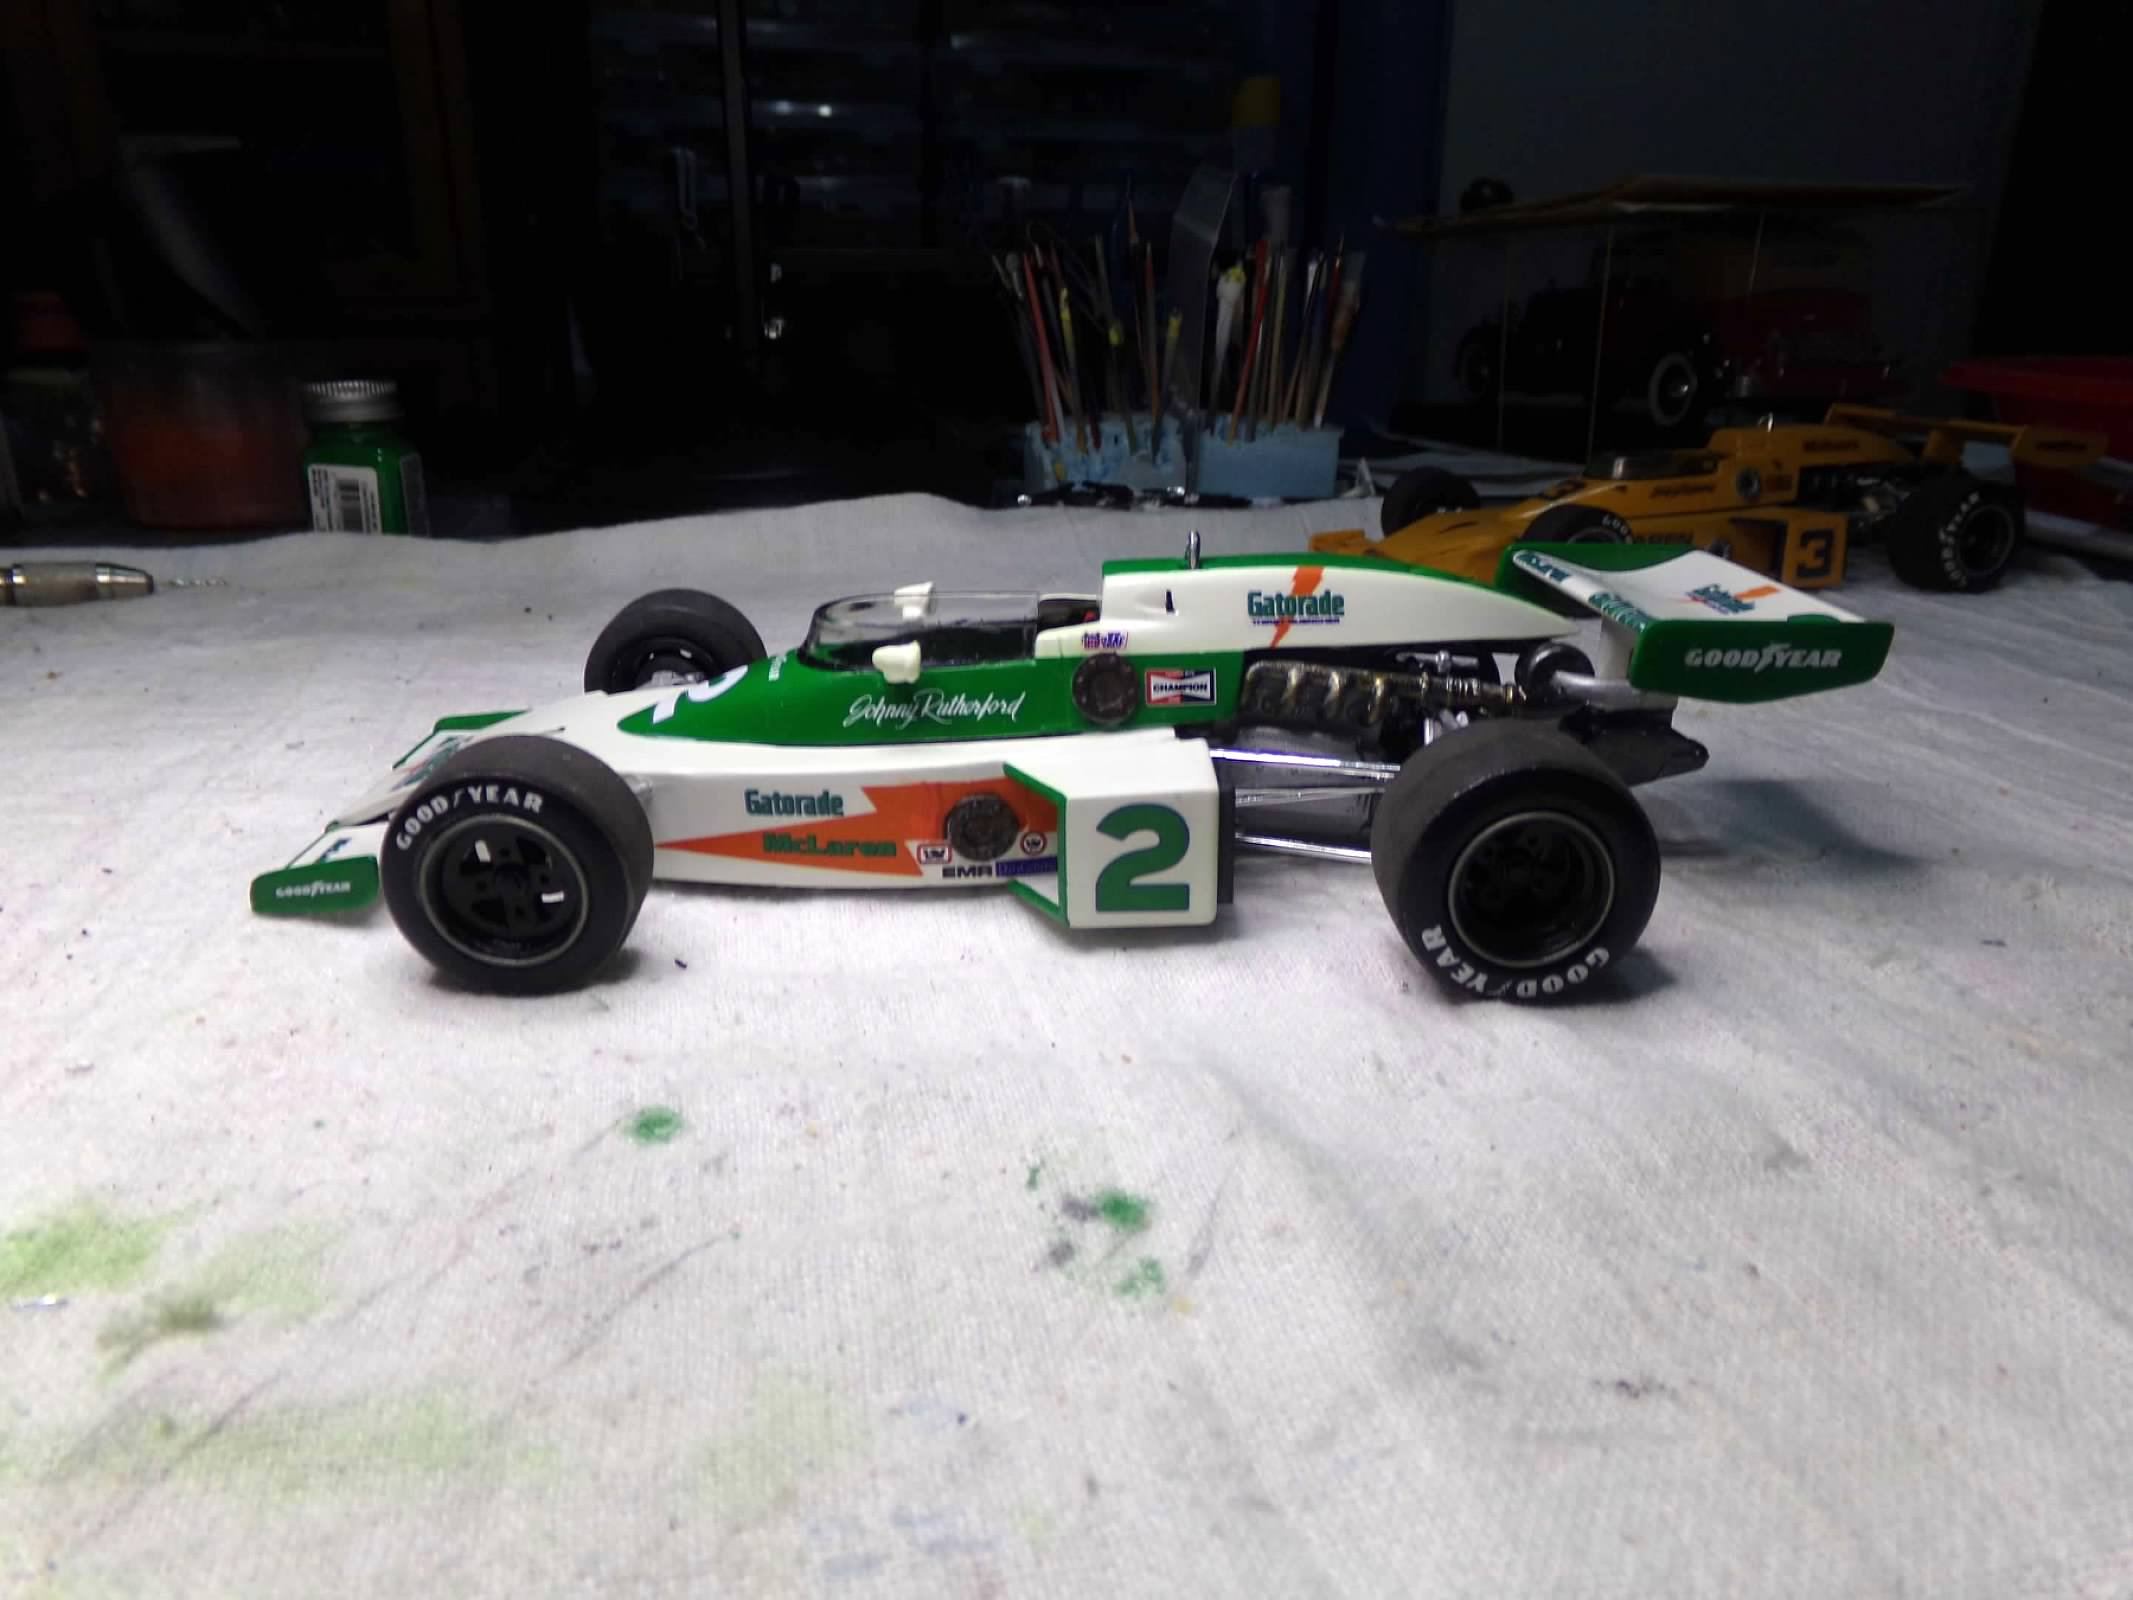
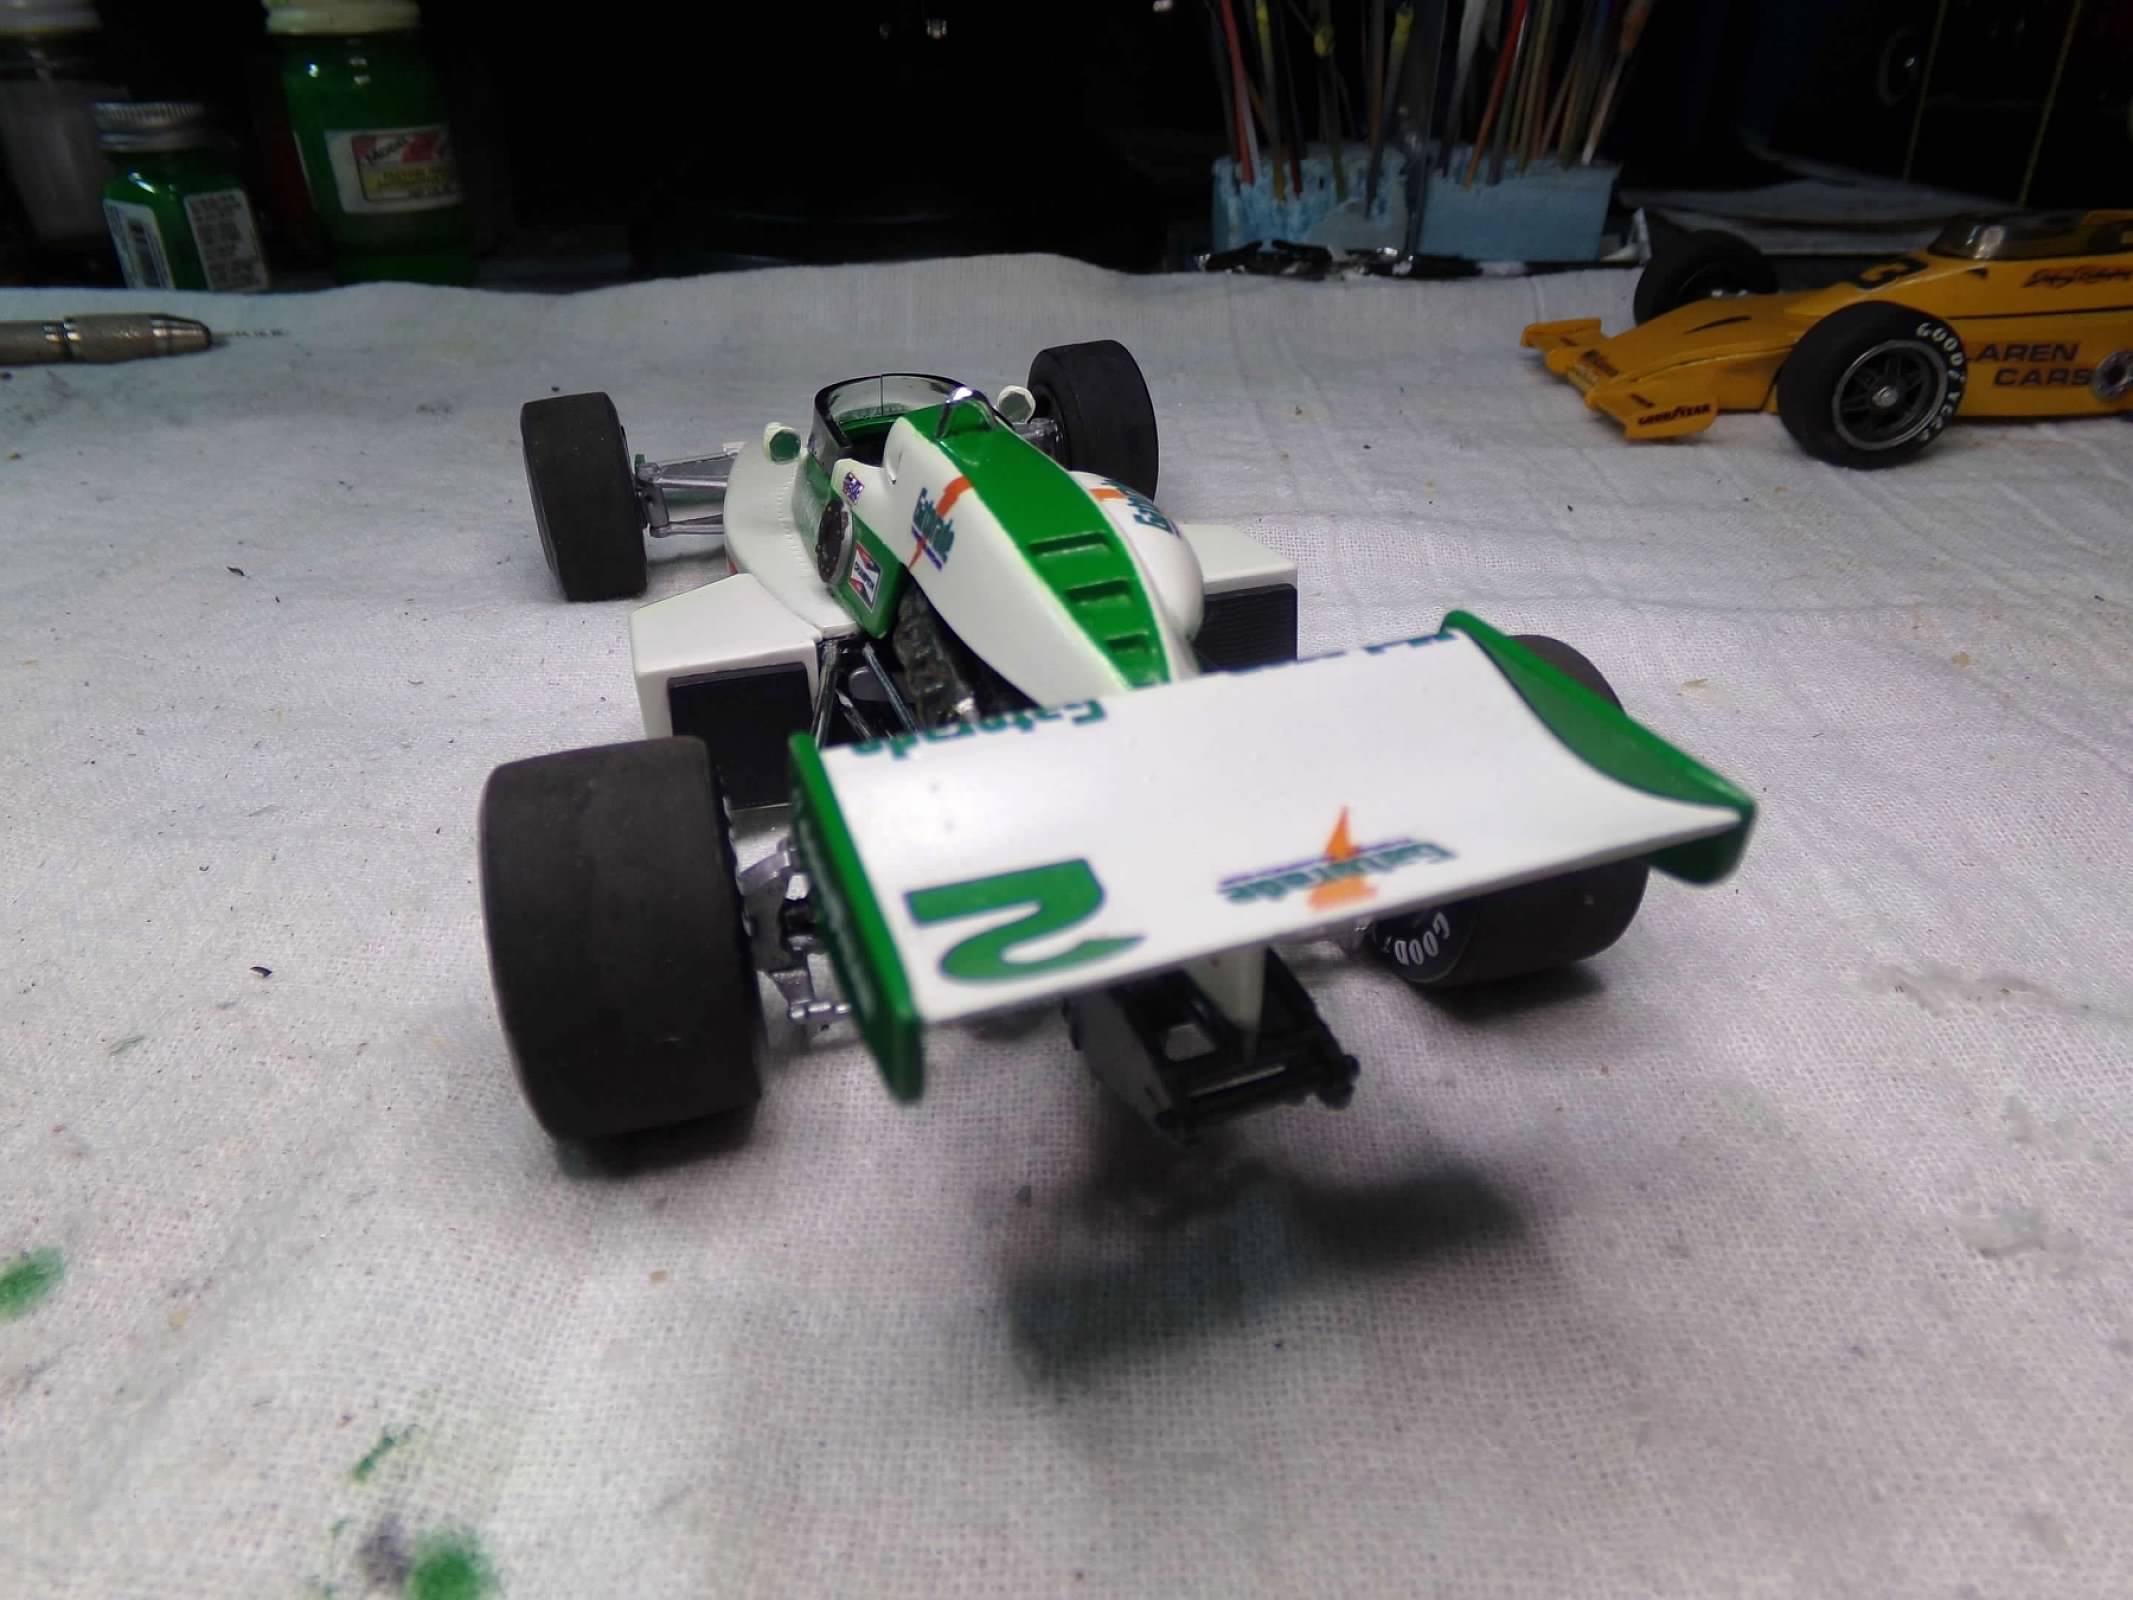
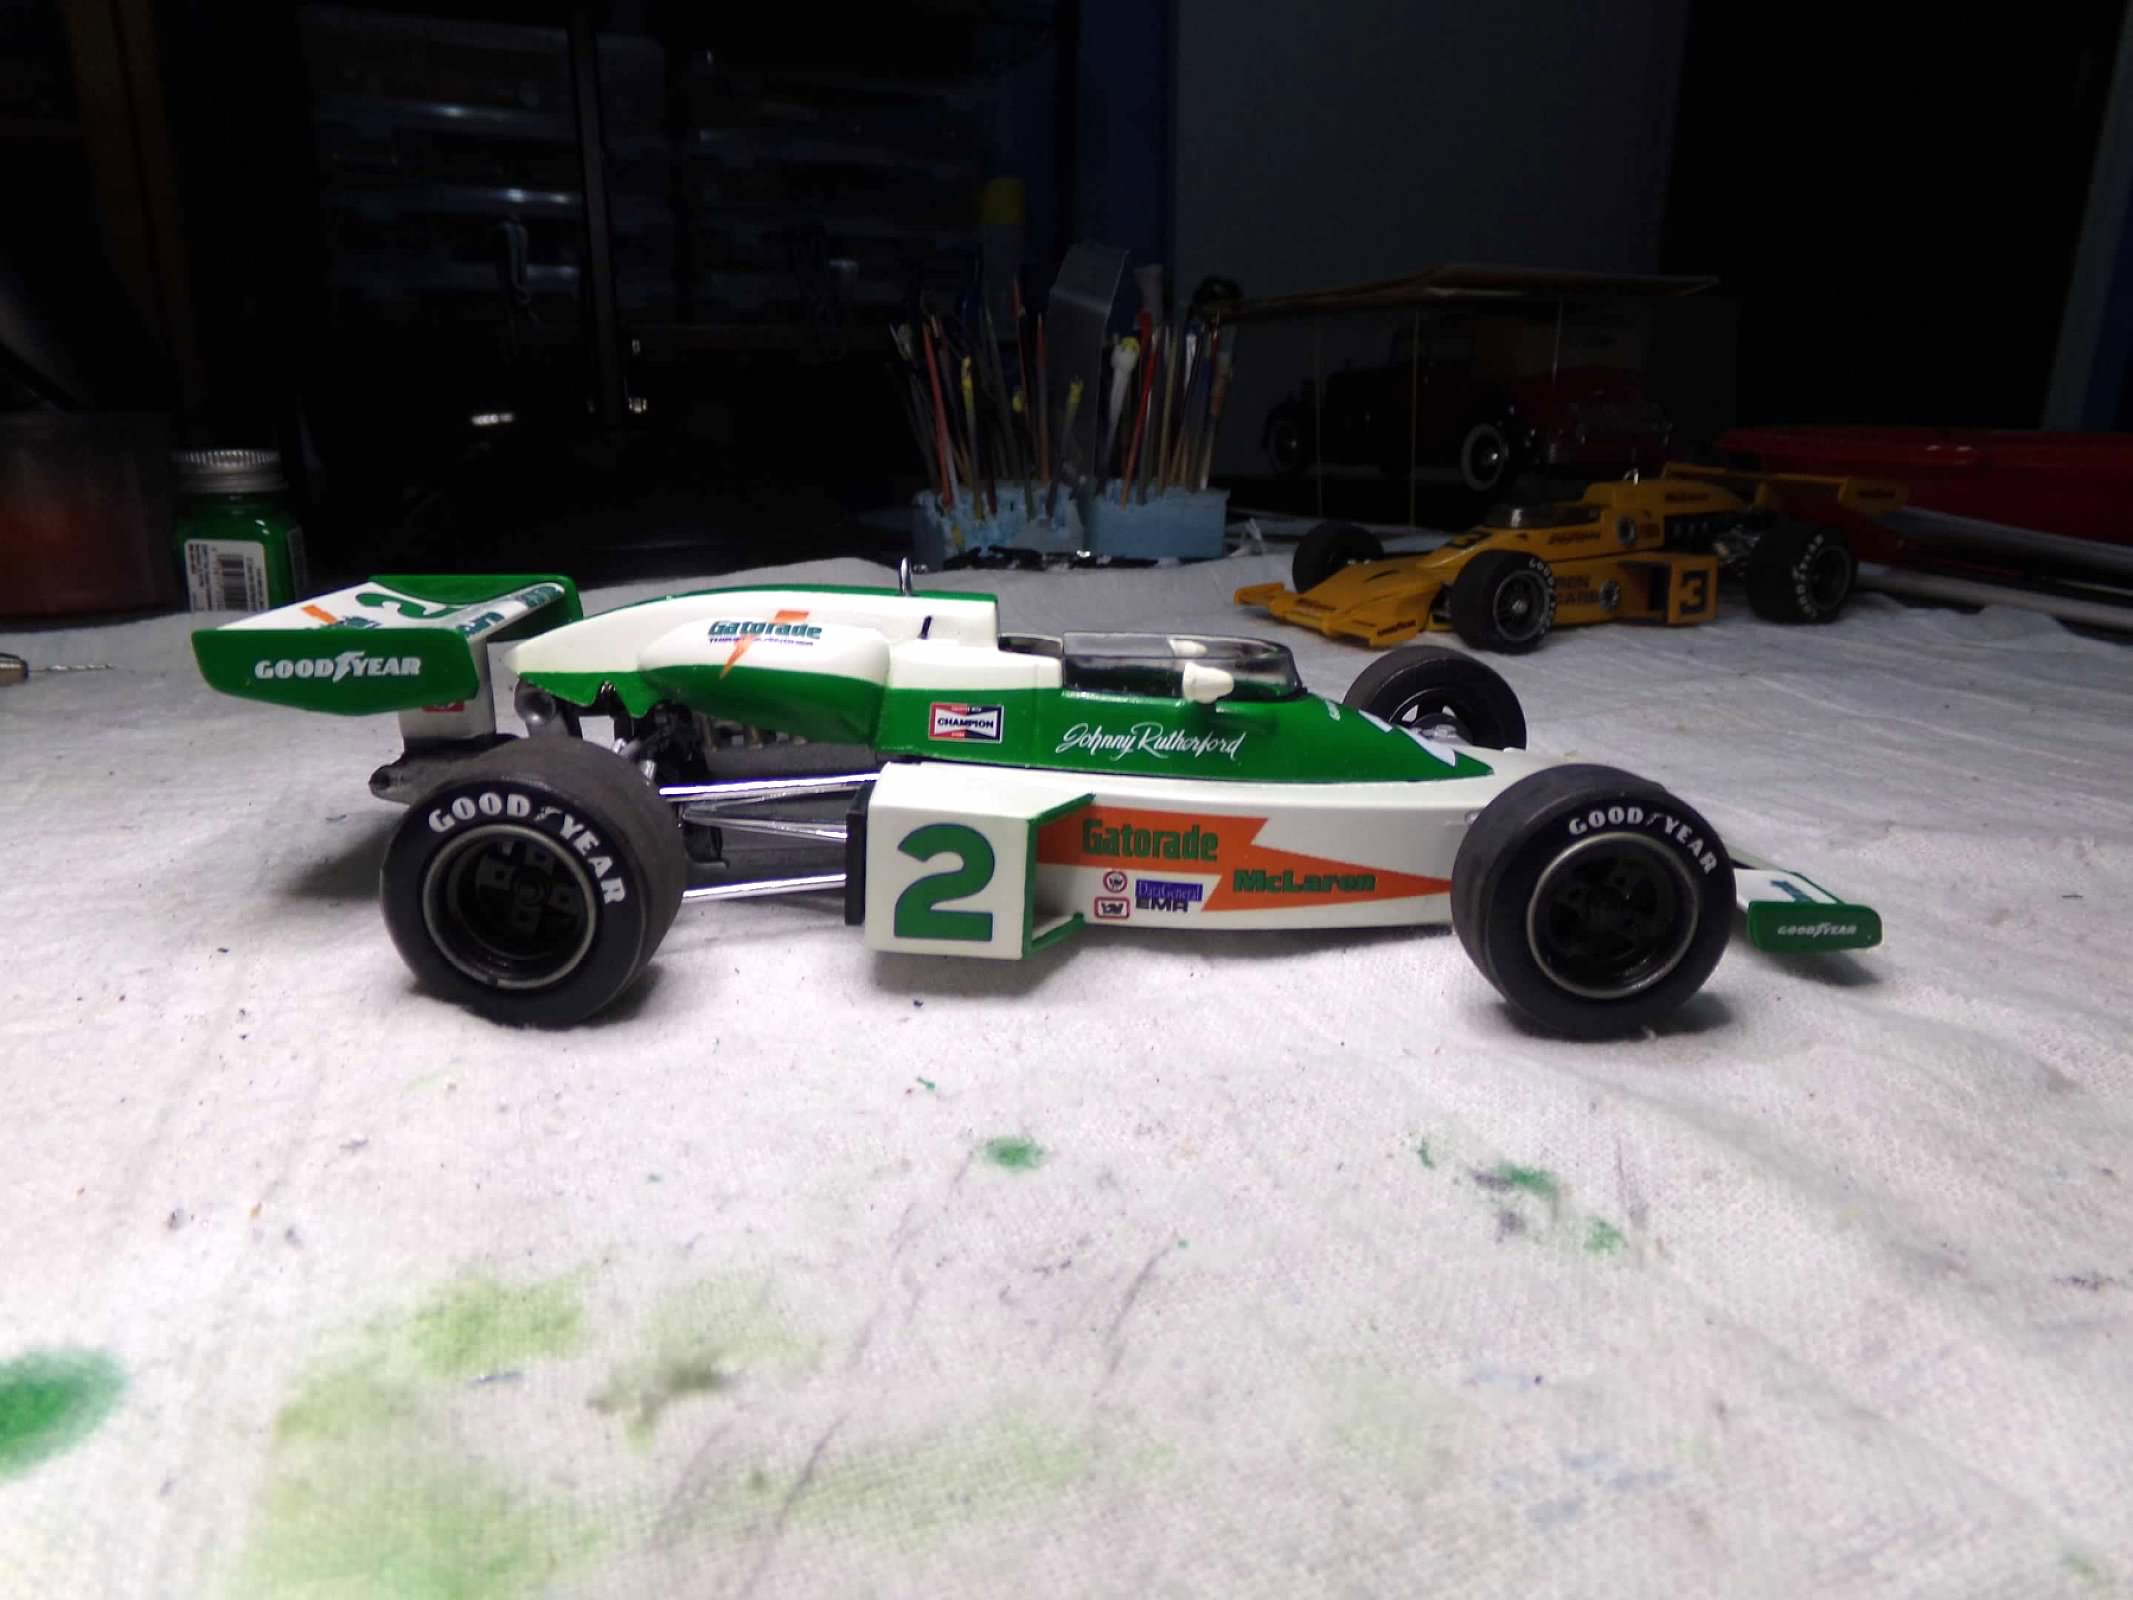
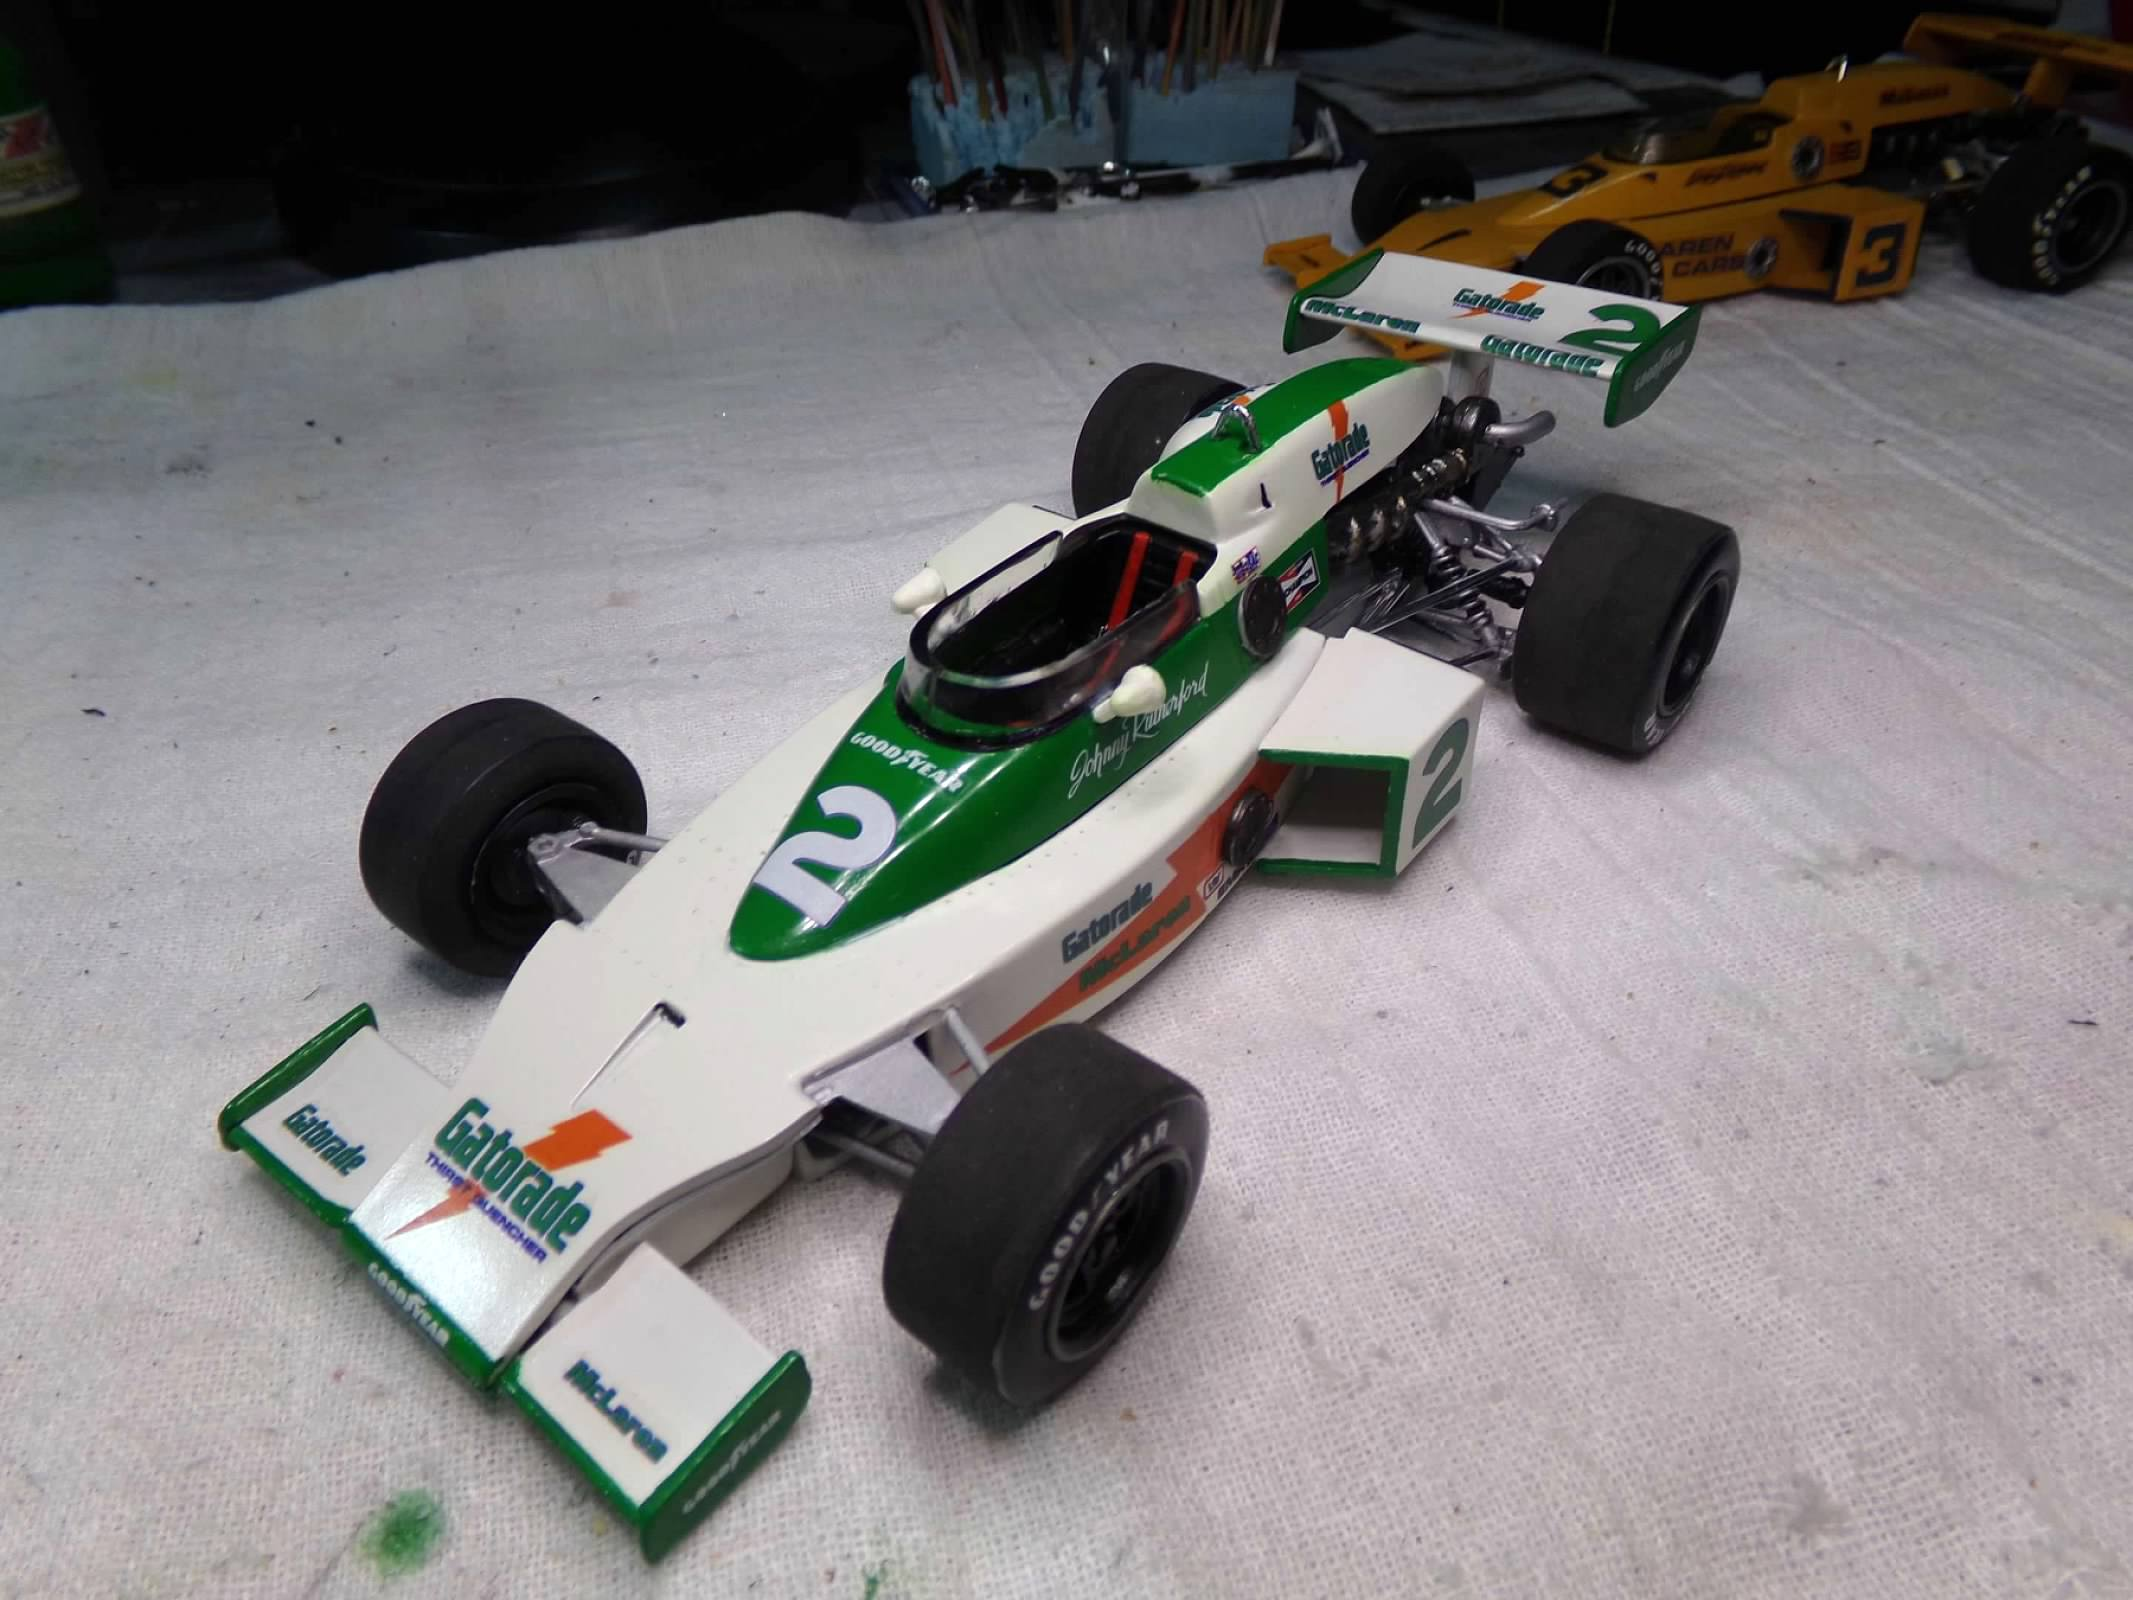
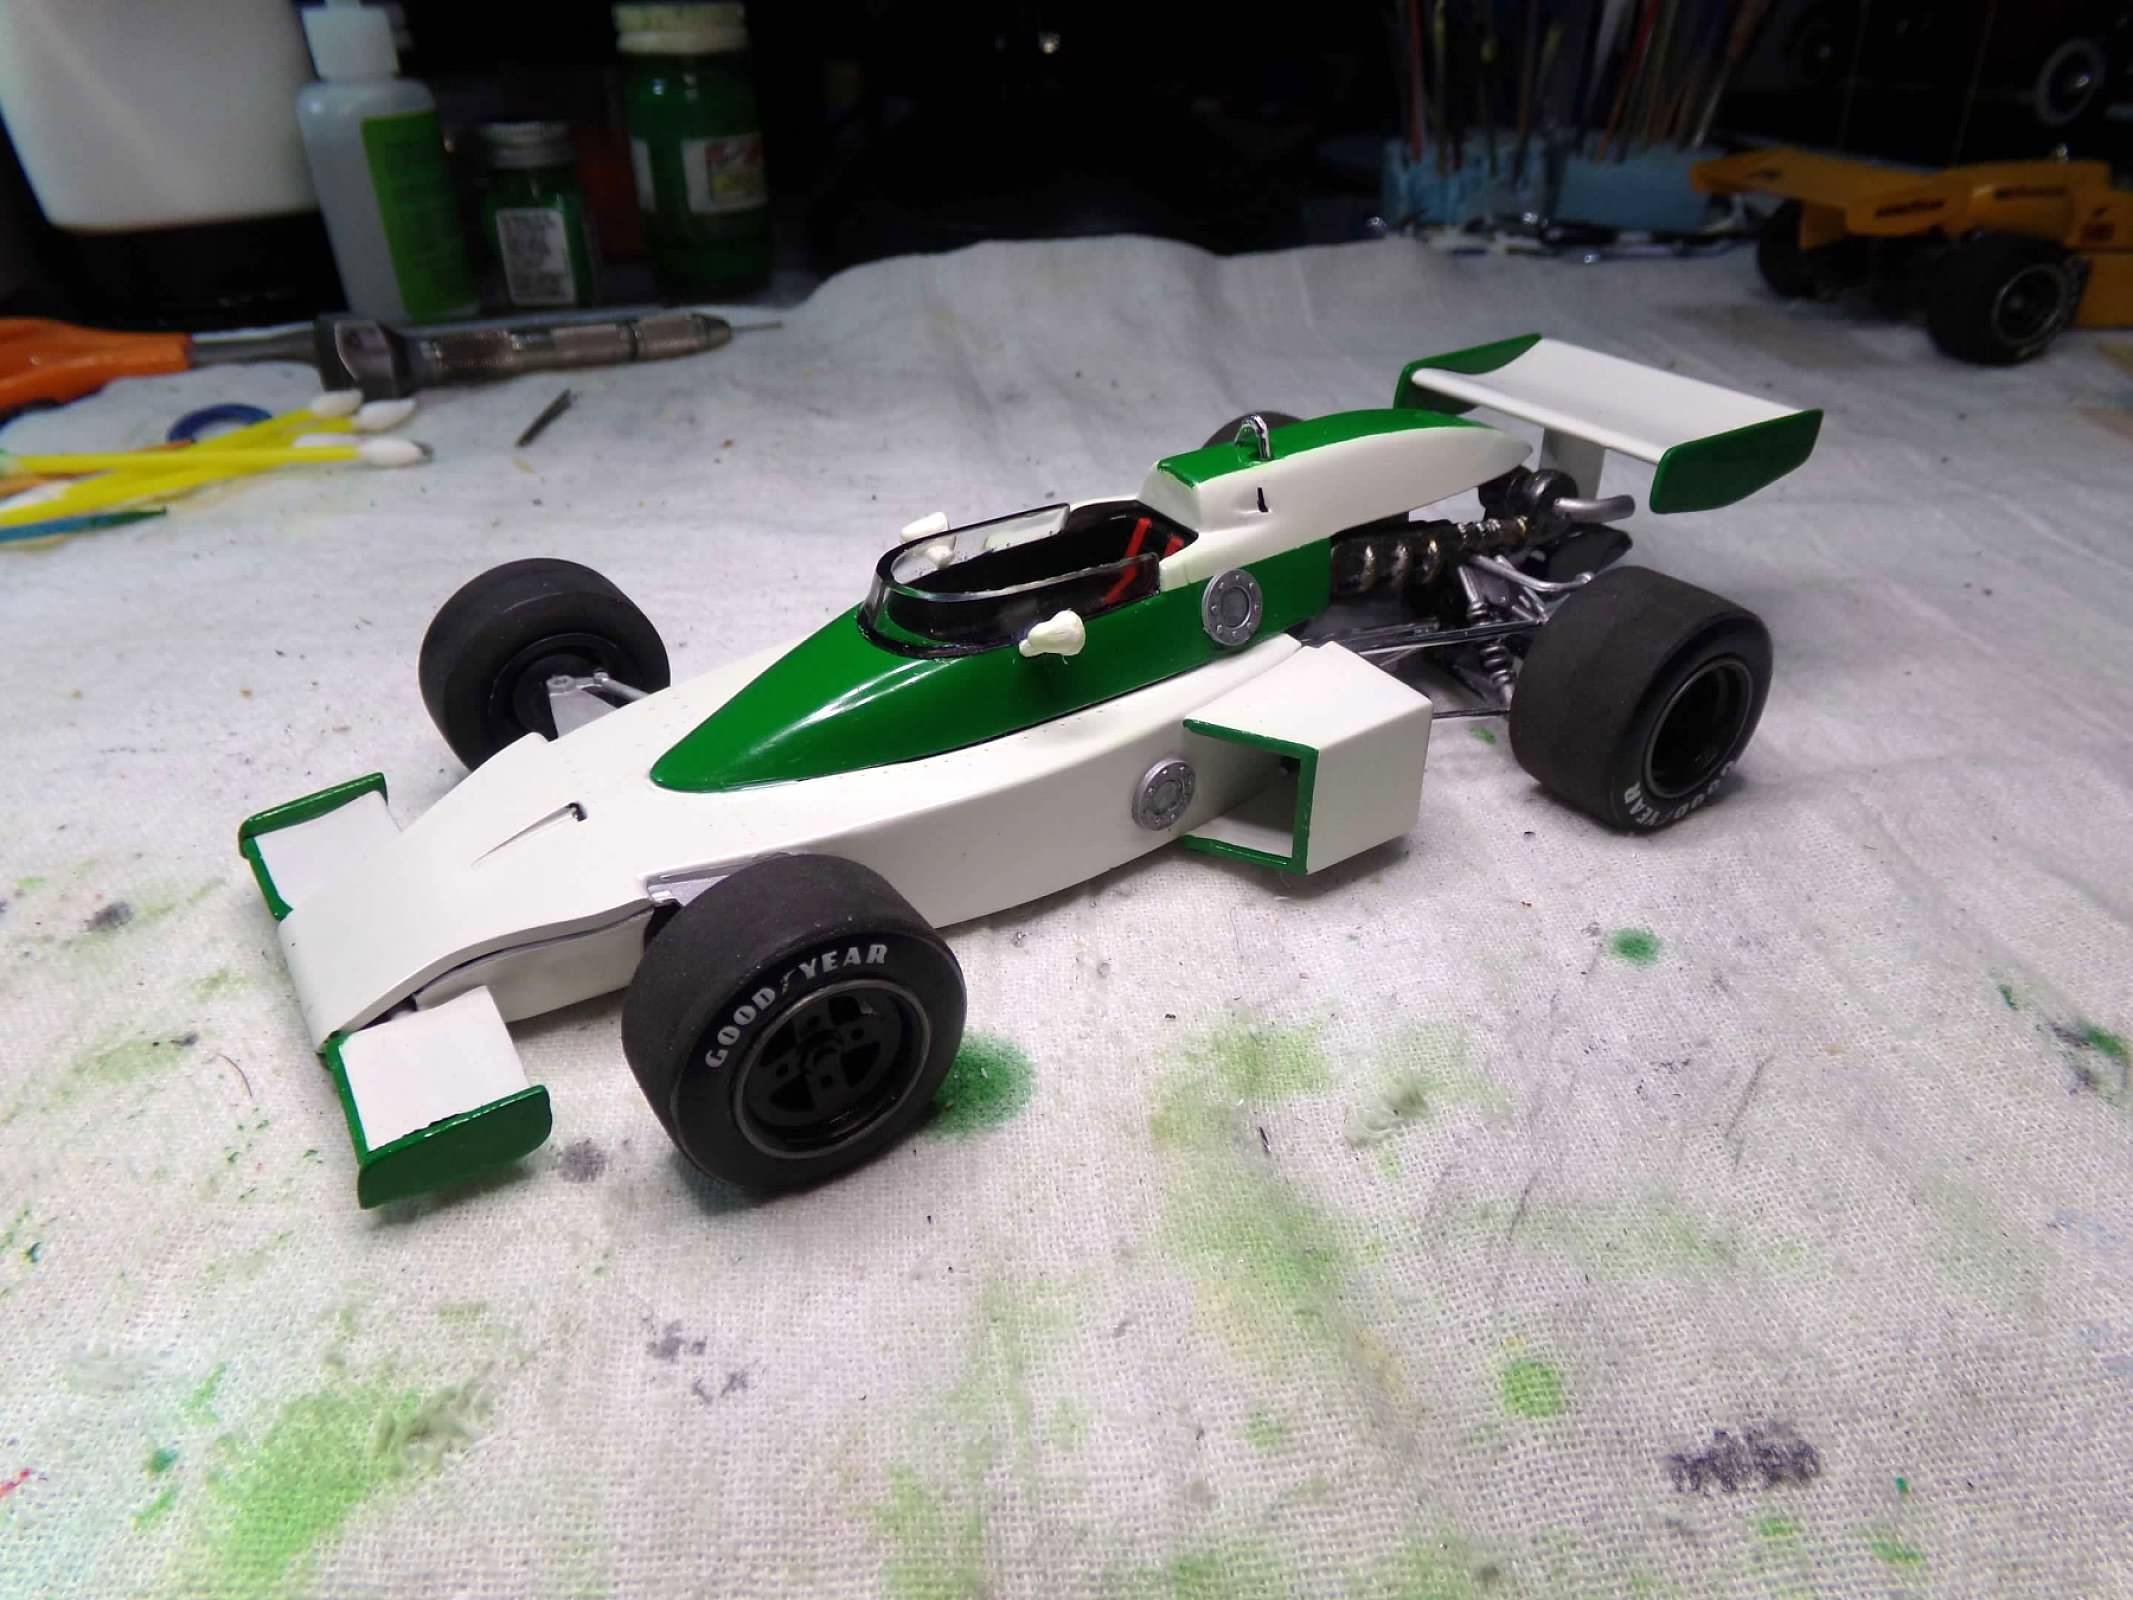
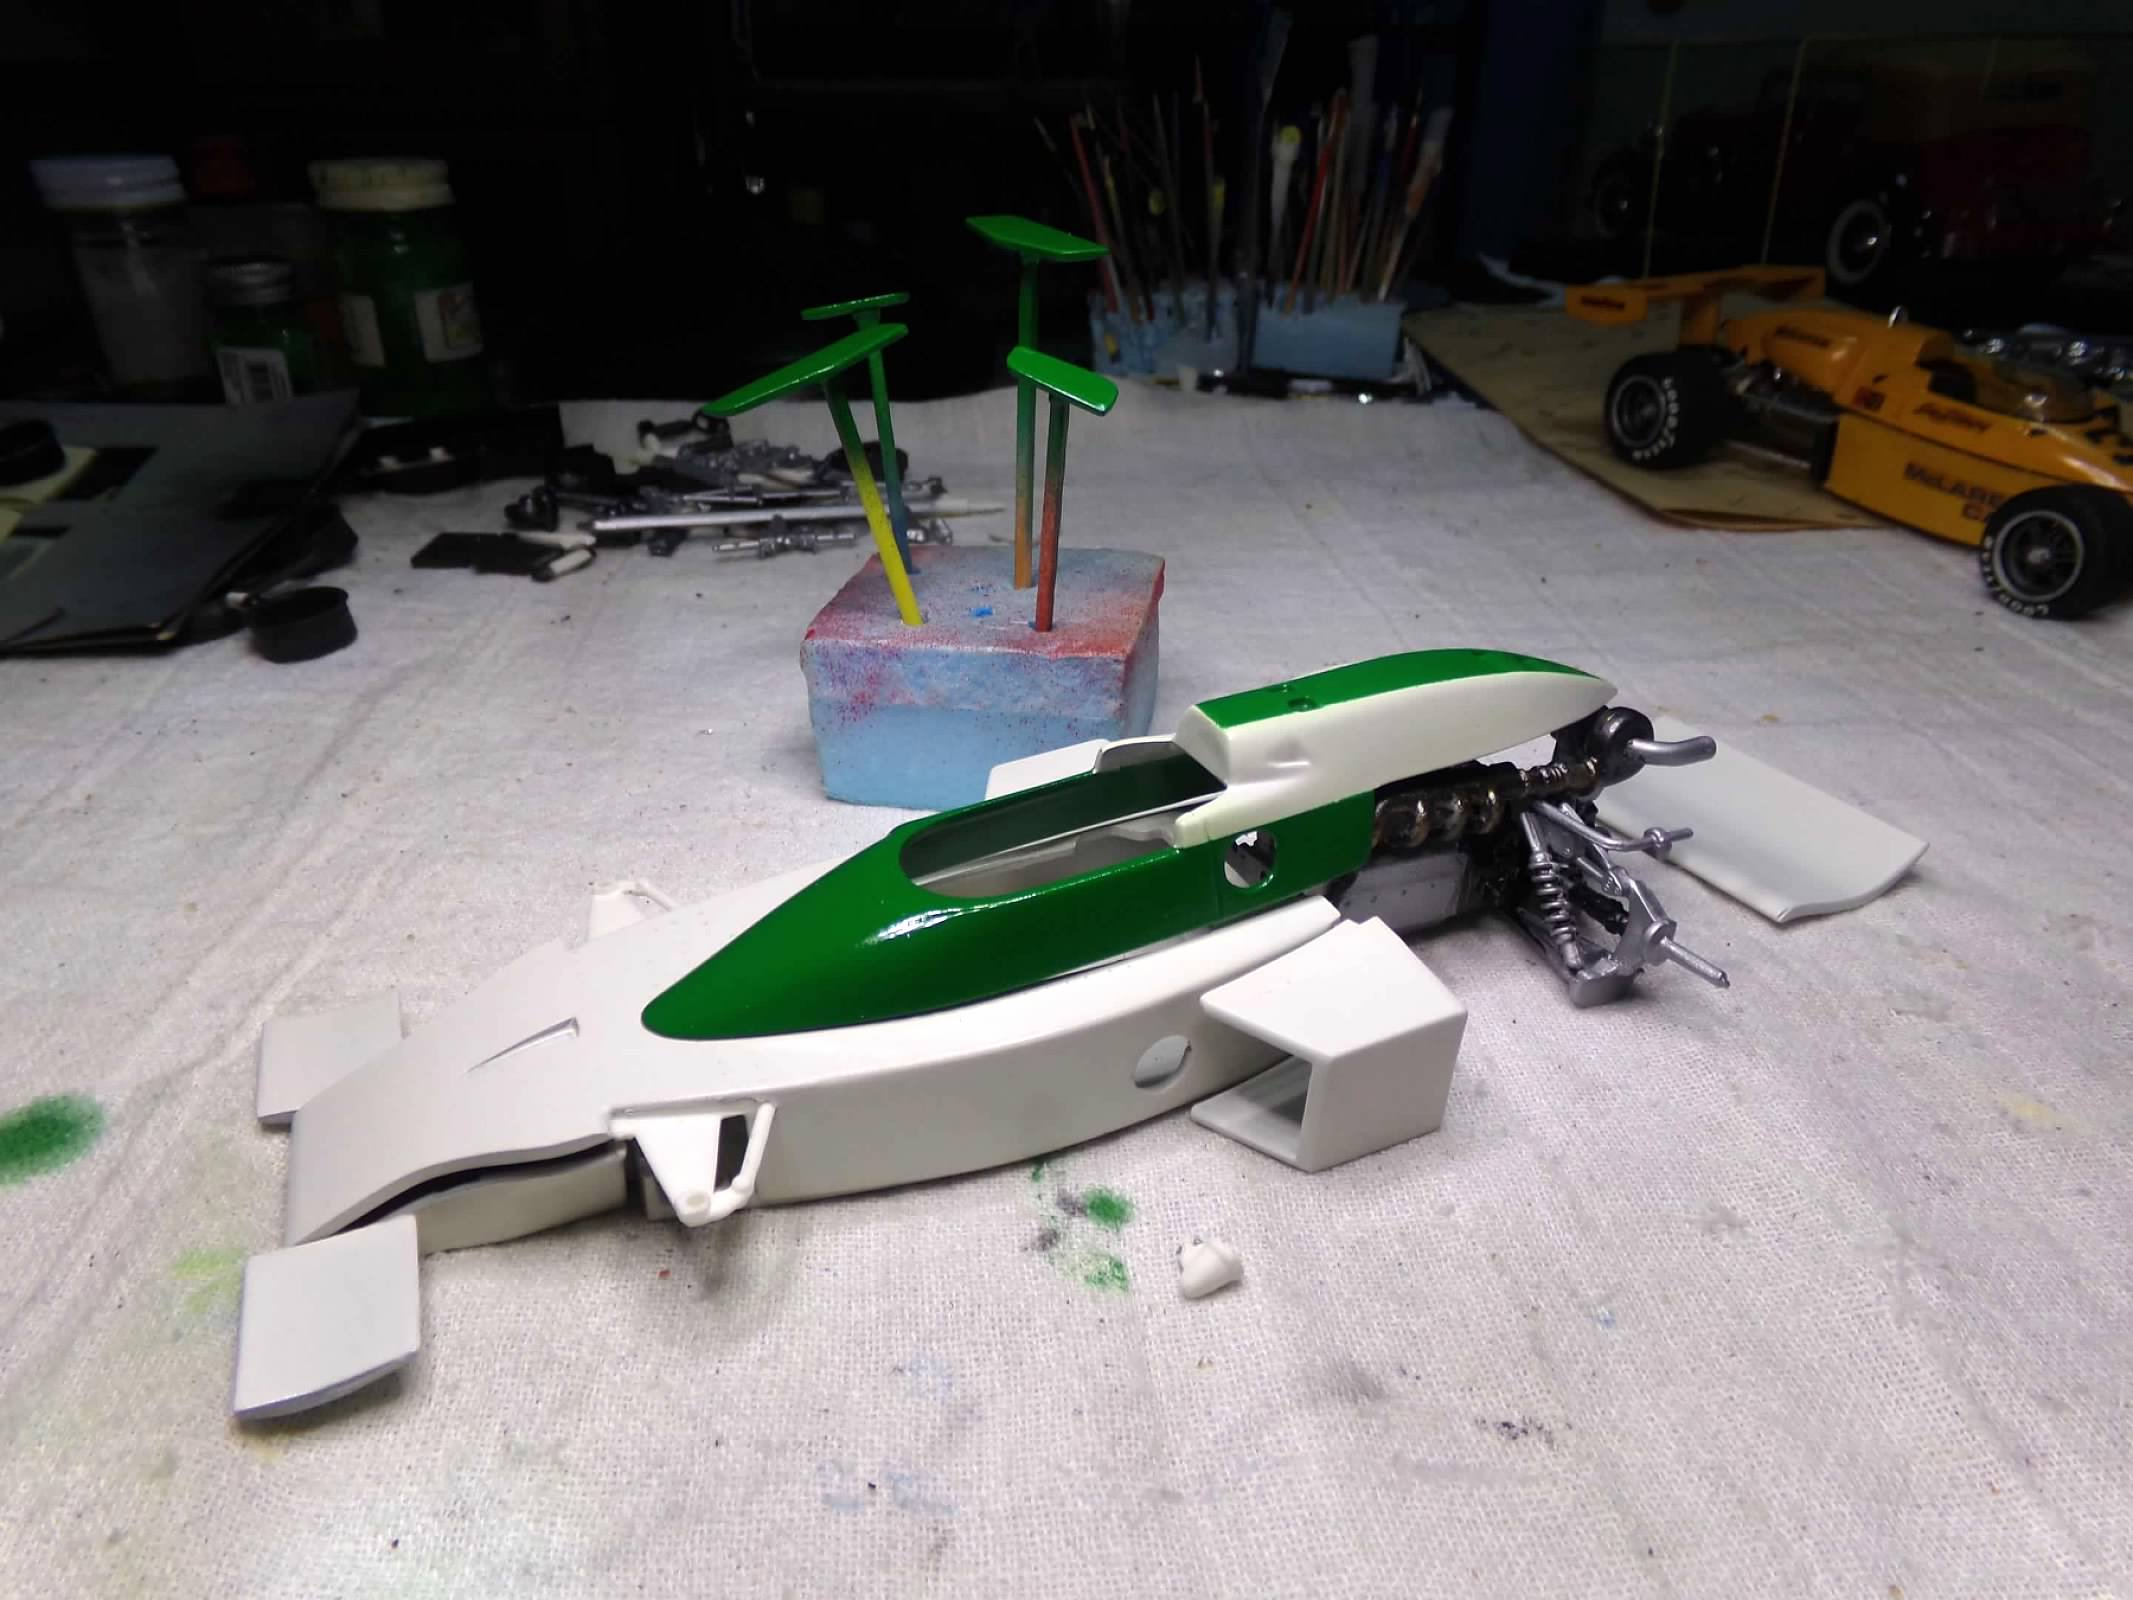
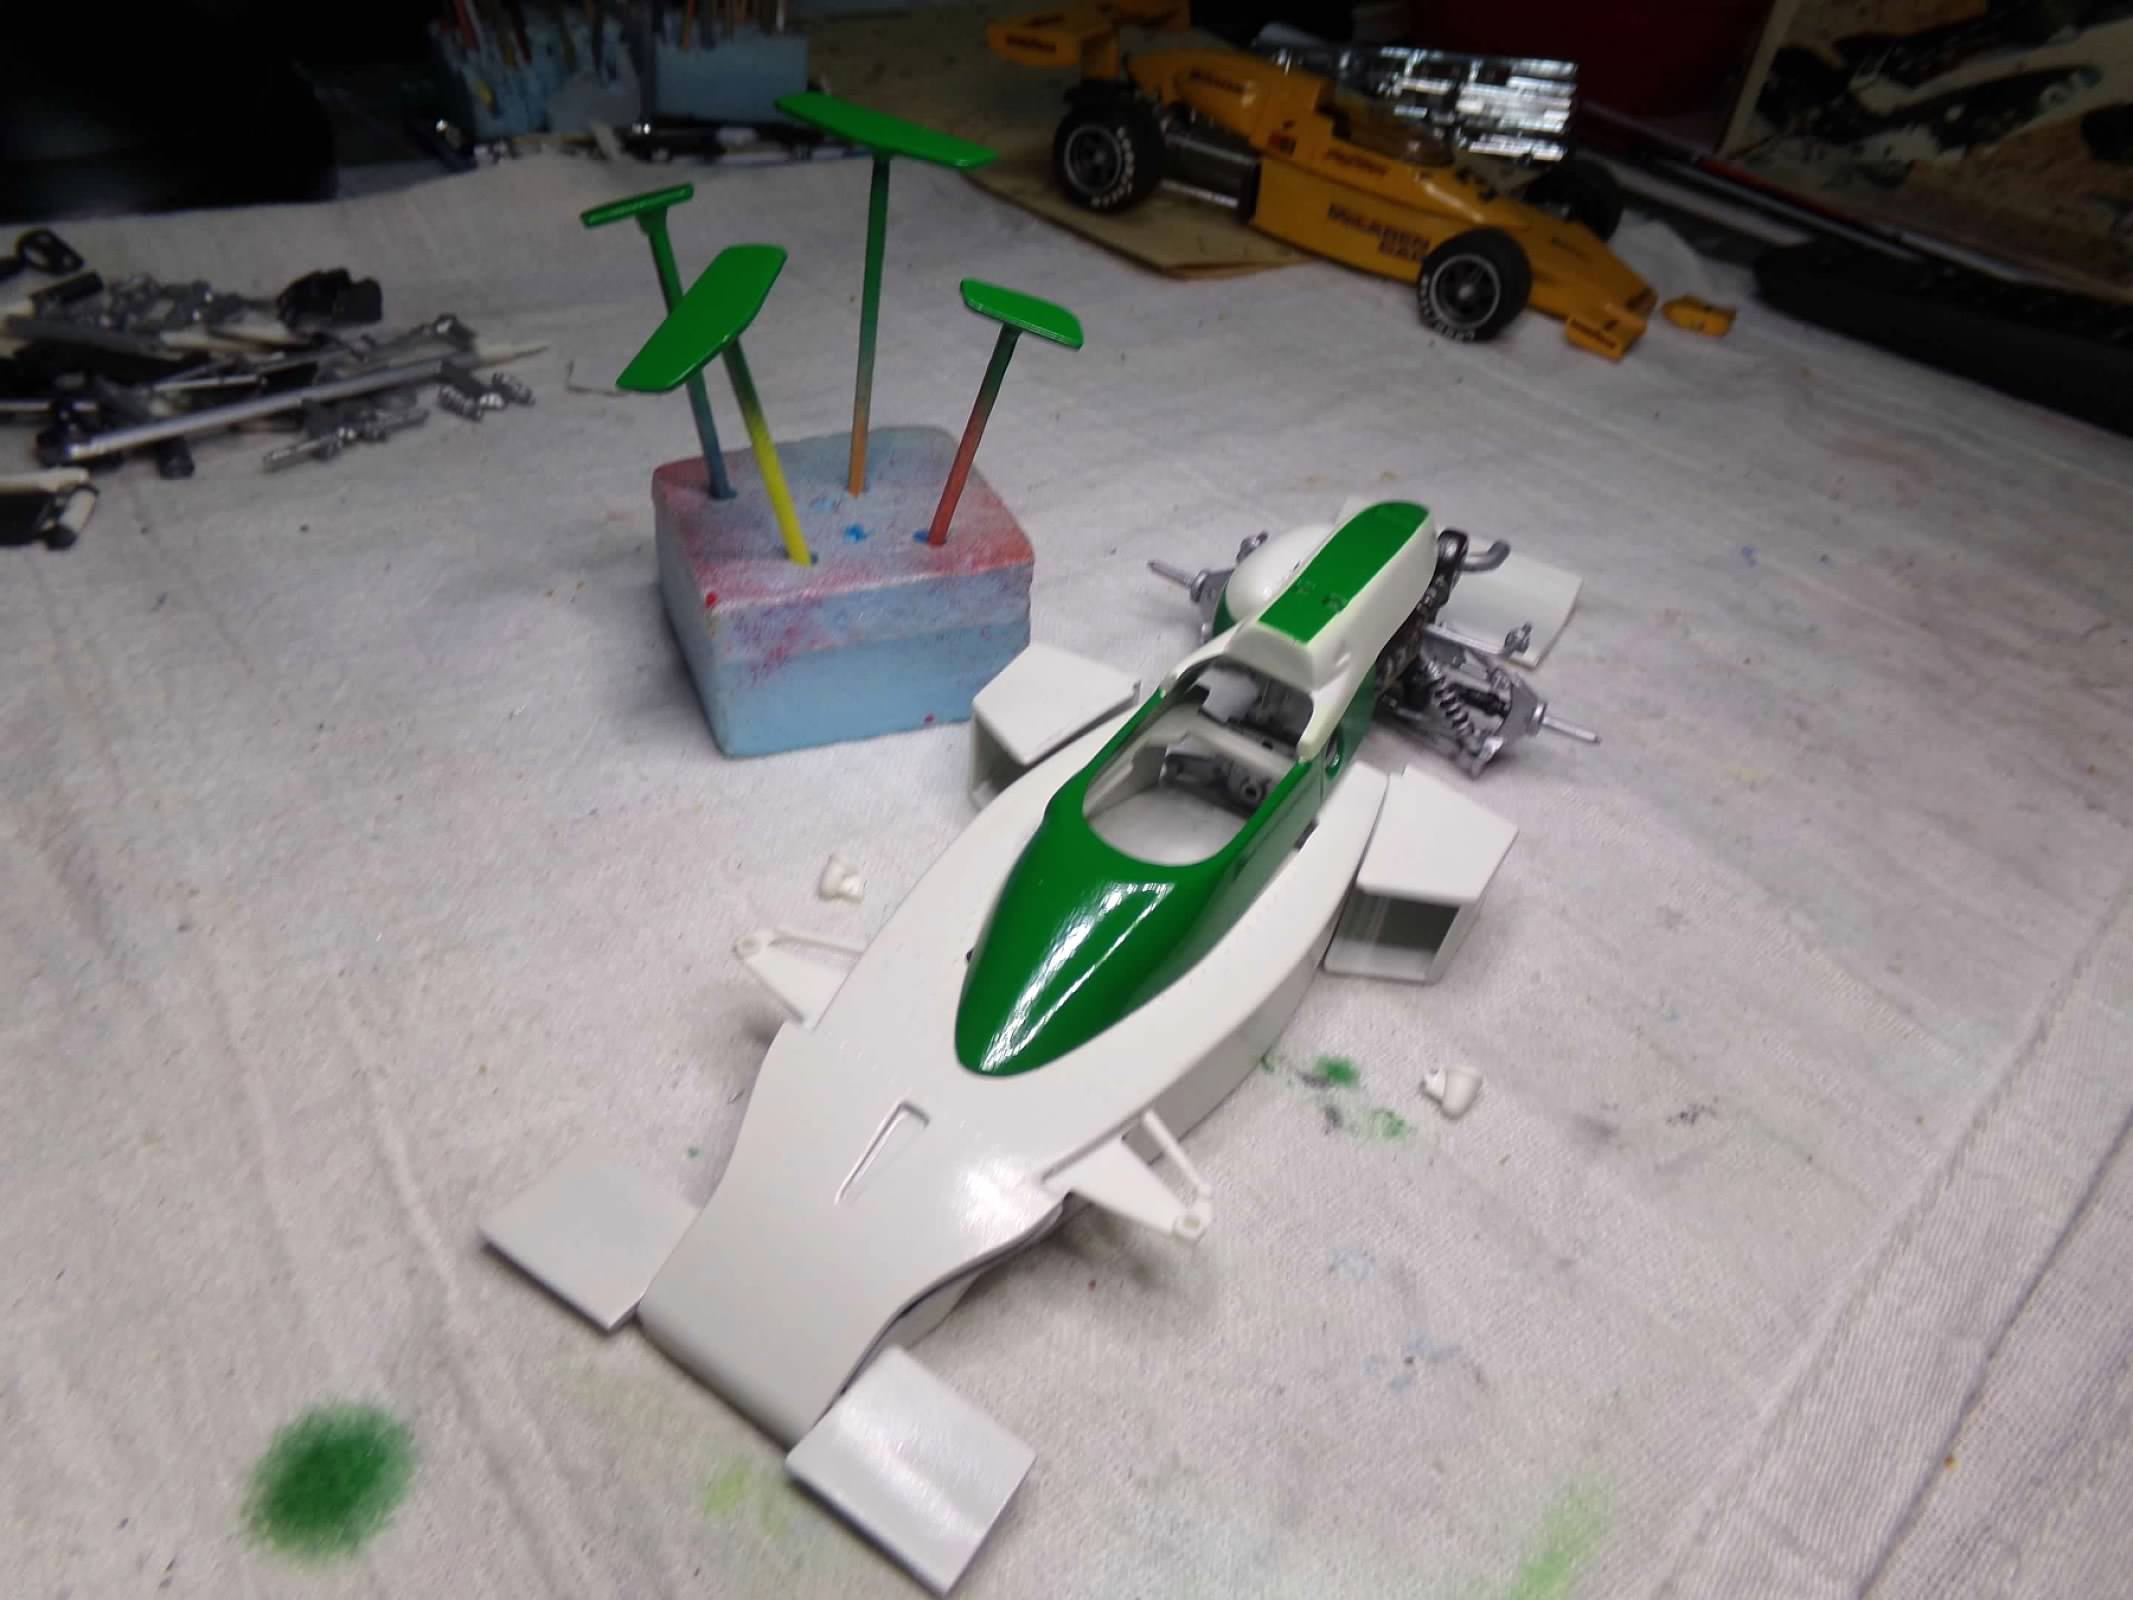
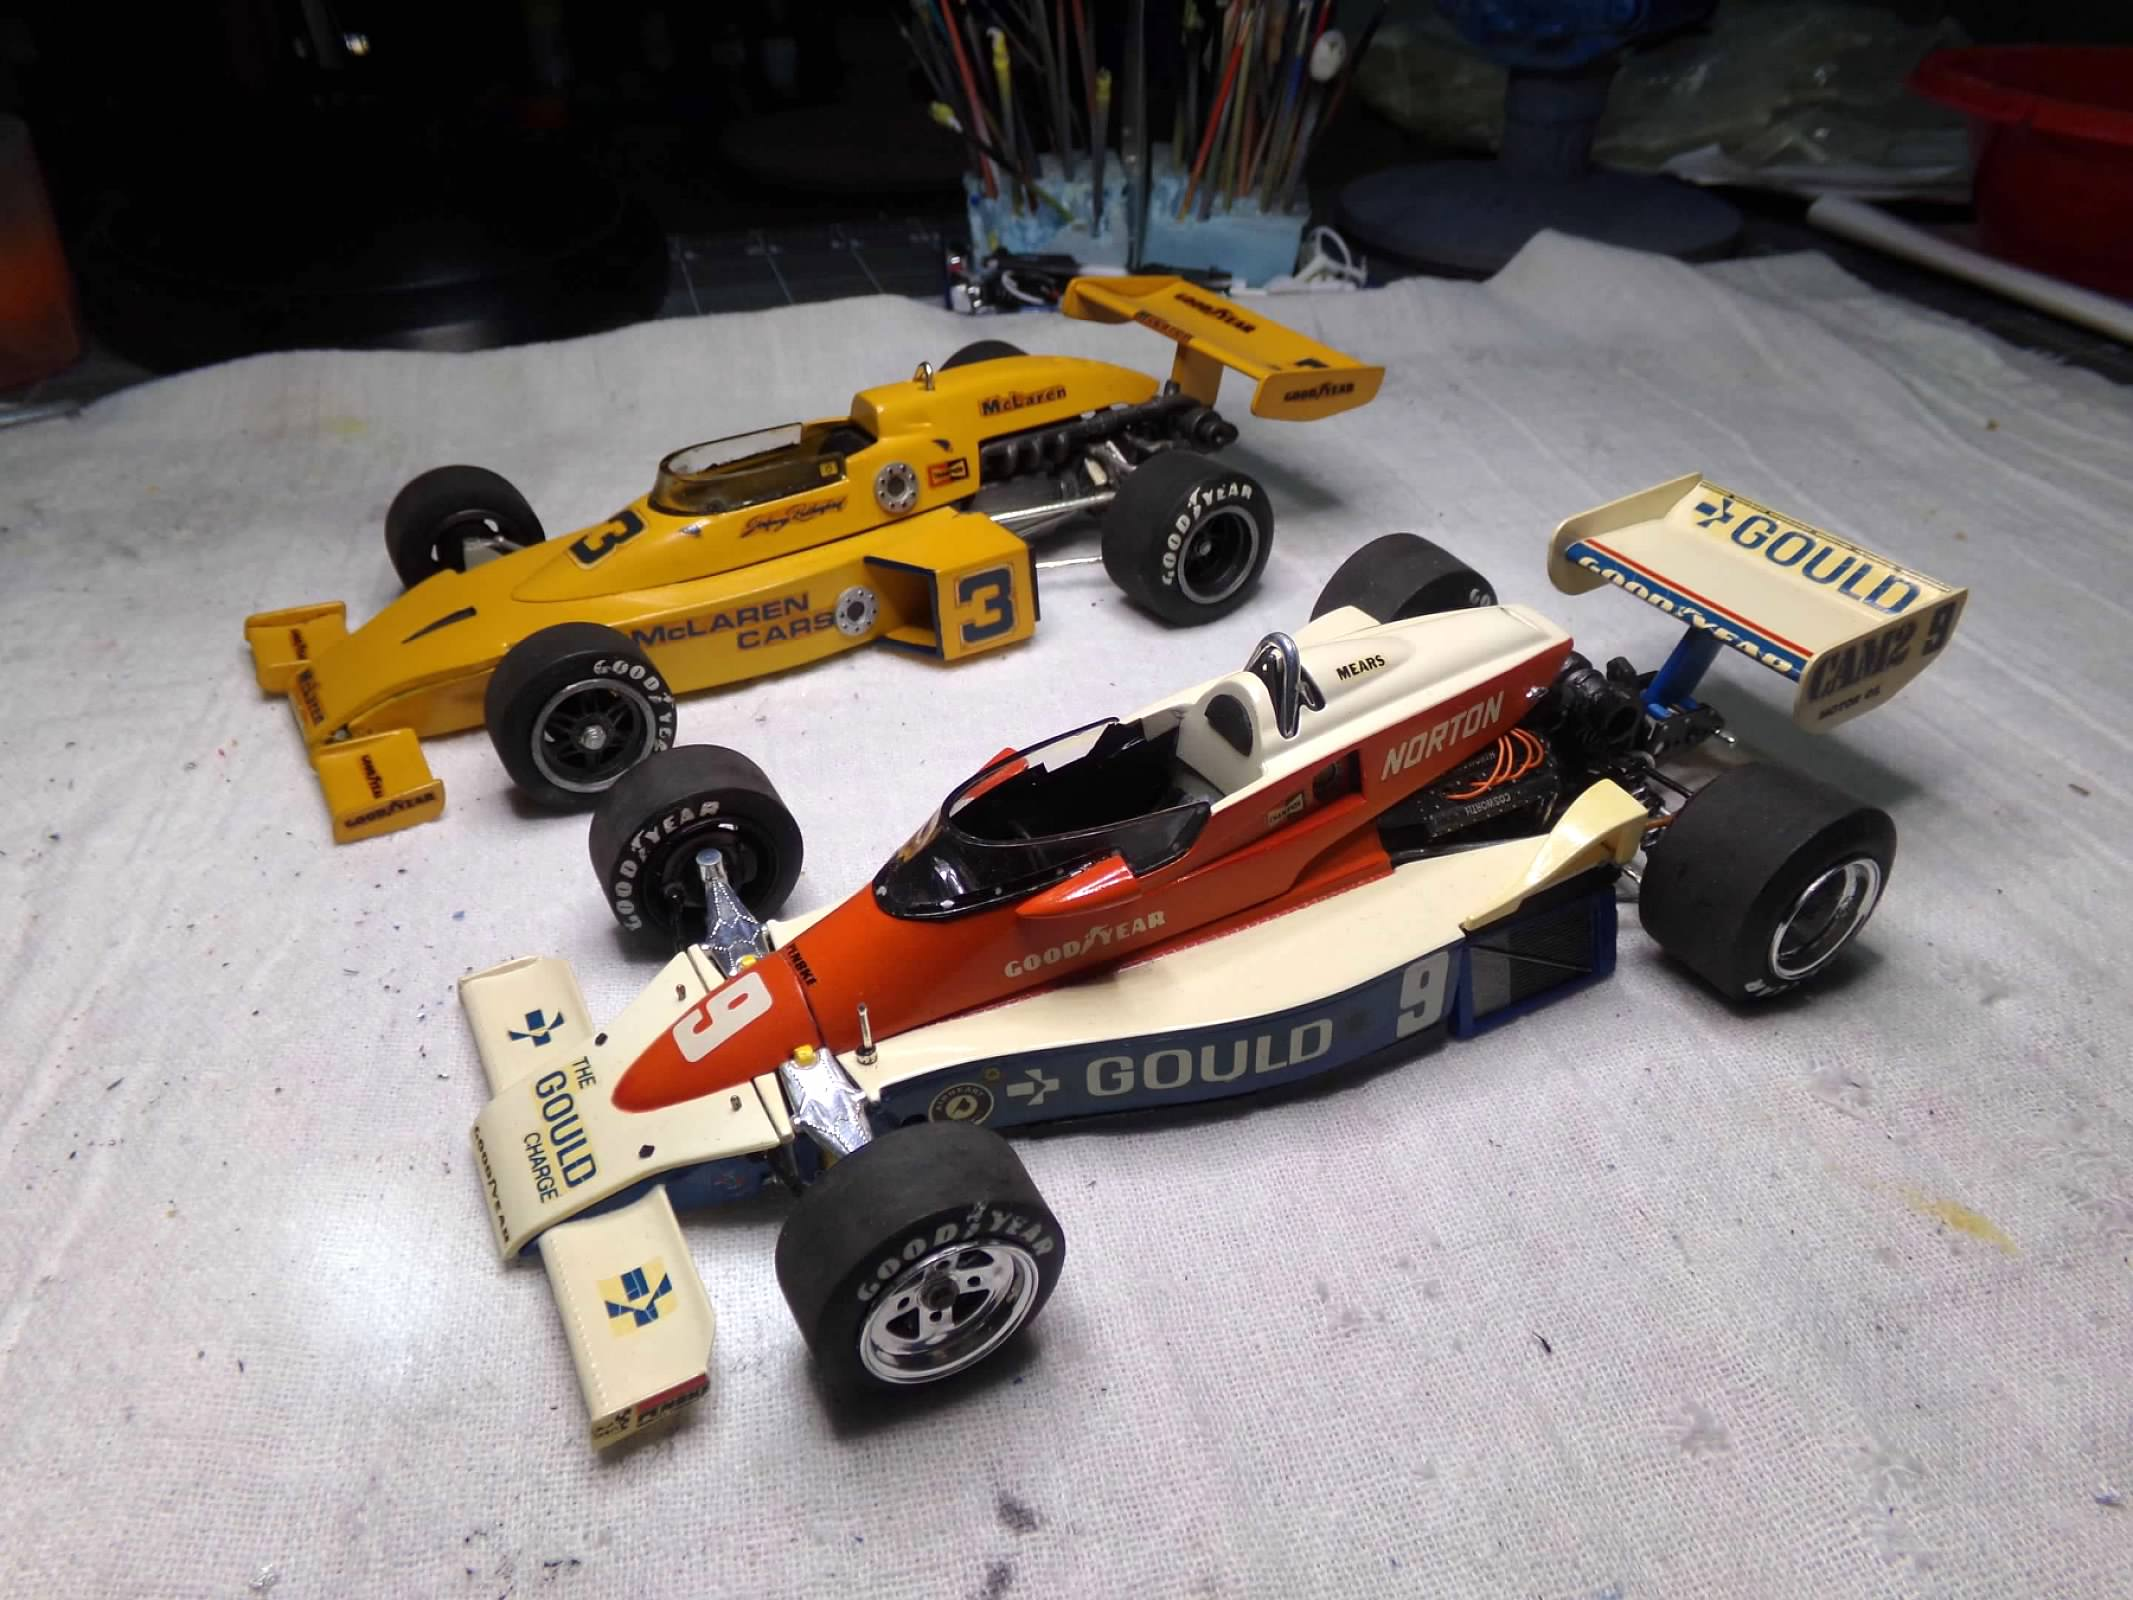
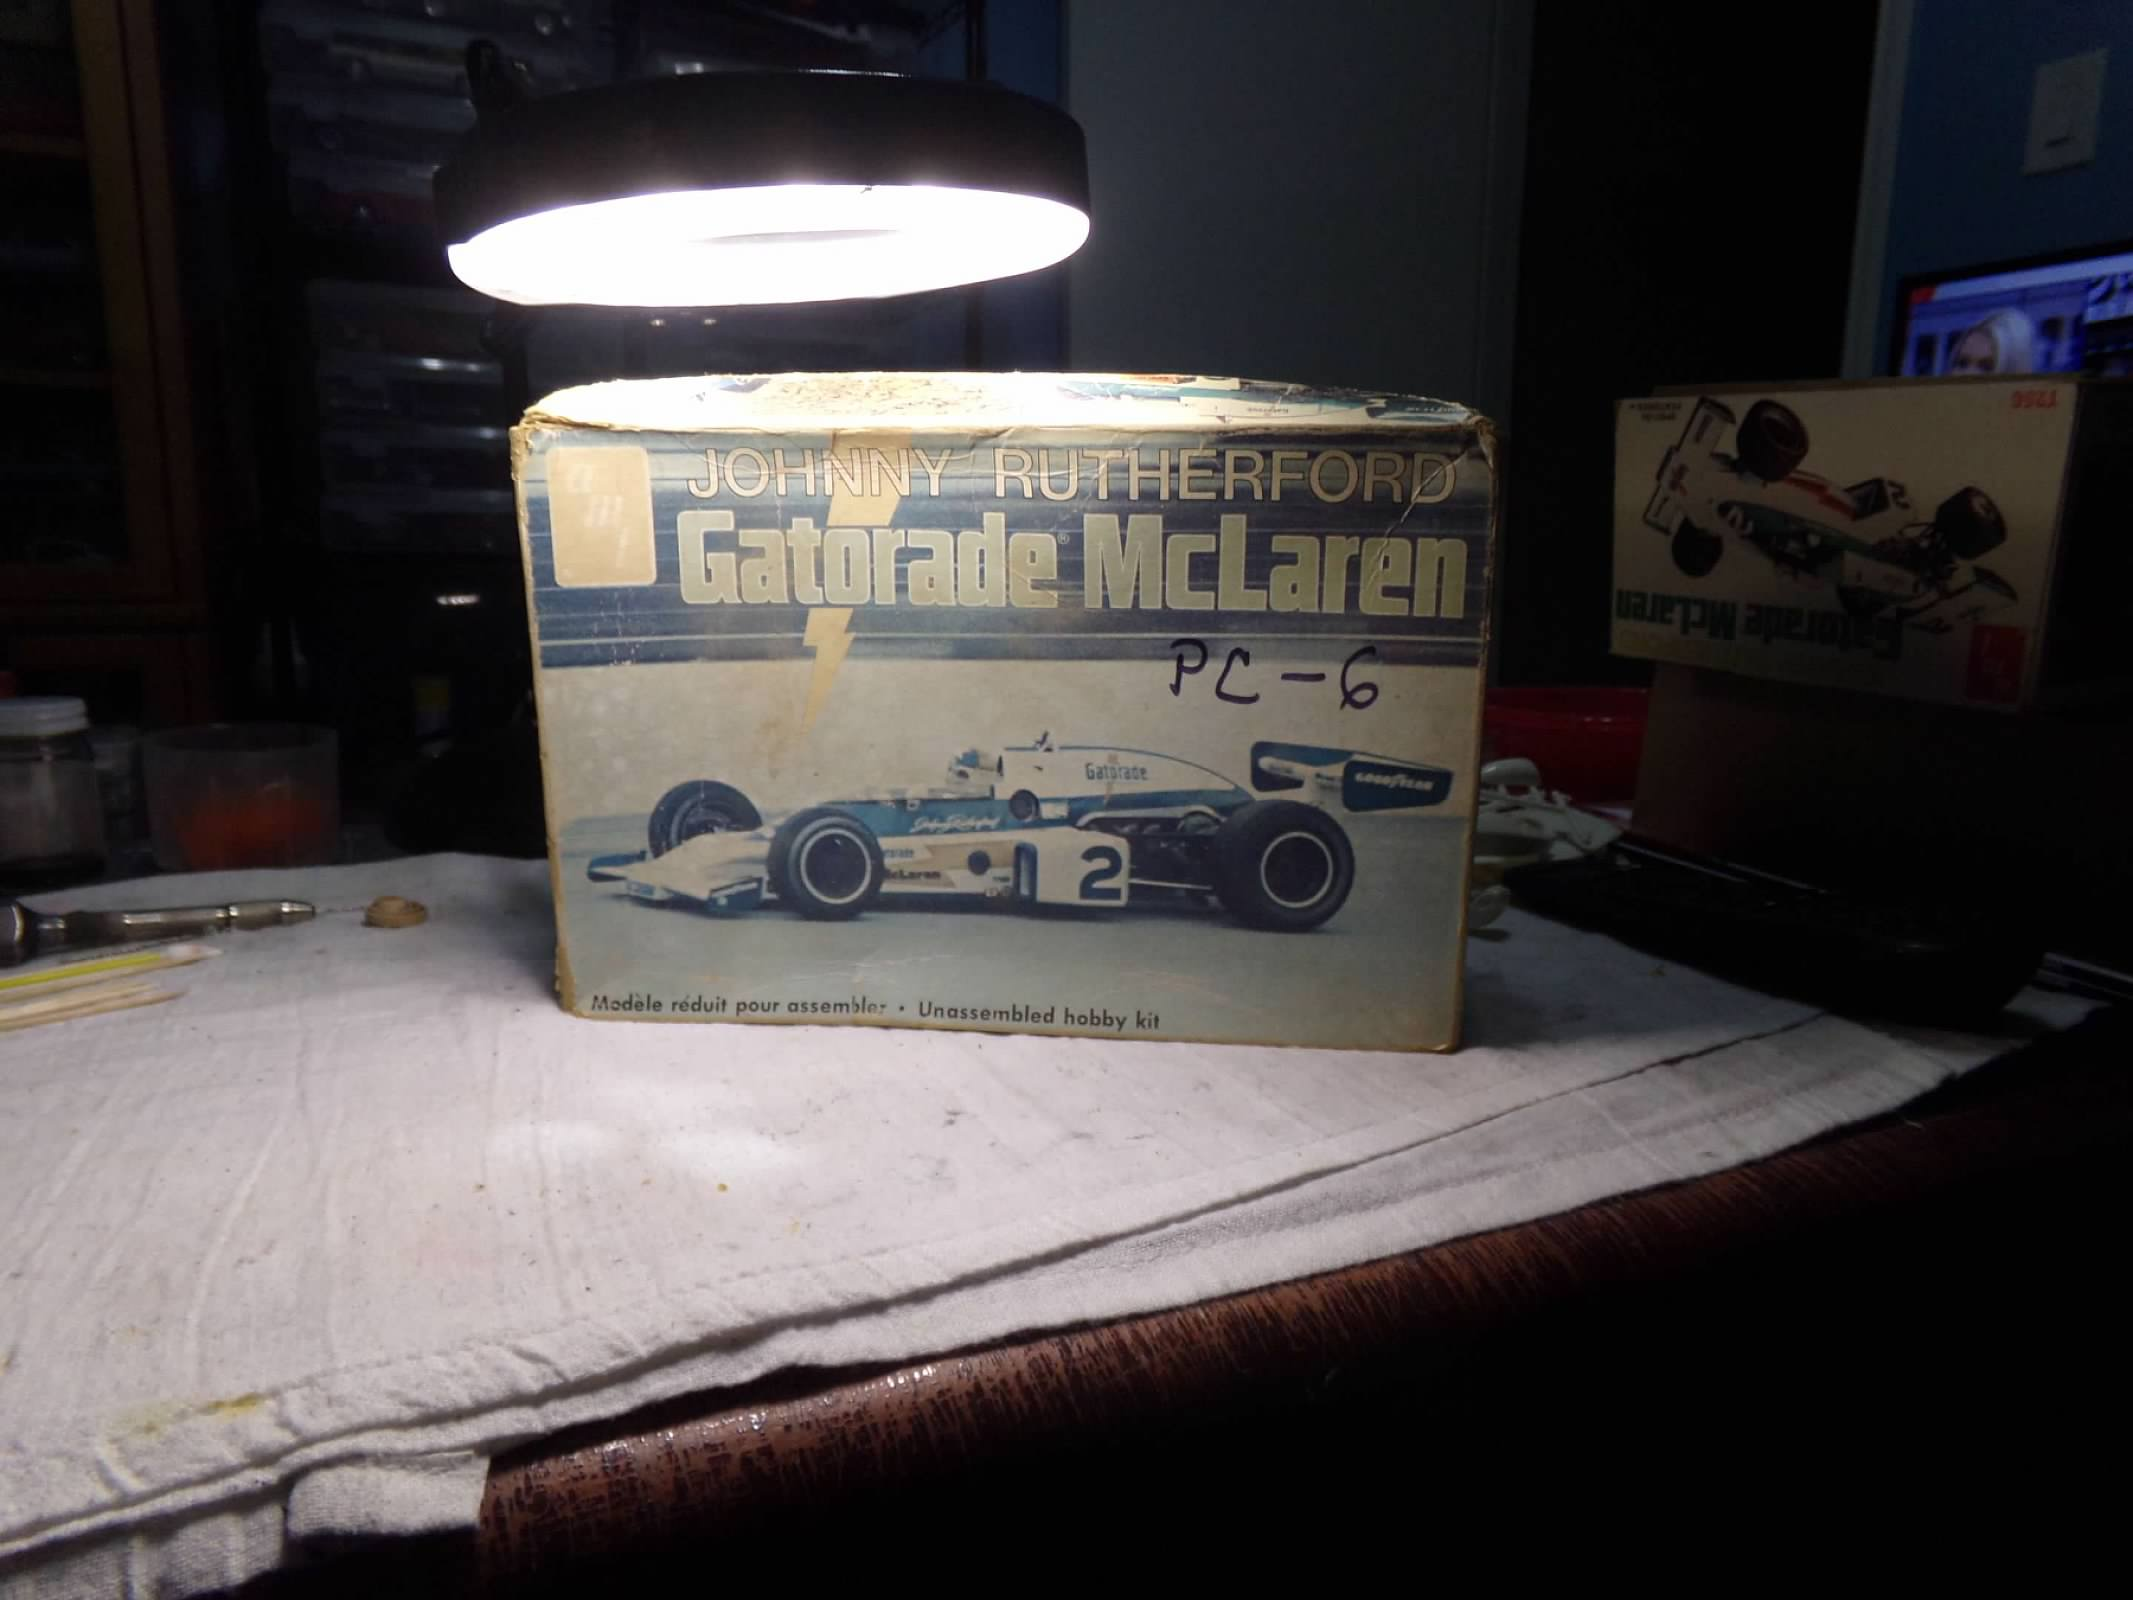
This is the AMT 75 McLaren also sold under the MPC brand in the Hall of Fame kit as the 74 McLaren. Hence, AMT simply re-boxed the 74 with new decals and called it a 75 McLaren. But I made some changes to make it resemble a 75 McLaren. I re-routed the turbo to be more centrally located over the transmission instead of off to the left side of the motor. I also cut down the rear wing so it was not so wide and removed the inner end plate from the front wing and moved it back to line up with the nose of the body. I added the correct wheels from a PC-6 and better vinyl tires from the parts box. The paint is Dupli-Color Pure White and Testors square bottle Gloss Green thinned for airbrush. The decals, including tire decals are from IndyCals. The 74 in the photos was built about 40 years ago and I have no idea what happened to the mirrors. Maybe I left them off not knowing how to attach them. I was a rookie then. Thanks for looking! ?
- 19 replies
-
- 13
-

-
All the painting and construction are done! IndyCals decals are next and this one will be done! ?
-
I finished the wheels and tires. Sanded the raised letters off of both sides of the tires and then sanded the drive surface of the tire to eliminate the mold line and make them look driven. I moved the front wing back about 1/16" to line up with the nose and eliminated the inside end plate that doesn't need to be there. I cut about 1/4" off each side of the rear wing because it was really too wide and needs to be within the width of the rear tires. I also finished the engine detailing and added the support rods for the suspension. a lot of work in the sub-assemblies but it should pay off in the final product. Thanks for looking! ?
-
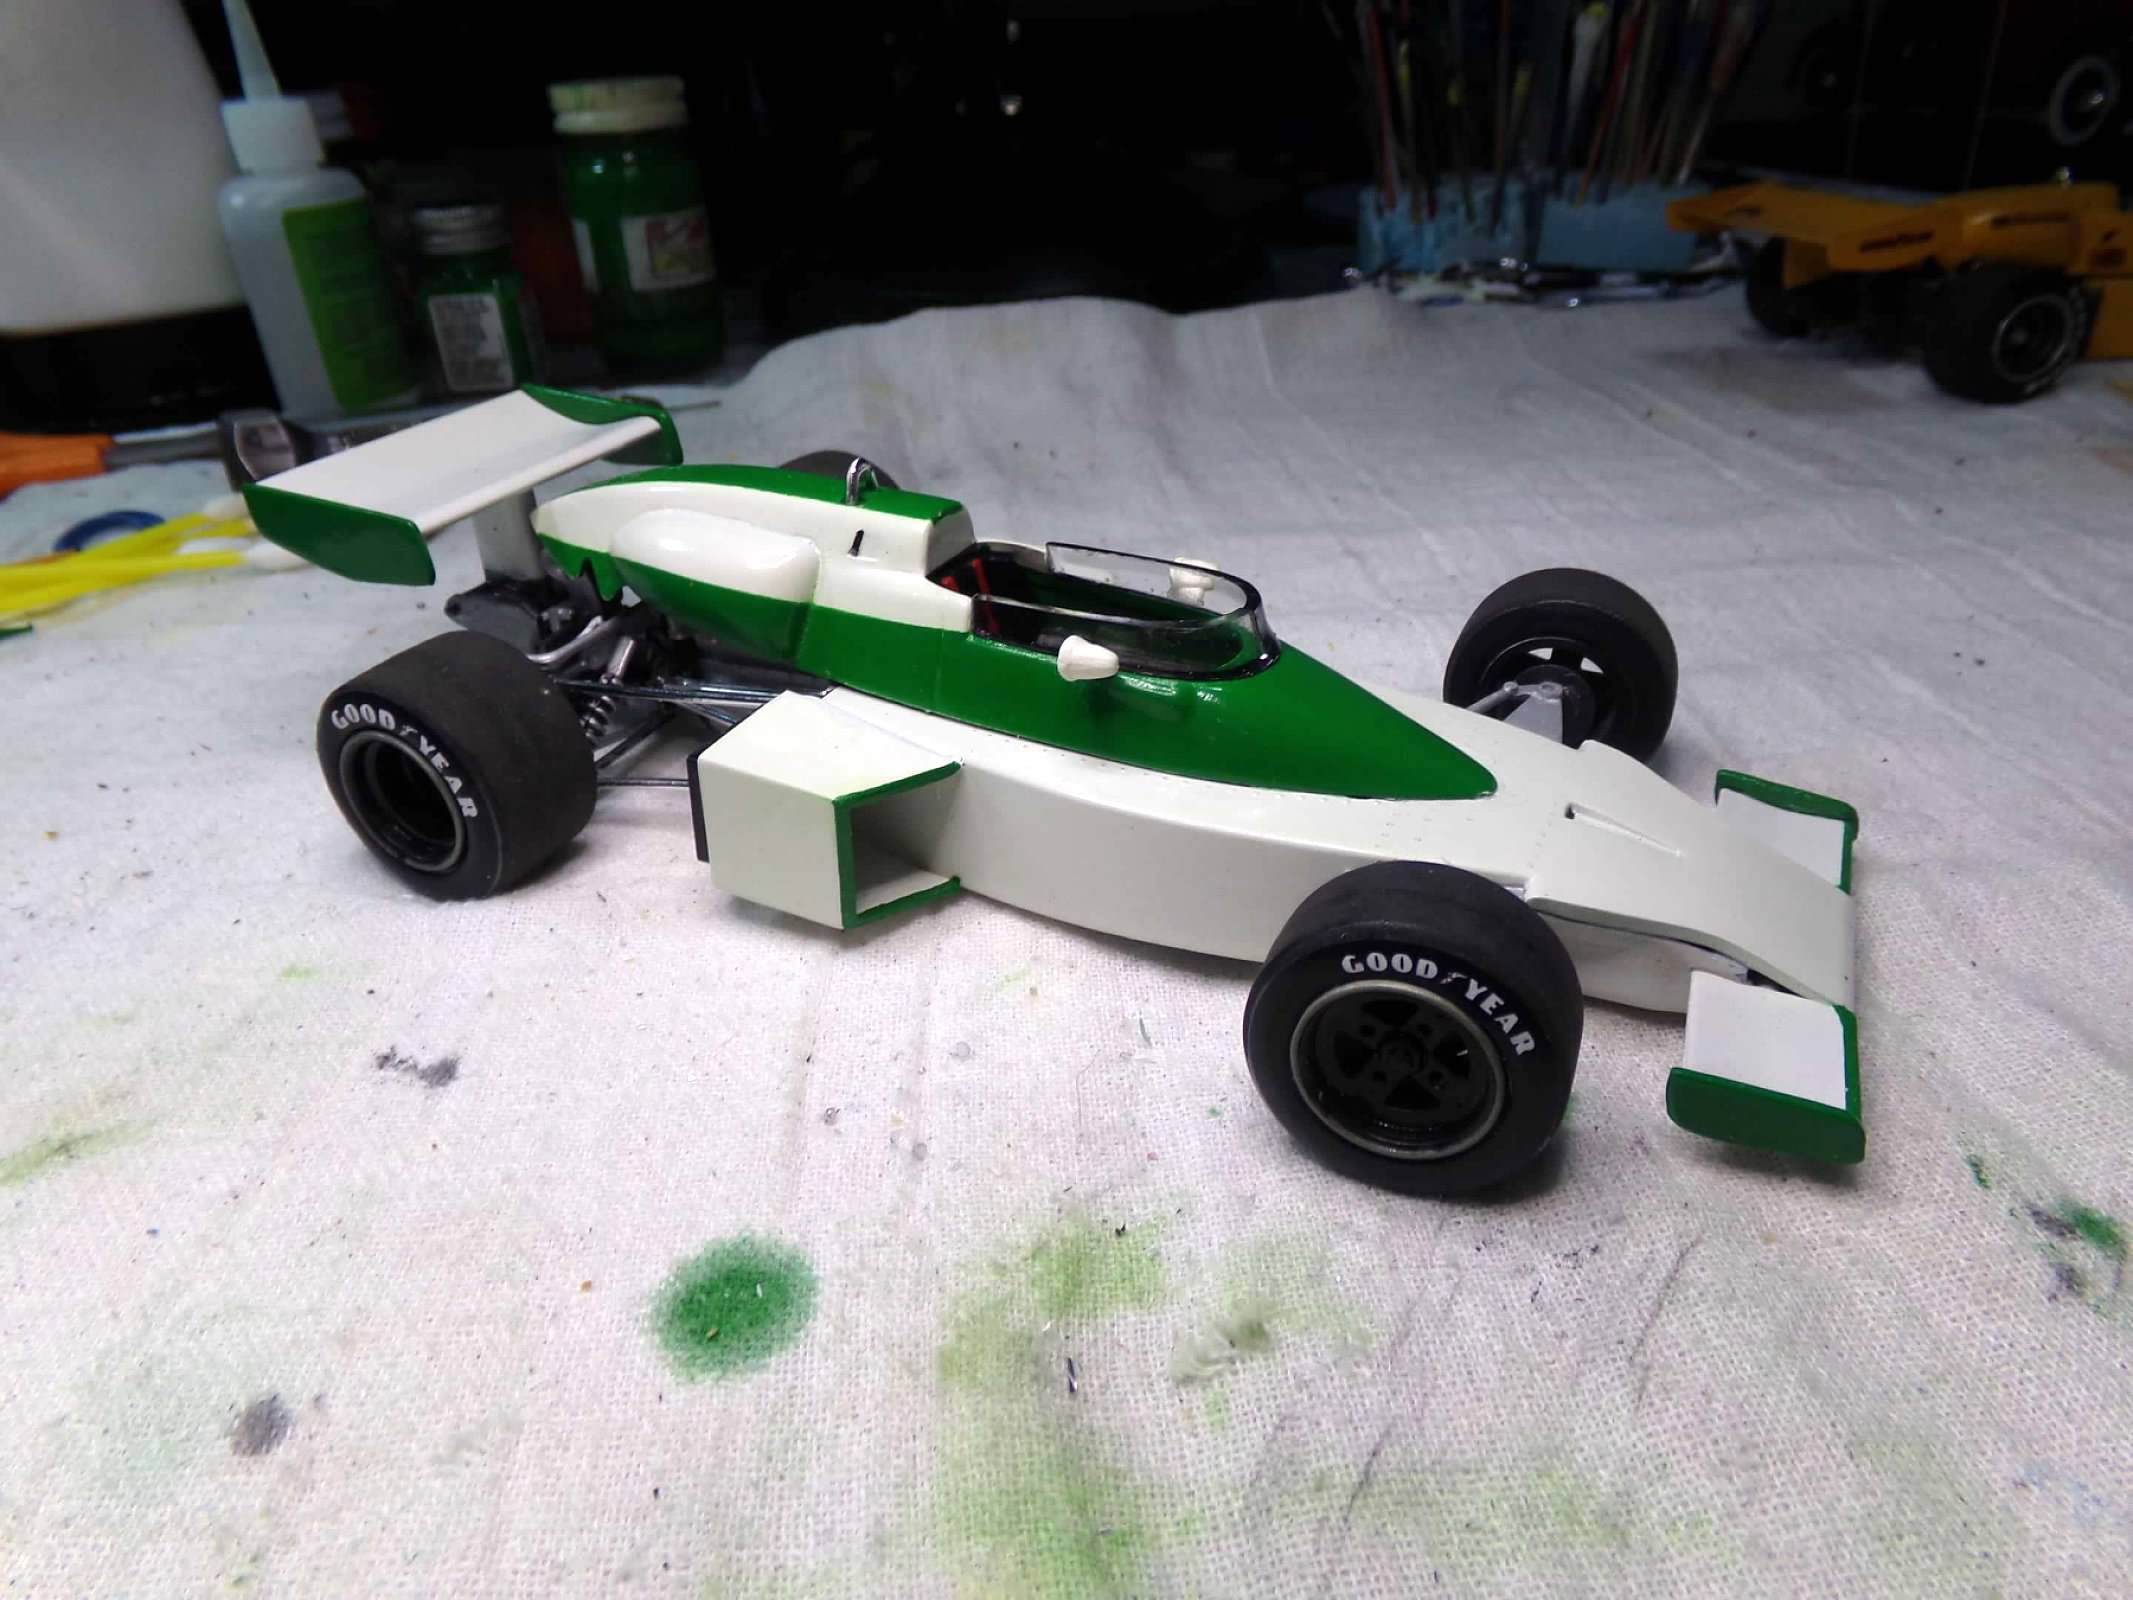
I finished painting everything today and none too soon as it is raining now and I have to paint on my covered patio. The white is Dupli-Color Pure white that I painted yesterday and the green is Testors square bottle Gloss Green thinned for airbrush. I'll do the green outlines on the radiator side pods and the front wing with some tape and a brush. So now after it dries a couple of days, I'll try to rub it out lightly (no clear coat because I don't have an enamel clear and they always yellow too quick anyway) and apply some Pledge Revive It. The white is already cleared because it is lacquer and it has been rubbed out a bit. I have some extra vinyl tires from an extra parts kit and correct four spoke wheels from a Penske PC-6 kit that I have already painted black. So I can sand the tires out including the Goodyear markings on the side and assemble the wheels and tires. That should keep me busy for a while. Plus I can finish the rear suspensions around the motor and get that all assembled so that when the body is ready I'll be ready to assemble this one. Oh, and did I mention there's a contest next Saturday so I can prepare for that as well. Should be a busy week! Thanks for looking! ?
-
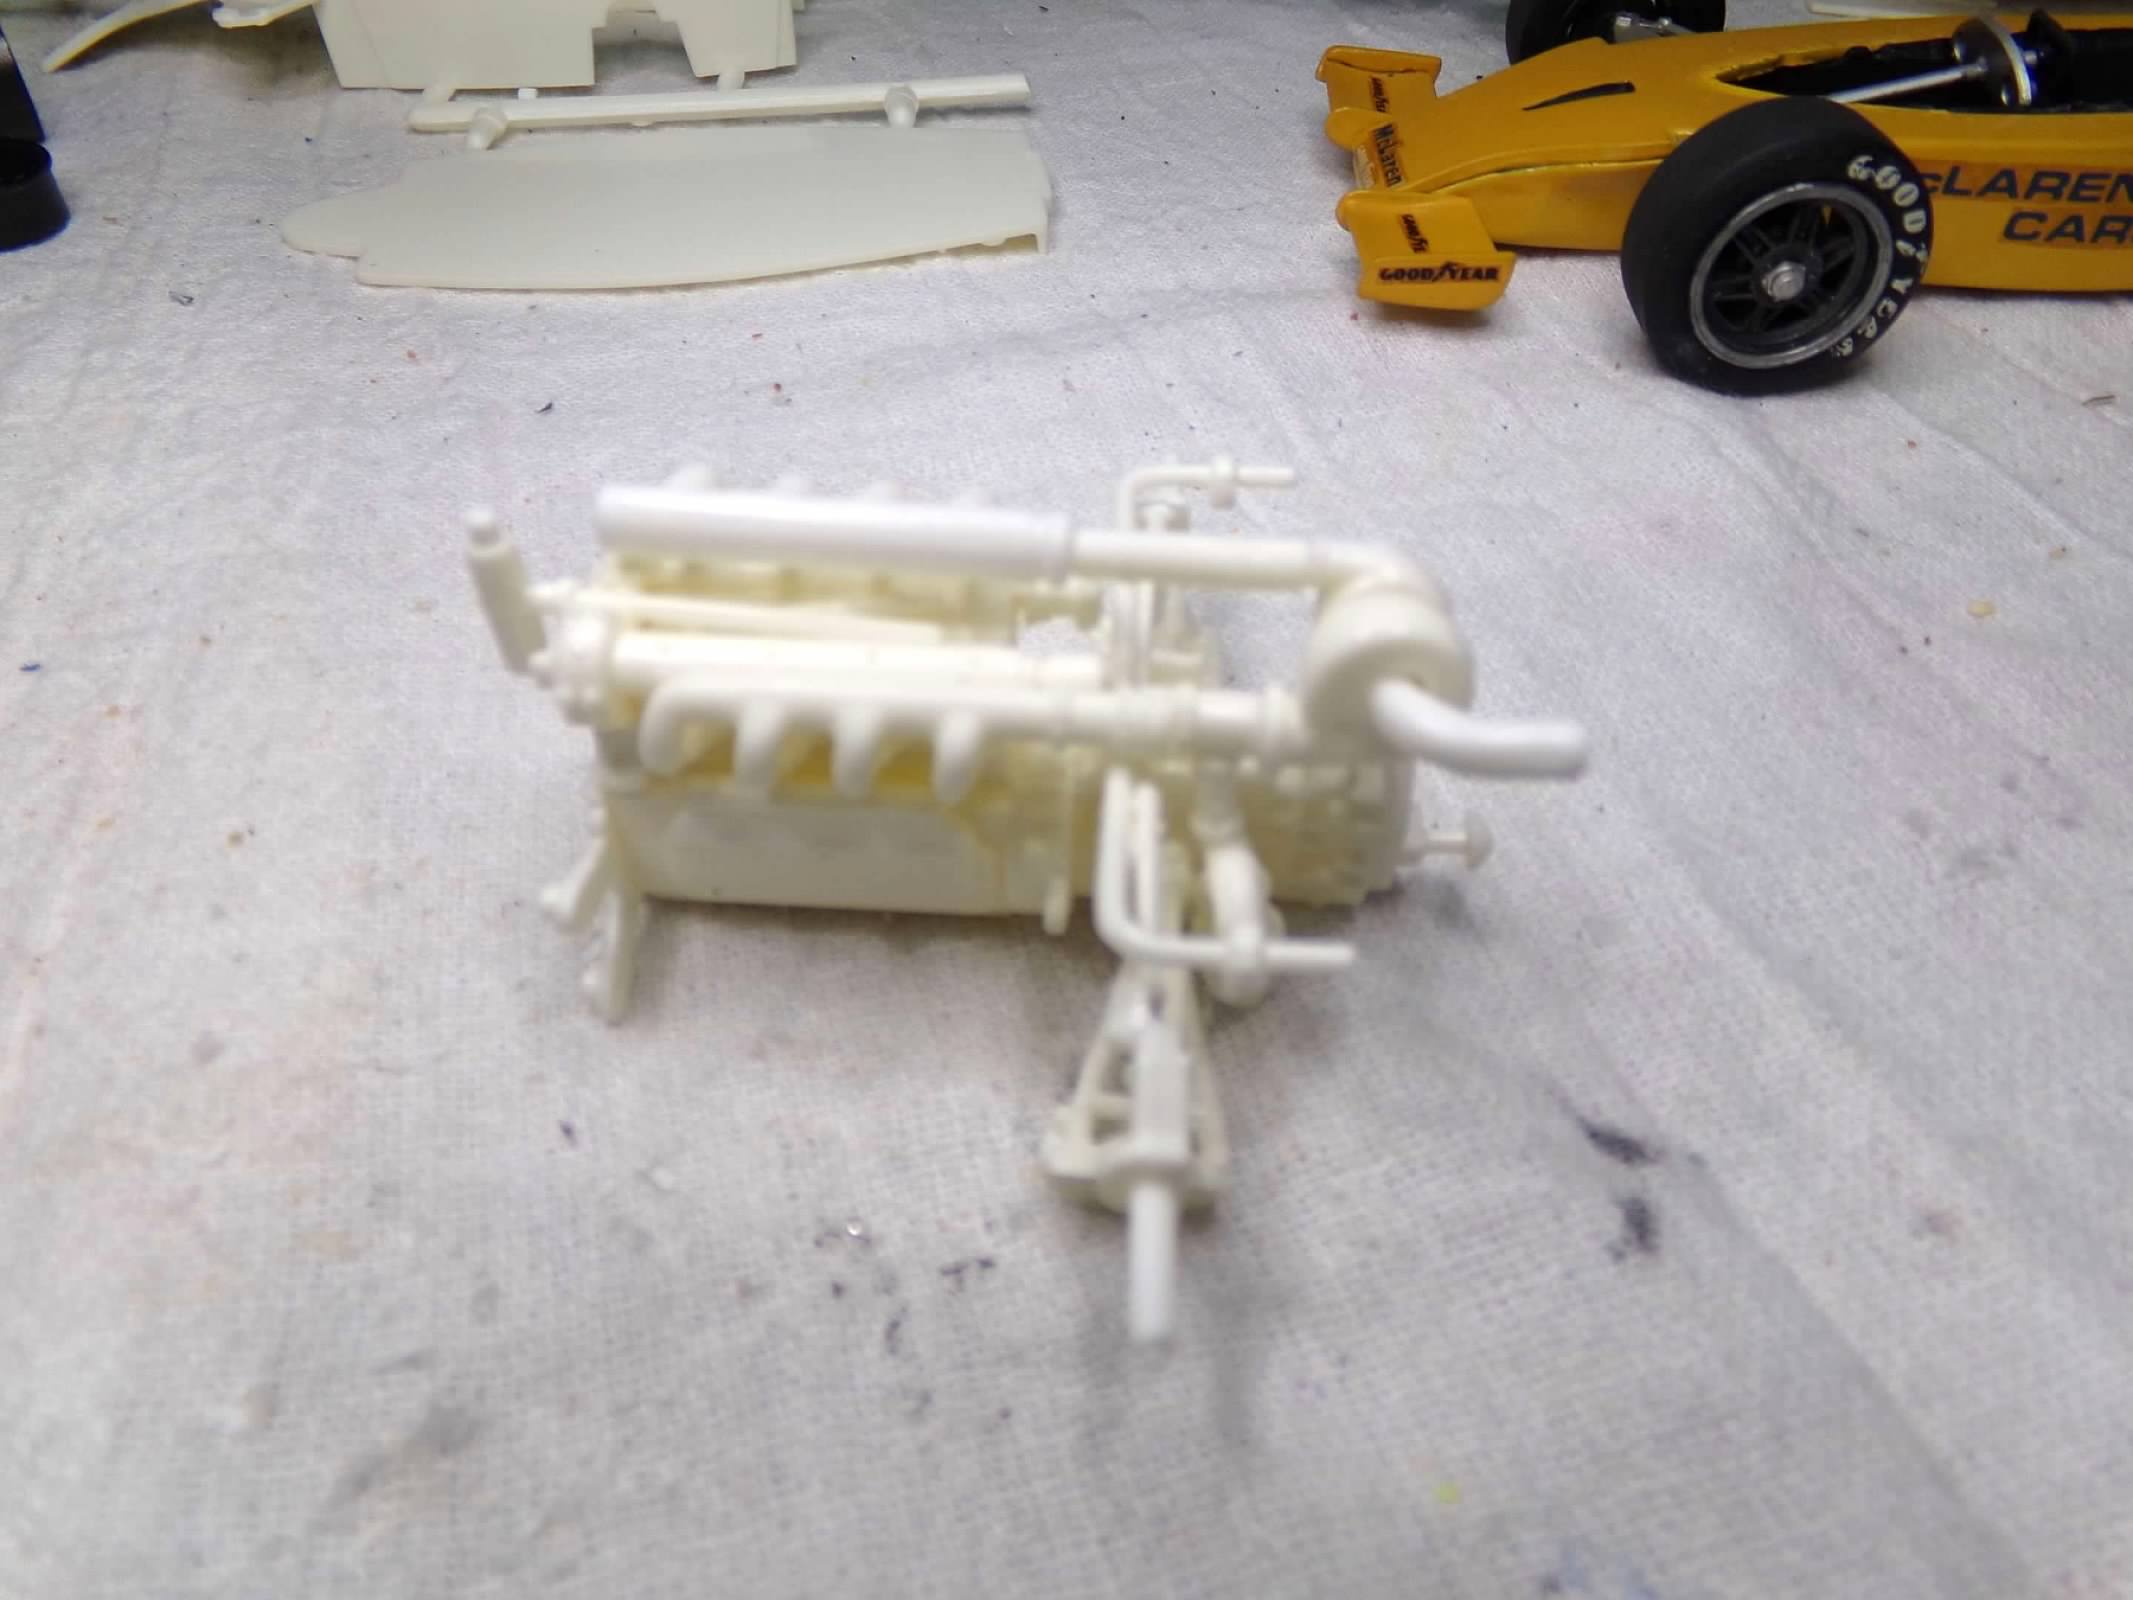
Thanks, Mike! I was referring to the MPC Indy Hall of Fame kit which combined the 1963 Parnelli Jones roadster, the 1963 Lotus Ford driven by Jimmy Clark and the 1974 Johnny Rutherford McLaren. Maybe MPC re-issued all three AMT kits but those are the ones in the MPC Hall of Fame kit. Nonetheless, the 74 was reissued as a 75 with little to no changes. I've been busy trying to change the routing of the turbo and I think I have arrived at a reasonable approach which more centrally locates the turbo. Actually, I just flipped the turbo so that the exhaust comes out of the left and the velocity stack is on the right. Then I shortened the pipe that attaches to the waist gate and re-routed the rest of the pipes. the turbo should be right behind the engine but I couldn't manage to do that because the suspension is in the way. I toyed with the idea of lengthening the transmission or using another one from another kit but that would have been a lot of work and this accomplished a change that should work. I also white glued to body together (not very well) and found that I only needed to cut a small corner off the engine cover at the end in order to make this fit. I also cut some supports for the turbo so that it wouldn't be a flying turbo! So now, I can start painting. I will have fun painting the engine now that it is together! Thanks for looking! ?
-
I had a long-winded explanation of what I am doing with this one but my computer decided to disconnect to the internet. I want back and pulled it back up but there was a tag that said clear editor and I did. When I did that everything disappeared. So don't even click on "clear editor" or you will lose everything! So now you get the short explanation. I had a 74 McLaren from the MPC Hall of Fame kit. I have previously built one of these. I studied phots of the 75 McLaren and determined that the turbo was more centrally located over the transmission instead of directly back and to the left of the body with a straight exhaust pipe. The rear wing is also smaller. So I bought an AMT 1975 McLaren from e-bay for $35. What I found was that AMT took the 1974 MPC McLaren with new instructions and decals and stuffed it in an AMT box. So I am right back where I started but $40 lighter. Here are some photos, I hope:
-
Thanks, Jim! No the kit did not include slicks. All the parts are on the car, except the rocker trim, the horns and some side badges that are not in the instructions. Also there was a remnant interior console but no bucket seats. What you see is pretty much it! I thought about using some cheater slicks on this but didn't want to waste them on this build. Probably the last AMT Ford or maybe even the last Ford with separate inner fenders that I will build. Thanks for looking! ?
-
Thanks, Jim and Len! I appreciate your comments! Well, I didn't think the inner fender liners were that far off but that was all the difference. Once I had them square, I was able to move the body back just a bit, maybe 1/16" so that the wheel position looks good. Not enough room for the horns but that's OK with me. The horns are there somewhere. everything else went OK but the decals in this kit are terrible and the Ford lettering would not register. So I was able to use chrome pen on the front but not the back because they are too shallow and I am not talented enough to draw a letter with a chrome pen. I left off the side rocker chrome because I thought it looked better without it. Thanks for looking! ?
-
Thanks, everyone for the lively discussion! Yes, Lenny, the tires are wider on than the GT/GTA but that doesn't account for the issue with tires outside the fenders. Well, I thought I was on the way home with this one but that may have been wishful thinking! For the third time, i tried to attach the body to the frame/engine compartment/interior assembly but it wasn't to be. The first time I mounted the body too far forward and the wheel position was not good. The second time I got the wheel position just right but the front bumper/grill assembly wouldn't mount on the body correctly. I tried to "customize" the radiator support and front of the frame with my sprue cutter hoping that I could bend the grill/bumper a bit in the middle to clear the middle of the frame but that was to no avail. So the third time I was right back to where I was before with the wheel position. Part of the problem is the inner left fender liner/spring tower/kingpin that is an issue with all the Fords. Its as crooked as a backyard stick. So I have taken everything apart again. Now it will sit for awhile so I can think about how I can solve the other issues with the wheel position. Fixing the left side inner fender issue will help but I don't think it will solve the problem. I really don't want to shorten the rear springs and drive shaft and that will only solve the rear wheel problem. The front wheels are still an issue. Maybe I can move the radiator support (or what is left of it) in toward the engine so I can move the frame forward a bit more. But I'll let it sit a few days and work on something else. I normally don't do that and work on only one at a time but this one will be the exception. Thanks for looking! ☹️
-
Looks great, David! You really did a nice job on the paint! Hang in there! ??
-
Thanks, Jim! I appreciate the info! I noticed that the instructions indicate that all 66 Ford Fairlane 427s were white out of the factory. Almost done with this one. I built the engine box stock, finished he chassis and installed the window glass. I wasn't able to get the steering poseable. I checked the red one again and noticed that it was the same front suspension but one of the wheel kingpins is loose on the left side and that is why it is turning. The steering linking has also broken free. So I guess I'll have to fix that. I also had to shorten the front wheelback stems on the the one I am currently working on in order to get the front wheels to sit inside of the front fender. The hood at the cowl sinks so I will have to make sure that I get the body glued down tight in front. They put a set of redline tires in this kit, I am not sure why. They look a bit too close to the wheel to me and they are hard to see with the blue but I am going to use them since I don't want to look for other tires to fit the wheels. I might turn them around since they don't really add anything, IMO. While installing the window glass I noticed that there were no mirrors in this kit. No interior mirror and no outside mirrors. I guess this model was meant only for straight line racing. So since I have no extra interior mirrors in the parts box, I stole one from another AMT kit, the Petty stock car released not too long ago. I have already built one of those and have robbed other parts from this second kit so I won't be building it anyway. But I had intended to enter this one in box stock at the annual IPMS contest in a few weeks so that out now. But mirrors are a pet peeve of mine because you can't drive a car without at least an interior mirror. But I have plenty of other possibilities, so this one is destined to be a shelf sitter. Thanks for looking! ☹️