ModelcarJR
-
Posts
1,648 -
Joined
-
Last visited
Content Type
Profiles
Forums
Events
Gallery
Everything posted by ModelcarJR
-
Thanks, Dan ad Michael! I appreciate your comments! Michael, I saw one on e-bay for $14.99, plus $11 shipping.
-
I intended to start the new Revell Mustang Mach 1, James Bond movie car. I was hoping that there might be some extra parts so that I could do a regular Mach 1 not the movie car. But the parts are not there and the only way to build it is as the movie car without borrowing parts from another kit. I re-read the review in Model Car Magazine (I've slept since then) and indeed, it confirmed that in order to build a regular Mach 1 you would have to borrow some parts from the Boss 351 kit and buy some decals. Or wait until Revell retools and runs a Mach 1 kit onto the market. So the new Revell kit is on the shelf for now since I just recently build the AMT version of the movie car. Then I remembered that I have a Revell 1970 Mustang Mach 1 in the closet. It was purchased several years ago when kit were priced where they should be at $17.99. I'll build that one! But when I opened the kit I found that the kit contains two options with two engines, a 351 and a 302 and there are two interior buckets with different patterns. I don't know why I am on this kick to build a Mach 1 when I never really liked them. I always thought they were too big and boxy and I really don't like the "Venetian Blind" on the back window. So the 302 became more interesting to me and I am going to build that one. I may even leave off the "blind" on the back window! So I prepped the body and attached the front fascia and rear taillight panel because the chassis will still fit without any problem with them attached. I also pinned the exterior mirrors and the rear spoiler so I don't have any issue with them on final assembly. Next, I wash everything, prep the other other parts for paint and get a primer on it today. I'm going with a Yellow exterior and black interior. I haven't done yellow for awhile and I think it will look good on this one. Thanks for looking! ?
-
AMT 1971 Mustang Mach 1 - Diamonds are Forever!
ModelcarJR replied to ModelcarJR's topic in Model Cars
Thanks, everyone! I appreciate your comments! ? -
This kit has a lot of issues but I bought it to build a box stock movie car and continue to practice with 2K Clear Urethane. Mission accomplished! The paint is Dupli-Color Flash Red and Universal Black on the exterior and an old can of Wal-Mart Fire Red in the interior because it was a little bit darker. I also added a 2K Urethane Clear with an airbrush that looks petty good once rubbed out. I used BMF foil and the exterior mirrors are covered with mirror foil because although there are hallow mirrors with a pin receiver inside there were no chrome mirrors on the chrome tree. The engine, chassis and engine compartment leave a lot to be desired so I'll keep the hood closed on this one. It builds up OK but its a lot of work, pesky flash, parts not fitting right, etc. See WIP thread for more detail. Another one is done so on to the Revell 71 Mustang Mach 1! Thanks for looking! ?
-
AMT 1971 Mustang Mach 1 - Diamonds are Forever!
ModelcarJR replied to ModelcarJR's topic in WIP: Model Cars
Thanks, Alan and Len! I appreciate your comments! I took Wednesday off to allow my hands to rest, and got back to this one yesterday afternoon. Its done now except for decals and license plate frames. Yes, it is a bit of a turd but the finish looks good and with the hood on it will work for a nice box stock shelf sitter. Some (not all) of the shortcomings are as follows: Lots of pesky flash and pin injector marks (6 in the interior bucket and 4 under the hood). No radiator hoses for the engine and a poor rendering of the engine. Inner fender liners that are not tall enough or wide enough to cover the front wheel openings. No interior mirror or turn signal indicator lever. Exterior mirrors that are hallowed out with a pin receiver but no chrome mirrors to insert. Poor chassis detail and necessity to drill new holes for the front wheel stems to move the wheel back in order not to rub the front fender. Difficult to glue the front fenders to the radiator support in order to sit the font end down and level with the rest of the body. So, I'll look forward to the next build and I'll be back in "Under Glass" as soon as I have the decals done. Thanks for looking! ? -
AMT 1971 Mustang Mach 1 - Diamonds are Forever!
ModelcarJR replied to ModelcarJR's topic in WIP: Model Cars
Thanks, All! I appreciate your comments! I've been working on the body a good part of the day and my hands are aching! I still have to do the hood and it looks like I may need to do a little more work on the top. There are a few nits and nats that may need a little more work but for the most part I am finished rubbing the body out. The nice thing about the urethane is that you don't have to worry about rubbing out the edges as the urethane is a hard finish. I knocked off the mirrors and actually broke the stems but I can glue them back on. Thanks for looking! ? -
AMT 1971 Mustang Mach 1 - Diamonds are Forever!
ModelcarJR replied to ModelcarJR's topic in WIP: Model Cars
Thanks, Richard and DJ! It wasn't my idea. I saw it in a magazine years ago. I guess there is actually a tool that has different size punches that you can pick the actual right size to fit the hole and punch it out exactly. I haven't bought that tool yet as you can sand out most of the injector pin marks or ignore them if there in a place where they won't be seen. But these were so deep I thought I should try to fill them. I have been dinged at a contest for ignoring them recently. So I thought I'd give it a try. I used the 2K clearcoat and it didn't work out so good this time. Some junk in the finish that I will have to sand out as well as some small circles that formed on the roof and trunk. There is also some orange peel that I thought wasn't suppose to happen with this clearcoat. But I'll rub it all out after I have let it dry awhile and see where it goes from here. Thanks for looking! ? -
AMT 1971 Mustang Mach 1 - Diamonds are Forever!
ModelcarJR replied to ModelcarJR's topic in WIP: Model Cars
Thanks, Carl! I appreciate your comment! I've rubbed out the paint and foiled all the trim. Normally, this is where I would stop and start assembly, windows, grill, bumpers, etc. The interior, engine, chassis, wheels and tires are done so I am ready for completion. But I'm going to add a 2K clearcoat to the body and see how that looks. Waiting till this afternoon for humidity to come down. Thanks for looking! ? -
AMT 1971 Mustang Mach 1 - Diamonds are Forever!
ModelcarJR replied to ModelcarJR's topic in WIP: Model Cars
Thanks, Michael and Alan! I appreciate your comments! Yes, this kit has the correct wheels. The body painting is complete as well as the other parts, not pictured. The paint is Dupli-Color Flash Red and Universal Black, 2 coats each followed by 2 coats of Krylon Clear lacquer. Tomorrow, I'll rub out it out with 3.000, 5000, and 7,000 sandpaper. I may add the foil and then spray with 2k clearcoat to give it that show car shine! Thanks for looking! ? -
AMT 1971 Mustang Mach 1 - Diamonds are Forever!
ModelcarJR replied to ModelcarJR's topic in WIP: Model Cars
Thanks, DJ, Carl, and Rex. I appreciate your comments! Yes, I know that it is a very old kit and its unfair to compare it to Revell. But I think it will still make a nice box stock replica of a movie car and then it will be much more satisfying to build the Revell Kit. Thanks for looking! ? -
I picked this up at the last model car contest. I also have just received my order from Model Roundup of the Revell kit. I am going to do them back to back, sort of a comparo, if you will. This one will be box stock as the James Bond movie car, and the Revell kit I will probably do differently with some engine detailing, etc. I've had good luck lately with 1971 models, the Olds 442 and Mustang Boss 351. So why not keep it going! The AMT kit needs a lot of prep work. The interior bucket has some severe pin ejector marks, better known as "clrcle thingys". I filled them with some hole punched plastic and putty but I probably should have used some thinker plastic or two thin ones in each hole. So not satisfied with how it looked, I took some white glue and embossing powder and then painted it black to look like carpeting. That'll work! Next, I had to do a lot of work on the body, getting rid of all the pesky flash meaning that every edge, wheel opening, and window opening had to be scraped with a knife and sanded down. the bottom left edge of the body looked like somebody had removed the sprue it was on with a meat cleaver. There were also a couple of mold lines at the rear window that had to be filled with putty and I didn't like how the from roll pan mounted so I filled the cracks there with some putty, although it may be covered by the bumper, I don't know. There are no mounting holes for the mirrors and no way to pin them as the stems are too small so I am going to glue them on before paint and I hope they don't cause any painting issues. That's about it for now - thanks for looking! ?
-
Thanks again, everyone! I appreciate your comments! ?
-
Thanks, All! I appreciate your comments! ?
-
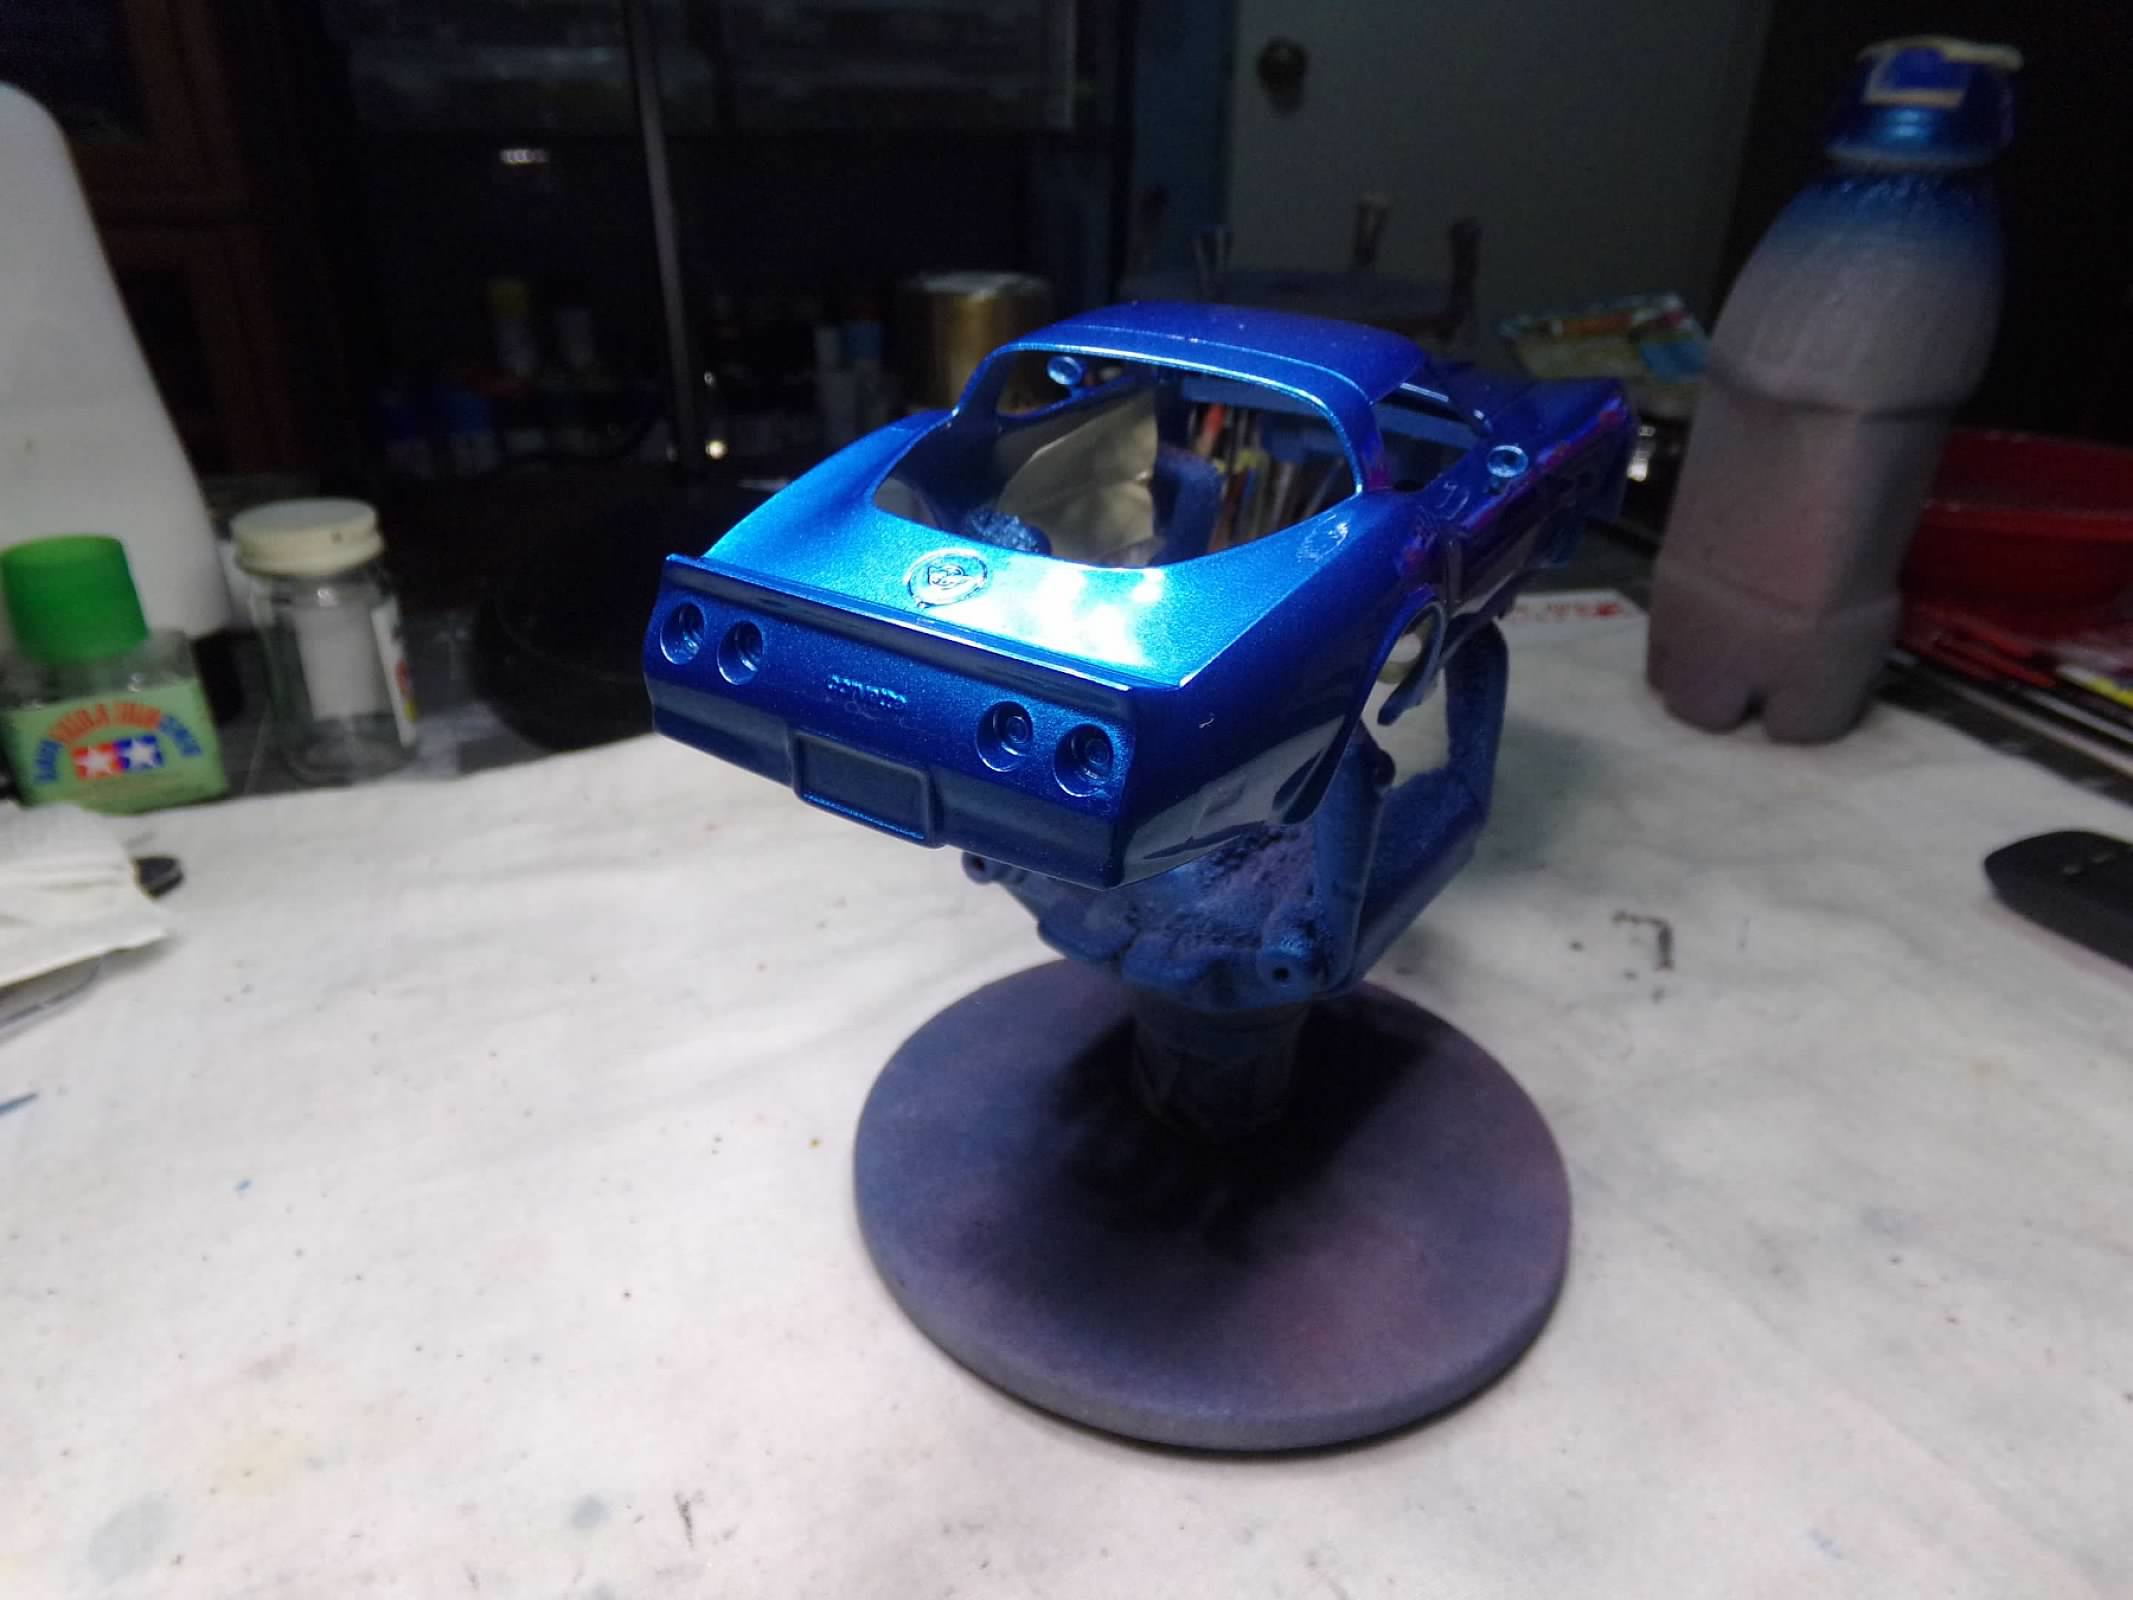
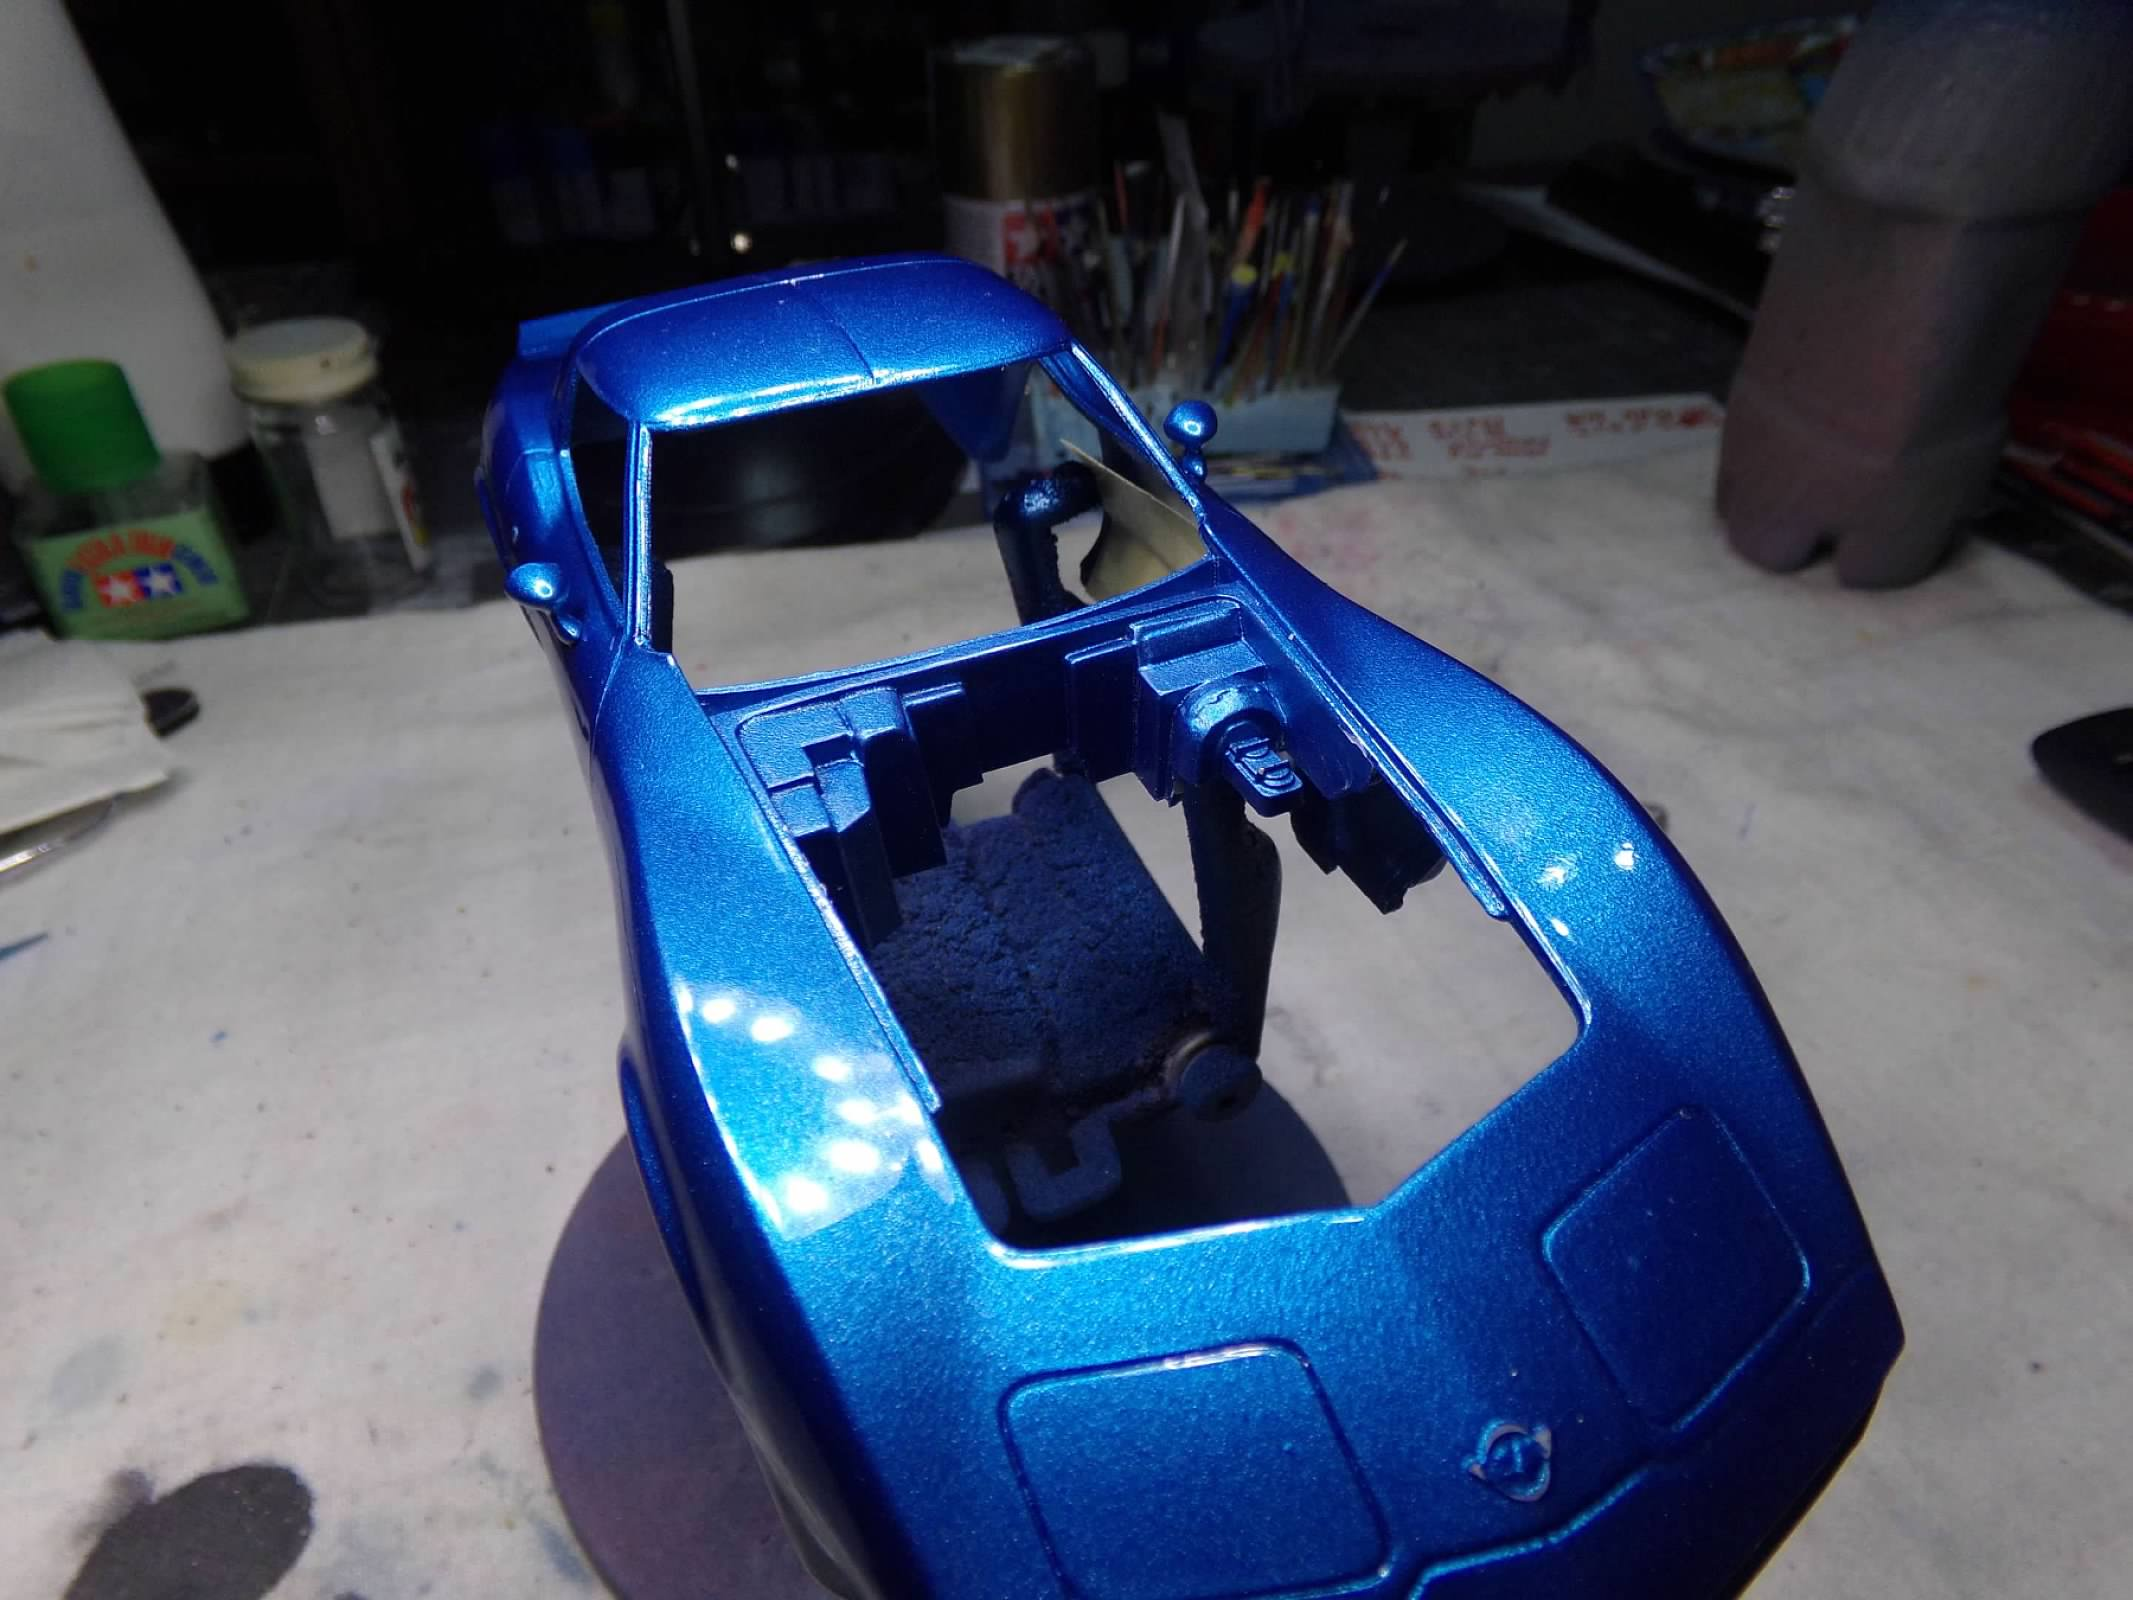
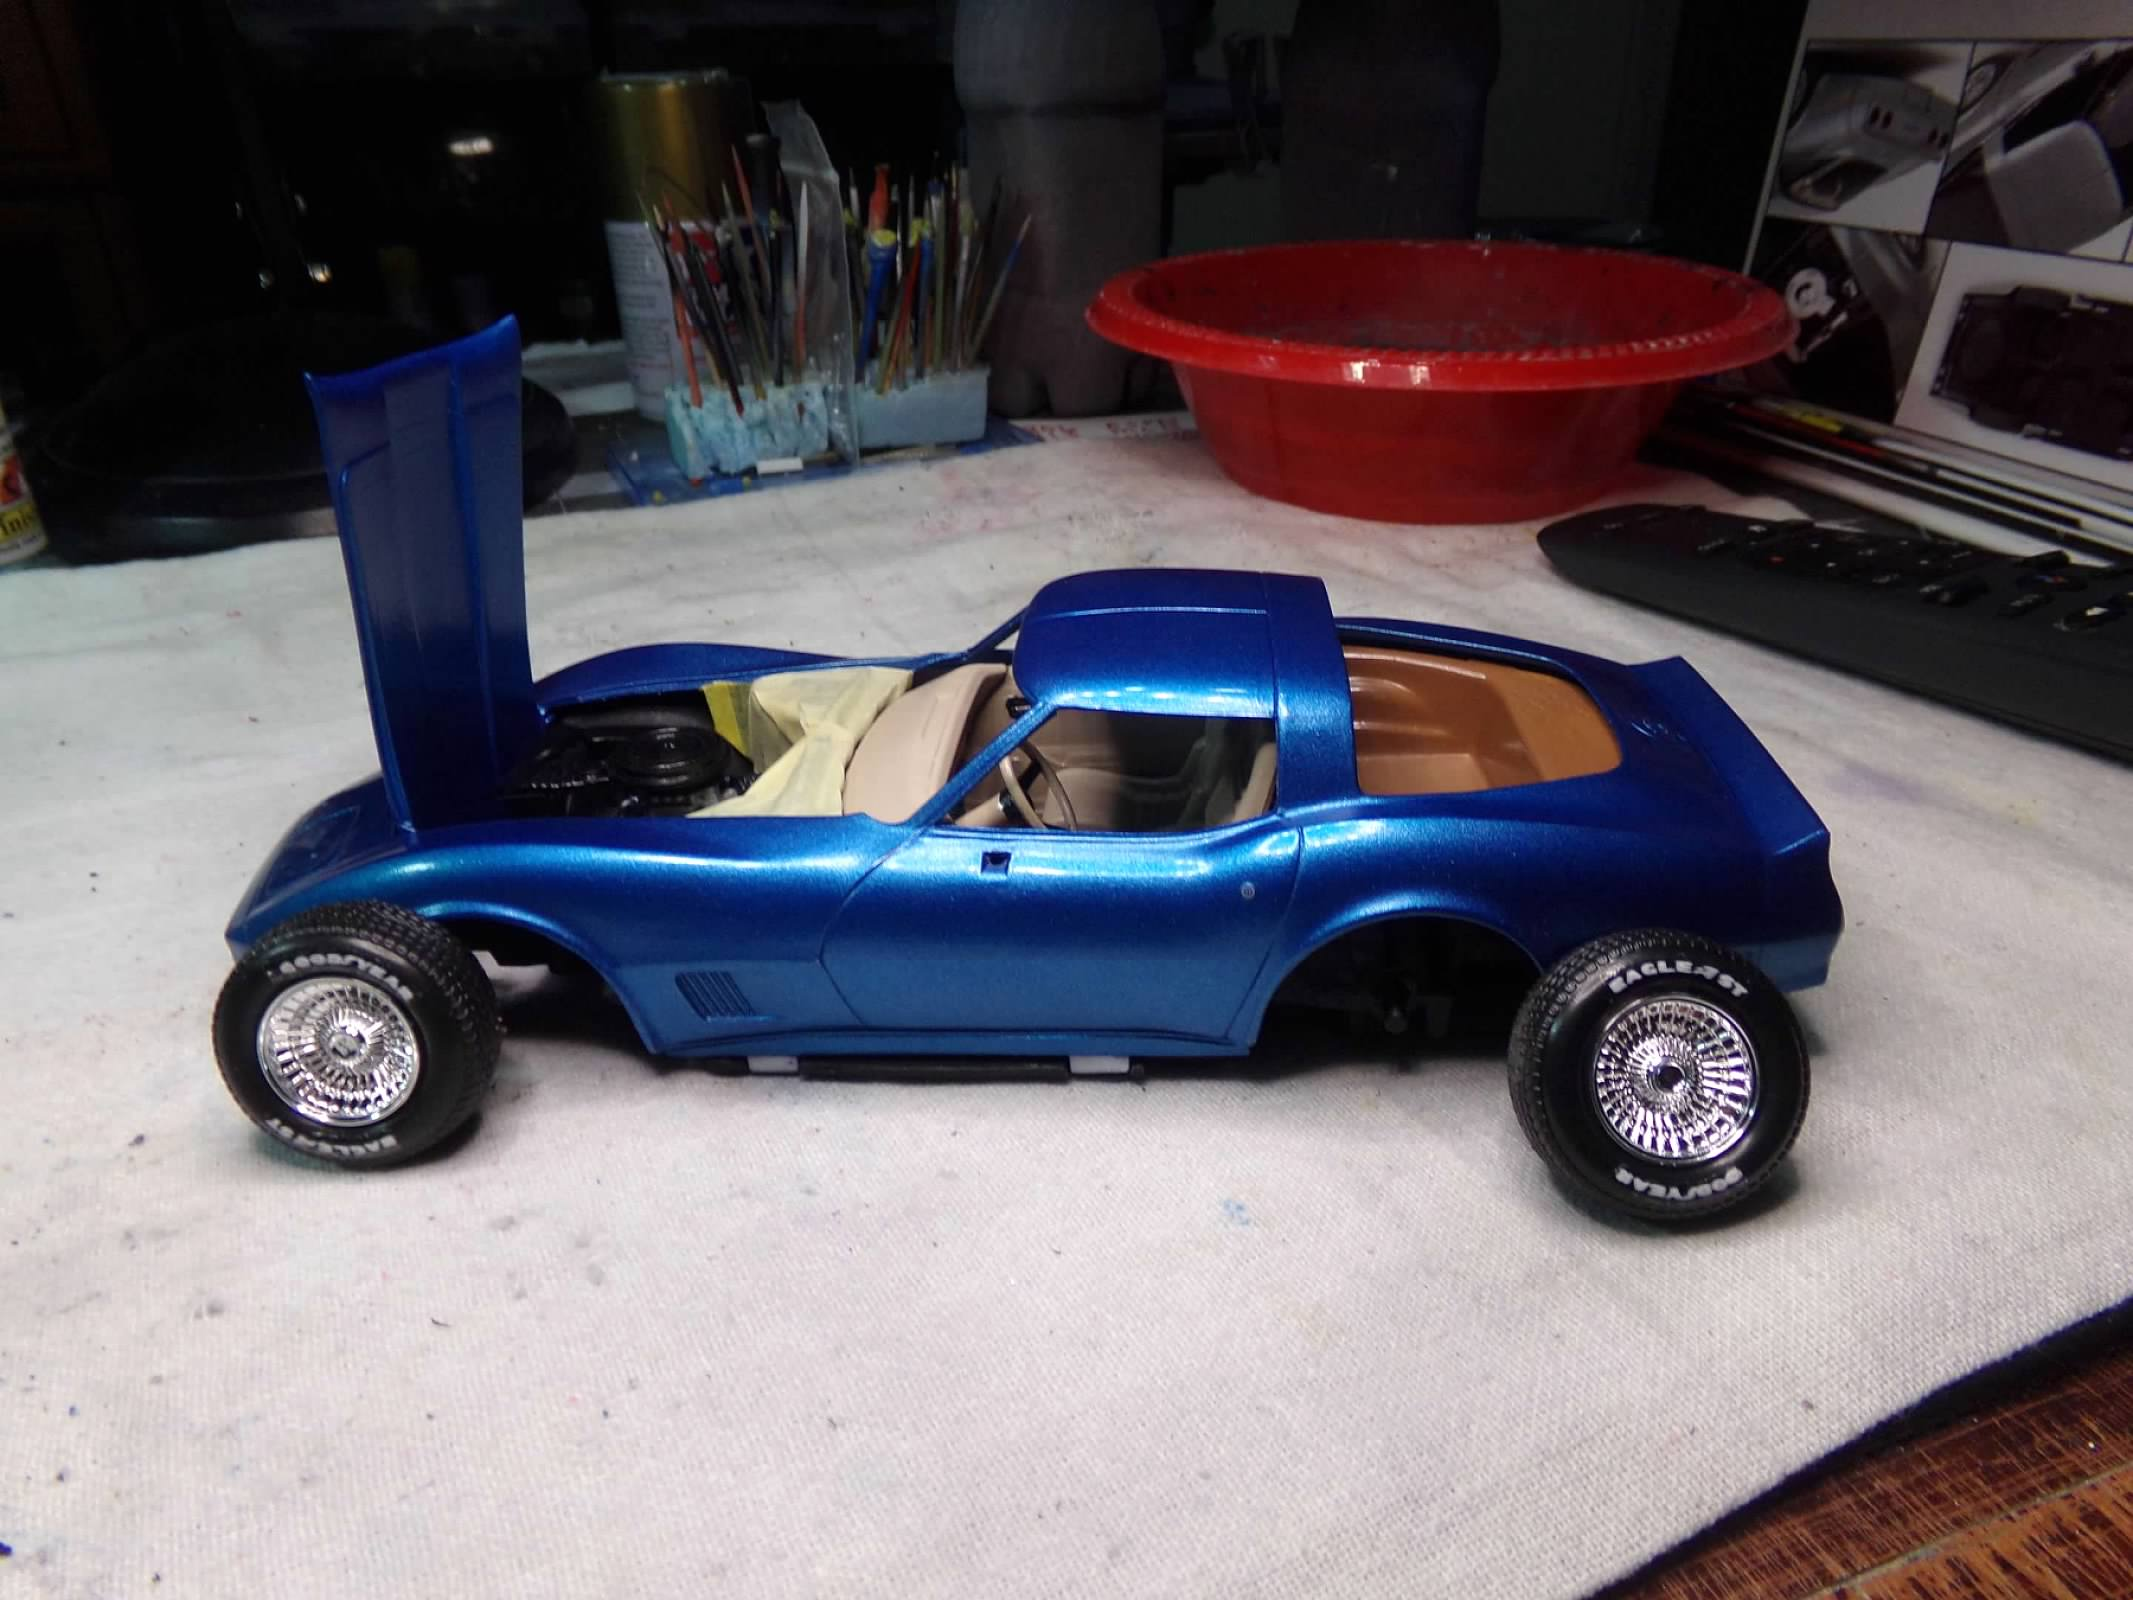
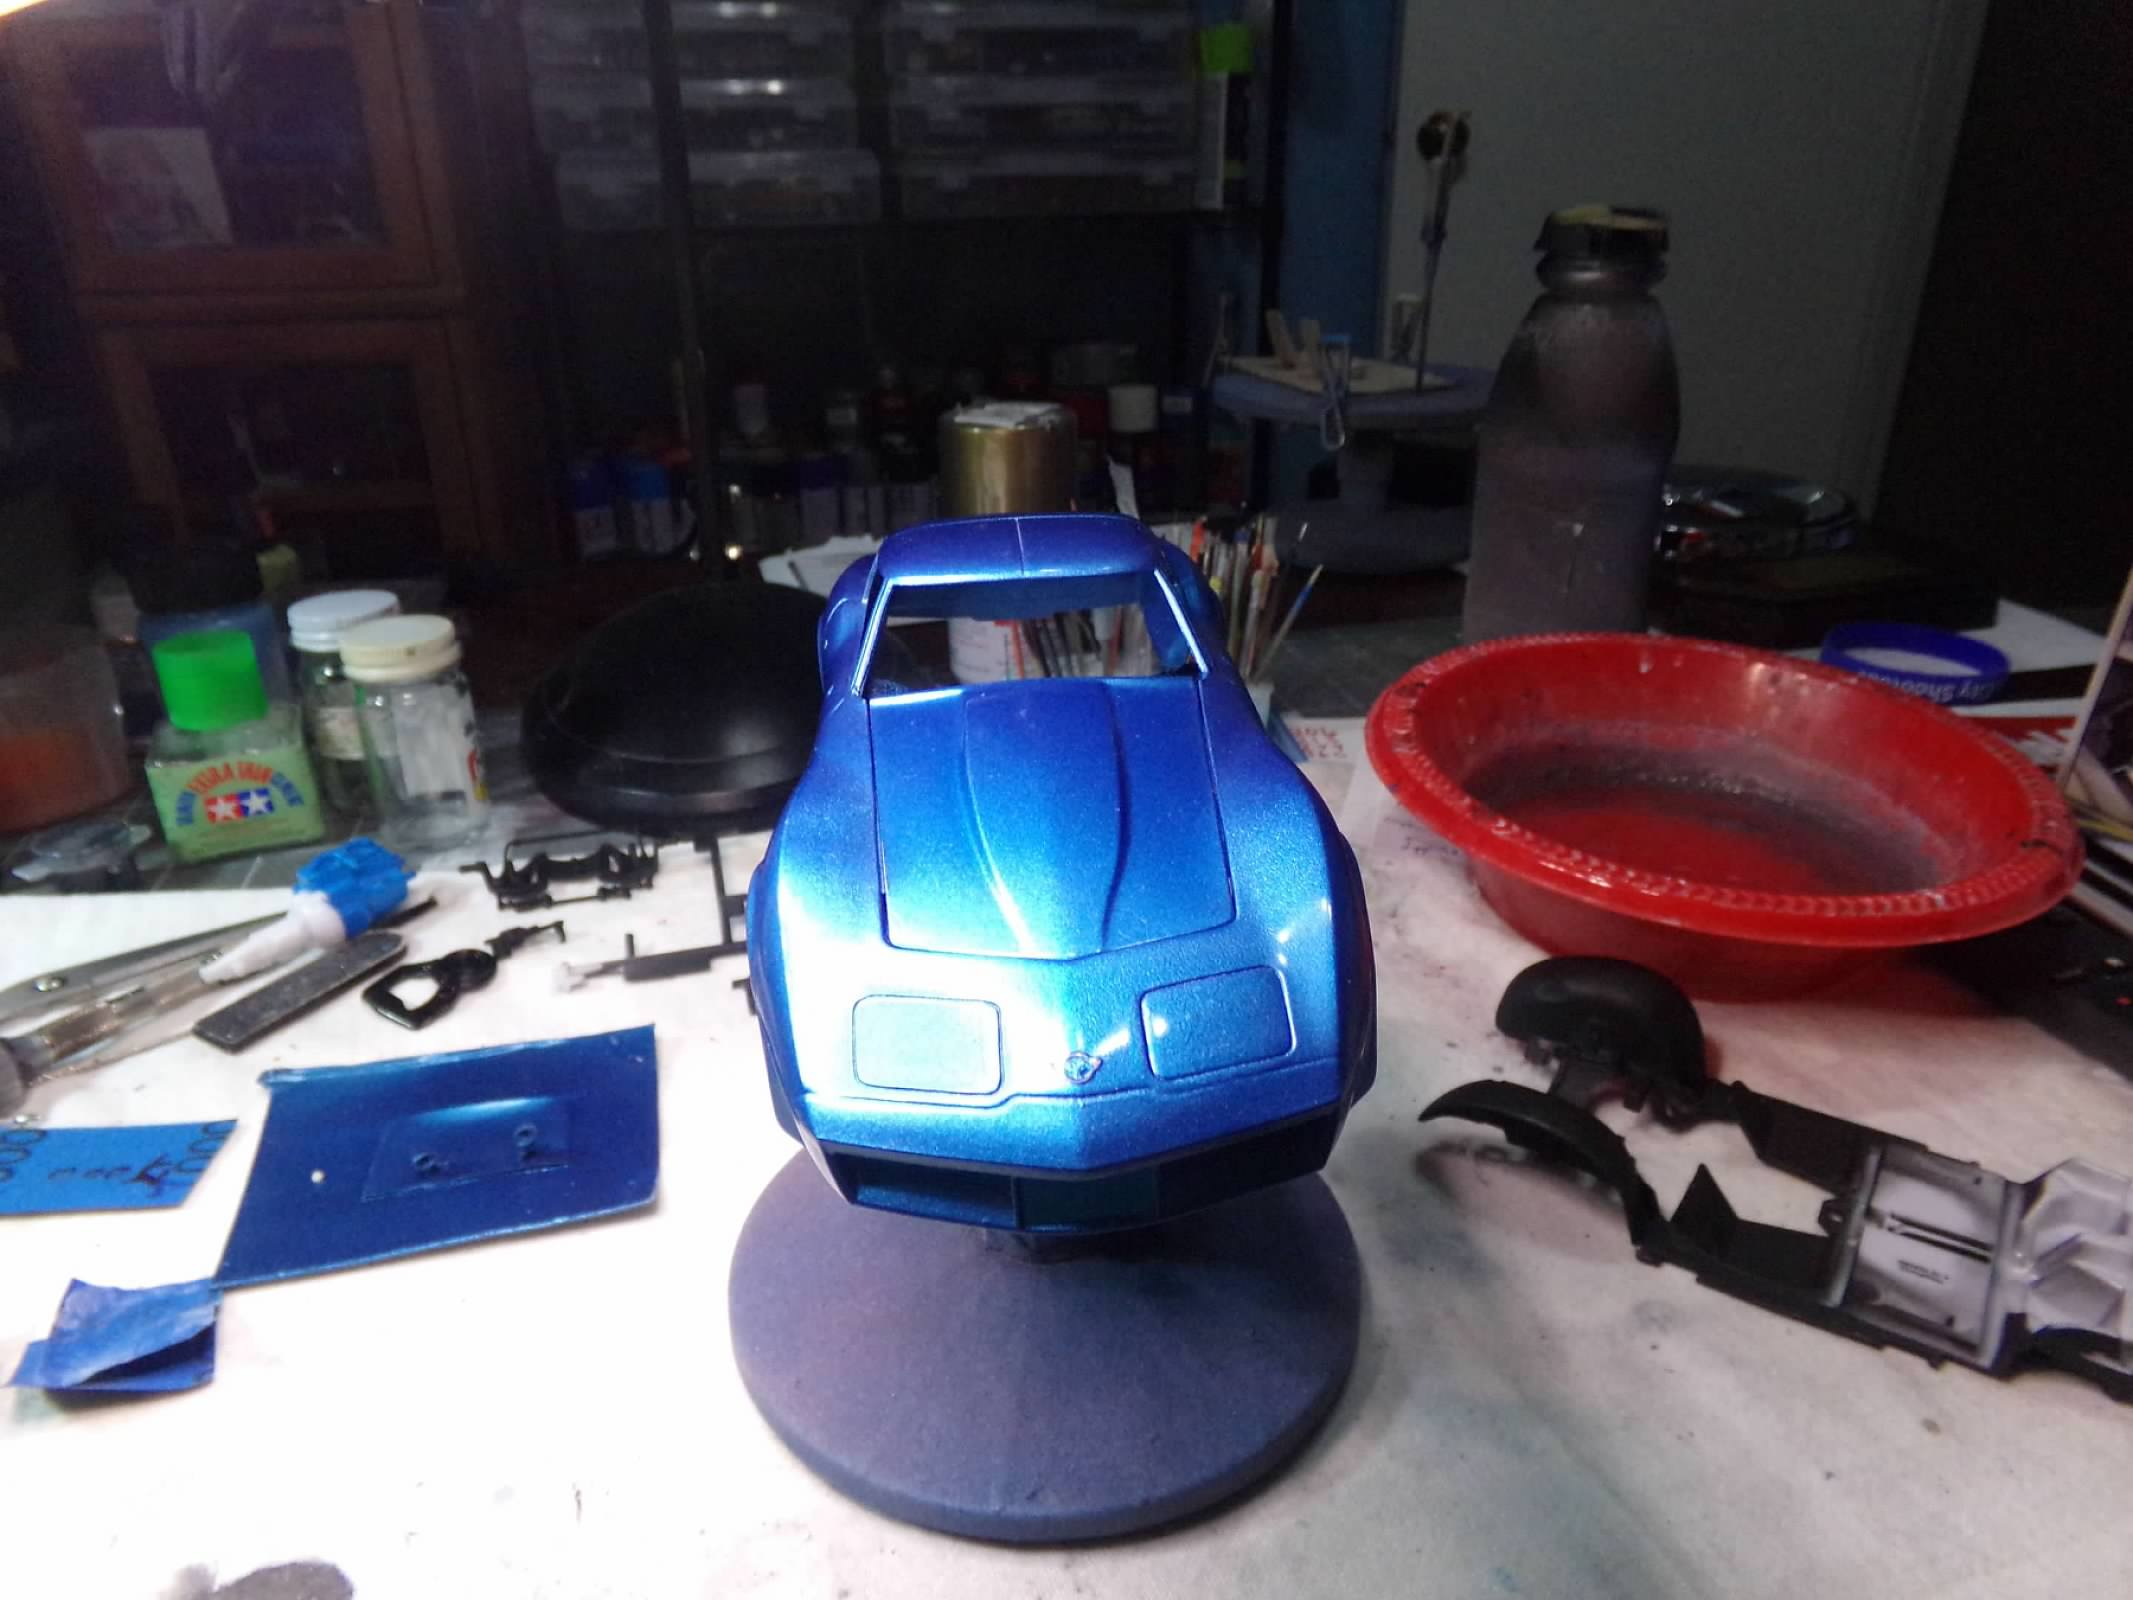
This is an old Monogram kit that I won in a raffle at the last HAMS model car contest. I wouldn't have bought it but it only cost me $5 in raffle tickets so I thought I would build it and try my first 2K urethane clearcoat on it. I think it came out pretty well! I painted it with Dupli-Color Bahama Blue Metallic with a Krylon tan interior. It is a very low parts count kit and my first thought was that it was a snap kit but it is not. After paint, I rubbed it out with 3,000, 5,000 and 7,000 sandpaper and Scratch-X then applied the two part clear with an airbrush. I think the experiment was a success and you can read more about it in the WIP section. The engine and chassis are not a plus in this kit and I don't display it with the hood open. I also removed the side pipes and replaced them with a trim piece from the 67 Corvette that I painted black. The tire lettering are decals from Fireball Modelworks. Thanks for looking! ?
-
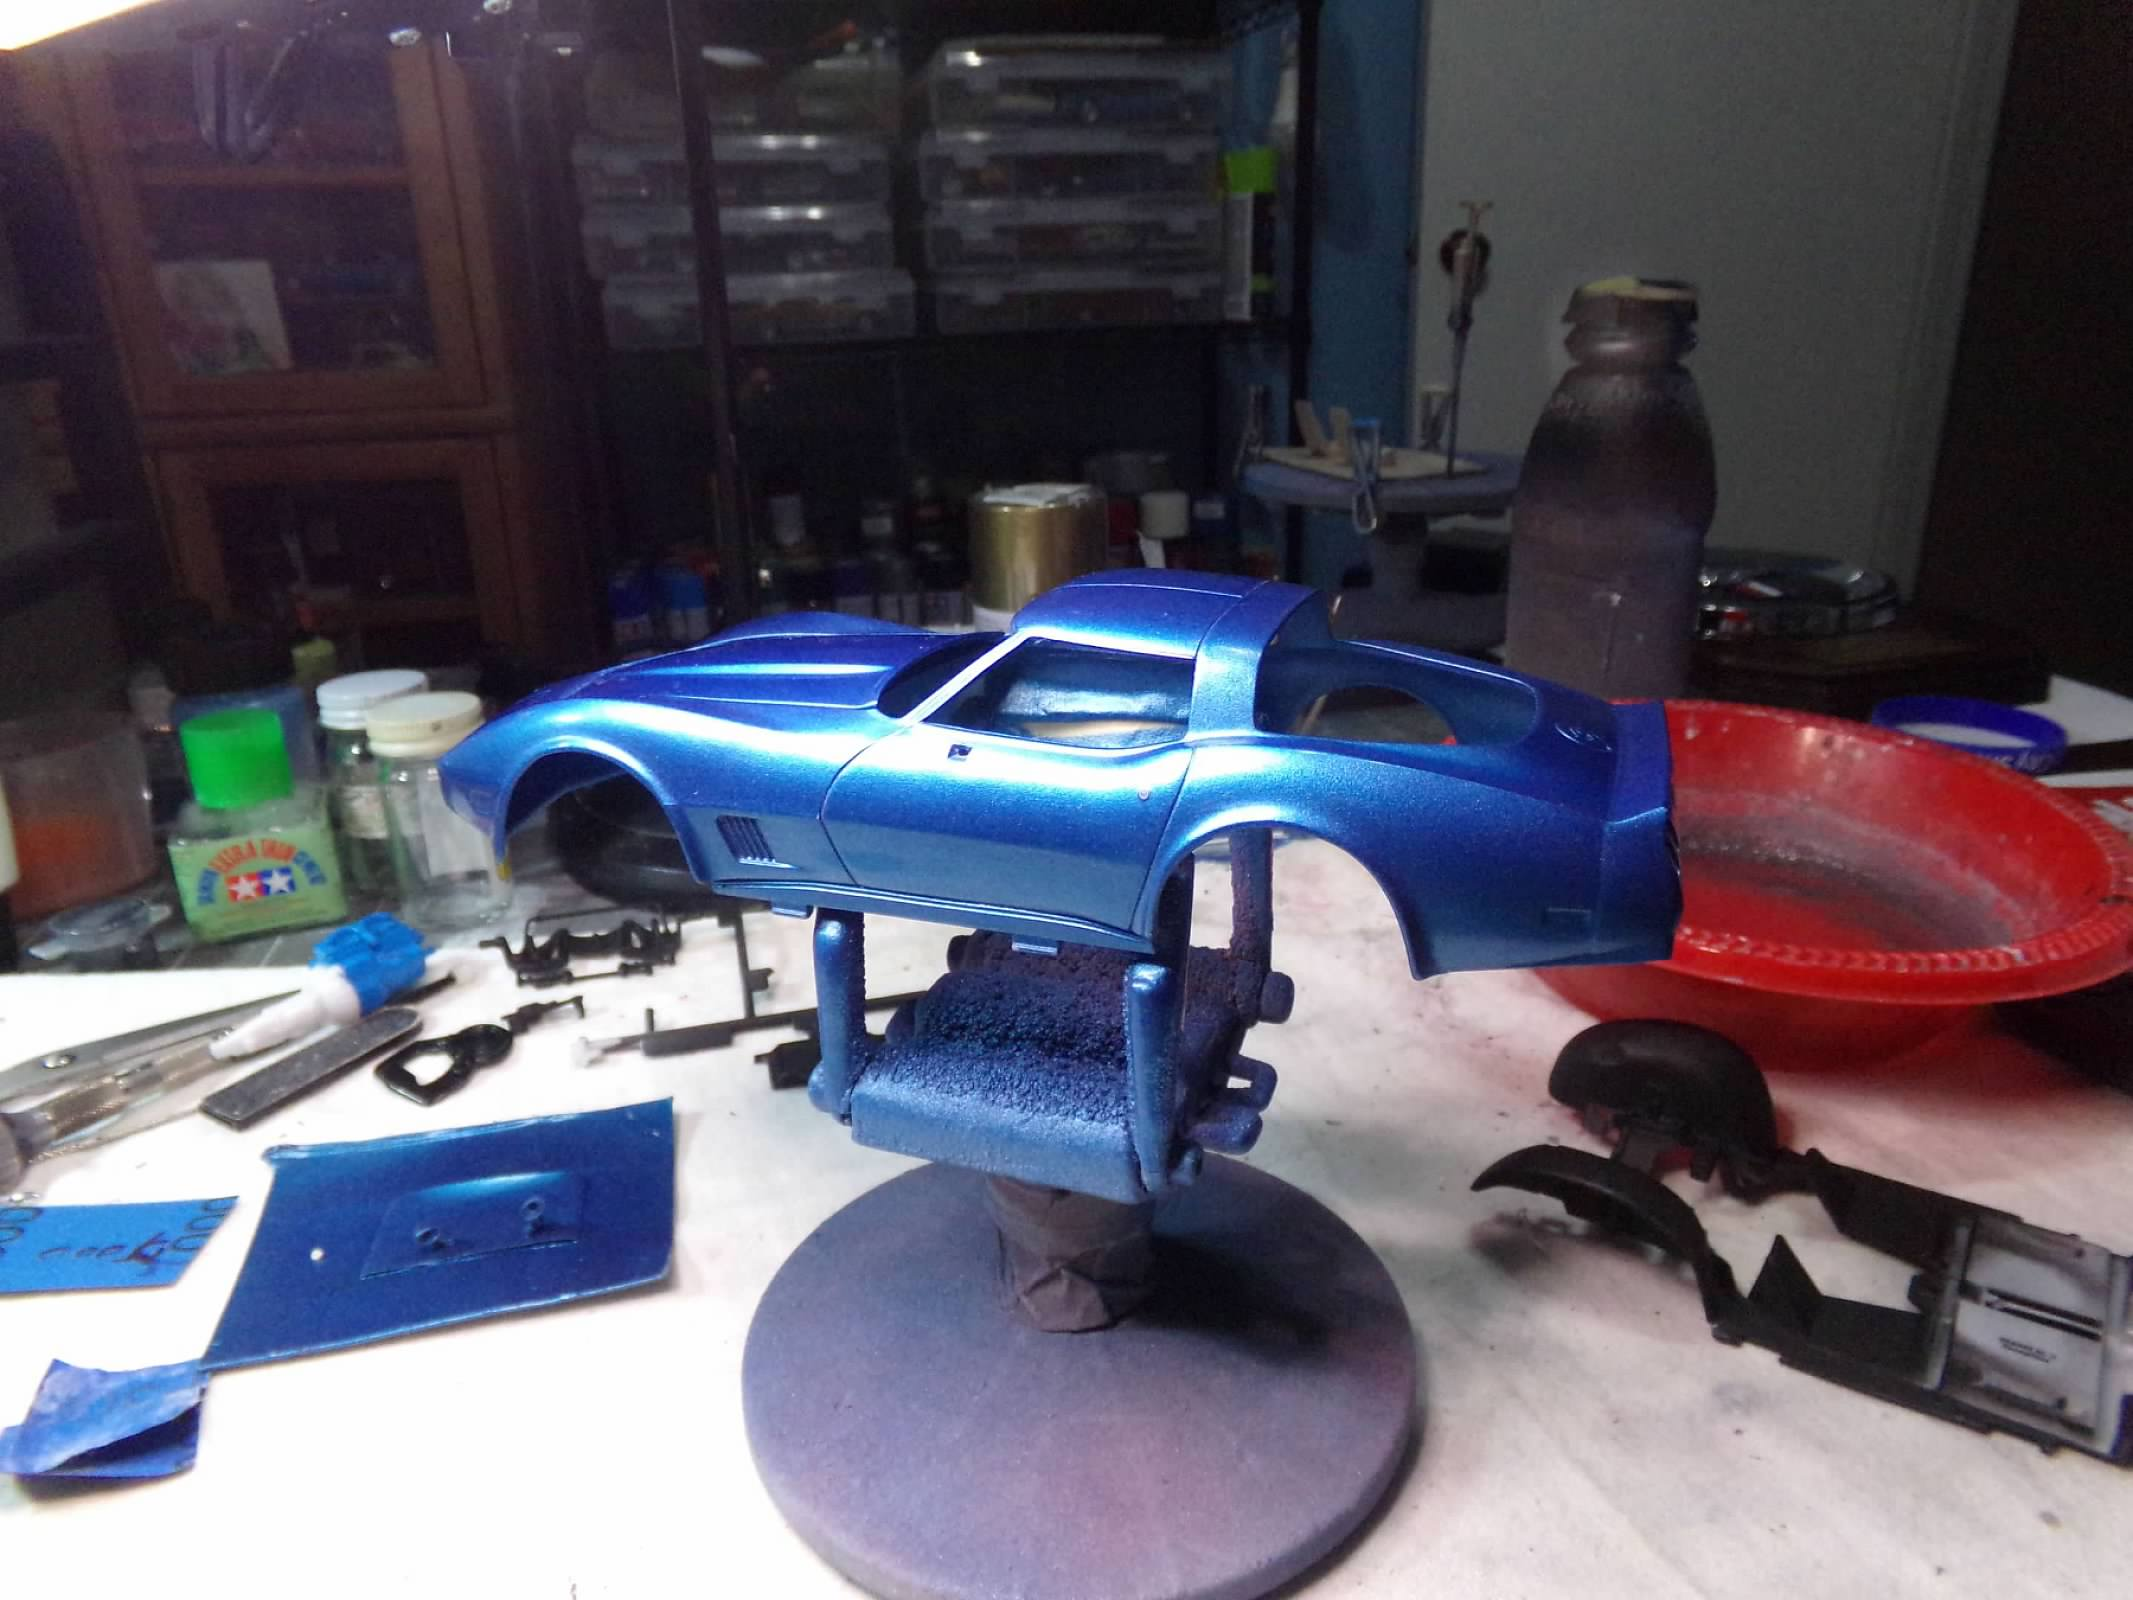
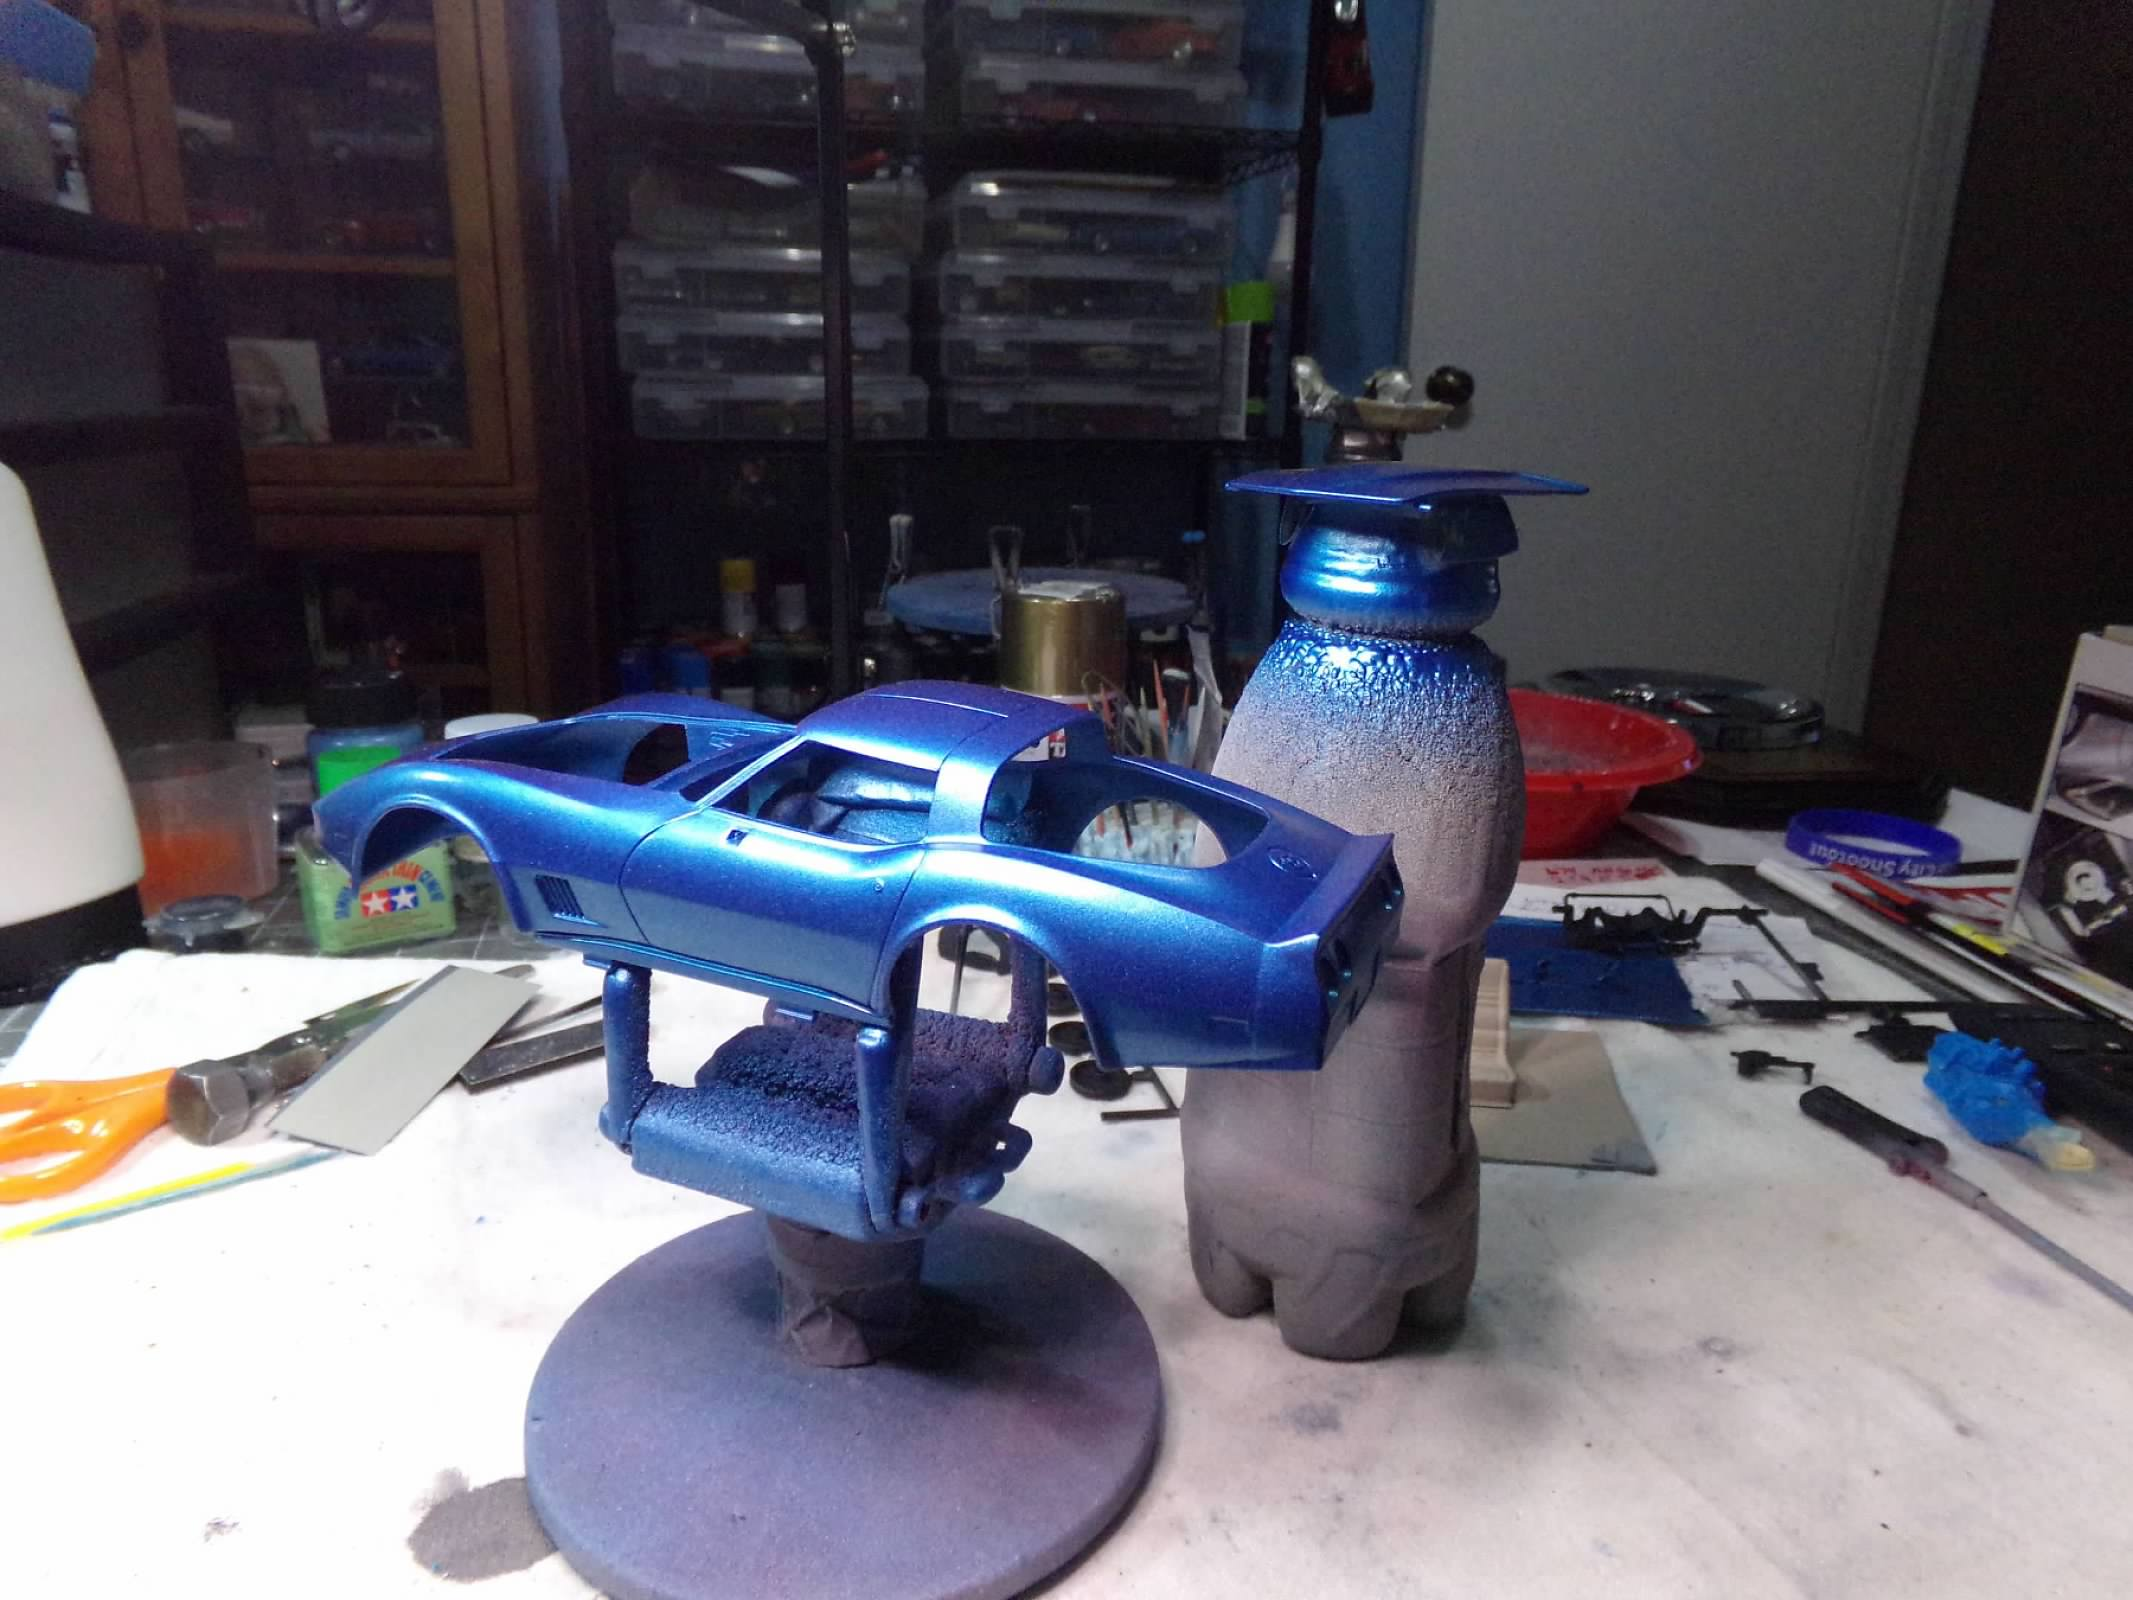
Thanks, Carl! I appreciate your comment! I've finished this one by adding a trim piece painted black at the rocker below the door and adding the decals. Since this is my first try with 2K Urethane clearcoat and I think it was successful, I wanted to reflect on lessons learned. I watched a couple of videos on You Tube before I bought the clearcoat. They helped in preparing and buying the things I would need to do the airbrushing. First, in addition to the clearcoat and hardener, I also needed some small, clear plastic cups, something to measure with and some stirring sticks. This may seem very basic but is something that I haven't really dealt with before. Even when I airbrush paint, if it needs to be thinned for airbrush I normally just pour in the thinner in the bottle and shake it up. But according to the videos, even though the measuring doesn't need to be exact it does need to be 4:1 and shaking may cause bubbles in the mix that might affect the airbrushing. So, I found some clear cups in the house in old "picnic and hurricane supplies" box. I bought some 2 ml. plastic, disposable, pipets at Michaels and found some wooden stir sticks in my wife's acrylic painting supplies. Both videos emphasized using "fast drying" clear coat, so I bought the cheapest quart of clear coat with 1/2 pint of hardener that I could find on Amazon. That along with some 3,000, 5,000, and 7,000 sandpaper that I wanted to buy put the order just over $35 for the free shipping on my wife's temporary membership for Amazon. The sandpaper came the next day which worked out well so I rubbed out the paint on this corvette with it and it was a good experience since I could cut the sandpaper in small squares and just use my fingers on the square to rub out the paint. The cloths although fine for the same purpose always required a foam backing pad and it is getting troublesome toClear grip without my hands cramping up in my old age. The clearcoat and hardener came in about a week with no instructions and no label except for a white label on each can. The clearcoat indicated 2K Urethane Glamour Clearcoat Quart 4:1. and the other 1.2 pint can read 2k Urethane Glamour Clearcoat Standard Activator 1/2 pint. One video indicated that he used an additional part Mr. Surfacer and the other one didn't. When I opened the cans they seemed to be thin enough for airbrush so I didn't add anything. But I did make a mistake - I mixed it up in the morning thinking I would paint in the less humid afternoon outdoors. Unfortunately, the clearcoat I mixed with the hardener turned to gel by noon. So one lesson learned - don't mix until ready to spray. Both videos indicated that you should do three wet coats after a light first coat. One indicated 15-20 PSI for the first coat and both indicated 30 PSI for the wet coats. I mixed up 20 ml. of the clearcoat and ran out after 2 wet coats. But I am glad that I did since I think I have it on a bit too thick in a couple of places. I think I could have gotten away with 1 wet coat and I probably will do that in the future. One video indicated they had a wide spray pattern and were using a "5" needle. I don't even have a "5 " needle and my biggest is a "3" for my Badger 150 airbrush. I don't know if a "5' would even fit in my airbrush. So I think my spray pattern is much narrower and heavier, and therefore, it buried the Corvette logo in the back and I noticed that the headlight covers and door lines were kinda buried a bit. So I think one wet coat will do it in the future. I rubbed out the finish the next day, using only the 3,000 sandpaper and some Scratch-X and it looks good to me. In fact, the photos don't really do it justice as it is a very smooth, glossy finish. I hope this might help anyone who is interested in using the 2k clearcoat. Final photos in the "Under Glass" section. Thanks for looking! ?
-
Looking good, Dan! I dullcoted my decals for the hood before I applied them. Watch out for those hood darts as they can make the decal application a bit tricky! ??
-
Thanks, Mike, Robert, and Jeremy! I appreciate your comments! Mike, I agree about the finish and I did repaint the cargo area tan. This one is done except for decals. I am also gonna add a piece at the rocker, actually it is a trim piece from the 67 Corvette that I have dechromed and painted black and it is drying now. I rubbed out the urethane clear with 3000 sandpaper and Scratch-X and it looked good to me so that is where I stopped. Its a little thick on the taillight panel so the Corvette lettering will not get any foil at this point as the letters are buried. I should have foiled them before clear. I also need to paint in the backup lights. But I sure do like the finish and I will come back with what I learned on my first urethane clear application. Thanks for looking! ?
-
I have no idea why the previous post posted twice. I received my 2k urethane clear late Friday afternoon. I unpacked it and only two plain cans; no branding, no instructions, just a quart of clear and a 1/2 pint of activator. The plain label on the clear indicated 4:1. So, I got up this morning watching some videos, wondering about a reducer, if needed, and watching what others have done. I did have one false start thinking I could mix up the clear with the activator and wait till this afternoon when the humidity was down. Wrong! The clear in the bottle ( I use a bottom feed bottle with my Badger 150 airbrush) turned to gel by noon. So, I cleaned out the bottle, and mixed up a new batch using 16 ml. of clear and 4 ml. of activator. I then got busy with the airbrush. I did one light coat of clear, waited 5 minutes and then sprayed two wet coats of clear 5 minutes apart. I let it dry for a couple of hours and everything looks good. Its really a wet look and what I call a "show car" shine. There are a couple of little nits in the top (its always the top) so I will have to rub everything out but I am hoping to keep it to a minimum, mainly using scratch X to polish it out. I think the photo without the hood shows the difference in shine with and without the clear. the firewall, etc. was taped off and will be painted black and it is much duller than the fenders. Thanks for looking! ?

-
Thanks, Dan! I have used them too with the same experience. They don't last too long. I am still waiting on the 2 part clear and hear that the Post Office has it now. I've detailed a few other things, the engine, interior, tires. I thought that the brown and tan interior would look OK but I am re-thinking the brown in the cargo area. I may repaint it tan. I added some paint to the engine and that's it and Fireball Modelworks Goodyear decals to the tires. I removed the side exhaust pipes from the frame and I may just add a thin piece of plastic to the rocker area and then just paint it black. But my main reason for building this one is to test my skill with 2 part clear. We'll see where it goes from there. Thanks for looking! ?
-
Man! That looks great, Bob! Nice paint and great assembly! Yes, this kit can be a problem but no problem for you! Nice work! ??
-
For what its worth, my security software keeps telling me lately that the website is not safe because it is not https. I have to hit a button that says continue on to the website and it takes forever and sometimes I just have to close and do it again. And it is slow going back and forth to different threads once I get on it. Is that something new with the website of is it that my security software is just catching it now?
-
Thanks, Dan! I have used them too with the same experience. They don't last too long. I am still waiting on the 2 part clear and hear that the Post Office has it now. I've detailed a few other things, the engine, interior, tires. I thought that the brown and tan interior would look OK but I am re-thinking the brown in the cargo area. I may repaint it tan. I added some paint to the engine and that's it and Fireball Modelworks Goodyear decals to the tires. I removed the side exhaust pipes from the frame and I may just add a thin piece of plastic to the rocker area and then just paint it black. But my main reason for building this one is to test my skill with 2 part clear. We'll see where it goes from there. Thanks for looking! ?
-
Thanks, Steve! I appreciate your comments! ?
-
Thanks, Jeremy, Curtis and Carl! I appreciate your comments! Having second thoughts about using a 2 part clear on this one. I usually use 4,000, 6,000 and 8,000 micro-mesh cloths to rub out a body. But my cloths are getting old and used up. There used to be a company called LMG Enterprises that packaged a wonderful set of micromesh cloths and foam backing pads but they are out of business. The last set of mesh cloths that I purchased from another seller had a cloth in it (12,000 to boot) that scratched one of my paint jobs horribly. So I am reticent to buy cloths again. I saw someone using 3.000, 5,000 and 7,000 sandpaper that looked like it worked well. So I bought some (sandpaper is much more reasonable and there was a lot of it) and used it today for the first time on this Corvette. The results are impressive to me. But the clear and hardener for the 2 part on on their way so I guess I'll give it a try. Thanks for looking! ?
-
This is an old Monogram kit that I won in the raffle last Saturday at the Houston Area Modelers contest. Its not a very good kit, few pieces and not a lot of detail. But I am going to use itud as guinea pig for a two- any part clear. First, I painted it Dupli-Color Bahama Blue Metallic and gave it one coat of clear to protect the paint and to get rid of the dull look of the lacquer so I can see any issues. I am going to let it dry for a couple of days and then rub out with some 3,000 5,000, and 7,000 sandpaper. Once that is done the clear and hardener that i ordered should be here and I can get to mixing it and using the airbrush to give it a few coats of clear. I'm hoping I can rub it out with just Scratch X. My reason for doing it is that is seems everyone at contests are going with the mirror finish, which I have an issue with, but I am going to give it a shot to remain competitive. I did OK at the contest with a couple of 3rds and a couple of 2nds. The Mustang Boss 351 took a second. The contest had a theme which was "1964" and "Mustang" . There were two theme awards for Best 1964 and Best Mustang. I am proud to say that the 1971 Mustang Boss 351 also took Best Mustang. I would like to thank the Houston Area Modelers for the award. Thanks for looking!?