ModelcarJR
-
Posts
1,648 -
Joined
-
Last visited
Content Type
Profiles
Forums
Events
Gallery
Everything posted by ModelcarJR
-
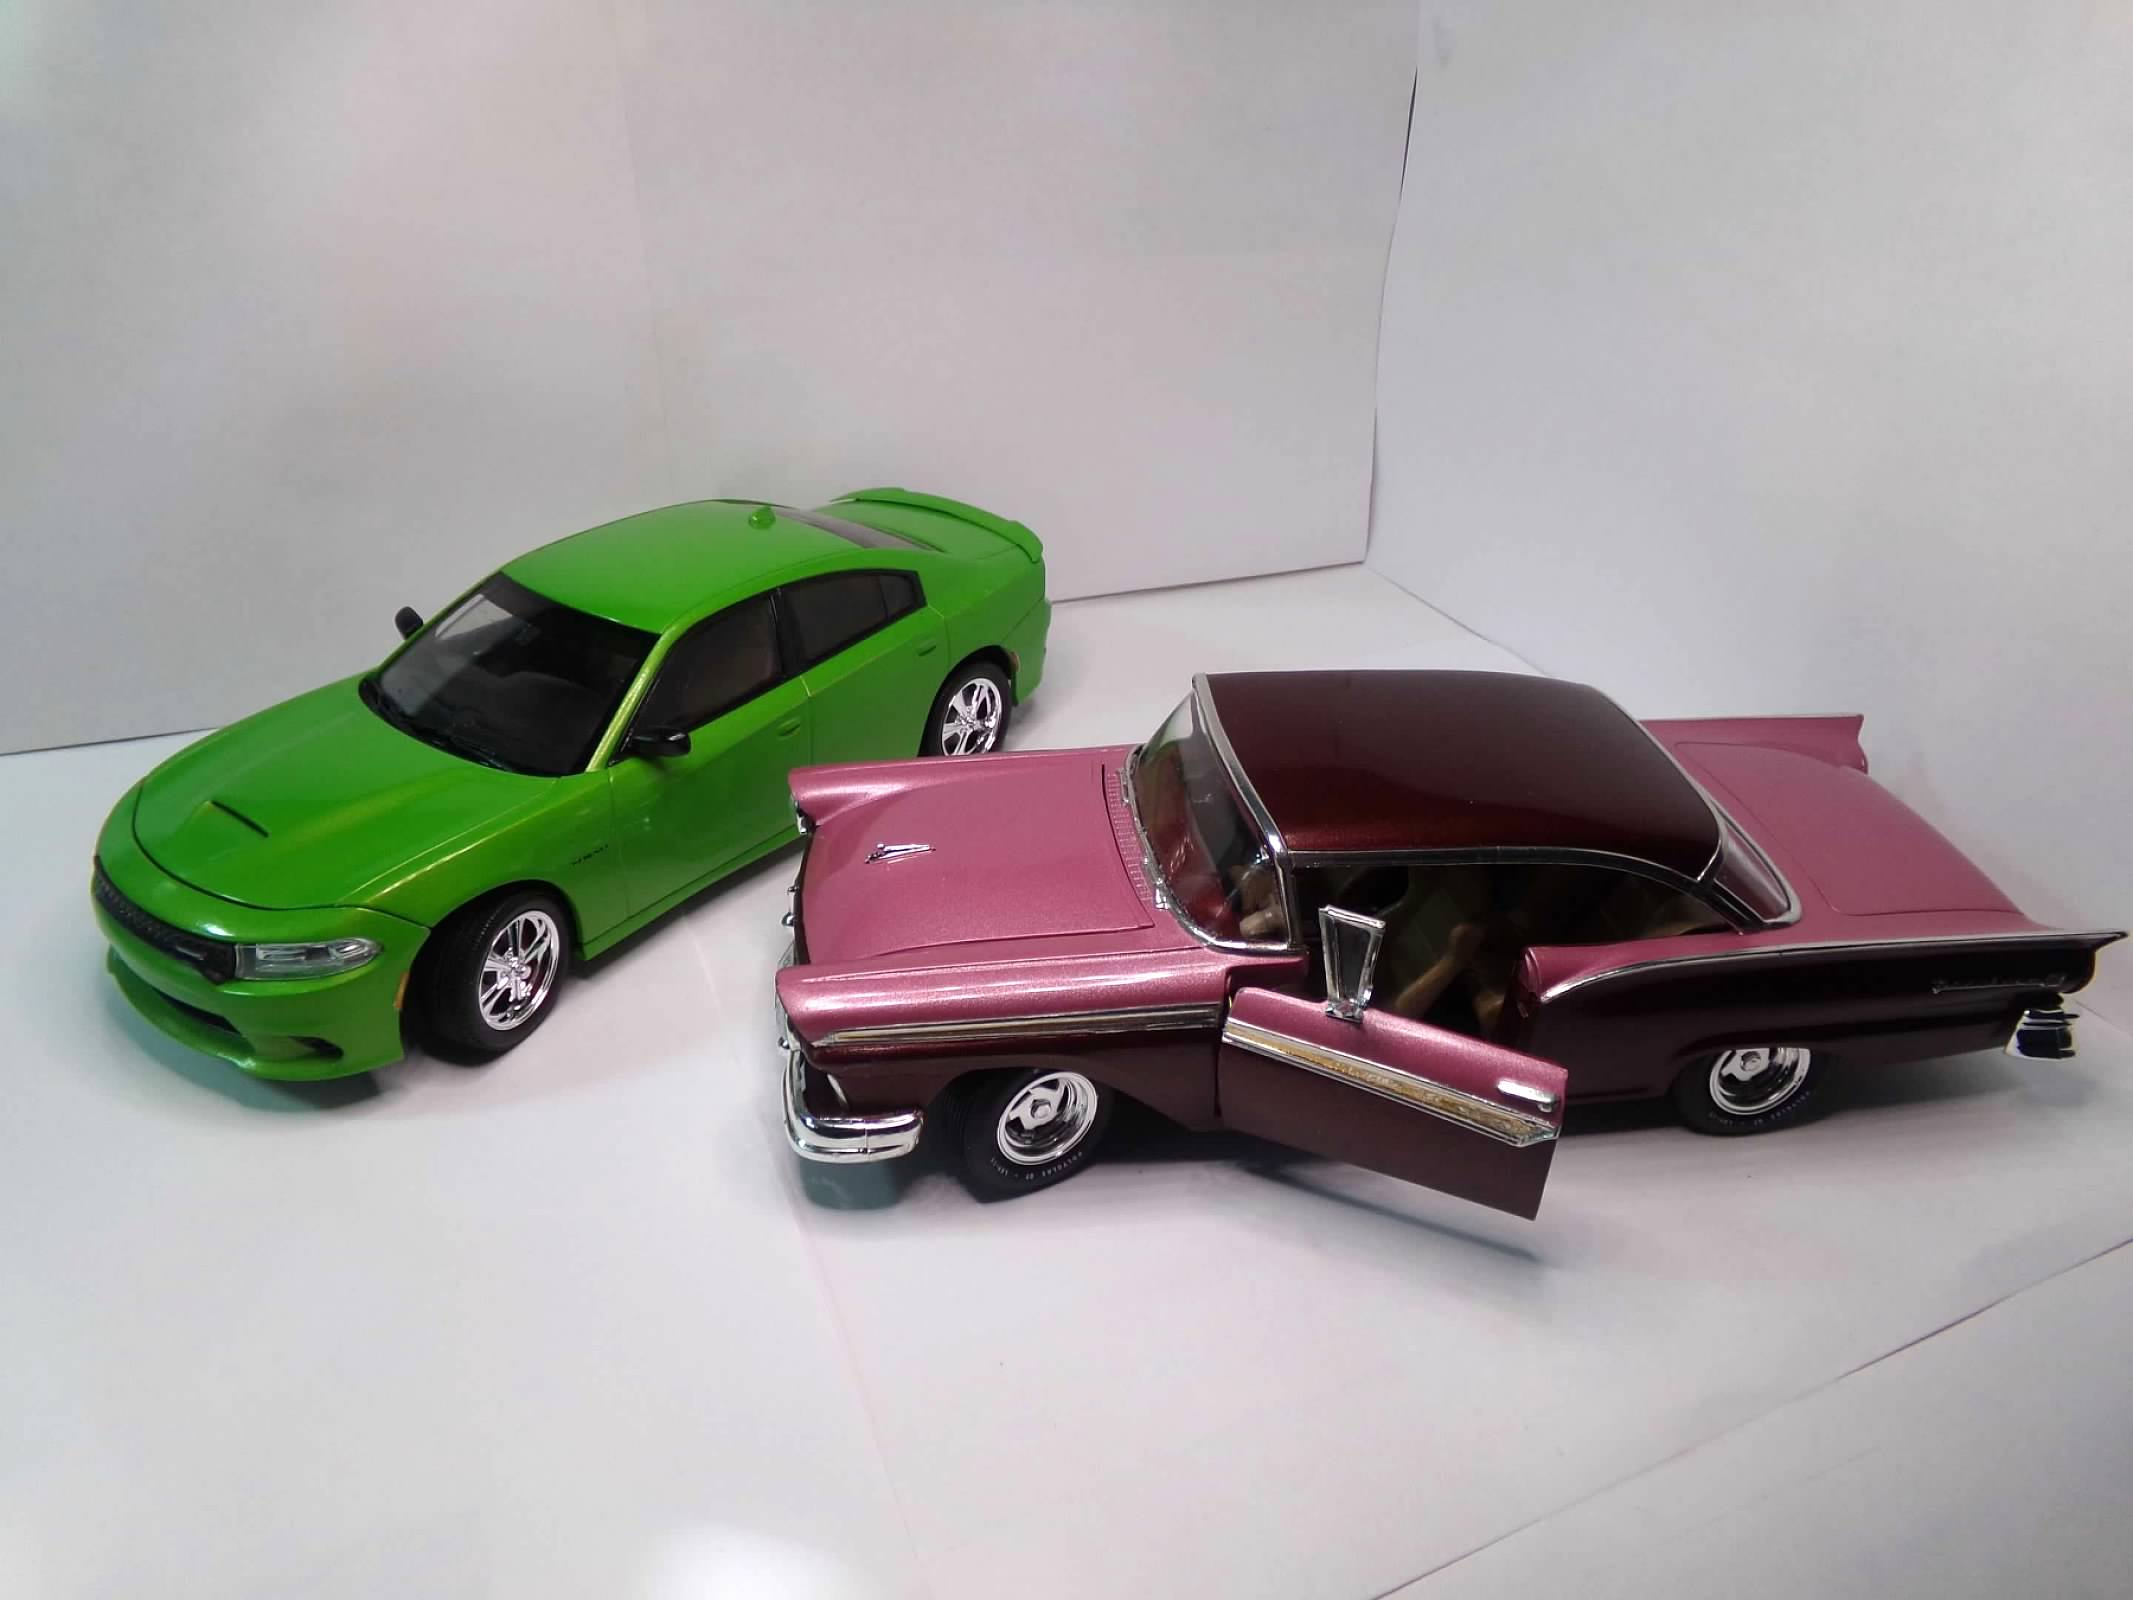
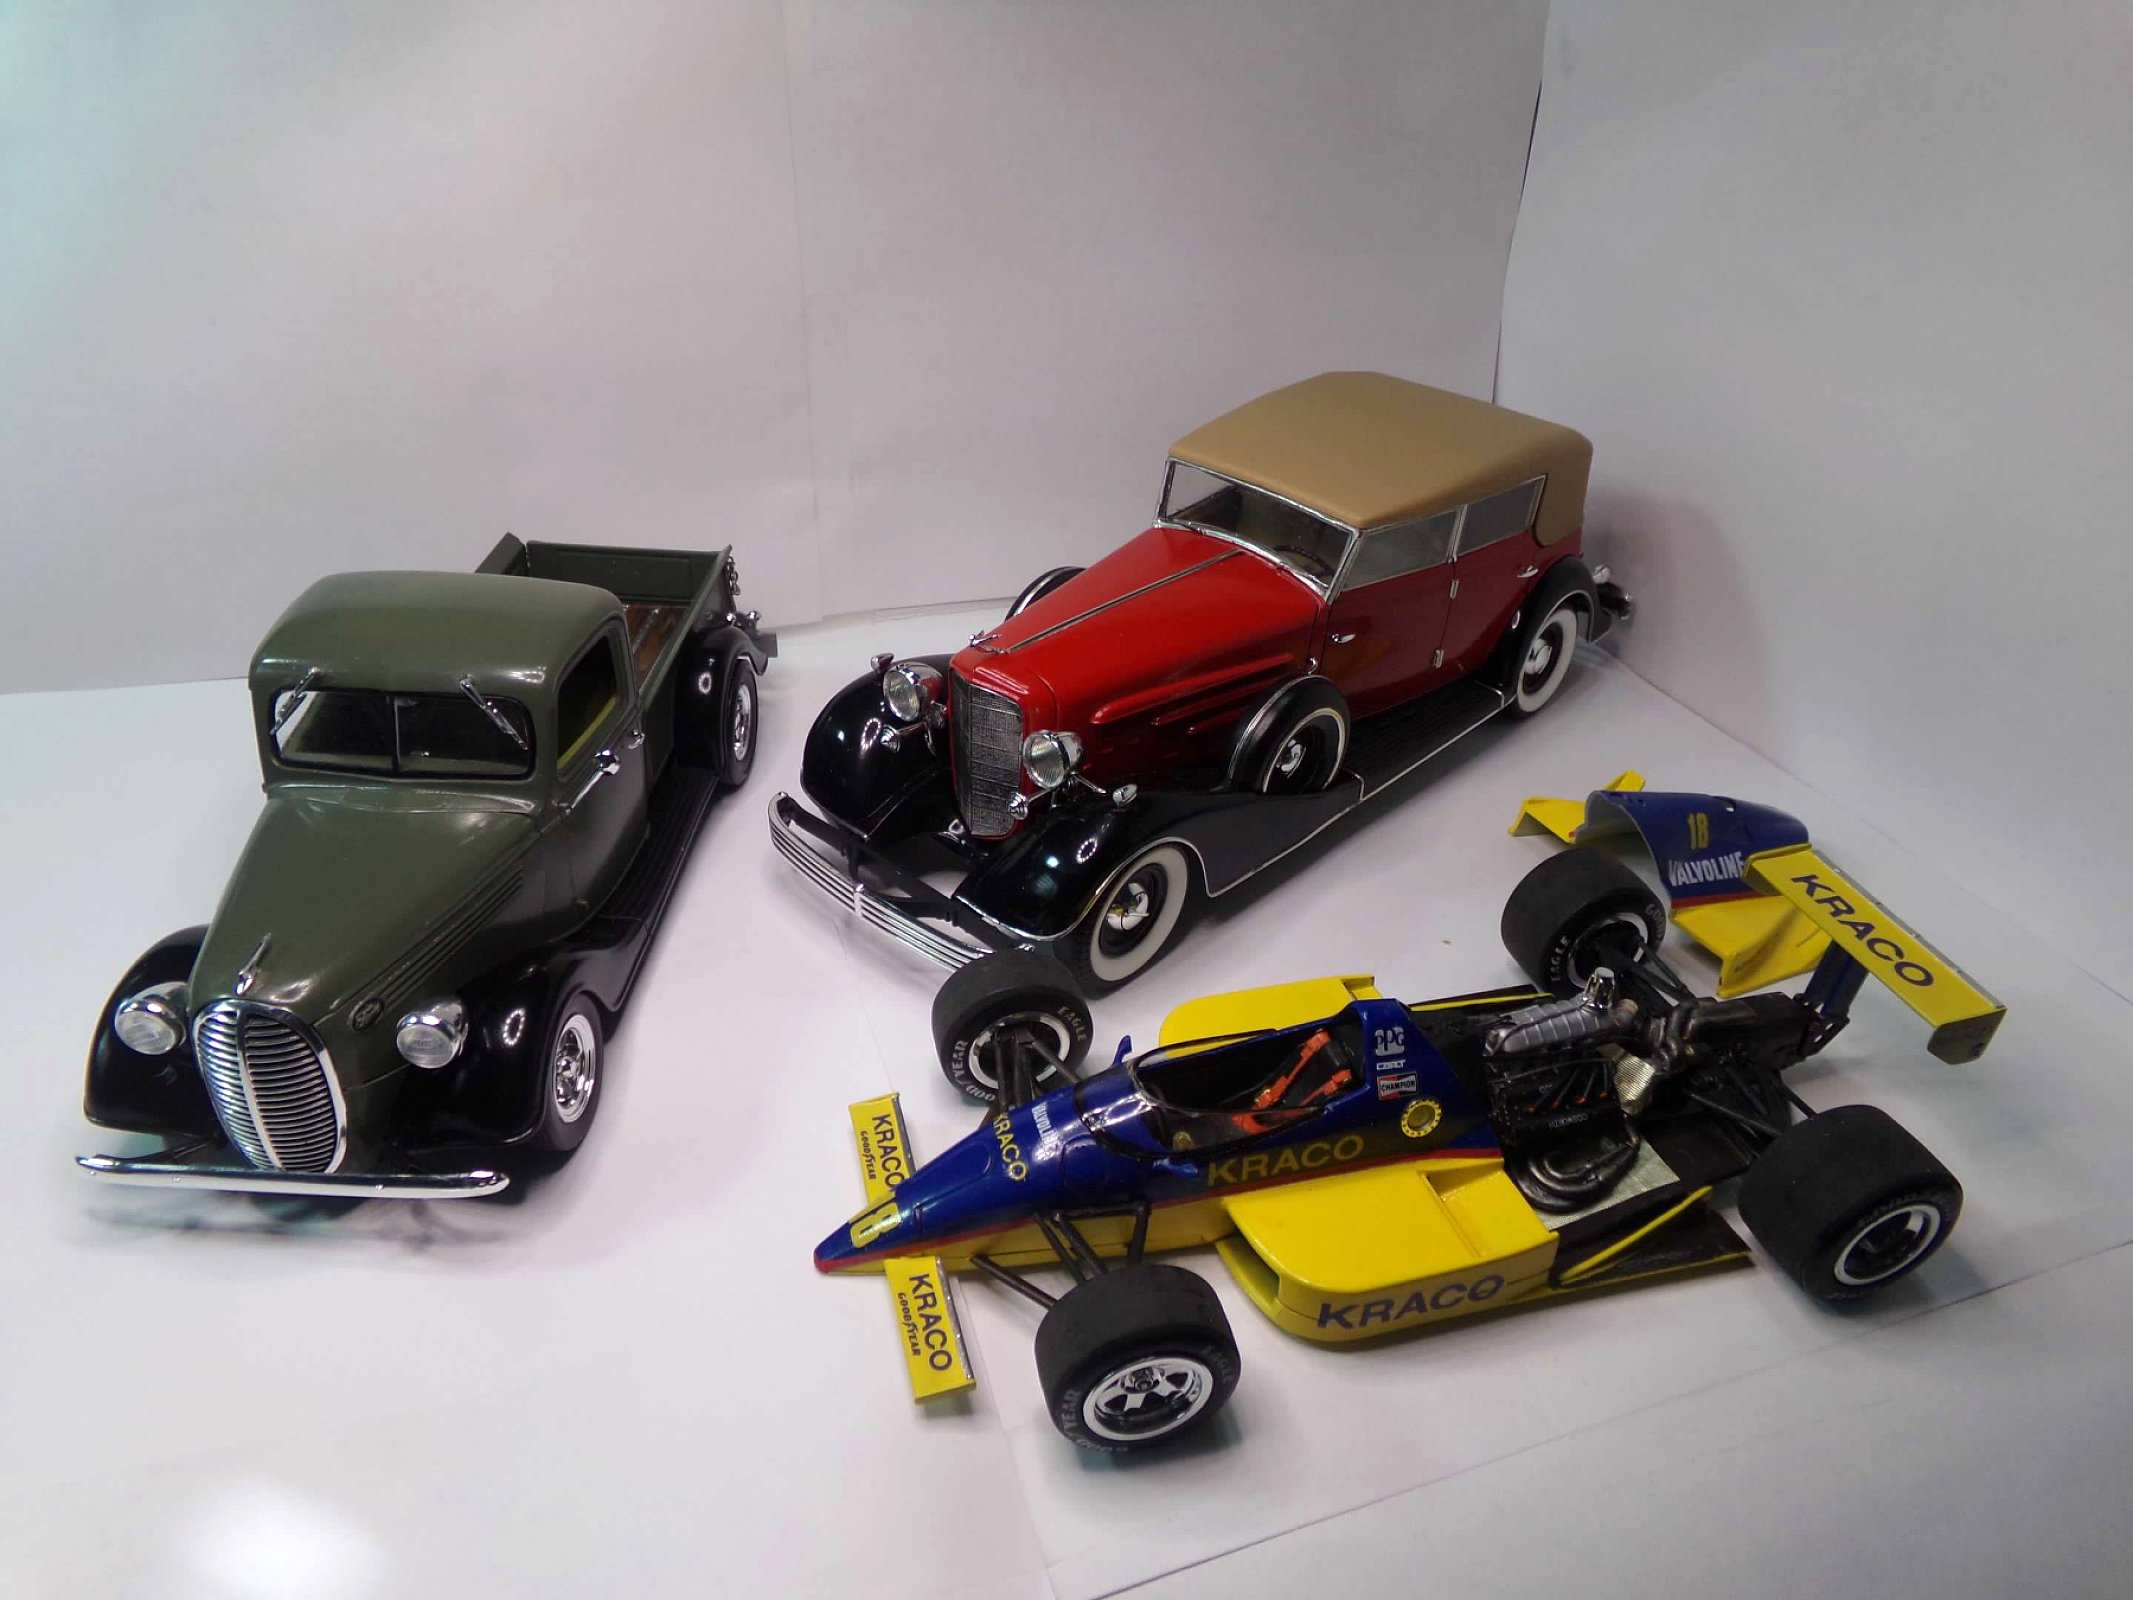
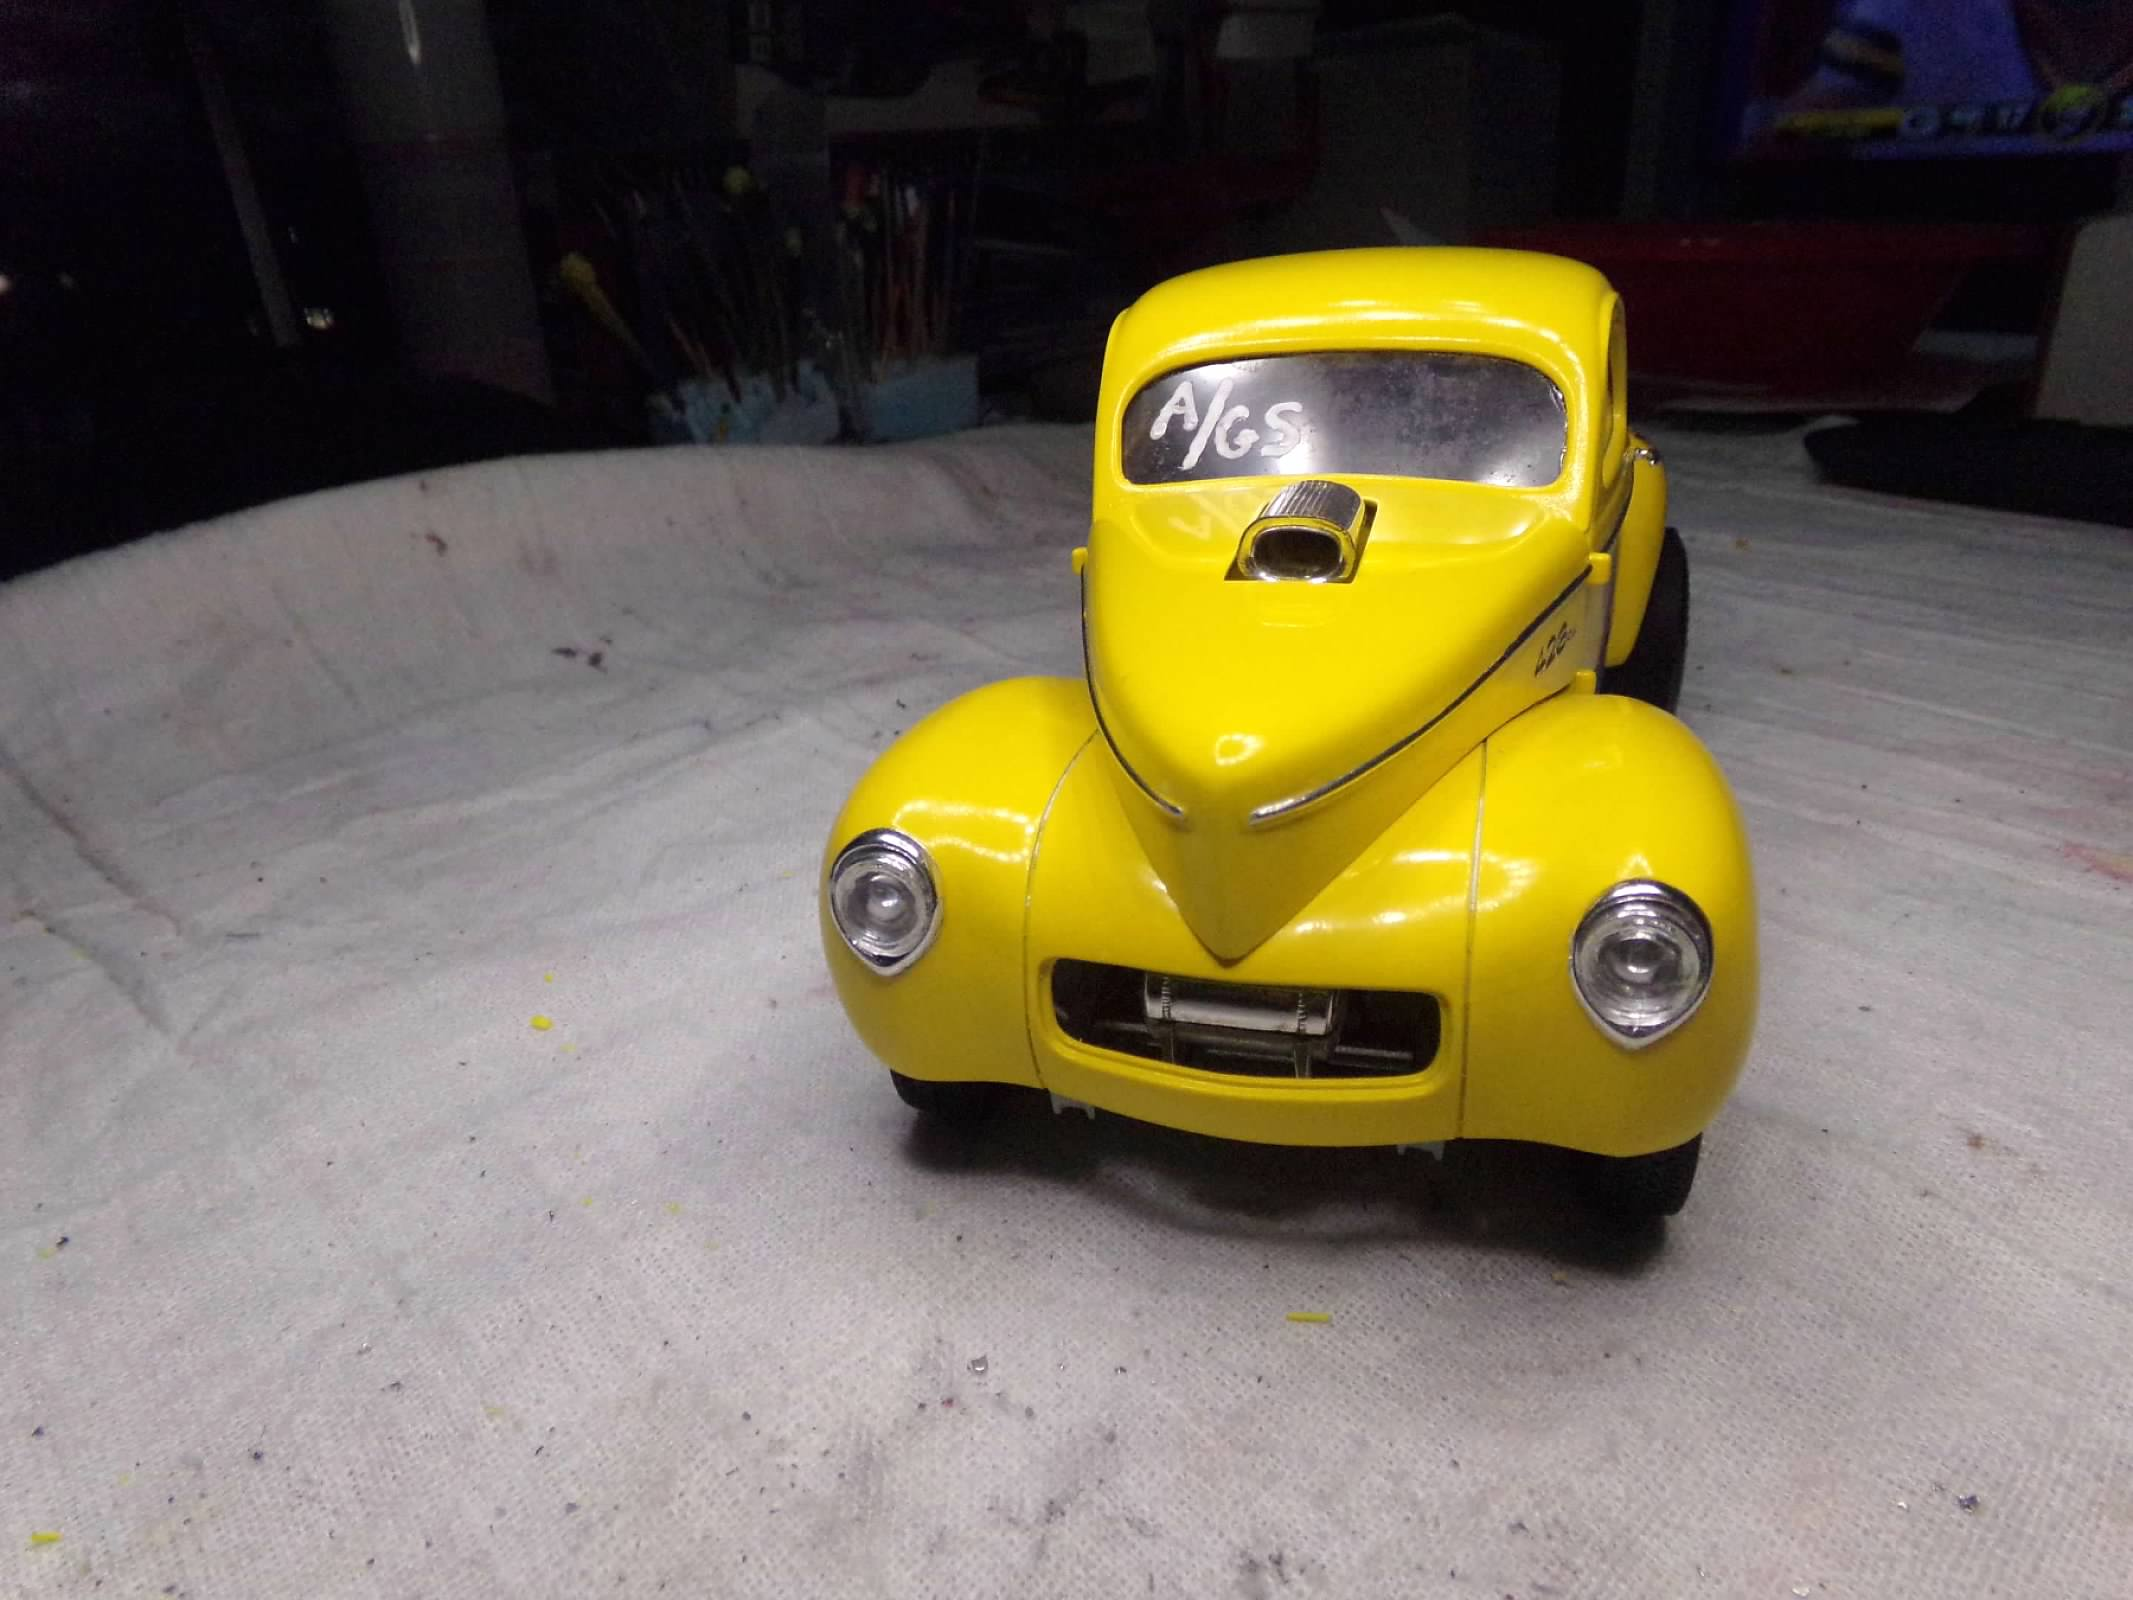
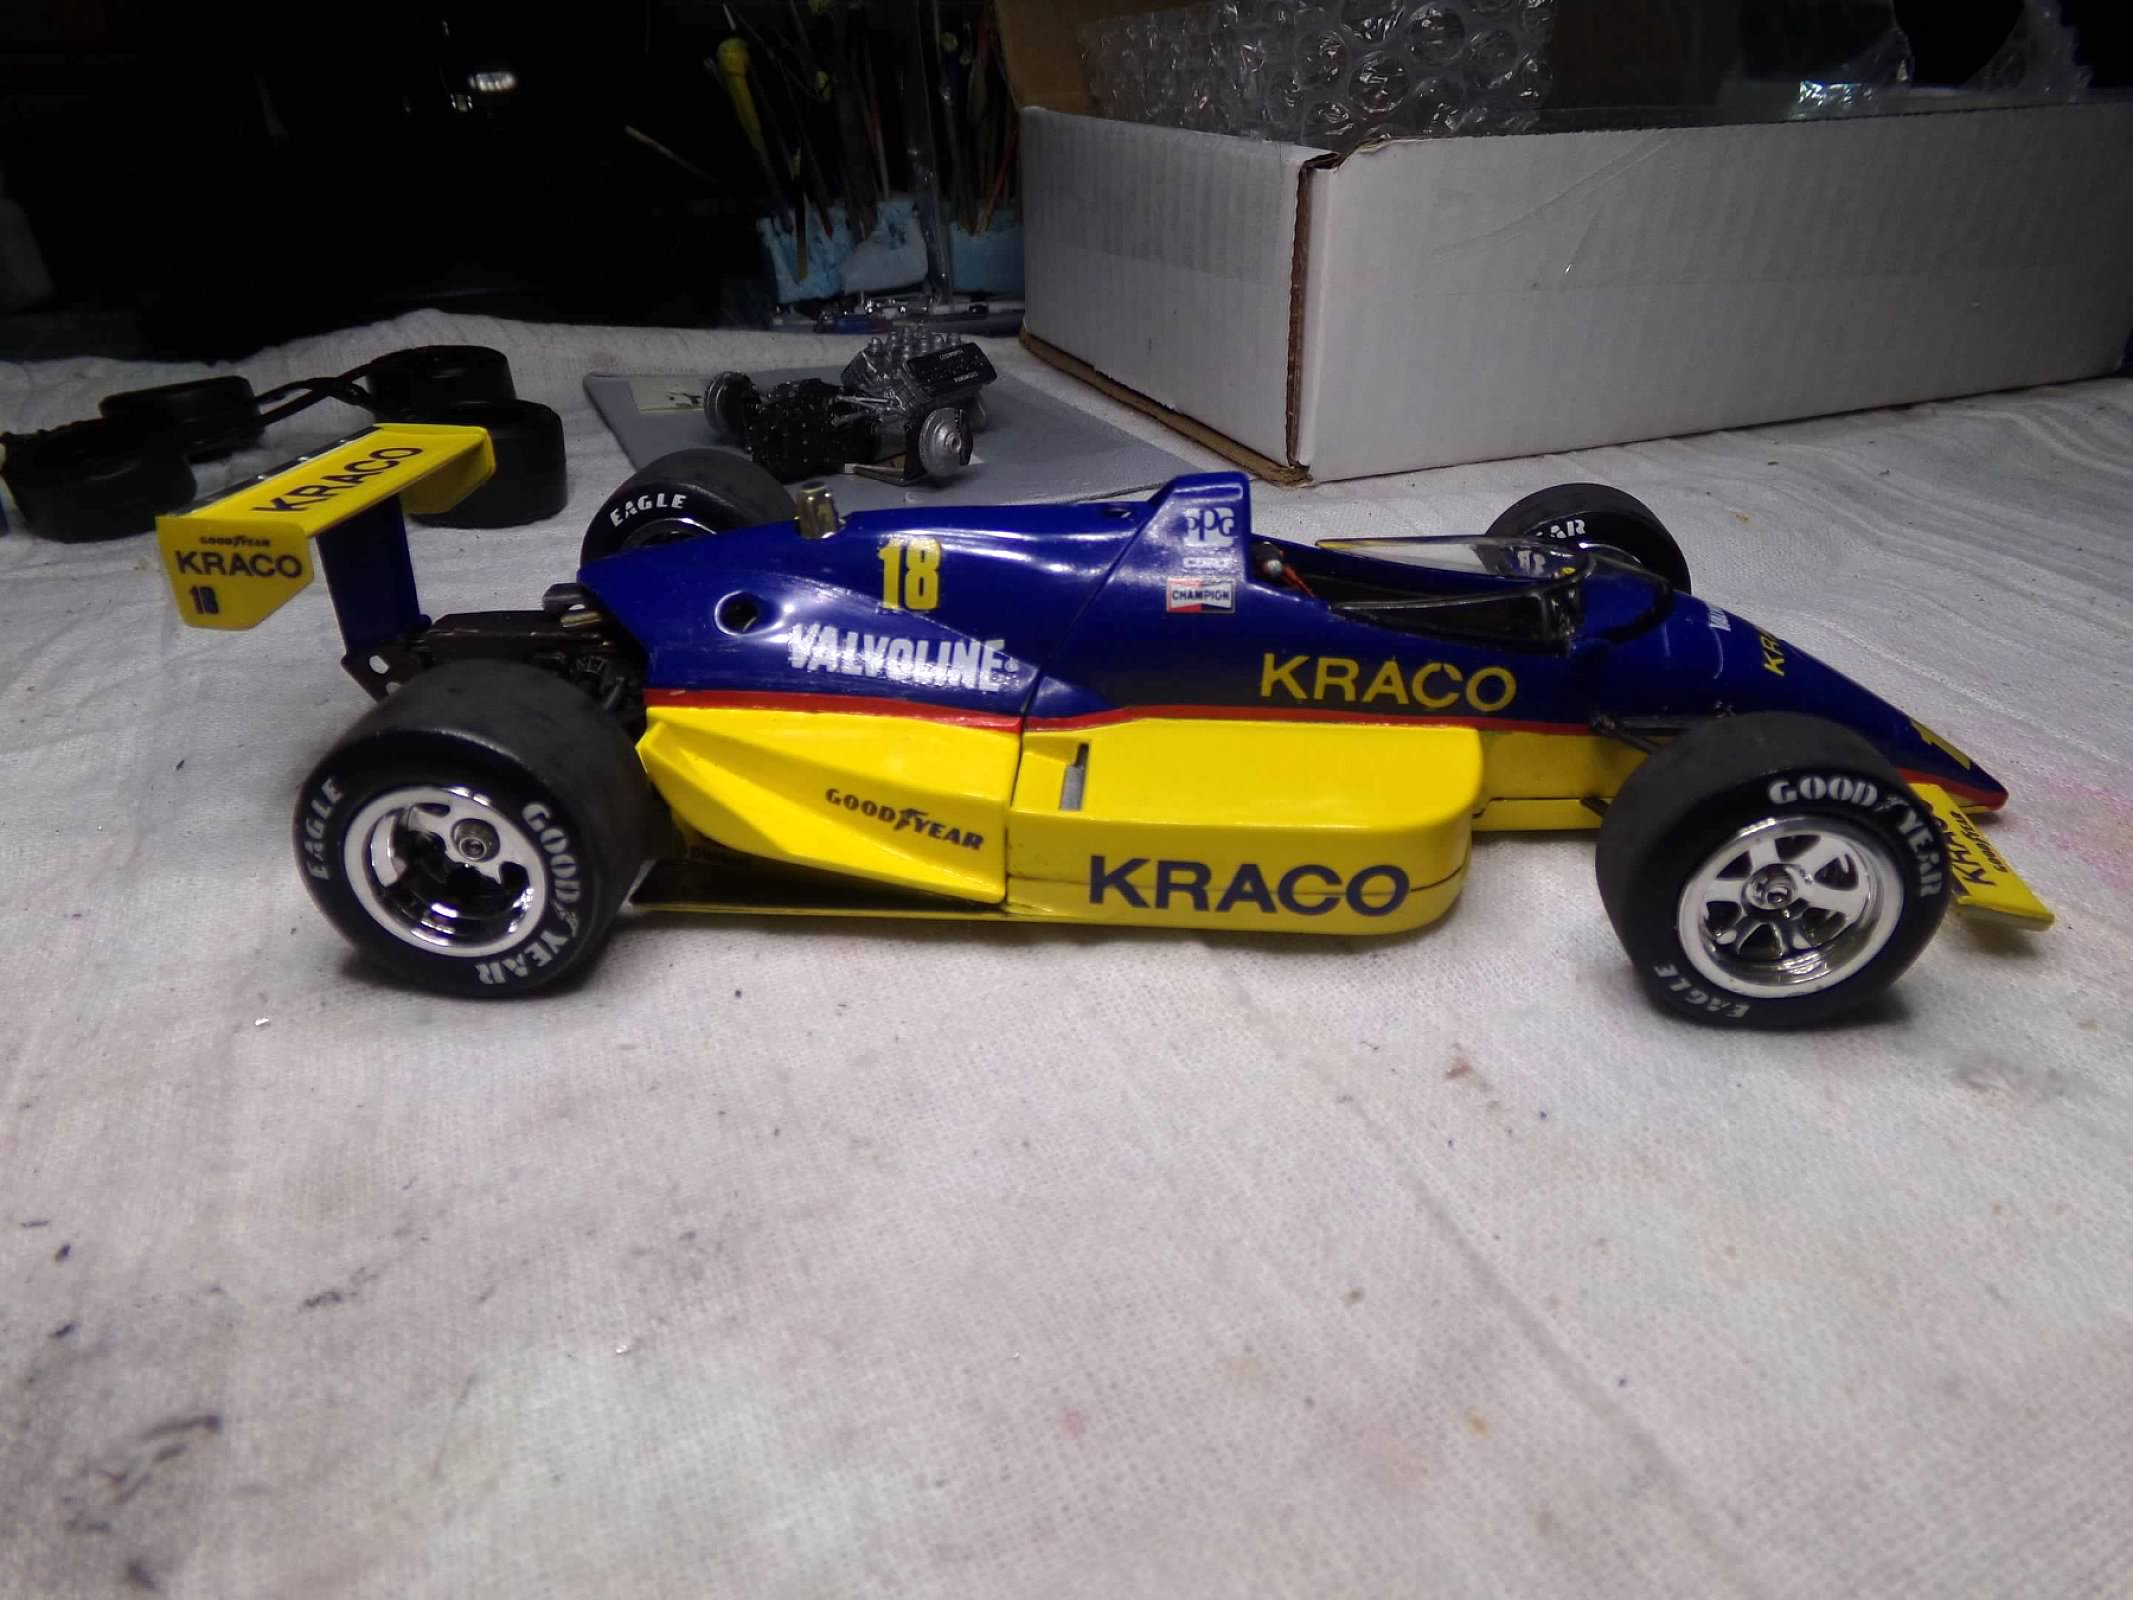
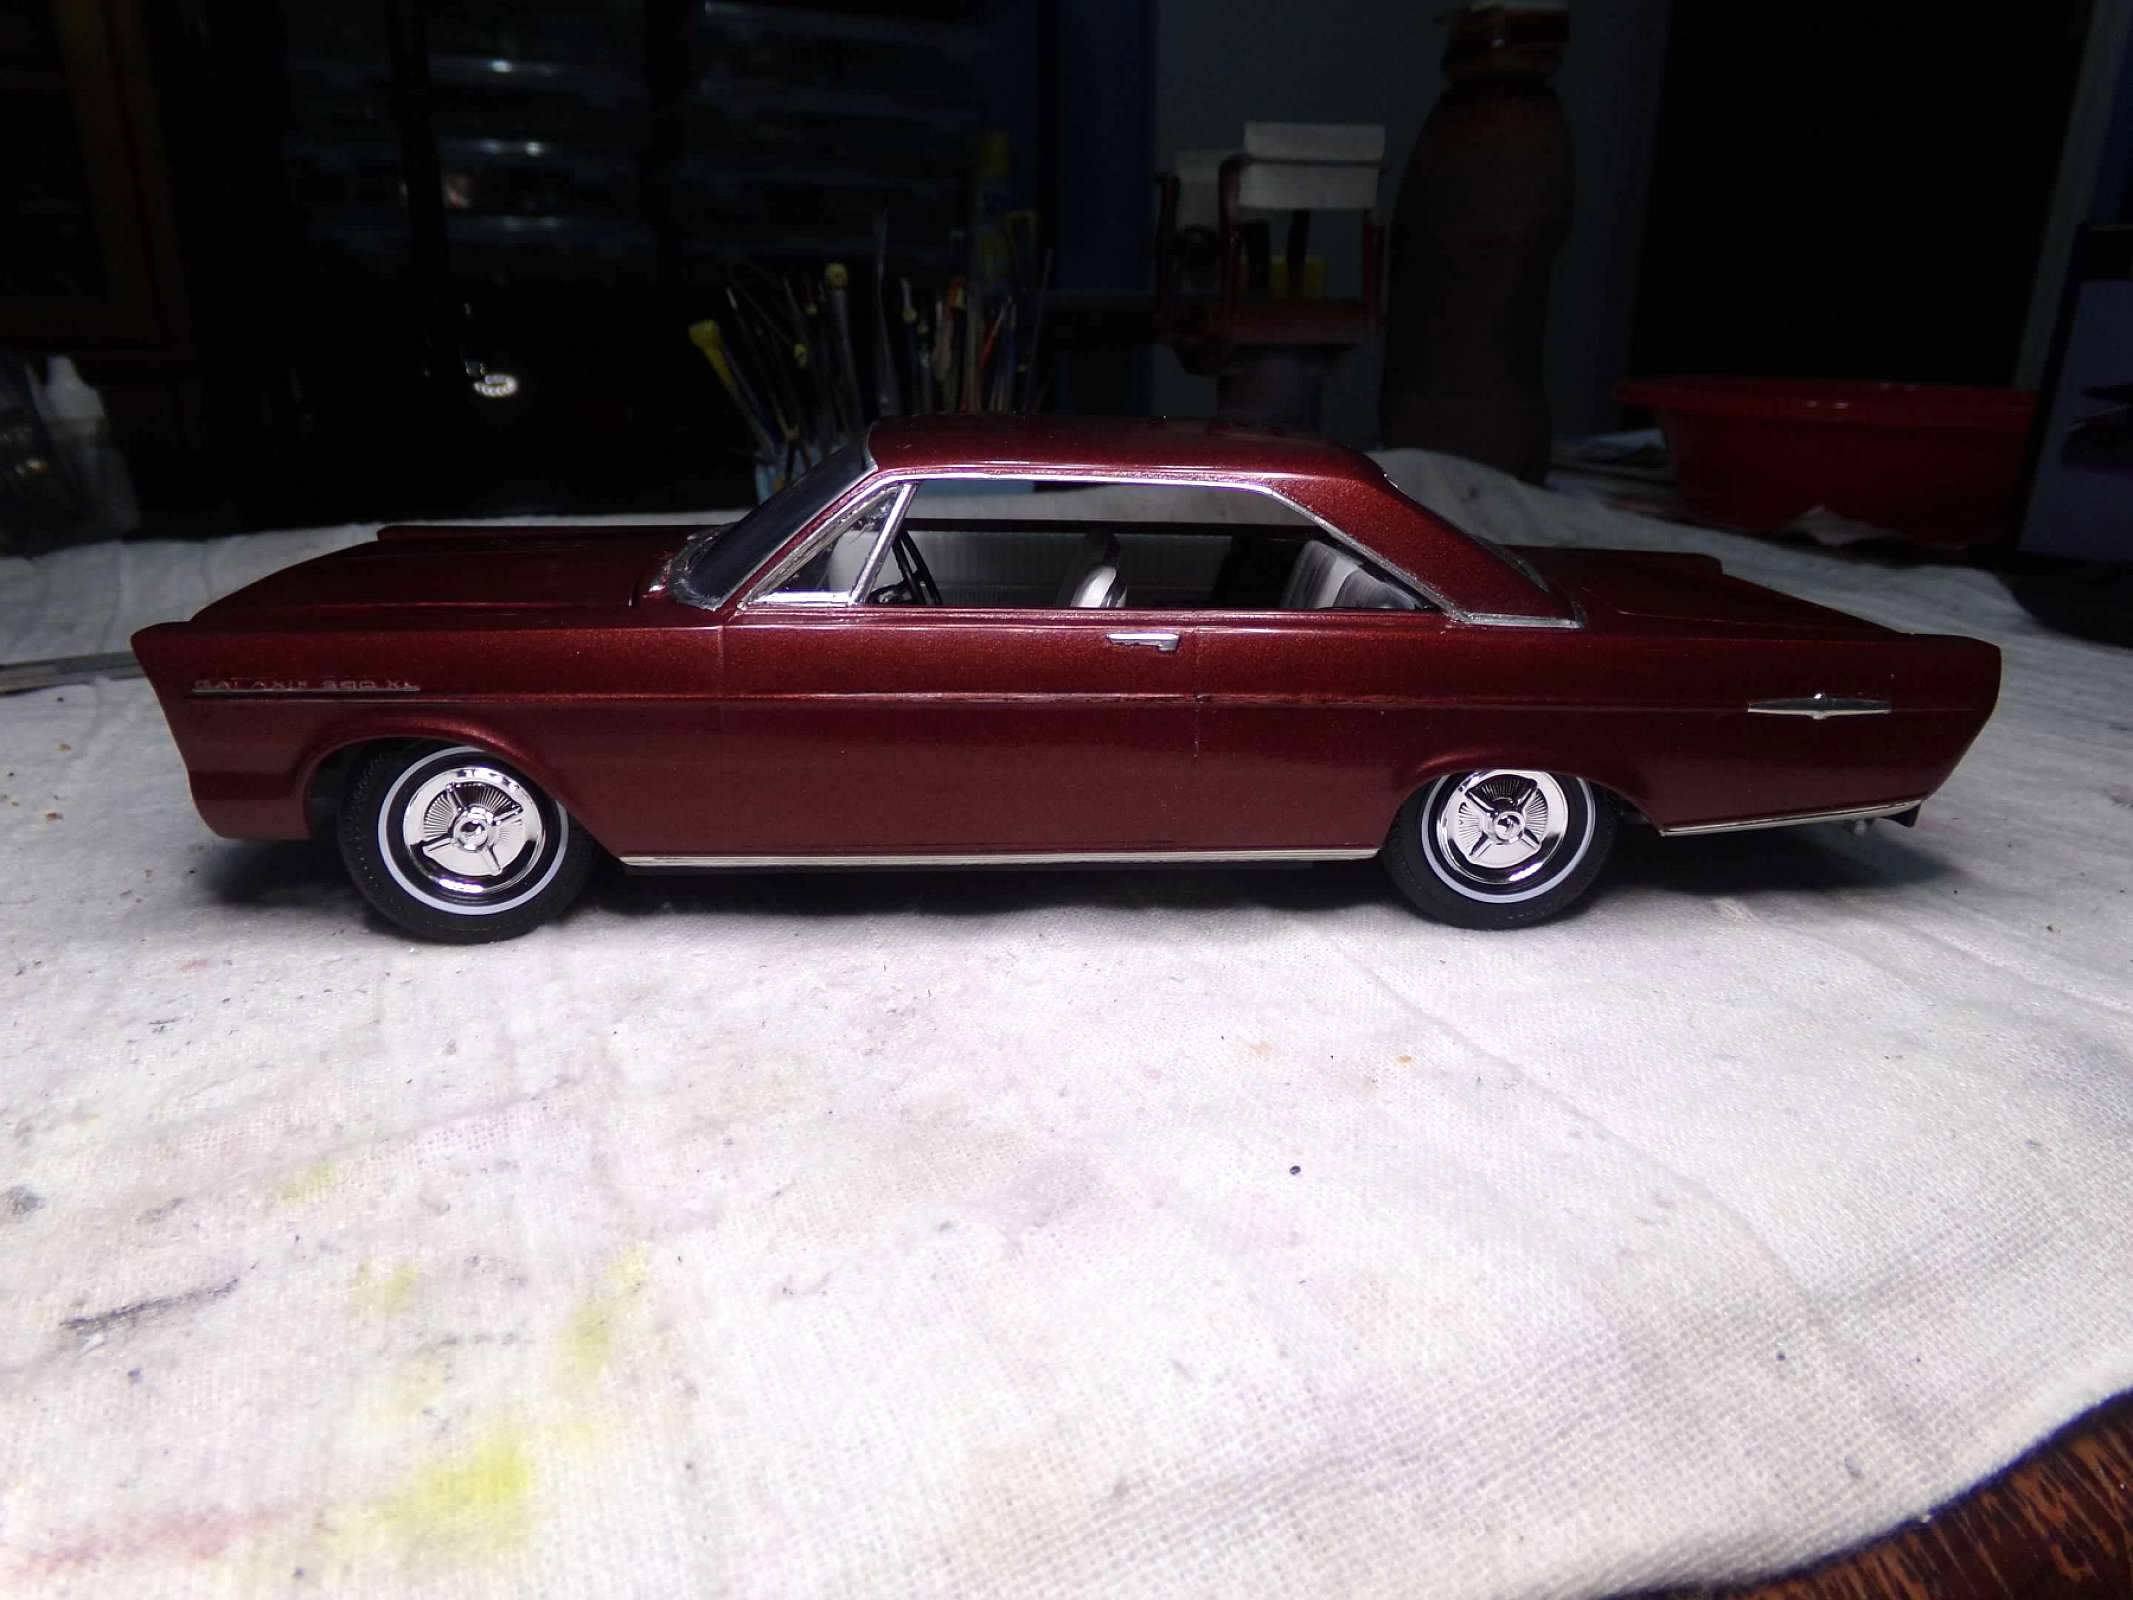
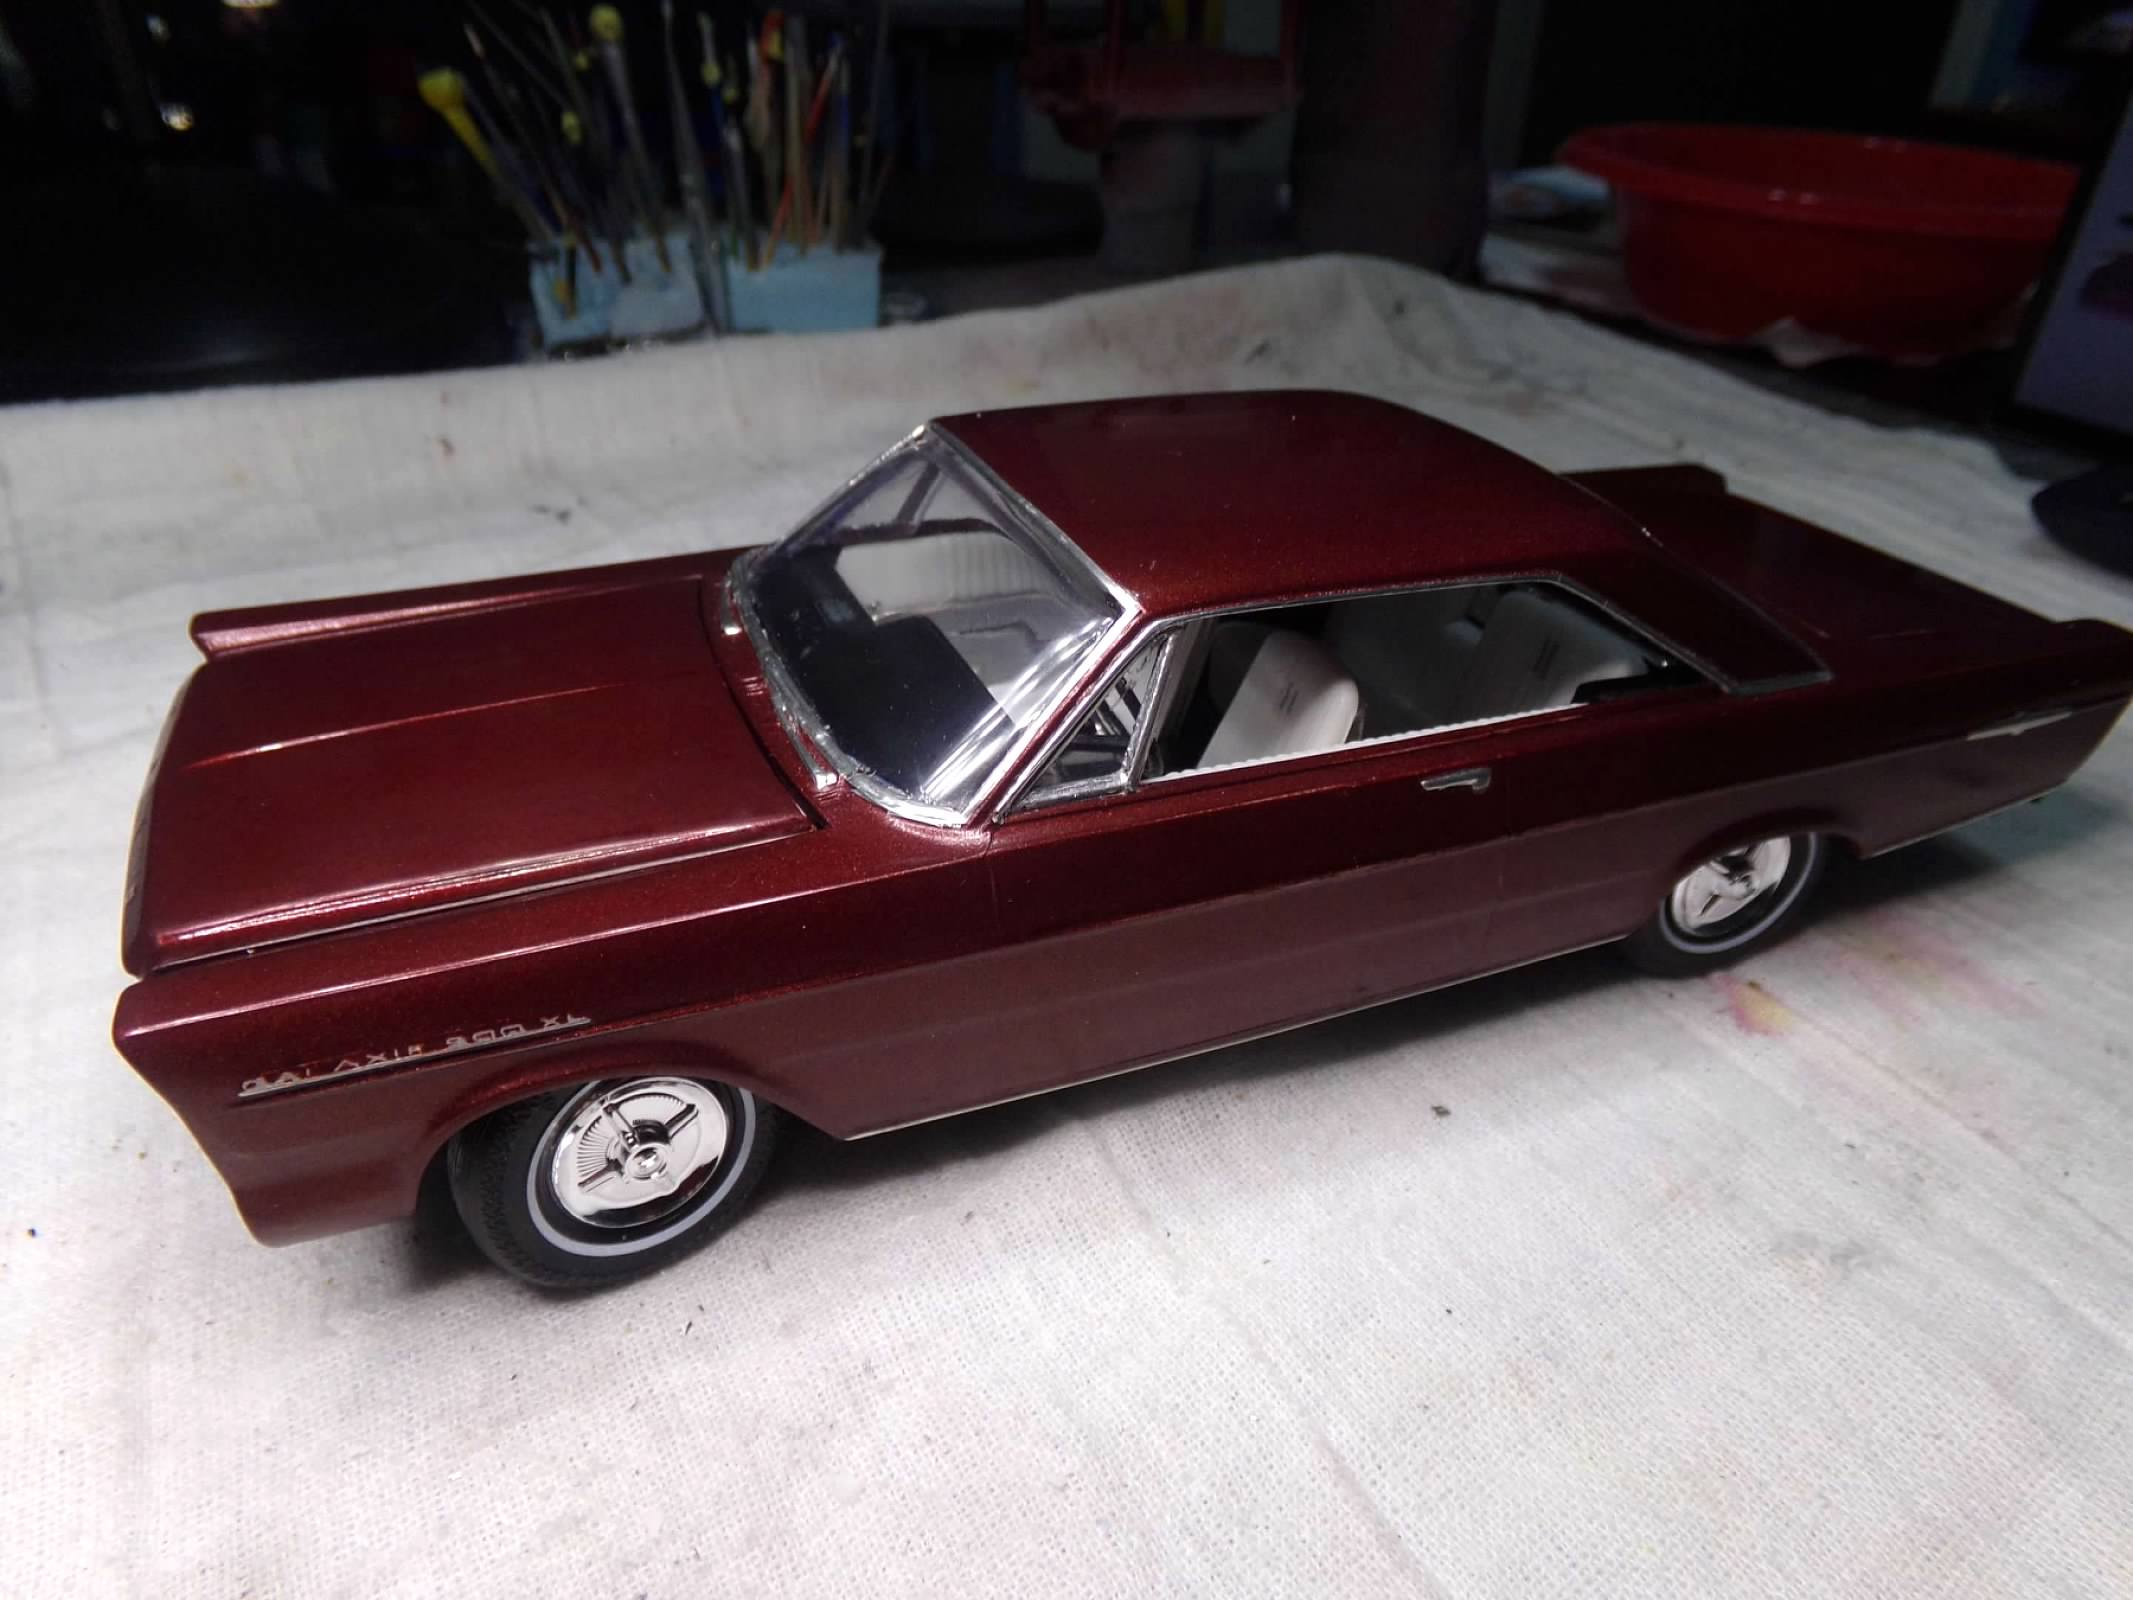
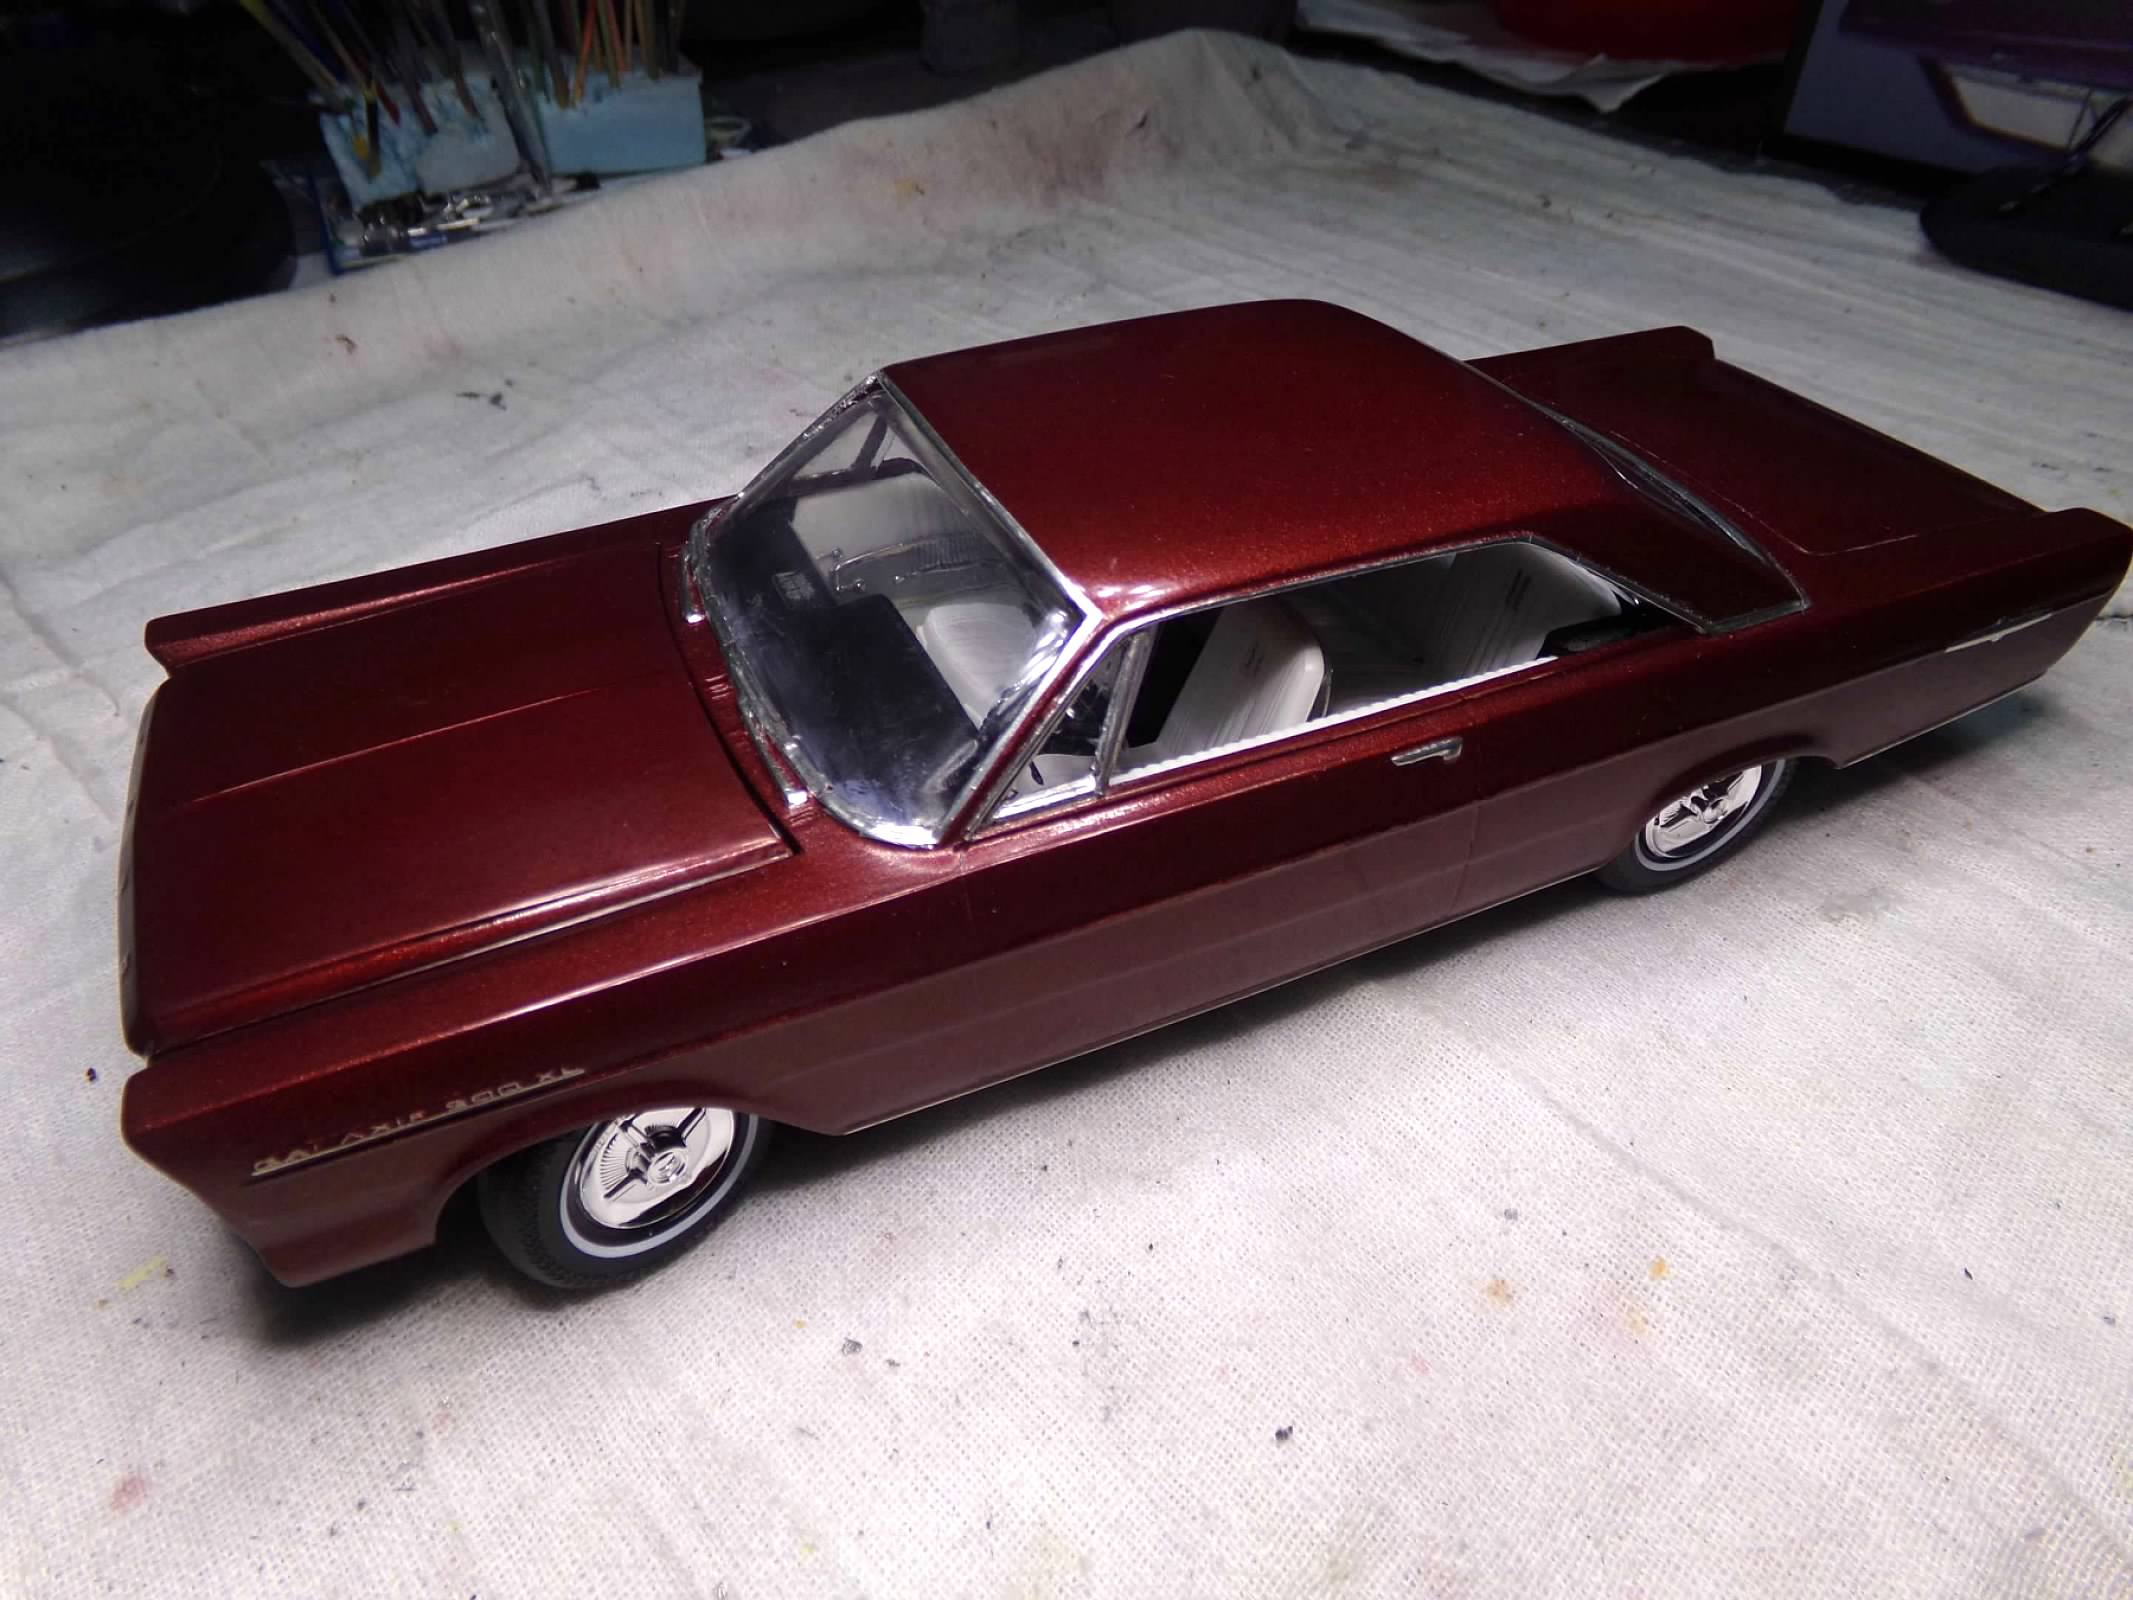
I built 31 models during 2023. Some turned out great, some turned out not so great and some were just OK. Here's just a few arranged in my own view of the hobby! Keeping it Fun! I started the year repairing this old Hawk Weird-OH Li'l Digger! It had fallen off the shelf years ago and I stuck it in a box and stuck it in the closet. It was the first one I re-built this year to remind me to keep it fun! I re-painted a number of faded parts and glued everything back together. A quick and easy fun project! The Bad and the Ugly These three builds were real disappointments so let me get them out of the way quickly. An MPC 75 Datsun pickup, the AMT Petty Short Track Sportsman, and the AMT 65 Ford Galaxie 500. I thought I would use Rustoleum Flat Gray Primer because of its darker color. What could go wrong? But I knew that Rustoleum was bad paint and then I forgot about the 24 hour rule and the additional note on the can: "Note: On plastic maximum paint adhesion and durability is achieved in 5-7 days." Bad paint and bad kit. Note to self; never use Rustoleum again. the two AMT kits were difficult to build. Getting the front wheels right on the Petty car was just a PITA. i tried to add some things like a window net and fire extinguisher but it just didn't do it for me. The 65 Ford body didn't like my first color, Tamiya Maroon and maybe it was a bad can so I had to strip it and re-paint with Dupli-Color Dark Toreador Metallic. The body finally came out OK but the rest of the kit is junk. No radiator hoses, no mirrors, poorly engraved interior, bad window glass, and sloppy poseable steering. Its the Paint, the Paint, the Paint! The 56 Del Ray is painted with a mix of an old bottle of MCW Yellow Gold, a Dodge color, and a mark-down bottle of drab green nail polish. I mixed my own Crocus and airbrushed it. The black is Dupli-Color. The Dodge Monaco (its the Joker Goon Car kit) is painted with Krylon Avocado Satin, with a Krylon Ivory Satin vinyl top. I wouldn't try it with any of the Krylon gloss paint but since its satin with a clear on the body it worked out well. The Willys is painted with Tamiya Orange and Dupli-Color Black. It was built around Halloween, hence the colors and the finish came out great! First place in one contest. Winners Each of these placed in the Houston Space City Shootout. All are painted with Dupli-Color from a rattle can. The 48 Ford was built box stock and finished third in that category. The 57 Chevy was built as a Boyd Coddington tribute to the "Chubster" and took third place in Custom. The 71 Olds 442 W-30 was painted Dark Toreador Metallic and is probably the best "new tool" I have built this year. It took 2nd place in Factory Stock and was published in the contest coverage of Model Car Magazine's latest issue. Three Tees I built these T's box stock with wild colors. A chopped T, a stock T, and Tweety Pie 2. Wild Paint The Charger was a pleasant surprise as it is the 2nd best "new tool" I've built this year. The paint is Tamiya Candy Lime Green and is close to Sublime Green so it makes a convincing replica of an actual car. The 57 Ford Fairlane is a very old kit that I painted Tamiya Light Red Pearl with Dupli-Color Dark Toreador Metallic. its a real change from the standard red and white one. The Surprises Last, but not least, are the Surprises. I was very pleasantly surprised by the 37 Ford Pick-up. I received this one as a birthday present from my grandsons. it almost fell into place and the Krylon Satin Italian Olive and Dupli-color Black look like they were just made for it and go together well. The 33 Cadillac Fleetwood All Weather Phaeton is and old Testors/Italeri kit that I bought on a discount in the 90s and I have been moving it around in the closet for years because I thought it would be nothing but trouble with its multi-piece frame and body. To my surprise, it went together easily and looks great! Finally, I just finished the old AMT Kraco Special Indy 500 Michael Andretti race car. I build a few Indy 500 cars and I thought that this would just be a routine box stock build but it built up well and I was able to add some wiring, plumbing and IndyCals tire decals, all of which made a big difference and makes it a standout. So that's it for the year - not all of them but the ones that are memorable for various reasons. Thanks for looking and Happy New Year's Modeling!

-
Replica of my 1969 GTO — My only one for 2023
ModelcarJR replied to Steve Geer's topic in Model Cars
Great looking GTO! Sorry about your 1:1! I had the same happen to me in an 85 Camaro. Crunch! ?? -
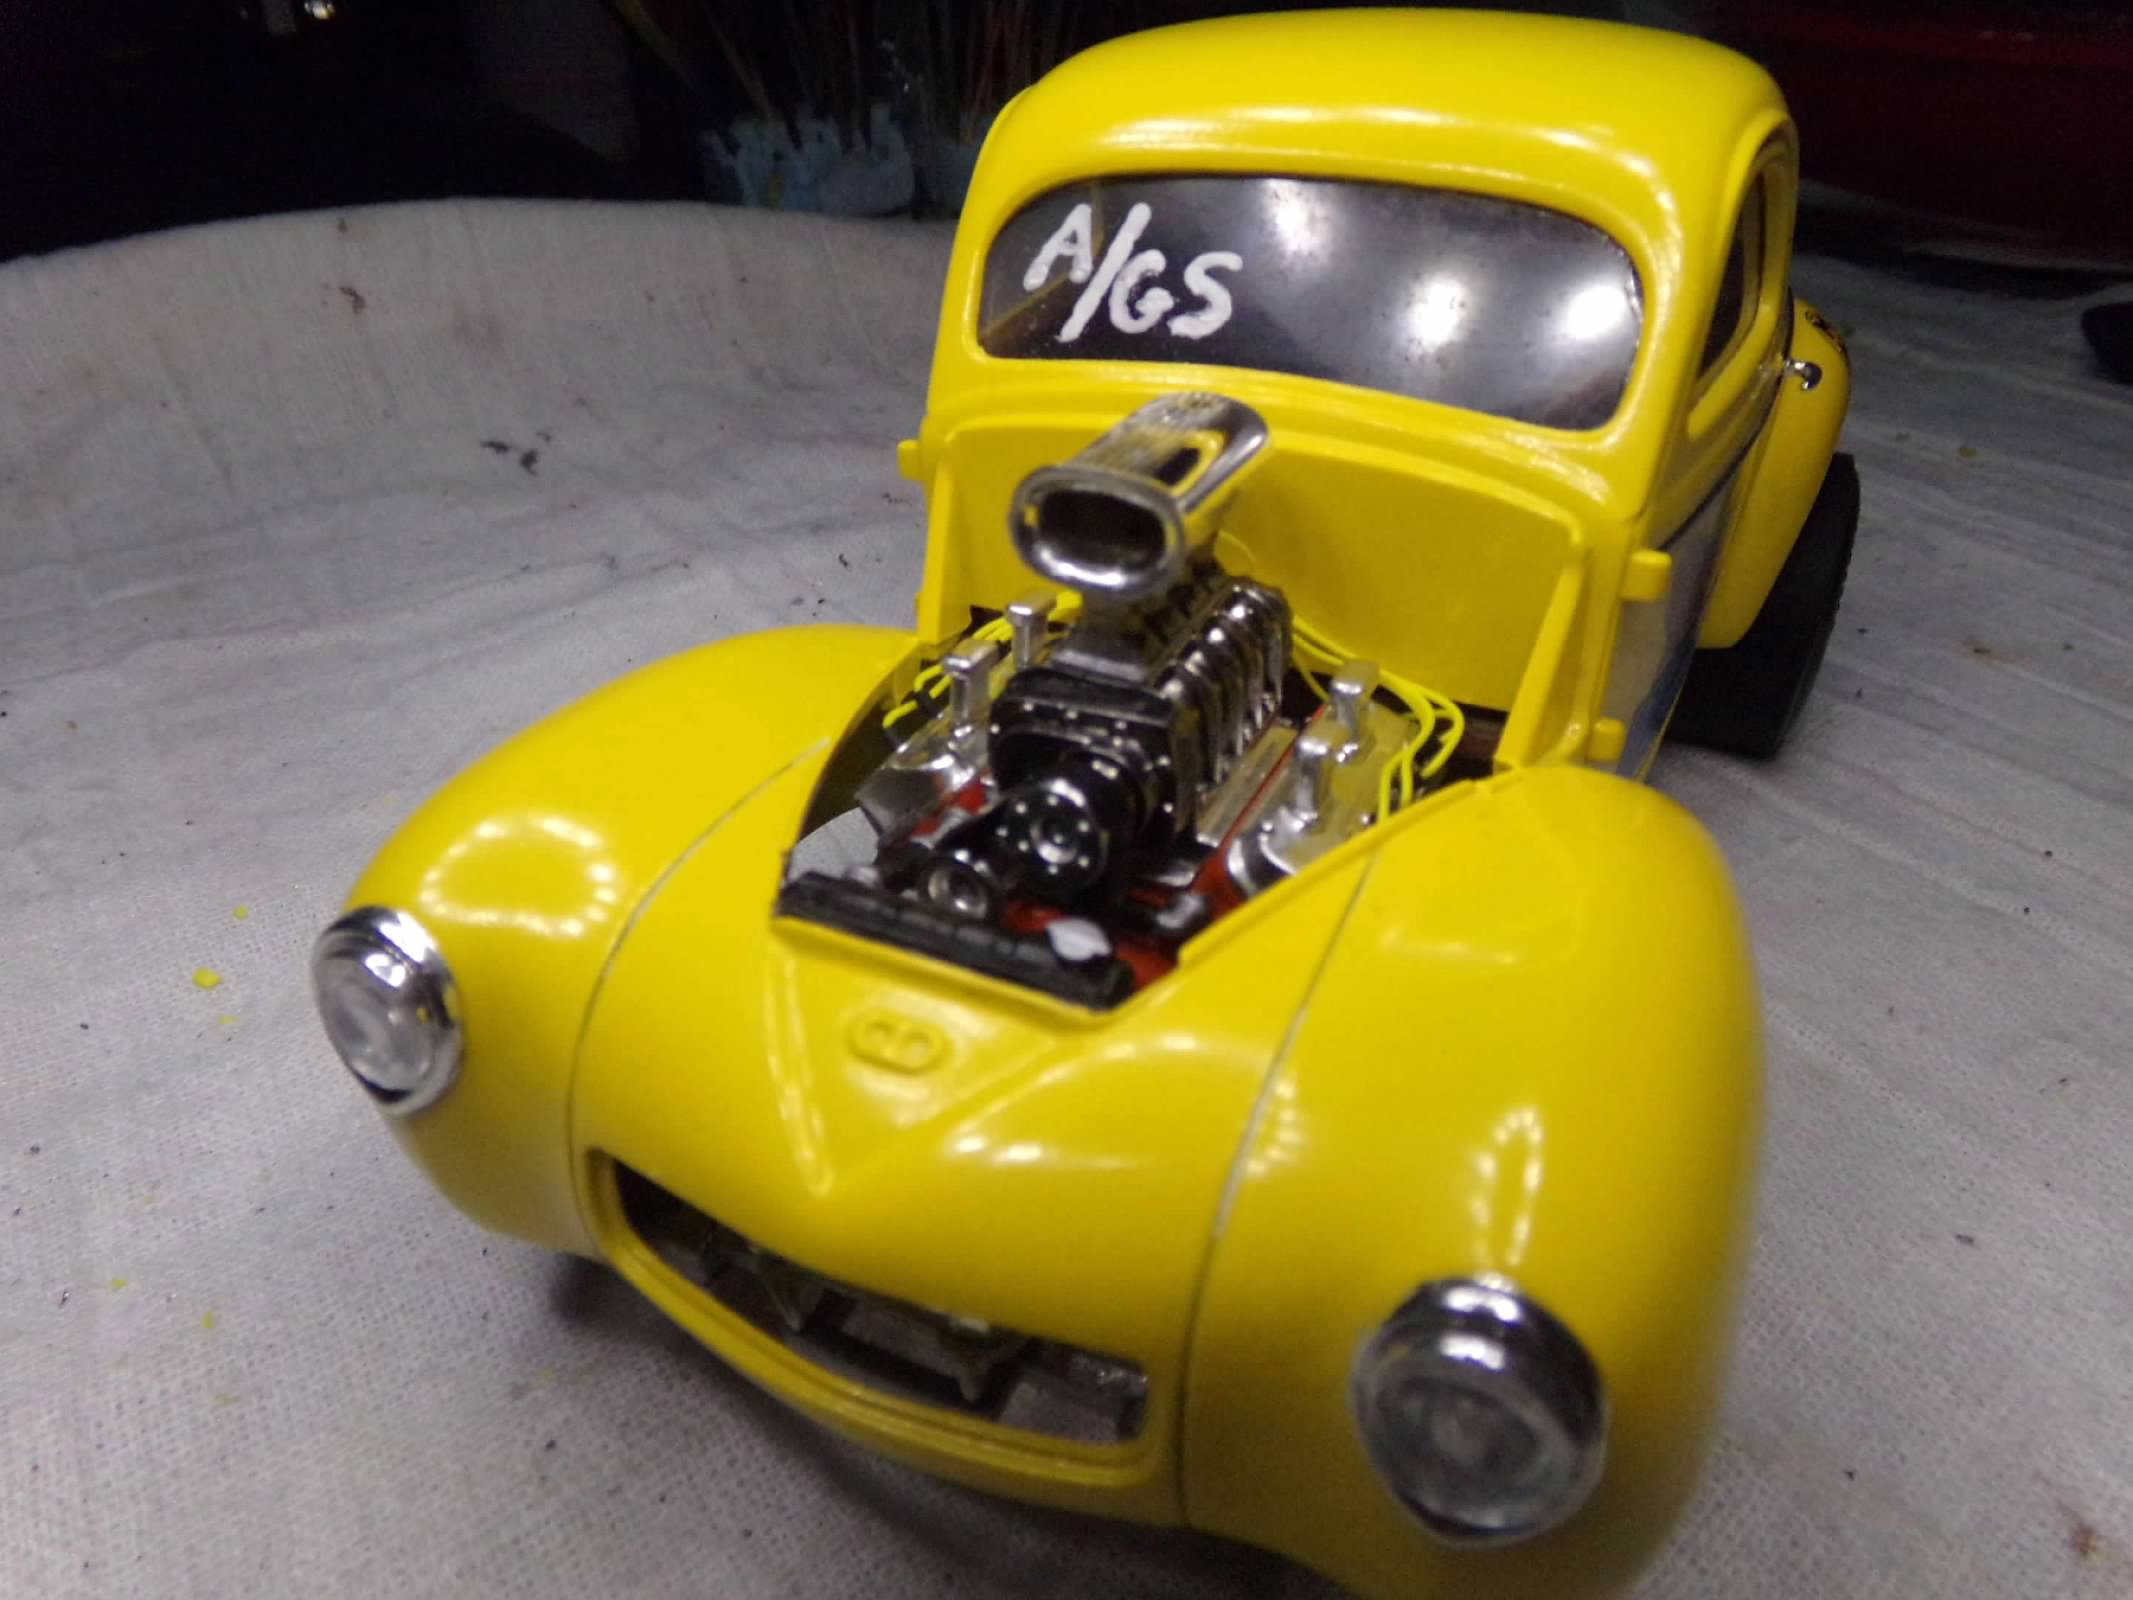
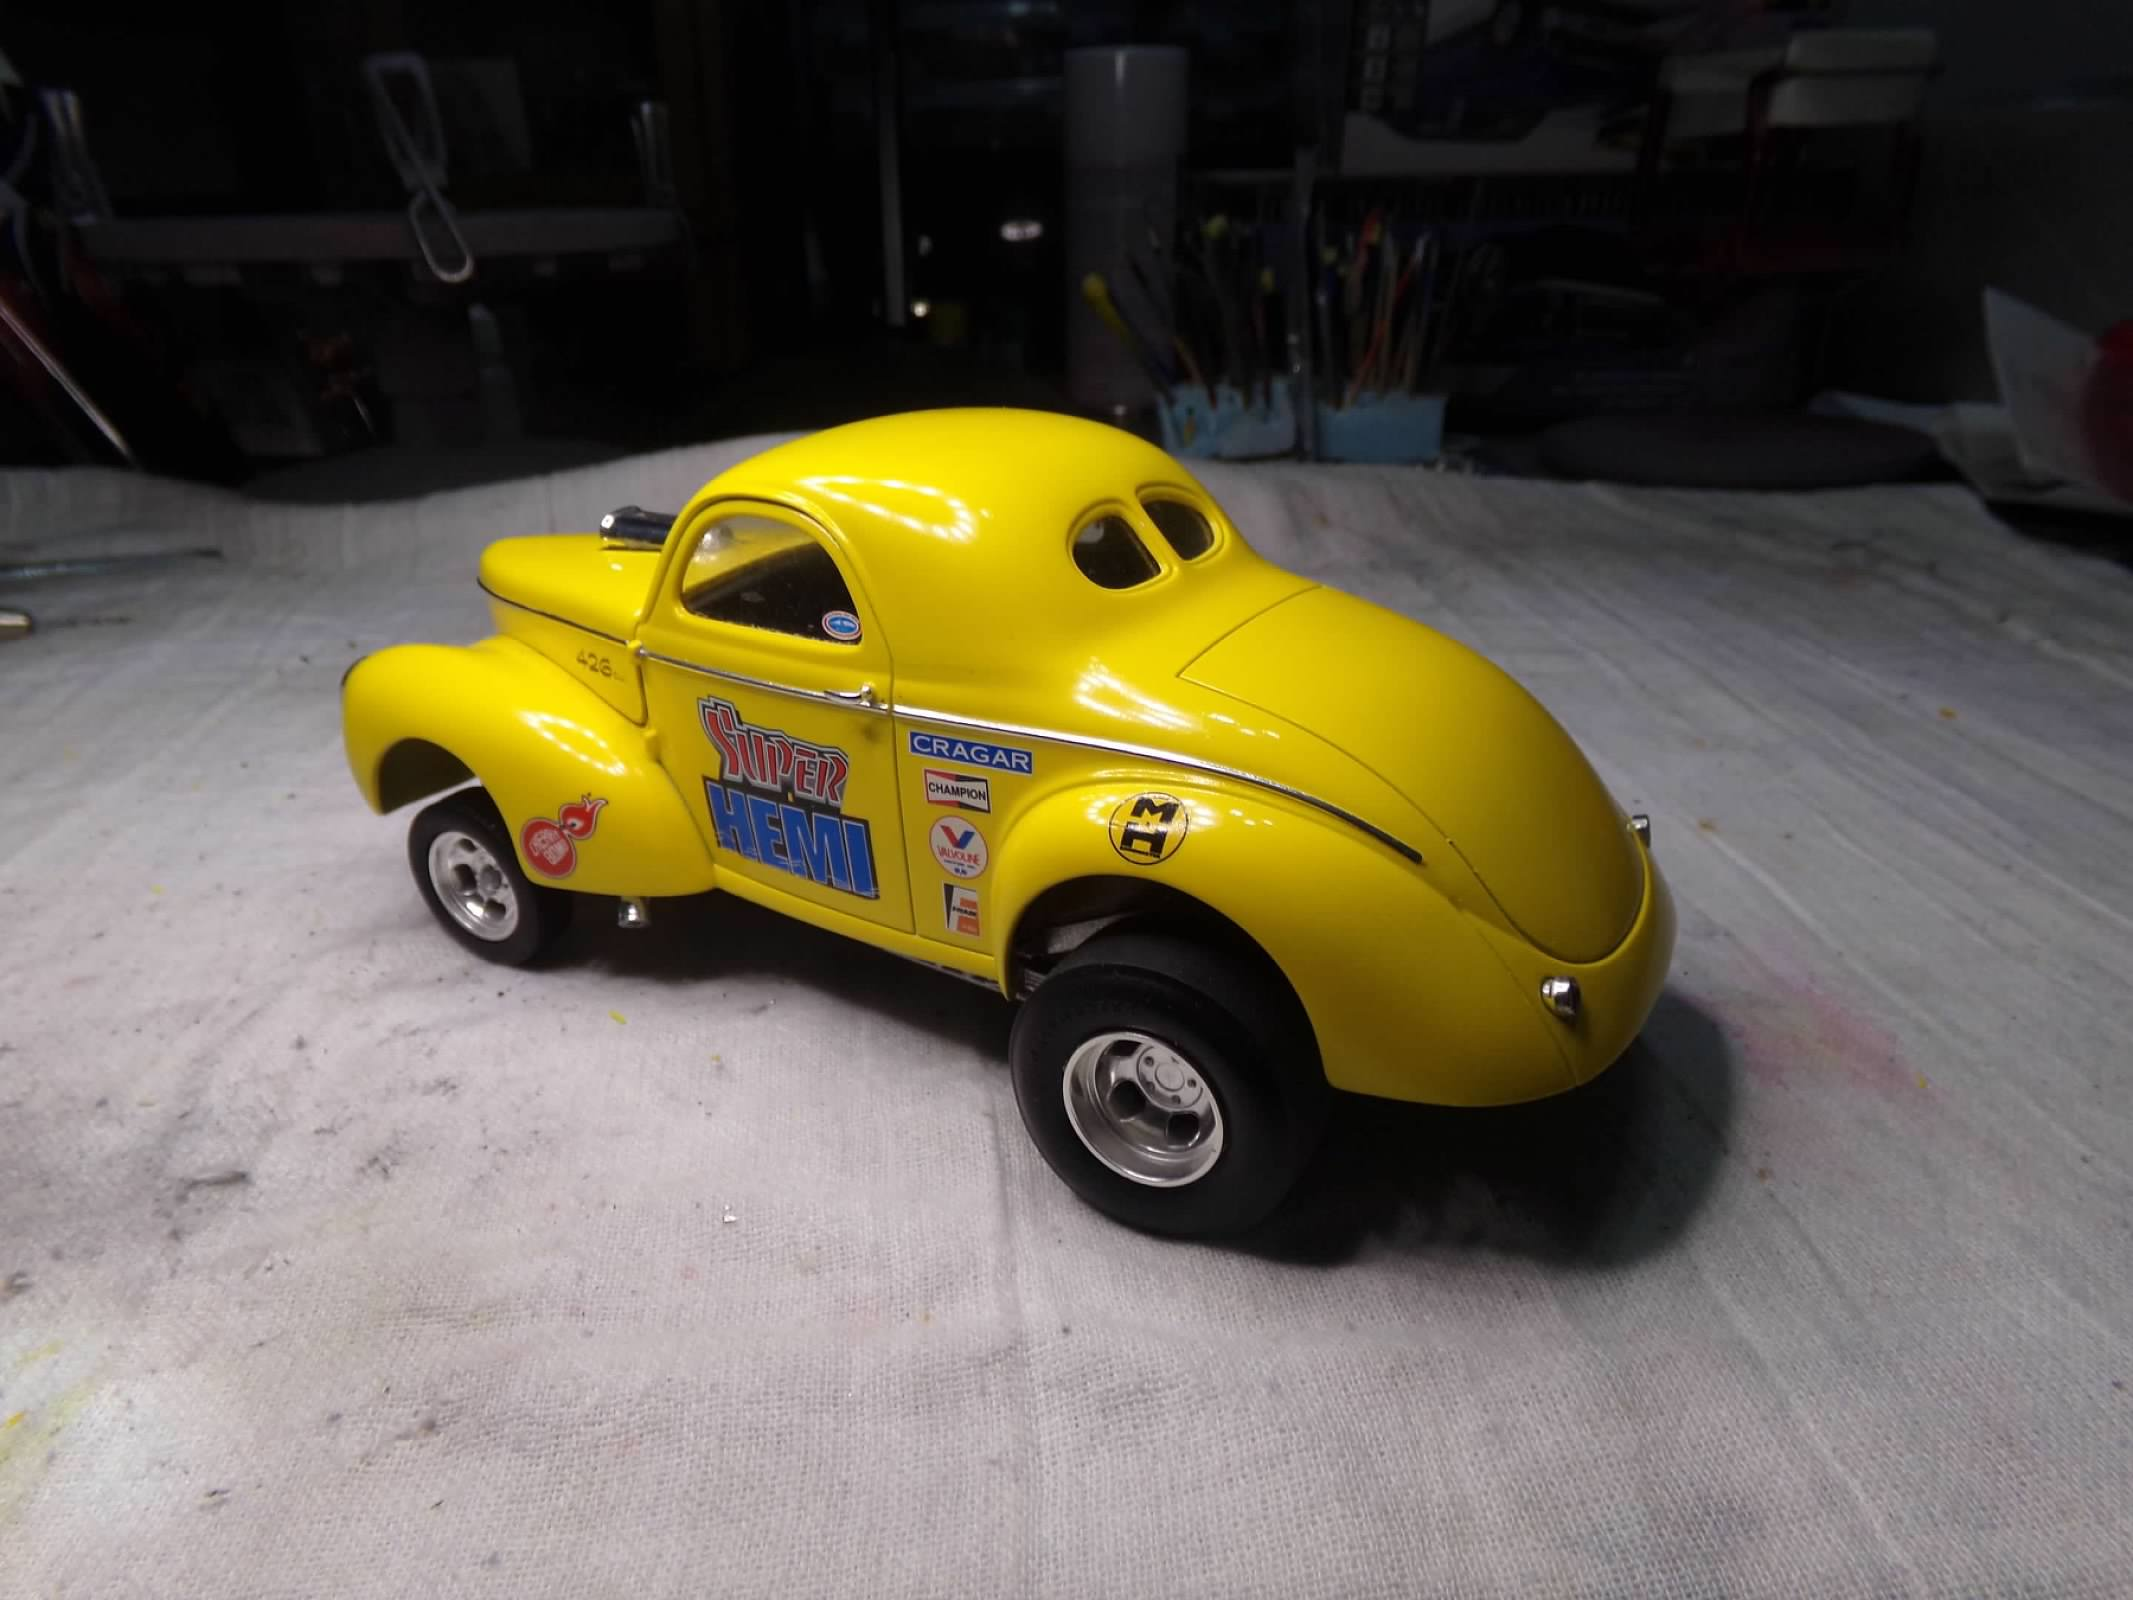
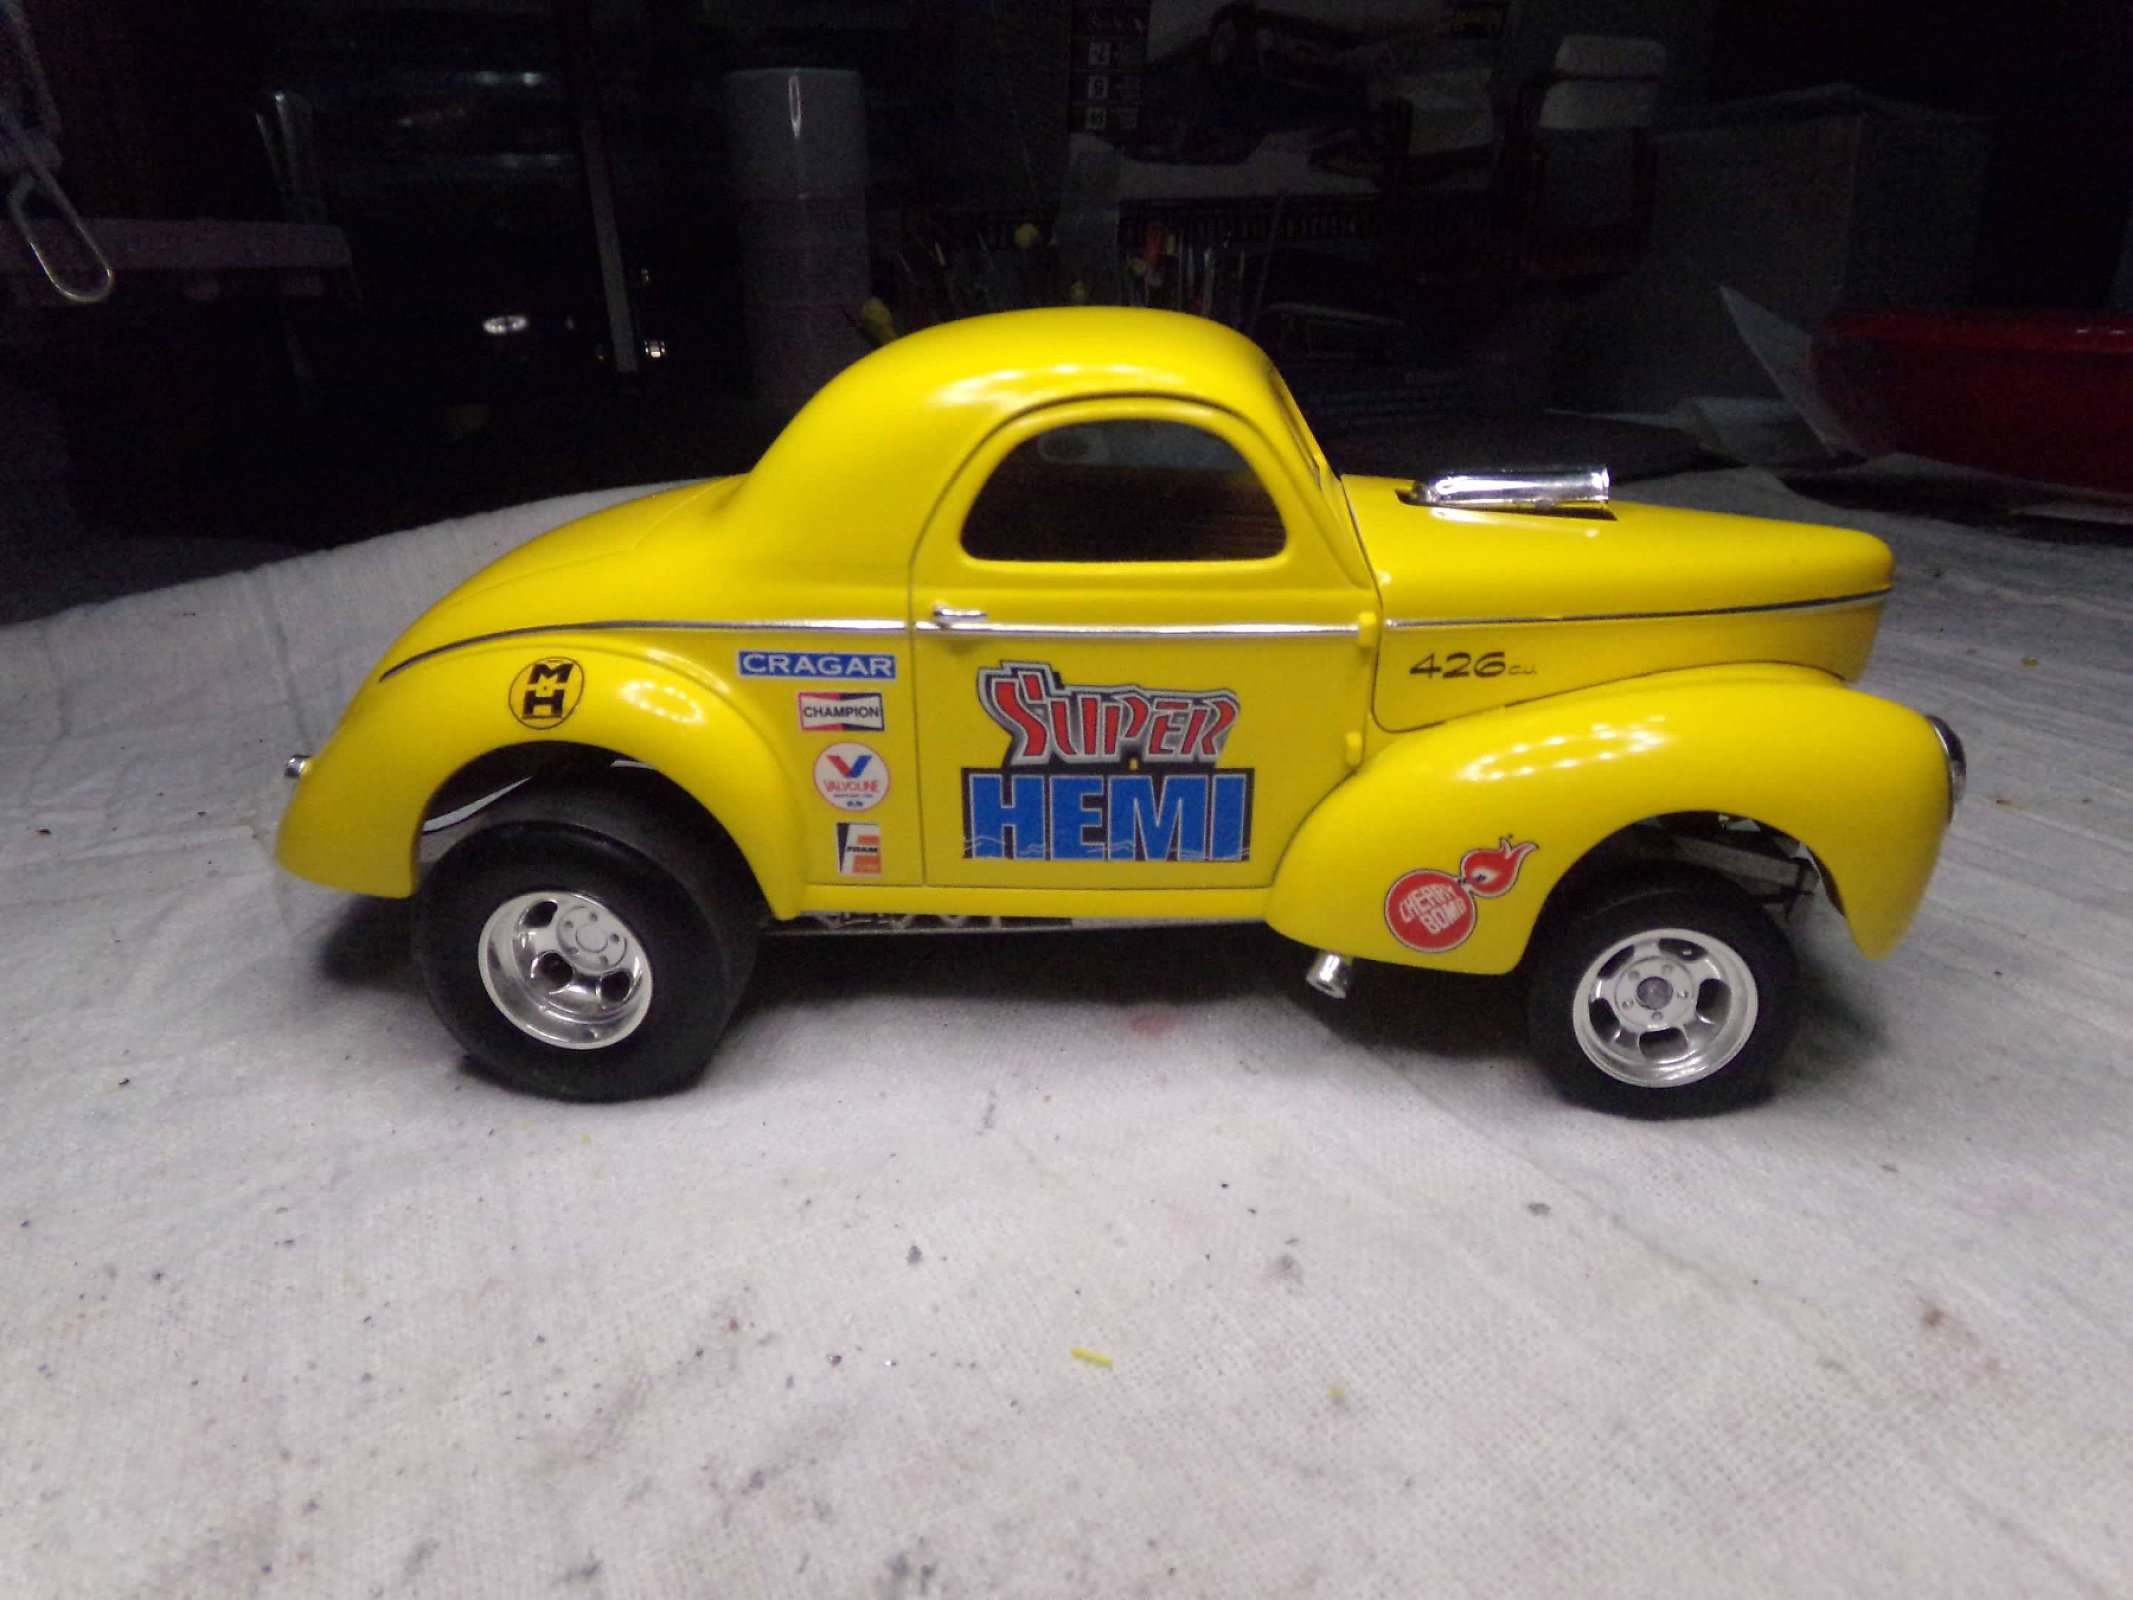
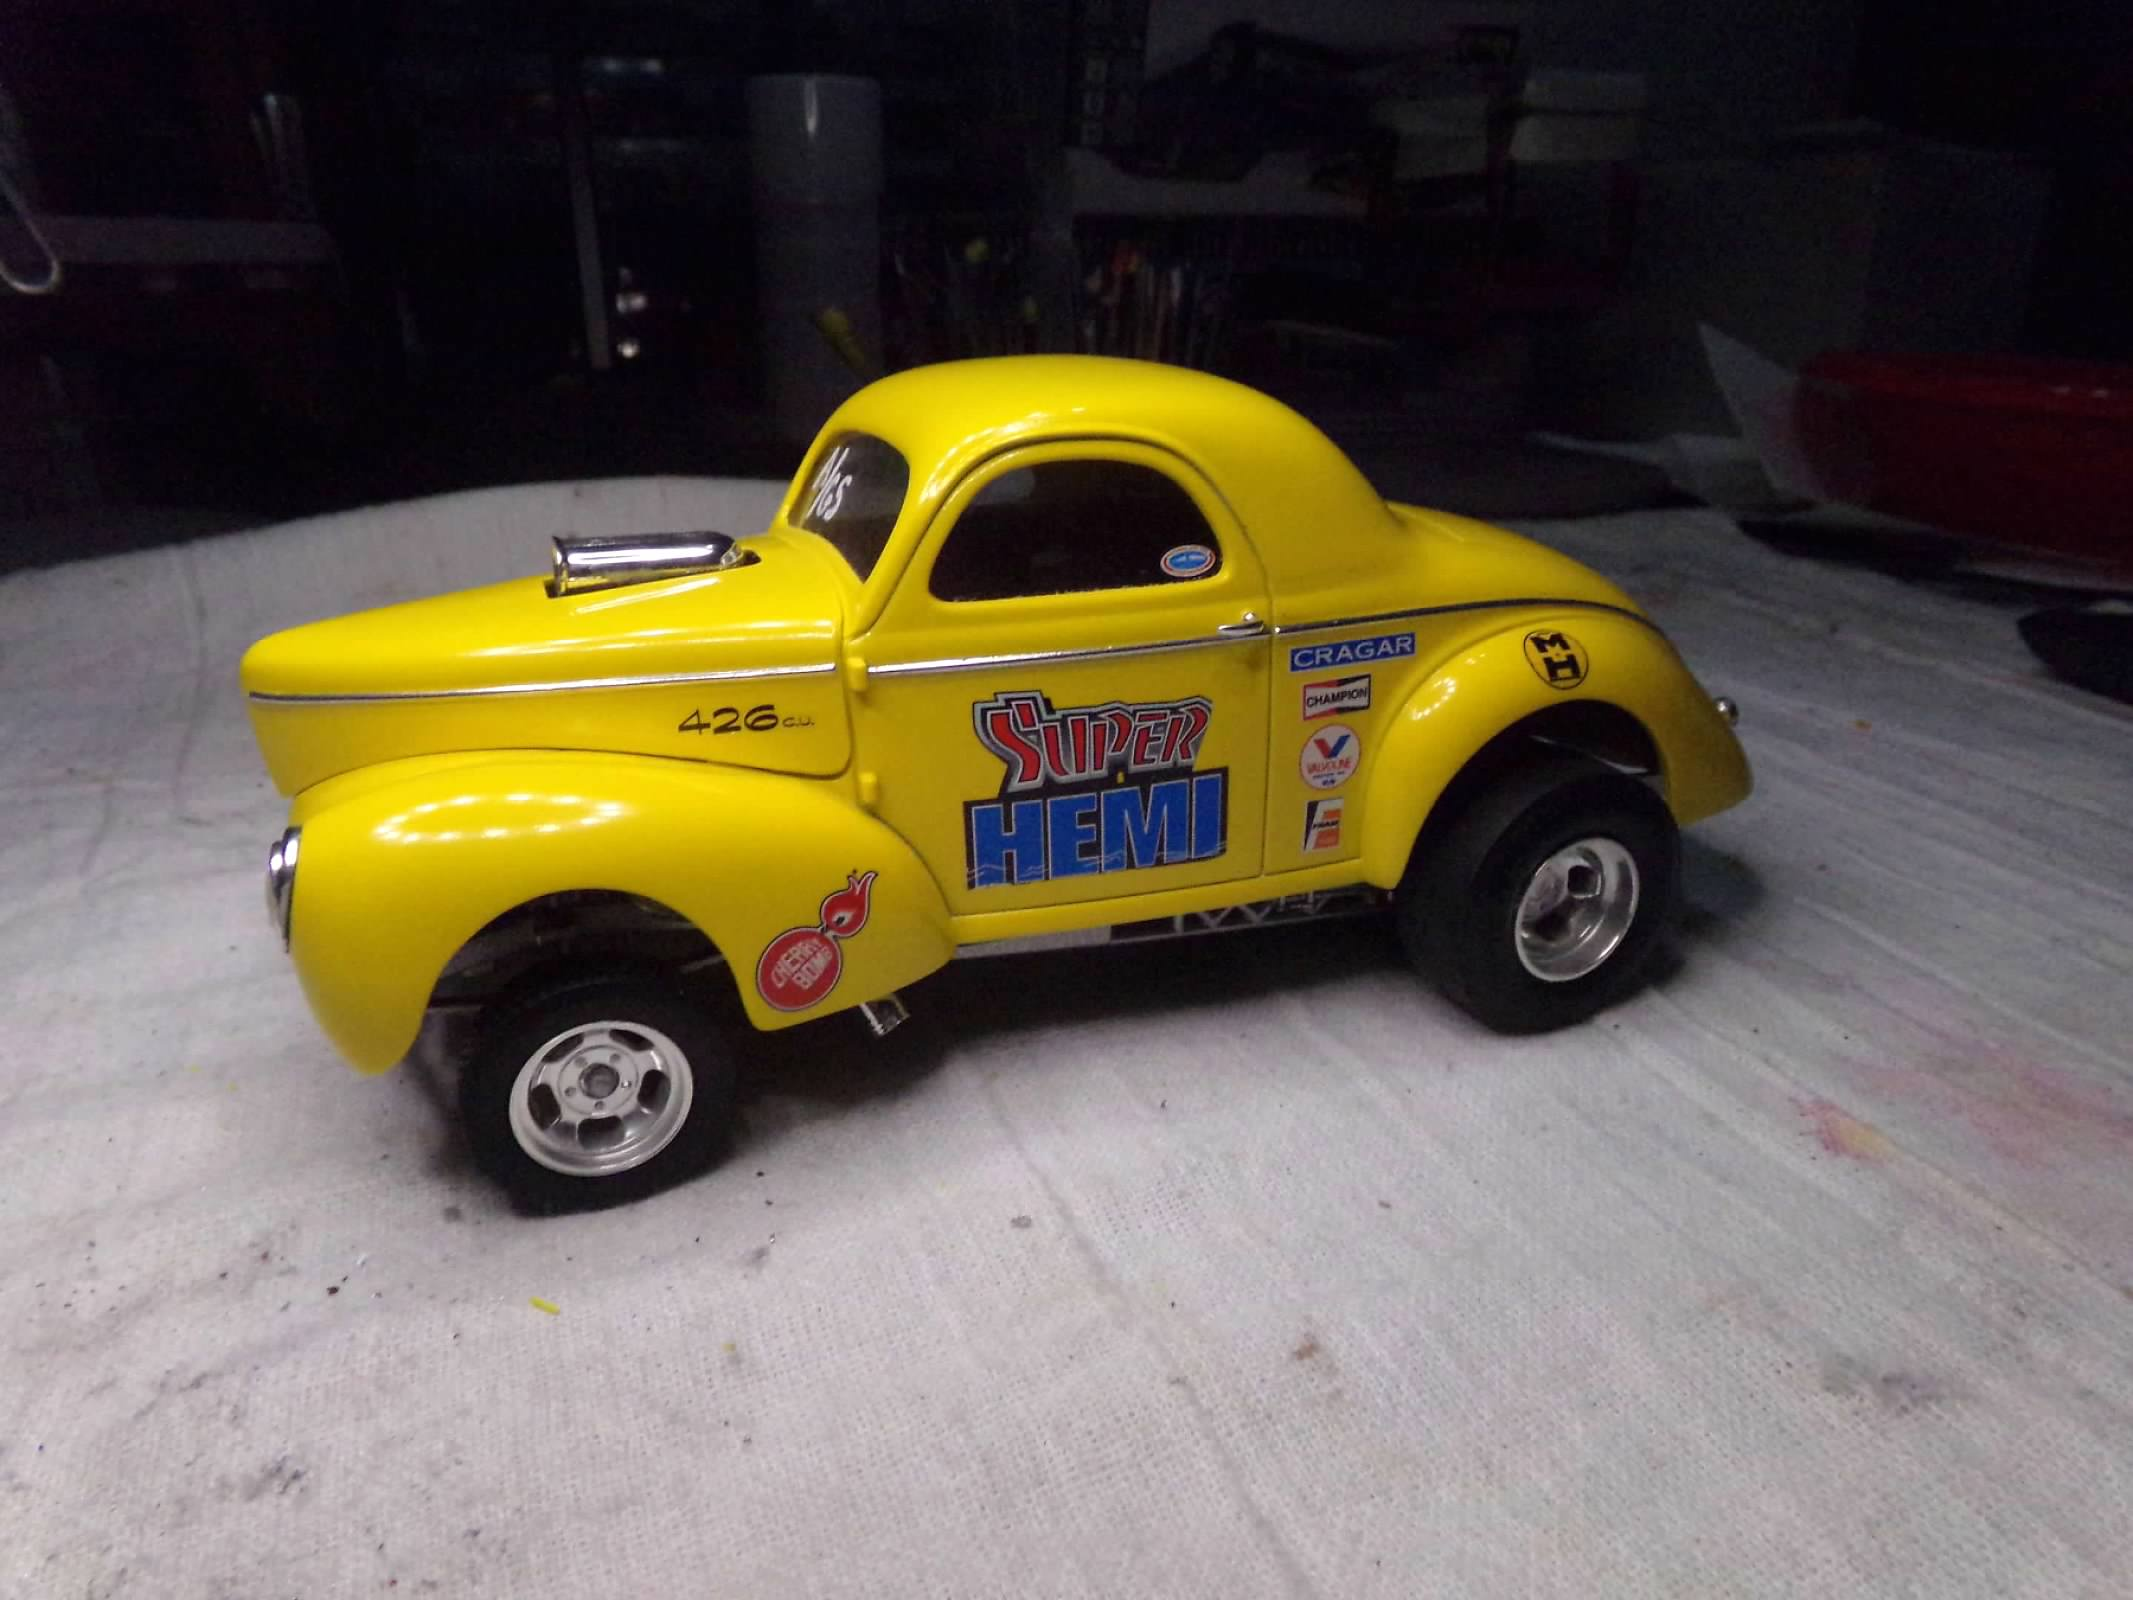
This is the Big John Mazmanian kit. I bought it from a modeler from Louisiana who endured a flood caused by a hurricane a couple of years ago. The box and decals were destroyed but the plastic was all ok and the instructions were dried out. So instead of building the John Mazmanian replica I built it differently. So I painted it Tamiya Yellow with a black interior. Instead of using the red window glass I cut some acetate and used it. I added a Mad pre-wired distributor with yellow wire and it has been done for a few months now without any decals. I looked for some Mom and Pop decals at Slixx but didn't like any of them. So it sat. Then while building the Super Nova, the 69 Chevy Nova kit, I had the idea that I could combine the "Super" decal with the "Hemi" decal from the 68 Dodge Dart kit and create the "Super Hemi" for the door panels. Then I added a few sponsor decals, the Cherry Bomb just for fun, and now it is done before the end of the year! Happy New Year everyone!
-
1977 McLaren M24 - Tom Sneva
ModelcarJR replied to ModelcarJR's topic in WIP: Other Racing: Road Racing, Land Speed Racers
Well, I'm kinda in a holding position now. I ordered decals for IndyCals but I think Michael must be on vacation because I haven't heard anything from him all week after ordering decals on Christmas day. I want to match the blue paint to the decals and I have a feeling I may have to mix up some Testors for airbrush to match. Kevin said he thought he used Tamiya Light Blue but that looks too dark to me. Its more like Petty Blue which I don't think would match the decals. Also waiting on the missing parts from Kevin which should be here maybe Tuesday. I've built the wings and painted them and painted the white on the body. Looks like the only other thing I can do is sand down 4 tires and get them ready for decals. Since I'll probably be up till Midnight with fireworks going off, I guess I should get started! -
Thanks, Phil, Carl and Tony! I appreciate your comments! ?
-
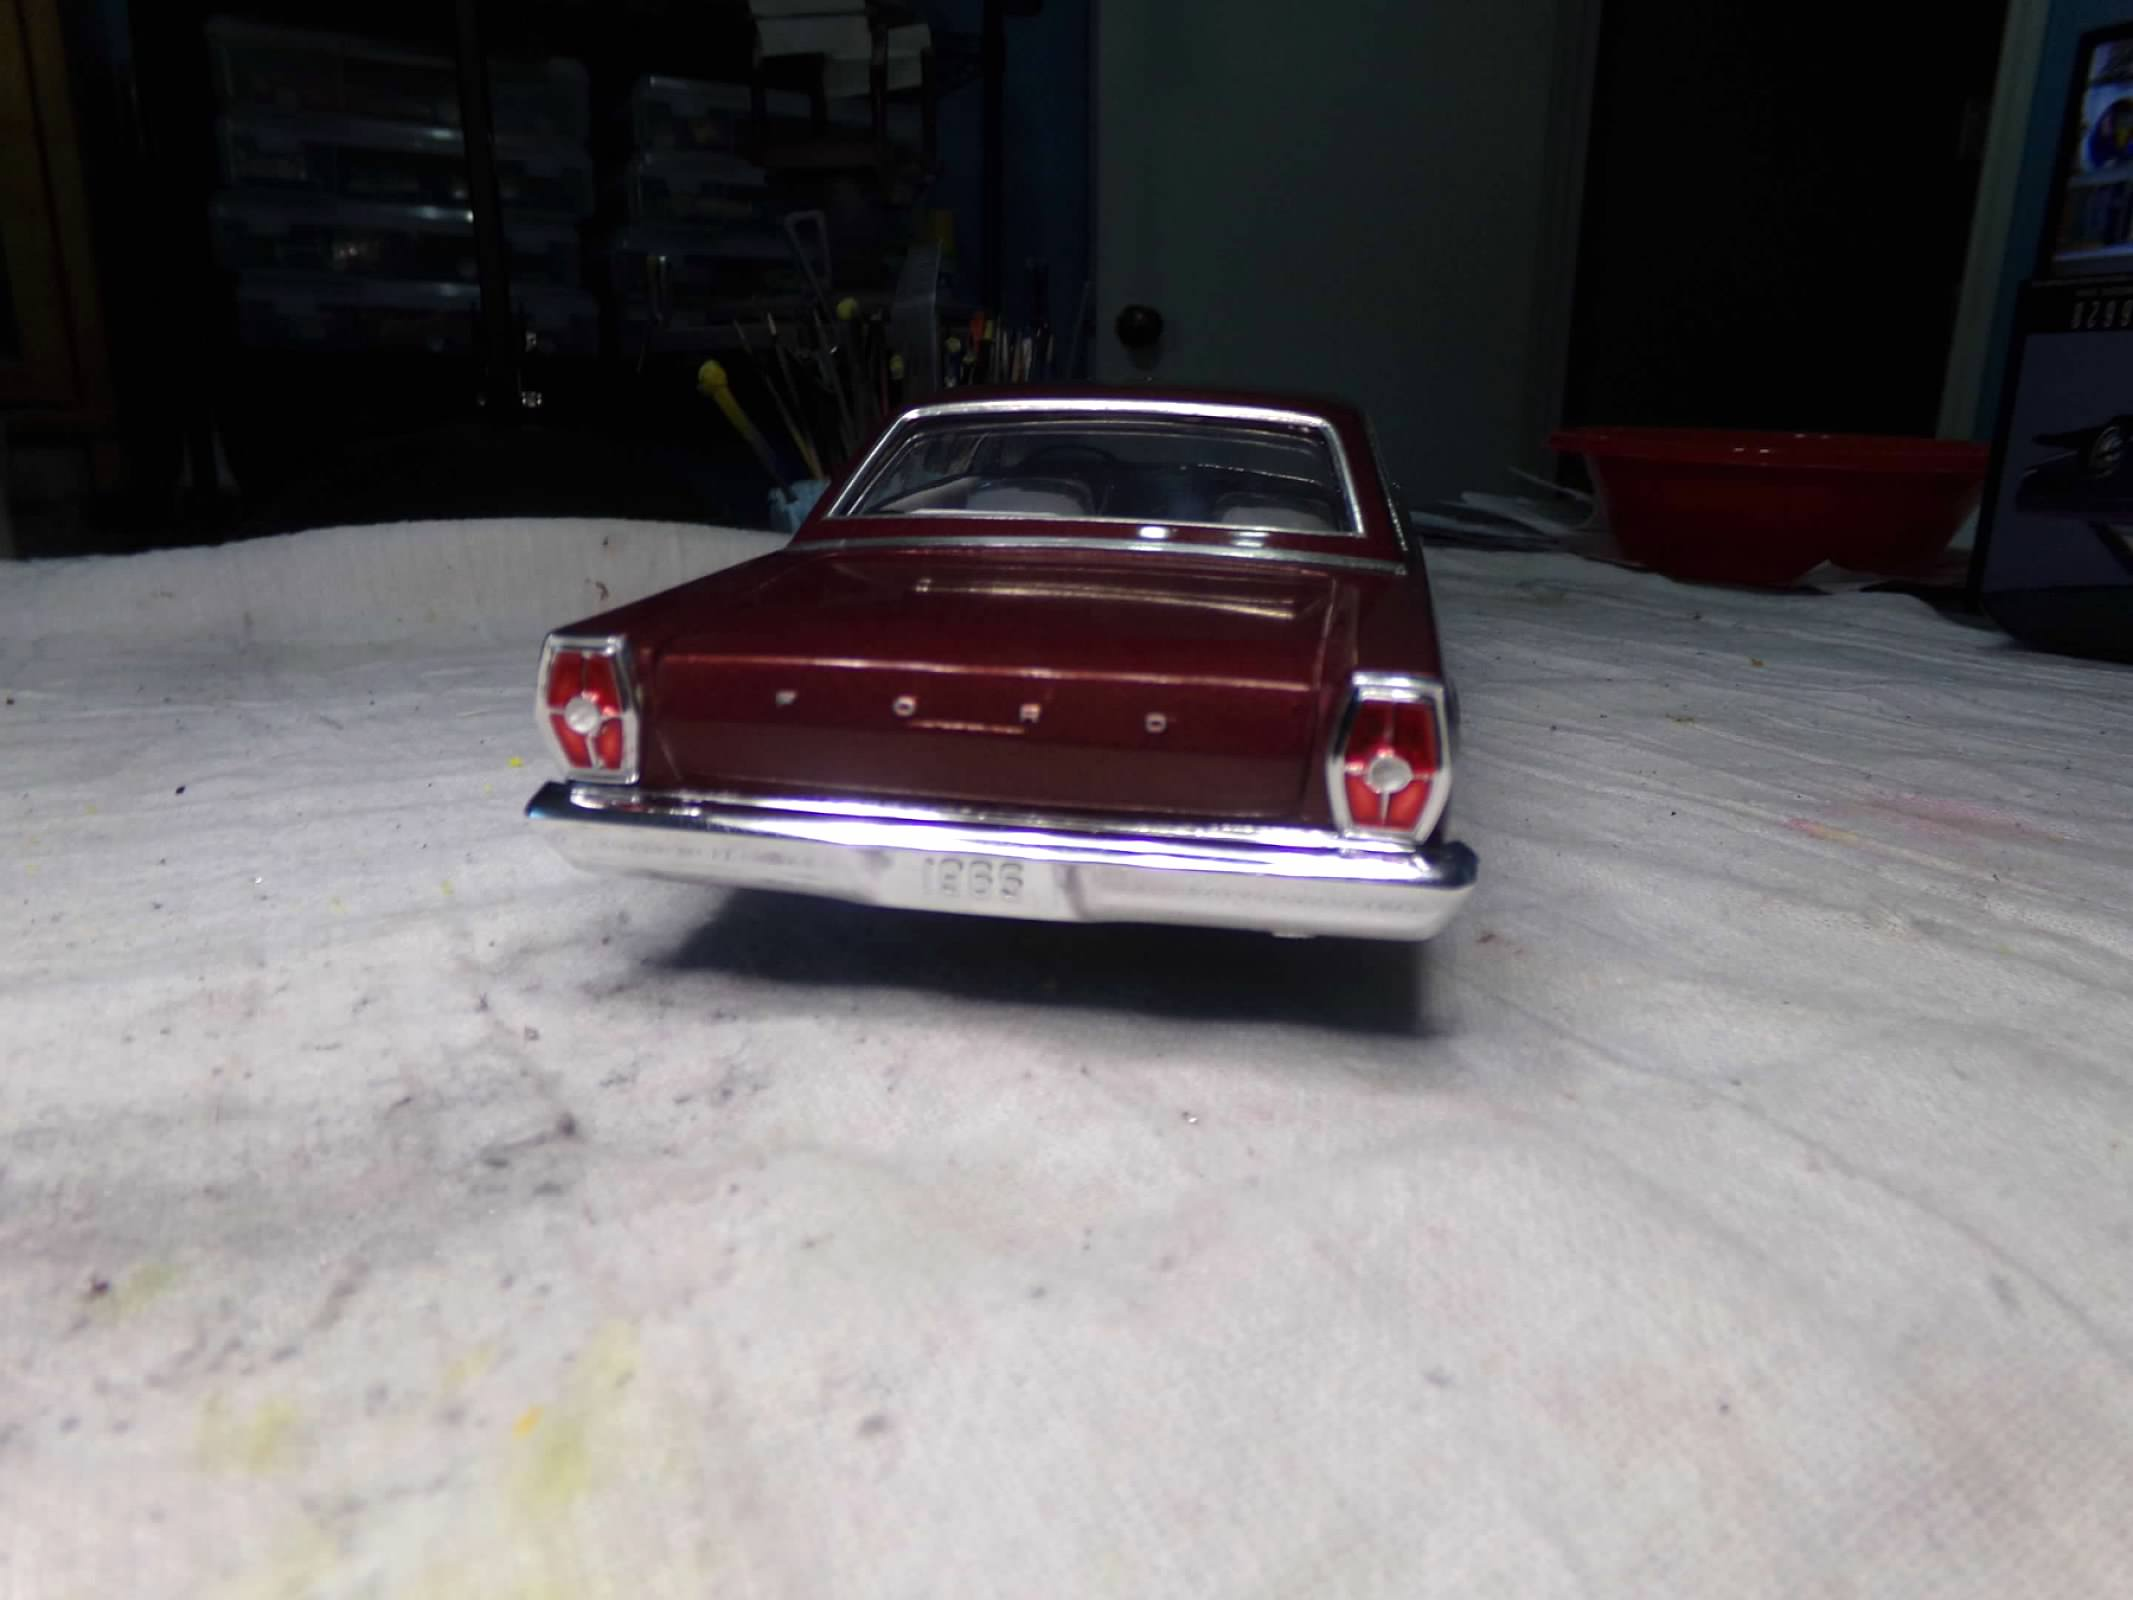
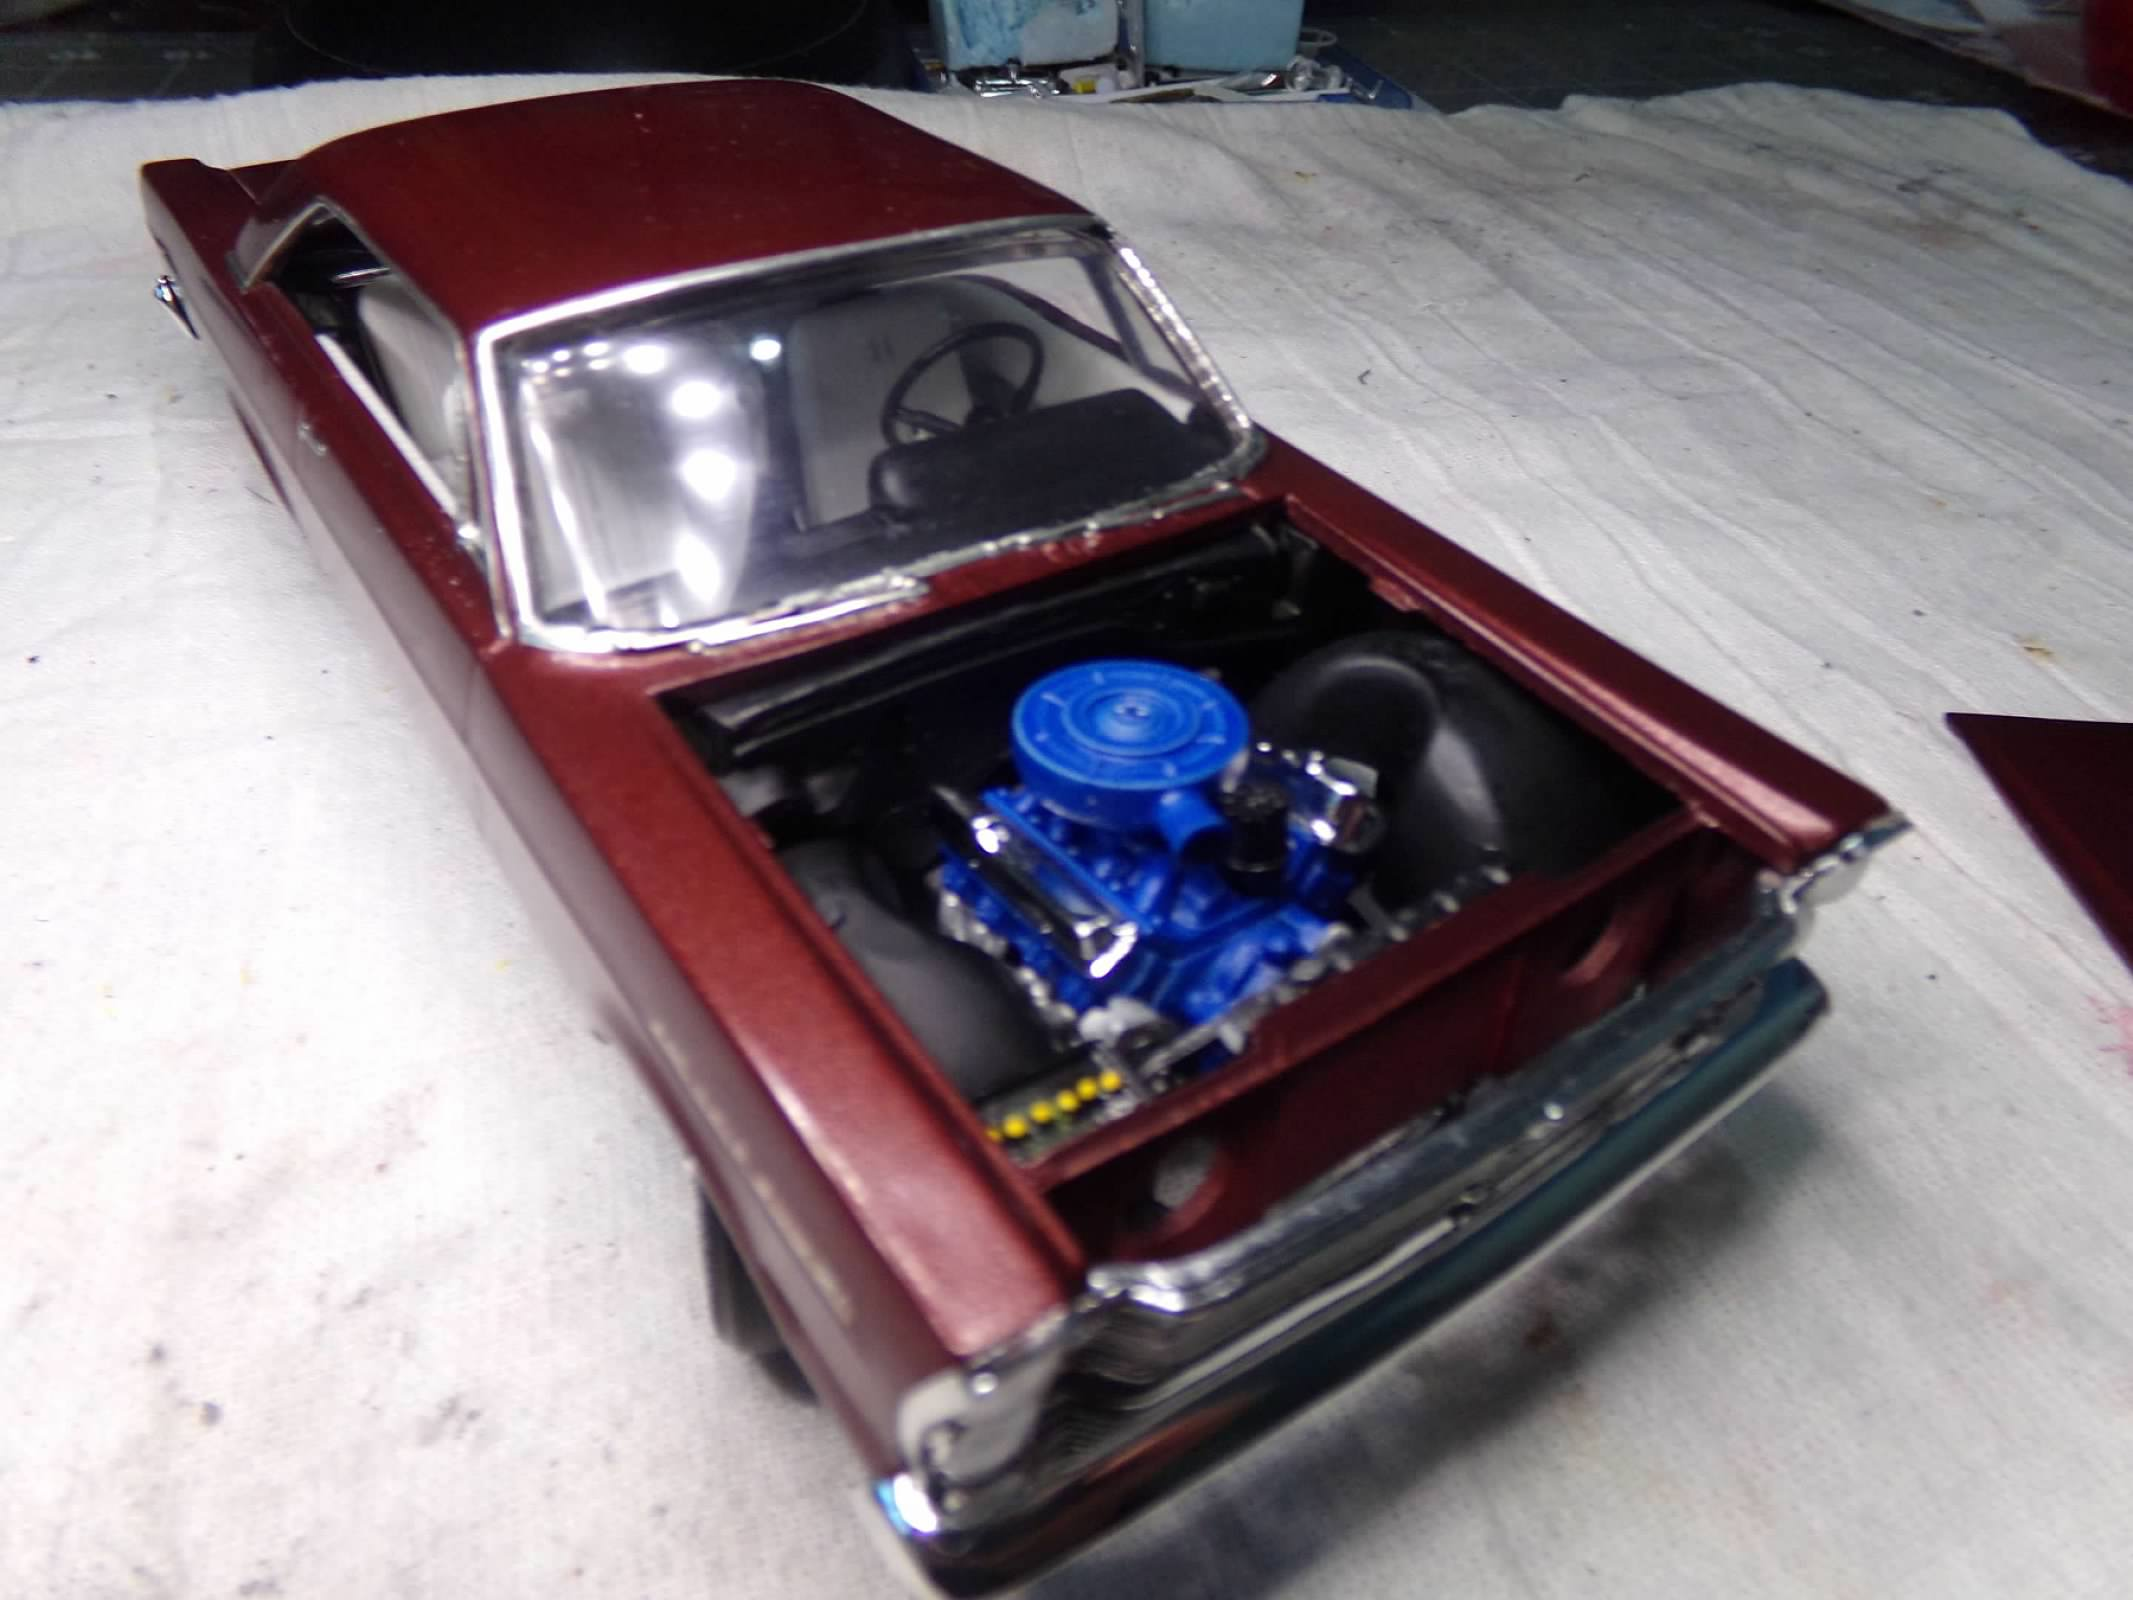
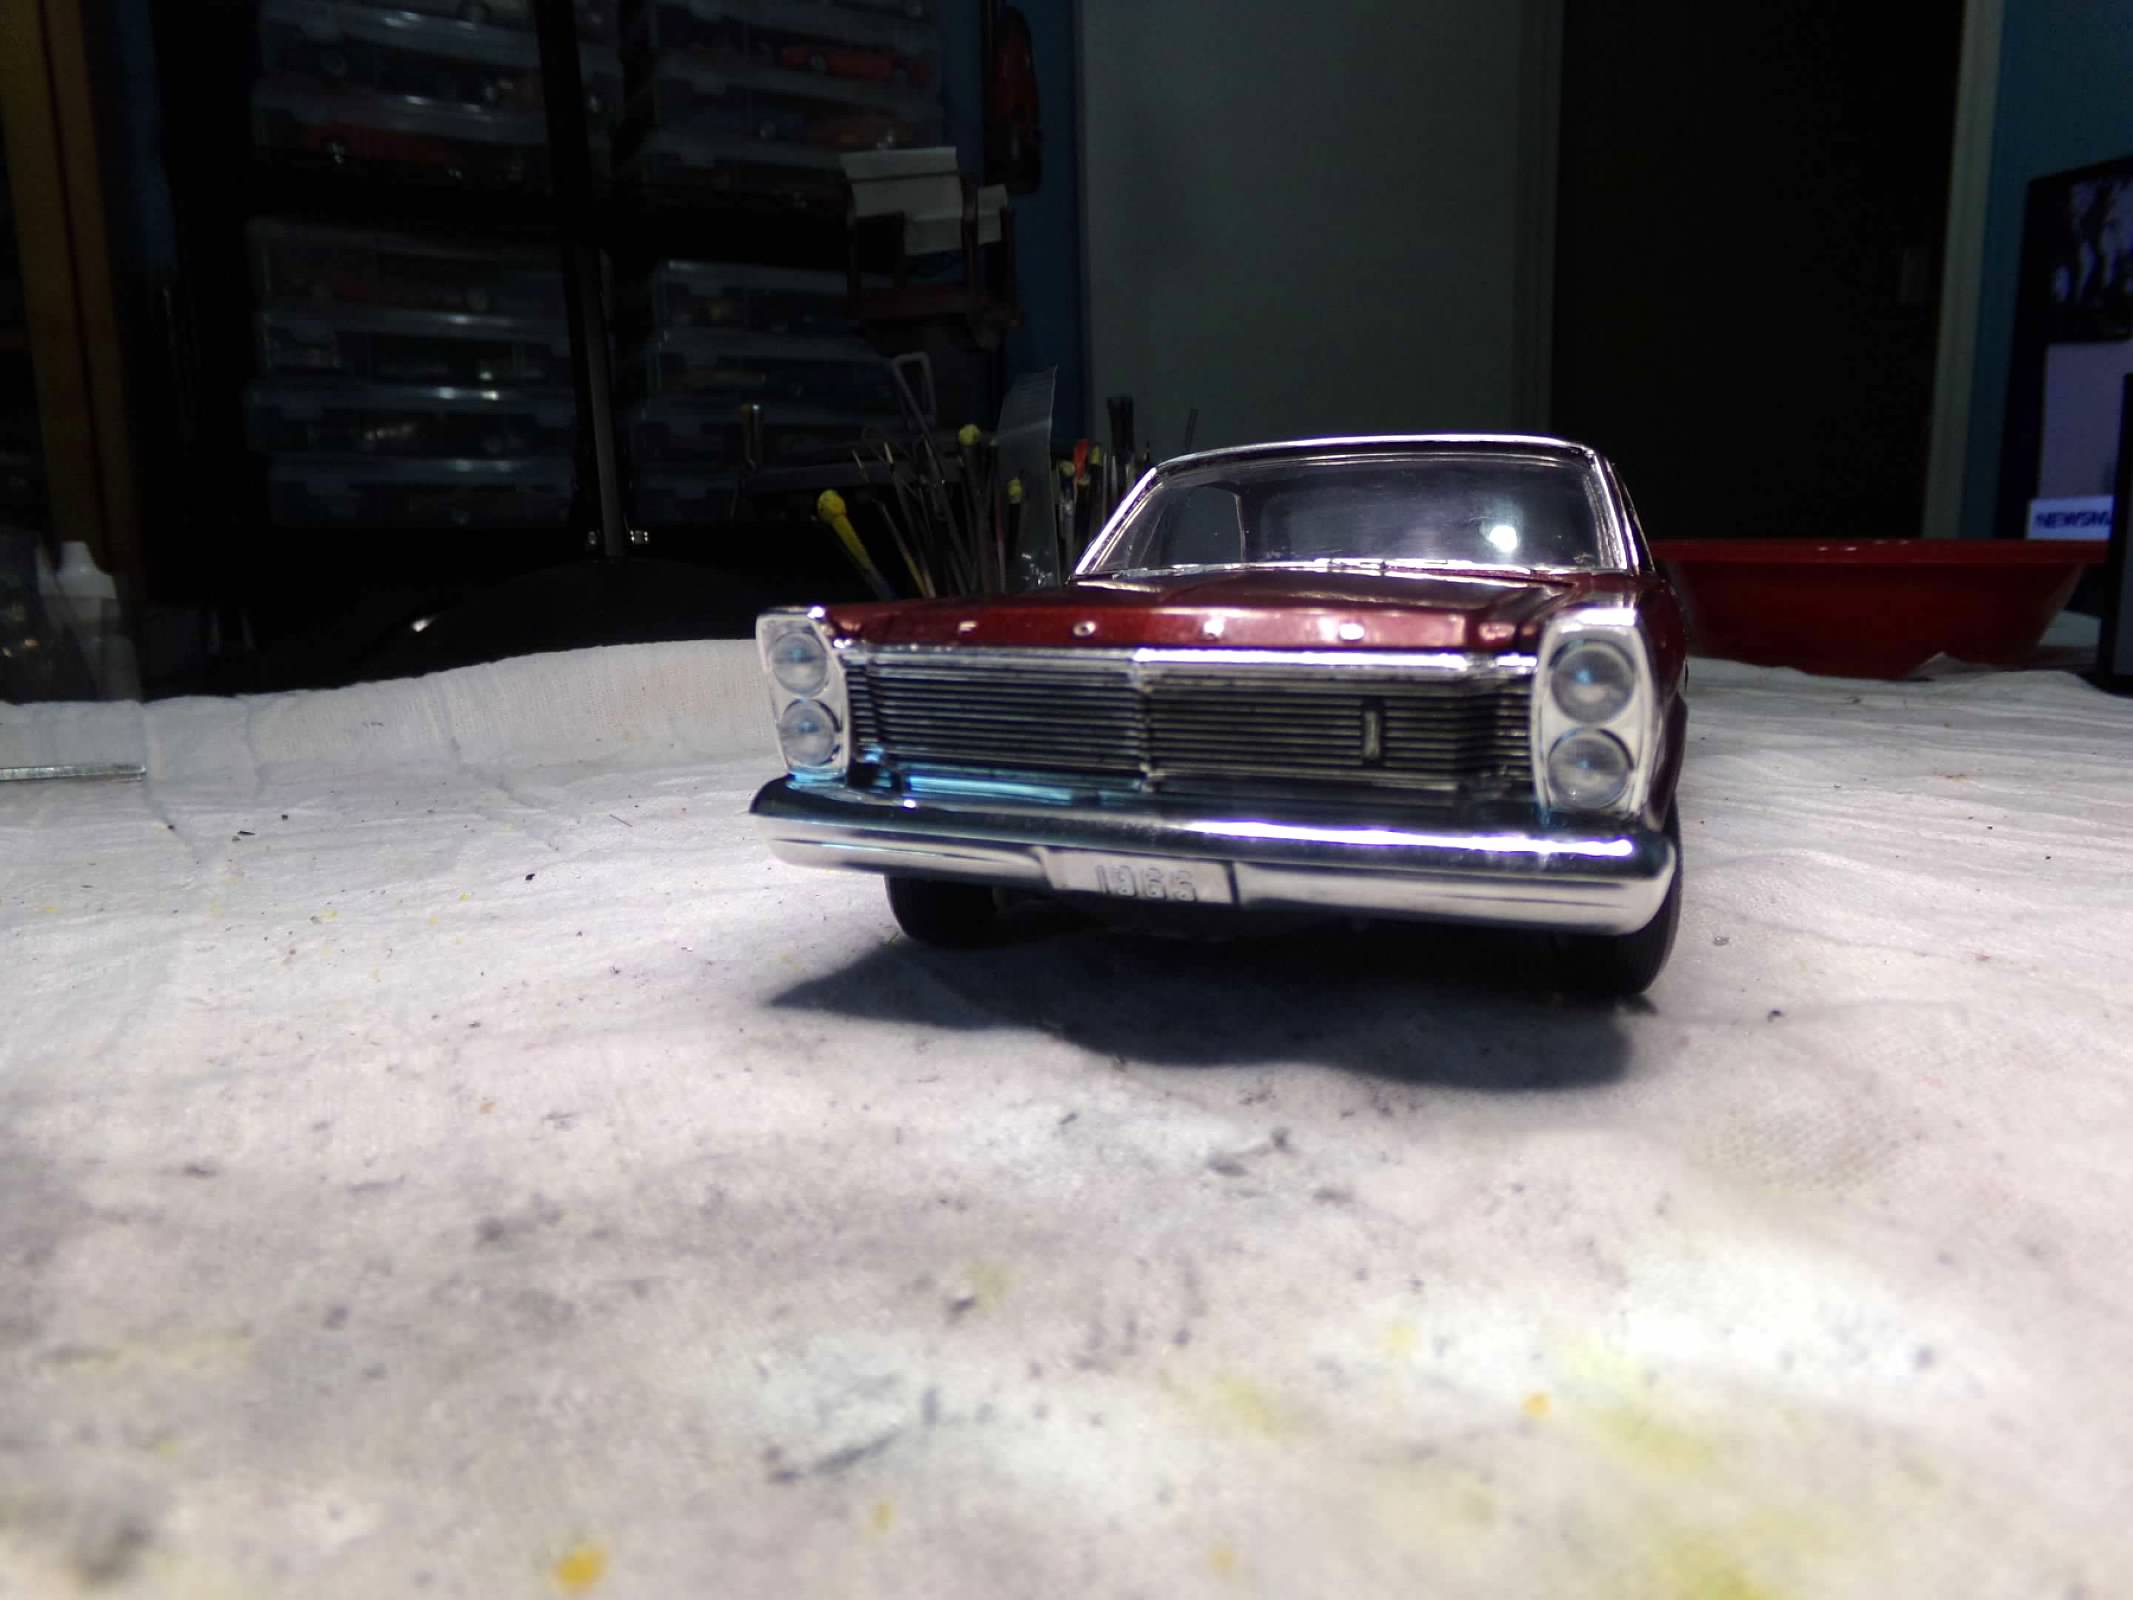
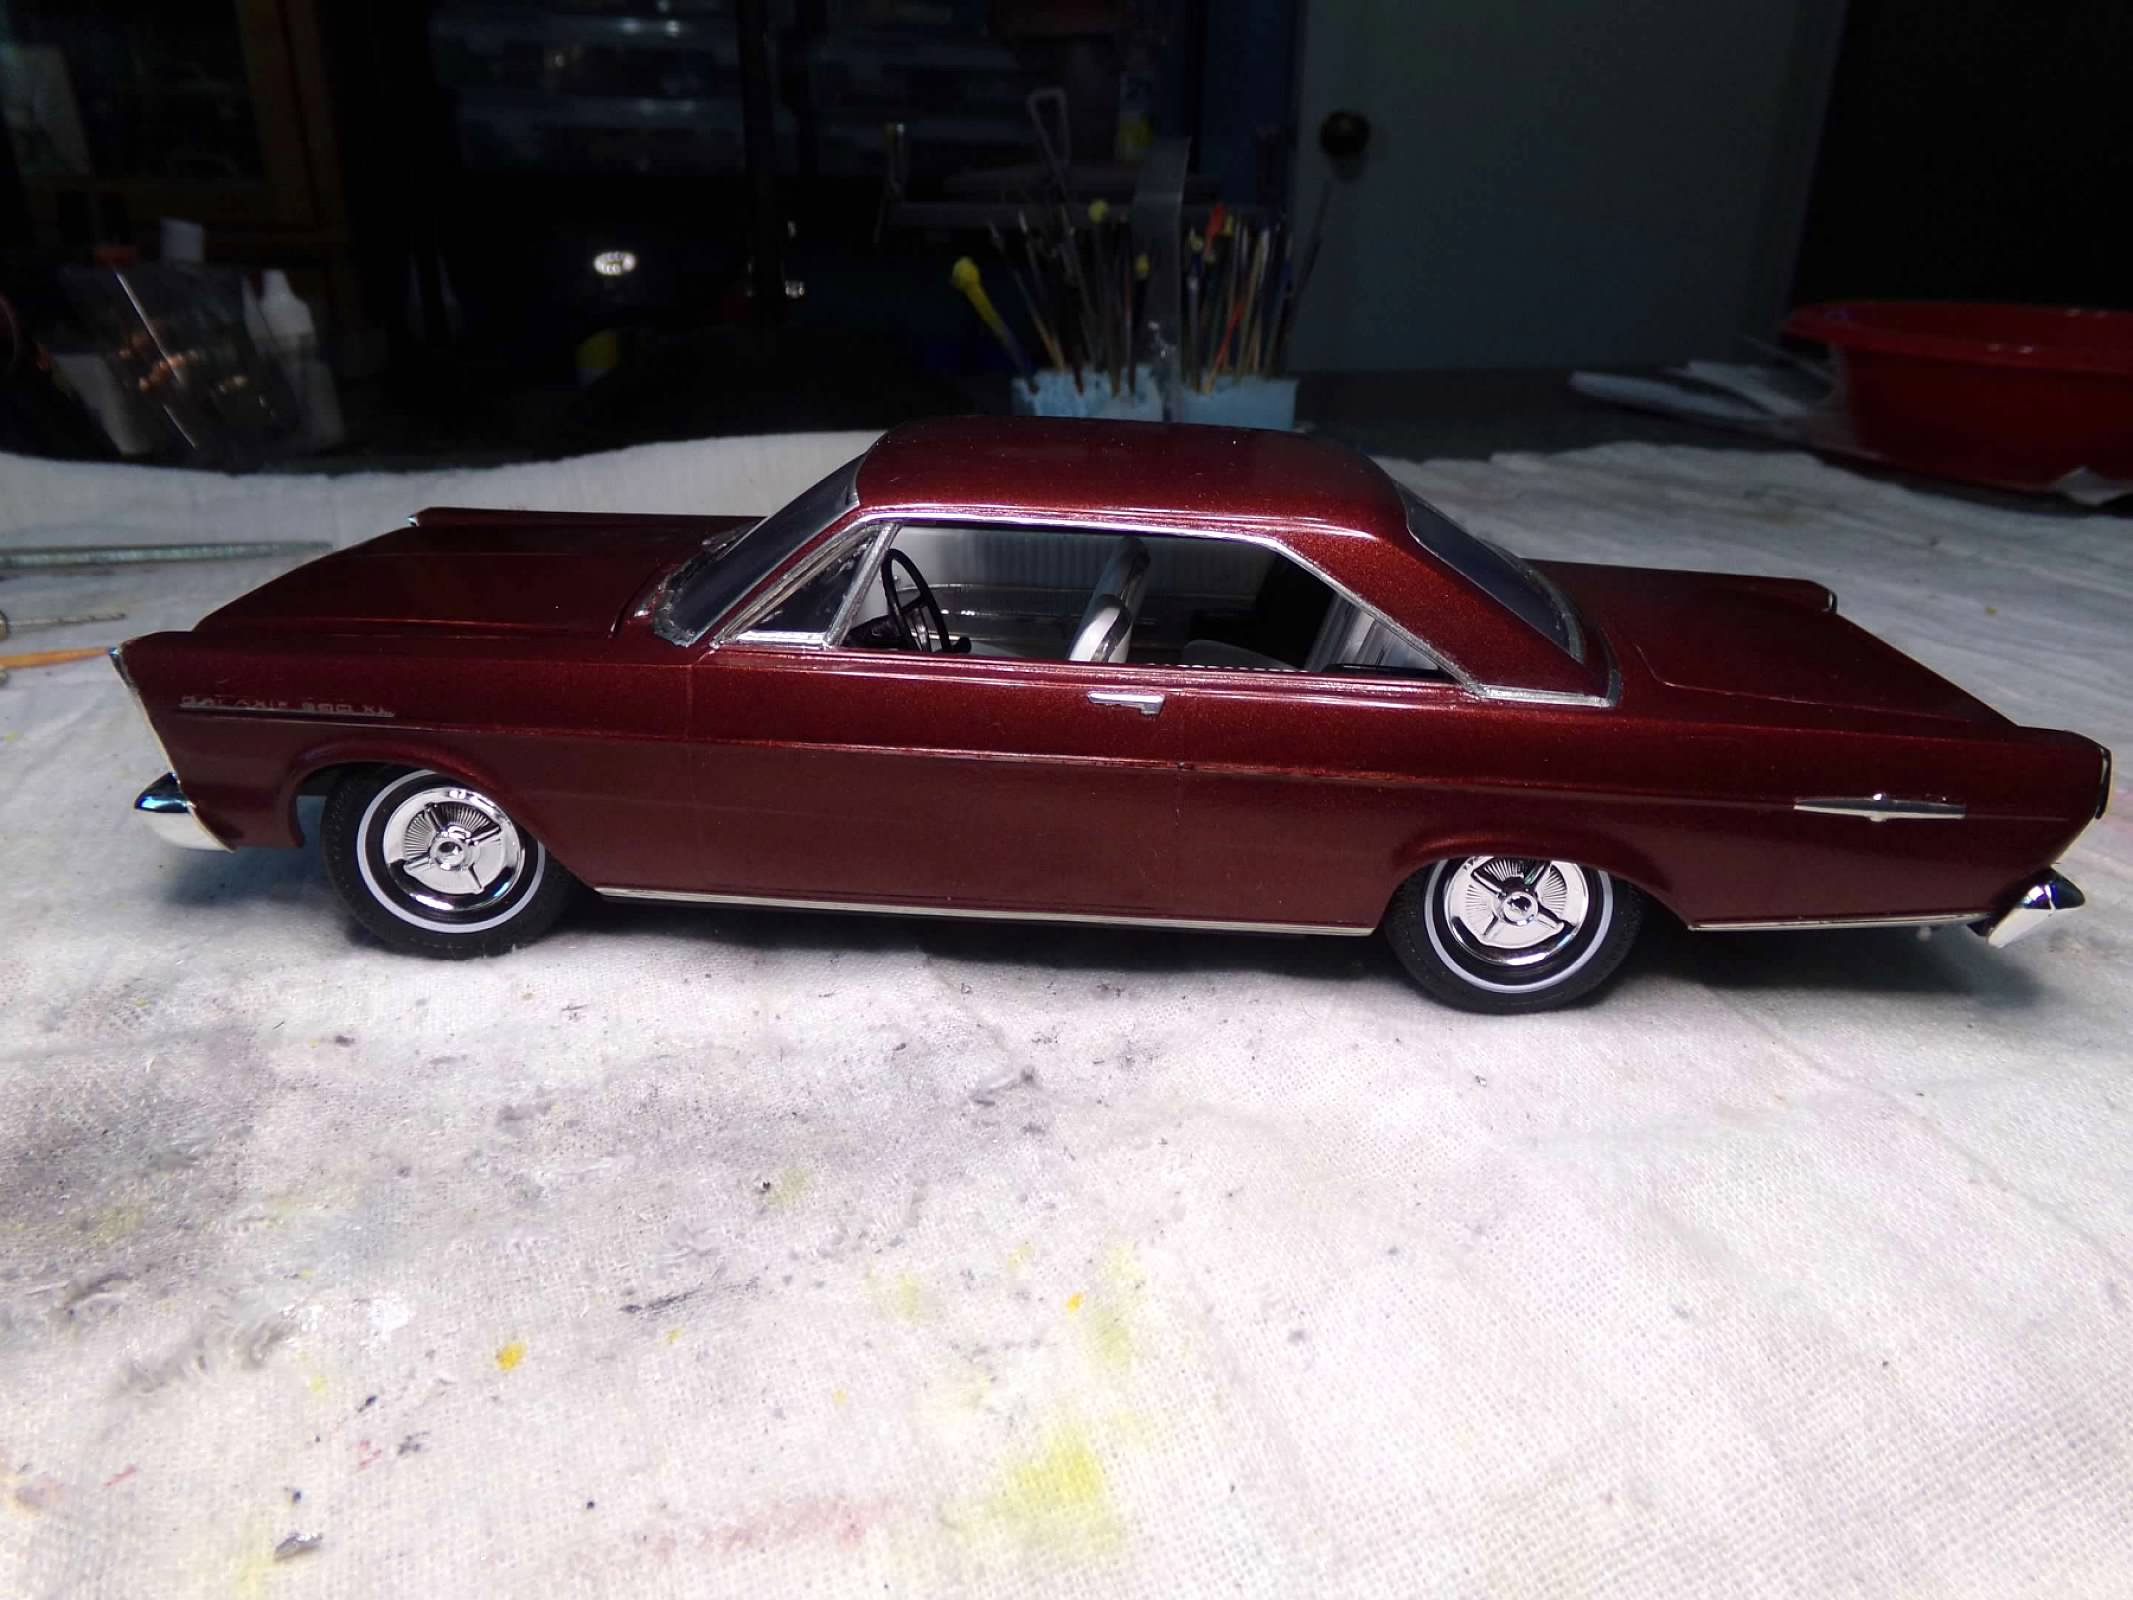
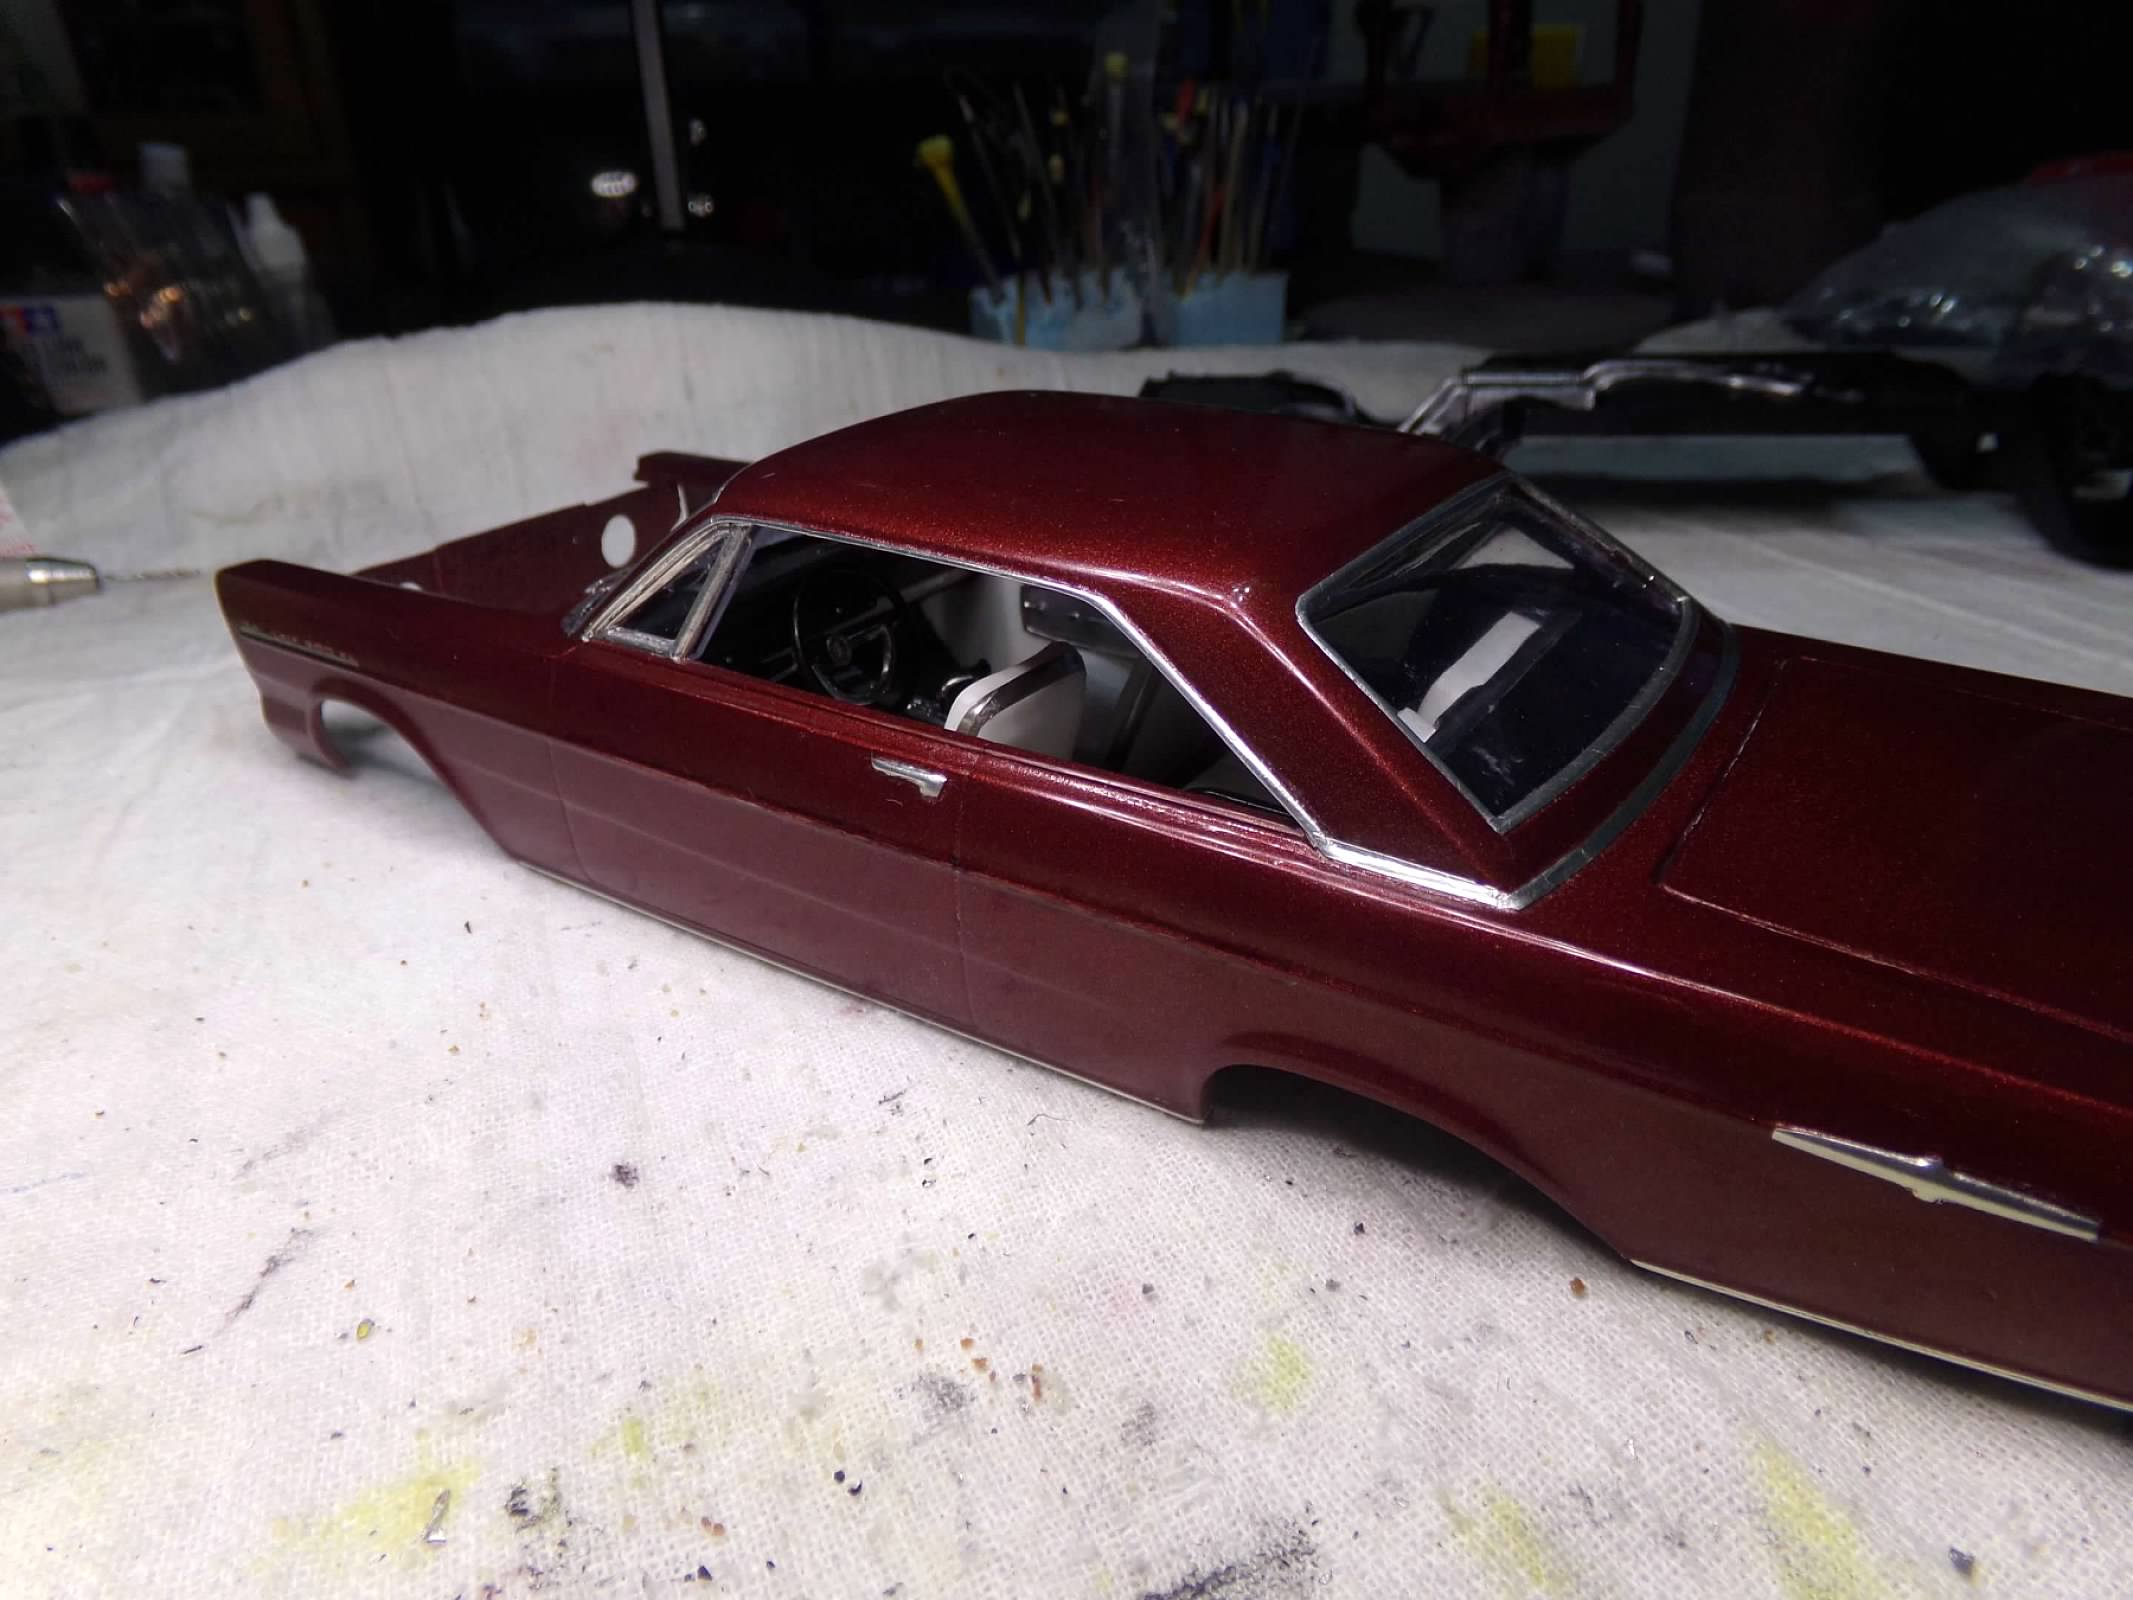
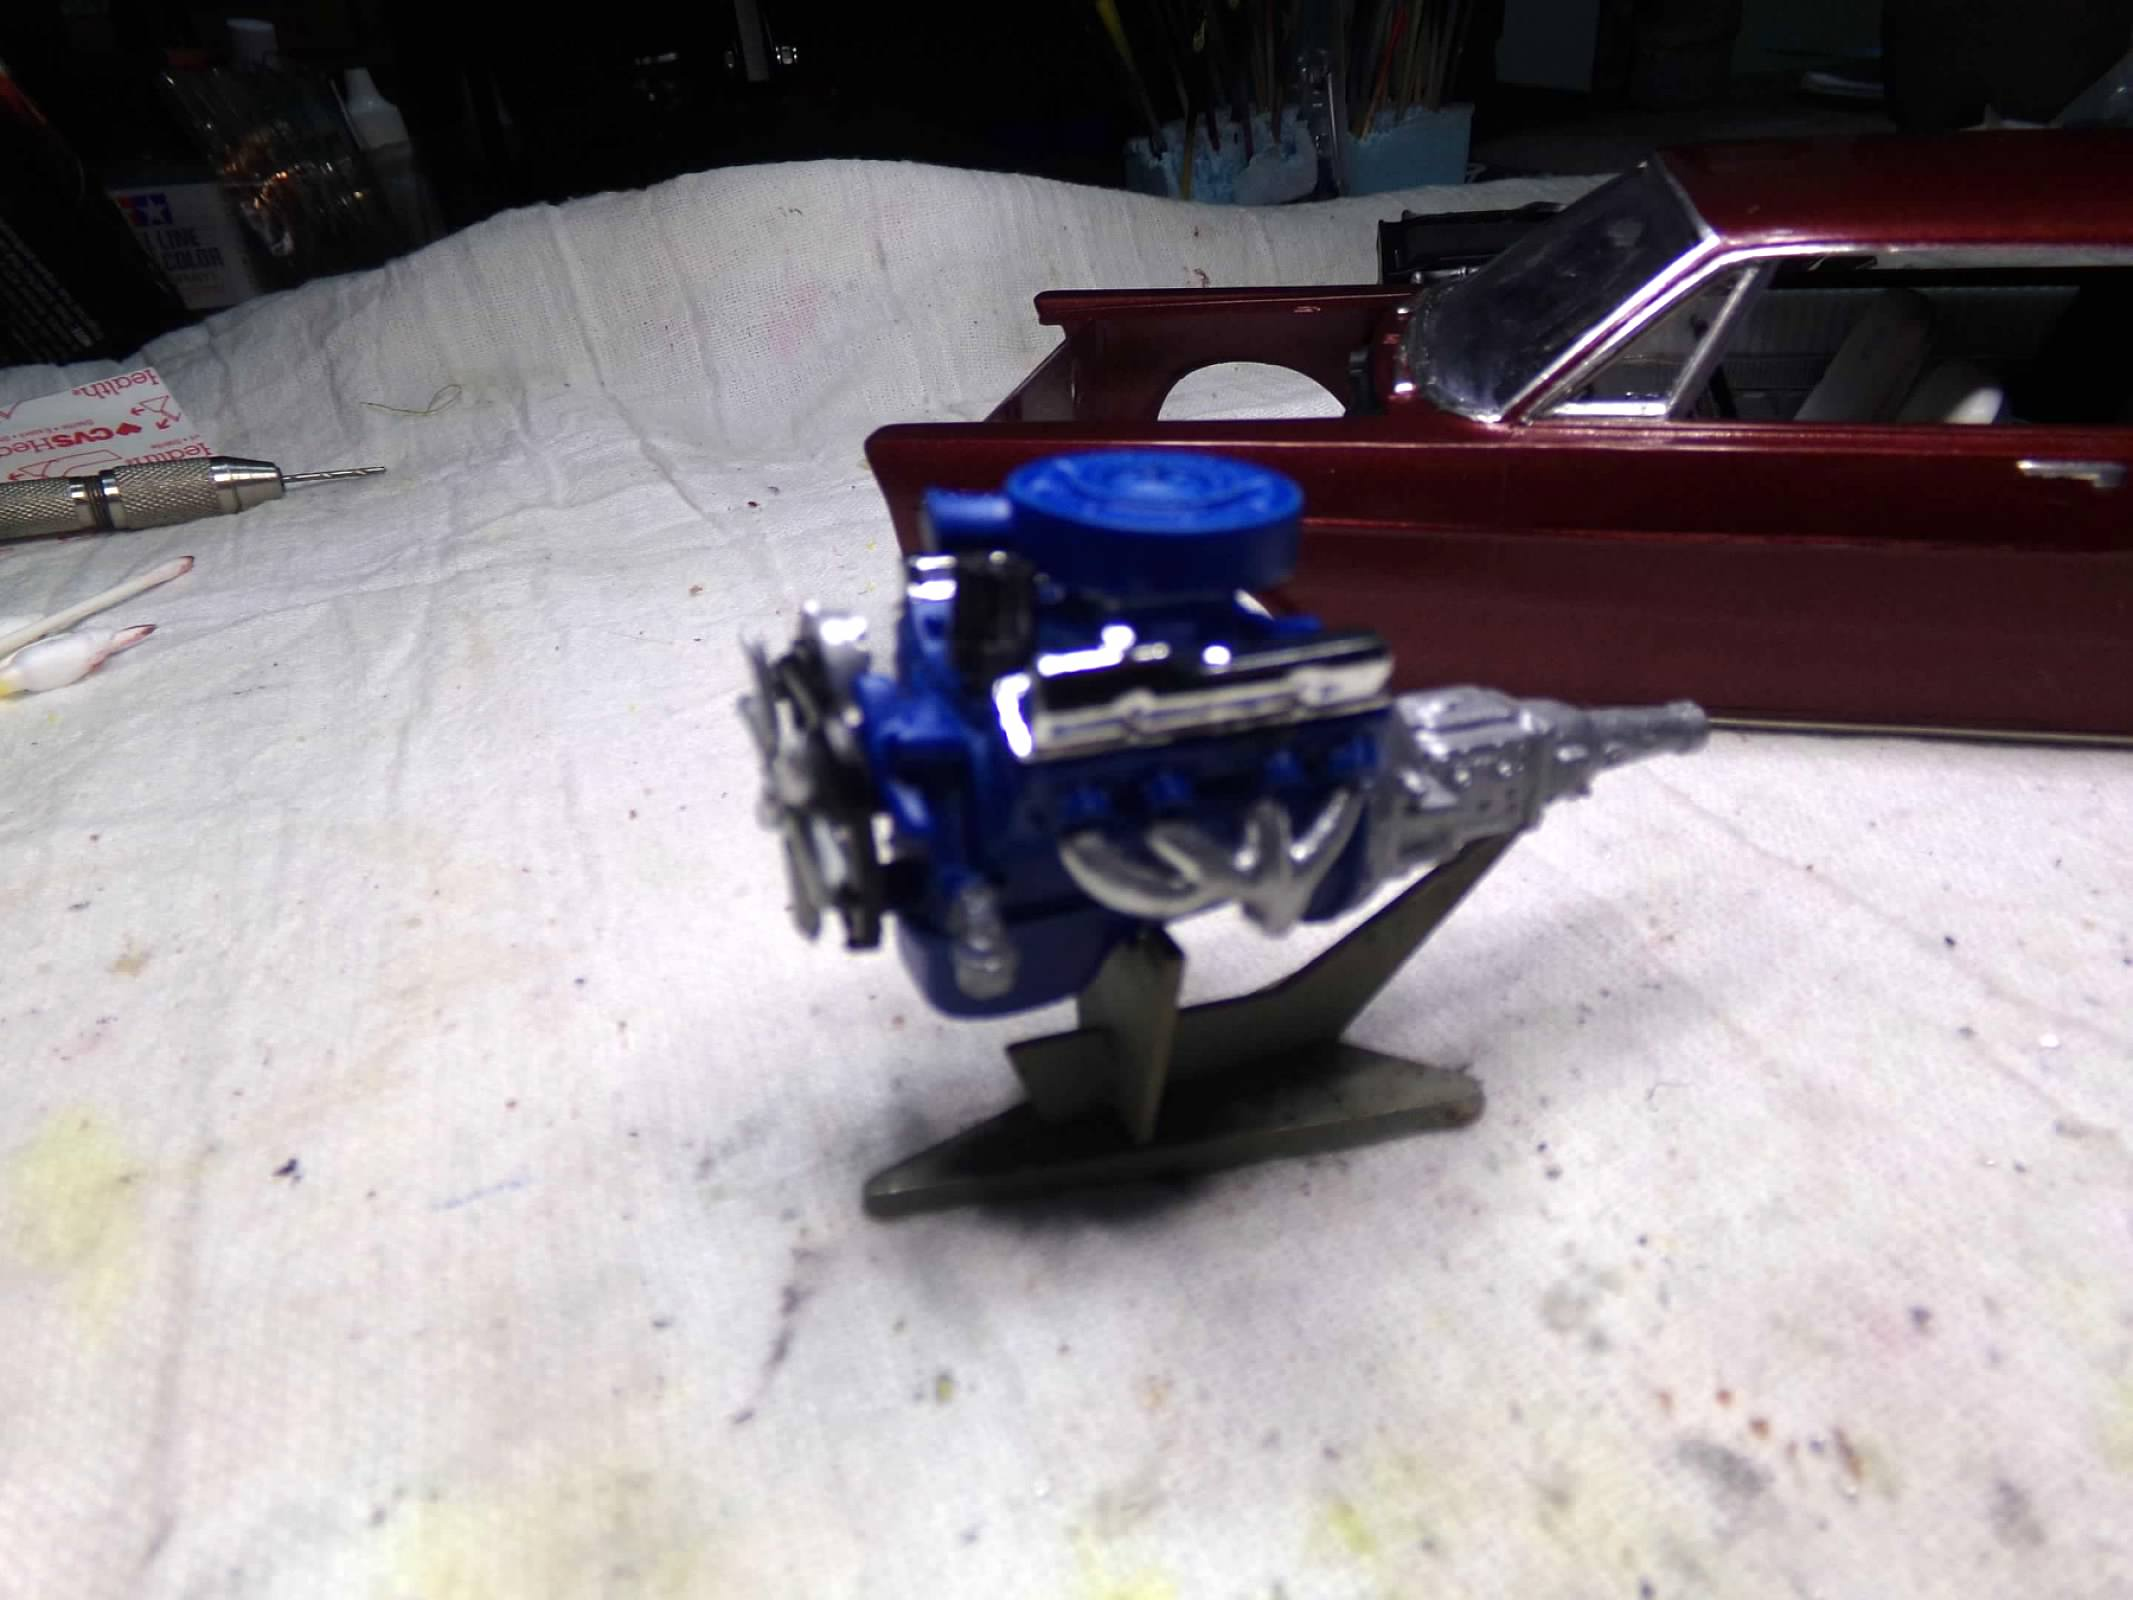
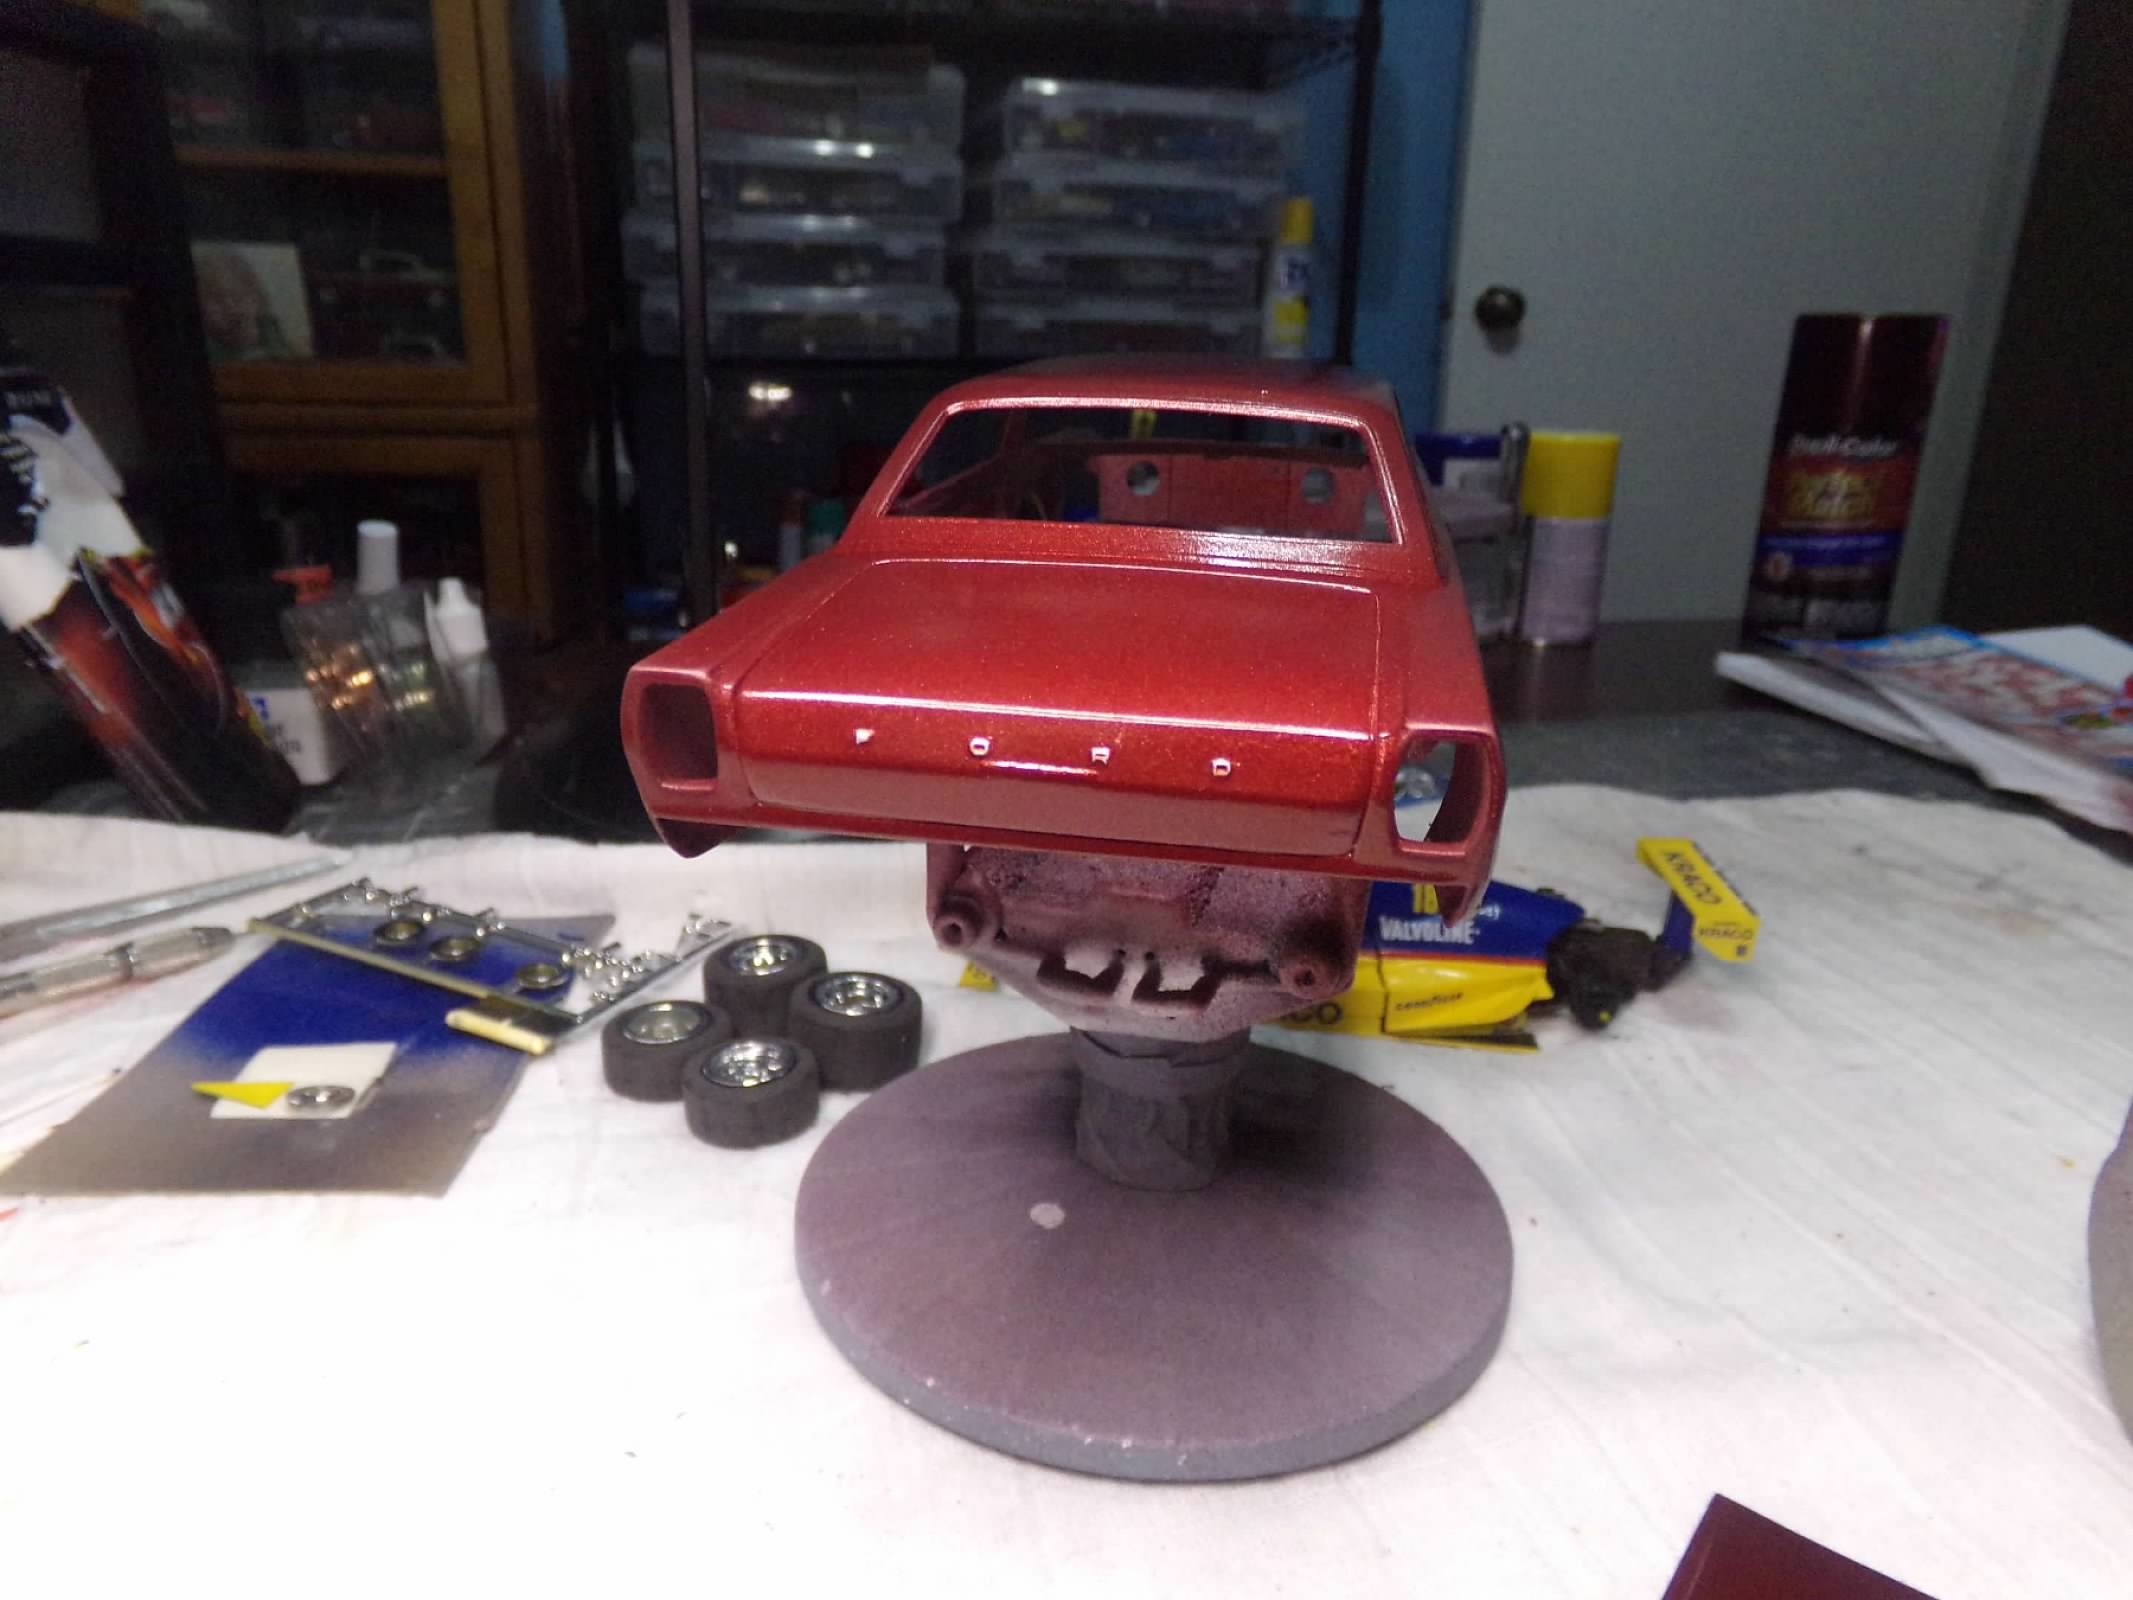
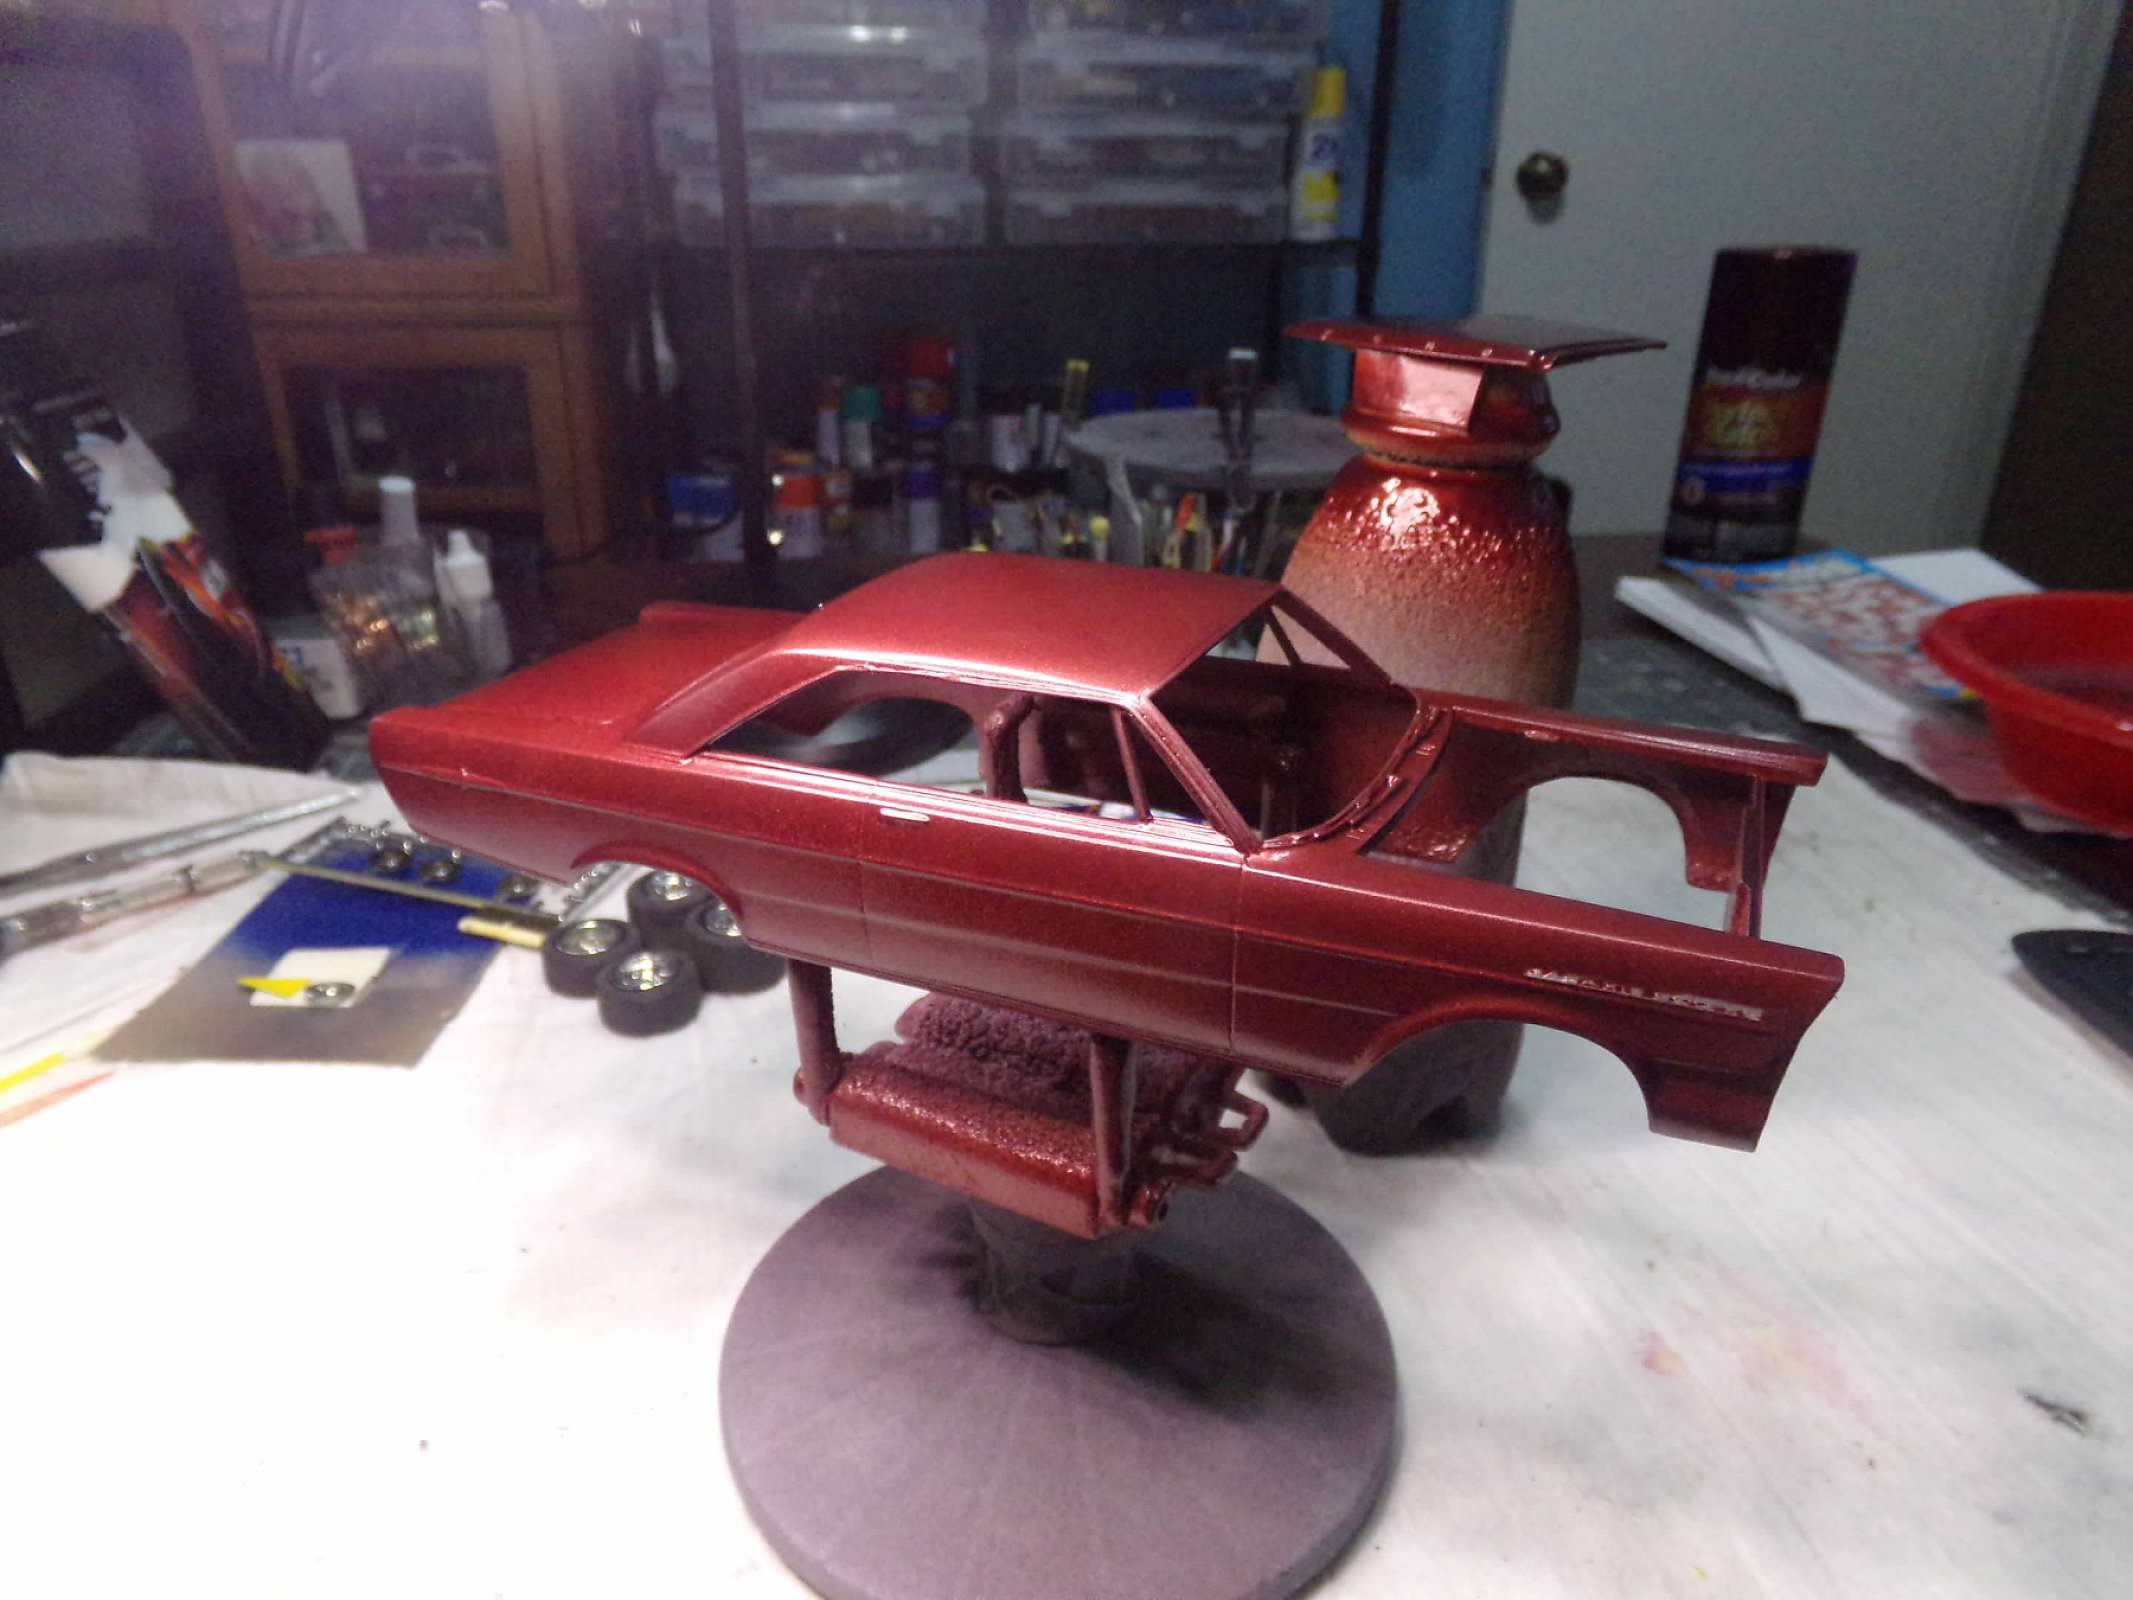
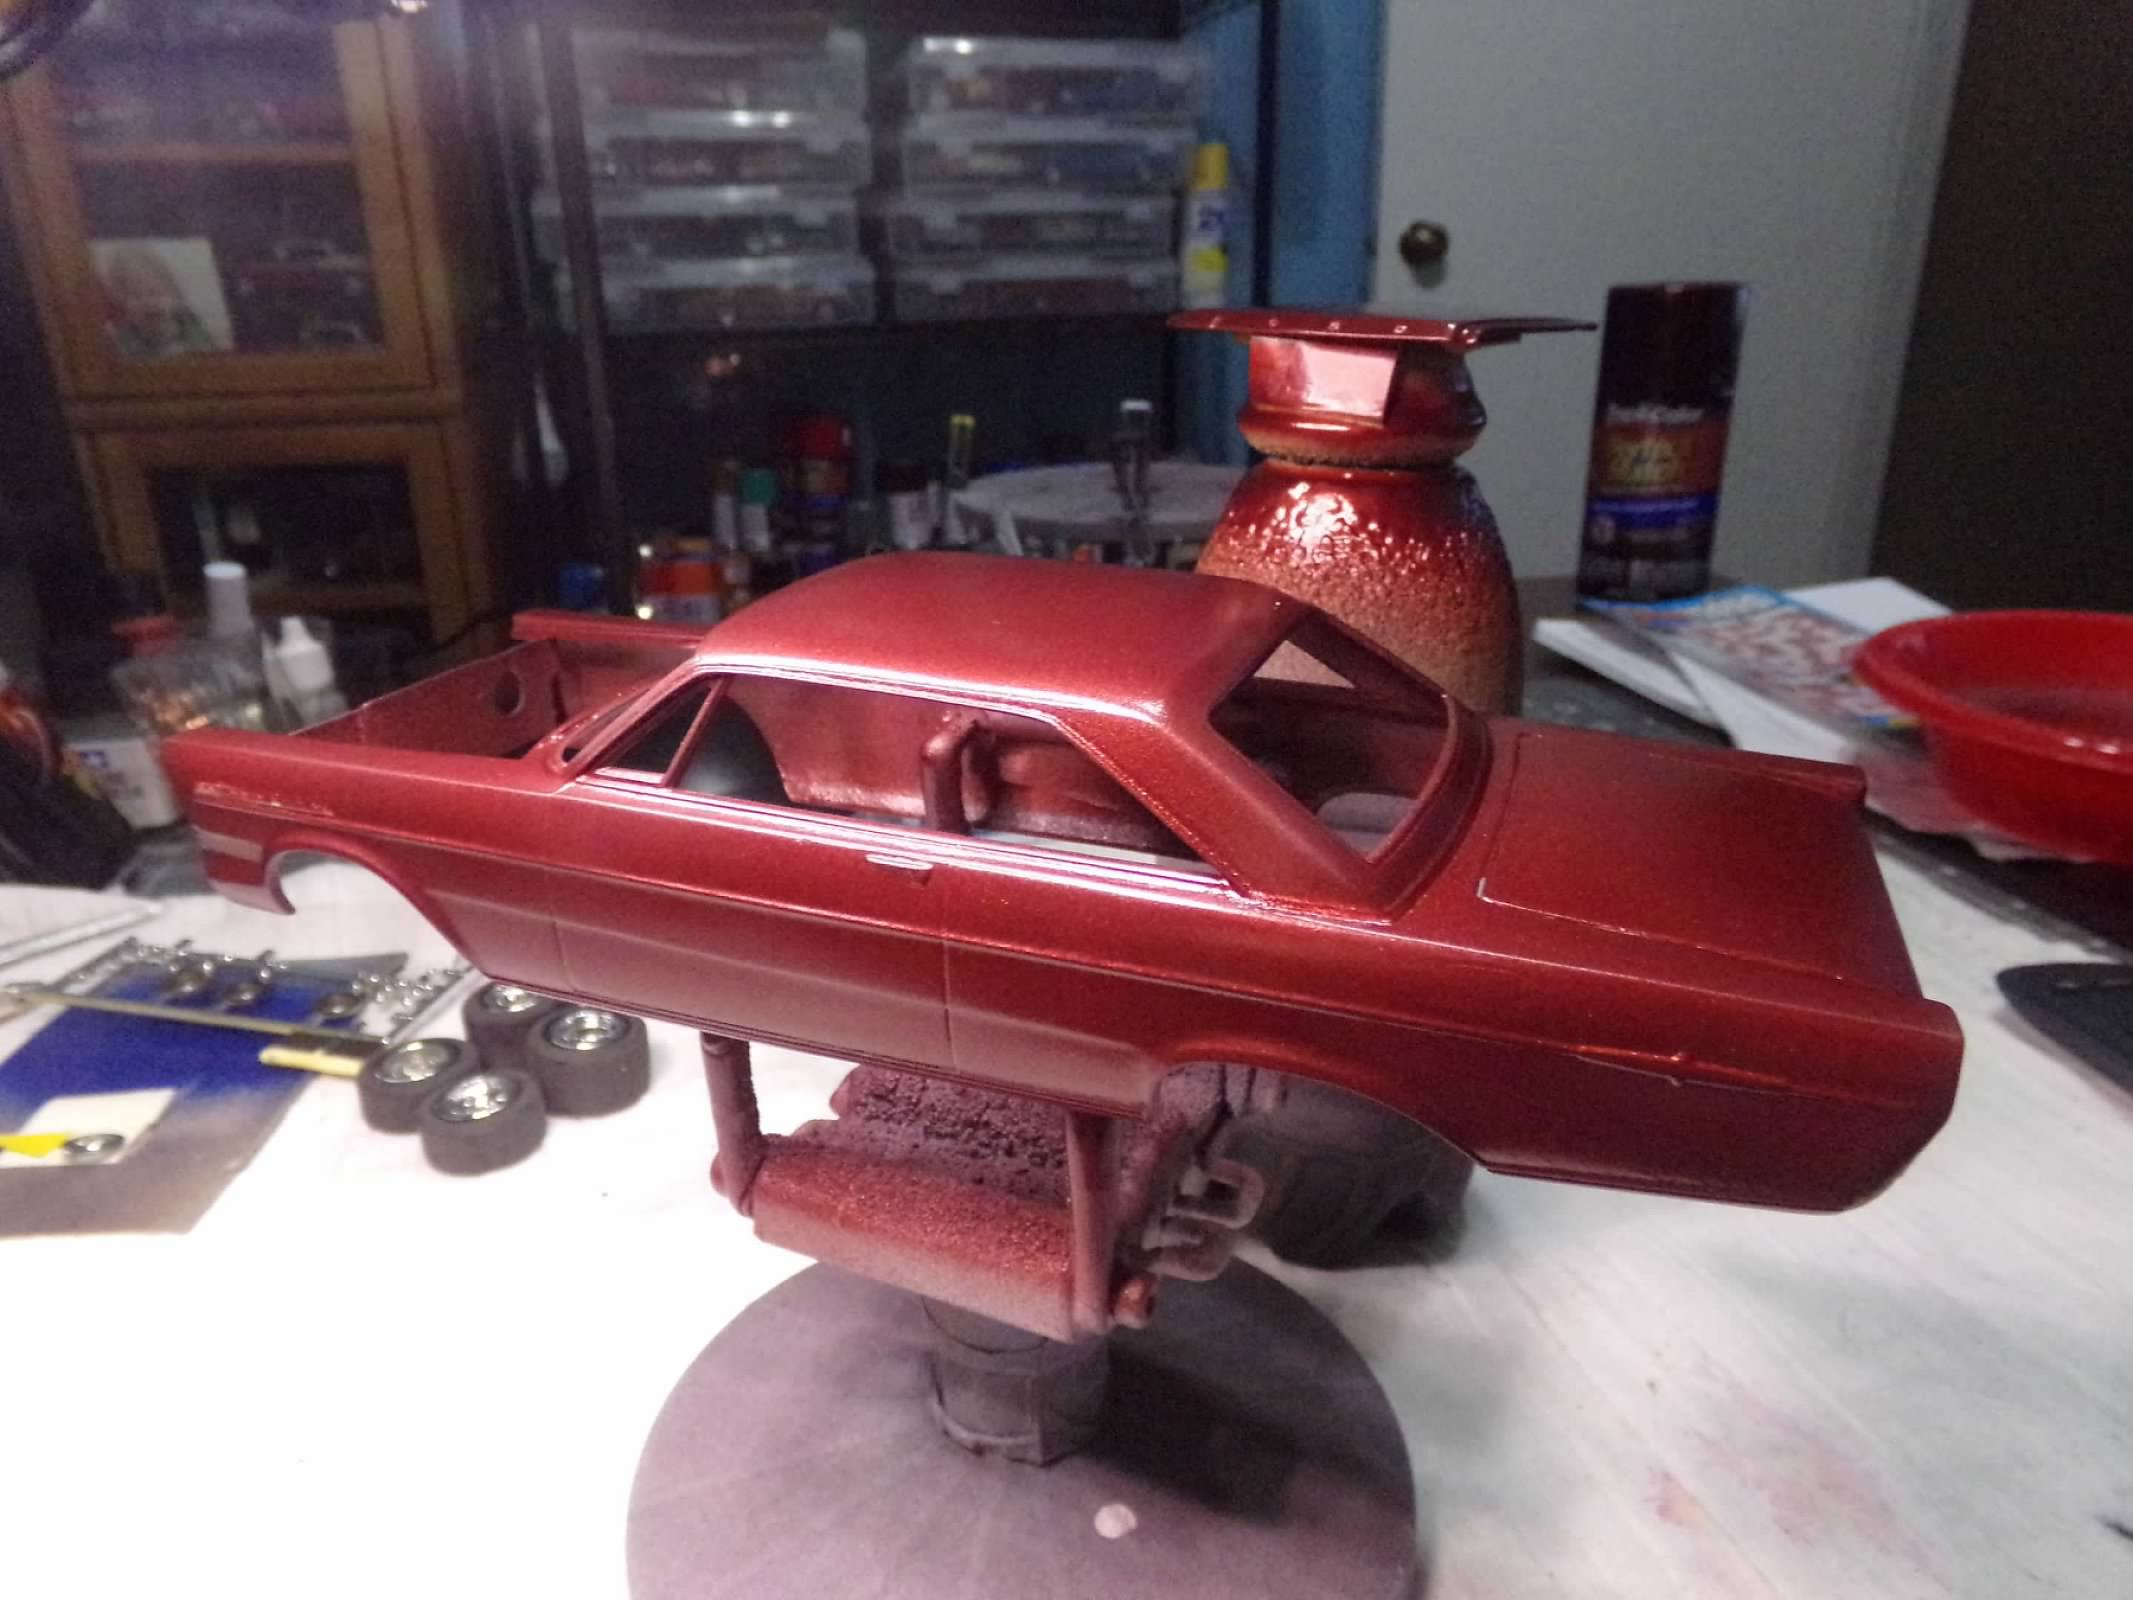
Thanks, David and Steve! I appreciate your comments! Well, I thought I would finish this one up before year-end. The body is pretty good, but the rest of the kit is a horror show. Poorly engraved interior, no mirrors inside or out, no radiator hoses, sloppy poseable steering, warped frame, poor window glass, and poor fit of interior into body. Other than that, its a great kit. I didn't bother to use any aftermarket of parts box pieces as it is not worth it. Thanks for looking! ?
-
1977 McLaren M24 - Tom Sneva
ModelcarJR replied to ModelcarJR's topic in WIP: Other Racing: Road Racing, Land Speed Racers
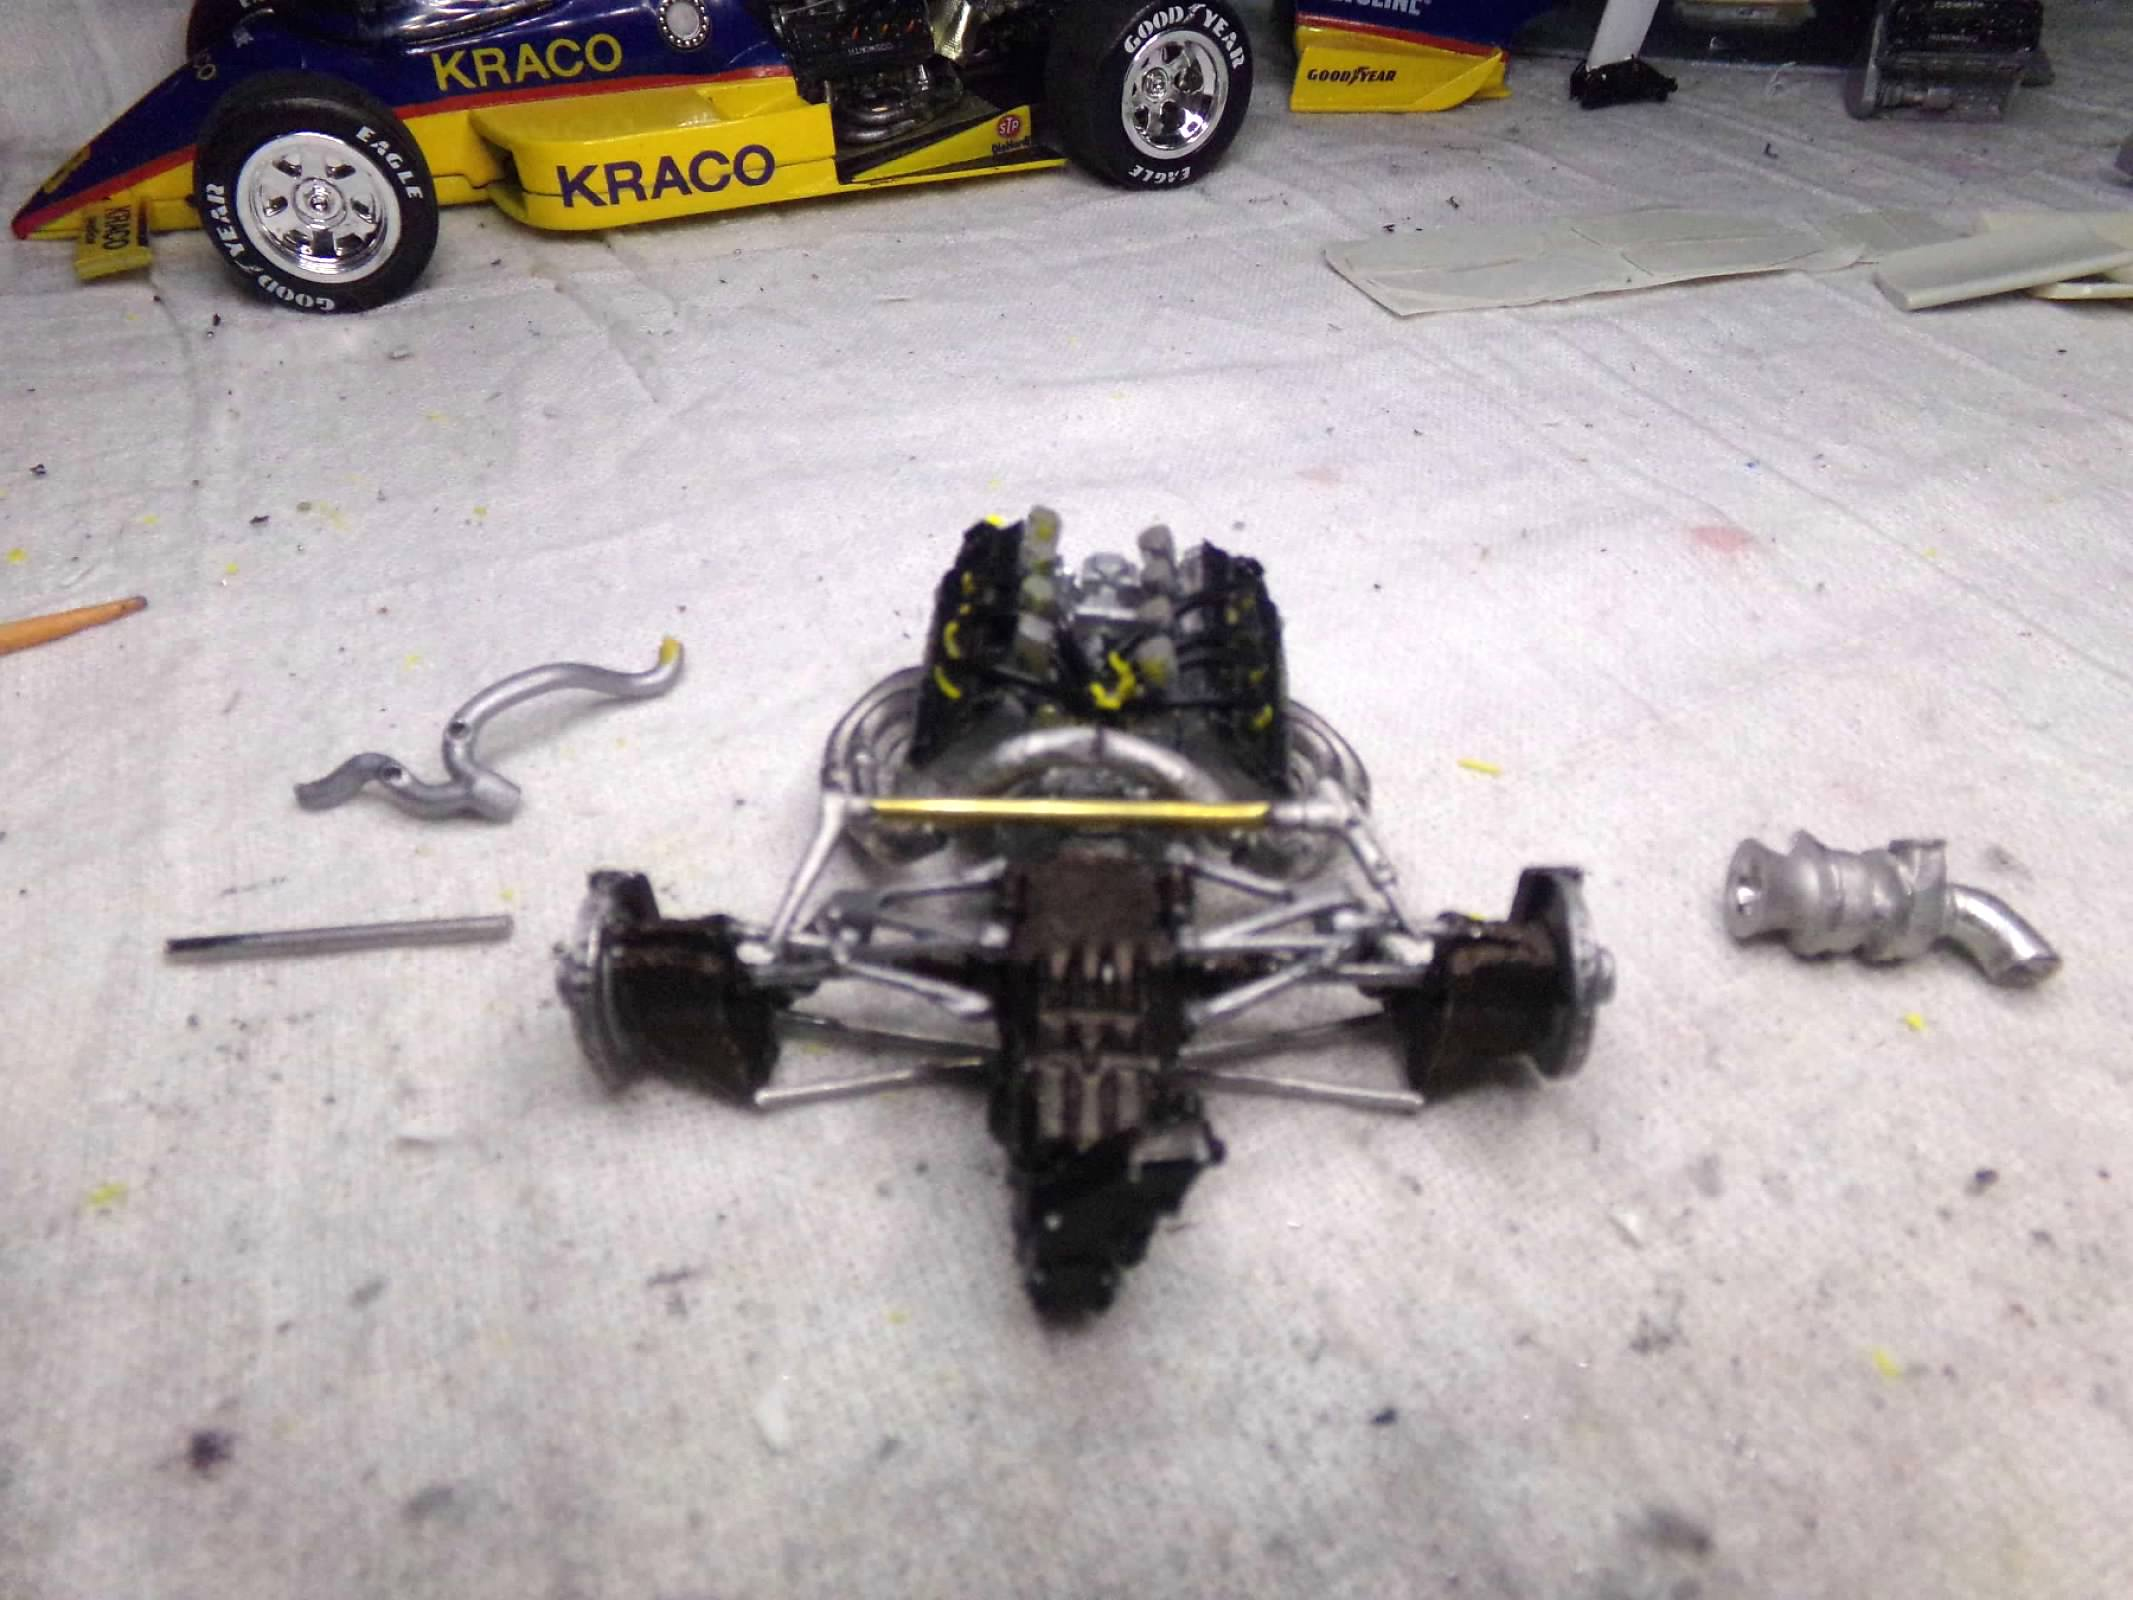
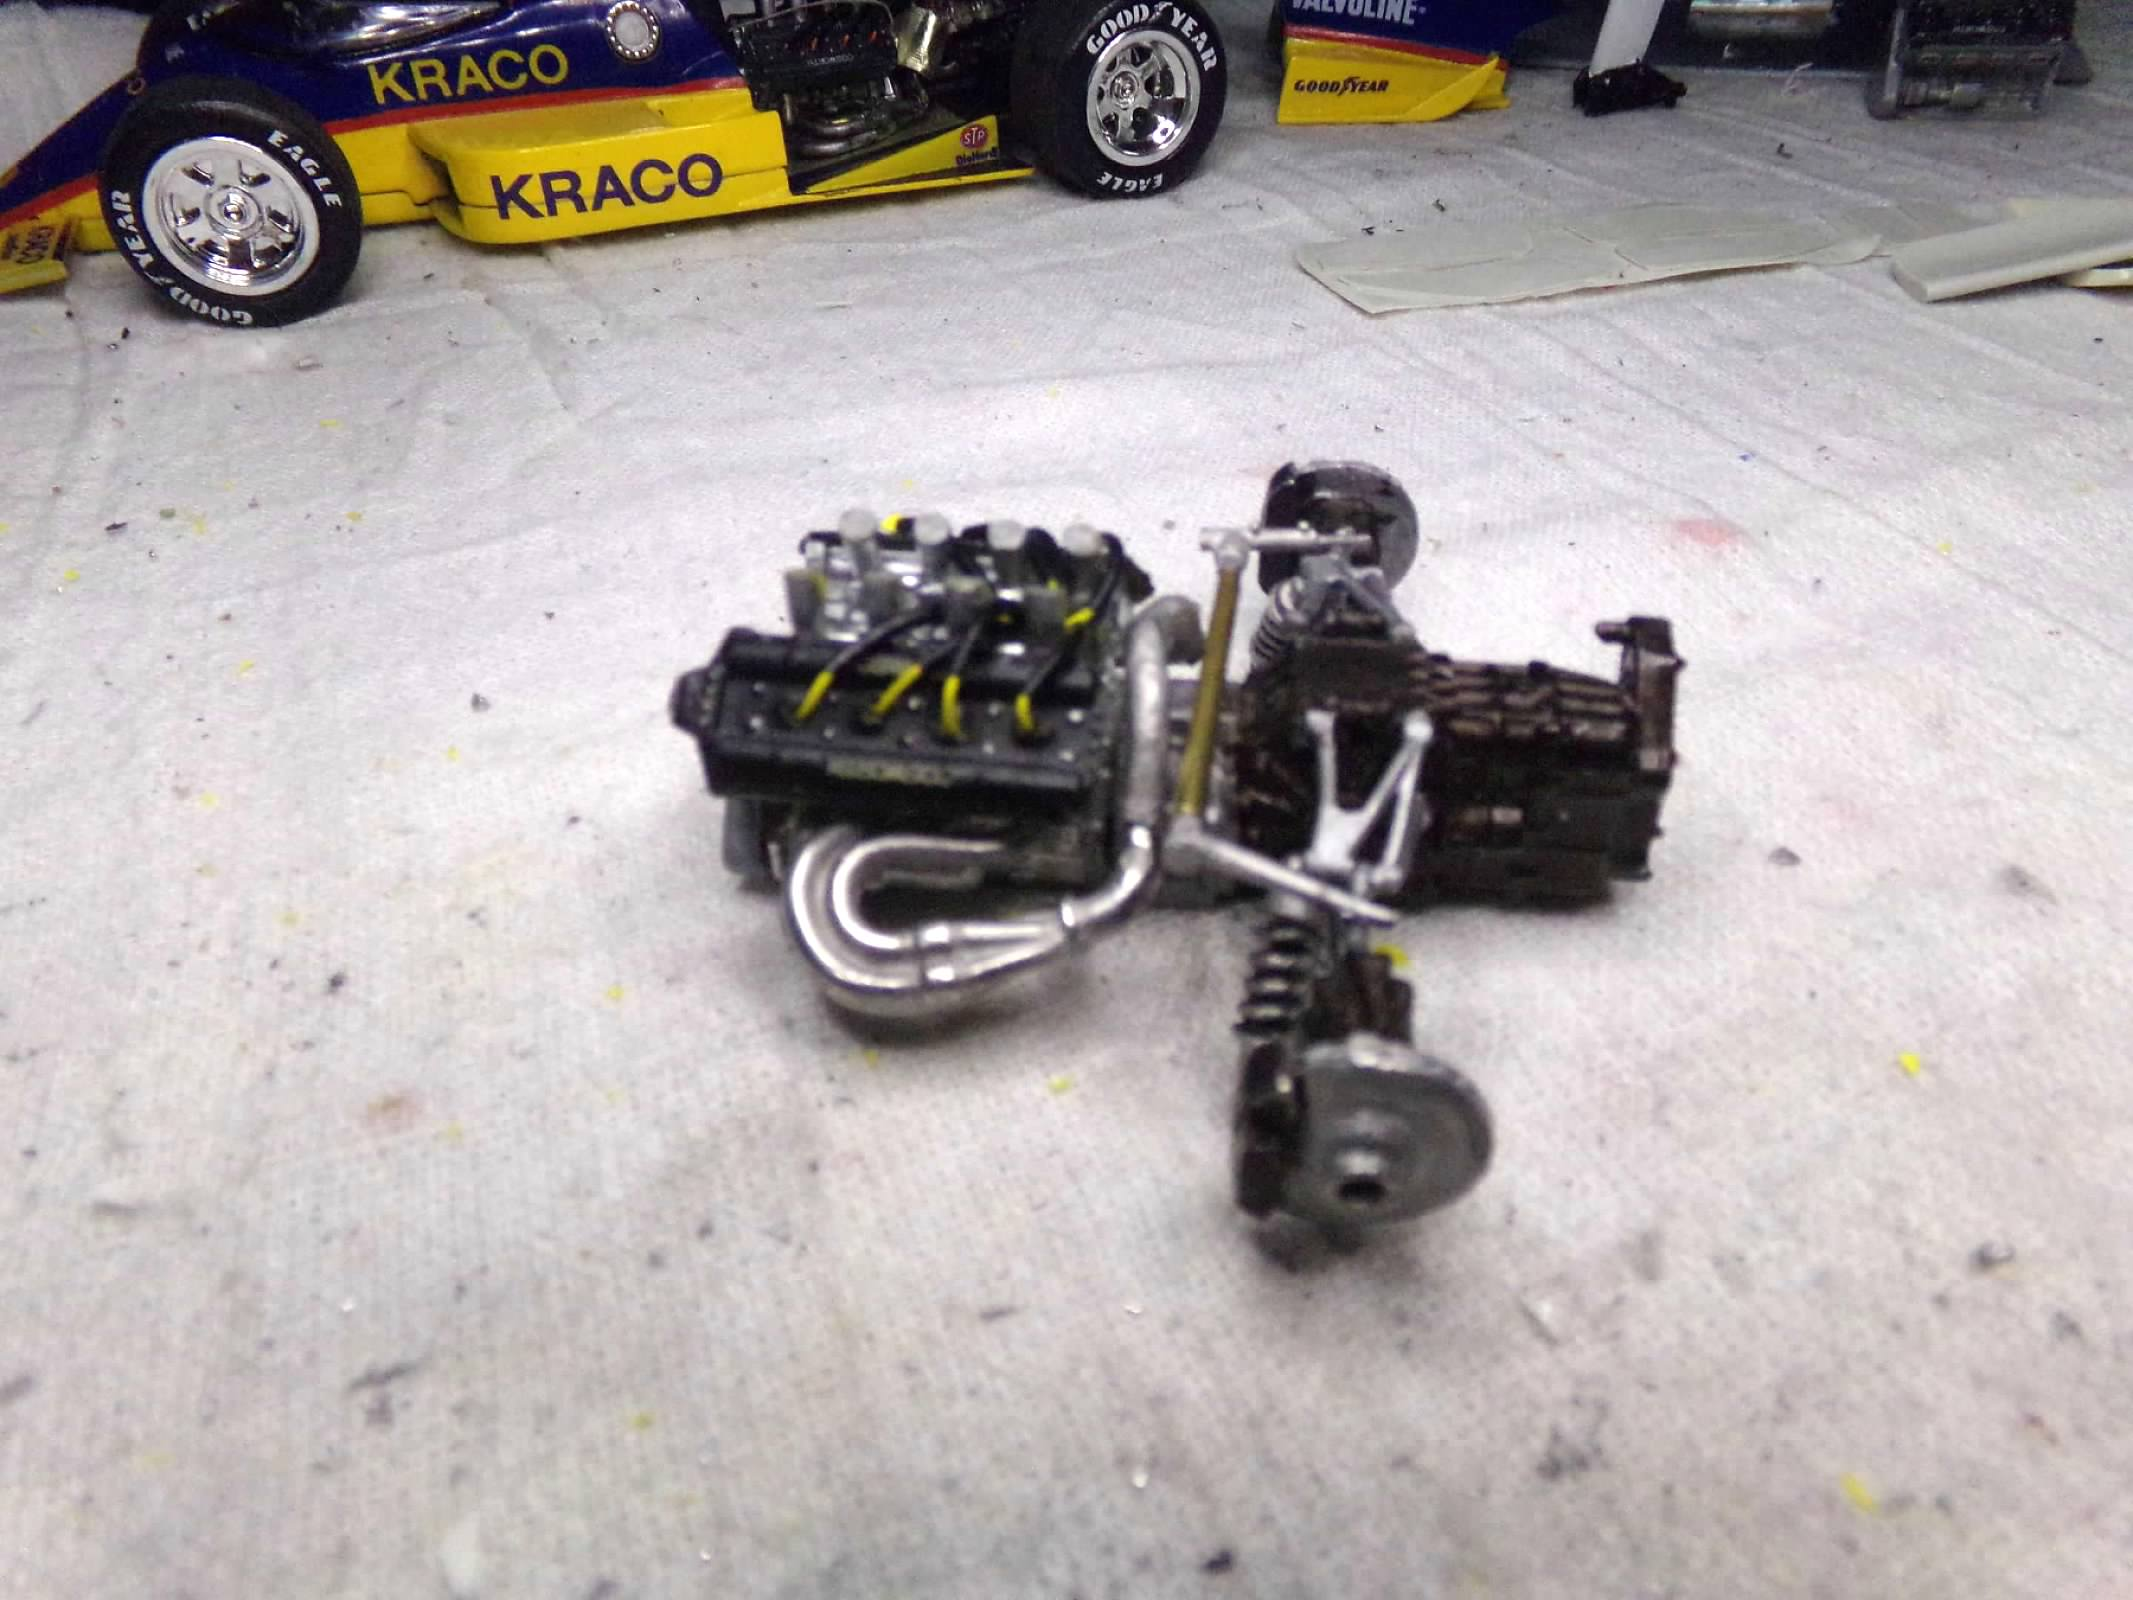
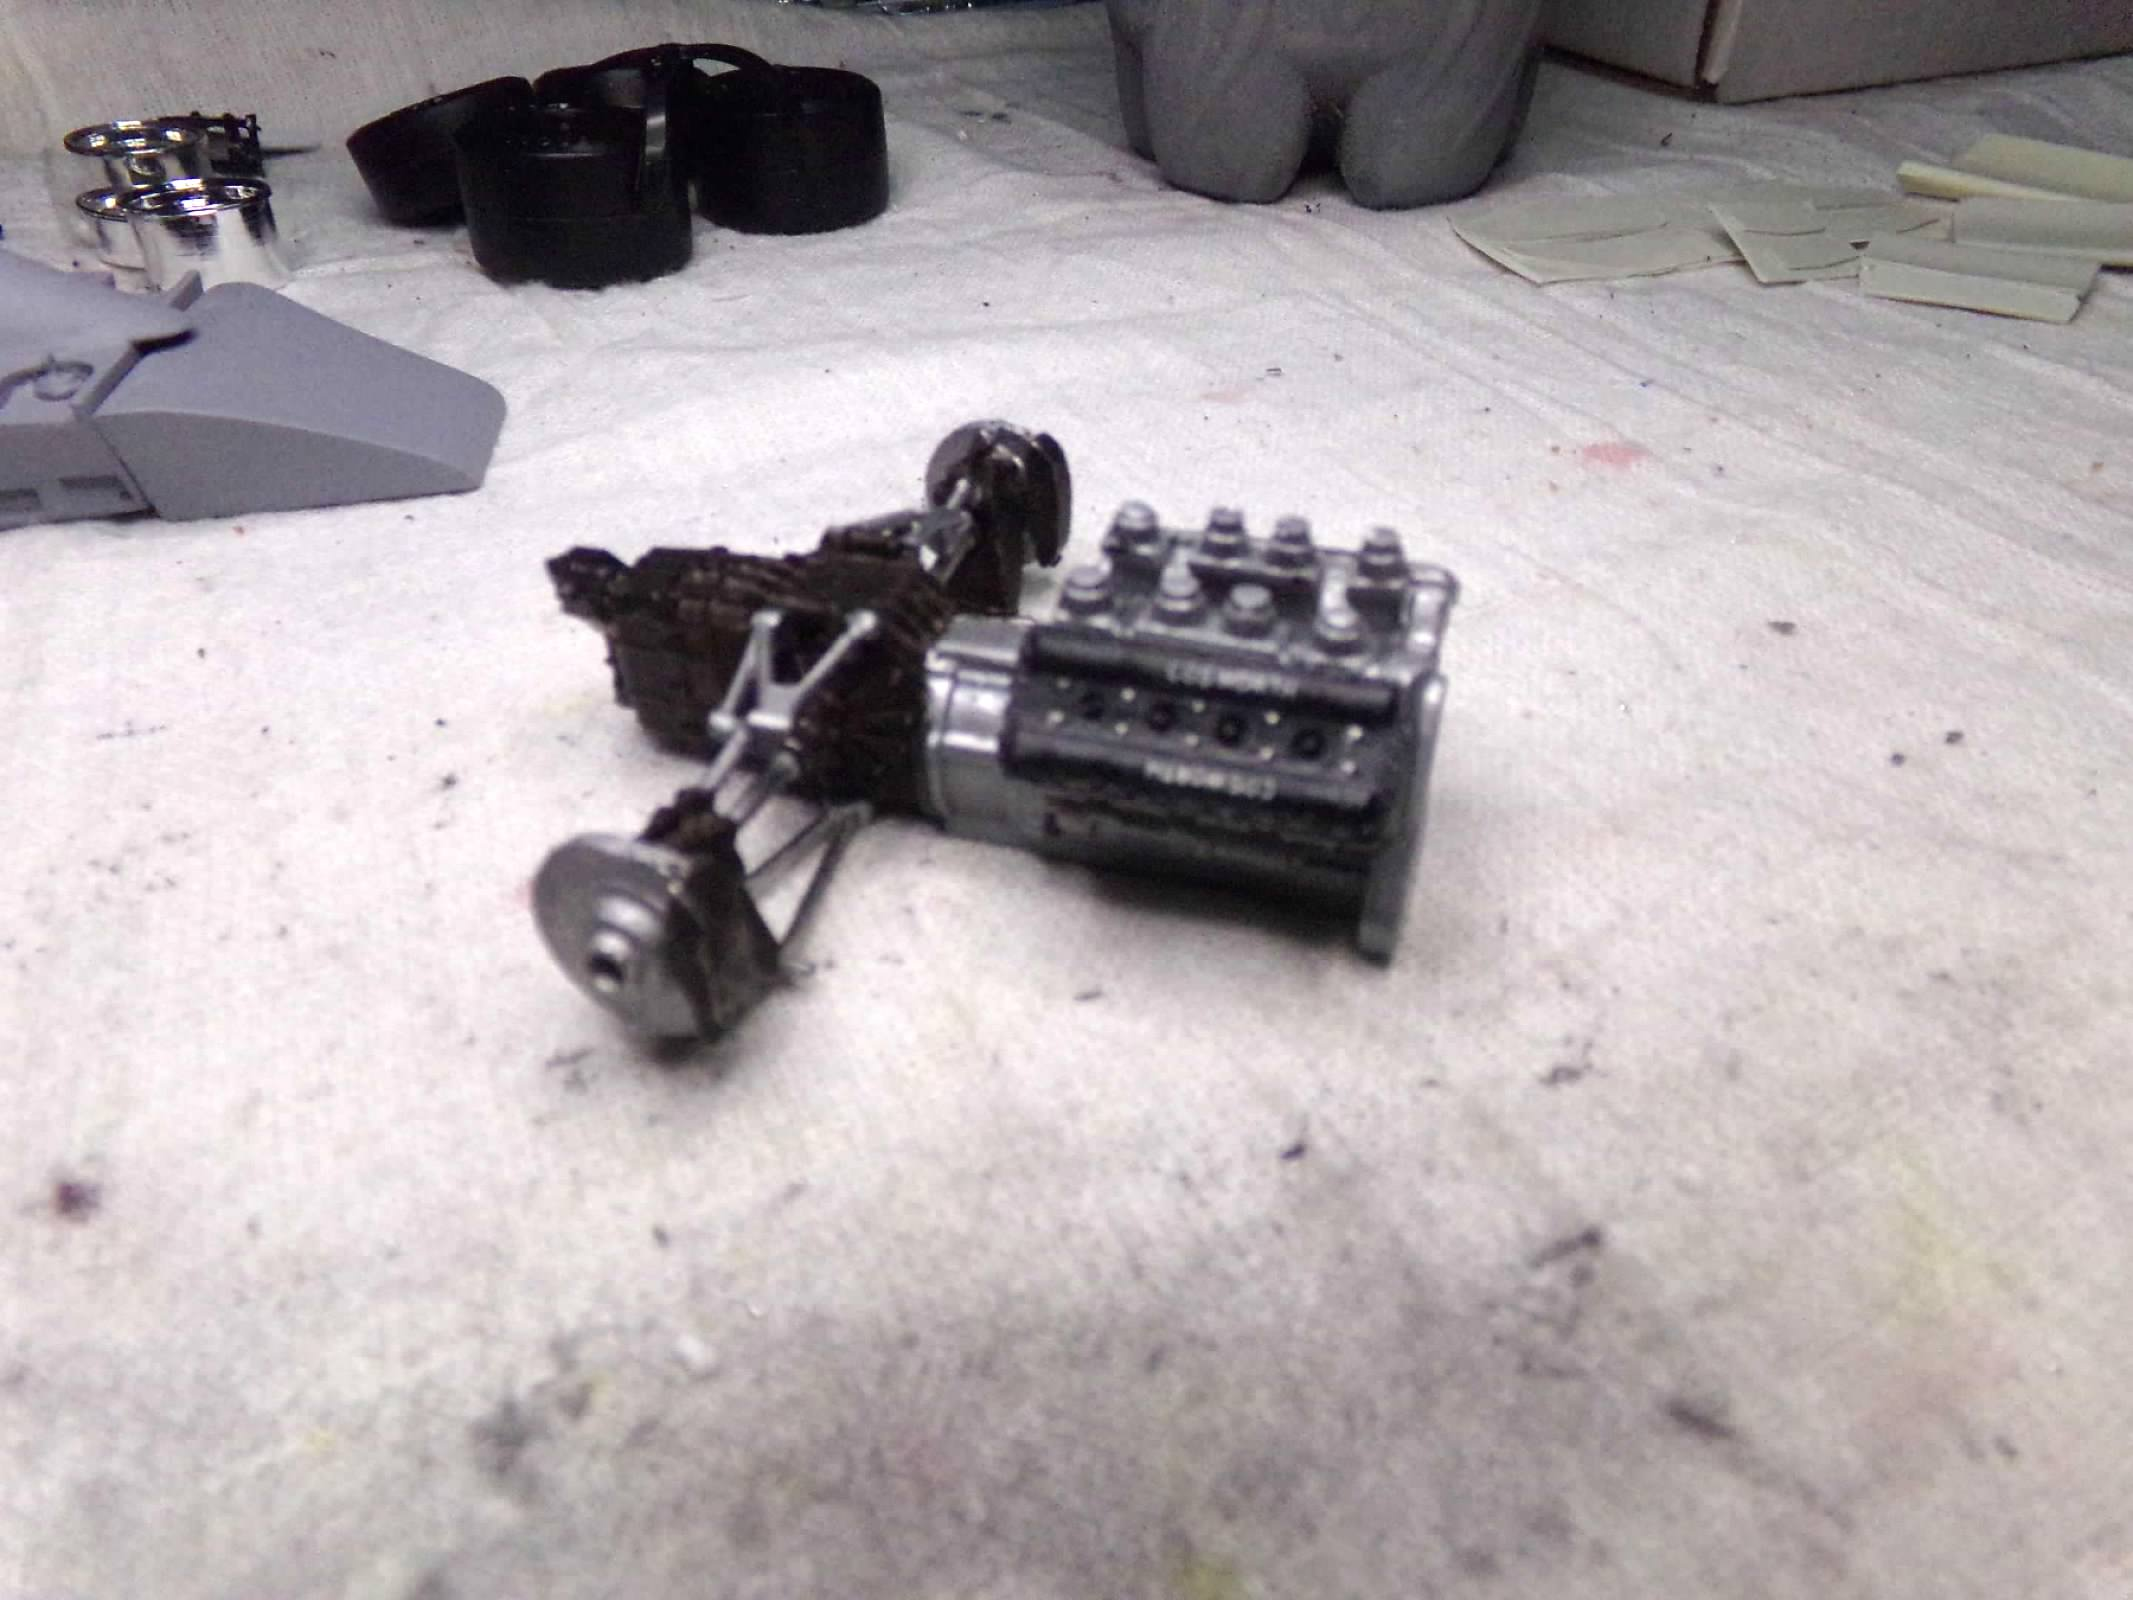
I spoke to Kevin at Silver City Models and he indicated that He couldn't find a photo of the back of this car either. He thinks it might be an internal wastegate but is sending me an external one when he sends the plenum that was left out of the kit originally. I should have them be Tuesday. In the meantime, I have completed everything I can complete on the engine. I added plug wires, attached the headers and crossover pipe, sway bar, shocks, and of course, the cam covers, distributor and injectors. I couldn't drill out the middle part of the sway bar (the silver piece) so I substituted a piece of brass tubing. I'll paint it aluminum when I finish detail painting the rest of the engine. I can't add the turbo until I get the plenum but I think I try to cut a piece of the other crossover pipe from the Kraco kit to connect the bottom of the turbo to the crossover pipe. Hopefully, it will sit just over the top of the sway bar. In the meantime, I'll paint the headers, assemble the wings, and start getting the body ready for paint. Thanks for looking! ?
-
1977 McLaren M24 - Tom Sneva
ModelcarJR replied to ModelcarJR's topic in WIP: Other Racing: Road Racing, Land Speed Racers
I think I found my answer. There are two kinds of wastegates. External and internal that regulate the pressure of the turbo. This one probably is an internal wastegate so that it is not visible. I'll call Kevin and see if that is the case. I am not a mechanic so I am learning as I am building. Thanks for any comments! -
1977 McLaren M24 - Tom Sneva
ModelcarJR replied to ModelcarJR's topic in WIP: Other Racing: Road Racing, Land Speed Racers
Thanks, Andrew. The kit includes the turbo but not the wastegate. The wastegate exits with a pipe that goes over the transmission like the no. 6 car. I can't see if it is present on the no. 8 car from this photo. I'll take a look at the Penske Museum. Thanks for the help! -
1977 McLaren M24 - Tom Sneva
ModelcarJR replied to ModelcarJR's topic in WIP: Other Racing: Road Racing, Land Speed Racers
One other thing; Does anyone know if a wastegate is on this engine? I can't find a photo of the rear of this engine. -
1977 McLaren M24 - Tom Sneva
ModelcarJR replied to ModelcarJR's topic in WIP: Other Racing: Road Racing, Land Speed Racers
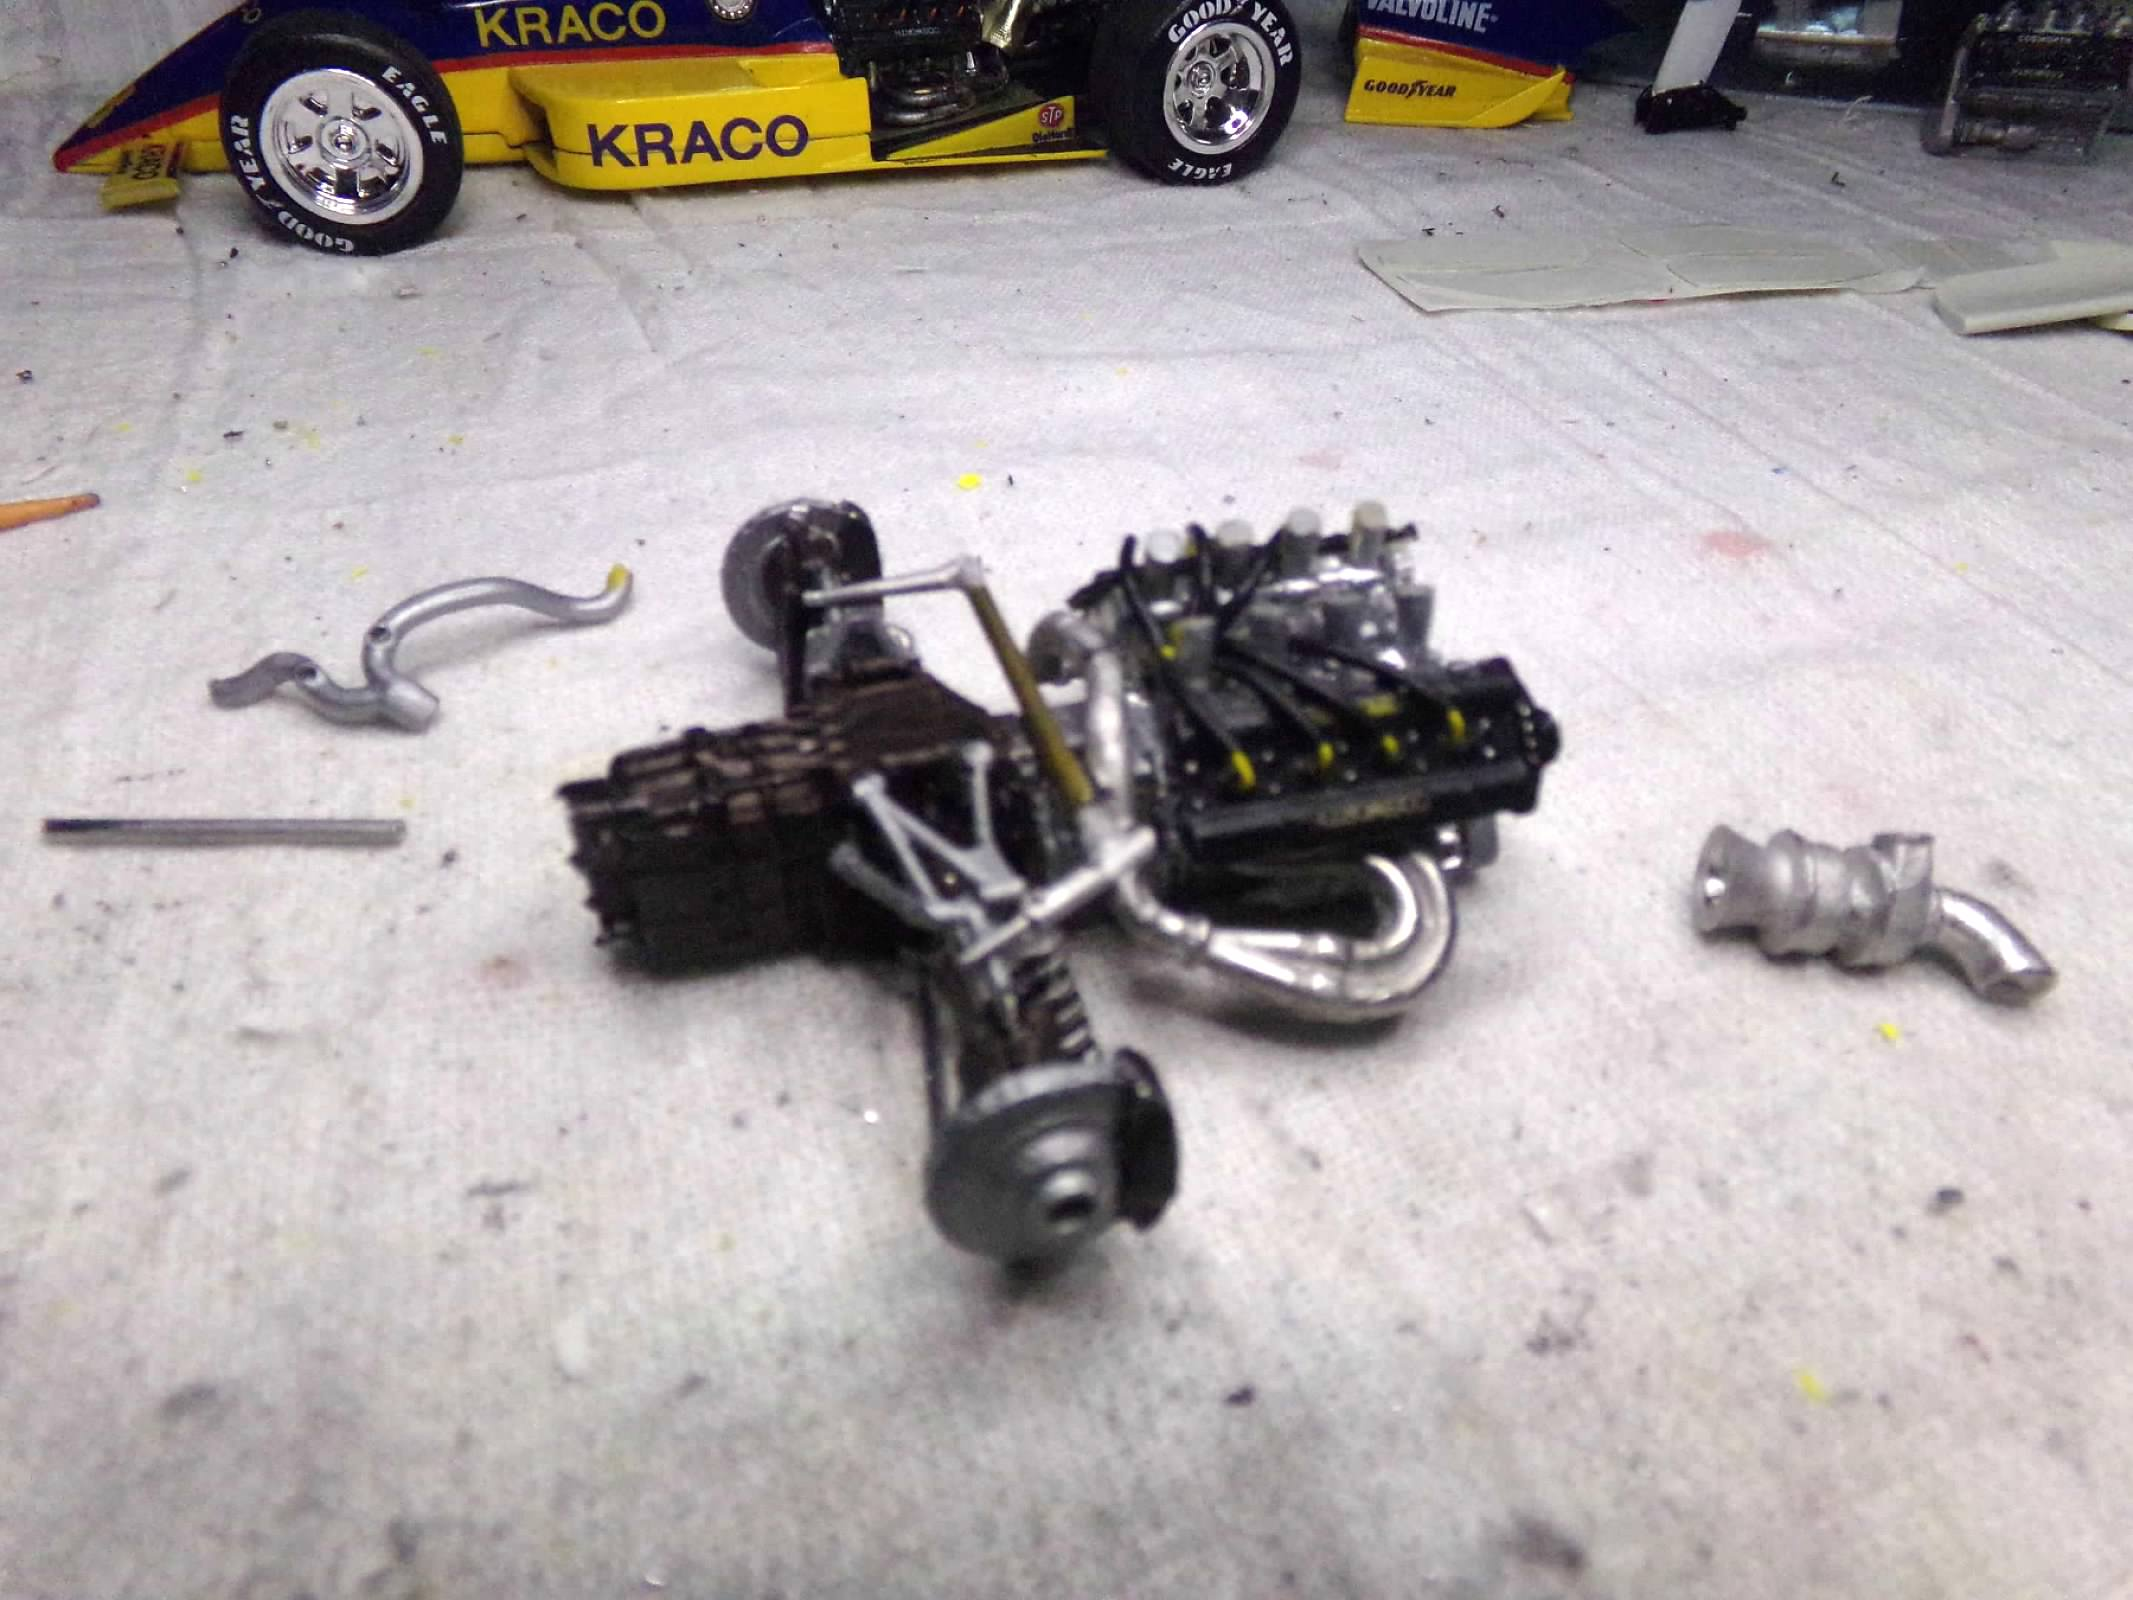
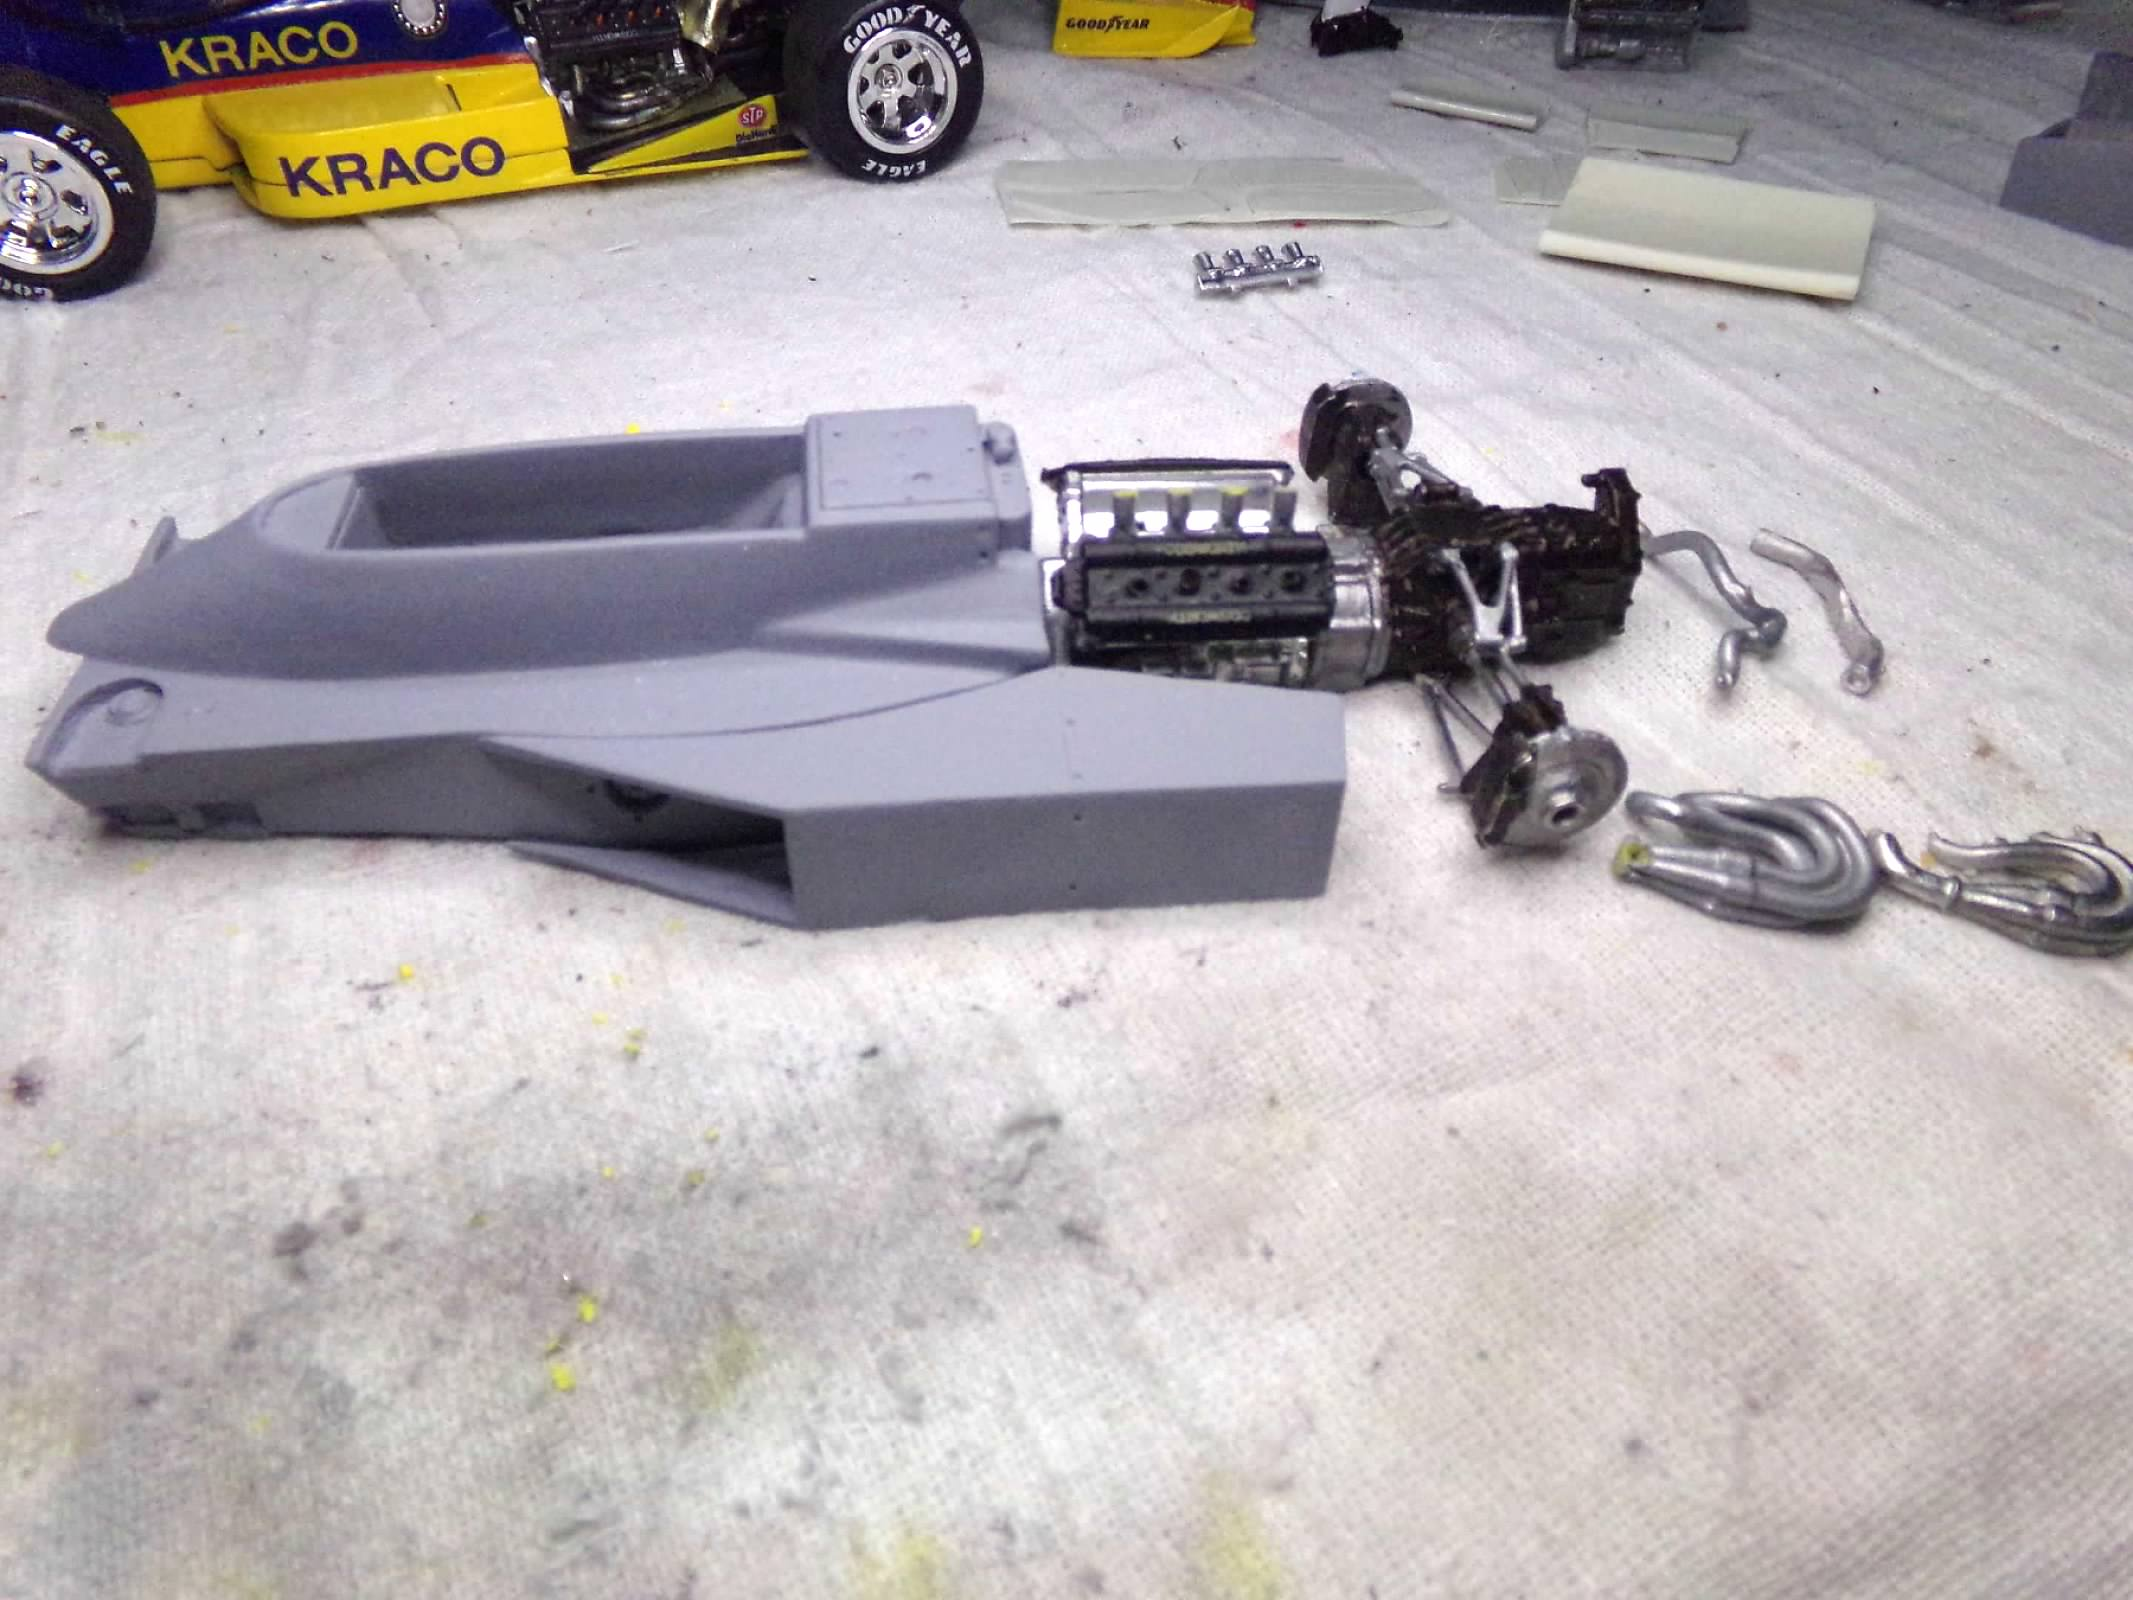
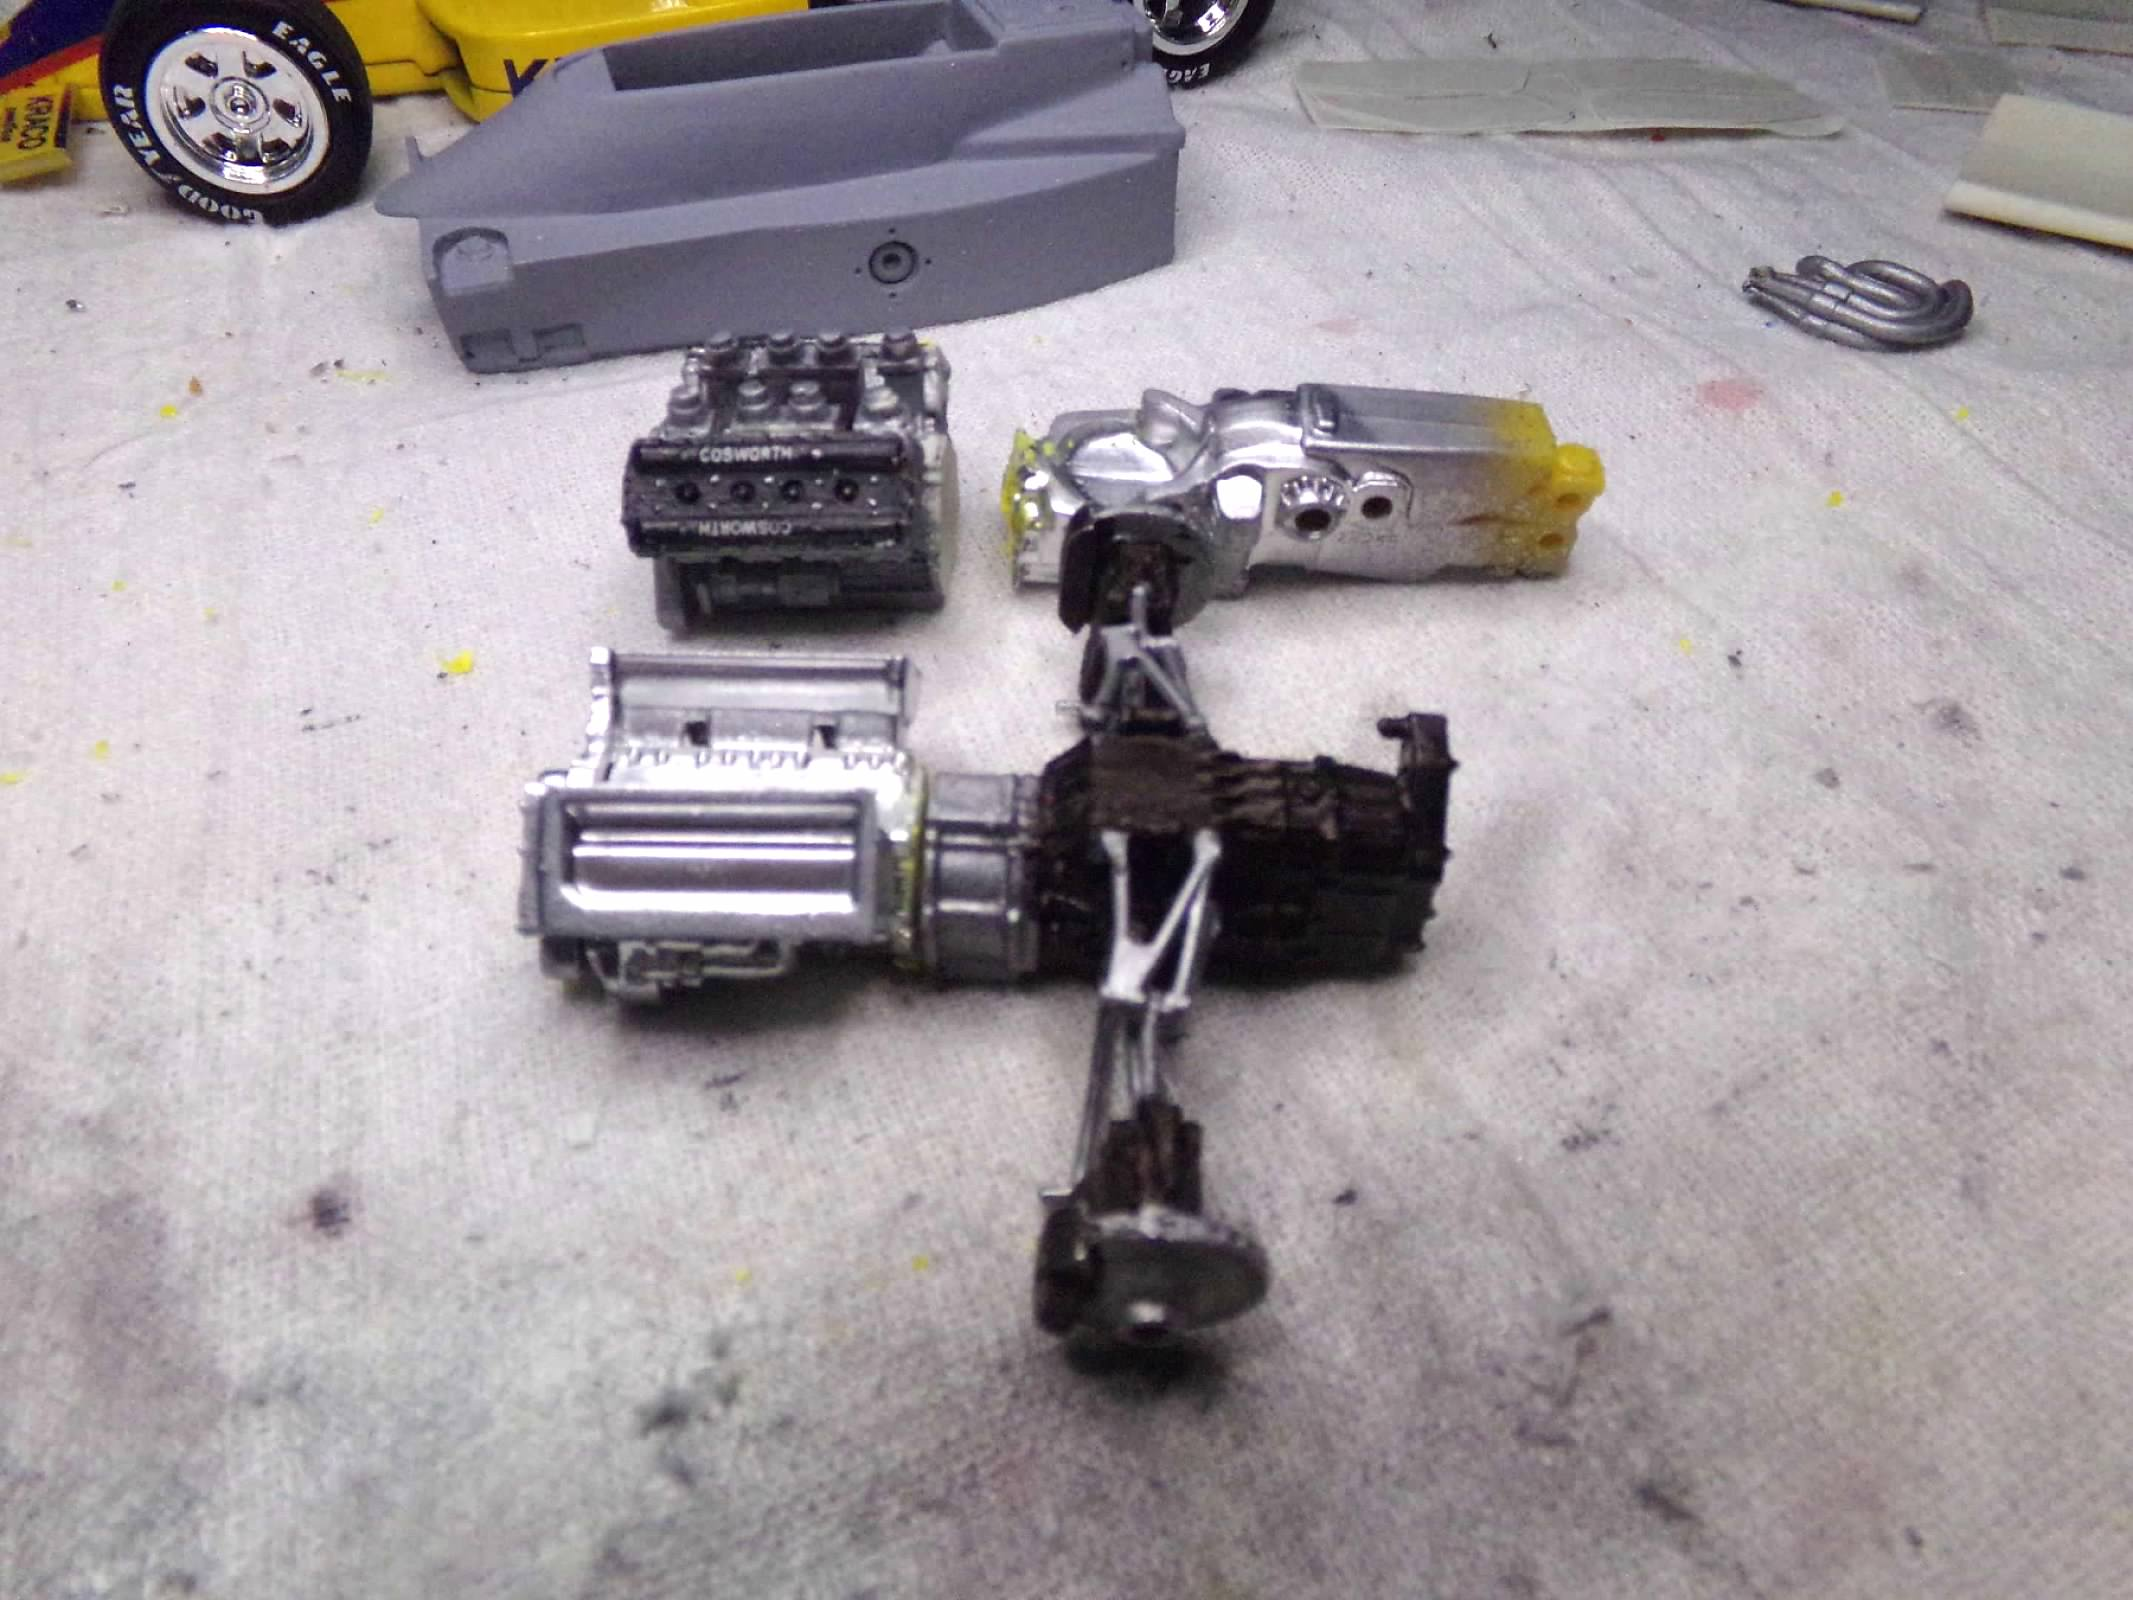
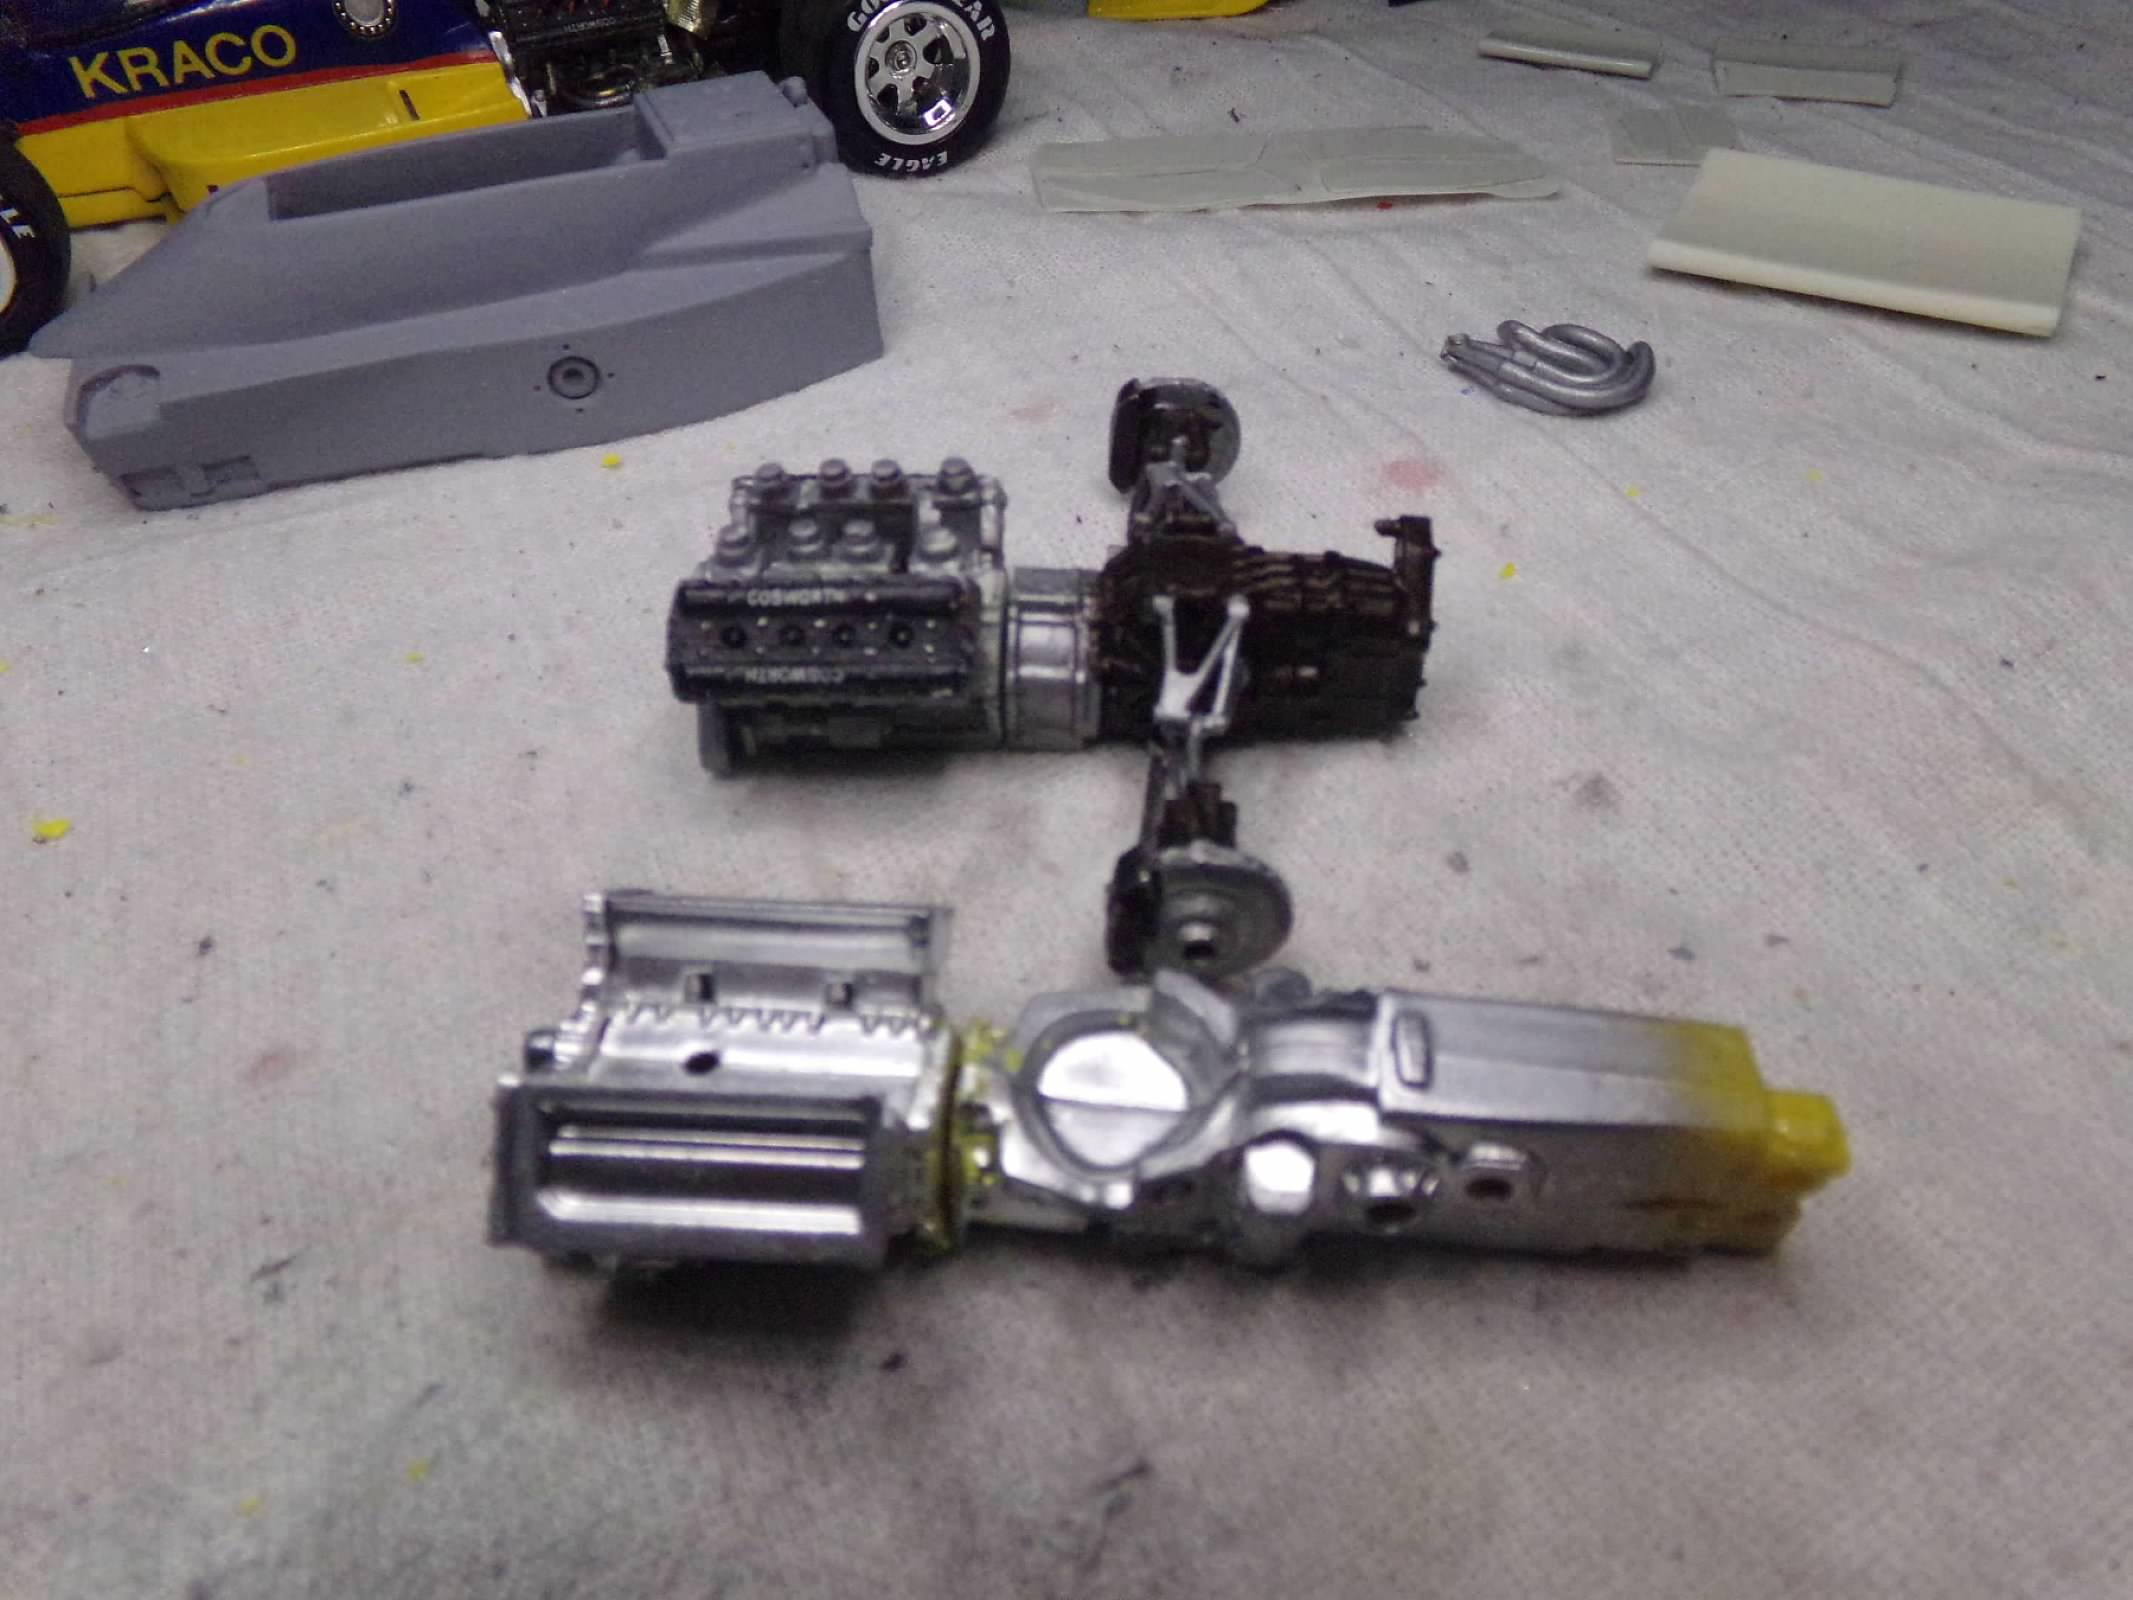
Thanks, Andrew, Ian, Phil and Rob! I appreciate your comments! Rob, I missed the 70 race. My first year in college and I was cramming for year-end exams. I always hated that gthey had exams the week after Memorial Day. So to accomplish substituting some plastic for the resin I saw that I couldn't use the extra Cosworth engine/transmission as it was much too long. So I decided I would cut the engine from both the resin and plastic transmissions. I have to use the resin transmission, suspension as it is shorter and the suspension is not as wide as the engine/transmission from the extra Kraco kit that I have. I am also hoping to use the headers and crossover pipe from the Kraco kit because the crossover has a connection to the turbo which is necessary but is not present in the Silver City resin kit, probably because its close or connection is not visible. I don't know. Also the front cover of the plastic kit gives me a little more room when attaching the front of the engine to the body so that I have about 1/16" more room for the rubber tires in front of the side pods. So all of these things seem to make sense to me and I can also add the plug wires - holes are already drilled! Thanks for looking! ?
-
1977 McLaren M24 - Tom Sneva
ModelcarJR replied to ModelcarJR's topic in Other Racing: Road Racing, Salt Flat Racers
Oops! This is in the wrong category! I moved it to the WIP section. Please ignore! -
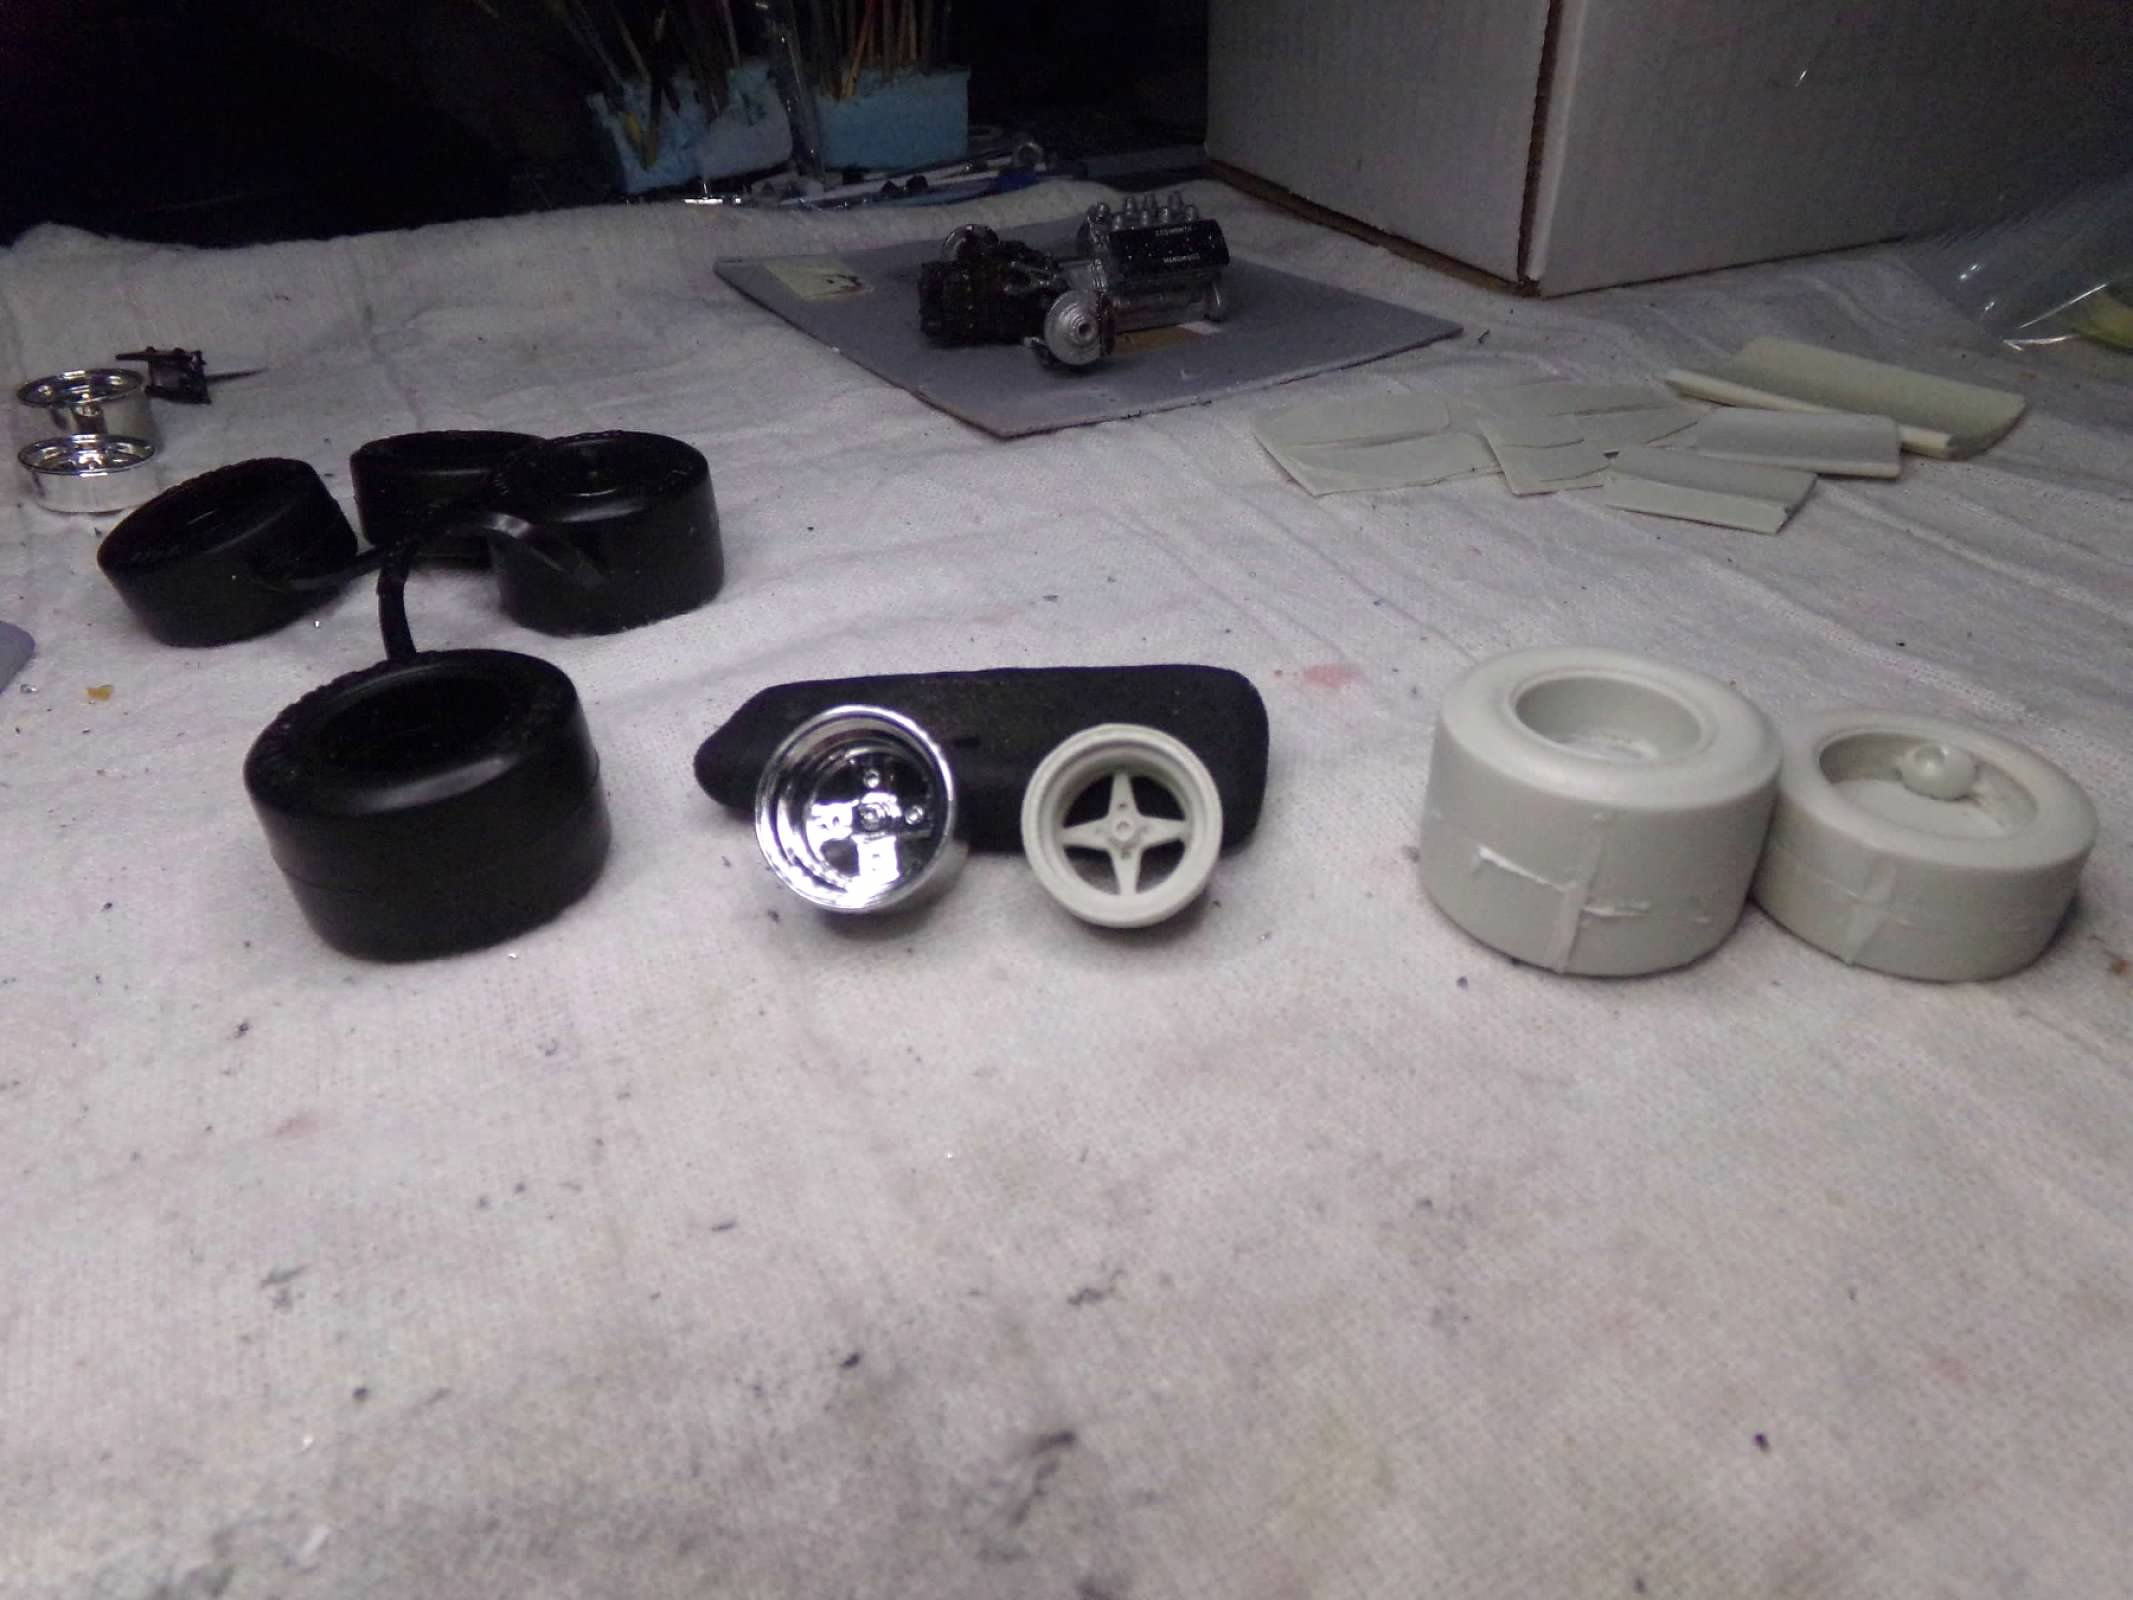
This kit is from Silver City Models and is a complete resin and white metal kit. I've wanted to build this car for many years as it it the car that Tom Sneva drove in 1977 and broke the 200 MPH barrier for 2 laps in qualifications on the first Saturday, Pole Day. I know because I was there. I positioned myself about halfway up the 1st turn stands toward the short shute side so that I could see the inside of the wall in the apex of the turn. In those days, you could tell how fast a car was by how close to the wall the front tire was in the high part of the turn. And when Tom drove that day you couldn't have put a sheet of paper between the front tire and the wall! I wouldn't be surprised it there wasn't a tiny black mark on the wall. In those days, the first day of qualifications was a big deal and the place was at least half-full of race fans. Everyone was standing and gasping on every lap that Tom turned that day! He is forever in the record books as the driver that broke the 200 MPH barrier. Although A. J. Foyt won his fourth race that year, Tom finished a strong second as he would two more time before finally winning the race in 1983. I found this one with a mention by a fellow modeler. That's when I finally got smart. Since it cost about 3 time what a normal model would cost, I mentioned to my son that I would really like to build this kit. Low and behold, it showed up for Christmas! Thanks, son! Now to get started. I looked at the wheels and they are not exactly the same as a photo of the car. The wheels are a straight 4 spoke cross and the ones in the kit look more like a 4 spoke star. So since I have a few Indy kits I found a set of wheels in a Penske PC-6. But one of the front wheels had bad sink marks in it. So since I have two PC-6s I took the good wheel from each kit and now I have one good set of wheels. I also won't have to clean up the resin wheels and tires. I have already built one PC-6 so I may use these other kits for parts. But I could still build one with bad wheels. I've primered the body after cleaning it up ( I am going to minimize the vent holes from the inside) and have started building the engine. I thought I would do any wiring since its hard to drill holes in solid resin. that might end up with broken bits and scarred cam covers. Now I am thinking that maybe I could take an extra Cosworth plastic engine and substitute it. That way I could add more detail because it easier to drill out the spark plug holes in plastic. So that is where I am. I have ordered decals from IndyCals and I am still waiting on a part from Silver City that didn't make it into the box. I want to wait on decals before I try to pick the blue paint that I will need. So that is progress so far! Thanks for looking! ?
-
Thanks, Chris, James, Bruce, and Larry! I appreciate your comments!
-
Thanks, Andy! I appreciate your comment!
-
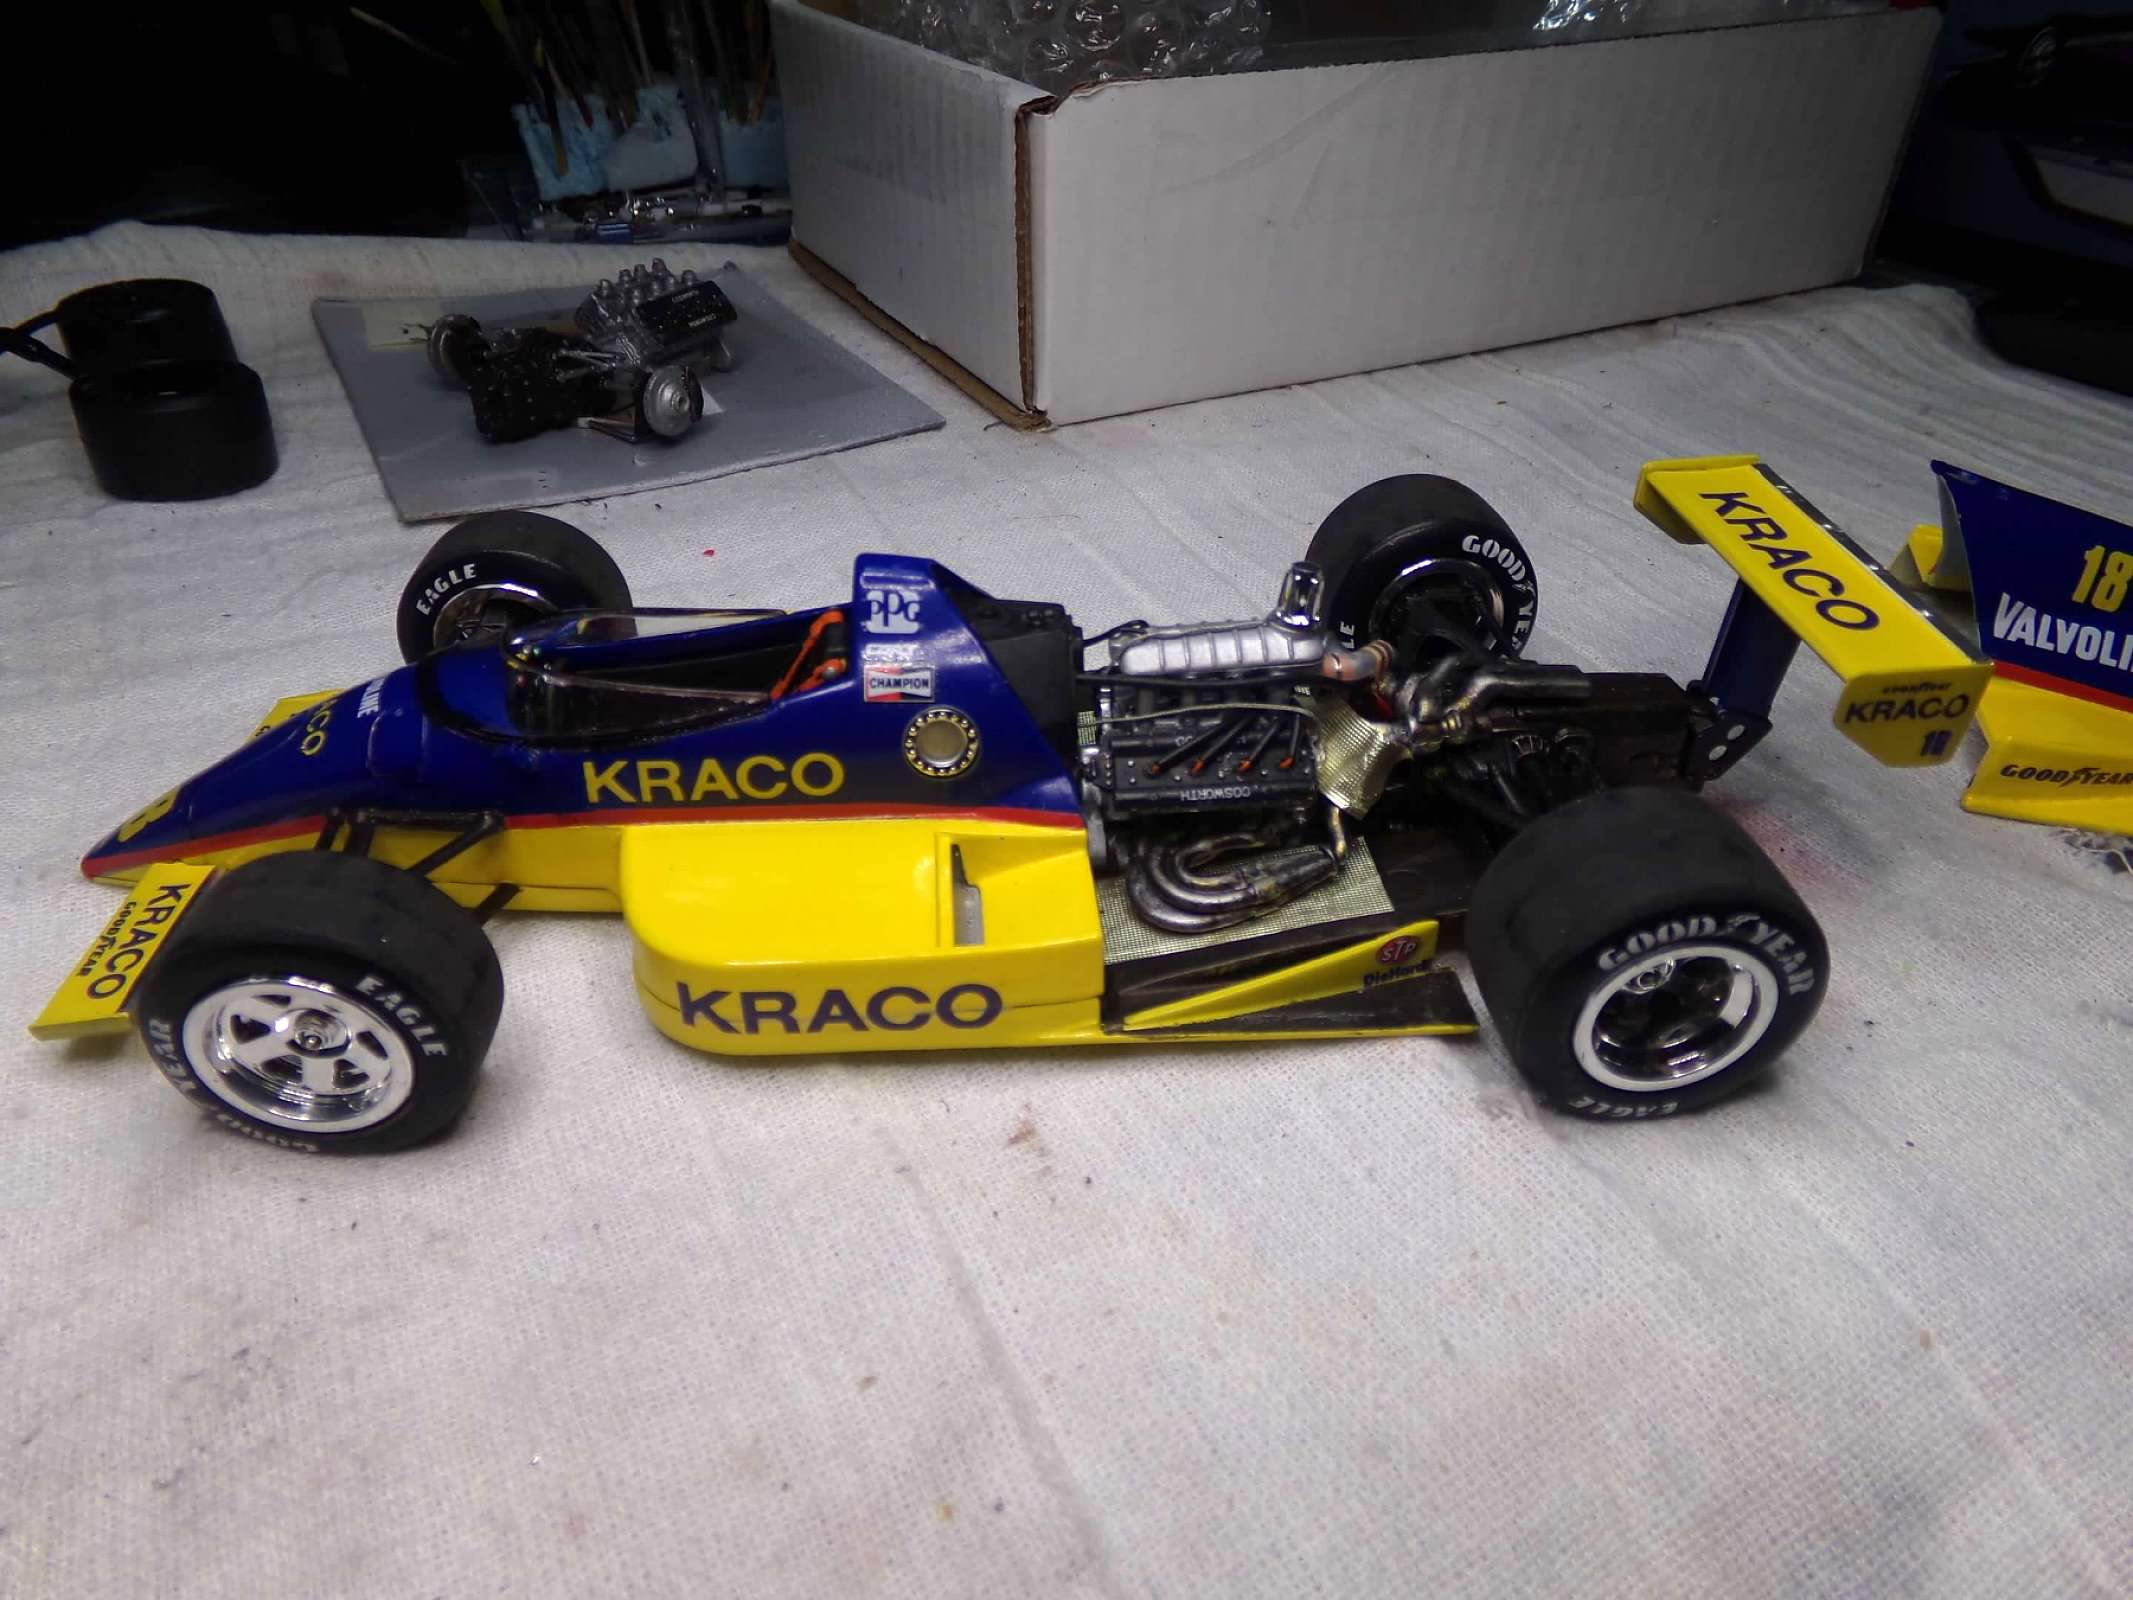
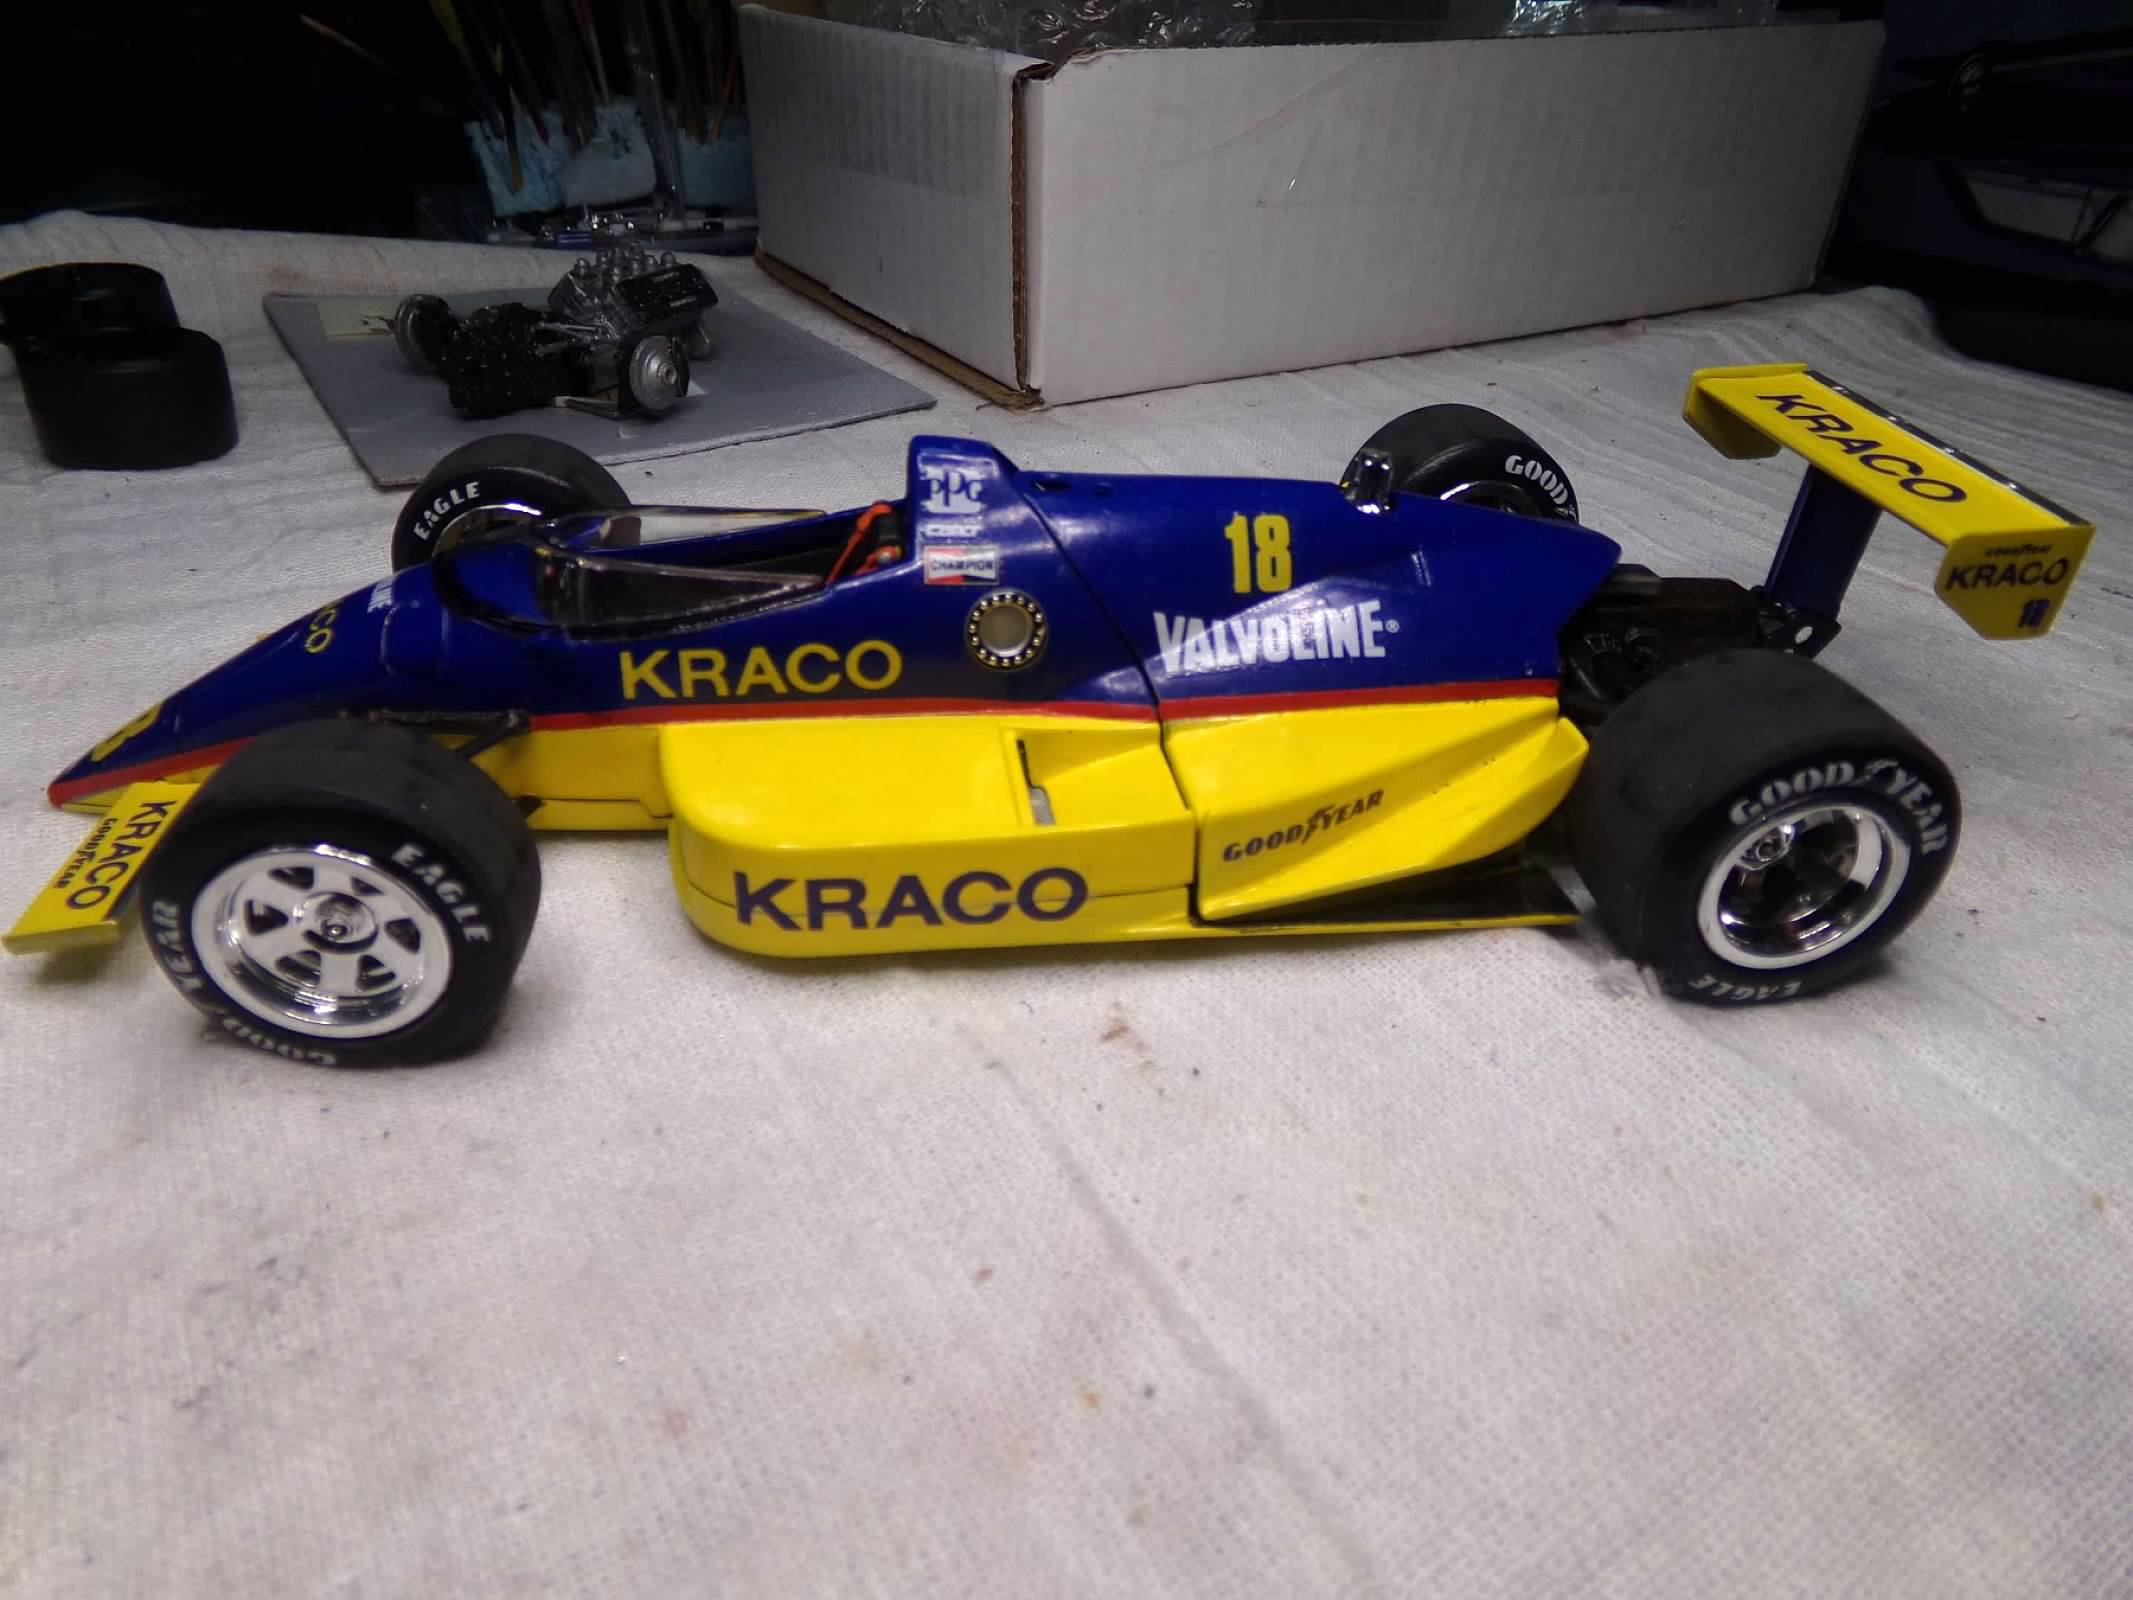
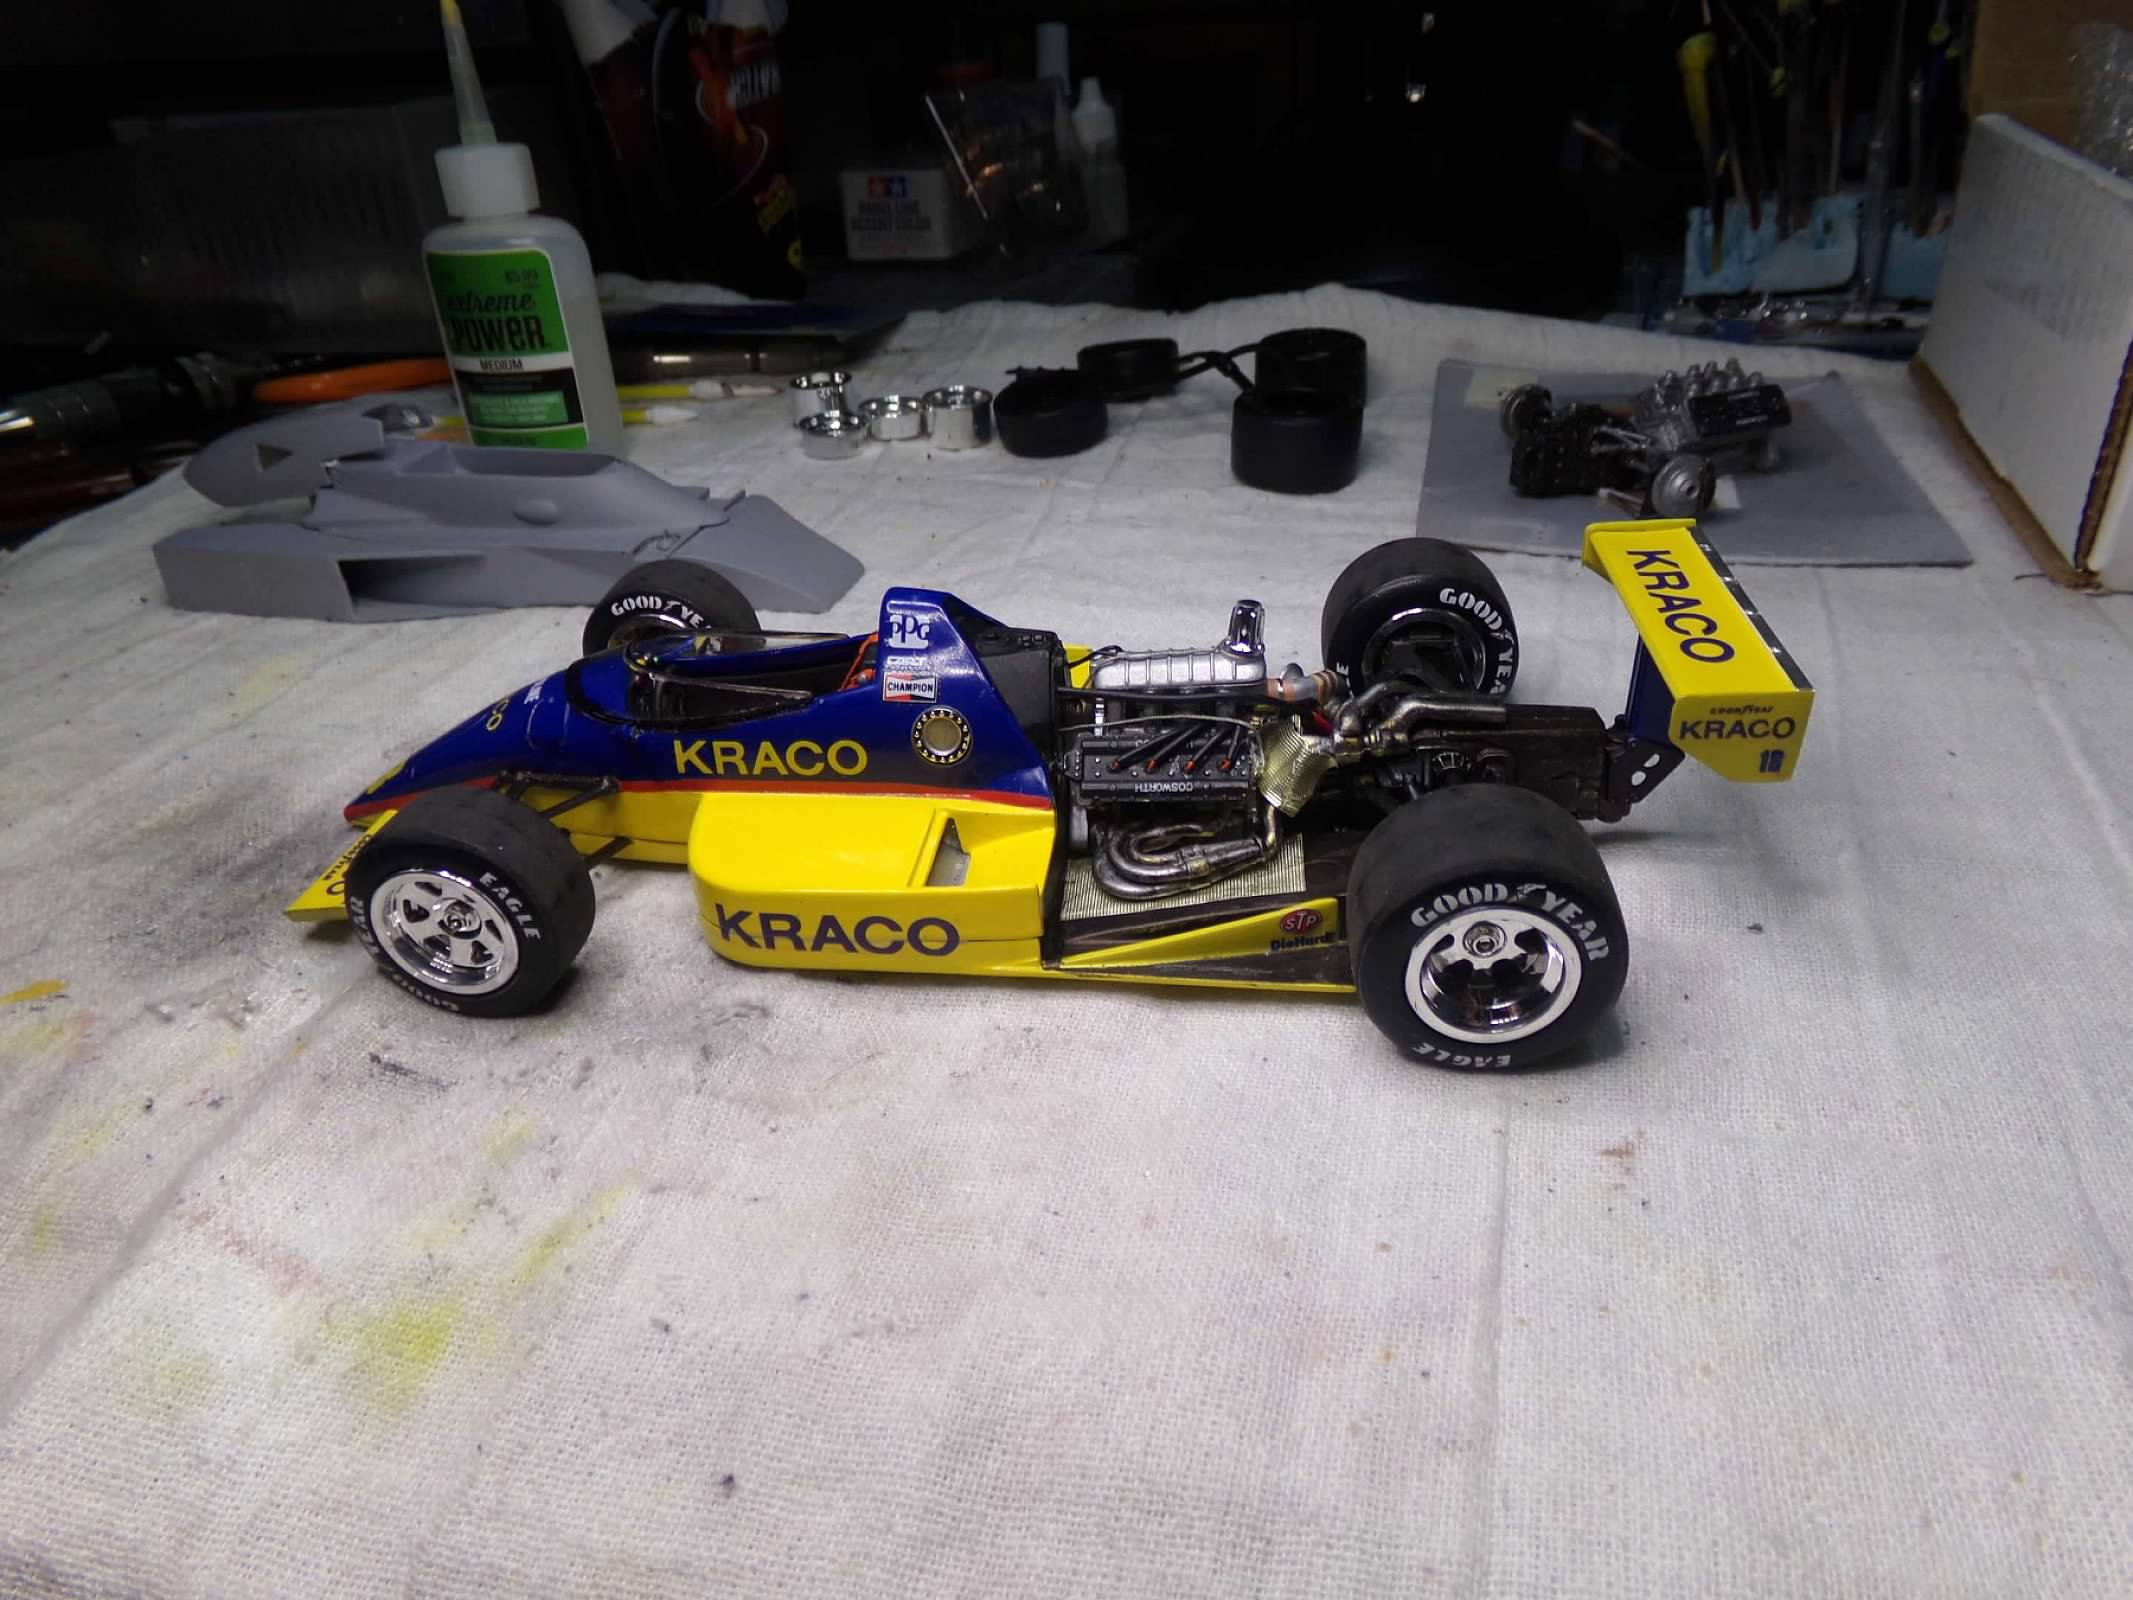
This is an old AMT kit March 88C that Michael Andretti drove in the 1988 Indy 500. Rick Mears won the race and Michael finished fourth. The paint is Tamiya Yellow and Krylon Short Cuts Forever Blue. I have added a seat with a 5 point harness, engine wiring and some plumbing and a rear wickerbill. Decals are from the kit except the tire decals are from IndyCals (excellent by the way). What is that in the last photo? Is that another Indy Car? Hmmmm.... Thanks for looking! ?
-
This one is done! I received my tire decals from IndyCals and they were excellent! The white letters on a blackwall decal laid down nicely and the edges seemed like they disappear into the tire surface. They look like they were stamped, just like real tires. What is that in the last photo? Is that another Indy car? Hmmmm....
-
This one is on pause for now. I had a thought about how to improve this build. I am thinking that the 66 Ford Fairlane GT has a better engine and chassis (I think) so maybe I could get one of them and swap out the engine and chassis. I think its about the same length and wheelbase so maybe it would work. And its on the shelves at HL, I think. Let me know what you think! Thanks for looking! ?
-
Well, I had a bit of a set-back this morning. The windshield had developed a CA fog overnight, probably from gluing in the firewall. So I have taken it apart, rubbed out the windshield with cloths and Scratch-X and reinstalled it. I also finished the chassis and the front suspension is poseable, sloppy at best, but it works. Its back together now and tomorrow I'll add the bumpers, grill and taillights and call it good! Thanks for looking and Merry Christmas! ? Before: After: After:
-
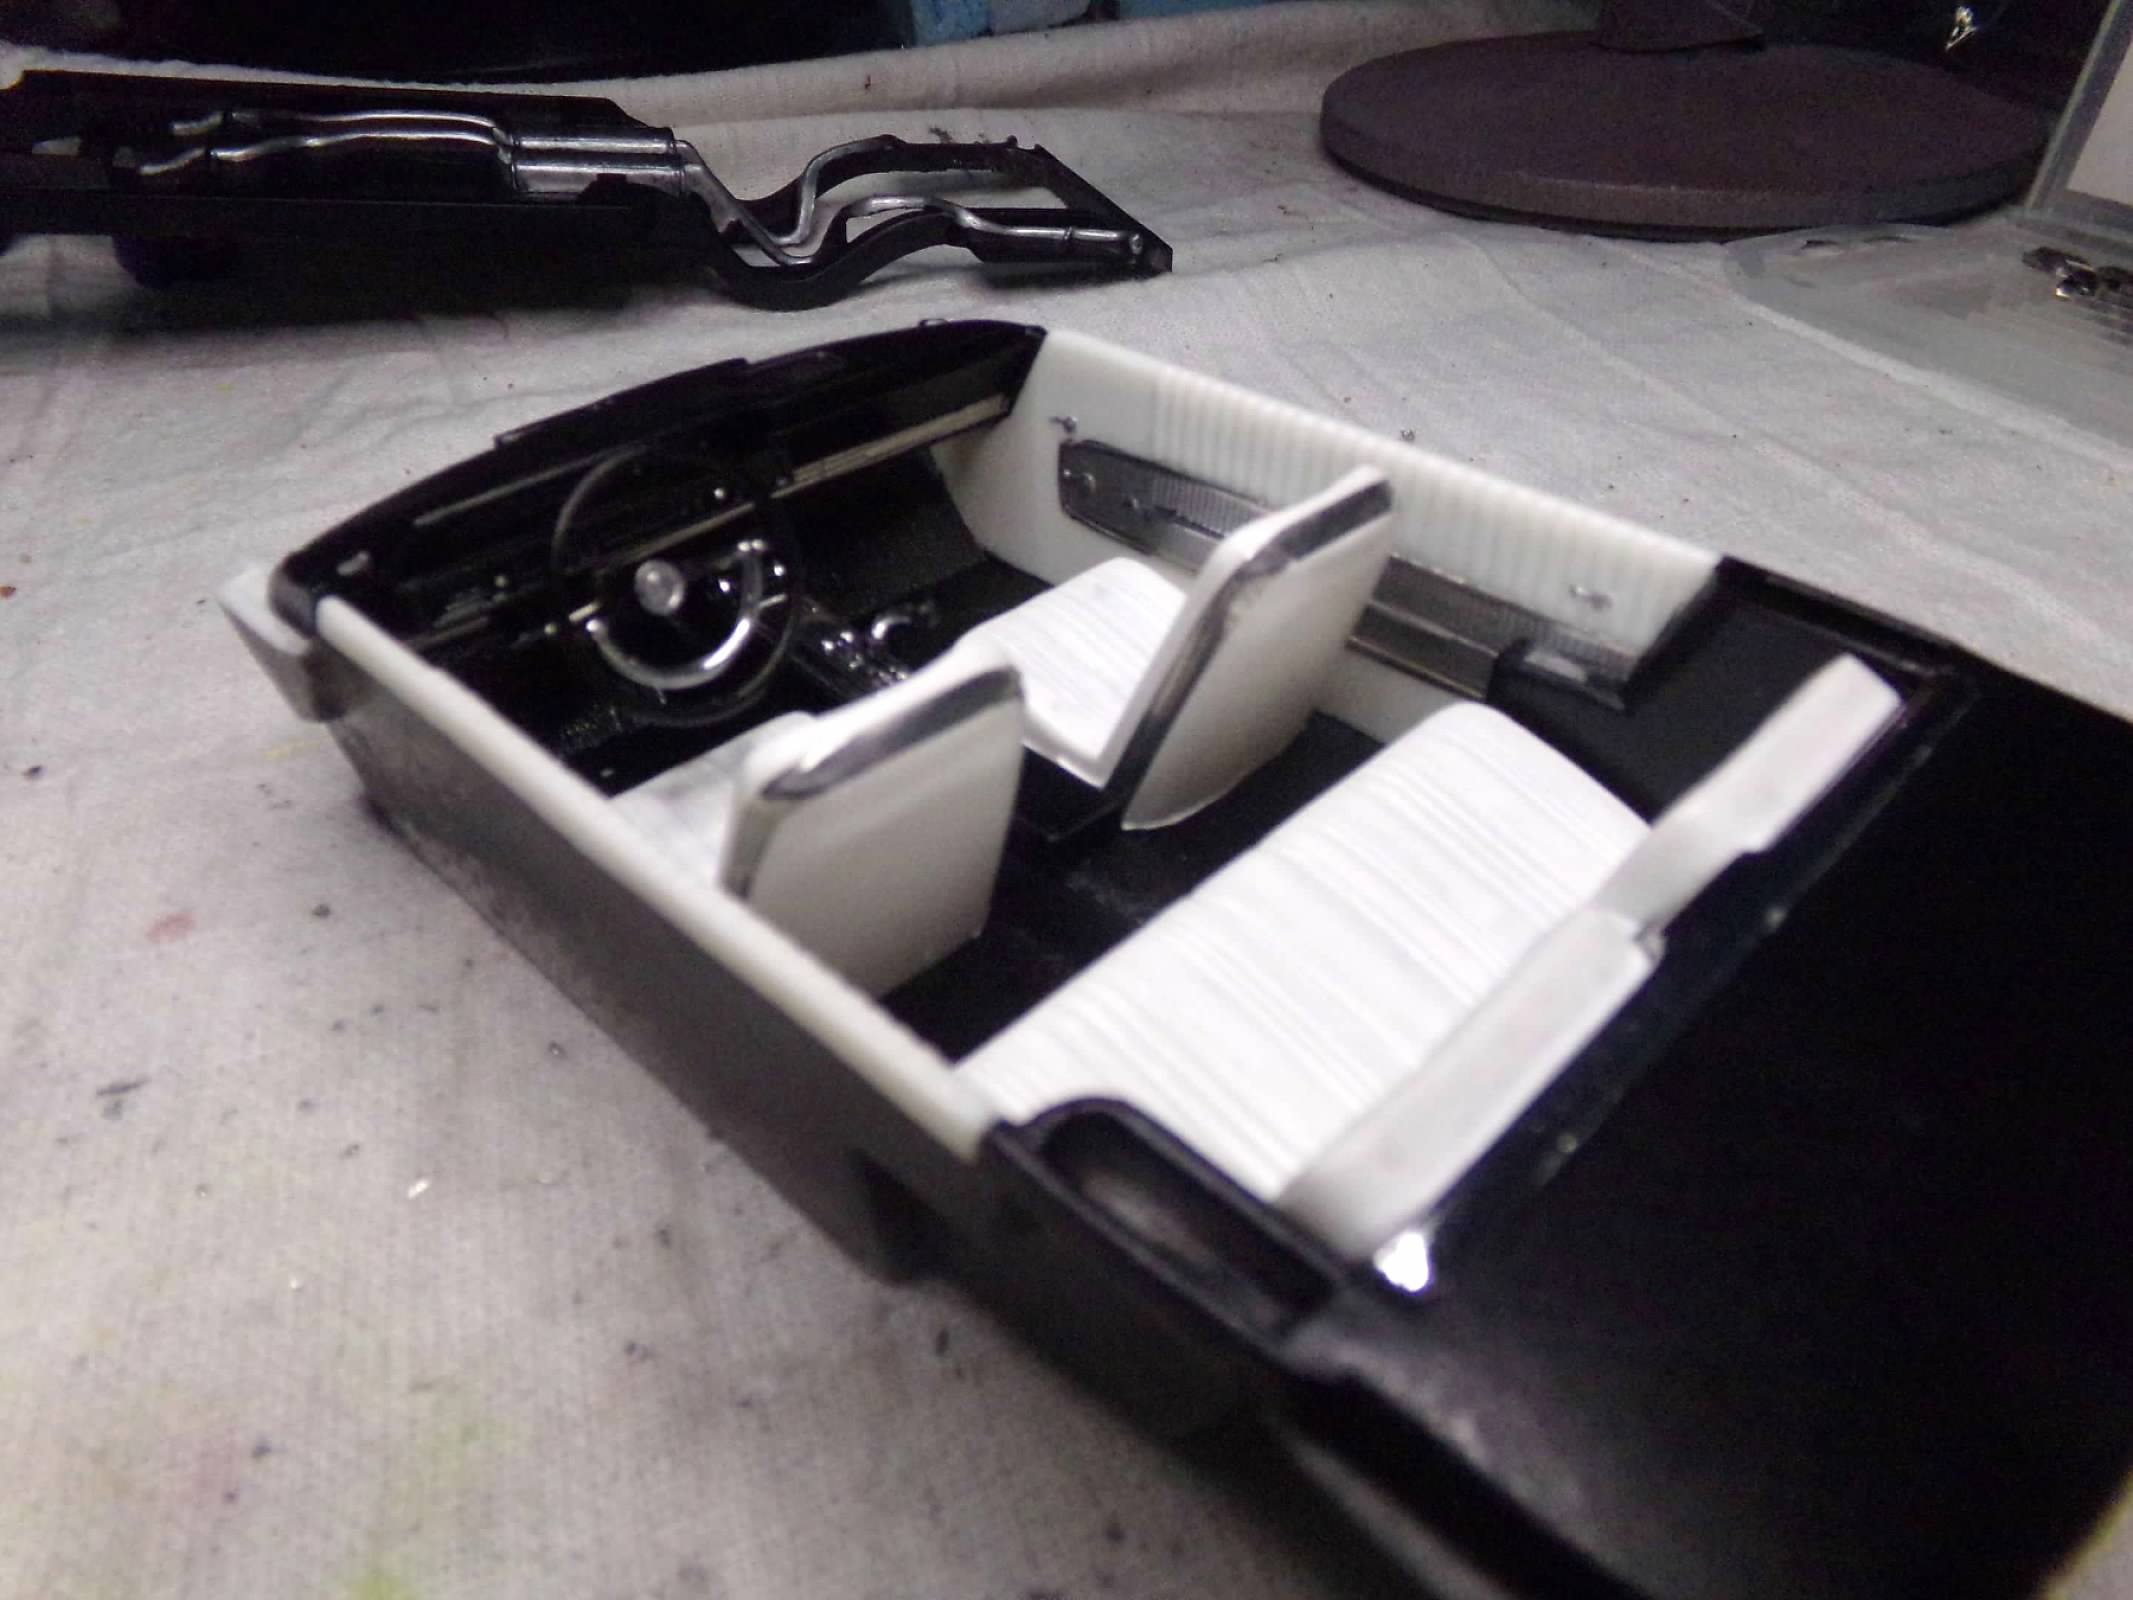
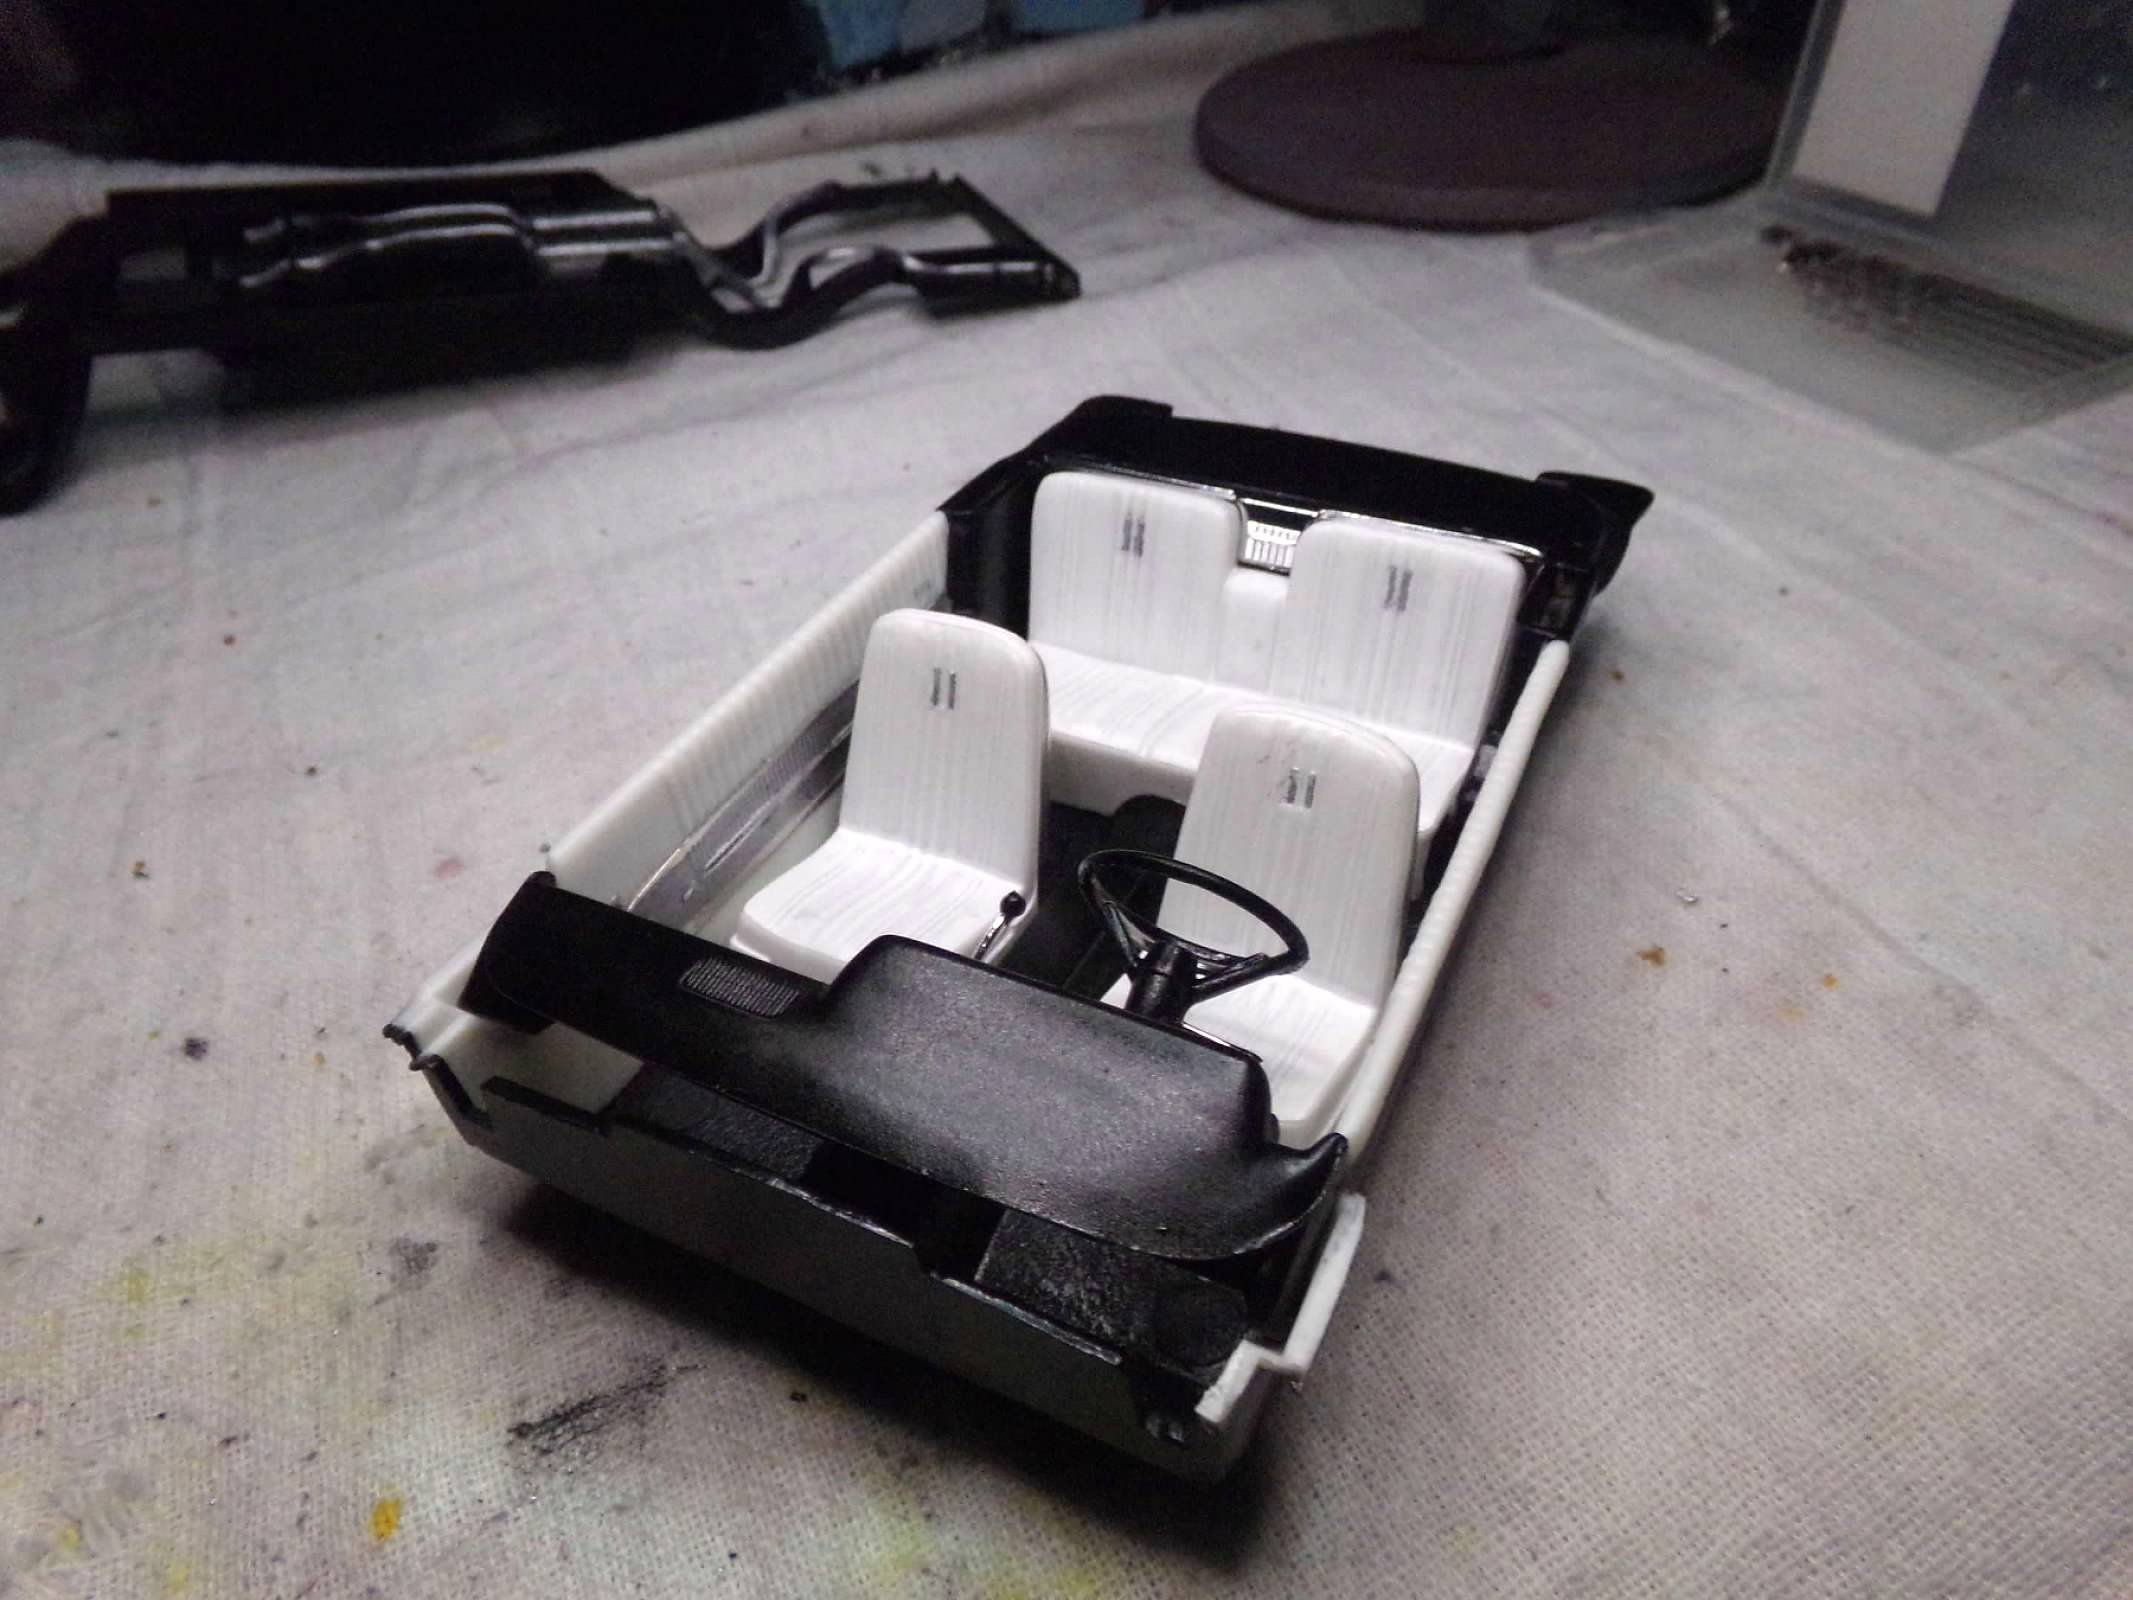
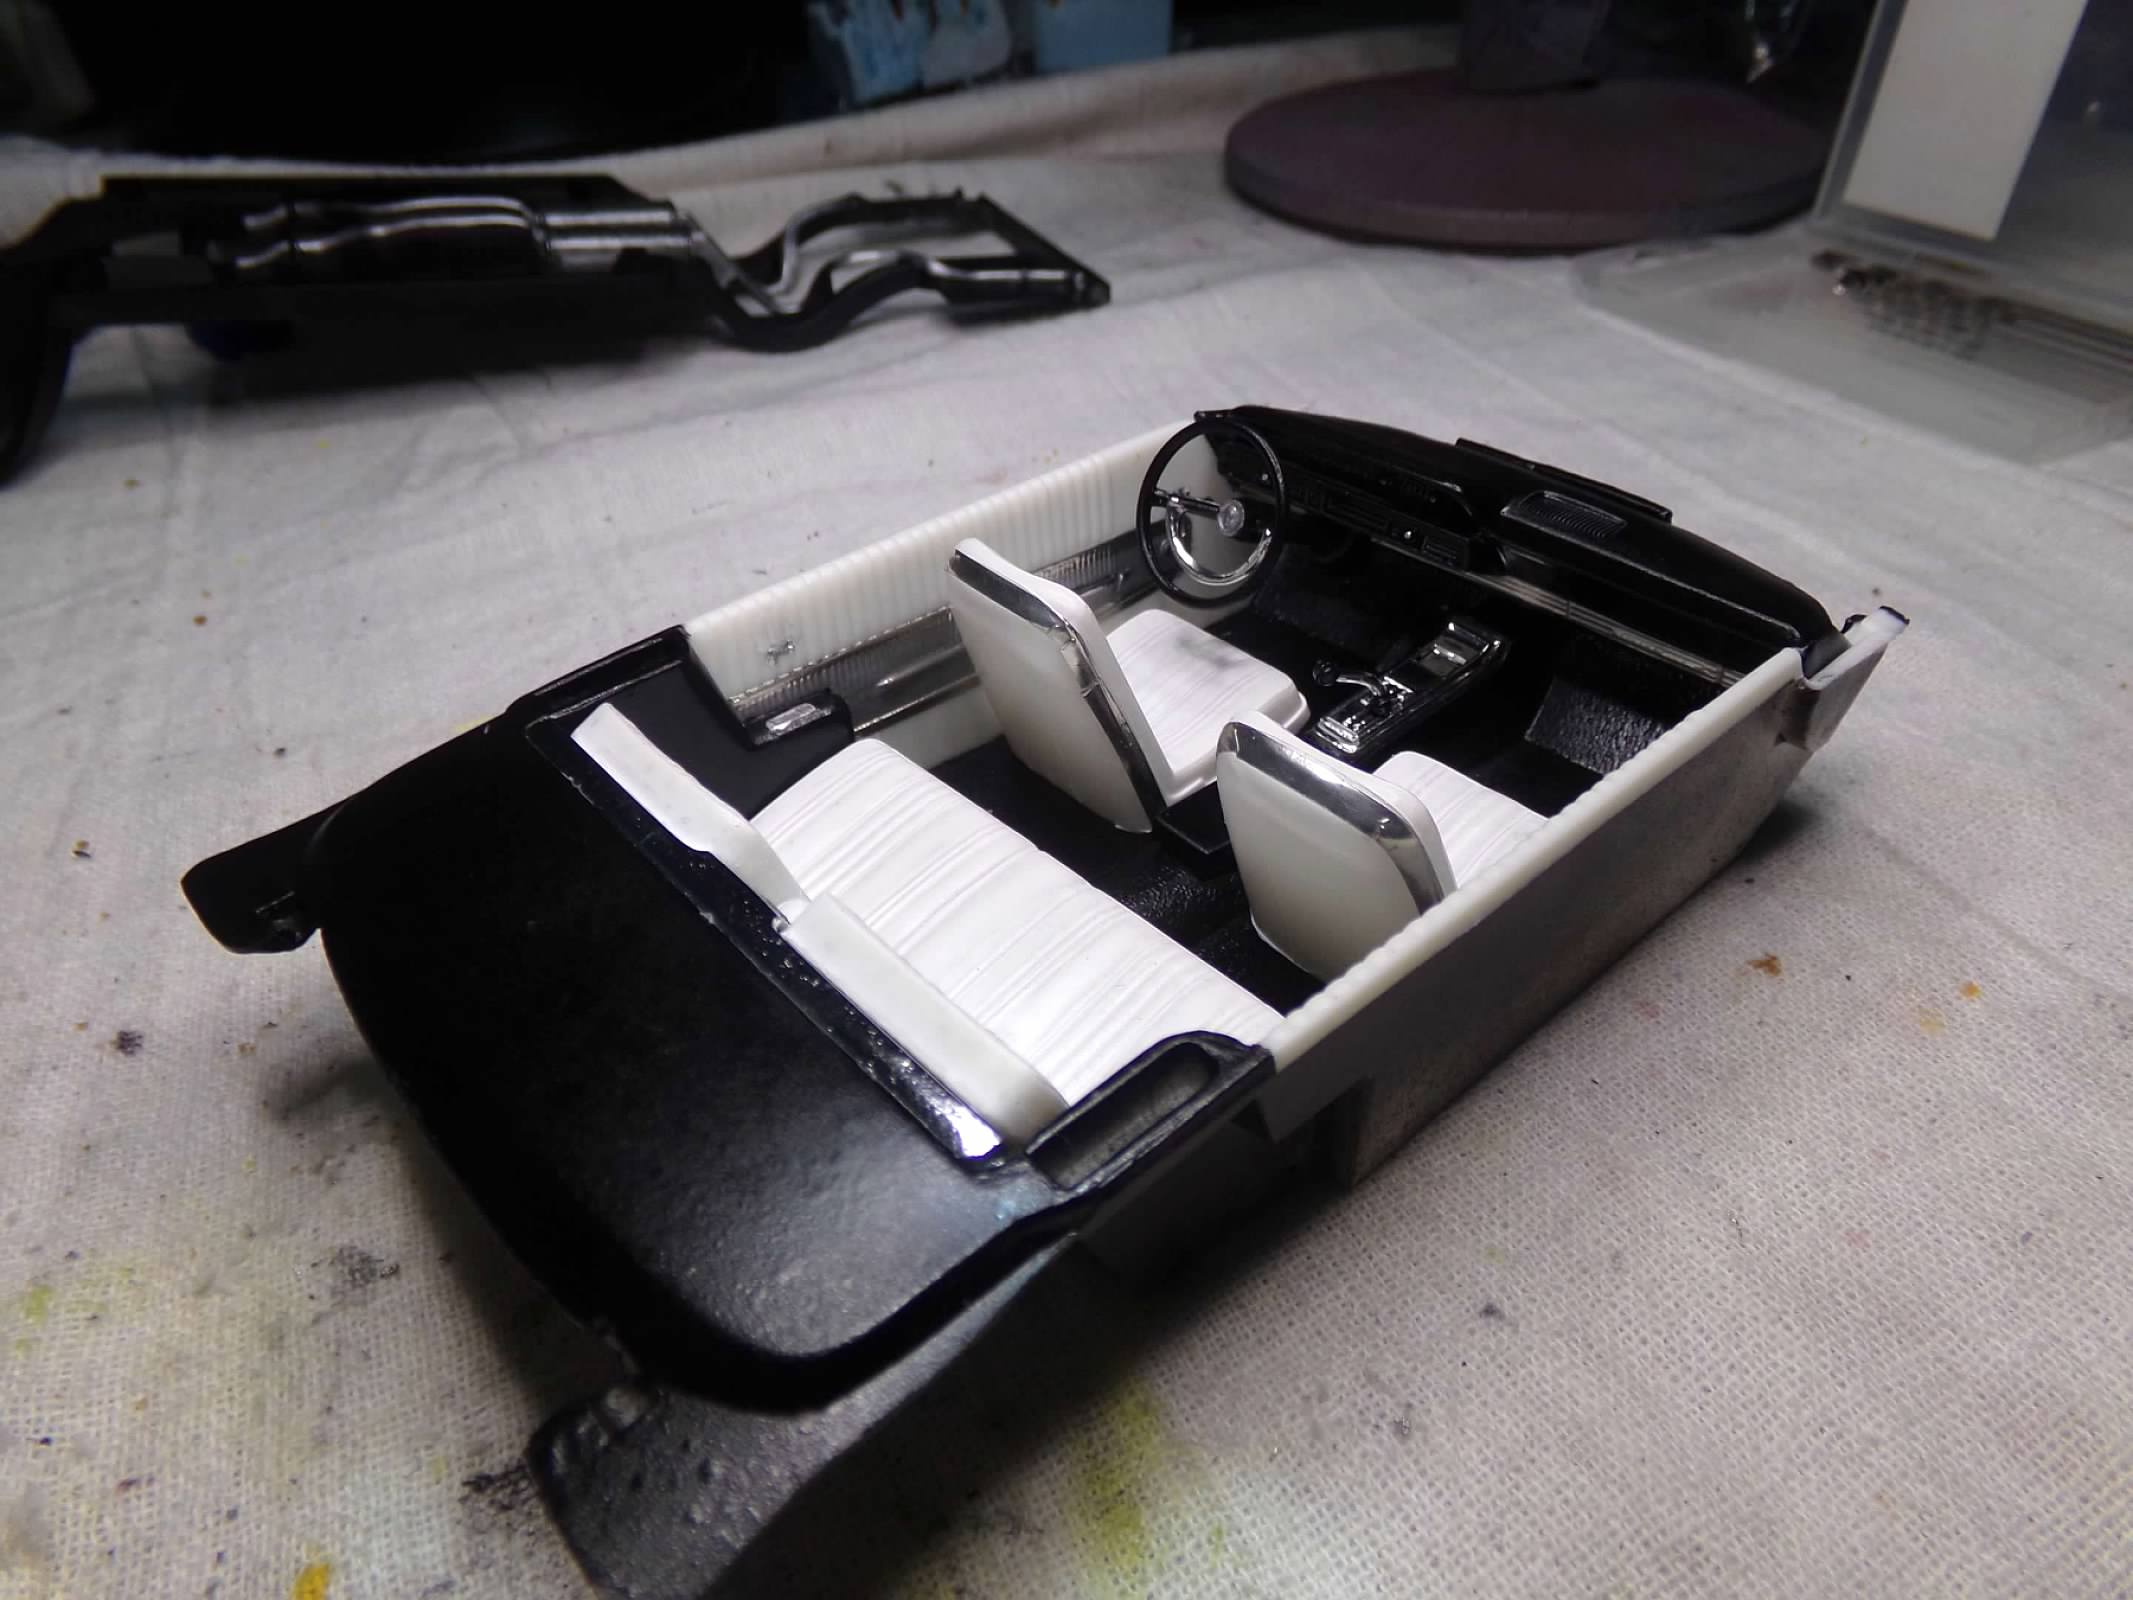
Interior is done, engine is done box stock, and the interior is in the body. I just added some paint, foil and chrome pen along with a turn signal indicator. There is no interior mirror so I will do without it. Fitting the interior was a PITA. The windshield/back window is one piece but I cut it down. Then I had to take out the windshield and interior because the windshield is too long. I cut it down and should have shave the wing window parts too as they are sticking out a bit past the wing frame. But I am going to leave them as is. The interior is not well engraved and the window cranks are too small in my opinion. The interior doesn't sit up to the top of the door sill but its close enough. I'm getting tired of this one and there are too many issues to correct. It is destined to be a shelf sitter, Thanks for looking and Merry Christmas!
-
Thanks, David! Yes, I mentioned that I was going to leave the vinyl top off this time in the interest of saving time due to rain. I rubbed out the body today and finished the foil on the body. Its not perfect but it will have to do. I'll probably build this one box stock. But I have another one that I can build later! Thanks for looking! ?
-
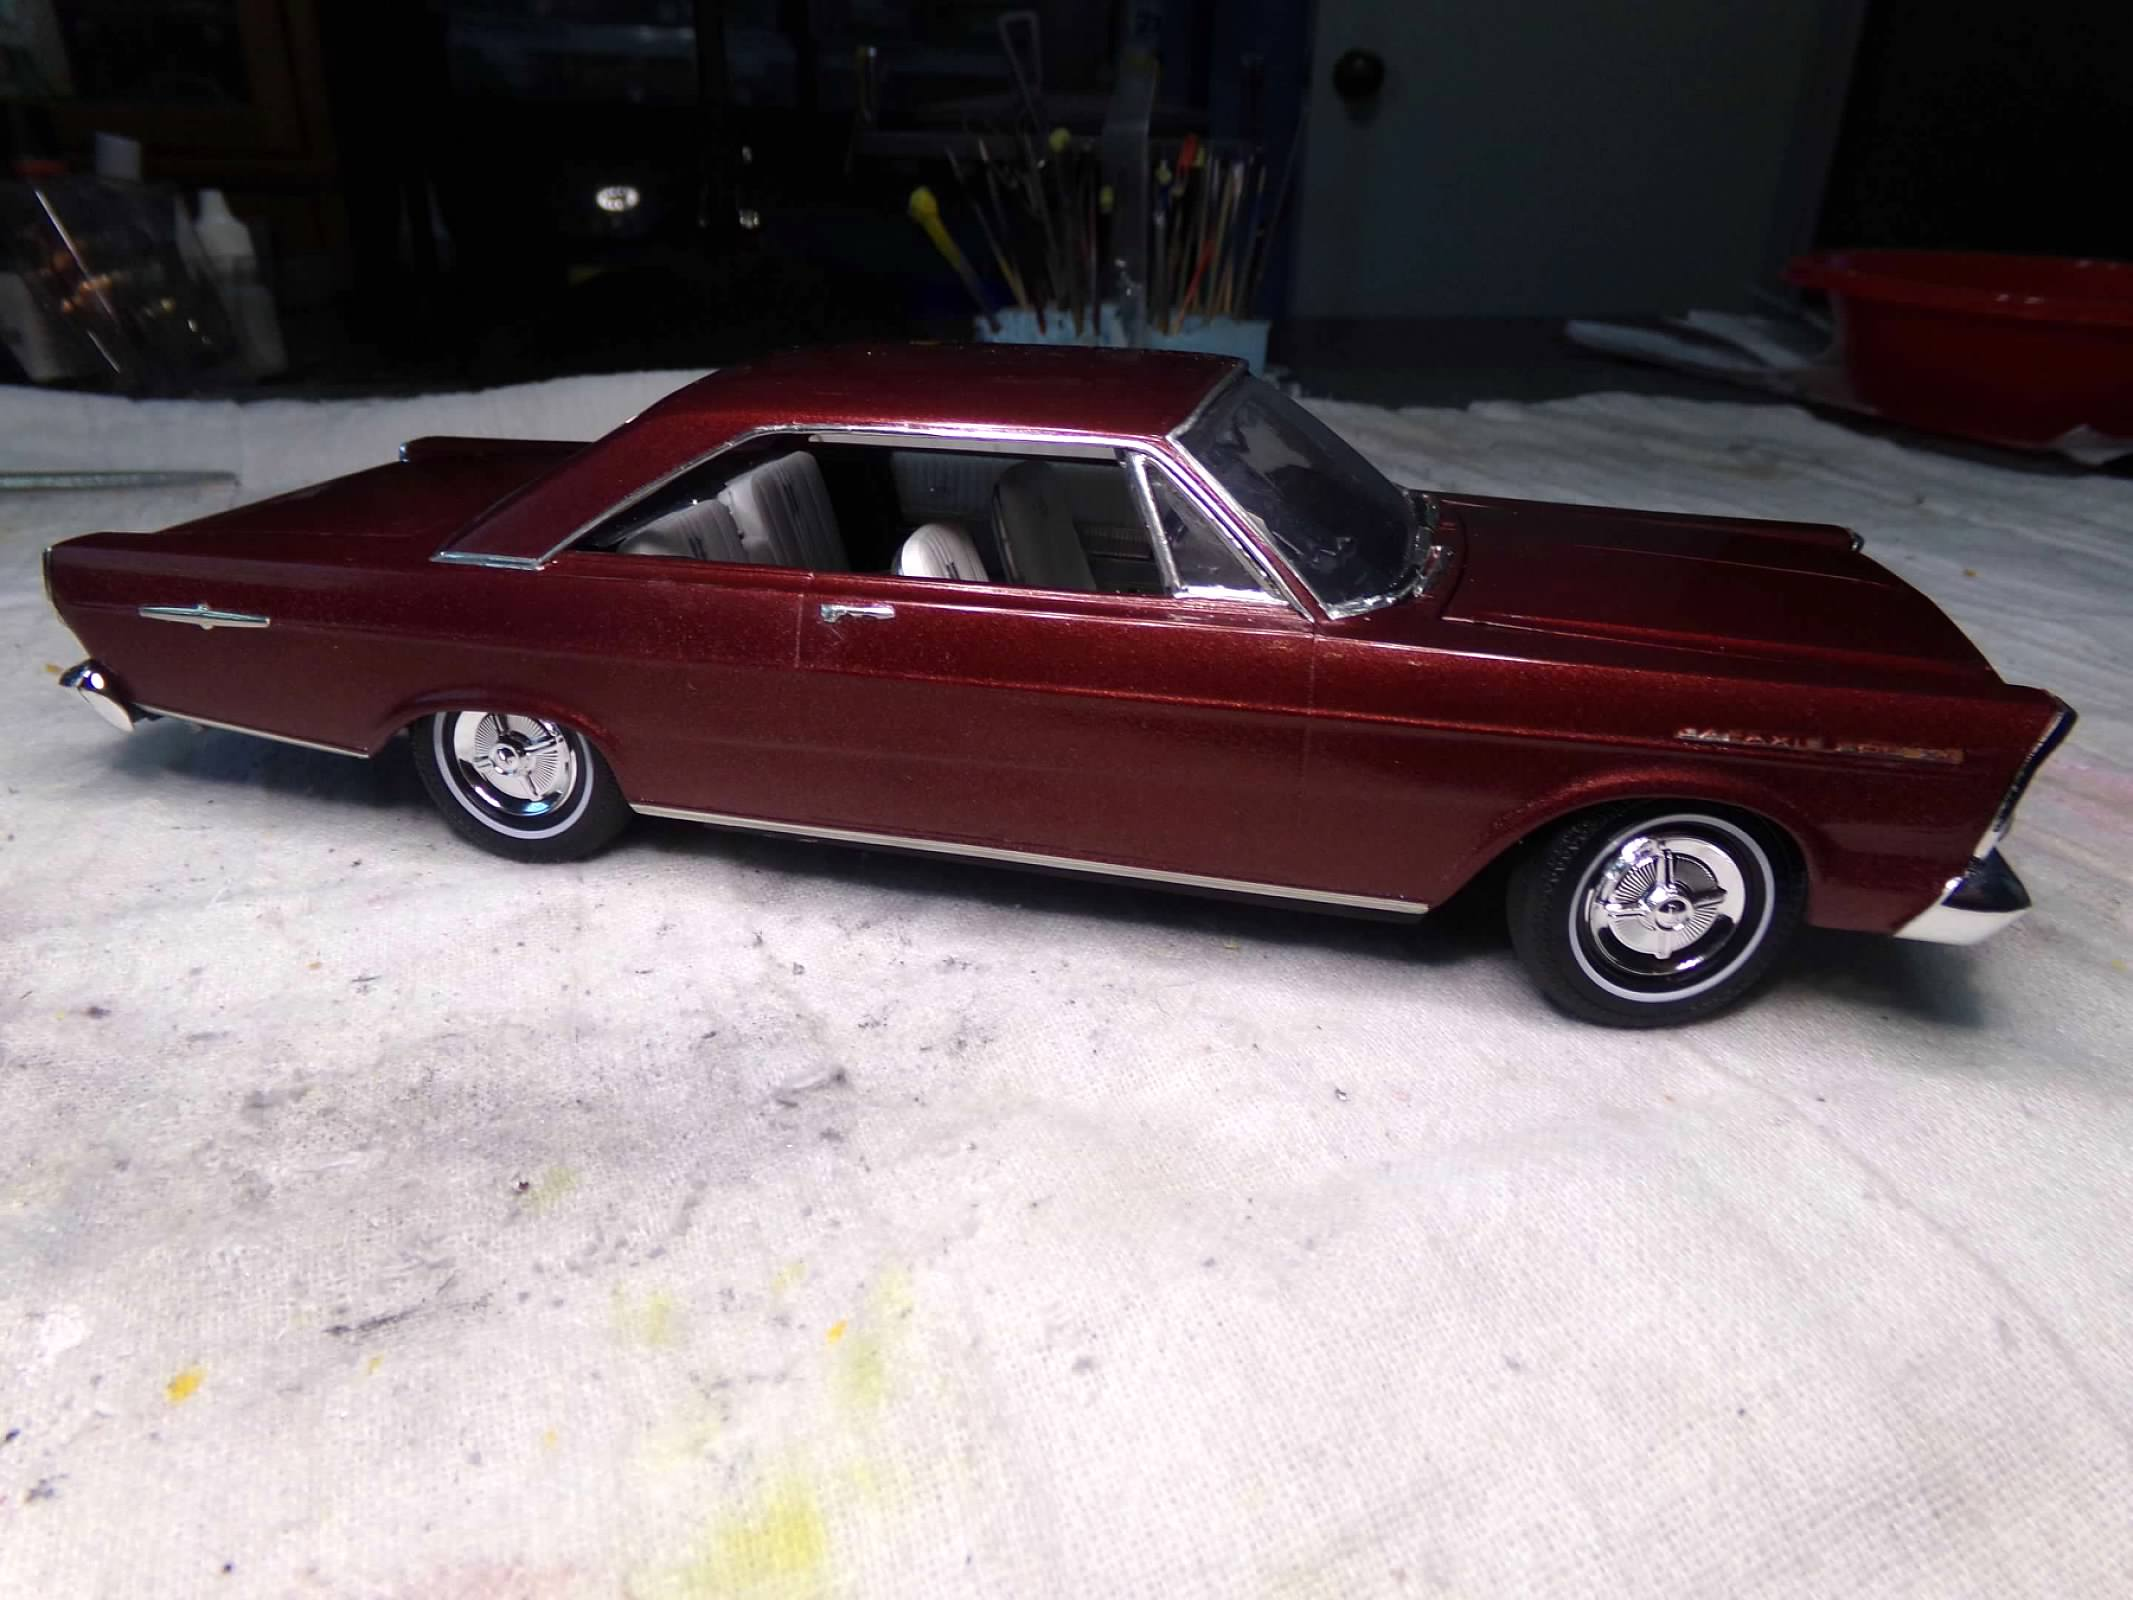
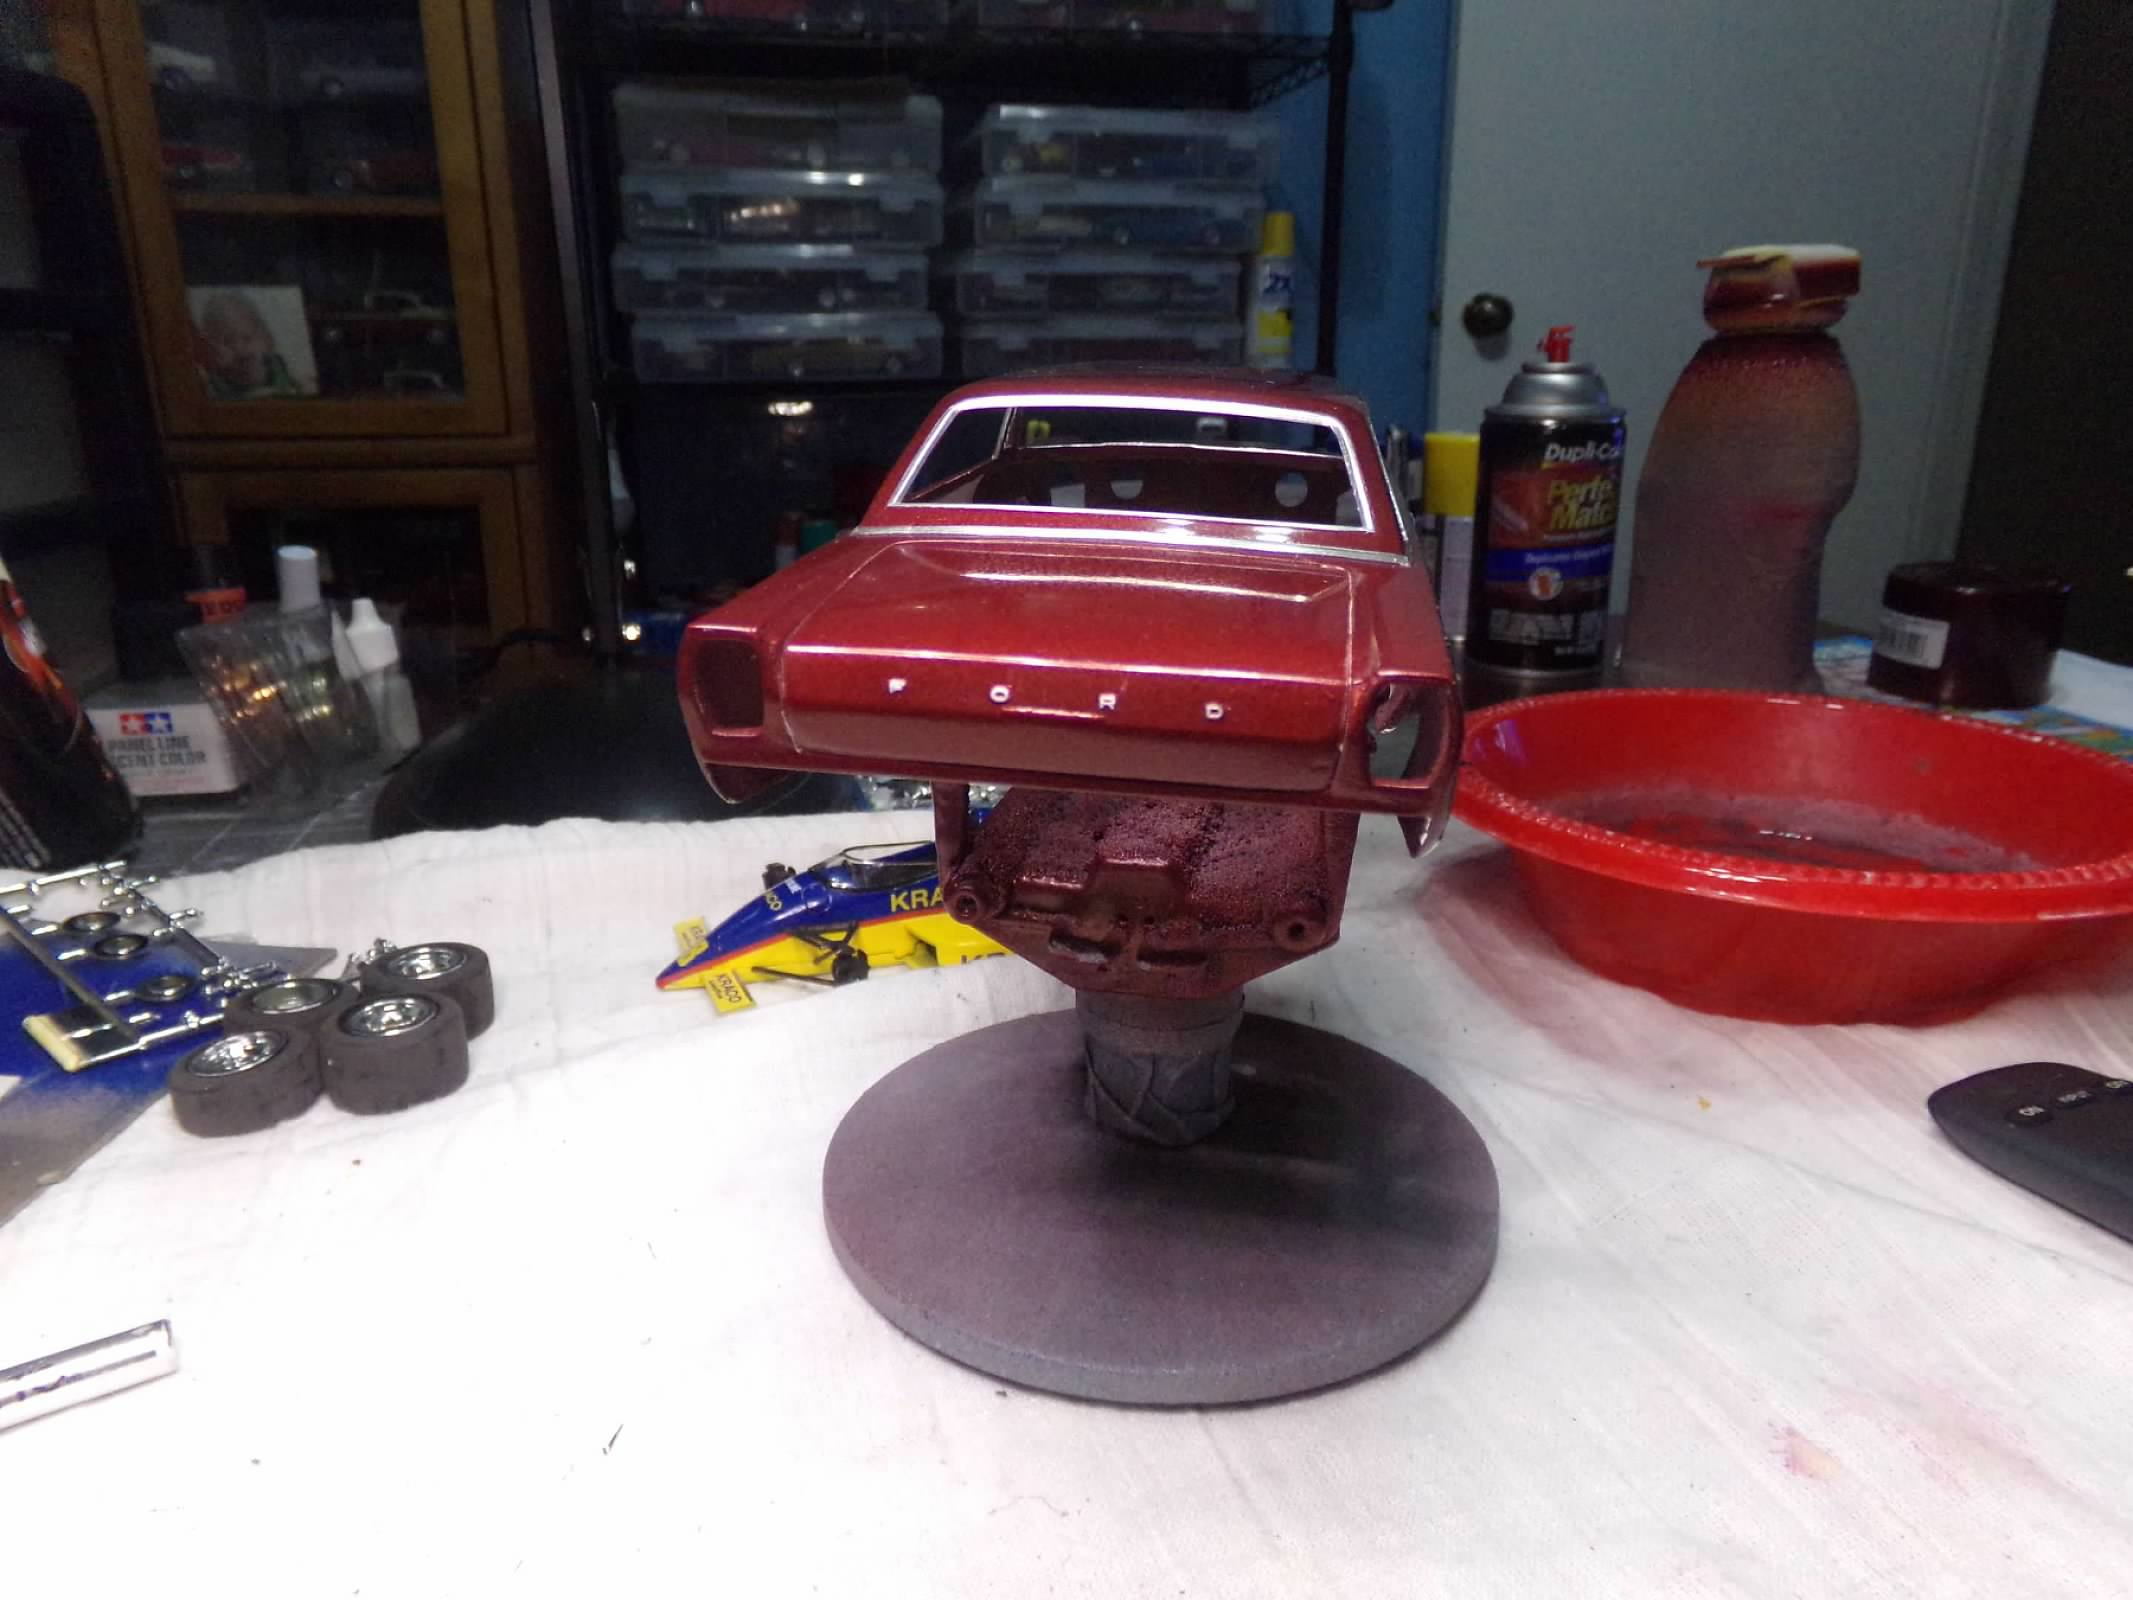
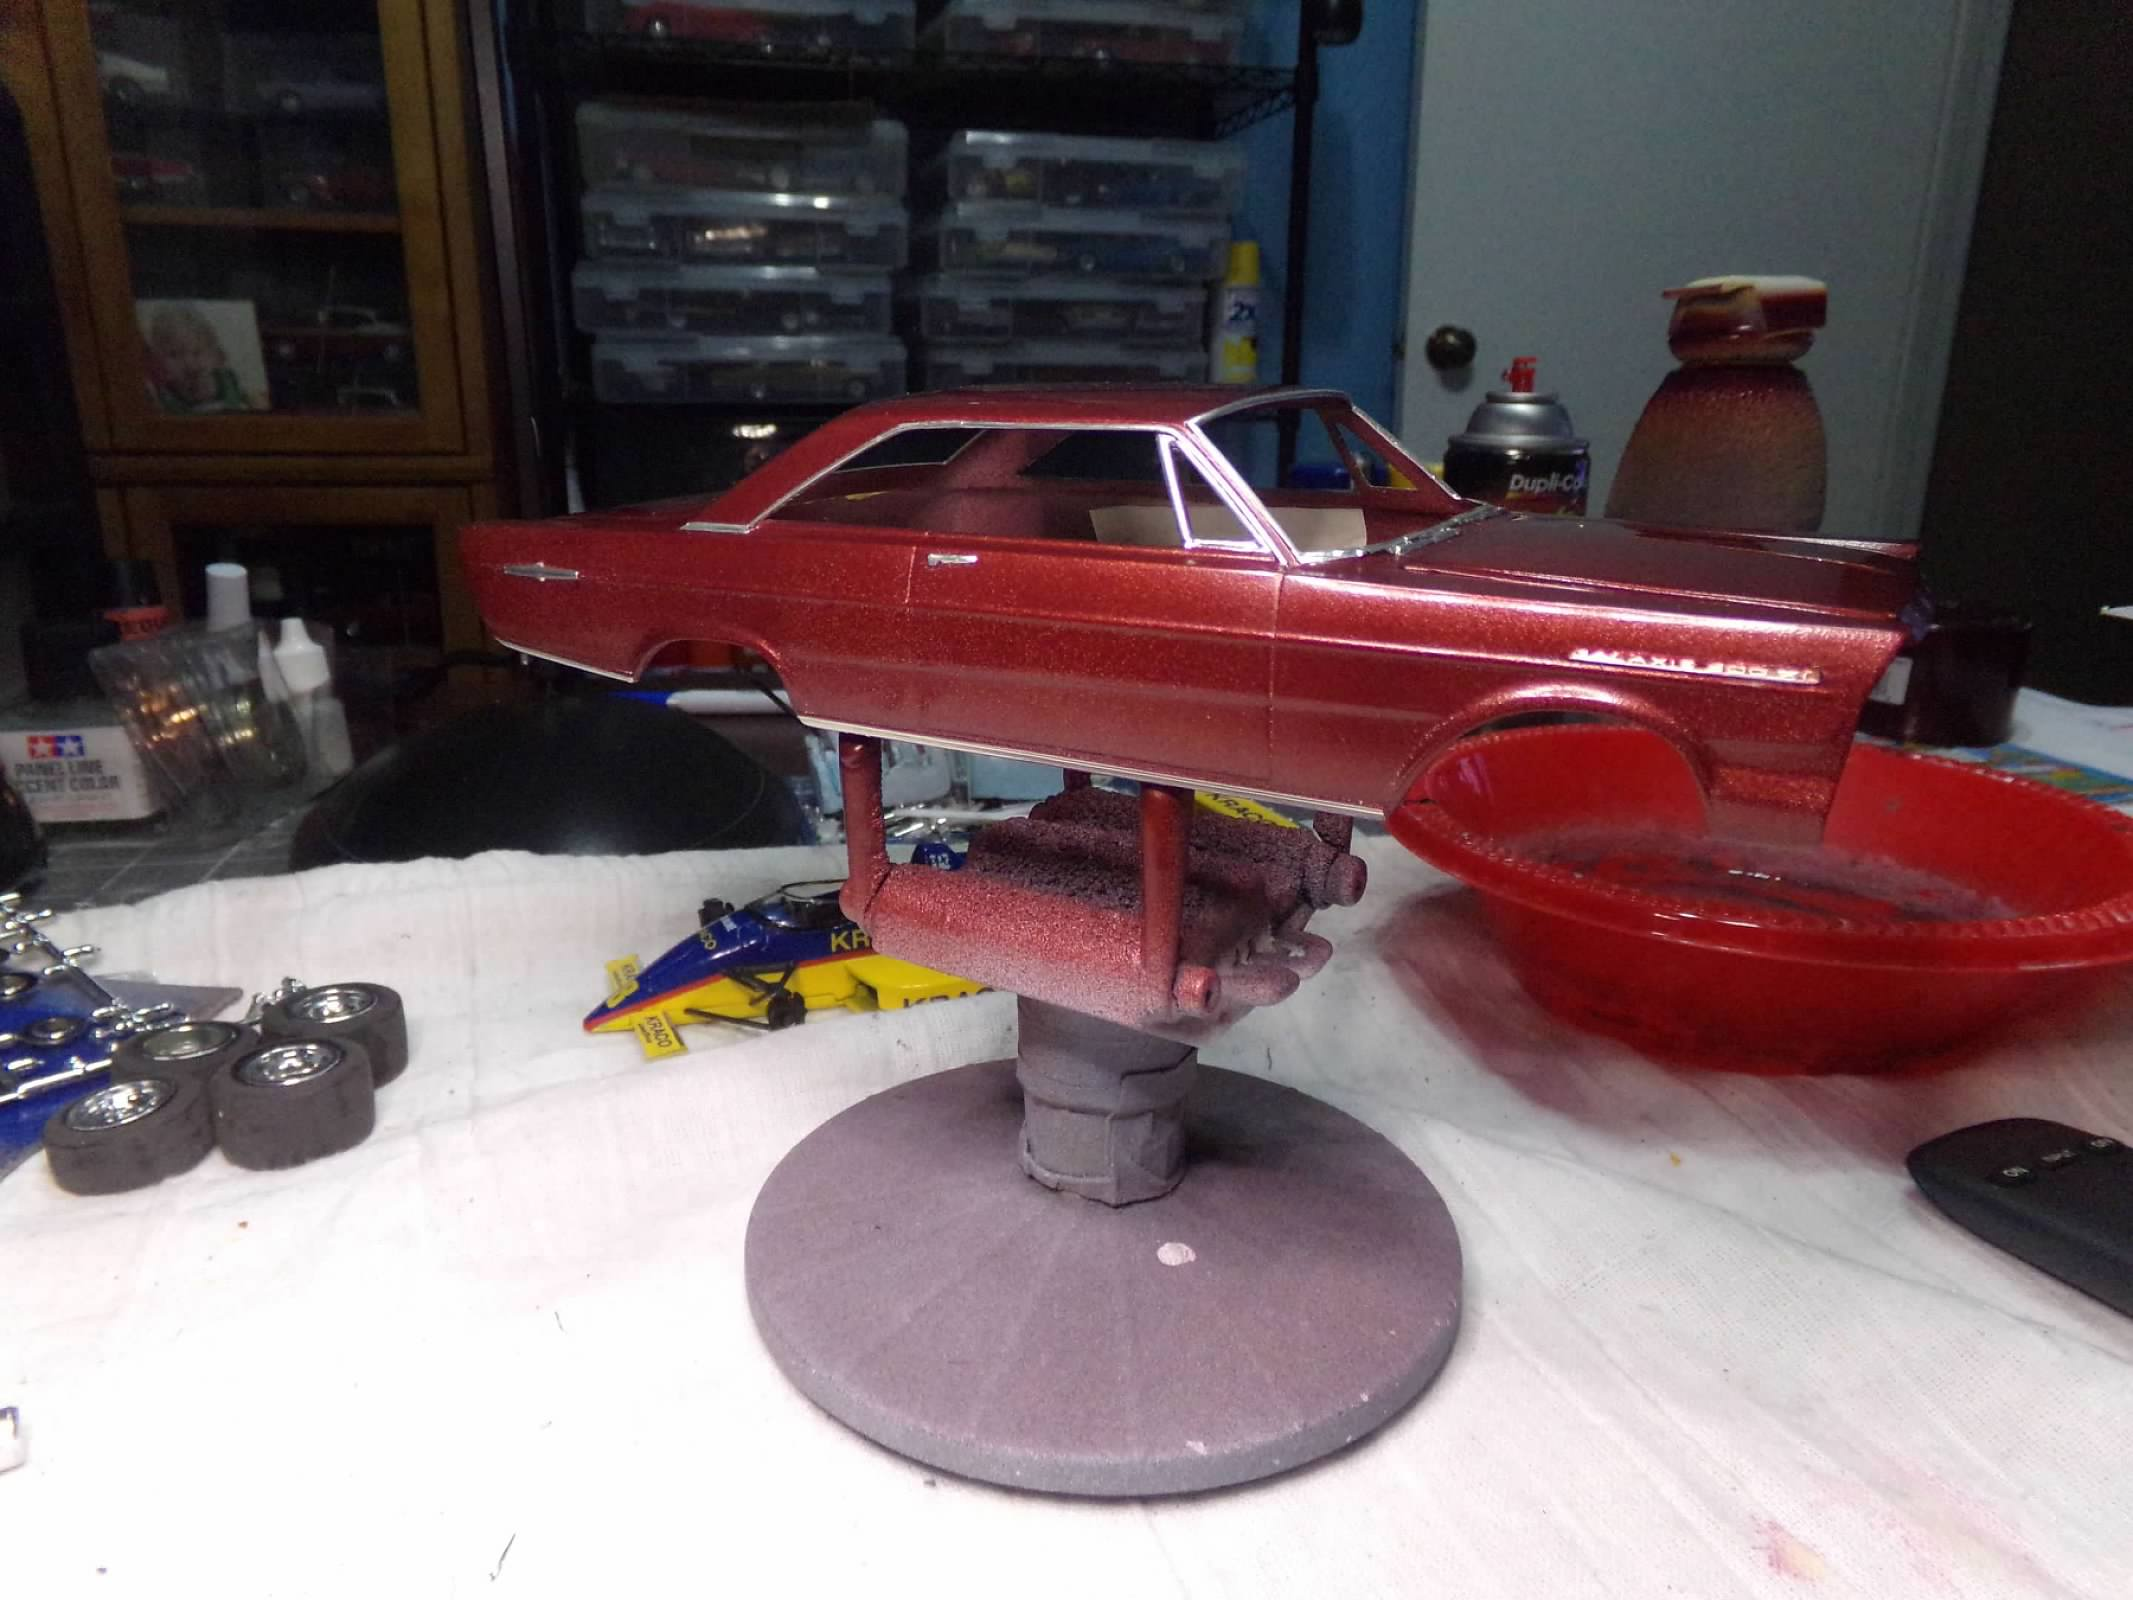
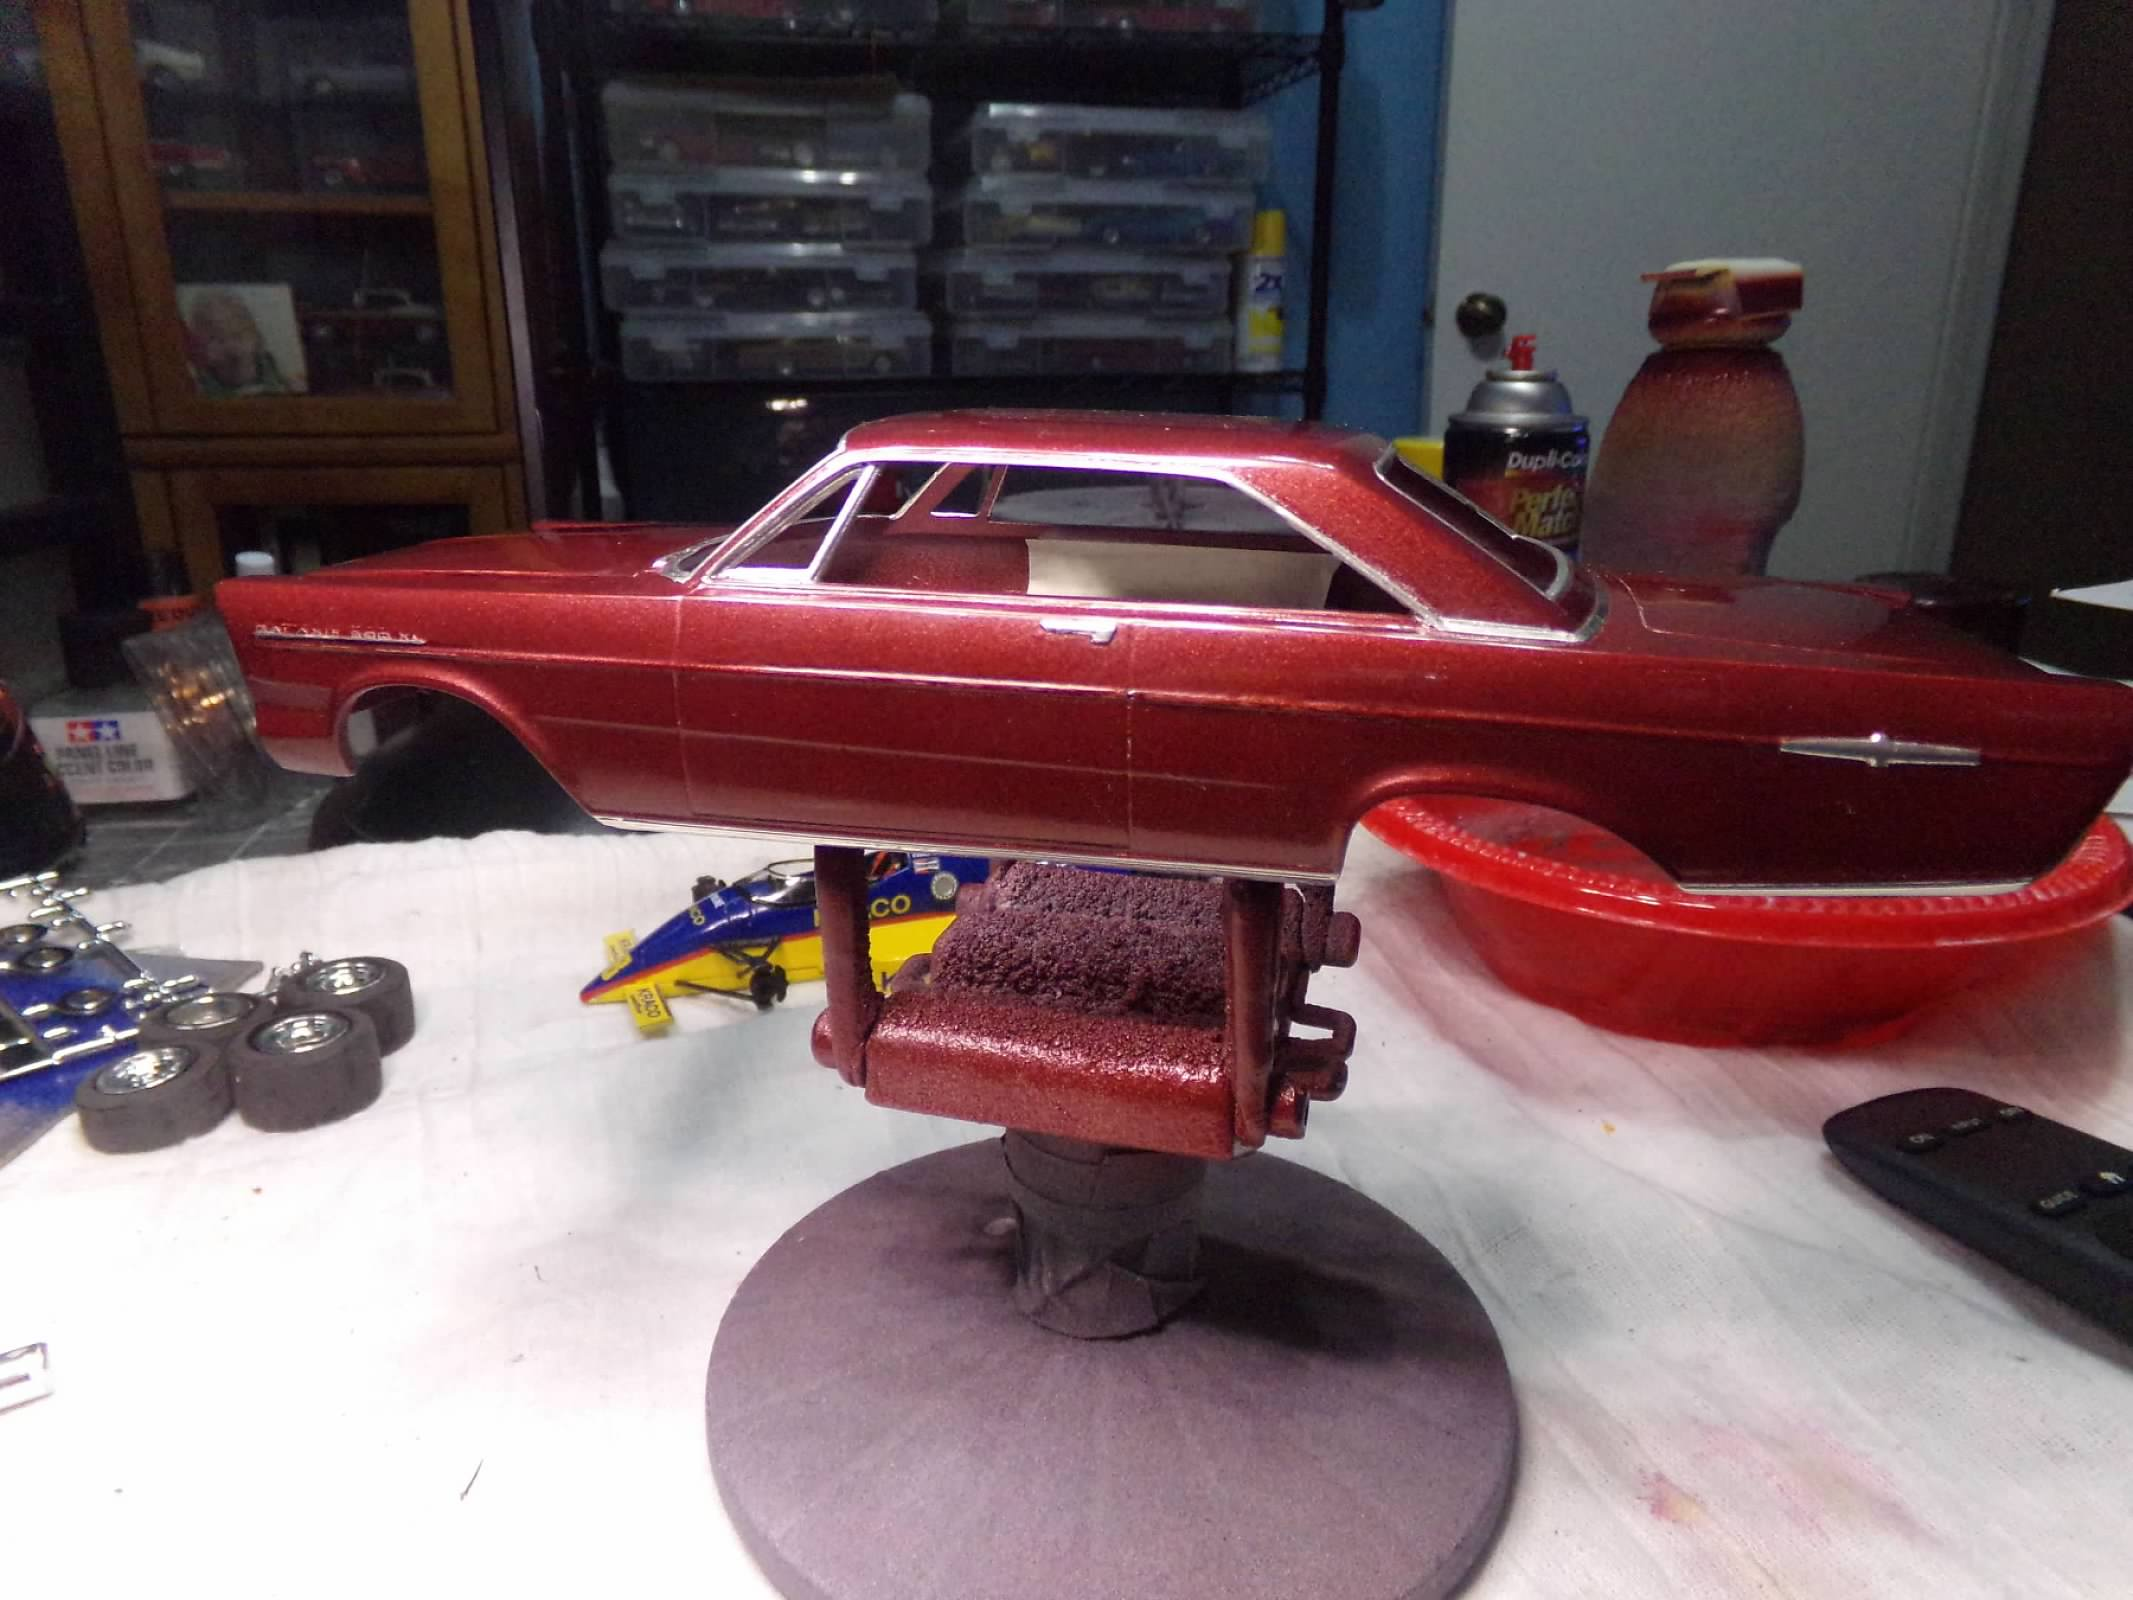
Thanks, Mike and Bob! I appreciate your comments! Well, in the beginning of the end, I think it turned out pretty well! Although the humidity didn't get below 60 today, I managed to get two coats of Dupli-Color Dark Toreador Metallic and two coats of Krylon Clear Lacquer on it today and it looks pretty good. I don't know what it is about this color but it always turns out nice. And I have had two 1st places and one 2nd place with cars painted this color in two different contests. The Galaxie 500 XL lettering on the right side didn't turn out too good, as I suspected, but the rest came through pretty well. The left side just needs a touch of lacquer thinner re-applied as the clear ran some of the paint over the lettering. So I will rub it out tomorrow and see where it goes from here. At least I have something to work on while its raining for the next few days. Thanks for looking! ?
-
Thanks, Mike and Carl! I appreciate your comments! I'll try denatured alcohol next time. Oven Cleaner has always worked in the past but not this time.
-
Great to hear from you, George! I can't believe its been 33 years since that contest and I remember visiting with you during those days. I hope you are doing well! Have a Merry Christmas and Happy New Year! ?